

Page 1

Keysight U5850 Series
TrueIR Thermal Imager
User’s Guide
Distribution in the UK & Ireland
Lambda Photometrics Limited
Lambda House Batford Mill
Harpenden Herts AL5 5BZ
United Kingdom
E: [email protected]
W: www.lambdaphoto.co.uk
T: +44 (0)1582 764334
F: +44 (0)1582 712084
Page 2

2 Keysight U5850 Series User’s Guide
Notices
Copyright Notice
© Keysight Technologies 2014–2016
No part of this manual may be repro-
duced in any form or by any means
(including electronic storage and
retrieval or translation into a foreign
language) without prior agreement and
written consent from Keysight Technologies as governed by United States and
international copyright laws.
Manual Part Number
U5857-90000
Edition
Edition 4, September 9, 2016
Printed in:
Printed in Malaysia
Published by:
Keysight Technologies
Bayan Lepas Free Industrial Zone,
11900 Penang, Malaysia
Technology Licenses
The hardware and/or software
described in this document are furnished under a license and may be
used or copied only in accordance with
the terms of such license.
Declaration of Conformity
Declarations of Conformity for this
product and for other Keysight products may be downloaded from the
Web. Go to http://www.keysight.com/
go/conformity. You can then search by
product number to find the latest Declaration of Conformity.
U.S. Government Rights
The Software is “commercial computer
software,” as defined by Federal Acquisition Regulation (“FAR”) 2.101. Pursuant to FAR 12.212 and 27.405-3 and
Department of Defense FAR Supplement (“DFARS”) 227.7202, the U.S.
government acquires commercial computer software under the same terms
by which the software is customarily
provided to the public. Accordingly,
Keysight provides the Software to U.S.
government customers under its standard commercial license, which is
embodied in its End User License
Agreement (EULA), a copy of which can
be found at http://www.keysight.com/
find/sweula. The license set forth in the
EULA represents the exclusive authority
by which the U.S. government may use,
modify, distribute, or disclose the Software. The EULA and the license set
forth therein, does not require or permit, among other things, that Keysight:
(1) Furnish technical information
related to commercial computer software or commercial computer software
documentation that is not customarily
provided to the public; or (2) Relinquish
to, or otherwise provide, the government rights in excess of these rights
customarily provided to the public to
use, modify, reprod uce, release, perform, display, or disclose commercial
computer software or commercial computer software documentation. No
additional government requirements
beyond those set forth in the EULA
shall apply, except to the extent that
those terms, rights, or licenses are
explicitly required from all providers of
commercial computer software pursuant to the FAR and the DFARS and are
set forth specifically in writing elsewhere in the EULA. Keysight shall be
under no obligation to update, revise or
otherwise modify the Software. With
respect to any technical data as
defined by FAR 2.101, pursuant to FAR
12.211 and 27.404.2 and DFARS
227.7102, the U.S. government
acquires no greater than Limited Rights
as defined in FAR 27.401 or DFAR
227.7103-5 (c), as applicable in any
technical data.
Warranty
THE MATERIAL CONTAINED IN THIS
DOCUMENT IS PROVIDED “AS IS,”
AND IS SUBJECT TO BEING
CHANGED, WITHOUT NOTICE, IN
FUTURE EDITIONS. FURTHER, TO THE
MAXIMUM EXTENT PERMITTED BY
APPLICABLE LAW, KEYSIGHT DISCLAIMS ALL WARRANTIES, EITHER
EXPRESS OR IMPLIED, WITH REGARD
TO THIS MANUAL AND ANY INFORMATION CONTAINED HEREIN, INCLUDING BUT NOT LIMITED TO THE
IMPLIED WARRANTIES OF MERCHANTABILITY AND FITNESS FOR A
PARTICULAR PURPOSE. KEYSIGHT
SHALL NOT BE LIABLE FOR ERRORS
OR FOR INCIDENTAL OR CONSEQUENTIAL DAMAGES IN CONNECTION
WITH THE FURNISHING, USE, OR
PERFORMANCE OF THIS DOCUMENT
OR OF ANY INFORMATION CONTAINED HEREIN. SHOULD KEYSIGHT
AND THE USER HAVE A SEPARATE
WRITTEN AGREEMENT WITH WARRANTY TERMS COVERING THE MATERIAL IN THIS DOCUMENT THAT
CONFLICT WITH THESE TERMS, THE
WARRANTY TERMS IN THE SEPARATE
AGREEMENT SHALL CONTROL.
Safety Information
CAUTION
A CAUTION notice denotes a hazard. It
calls attention to an operating procedure, practice, or the like that, if not
correctly performed or adhered to,
could result in damage to the product
or loss of important data. Do not proceed beyond a CAUTION notice until
the indicated conditions are fully
understood and met.
WARNING
A WARNING notice denotes a hazard. It
calls attention to an operating procedure, practice, or the like that, if not
correctly performed or adhered to,
could result in personal injury or death.
Do not proceed beyond a WARNING
notice until the indicated conditions are
fully understood and met.
Page 3

Keysight U5850 Series User’s Guide 3
Safety Symbols
The following symbols on the instrument and in the documentation indicate
precautions which must be taken to maintain safe operation of the instrument.
Caution, risk of danger
(refer to this manual for specific Warning or Caution information)
Laser radiation
Page 4

4 Keysight U5850 Series User’s Guide
Safety Considerations
Read the information below before using this instrument.
The following general safety precautions must be observed during all phases of
operation, service, and repair of this instrument. Failure to comply with these
precautions or with specific warnings elsewhere in this manual violates safety
standards for design, manufacture, and intended use of the instrument. Keysight
Technologies assumes no liability for the customer’s failure to comply with these
requirements.
WARNING
– Do not use the U5850 Series if it is damaged. Before you use the U5850
Series, inspect the casing. Look for cracks or missing plastic. Do not
operate the U5850 Series around explosive gas, vapor, or dust.
– Always use the U5850 Series with the cables provided.
– Observe all markings on the U5850 Series before establishing any
connection.
– Turn off the U5850 Series before removing the battery cover.
– When servicing the U5850 Series, use only the specified replacement
parts.
– Do not operate the U5850 Series with the battery cover or portions of the
cover removed or loosened.
– Use only the designated AC/DC power adapter or charger provided by the
manufacturer to avoid any unexpected hazards.
– Use only the battery pack supplied with the U5850 Series. Do not
disassemble/modify the battery pack or leave it under direct heat/
sunlight.
– Keep the battery pack away from water, fire, or heat.
– Avoid any contact with battery leakage to prevent personal injuries. If
there is leakage or strange smell, remove the battery pack immediately
from the U5850 Series or the external battery charger.
Page 5

Keysight U5850 Series User’s Guide 5
WARNING
– Do not connect the positive terminal and the negative terminal of the
battery pack (metallic part) to each other with any metal objects, such as
wires.
– Do not continue to charge the battery pack if it does not become charged
within the specified charging time.
– Do not apply impact to or insert foreign objects into the battery pack.
– Do not use the camera on a tripod in an area with large vibration or shock.
– Do not use the U5850 Series under water or with conductive gloves or
cloths worn or in a strong electromagnetic field.
– Do not stare into the torch light.
CAUTION
– Use of controls or adjustments or performance of procedures other than
those specified herein may result in hazardous radiation exposure.
– The U5850 Series uses a highly-sensitive infrared detector. Ensure to
comply with the requirements in “Environmental Conditions” on page 8
when using the U5850 Series.
– Do not apply excessive stress to the LCD screen, the focus adjustment
ring, or the camera lens to avoid damages.
– Avoid direct rays or shock to the visible or infrared camera lens of the
U5850 Series.
– Do not perform image acquisition directly at the sun or objects with
extremely high temperature over a long period of time to avoid damage to
the infrared detector.
Page 6

6 Keysight U5850 Series User’s Guide
CAUTION
– The following condition may be observed when the U5850 Series
acquires or saves a visible image. This condition is not a device failure.
– The color of the visible image changes periodically or may be different
from the real target object when the image is replayed in the freeze
mode.
To avoid this condition, perform image acquisitions by changing the
camera angle. In this case, it is recommended to acquire visible images
by observing the image on the screen.
– The following condition may be observed in outdoor data acquisitions.
This condition is not a device failure.
– If the contrast is great (e.g., due to backlight), the object may appear
darker on the camera display as compared to the brightness of the
background.
To avoid this condition, control the frame so that it covers only the target
object.
– If bright sunlight enters the visible camera, the entire picture may
become reddish. To avoid this, shield the camera from bright sunlight.
– When the U5850 Series is moved from objects with large temperature
differences, “ghost” image may be present on the display. This condition
is not a device failure. It may take several minutes to dissipate the “ghost”
image. You can automatically dissipate the “ghost” image by switching to
the freeze mode and back to the run mode (refer to “Image Playback” on
page 56).
– Do not input laser beam (CO
2
laser, etc.) to avoid damage to the infrared
detector.
– If the U5850 Series is used in a manner not specified by the manufacturer,
the U5850 Series protection may be impaired.
– Always use a dry cloth to clean the U5850 Series. Do not use ethyl
alcohol or any other volatile liquid to clean the U5850 Series.
Page 7

Keysight U5850 Series User’s Guide 7
WARNING
Laser pointer precautions:
– This laser pointer is a Class 2 laser product.
– Laser beam contact with the eyes may cause visual impairment.
– Do not point the laser beam towards people.
– Do not stare into the laser beam.
– The U5850 Series is intended for professional use and is not suitable for
general use.
Video
DC 12V
RAYONNEMENT LASER
PRODUIT LASER DE CLASSE 2
LONGUEUR D'ONDE :655nm
PUISSANCE DE SORTIE MAXI :1mW
NE PAS REGARDER LE FAISCEAU
IEC60825-1/2007
U5857A
Laser beam
Laser control key
Page 8

8 Keysight U5850 Series User’s Guide
Environmental Conditions
The U5850 Series TrueIR Thermal Imager is designed for indoor use and in an area
with low condensation. The table below shows the general environmental
requirements for this instrument.
Regulatory Information
The U5850 Series TrueIR Thermal Imager complies with the following safety and
Electromagnetic Compatibility (EMC) compliances:
Safety compliance
– Laser safety: IEC 60825-1/EN 60825-1 (Laser Class 2)
– IEC 61010-1/EN 61010-1
EMC compliance
– IEC 61326-1/EN61326-1
– CISPR11/EN55011, Group 1 Class A
– Canada: ICES/NMB-001: Issue 4, June 2006
– Australia/New Zealand: AS/NZS CISPR 11
Environmental condition Requirement
Temperature
Operating condition
– –15 °C to 50 °C
Storage condition
– –40 °C to 70 °C
Humidity
Operating condition
– 50% RH to 95% RH at 40 °C
Storage condition
– 95% RH at 40 °C
Altitude Up to 2000 m
Pollution degree 2
Page 9

Keysight U5850 Series User’s Guide 9
Regulatory Markings
The CE marking is a legal compliance
marking of the European Community.
This CE marking shows that the
product complies with all the relevant
European Legal Directives.
The RCM mark is a registered
trademark of the Spectrum
Management Agency of Australia. This
signifies compliance with the Australia
EMC Framework regulations under the
terms of the Radio Communication Act
of 1992.
ICES/NMB-001 indicates that this ISM
device complies with the Canadian
ICES-001.
Cet appareil ISM est conforme a la
norme NMB-001 du Canada.
This instrument complies with the
WEEE Directive (2002/96/EC) marking
requirement. This affixed product label
indicates that you must not discard
this electrical or electronic product in
domestic household waste.
This symbol is a South Korean Class A
EMC Declaration. This is a Class A
instrument suitable for professional
use and in electromagnetic
environment outside of the home.
This symbol indicates the time period
during which no hazardous or toxic
substance elements are expected to
leak or deteriorate during normal use.
Forty years is the expected useful life
of the product.
MSIP-REM-
ATi-THERMAL
Page 10

10 Keysight U5850 Series User’s Guide
Waste Electrical and Electronic Equipment (WEEE) Directive 2002/
96/EC
This instrument complies with the WEEE Directive (2002/96/EC) marking
requirement. This affixed product label indicates that you must not discard this
electrical or electronic product in domestic household waste.
Product category:
With reference to the equipment types in the WEEE directive Annex 1, this
instrument is classified as a “Monitoring and Control Instrument” product.
The affixed product label is as shown below.
Do not dispose in domestic household waste.
To return this unwanted instrument, contact your nearest Keysight Service Center,
or visit http://about.keysight.com/en/companyinfo/environment/takeback.shtml
for more information.
Sales and Technical Support
To contact Keysight for sales and technical support, refer to the support links on
the following Keysight websites:
– www.keysight.com/find/trueIRimager
(product-specific information and support, software and
documentation updates)
– www.keysight.com/find/assist
(worldwide contact information for repair and service)
Page 11

Keysight U5850 Series User’s Guide 11
Table of Contents
Safety Symbols . . . . . . . . . . . . . . . . . . . . . . . . . . . . . . . . . . . . . . . . . . . . .3
Safety Considerations . . . . . . . . . . . . . . . . . . . . . . . . . . . . . . . . . . . . . . . .4
Environmental Conditions . . . . . . . . . . . . . . . . . . . . . . . . . . . . . . . . . . . . 8
Regulatory Information . . . . . . . . . . . . . . . . . . . . . . . . . . . . . . . . . . . . . . .8
Safety compliance . . . . . . . . . . . . . . . . . . . . . . . . . . . . . . . . . . . . . . . .8
EMC compliance . . . . . . . . . . . . . . . . . . . . . . . . . . . . . . . . . . . . . . . . . 8
Regulatory Markings . . . . . . . . . . . . . . . . . . . . . . . . . . . . . . . . . . . . . . . . .9
Waste Electrical and Electronic Equipment (WEEE) Directive 2002/96/
EC . . . . . . . . . . . . . . . . . . . . . . . . . . . . . . . . . . . . . . . . . . . . . . . . . . . .10
Product category: . . . . . . . . . . . . . . . . . . . . . . . . . . . . . . . . . . . . . . .10
Sales and Technical Support . . . . . . . . . . . . . . . . . . . . . . . . . . . . . . . . .10
1Introduction
About This Manual . . . . . . . . . . . . . . . . . . . . . . . . . . . . . . . . . . . . . . . . .20
Documentation map . . . . . . . . . . . . . . . . . . . . . . . . . . . . . . . . . . . . .20
Safety notes . . . . . . . . . . . . . . . . . . . . . . . . . . . . . . . . . . . . . . . . . . . .20
Preparing the U5850 Series . . . . . . . . . . . . . . . . . . . . . . . . . . . . . . . . . .21
Check the shipment . . . . . . . . . . . . . . . . . . . . . . . . . . . . . . . . . . . . . .21
Standard shipped items . . . . . . . . . . . . . . . . . . . . . . . . . . . . . . . . . . .22
Install the hand strap . . . . . . . . . . . . . . . . . . . . . . . . . . . . . . . . . . . . . 23
Install and charge the battery . . . . . . . . . . . . . . . . . . . . . . . . . . . . . .24
Insert the SD memory card . . . . . . . . . . . . . . . . . . . . . . . . . . . . . . . .26
Turn on the U5850 Series . . . . . . . . . . . . . . . . . . . . . . . . . . . . . . . . .26
Set up the U5850 Series . . . . . . . . . . . . . . . . . . . . . . . . . . . . . . . . . .27
The U5850 Series in Brief . . . . . . . . . . . . . . . . . . . . . . . . . . . . . . . . . . . .32
LED status indication . . . . . . . . . . . . . . . . . . . . . . . . . . . . . . . . . . . . .34
Camera mode switching flow . . . . . . . . . . . . . . . . . . . . . . . . . . . . . .35
Display screen . . . . . . . . . . . . . . . . . . . . . . . . . . . . . . . . . . . . . . . . . .36
2 Image Capture, Processing, and Measurement Functions
Camera Controls . . . . . . . . . . . . . . . . . . . . . . . . . . . . . . . . . . . . . . . . . . .40
Page 12

12 Keysight U5850 Series User’s Guide
Capture images . . . . . . . . . . . . . . . . . . . . . . . . . . . . . . . . . . . . . . . . . 40
Image Saving . . . . . . . . . . . . . . . . . . . . . . . . . . . . . . . . . . . . . . . . . . . . . 44
Preview and save an image . . . . . . . . . . . . . . . . . . . . . . . . . . . . . . . . 44
Add tags . . . . . . . . . . . . . . . . . . . . . . . . . . . . . . . . . . . . . . . . . . . . . . 47
Edit tags . . . . . . . . . . . . . . . . . . . . . . . . . . . . . . . . . . . . . . . . . . . . . . . 51
Delete tags . . . . . . . . . . . . . . . . . . . . . . . . . . . . . . . . . . . . . . . . . . . . 52
Save an image directly . . . . . . . . . . . . . . . . . . . . . . . . . . . . . . . . . . . 53
Edit an image . . . . . . . . . . . . . . . . . . . . . . . . . . . . . . . . . . . . . . . . . . . 53
Image Playback . . . . . . . . . . . . . . . . . . . . . . . . . . . . . . . . . . . . . . . . . . . 56
Full screen/Thumbnail playback mode operation . . . . . . . . . . . . . . 56
Full screen playback mode overview . . . . . . . . . . . . . . . . . . . . . . . . 57
Thumbnail playback mode operation . . . . . . . . . . . . . . . . . . . . . . . . 58
Thumbnail playback mode overview . . . . . . . . . . . . . . . . . . . . . . . . . 59
Delete an image (full screen playback mode) . . . . . . . . . . . . . . . . . 60
Delete multiple images (thumbnail playback mode) . . . . . . . . . . . . 61
Measurement Controls . . . . . . . . . . . . . . . . . . . . . . . . . . . . . . . . . . . . . . 63
Set the temperature range . . . . . . . . . . . . . . . . . . . . . . . . . . . . . . . . 63
Set the center spot . . . . . . . . . . . . . . . . . . . . . . . . . . . . . . . . . . . . . . 66
Set the max/min tracking . . . . . . . . . . . . . . . . . . . . . . . . . . . . . . . . . 67
Set the moveable spots and boxes . . . . . . . . . . . . . . . . . . . . . . . . . . 68
Set the delta temperature . . . . . . . . . . . . . . . . . . . . . . . . . . . . . . . . . 72
Turn off all measurements . . . . . . . . . . . . . . . . . . . . . . . . . . . . . . . . 74
Imaging Controls . . . . . . . . . . . . . . . . . . . . . . . . . . . . . . . . . . . . . . . . . . 75
Set the color palette . . . . . . . . . . . . . . . . . . . . . . . . . . . . . . . . . . . . . 75
Load a custom color palette . . . . . . . . . . . . . . . . . . . . . . . . . . . . . . . 77
Set the color alarm . . . . . . . . . . . . . . . . . . . . . . . . . . . . . . . . . . . . . . 78
Digital Zoom . . . . . . . . . . . . . . . . . . . . . . . . . . . . . . . . . . . . . . . . . . . . . . 83
Set the zoom ratio . . . . . . . . . . . . . . . . . . . . . . . . . . . . . . . . . . . . . . . 83
Pan (move) the zoom area . . . . . . . . . . . . . . . . . . . . . . . . . . . . . . . . 84
Disable zoom . . . . . . . . . . . . . . . . . . . . . . . . . . . . . . . . . . . . . . . . . . . 84
Parameter Controls . . . . . . . . . . . . . . . . . . . . . . . . . . . . . . . . . . . . . . . . 85
Set the emissivity (ε) . . . . . . . . . . . . . . . . . . . . . . . . . . . . . . . . . . . . . 86
Set the reflected temperature (RT) . . . . . . . . . . . . . . . . . . . . . . . . . . 89
Set the object distance (OD), ambient temperature (AT), and
Page 13

Keysight U5850 Series User’s Guide 13
humidity (Hum) . . . . . . . . . . . . . . . . . . . . . . . . . . . . . . . . . . . . . . .92
Set the transmissivity (τ) . . . . . . . . . . . . . . . . . . . . . . . . . . . . . . . . . .94
3 Data Management and System-Related Functions
Data Management Controls . . . . . . . . . . . . . . . . . . . . . . . . . . . . . . . . . .96
Perform image logging . . . . . . . . . . . . . . . . . . . . . . . . . . . . . . . . . . .96
View the memory status of the SD memory card . . . . . . . . . . . . . .101
Manage image folders . . . . . . . . . . . . . . . . . . . . . . . . . . . . . . . . . . .102
Format the SD memory card . . . . . . . . . . . . . . . . . . . . . . . . . . . . . .106
System-Related Settings . . . . . . . . . . . . . . . . . . . . . . . . . . . . . . . . . . .107
Configure the Quick Start Tutorial . . . . . . . . . . . . . . . . . . . . . . . . .107
Save/recall instrument setups . . . . . . . . . . . . . . . . . . . . . . . . . . . . .110
Turn on/off visible image auto-save . . . . . . . . . . . . . . . . . . . . . . . .111
Configure the display items . . . . . . . . . . . . . . . . . . . . . . . . . . . . . . .112
Configure the main key press functions . . . . . . . . . . . . . . . . . . . . .114
Set the USB mode . . . . . . . . . . . . . . . . . . . . . . . . . . . . . . . . . . . . . . 115
Set the power saving mode . . . . . . . . . . . . . . . . . . . . . . . . . . . . . . . 117
Set the LCD brightness . . . . . . . . . . . . . . . . . . . . . . . . . . . . . . . . . .119
Set the temperature unit (°C or °F) . . . . . . . . . . . . . . . . . . . . . . . . .119
Set the date and time . . . . . . . . . . . . . . . . . . . . . . . . . . . . . . . . . . .119
Set the video out format . . . . . . . . . . . . . . . . . . . . . . . . . . . . . . . . .120
Set the language . . . . . . . . . . . . . . . . . . . . . . . . . . . . . . . . . . . . . . .120
Display the system and owner information . . . . . . . . . . . . . . . . . . .121
Reset the U5850 Series to factory default settings . . . . . . . . . . . .124
4 Characteristics and Specifications
Page 14

14 Keysight U5850 Series User’s Guide
THIS PAGE HAS BEEN INTENTIONALLY LEFT BLANK.
Page 15

Keysight U5850 Series User’s Guide 15
List of Figures
Figure 1-1 The front and side panels at a glance . . . . . . . . . . . . .32
Figure 1-2 The rear panel at a glance . . . . . . . . . . . . . . . . . . . . . .33
Figure 1-3 The display at a glance . . . . . . . . . . . . . . . . . . . . . . . . 36
Page 16

16 Keysight U5850 Series User’s Guide
THIS PAGE HAS BEEN INTENTIONALLY LEFT BLANK.
Page 17

Keysight U5850 Series User’s Guide 17
List of Tables
Table 1-1 Rear panel descriptions . . . . . . . . . . . . . . . . . . . . . . . .33
Table 1-2 LED status indication (power adapter connected) . . . 34
Table 1-3 Display descriptions . . . . . . . . . . . . . . . . . . . . . . . . . . .36
Table 1-4 Battery status indication . . . . . . . . . . . . . . . . . . . . . . .37
Table 2-1 Emissivity table . . . . . . . . . . . . . . . . . . . . . . . . . . . . . . .88
Page 18

18 Keysight U5850 Series User’s Guide
THIS PAGE HAS BEEN INTENTIONALLY LEFT BLANK.
Page 19

Keysight U5850 Series TrueIR Thermal Imager
User’s Guide
19
1 Introduction
About This Manual 20
Preparing the U5850 Series 21
The U5850 Series in Brief 32
This chapter guides you to set up the U5850 Series TrueIR Thermal Imager for the
first time. A summary of all the U5850 Series TrueIR Thermal Imager features is
also given.
Page 20

1Introduction
20 Keysight U5850 Series User’s Guide
About This Manual
The descriptions and instructions in this manual apply to the Keysight U5855A,
U5856A, and U5857A TrueIR Thermal Imager (hereafter referred to as the U5850
Series or the instrument).
The model U5857A appears in all illustrations.
Documentation map
The following manuals and software are available for your instrument. For the
latest version, visit our website at: www.keysight.com/find/trueIRimager
Check the manual revision on the first page of each manual.
– User’s Guide
This manual.
– Quick Start Guide
Printed copy, included with shipment.
– Service Guide
Free download at the Keysight website.
– Keysight TrueIR Analysis and Reporting Tool software
Free download at the Keysight website: www.keysight.com/find/trueIR_ART
Safety notes
Safety notes are used throughout this manual (refer to the Safety Symbols section
for format examples). Familiarize yourself with each of the notes and its meaning
before operating your instrument.
More pertinent safety notes for using this instrument are located under the Safety
Considerations section.
Do not proceed beyond a safety notice until the indicated conditions are fully
understood and met.
Page 21

Introduction 1
Keysight U5850 Series User’s Guide 21
Preparing the U5850 Series
Check the shipment
When you receive your instrument, check the shipment according to the following
procedure.
1 Inspect the shipping container for damage. Signs of damage may include a
dented or torn shipping container or cushioning material that indicates signs
of unusual stress or compacting. Save the packaging material in case the
instrument needs to be returned.
2 Carefully remove the contents from the shipping container, and verify that the
standard items are included in the shipment according to the standard shipped
items list shown in “Standard shipped items” on page 22.
3 For any enquiries, refer to the Keysight contact numbers on the back of this
manual.
If any item is found missing or damaged, contact your nearest Keysight Sales
Office.
Keep the original packaging in case the U5850 Series has to be returned to
Keysight in the future. If you return the U5850 Series for service, attach a tag
identifying the owner and model number. Include also a brief description of the
problem.
Page 22

1Introduction
22 Keysight U5850 Series User’s Guide
Standard shipped items
Keysight U5850 Series
TrueIR Thermal Imager
Quick Start
Guide
Keysight U5850 Series TrueIR Thermal Imager
Hard carrying case Power adapter Power cord Li-Ion rechargeable
battery
SD memory card
USB Standard-A to Mini
Type-B interface cable, 2 m
Video RCA to RCA
interface cable, 2 m
Keysight U5850 Series
Quick Start Guide
Certificate of
Calibration
Certificate of
Calibration
Page 23

Introduction 1
Keysight U5850 Series User’s Guide 23
Install the hand strap
Video
DC 12V
Page 24

1Introduction
24 Keysight U5850 Series User’s Guide
Install and charge the battery
NOTE
It is recommended to store the battery in a cool, dry place at normal room
temperature. Remove the battery from the device if the device is stored for
extended periods.
Video
DC 12V
Press to lock
firmly in place.
1
Page 25

Introduction 1
Keysight U5850 Series User’s Guide 25
Allow at least 4 hours for the battery to fully charge.
2
Indicates charging status
2a
NOTE
Refer to “LED status indication” on page 34 and “Battery status indication” on
page 37 for more details.
Page 26

1Introduction
26 Keysight U5850 Series User’s Guide
Insert the SD memory card
Turn on the U5850 Series
CAUTION
DO NOT REMOVE the battery or the SD memory card before power is turned
off and the LED light goes off entirely. Otherwise it may damage the U5850
Series or destroy files saved in the SD memory card.
Page 27

Introduction 1
Keysight U5850 Series User’s Guide 27
Set up the U5850 Series
Press for 1 seconds to
turn on/off.
1
When you turn on the U5850 Series for the
first time or after a factory reset, you will be
prompted to perform initial setups. Refer to
“Set up the U5850 Series” on page 27.
2
Quick start tutorial:
3
To navigate the tutorial pages:
To exit:
OR
4
5
Ready to take measurements with specified accuracy after warm-up.
6
NOTE
– If Auto Off is enabled, the U5850 Series will automatically turns off if idle for
20 minutes (default). Pressing the power key will turn it back on.
– If Auto Sleep is enabled, the U5850 Series will automatically goes to sleep if
idle for 10 minutes (default). Pressing any key will turn it back on.
– Refer to “Set the USB mode” on page 115 for more details.
Page 28

1Introduction
28 Keysight U5850 Series User’s Guide
Set the language
NOTE
This is only applicable when you turn on the U5850 Series for the first time, or
after restoring the factory settings.
Page 29

Introduction 1
Keysight U5850 Series User’s Guide 29
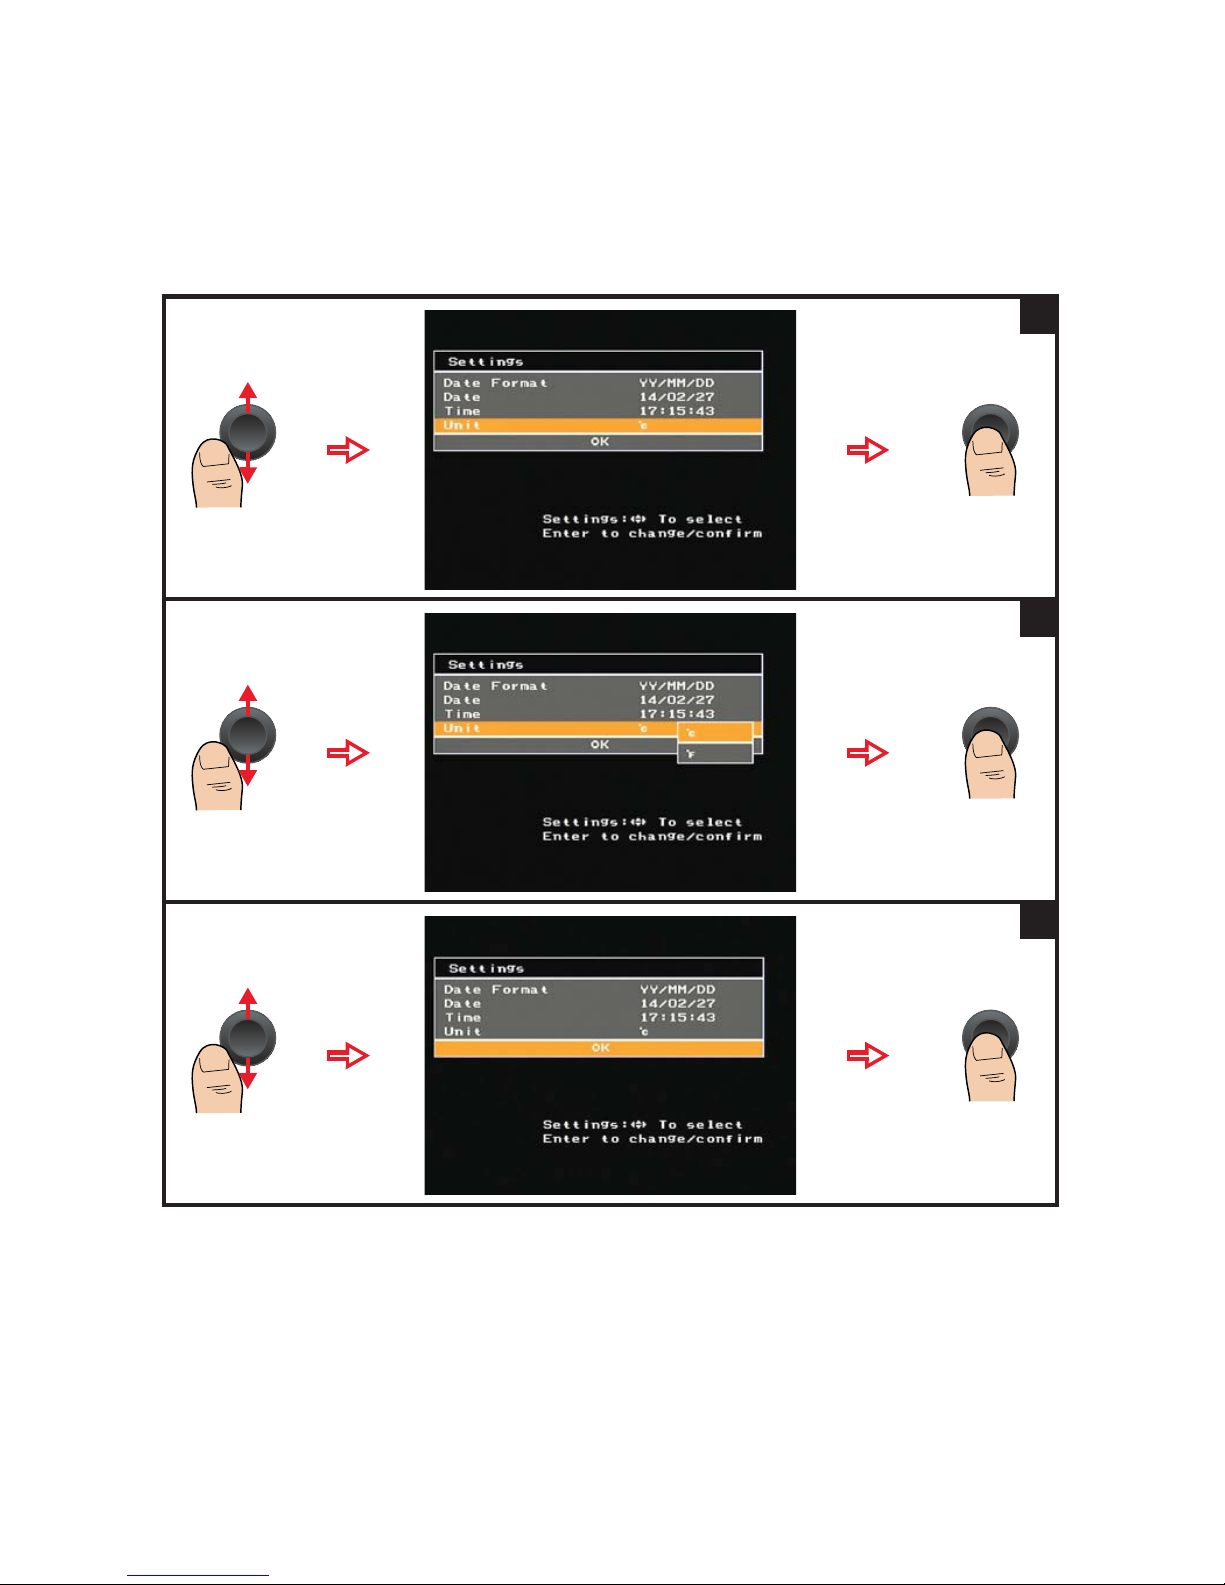
Set the date, time, and temperature unit
1
2
3
Page 30

1Introduction
30 Keysight U5850 Series User’s Guide
Push left/right to move the
indicator.
Push up/down to
increase/decrease the digits.
–Year: 00 to 99 (00: year 2000) – Month: 01 to 12 – Date: 01 to 31
4
5
–Hour: 00 to 23 – Minute: 00 to 59 – Second: 00 to 59
Push left/right to move the
indicator.
Push up/down to
increase/decrease the digits.
6
Page 31
Introduction 1
Keysight U5850 Series User’s Guide 31
7
8
9
Page 32
1Introduction
32 Keysight U5850 Series User’s Guide
The U5850 Series in Brief
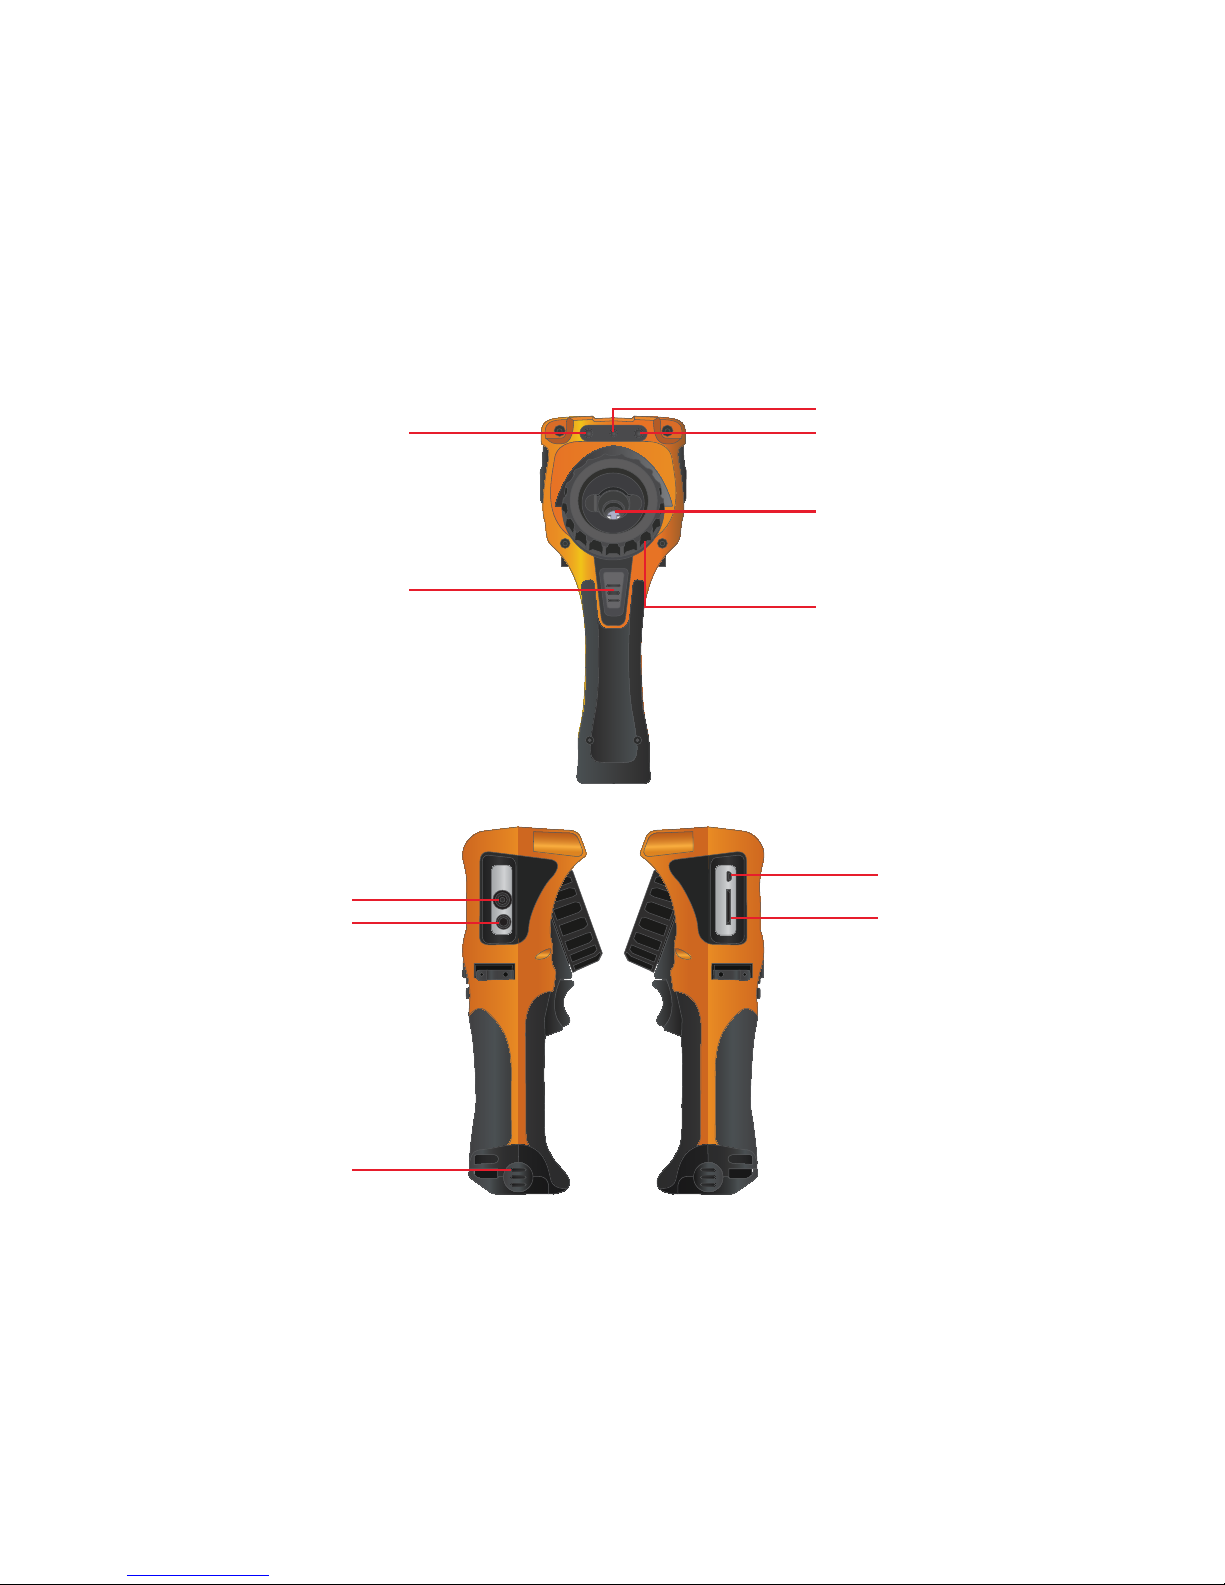
Figure 1-1 The front and side panels at a glance
[1] Press briefly to toggle between the image freeze (capture) or run operation.
Press for 1 second to perform a quick-save.
Front
Right Left
Visible image camera
Laser pointer
Torch light
Infrared (IR) image camera
lens (with shutter)
Focus adjustment ring
Camera trigger key
[1]
Video out port
DC power inlet
Battery cover
USB Mini-B port
SD memory card slot
Page 33
Introduction 1
Keysight U5850 Series User’s Guide 33
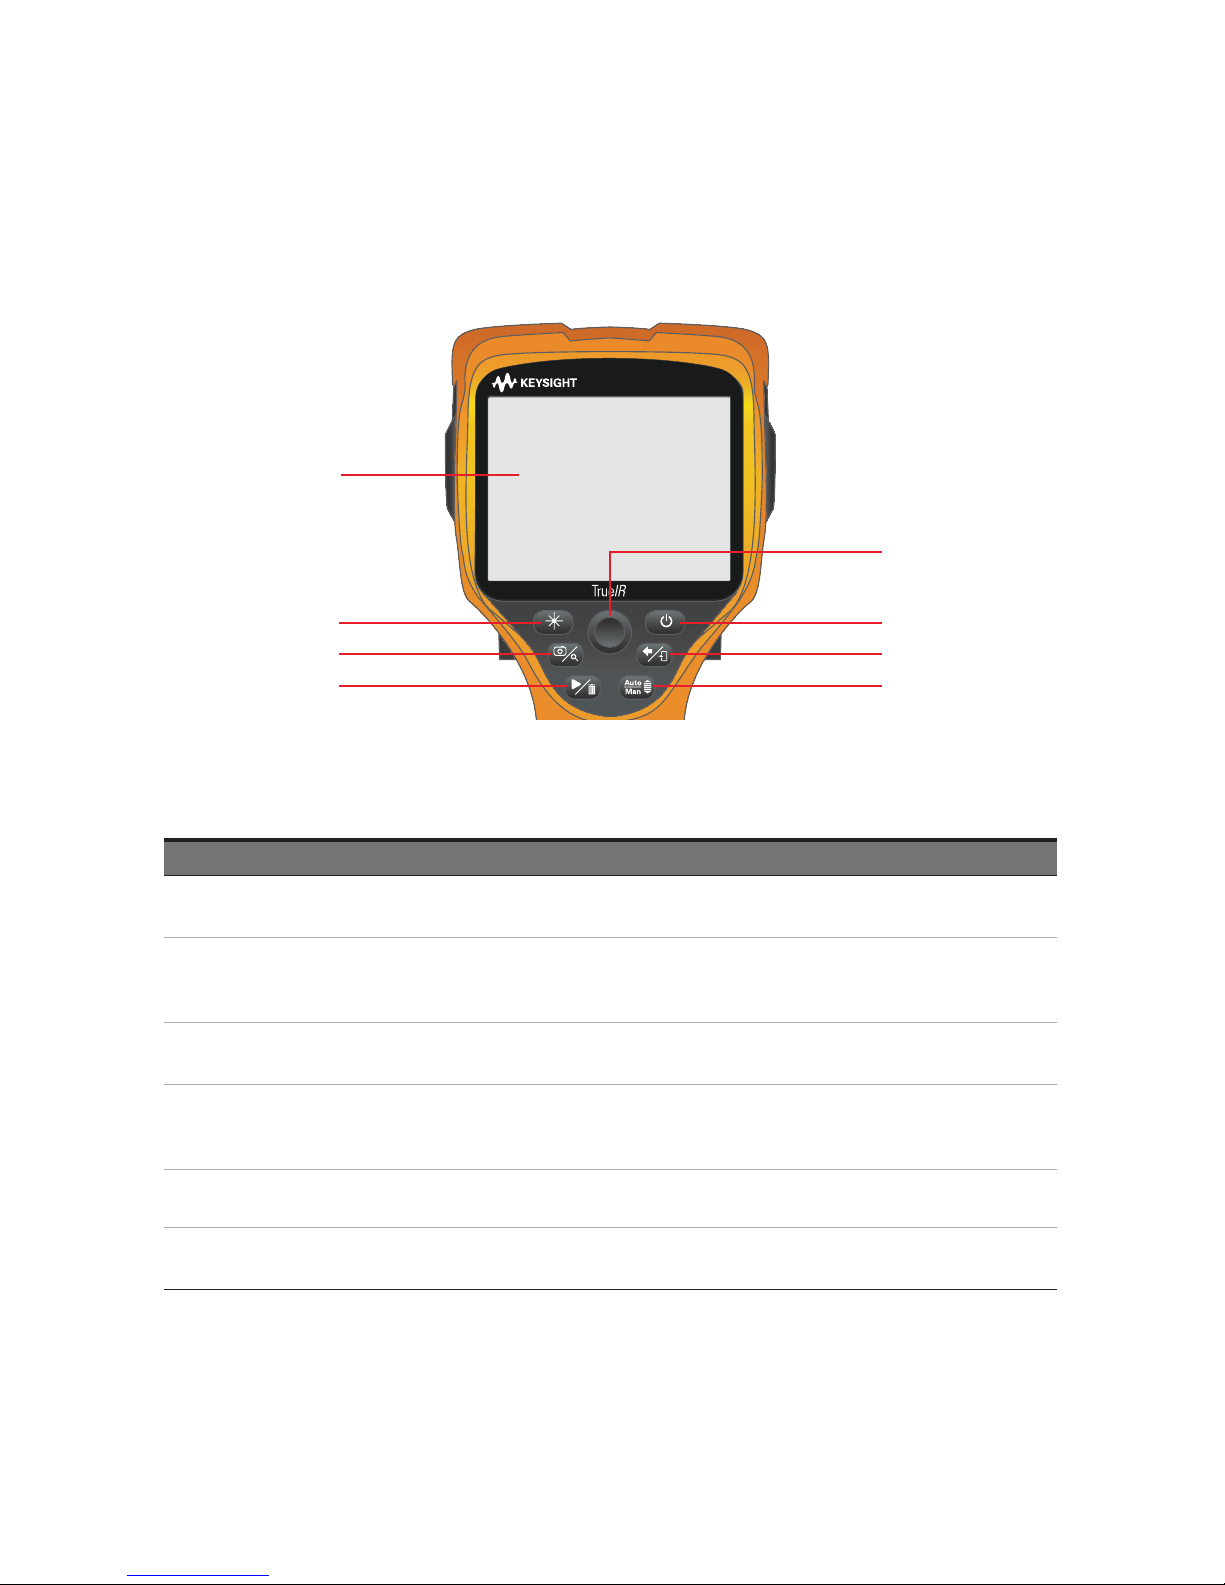
Figure 1-2 The rear panel at a glance
U5857A
LCD display
1
2
3
5
4
6
7
Table 1-1 Rear panel descriptions
Legend Description
1
Light/Laser control key
[a]
– Press briefly to toggle the torch light on or off.
– Press and hold to turn on the laser pointer, and release to turn it off.
2 Camera/Zoom key
– Press briefly to select the camera mode (refer to “Camera mode switching flow” on page 35
for more details).
– Press for 1 second to access the zoom mode.
3 Play/Delete key
– Press briefly to play back saved images.
– Press for 1 second for delete operations.
4 Navigation/Enter key
– Press the center of the key briefly to use as an Enter key or to access the Main Menu.
– Push the sides of the key for up/down/left/right navigation. The left/right sides can be
pushed to open or close sub-menus.
5
Power on/off key
(with LED status indicator)
Press for 1 seconds to turn the U5850 Series on or off.
6 Back/Exit key
– Press briefly to return to the previous menu.
– Press for 1 second to exit any menu.
Page 34
1Introduction
34 Keysight U5850 Series User’s Guide
LED status indication
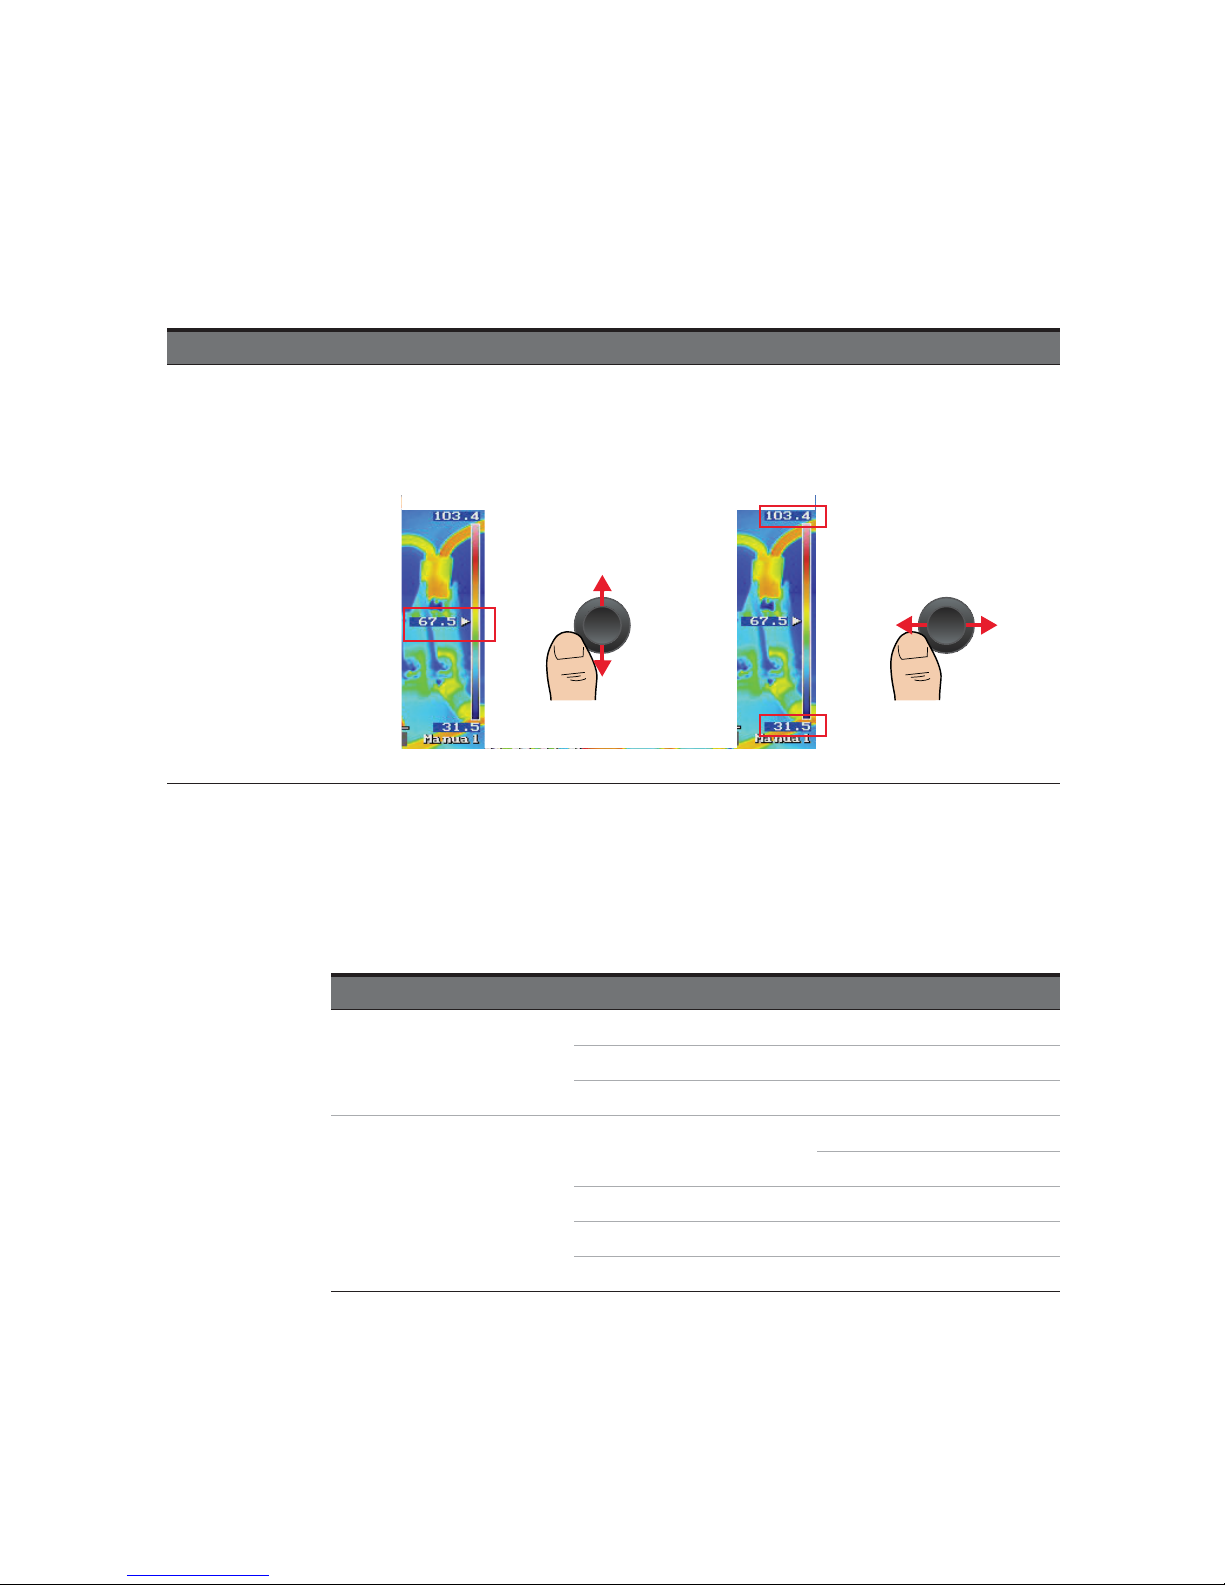
7 Auto/Manual scale key
Press briefly to switch from auto to manual scaling.
– In the manual scaling mode, press briefly to perform auto scaling once.
– Manual scaling allows you to set the temperature level or the temperature span
(upper/lower temperature limits) of the temperature scale.
Press for 1 second to switch from manual to auto scaling.
[a] Torch light and laser pointer are not functional when the U5850 Series is in the power-saving mode.
Tab le 1-1 Rear panel descriptions (continued)
Legend Description
Adjust temperature level: Adjust temperature span:
Tab le 1-2 LED status indication (power adapter connected)
Unit turned on/off LED Status
Off
Red (flashing) Charging
Off Full charge
Red Charge error
On
Green
Charging
Full charge
Red Charge error
Red (flashing) Laser on
Green (flashing) Power saving (Auto-Sleep) mode
Page 35
Introduction 1
Keysight U5850 Series User’s Guide 35
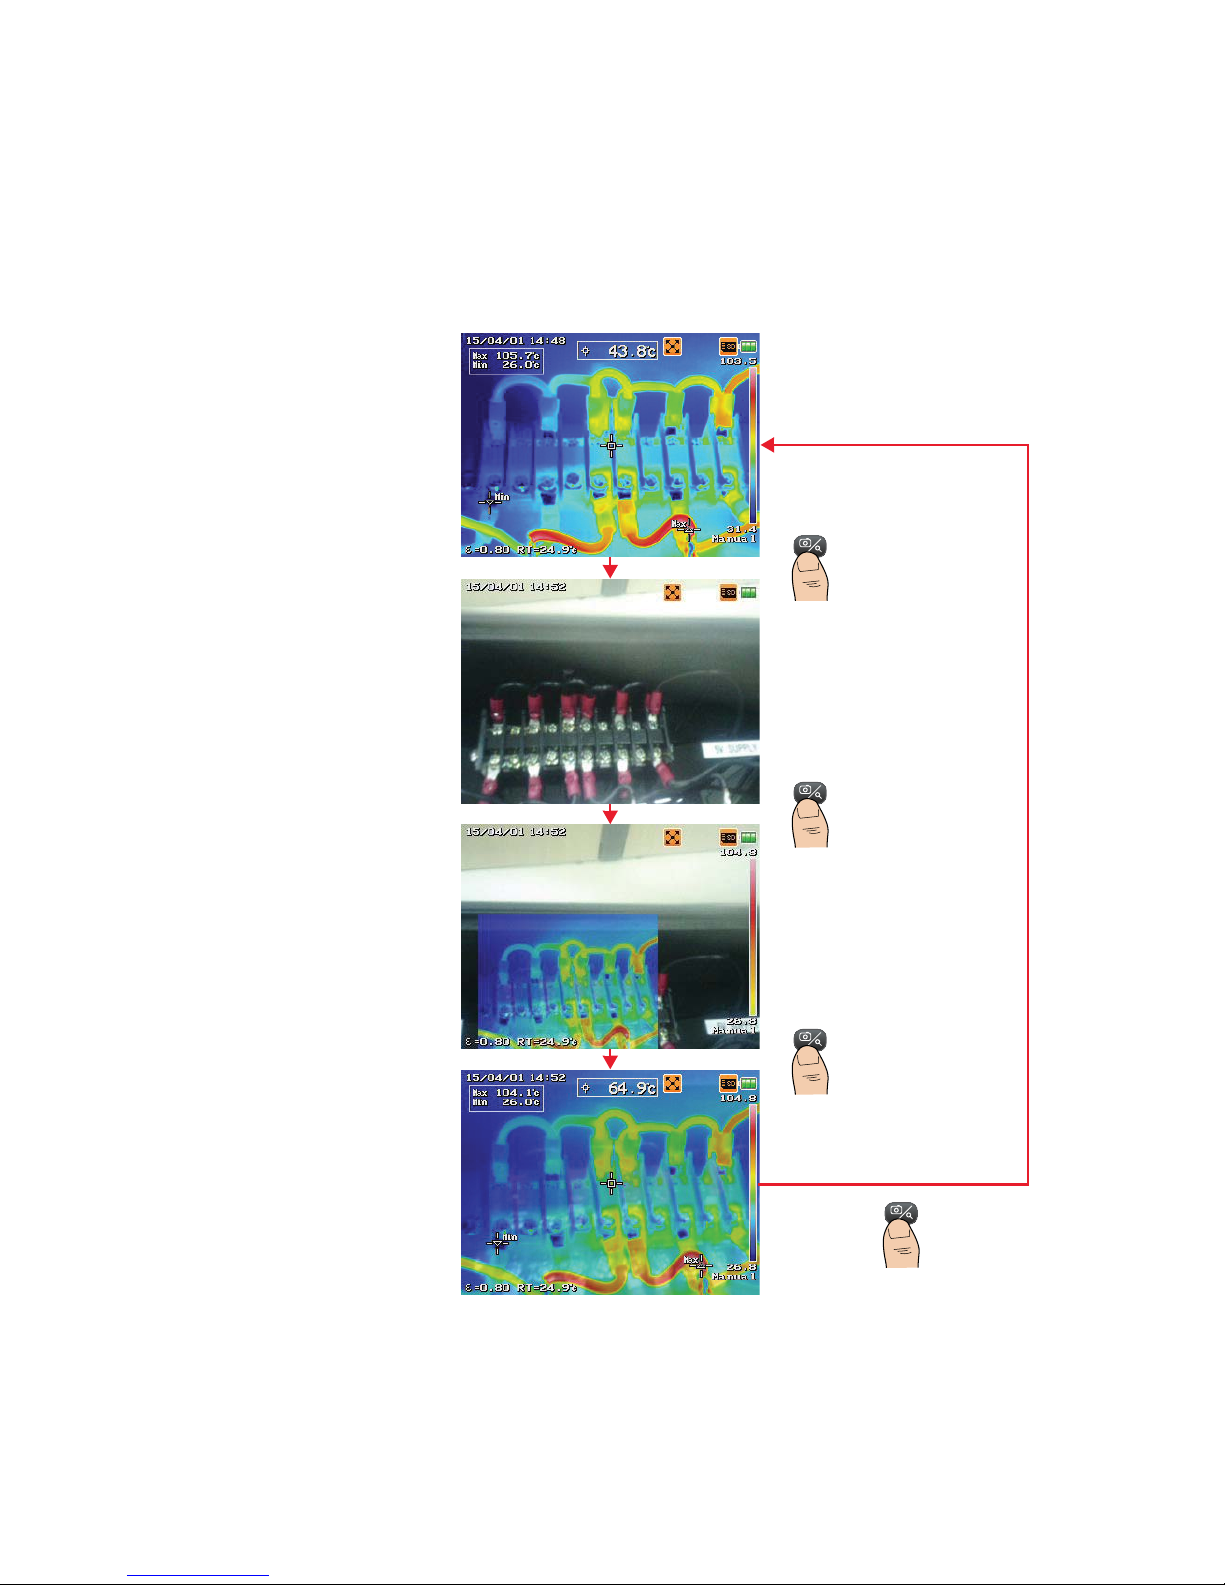
Camera mode switching flow
IR image
(with Fine Resolution enabled)
Visible image
Picture-in-picture
(fusion) image
Blend (fusion) image
Page 36
1Introduction
36 Keysight U5850 Series User’s Guide
Display screen
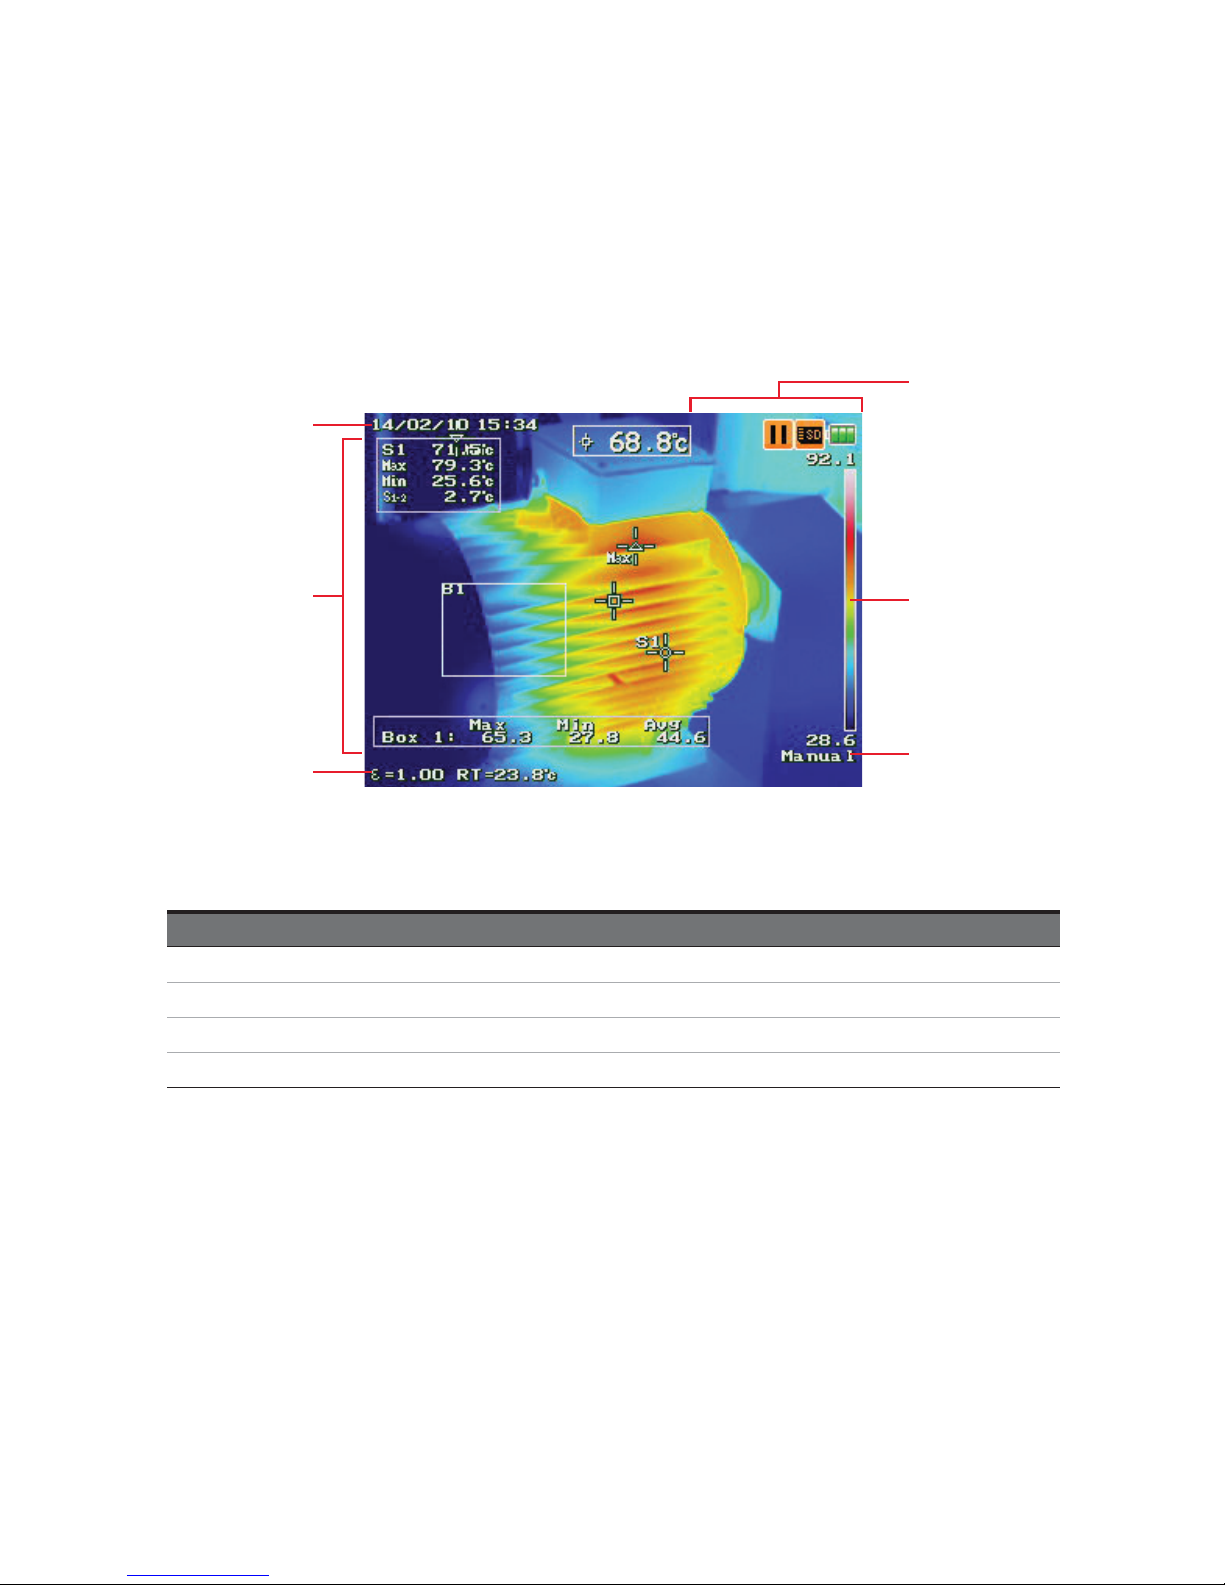
Figure 1-3 The display at a glance
1
2
3
4
5
6
Tab le 1-3 Display descriptions
Description
1 Date/time
2 Measurement results and tools
3 Info bar (selectable up to four items to display)
4 Auto/manual scaling
Page 37
Introduction 1
Keysight U5850 Series User’s Guide 37
Battery status indication
5 Temperature scale/color bar with upper and lower temperature limits
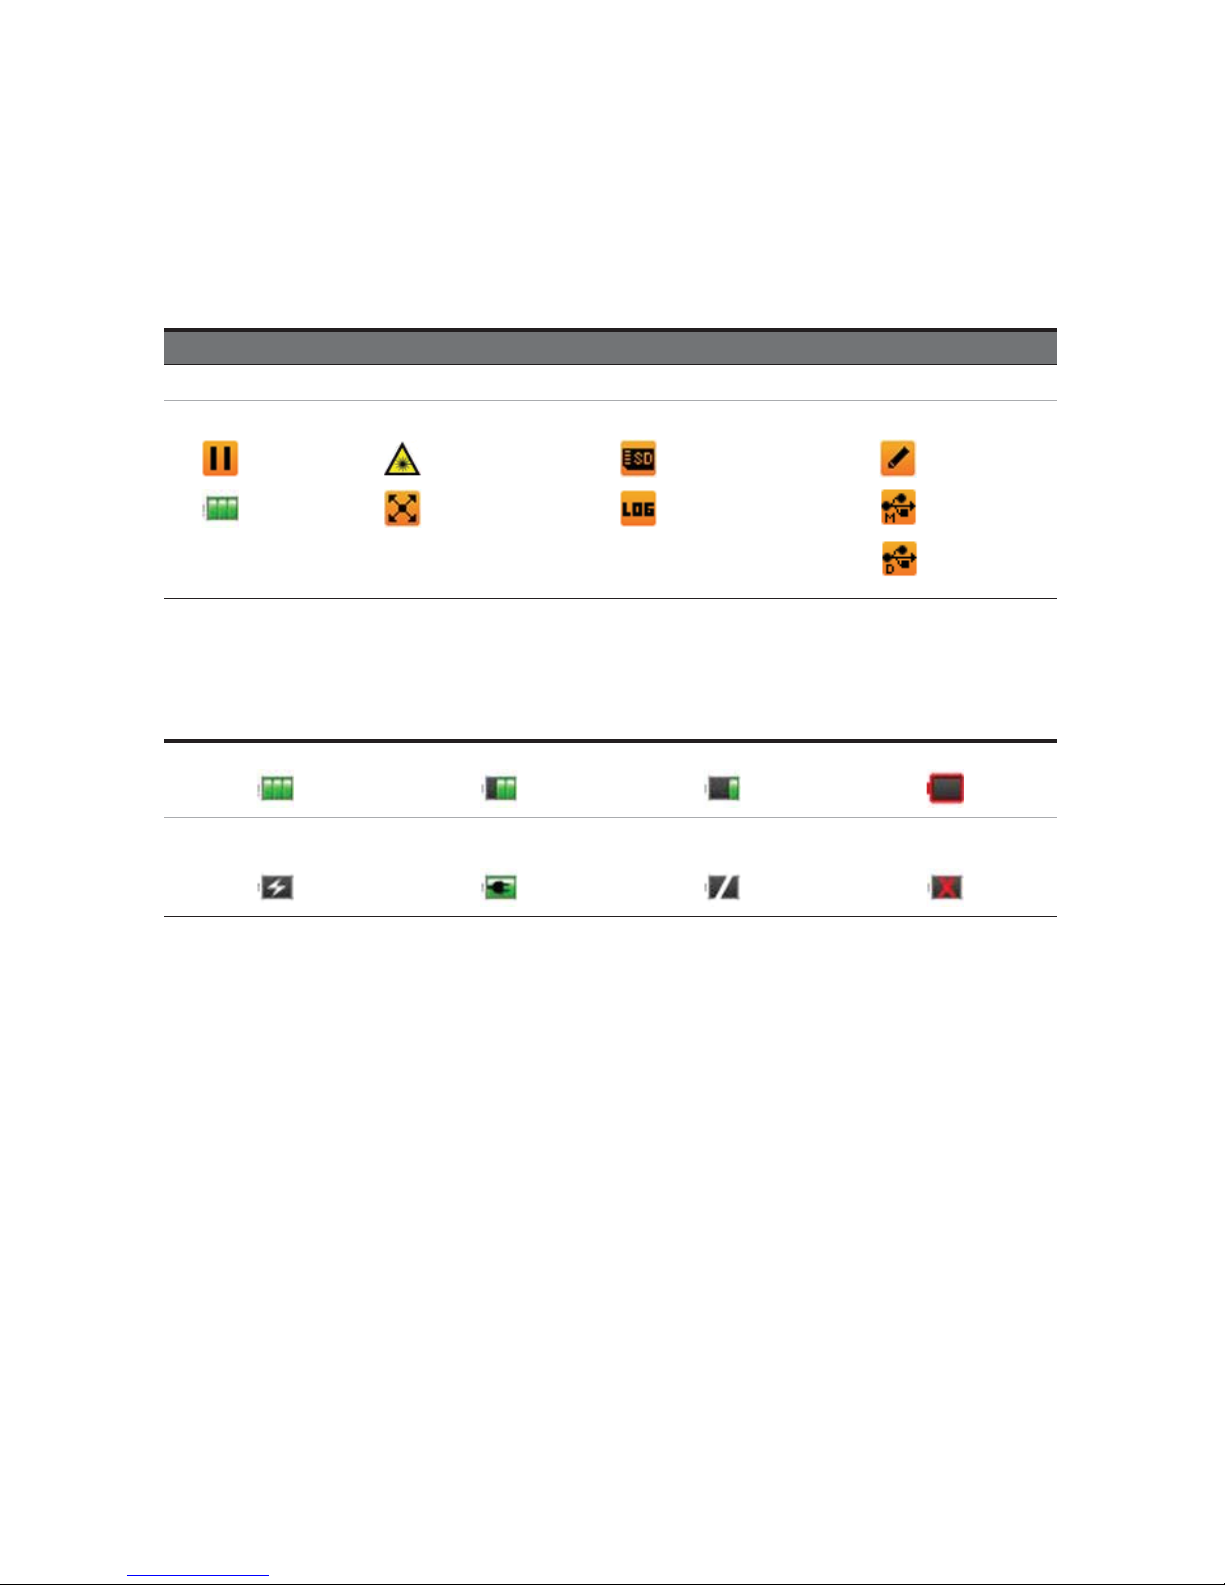
6
Icons as status indicators:
Table 1-3 Display descriptions (continued)
Description
Freeze mode
Battery status
Laser on
Fine Resolution Mode
SD memory card inserted
Image logging operation
Edit mode
USB connectivity
for mass storage
USB connectivity
for data streaming
Table 1-4 Battery status indication
[a]
(~2.5 to 4 hours remaining) 1 to 2.5 hours remaining 15 to 60 minutes remaining Empty (flashing)
Charging
Fully charged
(with adapter connected)
No battery
(with adapter connected)
Charge error (flashing)
(with adapter connected)
[a] Typical operating time of a new battery.
Page 38

1Introduction
38 Keysight U5850 Series User’s Guide
THIS PAGE HAS BEEN INTENTIONALLY LEFT BLANK.
Page 39

Keysight U5850 Series TrueIR Thermal Imager
User’s Guide
39
2 Image Capture,
Processing, and
Measurement Functions
Camera Controls 40
Image Saving 44
Image Playback 56
Measurement Controls 63
Imaging Controls 75
Digital Zoom 83
Parameter Controls 85
This chapter guides you on how to operate the main functions of the U5850 Series
TrueIR Thermal Imager.
Page 40
2 Image Capture, Processing, and Measurement Functions
40 Keysight U5850 Series User’s Guide
Camera Controls
Capture images
Select a camera mode
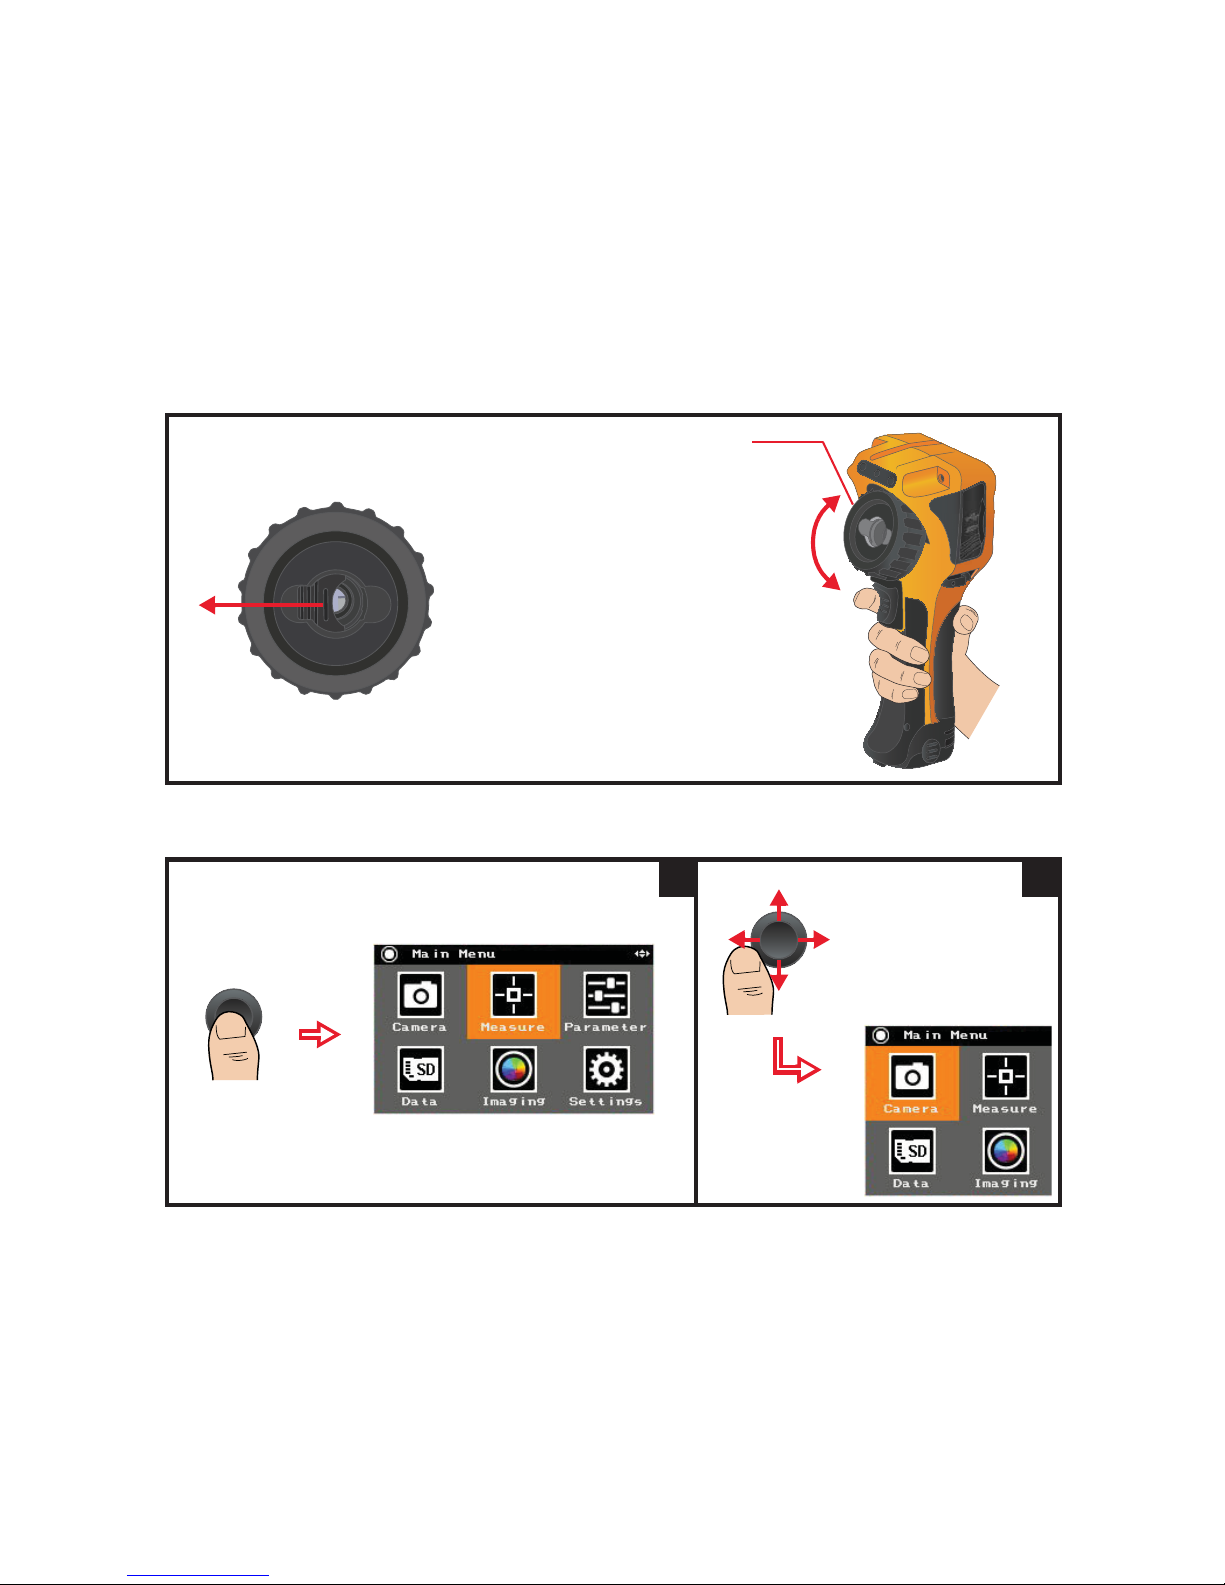
Slide to open the shutter.
Adjust the focus on
the target image
Near-end focus
Far-end focus
1
2
Page 41
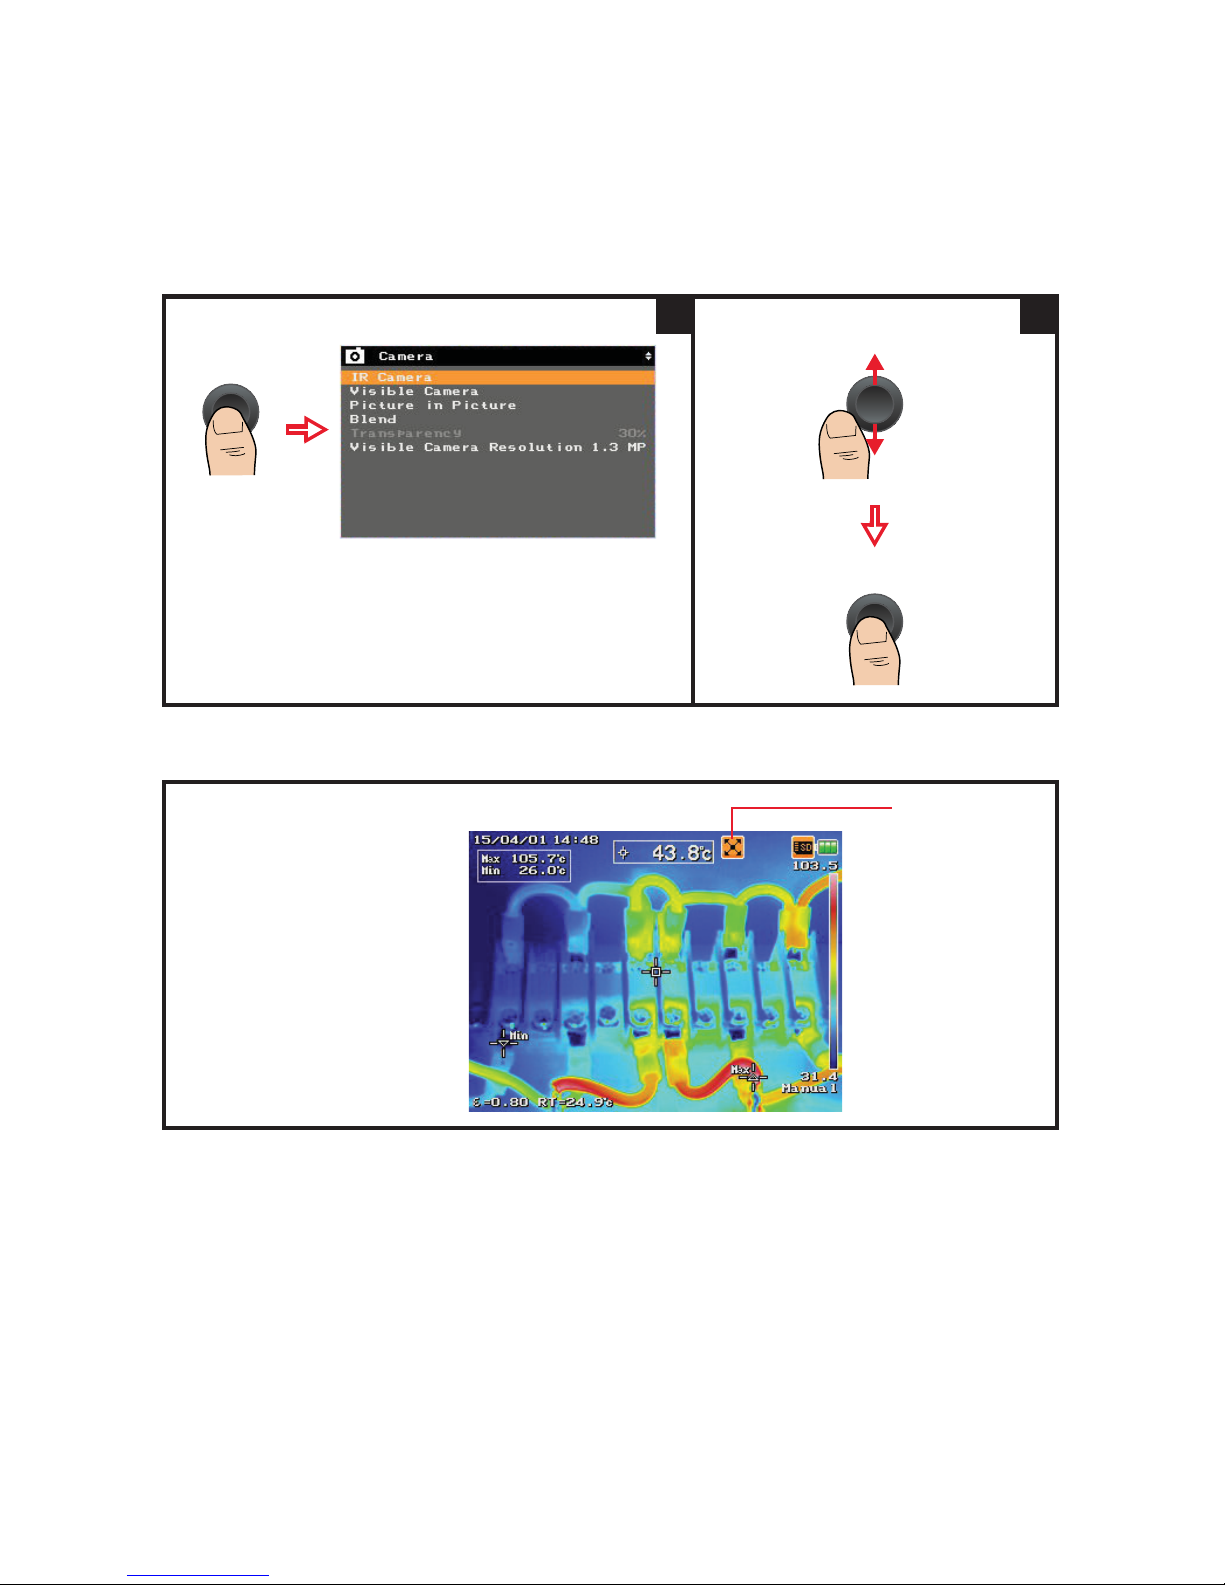
Image Capture, Processing, and Measurement Functions 2
Keysight U5850 Series User’s Guide 41
Fine resolution (FR)
The U5850 Series provides two fusion camera modes:
– Picture in Picture
–Blend
These modes enable you to identify abnormalities easily
with a fusion of both IR and visible images.
3
Select a camera mode:
4
FR indicator
Fine resolution thermal imaging
produces high quality
in-camera IR images by
capturing images with 4× more
effective IR resolution and
approximately 1.5× finer
Instantaneous Field of View
(IFOV) using multi-frames
capturing and sophisticated
image processing techniques.
Page 42
2 Image Capture, Processing, and Measurement Functions
42 Keysight U5850 Series User’s Guide
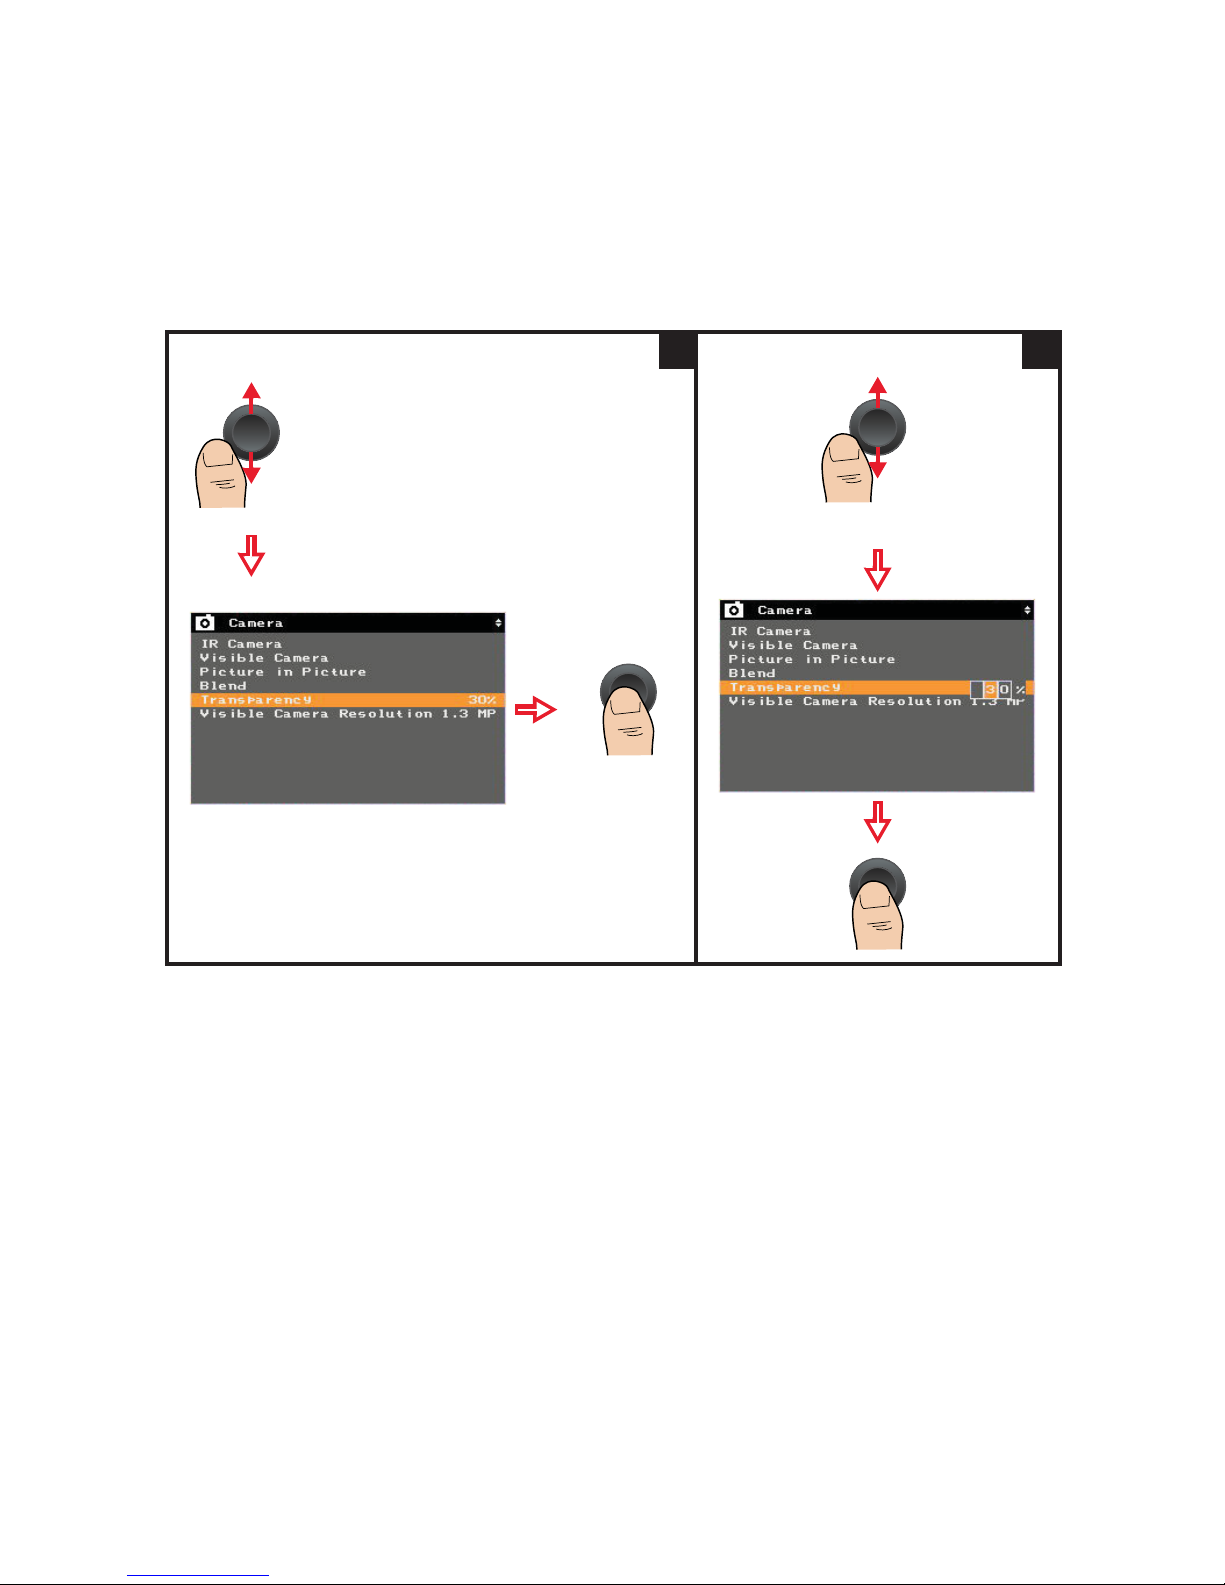
Set the transparency of fusion images
Transparency can only be set when the
Picture in Picture or Blend mode is
selected.
1
Set a value (with a 10% step):
Push up/down to increase/decrease
the digits.
2
Page 43
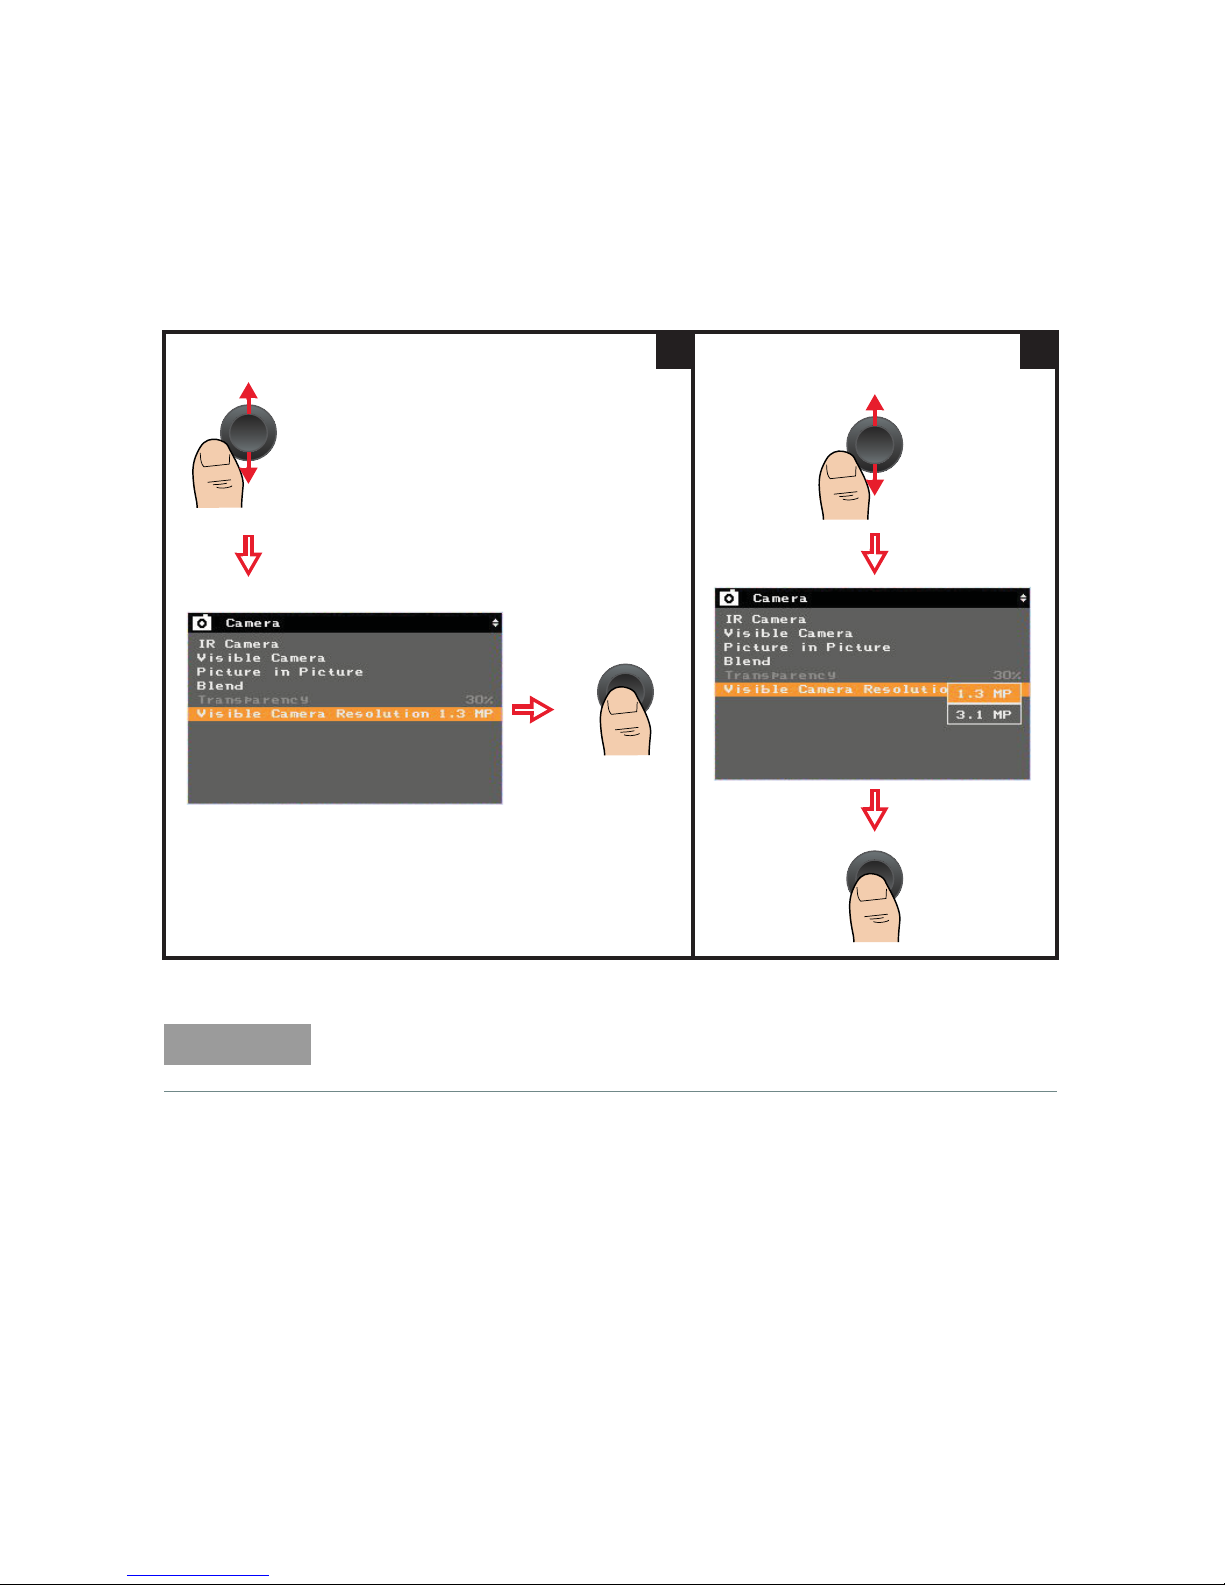
Image Capture, Processing, and Measurement Functions 2
Keysight U5850 Series User’s Guide 43
Set the visible camera resolution
1
Select either 1.3 MP (default) or
3.1 MP as the visible camera resolution:
2
NOTE
For better clarity and higher resolution, select 3.1 MP as the visible camera
resolution.
Page 44
2 Image Capture, Processing, and Measurement Functions
44 Keysight U5850 Series User’s Guide
Image Saving
After capturing the images, you can save them into the SD memory card inserted
in the U5850 Series. You can also add tags and edit the images.
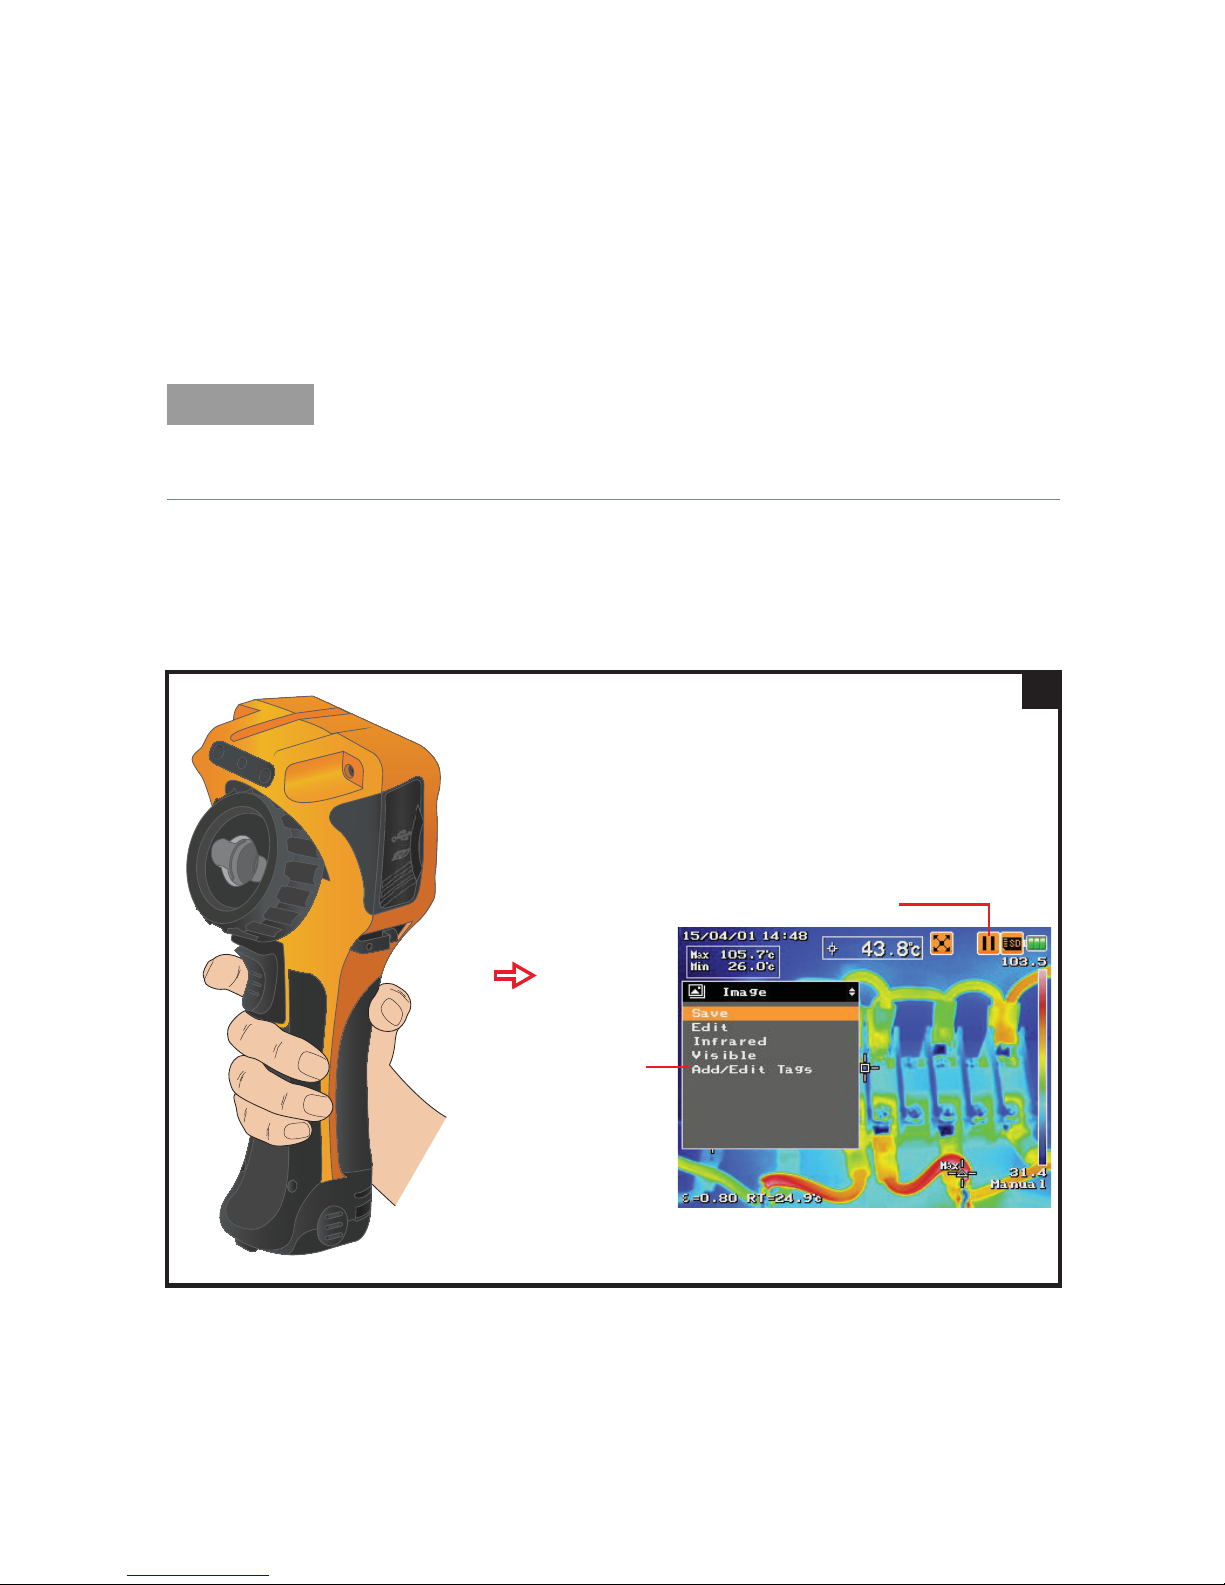
Preview and save an image
NOTE
– Allow a short warm up before performing image acquisition for accurate
measurement.
– It is recommended to power on the U5850 Series before connecting the USB
cable to the PC.
The Image menu is displayed:
(You need to set to the Preview/Save mode for the Trigger
key press in order to display the Image menu. Refer to
“Configure the main key press functions” on page 114.)
Freeze indicator
Image menu
1
Page 45
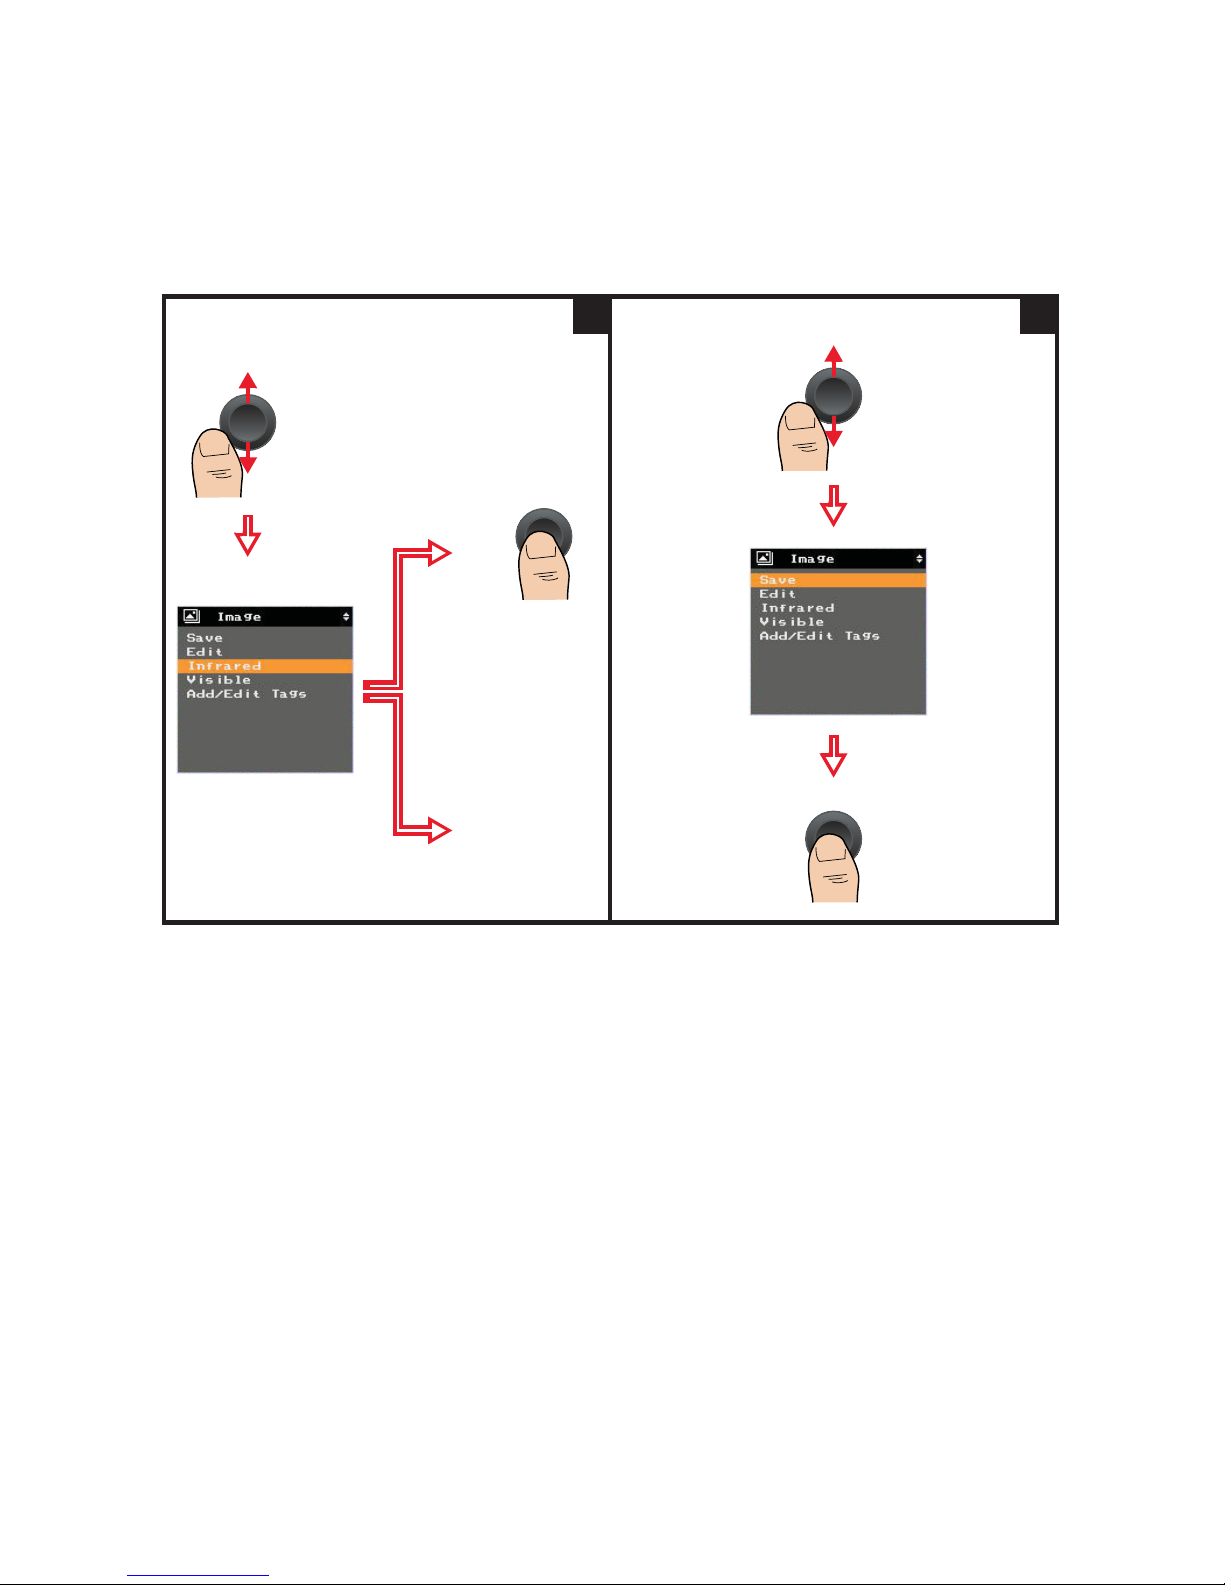
Image Capture, Processing, and Measurement Functions 2
Keysight U5850 Series User’s Guide 45
To preview the IR/visible image, select
Infrared/Visible respectively:
OR:
Wait for 500 ms.
2
To save the image:
3
Page 46
2 Image Capture, Processing, and Measurement Functions
46 Keysight U5850 Series User’s Guide
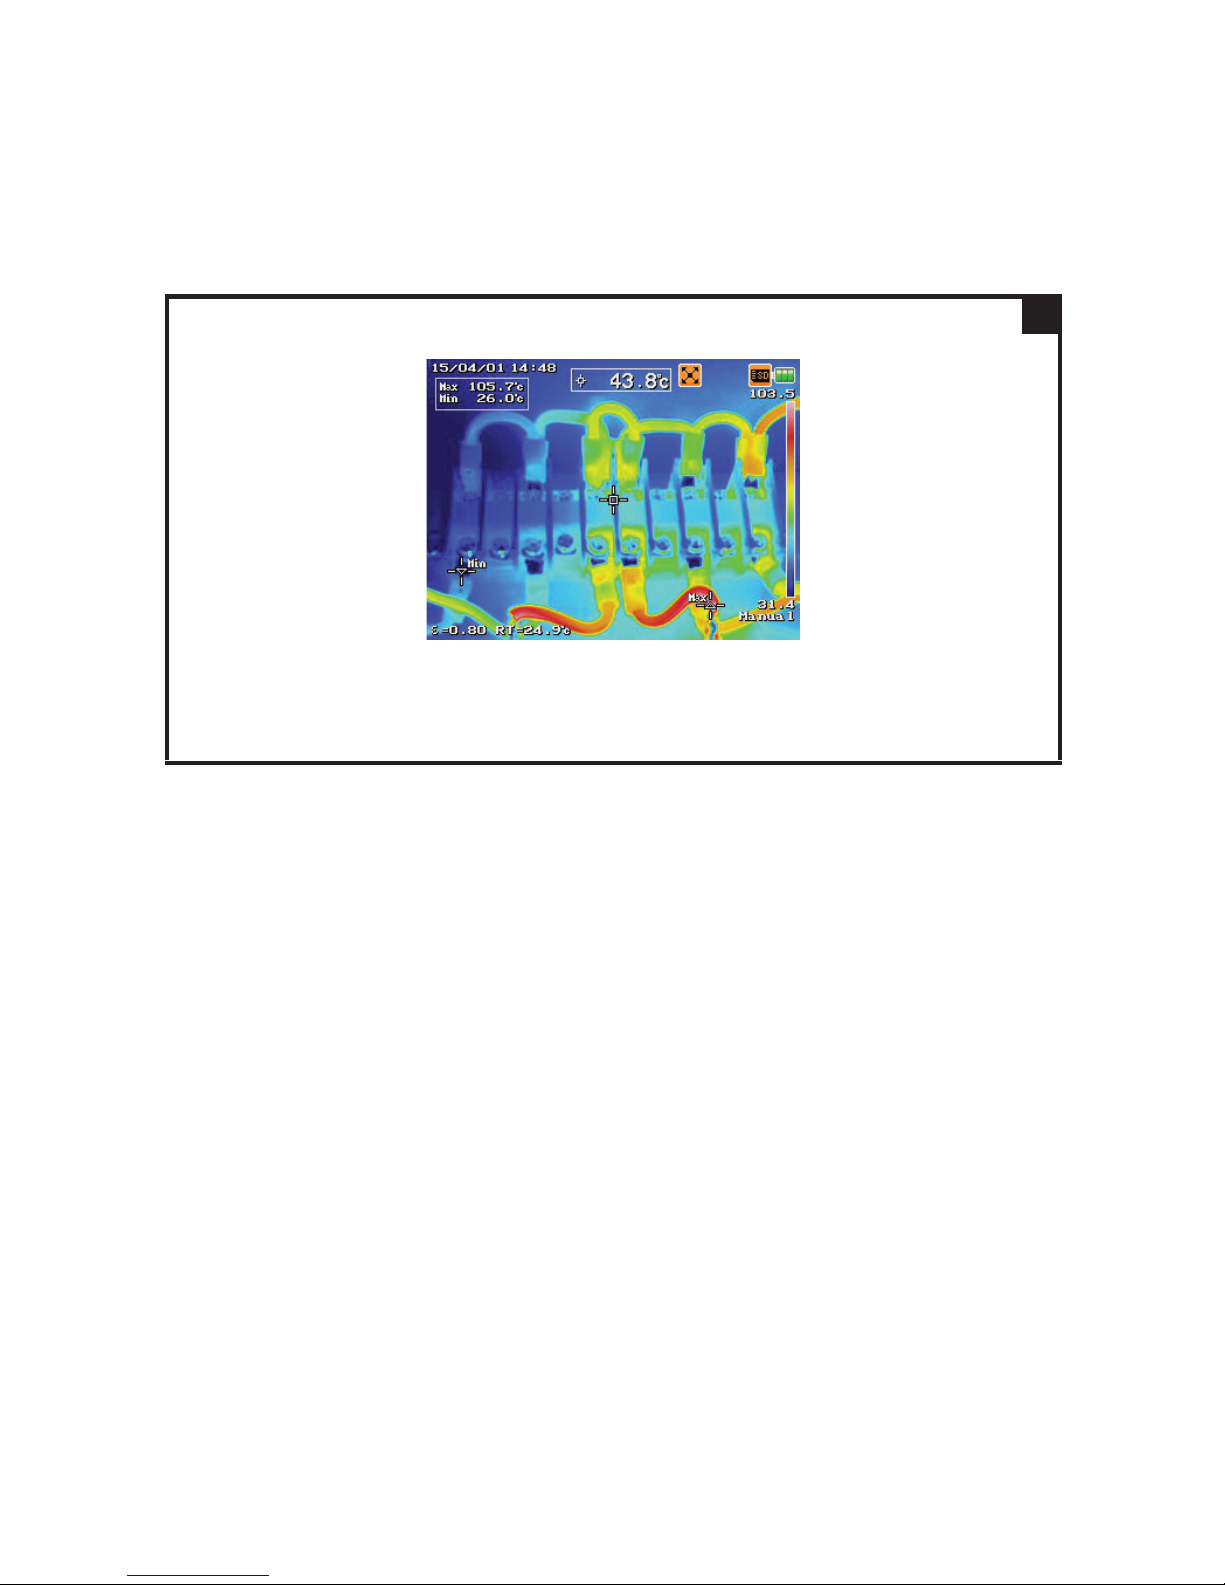
Once the image has been saved, it will return to the run mode.
– If the auto save visible image setting is enabled, both the IR and visible images will be saved.
– If the auto save visible image setting is disabled, only the IR image will be saved.
Refer to “Turn on/off visible image auto-save” on page 111 for more details.
4
Page 47
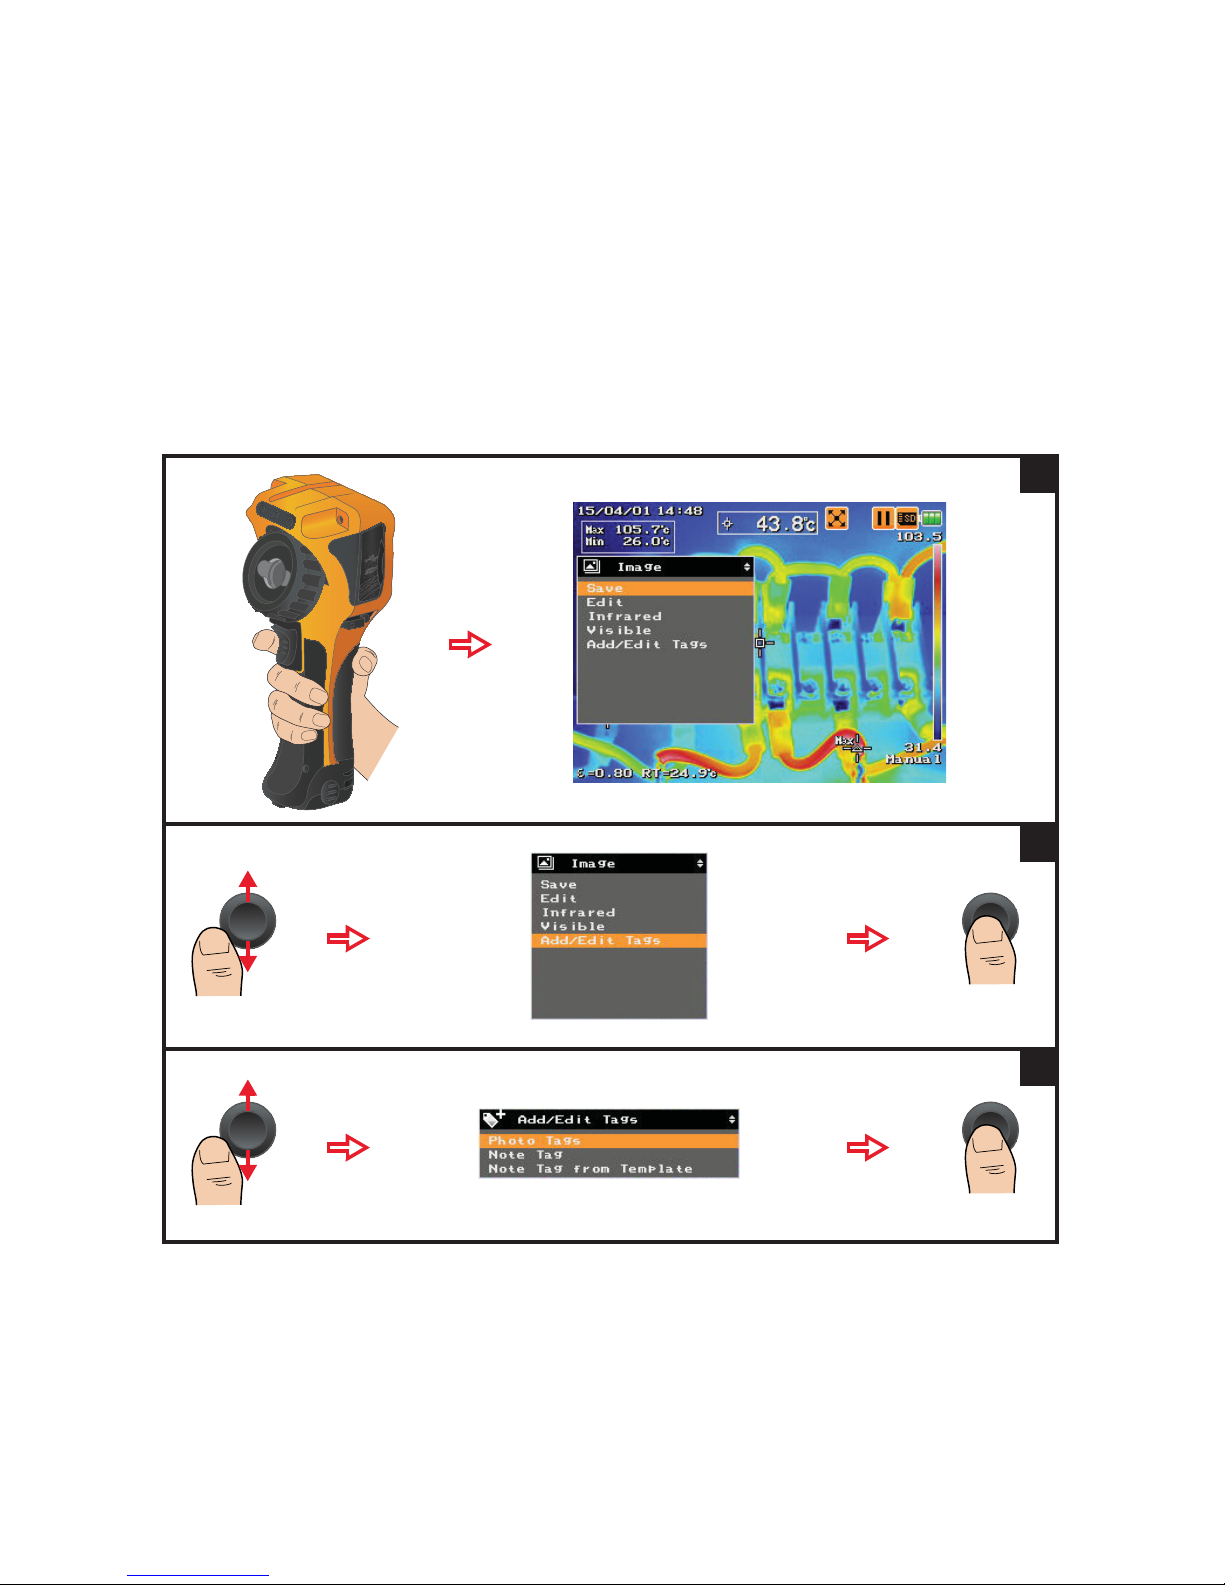
Image Capture, Processing, and Measurement Functions 2
Keysight U5850 Series User’s Guide 47
Add tags
You can include photo tags (up to three visible images) and note tag that
correspond to your IR image analysis.
Add photo tags
The Image menu is displayed:
1
2
3
Page 48
2 Image Capture, Processing, and Measurement Functions
48 Keysight U5850 Series User’s Guide
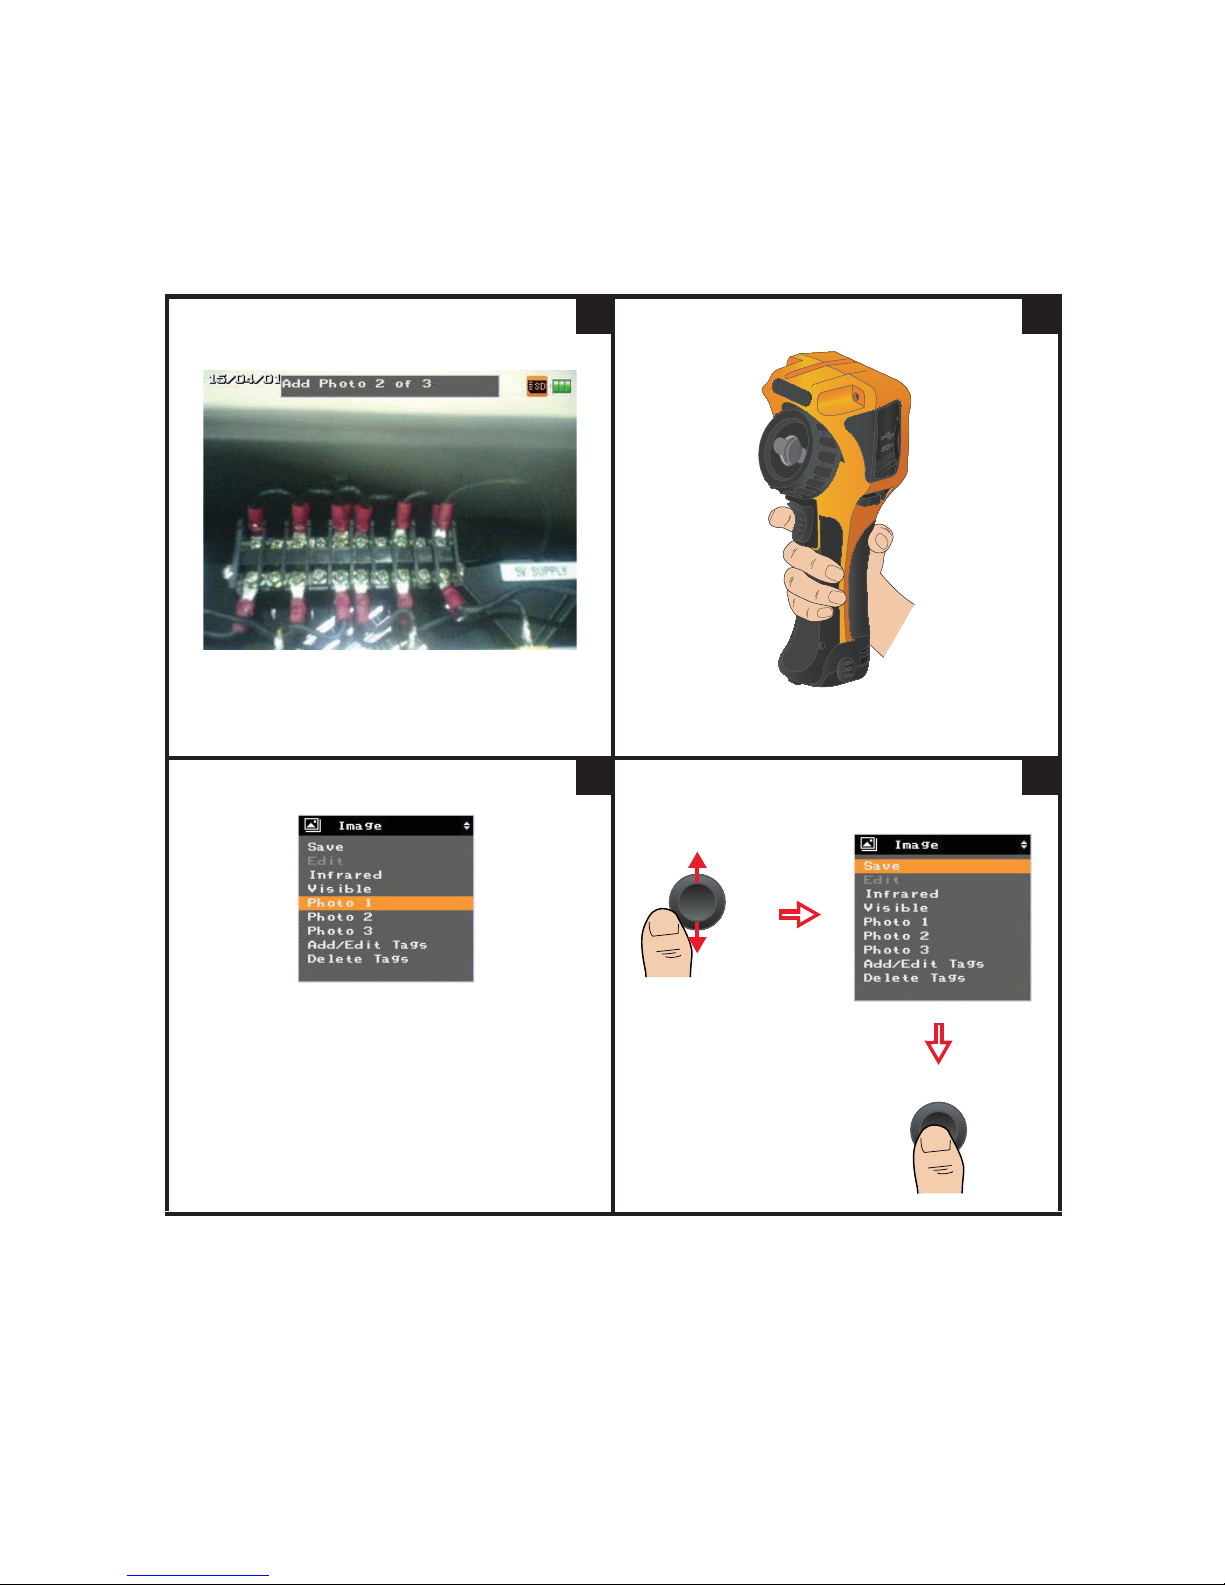
Visible image is displayed:
4
To capture the photo tag:
Repeat the same to add more photo tags
(up to three).
5
Photo tag indicators will be added:
6
Save the photo tags with the IR and visible
images, and return to the run mode:
7
Page 49
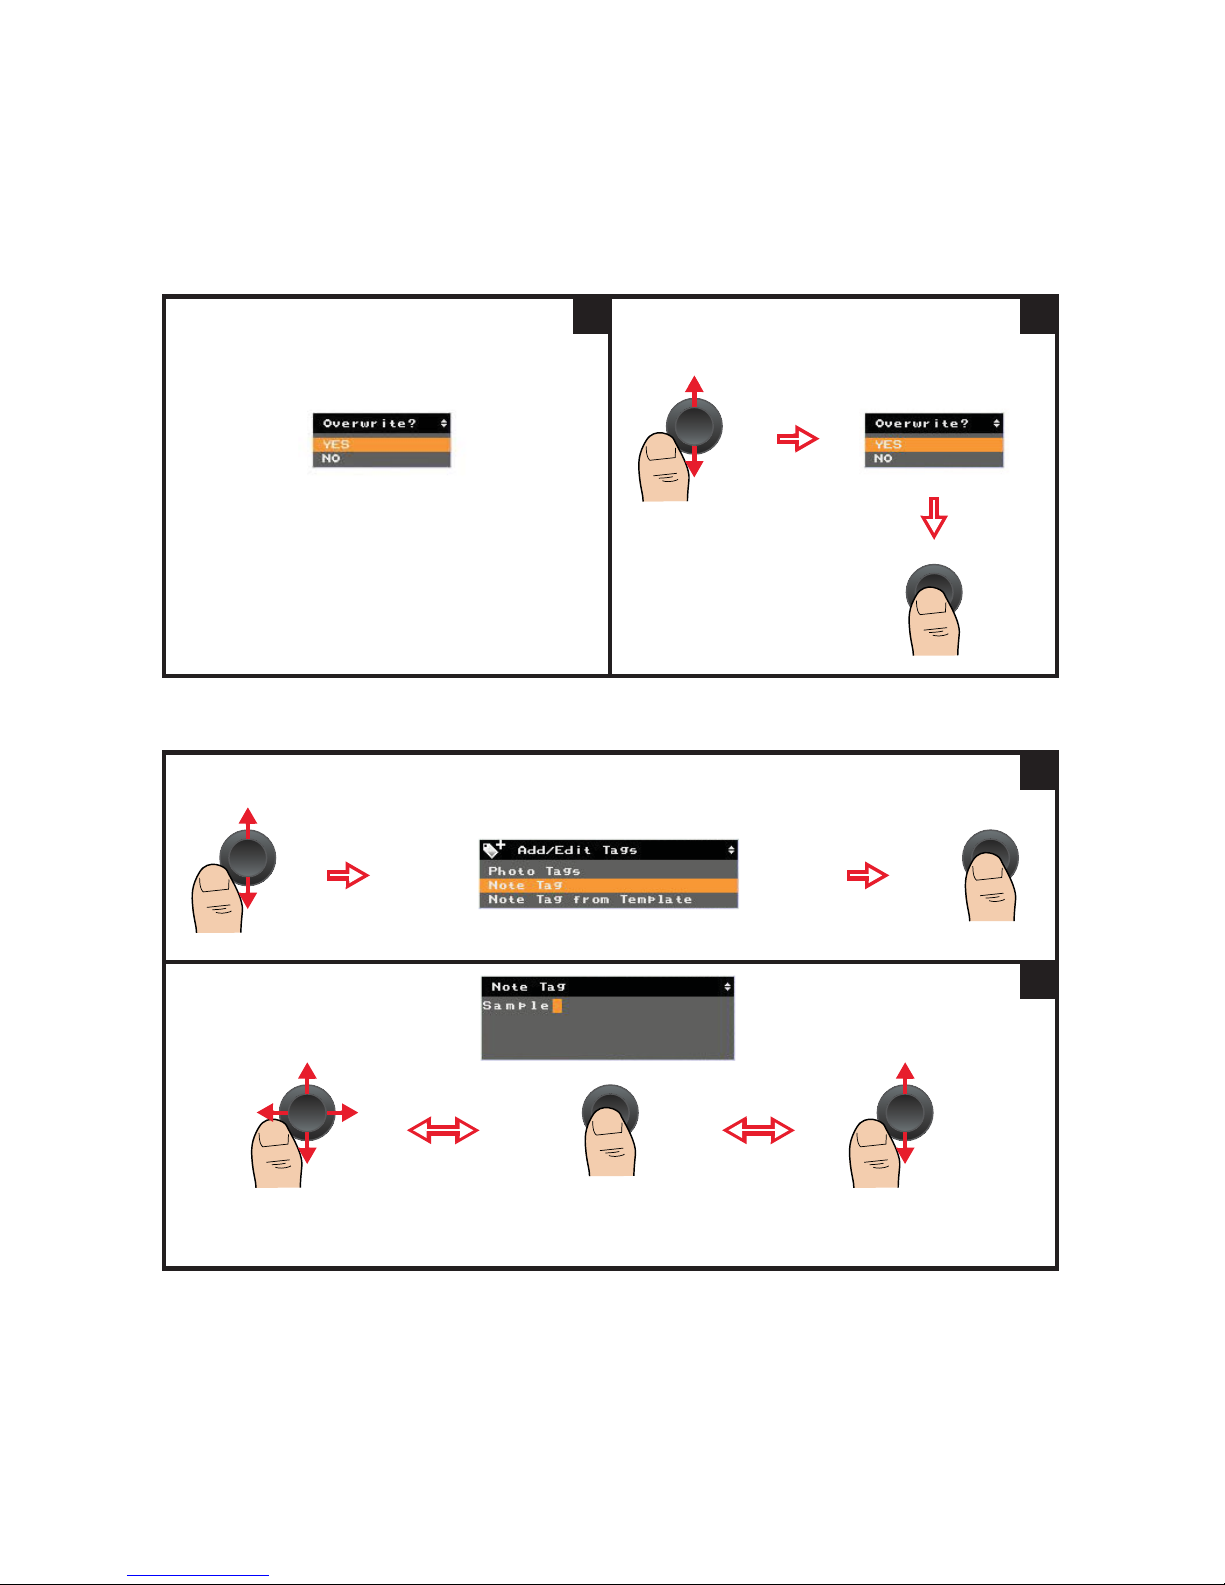
Image Capture, Processing, and Measurement Functions 2
Keysight U5850 Series User’s Guide 49
Add a note tag
If there is already an existing photo tag and you
want to add a new tag, a message prompts you
to overwrite the existing tag:
8
Select YES to proceed with adding tags or
NO to return to the previous screen:
9
Repeat steps 1 to 2 from “Add photo tags” on page 47.
1
Move the character cursor Confirm the cursor position Select and enter the character
If there is no character input, a blank character is inserted.
2
Page 50
2 Image Capture, Processing, and Measurement Functions
50 Keysight U5850 Series User’s Guide
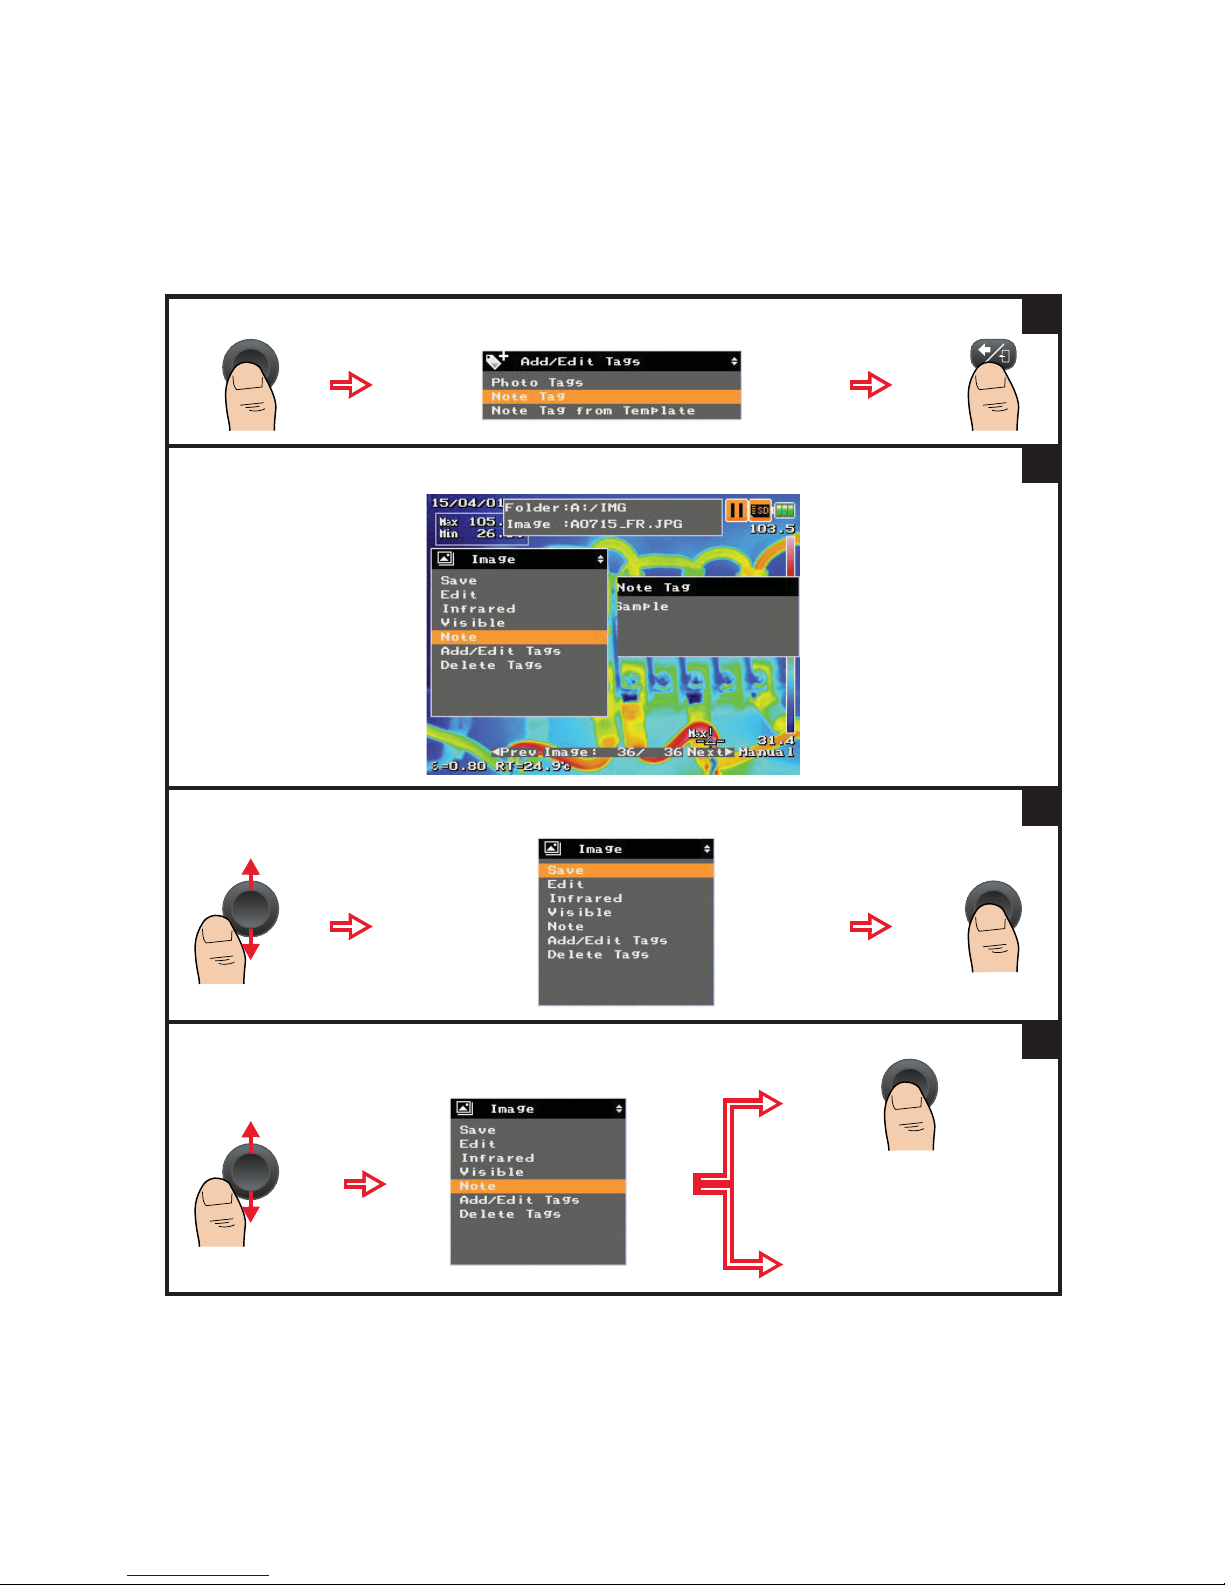
Press for 1 second.
3
Note tag indicator will be added:
4
Save the note tag with the IR and visible images, and return to the run mode:
5
To preview the note tag:
OR:
Wait for 500 ms
6
Page 51
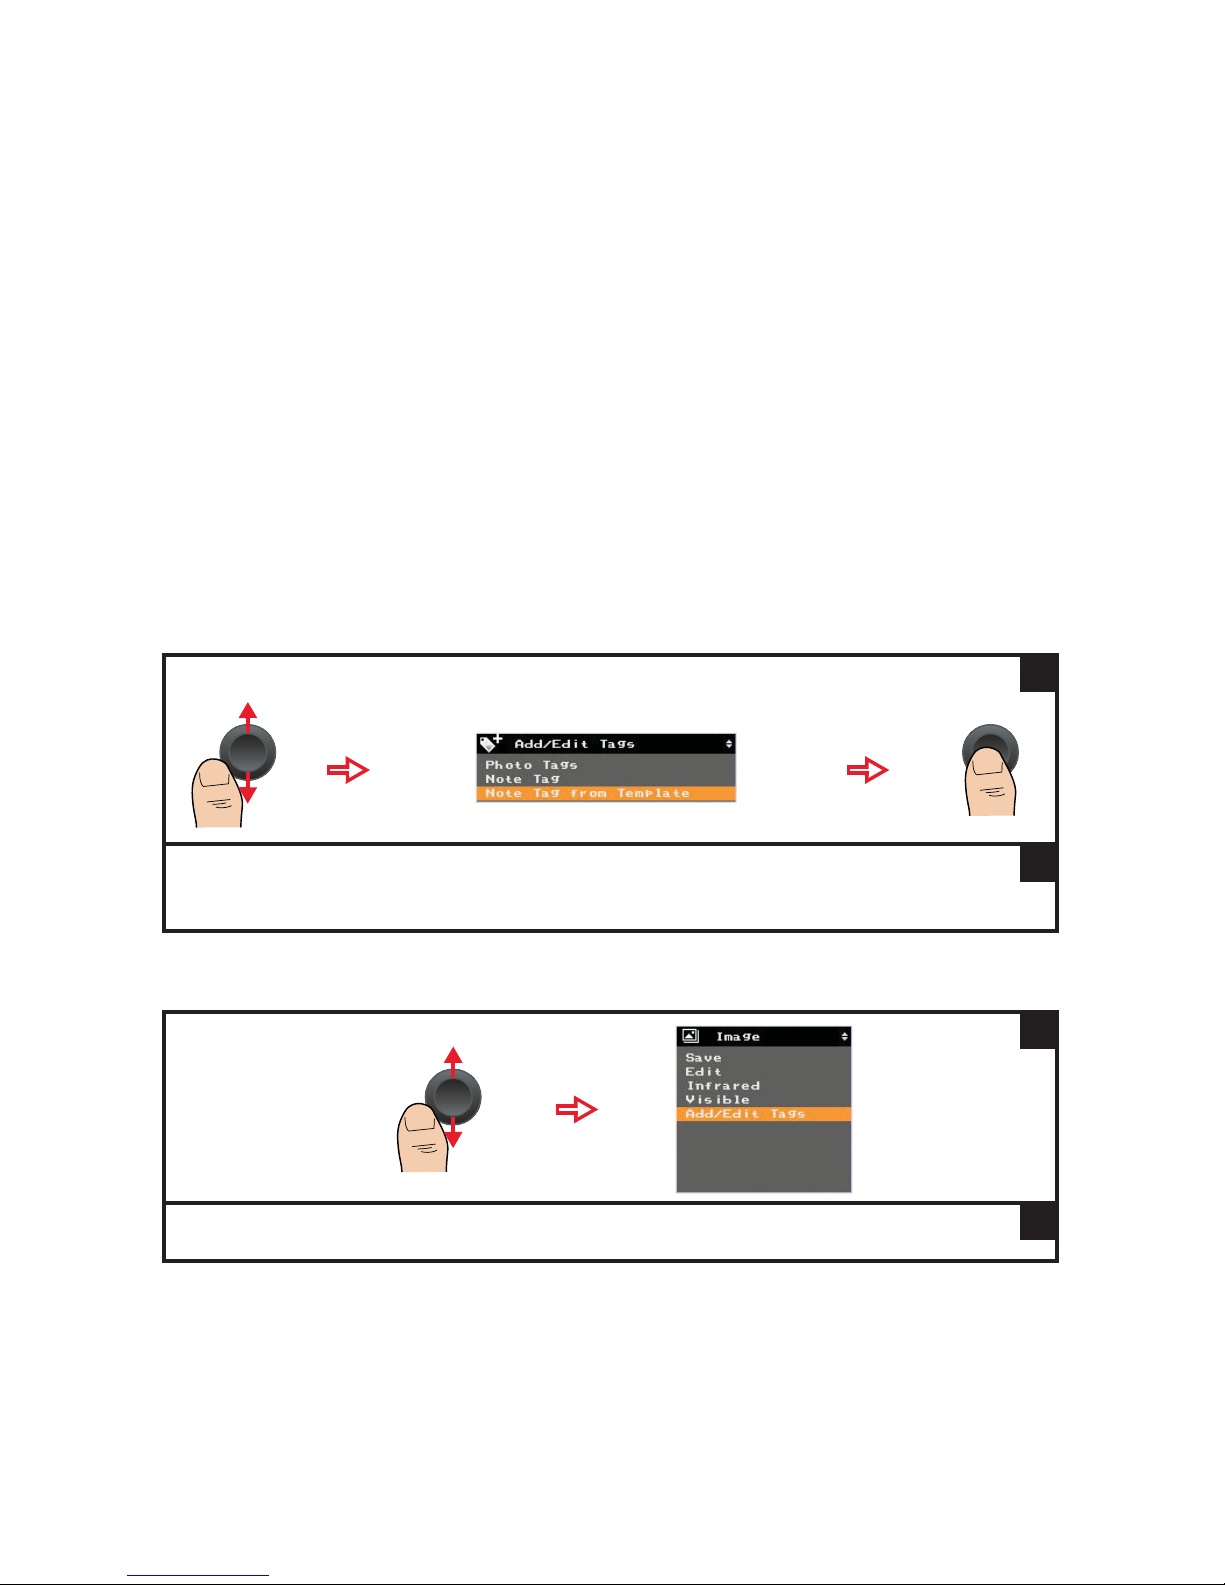
Image Capture, Processing, and Measurement Functions 2
Keysight U5850 Series User’s Guide 51
Add a note tag from a template file
You can download the note tag template file from the Keysight website to the SD
memory card.
To ensure proper use of this template file, use the following guidelines:
– File name and extension: NOTE_TMP.TXT
– File format: Text file/Notepad
– File location: Root of the SD memory card
– Character code: ASCII (20h to 7Fh)
– Maximum line: 50 lines
– Maximum characters per line: 64 characters
Edit tags
Follow steps 1 to 2 from “Add photo tags” on page 47.
1
The note tag template file that you downloaded will be displayed. Select a template and follow the
same procedure from “Add a note tag” on page 49.
2
1
Follow the same procedure as adding tags. Existing tags will be overwritten by the edited tags.
2
Page 52
2 Image Capture, Processing, and Measurement Functions
52 Keysight U5850 Series User’s Guide
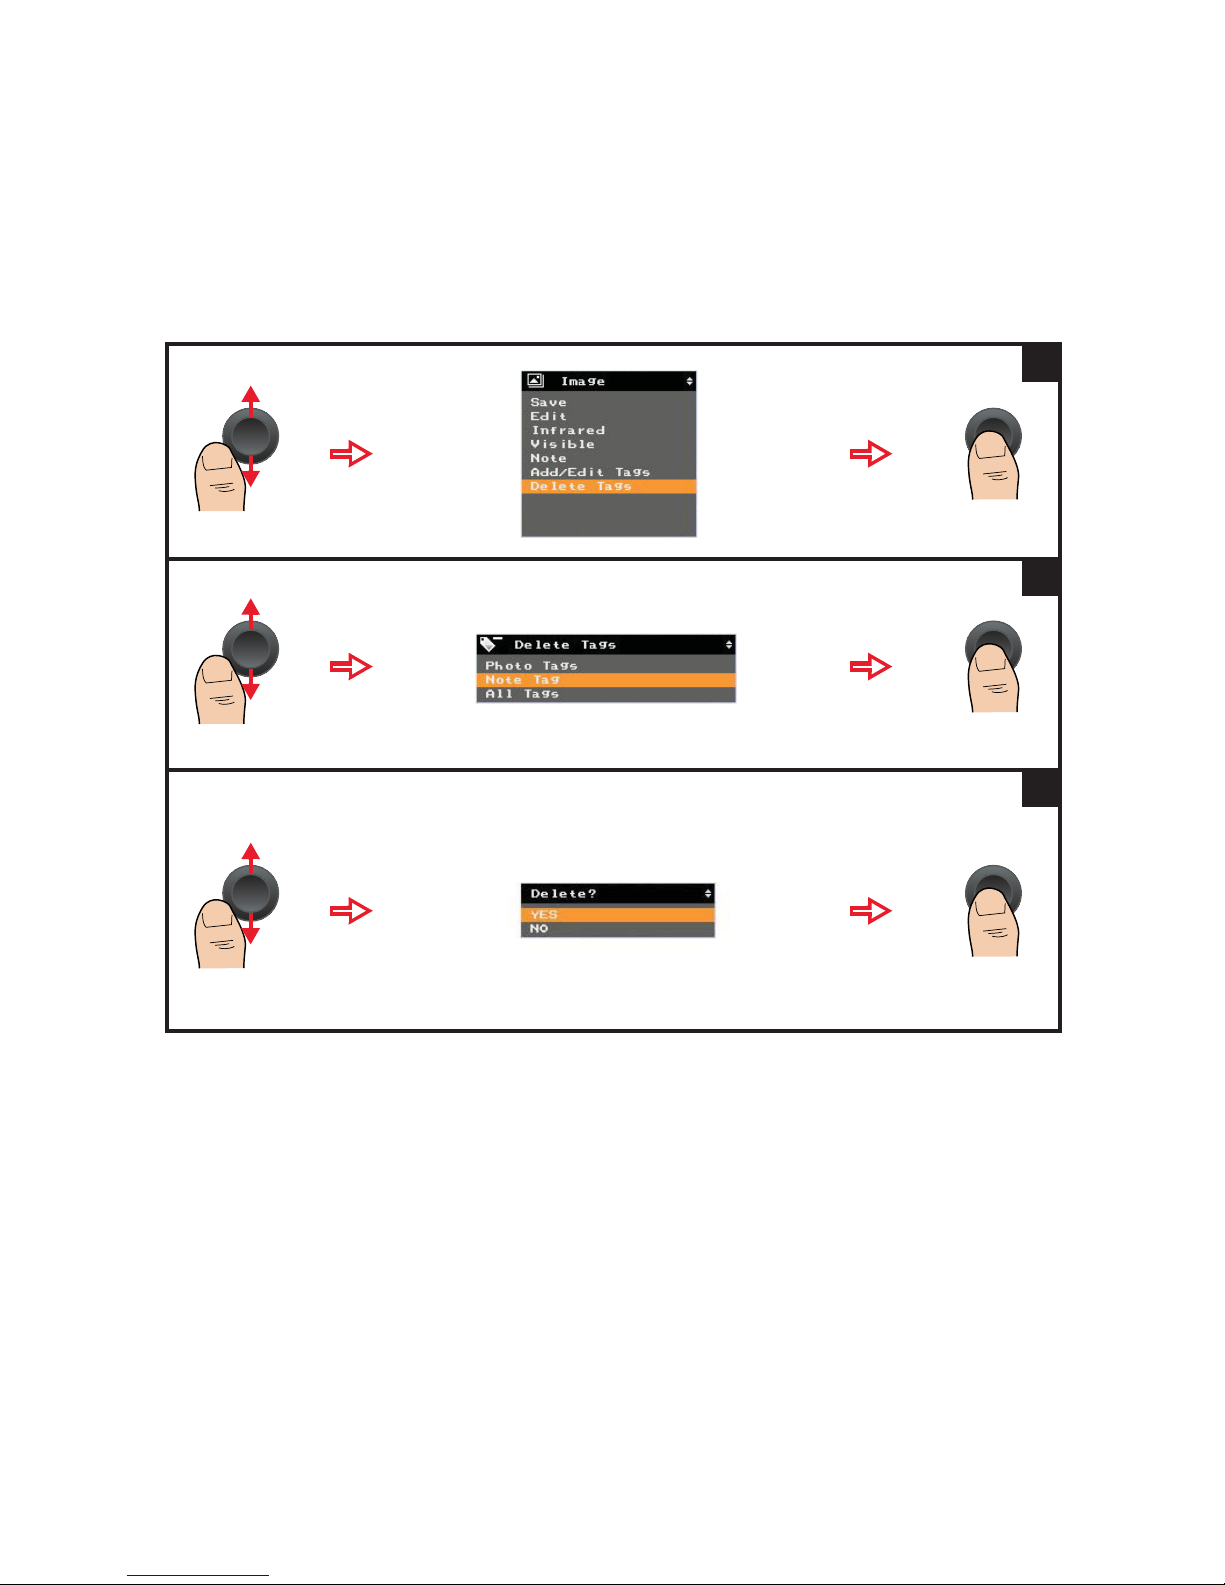
Delete tags
1
2
Select YES to delete all photo tags, note tag, or all photo and note tags.
Select NO to return to the previous screen.
When a tag is deleted, the respective tag indicator will be removed from the Image menu.
3
Page 53
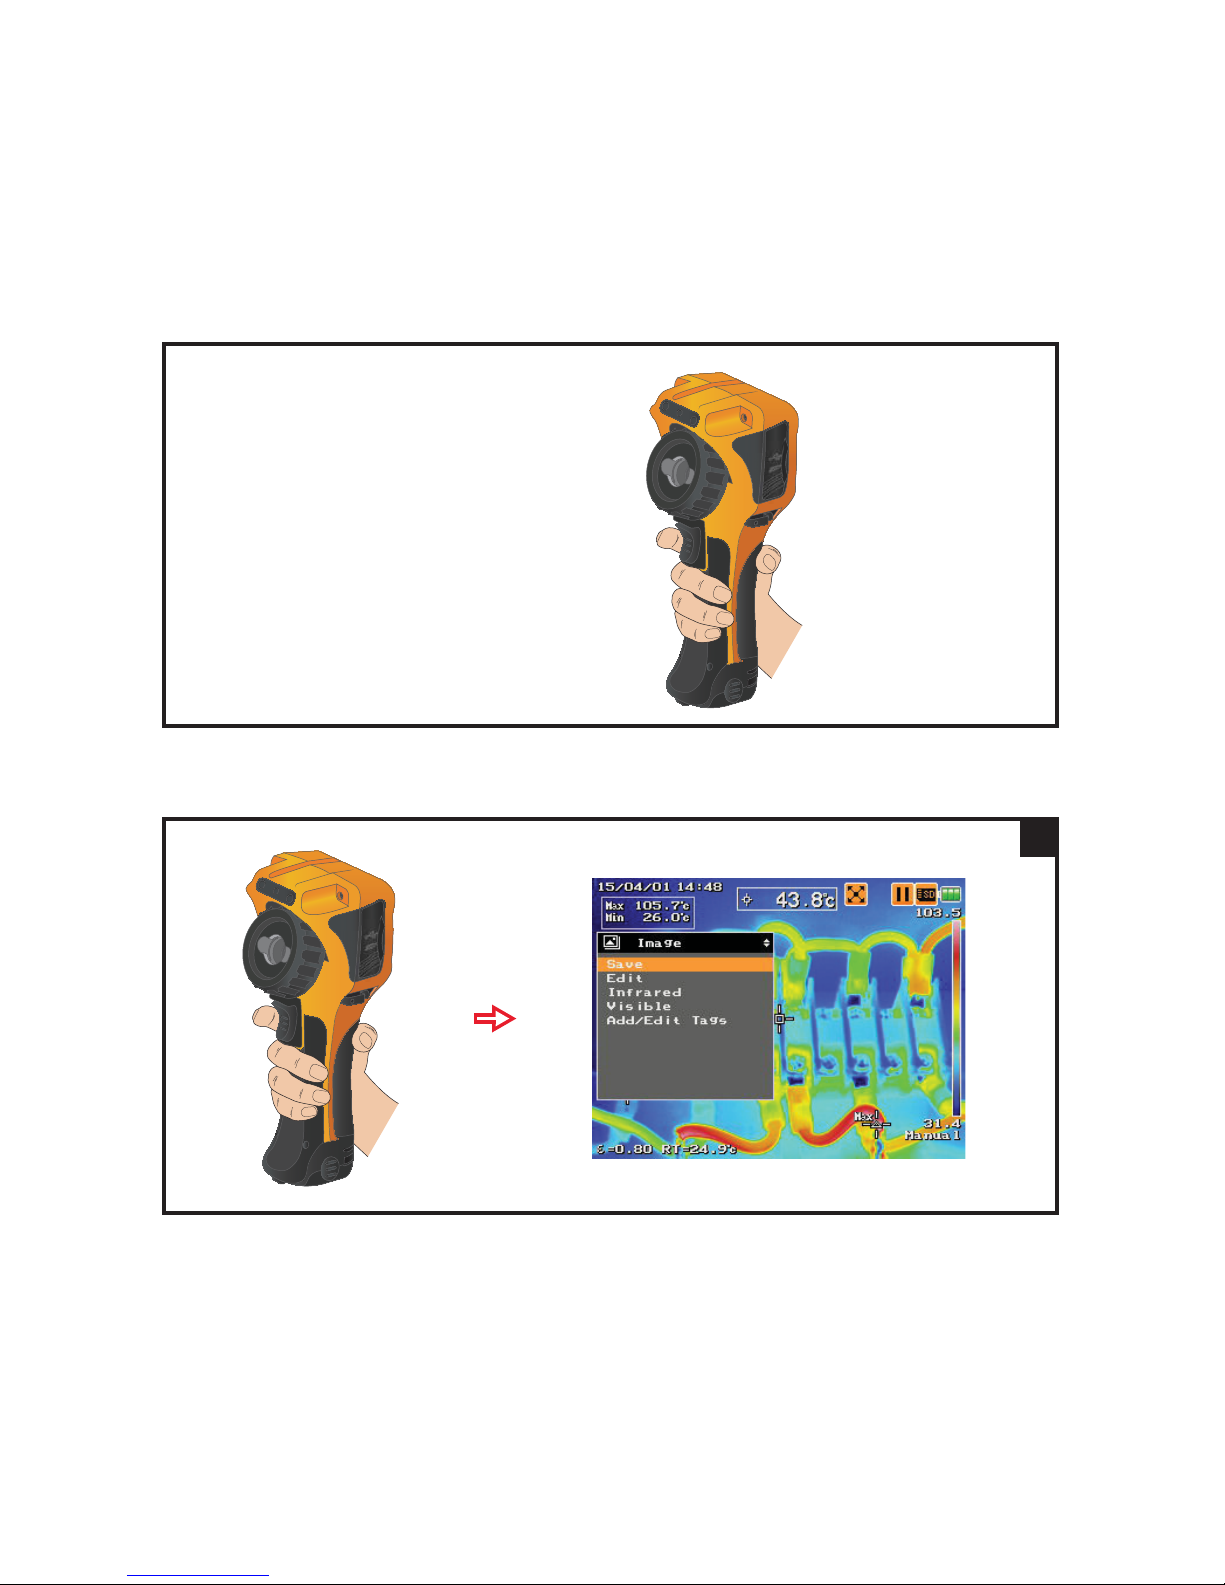
Image Capture, Processing, and Measurement Functions 2
Keysight U5850 Series User’s Guide 53
Save an image directly
Edit an image
Press for 1 second to save.
The Image menu is displayed:
1
Page 54
2 Image Capture, Processing, and Measurement Functions
54 Keysight U5850 Series User’s Guide
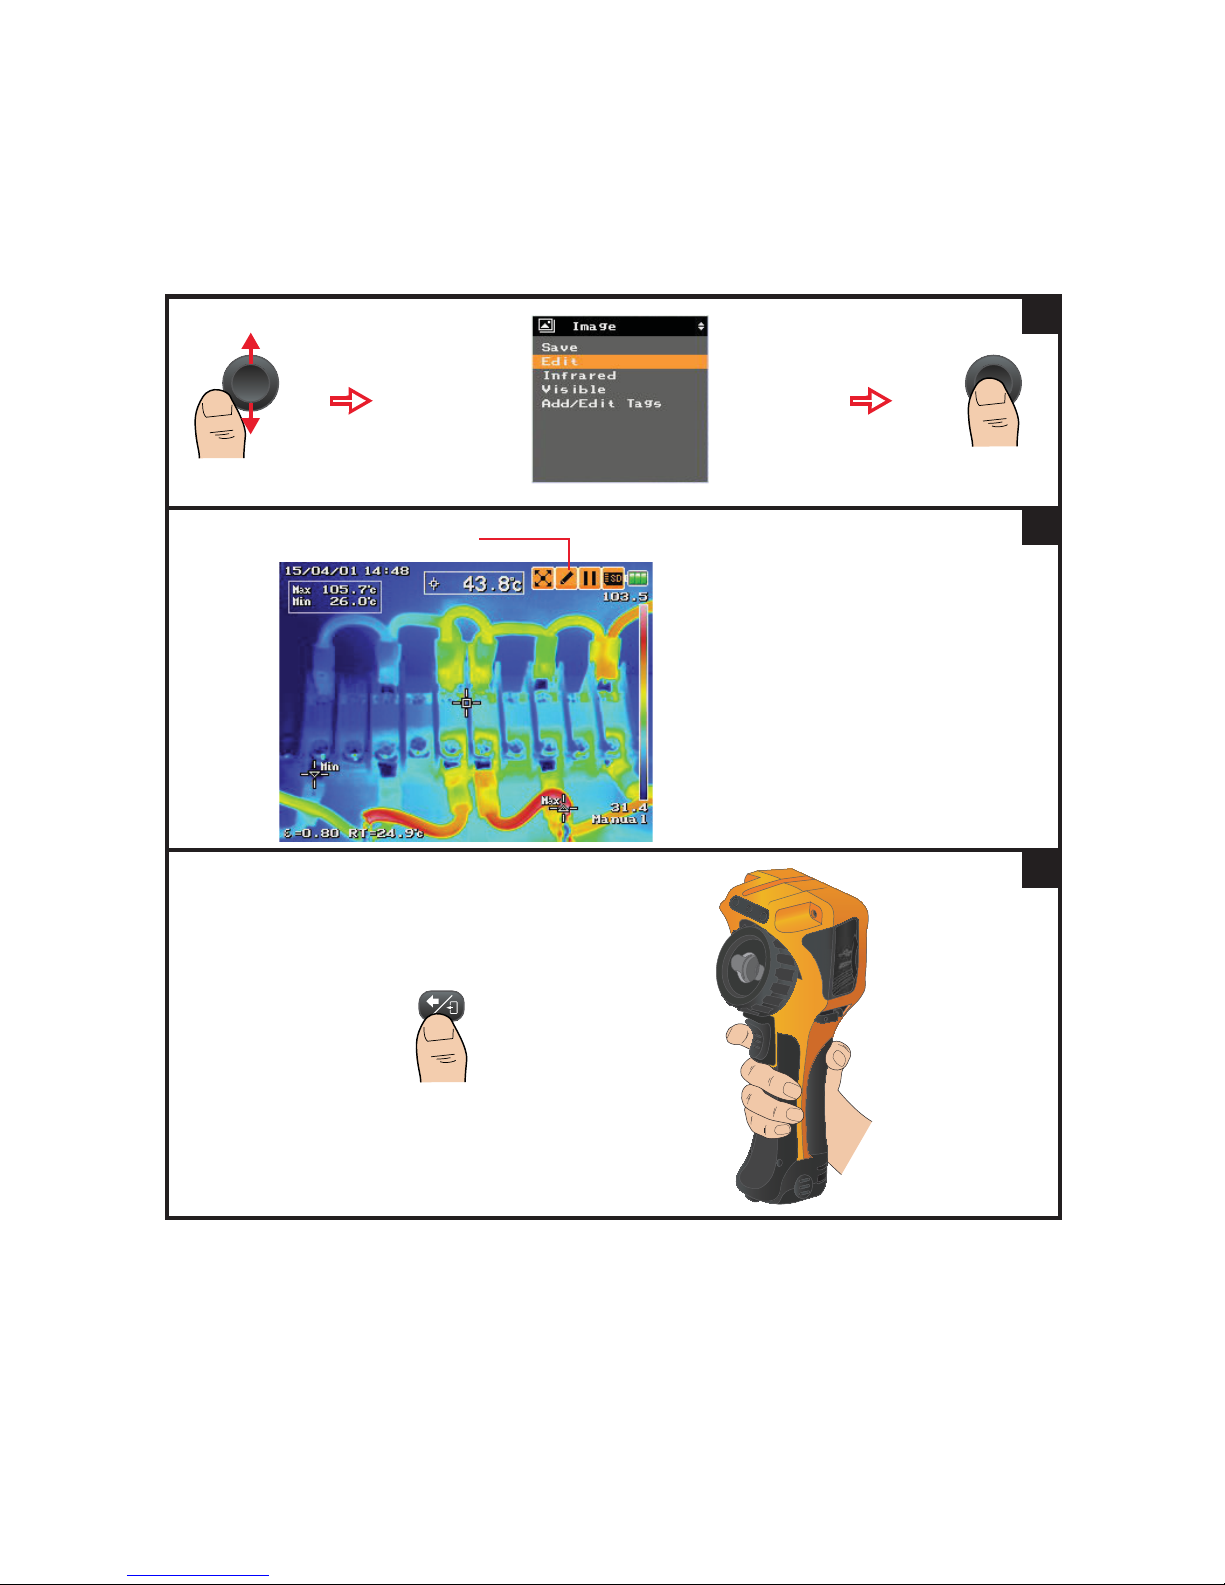
2
You can then proceed to edit the image or
access the Main Menu for more operations.
Edit mode ind icator
3
To exit the Edit mode:
OR
4
Page 55
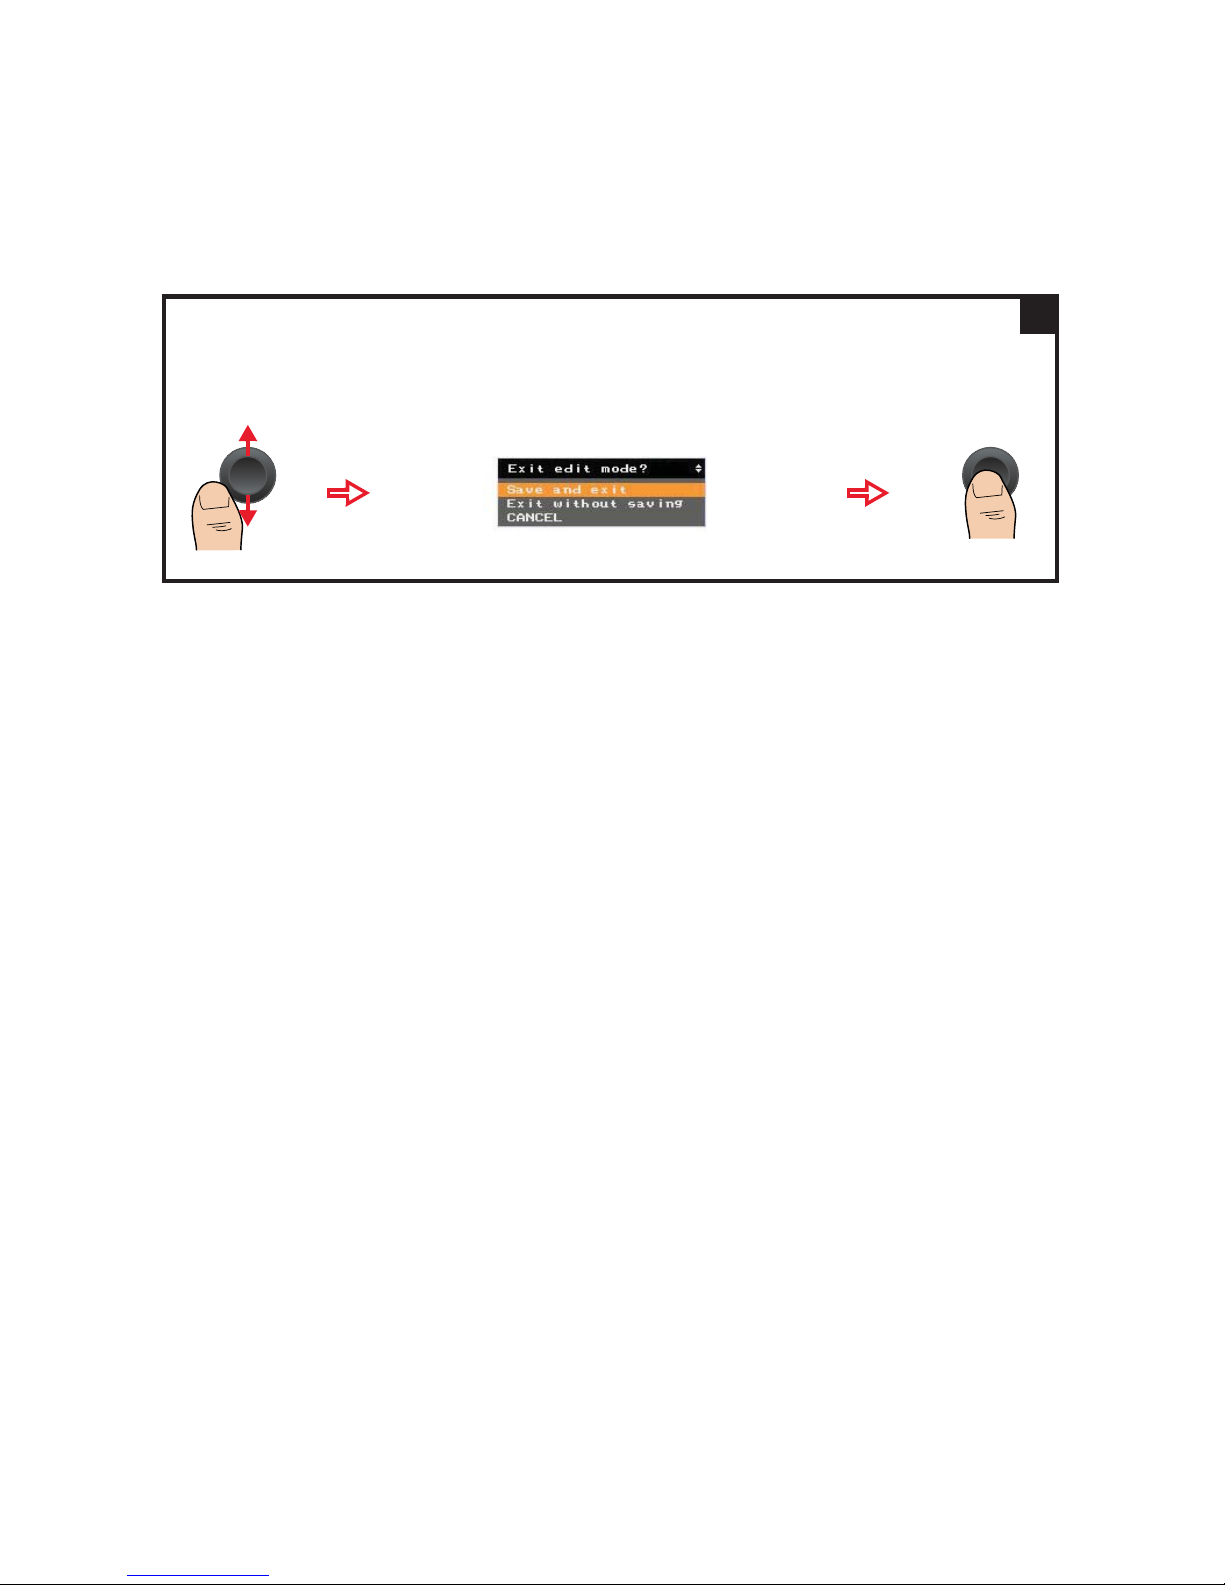
Image Capture, Processing, and Measurement Functions 2
Keysight U5850 Series User’s Guide 55
– Select Save and exit to overwrite the existing image and save your new edits, and then exit the
Edit mode.
– Select Exit without saving to exit the Edit mode without saving your edits.
– Select CANCEL to return to the current operation.
5
Page 56
2 Image Capture, Processing, and Measurement Functions
56 Keysight U5850 Series User’s Guide
Image Playback
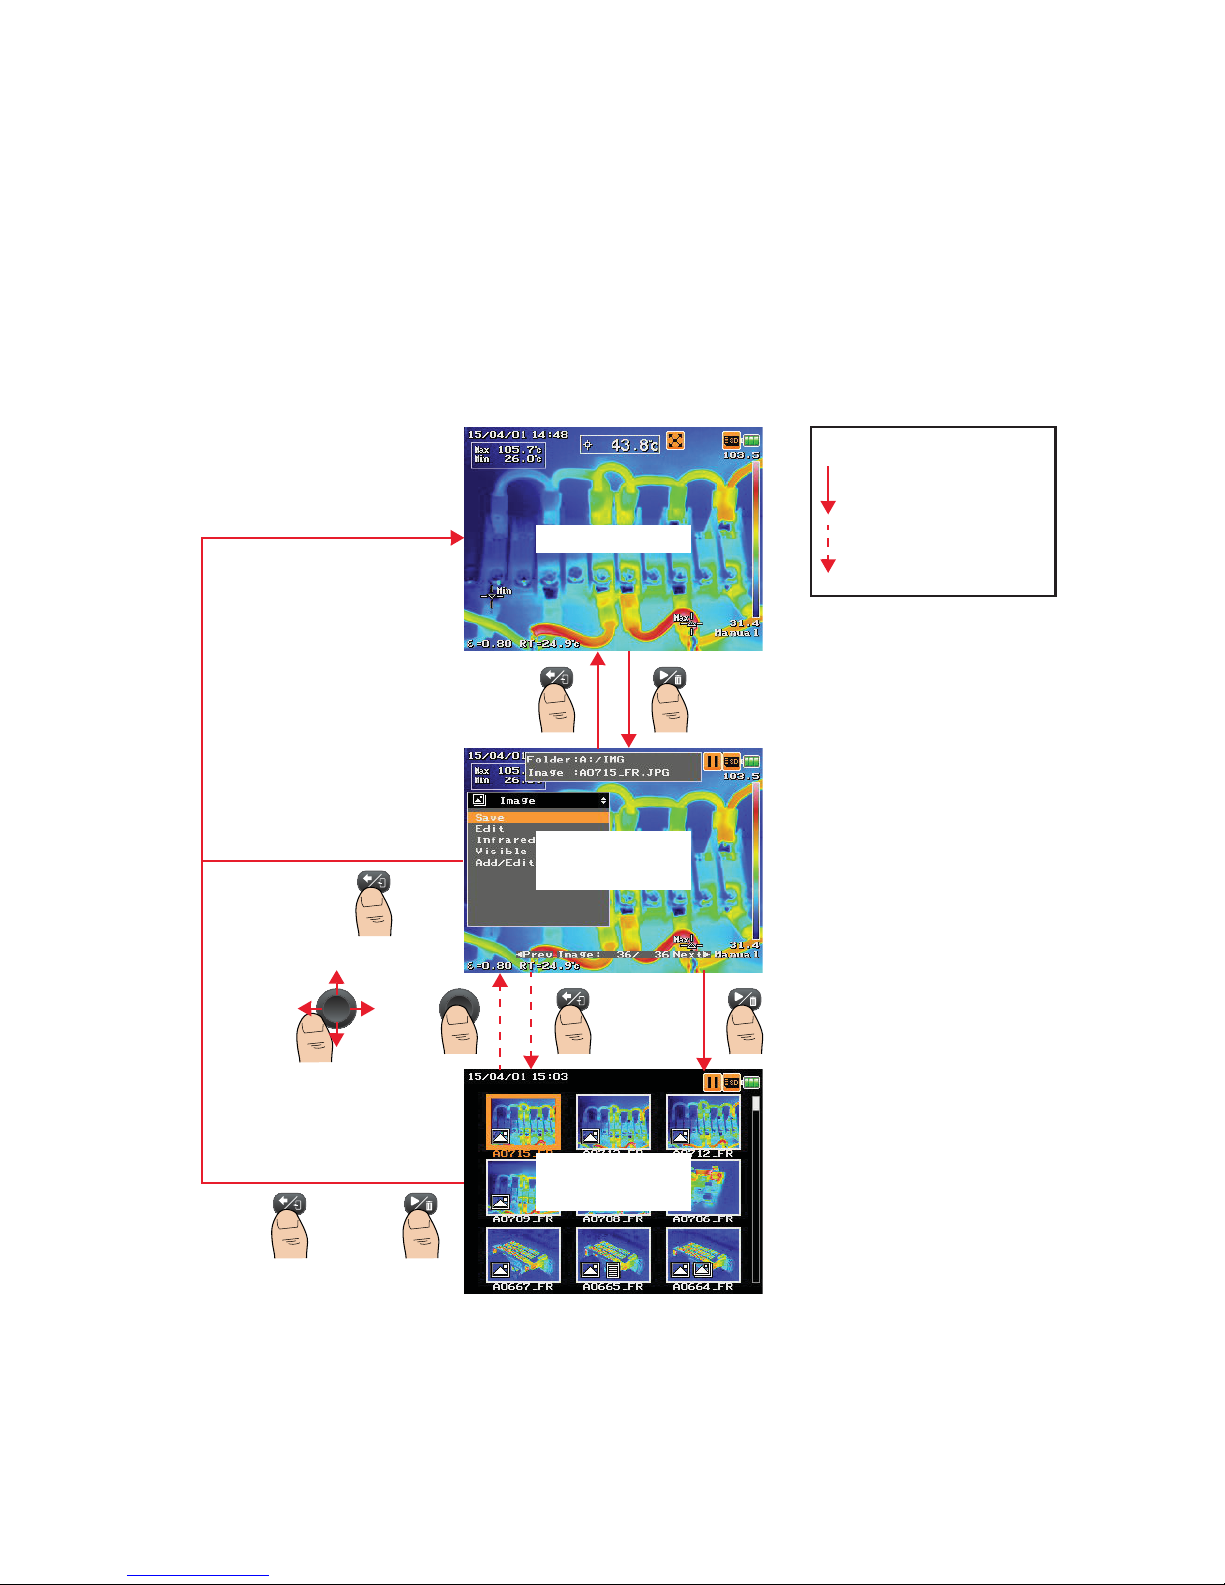
This feature allows you to play back saved images.
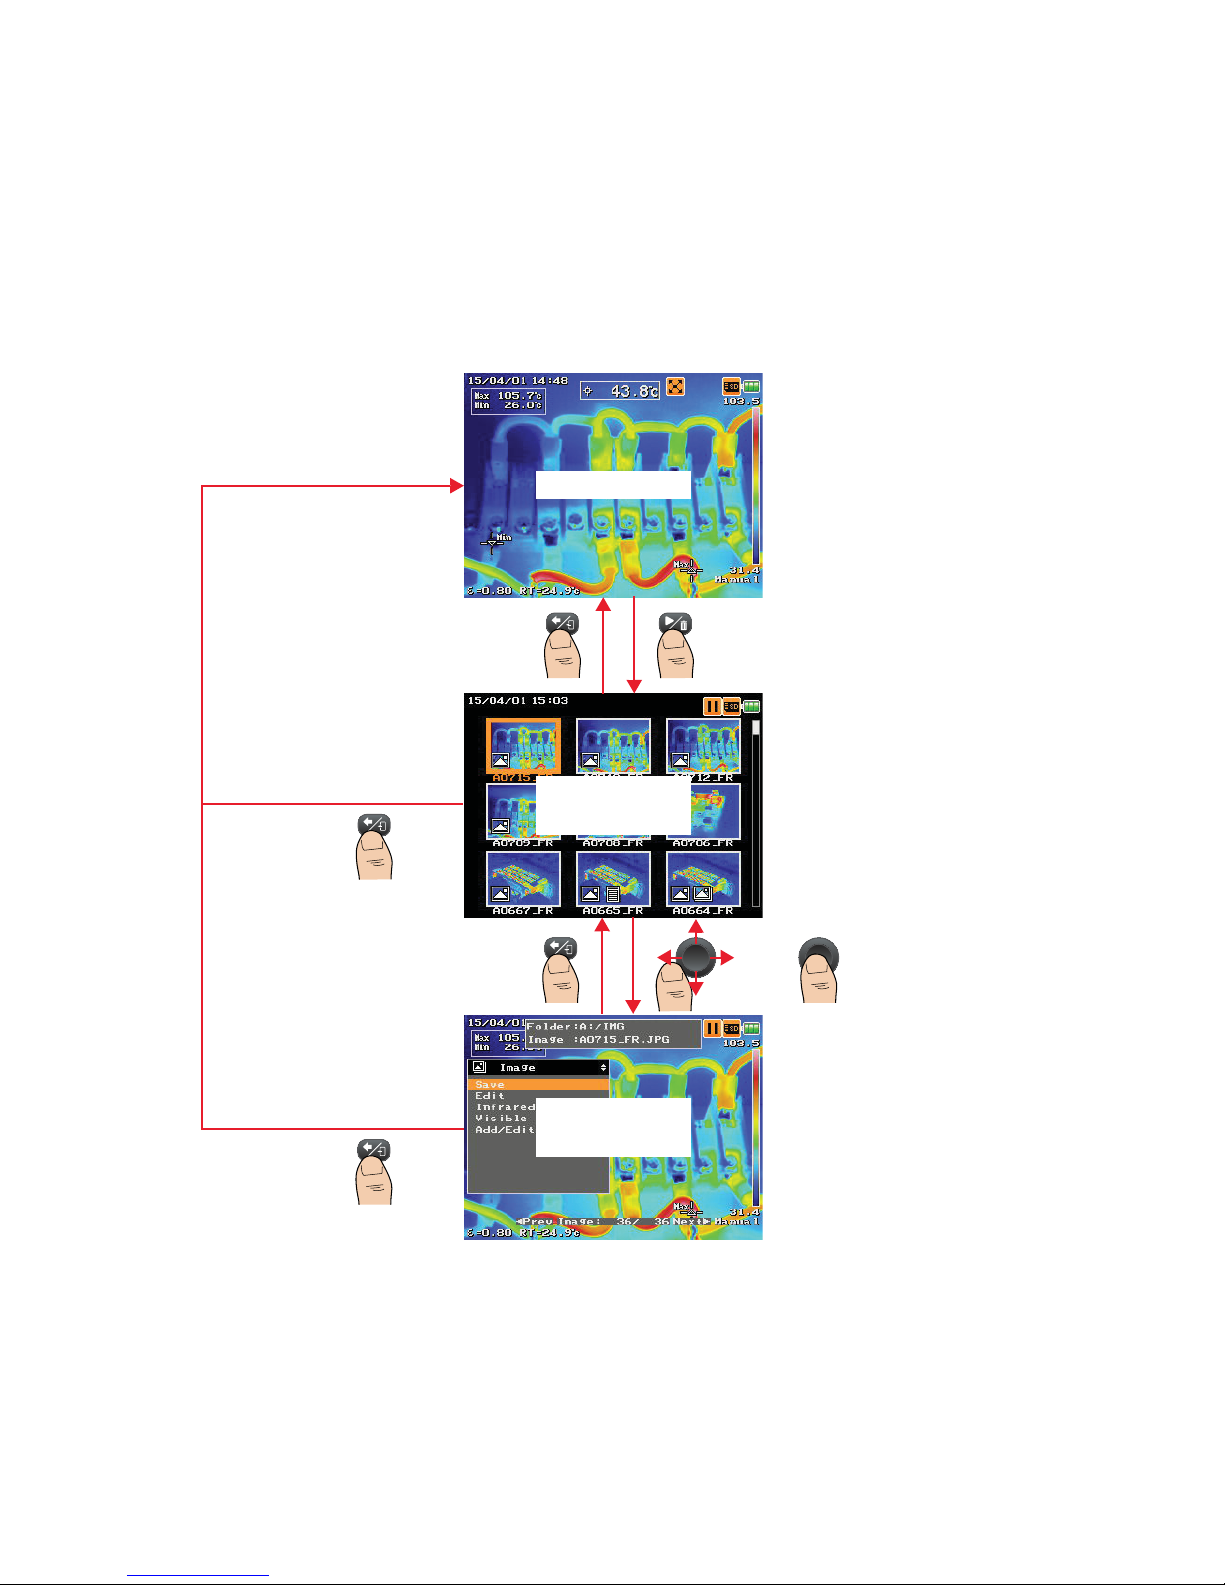
Full screen/Thumbnail playback mode operation
Legend
Full screen to thumbnail
playback operation
Thumbnail/full screen
playback switching
operation
Press for
1 second
Press for
1 second
OR
+
Run mode
Thumbnail
playback mode
Full screen
playback mode
Page 57
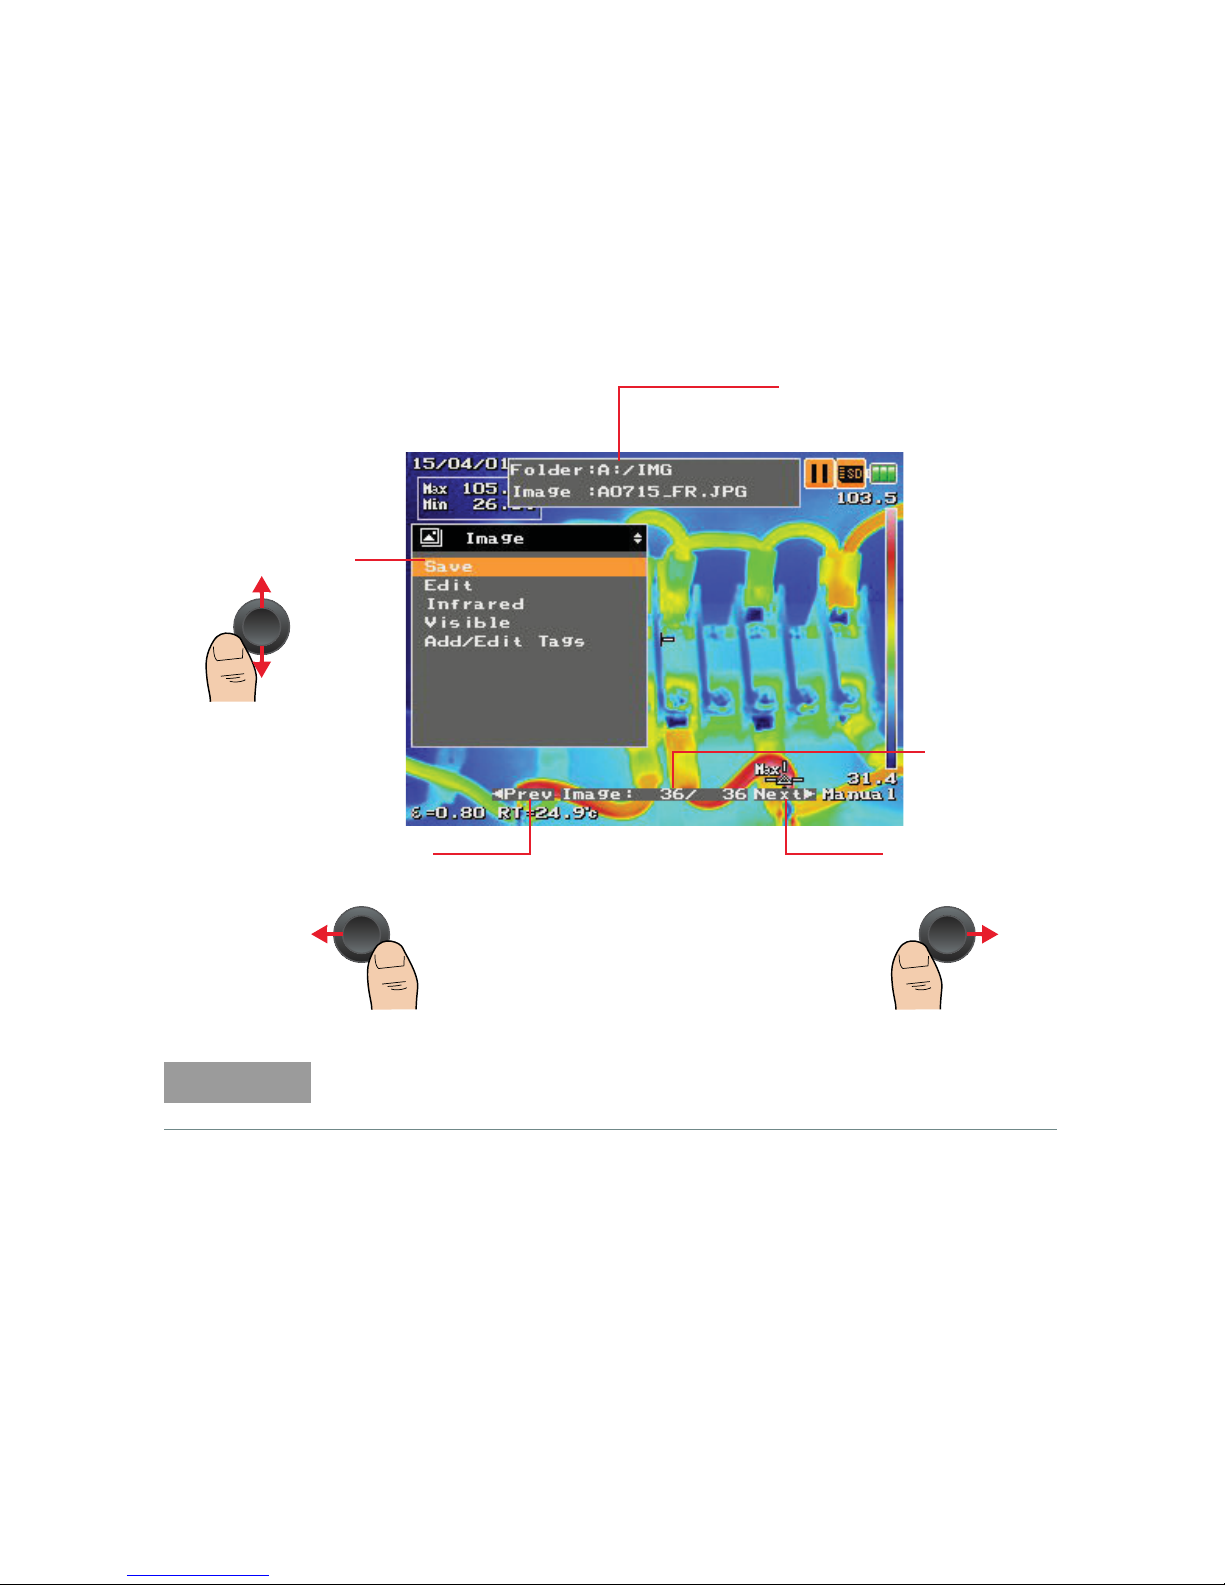
Image Capture, Processing, and Measurement Functions 2
Keysight U5850 Series User’s Guide 57
Full screen playback mode overview
Folder and image file indicators
(Image files are always sorted
with the latest first.)
Image number
To display this menu:
It will be hidden if idle
for 3 seconds.
To display the
previous image:
To display the
next image:
NOTE
In the playback mode, you can perform the same Image menu operations as
described in the previous sections of this chapter.
Page 58
2 Image Capture, Processing, and Measurement Functions
58 Keysight U5850 Series User’s Guide
Thumbnail playback mode operation
Set to the thumbnail mode (refer
to “Configure the main key press
functions” on page 114)
Press for
1 second
Press for
1 second
+
Run mode
Thumbnail
playback mode
Full screen
playback mode
Page 59
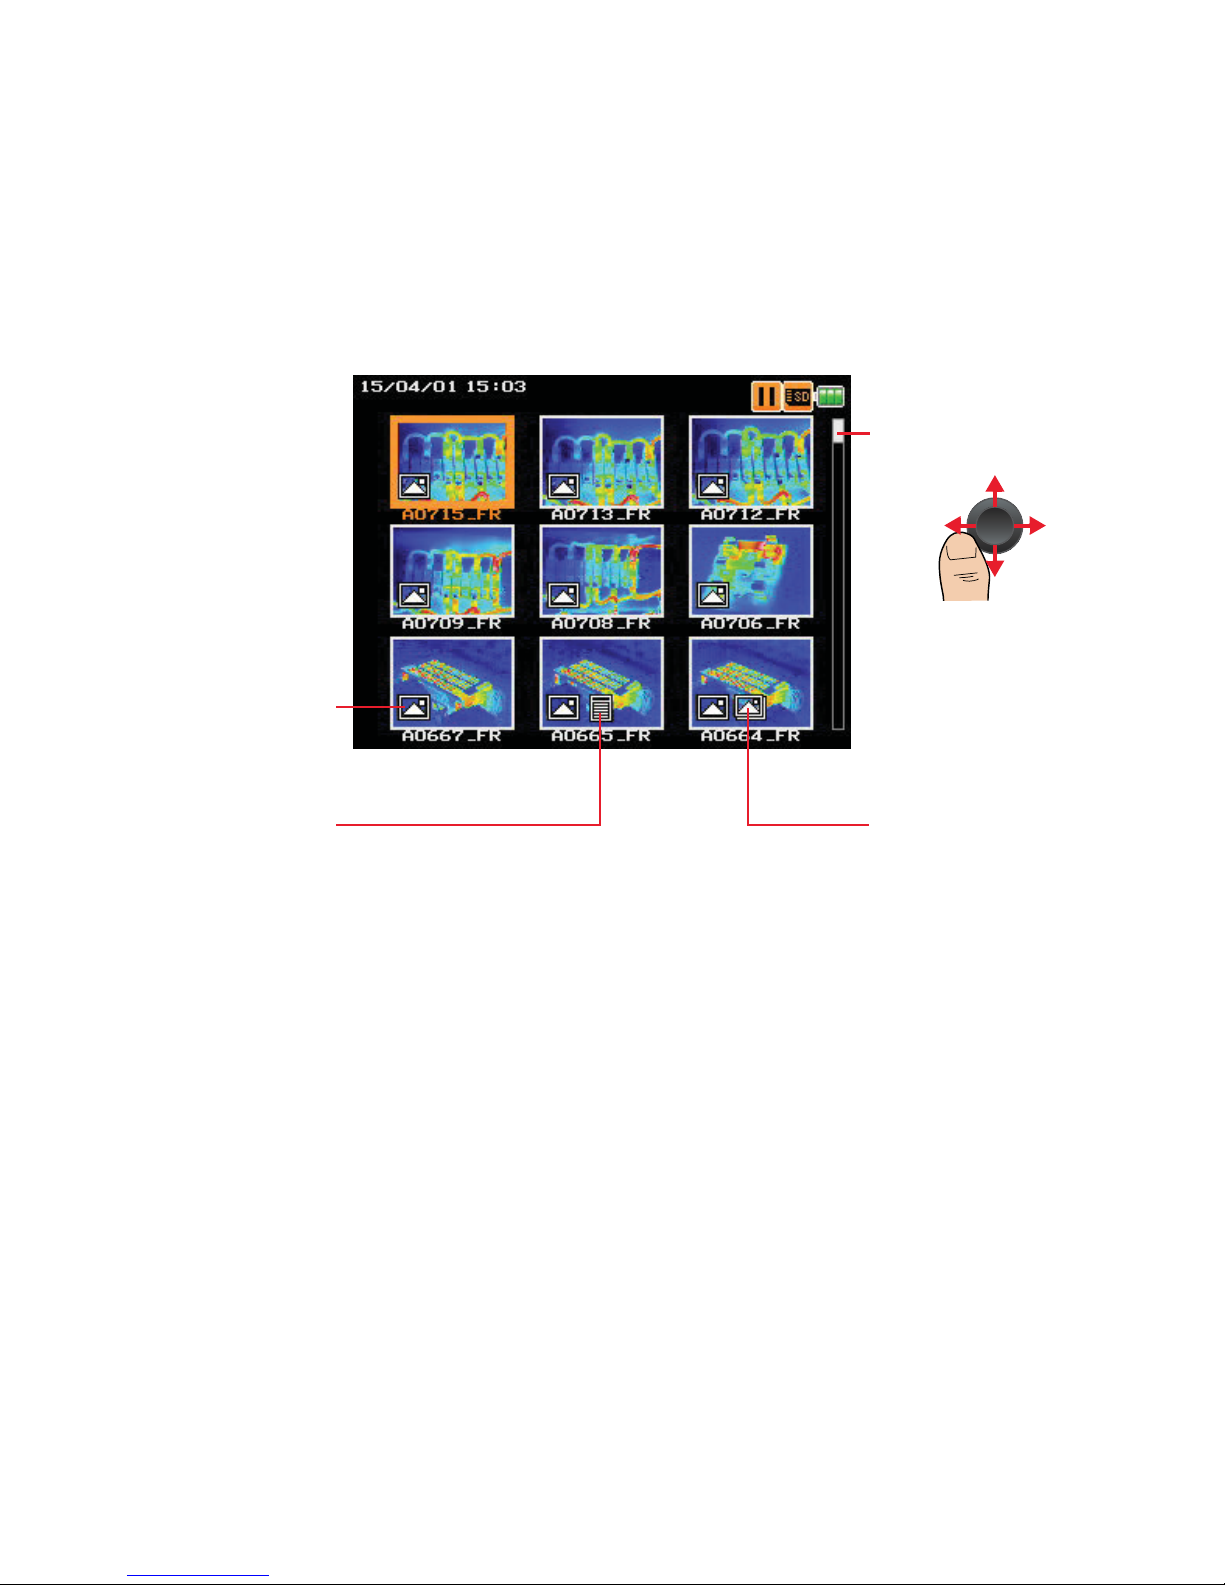
Image Capture, Processing, and Measurement Functions 2
Keysight U5850 Series User’s Guide 59
Thumbnail playback mode overview
Note tag icon
Visible image icon
Photo tag icon
Thumbnail display
scroll bar.
To scroll:
Page 60
2 Image Capture, Processing, and Measurement Functions
60 Keysight U5850 Series User’s Guide
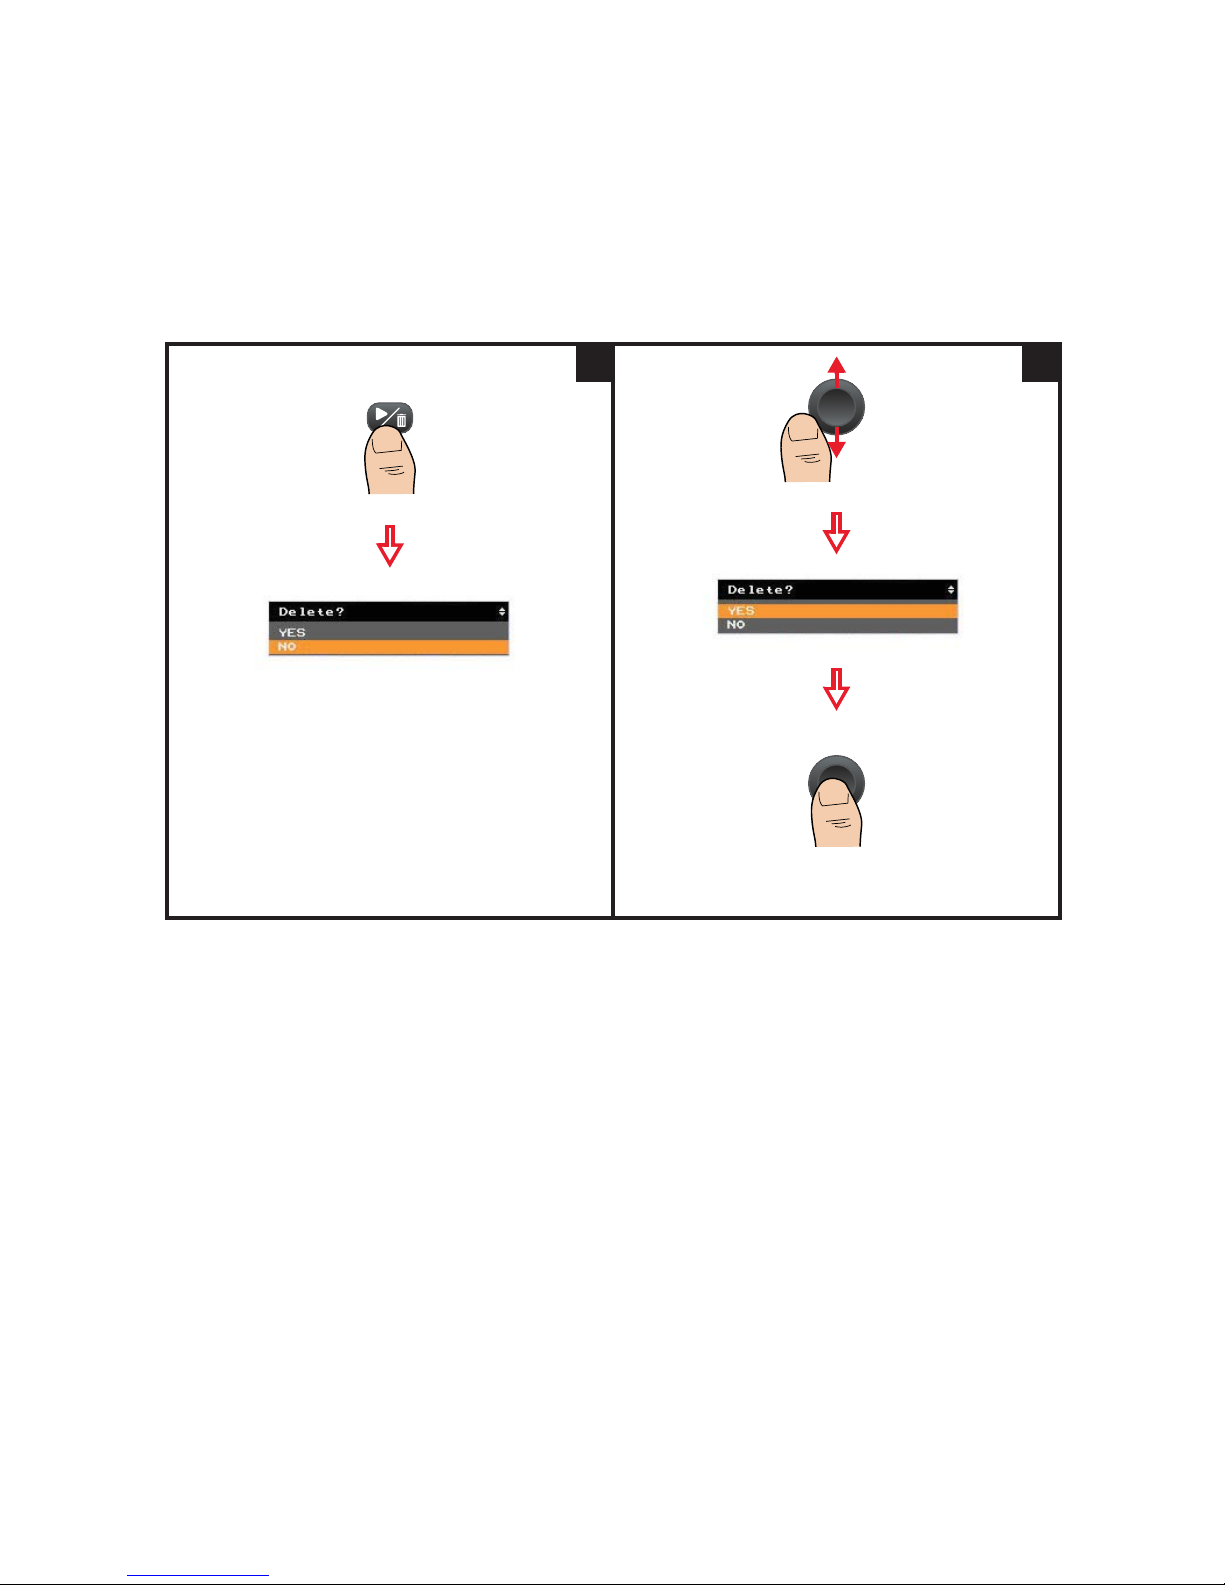
Delete an image (full screen playback mode)
Press for 1 second
3
If an IR image is deleted, its related visible image,
photo tag, and note tag are also deleted.
4
Page 61
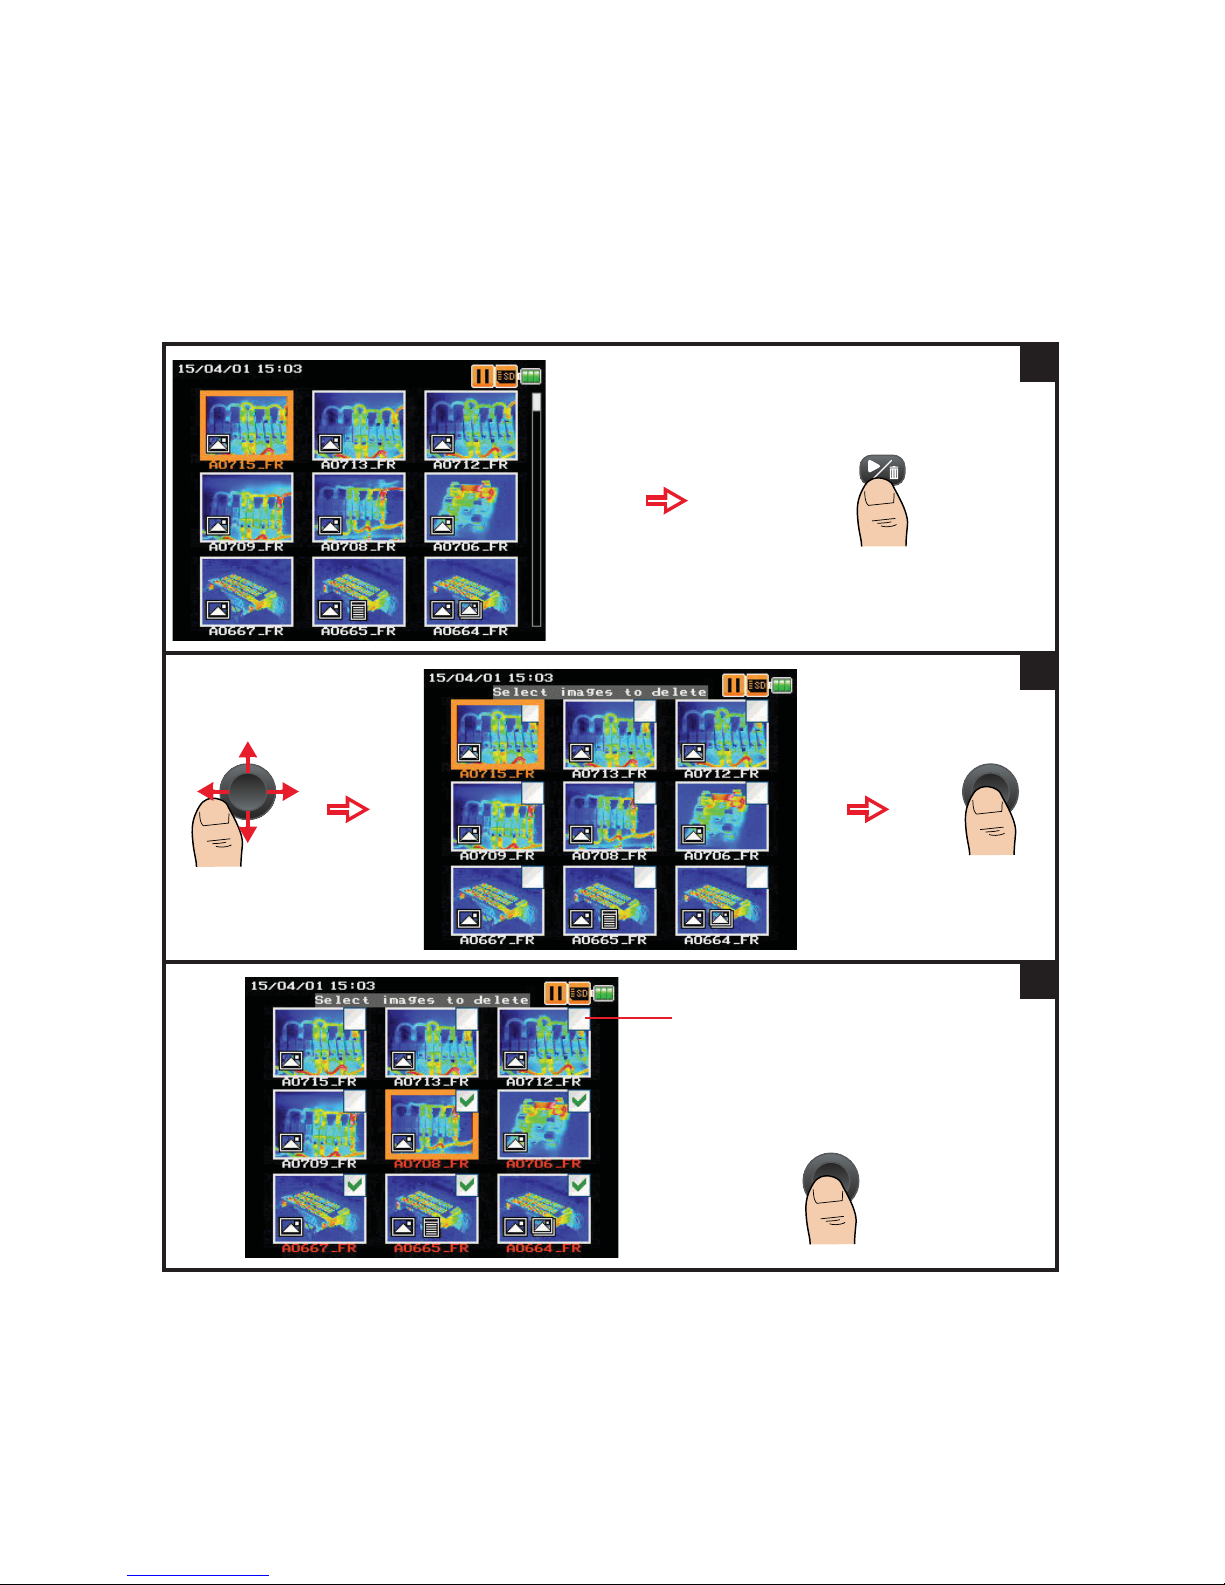
Image Capture, Processing, and Measurement Functions 2
Keysight U5850 Series User’s Guide 61
Delete multiple images (thumbnail playback mode)
Press for 1 second
1
2
Indicator for the selected image
Toggle to check/uncheck
2a
Page 62
2 Image Capture, Processing, and Measurement Functions
62 Keysight U5850 Series User’s Guide
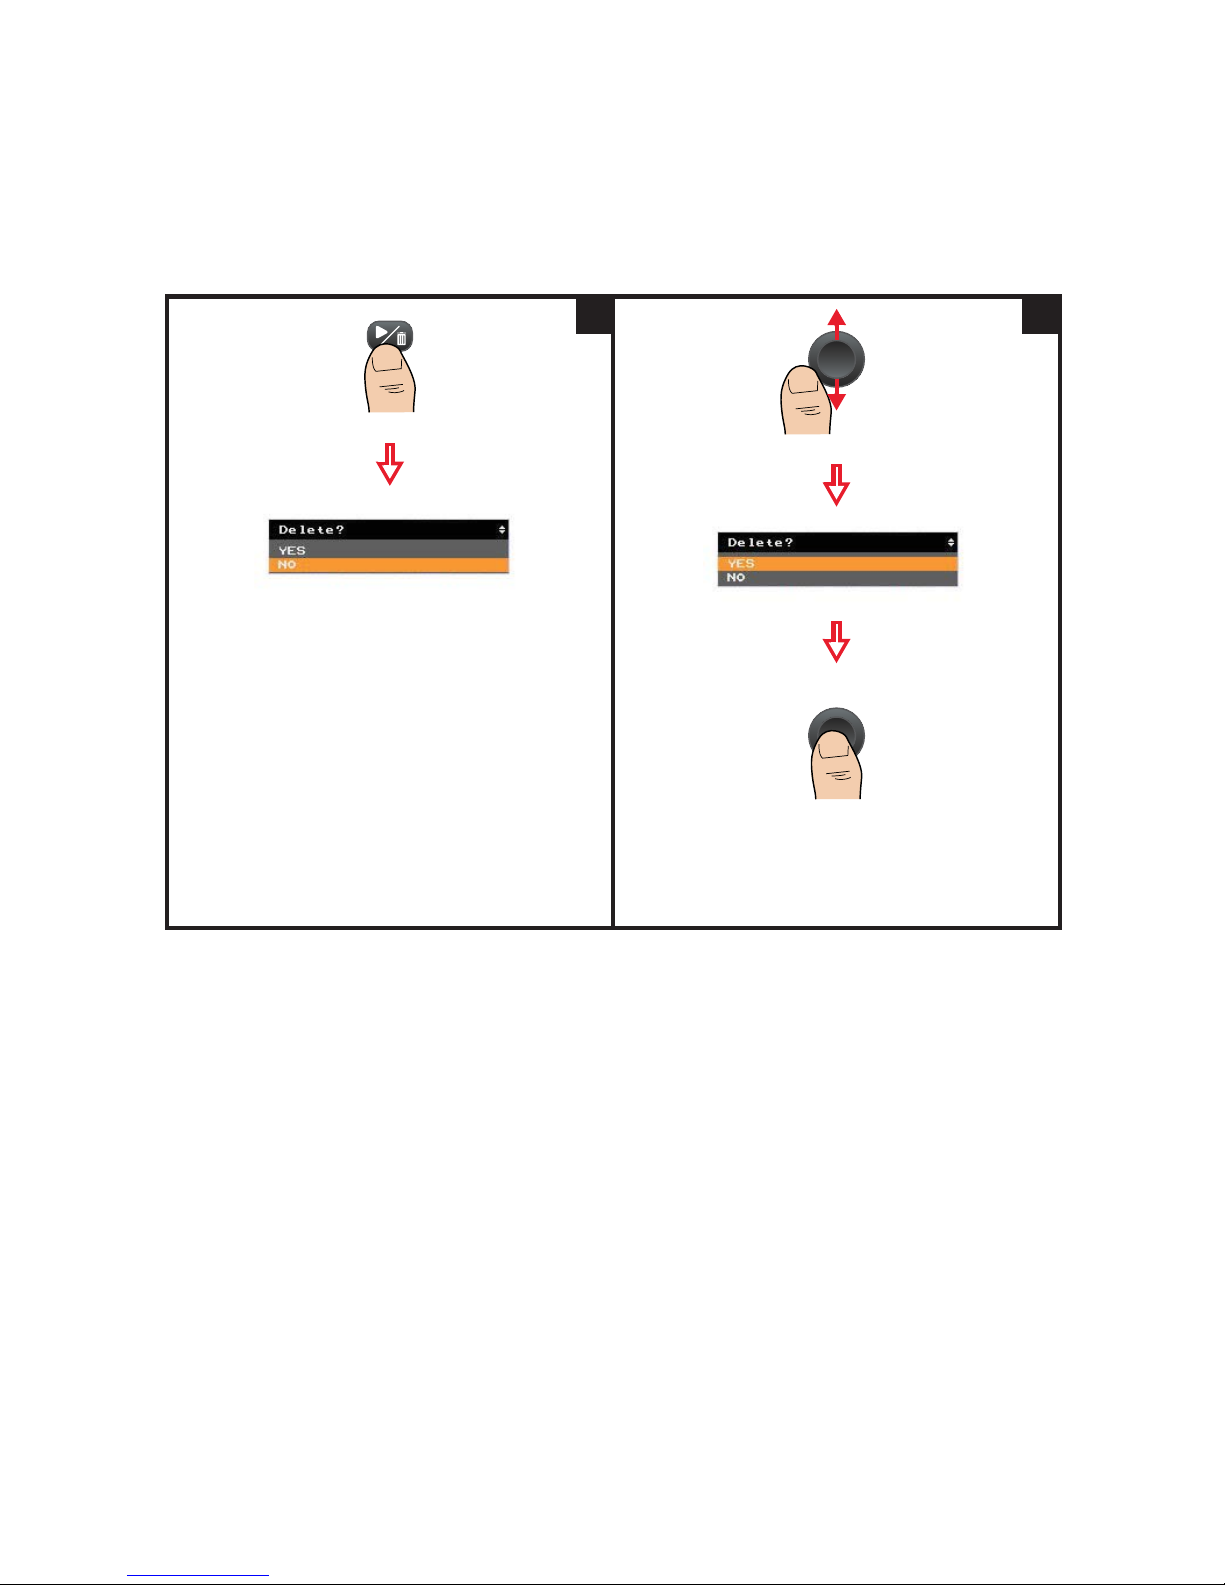
3
Every deleted image will be updated with another
thumbnail image.
If an IR image is deleted, its related visible image,
photo tag, and note tag are also deleted.
4
Page 63

Image Capture, Processing, and Measurement Functions 2
Keysight U5850 Series User’s Guide 63
Measurement Controls
The U5850 Series TrueIR Thermal Imager measurement controls enable you to
identify hot/cold spots and to perform thermal analysis on the move, directly on
the camera.
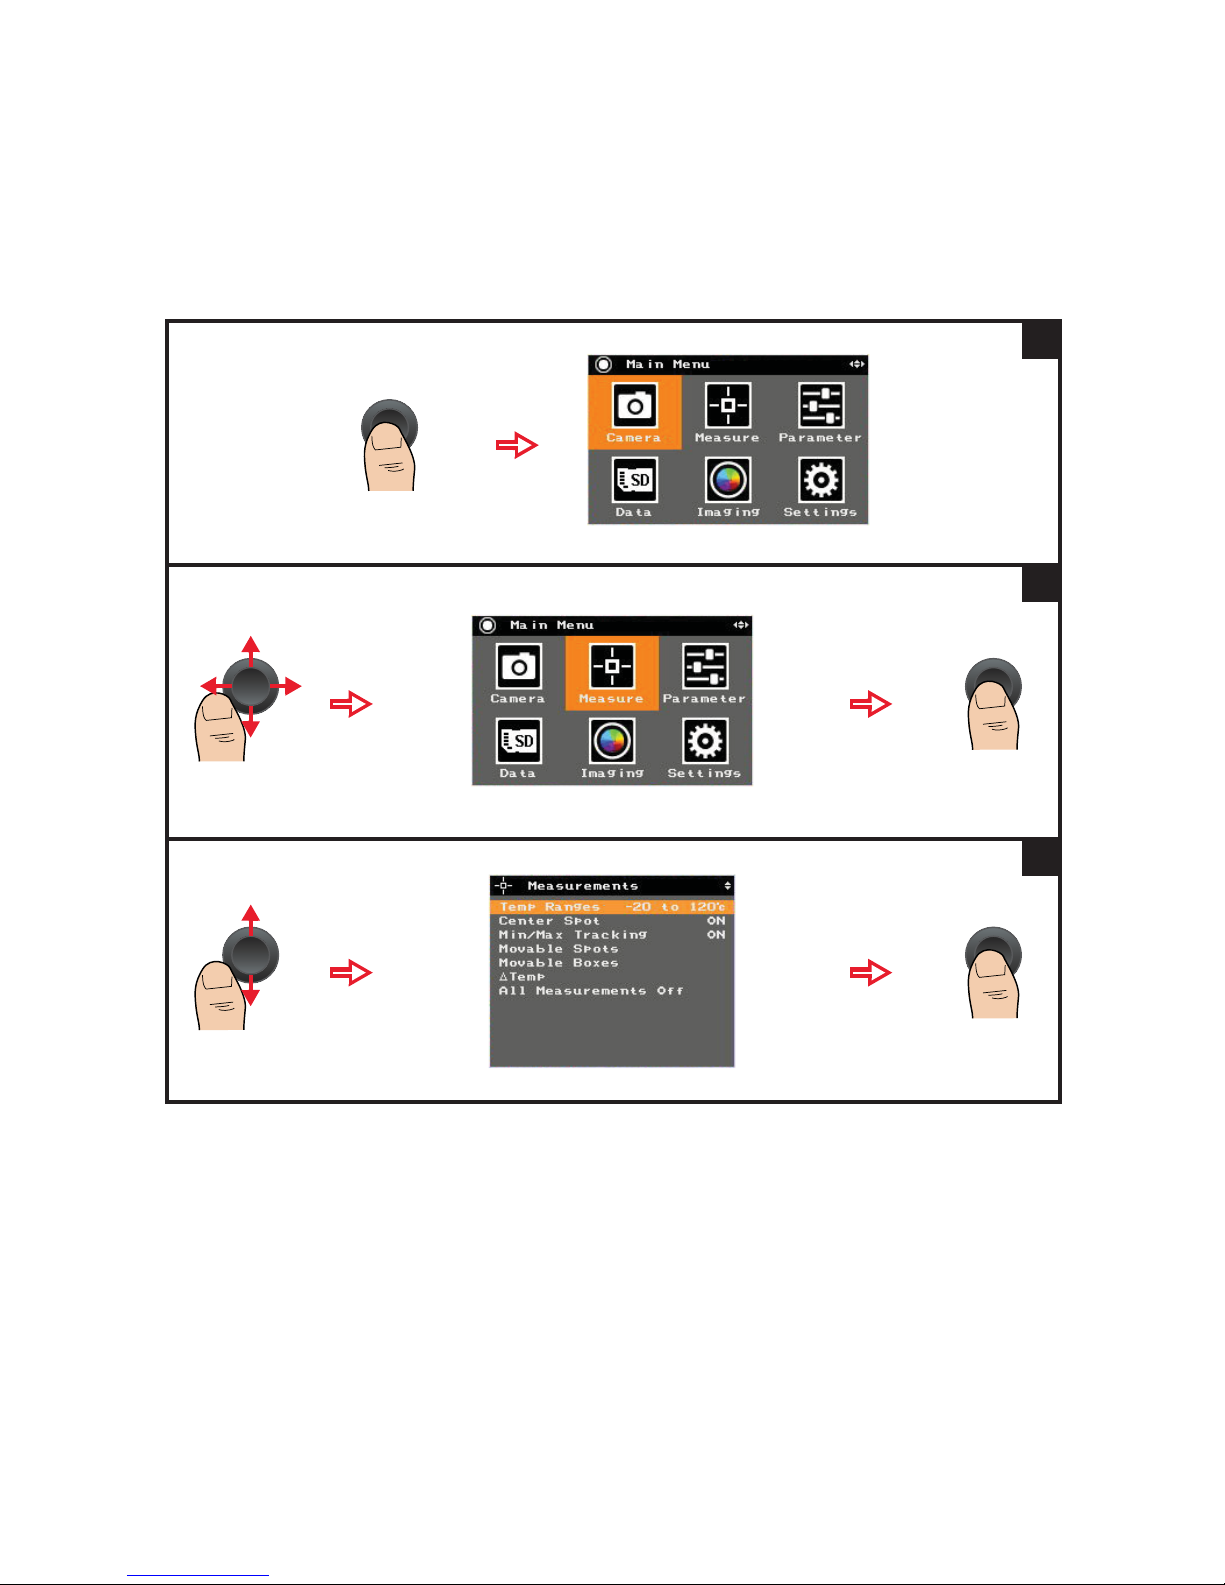
Set the temperature range
You can set auto range or manual range for temperature measurement.
– Range 1: –20 to 120 °C (U5855A/U5856A/U5857A)
– Range 2: 0 to 350 °C (U5855A/U5857A), 0 to 650 °C (U5856A)
– Range 3: 0 to 1200 °C (U5857A)
If the maximum temperature (within 80% of the image center area) meets the
following conditions, auto ranging will occur:
– > 120 °C:
Automatically switches from range 1 to range 2.
– > 350 °C (for U5857A):
Automatically switches from range 2 to range 3.
– < 108 °C:
Automatically switches from range 2 to range 1.
– < 315 °C (for U5857A):
Automatically switches from range 3 to range 2.
Auto ranging for these conditions only applies in the auto scaling mode.
Page 64
2 Image Capture, Processing, and Measurement Functions
64 Keysight U5850 Series User’s Guide
1
2
3
Page 65
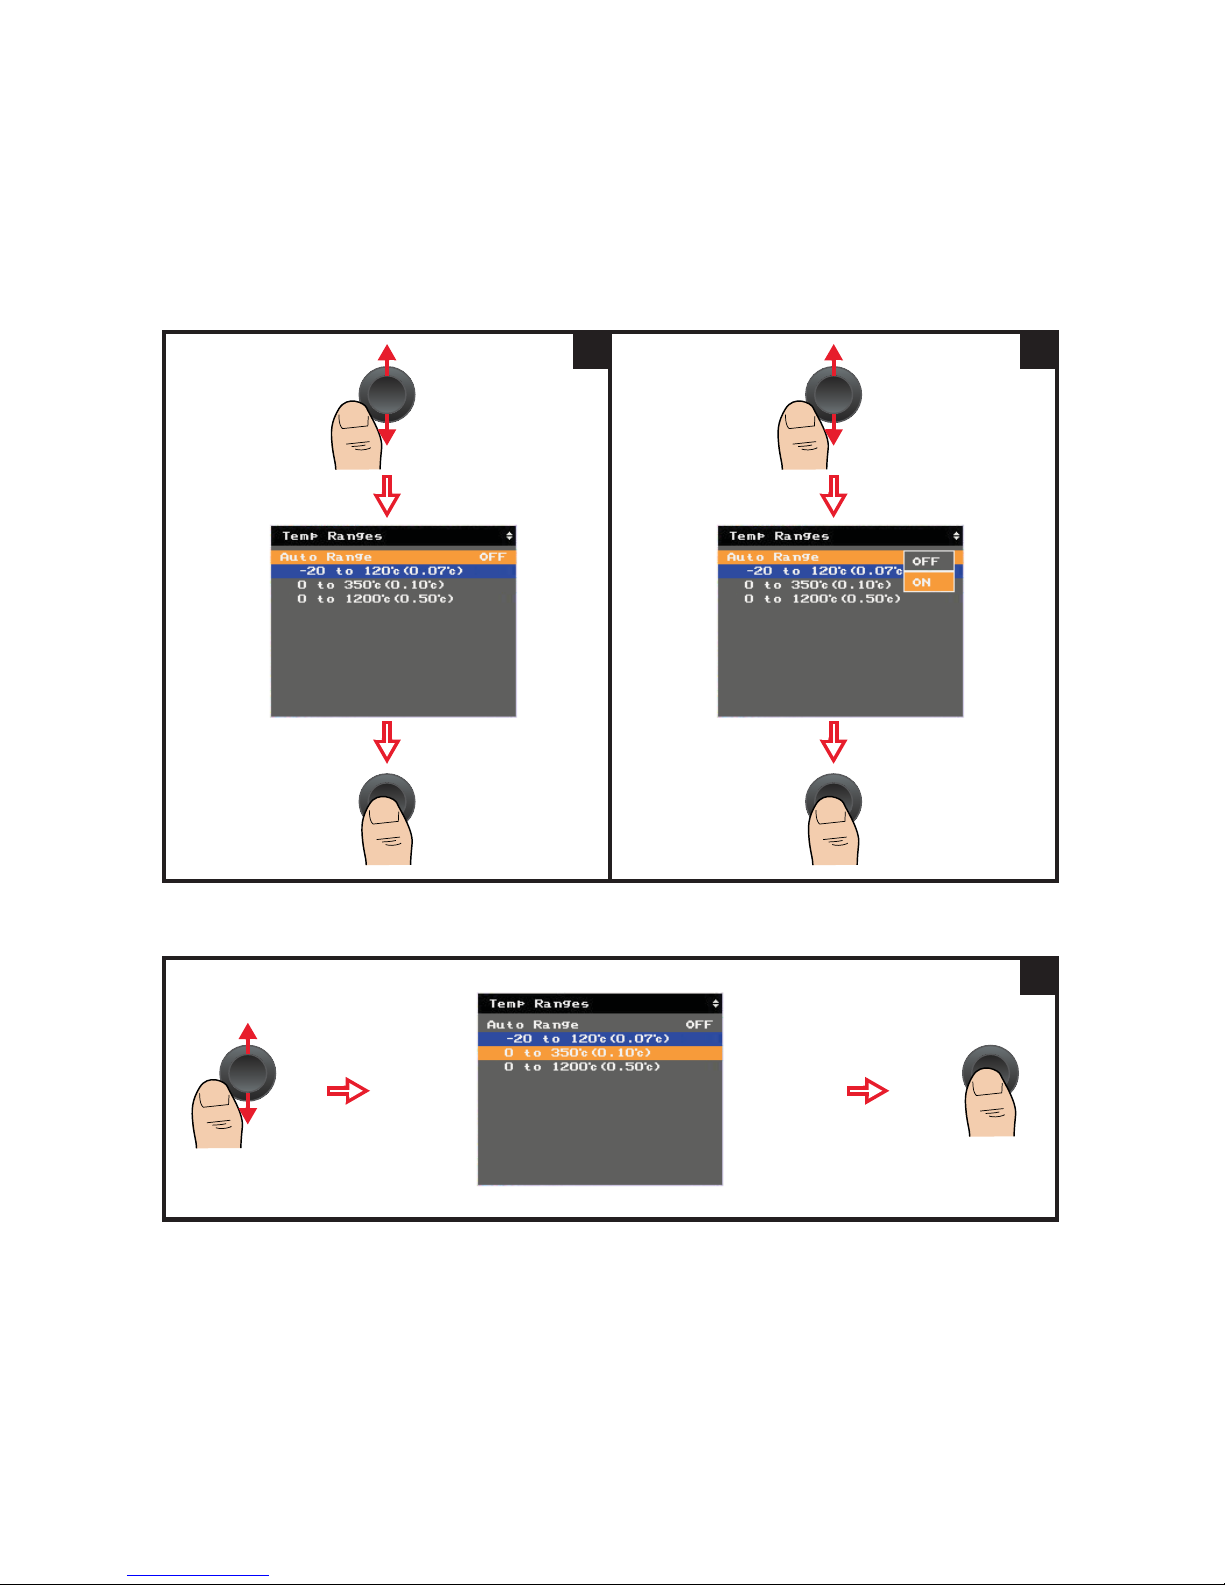
Image Capture, Processing, and Measurement Functions 2
Keysight U5850 Series User’s Guide 65
Enable/disable auto range
Select a manual range (auto range disabled)
v
4
5
6
Page 66
2 Image Capture, Processing, and Measurement Functions
66 Keysight U5850 Series User’s Guide
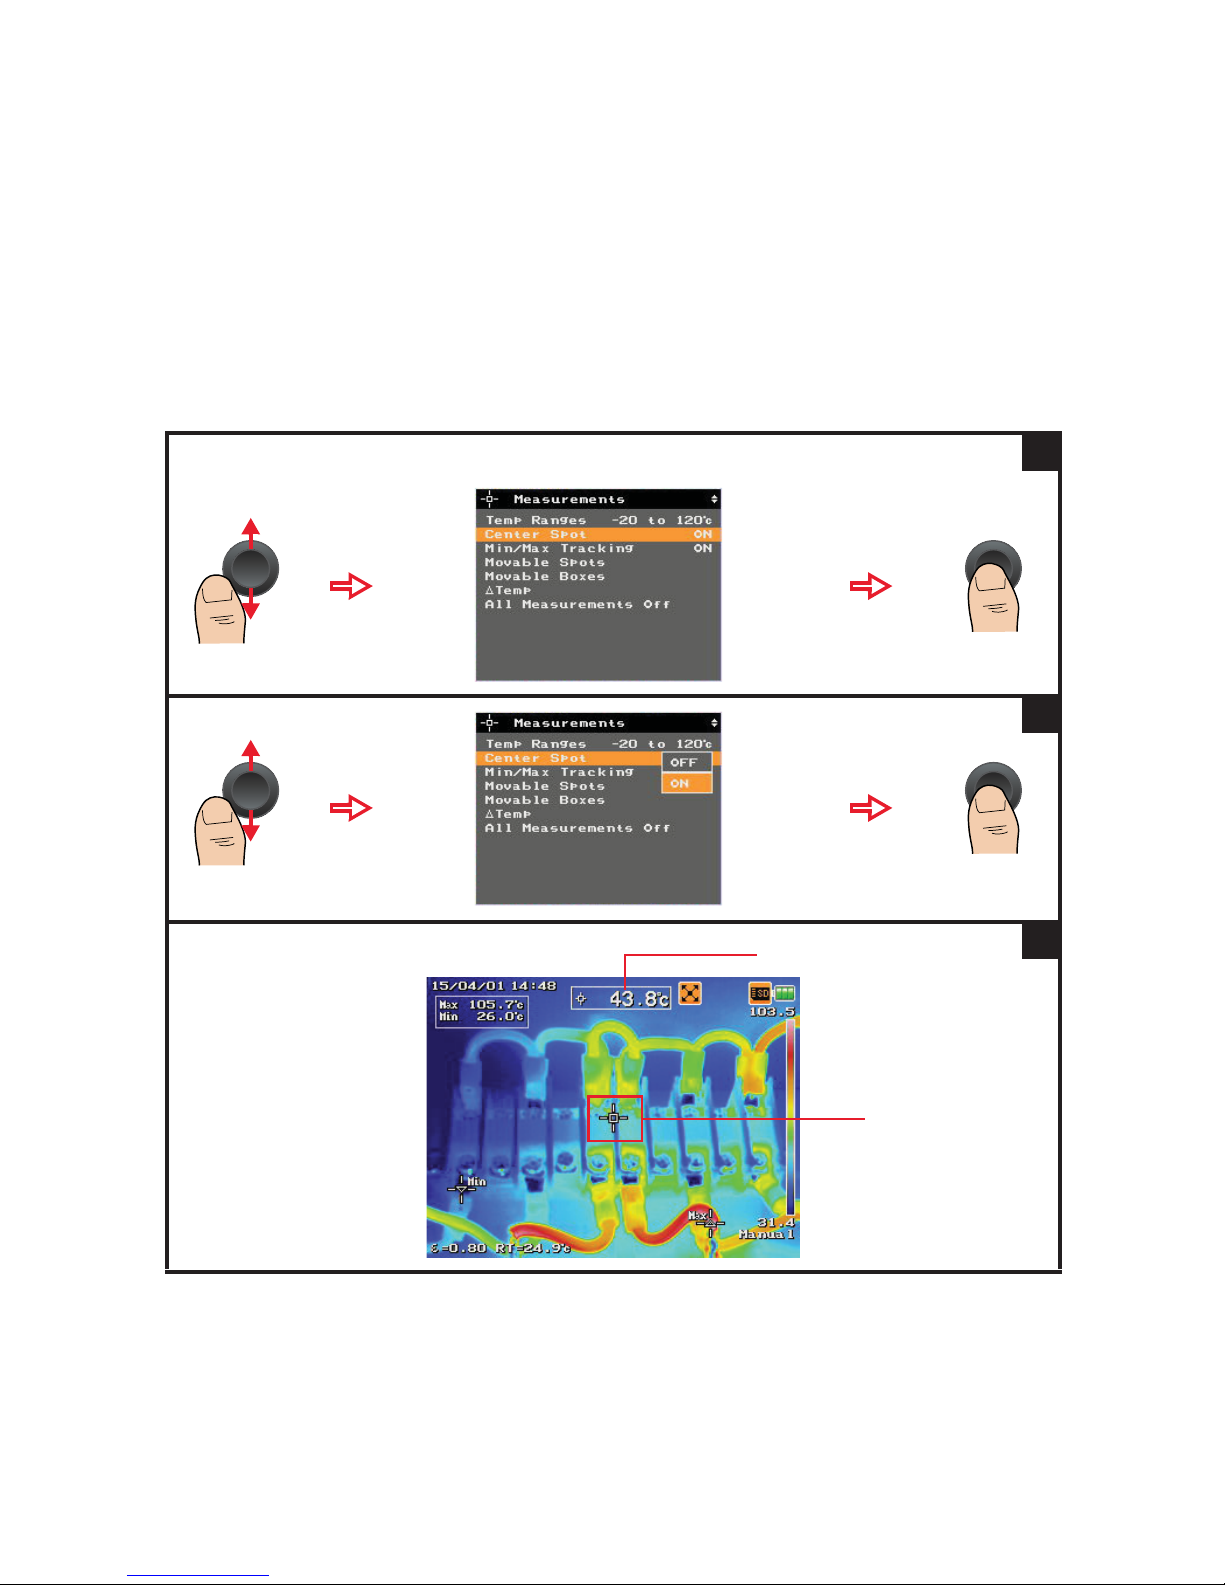
Set the center spot
You can enable or disable the center spot cursor which measures the temperature
at the center of the IR image.
Follow steps 1 to 2 from “Set the temperature range” on page 63.
1
2
Center spot measurement
Center spot cursor
3
Page 67
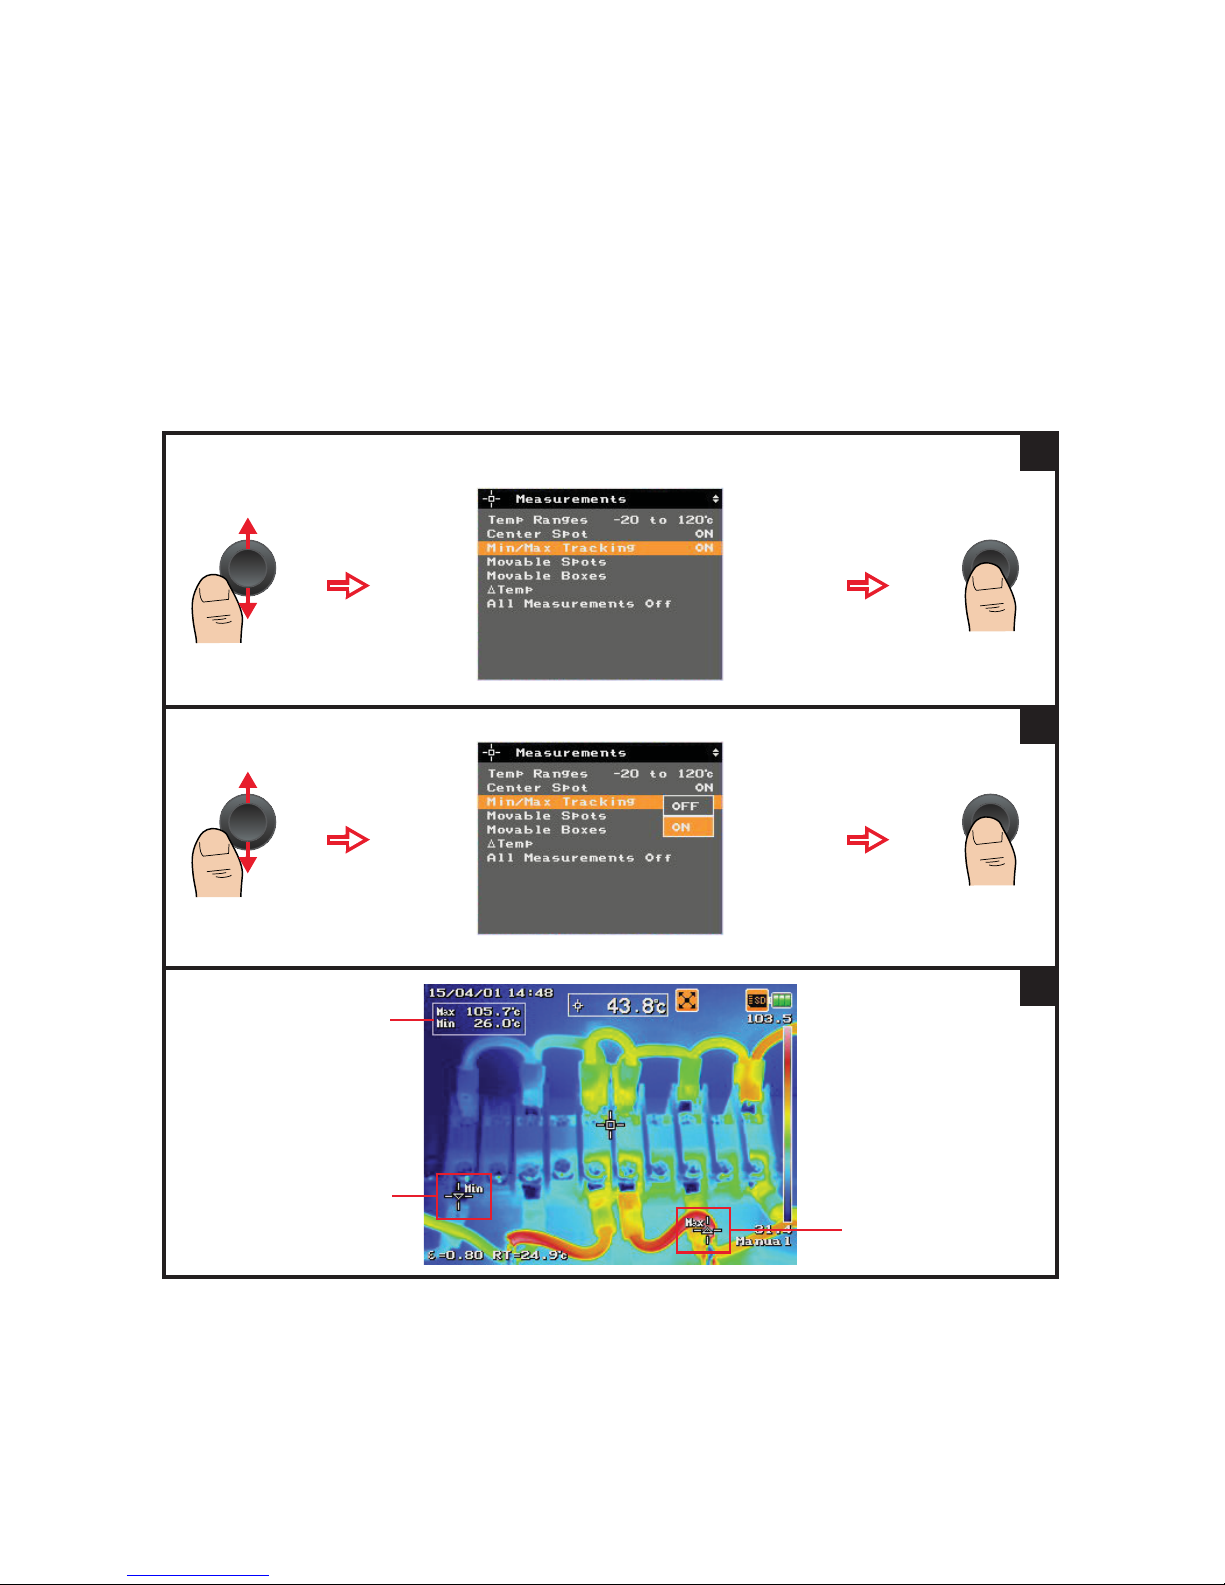
Image Capture, Processing, and Measurement Functions 2
Keysight U5850 Series User’s Guide 67
Set the max/min tracking
This function tracks the maximum and minimum temperature within the full IR
image.
Follow steps 1 to 2 from “Set the temperature range” on page 63.
1
2
Max/Min measurements
Min point cursor
Max point cursor
3
Page 68
2 Image Capture, Processing, and Measurement Functions
68 Keysight U5850 Series User’s Guide
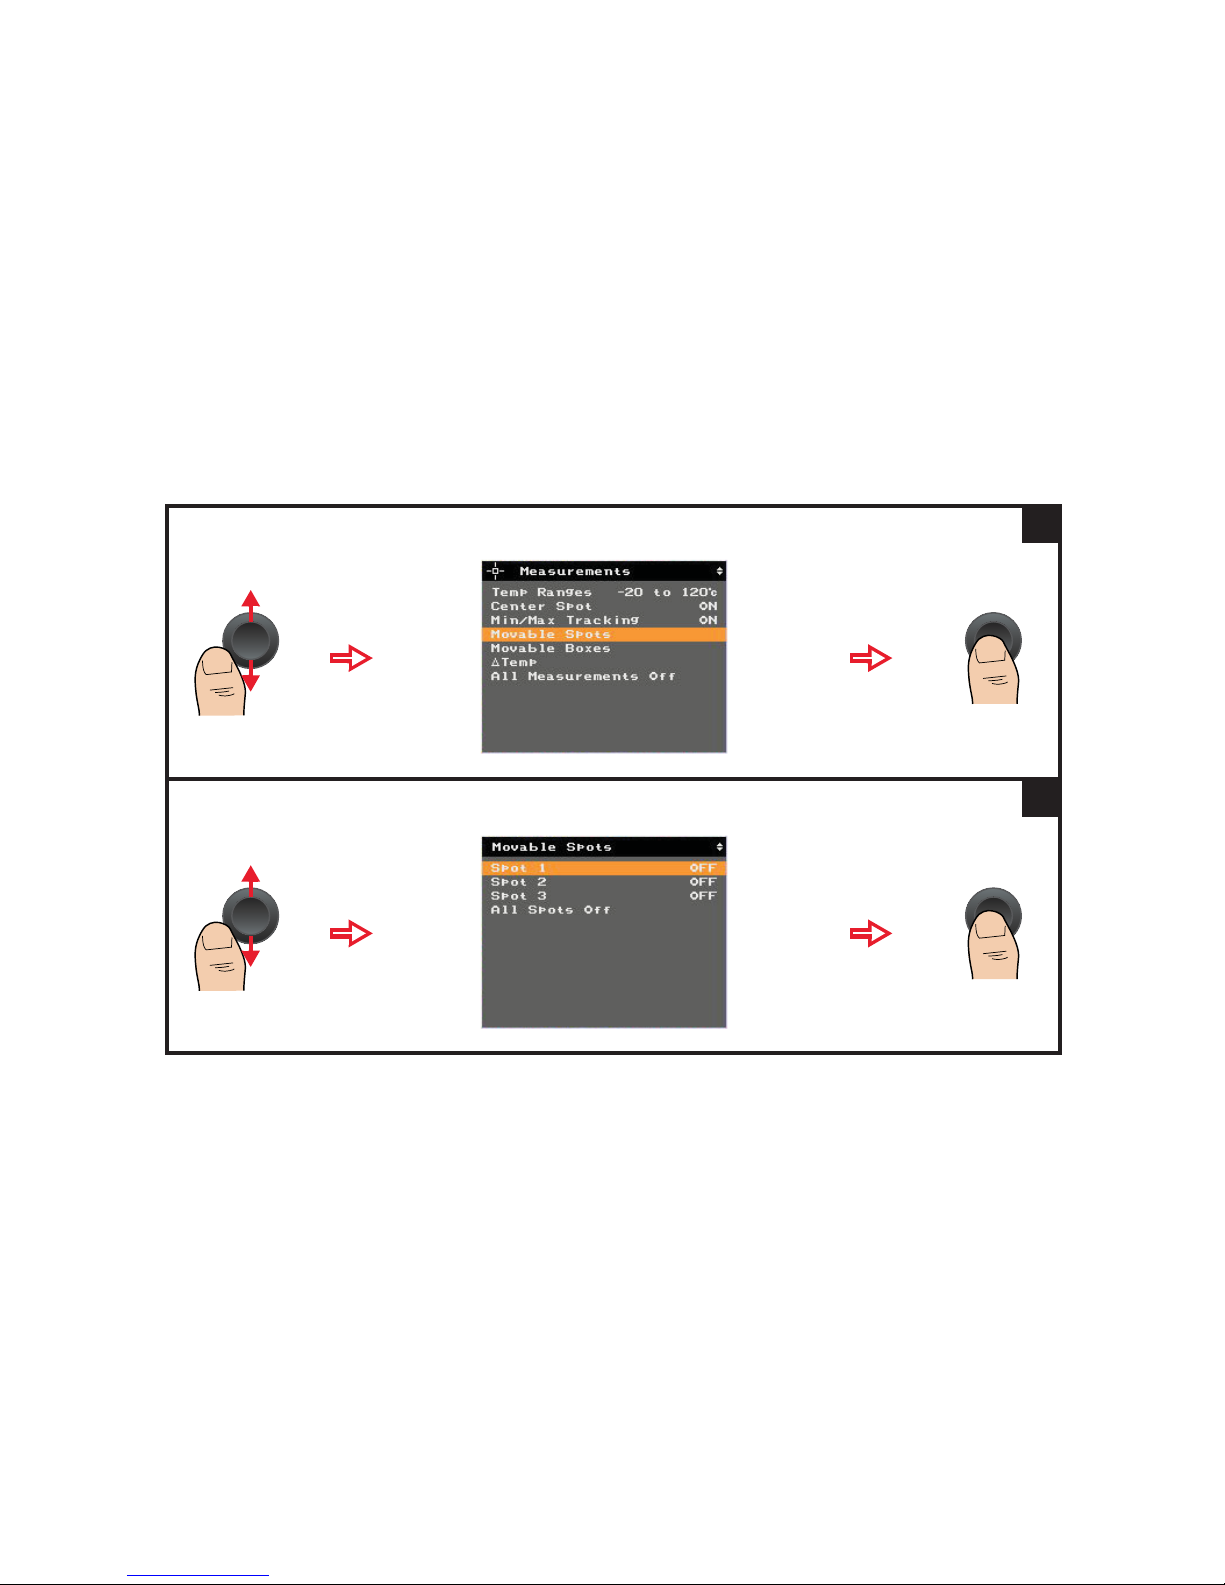
Set the moveable spots and boxes
You can enable measurement spots and boxes to browse and detect the hot/cold
areas of the IR image. You can allocate boxes at specific areas of the IR image to
perform max, min, and average temperature measurements within the areas. The
box size can be adjusted.
Set a measurement spot
Follow steps 1 to 2 from “Set the temperature range” on page 63.
1
Select any spot or disable all existing spots:
2
Page 69
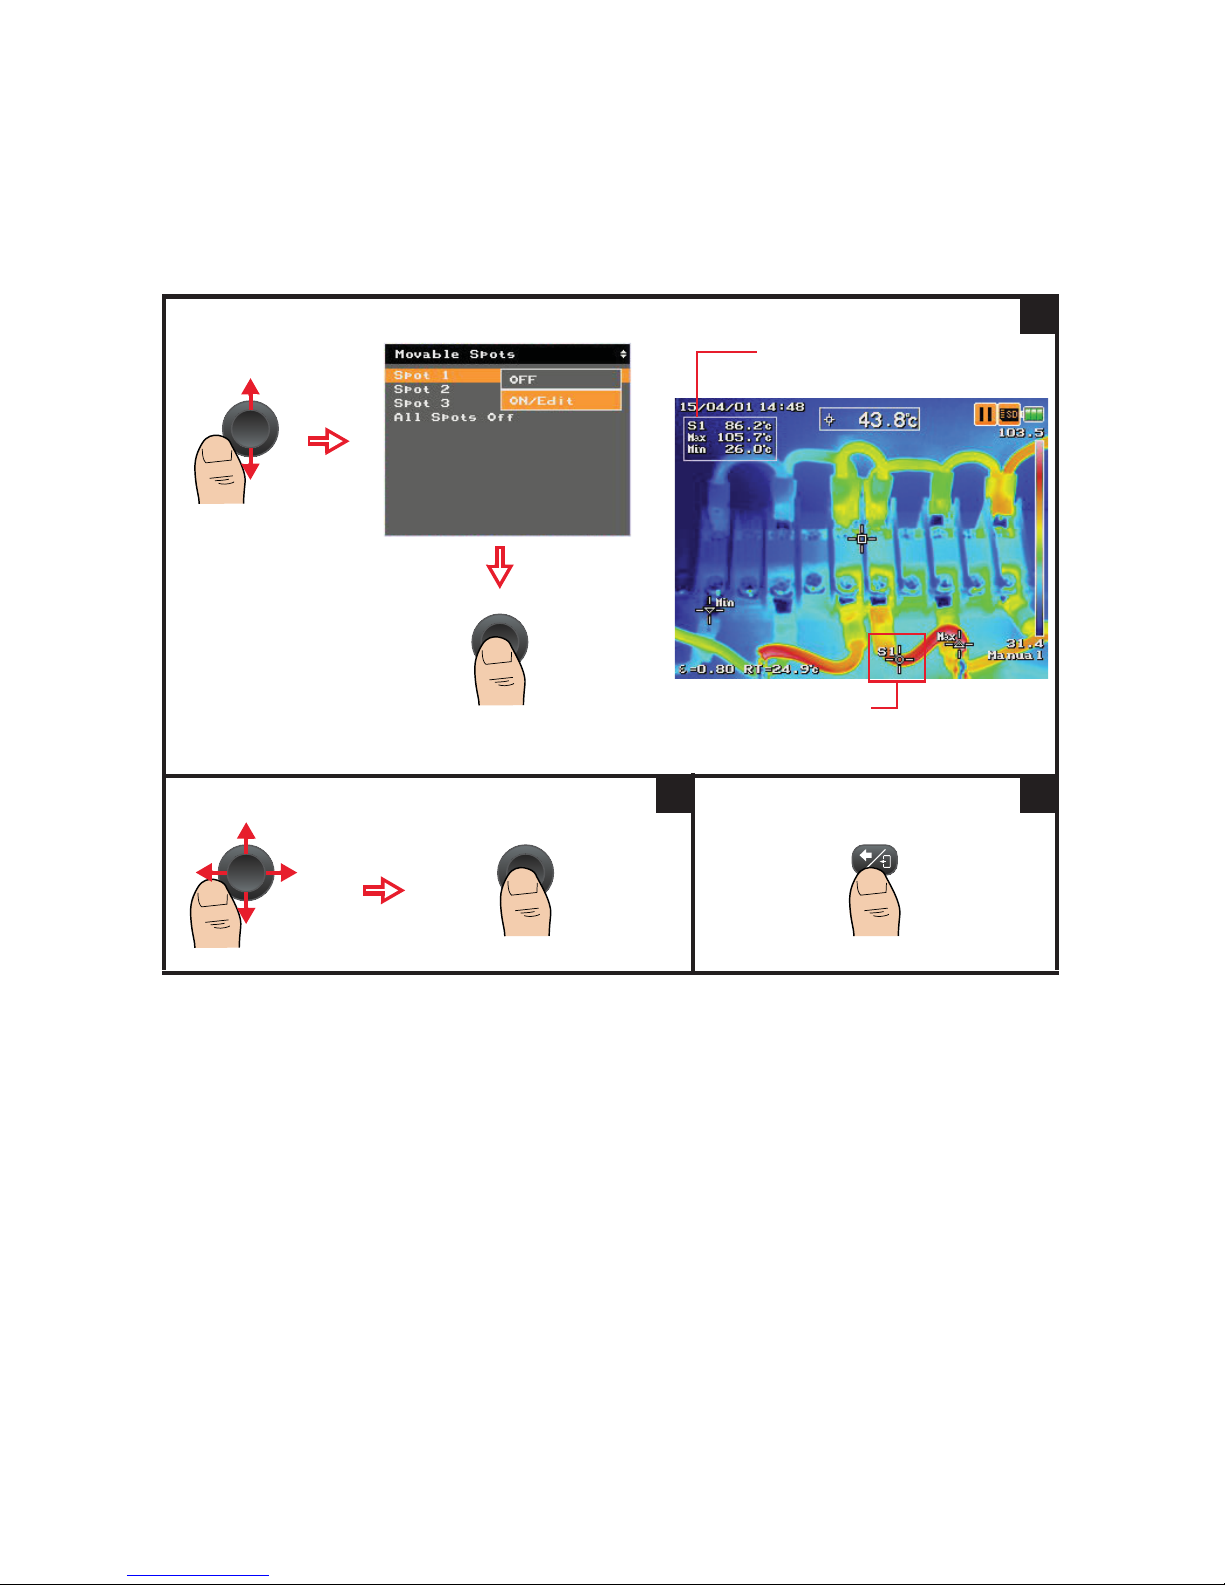
Image Capture, Processing, and Measurement Functions 2
Keysight U5850 Series User’s Guide 69
For example, to enable or move spot 1:
Spot 1 measurement
Spot 1 point cursor
3
To move spot 1: To confirm spot 1 location:
4
To exit spot 1 moving mode:
4a
Page 70
2 Image Capture, Processing, and Measurement Functions
70 Keysight U5850 Series User’s Guide
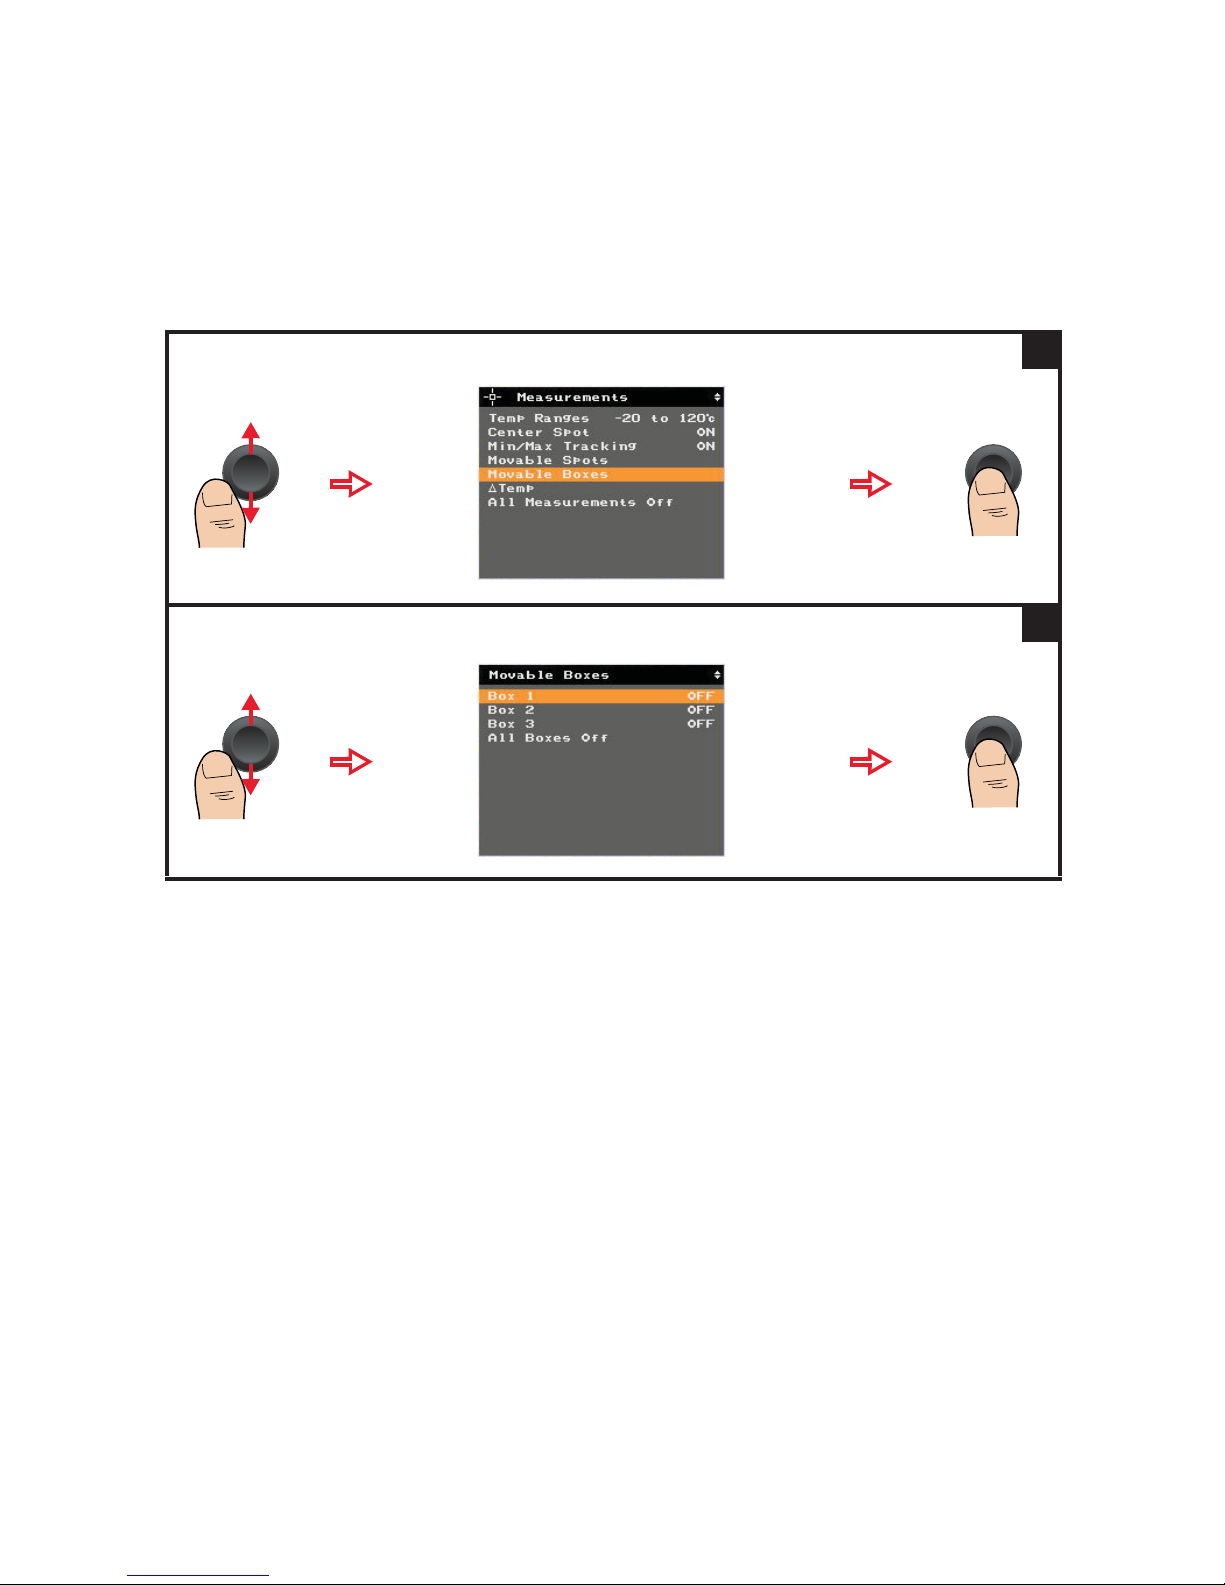
Set a measurement box
Follow steps 1 to 2 from “Set the temperature range” on page 63.
1
Select any box or disable all existing boxes:
2
Page 71
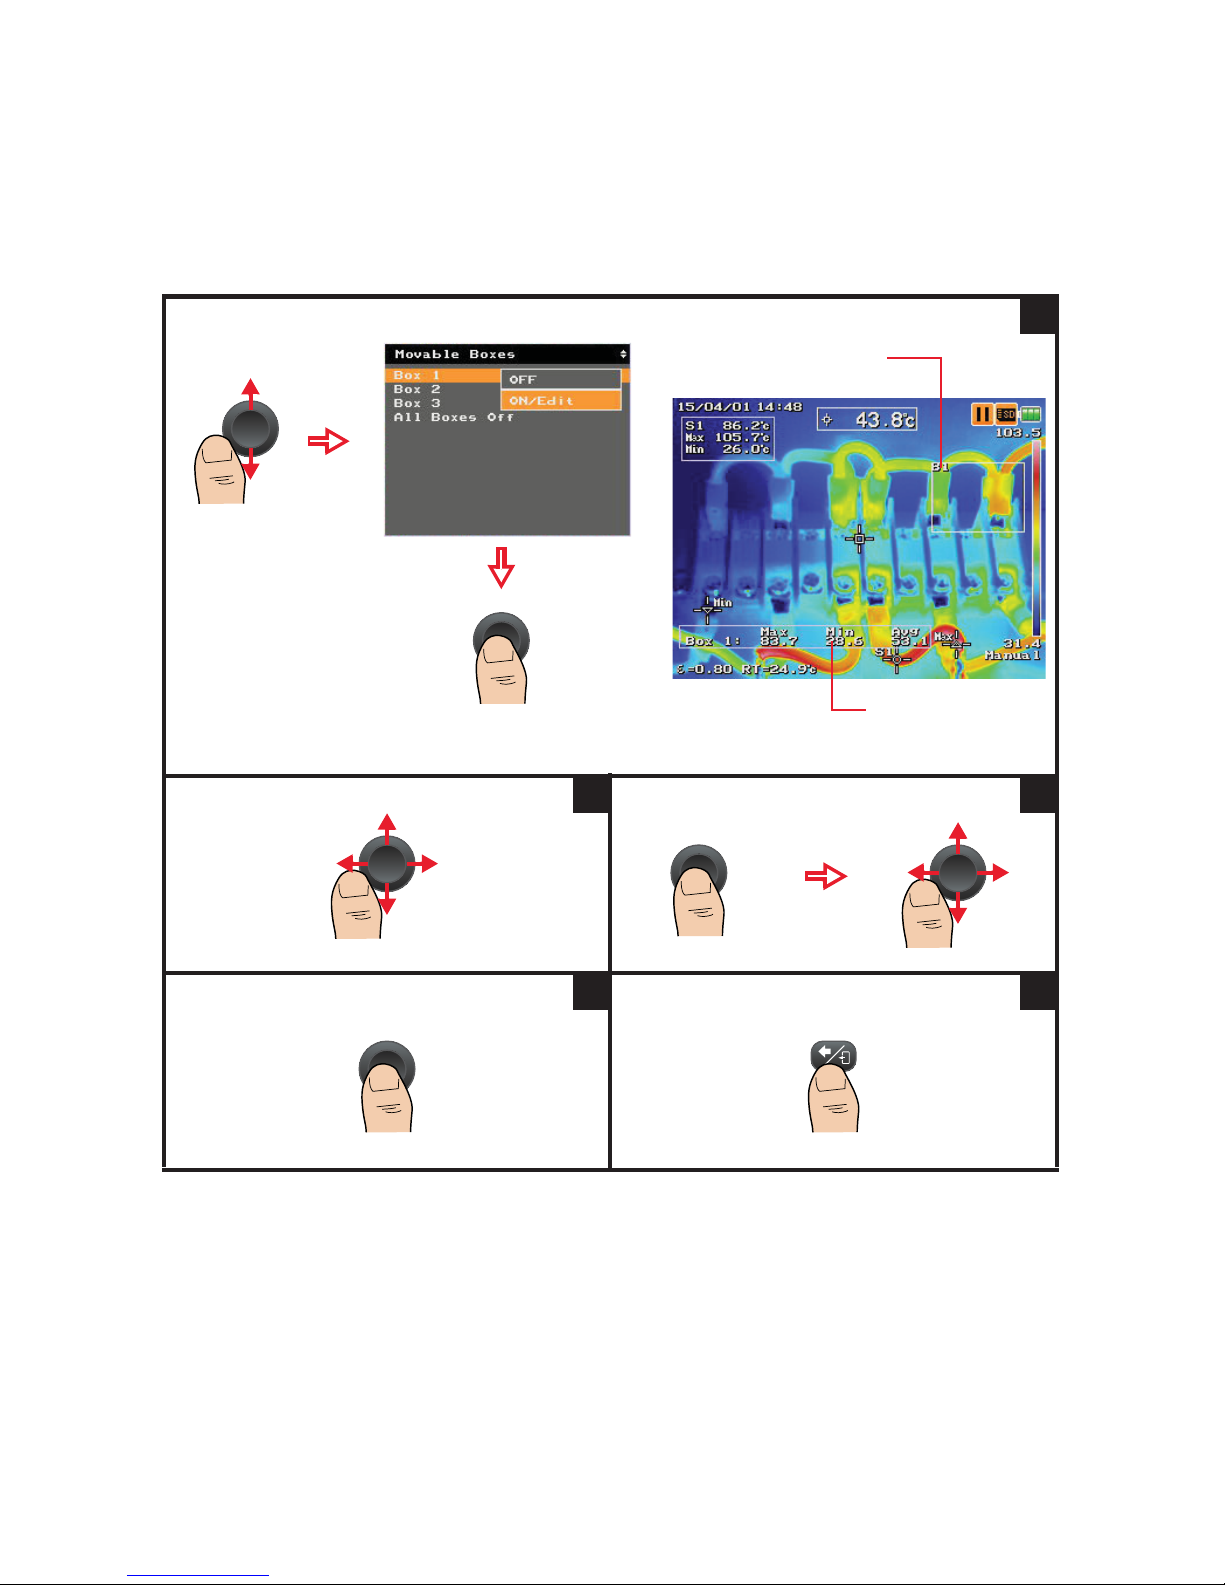
Image Capture, Processing, and Measurement Functions 2
Keysight U5850 Series User’s Guide 71
For example, to enable or move/adjust box 1:
Box 1 max, min, and
average readings
Box 1 cursor
3
To move box 1:
4
To adjust the size of box 1:
5
To confirm box 1:
6
To exit box 1 moving mode or size adjustment:
6a
Page 72
2 Image Capture, Processing, and Measurement Functions
72 Keysight U5850 Series User’s Guide
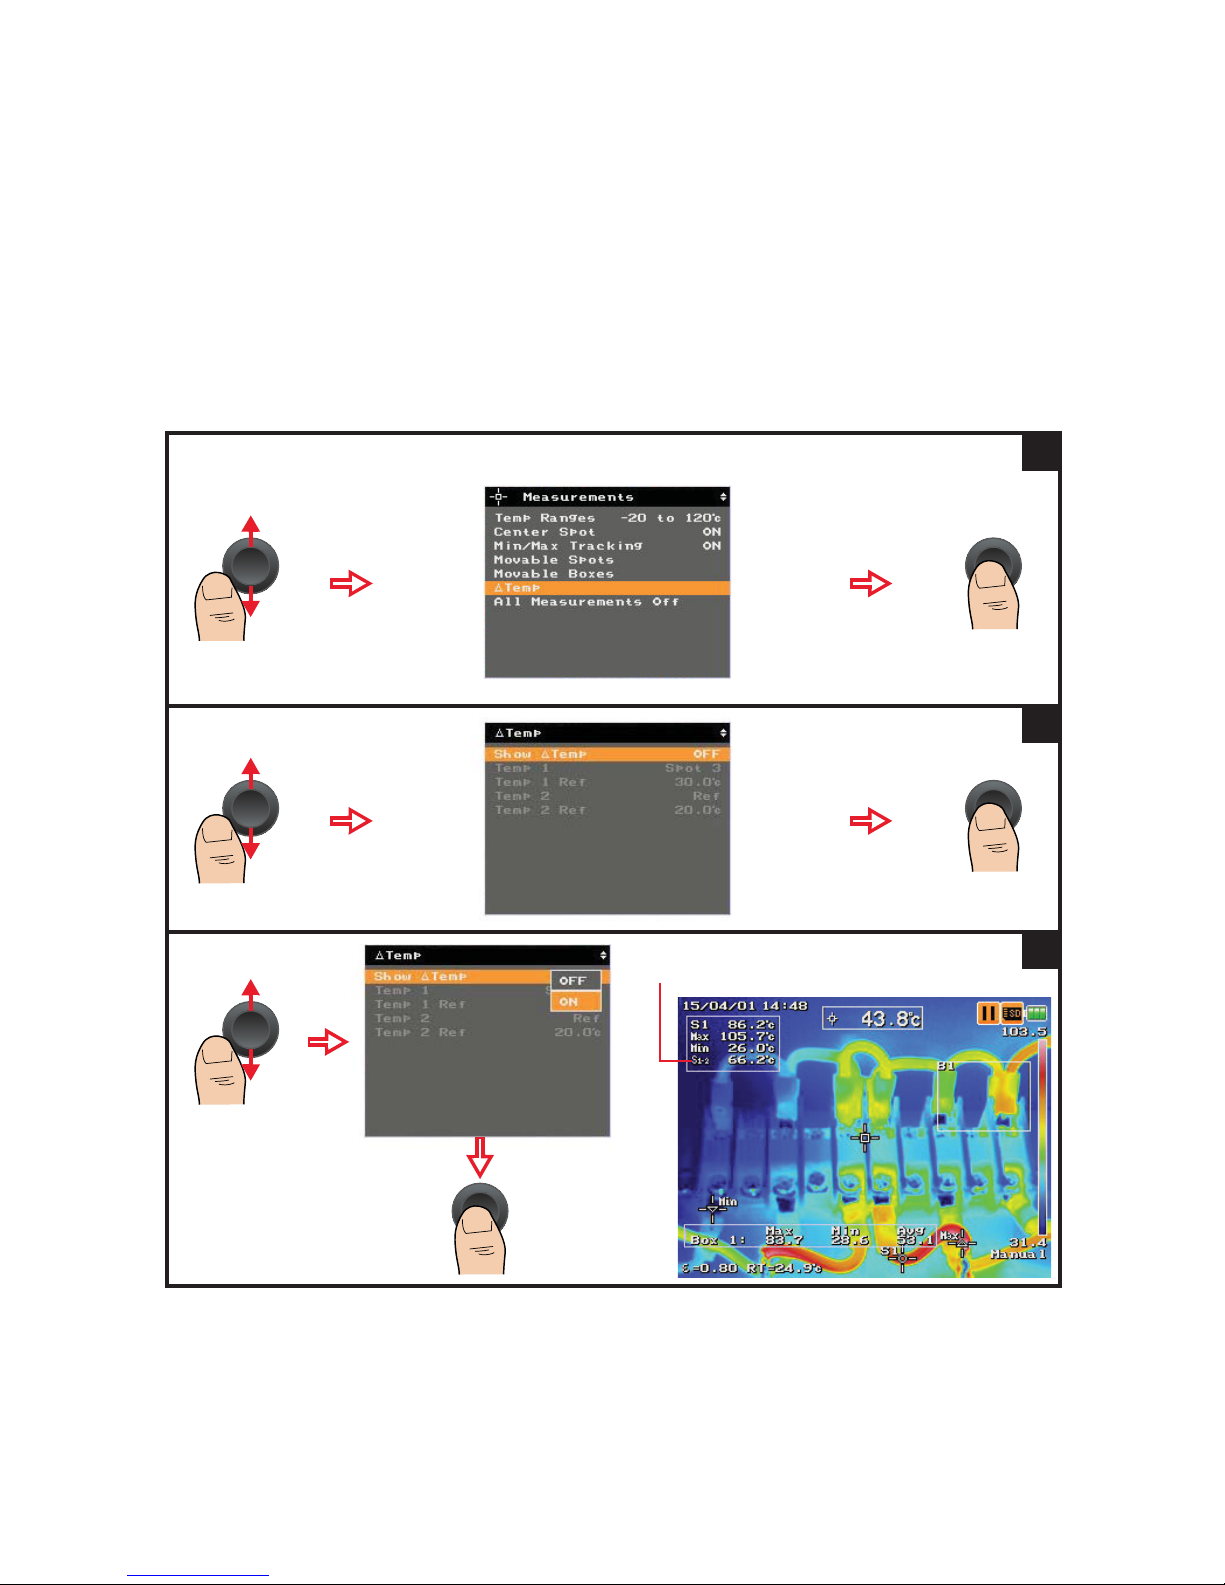
Set the delta temperature
You can measure the difference between two temperature readings — you can
select from the spot readings or specify your own reference value.
Follow steps 1 to 2 from “Set the temperature range” on page 63.
1
2
Δ Temp indicator
3
Page 73
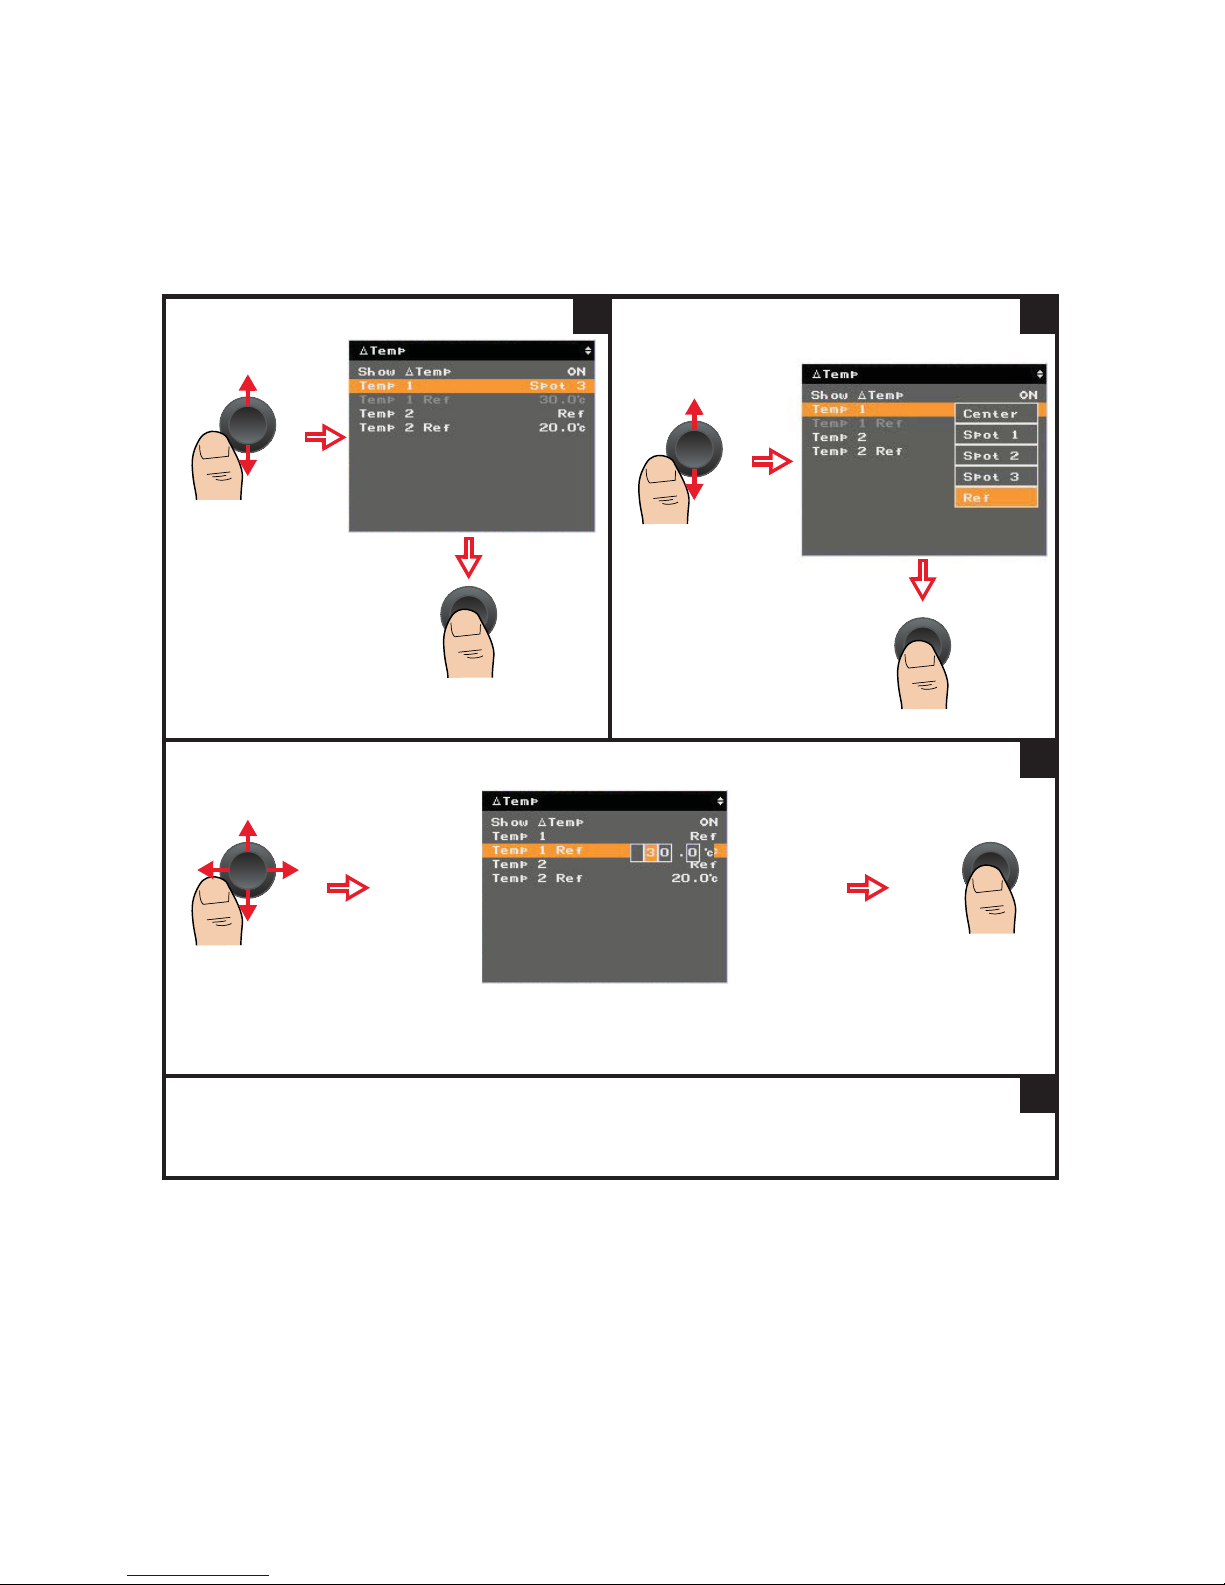
Image Capture, Processing, and Measurement Functions 2
Keysight U5850 Series User’s Guide 73
4
Select the center spot, spot 1, 2, or 3,
or a reference value for Temp 1:
5
If you want to enter a reference value:
Push left/right to move the
indicator.
Push up/down to increase/
decrease the digits.
6
Repeat the same procedure for Temp 2.
7
Page 74
2 Image Capture, Processing, and Measurement Functions
74 Keysight U5850 Series User’s Guide
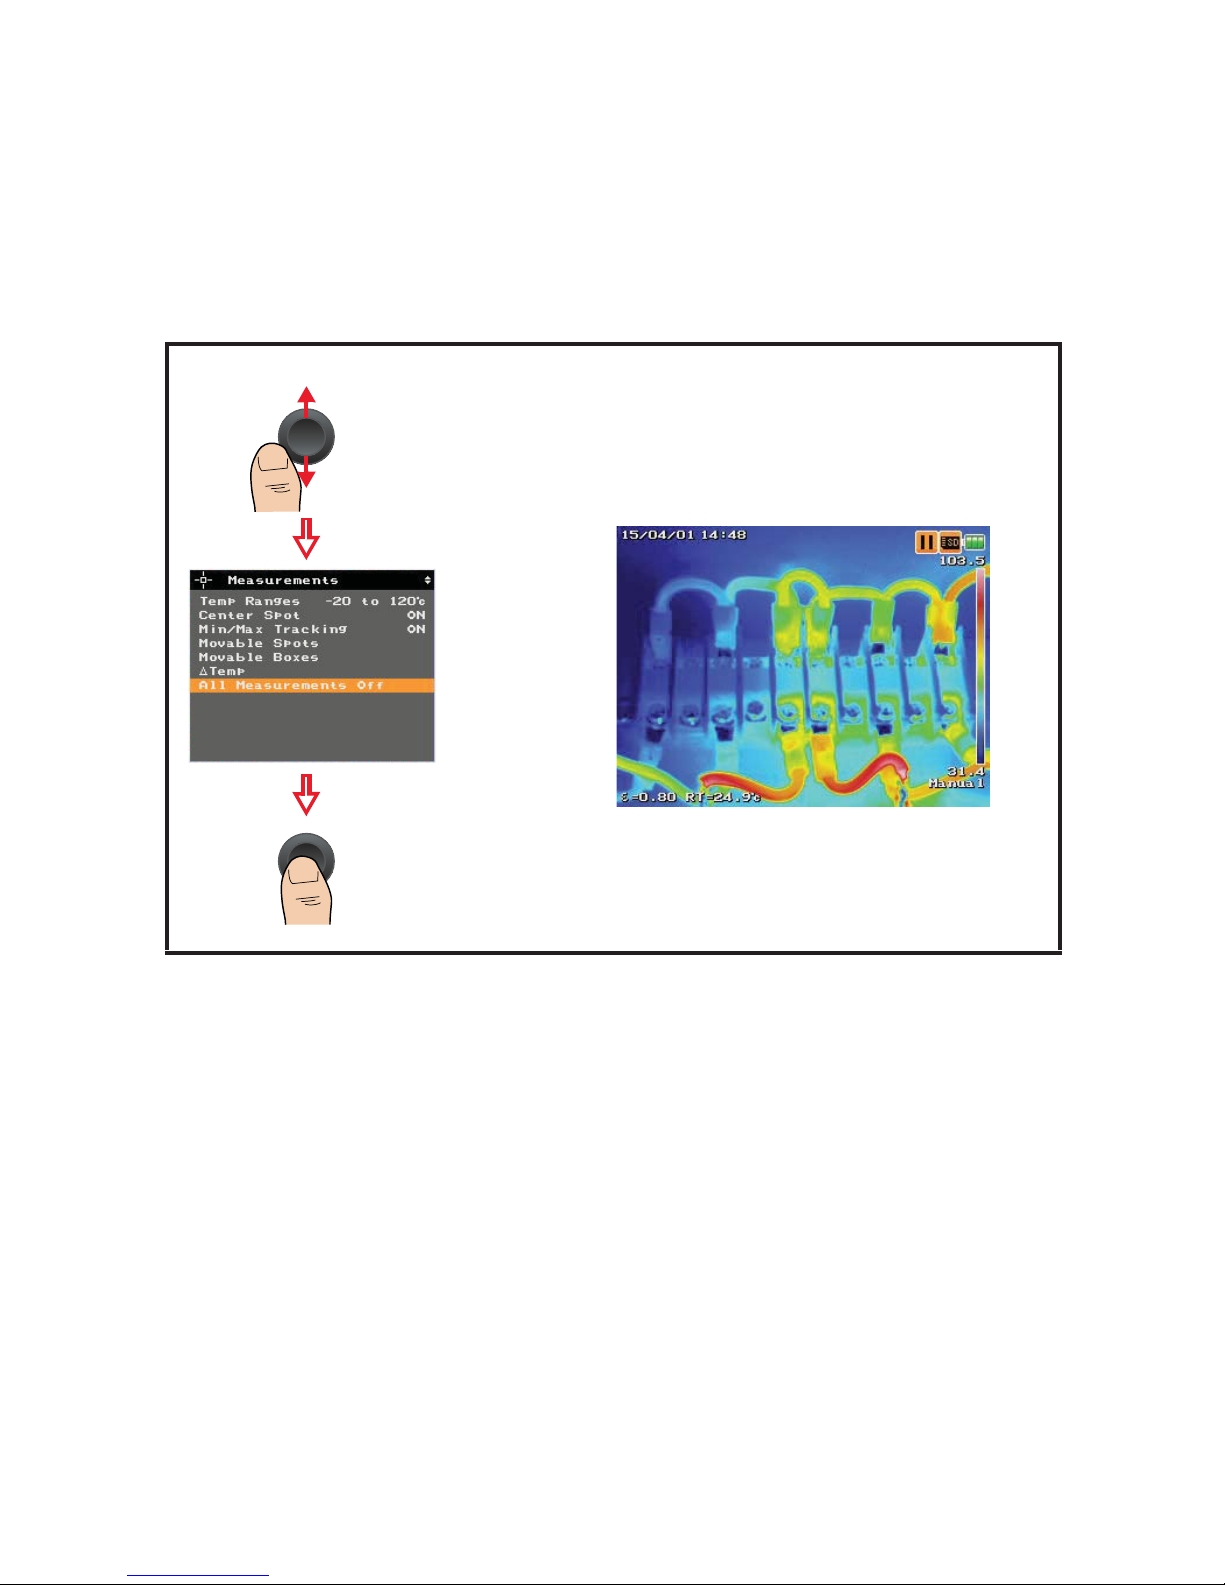
Turn off all measurements
All measurement indicators are removed:
Follow steps 1 to 2 from “Set the temperature range” on page 63.
Page 75
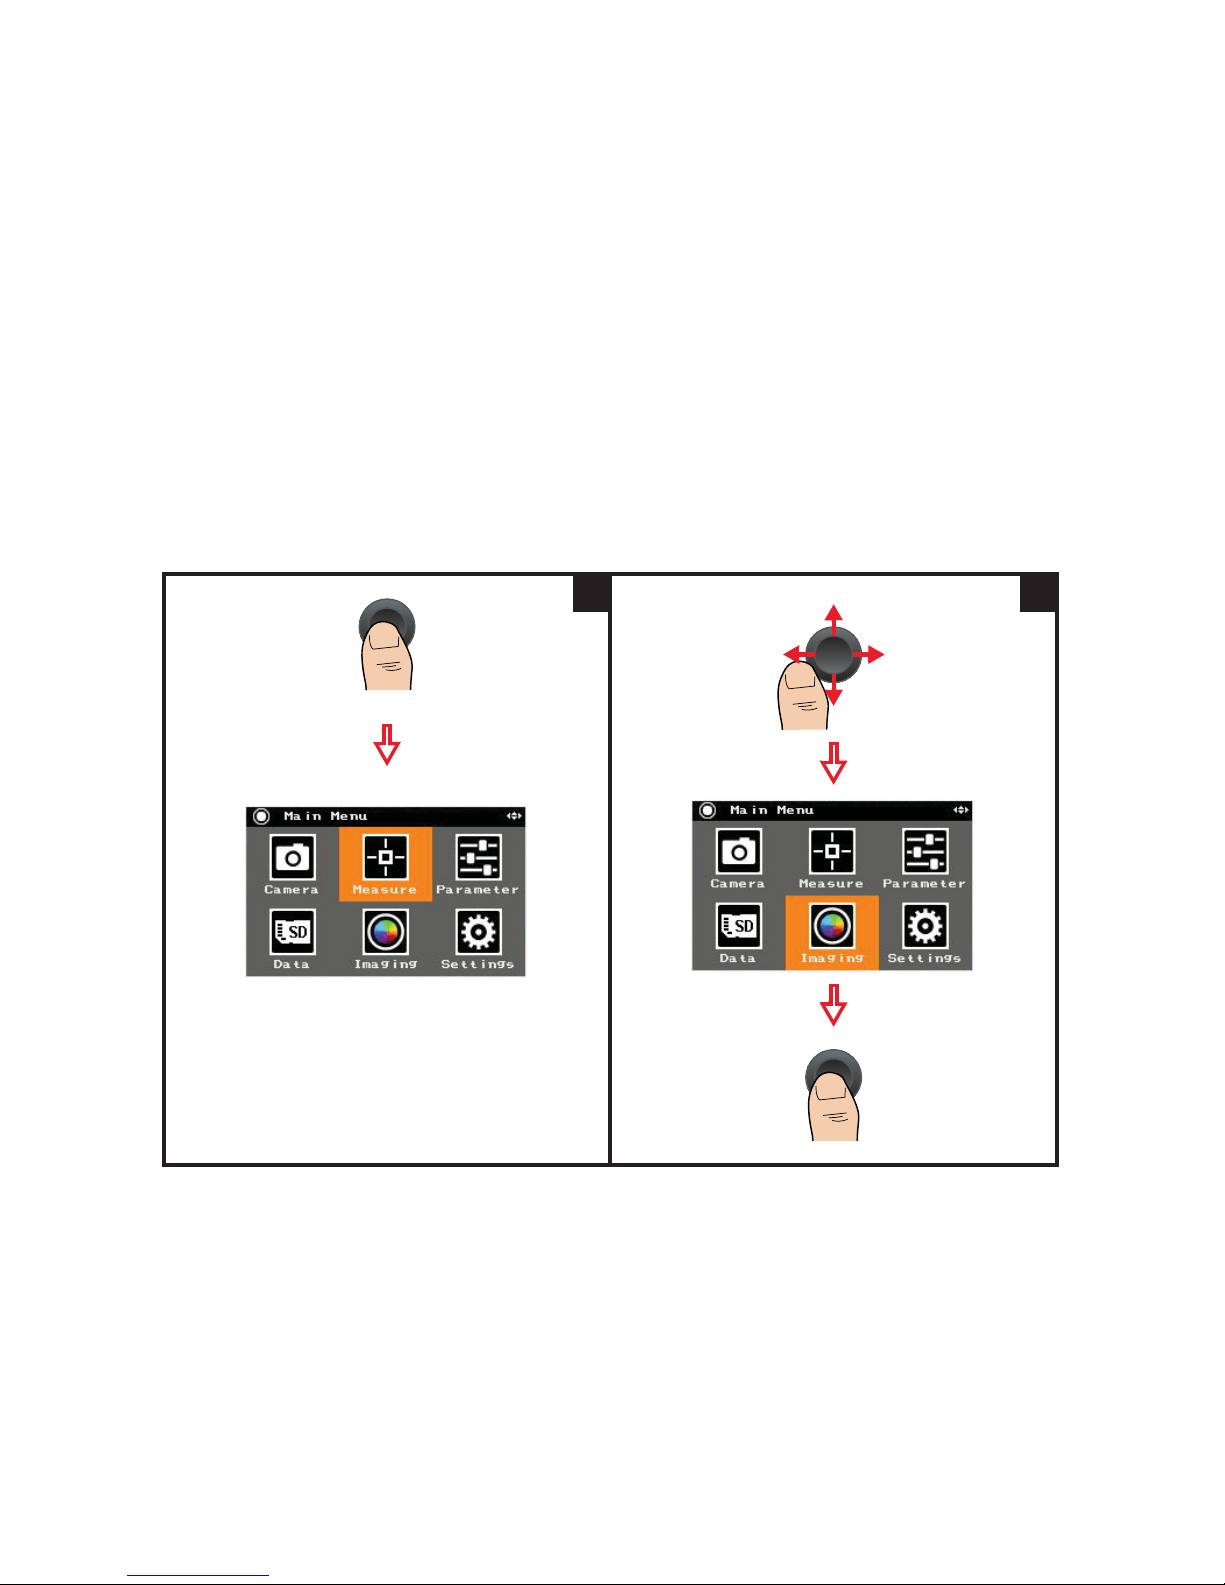
Image Capture, Processing, and Measurement Functions 2
Keysight U5850 Series User’s Guide 75
Imaging Controls
The imaging feature allows you to perform a more comprehensive thermal
analysis by configuring the IR image display for different environments.
Set the color palette
You can apply a specific color palette for your IR image to improve contrast and
clarity when identifying hot/cold areas.
1
2
Page 76
2 Image Capture, Processing, and Measurement Functions
76 Keysight U5850 Series User’s Guide
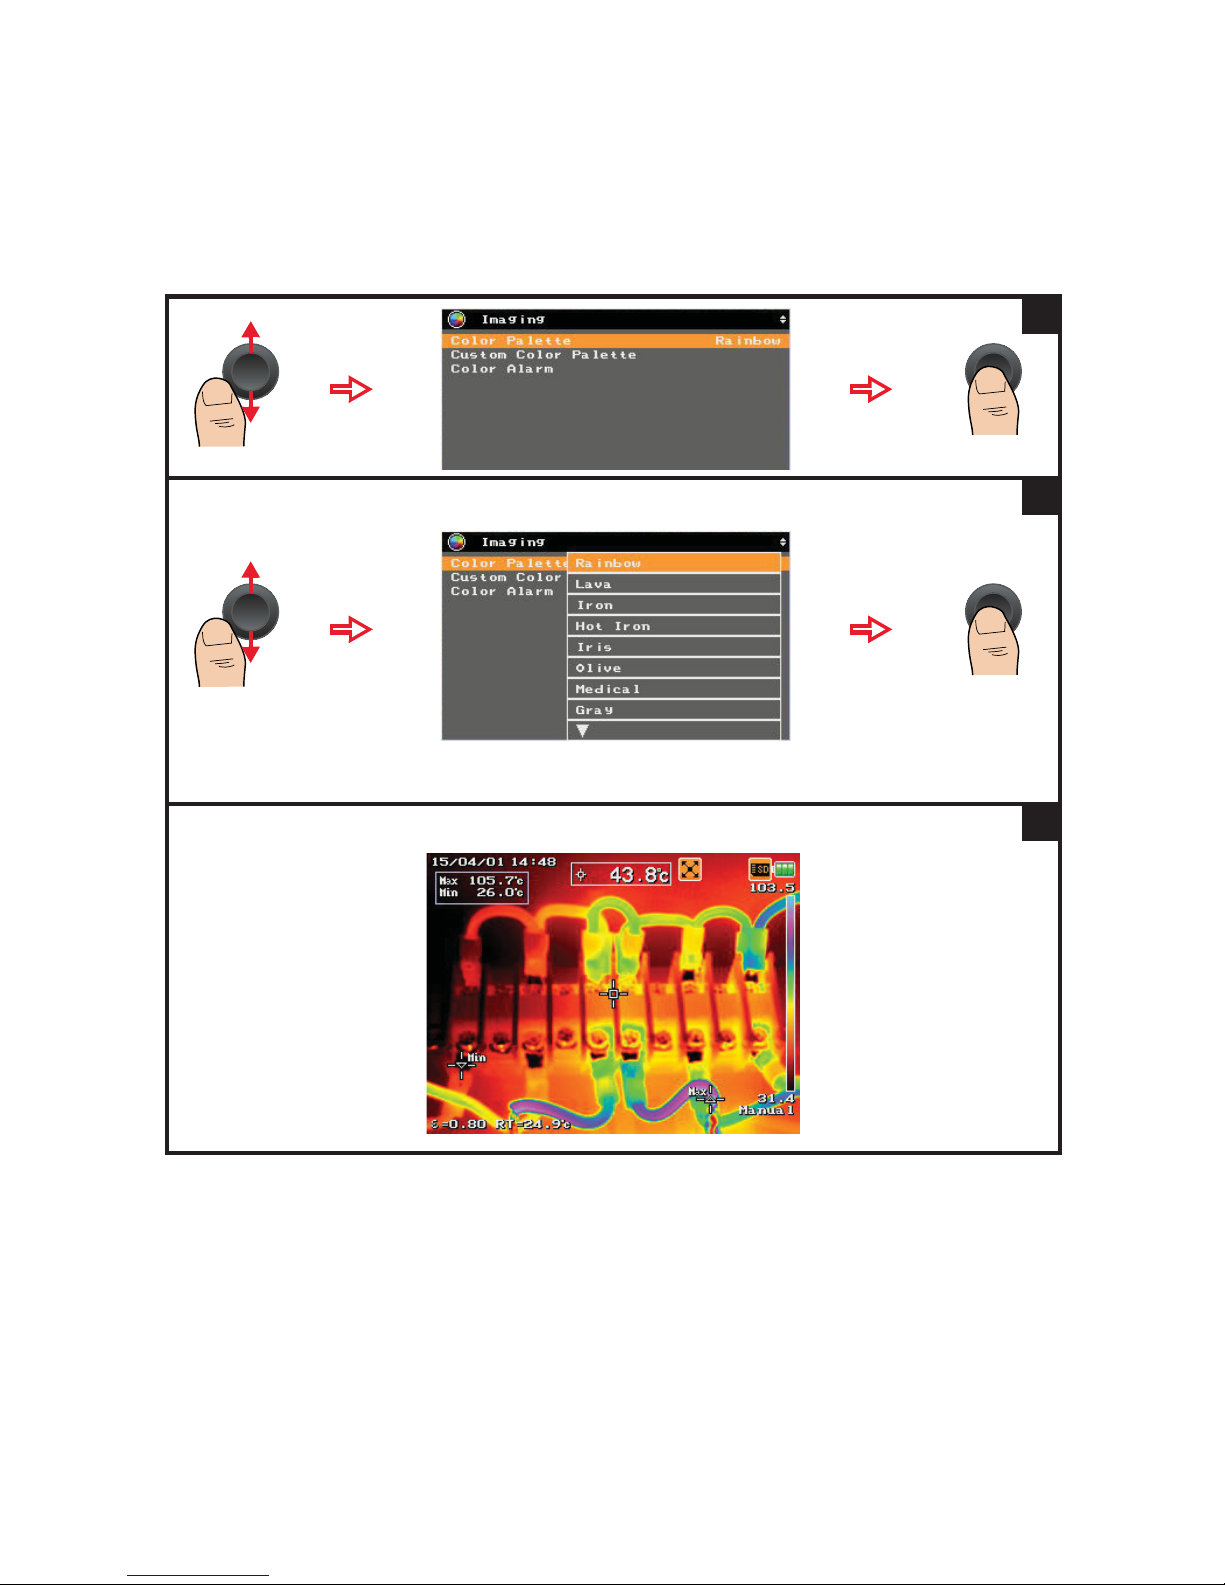
3
Select a color palette:
Lava, Olive, and Medical are only
available for U5856A and U5857A.
4
For example, the Medical color palette is applied:
5
Page 77
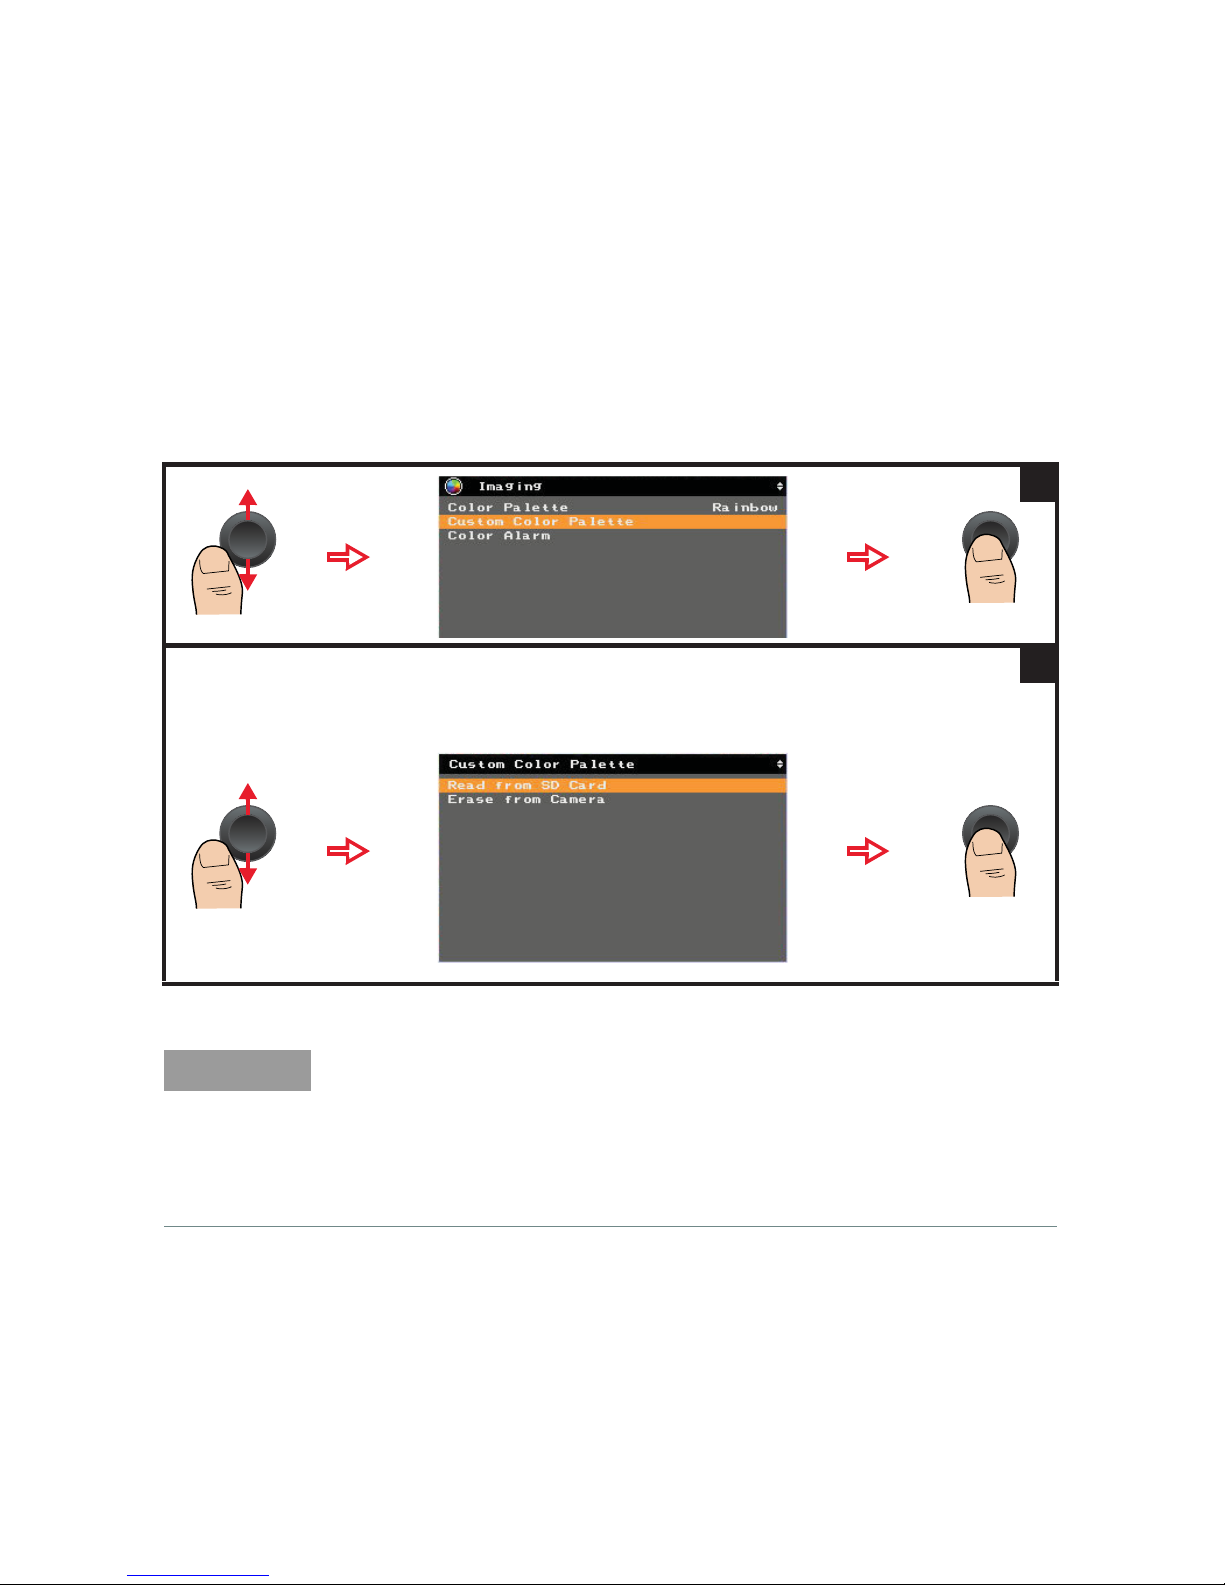
Image Capture, Processing, and Measurement Functions 2
Keysight U5850 Series User’s Guide 77
Load a custom color palette
You can create custom color palette from the Keysight TrueIR Analysis and
Reporting Tool. Visit www.keysight.com/find/trueIR_ART to download the
software for free.
1
– Select Read from SD Card to select a custom color palette from the SD memory card to
be loaded into the U5850 Series.
– Select Erase from Camera to remove the custom color palette from the U5850 Series.
2
NOTE
– The custom color palettes must be saved into the root directory of the
SD memory card.
– The maximum characters for the custom color palette file name is
8 characters.
– The U5850 Series allows up to 30 custom color palettes (sorted by time) to
be displayed from the SD memory card.
Page 78
2 Image Capture, Processing, and Measurement Functions
78 Keysight U5850 Series User’s Guide
Set the color alarm
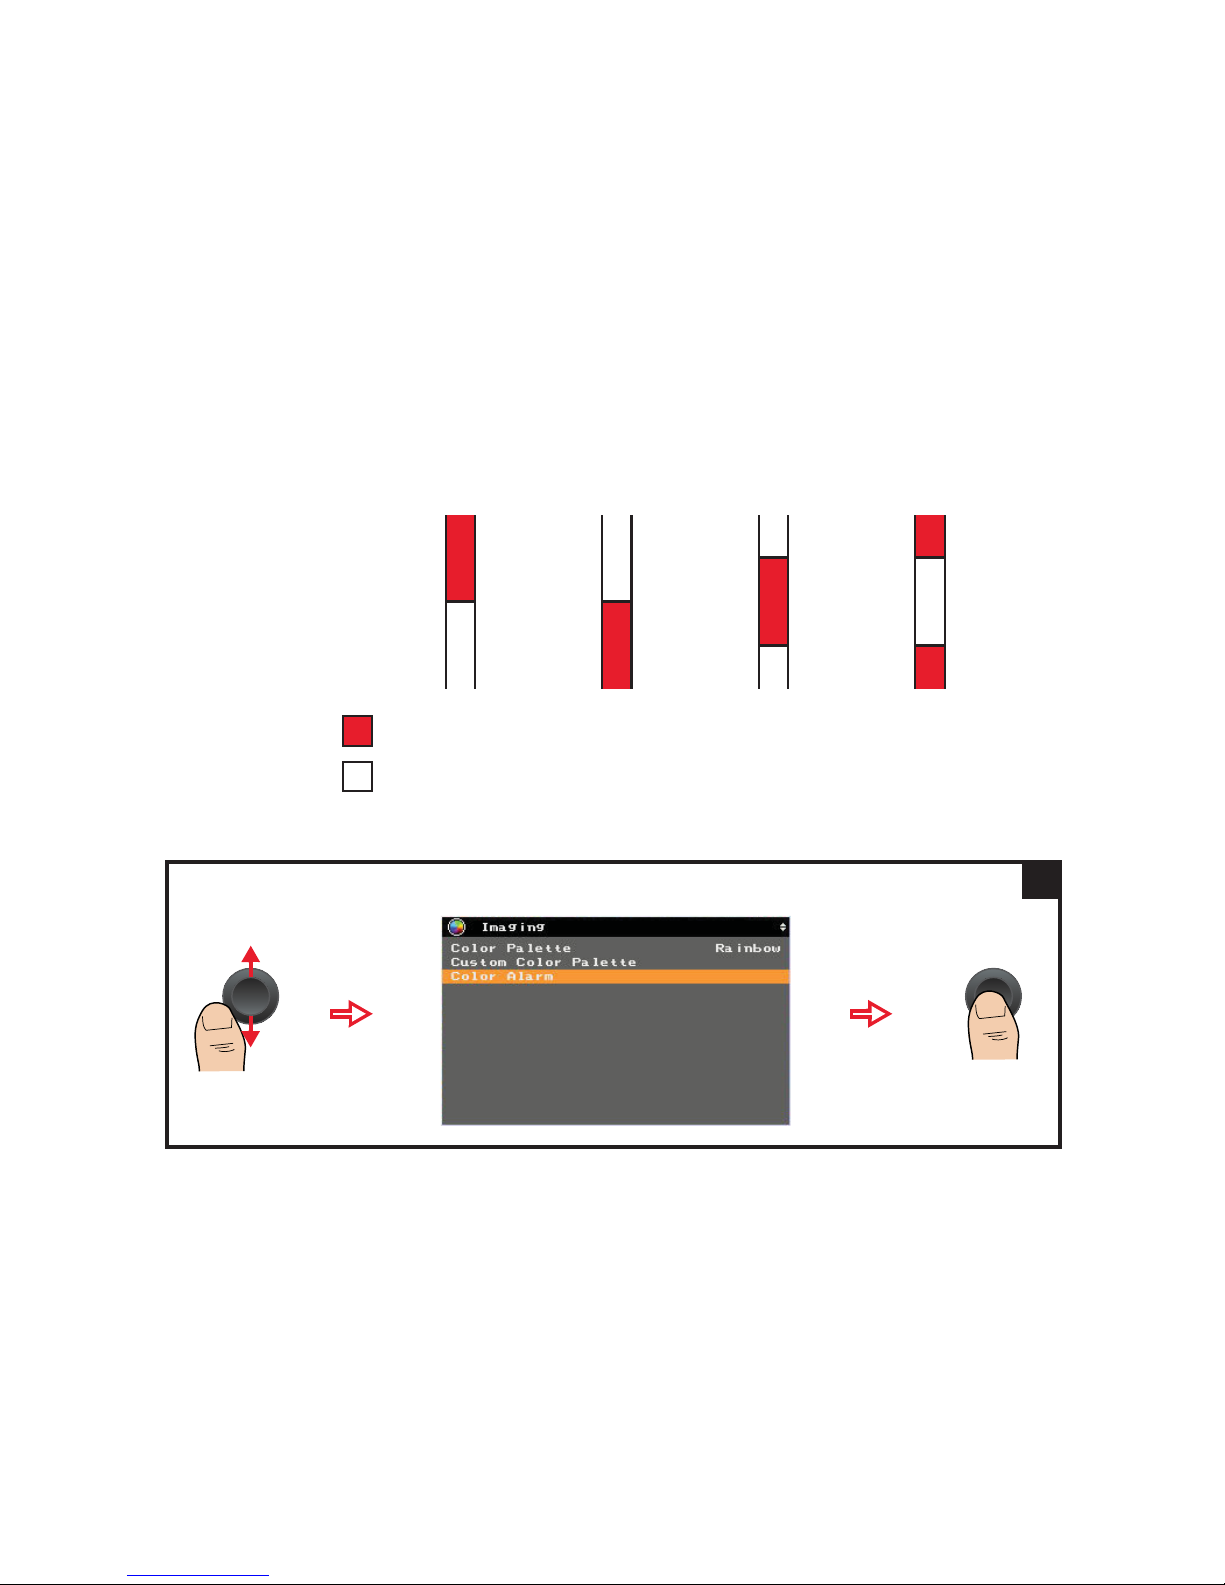
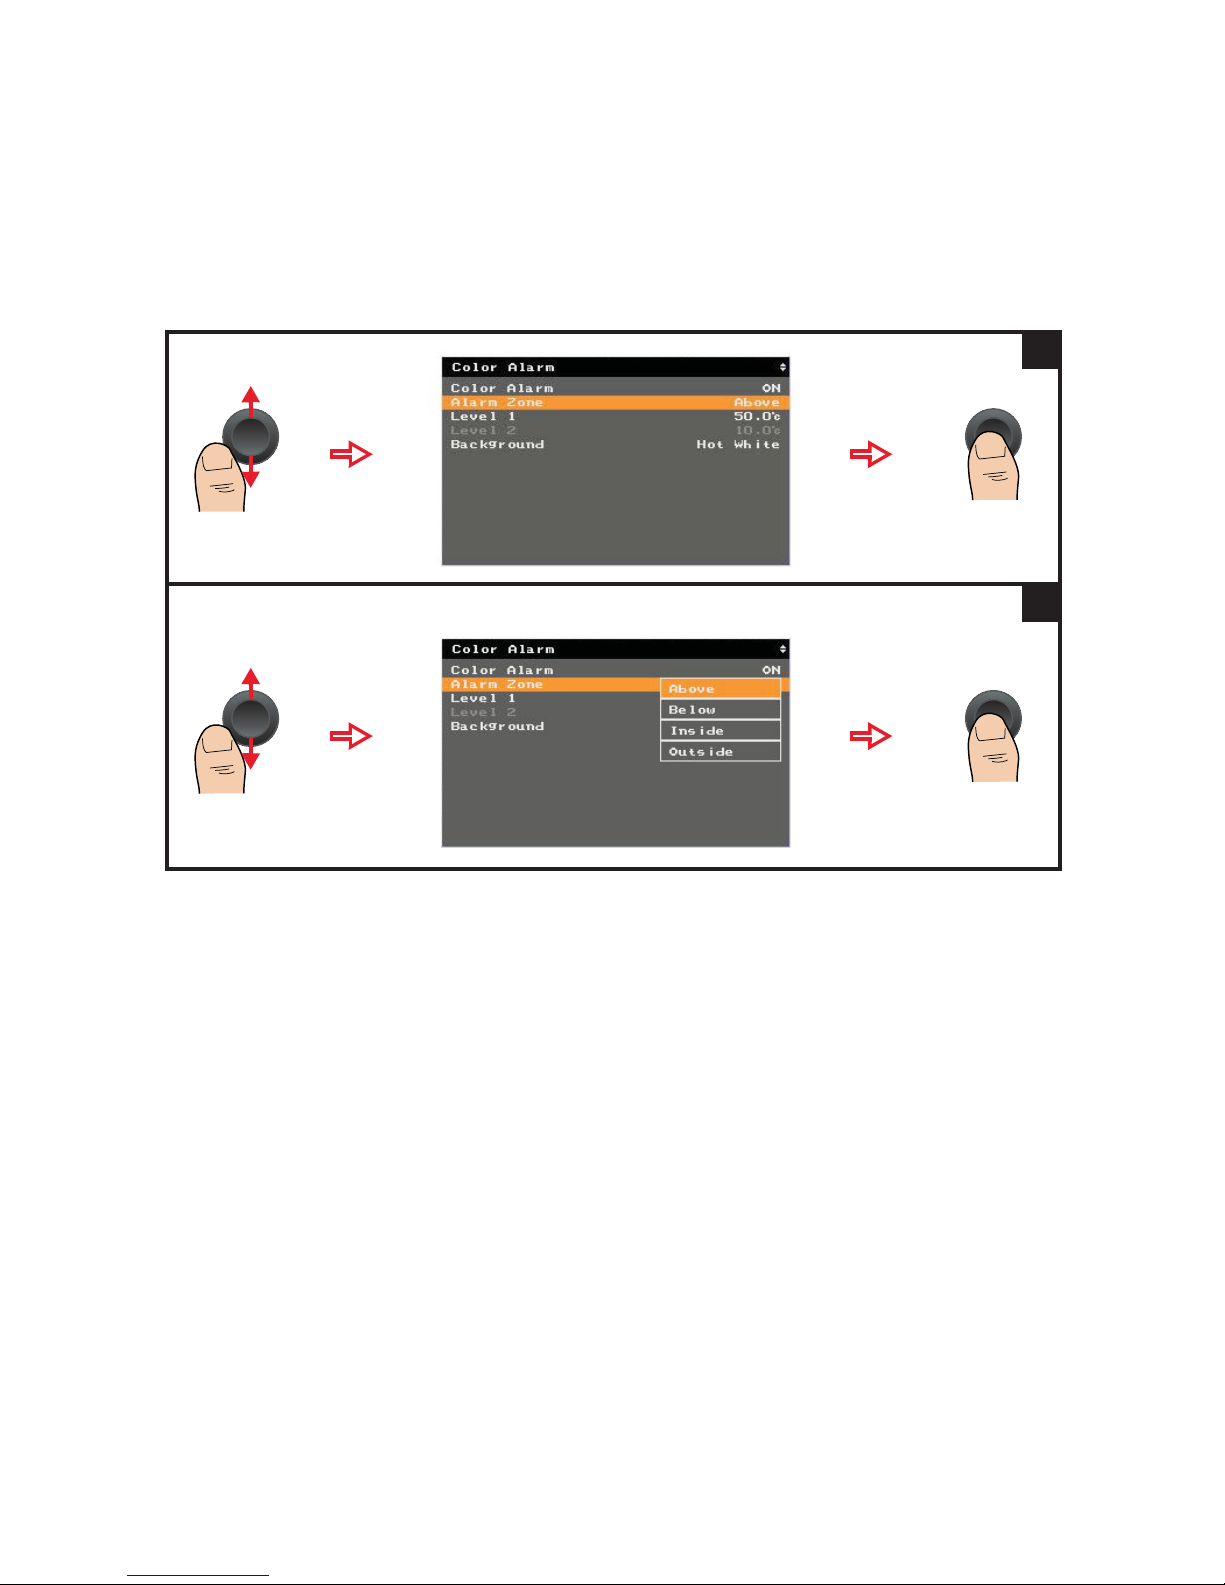
The color alarm allows you to set an alarm threshold which only displays IR
components on image zones above, below, inside, or outside the alarm threshold.
Turn on/off the color alarm
Alarm threshold s
Above Below Inside Outside
Level 1 Level 1
Level 1
Level 2
Level 1
Level 2
Alarm zone (based on selected color palette)
Image background zone (based on selected background)
Follow steps 1 to 2 from “Set the temperature range” on page 63.
1
Page 79
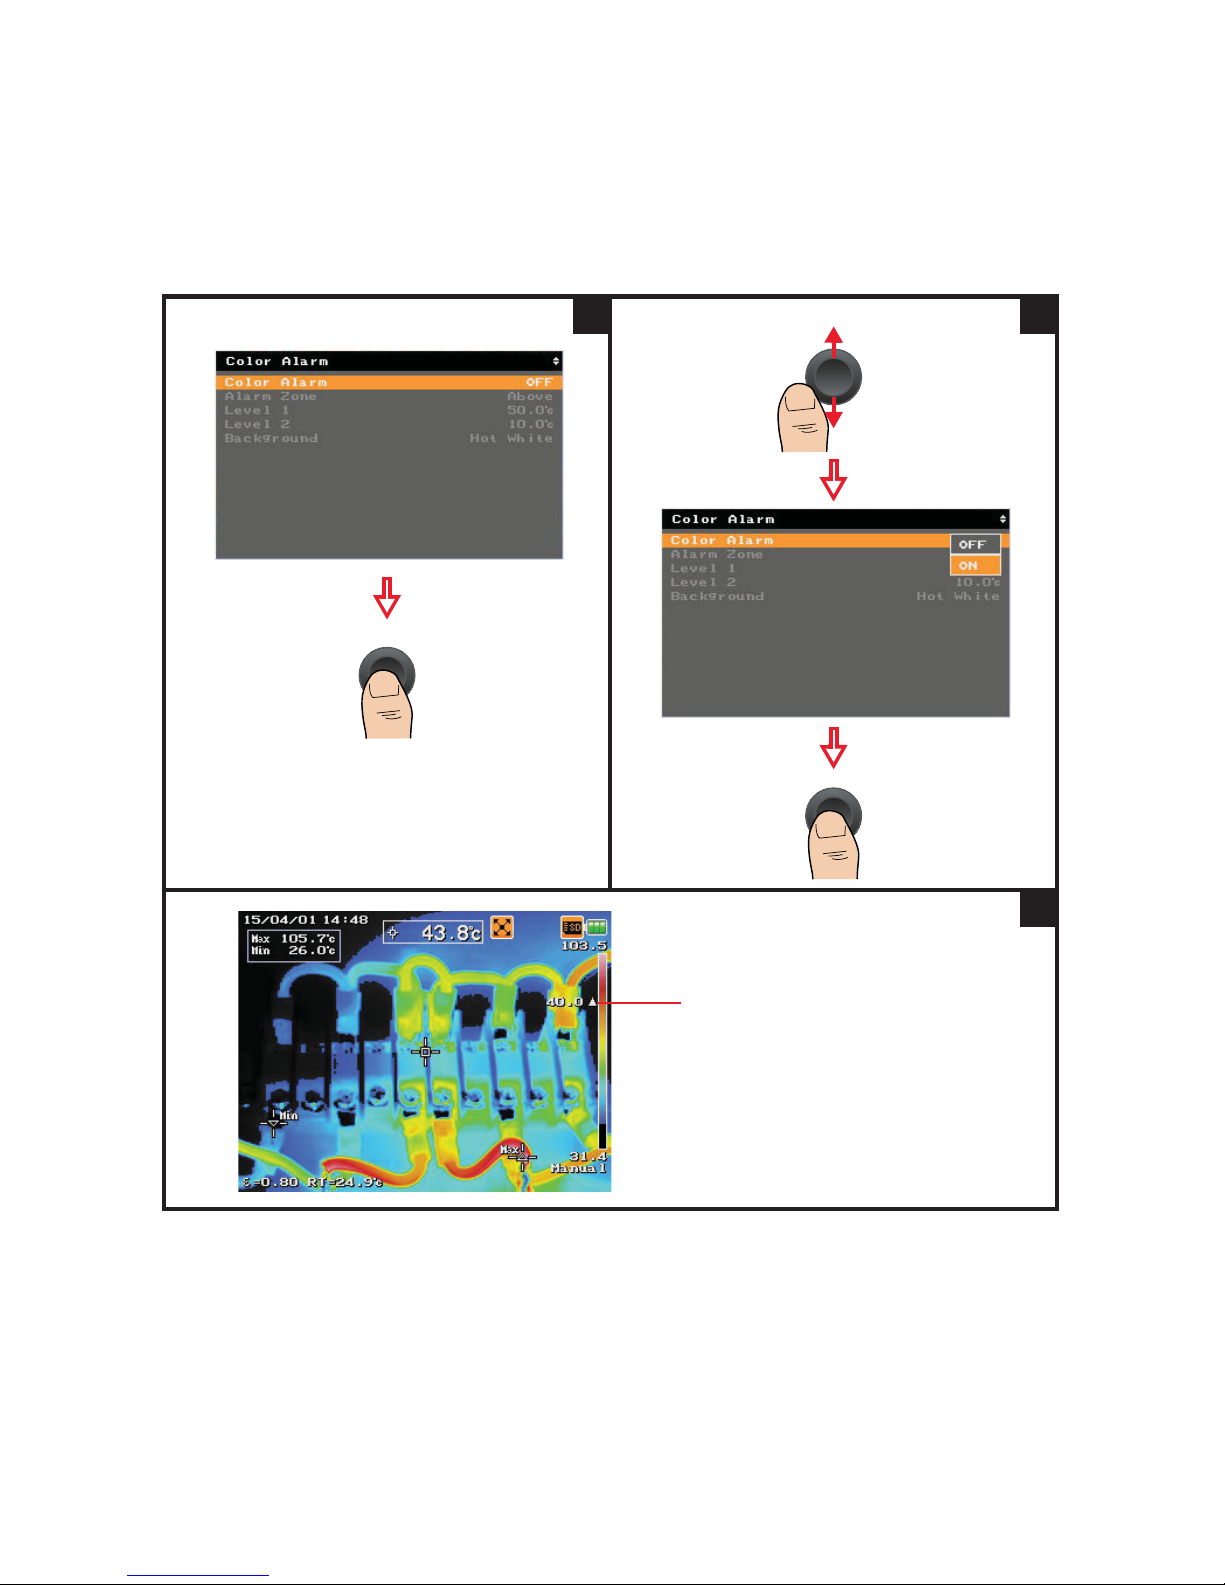
Image Capture, Processing, and Measurement Functions 2
Keysight U5850 Series User’s Guide 79
2
3
Color alarm indicator when enabled
3a
Page 80
2 Image Capture, Processing, and Measurement Functions
80 Keysight U5850 Series User’s Guide
Set the alarm threshold
1
Select the threshold type:
2
Page 81
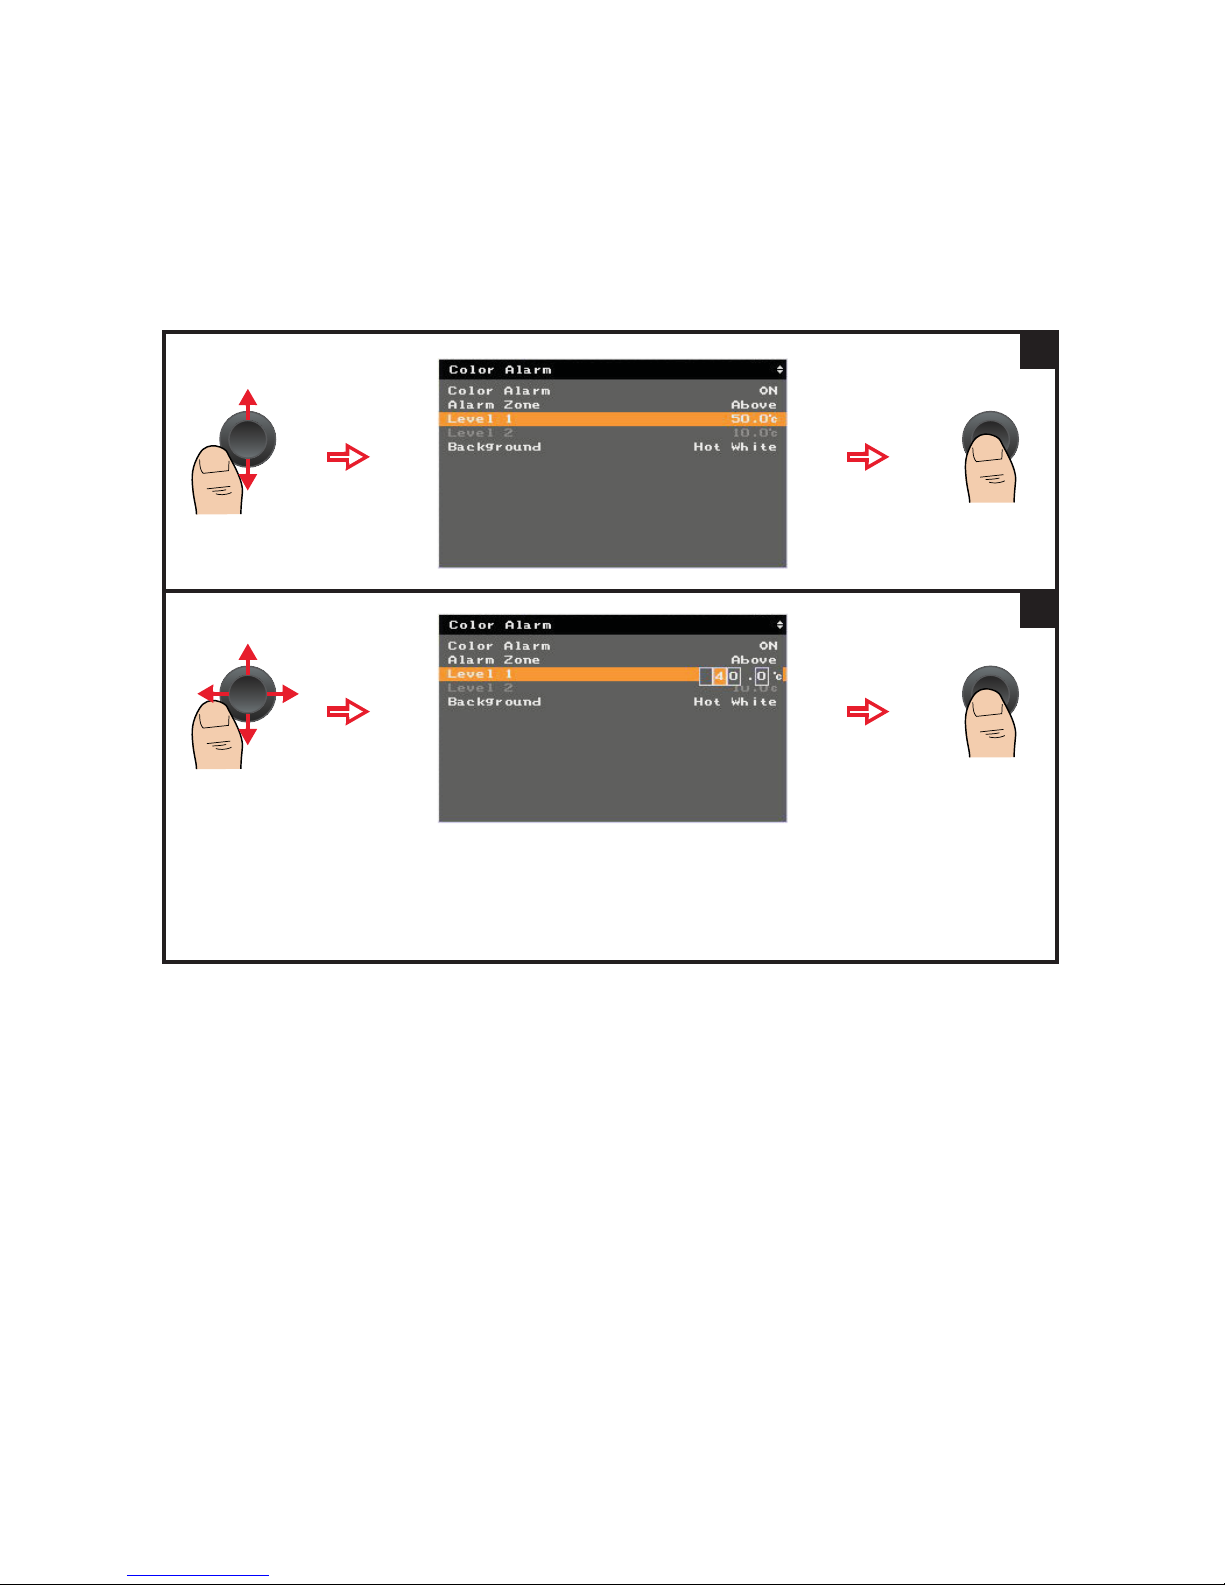
Image Capture, Processing, and Measurement Functions 2
Keysight U5850 Series User’s Guide 81
Set the alarm threshold level
1
Push left/right to move the
indicator.
Push up/down to increase/
decrease the digits.
If you have selected the Inside or Outside threshold, repeat the same procedure to enter the value for
Level 2.
2
Page 82
2 Image Capture, Processing, and Measurement Functions
82 Keysight U5850 Series User’s Guide
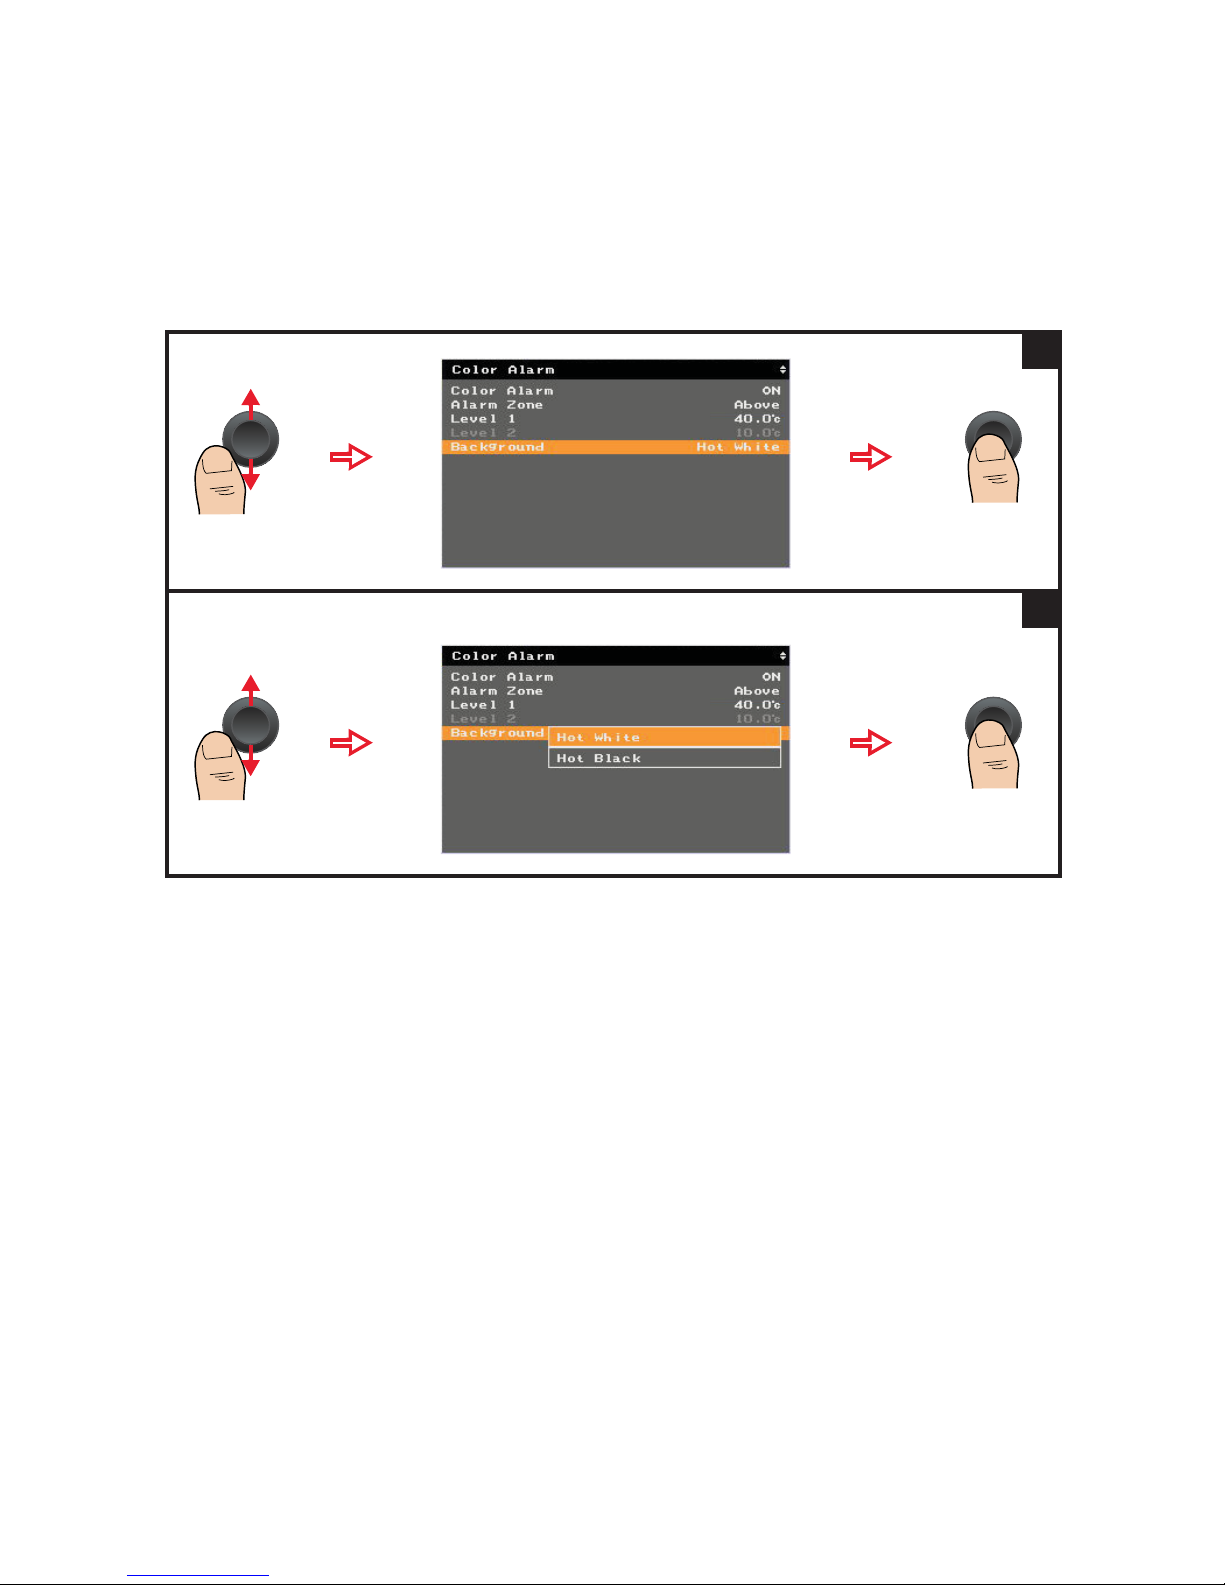
Set the image background
1
Select the background type:
2
Page 83
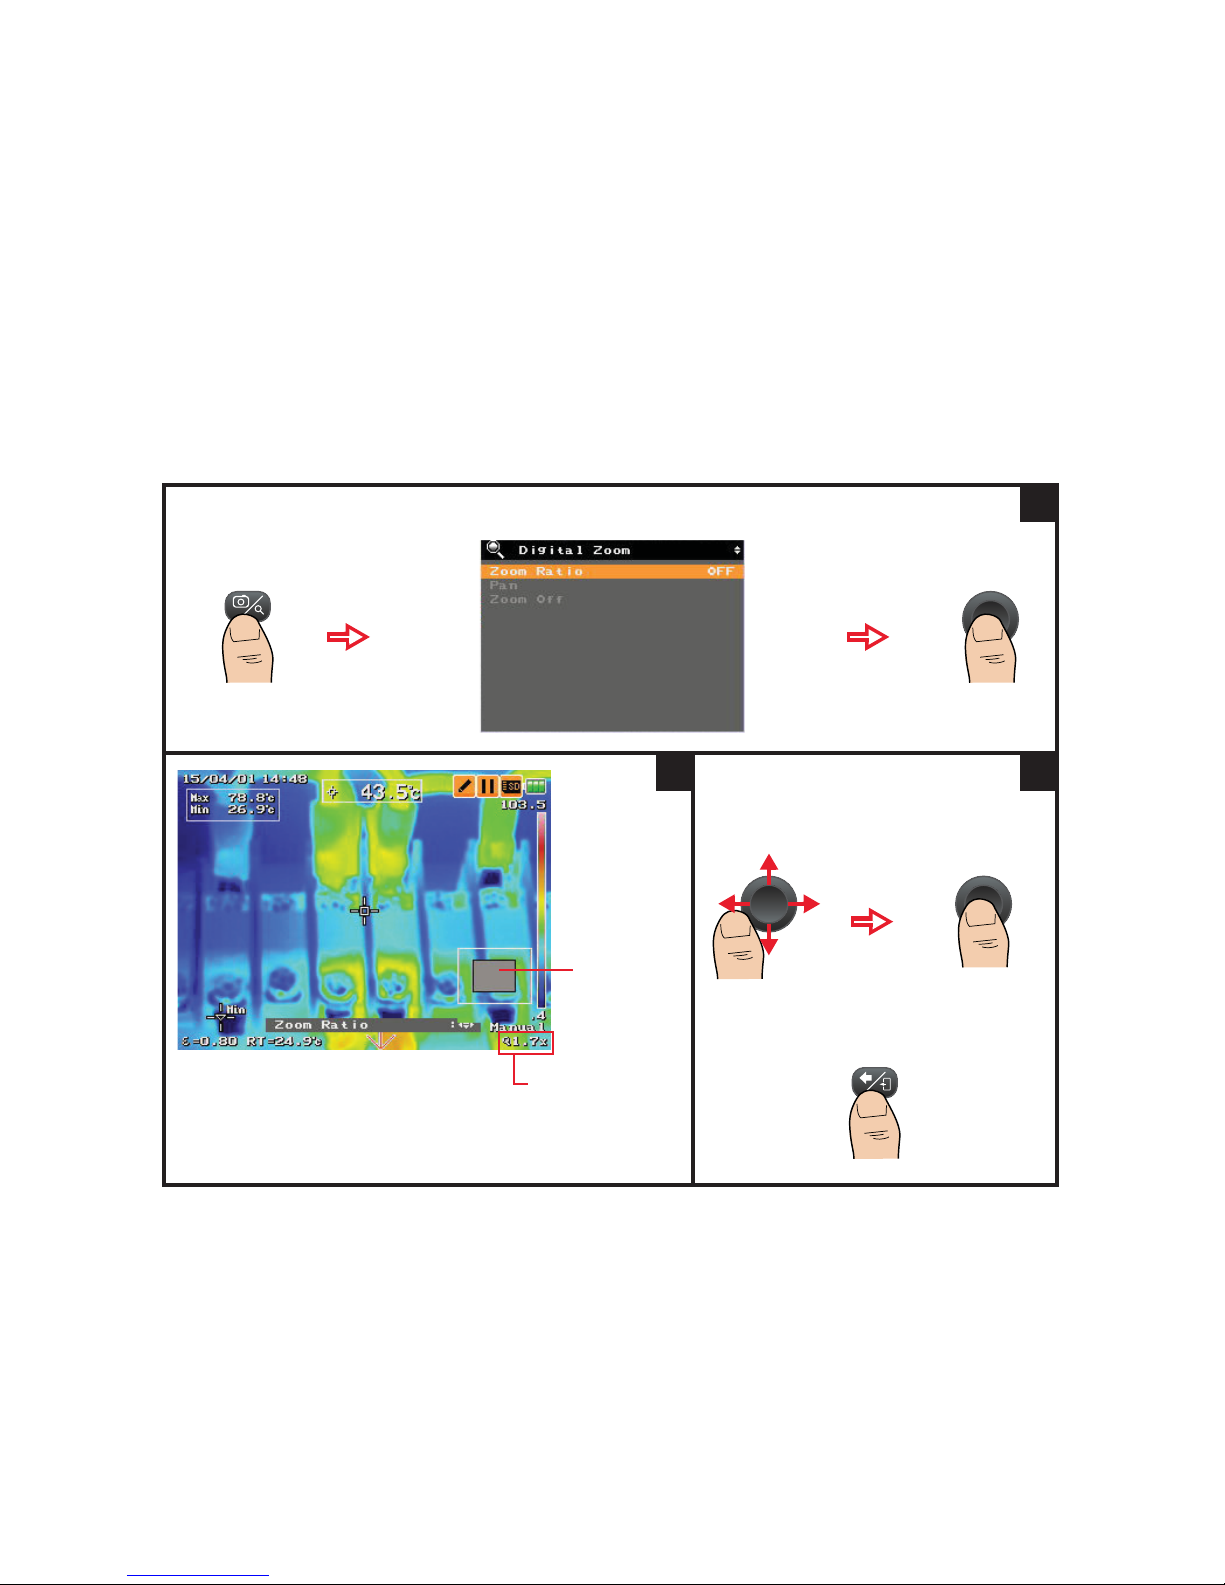
Image Capture, Processing, and Measurement Functions 2
Keysight U5850 Series User’s Guide 83
Digital Zoom
You can zoom in to expand the view of certain areas of the image at a 1× to 4×
ratio.
Set the zoom ratio
Press for 1 second.
1
In run mode, the zoom area is
always at the center of the image.
Zoom area
Zoom ratio value
2
To change and confirm the
zoom ratio:
To exit:
3
Page 84
2 Image Capture, Processing, and Measurement Functions
84 Keysight U5850 Series User’s Guide
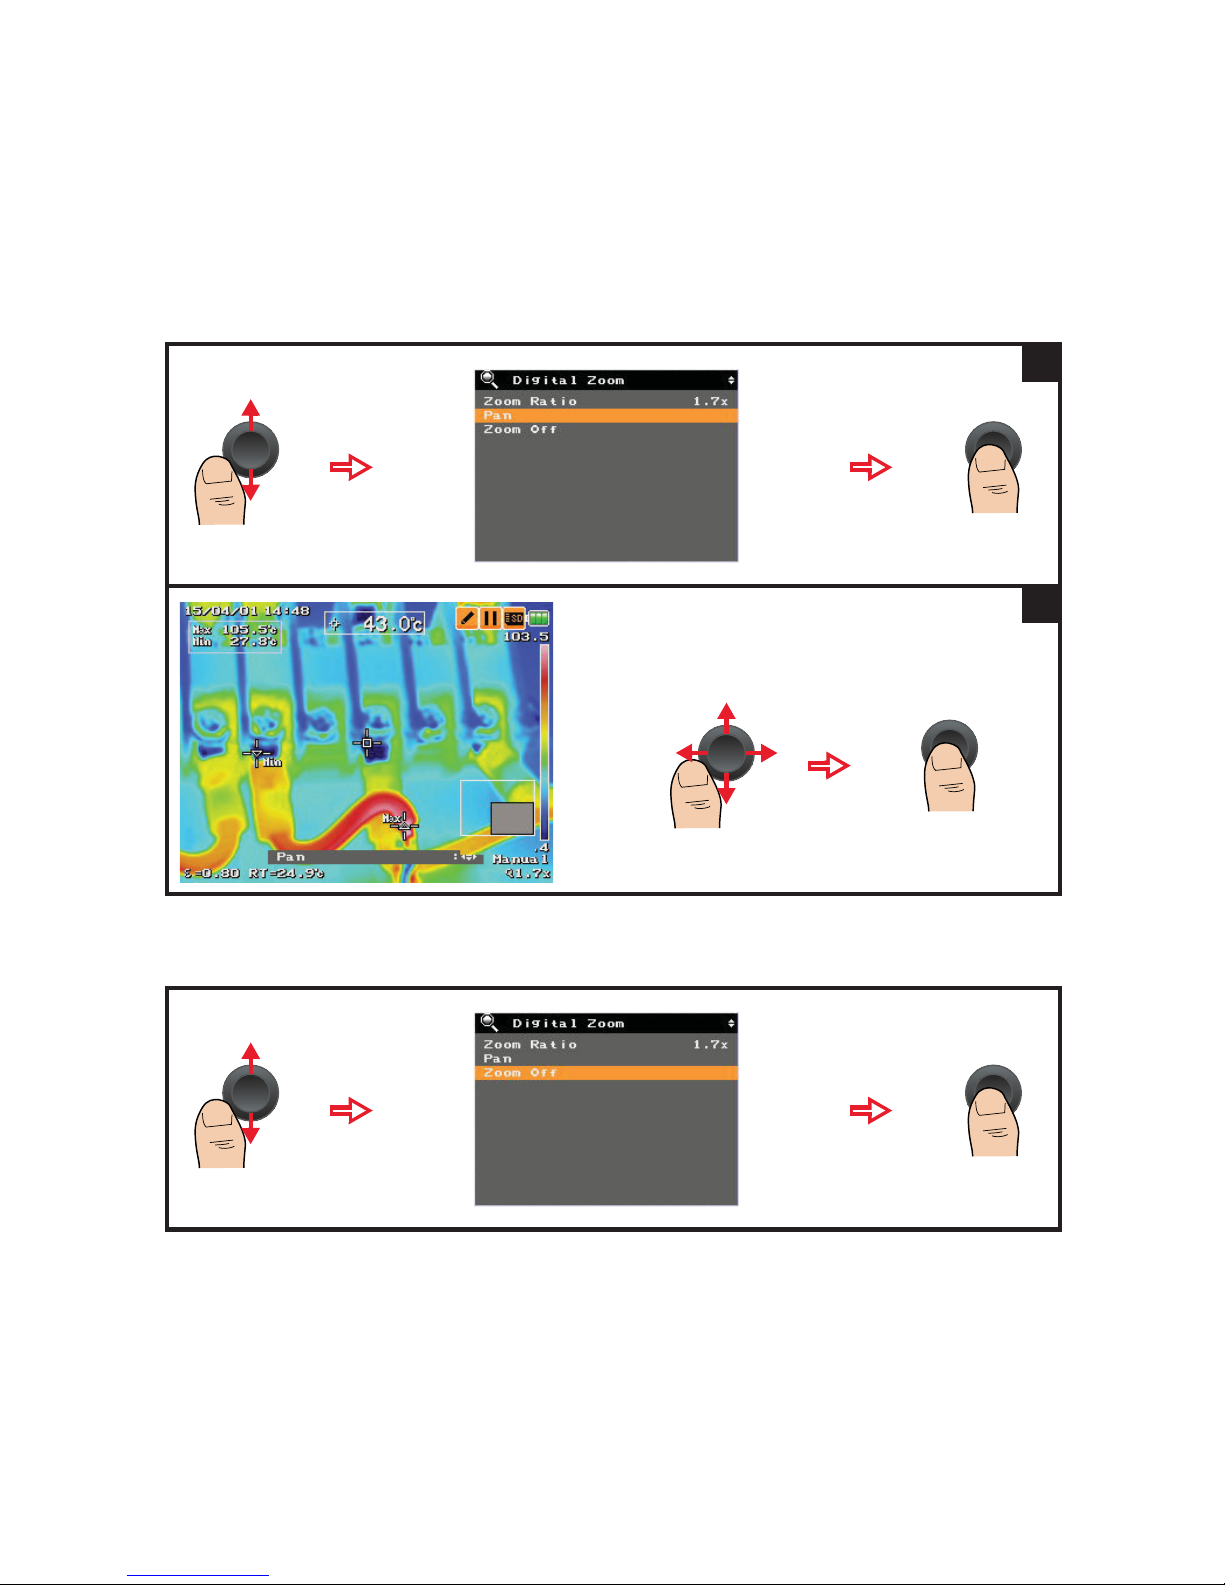
Pan (move) the zoom area
Disable zoom
1
To pan and confirm the zoom area:
2
Page 85
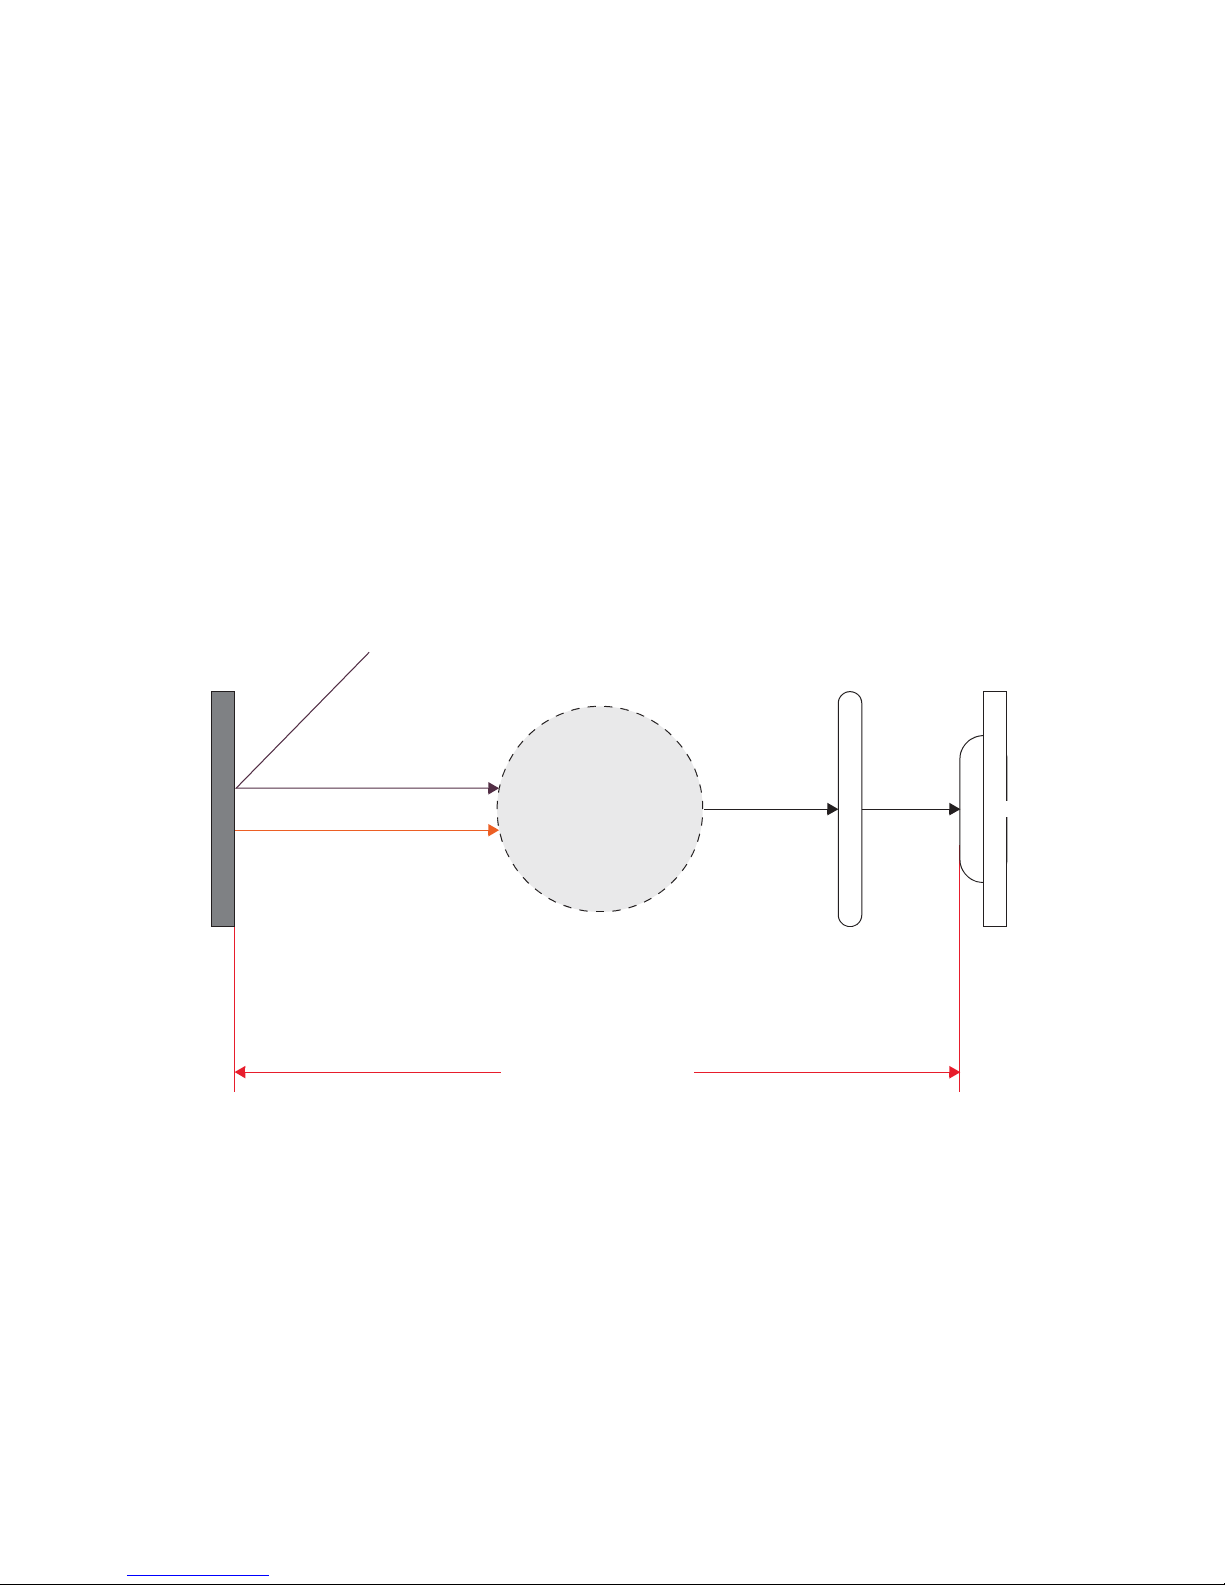
Image Capture, Processing, and Measurement Functions 2
Keysight U5850 Series User’s Guide 85
Parameter Controls
These controls enable you to improve the accuracy of your temperature
measurements by making corrections or compensations to the emissivity,
reflected temperature, object distance, ambient temperature, humidity, and
transmissivity.
Below illustrates a model of the IR emission energy received by the U5850 Series.
Reflective compensation Ambient compensation Transmissivity compensation
Object
temperature
Reflected temperature (RT)
Reflected IR
Emitted IR
Emissivity (ε)
Object distance (OD)
External window
transmission (τ),
if applicable
Atmospheric
temperature (AT)
Humidity (Hum)
Sensor
Page 86
2 Image Capture, Processing, and Measurement Functions
86 Keysight U5850 Series User’s Guide
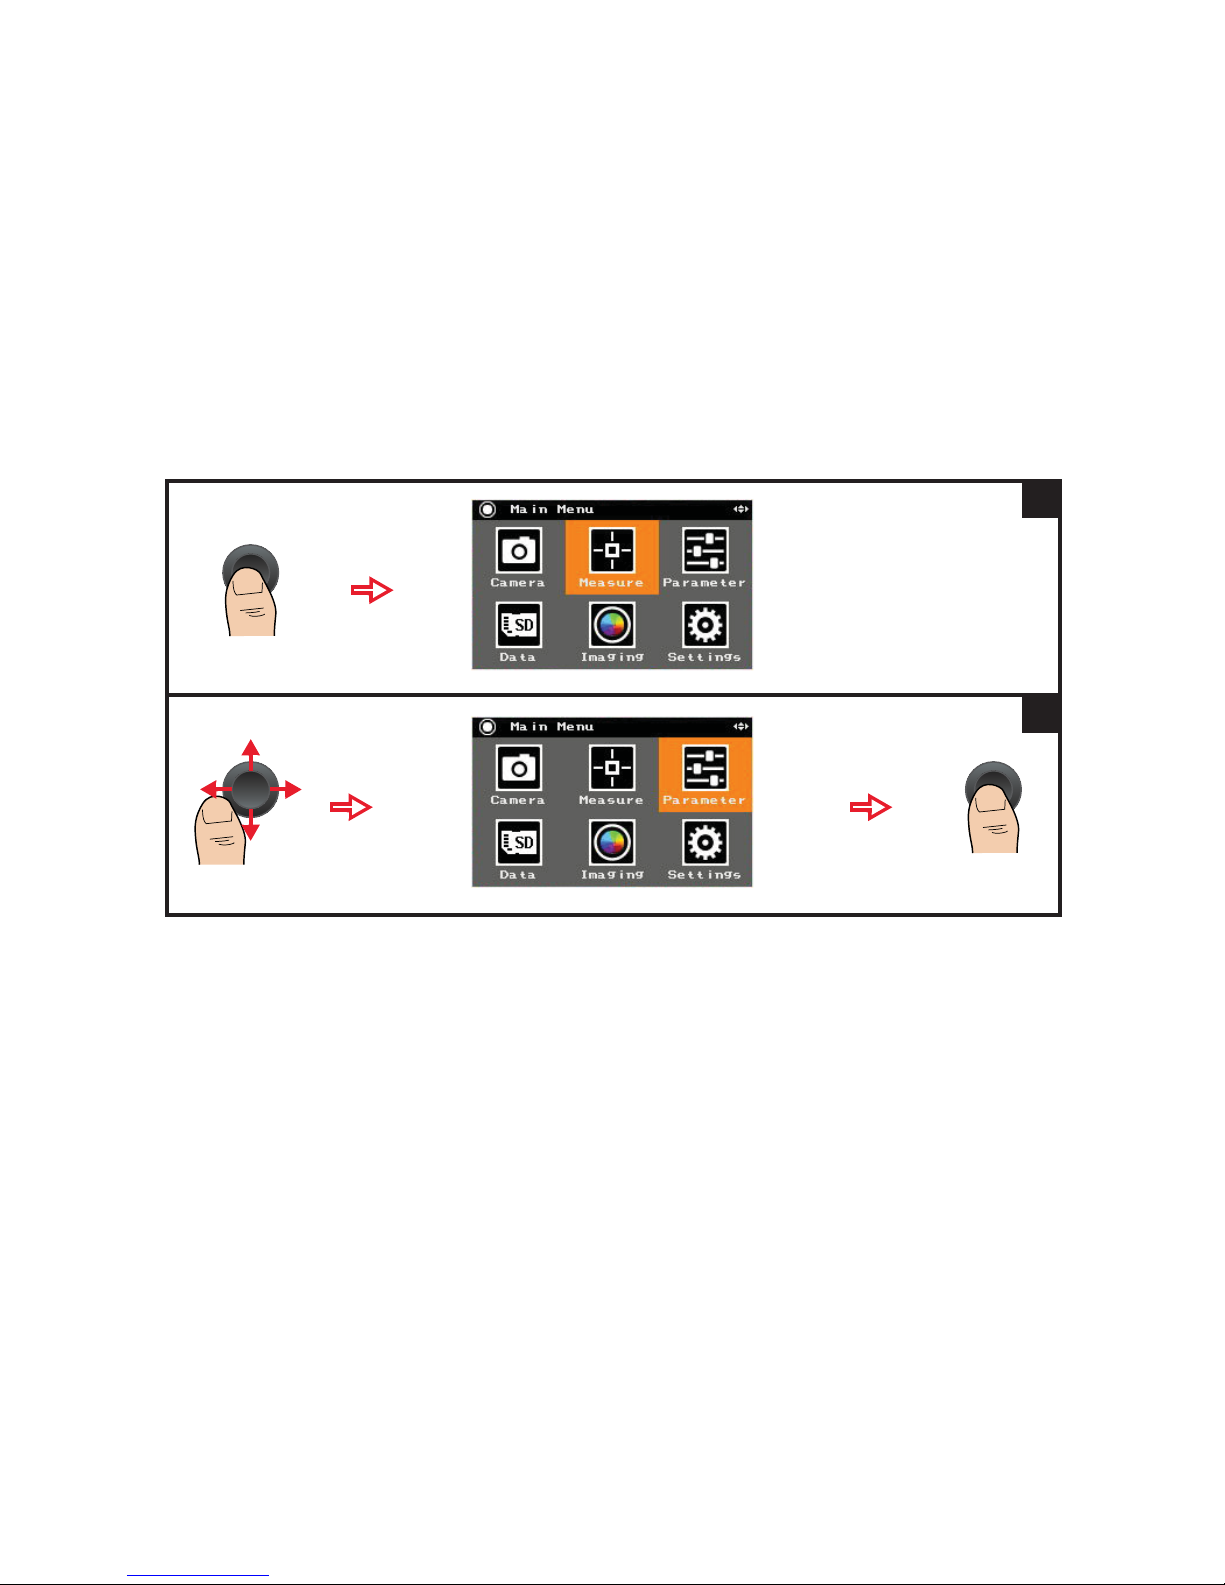
Set the emissivity (ε)
Emissivity is the ratio of energy radiated from an object and energy radiated from
blackbody. The emissivity varies with the surface condition of the object. The
emissivity value is expressed between 0.10 to 1.00.
Enter an emissivity value
1
2
Page 87
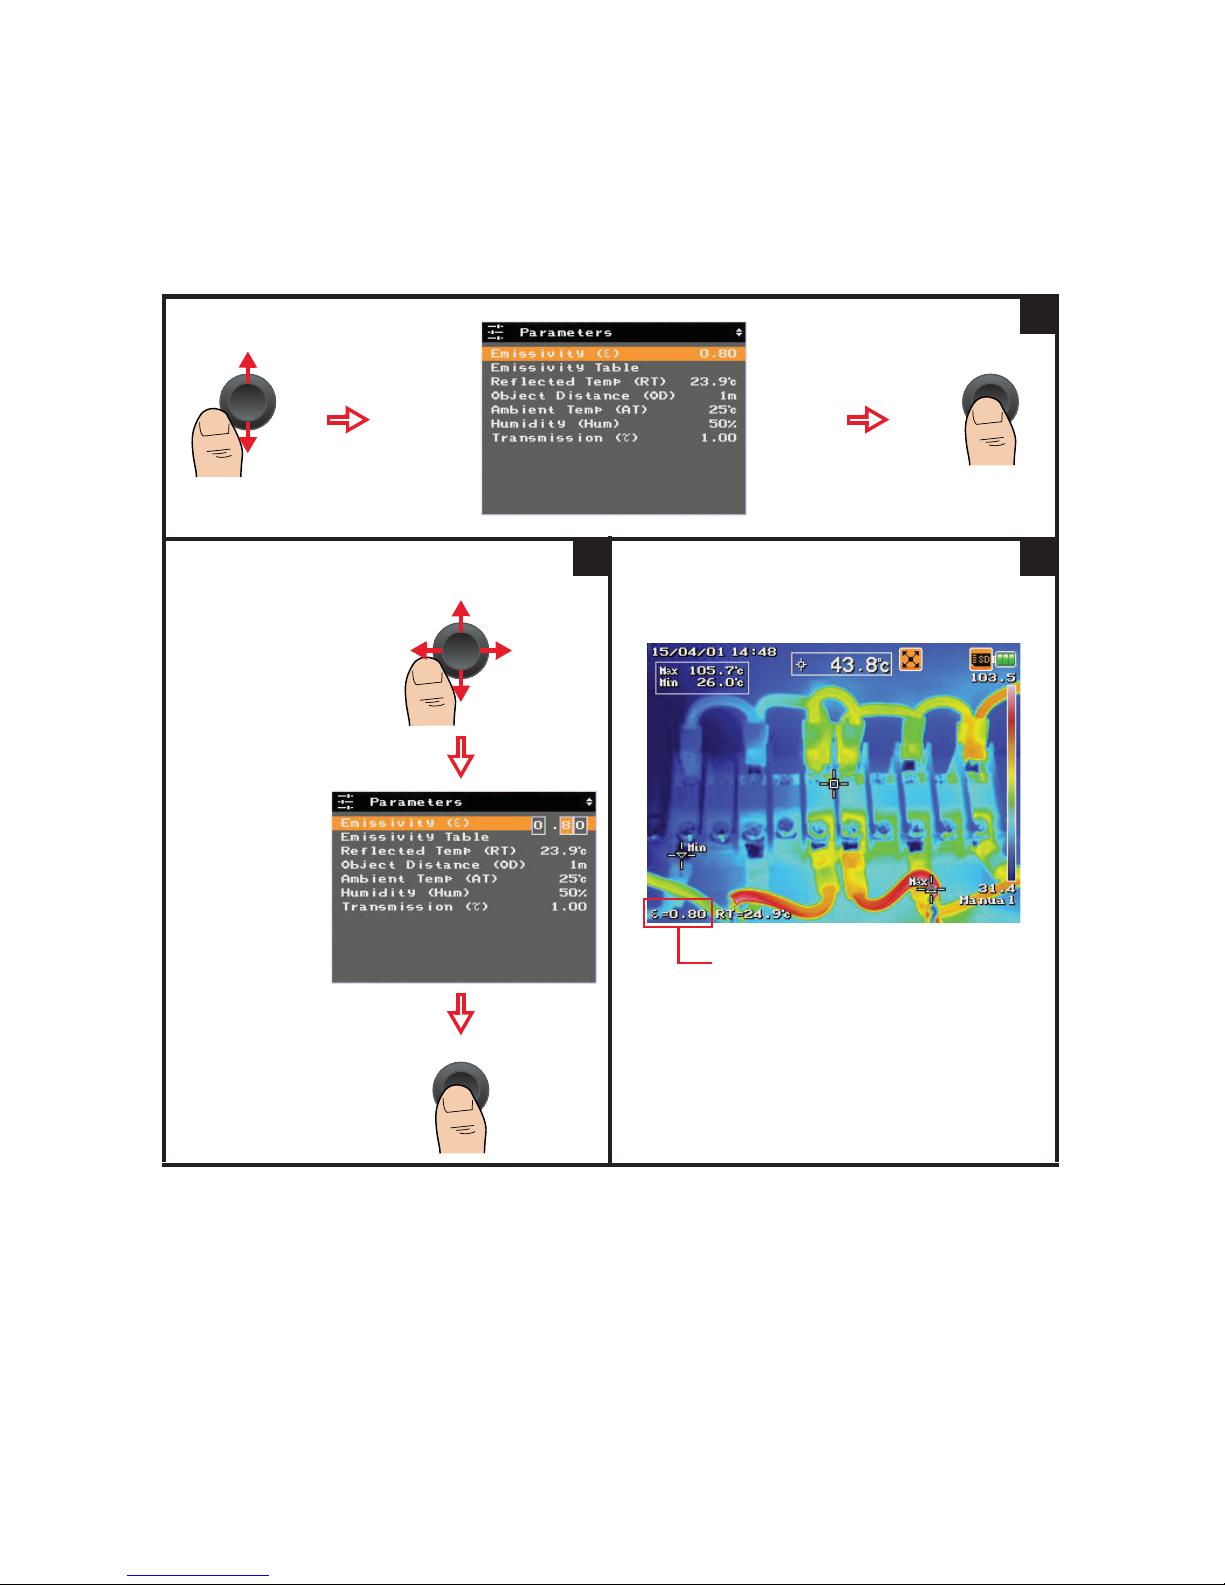
Image Capture, Processing, and Measurement Functions 2
Keysight U5850 Series User’s Guide 87
3
Enter a value from 0.10 to 1.00:
Push left/right to
move the indicator.
Push up/down to
increase/decrease
the digits.
4
Emissivity parameter indicator
To display the parameter indicator, refer to
“Configure the display items” on page 112.
5
Page 88
2 Image Capture, Processing, and Measurement Functions
88 Keysight U5850 Series User’s Guide
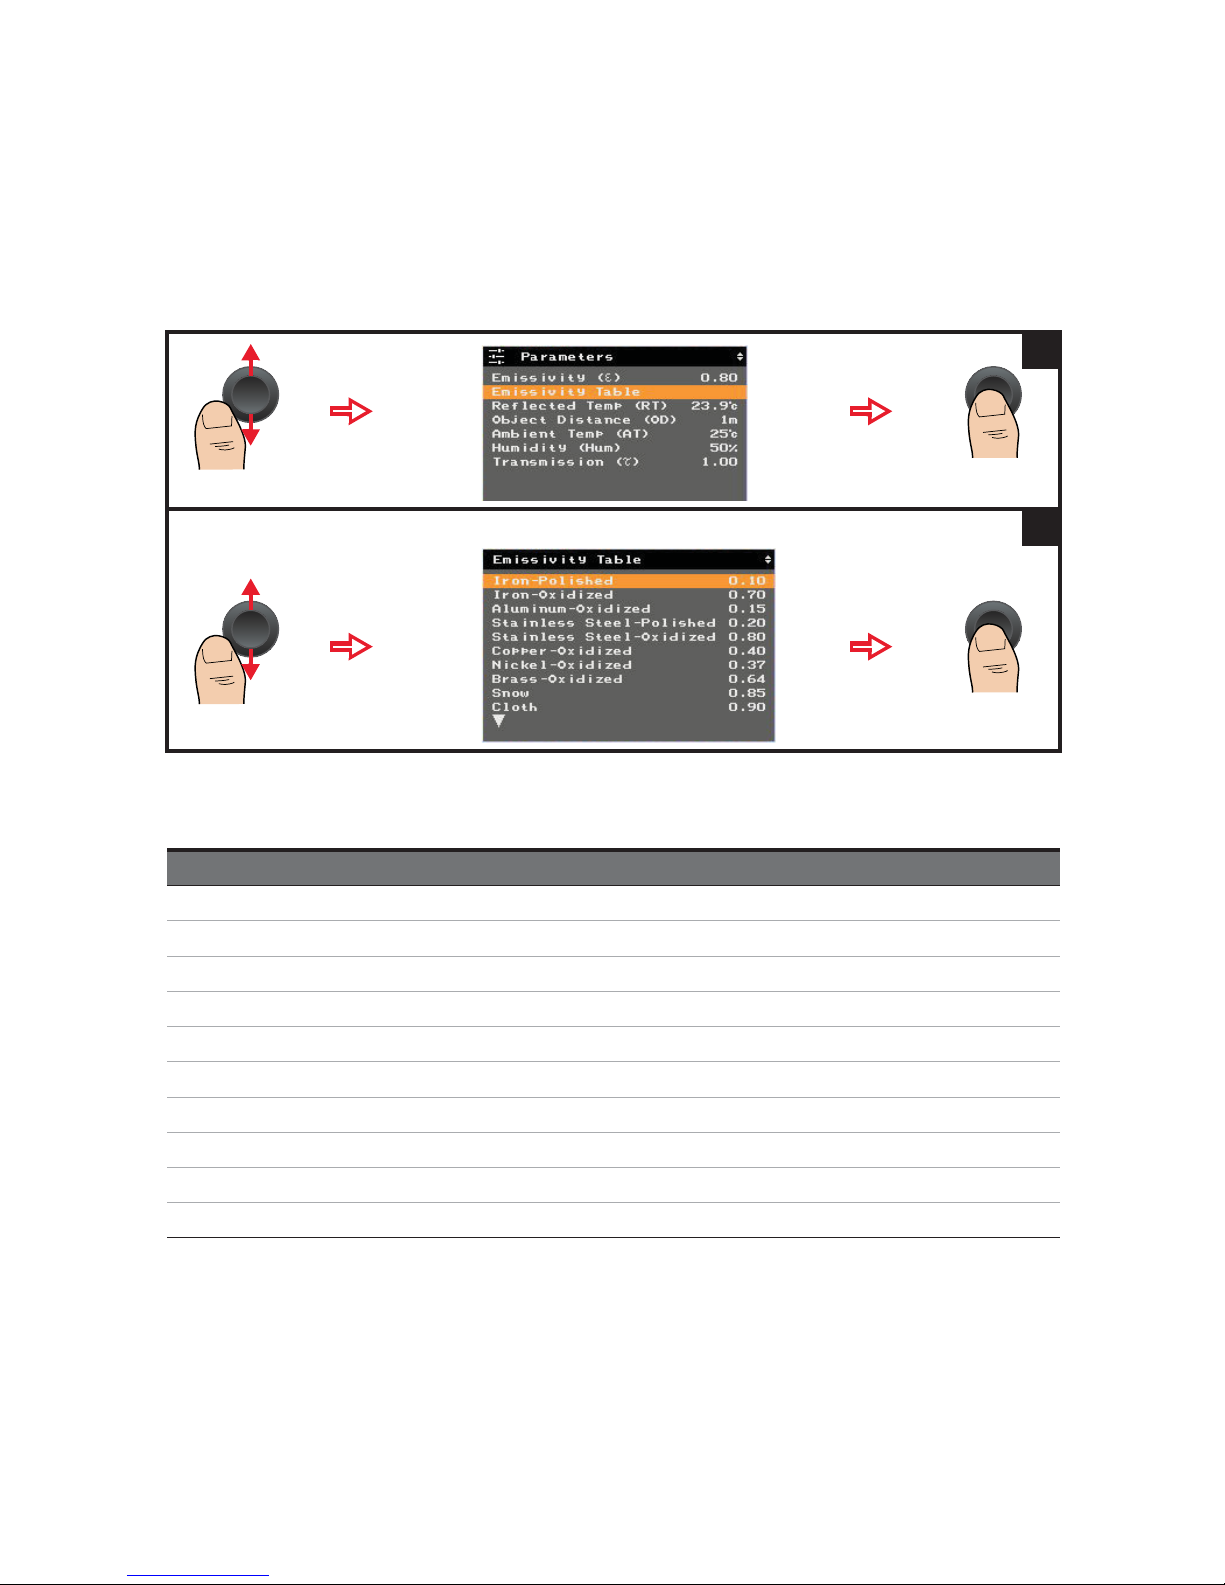
Select a common emissivity value
1
Select a value to use:
2
Tab le 2-1 Emissivity table
Common item Emissivity value Common item Emissivity value
Iron (polished) 0.10 Paint (typical) 0.94
Iron (oxidized) 0.70 Brick 0.93
Aluminum (oxidized) 0.15 Paper 0.90
Stainless steel (polished) 0.20 Clay 0.92
Stainless steel (oxidized) 0.80 Graphite (carbon) 0.95
Copper (oxidized) 0.40 Glass 0.90
Nickel (oxidized) 0.37 Rubber 0.90
Brass (oxidized) 0.64 Concrete 0.92
Snow 0.85 Skin 0.98
Cloth 0.90 Water 0.96
Page 89

Image Capture, Processing, and Measurement Functions 2
Keysight U5850 Series User’s Guide 89
Set the reflected temperature (RT)
RT can be corrected to obtain a more accurate temperature measurement
especially for low-emissivity objects.
You can manually enter an RT value or run the RT calibration (RT Cal) for
reflection source correction. When the source of reflection exists around an object
and the temperature of the source of reflection is known, you can enter the RT
value manually. If the temperature of the source of reflection is not known,
perform RT Cal to obtain the RT value automatically.
NOTE
RT Cal cannot be executed during freeze mode and image logging.
Page 90
2 Image Capture, Processing, and Measurement Functions
90 Keysight U5850 Series User’s Guide
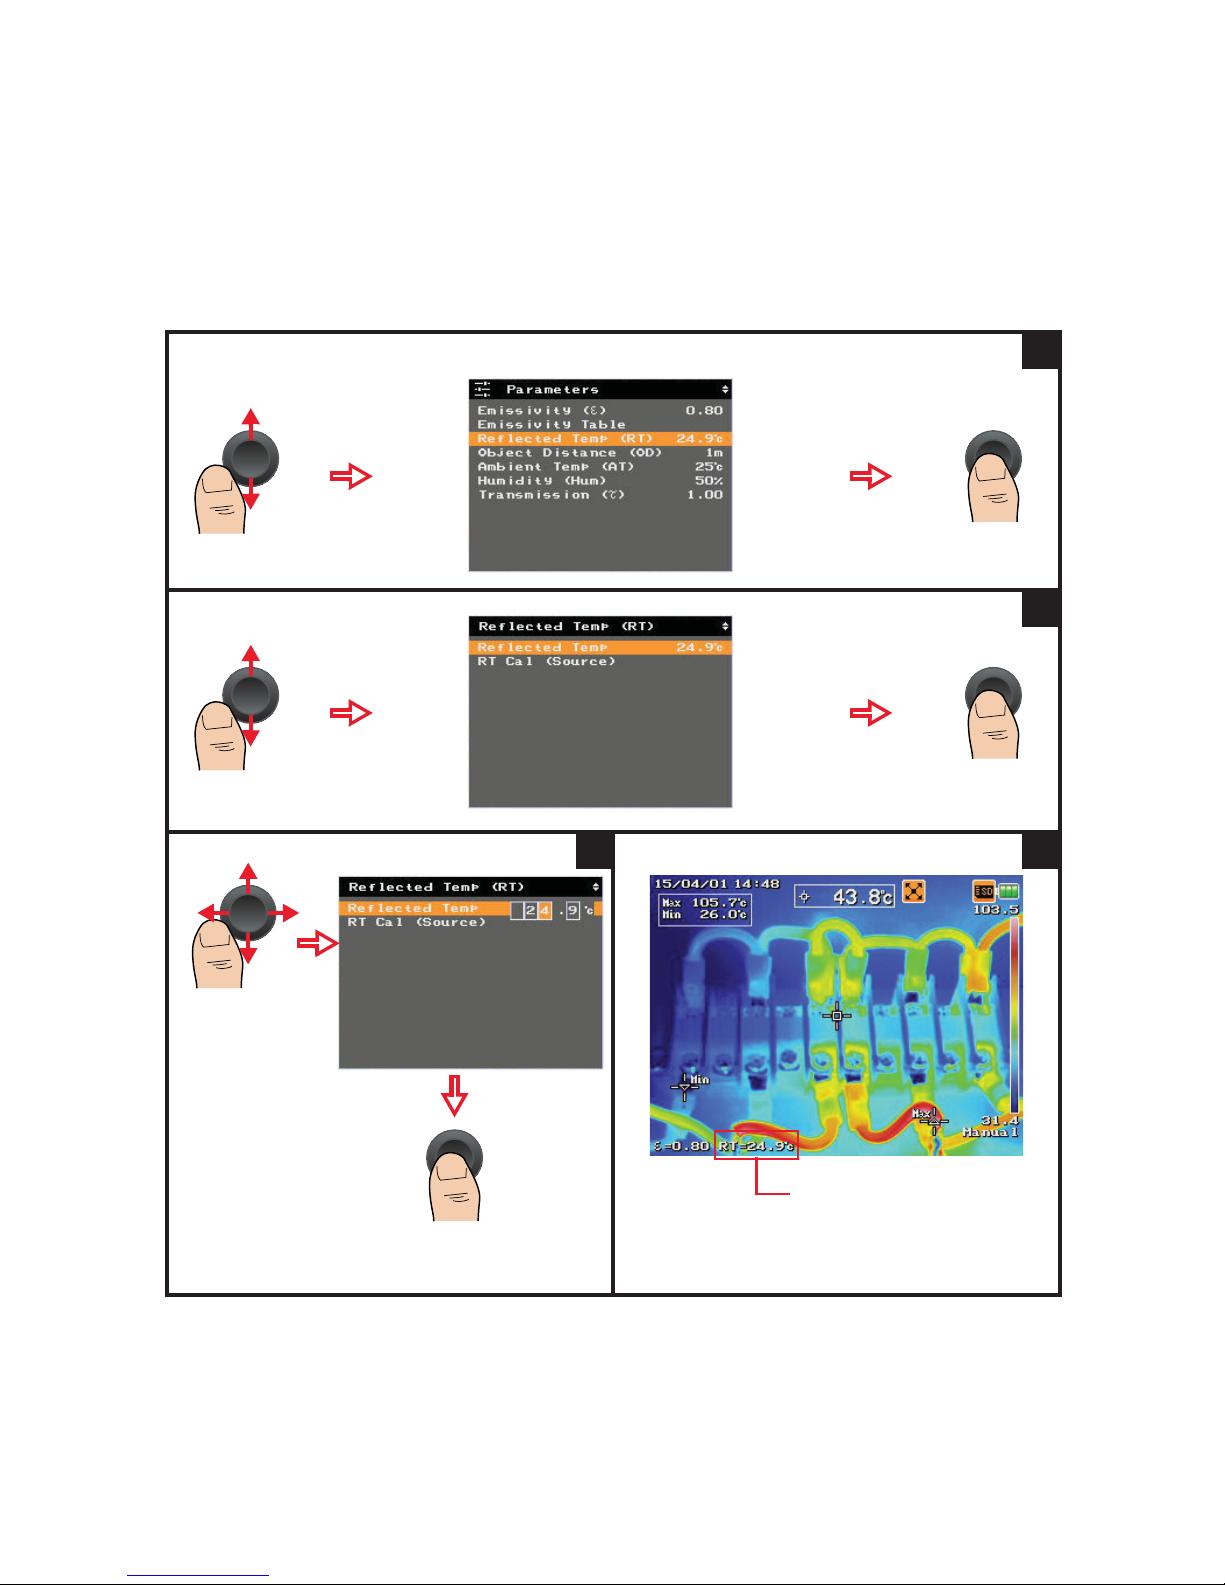
Enter an RT value
Follow steps 1 to 2 from “Enter an emissivity value” on page 86.
1
2
Push left/right
to move the
indicator.
Push up/down
to increase/
decrease the
digits.
3
RT parameter indicator
To display the parameter indicator, refer to
“Configure the display items” on page 112.
4
Page 91
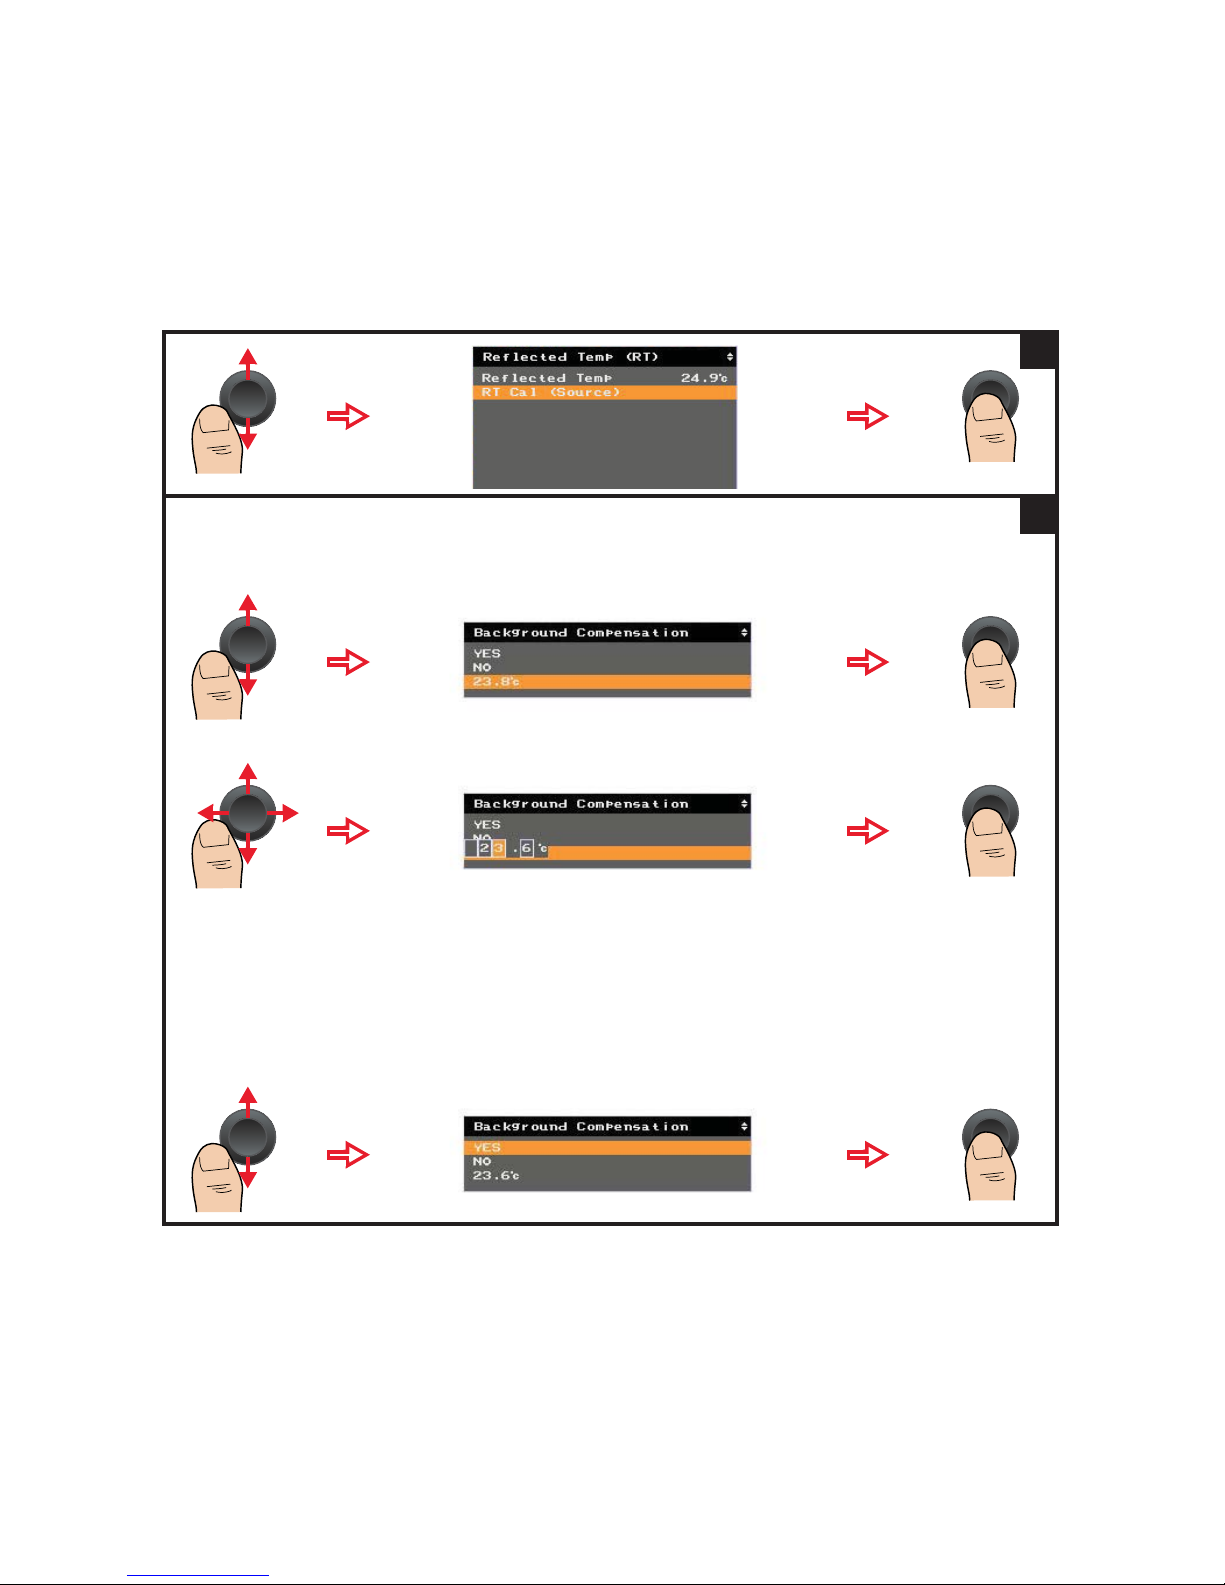
Image Capture, Processing, and Measurement Functions 2
Keysight U5850 Series User’s Guide 91
Run RT Cal for reflection source correction
1
If you know the temperature of the reflection source, you may enter the value.
If not, point the U5850 Series at the reflection source and select YES to run the
calibration to obtain the temperature.
Push left/right to
move the indicator.
Push up/down to
increase/decrease
the digits.
OR
2
Page 92
2 Image Capture, Processing, and Measurement Functions
92 Keysight U5850 Series User’s Guide
Set the object distance (OD), ambient temperature (AT), and
humidity (Hum)
You can perform compensation for ambient parameters (OD, AT, Hum) to correct
atmospheric errors in your temperature measurements.
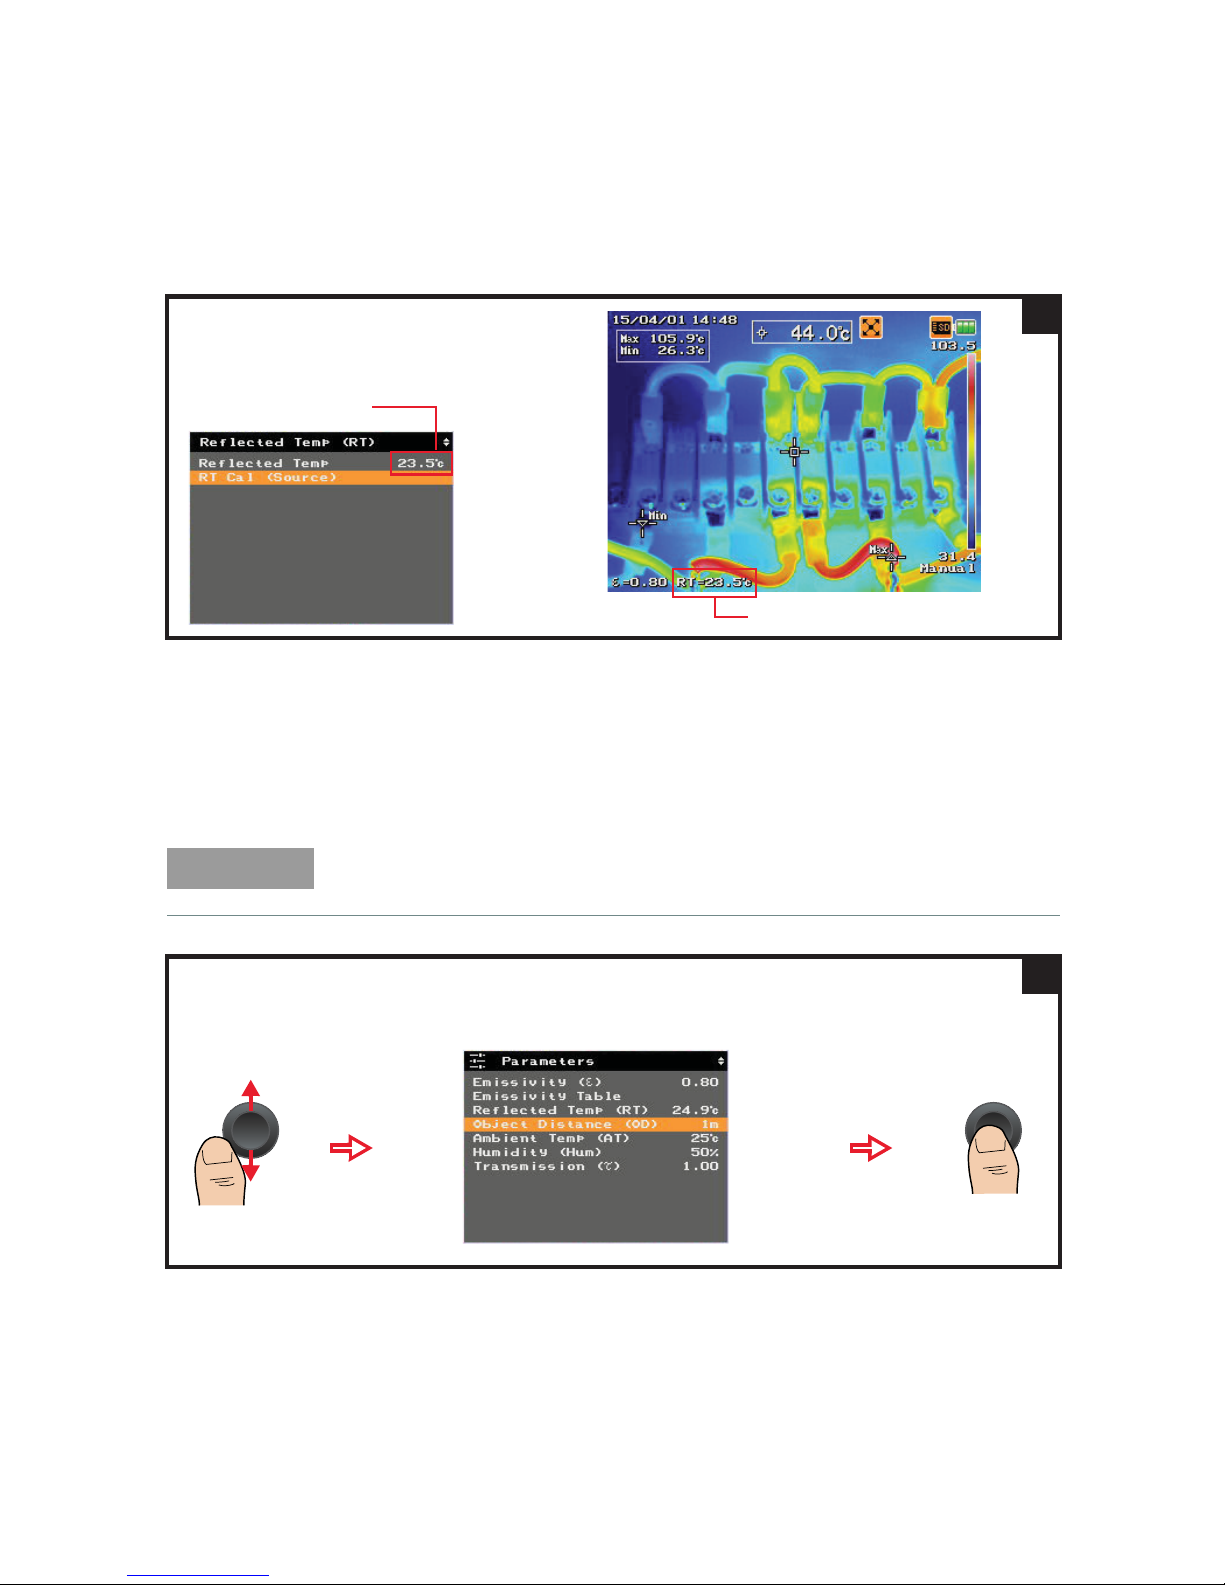
When completed, it will return to
the Reflected Temp (RT) menu.
Value updated
RT indicator updated
3
NOTE
Ambient parameter settings are not supported in the freeze, playback, and
image logging modes.
Follow steps 1 to 2 from “Enter an emissivity value” on page 86.
Select Object Distance (OD)/Ambient Temp (AT)/Humid ity (Hum):
1
Page 93
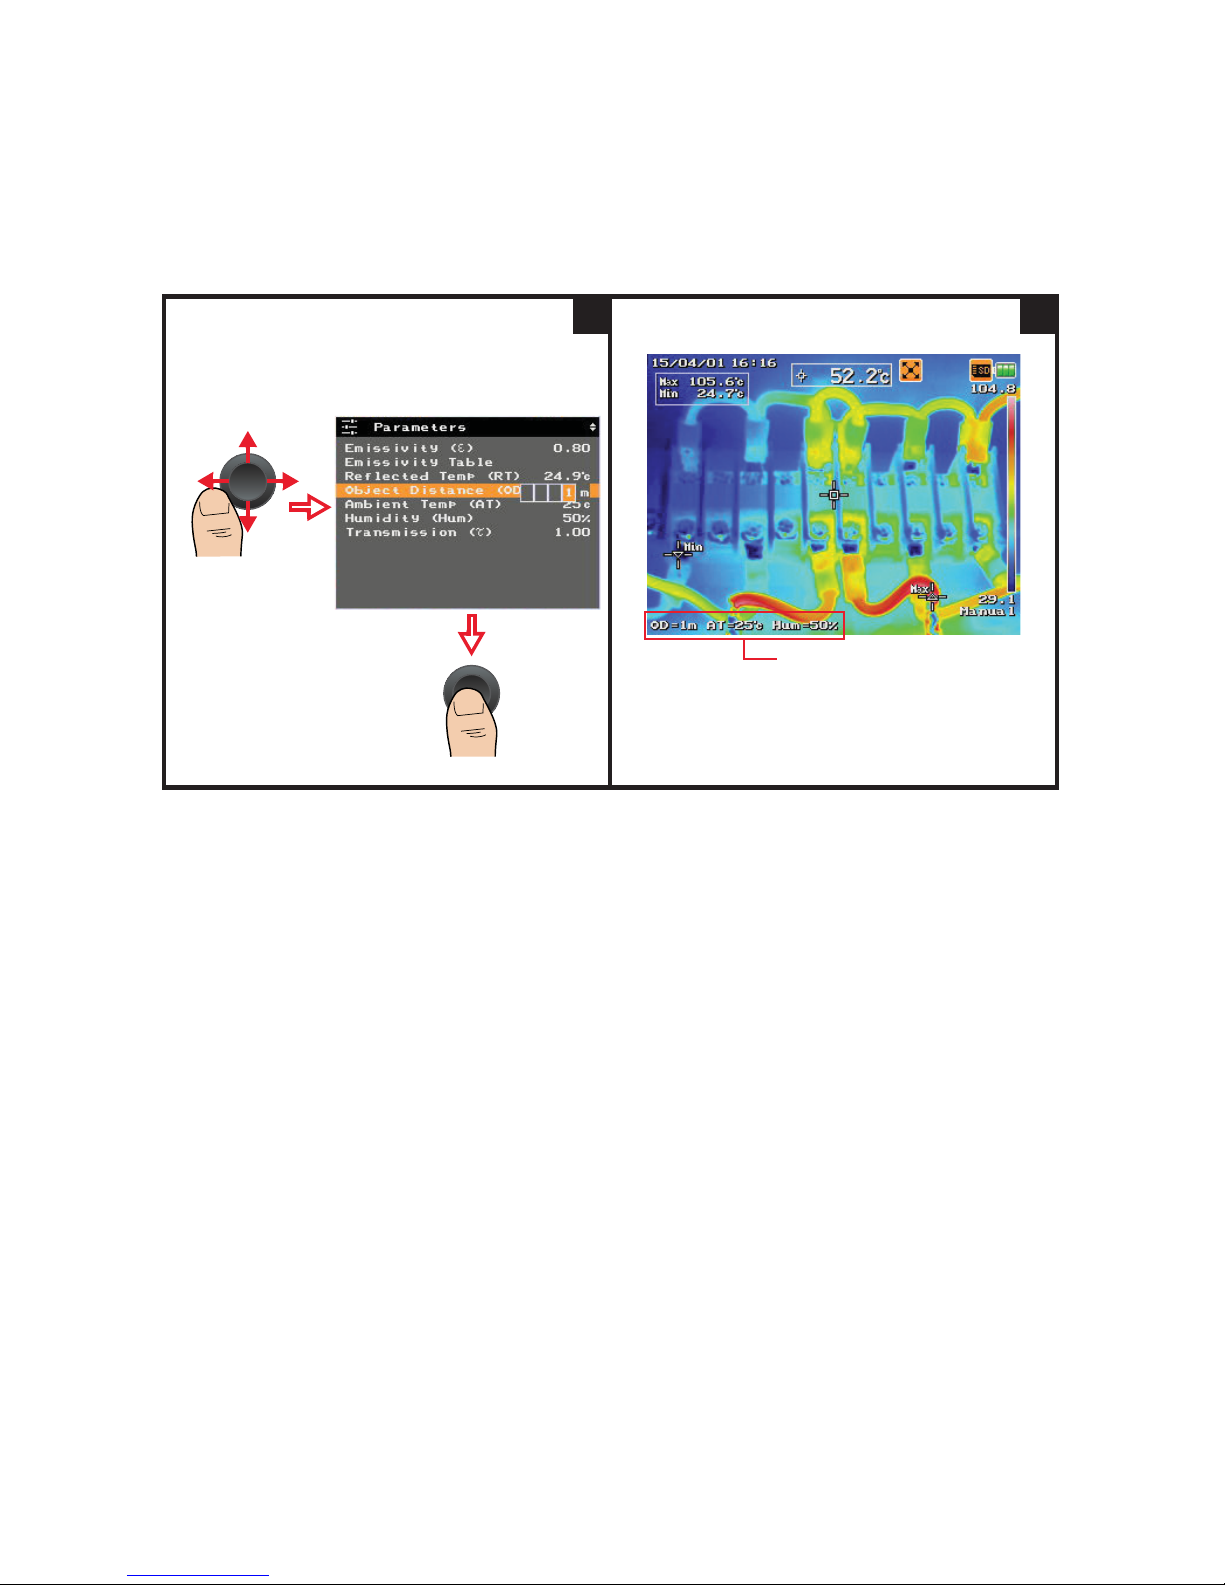
Image Capture, Processing, and Measurement Functions 2
Keysight U5850 Series User’s Guide 93
Push left/right to
move the indicator.
Push up/down to
increase/decrease
the digits.
–OD: 1 to 1000 m
–AT: –15 to 50 °C
– Hum: 0 to 100%
2
Ambient parameter indicators
To display the parameter indicator, refer to
“Configure the display items” on page 112.
3
Page 94
2 Image Capture, Processing, and Measurement Functions
94 Keysight U5850 Series User’s Guide
Set the transmissivity (τ)
Some IR energy may be lost when transmitted through an external window; this
transmissivity error must be corrected to improve the accuracy of your
temperature measurements.
NOTE
Transmissivity setting is not supported in the freeze, playback, and image
logging modes.
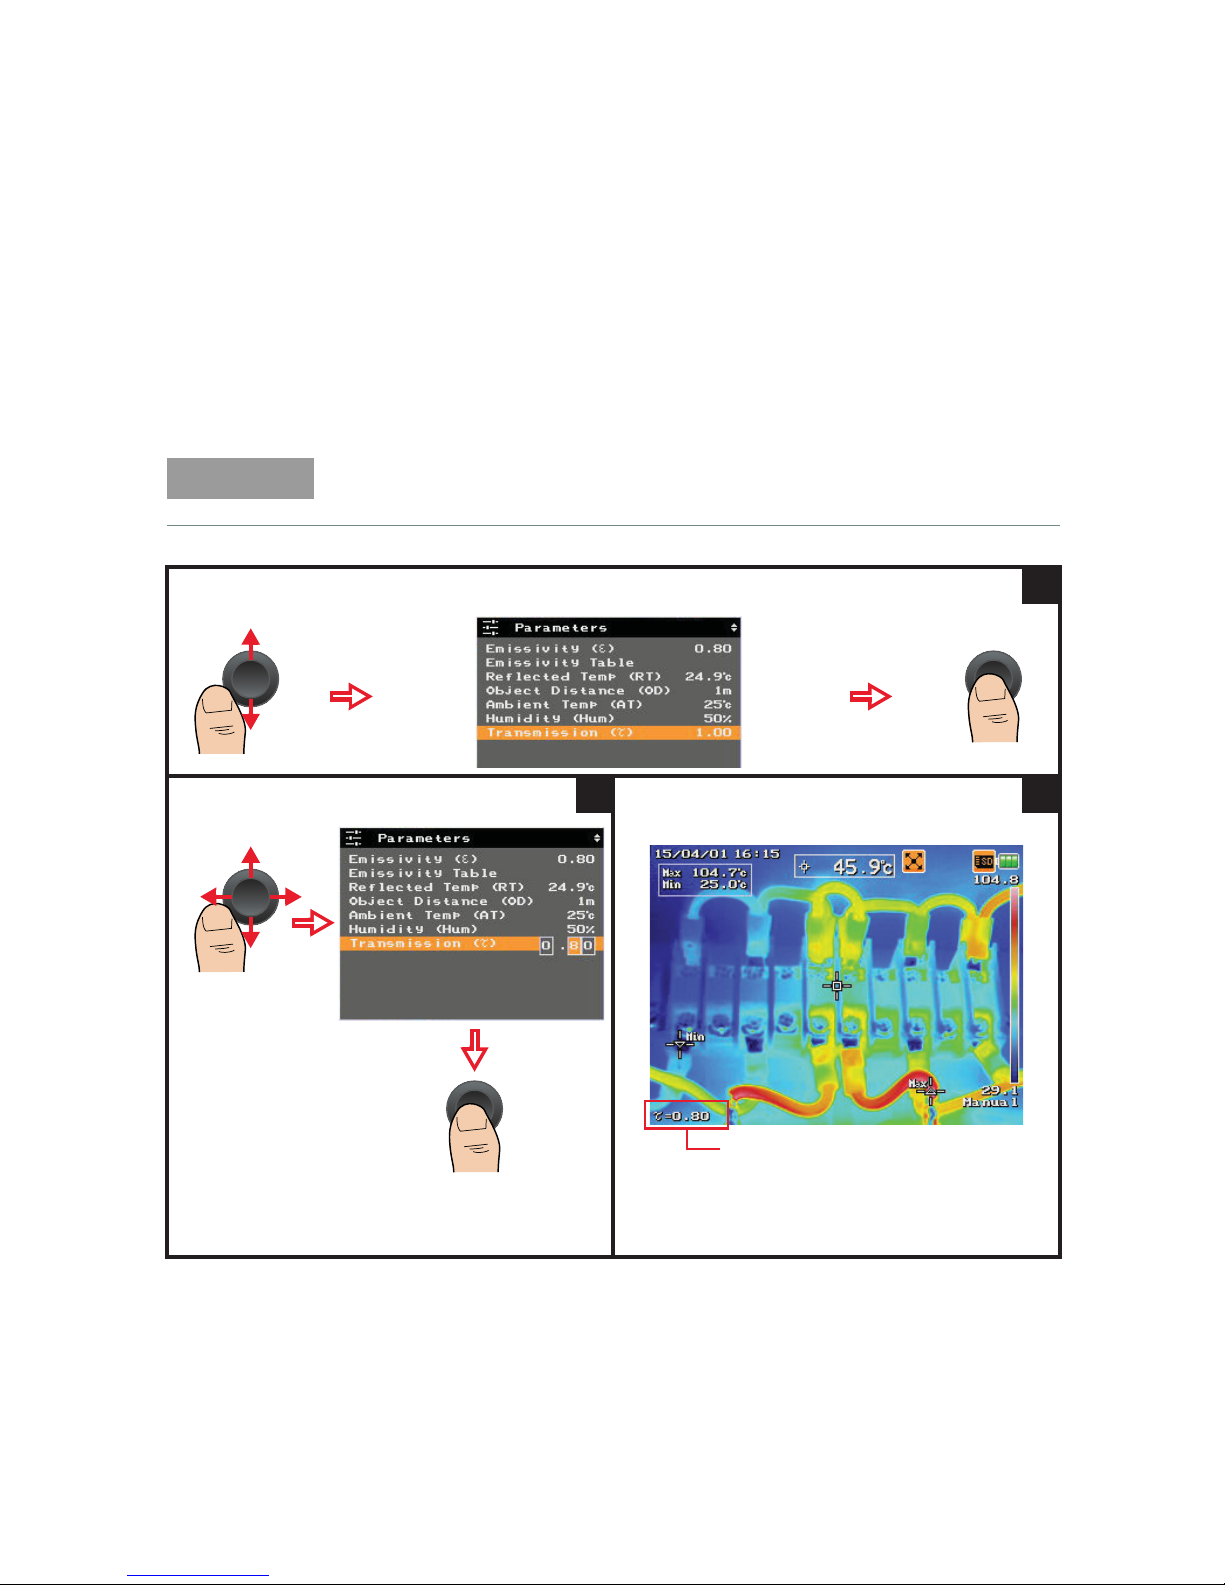
Follow steps 1 to 2 from “Enter an emissivity value” on page 86.
1
Enter a value from 0.10 to 1.00:
Push left/right to
move the indicator.
Push up/down to
increase/decrease
the digits.
2
Transmissivity parameter indicator
To display the parameter indicator, refer to
“Configure the display items” on page 112.
3
Page 95

Keysight U5850 Series TrueIR Thermal Imager
User’s Guide
95
3 Data Management and
System-Related Functions
Data Management Controls 96
System-Related Settings 107
This chapter guides you on how to configure data and system settings for the
U5850 Series TrueIR Thermal Imager.
Page 96

3 Data Management and System-Related Functions
96 Keysight U5850 Series User’s Guide
Data Management Controls
These controls allow you to log images, check the memory status, manage your
image folders, and format the SD memory card.
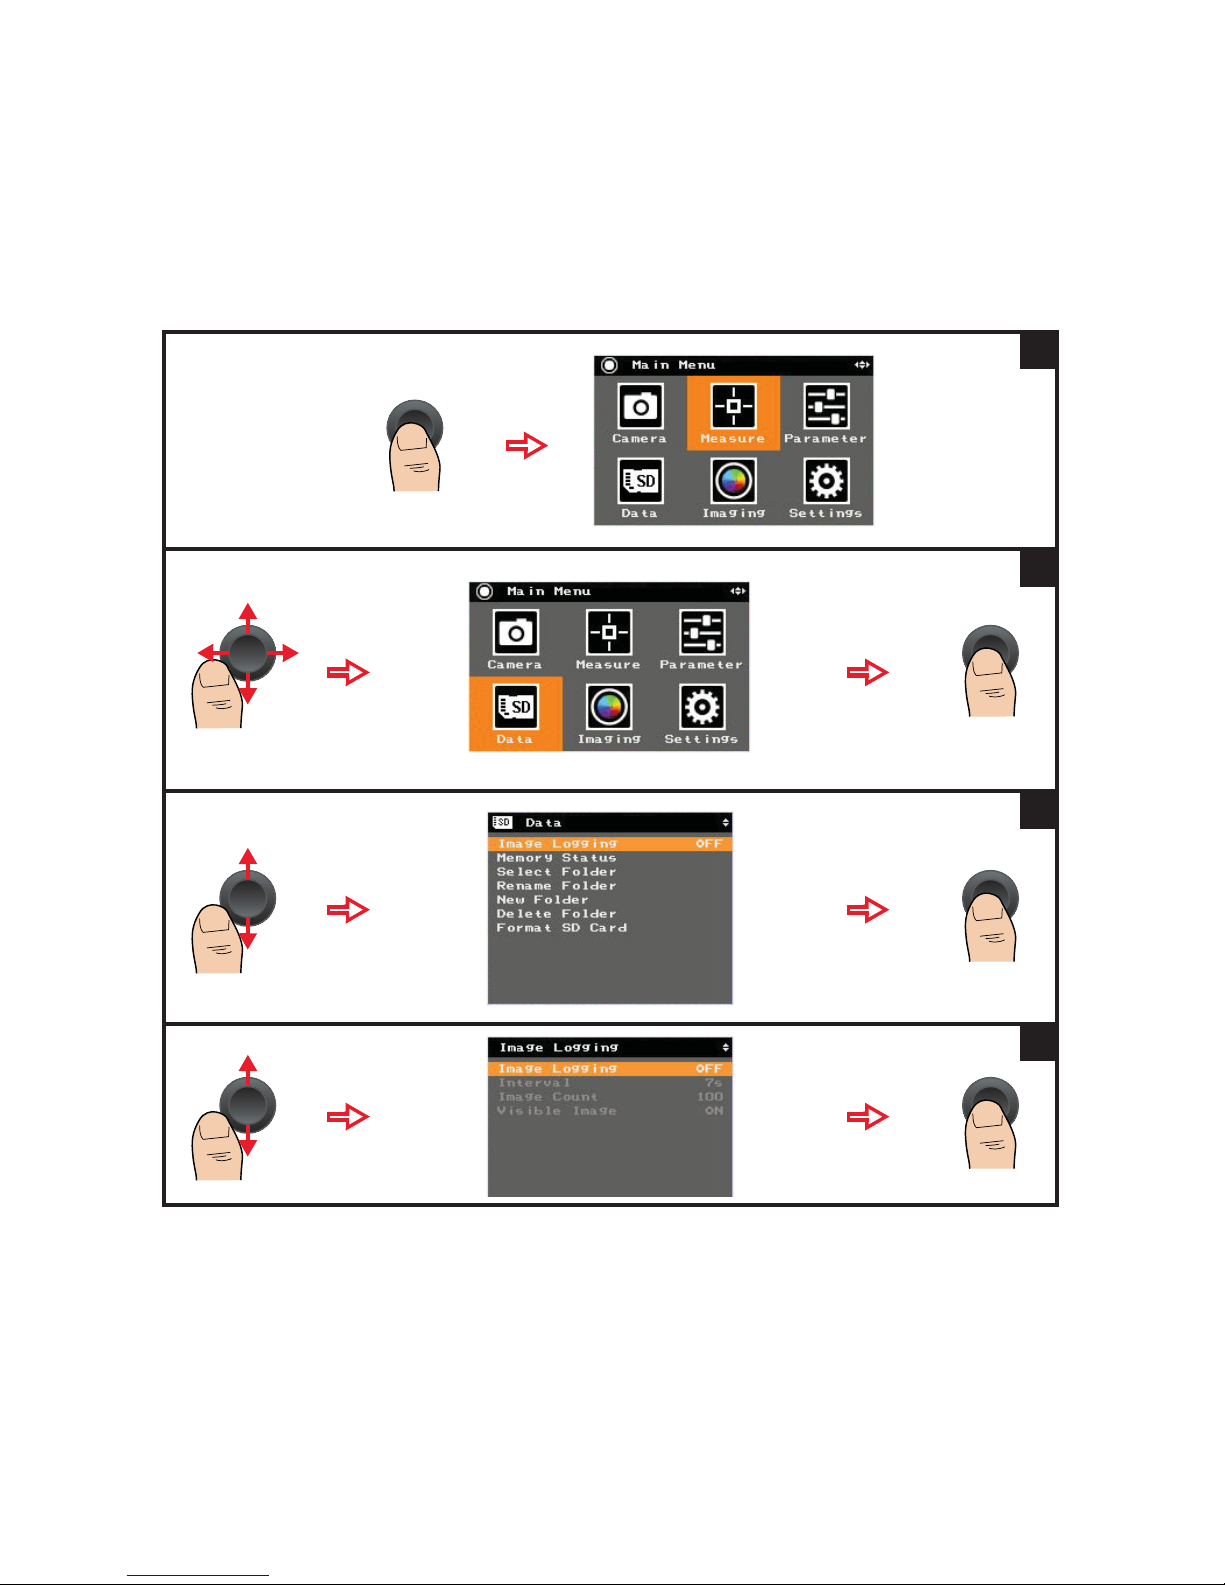
Perform image logging
You can log IR, visible, or fusion images at defined intervals. During logging,
folders are automatically created in the SD memory card to store the images. The
folder created at the first logging interval will be named LOG_0001, then
LOG_0002 at the next interval, and will increase subsequently.
NOTE
All functions are not accessible during image logging.
CAUTION
Do not perform image logging on objects with extremely high temperature
over a long period of time to avoid damage to the infrared detector.
Page 97
Data Management and System-Related Functions 3
Keysight U5850 Series User’s Guide 97
Enable/Disable image logging
1
2
3
4
Page 98
3 Data Management and System-Related Functions
98 Keysight U5850 Series User’s Guide
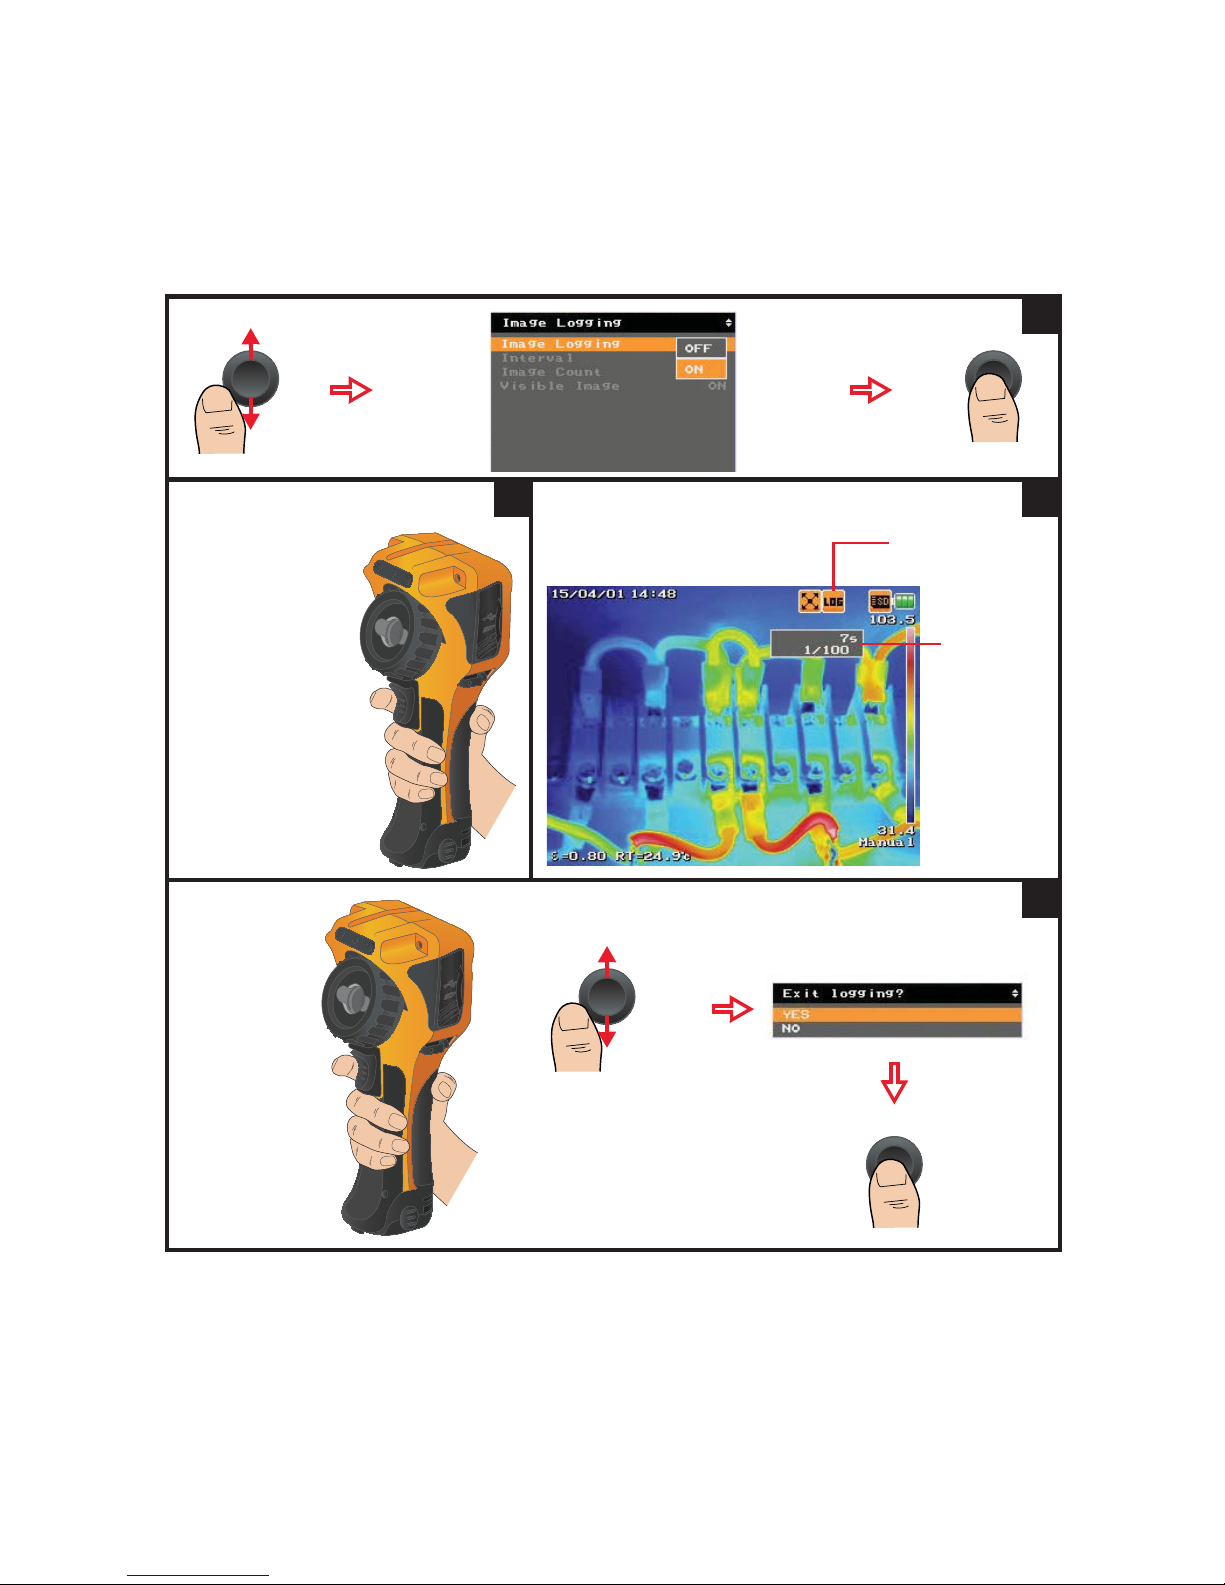
5
Press for 1 second
to start logging.
6
Log indicator
Interval and
image count
indicators
6a
To exit logging:
7
Page 99
Data Management and System-Related Functions 3
Keysight U5850 Series User’s Guide 99
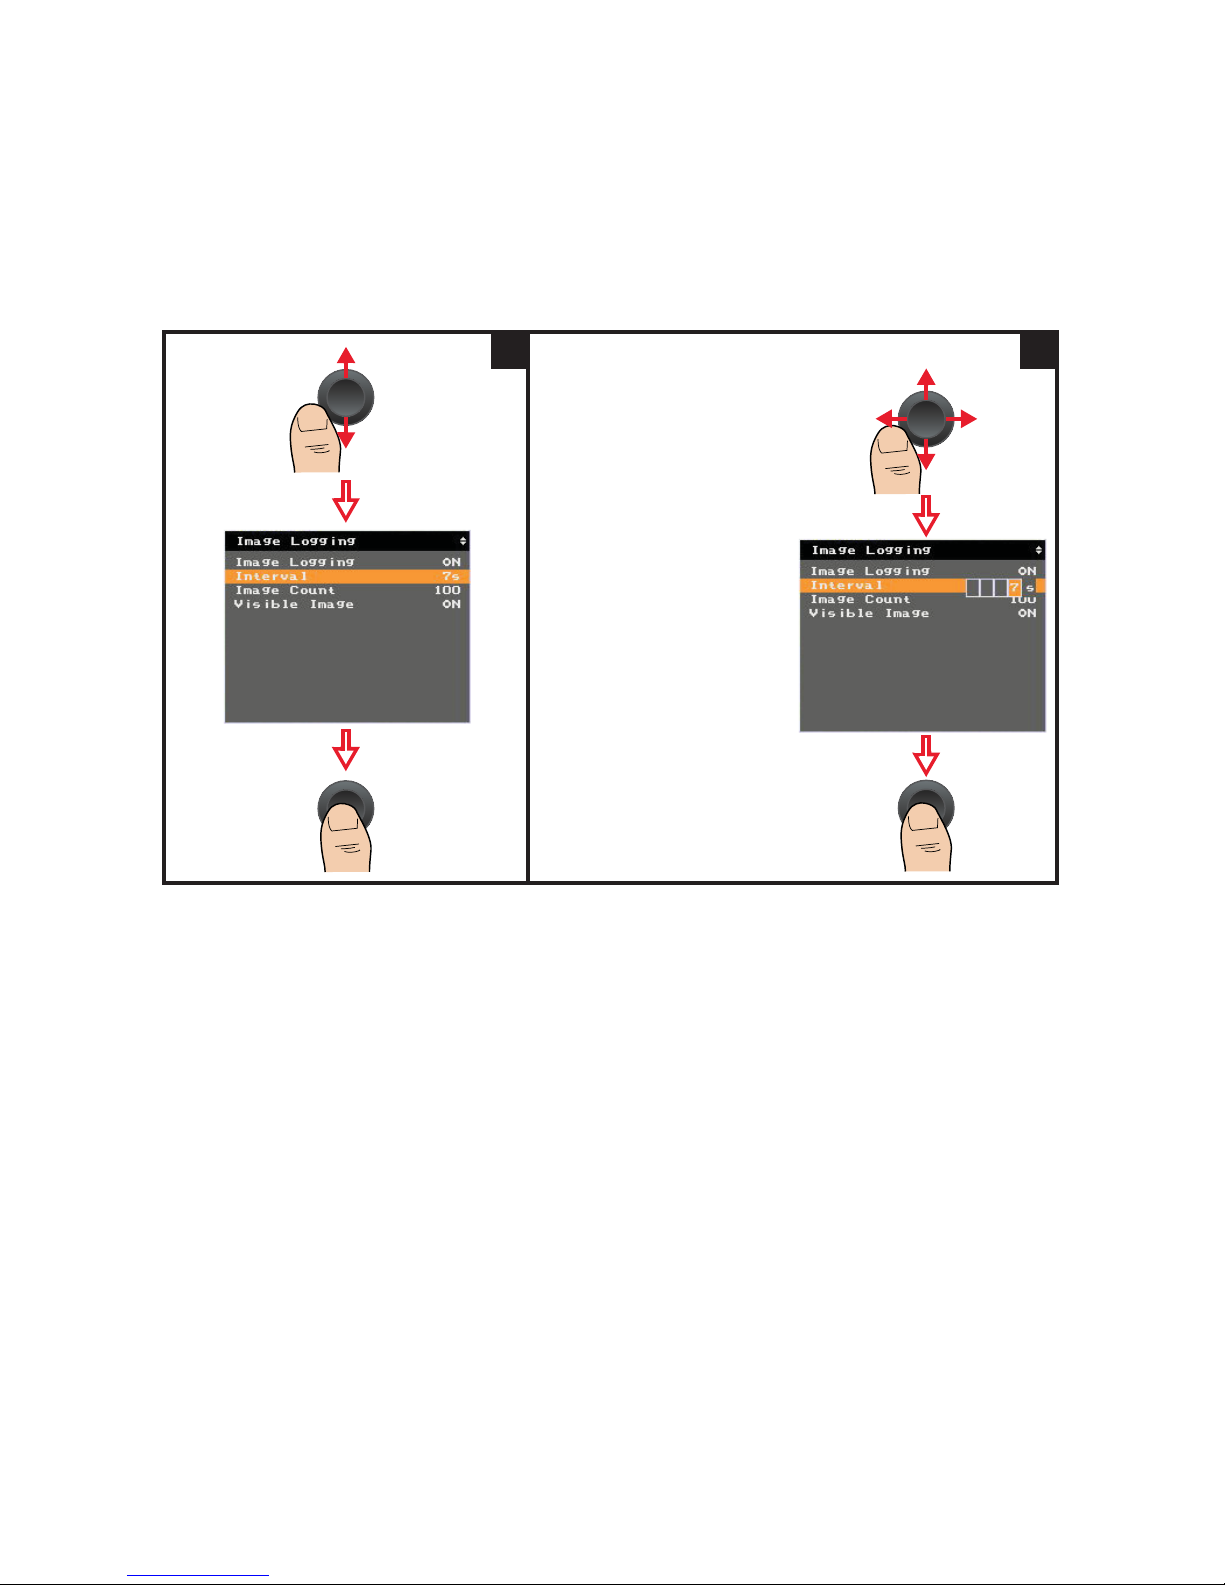
Set the logging interval
1
Enter a value from 7 to 3600 seconds:
Push left/right to
move the indicator.
Push up/down to
increase/decrease
the digits.
2
Page 100
3 Data Management and System-Related Functions
100 Keysight U5850 Series User’s Guide
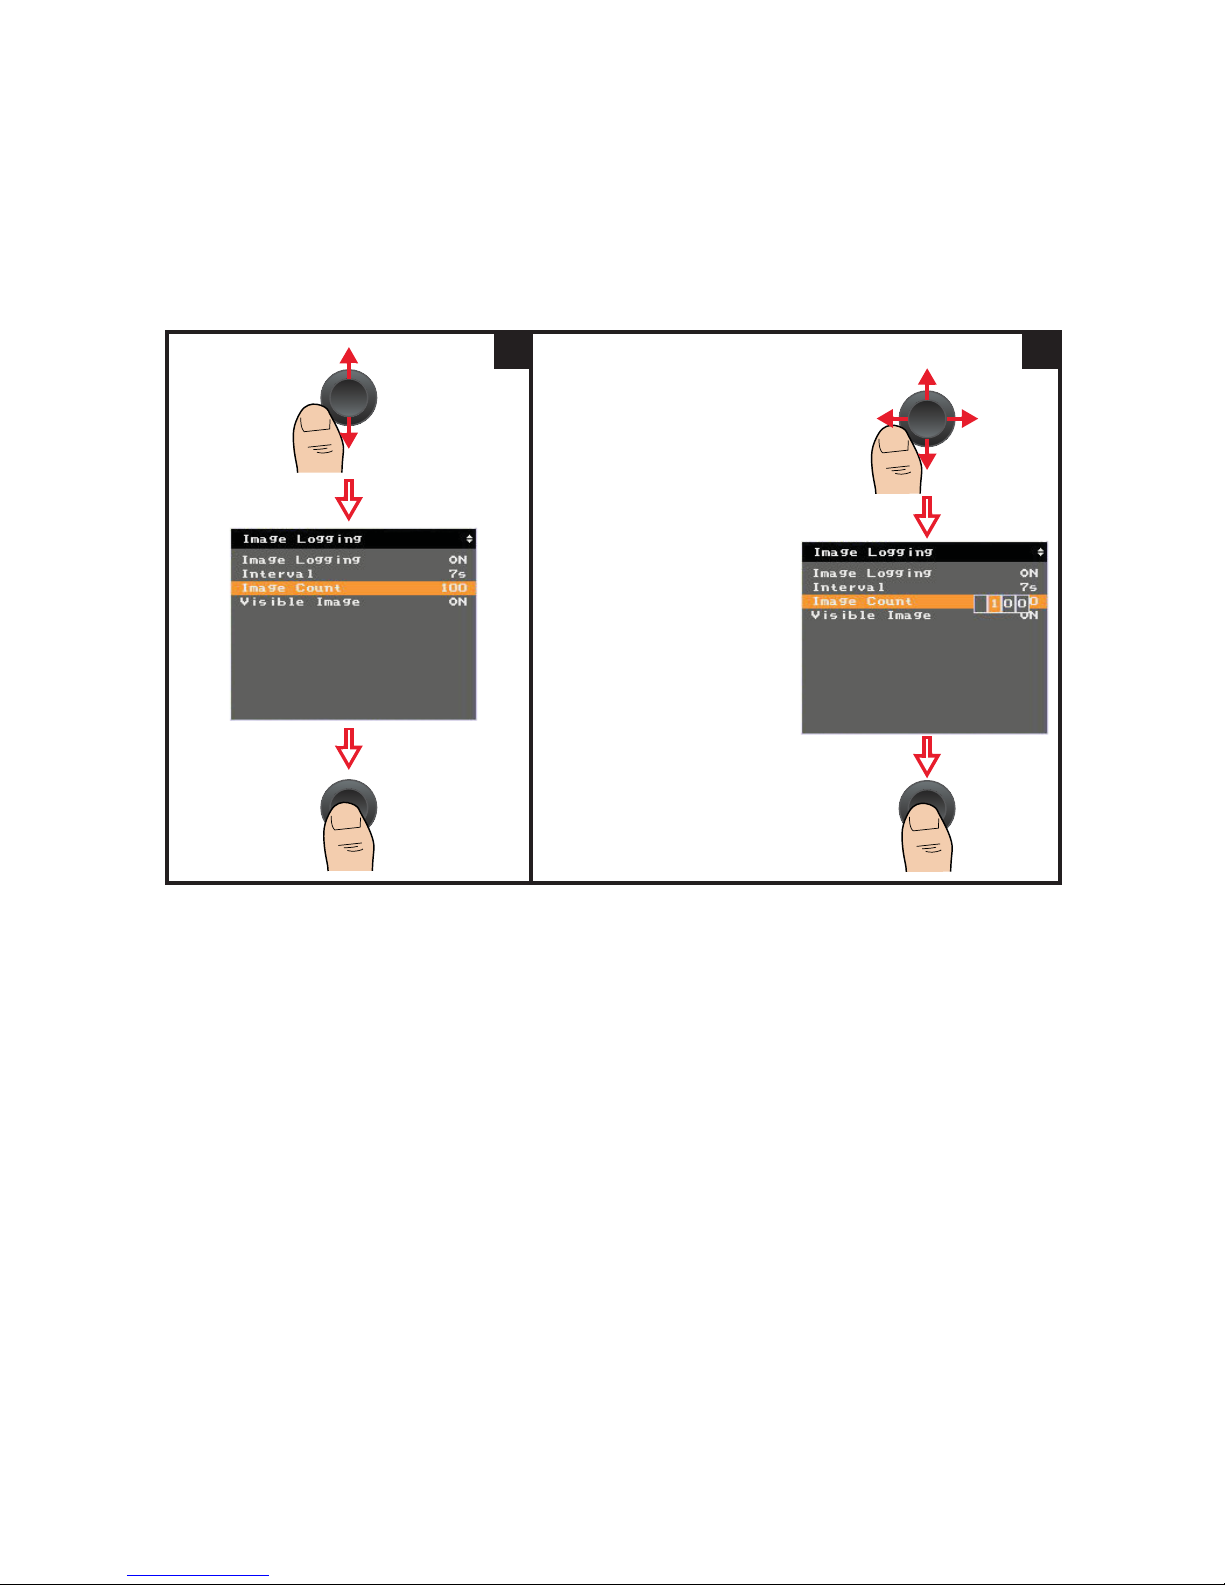
Set the image count
1
Enter a value from 1 to 1000:
Push left/right to
move the indicator.
Push up/down to
increase/decrease
the digits.
2
 Loading...