

Page 1
Keysight E2655C Probe
Deskew and Performance
Verification Kit
User Guide
Page 2

Notices
CAUTION
WARNING
© Keysight Technologies 2003, 2004, 2013,
2016
No part of this manual may be reproduced in
any form or by any means (includ ing electronic storage and retrieval or translation
into a foreign language) without prior agreement and written consent from Keysight
Technologies as governed by United States
and international copyright laws.
Manual Part Number
E2655-92004
Edition
Fifth Edition, August 2016
Available in electronic format only
Keysight Technologies
1900 Garden of the Gods Road
Colorado Springs, CO 80907 USA
Warranty
THE MATERIAL CONTAINED IN THIS DOCUMENT IS PROVIDED "AS IS," AND IS SUBJECT TO BEING CHANGED, WITHOUT
NOTICE, IN FUTURE EDITIONS. FURTHER,
TO THE MAXIMUM EXTENT PERMITTED BY
APPLICABLE LAW, KEYSIGHT DISCLAIMS
ALL WARRANTIES, EITHER EXPRESS OR
IMPLIED WITH REGARD TO THIS MANUAL
AND ANY INFORMATION CONTAINED
HEREIN, INCLUDING BUT NOT LIMITED TO
THE IMPLIED WARRANTIES OF MERCHANTABILITY AND FITNESS FOR A PARTICULAR
PURPOSE. KEYSIGHT SHALL NOT BE LIABLE
FOR ERRORS OR FOR INCIDENTAL OR CONSEQUENTIAL DAMAGES IN CONNECTION
WITH THE FURNISHING, USE, OR PERFORMANCE OF THIS DOCUMENT OR ANY
INFORMATION CONTAINED HEREIN.
SHOULD KEYSIGHT AND THE USER HAVE A
SEPARATE WRITTEN AGREEMENT WITH
WARRANTY TERMS COVERING THE MATERIAL IN THIS DOCUMENT THAT CONFLICT
WITH THESE TERMS, THE WARRANTY
TERMS IN THE SEPARATE AGREEMENT WILL
CONTROL.
Technology Licenses
The hardware and/or software described in
this document are furnished under a license
and may be used or copied only in accordance with the terms of such license.
U.S. Government Rights
The Software is "commercial computer software," as defined by Federal Acquisition
Regulation ("FAR") 2.101. Pursuant to FAR
12.212 and 27.405-3 and Department of
Defense FAR Supplement ("DFARS")
227.7202, the U.S. government acquires
commercial computer software under the
same terms by which the software is customarily provided to the public. Accordingly,
Keysight provides the Software to U.S. government customers under its standard commercial license, which is embodied in its
End User License Agreement (EULA), a copy
of which can be found at
sight.com/find/sweula
forth in the EULA represents the exclusive
authority by which the U.S. government may
use, modify, distribute, or disclose the Software. The EULA and the license set forth
therein, does not require or permit, among
other things, that Keysight: (1) Furnish technical information related to commercial
computer software or commercial computer
software documentation that is not customarily provided to the public; or (2) Relinquish
to, or otherwise provide, the government
rights in excess of these rights customarily
provided to the public to use, modify, reproduce, release, perform, display, or d isclose
commercial computer software or commercial computer software documentation. No
add itional government requirements beyond
those set forth in the EULA shall apply,
except to the extent that those terms, rights,
or licenses are explicitly required from all
providers of commercial computer software
pursuant to the FAR and the DFARS and are
set forth specifically in writing elsewhere in
the EULA. Keysight shall be under no obligation to update, revise or otherwise modify
the Software. With respect to any technical
data as defined by FAR 2.101, pursuant to
FAR 12.211 and 27.404.2 and DFARS
227.7102, the U.S. government acquires no
greater than Limited Rights as defined in
FAR 27.401 or DFAR 227.7103-5 (c), as
applicable in any technical data.
http://www.key-
. The license set
Safety Notices
A CAUTION notice denotes a hazard. It
calls attention to an operating procedure, practice, or the like that, if not
correctly performed or adhered to,
could result in d amage to the prod uct
or loss of important data. Do not proceed beyond a CAUTION notice until
the indicated conditions are fully
understood and met.
A WARNING notice denotes a hazard.
It calls attention to an operating procedure, practice, or the like that, if not
correctly performed or adhered to,
could result in personal injury or
death. Do not proceed beyond a
WARNING notice until the indicated
conditions are fully understood and
met.
2 E2655C Probe Deskew and Performance Verification Kit User’s Guide
Page 3

E2655C Probe Deskew and Performance Verification Kit User’s Guide 3
Page 4

4 E2655C Probe Deskew and Performance Verification Kit User’s Guide
Page 5

Introduction
Calibration for the Solder-in and Socketed Probe Heads 7
Calibration for Hand-held Browser Probe Heads 14
Calibrating the InfiniiMax probes (1168B, 1169B, 1130B, 1131B, 1132B, 1134B)
and the InfiniiMode differential probes (N2750A, N2751A, N2752A) is done using
the E2655C Probe Deskew and Performance Verification Kit. The kit contains the
following parts:
• SMA (male) to SMA (male) adapter
• SMA (male) to BNC (female) adapter
• BNC (male) to SMA (male) adapter
• 50 Ω SMA Terminator
• De-skew Fixture
Figure 1 E2655C Probe Deskew and Performance Verification Kit
Page 6

This document contains procedures showing vertical and skew calibration for the
InfiniiMax (1160B series and 1130B series probes) solder-in differential probe head
and the differential browser probe head. However, the procedures also apply to all
of the different InfiniiMax probe configurations.
For use with the probe calibration and verifications, we highly recommend using
the N2787A 3D probe positioner.
6 E2655C Probe Deskew and Performance Verification Kit User’s Guide
Page 7

Calibration for the Solder-in and Socketed Probe Heads
NOTE
NOTE
Calibration of the solder-in and socketed probe heads consists of a vertical
calibration and a skew calibration. The vertical calibration should be performed
before the skew calibration. Both calibrations should be performed for best probe
measurement performance.
Before calibrating the probe, verify that the Infiniium oscilloscope has been calibrated recently
and that the calibration
oscilloscope before calibrating the probe. This information is found in the Infiniium Calibration
dialog box.
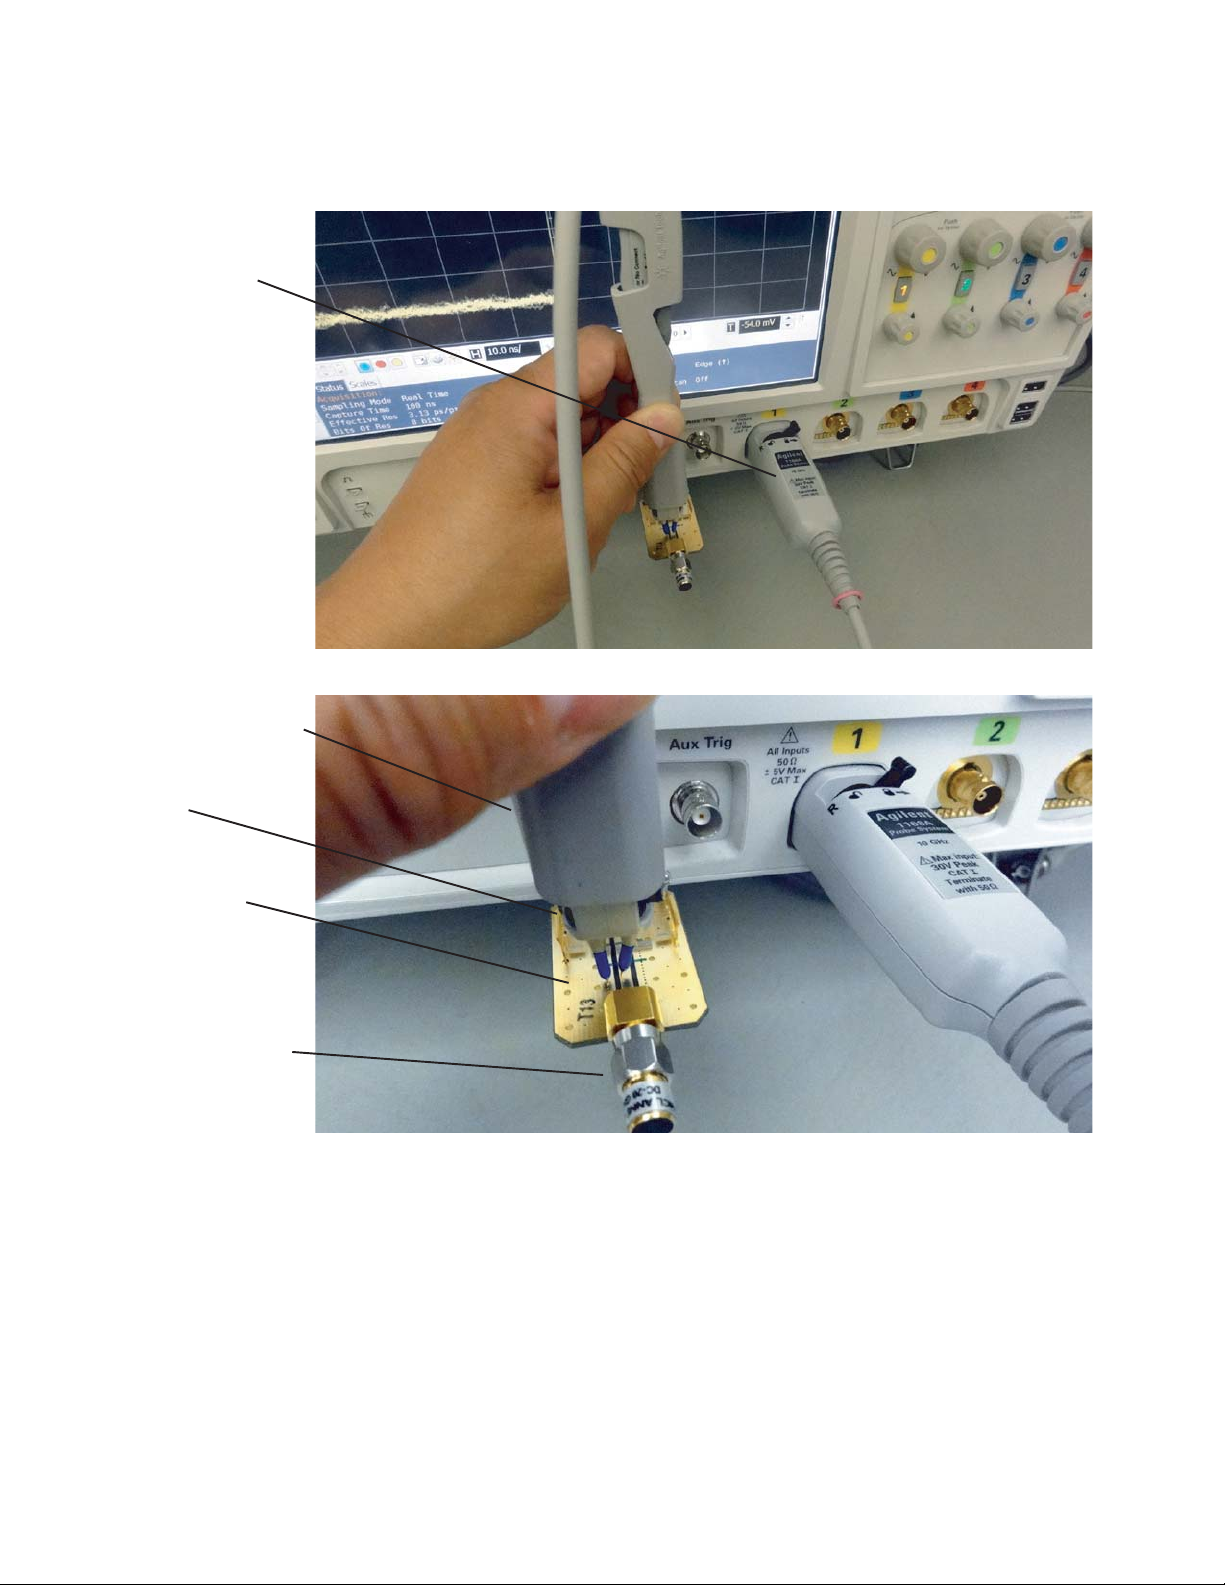
Connecting the Probe for Calibration
The calibration procedure requires the following parts.
• BNC (male) to SMA (male) adapter
•Deskew fixture
• 50 Ω SMA terminator
For the following procedure, refer to Figure 2.
1 Connect BNC (male) to SMA (male) adapter to the deskew fixture on the
connector closest to the pincher.
2 Connect the 50 Ω SMA terminator to the connector farthest from the pincher.
3 Connect the BNC side of the deskew fixture to the Aux Out BNC of the Infiniium
oscilloscope.
4 Connect the probe to an oscilloscope channel.
Δ temperature is within ±5 °C. If this is not the case, calibrate the
5 To minimize the wear and tear on the probe head, the probe head should be
placed on a support to relieve the strain on the probe head cables.
6 Push down on the back side of the pincher. Insert the probe head resistor lead
underneath the center of the pincher and over the center conductor of the
deskew fixture. The negative probe head resistor lead or ground lead must be
underneath the pincher and over one of the outside copper conductors
(ground) of the deskew fixture. Make sure that the probe head is approximately
perpendicular to the deskew fixture.
For the socketed probe head, insert two properly trimmed 82 Ω resistors into the sockets.
7 Release the pincher.
E2655C Probe Deskew and Performance Verification Kit User’s Guide 7
Page 8

NOTE
nfiniiMax Probe
To ensure contact, pull up on the back side of the pincher to ensure good contact between
resistor leads and the deskew fixture.
Figure 2 Connecting the Probe for Calibration
8 E2655C Probe Deskew and Performance Verification Kit User’s Guide
Page 9

Verifying the Connection
1 On the Infiniium oscilloscope, press the [Auto Scale] key on the front panel.
2 Set the volts per division to 100 mV/div.
3 Set the horizontal scale to 1.00 ns/div.
4 Set the horizontal position to approximately 3ns. You should see a waveform
similar to that in Figure 3.
Figure 3 Good Connection
If you see a waveform similar to that of Figure 4 then you have a bad connection
and should check all of your probe connections.
E2655C Probe Deskew and Performance Verification Kit User’s Guide 9
Page 10

Figure 4 Bad Connection
Running the Probe Calibration and Deskew
1 On the Infiniium oscilloscope in the Setup menu, select the channel connected
to the probe.
2 In the Channel Setup dialog box, select the Probe Config... button.
3 Select the Probe head model from the drop-down menu.
4 In the Probe Configuration dialog box, select the Calibrate Probe... button.
5 In the Probe Calibration dialog box, select the Start Atten/Offset Calibration...
button and follow the on-screen instructions for the vertical calibration
procedure.
6 Once the vertical calibration has successfully completed, select the Start Skew
Calibration... button and follow the on-screen instructions for the skew
calibration.
At the end of each calibration the oscilloscope will inform you if the calibration
was or was not successful.
10 E2655C Probe Deskew and Performance Verification Kit User’s Guide
Page 11

Verifying the Probe Calibration
NOTE
If you have just successfully calibrated the probe, it is not necessary to perform
this verification. However, if want to verify the probe was properly calibrated, the
following procedure will help you verify the calibration.
The calibration procedure requires the following parts.
• BNC (male) to SMA (male) adapter
• SMA (male) to BNC (female) adapter
• BNC (male) to BNC (male) 12 inch cable such as the Keysight 8120-1838 (not
included in this kit)
• Keysight 54855-61620 calibration cable (Infiniium oscilloscopes with
bandwidths of 6 GHz and greater only)
• Keysight 54855-67604 precision 3.5 mm adapters (Infiniium oscilloscopes with
bandwidths of 6 GHz and greater only)
•Deskew fixture
For the following procedure, refer to Figure 5.
1 Connect BNC (male) to SMA (male) adapter to the deskew fixture on the
connector closest to the pincher.
2 Connect the SMA (male) to BNC (female) to the connector farthest from the
pincher.
3 Connect the BNC (male) to BNC (male) cable to the BNC connector on the
deskew fixture to one of the unused oscilloscope channels. For Infiniium
oscilloscopes with bandwidths of 6 GHz and greater, use the 54855-61620
calibration cable and the two 54855-67604 precision 3.5 mm adapters.
4 Connect the BNC side of the deskew fixture to the Aux Out BNC of the Infiniium
oscilloscope.
5 Connect the probe to an oscilloscope channel.
6 To minimize the wear and tear on the probe head, the probe head should be
placed on a support to relieve the strain on the probe head cables.
We recommend the Keysight N2787A 3D probe positioner for this.
7 Push down on the back side of the pincher. Insert the probe head resistor lead
underneath the center of the pincher and over the center conductor of the
deskew fixture. The negative probe head resistor lead or ground lead must be
underneath the pincher and over one of the outside copper conductors
(ground) of the deskew fixture. Make sure that the probe head is approximately
perpendicular to the deskew fixture.
For the socketed probe head, insert two properly trimmed 82 Ω resistors into the sockets.
E2655C Probe Deskew and Performance Verification Kit User’s Guide 11
Page 12

NOTE
BNC to SMA Connector
BNC Cable
Pincher
Deskew Fixture
SMA to BNC Connector
InfiniiMax Probe
8 Release the pincher.
To ensure contact, pull up on the back side of the pincher to ensure good contact between
resistor leads and the deskew fixture.
Figure 5 Connection setup for verifying the probe calibration
12 E2655C Probe Deskew and Performance Verification Kit User’s Guide
9 On the oscilloscope, press the [Auto Scale] key on the front panel.
Page 13

10 Select Setup menu and choose the channel connected to the BNC cable from
the pull-down menu.
11 Select the Probes... button.
12 Select the Configure Probe System button.
13 Select User Defined Probe from the pull-down menu.
14 Select the Calibrate Probe... button.
15 Once the skew calibration is completed, close all dialog boxes.
16 Select the Start Skew Calibration... button and follow the on-screen
instructions.
17 Set the vertical scale for the displayed channels to 100 mV/div.
18 Set the horizontal range to 1.00 ns/div.
19 Set the horizontal position to approximately 3ns.
20 Change the vertical position knobs of both channels until the waveforms
overlap each other.
21 Select the Setup menu choose Acquisition... from the pull-down menu.
22 In the Acquisition Setup dialog box enable averaging. When you close the
dialog box, you should see waveforms similar to that in Figure 6.
Figure 6 Overlapping Waveforms
E2655C Probe Deskew and Performance Verification Kit User’s Guide 13
Page 14

Calibration for Hand-held Browser Probe Heads
NOTE
Calibration of the hand-held browser probe heads consists of a vertical calibration
and a skew calibration. The vertical calibration should be performed before the
skew calibration. Both calibrations should be performed for best probe
measurement performance.
Before calibrating the probe, verify that the Infiniium oscilloscope has been calibrated recently
and that the calibration
oscilloscope before calibrating the probe. This information is found in the Infiniium Calibration
dialog box.
Calibration Setup
The calibration procedure requires the following parts.
• BNC (male) to SMA (male) adapter
•Deskew fixture
• 50 Ω SMA terminator
For the following procedure, refer to Figure 7.
1 Connect BNC (male) to SMA (male) adapter to the deskew fixture on the
connector closest to the pincher.
2 Connect the 50 Ω SMA terminator to the connector farthest from the pincher.
3 Connect the BNC side of the deskew fixture to the Aux Out of the Infiniium
oscilloscope.
4 Connect the probe to an oscilloscope channel.
Δ temperature is within ±5 °C. If this is not the case, calibrate the
5 Place the positive resistor tip of the browser on the center conductor of the
deskew fixture between the green line and front end of the pincher. The
negative resistor tip or ground pin of the browser must be on either of the two
outside conductors (ground) of the deskew fixture.
6 On the Infiniium oscilloscope in the Setup menu, select the channel connected
to the probe.
7 In the Channel Setup dialog box select the Probe Config... button.
8 In the Probe Configuration dialog box select the Calibrate Probe... button.
9 Select the Start Atten/Offset Calibration... button and follow the on-screen
instructions for the vertical calibration procedure.
10 Once the vertical calibration has successfully completed, select the Calibrated
Skew... button.
11 Select the Start Skew Calibration... button and follow the on-screen
instructions for the skew calibration.
14 E2655C Probe Deskew and Performance Verification Kit User’s Guide
Page 15
BNC to SMA Connector
(not visible)
InfiniiMax Probe
Pincher
Deskew Fixture
50 W SMA Terminator
Figure 7 Calibration setup
E2655C Probe Deskew and Performance Verification Kit User’s Guide 15
Page 16

16 E2655C Probe Deskew and Performance Verification Kit User’s Guide
Page 17

E2655C Probe Deskew and Performance Verification Kit User’s Guide 17
Page 18

This information is subject to
change without notice.
© Keysight Technologies 2003-2004, 2013, 2016
Edition 5 August 2016
*E2655-92004*
www.keysight.com
 Loading...