

Page 1

75000 Series C
User Manual
Keysight E1463A 32-Channel
5-Amp Form C Switch
Page 2

Page 3

Notices
© Keysight Technologies, Inc. 1996-2019
No part of this manual may be reproduced in any form or by any means
(including electronic storage and retrieval
or translation into a foreign language)
without prior agreement and written consent from Keysight Technologies, Inc. as
governed by United States and international copyright laws.
Manual Part Number
E1463-90004
Edition
Fifth Edition, October 2019
Published by
Keysight Technologies, Inc.
900 S. Taft Ave.
Loveland, CO 80537 USA
Sales and Technical Support
To contact Keysight for sales and technical support, refer to the support links on
the following Keysight websites:
www.keysight.com/find/E1463A
(product-specific information and support, software and documentation
updates)
www.keysight.com/find/assist (world-
wide contact information for repair and
service)
Declaration of Conformity
Declarations of Conformity for this product and for other Keysight products may
be downloaded from the Web. Go to
http://keysight.com/go/conformity and
click on “Declarations of Conformity.” You
can then search by product number to
find the latest Declaration of Conformity.
Technology Licenses
The hardware and/or software described
in this document are furnished under a
license and may be used or copied only in
accordance with the terms of such
license.
Warranty
THE MATERIAL CONTAINED IN THIS
DOCUMENT IS PROVIDED “AS IS,” AND
IS SUBJECT TO BEING CHANGED,
WITHOUT NOTICE, IN FUTURE EDITIONS. FURTHER, TO THE MAXIMUM
EXTENT PERMITTED BY APPLICABLE
LAW, KEYSIGHT DISCLAIMS ALL WARRANTIES, EITHER EXPRESS OR IMPLIED,
WITH REGARD TO THIS MANUAL AND
ANY INFORMATION CONTAINED
HEREIN, INCLUDING BUT NOT LIMITED
TO THE IMPLIED WARRANTIES OF MERCHANTABILITY AND FITNESS FOR A
PARTICULAR PURPOSE. KEYSIGHT
SHALL NOT BE LIABLE FOR ERRORS OR
FOR INCIDENTAL OR CONSEQUENTIAL
DAMAGES IN CONNECTION WITH THE
FURNISHING, USE, OR PERFORMANCE
OF THIS DOCUMENT OR OF ANY INFORMATION CONTAINED HEREIN. SHOULD
KEYSIGHT AND THE USER HAVE A SEPARATE WRITTEN AGREEMENT WITH
WARRANTY TERMS COVERING THE
MATERIAL IN THIS DOCUMENT THAT
CONFLICT WITH THESE TERMS, THE
WARRANTY TERMS IN THE SEPARATE
AGREEMENT SHALL CONTROL.
Keysight Technologies does not warrant
third-party system-level (combination of
chassis, controllers, modules, etc.) performance, safety, or regulatory compliance unless specifically stated.
DFARS/Restricted Rights
Notices
If software is for use in the performance
of a U.S. Government prime contract or
subcontract, Software is delivered and
licensed as “Commercial computer software” as defined in DFAR 252.227-7014
(June 1995), or as a “commercial item” as
defined in FAR 2.101(a) or as “Restricted
computer software” as defined in FAR
52.227-19 (June 1987) or any equivalent
agency regulation or contract clause.
Use, duplication or disclosure of Software
is subject to Keysight Technologies’ standard commercial license terms, and nonDOD Departments and Agencies of the
U.S. Government will receive no greater
than Restricted Rights as defined in FAR
52.227-19(c)(1-2) (June 1987). U.S. Government users will receive no greater
than Limited Rights as defined in FAR
52.227-14 (June 1987) or DFAR 252.2277015 (b)(2) (November 1995), as applicable in any technical data.
Page 4

Safety Information
The following general safety precautions must be observed during all
phases of operation of this instrument.
Failure to comply with these precautions or with specific warnings or operating instructions in the product
manuals violates safety standards of
design, manufacture, and intended use
of the instrument. Keysight Technologies assumes no liability for the customer's failure to comply with these
requirements.
General
Do not use this product in any manner not
specified by the manufacturer. The protective features of this product must not be
impaired if it is used in a manner specified in
the operation instructions.
Before Applying Power
Verify that all safety precautions are taken.
Make all connections to the unit before
applying power. Note the external markings
described under “Safety Symbols”.
Ground the Instrument
Keysight chassis’ are provided with a
grounding-type power plug. The
instrument chassis and cover must be
connected to an electrical ground to
minimize shock hazard. The ground pin
must be firmly connected to an electrical ground (safety ground) terminal at
the power outlet. Any interruption of
the protective (grounding) conductor
or disconnection of the protective
earth terminal will cause a potential
shock hazard that could result in personal injury.
Do Not Operate in an Explosive
Atmosphere
Do not operate the module/chassis in
the presence of flammable gases or
fumes.
Do Not Operate Near Flammable
Liquids
Do not operate the module/chassis in
the presence of flammable liquids or
near containers of such liquids.
Cleaning
Clean the outside of the Keysight module/chassis with a soft, lint-free,
slightly dampened cloth. Do not use
detergent or chemical solvents.
Do Not Remove Instrument Cover
Only qualified, service-trained personnel who are aware of the hazards
involved should remove instrument
covers. Always disconnect the power
cable and any external circuits before
removing the instrument cover.
Keep away from live circuits
Operating personnel must not remove
equipment covers or shields. Procedures involving the removal of covers
and shields are for use by servicetrained personnel only. Under certain
conditions, dangerous voltages may
exist even with the equipment
switched off. To avoid dangerous electrical shock, DO NOT perform procedures involving cover or shield removal
unless you are qualified to do so.
DO NOT operate damaged
equipment
Whenever it is possible that the safety
protection features built into this product have been impaired, either through
physical damage, excessive moisture,
or any other reason, REMOVE POWER
and do not use the product until safe
operation can be verified by servicetrained personnel. If necessary, return
the product to a Keysight Technologies
Sales and Service Office for service and
repair to ensure the safety features are
maintained.
DO NOT block the primary
disconnect
The primary disconnect device is the
appliance connector/power cord when
a chassis used by itself, but when
installed into a rack or system the disconnect may be impaired and must be
considered part of the installation.
Do Not Modify the Instrument
Do not install substitute parts or perform any unauthorized modification to
the product. Return the product to a
Keysight Sales and Service Office to
ensure that safety features are maintained.
In Case of Damage
Instruments that appear damaged or
defective should be made inoperative
and secured against unintended operation until they can be repaired by
qualified service personnel
Do NOT block vents and fan exhaust:
To ensure adequate cooling and ventilation, leave a gap of at least 50mm
(2") around vent holes on both sides of
the chassis.
Do NOT operate with empty slots: To
ensure proper cooling and avoid damaging equipment, fill each empty slot
with an AXIe filler panel module.
Do NOT stack free-standing chassis:
Stacked chassis should be rackmounted.
All modules are grounded through the
chassis: During installation, tighten
each module's retaining screws to
secure the module to the chassis and
to make the ground connection.
Operator is responsible to maintain
safe operating conditions. To ensure
safe operating conditions, modules
should not be operated beyond the full
temperature range specified in the
Environmental and physical specification. Exceeding safe operating conditions can result in shorter lifespan,
improper module performance and
user safety issues. When the modules
are in use and operation within the
specified full temperature range is not
maintained, module surface temperatures may exceed safe handling conditions which can cause discomfort or
burns if touched. In the event of a
module exceeding the full temperature
range, always allow the module to cool
before touching or removing modules
from the chassis.
vi
Page 5

Safety Symbols
A CAUTION denotes a hazard. It
calls attention to an operating procedure or practice, that, if not correctly performed or adhered to
could result in damage to the
product or loss of important data.
Do not proceed beyond a CAUTION
notice until the indicated conditions are fully understood and met.
A WARNING denotes a hazard. It
calls attention to an operating procedure or practice, that, if not correctly performed or adhered to,
could result in personal injury or
death. Do not proceed beyond a
WARNING notice until the indicated conditions are fully understood and met.
Products display the following symbols:
Warning, risk of electric
shock
Refer to manual for additional safety information.
Earth Ground.
Chassis Ground.
Alternating Current (AC).
Direct Current (DC)
vii
Page 6

viii
Page 7

Contents
2 Getting Started
Using This Chapter. . . . . . . . . . . . . . . . . . . . . . . . . . . . . . . . . . . . . . . . . . . . . . . 13
Form C Switch Description . . . . . . . . . . . . . . . . . . . . . . . . . . . . . . . . . . . . . . . . 13
Basic Operation. . . . . . . . . . . . . . . . . . . . . . . . . . . . . . . . . . . . . . . . . . . . . . . 13
Typical Configurations. . . . . . . . . . . . . . . . . . . . . . . . . . . . . . . . . . . . . . . . . . 15
Configuring the Form C Switch . . . . . . . . . . . . . . . . . . . . . . . . . . . . . . . . . . . . . 17
Warnings and Cautions. . . . . . . . . . . . . . . . . . . . . . . . . . . . . . . . . . . . . . . . . 17
Setting the Logical Address Switch . . . . . . . . . . . . . . . . . . . . . . . . . . . . . . . 17
Setting the Interrupt Priority. . . . . . . . . . . . . . . . . . . . . . . . . . . . . . . . . . . . . 18
Installing the Form C Switch in a Mainframe . . . . . . . . . . . . . . . . . . . . . . . . 19
Configuring a Terminal Module . . . . . . . . . . . . . . . . . . . . . . . . . . . . . . . . . . . . . 21
Standard Terminal Module Description . . . . . . . . . . . . . . . . . . . . . . . . . . . . 21
Terminal Module Option A3G Description . . . . . . . . . . . . . . . . . . . . . . . . . . 22
Connecting User Inputs . . . . . . . . . . . . . . . . . . . . . . . . . . . . . . . . . . . . . . . . 23
Wiring a Terminal Module. . . . . . . . . . . . . . . . . . . . . . . . . . . . . . . . . . . . . . . 24
Attaching a Terminal Module to the Form C Switch . . . . . . . . . . . . . . . . . . 26
Protecting Relays and Circuits. . . . . . . . . . . . . . . . . . . . . . . . . . . . . . . . . . . . . . 27
Relay Life Factors . . . . . . . . . . . . . . . . . . . . . . . . . . . . . . . . . . . . . . . . . . . . . 27
Extending Relay Life . . . . . . . . . . . . . . . . . . . . . . . . . . . . . . . . . . . . . . . . . . . 28
Adding Relay and Circuit Protection. . . . . . . . . . . . . . . . . . . . . . . . . . . . . . . 29
Maximum Allowable Module Switch Current . . . . . . . . . . . . . . . . . . . . . . . . 30
Programming the Form C Switch . . . . . . . . . . . . . . . . . . . . . . . . . . . . . . . . . . . 32
Using SCPI Commands. . . . . . . . . . . . . . . . . . . . . . . . . . . . . . . . . . . . . . . . . 32
Addressing the Form C Switch . . . . . . . . . . . . . . . . . . . . . . . . . . . . . . . . . . . 33
Initial Operation. . . . . . . . . . . . . . . . . . . . . . . . . . . . . . . . . . . . . . . . . . . . . . . 34
3 Using the Form C Switch
Using This Chapter. . . . . . . . . . . . . . . . . . . . . . . . . . . . . . . . . . . . . . . . . . . . . . . 37
Form C Switch Commands . . . . . . . . . . . . . . . . . . . . . . . . . . . . . . . . . . . . . . . . 38
Power-on and Reset Conditions . . . . . . . . . . . . . . . . . . . . . . . . . . . . . . . . . . . . 38
Module Identification . . . . . . . . . . . . . . . . . . . . . . . . . . . . . . . . . . . . . . . . . . . . . 39
Example: Module Identification (BASIC). . . . . . . . . . . . . . . . . . . . . . . . . . . . 39
Example: Module Identification (TURBO C) . . . . . . . . . . . . . . . . . . . . . . . . . 39
Switching Channels . . . . . . . . . . . . . . . . . . . . . . . . . . . . . . . . . . . . . . . . . . . . . . 41
Example: Opening/Closing Channels (BASIC) . . . . . . . . . . . . . . . . . . . . . . . 41
Example: Voltage Switching (BASIC) . . . . . . . . . . . . . . . . . . . . . . . . . . . . . . 41
Example: Controlling RF Switches/Step Attenuators (BASIC). . . . . . . . . . . 42
Keysight E1463A Form C Switch User Guide ix
Page 8

Example: Digital Output Configuration (BASIC). . . . . . . . . . . . . . . . . . . . . . 44
Example: Matrix Switching (BASIC) . . . . . . . . . . . . . . . . . . . . . . . . . . . . . . . 44
Scanning Channels . . . . . . . . . . . . . . . . . . . . . . . . . . . . . . . . . . . . . . . . . . . . . . 47
Example: Scanning Using Trig In and Trig Out Ports (BASIC) . . . . . . . . . . . 47
Example: Scanning Using the TTL Trigger Bus (BASIC). . . . . . . . . . . . . . . . 49
Querying the Form C Switch . . . . . . . . . . . . . . . . . . . . . . . . . . . . . . . . . . . . . . . 51
Example: Querying Channel Closures (BASIC) . . . . . . . . . . . . . . . . . . . . . . . 51
Using the Scan Complete Bit. . . . . . . . . . . . . . . . . . . . . . . . . . . . . . . . . . . . . . . 51
Example: Using the Scan Complete Bit (BASIC) . . . . . . . . . . . . . . . . . . . . . 52
Saving and Recalling States . . . . . . . . . . . . . . . . . . . . . . . . . . . . . . . . . . . . . . . 53
Example: Saving and Recalling State (BASIC) . . . . . . . . . . . . . . . . . . . . . . . 53
Detecting Error Conditions . . . . . . . . . . . . . . . . . . . . . . . . . . . . . . . . . . . . . . . . 54
Example: Detecting Error Conditions (BASIC) . . . . . . . . . . . . . . . . . . . . . . . 54
Example: Detecting Error Conditions (Turbo C) . . . . . . . . . . . . . . . . . . . . . . 54
Synchronizing the Form C Switch . . . . . . . . . . . . . . . . . . . . . . . . . . . . . . . . . . . 55
Example: Synchronizing the Form C Switch (BASIC) . . . . . . . . . . . . . . . . . . 55
4 E1463A Command Reference
Using This Chapter. . . . . . . . . . . . . . . . . . . . . . . . . . . . . . . . . . . . . . . . . . . . . . . 57
Command Types. . . . . . . . . . . . . . . . . . . . . . . . . . . . . . . . . . . . . . . . . . . . . . . . . 57
Common Command Format . . . . . . . . . . . . . . . . . . . . . . . . . . . . . . . . . . . . . 57
SCPI Command Format . . . . . . . . . . . . . . . . . . . . . . . . . . . . . . . . . . . . . . . . 57
Command Separator. . . . . . . . . . . . . . . . . . . . . . . . . . . . . . . . . . . . . . . . . . . 58
Abbreviated Commands . . . . . . . . . . . . . . . . . . . . . . . . . . . . . . . . . . . . . . . . 58
Implied Commands . . . . . . . . . . . . . . . . . . . . . . . . . . . . . . . . . . . . . . . . . . . . 58
Variable Command Syntax . . . . . . . . . . . . . . . . . . . . . . . . . . . . . . . . . . . . . . 59
SCPI Command Reference. . . . . . . . . . . . . . . . . . . . . . . . . . . . . . . . . . . . . . . . . 60
ABORt. . . . . . . . . . . . . . . . . . . . . . . . . . . . . . . . . . . . . . . . . . . . . . . . . . . . . . . . . 60
Subsystem Syntax. . . . . . . . . . . . . . . . . . . . . . . . . . . . . . . . . . . . . . . . . . . . . 60
ARM . . . . . . . . . . . . . . . . . . . . . . . . . . . . . . . . . . . . . . . . . . . . . . . . . . . . . . . . . . 61
Subsystem Syntax. . . . . . . . . . . . . . . . . . . . . . . . . . . . . . . . . . . . . . . . . . . . . 61
ARM:COUNt . . . . . . . . . . . . . . . . . . . . . . . . . . . . . . . . . . . . . . . . . . . . . . . . . . . . 61
ARM:COUNt? . . . . . . . . . . . . . . . . . . . . . . . . . . . . . . . . . . . . . . . . . . . . . . . . . . . 62
DISPlay . . . . . . . . . . . . . . . . . . . . . . . . . . . . . . . . . . . . . . . . . . . . . . . . . . . . . . . . 63
Subsystem Syntax. . . . . . . . . . . . . . . . . . . . . . . . . . . . . . . . . . . . . . . . . . . . . 63
DISPlay:MONitor:CARD . . . . . . . . . . . . . . . . . . . . . . . . . . . . . . . . . . . . . . . . 63
DISPlay:MONitor[:STATe] . . . . . . . . . . . . . . . . . . . . . . . . . . . . . . . . . . . . . . . 64
INITiate . . . . . . . . . . . . . . . . . . . . . . . . . . . . . . . . . . . . . . . . . . . . . . . . . . . . . . . . 65
Subsystem Syntax. . . . . . . . . . . . . . . . . . . . . . . . . . . . . . . . . . . . . . . . . . . . . 65
INITiate:CONTinuous. . . . . . . . . . . . . . . . . . . . . . . . . . . . . . . . . . . . . . . . . . . 65
x Keysight E1463A Form C Switch User Guide
Page 9

INITiate:CONTinuous? . . . . . . . . . . . . . . . . . . . . . . . . . . . . . . . . . . . . . . . . . 66
INITiate[:IMMediate] . . . . . . . . . . . . . . . . . . . . . . . . . . . . . . . . . . . . . . . . . . . 66
OUTPut . . . . . . . . . . . . . . . . . . . . . . . . . . . . . . . . . . . . . . . . . . . . . . . . . . . . . . . 67
Subsystem Syntax . . . . . . . . . . . . . . . . . . . . . . . . . . . . . . . . . . . . . . . . . . . . 67
OUTPut:EXTernal[:STATe] . . . . . . . . . . . . . . . . . . . . . . . . . . . . . . . . . . . . . . . 67
OUTPut:EXTernal[:STATe]? . . . . . . . . . . . . . . . . . . . . . . . . . . . . . . . . . . . . . . 68
OUTPut[:STATe]. . . . . . . . . . . . . . . . . . . . . . . . . . . . . . . . . . . . . . . . . . . . . . . 68
OUTPut[:STATe]?. . . . . . . . . . . . . . . . . . . . . . . . . . . . . . . . . . . . . . . . . . . . . . 69
OUTPut:TTLTrgn[:STATe]. . . . . . . . . . . . . . . . . . . . . . . . . . . . . . . . . . . . . . . . 69
OUTPut:TTLTrgn[:STATe]? . . . . . . . . . . . . . . . . . . . . . . . . . . . . . . . . . . . . . . . 70
[ROUTe:]. . . . . . . . . . . . . . . . . . . . . . . . . . . . . . . . . . . . . . . . . . . . . . . . . . . . . . . 71
[ROUTe:]CLOSe. . . . . . . . . . . . . . . . . . . . . . . . . . . . . . . . . . . . . . . . . . . . . . . 71
[ROUTe:]CLOSe?. . . . . . . . . . . . . . . . . . . . . . . . . . . . . . . . . . . . . . . . . . . . . . 72
[ROUTe:]OPEN . . . . . . . . . . . . . . . . . . . . . . . . . . . . . . . . . . . . . . . . . . . . . . . 73
[ROUTe:]OPEN? . . . . . . . . . . . . . . . . . . . . . . . . . . . . . . . . . . . . . . . . . . . . . . 74
[ROUTe:]SCAN . . . . . . . . . . . . . . . . . . . . . . . . . . . . . . . . . . . . . . . . . . . . . . . 74
STATus . . . . . . . . . . . . . . . . . . . . . . . . . . . . . . . . . . . . . . . . . . . . . . . . . . . . . . . . 76
Subsystem Syntax . . . . . . . . . . . . . . . . . . . . . . . . . . . . . . . . . . . . . . . . . . . . 76
STATus:OPERation:CONDition? . . . . . . . . . . . . . . . . . . . . . . . . . . . . . . . . . . 78
STATus:OPERation:ENABle . . . . . . . . . . . . . . . . . . . . . . . . . . . . . . . . . . . . . . 78
STATus:OPERation:ENABle? . . . . . . . . . . . . . . . . . . . . . . . . . . . . . . . . . . . . . 78
STATus:OPERation[:EVENt]?. . . . . . . . . . . . . . . . . . . . . . . . . . . . . . . . . . . . . 79
STATus:PRESet . . . . . . . . . . . . . . . . . . . . . . . . . . . . . . . . . . . . . . . . . . . . . . . 80
SYSTem . . . . . . . . . . . . . . . . . . . . . . . . . . . . . . . . . . . . . . . . . . . . . . . . . . . . . . . 81
Subsystem Syntax . . . . . . . . . . . . . . . . . . . . . . . . . . . . . . . . . . . . . . . . . . . . 81
SYSTem:CDEScription? . . . . . . . . . . . . . . . . . . . . . . . . . . . . . . . . . . . . . . . . 81
SYSTem:CPON . . . . . . . . . . . . . . . . . . . . . . . . . . . . . . . . . . . . . . . . . . . . . . . 82
SYSTem:CTYPe? . . . . . . . . . . . . . . . . . . . . . . . . . . . . . . . . . . . . . . . . . . . . . . 82
SYSTem:ERRor? . . . . . . . . . . . . . . . . . . . . . . . . . . . . . . . . . . . . . . . . . . . . . . 83
TRIGger . . . . . . . . . . . . . . . . . . . . . . . . . . . . . . . . . . . . . . . . . . . . . . . . . . . . . . . 84
Subsystem Syntax . . . . . . . . . . . . . . . . . . . . . . . . . . . . . . . . . . . . . . . . . . . . 84
TRIGger[:IMMediate] . . . . . . . . . . . . . . . . . . . . . . . . . . . . . . . . . . . . . . . . . . 84
TRIGger:SOURce . . . . . . . . . . . . . . . . . . . . . . . . . . . . . . . . . . . . . . . . . . . . . 85
Keysight E1463A Form C Switch User Guide xi
Page 10

TRIGger:SOURce?. . . . . . . . . . . . . . . . . . . . . . . . . . . . . . . . . . . . . . . . . . . . . 87
SCPI Commands Quick Reference. . . . . . . . . . . . . . . . . . . . . . . . . . . . . . . . . . . 88
IEEE 488.2 Common Commands Reference . . . . . . . . . . . . . . . . . . . . . . . . . . . 89
A Form C Switch Specifications
B Register-Based Programming
About This Appendix . . . . . . . . . . . . . . . . . . . . . . . . . . . . . . . . . . . . . . . . . . . . . 93
Register Programming vs. SCPI Programming . . . . . . . . . . . . . . . . . . . . . . . . . 93
Addressing the Registers . . . . . . . . . . . . . . . . . . . . . . . . . . . . . . . . . . . . . . . . . . 93
The Base Address . . . . . . . . . . . . . . . . . . . . . . . . . . . . . . . . . . . . . . . . . . . . . 94
A16 Address Space Outside the Command Module . . . . . . . . . . . . . . . . . . 94
A16 Address Space Inside the Command Module or Mainframe . . . . . . . . 94
Register Offset. . . . . . . . . . . . . . . . . . . . . . . . . . . . . . . . . . . . . . . . . . . . . . . . 95
Register Descriptions. . . . . . . . . . . . . . . . . . . . . . . . . . . . . . . . . . . . . . . . . . . . . 96
Reading and Writing to the Registers . . . . . . . . . . . . . . . . . . . . . . . . . . . . . 96
Manufacturer Identification Register . . . . . . . . . . . . . . . . . . . . . . . . . . . . . . 96
Device Type Register. . . . . . . . . . . . . . . . . . . . . . . . . . . . . . . . . . . . . . . . . . . 96
Status/Control Register . . . . . . . . . . . . . . . . . . . . . . . . . . . . . . . . . . . . . . . . 97
Reading the Status/Control Register . . . . . . . . . . . . . . . . . . . . . . . . . . . . . . 97
Relay Control Register . . . . . . . . . . . . . . . . . . . . . . . . . . . . . . . . . . . . . . . . . 98
Programming Examples . . . . . . . . . . . . . . . . . . . . . . . . . . . . . . . . . . . . . . . . . . . 99
Example: Reading the Registers (BASIC) . . . . . . . . . . . . . . . . . . . . . . . . . . . 99
Example: Reading the Registers (C/HP-UX) . . . . . . . . . . . . . . . . . . . . . . . 100
Example: Making Measurements (BASIC) . . . . . . . . . . . . . . . . . . . . . . . . . 101
Example: Making Measurements (C/HP-UX) . . . . . . . . . . . . . . . . . . . . . . . 102
Example: Scanning Channels (BASIC) . . . . . . . . . . . . . . . . . . . . . . . . . . . . 104
Example: Scanning Channels (C/HP-UX). . . . . . . . . . . . . . . . . . . . . . . . . . 105
C E1463A Error Messages
Error Types . . . . . . . . . . . . . . . . . . . . . . . . . . . . . . . . . . . . . . . . . . . . . . . . . . . . 107
Error Messages. . . . . . . . . . . . . . . . . . . . . . . . . . . . . . . . . . . . . . . . . . . . . . . . . 108
xii Keysight E1463A Form C Switch User Guide
Page 11

Keysight E1463A 32-Channel Form C Switch
User Guide
1 Getting Started
Using This Chapter
This chapter gives guidelines to get started using the E1463A 32-Channel, 5
Amp Form C Switch module (Form C switch), including:
Form C Switch Description page 13
Configuring the Form C Switch page 17
Configuring a Terminal Module page 21
Protecting Relays and Circuits page 27
Programming the Form C Switch page 32
Form C Switch Description
The E1463A 32-Channel, 5 Amp, Form C Switch module (Form C switch)
is defined as a VXIbus instrument. VXIbus plug-in modules installed in a
mainframe or used with a command module are treated as independent
instruments each having a unique secondary address.
Each instrument is also assigned a dedicated error queue, input and output
buffers, status registers and, if applicable, dedicated mainframe/command
module memory space for readings or data. An instrument may be composed of
a single plug-in module (such as a counter) or multiple plug-in modules (for a
switchbox or scanning multimeter instrument).
Basic Operation
The Form C switch is a C-Size VXIbus and VMEbus register-based product that
can be used for switching, scanning, and control. The switch can operate in a
C-Size VXIbus or VMEbus mainframe. The switch has 32 channels of Form C
relays. Each channel includes a relay with common (C), normally open (NO), and
normally closed (NC) contacts.
For the Form C switch, switching consists of opening or closing a channel relay
to provide alternate connections to user devices. Scanning consists of closing a
set of relays, one at a time.
13
Page 12

Getting Started Form C Switch Description
TERMINAL MODULE
C0NO
C0C
C0NC
C0N0
C0C
C0NC
NCNO
Channe l 0
E1463A MODULE
Channe l 15
C15N0
C15C
C15C
NO NC
C15NC
C15C
C15NO
Pads
for M OVS
Pads
for M OVS
Jumper
Channel 16
NO
C16C
C16C
C16N0
NC
C16NC
C16C
C16NO
Channel 31
NO
C31C
C31C
C31N0
NC
C31C
C31NC
C31NO
As shown in Figure 1-1, the Form C switch module consists of 32 channels
(channels 00 through 31). Each channel uses a nonlatching relay. Varistors
(MOVs) can be added for relay protection and resistors or fuses can be added for
circuit protection. See "Adding Relay and Circuit Protection" for more information
on protecting relays.
External pull-up resistors can also be added for digital output applications. See
"Digital Output Configuration" for additional information about these
applications.
Figure 1-1 Form C Switch Simplified Schematic
14 Keysight E1463A 32-Channel Form C Switch User Guide
Page 13

Form C Switch Description Getting Started
Each channel is switched by opening or closing the appropriate channel relay.
Since the relays are nonlatching, the relays are all open during power-up or
power-down.
When a reset occurs, all channel commons (C) are connected to the
corresponding normally closed (NC) contacts. When a channel is closed, the
common contact (C) is connected to the normally open contact (NO). User
inputs and outputs to each channel are via the NO, NC, and C terminal
connectors on the terminal module.
Typical Configurations
The Form C switch accepts user inputs up to 125 Vdc or 250 Vrms. Maximum
rated power capacity (external load) is 150 Wdc or 1250 VA per channel. Per
module, you can switch 1500 Wdc or 12500 VA.
As noted, the switch may be configured for general purpose switching/scanning
or digital output applications. For general purpose switching or scanning, no
additional configuration is required. To configure the switch for digital output
applications, install external pull-up resistors as required.
Multiple Form C switch modules can be configured as a switchbox instrument.
When using a switchbox instrument, multiple Form C switch modules within the
switchbox instrument can be addressed using a single interface address. This
configuration, however, requires the use of Standard Commands for
Programmable Instruments (SCPI).
General Purpose Relay Configuration
As factory-configured, the Form C switch module is set for general purpose relay
configuration. For this configuration, you can switch channels by opening or
closing channel relays or you can scan a set of channels.
Figure 1-2 shows a typical general purpose relay configuration for channel 00.
When the relay is open (NC terminal is connected to the C terminal), load 1 is
connected. When the relay is closed (NO terminal is connected to the C
terminal), load 2 is connected.
Keysight E1463A 32-Channel Form C Switch User Guide 15
Page 14

Getting Started Form C Switch Description
C
NO
NC
Channel
00
C0NO
C0NC
C0C
TERMINAL
MODULE
2
1
+V
Relay Load
Open 1
Closed 2
MODULE
TERMINAL
C0NC
C0NO
Closed
Open
Relay
OV
+V
1
MODULE
E1463A
Channel
C
00
NC
NO
OV
0V
2
2
C0C
1
+V
Figure 1-2 General Purpose Relay Configuration
Digital Output Configuration
By installing external pull-up resistors, the Form C switch can be configured as a
digital output device. Figure 1-3 shows channel 00 configured for digital output
operation. When the channel 00 relay is open (NC connected to C), point 1 is at
+V. When the channel 00 relay is closed (NO connected to C), point 1 is at 0V.
Figure 1-3 Digital Output Configuration
16 Keysight E1463A 32-Channel Form C Switch User Guide
Page 15

Configuring the Form C Switch Getting Started
Configuring the Form C Switch
This section gives guidelines to configure the Form C switch, including the
following topics. See "Configuring a Terminal Module" for guidelines to configure
the terminal modules. Section topics include:
– Warnings and Cautions
– Setting the Logical Address Switch
– Setting the Interrupt Priority
– Installing the Form C Switch in a Mainframe
Warnings and Cautions
SHOCK HAZARD. Only qualified, service-trained personnel
who are aware of the hazards involved should install,
configure, or remove the Form C switch module. Use only
wire rated for the highest input voltage and remove all
power sources from the mainframe and installed modules
before installing or removing a module.
MAXIMUM VOLTAGE/CURRENT. Maximum allowable voltage per channel
for the Form C switch is 125 Vdc or 250 Vrms. Maximum current per
channel is 5 Adc or ac rms (non-inductive). Maximum power of an
external load is 150 W or 1250 VA per channel or 1500 W or 12500 VA
per module. Exceeding any limit may damage the Form C switch.
STATIC ELECTRICITY. Static electricity is a major cause of component
failure. To prevent damage to the electrical components in the Form C
switch, observe anti-static techniques whenever removing a module
from the mainframe or whenever working on a module. The Form C
switch is susceptible to static discharges. Do not install the Form C
switch without its metal shield attached.
Setting the Logical Address Switch
The logical address switch (LADDR) factory setting is 120. Valid addresses are
from 1 to 255. The Form C switch can be configured as a single instrument or as
a switchbox. See Figure 1-4 for switch position information.
Keysight E1463A 32-Channel Form C Switch User Guide 17
Page 16
Getting Started Configuring the Form C Switch
8+16+32+64=120
Logical Address = 120
Logical Address
Switc h Loc ation
128
64
32
16
8
4
2
1
C
L
O
S
E
D
O
P
E
N
CLOSED = Switch Set To 1 (ON)
OPEN = Switch Set To 0 (OFF)
The address switch selected value must be a multiple of 8 if the
module is the first module in a switchbox used with a VXIbus
command module and is being instructed by SCPI commands.
.
Figure 1-4 Setting the Logical Address Switch
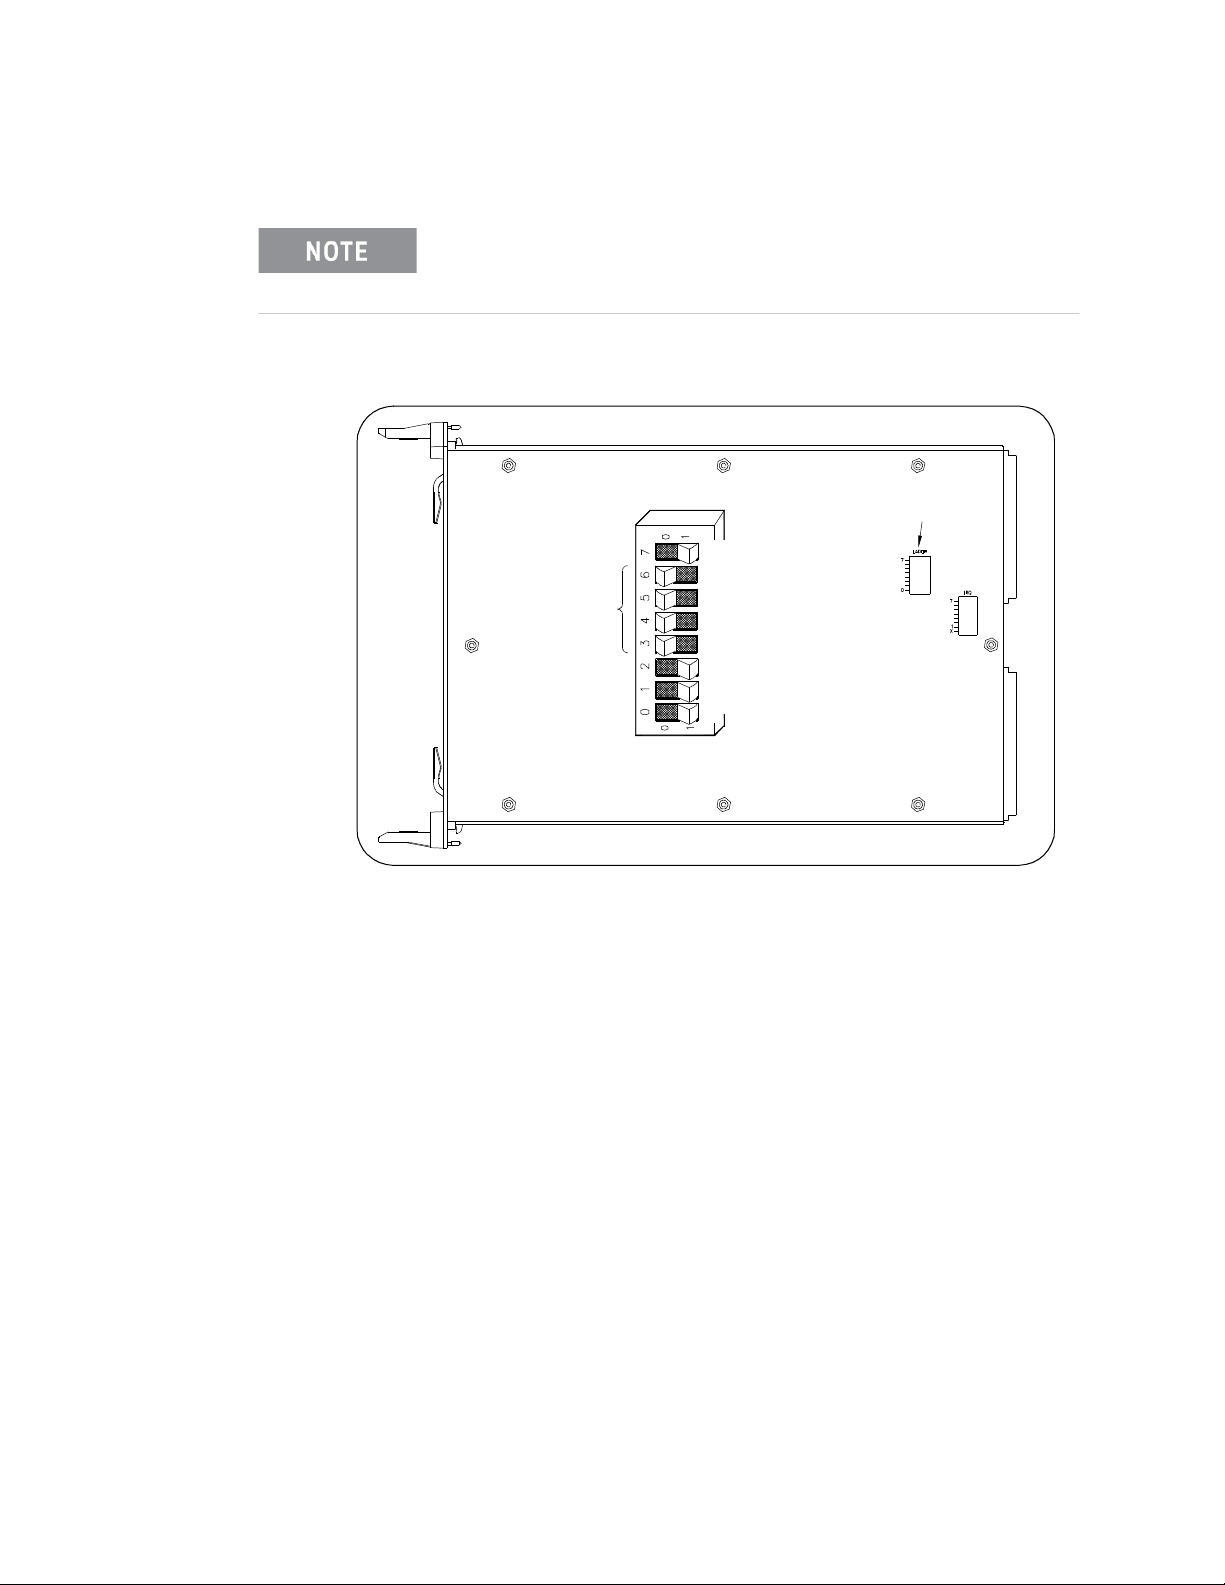
Setting the Interrupt Priority
The Form C switch generates an interrupt after a channel has been closed. These
interrupts are sent to, and acknowledgments are received from, the command
module (E1406, for example) via the VXIbus backplane interrupt lines.
For most applications where the Form C switch is installed in a C-Size
18 Keysight E1463A 32-Channel Form C Switch User Guide
mainframe, the interrupt priority jumper does not have to be moved. This is
because the VXIbus interrupt lines have the same priority and interrupt priority is
established by installing modules in slots numerically closest to the command
module. Thus, slot 1 has a higher priority than slot 2, slot 2 has a higher priority
than slot 3, etc.
See Figure 1-5 to change the interrupt priority. You can select eight different
interrupt priority levels. Level 1 is the lowest priority and Level 7 is the highest
priority. Level X disables the interrupt. The Form C switch factory setting is Level
Page 17
Configuring the Form C Switch Getting Started
Interrupt
2
2
X
1
Location
Priority
X
1
Using 2-Pin
5
3
4
6
7
Jumper
IRQ
Switch Location
Logical Address
5
3
4
6
7
Jumper
Using 4-Pin
IRQ
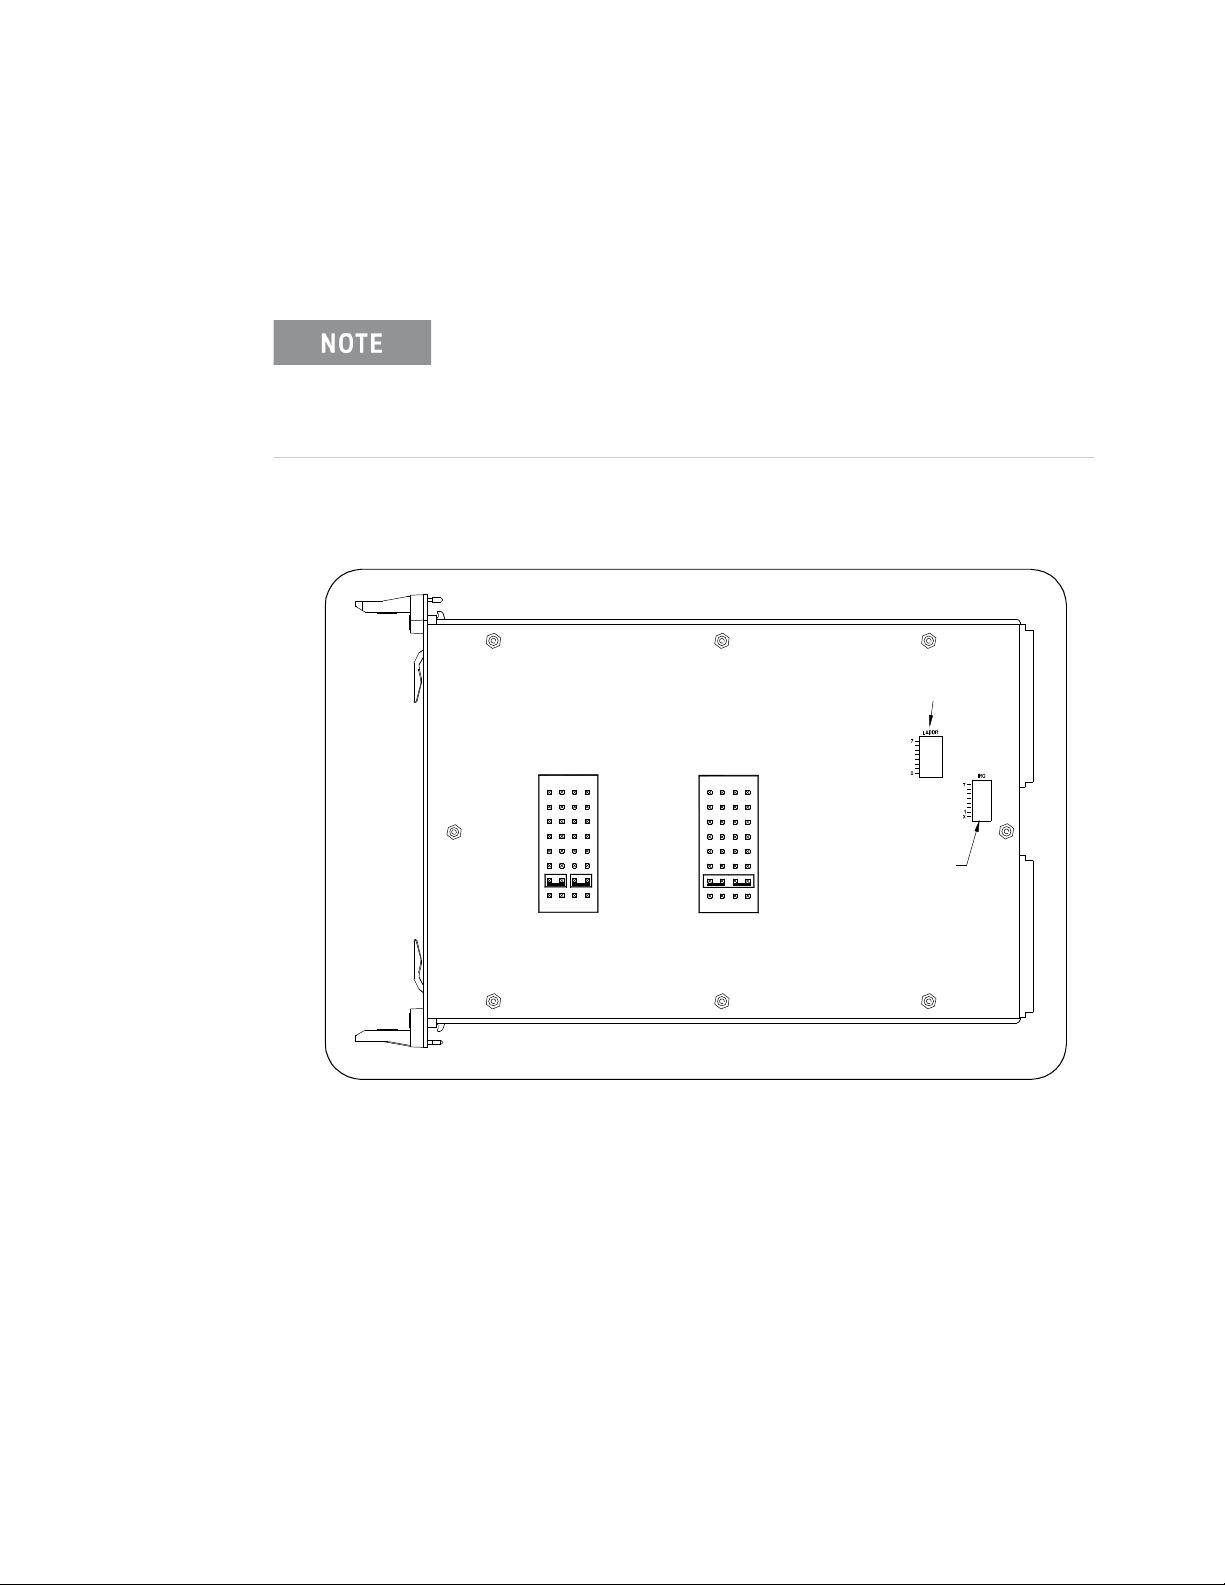
1. To change the interrupt priority, remove the 4-pin jumper from the old priority
location and reinstall in the new priority location. If the 4-pin jumper is not used,
the two jumper locations must have the same interrupt priority level selected.
The interrupt priority jumper MUST be installed in position 1 when
using the E1406 Command Module. Level X interrupt priority
should not be used under normal operating conditions. Changing
the priority level jumper is not recommended. Do not change
unless specifically instructed to do so.
Figure 1-5 Setting the Interrupt Priority
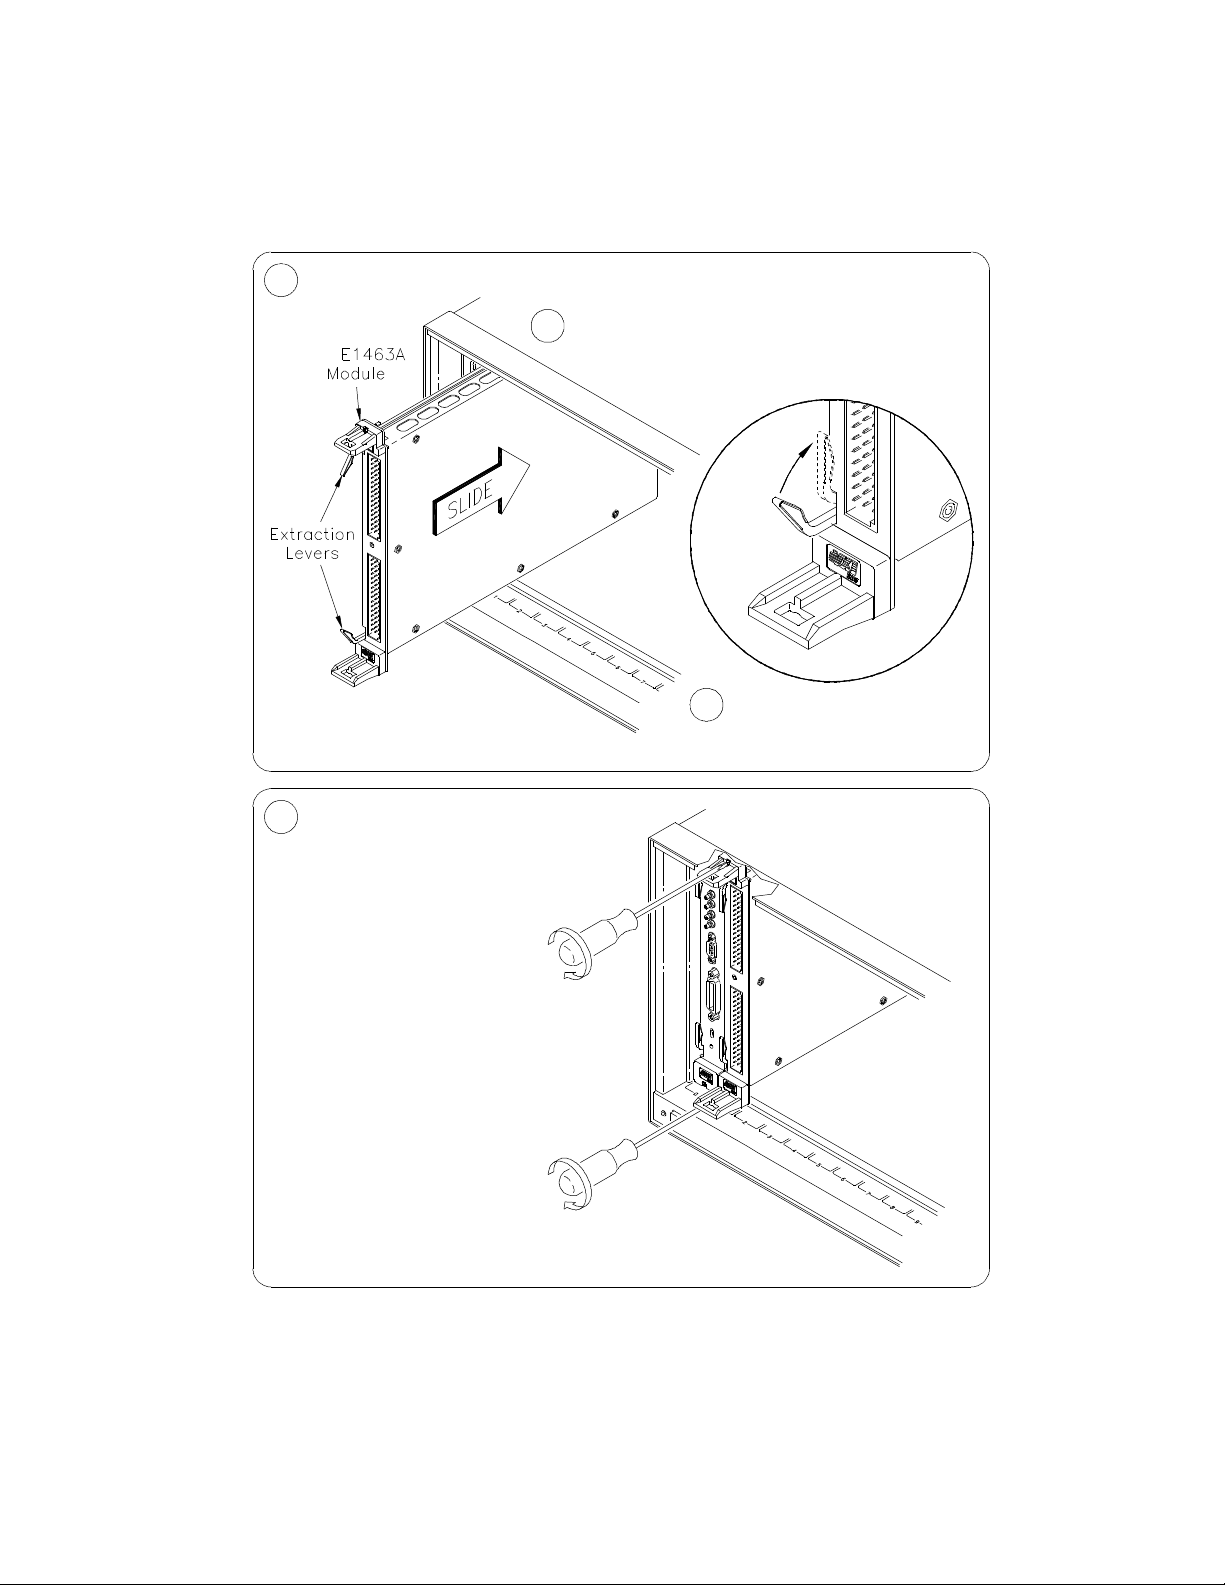
Installing the Form C Switch in a Mainframe
The E1463A may be installed in any slot, except slot 0, in a C-size VXIbus
mainframe. See Figure 1-6 to install the Form C switch in a mainframe.
Keysight E1463A 32-Channel Form C Switch User Guide 19
Page 18
Getting Started Configuring the Form C Switch
in the extraction levers.
Seat the E1463A into
the mainframe by pushing
4 Tighten the top and bottom screws
to secure the module to the
To remove the module from the mainframe,
reverse the procedure.
mainframe.
Set the extraction levers out.1
3
Slide the E1463A into any slot
(except slot 0) until the backplane
connectors touch.
2
NOTE: The extraction levers will not
seat the backplane connectors on older
VXIbus mainframes. You must manually
seat the connectors by pushing in the
module until the module's front panel is
flush with the front of the mainframe. The
extraction levers may be used to guide or
remove the Form C switch.
Figure 1-6 Installing the Form C Switch in a VXIbus Mainframe
20 Keysight E1463A 32-Channel Form C Switch User Guide
Page 19

Configuring a Terminal Module Getting Started
Configuring a Terminal Module
The E1463A 32-Channel, 5 Amp, Form C Switch consists of a relay switch card
and a screw type standard terminal module. In addition, a solder eye terminal
module (Option A3G) is available. User inputs to the Form C switch are to the
normally open (NO), normally closed (NC), and common (C) terminal connectors
on the terminal module. This section shows how to configure the terminal
modules, including:
– Standard Terminal Module Description
– Terminal Module Option A3G Description
– Connecting User Inputs
– Wiring a Terminal Module
– Attaching a Terminal Module to the Form C Switch
Standard Terminal Module Description
Figure 1-7 shows the standard screw type terminal module connectors and
associated channel numbers.
Figure 1-7 Standard Screw-type Terminal Module
Keysight E1463A 32-Channel Form C Switch User Guide 21
Page 20
Getting Started Configuring a Terminal Module
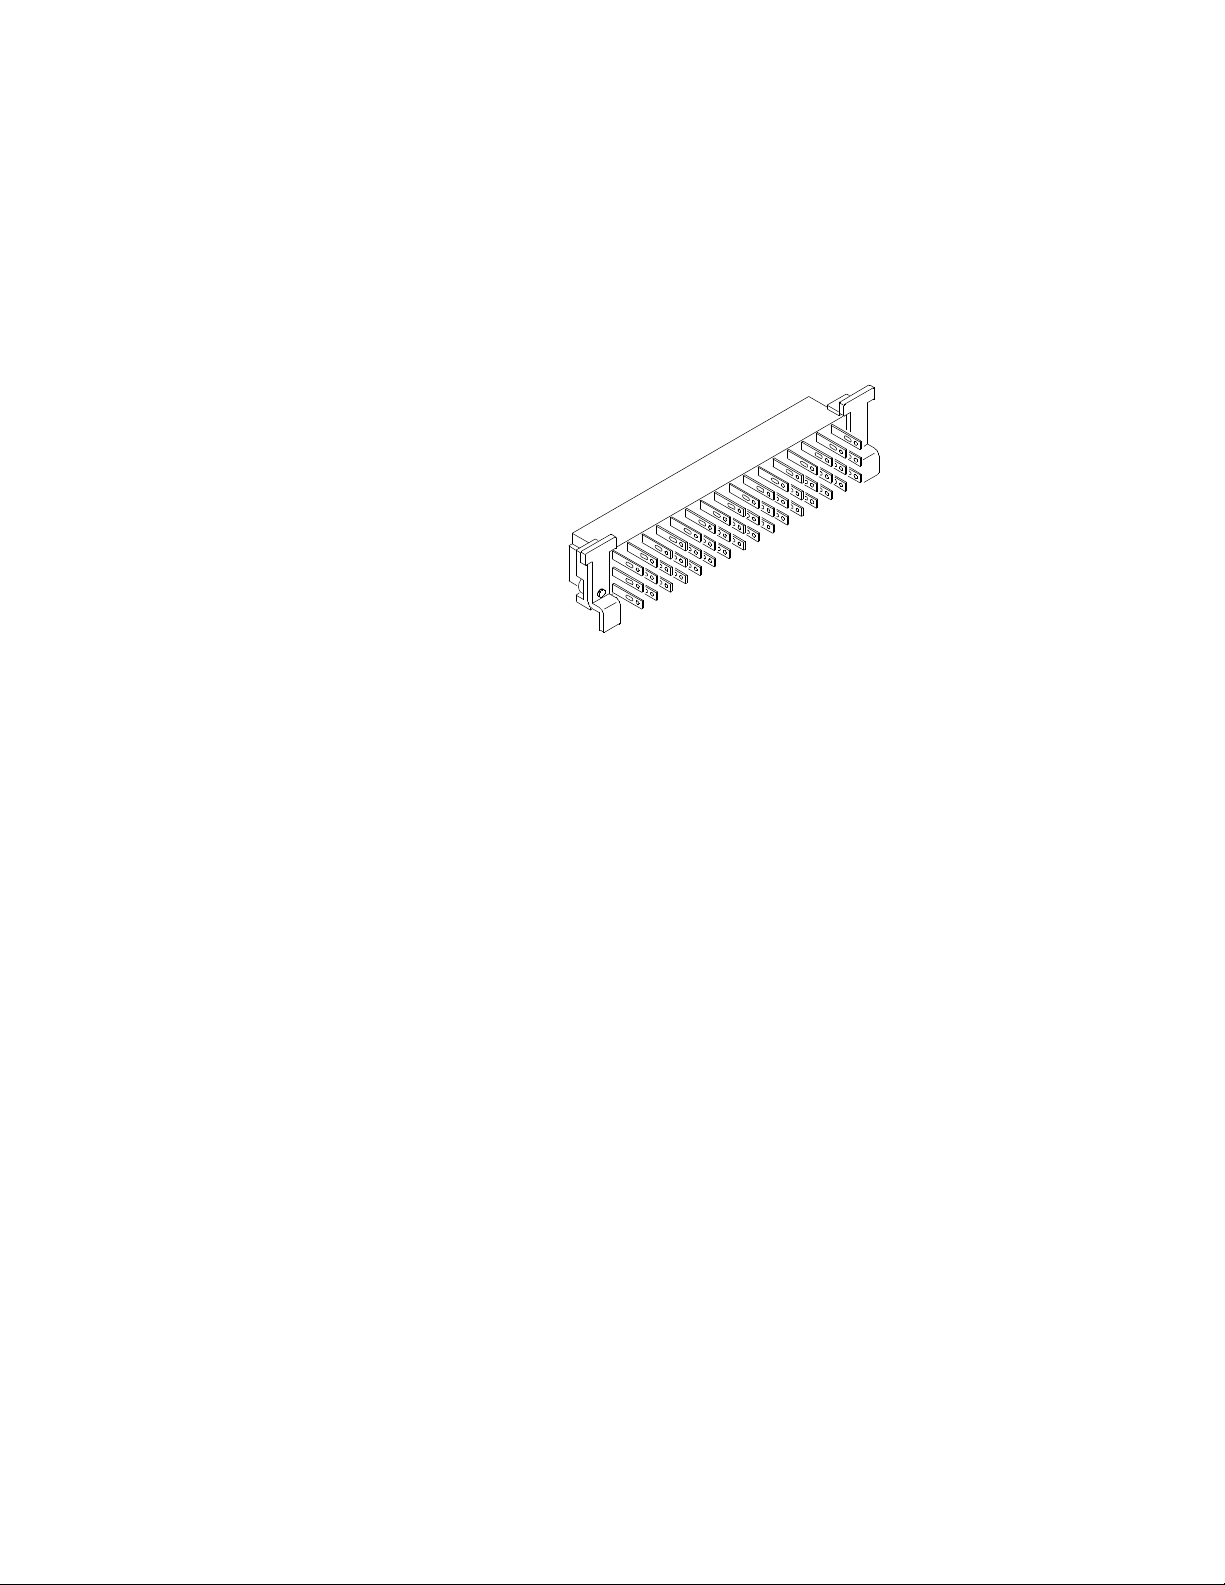
Terminal Module Option A3G Description
Option A3G provides a plastic terminal module housing with solder eye
connectors (see Figure 1-8) that allows you to solder wires onto connectors
which are then inserted directly into the mating connector of the Form C switch.
See Figure 1-9 for pin-outs.
Figure 1-8 Option A3G Terminal Module
22 Keysight E1463A 32-Channel Form C Switch User Guide
Page 21

Configuring a Terminal Module Getting Started
A32
Pin
00NO
01NO
02NO
03NO
A2
Pin
04NO
05NO
06NO
07NO
08NO
09NO
10NO
11NO
12NO
13NO
14NO
15NO
C2
Pin
15C
14C
11C
13C
12C
10C
09C
06C
08C
07C
05C
04C
C32
Pin
01C
02C
03C
00C
Pin
E2
15NC
14NC
11NC
13NC
12NC
10NC
09NC
06NC
08NC
07NC
05NC
04NC
Pin
E32
01NC
03NC
02NC
00NC
A2
Pin
31NO
30NO
Pin
C2
31C
30C
Pin
E2
31NC
30NC
27NO
29NO
28NO
26NO
25NO
22NO
23NO
24NO
21NO
20NO
27C
29C
28C
26C
25C
22C
24C
23C
21C
20C
A32
Pin
18NO
19NO
17NO
16NO
Pin
C32
17C
19C
18C
16C
27NC
29NC
28NC
26NC
25NC
22NC
24NC
23NC
21NC
20NC
E32
Pin
17NC
19NC
18NC
16NC
Connecting User Inputs
Figure 1-9 shows the front panel of the E1463A and the Form C switch connector
pin-out that mates to the terminal module. Actual user inputs are connected to
the applicable terminal module.
Figure 1-9 Form C Switch Pin-outs
Keysight E1463A 32-Channel Form C Switch User Guide 23
Page 22

Getting Started Configuring a Terminal Module
Tighte n wraps to
secure wires
Remove Clear Cover1 Remove and Retain Wiring Exit Panel2
Make Connections3
Route WiringInstall Connectors (Solder Eye Only)45
A. Release Screws
B. Press Tab Forward
and Release
Tab
Remove 1 of the 3
wire exit panels
Size 16-26
AWG
5mm
0.2"
Use wire
VW1 Flammability
Rating
Insert wire into terminal.
Tighten screw.
Screw Type Solder Eye Type
Wiring a Terminal Module
Figures 1-10 and 1-11 show how to connect field wiring to the terminal module.
When making wiring connections, be sure the wires make good connections on
screw terminals. Maximum terminal wire size is No. 16 AWG. When wiring all
channels, a smaller gauge wire (No. 20 - 22 AWG)
is recommended. Wire ends should be stripped 6 mm (0.25 inch) and tinned to
prevent single strands from shorting to adjacent terminals.
Figure 1-10Wiring a Terminal Module (continued on next page)
24 Keysight E1463A 32-Channel Form C Switch User Guide
Page 23

Configuring a Terminal Module Getting Started
Module
E1463A
Replace Wiring Exit Panel
for wire exit
holes in panels
Cut required
Install the Terminal
8
Module
6
possible
hole as small as
Keep wiring exit panel
Extraction
Levers
Terminal Module onto the E1463A
tighten screws
B. Press down and
Push in the Extraction Levers to Lock the
9
onto the fixture
A. Hook in the top cover tabs
Replace Clear Cover
7
Figure 1-11Wiring a Terminal Module
Keysight E1463A 32-Channel Form C Switch User Guide 25
Page 24

Getting Started Configuring a Terminal Module
to free it from the Form C switch module.
levers and push both levers out simultaneously
use a small screwdriver to release the two extraction
To remove the terminal module from the E1463A,
onto the E1463A module.
Push in the extraction levers
to lock the terminal module
the terminal module to the
Apply gentle pressure to attach
Align the terminal module connectors
to the E1463A module connectors.
4
E1463A module.
extraction levers
to release the two
3
2
Levers
Extraction
Module
E1463A
Extraction Lever
Extend the extraction levers on the1
Use small screwdriver
terminal module.
Extraction Lever
Attaching a Terminal Module to the Form C Switch
Figure 1-12 gives guidelines to attach a terminal module to the Form C switch.
Figure 1-12Attaching a Terminal Module to the Form C Switch
26 Keysight E1463A 32-Channel Form C Switch User Guide
Page 25

Protecting Relays and Circuits Getting Started
Protecting Relays and Circuits
This section gives guidelines to protect relays and circuits in the Form C switch,
including:
– Relay Life Factors
– Extending Relay Life
– Adding Relay and Circuit Protection
– Maximum Allowable Module Switch Current
Relays that wear out normally or fail due to misuse should not be
considered defective and are not covered by the product's
warranty.
Relay Life Factors
Relays have a shorter life span than other electronic parts, such as ICs. Because
of their mechanical nature, relays usually have about 10 million operations (at 30
operations per second) which is not quite 100 hours. Therefore, to get the full life
out of a relay in a switching module, you must protect the relay.
Loading and Switching Frequency
Electromechanical relays are subject to normal wear-out. Relay life depends on
several factors. The effects of loading and switching frequency are:
Relay Load. In general, higher power switching reduces relay life. In addition,
capacitive/inductive loads and high inrush currents (for example, turning on a
lamp or starting a motor) reduces relay life.
Exceeding specified maximum inputs can cause catastrophic
failure.
Switching Frequency. Relay contacts heat up when switched. As the switching
frequency increases, the contacts have less time to dissipate heat. The resulting
increase in contact temperature also reduces relay life.
End-of-Life Detection
A preventive maintenance routine can prevent problems caused by unexpected
relay failure. The end of the life of the relay can be determined by using one or
more of the following three methods. The best method (or combination of
methods), as well as the failure criteria, depends on the application in which the
relay is used.
Keysight E1463A 32-Channel Form C Switch User Guide 27
Page 26

Getting Started Protecting Relays and Circuits
Contact Resistance. As the relay begins to wear out, its contact resistance
increases. When the resistance exceeds a predetermined value, the relay should
be replaced.
Stability of Contact Resistance. The stability of the contact resistance decreases
with age. Using this method, the contact resistance is measured several (5-10)
times and the variance of the measurements is determined. An increase in the
variance indicates deteriorating performance.
Number of Operations. Relays can be replaced after a predetermined number of
contact closures. However, this method requires knowledge of the applied load
and life specifications for the applied load.
Replacement Strategy
The replacement strategy depends on the application. If some relays are used
more often, or at a higher load, than the others, the relays can be individually
replaced as needed. If all the relays see similar loads and switching frequencies,
the entire circuit board can be replaced when the end of relay life approaches.
The sensitivity of the application should be weighed against the cost of replacing
relays with some useful life remaining.
Extending Relay Life
To help ensure full life for the relays, you should consider the following items.
Be aware of non-resistive loads. When switching inductive loads, high voltages
(thousands of volts) are produced across the relay contacts. This causes arcing
and transfer of material between contacts. Oxides and carbides from
components of the atmosphere coat the contacts and cause high contact
resistance.
The transfer of material creates hills and valleys that lock together to "weld"
contacts. Motor loads, for example, produce large inrush currents that can be 5
to 10 times greater than the steady state current. Table 1-1 summarizes inrush
current magnitudes for different types of loads.
Table 1-1 Inrush Currents
Type of
Load
Resistive 1 Incandescent Lamp 10 - 15
Capacitive 20 - 40 Mercury Lamp 3
Solenoid 10 - 20 Sodium Vapor Lamp 1 - 3
Inrush Current
Times
Steady State
Type of
Load
Inrush Current
Times
Steady State
Motor 5 - 10 Transformer 5 - 15
28 Keysight E1463A 32-Channel Form C Switch User Guide
Page 27

Protecting Relays and Circuits Getting Started
Be aware of heavy current applications. When a relay is used in heavy current
applications, the thin layer of gold plating on the contact may be destroyed. This
will not affect the heavy current application. However, if you go back to a low
current application, a high contact resistance may be present and the relay
cannot be used for low current applications.
Use protective circuits with relay connections. The relay manufacturer (Aromat)
recommends some protective circuits that can be used with your relay
connections. See the Aromat Technical Data Book (AGC-C0064-A-1) for
additional information. Contact Aromat at (408) 433-0466 for more information.
Do not use capacitors. Capacitors are not to be placed across the load or relay
contacts. Capacitors may suppress arcs, but the energy stored in the capacitors
will flow through the relay contacts, welding them.
Adding Relay and Circuit Protection
The Form C switch has space for adding relay and circuit protection. Relay
protection can be added by placing a protective device across the specified pads.
This is done by adding metal oxide varistors (MOVs) between the common (C)
and normally open (NO) or normally closed (NC) terminals. As the voltage goes
up, the varistor draws current to protect the relay.
Circuit protection can be added by placing a protective device in series with the
common lead. This is done by adding a resistor between the common (C)
terminal and your circuit. When installing circuit protection, a jumper must be
removed first.
To install these protective devices it is necessary to remove the sheet metal
covers from the module. The locations for installing the devices are labeled as
shown in Table 1-2, where xx = the channel number. Do not install a capacitor in
any of these locations. Figure 1-13 shows locations where these protective
devices can be added.
Table 1-2 Protective Devices Board Locations
Relay Protection Circuit Protection
VxxO Varistor location across common (C) and normally open (NO).
VxxC Varistor location across common (C) and normally closed
(NC).
Circuit Protection
JMxx Resistor or fuse location in series with common (C).
Keysight E1463A 32-Channel Form C Switch User Guide 29
Page 28

Getting Started Protecting Relays and Circuits
C
Relay
NCNO
VxxC
VxxO
J
M
x
x
xx = Channel Number
Figure 1-13Adding Relay and Circuit Protection
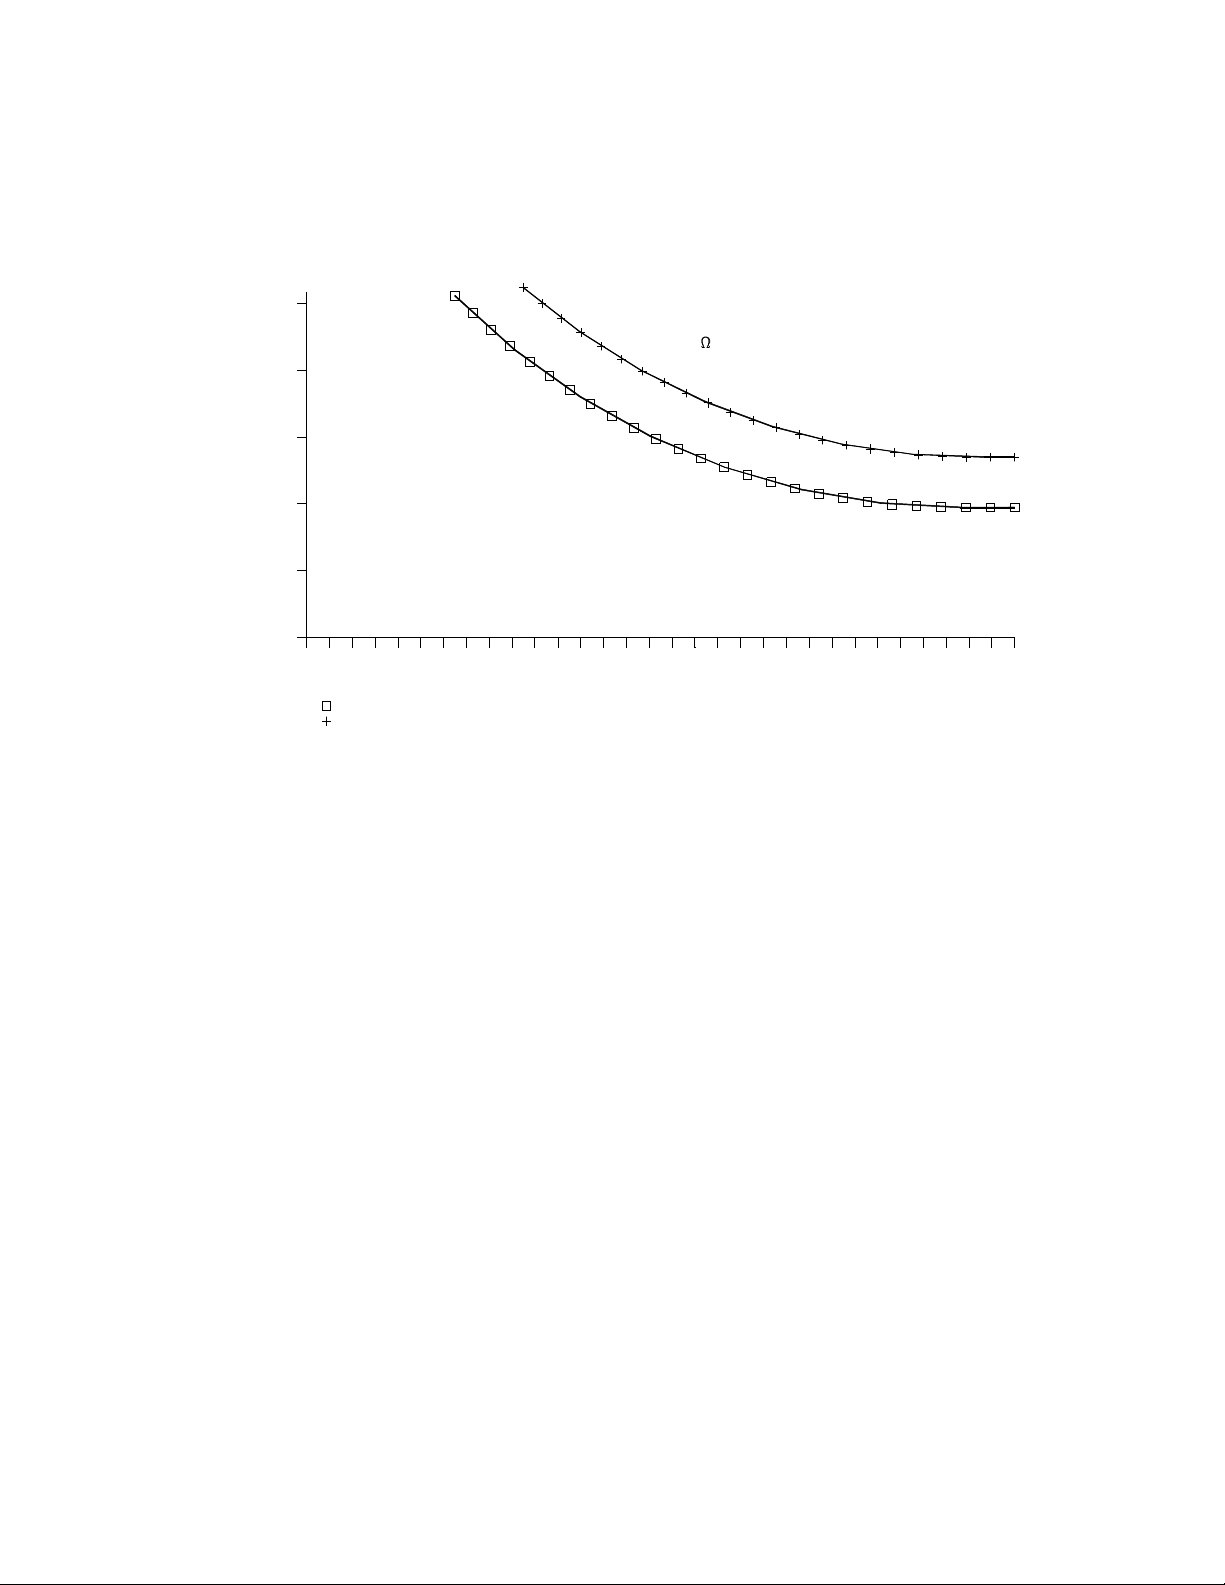
Maximum Allowable Module Switch Current
The Form C switch has an individual channel current specification of 5A.
However, if you apply 5A to all the channels with a relay contact resistance of .25
Ohms, the power dissipation is 200 W. Since, for example, the
E1401B mainframe can only provide cooling for 55W per slot (to keep the
temperature rise to 10
A reasonable maximum current for the entire mainframe is 50A. That is,
10 channels each carrying 5A or some combination of channels and currents that
total 50A. This will produce about 67.5 W of internal dissipation, leading to an
approximate 15
o
Figure 1-14 shows a typical way to derate the channels, in terms of current
throughout the channels, to keep internal power dissipation under 45 W and
o
67.5 W or 10
C and 15oC temperature rise, respectively.
o
C), this cannot be allowed to happen.
C temperature rise.
30 Keysight E1463A 32-Channel Form C Switch User Guide
Page 29
Protecting Relays and Circuits Getting Started
1230 4 5 6 7 8 9 101112131415161718192021222324252627282930 31
0
1
2
3
4
5
No. of Switches Carrying Current
C
u
r
r
e
n
t
P
e
r
S
w
itc
h
-
A
M
P
S
=45 Watt MF Diss
=67.5 Watt MF Diss
E1401 B Mainframe and
.25 Relay Contact Resistance
Figure 1-14Typical Form C Switch Allowable Switch Current
Keysight E1463A 32-Channel Form C Switch User Guide 31
Page 30

Getting Started Programming the Form C Switch
Programming the Form C Switch
This section gives guidelines to program the Form C switch, including:
– Using SCPI Commands
– Addressing the Form C Switch
– Initial Operation
Using SCPI Commands
There are several ways you can program the Form C switch. One way is
to write directly to the registers. This method can provide better throughput
speed. However, it requires more knowledge of the Form C switch design.
Another way to program the Form C switch is to use an E1406 Command Module
and SCPI commands. With SCPI commands, the command module parses the
commands and writes to the appropriate Form C switch register.
You can use different controllers and different programming languages.
However, most examples in this manual use SCPI commands and an
HP 9000 Series 200/300 (or equivalent) computer running BASIC or a
PC with an 82350A (or equivalent) Interface Card (with command library) running
Borland
Turbo C.
Most examples in this manual use SCPI commands. See Appendix
B for information on writing directly to the registers.
To address specific channels (relays) within a Form C switch, you must specify
the SCPI command and switch channel list. Table 1-3 lists the most commonly
used commands.
Table 0-1. Typical SCPI Commands
SCPI Command Description
CLOSe <channel_list> Connects the normally open (NO) terminal to the
common (C) terminal for the channels specified.
OPEN <channel_list> Connects the normally closed (NC) terminal to the
common (C) terminal for the channels specified.
SCAN <channel_list> Closes the set of Form C relays, one at a time.
32 Keysight E1463A 32-Channel Form C Switch User Guide
Page 31

Programming the Form C Switch Getting Started
Command
Module
Note: Physical placement of the Module in the Logical Address
order is not required, but is recommended.
Switch Module
Logical Address = 120
Secondary Address = 15
Card Number 01
Logical Address = 121
Switch Module
Switch Module
Logical Address = 122
1
2
8
6
4
3
2
1
6
8
4
2
1
Card Number 02
641
2
8
1
6
32841
2
Card Number 03
641
2
8
1
6
3
2
8
4
1
2
Addressing the Form C Switch
Relays (channels) within the Form C switch are addressed using the channel_list
statement. The channel_list is a combination of the switch card number and the
channel numbers. The channel_list takes the form @ccnn where cc = switch card
number (01-99) and nn = channel number (00-31).
Card Numbers
The card number (cc of the channel_list) identifies the module within a
switchbox. The card number assigned depends on the switch configuration used.
Leading zeroes can be ignored for the card number.
In a single-module switchbox configuration, the card number is always 01.
In a multiple-module switchbox
logical addresses.
The module with the lowest logical address is always card number 01. The
module with the next successive logical address is card number 02, etc. Figure
1-15 illustrates card numbers and logical addresses of a typical multiple-module
switchbox configuration.
configuration, modules are set to successive
Figure 1-15Typical Card Numbers in a Multiple-module Switchbox
Channel Addresses
The channel address (nn of the channel list) determines which relay on the
selected card will be addressed. Form C switch channel numbers are 00 through
31. The channels can be addressed using channel numbers or channel ranges:
– single channels (@ccnn);
Keysight E1463A 32-Channel Form C Switch User Guide 33
Page 32

Getting Started Programming the Form C Switch
– multiple channels (@ccnn,ccnn,...);
– sequential channels (@ccnn:ccnn);
– groups of sequential channels (@ccnn:ccnn,ccnn:ccnn);
– or any combination of the above.
Use a comma (,) to form a channel list or a colon (:) to form a channel range. Only
valid channels can be accessed in a channel list or channel range. Also, the
channel range must be from a lower channel number to a higher channel
number. For example, CLOS(@100:215) is acceptable, but CLOS(@215:100)
generates an error.
Initial Operation
Two example programs follow to help get you started using the Form C switch.
The first example assumes an HP 9000 Series 200/300 controller running BASIC
and a GPIB interface. The second example assumes a PC running Borland Turbo
C and an 82350A (or equivalent) Interface Card (with command library)
Example: Closing a Channel (BASIC)
This program closes channel 02 of a Form C switch at logical address 120
(secondary address = 120/8 = 15) and queries the channel closure state. The
result is returned to the computer and displayed (1 = channel closed, 0 = channel
open). See Chapter 3 for information on the SCPI commands.
10 OUTPUT 70915;"*RST" ! Reset the module
20 OUTPUT 70915;"CLOS(@102)" ! Close channel 02
30 OUTPUT 70915;"CLOS?(@102)" ! Query channel 02 state
40 ENTER 70915;Value ! Enter result into Value
50 PRINT Value ! Display result
60 END
Example: Closing a Channel (TURBO C)
This program closes channel 02 of a Form C switch at logical address 120
(secondary address = 120/8 = 15) and queries the channel closure state. The
result is returned to the computer and displayed (1 = channel closed,
0 = channel open). See Chapter 3 for information on the SCPI commands.
#include <stdio.h>
#include <chpib.h> /*Include file for
GPIB*/
#define ISC 7L
#define FORMC 70915L /*Form C default
address*/
34 Keysight E1463A 32-Channel Form C Switch User Guide
Page 33

Programming the Form C Switch Getting Started
#define TASK1 "*RST" /*Command for a reset*/
#define TASK2 "CLOSE (@102)" /*Command to close
channel 02*/ #define TASK3 "CLOS? (@102)" /*Command to query
channel 02*/
main()
{
char into[257];
int length = 256;
/*Output commands to Form C switch*/
error_handler (IOTIMEOUT (7L,5.0), "TIMEOUT");
error_handler (IOOUTPUTS (FORMC, TASK1, 4), "OUTPUT command");
error_handler (IOOUTPUTS (FORMC, TASK2, 12), "OUTPUT command");
error_handler (IOOUTPUTS (FORMC, TASK3, 12), "OUTPUT command");
/*Enter from Form C switch*/
error_handler (IOENTERS (FORMC, into, &length), "ENTER command");
printf("Now let's see if the switch is closed: %s",into);
return;
}
int error_handler (int error, char *routine)
{
char ch;
if (error != NOERR)
{
printf ("\n Error %d %s \n", error, errstr(error));
printf (" in call to function %s \n\n", routine);
printf ("Press 'Enter' to exit: ");
scanf ("%c", &ch);
exit(0);
}
return 0;
}
Keysight E1463A 32-Channel Form C Switch User Guide 35
Page 34

Getting Started Programming the Form C Switch
36 Keysight E1463A 32-Channel Form C Switch User Guide
Page 35

Keysight E1463A 32-Channel Form C Switch
User Guide
2 Using the Form C Switch
Using This Chapter
This chapter uses typical examples to show ways to use the E1463A Form C
switch module for switching channels and scanning channels. See Chapter 3 for
command information. Chapter contents are:
Form C Switch Commands page 38
Power-on and Reset Conditions page 38
Module Identification page 39
Switching Channels page 41
Scanning Channels page 47
Querying the Form C Switch page 51
Using the Scan Complete Bit page 51
Saving and Recalling States page 53
Detecting Error Conditions page 54
Synchronizing the Form C Switch page 55
All examples in this chapter use GPIB select code 7, primary
address 09, and secondary address 15 (LADDR = 120).
37
Page 36

Using the Form C Switch Form C Switch Commands
Form C Switch Commands
Table 2-1 explains some of the SCPI commands used in this chapter.
See Chapter 3 for more information on these commands.
Table 2-1 E1463A Form C Switch Commands Used in Chapter 2
SCPI Command Command Description
[ROUTe:]CLOSe <channel_list> Closes the channels in the <channel_list>
[ROUTe:]CLOSe? <channel_list> Queries the state of the channels in the <channel_list>
[ROUTe:]OPEN <channel_list> Opens the channels in the <channel_list>
[ROUTe:]OPEN? <channel_list> Queries the state of the channels in the <channel_list>
[ROUTe:]SCAN <channel_list> Closes the channels in the <channel_list>, one at a time
INITiate[:IMMediate] Starts scan sequence and closes first channel in the <channel_list>
TRIGger:SOURce BUS | EXT | HOLD |
IMM | TTLT
Selects the trigger source to advance the scan
Power-on and Reset Conditions
Since the Form C switch module has nonlatching relays, all relays condition are
in the normally closed (NC) position at power-down and power-up. The *RST
command opens all channels, invalidates the current channel list for scanning
and sets the conditions shown in Table 2-2.
Table 2-2 Reset Conditions
Parameter Default Description
ARM:COUNt
TRIGger:SOURce IMM Will advance scanning cycles automatically
INITiate:CONTinuous
OUTPut[:STATe]
1
OFF
OFF
Number of scanning cycles is 1
Number of scanning cycles is set by ARM:COUNt
Trigger output from EXT or TTL sources is disabled
38 Keysight E1463A 32-Channel Form C Switch User Guide
Page 37

Module Identification Using the Form C Switch
Module Identification
The following example programs use the *RST, *CLS, *IDN?, SYST:CTYP?, and
SYST:CDES commands to reset and identify the E1463A Form C switch module.
A typical print for the E1463A Form C switch is:
HEWLETT-PACKARD,SWITCHBOX,0,A.04.00
32 Channel General Purpose Relay
HEWLETT-PACKARD,E1463A,0,A.04.00
Example: Module Identification (BASIC)
10 DIM A$[50], B$[50], C$[50] IDimensions three string variables to
fifty characters
20 OUTPUT 70915;"*RST; *CLS" !Outputs the commands to reset and
clears the status register
30 OUTPUT 70915; "*IDN?" !Queries for module identification
40 ENTER 70915; A$ IEnters the results into A$
50 OUTPUT 70915; "SYST:CDES? 1" !Outputs the command for a card
description
60 ENTER 70915; B$ !Enters the results into B$
70 OUTPUT 70915; "SYST:CTYP? 1" !Outputs the command for the card
type
80 ENTER 70915; C$ !Enters the results into C$
90 PRINT A$, B$, C$ !Prints the contents of variables A$, B$, and
C$
100 END
Example: Module Identification (TURBO C)
#include stdio.h
#include chpib.h /*Include file for GPIB*/
#define ISC 7L
#define FORMC 70915L /*Form C default address*/
#define TASK1 "*RST;*CLS;*IDN?" /*Reset, clear, and query
id*/
#define TASK2 "SYST:CDES? 1" /*Command for card
description*/
#define TASK3 "SYST:CTYP? 1" /*Command for card type*/
main( )
{
char into1[51], into2[51], into3[51];
int length = 50; /*Output and enter commands to Form C*/
Keysight E1463A 32-Channel Form C Switch User Guide 39
Page 38

Using the Form C Switch Module Identification
error_handler (IOTIMEOUT (7L,5.0), "TIMEOUT");
error_handler (IOOUTPUTS (FORMC, TASK1, 15), "OUTPUT command");
error_handler (IOENTERS (FORMC, into1, &length), "ENTER command");
error_handler (IOOUTPUTS (FORMC, TASK2, 12), "OUTPUT command");
error_handler (IOENTERS (FORMC, into2, &length), "ENTER command");
error_handler (IOOUTPUTS (FORMC, TASK3, 12), "OUTPUT command");
error_handler (IOENTERS (FORMC, into3, &length), "ENTER command");
printf("IDENTIFICATION: %s",into1);
printf("CARD DESCRIPTION: %s",into2);
printf("CARD TYPE: %s",into3);
return;
}
int error_handler (int error, char *routine)
{
char ch;
if (error != NOERR)
{
printf ("\n Error %d %s \n", error, errstr(error));
printf (" in call to GPIB function %s \n\n", routine);
printf ("Press 'Enter' to exit: ");
scanf ("%c", &ch);
exit(0);
}
return 0;
}
40 Keysight E1463A 32-Channel Form C Switch User Guide
Page 39

Switching Channels Using the Form C Switch
Switching Channels
For general purpose relay operation, you can connect or disconnect a load by
opening or closing specified channel relays. By adding exterminal pull-up
resistors, the switch can be configured for digital output operations.
Use CLOS <channel_list> to connect a channel's normally open (NO) terminal to
its common (C) terminal or use OPEN channel_list to connect
a channel's normally closed (NC) contact to its common (C) terminal. The
channel_list has the form (@ccnn) where cc = card number (01-99) and
nn = channel number (00-31).
To OPEN or CLOSe multiple channels place a comma (,) between the channel
numbers. For example, to close channels 101 and 103 execute CLOS
(@101,103). To OPEN or CLOSe a continuous range of channels place a colon (:)
between the first and last channel numbers.
Example: Opening/Closing Channels (BASIC)
This BASIC program shows one way to close and open channel 2 on an E1463A
Form C module (card #1).
Implied commands are those that appear in square brackets ([ ]) in the
command syntax. The brackets are not part of the command and are not
sent to the instrument. For example, in the following program, ROUTe
can be eliminated and just the CLOSe command can be used.
10 DISP "TEST E1463A Module"
20 OUTPUT 70915; "ROUT:CLOS (@102)"
30 OUTPUT 70915; "ROUT:OPEN (@102)"
40 END
Example: Voltage Switching (BASIC)
This example closes channel 00 of a Form C switch module to switch the load
voltage (E) from load 1 to load 2. When the channel relay is open, the load
voltage is applied to load 1. When the relay is closed, the voltage is applied to
load 2. See Figure 2-1 for typical user connections. The program shows how to
close channel 00 of the E463A Form C Switch. To open channel 00, use OPEN
(@100).
10 DISP "Testing the E1463A"
20 OUTPUT 70915; "CLOS (@100)" !Close channel 00 relay (connect NO to
C). 1 is the card number and 00 is the channel number.
30 END
Keysight E1463A 32-Channel Form C Switch User Guide 41
Page 40

Using the Form C Switch Switching Channels
C
NO
NC
Channel
00
C0NO
C0NC
C0C
TERMINAL
MODULE
2
1E
E
MODULE
E1463A
Figure 2-1 Example: Voltage Switching
Example: Controlling RF Switches/Step Attenuators (BASIC)
Figure 2-2 shows one way to drive the 8761 SPDT RF Switches or 33300 Series
Programmable Step Attenuators. (Figure 2-2 only shows control for the 33300 40
dB step. Additional drive relays are required for the 10 dB and 20 dB steps.)
The 8761A and 33300A/C operate from a 12V - 15V coil voltage, while the 8761B
and 33300B/D operate from a 24V - 30V coil voltage. To close channel 00,
execute the following. To open channel 00, use OPEN (@100).
10 DISP "Applying -12V"
20 OUTPUT 70915; "CLOS (@100)" !Close channel 00 relay (connect NO to
C). 1 is the card number and 00 is the channel number.
30 END
42 Keysight E1463A 32-Channel Form C Switch User Guide
Page 41

Switching Channels Using the Form C Switch
24V PWR SUPPLY
DUAL PWR SUPPLY
C
NC
NO
Channel
01
C1C
C1NO
C1NC
C0C
MODULE
MODULE
E1463A
C
E1463A
Channel
C
MODULE
TERMINAL
NO
NC
00
Channel
NC
C0NO
C0NC
C0C
C0NC
MODULE
TERMINAL
NO
00
C0NO
8761B RF Switch or
33300B/D Step Attenuator
6206B
(24V Coil Voltage)
EXTERNAL
+
2
1
Port 2
2
33300A/C Step Attenuator
8761A RF Switch or
33300
(12V Coil Voltage)
Port C
8761
2
1
+12V
6205C
EXTERNAL
-12V
Port 1
1
2
1
Figure 2-2 Example: Controlling RF Switches/Step Attenuators
Keysight E1463A 32-Channel Form C Switch User Guide 43
Page 42

Using the Form C Switch Switching Channels
C
NO
NC
Channel
00
C0NO
C0NC
C0C
TERMINAL
MODULE
1
2
Relay 1
Open +V
Closed OV
2
0V
OV
+V
E1463A
MODULE
Example: Digital Output Configuration (BASIC)
Figure 2-3 shows channel 00 configured for digital output operation.
When the channel 00 relay is open (NC connected to C), point 1 is at +V
and point 2 is at 0V. When the channel 00 relay is closed (NO connected
to C), points 1 and 2 are both at 0V. To close channel 00, execute the following.
To open channel 00, use OPEN (@100).
10 DISP "Closing channel 0"
20 OUTPUT 70915; "CLOS (@100)" !Close channel 00 relay (connect NO to
C). 1 is the card number and 00 is the channel number.
30 END
Figure 2-3 Example: Digital Output Configuration
44 Keysight E1463A 32-Channel Form C Switch User Guide
Example: Matrix Switching (BASIC)
The Form C switch module can be configured as a 4 x 8 single-wire matrix to
connect any combination of up to four user sources (S0, S1, S2, S3) to any
combination of up to eight user instruments (I0, I1, I1...I7) at a time.
To do this, make the connections shown in Table 2-3.
Page 43

Switching Channels Using the Form C Switch
Table 2-3 Matrix Switching Connections
Connect These Common (C)
Channel Numbers Together
0, 8, 16, and 24 0 - 7
1, 9, 17, and 25 8 - 15
2, 10, 18, and 26 16 - 23
3, 11, 19, and 27 24 - 31
4, 12, 20, and 28
5, 13, 21, and 29
6, 14, 22, and 30
7, 15, 23, and 31
Connect These Normally Open (NO)
Channel Numbers Together
Close the channel number enclosed in the circle in Figure 2-4 to connect the
corresponding row and column. This example closes channel 25 to connect S3 to
I1 and closes channel 20 to connect S2 to I4. To close channels 20 and 25,
execute the following. To open the channels, use OPEN (@120,125).
10 DISP "Testing Switch Matrix"
20 OUTPUT 70915; "CLOS (@120,125)"
!Close channels 20 and 25. 1 is the card number; 20 and 25 are channel
numbers.
30 END
Keysight E1463A 32-Channel Form C Switch User Guide 45
Page 44

Using the Form C Switch Switching Channels
03
11
19
27
Close this channel to connect S to I.
C
24 25
C
C
26
C
S3
S2
S1
C
C
S0
I0
C
NO
NO
16
NO
08
17
C
NO
NO
09
C
NO
NO
00
01
C
NO
NO
NO
NO
C
18
C
10
C
C
NO
I2
C
02
I3
C
C
28 29
C C
30
C
31
NO
NO
NO
NO
I5
NO
NO
C
NO
C
NO
NO
20
NO
12
I4
NO
C
NO
04
C
NO
NO
21
13
C
NO
C
22
C
14
05
C
NO
I6
C
06
C
C
NO
NO
23
15
NO
I7
C
NO
07
I1
Figure 2-4 Example: Matrix Switching
46 Keysight E1463A 32-Channel Form C Switch User Guide
Page 45

Scanning Channels Using the Form C Switch
Scanning Channels
For the Form C switch, scanning channels consists of closing a specified set of
channels, one channel at a time. You can scan any combination of channels for a
single-module or a multiple-module switchbox. Single, multiple, or continuous
scanning modes are available. See Chapter 3 for additional information on
scanning Form C switch channels.
Channel lists can extend across boundaries. For multiple-module switchbox
instruments, the channels to be scanned can extend across switch modules. For
example, for a two-module switchbox instrument, SCAN (@100:231 will scan all
channels of both Form C switch modules.
Use ARM:COUNt <number> to set multiple/continuous scans (from 1 to 32,767
scans). Use INITiate:CONTinuous ON to set continuous scanning. See Chapter 3
for information about these SCPI commands.
Example: Scanning Using Trig In and Trig Out Ports (BASIC)
This example shows one way to synchronize instrument measurements of a
device under test (DUT) with Form C switch channel closures. For measurement
synchronization, the E1406A Command Module "Trig In" and "Trig Out" ports are
connected to the instrument "Voltmeter Complete" and "External Trigger ports.
See Figure 2-5 for typical user connections.
For this example, the normally closed (NC) contacts (channels 00-02) are
connected to ground and the measurements are made on the common (C)
contacts. The command module and instrument are connected via GPIB. The
Form C switch module has a logical address 120 (secondary address 15) and the
external instrument has an address of 722.
Keysight E1463A 32-Channel Form C Switch User Guide 47
Page 46

Using the Form C Switch Scanning Channels
Trig
Trig
In
Out
E1406A
Command
Module
HI
HI LO
Complete
3457A Multimeter (Rear View)
LO
I
Trigger
E1463A
Module
Voltmeter Exter nal
+5V
0V
0V
+5V
NC(00,01,02)
C(00,01,02)
E1463A
FORM-C
Terminal Mo dule
Figure 2-5 Example: Scanning Using Trig In and Trig Out Ports
10 OUTPUT 70915; "*RST;*CLS" !Reset and clear the module
20 OUTPUT 722;"TRIG EXT;DCV" !External trigger, dc volts
30 OUTPUT 722;"MEM FIFO" !Memory first in, first out
40 OUTPUT 70915;"OUTP ON" !Enable "Trig Out"
50 OUTPUT 70915;"TRIG:SOUR EXT" !External triggering
60 OUTPUT 70915;"SCAN (@100:102)" !Scan channels 00-02
70 OUTPUT 70915;"INIT" !Enable scan
80 WAIT 2 !Wait for switch closures
90 FOR Channel=1 TO 3 !Start loop
100 ENTER 722;Result !Enter result
110 PRINT Result !Display result
120 NEXT Channel !Increment count
130 END
48 Keysight E1463A 32-Channel Form C Switch User Guide
Page 47

Scanning Channels Using the Form C Switch
E1406A
Command Module
Multimeter Module
E1412A
E1463A
Terminal Mod ule
HI
LO
Module
E1463A
Trigger
VM
TTLTrg0
TTLTrg1
TTLTrg1
TTLTrg0
Complete
Part of VXIb us
Example: Scanning Using the TTL Trigger Bus (BASIC)
This example uses the E1406A Command Module TTL trigger bus lines to
synchronize Form C channel closures to an E1412A System Multimeter. For
measurement synchronization, the E1406A TTL trigger bus line 0 is used by the
Form C module to trigger the multimeter to perform a measurement and the
E1406A TTL trigger bus line 1 is used by the multimeter to advance the Form C
scan.
Figure 2-6 shows one way to connect the Form C module to the E1412A
multimeter module. The connections shown with dotted lines are not actual
hardware connections. These connections indicate how the firmware operates to
accomplish the triggering.
Figure 2-6 Example: Scanning Using the TTL Trigger Bus
Keysight E1463A 32-Channel Form C Switch User Guide 49
The following BASIC program sets up the multimeter (GPIB address 70903) to
scan making 2-wire resistance measurements. The common terminals for
channels 0 through 2 are connected together for this example. When one of
these switches is closed (C connected to NO), different DUTs are switched in for a
measurement. Triggering is accomplished by the E1406A firmware. The
measurement is taken from the common (C) terminal.
Page 48

Using the Form C Switch Scanning Channels
10 ALLOCATE REAL Rdgs(1:3)
20 OUTPUT 70915; "*RST;*CLS" !Reset and clear Form C switch
30 OUTPUT 70903; "*RST;*CLS" !Reset and clear multimeter
40 OUTPUT 70903;"ABORT;:TRIG:SOUR TTLTRG0" !Multimeter triggers on
TTL trigger line 0
50 OUTPUT 70903; "OUTP:TTLT1:STAT ON" !Multimeter pulses TTL
trigger line 1 on measurement complete
60 OUTPUT 70903; "CONF:RES AUTO,DEF" !Set multimeter function to
resistance, range, NPLC
70 OUTPUT 70903; "TRIG:DEL 0; COUN 3;:CAL:ZERO:AUTO ON"
!Set multimeter trigger delay, counts, calibration state
80 OUTPUT 70903; "*OPC?" ! Check to see if multimeter is ready.
When ready, initialize trigger 1.
90 ENTER 70903; Check
100 OUTPUT 70903; "INIT"
110 OUTPUT 70915; "OUTPUT:TTLT0:STATE ON" !Set up the Form C.
Form C pulses TTL Trigger line 0 on channel closed
120 OUTPUT 70915;"TRIG:SOUR TTLT1" !Set Form C to be triggered by
TTL Trigger line 1.
130 OUTPUT 70915; "SCAN (@100:102)"
140 OUTPUT 70915; "INIT"
150 OUTPUT 70903; "FETCH?"
160 ENTER 70903; Rdgs(*)
170 PRINT Rdgs(*) !Enter and print readings
180 END
50 Keysight E1463A 32-Channel Form C Switch User Guide
Page 49

Querying the Form C Switch Using the Form C Switch
Querying the Form C Switch
All query commands end with a "?". These commands are used to determine a
specific state of the module. The data is sent to the output buffer where you can
retrieve it into your computer. See Chapter 3 for more information on these
commands.
Use CLOSe? <channel_list> or OPEN? <channel_list> to query the channel state
(open/closed). CLOS? returns a "1" for channel(s) closed and a "0" for channel(s)
open. OPEN? returns a "0" for channel(s) closed and a "1" for channel(s) open.
(Commands are software queries and do not account for relay hardware failures.)
Example: Querying Channel Closures (BASIC)
This example closes a range of channels and queries for the results.
10 DIM Channels$[32] !Dimensions a string variable to 32 characters
20 OUTPUT 70915;"CLOS (@100:131)" !Closes channels 00 through 31
30 OUTPUT 70915;"CLOS? (@100:131)" !Queries to see if the channels
40 ENTER 70915; Channels$ !Enters the results from the switch card
50 PRINT "Channels Closed:";Channels$ ! Prints the channels closed
60 END
Using the Scan Complete Bit
You can use the Scan Complete bit (bit 8) in the Operation Status Register (in the
command module) of a switchbox to determine when a scanning cycle
completes (no other bits in the register apply to the switchbox).
Bit 8 has a decimal value of 256 and you can read it directly with the STAT:OPER?
command. Refer to the STATus:OPERation[:EVENt]? command in Chapter 3 for
an example.
When enabled by the STAT:OPER:ENAB 256 command, the Scan Complete bit
will be reported as bit 7 of the Status Register. Use the GPIB Serial Poll or the
IEEE 488.2 Common Command *STB? to read the Status Register.
When bit 7 of the Status Register is enabled by the *SRE 128 Common
Command to assert a GPIB Service Request, you can interrupt the computer
when the Scan Complete bit is set, after a scanning cycle completes. This allows
the computer to do other operations while the scanning cycle is in progress.
are closed
into the variable Channels$
(should print 1s)
Keysight E1463A 32-Channel Form C Switch User Guide 51
Page 50

Using the Form C Switch Using the Scan Complete Bit
Example: Using the Scan Complete Bit (BASIC)
This example monitors bit 7 in the Status Register to determine when the
scanning cycle is complete. The computer interfaces with an E1406A Command
Module over GPIB. The GPIB select code is 7, the GPIB primary address is 09,
and the GPIB secondary address is 15.
10 OUTPUT 70915;"*RST; *CLS" !Reset and clear the module
20 OUTPUT 70915;"STAT:OPER:ENAB 256" !Enable Scan Complete Bit
30 OUTPUT 70915; "TRIG:SOUR IMM" !Set the Form C switch for
continuous triggering
50 OUTPUT 70915; "SCAN (@100:115)" !Select channels to scan
60 OUTPUT 70915; "*OPC?" !Wait for operation complete
70 ENTER 70915; A$
80 PRINT "*OPC? = ";A$
90 OUTPUT 70915;"STAT:OPER:ENAB?" !Query the contents in the
operation status register
100 ENTER 70915; A$
110 PRINT "STAT:OPER:ENAB?=";A$ !Print the contents of the operation
status register
120 OUTPUT 70915; "*STB?" !Query the contents of the status byte
register
130 ENTER 70915; A$
140 PRINT "Switch Status = ";A$ !Print the contents of the status
byte register
150 OUTPUT 70915; "INIT" !Start scan cycle
160 I = 0 !Initialize the value of the counter
170 WHILE (I=0) !Stay in loop until some value is returned from the
SPOLL (70915) command
180 I = SPOLL(70915)
190 PRINT "Waiting for scan to complete: SPOLL = ";I
200 END WHILE
210 I = SPOLL(70915)
220 PRINT "Scan complete: SPOLL = ";I
230 END
52 Keysight E1463A 32-Channel Form C Switch User Guide
Page 51

Saving and Recalling States Using the Form C Switch
Saving and Recalling States
The *SAV <numeric_state> command saves the current instrument state. The
state number (0-9) is specified by the <numeric_state> parameter. The settings
saved by this command are:
Channel relay states (open or closed)
ARM:COUNt
TRIGger:SOURce
OUTPut:STATe
INITiate:CONTinuous
The *RCL <numeric_state> command recalls the state when the last
*SAV was executed for the specified <numeric_state> parameter (0-9).
If no *SAV was executed for the <numeric_state>, *RST default settings
are used. Refer to the *SAV settings list for the settings recalled by *RCL.
Example: Saving and Recalling State (BASIC)
This program shows how to save and recall Form C switch states.
10 DIM A$[150] !Dimension a string variable for 150 characters
20 OUTPUT 70915; "CLOS (@100:131)" !Close channels 00 - 31 on
30 OUTPUT 70915; "*SAV 5" !Save as numeric state 5
40 OUTPUT 70915 "*RST;*CLS" !Reset and clear the Form C switch
50 OUTPUT 70915;"CLOS? (@100:131)" !Query the channels closed
60 ENTER 70915;A$
70 PRINT "Channels Closed:";A$ !Print closed channels
(should print 0s)
80 OUTPUT 70915; "*RCL 5" !Recall numeric state 5
90 OUTPUT 70915 "CLOS? (100:131)" !Query to see which channels
100 ENTER 70915;A$
110 PRINT "Channels Closed:";A$ !Print closed channels
(should print 1s)
120 END
the Form C switch
are closed
Keysight E1463A 32-Channel Form C Switch User Guide 53
Page 52

Using the Form C Switch Detecting Error Conditions
Detecting Error Conditions
The SYSTem:ERRor? query requests a value from an instrument's error register.
This register contains an integer in the range [-32,768 to 32,767]. The response
takes the form <err_number>,<err_message> where <err_number> is the value
of the instrument's error and <err_message>
is a short description of the error.
Example: Detecting Error Conditions (BASIC)
This BASIC program attempts an illegal channel closure and polls for an error
message.
10 DIM Err_num$[256] !Dimension a string variable for 256 characters
20 OUTPUT 70915; "CLOS (@135)" !Try to close an illegal channel
30 OUTPUT 70915; "SYST:ERR?" !Query for a system error
40 ENTER 70915; Err_num$
50 PRINT Err_num$ !Print error +2001, "Invalid channel number"
60 END
Example: Detecting Error Conditions (Turbo C)
This Turbo C program attempts an illegal channel closure and polls for an error
message. If no error occurs, the switchbox responds with 0, "No error". If there
has been more than one error, the instrument will respond with the first error in
its error queue. Subsequent queries continue to read the error queue until it is
empty. The maximum <err_message> string length is 255 characters.
#include stdio.h
#include chpib.h /*Include file for GPIB*/
#define ISC 7L
#define FORMC 70915L /*Form C default address*/
#define TASK1 "CLOSE (@135)" /*Command for illegal
switch closure*/
#define TASK2 "SYST:ERR?" /*Command for system error*/
main( )
{
char into[257];
int length = 256;
/*Output commands to Form C*/
54 Keysight E1463A 32-Channel Form C Switch User Guide
Page 53

Synchronizing the Form C Switch Using the Form C Switch
error_handler (IOTIMEOUT (7L,5.0), "TIMEOUT");
error_handler (IOOUTPUTS (FORMC, TASK1, 12), "OUTPUT command");
error_handler (IOOUTPUTS (FORMC, TASK2, 9), "OUTPUT command");
/*Enter from Form C*/
error_handler (IOENTERS (FORMC, into, &length), "ENTER command");
printf("Print the errors: %s",into);
return;
}
int error_handler (int error, char *routine)
{
char ch;
if (error != NOERR)
{
printf ("\n Error %d %s \n", error, errstr(error));
printf (" in call to GPIB function %s \n\n", routine);
printf ("Press 'Enter' to exit: ");
scanf ("%c", &ch);
exit(0);
}
return 0;
}
Synchronizing the Form C Switch
This section gives guidelines to synchronize a Form C switch module with a
measurement instrument.
Example: Synchronizing the Form C Switch (BASIC)
This BASIC program shows one way to synchronize a Form C switch module with
a measurement instrument. In this example, the Form C
switch module switches a signal to a multimeter. The program then verifies the
channel is closed before the multimeter begins its measurement.
10 OUTPUT 70915; "CLOS (@105)" !Close channel 5
20 OUTPUT 70915; "*OPC?" !Wait for operation complete
30 ENTER 70915; Opc_value
40 OUTPUT 70915; "CLOS? (@105)" !Check to see if channel closed
50 ENTER 70915;A
60 IF A=1 THEN
70 OUTPUT 70903;"MEAS:VOLT:DC?" !When channel is closed, measure
the voltage
80 ENTER 70903; Meas_value
90 PRINT Meas_value !Print the measured voltage
Keysight E1463A 32-Channel Form C Switch User Guide 55
Page 54

Using the Form C Switch Synchronizing the Form C Switch
100 ELSE
110 PRINT "Channel did not close"
120 END IF
130 END
56 Keysight E1463A 32-Channel Form C Switch User Guide
Page 55

Keysight E1463A 32-Channel Form C Switch
User Guide
3 E1463A Command Reference
Using This Chapter
This chapter describes Standard Commands for Programmable Instruments
(SCPI) and summarizes IEEE 488.2 Common (*) commands applicable to the
E1463A Form C Switch Module. This chapter contains the following sections:
Command Types page 57
SCPI Command Reference page 60
SCPI Commands Quick Reference page 88
IEEE 488.2 Common Commands Reference page 89
Command Types
Commands are separated into two types: IEEE 488.2 Common commands and
SCPI commands.
Common Command Format
The IEEE 488.2 standard defines the Common commands that perform functions
like reset, self-test, status byte query, etc. Common commands are four or five
characters in length, always begin with the asterisk character (*), and may
include one or more parameters. The command keyword is separated from the
first parameter by a space character. Some examples
of Common commands are shown below:
*RST *ESE <unmask> *STB?
SCPI Command Format
The SCPI commands perform functions like closing switches, opening switches,
scanning channels, querying instrument states or retrieving data. A subsystem
command structure is a hierarchical structure that usually consists of a top level
(or root) command, one or more lower-level commands, and their parameters.
The following example shows part of a typical subsystem:
[ROUTe:]
CLOSe<channel_list>
SCAN <channel_list>
:MODE?
57
Page 56

E1463A Command Reference Command Types
[ROUTe:] is the root command, CLOSe and SCAN are second-level commands
with parameters, and :MODE? is a third-level command.
There must be a space between the second-level command (such as CLOSe) and
the parameter (<channel_list>).
Command Separator
A colon (:) always separates one command from the next lower-level command
as shown below:
[ROUTe:]SCAN:MODE?
Colons separate the root command from the second-level command
([ROUTe:]SCAN) and the second level from the third level (SCAN:MODE?).
Abbreviated Commands
The command syntax shows most commands as a mixture of upper- and
lowercase letters. The uppercase letters indicate the abbreviated spelling for the
command. For shorter program lines, send the abbreviated form. For better
program readability, you may send the entire command. The instrument will
accept either the abbreviated form or the entire command.
For example, if the command syntax shows TRIGger, then TRIG and TRIGGER are
both acceptable forms. Other forms of TRIGger, such as TRIGG or TRIGGE will
generate an error. You may use uppercase or lowercase letters. Therefore,
TRIGGER, trigger, and TrigGeR are all acceptable.
Implied Commands
Implied commands are those that appear in square brackets ([ ]) in the command
syntax. (The brackets are not part of the command and are not sent to the
instrument.) Suppose you send a second-level command but do not send the
preceding implied command. In this case, the instrument assumes you intend to
use the implied command and it responds as if you had sent it. Examine the
portion of the [ROUTe:] subsystem shown below:
[ROUTe:]
The root command [ROUTe:] is an implied command (indicated by square
brackets ([ ])). To make a query about a channel’s present status, you can send
either of the following command statements:
ROUT:CLOSe? <channel_list> or CLOSe? <channel_list>
CLOSe<channel_list>
58 Keysight E1463A 32-Channel Form C Switch User Guide
Page 57

Command Types E1463A Command Reference
Variable Command Syntax
Some commands have what appears to be a variable syntax, such as
OUTPut:TTLTrgn. In this command, the "n" is replaced by a number.
No space is left between the command and the number because the number is
not a parameter.
Parameters
Parameter Types. The following table contains explanations and examples of
parameter types you might see later in this chapter.
Type Explanations and Examples
Boolean Represents a single binary condition that is either true or false (ON,
OFF, 1.0). Any non-zero value is considered true.
Discrete Selects from a finite number of values. These parameters use
mnemonics to represent each valid setting. An example is the
TRIGger:SOURce <source> command where <source> can be BUS,
EXTernal, HOLD, IMMediate, or TTLTrgn.
Numeric Commonly used decimal representations of numbers including
optional signs, decimal points, and scientific notation. Examples are
123, 123E2, -123, -1.23E2, .123, 1.23E-2, 1.23000E-01. Special
cases include MINimum, MAXimum, DEFault and INFinity.
Optional Parameters shown within square brackets ([ ]) are optional
parameters. (The brackets are not part of the command and are not
sent to the instrument.) If you do not specify a value for an optional
parameter, the instrument chooses a default value.
For example, consider the ARM:COUNt? [<MIN | MAX>] command. If
you send the command without specifying a parameter, the present
ARM:COUNt value is returned. If you send the MIN parameter, the
command returns the minimum count available. If you send the MAX
parameter, the command returns the maximum count available. Be
sure to place a space between the command and the parameter.
Linking Commands
Linking IEEE 488.2 Common Commands with SCPI Commands. Use a semicolon (;)
between the commands. For example, *RST;*RCL 1 or
CLOS (@101);*SAV 1
Linking Multiple SCPI Commands. Use both a semicolon (;) and a colon (:) between
the commands, such as CLOS (@101);:CLOS? (@101).
Linking Subsystem Commands. SCPI also allows several commands within the same
subsystem to be linked with a semicolon, such as ROUT:CLOS
(@101);:ROUT:CLOS? (@101) or ROUT:CLOS (@101);CLOS? (@101).
Keysight E1463A 32-Channel Form C Switch User Guide 59
Page 58

E1463A Command Reference SCPI Command Reference
SCPI Command Reference
This section describes the Standard Commands for Programmable Instruments
(SCPI) commands for the E1463A. Commands are listed alphabetically by
subsystem and within each subsystem.
ABORt
The ABORt command stops a scan in progress when the scan is enabled via the
interface and the trigger source is TRIGger:SOURce BUS or TRIGger:SOURce
HOLD.
Subsystem Syntax
ABORt
Comments
ABORt Actions: The ABORt command terminates the scan and invalidates the
current channel list.
Stopping Scan Enabled Via Interface: When a scan is enabled via an interface, an
interface CLEAR command can be used to stop the scan. When the scan is
enabled via the interface and TRIG:SOUR BUS or HOLD is set, you can use
ABORt to stop the scan.
Related Commands: ARM, INITiate:CONTinuous,[ROUTe:]SCAN, TRIGger
Example
Stopping a Scan with ABORt
This example stops a continuous scan in progress.
TRIG:SOUR BUS !Trigger command will be via backplane (bus) interface
(*TRG command generates trigger)
INIT:CONT ON !Set continuous scanning
SCAN(@100:107) !Scan channels 00 to 07
INIT !Start scan, close channel 00
.
.
ABOR !Abort scan in progress
60 Keysight E1463A 32-Channel Form C Switch User Guide
Page 59

ARM E1463A Command Reference
ARM
The ARM subsystem selects the number of scanning cycles (1 to 32,767)
for each INITiate command.
Subsystem Syntax
ARM
:COUNt <number> MIN | MAX
:COUNt? [<MIN | MAX>]
ARM:COUNt
ARM:COUNt <number> MIN | MAX allows scanning to occur a multiple of times (1 to
32,767) with one INITiate command when INITiate:CONTinuous OFF | 0 is set.
MIN sets 1 cycle and MAX sets 32,767 cycles.
Parameters
Name Type Range of Values Default Value
<number> numeric 1 - 32,767 | MIN | MAX 1
Comments
– Number of Scans: Use only numeric values between 1 and 32767, MIN, or
MAX for the number of scanning cycles.
–
Related Commands: ABORt, INITiate[:IMMediate]
–
*RST Condition: ARM:COUNt 1
Example
Setting Ten Scanning Cycles
This example sets a Form C switch for 10 scans of channels 00 through 03. When
the scan sequence completes, channels 00 through 03 (relays 00 through 03) are
closed.
ARM:COUN 10 !Set 10 scans per INIT command
SCAN(@100:103) !Scan channels 00 to 03
INIT !Start scan, close channel 00
Keysight E1463A 32-Channel Form C Switch User Guide 61
Page 60

E1463A Command Reference ARM:COUNt?
ARM:COUNt?
ARM:COUNt? [<MIN | MAX>] returns the current number of scanning cycles set by
ARM:COUNt. The current number of scan cycles is returned when MIN or MAX is
not specified. With MIN or MAX as a parameter, MIN returns "1" and MAX returns
"32,767".
Parameters
Name Type Range of Values Default Value
MIN | MAX numeric MIN = 1, MAX = 32,767 current cycle
Comments
Related Commands: INITiate[:IMMediate]
Example
Querying Number of Scans
This example sets a switchbox for 10 scanning cycles and queries the number of
scan cycles set. The ARM:COUN? command returns 10.
ARM:COUN 10 !Set 10 scans per INIT command
ARM:COUN? !Query number of scans
62 Keysight E1463A 32-Channel Form C Switch User Guide
Page 61

DISPlay E1463A Command Reference
DISPlay
The DISPlay subsystem monitors the channel state of the selected module in a
switchbox. This subsystem operates with an E1406A Command Module when a
display terminal is connected.
Subsystem Syntax
DISPlay
:MONitor
:CARD <number> | AUTO
[:STATe] <mode>
DISPlay:MONitor:CARD
DISPlay:MONitor:CARD <number> | AUTO selects the module in a switchbox to be
monitored.
Parameters
Name Type Range of Values Default Value
<number> | AUTO numeric 1 - 99 AUTO
Comments
Selecting a Specific Module to be Monitored: Use DISPlay:MONitor:CARD
to send the card number for the switchbox to be monitored.
Selecting the Present Module to be Monitored: Use DISPlay:MONitor:CARD AUTO to
select the last module addressed by a switching command (for example,
[ROUTe:]CLOSe).
*RST Conditions: DISPlay:MONitor:CARD AUTO
Example
Select Module #2 in a Switchbox for Monitoring
DISP:MON:CARD 2 !Selects module #2 in a switchbox
Keysight E1463A 32-Channel Form C Switch User Guide 63
Page 62

E1463A Command Reference DISPlay
DISPlay:MONitor[:STATe]
DISPlay:MONitor[:STATe] <mode> turns the monitor mode ON or OFF.
Parameters
Name Type Range of Values Default Value
<mode> boolean ON | OFF | 1 | 0 OFF | 0
Comments
Monitoring Switchbox Channels: DISPlay:MONitor:STATe ON or
DISPlay:MONitor:STATe 1 turns the monitor mode ON to show the channel state
of the selected module. DISPlay:MONitor:STATe OFF or DISPlay:MONitor:STATe
0 turns the channel monitor OFF.
Selecting the Module to be Monitored: Use DISPlay:MONitor:CARD <number> AUTO to
select the module.
Monitor Mode with a Form C Switch: When monitoring mode is turned ON, decimal
numbers representing the channels closed will be displayed at the bottom of the
display terminal. For example, if channels 3, 7, and 12 are closed, the bottom of
the display will read as follows, where the channel numbers represent channels
that are closed.
Chan , , ,3, , , , 7, , , , ,12, , , , ... etc.
*RST Condition: DISPlay:MONitor[:STATe]OFF | 0
Example
Enabling Monitor Mode
DISP:MON:CARD 2 !Select module #2 in a switchbox
DISP:MON 1 !Turn monitor mode ON
64 Keysight E1463A 32-Channel Form C Switch User Guide
Page 63

INITiate E1463A Command Reference
INITiate
The INITiate command subsystem selects continuous scanning cycles and starts
the scanning cycle.
Subsystem Syntax
INITiate
:CONTinuous <mode>
:CONTinuous?
[:IMMediate]
INITiate:CONTinuous
INITiate:CONTinuous <mode> enables or disables continuous scanning cycles for the
switchbox.
Parameters
Name Type Range of Values Default Value
<mode> boolean ON | OFF | 1 | 0 OFF | 0
Comments
Continuous Scanning Operation: Continuous scanning is enabled with
INITiate:CONTinuous ON or INITiate:CONTinuous 1. Sending INITiate:IMMediate
closes the first channel in the channel list. Each trigger from the source specified
by TRIGger:SOURce advances the scan through the channel list. A trigger at the
end of the channel list closes the first channel in the channel list and the scan
cycle repeats.
Noncontinuous Scanning Operation: Noncontinuous scanning is enabled with
INITiate:CONTinuous OFF or INITiate:CONTinuous 0. Sending
INITiate:IMMediate closes the first channel in the channel list. Each trigger from
the source specified by TRIGger:SOURce advances the scan through the channel
list. At the end of the scanning cycle, the last channel in the channel list is
opened.
Stopping Continuous Scan: See the ABORt command.
Related Commands: ABORt, ARM:COUNt, TRIGger:SOURce
*RST Condition: INITiate:CONTinuous OFF | 0
Example
Enabling Continuous Scanning
Keysight E1463A 32-Channel Form C Switch User Guide 65
Page 64

E1463A Command Reference INITiate
This example enables continuous scanning of channels 00 through 03 of a
single-module switchbox. Since TRIGger:SOURce IMMediate (default) is set, use
an interface clear command (such as CLEAR) to stop the scan.
INIT:CONT ON !Enable continuous scanning
SCAN(@100:103) !Define channel list
INIT !Start scan cycle, close channel 00
INITiate:CONTinuous?
INITiate:CONTinuous? queries the scanning state. With continuous scanning
enabled, the command returns "1" (ON). With continuous scanning disabled, the
command returns "0" (OFF).
Example
Querying Continuous Scanning State
This example enables continuous scanning of a switchbox and queries the state.
Since continuous scanning is enabled, INIT:CONT? returns "1".
INIT:CONT ON !Enable continuous scanning
INIT:CONT? !Query continuous scanning state
INITiate[:IMMediate]
INITiate[:IMMediate] starts the scanning process and closes the first channel in the
channel list. Successive triggers from the source specified by the
TRIGger:SOURce command advance the scan through the channel list.
Comments
Starting the Scanning Cycle: INITiate:IMMediate starts scanning by closing the first
channel in the channel list. Each trigger received advances the scan to the next
channel in the channel list. An invalid channel list definition causes an error (see
[ROUTe:]SCAN).
Stopping Scanning Cycles: See the ABORt command.
Example
Enabling a Single Scan
This example enables a single scan of channels 00 through 03 of a single-module
switchbox. The trigger source to advance the scan is immediate (internal)
triggering set with TRIGger:SOURceIMMediate (default).
SCAN(@100:103) !Scan channels 00 - 03
INIT !Begin scan, close channel 00 (use immediate triggering)
66 Keysight E1463A 32-Channel Form C Switch User Guide
Page 65

OUTPut E1463A Command Reference
OUTPut
The OUTPut command subsystem enables or disables the different trigger lines
of the E1406A Command Module.
Subsystem Syntax
OUTPut
:EXTernal
[:STATe] <mode>
[:STATe]?
[:STATe] <mode>
[:STATe]?
:TTLTrgn (:TTLTrg0 through :TTLTrg7)
[:STATe] <mode>
[:STATe]?
OUTPut:EXTernal[:STATe]
OUTPut:EXTernal[:STATe] <mode> enables or disables the "Trig Out" port on the
E1406A Command Module.
Parameters
Name Type Range of Values Default Value
<mode> boolean ON | OFF | 1 | 0 OFF | 0
Comments
Enabling "Trig Out" Port: When enabled, a pulse is output from the "Trig Out" port
after each scanned switchbox channel is closed. If disabled, a pulse is not output
from the port after channel closures. The output pulse is a +5V negative-going
pulse.
"Trig Out" Port Shared by Switchboxes: When enabled, the "Trig Out" port is pulsed by
any switchbox each time a scanned channel is closed. To disable the output for a
specific module send OUTPut:EXTernal[:STATe] OFF or OUTPut:EXTernal[:STATe]
0 for that module.
One Output Selected at a Time: Only one output (TTLTrg or EXTernal) can be enabled
at one time. Enabling a different output source will automatically disable the
active output.
Related Commands: [ROUTe:]SCAN, TRIGger:SOURce
*RST Condition: OUTPut:EXTernal[:STATe] OFF (port disabled)
Keysight E1463A 32-Channel Form C Switch User Guide 67
Page 66

E1463A Command Reference OUTPut
Example
Enabling "Trig Out" Port
OUTP:EXT ON !Enable "Trig Out" port to output pulse after each scanned
channel is closed
OUTPut:EXTernal[:STATe]?
OUTPut:EXTernal[:STATe]? queries the present state of the "Trig Out" port on the
E1406A Command Module. The command returns "1" if the port is enabled or "0"
if the port is disabled.
Example
Query "Trig Out" Port Enable State
This example enables the "Trig Out" port and queries the enable state.
OUTPut:EXTernal[:STATe]? returns "1" since the port is enabled.
OUTP:EXT ON !Enable E1406A "Trig Out" port
OUTP:EXT? !Query port enable state
OUTPut[:STATe]
OUTPut[:STATe] <mode> enables or disables the "Trig Out" port on the E1406A
Command Module. OUTPut[:STATe] ON | 1 enables the port and OUTPut[:STATe]
OFF | 0 disables the port. This command functions the same as
OUTPut:EXTernal[:STATe].
Parameters
Comments
*RST Condition: OUTPut[:STATe] OFF (port disabled)
Example
Enabling "Trig Out" Port
Name Type Range of Values Default Value
<mode> boolean ON | OFF | 1 | 0 OFF | 0
OUTP ON !Enable "Trig Out" port to output pulse after each scanned
channel is closed
68 Keysight E1463A 32-Channel Form C Switch User Guide
Page 67

OUTPut E1463A Command Reference
OUTPut[:STATe]?
OUTPut[:STATe]? queries the present state of the E1406A Command Module "Trig
Out" port. The command returns "1" if the port is enabled or
"0" if the port is disabled. This command functions the same as
OUTPut:EXTernal[:STATe]?.
Example
Query "Trig Out" Port Enable State
This example enables the E1406A Command Module "Trig Out" port and queries
the enable state. OUTPut[:STATe]? returns "1" since the port is enabled.
OUTP ON !Enable "
Trig Out" port OUTP? !Query port enable state
OUTPut:TTLTrgn[:STATe]
OUTPut:TTLTrgn[:STATe] <mode> selects and enables which TTL Trigger bus line (0 to
7) will output a trigger when a channel is closed during a scan. This is also used
to disable a selected TTL Trigger bus line. "n" specifies the TTL Trigger bus line (0
to 7) and <mode> enables (ON or 1) or disables (OFF or 0) the specified TTL
Trigger bus line.
Parameters
Name Type Range of Values Default Value
n numeric 0 to 7 N/A
<mode> boolean ON | OFF | 1 | 0 OFF | 0
Comments
Enabling TTL Trigger Bus: When enabled, a pulse is output from the selected TTL
Trigger bus line (0 to 7) after each channel in the switchbox is closed during a
scan. If disabled, a pulse is not output. The output is a negative-going pulse.
One Output Selected at a Time: Only one output (TTLTrg or EXTernal) can be enabled
at one time. Enabling a different output source will automatically disable the
active output. For example, if TTLTrg1 is the active output and TTLTrg4 is
enabled, TTLTrg1 will become disabled and TTLTrg4 will become the active
output.
Related Commands: [ROUTe:]SCAN, TRIGger:SOURce, OUTPut:TTLTrgn[:STATe]?
*RST Condition: OUTPut:TTLTrgn[:STATe] OFF (disabled)
Keysight E1463A 32-Channel Form C Switch User Guide 69
Page 68

E1463A Command Reference OUTPut
Example
Enabling TTL Trigger Bus Line 7
OUTP:TTLT7:STAT 1 !Enable TTL Trigger bus line 7 to output pulse after
each scanned channel is closed
OUTPut:TTLTrgn[:STATe]?
OUTPut:TTLTrgn[:STATe]? queries the present state of the specified TTL Trigger bus
line. The command returns "1" if the specified TTLTrg bus line is enabled or "0" if
disabled.
Example
Query TTL Trigger Bus Enable State
This example enables TTL Trigger bus line 7 and queries the enable state.
OUTPut:TTLTrgn? returns "1" since the port is enabled.
OUTP:TTLT7:STAT 1 !Enable TTL Trigger bus line 7
OUTP:TTLT 7? !Query bus enable state
70 Keysight E1463A 32-Channel Form C Switch User Guide
Page 69

[ROUTe:] E1463A Command Reference
[ROUTe:]
The [ROUTe:] command subsystem controls switching and scanning operations
for Form C switch modules in a switchbox.
Subsystem Syntax
[ROUTe:]
CLOSe <channel_list>
CLOSe? <channel_list>
OPEN <channel_list>
OPEN? <channel_list>
SCAN <channel_list>
There must be a space between the second level command (CLOS, for
example) and the parameter <channel_list>.
[ROUTe:]CLOSe
[ROUTe:]CLOSe <channel_list> closes the Form C switch channels specified by
<channel_list>. <channel_list> has the form (@ccnn) where cc = card number
(01-99) and nn = channel number (00-31).
Parameters
Comments
Closing Channels:
– To close a single channel use ROUT:CLOS (@ccnn)
– To close multiple channels use ROUT:CLOS (@ccnn,ccnn,...)
– To close sequential channels use ROUT:CLOS (@ccnn:ccnn)
– To close groups of sequential channels use ROUT:CLOS
Name Type Range of Values Default Value
<channel_list> numeric cc00 - cc31 N/A
(@ccnn:ccnn,ccnn:ccnn)
– or any combination of the above
Closure order for multiple channels with a single command is not
guaranteed. Channel numbers can be in the <channel_list> in any
random order.
Keysight E1463A 32-Channel Form C Switch User Guide 71
Page 70

E1463A Command Reference [ROUTe:]
Related Commands: [ROUTe:]OPEN, [ROUTe:]CLOSe?
*RST Condition: All channels open.
Example
Closing Form C Switch Channels
This example closes channels 100 and 213 of a two-module switchbox (card
numbers 01 and 02).
CLOS(@100,213) !Close channels 100 and 213. 100 closes channel 00 of
card #1 and 213 closes channel 13 of card #2.
[ROUTe:]CLOSe?
[ROUTe:]CLOSe? <channel_list> returns the current state of the channel(s) queried.
<channel_list> has the form (@ccnn) where cc = card number (01-99) and nn =
channel number (00-31). The command returns "1" if channel(s) are closed or
returns "0" if channel(s) are open.
Comments
Query is Software Readback: ROUTe:CLOSe? returns the current software state of the
channel(s) specified. It does not account for relay hardware failures.
A maximum of 128 channels can be queried at one time. If you want to query more than
128 channels, you must enter the query data in two separate commands.
Example
Querying Channel Closure
This example closes channels 100 and 213 of a two-module switchbox and
queries channel closure. Since the channels are programmed to be closed "1,1"
is returned as a string.
CLOS(@100,213) !Close channels 100 and 213
CLOS?(@100,213) !Query channels 100 and 213 state
72 Keysight E1463A 32-Channel Form C Switch User Guide
Page 71

[ROUTe:] E1463A Command Reference
[ROUTe:]OPEN
[ROUTe:]OPEN <channel_list> opens the Form C switch channels specified by
<channel_list>. <channel_list> has the form (@ccnn) where cc = card number
(01-99) and nn = channel number (00-31).
Parameters
Name Type Range of Values Default Value
<channel_list> numeric cc00 - cc31 N/A
Comments
– Opening Channels:
– To open a single channel use ROUT:OPEN (@ccnn)
– To open multiple channels use ROUT:OPEN (@ccnn,ccnn,...)
– To open sequential channels use ROUT:OPEN (@ccnn:ccnn)
– To open groups of sequential channels use ROUT:OPEN
(@ccnn:ccnn,ccnn:ccnn)
– or any combination of the above
Opening Order: Opening order for multiple channels with a single command is not
guaranteed.
Related Commands: [ROUTe:]CLOSe, [ROUTe:]OPEN?
*RST Condition: All channels open.
Example
Opening Form C Switch Channels
This example opens channels 100 and 213 of a two-module switchbox (card
numbers 01 and 02).
OPEN(@100,213) !Open channels 100 and 213. 100 opens channel 00 of
card #1 and 213 opens channel 13 of card #2.
Keysight E1463A 32-Channel Form C Switch User Guide 73
Page 72

E1463A Command Reference [ROUTe:]
[ROUTe:]OPEN?
[ROUTe:]OPEN? <channel_list> returns the current state of the channel(s) queried.
<channel_list> has the form (@ccnn) where cc = card number (01-99) and nn =
channel number (00-31). The command returns "1" if channel(s) are open or
returns "0" if channel(s) are closed.
Comments
Query is Software Readback: ROUTe:OPEN? returns the current software state of the
channel(s) specified. It does not account for relay hardware failures.
A maximum of 128 channels can be queried at one time: If you want to query more than
128 channels, you must enter the query data in two separate commands.
Example
Querying Channel Open State
This example opens channels 100 and 213 of a two-module switchbox and queries
channel 213 state. Since channel 213 is programmed to be open, "1" is returned.
OPEN(@100,213)
OPEN?(@213)
[ROUTe:]SCAN
[ROUTe:]SCAN <channel_list> defines the channels to be scanned. <channel_list> has
the form (@ccnn) where cc = card number 01-99) and nn = channel number
(00-31).
Parameters
Comments
Defining Scan List: When ROUTe:SCAN is executed, the channel list is checked for
valid card and channel numbers. An error is generated for an invalid channel list.
Scanning Channels:
– To scan a single channel use ROUT:SCAN (@ccnn)
!Open channels 100 and 213
!Query channel 213 state
Name Type Range of Values Default Value
<channel_list> numeric cc00 - cc31 N/A
– To scan multiple channels use ROUT:SCAN (@ccnn,ccnn,...)
– To scan sequential channels use ROUT:SCAN (@ccnn:ccnn)
74 Keysight E1463A 32-Channel Form C Switch User Guide
Page 73

[ROUTe:] E1463A Command Reference
– To scan groups of sequential channels use ROUT:SCAN
(@ccnn:ccnn,ccnn:ccnn)
– or any combination of the above
Channel numbers can be in the <channel_list> in any random
order.
Scanning Operation: When a valid channel list is defined, INITiate[:IMMediate]
begins the scan and closes the first channel in the <channel_list>. Successive
triggers from the source specified by TRIGger:SOURce advance the scan through
the <channel list>. At the end of the scan, the last trigger opens the last channel.
Stopping Scan: See ABORt
Related Commands: TRIGger, TRIGger:SOURce
*RST Condition: All channels open.
Example
Scanning Using External Device
See "Scanning Channels" in Chapter 2 for examples of scanning programs using
external instruments.
Keysight E1463A 32-Channel Form C Switch User Guide 75
Page 74

E1463A Command Reference STATus
STATus
The STATus subsystem reports the bit values of the OPERation Status Register. It
also allows you to unmask the bits you want reported from the Standard Event
Status Register and to read the summary bits from the Status Byte Register.
Subsystem Syntax
STATus
:OPERation
:CONDition?
:ENABle <unmask>
:ENABle?
[:EVENt?]
:PRESet
As shown in Figure 3-1, the STATus subsystem for the E1463A Form C Switch
includes the Status Byte Register, the Standard Event Status Register,
OPERation Status Register, and Output Queue. The Standard Event Status
Register (*ESE?) and the Status Byte Register (*STB?) are under IEEE 488.2
control.
Status Byte Register
In the Status Byte register, the Operation Status bit (OPR), Request Service bit
(RQS), Standard Event bit (ESB), Message Available bit (MAV) and Questionable
Data bit (QUE) (bits 7, 6, 5, 4 and 3 respectively) can be queried with the *STB?
command.
Standard Event Status Register
In the Standard Event Status Register, you can use *ESE? to query the "unmask"
value (the bits to be logically ORed into the Summary bit).
The registers are queried using decimal-weighted bit values. Decimal equivalents
for bits 0 through 15 are shown in Figure 3-1.
OPERation Status Register
Using STATus:OPERation:ENABle 256 allows only bit 8 to generate a Summary
bit from the OPERation Status Register, since the decimal value for bit 8 is 256.
The decimal values can also used in the inverse manner to determine the bits set
from the value returned by STATus:OPERation:EVENt? or
STATus:OPERation:CONDition?.
The Form C switch driver uses only bit 8 of OPERation Status Register.
This bit is called the Scan Complete bit and is set whenever a scan operation
completes. Since completion of a scan operation is an event in time, bit 8
will never appear set when STATus:OPERation:CONDition? is queried. However,
you can find bit 8 set by using STATus:OPERation:EVENt?.
76 Keysight E1463A 32-Channel Form C Switch User Guide
Page 75

STATus E1463A Command Reference
0
1
2
3
4
5
6
7
8
9
10
11
12
13
14
15
+
STATus:OPE Ration:CONDition?
STATus:OPERation:EVENt?
STATus:OPERation:ENABle
+
"OR"
CEV EN
3
4
5
6
7
2
1
0
+
Command Error
Execution Error
Device Dep endent Error
Query Error
Operation C omplete
EV E N
Statu s
Byte
Summary B it
Output Queue
Standard Event Status Register
*SRE <unmask>
*SRE?
*STB?
Status Byte Register
OPERation Status Register
QUE = Question able Data
NOTE:
MAV = Message Available
ESB = Standa rd Event
RQS = Request Service
C = Condition Register
EV = Event Register
EN = Enable R egister
<32768>
<16384>
<8192>
<4096>
<2048>
<1024>
<512>
<256>
<128>
<64>
<32>
<16>
<8>
<4>
<2>
<1>
<128>
<64>
<32>
<16>
<8>
<4>
<2>
<1>
<2>
<128>
<4>
<8>
<16>
<32>
<1>
RQS
ESB
MAV
1
7
6
3
5
4
2
0
unmask examples:
*ESE 61 unmasks standar d event regi ster bits 0,
2, 3, 4 and 5 (*ESE 128 only unmasks bit 7).
*SRE 128 unmasks the OPR bit (operation) in
the status byte register . This is effective
only if the STAT:OP ER:ENAB 256 command
is executed.
STAT:QUE S:ENAB 256 unma sks the "Scan Complete"
Operation Co mplete <128>7
Register
bit
unmask
decimal
weight
+
"OR"
ESB
SRQ
SRQ
SRQ
SRQ = Interfac e Bus
Service R equest
Other
Instrument
Other
Instrument
SRQ Line
Interface Bus
System
Controller
SPOLL
*ESE?
*ESE <unmask>
*ESR?
EN
Scan Complete
OPR
Summary
Bit
OPR = Operati on Status
User Request
Request Contr ol
"OR"
"OR"
Automatically Set at
Power On Co nditions
Automatically Set by
Parse r
Power On
Related Comm ands
Set by *OPC
are *OPC? and *WAI
Summary
Bit
bit.
STATu s:PRESe t
STATus:OPERation:ENABle?
Figure 3-7 E1463A Status System Register Diagram
Keysight E1463A 32-Channel Form C Switch User Guide 77
Page 76

E1463A Command Reference STATus
STATus:OPERation:CONDition?
STATus:OPERation:CONDition? returns the state of the Condition Register
in the OPERation Status Register. The state represents conditions that are part of
the instrument's operation. The switch driver does not set bit 8 in the OPERation
Status Register (see STATus:OPERation[:EVENt]?).
STATus:OPERation:ENABle
STATus:OPERation:ENABle <unmask> sets an enable mask to allow events recorded in
the Event Register of the OPERation Status Register to send a Summary bit to
the Status Byte Register (bit 7). For switch modules, when bit 8 in the OPERation
Status Register is set to 1 and bit 8 is enabled by STATus:OPERation:ENABle, bit
7 in the Status Byte Register is set to 1.
Parameters
Name Type Range of Values Default Value
<unmask> numeric 0 through 65,535 N/A
Comments
Setting Bit 7 of the Status Byte Register: STATus:OPERation:ENABle 256 sets bit 7 (OPR)
of the Status Byte Register to 1 after bit 8 (Scan Complete) of the OPERation
Status Register is set to 1.
Related Commands: [ROUTe:]SCAN
Example
Enabling Operation Status Register Bit 8
STAT:OPER:ENAB 256 !Enable bit 8 of the OPERation Status Register to
be reported to bit 7 (OPR) in the Status Byte Register
STATus:OPERation:ENABle?
STATus:OPERation:ENABle? returns the bit value of the Enable Register within the
OPERation Status Register.
Comments
Output Format: STATus:OPERation:ENABle? returns a decimal-weighted value from
0 to 65,535 indicating the bits set to true.
78 Keysight E1463A 32-Channel Form C Switch User Guide
Page 77

STATus E1463A Command Reference
Maximum Value Returned: The value returned is the value set by
STATus:OPERation:ENABle <unmask>. However, the maximum
decimal-weighted value used in this module is 256 (bit 8 in the Condition
Register within the OPERation Status Register is set to true).
Example
Querying the Enable Register in the OPERation Status Register
STAT:OPER:ENAB? ! Query the Enable Register in the OPERation Status
Register
STATus:OPERation[:EVENt]?
STATus:OPERation[:EVENt]? returns which bits in the Event Register within the
OPERation Status Register are set. The Event Register indicates that
a time-related instrument event has occurred.
Comments
Setting Bit 8 of the OPERation Status Register: Bit 8 (Scan Complete) is set to 1 after a
scanning cycle completes. Bit 8 returns to 0 (zero) after sending
STATus:OPERation[:EVENt]?.
Returned Data after sending STATus:OPERation[:EVENt]?: The command returns "+256" if
bit 8 of the OPERation Status Register is set to 1. The command returns "+0" if bit
8 of the OPERation Status Register is set to 0.
Event Register Cleared: Reading the Event Register within the OPERation Status
Register with STATus:OPERation:EVENt? clears the Event Register.
Aborting a Scan: Aborting a scan will leave bit 8 set to 0.
Related Commands: [ROUTe:]SCAN
Example
Reading the OPERation Status Register After a Scanning Cycle
STAT:OPER? !Return the bit values of the Event Register within the
OPERation Status Register
read the register value +256 shows bit 8 is set to 1.
+0 shows bit 8 is set to 0.
Keysight E1463A 32-Channel Form C Switch User Guide 79
Page 78

E1463A Command Reference STATus
STATus:PRESet
STATus:PRESet affects only the Enable Register within the OPERation Status
Register by setting all Enable Register bits to 0. It does not affect either the
Status Byte Register or the Standard Event Status Register. STATus:PRESet does
not clear any of the Event Registers.
80 Keysight E1463A 32-Channel Form C Switch User Guide
Page 79

SYSTem E1463A Command Reference
SYSTem
The SYSTem subsystem returns the error numbers and error messages in the
error queue of a switchbox. It can also return the types and descriptions of
modules (cards) in a switchbox.
Subsystem Syntax
SYSTem
:CDEScription? <number>
:CPON <number> | ALL
:CTYPe? <number>
:ERRor?
SYSTem:CDEScription?
SYSTem:CDEScription? <number> returns the description of a selected module (card)
in a switchbox.
Parameters
Name Type Range of Values Default Value
<number> numeric 1 through 99 N/A
Comments
Form C Switch Module Description: SYSTem:CDEScription? returns:
"32 Channel General Purpose Relay"
Example
Reading the Description of a Module
SYST:CDES? 1 !Return description of module card #1
Keysight E1463A 32-Channel Form C Switch User Guide 81
Page 80

E1463A Command Reference SYSTem
SYSTem:CPON
SYSTem:CPON <number> | ALL sets the selected module (card) in a switchbox to its
power-on state.
Parameters
Name Type Range of Values Default Value
<number> numeric 1 through 99 N/A
Comments
Form C Switch Power-on State: The power-on state is all channels (relays) open.
SYSTem:CPON ALL and *RST open all channels of all modules in a switchbox,
while SYSTem:CPON <number> opens the channels in only the module (card)
specified in the command.
Example
Setting Module to Power-on State
SYST:CPON 1 !Set card #1 to power-on state
SYSTem:CTYPe?
SYSTem:CTYPe? <number> returns the module (card) type of a selected module in a
switchbox.
Parameters
Name Type Range of Values Default Value
<number> numeric 1 through 99 N/A
Comments
E1463A Form C Switch Model Number: SYSTem:CTYPe? <number> returns
where the 0 after E1463A is the module serial number (always 0) and
A.04.00 is an example of the module revision code number.
HEWLETT-PACKARD,El463A,0,A.04.00
Example
Reading the Model Number of a Module
SYST:CTYP? 1 !Return the model number
82 Keysight E1463A 32-Channel Form C Switch User Guide
Page 81

SYSTem E1463A Command Reference
SYSTem:ERRor?
SYSTem:ERRor? returns the error numbers and corresponding error messages in
the error queue of a switchbox. See Appendix C for a listing
of switchbox error numbers and messages.
Comments
Error Numbers/Messages in the Error Queue: Each error generated by a switchbox stores
an error number and corresponding error message in the error queue. The error
message can be up to 255 characters long.
Clearing the Error Queue: An error number/message is removed from the queue each
time SYSTem:ERRor? is sent. The errors are cleared first-in, first-out. When the
queue is empty, each following SYSTem:ERRor? command returns +0, "No
error". To clear all error numbers/messages in the queue, execute *CLS.
Maximum Error Numbers/Messages in the Error Queue: The queue holds a maximum of 30
error numbers/messages for each switchbox. If the queue overflows, the last
error number/message in the queue is replaced by -350, "Too many errors". The
least recent error numbers/messages remain in the queue and the most recent
errors are discarded.
Example
Reading the Error Queue
SYST:ERR? !Query the error queue
Keysight E1463A 32-Channel Form C Switch User Guide 83
Page 82

E1463A Command Reference TRIGger
TRIGger
The TRIGger command subsystem controls the triggering operation of
Form C switch modules in a switchbox.
Subsystem Syntax
TRIGger
[:IMMediate]
:SOURce <source>
:SOURce?
TRIGger[:IMMediate]
TRIGger[:IMMediate] causes a trigger event to occur when the defined trigger source
is TRIGger:SOURce BUS or TRIGger:SOURce HOLD.
Comments
Executing TRIGger[:IMMediate]: Before TRIGger[:IMMediate] will execute, a channel
list must be defined with [ROUTe:]SCAN <channel_list> and an
INITiate[:IMMediate] must be executed
BUS or HOLD Source Remains: If selected, TRIGger:SOURce BUS or TRIGger:SOURce
HOLD remains in effect after triggering a switchbox with TRIGger[:IMMediate].
Related Commands: INITiate, [ROUTe:]SCAN
Example
Advancing Scan Using TRIGger
This example uses TRIGger[:IMMediate] to advance the scan of a single-module
switchbox from channel 00 through 03. Since TRIGger:SOURce HOLD is set, the
scan is advanced one channel
each time TRIGger is executed.
TRIG:SOUR HOLD !Set trigger source to HOLD
SCAN(@100:103) !Define channel list
INIT !Begin scan, close channel 00
loop statement !Start count loop
TRIG !Advance scan to next channel
increment loop !Increment loop count
84 Keysight E1463A 32-Channel Form C Switch User Guide
Page 83

TRIGger E1463A Command Reference
TRIGger:SOURce
TRIGger:SOURce <source> specifies the trigger source to advance the <channel_list>
during scanning.
Parameters
Parameter
Name
BUS discrete *TRG or GET command IMM
EXTernal discrete "Trig In" port IMM
HOLD discrete Hold Triggering IMM
IMMediate discrete Immediate Triggering IMM
TTLTrgn numeric TTL Trigger Bus Line 0 - 7 IMM
Parameter
Type
Parameter
Description
Default
Value
Comments
Enabling the Trigger Source: TRIGger:SOURce only selects the trigger source.
INITiate[:IMMediate] enables the trigger source.
Using the TRIGger Command: You can use TRIGger[:IMMediate] to advance the scan
when TRIGger:SOURce BUS or TRIGger:SOURce HOLD is selected.
Using External Trigger Inputs: With TRIGger:SOURce EXTernal selected, only one
switchbox at a time can use the external trigger input at the E1406A "Trig In"
port. The trigger input is assigned to the first switchbox requesting the external
trigger source (with a TRIGger:SOURce EXTernal command).
Assigning External Trigger: A switchbox assigned with TRIGger:SOURce EXTernal
remains assigned to that source until the switchbox trigger source is changed to
BUS, HOLD, or IMMediate. When the source is changed, the external trigger
source is available to the next switchbox requesting it (with a TRIGger:SOURce
EXTernal command). If a switchbox requests an external trigger input already
assigned to another switchbox, an error is generated.
Using Bus Triggers: To trigger the switchbox with bus triggers when
TRIGger:SOURce BUS selected, use the IEEE 488.2 common command *TRG or
the GPIB Group Execute Trigger (GET) command.
"Trig Out" Port Shared by Switchboxes: When enabled, the E1406A Command Module
"Trig Out" port is pulsed by any switchbox each time a scanned channel is
closed. To disable the output for a specific module
send OUTPut:EXTernal[:STATe] OFF or OUTPut:EXTernal[:STATe] 0 for that
module.
Keysight E1463A 32-Channel Form C Switch User Guide 85
Page 84

E1463A Command Reference TRIGger
One Output Selected at a Time: Only one output (TTLTrg or EXTernal) can be enabled
at one time. Enabling a different output source will automatically disable the
active output.
Related Commands: ABORt, [ROUTe:]SCAN, OUTPut
*RST Condition: TRIGger:SOURce IMMediate
Example
Scanning Using External Triggers
This example uses external triggering (TRIGger:SOURce EXTernal) to scan
channels 00 through 03 of a single-module switchbox. The trigger source to
advance the scan is the input to the "Trig In" port on the E1406A Command
Module. When INIT is executed, the scan is started and channel 00 is closed.
Then, each trigger received at the "Trig In" port advances the scan to the next
channel.
TRIG:SOUR EXT !Select external triggering
SCAN(@100:103) !Scan channels 00 through 03
INIT !Begin scan, close channel 00
trigger externally !Advance scan to next channel
Example
Scanning Using Bus Triggers
This example uses bus triggering (TRIG:SOUR BUS) to scan channels 00 through
03 of a single-module switchbox. The trigger source to advance the scan is the
*TRG command (as set with TRIGger:SOURce BUS). When INIT is executed, the
scan is started and channel 00 is closed. Then, each *TRG command advances
the scan to the next channel.
TRIG:SOUR BUS !Select interface (bus) triggering
SCAN(@100:103) !Scan channels 00 through 03
INIT !Begin scan, close channel 00
loop statement !Loop to scan all channels
*TRG !Advance scan using bus triggering
increment loop !Increment loop count
86 Keysight E1463A 32-Channel Form C Switch User Guide
Page 85

TRIGger E1463A Command Reference
TRIGger:SOURce?
TRIGger:SOURce? returns the current trigger source for the switchbox. The
command returns BUS, EXT, HOLD, IMM, or TTLTfor sources BUS, EXTernal,
HOLD, IMMediate, or TTLTrgn, respectively.
Example
Querying the Trigger Source
This example sets external triggering and queries the trigger source.
Since external triggering is set, TRIG:SOUR? returns "EXT".
TRIG:SOUR EXT !Set external trigger source
TRIG:SOUR? !Query trigger source
Keysight E1463A 32-Channel Form C Switch User Guide 87
Page 86

E1463A Command Reference SCPI Commands Quick Reference
SCPI Commands Quick Reference
The following table summarizes the SCPI Commands for the E1463A
Form C Switch module.
Command Description
ABORt ABORt Aborts a scan in progress
ARM :COUNt <number> MIN |MAX
:COUNt? [MIN|MAX]
DISPlay :MONitor:CARD <number> |AUTO
:MONitor[:STATe] <mode>
INITiate :CONTinuous <mode>
:CONTinuous?
[:IMMediate]
OUTPut [:EXTernal][:STATe] <mode>
[:EXTernal][:STATe]?
[:STATe] <mode>
[:STATe]?
:TTLTrgn[:STATe] <mode>
:TTLTrgn[:STATe]?
[ROUTe:] CLOSe <channel _list>
CLOSe? <channel _list>
OPEN <channel_list>
OPEN? <channel _list>
SCAN <channel_list>
STATus :OPERation:CONDition?
:OPERation:ENABle <unmask>
:OPERation:ENABle?
:OPERation[:EVENt]?
:PRESet
Multiple scans per INIT command
Queries number of scans
Selects module to be monitored
Selects monitor mode
Enables/disables continuous scanning
Queries continuous scan state
Starts a scanning cycle
Enables/disables the Trig Out port on the E1406
Queries the external state
Enables/disables the Trig Out port on the E1406
Queries port enable state
Enables/disables the specified TTL trigger line
Queries the specified TTL trigger line
Closes channel(s)
Queries channel(s) closed
Opens channel(s)
Queries channel(s) opened
Defines channels for scanning
Returns status of the Condition Register
Enables the Operation Event Register to set a bit in the
Status Register
Query the contents in the Operation Status Register
Returns status of the Operation Status Register
Sets Enable Register to 0
SYSTem :CDEScription? <number>
:CTYPe? <number>
:CPON <number> |ALL
:ERRor?
TRIGger [:IMMediate]
:SOURce BUS
:SOURce EXTernal
:SOURce HOLD
:SOURce IMMediate
:SOURce?
88 Keysight E1463A 32-Channel Form C Switch User Guide
Returns description of module in a switchbox
Returns the module type
Sets specified module to its power-on state
Returns error number/message to error queue
Causes a trigger to occur
Trigger source is *TRG
Trigger source is Trig In (on the E1406)
Hold off triggering
Continuous (internal) triggering
Query scan trigger source
Page 87

IEEE 488.2 Common Commands Reference E1463A Command Reference
IEEE 488.2 Common Commands Reference
The following table lists the IEEE 488.2 Common (*) commands accepted by the
E1463A Form C Switch module. The operation of some of these commands is
described in Chapter 2 of this manual. For more information on Common
commands, refer to the user’s manual for your mainframe or to the ANSI/IEEE
Standard 488.2-1987.
Command Title Command Description
*CLS Clear Status Register Clears all status registers (see STATus:OPERation[:EVENt]?).
*ESE Event Status Enable Enables Status Register bits.
*ESE? Event Status Enable Query Queries the current contents in the Standard Event Status Register
*ESR? Event Status Register Query Queries and clears the current contents in the Standard Event Status Register
*IDN? Identification Query Returns identification string of the Switchbox.
*OPC Operation Complete Sets the Request for OPC flag when all pending operations have completed.
Also, sets OPC bit in the Standard Event Status Register.
*OPC? Operation Complete Query Returns a "1" to the output queue when all pending operations have
completed. Used to synchronize between multiple instruments.
*RCL Recall Instrument State Recalls previously stored configuration.
*RST Reset Opens all channels and sets the module to a known state.
*SAV Save Instrument State Stores the current configuration in specified memory.
*SRE Service Request Enable Sets the Service Request Enable Register bits and corresponding
Serial Poll Status Register bits to generate a service request.
*SRE? Service Request Enable Query Queries the current contents in the Service Request Enable Register.
*STB? Read Status Byte Query Queries the current contents in the Status Byte Register.
*TRG Trigger Triggers the module to advance the scan when scan is enabled and trigger
source is TRIGger:SOURce BUS.
*TST? Self-Test Query Returns +0 if self-test passes.
Returns +cc01 for firmware error.
Returns +cc02 for bus error.
Returns +cc10 if an interrupt was expected but not received.
Returns +cc11 if the busy bit was not held for 10 msec.
*WAI Wait to Continue Prevents an instrument from executing another command until the operation
caused by the previous command is finished. Since all instruments normally
perform sequential operations, executing this command causes no change.
Keysight E1463A 32-Channel Form C Switch User Guide 89
Page 88

E1463A Command Reference IEEE 488.2 Common Commands Reference
90 Keysight E1463A 32-Channel Form C Switch User Guide
Page 89

Keysight E1463A 32-Channel Form C Switch
User Guide
A Form C Switch Specifications
General
Module Size / Device Type:
C-size VXIbus, Register based, A16/D16, Interrupter
(levels 1-7, jumper selectable
Power Requirements:
Voltage: +5 V +12 V
Peak Module Current (A) 0.10 0.60**
Dynamic Module Current (A) 0.10 0.01
Watts/slot: 10 W
Cooling/slot: 0.08 mm H
Operating Temperature: 0
0 @ 0.42 Liter/sec for 10oC rise
2
- 55C
Operating Humidity: 65% RH, 0 - 40C
Terminals:
Screw type, maximum wire size 16 AWG
Input Characteristics
Maximum Input Voltage:
220 Vdc or 250 Vac
220 Vdc or 250 Vac
Terminal to Terminal
rms
Terminal to Chassis
rms
Maximum Current per Channel (non-inductive):
5 Adc or ac
rms
DC Performance
Insulation Resistance (between any two points):
6
at 40C, 95% RH
>5x10
8
at 25C, 40% RH
>5x10
Maximum Thermal Offset per Channel:
<7 V (<3 V typical)
AC Performance
Capacitance:
<30 pF (Channel to Channel)
<40 pF (Channel to Common)
<25 pF (Common to Guard)
Bandwidth (-3 dB):
>10 MHz (typical)
* Relays are subject to normal wearout based on the number of operations.
** Absolute worst case when all relays are closed simultaneously.
Relay Life (Typical):*
Condition Number of Operations
No Load 5 x 10
250 Vac, 2A, Resistive 10
250 Vac, 5A, Resistive 10
250 Vac, 2A, p.f. = 0.4 10
250 Vac, 5A, p.f. = 0.4 10
30 Vdc, 1A, Resistive >10
30 Vdc, 5A, Resistive 10
30 Vdc, 1A, L/R = 7 msec >10
30 Vdc, 5A, L/R = 7 msec 10
Maximum Switchable Power per Channel:
150 W dc; 1250 VA per switch
1500 W dc; 12,500 VA per module
Closed Channel Resistance:
>100 mA: <0.250 (<2 at end of relay life)
<100 mA: <20
Crosstalk (db) (for Z1 = Zs =50 ):
Frequency <10 kHz <100 kHz <1 MHz
Channel to Channel <-83 <-63 <-43
Common to NO or NC <-80 <-60 <-40
Module to Module <-100 <-100 <-90
7
6
5
6
5
6
5
6
5
91
Page 90

Form C Switch Specifications
92 Keysight E1463A 32-Channel Form C Switch User Guide
Page 91

Keysight E1463A 32-Channel Form C Switch
User Guide
B Register-Based Programming
About This Appendix
This appendix contains the information you can use for register-based
programming of the E1463A Form C Switch. The contents include:
Register Programming vs. SCPI Programming page 93
Addressing the Registers page 93
Register Descriptions page 96
Programming Examples page 99
Register Programming vs. SCPI Programming
The E1463A Form C Switch is a register-based module that does not support the
VXIbus word serial protocol. When a SCPI command is sent
to the Form C switch, the E1406 Command Module parses the command and
programs the switch at the register level.
If SCPI is used to control this module, register programming is not
recommended. The SCPI driver maintains an image of the card
state. The driver will be unaware of changes to the card state if
you alter the card state by using register writes.
Register-based programming is a series of reads and writes directly to
the Form C switch registers. This increases throughput speed since it eliminates
command parsing and allows the use of an embedded controller. Also, if slot 0,
the resource manager, and the computer GPIB interface are provided by other
devices, a C-size system can be downsized by removing the command module.
Addressing the Registers
Register addresses for register-based devices are located in the upper 25% of
VXI A16 address space. Every VXI device (up to 256 devices) is allocated a
32-word (64-byte) block of addresses. With five registers, the E1463A Form C
Switch uses five of the 64 addresses allocated.
93
Page 92

Register-Based Programming Addressing the Registers
The Base Address
When reading or writing to a switch register, a hexadecimal or decimal register
address is specified. This address consists of a base address plus a register
offset. The base address used in register-based programming depends on
whether the A16 address space is outside or inside the E1406 Command Module.
Figure B-1 shows the register address location within A16 as it might be mapped
by an embedded controller. Figure B-2 shows the location of A16 address space
in the E1406 Command Module.
A16 Address Space Outside the Command Module
When the E1406 Command Module is not part of your VXIbus system (see Figure
B-1), the switch’s base address is computed as:
C000
+ (LADDR * 64)
16
where C000
(49,152) is the starting location of the register addresses, LADDR
16
or 49,152 + (LADDR * 64)
16
is the switch’s logical address, and 64 is the number of address bytes per VXI
device. For example, the switch’s factory-set logical address is 120 (78
address is not changed, the switch will have a base address of:
C000
+ (120 * 64)16 = C00016 + 1E0016 = DE00
16
16
or (decimal)
49,152 + (120 * 64) = 49,152 + 7680 = 56,832
A16 Address Space Inside the Command Module or Mainframe
When the A16 address space is inside the E1406 Command Module
(see Figure B-2), the switch’s base address is computed as:
1FC000
where 1FC000
LADDR is the switch’s logical address, and 64 is the number of address bytes per
register-based device. Again, the switch’s factory-set logical address is 120. If
this address is not changed, the switch module will have a base address of:
1FC000
+ (LADDR * 64)16 or 2,080,768 + (LADDR * 64)
16
(2,080,768) is the starting location of the VXI A16 addresses,
16
+ (120 * 64)16 = 1FC00016 + 1E0016 = 1FDE00
16
16
). If this
16
or
2,080,768 + (120 * 64) = 2,080,768 + 7680 = 2,088,448
94 Keysight E1463A 32-Channel Form C Switch User Guide
Page 93

Addressing the Registers Register-Based Programming
Register Address = Base address + Register Offset
Base Address = COOO
OOOO
16
*
SPACE
ADDRESS
COOO
16
FFFF
16
A16
(49,15 2)
C000
SPACE
ADDRESS
REGISTER
16
*
16
FFFF
ID Register
A16 REGISTER MAP
E1463A
or
49,152 + (Logical Address 64)
+ (Logical Address 64)
16
*
10
*
16
DESCRIPTION
Status/Co ntrol Register
Device Type Register
Relay Control Regist er 1
Relay C ontrol Re gister 2
06
REGISTER
OFFSET
04
02
00
16
16
16
16
16
08
Register Address = Base address + Register Offset
2,080,768 + (Logical Address 64)
+ (Logical Address 64)
000000
IF0000
200000
16
16
16
Base Address = IFC000
IFOOOO
16
16
ADDRESS MAP
E1406
SPACE
ADDRESS
EOOOOO
FFFFFF
16
16
A24
16
IFCOOO
SPACE
ADDRESS
A16
16
200000
IFCOOO
(2,080,768)
or
*
*
16
*
10
16
200000
REGISTER
ADDRESS
SPACE
16
Relay Control Register 2
Relay Control Register 1
Device Typ e Register
Status/Control Register
16-BIT WORDS
E1463A
A16 REG ISTER MAP
ID Register
00
02
04
16
16
16
08
06
16
16
OFFSET
REGISTER
Register Offset
The register offset is the register’s location in the block of 64 address bytes. For
example, the switch’s Status Register has an offset of 04
command to this register, the offset is added to the base address to form the
register address:
. When you write a
16
1FDE00
+ 0416 = 1FDE04
16
Figure B-1 Registers Within A16 Address Space
or 2,088,448 + 4 = 2,088,452
16
Figure B-2 Registers Within the E1406 A16 Address Space
Keysight E1463A 32-Channel Form C Switch User Guide 95
Page 94

Register-Based Programming Register Descriptions
Register Descriptions
The Form C switch module contains two read registers, one read/write register,
and two write registers. This section describes each Form C module register.
Reading and Writing to the Registers
Example programs are provided at the end of this appendix that show how to
read and write to these registers. You can read or write to the following Form C
switch module registers.
– Manufacturer Identification Register (base + 00
– Device Type Register (base + 02
16
– Status/Control Register (base + 04
– Relay Control Register for Channels 00 - 15 (base + 06
– Relay Control Register for Channels 16 - 31 (base + 08
Manufacturer Identification Register
The Manufacturer Identification Register is at offset address 0016 and returns
FFFF
. This shows that Keysight Technologies is the manufacturer and the
16
module is an A16 register-based module. This register is read only.
b+00
16
Write Undefined
Read
15 14 13 12 11 10 9 8 7 6 5 4 3 2 1 0
Manufacturer ID - Returns
FFFF
= Keysight Technologies A16 only register-based device.
16
Device Type Register
) (read)
) (read or write)
16
) (read)
16
) (write)
16
) (write)
16
The Device Type Register is at offset address 0216 and returns 012116 for an
E1463A Form C Switch module. This register is read only.
b+02
16
Write Undefined
Read 0121
96 Keysight E1463A 32-Channel Form C Switch User Guide
15 14 13 12 11 10 9 8 7 6 5 4 3 2 1 0
16
Page 95

Register Descriptions Register-Based Programming
Status/Control Register
The Status/Control Register is at offset address 0416 and informs the user about
the module’s status and configuration. This register is read and write.
b+04
16
Write Not Used E Not Used R
Read
15 14 13 12 11 10 9 8 7 6 5 4 3 2 1 0
MS Not Used B E X X 1 1 X X
X
Reading the Status/Control Register
For Status/Control register reads, three bits are defined as follows.
–
MODID Select (bit 14): 0 indicates the module has been selected
by MODID (module ID) and a 1 indicates the module has not been
selected.
Busy (bit 7): 0 indicates the module is busy. Each relay requires about 10 ms
–
execution time during which the Form C switch is busy. Bit 7 of this register
is used to inform the user of a busy condition.
Enable (bit 6): 0 indicates the interrupt is enabled. The interrupt generated
–
after a channel has been closed can be disabled. Bit 6 of this register is
used to inform the user of the interrupt status.
For example, if the Form C switch module is not busy (bit 7 = 1) and the interrupt
is enabled (bit 6 = 0), a read of the Status/Control Register
(base + 04
) returns FFBF.
16
Writing to the Status/Control Register
You can only write to bits 0 and 6 of the Status/Control Register.
–
Enable (bit 6): Writing a "1" to this bit disables the interrupt function of the
module.
–
Soft Reset (bit 0): Writing a "1" to this bit soft resets the module.
When writing to the registers it is necessary to write "0" to bit 0
after the reset has been performed before any other commands
can be programmed and executed. SCPI commands take care of
this automatically.
Typically, interrupts are only disabled to "peek-poke" a module.
See the appropriate command module operating manual before
disabling the interrupt. Writing a "1" to bit 0 resets the switch (all
channels open).
Keysight E1463A 32-Channel Form C Switch User Guide 97
Page 96

Register-Based Programming Register Descriptions
Relay Control Register
There are two relay control registers: Relay Control Register 1 (base + 0616) and
Relay Control Register 2 (base + 08
common (C) to the normally open (NO) terminal. Reading any Relay Control
Register will always return FFFF
The numbers in the register maps indicate the channel number to be written to.
Writes to the Relay Control Registers enable you to open or close the desired
channel. For example, write a "1" to bit 2 of Relay Control Register 1 to close
channel 02.
Relay Control Register Channels 00 - 15
). These registers are used to connect the
16
regardless of the channel states.
16
b+06
Write
Read
b+08
Write
Read
15 14 13 12 11 10 9 8 7 6 5 4 3 2 1 0
16
CH15 CH14 CH13 CH12 CH11 CH10 CH09 CH08 CH07 CH06 CH05 CH04 CH03 CH02 CH01 CH00
Always returns
FFFF
16
Relay Control Register Channels 16 - 31
15 14 13 12 11 10 9 8 7 6 5 4 3 2 1 0
16
CH31 CH30 CH29 CH28 CH27 CH26 CH25 CH24 CH23 CH22 CH21 CH20 CH19 CH18 CH17 CH16
Always returns
FFFF
16
98 Keysight E1463A 32-Channel Form C Switch User Guide
Page 97

Programming Examples Register-Based Programming
Programming Examples
This section provides example programs in BASIC and C/HP-UX, including:
– Example: Reading the Registers (BASIC)
– Example: Reading the Registers (C/HP-UX)
– Example: Making Measurements (BASIC)
– Example: Making Measurements (C/HP-UX)
– Example: Scanning Channels (BASIC)
– Example: Scanning Channels (C/HP-UX)
Example: Reading the Registers (BASIC)
This BASIC programming example reads the Manufacturer ID Register, Device
Type Register and Status Register on the Form C switch.
10 !*****************************************************
20 ! ****** READREG
*****
30 !*****************************************************
40 OPTION BASE 1
50 !Set up arrays to store register names and addresses
60 DIM Reg_name$(1:3)[32], Reg_addr(1:3)
70 !
80 !Read register names and addresses into the arrays
90 READ Reg_name$(*)
100 READ Reg_addr(*)
110 !
120 !Set base address variable
130 Base_addr = DVAL("DE00",16)
140 !
150 !Map the A16 address space in the controller
160 !
170 CONTROL 16,25;2
180 !Call the subprogram Read_regs
190 Read_regs(Base_addr, Reg_name$(*), Reg_addr(*))
200 !
210 DATA Identification register, Device register, Status register
220 DATA 00, 02, 04
230 END
.
.
.
300 !This subprogram steps through a loop that reads each register
310 !and prints its contents
320 SUB Read_regs(Base_addr, Reg_name$(*), Reg_addr(*))
330 !
340 For Number = 1 to 3
Keysight E1463A 32-Channel Form C Switch User Guide 99
Page 98

Register-Based Programming Programming Examples
350 Register = READIO(-16,Base_addr + Reg_addr(number))
360 PRINT Reg_name$(number); " = "; IVAL$(Register,16)
370 Next Number
380 SUBEND
Example: Reading the Registers (C/HP-UX)
This C/HP-UX programming example reads the Manufacturer ID Register, Device
Type Register and Status Register on the Form C switch.
/***************************************************/
/****** readreg.c
******/ /**************************************************/
#include <sys/vxi.h> /*source file for controller VXI
drivers*/
#include <fcntl.h>
#include <stdio.h>
#define logical_address 120 /*logical address of the Form C module*/
int fd;
typedef unsigned short word;
typedef struct dev_regs{ /*set up pointers*/
unsigned short id_reg;
unsigned short device_type;
unsigned short status_reg;
unsigned short bank0_channels;
} DEV_REGS;
main( )
{
/*open the controller VXI interface*/
fd=open("/dev/vxi/primary",O_RDWR);
if (fd){
perror("open");
exit(1);
}
/*retrieve the A16 pointers*/
dev=(struct dev_regs *)vxi_get_a16_addr(fd,logical_address);
/*sub to read the registers*/
read_reg(dev);
/*END of main program*/
}
/*SUB READ_REG*/
int read_reg(reg_ptr)
DEV_REGS *reg_ptr;
{
/*read the ID register*/
printf("\n ID Register = 0x%x\n",reg_ptr->id_reg);
/*read the Device Type register*/
100 Keysight E1463A 32-Channel Form C Switch User Guide
Page 99

Programming Examples Register-Based Programming
printf("\n Device Type Register = 0x%x\n",reg_ptr->device_type);
/*read the Status register*/
printf("\n Status Register = 0x%x\n",reg_ptr->status_reg);
return;
}
Example: Making Measurements (BASIC)
This BASIC programming example closes bit 1 on bank 0, waits for a
measurement to be made, and then opens the channel. You must insert your own
programming code for the measurement part of this program. For example, if you
are using the E1411B, see the E1326B/E1411B Multimeter User's Manual for
programming examples.
10 !***************************************************
20 !***** MAKEMEAS
*****
30 !***************************************************
40 OPTION BASE 1
50 !Set up arrays to store register names and addresses
60 DIM Reg_name$(1:1)[32], Reg_addr(1:1)
70 !
80 !Read register names and address into the arrays
90 READ Reg_name$(*)
100 READ Reg_addr(*)
110 !
120 !Set base address variable
130 Base_addr = DVAL("DE00",16)
140 !
150 !Map the A16 address space in the controller
160 CONTROL 16,25;2
170 !Call the subprogram Make_meas
180 Make_meas(Base_addr, Reg_addr(*))
190 !
200 DATA Bank0 channels register
210 DATA 06
220 END
.
.
.
280 !This subprogram closes bit 1 of bank0 channels, waits for the
290 !channel to be closed, makes a measurement, and then opens
300 !the relay.
310 SUB Make_meas(Base_addr, Reg_addr(*))
320 !
330 WRITEIO -16, Base_addr + Reg_addr(1); 1
340 REPEAT
350 UNTIL BIT(READIO(-16,Base_addr+4),7)
.
. !Make Measurements
Keysight E1463A 32-Channel Form C Switch User Guide 101
Page 100

Register-Based Programming Programming Examples
.
380 WRITEIO -16, Base_addr + Reg_addr(1);0
390 SUBEND
Example: Making Measurements (C/HP-UX)
This C/HP-UX programming example closes bit 1 on bank 0, waits for a
measurement to be made, and then opens the channel. You must insert your own
programming code for the measurement part of this program. For example, if you
are using the E1411B, see the E1326B/E1411B Multimeter User's Manual for
programming examples.
The sub ver_time allows time for switch closures. This sub should print a time
around 10 ms. If the time is less, you must change the value of j in the for loop.
For example, instead of 10000, you might need to use 12000.
/******************************************************/
/*** makemeas.c ***/
/******************************************************/
#include <time.h>
#include <sys/vxi.h> /*source file for controller VXI
drivers*/
#include <fcntl.h>
#include <stdio.h>
#define logical_address 120 /*logical address of Form C Switch*/
int fd;
typedef unsigned short word;
typedef struct dev_regs{ /*set up pointers*/
unsigned short id_reg;
unsigned short device_type;
unsigned short status_reg;
unsigned short bank0_channels;
} DEV_REGS;
main( )
{
/*open the controller VXI interface*/
fd=open("/dev/vxi/primary",O_RDWR);
if (fd){
perror("open");
exit(1);
}
/*retrieve the A16 pointers*/
dev=(struct dev_regs *)vxi_get_a16_addr(fd,logical_address);
/*sub to verify the time to close the switch*/
ver_time( );
/*sub to close switch and make measurement*/
make_meas(dev);
} /* *END of main program*/
102 Keysight E1463A 32-Channel Form C Switch User Guide
 Loading...