

Page 1

Agilent X-Series
E6607B Wireless
Communications
Test Set
Notice: This document contains references to
Agilent. Please note that Agilent’s Test and
Measurement business has become Keysight
Technologies. For more information, go to
www.keysight.com.
Getting Started Guide
Agilent Technologies
Page 2

Notices
© Agilent Technologies, Inc. 2012-2014
No part of this manual may be reproduced
in any form or by any means (including
electronic storage and retrieval or translation into a foreign language) without prior
agreement and written consent from Agilent Technologies, Inc. as governed by
United States and international copyright
laws.
Trademark
Acknowledgements
Microsoft “ is a U.S. registered trademark
of Microsoft Corporation.
Windows “ and MS Windows “ are U.S.
registered trademarks of Microsoft
Corporation.
Adobe Reader “ is a U.S. registered
trademark of Adobe System Incorporated.
Java™ is a U.S. trademark of Sun
Microsystems, Inc.
MA TLAB “ is a U.S. registered trademark
of Math Works, Inc.
Norton Ghost™ is a U.S. trademark of
Symantec Corporation.
Copyright 2008-9 Agilent Technologies
Inc.
Licensed under the Apache License, Version 2.0 (the "License");
you may not use this file except in compliance with the License.
You may obtain a copy of the License at:
http://www.apache.org/licenses/
LICENSE-2.0
Unless required by applicable law or
agreed to in writing, software
distributed under the License is
distributed on an "AS IS" BASIS,
WITHOUT WARRANTIES OR CONDITIONS OF ANY KIND, either express or
implied.
See the License for the specific
language governing permissions and limitations under the License.
Manual Part Number
E6607-90033
Print Date
December 2014
Printed in USA
Agilent Technologies, Inc.
1400 Fountaingrove Parkway
Santa Rosa, CA 95403
Warranty
The material contained in this document is provided “as is,” and is
subject to being changed, without
notice, in future editions. Further,
to the maximum extent permitted
by applicable law, Agilent disclaims
all warranties, either express or
implied, with regard to this manual
and any information contained
herein, including but not limited to
the implied warranties of merchantability and fitness for a particular purpose. Agilent shall not
be liable for errors or for incidental
or consequential damages in connection with the furnishing, use, or
performance of this document or of
any information contained herein.
Should Agilent and the user have a
separate written agreement with
warranty terms covering the material in this document that conflict
with these terms, the warranty
terms in the separate agreement
shall control.
Technology Licenses
The hardware and/or software described
in this document are furnished under a
license and may be used or copied only in
accordance with the terms of such license.
Restricted Rights Legend
If software is for use in the performance
of a U.S. Government prime contract or
subcontract, Software is delivered and
licensed as “Commercial computer software” as defined in DF AR 252.227-7014
(June 1995), or as a “commercial item” as
defined in F AR 2.101(a) or as “Restricted
computer software” as defined in FAR
52.227-19 (June 1987) or any equivalent
agency regulation or contract clause. Use,
duplication or disclosure of Software is
subject to Agilent Technologies’ standard
commercial license terms, and non-DOD
Departments and Agencies of the U.S.
Government will receive no greater than
Restricted Rights as defined in FAR
52.227-19(c)(1-2) (June 1987). U.S. Government users will receive no greater than
Limited Rights as defined in FAR 52.22714 (June 1987) or DFAR 252.227-7015
(b)(2) (November 1995), as applicable in
any technical data.
Safety Notices
A CAUTION notice denotes a
hazard. It calls attention to an
operating procedure, practice, or
the like that, if not correctly performed or adhered to, could result
in damage to the product or loss of
important data. Do not proceed
beyond a CAUTION notice until
the indicated conditions are fully
understood and met.
A WARNING notice denotes a
hazard. It calls attention to an
operating procedure, practice,
or the like that, if not correctly
performed or adhered to, could
result in personal injury or
death. Do not proceed beyond a
WARNING notice until the indicated conditions are fully
understood and met.
Page 3

Warranty
This Agilent Technologies product is warranted against defects in material and
workmanship for a period of one year from the date of shipment. during the warranty
period, Agilent Technologies will, at its option, either repair or replace products that
prove to be defective.
For warranty service or repair, this product must be returned to a service facility
designated by Agilent Technologies. Buyer shall prepay shipping charges to Agilent
Technologies shall pay shipping charges to return the product to Buyer. However,
Buyer shall pay all shipping charges, duties, and taxes for products returned to Agilent
Technologies from another country.
Where to Find the Latest Information
Documentation is updated periodically. For the latest information about this test set,
including firmware upgrades, application information, and product information, see
the following URLs:
http://www.agilent.com/find/ext
To receive the latest updates by email, subscribe to Agilent Email Updates:
http://www.agilent.com/find/emailupdates
Information on preventing test set damage can be found at:
http://www.agilent.com/find/tips
Page 4

Compliance
This product has been designed and tested in accordance with accepted industry standards, and has been
supplied in a safe condition. The documentation contains information and warnings that must be followed
by the user to ensure safe operation and to maintain the product in a safe condition.
Canadian EMC Requirements
This ISM device complies with Canadian ICES-001.
Cet appareil ISM est conforme à la norme NMB-001 Canada.
Acoustic Noise Requirements
Acoustic Noise Emission Geraeuschemission
LpA <70 dB
Operator Position
Normal Position
Per ISO 7779
Acoustic Noise -- Further
Information
Ambient Temperature <40
LpA < 70 dB
Am Arbeitsplatz
Normaler Betrieb
Nach DIN 45635 t.19
Supplemental Information
(Values given are per ISO 7779 standard in the “Operator
Sitting” position)
° C Nominally under 55 dBA Sound Pressure. 55 dBA is gen-
erally considered suitable for use in quiet office environments.
Ambient Temperature >40° C Nominally under 65 dBA Sound Pressure. 65 dBA is gen-
erally considered suitable for noisy office environments.
(The fan speed, and thus the noise level, increases with
increasing ambient temperature.)
Page 5

In This Guide…
This guide contains the following information:
1 Quick-Start
This chapter explains how to initial ize the test se t and generate and view a
signal.
2 Front and Rear Panel Features
Refer to this chapter for information on front- and rear-panel key
functionality, and display annotations.
3 Test Set Operating System
This chapter describes the Microsoft Windows OS configuration and the
settings used with the Agilent test set software.
4 Using Microsoft Windows
The information in this chapter provides some guidelines for using the
Microsoft Windows feature capabilities with the test set.
5 Troubleshooting
This chapter details some basic steps that may solve any problems you are
experiencing with either the test set or Microsoft Windows OS.
Page 6

Contents
1 Quick-Start
Initial Inspection 12
Table. Verifying the contents 12
Shipping problems? 13
Test Set Location and Rack Mounting Requirements 13
Turning on the test set the first time 14
Initializing the test set using a USB mouse 14
Initializing the test set using front-panel navigation 19
Anti-Virus Software and Firewalls 23
Shortening the Test Set Power-On Time 23
Instrument Information 24
Power requirements 24
Environmental Conditions (Operating) 25
Ventilation 26
Instrument Maintenance 26
Protecting against electrostatic discharge 28
2 Front and Rear Panel Features
Front-Panel Features (E6607A/B) 30
V irtual Front Panel 33
When the Test Set is Controlled Remotely 34
Display Annotations 35
Rear-Panel Features 37
Front and Rear Panel Symbols 39
3 Test Set Operating System
Agilent Software Installed 42
Agilent U9065A & U9060A software 42
Customer Installation of Software 43
3rd party software verified by Agilent 43
Getting Started Guide 7
Page 7

Installation of other 3rd party software 43
User Accounts 44
Administrator login 44
User login 44
AgilentOnly user account 44
Agilent service user accounts 44
Customer creation of accounts 45
Agilent X-Series Licensing Options 46
Fixed Perpetual 46
Transportable Perpetual 46
Time-Based Licenses 47
Licensing New Measurement Application Software - After Initial Purchase 48
Transporting a License Between X-Series Test Sets 50
Windows Configuration 53
Settings that can be changed 53
Settings that must not be changed 54
Configuring Printers 56
Configuring LAN 57
Hostname 57
IP Address & Gateway 57
Windows Security 58
Windows Firewall 59
Automatic updates 59
Virus protection 60
Spyware protection 61
System Maintenance 62
Backup 62
System restore 62
Disk defragmenting 62
USB Connections 63
Hard Drive Partitioning and Use 64
Backing-up the factory calibration data 65
Hard Drive Recovery Process 67
Updating the software 69
Configuring recovery prompt timing 71
8 Getting Started Guide
Page 8

4 Using Microsoft Windows Operating System
Navigating Windows Without a Mouse 74
Remote Desktop: Using the X-Series test set remotely 78
Overview of Remote Desktop operation 78
Setting up Remote Desktop operation 78
How to locate the computer name of the test set 80
Running a Remote Desktop session 82
The Virtual Front Panel 91
Embedded Web Server: Using the X-Series Test Set Remotely 92
Accessing the test set through the Internet 92
Accessing the Web Control tab 96
Selecting the Get Data tab 97
Selecting the Get Image tab 98
Selecting the SCPI Telnet tab 100
Selecting the Help Tab 102
Capturing/Printing Displays and Windows 103
Windows Shortcuts and Miscellaneous Tasks 104
Windows shortcuts (key combinations) 104
Windows taskbar auto-hide feature 105
Windows startup folder 107
5 Troubleshooting
Check the Basics 110
Problems with Microsoft Windows Operating System 112
Returning a test set for Service 113
Calling Agilent Technologies 113
Locations for Agilent Technologies 113
Read the Warranty 114
Service Options 114
Service Tag 114
Packaging the T e st Set 116
Index
Getting Started Guide 9
Page 9

10 Getting Started Guide
Page 10

Agilent X-Series Wireless Communications Test Set
Getting Started Guide
1
Quick-Start
This section explains how to initialize the test set and generate and view a signal.
The following topics can be found in this section:
“Initial Inspection" on page 12
“Test Set Location and Rack Mounting Requirements" on page 13
“Turning on the test set the first time" on page 14
“Anti-V irus Software and Firewalls" on page 23
“Shortening the Test Set Power-On Time" on page 23
“Instrument Information" on page 24
Agilent Technologies
11
Page 11

1 Quick-Start
Initial Inspection
Inspect the shipping container and the cushioning material for signs of stress. Retain the
shipping materials for future use, as you may wish to ship the test set to another location
or to Agilent Technologies for service.
Verifying the contents
Item Deliverable Description
Getting Started Guide Provides first-time power on instructions,
Agilent IO Libraries disk Software for establishing and configuring
licensing information, operating system
information, and general hardware
information.
PC to test set interfaces.
Optical mouse An optical USB mouse to simplify screen
navigation.
E6607B Safety and
Regulations Guide
Power cable Connection for test set power.
For use with E6607B Wireless
Communications Test Set.
12 Getting Started Guide
Page 12

Shipping problems?
If the shipping materials are damaged or the contents of the container are incomplete:
• Contact the nearest Agilent Technologies office.
• Keep the shipping materials for the carrier’s inspection.
• If you must return an test set to Agilent Technologies, use the original (or
comparable) shipping materials. See “Returning a test set for Service" on page 113.
Test Set Location and Rack Mounting Requirements
Locating the test set
Make sure that the fan inlet and exhaust vent areas on the sides of the test set are not
obstructed. The minimal required clearance is 2 inches. Airflow restrictions cause
additional airflow noise and cause the fans to speed up so they can draw in enough air for
the required cooling resulting in excessive audible noise.
Cooling and rack mounting
Quick-Start 1
Do not rack mount the test set side-by-side with any other instrument with side-by-side
ventilation. Make sure the exhaust air from the first instrument is directed away from the
inlet of the second unit. If the pre-heated air from the first instrument is directed into the
second instrument, it can cause excessive operating temperatures in the second unit and
can cause instrument failures. The test set draws air in from the left side and exhausts air
from the right side.
Getting Started Guide 13
Page 13

1 Quick-Start
Turning on the test set the first time
Initial power-on of the test set can be accomplished using either of the following
methods:
• “Initializing the test set using a USB mouse" on page 14
• “Initializing the test set using front-panel navigation" on page 19
During the initial power-on process, the test set turns off and restarts
several times. This only happens during the initial installation process.
Initializing the test set using a USB mouse
Steps Actions Notes
1 Connect the mouse
2 Power on the test set a Position the test set so you
• Connect the mouse to one
of the USB ports on the test
set.
have easy access to the
power cord and plug it in.
b Press the power switch
(located in the lower left
corner of the test set front
panel) to turn the test set
on.
• See “Test Set Location and Rack Mounting
Requirements and “Power requirements" on page 24
for more details.
• The test set can require more than 5 minutes to
power-on. This is affected by Windows start-up
requirements.
• The Agilent Technologies screen appears followed
by a screen that allows you to select the operating
system.
• At this time, it is safe to turn off the test set before
starting the Setup Wizard.
14 Getting Started Guide
Page 14

Steps Actions Notes
Quick-Start 1
3 Launch Microsoft Setup
Wizard
• Highlight Microsoft
Windows and press
to start the pre-installed
operating system.
a The analyzer performs the following steps:
Enter
• Windows S tartup window
• Black screen
• Windows blue please wait message window, “Please wait wh ile windows prepares
to setup”
• Blue Agilent window
• The following Welcome window appears giving you info rmation about the End-
User License Agreement.
• At this time, it is safe to turn off the instrument before initializing the software.
After launching the setup, do not turn off the instrument or remove power before the
Setup Wizard comple tes and the system restarts. Turning off the instrument may corrupt
the system and the application may not operate.
4 Reboot and logon a Click
Getting Started Guide 15
OK • When the instrument restarts, the following message
window appears:
Page 15

1 Quick-Start
Steps Actions Notes
• This window appears and covers the LaunchXSA window.
If you do not check the “Do not show this message again” check box, this message will
be displayed each time the analyzer is turned on. No application will start while this
message is displayed. Before continuing, make sure that you carefully read the AntiVirus message and determine what action is appropriate.
5 Disable the Anti-Virus
message
6 Verify the installation a On the test set, press
7 View a signal a Press
a Select the check box and
click
Continue.
System, Show, System.
b Verify that the purchased
application(s) appear in the
list.
Input/Output,
RF Calibrator, 50 MHz.
b Press
c Press
d Press
AMPTD Y Scale, Ref
Value
, 10, dBm.
FREQ, Center Freq,
50, MHz.
SPAN X Scale,
Span, 8, MHz.
• Messages similar to the following continue to
appears:
• The system reboots.
• Several required processes continue.
• The system reboots.
• The XSA application initializes
• If you require further assistance, contact the Agilent
support team.
Online assistance: http://www.agilent.com/find/assist
• To view a signal without attaching any RF cables to
the test set, route the internal 50 MHz calibration
signal to the test set input.
• Set the reference level to 10 dBm.
• Set the analyzer center frequency to 50 MHz.
• Set the analyzer span to 8 MHz.
16 Getting Started Guide
Page 16

Steps Actions Notes
The 50 MHz reference signal appears on the display.
Quick-Start 1
8 Generate and view signal a Connect the ends of a short
RF cable to the RF Input
and RF Output connectors
on the front panel.
b Press
c Press
d Press
e Press
f Press
g Press
h Press
i Press
Input/Output,
RF Input, RF Input Port,
RF In.
Input/Output, More,
RF Output Port,
RF Output.
Source, RF Output,
On.
Source, Amplitude,
RF Power, 0, dBm.
Freq, Center Freq, 1,
GHz.
AMPTD Y Scale,
Ref Value, 10, dBm.
FREQ, Center Freq,
1, GHz.
SPAN X Scale,
Span, 8, MHz.
• The purpose is to use a loopback cable to verify that
the test set’s source can generate a signal and the test
set’s analyzer can measure it.
• Because there are four RF ports on the front panel, it
is necessary to specify which ports are used for the
input and output.
• You need to choose frequency and power-level
settings for the source; you also need to specify that
the source output is on.
• You need to specify the center frequency, span, and
reference power level for the analyzer.
Getting Started Guide 17
Page 17

1 Quick-Start
Steps Actions Notes
The 1 GHz signal appears on the display.
18 Getting Started Guide
Page 18

Initializing the test set using front-panel navigation
The following keys are used in the initialization process:
Quick-Start 1
Steps Actions Notes
1 Power on the test set a Position the test set so you
have easy access to the
power cord and plug it in.
b Press the power switch
(located in the lower left
corner of the test set front
panel) to turn the test set
on.
• See “Test Set Location and Rack Mounting
Requirements and “Power requirements" on page 24
for more details.
• The test set can require more than 5 minutes to power-
on. This is affected by Windows start-up
requirements.
• The Agilent T echnologies sc reen appears followed by
a screen that allows you to select the operating
system.
• At this time, it is safe to turn off the test set before
starting the Setup Wizard.
After launching the Setup Wizard, do not turn off the test set or remove power before the
Setup Wizard completes and the system restarts. Turning off the test set may corrupt the
system and the application may not operate.
Getting Started Guide 19
Page 19

1 Quick-Start
Steps Actions Notes
2 Launch the Microsoft
Setup Wizard
a Highlight Microsoft
Windows and press
to start the pre-installed
operating system.
a The analyzer performs the following steps:
Enter
• Windows S tartup window
• Black screen
• Windows blue please wait message window, “Please wait while windows prepares
to setup”
• Blue Agilent window
• The following Welcome window appears giving you info rmation about the End-
User License Agreement.
• At this time, it is safe to turn off the instrument before initializing the software.
After launching the setup, do not turn off the instrument or remove power before the
Setup Wizard completes and the system restarts. Turning off the instrument may corrupt
the system and the application may not operate.
3 Reboot and logon a Click
20 Getting Started Guide
OK • When the instrument restarts, the following message
window appears:
Page 20

Steps Actions Notes
• This window appears and covers the LaunchXSA window.
If you do not check the “Do not show this message again” check box, this message will
be displayed each time the analyzer is turned on. No application will start while this
message is displayed. Before continuing, make sure that you carefully read the Anti-Virus
message and determine what action is appropriate.
Quick-Start 1
4 Disable the Anti-Virus
message
5 Verify the installation a Press
6 View a signal a Press
a Press Select to select the
check box and
continue.
System.
b Verify that the purchased
application(s) appear in the
list.
RF Calibrator, 50 MHz.
b Press
Value
c Press
50, MHz.
d Press
Span, 8, MHz.
Enter to
System, Show,
Input/Output,
AMPTD Y Scale, Ref
, 10, dBm.
FREQ, Center Freq,
SPAN X Scale,
• Messages similar to the following continue to
appears:
• The system reboots.
• Several required processes continue.
• The system reboots.
• The XSA application initializes
• If you require further assistance, contact the Agilent
support team.
Online assistance: http://www.agilent.com/find/assist
• To view a signal without attaching any RF cables to
the test set, route the internal 50 MHz calibration
signal to the test set input.
• Set the reference level to 10 dBm.
• Set the analyzer center frequency to 50 MHz.
• Set the analyzer span to 8 MHz.
Getting Started Guide 21
Page 21

1 Quick-Start
Steps Actions Notes
The 50 MHz reference signal appears on the display.
7 Generate and view signal a Connect the ends of a short
RF cable to the RF Input
and RF Output connectors
on the front panel.
b Press
c Press
d Press
e Press
f Press
g Press
h Press
i Press
Input/Output,
RF Input, RF Input Port,
RF In.
Input/Output, More,
RF Output Port,
RF Output.
Source, RF Output,
On.
Source, Amplitude,
RF Power, 0, dBm.
Freq, Center Freq, 1,
GHz.
AMPTD Y Scale,
Ref Value, 10, dBm.
FREQ, Center Freq,
1, GHz.
SPAN X Scale,
Span, 8, MHz.
• The purpose is to use a loopback cable to verify that
the test set’s source can generate a signal and the test
set’s analyzer can measure it.
• Because there are four RF ports on the front panel, it
is necessary to specify which ports are used for the
input and output.
• You need to choose frequency and power-level
settings for the source; you also need to specify that
the source output is on.
• You need to specify the center frequency, span, and
reference power level for the analyzer.
22 Getting Started Guide
Page 22

Steps Actions Notes
The 1 GHz signal appears on the display.
Quick-Start 1
Anti-Virus Software and Firewalls
No anti-virus software is shipped with the test set. It is recommended that you install
anti-virus software if your test set is connected to the LAN. Check with your IT
department to see what they recommend.
The test set is shipped with the Windows firewall enabled. Do not modify the default
network settings as this may cause problems with the operating system of the test set.
Shortening the Test Set Power-On Time
The test set desktop includes a shortcut to the ConfigureApplications.exe application that
lets you control your test set power-on configuration. You can set the configuration to
pre-load only the applications that you typically run. This can significantly shorten the
time it takes for your test set to power-on. You can also access this functionality by
pressing:
If (after power-on) you want to access an application that you did not pre-load, it will
take a little longer to bring it up once you press the application softkey . This longer timeframe is only for the first access after power-on. After the initial access, mode
(application) switching will operate as quickly as if the application was pre-loaded.
System, Power On, Configure Applications.
Getting Started Guide 23
Page 23

1 Quick-Start
Instrument Information
Power requirements
The only physical installation of your Agilent test set is a connection to a power source.
Line voltage does not need to be selected.
This test set does not contain customer serviceable fuses.
This is a Safety Class 1 Product (provided with a protective earthing
ground incorporated in the power cord). The mains plug shall only be
inserted in a socket outlet provided with a protective earth contact.
Any interruption of the protective conductor inside or outside of the
product is likely to make the product dangerous. Intentional
interruption is prohibited. (IEC 348 clauses 17.3.3c & 17.3.4)
Failure to ground the test set properly can result in personal injury.
Before turning on the test set, you must connect its protective earth
terminals to the protective conductor of the main power cable. Insert
the main power cable plug into a socket outlet that has a protective
earth contact only . DO NOT defeat the earth-grounding pr otection by
using an extension cable, power cable, or autotransformer without a
protective ground conductor.
This product is designed for use in Installation Category II and Pollution
Degree 2 per IEC 61010 Second Edition and IEC 664 respectively.
This instrument has autoranging line voltage input. Before switching on
the instrument, be sure the supply voltage is within the specified range.
The Mains wiring and connectors shall be compatible with the connector
used in the premise electrical system. Failure, to ensure adequate earth
grounding by not using the correct components may cause product
damage, and serious injury.
24 Getting Started Guide
Page 24

Quick-Start 1
AC power cord
The test set is equipped with a three-wire power cord, in accordance with international
safety standards. This cable grounds the test set cabinet when connected to an
appropriate power line outlet. The cable appropriate to the original shipping location is
included with the test set. See:
http://www.agilent.com/find/powercords
Always use the three-prong AC power cord supplied with this product.
Failure to ensure adequate earth grounding by not using this cord can
cause product damage.
This instrument has auto-ranging line voltage input; be sure the supply
voltage is within the specified range and voltage fluctuations do not to
exceed 10 percent of the nominal supply voltage:
100/120 VAC 50/60 Hz,
220/240 VAC 50/60 Hz,
270 W Max.
If this product is not used as specifi ed, the pr otect ion pr ovid ed by the
equipment could be impaired. This product mu st be used in a normal
condition (in which all means for protection are intact) only.
Install the instrument so that the detachable power cord is readily
identifiable and easily reached by the operator. The detachable power
cord is the instrument disconnecting device. It disconnects the mains
circuits from the mains supply before other parts of the instrument.
The front panel switch is only a standby switch and is not a LINE
switch. Alternatively, an externally installed switch or circuit breaker
(which is readily identifiable and is easily reached by the operator)
may be used as a disconnecting device.
Environmental Conditions (Operating)
This product is designed for use in the following conditions:
• For indoor use only
• Temperature 5°C to 50°C
• Altitude up to 3048 meters
• 0% Relative Humidity to 90% Relative Humidity up to 40°C, and li nearly decreasing
to 50% Relative Humidity up to 50°C; non-condensing..
This product is designed for use in Installation Category II and
Pollution Degree 2.
Getting Started Guide 25
Page 25

1 Quick-Start
Ventilation
Instrument Maintenance
VENTILATION REQUIREMENTS: When installing the product in a
cabinet, the convection into and out of the product must not be restricted.
The ambient temperature (outside the cabinet) must be less than the
maximum operating temperature of the product by 4
watts dissipated in the cabinet. If the total power dissipated in the
cabinet is greater than 800 watts, then forced convection must be used.
Cleaning the instrument
To prevent electrical shock, disconnect the test set from mains before
cleaning. Use a dry cloth or one slightly dampened with water to
clean the external case parts. Do not attempt to clean internally.
o
C for every 100
Cleaning the connectors
Cleaning connectors with alcohol shall only be done with the
instrument power cord removed, and in a well-ventilated area. Allow
all residual alcohol moisture to evaporate, and the fumers to
dissapate prior to energizing the instrument.
Battery Information
The test set uses a lithium battery located on the CPU board. This is not an operator
replaceable part. See “Returning a test set for Service" on page 113. Replaceable parts
must be approved or supplied by Agilent Technologies.
You can order the service documentation for the instrument through your Agilent Sales
and Service office.
Danger of explosion if battery is incorrectly replaced. Replace only
with the same or equivalent type recommended. Discard used
batteries according to the manufacturer’s instructions.
Do not throw batteries away but collect as small chemical waste.
26 Getting Started Guide
Page 26

Quick-Start 1
Getting Started Guide 27
Page 27

1 Quick-Start
Protecting against electrostatic discharge
Electrostatic discharge (ESD) can damage or destroy electronic components (the
possibility of unseen damage caused by ESD is present whenever components are
transported, stored, or used).
Test equipment and ESD
To help reduce ESD damage that can occur while using test equipment:
Do not use these first three techniques when working on circuitry with
a voltage potential greater than 500 volts.
• Before connecting any coaxial cable to a test set connector for the first time each day ,
momentarily short the center and outer conductors of the cable together.
• Personnel should be grounded with a 1 MΩ resistor-isolated wrist-strap before
touching the center pin of any connector and before removing any assembly from the
test set.
• Be sure that all instruments are properly earth-grounded to prevent build-up of st atic
charge.
• Perform work on all components or assemblies at a static-safe workstation.
• Keep static-generating materials at least one meter away from all components.
• Store or transport components in static-shielding containers.
• Always handle printed circuit board assemblies by the edges. This reduces the
possibility of ESD damage to components and prevent contamination of exposed
plating.
Additional information about ESD
• For more information about ESD and how to prevent ESD damage, contact the
Electrostatic Discharge Association (http://www.esda.org). The ESD standards
developed by this agency are sanctioned by the American National Standards
Institute (ANSI).
28 Getting Started Guide
Page 28

Agilent X-Series Wireless Communications Test Set
Getting Started Guide
2
Front and Rear Panel Features
This section describes the following features:
“Front-Panel Features (E6607A/B)" on page 30
“Display Annotations" on page 35
“Rear-Panel Features" on page 37
“Front and Rear Panel Symbols" on page 39
Agilent Technologies
29
Page 29

2 Front and Rear Panel Features
Front-Panel Features (E6607A/B)
Item
Description
#Name
1 Menu Keys Key labels appear to the left of the menu keys to identify the current function
of each key. The displayed functions are dependent on the currently selected
Mode and Measurement, and are directly related to the most recent key press.
2 Measurement Keys These keys select the Mode, and the Measurement within the mode. They also
control the initiation and rate of recurrence of measurements.
3 Setup Keys These keys set the parameters used for setting up the test set in the current
Mode.
4 Marker Keys Markers are often available for a measurement, to measure a very specific
point/segment of data within the range of the current measurement data.
5 Utility Keys These keys control system-wide functionality such as
• test set configuration information and I/O setup,
• printer setup and printing,
• file management, save and recall,
• test set presets.
6 Probe Power Supplies power for external high frequency probes and accessories.
7 Headphones Output Headphones can be used to hear any available audio output.
8 Back Space Key Press this key to delete the previous character when entering alphanumeric
information. It also works as the Back key in Help and Explorer windows.
9 USB Connectors Standard USB 2.0 ports, Type A. Connect to external peripherals such as a
mouse, keyboard, DVD drive or hard drive.
10 Delete Key Press this key to delete files, or to perform other deletion tasks.
30 Getting Started Guide
Page 30

Front and Rear Panel Features 2
Item
Description
#Name
11 Local/Cancel/(Esc) Key If you are in remote operation the Local key
• returns test set control from remote back to local (the front panel).
• turns the display on (if it was turned off for remote operation).
• can be used to clear errors. (Press the key once to return to local control,
and a second time to clear error message line.)
If you have not already pressed the units or Enter key, Cancel exits the
currently selected function without changing its value.
Esc works the same as it does on a pc keyboard. It
• exits Windows dialogs
• clears errors
• aborts printing
• cancels operations.
This key also exits the help system if it has been accessed.
12 Numeric Keypad Enters a specific numeric value for the current function. Entries appear on the
upper left of the display, in the measurement information area.
13 Enter and Arrow Keys The Enter key terminates data entry when either no unit of measure is needed,
or you want to use the default unit.
The arrow keys
• Increment and decrement the value of the current measurement selection.
• Navigate help topics.
• Navigate, or make selections, within Windows dialogs.
• Navigate within forms used for setting up measurements.
• Navigate within tables.
The arrow keys cannot be used to move a mouse
pointer around on the display.
14 Menu/ (Alt) Key Alt works the same as a pc keyboard. Use it to change control focus in
Windows pull-down menus.
15 Ctrl Key Ctrl works the same as a pc keyboard. Use it to navigate in W i ndows
applications, or to select multiple items in lists.
16 Select / Space Key Select is also the Space key and it has typical pc functionality. For example, in
Windows dialogs, it selects files, checks and unchecks check boxes, and picks
radio button choices. It opens a highlighted Help topic.
17 Tab Keys Use these keys to move between fields in Windows dialogs.
18 Knob Increments and decrements the value of the current active function.
19 Return Key Exits the current menu and returns to the previous menu. Has typical pc
functionality.
20 Full Screen Key Pressing this key turns off the softkeys to maximize the graticule display area.
Getting Started Guide 31
Page 31

2 Front and Rear Panel Features
Item
#Name
21 Help Key Initiates a context-sensitive help display for the current Mode. Once Help is
22 Speaker Control Keys Enables you to increase or decrease the speaker volume, or mute it.
23 Window Control Keys These keys select between single or multiple window displays. They zoom the
24 Power Standby/ On Turns the test set on. A green light indicates power on. A yellow light
Description
accessed, pressing a front panel key brings up the help topic for that key
function. Use the Local/Cancel/(Esc) key to exit help.
current window to fill the data display, or change the currently selected
window. They can be used to switch between the Help window navigation
pane and the topic pane.
indicates standby mode.
The front-panel switch is a standby switch, not a LINE
switch (disconnecting device). The test set continues to
draw power even when the line switch is in standby.
The main power cord can be used as the system
disconnecting device. It disconnects the mains circuits
from the mains supply
If the test set is being controlled remotely from another
computer, pressing this switch does not deactivate the
test set. See “When the Test Set is Controlled
Remotely" on page 34.
25 RF I/O 1 Connector RF Input/Output port #1
(communicates with both the source and the analyzer).
26 RF I/O 2 Connector RF Input/Output port #2
(communicates with both the source and the analyzer).
27 RF Output The test set RF output port (communicates only with the source).
28 RF Input The test set RF input port (communicates only with the analyzer).
32 Getting Started Guide
Page 32

Front and Rear Panel Features 2
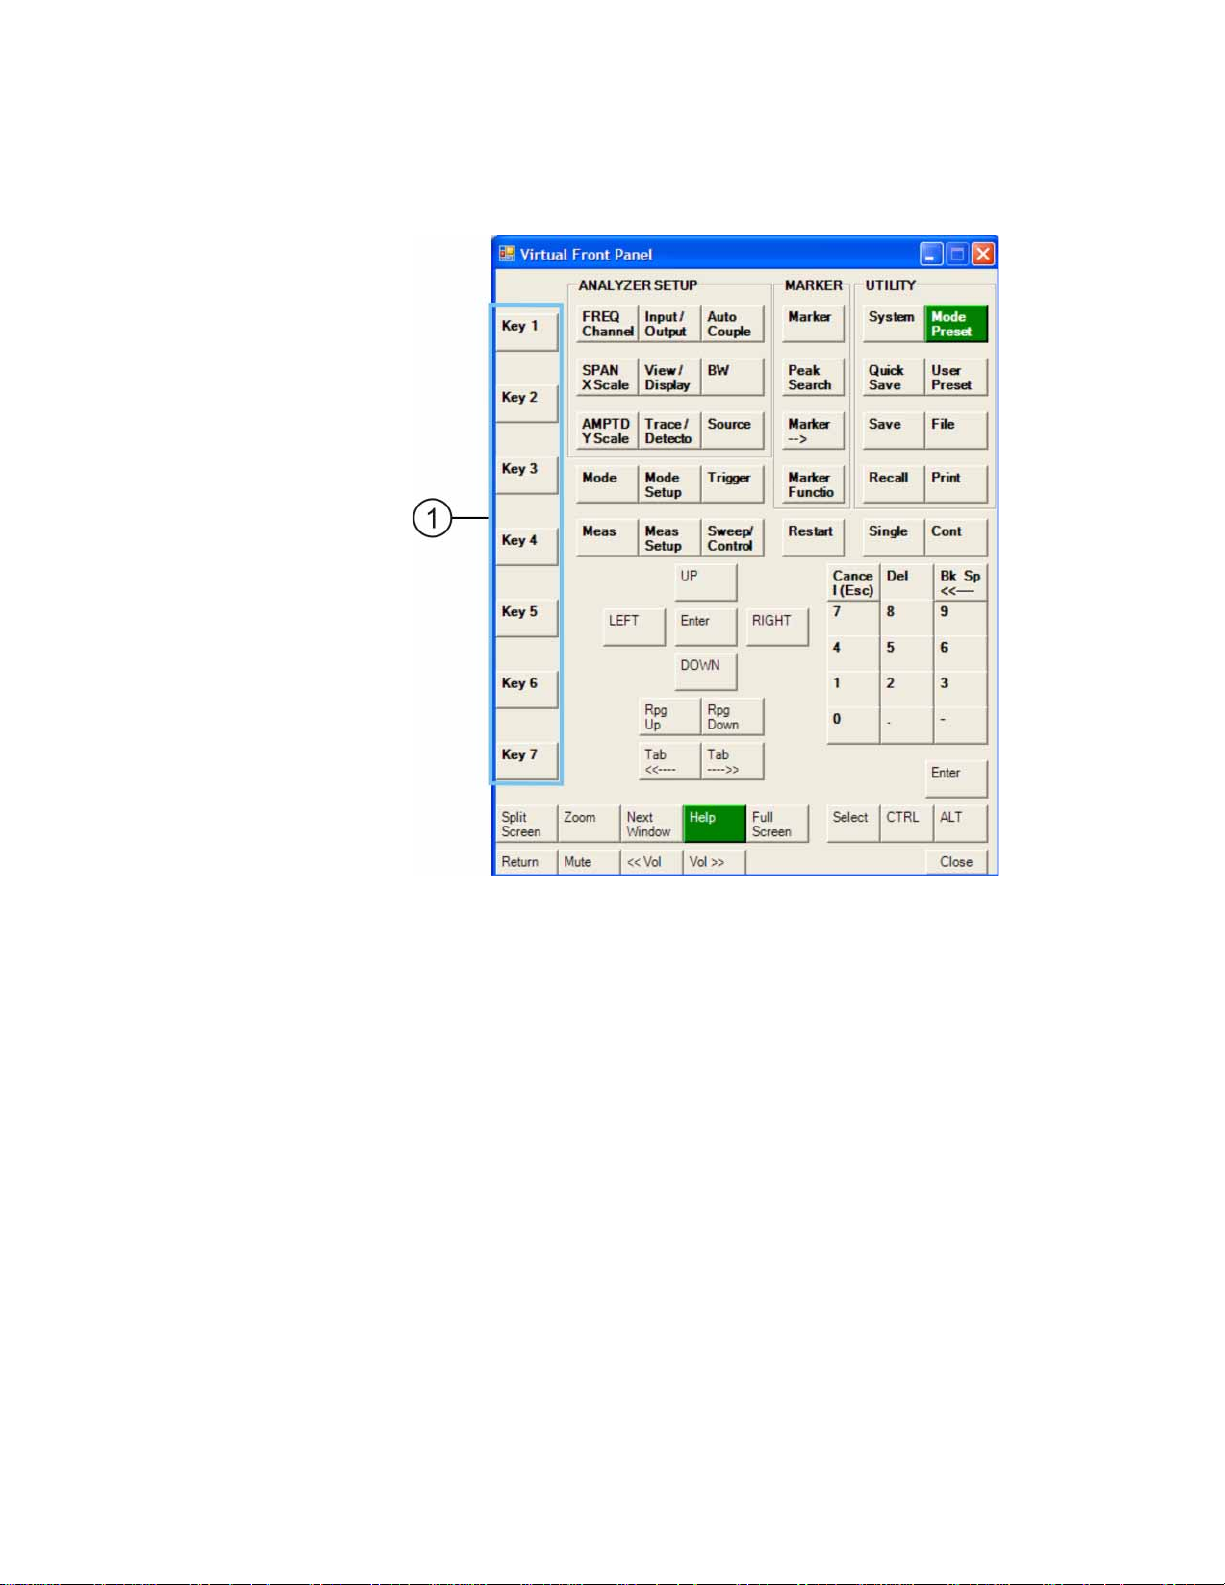
Virtual Front Panel
If you have a PC mouse, monitor, and keyboard plugged in (or through a Remote
Desktop), you can navigate the front panel functions using the virtual front panel (VFP)
shown below. Acc ess the VFP as follows:
1. Right-click the mouse.
2. Left-click Utility (1) in the menu, as shown below.
3. Left-click Virtual Front Panel (2) in the menu, as shown below.
NOTE The PC mouse and monitor are required when using the VFP. For ease in using the VFP,
the PC keyboard is recommended.
:
On the VFP the keys labeled "Key 1" through "Key 7" function as the menu keys. Using
the mouse to click on a combination of the VFP keys and the menu keys on the display
screen, you can operate the instrument as if it had conventional front-panel keys.
Getting Started Guide 33
Page 33
2 Front and Rear Panel Features
When the Test Set is Controlled Remotely
The test set can be controlled remotely, from another computer. When the test set is
being controlled remotely, a message similar to the following is displayed on the
monitor:
Computer Locked
This computer is in use and has been locked. Only A-E6607CNEN538\user or an administrator can unlock this computer. Press
Ctrl-Alt-Del to unlock this computer.
Under these circumstances, pressing the front-panel Power switch does not immediately
turn instrument power off. Instead, the following message appears:
Other people are logged on to this computer. Shutting down
windows might cause them to lose data. Do you want to continue
shutting down?
Pressing and holding down the Power button will force a power shutdown.
34 Getting Started Guide
Page 34

Display Annotations
This section describes the display annotation as it is on the Sequence Analyzer
measurement application display. Other measurement application modes have some
annotation differences.
Front and Rear Panel Features 2
Item Description Function Keys
1 Measurement bar - Shows general measurement
settings and information.
Indicates single/continuous
measurement.
Some measurements include limits that the data is
tested against. A Pass/Fail indication may be shown in
the lower left of the measurement bar.
2 Active Function (measurement bar) - when the current
active function has a settable numeric value, it is
shown here.
3 Banner - shows the name of the selected application
that is currently running.
Getting Started Guide 35
All the keys in the test set Setup part
of the front panel.
Currently selected front panel key.
Mode
Page 35

2 Front and Rear Panel Features
Item Description Function Keys
4 Measurement title - shows title information for the
current measurement, or a title that you created for the
measurement.
5 Settings panel - displays system information that is not
specific to any one application.
• Input/Output status - RLTS indicate Remote,
Meas
View/Display, Display, Title
Local and System, I/O Config
Input/Output, Amplitude, System
and others
Listen, Talk, SRQ
• Input impedance and coupling
• Selection of external frequency reference
• Setting of automatic internal alignment routine
6 Active marker frequency, amplitude or function value
Marker
7 Settings panel - time and date display. System, Control Panel
8 Trace and detector information Trace/Detector,
Clear Write (W) Trace A verage (A) Max
Hold (M) Min Hold (m)
Trace/Detector,
More,
Detector,
Average (A) Normal (N) Peak (P)
Sample (S) Negative Peak (p)
9 Key labels that change based on the most recent key
Softkeys
press.
10 Displays information, warning and error messages.
Message area - single events, Status area - conditions
11 Measurement settings for the data currently being
displayed in the graticule area. In the example above:
center frequency, resolution bandwidth, video
bandwidth, frequency span, sweep time and number of
sweep points.
Keys in the test set Setup part of the
front panel.
36 Getting Started Guide
Page 36

Rear-Panel Features
Front and Rear Panel Features 2
Item
# Name
1 EXT REF IN Inpu t for an external frequency reference signal: 1 to 50 MHz
2 GPIB A General Purpose Interface Bus (GPIB, IEEE 488.1) connection that can
be used for remote test set operation.
3 USB Connector USB 2.0 port, T ype B. USB TMC (test and measurement class) connects to
an external pc controller to control the test set and for data transfers over a
480 Mbps link.
4 USB Connectors Standard USB 2.0 por ts , Type A. Connect to external peripherals such as a
mouse, keyboard, printer, DVD drive, or hard drive.
5 MONITOR Allows connection of an external VGA monitor.
6 LAN A TCP/IP Interface that is used for remote test set operation.
7 Line power input The AC power connection. See the product specifications for more details.
8 Removable Hard
Drive
9 DIGITAL BUS Reserved for future use.
10 ANALOG OUT Reserved for future use.
Standard on E6607A.
Description
11 TRIGGER 2
OUT
Getting Started Guide 37
A trigger output used to synchronize other test equipment with the test set.
Configurable from the Input/Output keys.
Page 37

2 Front and Rear Panel Features
Item
# Name
12 TRIGGER 1
OUT
13 SYNC Reserved for future use.
14 TRIGGER 2 IN Allows external triggering of measurements.
15 TRIGGER 1 IN Allows external triggering of measurements.
16 NOISE
SOURCE
DRIVE +28 V
(PULSED)
17 SNS SERIES
NOISE
SOURCE
18 10 MHz OUT An output of the test set internal 10 MHz frequency reference signal. It is
A trigger output used to synchronize other test equipment with the test set.
Configurable from the Input/Output keys.
Not functional in the EXT Test Set.
Not functional in the EXT Test Set.
used to lock the frequency reference of other test equipment to the test set.
Description
38 Getting Started Guide
Page 38

Front and Rear Panel Symbols
This symbol is used to indicate power ON (green LED).
This symbol is used to indicate power STANDBY mode (yellow
LED).
This symbol indicates the input power required is AC.
The instruction documentation symbol. The product is marked with
this symbol when it is necessary for the user to refer to instructions in
the documentation.
The CE mark is a registered trademark of the European Community.
The RCM Mark is a Compliance Mark accord ing to the ACMA
Labelling Requirement.
This is a marking of a product in compliance with the Canadian
Interference-Causing Equipment Standard (ICES-001).
Front and Rear Panel Features 2
This is also a symbol of an Industrial Scientific and Medical Group 1
Class A product (CISPR 11, Clause 4).
The CSA mark is a registered trademark of the Canadian Standards
Association International.
This symbol indicates separate collection for electrical and electronic
equipment mandated under EU law as of August 13, 2005. All electric
and electronic equipment are required to be separated from normal
waste for disposal (Reference WEEE Directive 2002/96/EC).
Indicates the time period during which no hazardous or toxic
substance elements are expected to leak or deteriorate during normal
use. Forty years is the expected useful life of the product.
This symbol on all primary and secondary packaging indicates
compliance to China standard GB 18455-2001.
To return unwanted products, contact your local Agilent office, or see
http://www.agilent.com/environment/product/ for more information.
Getting Started Guide 39
Page 39

2 Front and Rear Panel Features
40 Getting Started Guide
Page 40

Agilent X-Series Wireless Communications Test Set
Getting Started Guide
3
Test Set Operating System
This chapter describes the Microsoft Windows configuration and the settings used with
the Agilent test set software. It includes information about changing some of the system
settings. And it describes the Windows operating system configuration and the software
installations that are present on the hard disk drive when the test set leaves the factory.
The front panel of the test set has been designed with the keys needed to navigate
windows for: accessing menus, traversing in dialogs, selecting items, and depressing
displayed buttons. It is possible to use the front panel for changing Windows
configuration items, but it is much easier to perform these tasks with a USB mouse and
external keyboard. For specifics on navigating using the front panel, see “Navigating
Windows Without a Mouse" on page 74.
“Agilent Software Installed" on page 42
“Customer Installation of Software" on page 43
“User Accounts" on page 44
“Agilent X-Series Licensing Options" on page 46
“Licensing New Measurement Application Software - After Initial Purchase" on
page 48
“Windows Configuration" on page 53
“Configuring Printers" on page 56
“Configuring LAN" on page 57
“Windows Security" on page 58
“System Maintenance" on page 62
“USB Connections" on page 63
“Hard Drive Partitioning and Use" on page 64
“Hard Drive Recovery Process" on page 67
Agilent Technologies
41
Page 41

3 Test Set Operating System
Agilent Software Installed
Agilent U9065A & U9060A software
The Agilent U9065A Sequence Analyzer Application and the Agilent U9060A IQ
Analyzer application are installed by default in the test set, with fixed perpetual licenses
(no purchase order required).
Additional measurement applications are available. Each application requires a license
to execute the software. All of these applications are installed by the factory at the time
of manufacture, even if the licenses have not been purchased. You may purchase
additional licenses at a later date.
42 Getting Started Guide
Page 42

Customer Installation of Software
3rd party software verified by Agilent
Agilent has verified that the following programs are compatible with the test set
applications:
• Symantec AntiVirus™ Corporate Edition version 10
• MathWorks MATLAB
Installation of other 3rd party software
The X-Series platform is an open Windows environment, so you can install nonapproved software on the test set. However, installation of non-approved software may
affect test set performance. Agilent does not warrant the performance of the test set with
non-approved software installed.
Test Set Operating System 3
Before installing any additional programs on the test set, you should exit
the test set application.
Also, you must not remove any applications or programs that are installed
on the test set when it is shipped from the factory.
If you install programs other than those that Agilent has tested, it could cause problems
with the test set's applications. If this happens, you should try uninstalling the program
that has caused the problem, or try changing the program's configuration. If this does not
correct the problem, you may have to use the Agilent Recovery system to reinstall the
test set's system software.
Getting Started Guide 43
Page 43

3 Test Set Operating System
User Accounts
Administrator login
The Administrator account ships from the factory with the password “agilent4u”. Using
the Administrator account you can perform the following operations:
• Install software
• Configure network and printer access
• Access all files on the test set
• Add or change user accounts and passwords
• Change Windows settings
• Run any application
User login
The default user account that ships from the factory is “Instrument” with the password
“measure4u”. This user is a member of the Power Users group. Using the Instrument
account you can perform the following operations:
• Install software
• Configure network and printer access
• Access files on the test set that are accessible to the Power Users group
• Run applications that are accessible to the Power Users group
AgilentOnly user account
The test set contains a user account called “AgilentOnly” that can be used by Agilent’s
customer support in the event that the Administrator password was changed and has
since been lost or forgotten. You must not remove or modify the AgilentOnly account.
Agilent service user accounts
User accounts are defined for Agilent’s use if it is necessary to service the test set.
44 Getting Started Guide
Page 44

Customer creation of accounts
You can create additional user accounts and decide on the level of security granted to any
new user accounts created. For example, the level of security can be assigned as
administrator, power user, user, backup operators. User names are not case sensitive but
passwords are case sensitive.
For the test set software to operate, the user account executing the software
must be assigned Administrator or Power User privileges. Otherwise, the
test set software will not operate correctly.
It is Agilent’s expectation that each user’s My Documents folder is mapped to the D:
drive. This is to avoid overwriting the user’s data in the event the Agilent Recovery must
be performed. Also, this facilitates convenient backup by copying the contents of the D:
drive to external media. All users accounts created by the factory already have My
Documents mapped to the D: drive. Please map all new users My Documents folders to
the D: drive.
Test Set Operating System 3
Getting Started Guide 45
Page 45

3 Test Set Operating System
Agilent X-Series Licensing Options
The Agilent X-Series test sets use three licensing types: Fixed Perpetual, Transportable
Perpetual, and Trial. These licensing types are available on all existing measurement
applications except the Sequence Analyzer Measurement Application (U9065A), which
requires a fixed perpetual license. Fixed Perpetual licenses are also required to enable
hardware options.
Fixed Perpetual
Fixed Perpetual licenses are the traditional license type (Fixed) with the same duration
(Perpetual) that have been available for all features since the X-Series introductions.
Fixed Perpetual licenses are identified by the “F” in the second character and “P” in the
third character of the option designator:
Example: U9080A-1FP
A license key is instrument model and serial number dependent. You can only install the
license key on the specific instrument for which it was created.
Transportable Perpetual
Transportable Perpetual licenses are an optional license type offering deployment
duration which is not fixed to a specific instrument model and serial number.
Transportable Perpetual licenses are identified in the product structure by a “T” in the
second character and “P” in the third character of the option designator:
Example: U9080A-1TP
Transportable Perpetual licenses require a connection to the Agilent server only for
managing the check-in/out of the license. The Agilent licensing server also provides for
storage of unused licenses which have been transported off instruments but are awaiting
assignment to new instruments. The server will limit the number of transports per 30 day
period per application license to 10.
Unlike Fixed Perpetual licenses which are pre-installed at the factory with new
instrument purchases, Transportable Perpetual licenses require redemption and
installation of the license before the first use. This allows the user to determine on which
instrument to initially install the application license.
Agilent recommends that instruments be at the same instrument software release to
ensure the latest code is available on each instrument so that the user experience is
identical between instruments. This is particularly important when transporting the
license for a newly-released application which may only be available in the latest latest
software release.
46 Getting Started Guide
Page 46

Time-Based Licenses
Time-based licenses are fixed licenses (that is, not transportable from one instrument to
another) that are limited in duration. Time-based licenses are identified by the “F” in the
second character and a numeral (indicating duration in months) in the third character of
the option designator:
Example: U9080A-1F3
A license key is instrument model and serial number dependent. You can only install the
license key on the specific instrument for which it was created.
Trial license s
Trial licenses are available so that you may try applications before you buy the full
applications. These licenses are time limited for a 14 day period, and are restricted to one
trial for an individual application per instrument. The restriction is enforced through the
license redemption process of the Agilent Software Licensing (ASL) system.
Trial licenses are only available for measurement applications and not available for
enabling hardware capability.
Test Set Operating System 3
Trial licenses are not installed in the factory and no entitlement certificates are created
for distribution with new instrument shipments. Trial licenses are not available for order,
but are available from the Agilent Web site after completing a brief registration:
http://www.agilent.com/find/xseries_trial
Trial Licenses are identified by the license designator “-TRL”.
Example: N9071A-TRL
If a product has multiple tiers (levels of functionality), the –TRL license enables all tiers
for the duration of the license. If you have a base tier and want a trial license for a higher
tier, you can install the –TRL license. When the duration expires the entitlement is
reverted back to the base tier.
Getting Started Guide 47
Page 47

3 Test Set Operating System
Licensing New Measurement Application Software - After Initial Purchase
Additional measurement application software can be ordered after your initial purchase
of the E6607B test set. Software upgrades are provided in a kit that includes an option
based Entitlement Certificate, a license agreement, and a USB storage device. The
licenses are downloaded from the license Web site onto the storage device so they can be
loaded into the instrument.
If you do not want to wait for your upgrade kit to arrive, licenses can be installed using
any available USB storage device. If you choose to do this, we recommend that the latest
version of the instrument software be installed. This ensures that the measurement
application being licensed and activated is installed and is the most current version.
The latest revision of the software may be downloaded from:
http://www.agilent.com/find/ext
A license key is usually for one instrument model and serial number combination. The
license key will only install itself on that instrument.
No calibration is required after a test set application installation.
Installation procedure over USB
Step Action Notes
1 Redeem the Option
Upgrade Entitlement
Certificate
2 Save the license file
3 Load the license file
• Follow the instructions on the Certificate After redeeming your Option Upgrade
Entitlement Certificate you will receive
an e-mail with an attached License File.
• Save the .lic file to the root directory of a
USB storage device
• Connect the USB storage device to one of
the test set USB ports.
Alternatively the license file can be manually installed over USB or LAN by placing the
license file in the following folder on the test set.
Windows will detect the new hardware
and may display the configuration menu.
The test set automatically loads the
license file. (This may take a few
minutes) Upon completion, the Agilent
License Manager displays a “Successful
License Installation” message.
C:\Program Files\Agilent\licensing
48 Getting Started Guide
Page 48

Step Action Notes
Test Set Operating System 3
4 Verify installation a Cycle the power on the signal test set.
b Press System, Show, System.
c Verify that the new application appears in
the list.
The application will not be available for
use until after the power has been cycled
This displays the list of installed
applications.
If you require further assistance, please
contact the Agilent support team.
Online assistance: http://
www.agilent.com/find/assist
If you do not have access to the Internet,
contact your local Agilent Technologies
Sales and Service Office, or if in the
United States, call 1-800-829-4444.
Getting Started Guide 49
Page 49

3 Test Set Operating System
Transporting a License Between X-Series Test Sets
Transportable licenses can be identified by the letters "TP" in their option desi gnator . For
example, U9063A-2TP indicates the license is transportable and perpetual. To transport
this license from one X-Series test set to another, Agilent recommends that both test sets
be at the same instrument software release. This ensures that the user experience is
identical between instruments.
As a minimum, the instrument software release in the test set that will receive the
transportable license (the "target instrument") must at least be able to support the desired
application.
The X-Series signal test sets support several ways of transporting licenses. The
procedure below will focus on the most common procedure, where neither of the test
sets has access to an internet connection. For this procedure to work, a PC with an
internet connection is required
You will need the following:
• USB flash drive
• USB keyboard
•USB mouse
We will refer to the test set from which the transportable license will be removed as the
"source instrument". We will refer to the test set which will receive the transportable
license as the "target instrument".
Procedure for Transporting a License, Neither Test Set Connected to the
Internet
Step Action Notes
1 Connect the USB devices
to the source instrument
2 Verify software version
in each test set
3 Obtain the Host ID from
the Target Instrument
• Connect the USB flash drive, USB
keyboard, and USB mouse to the USB
ports on the source instrument.
• On each test set, press System, Show,
System and make note of the Instrument
S/W Revision on each.
• On the target instrument, press System,
Show, System, and make note of the
Host ID.
It will be necessary to use one or more of
the rear panel ports to connect the USB
devices.
Ideally, the revisions will be the same.
But at least, both versions should be able
to support the application whose license
is being transported.
This information will be needed to issue
the license for the target instrument. The
Host ID is the model number, followed
by a comma, followed by the serial
number.
50 Getting Started Guide
Page 50

Step Action Notes
Test Set Operating System 3
4 Start the License
Manager on the Source
Instrument
5 Transport the
Transportable License
from Source Instrument
6 Get New License from
ASL Transportation Web
page
• On the source instrument, press System,
More, Licensing… It may take a minute
for the Agilent License Manager screen to
be fully populated with all the installed
licenses.
a On the source instrument, locate the
desired license to be transported and
highlight it. Its option designator should
include the letters "TP".
b .Right-click on the mouse and select
Delete.
c Click Yes in the License Deletion
Confirmation dialog box.
d After a few seconds, a Transport License
dialog box will appear. Click OK and
save the *.url files on the USB flash drive,
with a name such as
"PhaseNoise_License.url"
a Insert USB flash drive into PC that is
connected to the internet
b On the PC, locate the *.url file on the
USB flash drive that was saved in the
previous step and click on it.
c After a few seconds, the ASL
Transportation W eb page will appear . One
field, the New Host ID will be empty.
d Enter the Host ID of the target instrument
(step 3 above) into the field marked New
Host ID.
e Click Submit.
Be sure you are selecting a transportable
license and not a fixed perpetual license.
Although you are "deleting" the
transportable license, the ultimate action
will be to transport it.
The information in this dialog box will
be used to issue a new license for the
target instrument.
The PC must have an internet connection
and an available USB port.
Most of the fields have been populated
from the information in the *.url file.
Be very careful when entering the New
Host ID. A mistake made in entering the
New Host ID will result in an invalid
license being issued. Be sure there is a
comma between the model number and
serial number. There should be no spaces
in the Host ID.
7 Save License File to
USB Flash Drive
Getting Started Guide 51
a The ASL Transportation Web page will
indicate that a license file is available and
display two links to the license file. Rightclick on the license file and select Save
Target As…
b Save the license file to the root level of
the USB flash drive, keeping the ".lic" file
extension.
c Close the Save dialog and exit the ASL
Transportation Web page.
Either link can be used to either display
or save the license file.
The license file must be saved to the root
level of the USB flash drive for it to be
recognized by the target instrument.
Page 51

3 Test Set Operating System
Step Action Notes
8 Install License File in
Target Instrument
a With the target instrument running, insert
the USB flash drive into one of the front
panel USB ports. After a few minutes,
you should see a message saying
"Successful License Installation"
b Cycle power on the target instrument.
c O nce the test set has re-booted, the
application should be ready to use on the
target instrument.
The Agilent License Services running on
the target instrument looks for *.lic files
whenever it detects a USB device has
been inserted. If the contents of the *.lic
file are appropriate for the instrument,
the license will be installed
automatically.
Newly-installed licenses are only
recognized by the instrument software
on power-up.
52 Getting Started Guide
Page 52

Windows Configuration
The Windows settings have been optimized for the best measurement performance. Any
modifications to these settings may degrade test set performance and measurement
speed. In general, most Windows System settings (typically set through the Windows
Control Panel) should not be modified. Those that can be safely modified are listed
below.
Settings that can be changed
You may change the following Windows settings or administrative tasks (available from
the Windows Control Panel) to select your personal preferences.
Test Set Operating System 3
To recover from pro blem s caused by changin g Windows systems settings,
you may have to reinstall the Windows system and test set application using
the Agilent Recovery process.
You may use
this feature
Before changing any Windows System settings, exit the test set
application.
To do this ...
Configure Microsoft Automatic Updates.
Install and configure an Anti Virus program.
Setup new test set user accounts.
Do not delete or modify the “Agilent-Only” user
account.
Add the test set to a network.
Getting Started Guide 53
Page 53
3 Test Set Operating System
You may use
this feature
To do this ...
Install and configure a printer.
Set the time and date.
Modify System Properties, Advanced Tab settings of Performance,
for Best Performance
Settings that must not be changed
Avoid changing any settings in this section. Changes to the following settings may
degrade test set performance, screen displays, and measurement speed.
Adjust
. Leave all other settings unchanged.
Do NOT use this
feature
To do this...
Do not change Power Options. (Power Scheme, Power Button,
Hibernate)
Do not modify System Properties, Hardware Tab settings (Device
Manager, Drivers).
Do not modify System Properties, Advanced Tab settings (Performance
(except
Recovery , Environment Variables, Error Reporting)
Adjust for Best Performance), User Profiles, Startup and
Do not remove installed Fonts.
Do not change the following Display Settings:
• Screen Saver settings
• The screen resolution, 1024 x 768
• DPI setting from Normal size (96 DPI)
54 Getting Started Guide
Page 54

Test Set Operating System 3
Do NOT use this
feature
To do this...
Do not delete or modify the “AgilentOnly” user account.
In addition, DO NOT:
• Add, delete, or modify hard-disk drive partitions.
• Delete or modify Agilent registry entries.
• Change the contents of any directories containing the name “Agilent”
• Stop these services:
— The MSSQL$CDF service or uninstall the “Microsoft SQL Server Desktop
Engine”
— The IIS server or tamper with any virtual directories (or their contents) that came
configured with the test set.
• Uninstall these libraries, interfaces, or programs:
— The Agilent I/O Libraries
— The .NET Framework or any Hotfixes or Service Packs for the .NET Framework
— The “Microsoft Visual J# .NET Redistributable Package 1.1"
— Programs that begin with “Agilent”
— The Adobe Acrobat Reader
•Modify
— The Agilent I/O Library “GPIB27”, “GPIB28” interfaces shown as configured
Instrument I/O in the Agilent Connection Expert or I/O Config.
Getting Started Guide 55
Page 55

3 Test Set Operating System
Configuring Printers
Printers are configured using the Microsoft Windows Control Panel. It is easily accessed
from the Windows Start menu or from under the front panel
process is most easily done using a USB mouse and an external keyboard. If you do not
have a mouse it can be done using front-panel keys. See “Navigating Windows Without
a Mouse" on page 74.
When setting up a new printer, you may need to load the printer driver (unless you are
using a network printer that your IT department has set up to include the driver). The
manufacturer of the printer supplies the driver software and process. That may require
that you attach an external USB disk drive. An alternative is to connect the test set to the
LAN and download the driver from the printer manufacturer’s internet site.
System key. This setup
56 Getting Started Guide
Page 56

Configuring LAN
Hostname
The Computer Name, or hostname, is pre-configured from the factory. It must be a
unique name so that it does not conflict with other equipment on your LAN. The preconfigured Computer Name is A-E6607B-xxxxx, where xxxxx represents the last 5
digits of the test set serial number.
To change the Computer Name consult the Microsoft Windows Help and Support
Center.
IP Address & Gateway
The test set is pre-configured to obtain an IP Address using DHCP. The IP Address and
Gateway can be changed. Consult the Microsoft Windows Help and Support Center to
configure the LAN.
Test Set Operating System 3
Getting Started Guide 57
Page 57
3 Test Set Operating System
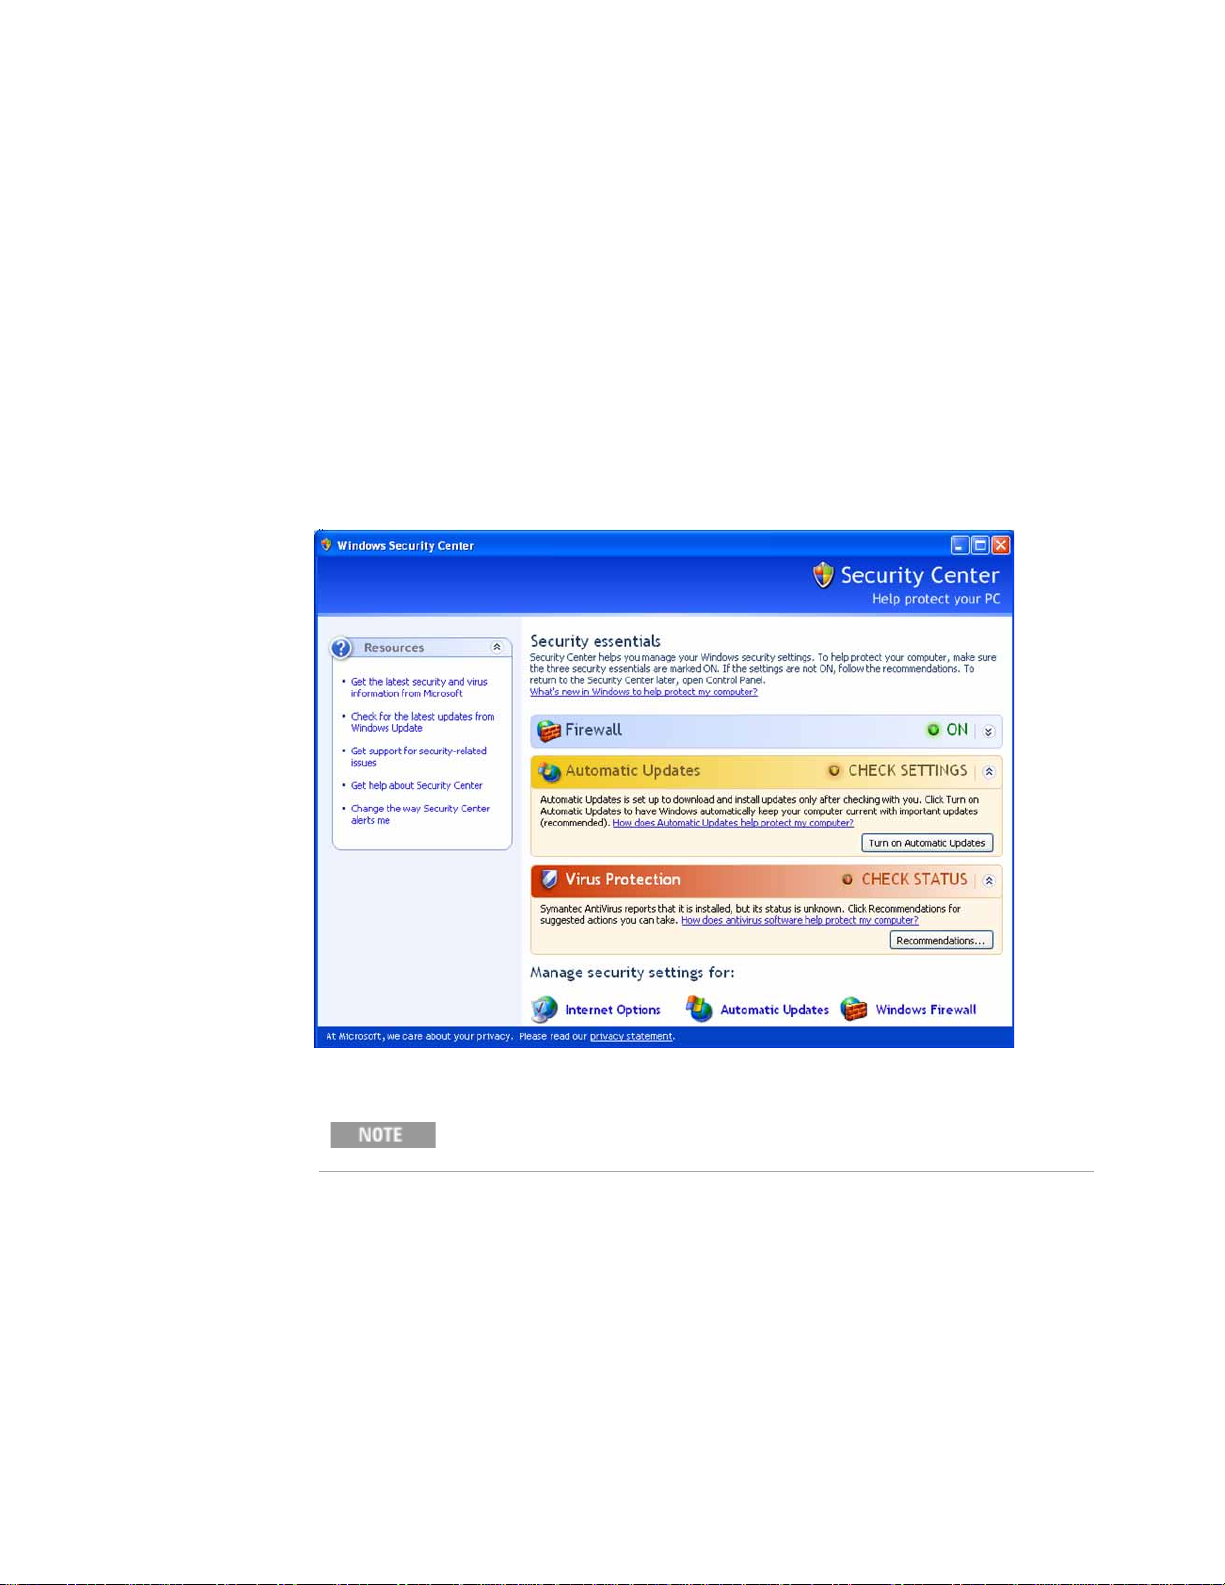
Windows Security
Microsoft recommends the following to ensure the test set Windows operating system is
protected:
• Use an internet firewall.
• Get the latest critical Windows updates.
• Use up-to-date antivirus software.
To check the status or make changes in the security settings for your test set, open the
Windows Security Center, click
Start, Control Panel, and then click Security Center.
The window may look slightly different on your test set.
58 Getting Started Guide
Page 58

Windows Firewall
The test set is shipped with the Windows Firewall enabled.
Test Set Operating System 3
Windows Firewall
operation of the test set over a network. Modifying these settings may cause the test set
to not operate properly.
Automatic updates
The default test set setting is to automatically check for critical Windows Updates and
notify you, if the test set has internet access.
You can change the configuration of the Microsoft Automatic Updates. You can choose
not to have automatic updates. Then you can manually update Windows by accessing
Internet Explorer and from the Tools menu select Windows Update.
The window may look slightly different on your test set.
Exceptions for programs and ports have been added to allow proper
Getting Started Guide 59
Page 59

3 Test Set Operating System
Virus protection
There is no antivirus software included with your test set. Antivirus application software
has been tested to be comp atible with the test set. See the section on “3rd party software
verified by Agilent" on page 43 for anti-virus software that has been tested by Agilent.
Be aware that downloading and installing Windows Updates can be
network and CPU usage intensive (impacting the test set performance), and
some Windows Updates automatically reboot the test set. It is
recommended that Windows Updates be performed when the test set is not
in normal use.
Having antivirus software installed may have a slight impact on the test set
performance.
60 Getting Started Guide
Page 60

Test Set Operating System 3
Spyware protection
There is no anti-spyware software installed on the test set. This should not be a problem
if you do not use the test set for a lot of internet browsing. Having spyware in the test set
could have an impact on the test set performance.
Getting Started Guide 61
Page 61

3 Test Set Operating System
System Maintenance
Backup
It is recommended that you have a regular backup strategy. Your IT department may
already have a backup strategy in place which is suitable for the test set and its data.
Using the Agilent Recovery system in conjunction with a regular backup strategy should
allow full recovery of the test set data.
The Windows operating system has a Backup utility that you can use to archive files and
folders in case of a hard disk drive failure. See the Microsoft Windows Help and Support
Center for more information on this utility. You can also use third party backup utilities.
However, you must ensure that this third party software is compatible with the test set's
system software. See “Customer Installation of Software" on page 43 for more
information.
When performing backups, we recommend that you backup the data to an external
storage device connected to the network or one of the test set's USB connectors. Also,
you should perform backups at times when the test set is not being used for normal
operations as it may impact the test set's overall performance.
System restore
Windows contains the capability to restore the system to a previous point in time.
System Restore is enabled with default settings as provided by Microsoft. However,
System Restore is not 100% successful. Therefore, it is not the recommended method to
backup the test set. System Restore has not been tested to verify successful restoring.
Disk defragmenting
Over time the hard disk on the test set becomes fragmented. Windows has a Disk
Defragmenter utility that you can use to defragment the hard disk. See the Microsoft
Windows Help and Support Center for more information on this utility.
Running Disk Defragmenter should be performed when the measurement
application is not running. Measurement throughput is significantly
impacted while disk defragmentation is in process.
62 Getting Started Guide
Page 62

USB Connections
All of the USB ports are compatible with the USB 2.0 and 1.1 specification. The two
USB ports on the front panel (see graphic below) and four of the USB ports on the rear
panel are USB Series “A” ports. These are ports to which you can connect USB mass
storage devices and printers. The test set USB Host support includes the standard
Microsoft Windows USB class drivers for human interface, mass storage, printing,
scanning, and imaging devices. A complete up-to-date list of the Windows USB class
driver support is available on the Microsoft website.
http://www.microsoft.com/whdc/system/bus/usb/USBFAQ_intro.mspx
Test Set Operating System 3
The square USB port (see graphic below) on the rear panel is a USB Series “B” port and
is used for controlling the test set over USB. The test set USB device driver included in
the test set software supports the test and measurement industry standard USBTMCUSB488 device class.
In addition, the Agilent IO Libraries CD that was included with your test set contains
USB Host drivers that allow control of other test sets connected to the USB bus.
Agilent Technologies does not support or warrant correct test set operation if additional
USB drivers from third parties are installed in the test set. It is possible that additional
drivers could break the normal USB operation. If USB operation is broken, recovery
would require reinstalling the test set application using the hard drive recovery process.
Getting Started Guide 63
Page 63

3 Test Set Operating System
Hard Drive Partitioning and Use
The drive is partitioned into 3 sections: C:, D: and E:
•The C: partition contains the Windows operating system and software installed by
Agilent. This is an Open System which means you can install additional software,
and these should be installed on the C: drive. However, only a limited set of software
applications are tested for use with the Agilent measurement software. The
installation and/or use of other software is not warranted, and could interfere with the
operation of the measurement software. If test set repair is ever needed, the Agilent
version of the C: drive is the only part of the test set software that is restored by the
Agilent Recovery process. You must reload any other software that you have added
in the test set.
•The D: partition is reserved for data storage. The User Accounts that are configured
by Agilent have their My Documents folder mapped to the D: drive. This is for the
convenience of backing-up the measurement data. You should always back-up the
data on the D: drive to an external device. This allows you to restore the data if you
ever need to replace the hard drive.
•The E: partition is reserved for Agilent’s use. The primary use of the E: drive is for
housing the Calibration and Alignment data. Do not change or overwrite the files on
this drive. This could cause your test set to not meet specifications, or even to stop
functioning correctly. Do not use this drive for data storage. It is also recommended
that you back up the contents of this drive by using the factory calibration data
backup utility.
64 Getting Started Guide
Page 64

Backing-up the factory calibration data
To back-up the factory calibration data you will need a USB mouse and storage device
and follow the step in “Process 1" or “Process 2" below.
Process 1
Step Notes
1 Insert the mouse in one of the
instrument USB ports
2 Insert the USB memory device in one
of the instrument USB ports.
Test Set Operating System 3
3 Press System, Alignments,
Backup or Restore Align Data...
4 Follow the on screen instructions to
backup the calibration data to the USB
drive and save the file.
Process 2
The Alignment Data Wizard will appear:
Step Notes
1 Insert the mouse in one of the test set USB
ports
2 Insert the USB memory device in one of
the test set USB ports.
Getting Started Guide 65
Page 65
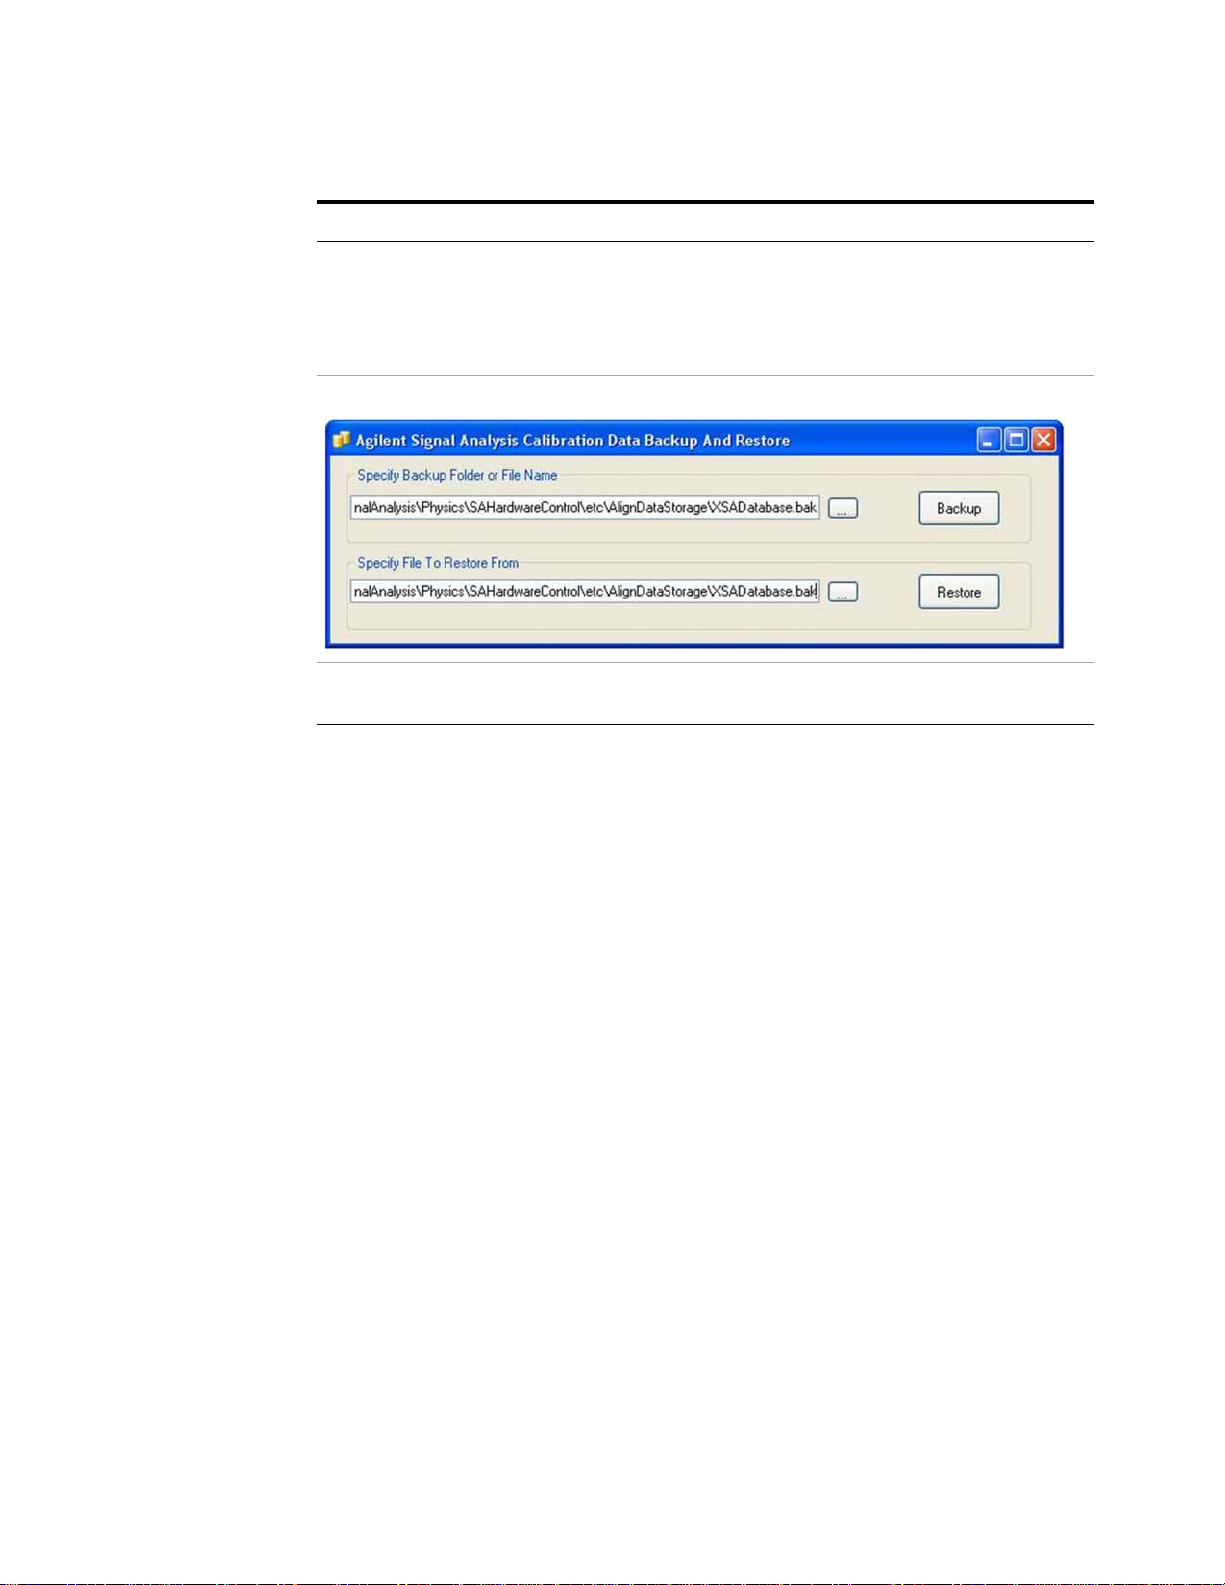
3 Test Set Operating System
Step Notes
3 Navigate to the following directory using
Windows Explorer
C:\Program
Files\Agilent\SignalAnalysis\Physics
4 Double-Click BackupAndRestore.exe
5 Set the Backup File to the USB drive and
save the file.
The following dialog box appears.
66 Getting Started Guide
Page 66

Hard Drive Recovery Process
The Agilent Recovery System can be used to repair errors on the test set's C: drive
partition, or to restore the original factory configuration of the system software. The
Agilent Recovery System is stored in a separate hidden hard disk drive partition.
Repairing errors on the hard disk drive may result in loss of data or files. If you need
more information about the Windows “chkdsk” error repair process, see the chkdsk
documentation in the Microsoft Windows Help and Support Center.
Restoring the original factory system software does not restore any of the following
items:
• Windows system configurations that were made after the test set was shipped from
the factory. For example, Windows and Service Pack updates, user accounts, and
windows configuration settings. After an Agilent Recovery, these configurations
need to be redone.
• Additional software that was installed after the test set was shipped from the factory.
After an Agilent Recovery, that software needs to be re-installed.
Test Set Operating System 3
• Any data or programs saved on the D: or E: drives.
• Any upgrades that were made to the Agilent measurement application software.
Restoring the original factory system software will not synchronize the code in the Field
Programmable Gate Arrays (FPGAs) on the various hardware assemblies. As a result,
you may see an error dialog box appear during the final boot-up at the end of the
recovery process. This typically occurs when there are significant differences between
the software version installed prior to performing the recovery and the version restored
by the recovery. In these situations, upgrade the software to the latest version.
It is recommended that you use a regular back up strategy. Your IT
department may already have a back up strategy in place which is suitable
for the test set and its data. See “System Maintenance"
the Agilent Recovery System in conjunction with a regular back up
strategy should allow you to fully recover the test set software and data.
on page 62. Using
It is recommended that routine backups of the test set information be performed to keep
current archives of the test set information. This allows a full recovery of the test set
information after the test set recovery system operations are performed. See
“Backup" on page 62 for more details.
Getting Started Guide 67
Page 67

3 Test Set Operating System
Using the test set recovery system
Step Notes
1 Make sure the test set is turned off.
2 Turn on the test set.
• Press the down arrow key to move the
highlight to Agilent Recovery System,
then press Enter.
3 When the Agilent Recovery System has
booted, follow the on-screen instructions
to recover the image of the C: drive.
• Press 2, then press Enter to select the
recovery.
• Press 1, then press Enter to continue.
• Press 1, then Enter to confirm.
After the Agilent Technologies screen is
displayed,
this screen is displayed for five seconds.
It may take up to 25 minutes for this process to
complete
After exiting the Agilent Recovery System, the test set reboots. If the original factory test set
system has been restored, the test set re-executes the following process:“Turning on the test set
the first time" on page 14
Additional recovery steps may be required to fully recover the system
to a more current working state. This could involve restoring your own
backups of the test set configuration, including re-installing
applications, data, and performing system customizations.
68 Getting Started Guide
Page 68

Updating the software
The following steps load a copy of the instrument software that forces the program code
resident in the instrument’s various pro gramm able gate arrays to be in sync with the
restored system software.
Removing the Software
Step Notes
1 Connect a USB keyboard and mouse to the
instrument
2 Log out of the default user (instrument):
• Select Start, Log Off, Log Off
3 At the log in prompt enter:
• User Name: administrator
• Password: agilent4u
4 Uninstall the test set application:
• Select Start, Control Panel, Add or
Remove Programs
• Find the Agilent X-Series Signal
Analyzer Application and select
Remove.
Test Set Operating System 3
• When prompted to completely remove
the selected application and all of its
features, select Yes. Select OK to any
pop-up windows that appear.
• When the software uninstall is complete,
select Finish.
5 Wait for the test set to restart.
Getting Started Guide 69
Page 69

3 Test Set Operating System
Installing the Software
Step Notes
1 Log out of the default user (instrument):
• Select Start, Log Off, Log Off
2 At the log in prompt enter:
• User Name: administrator
• Password: agilent4u
3 Navigate to C Drive:
• Click Start, My Computer, C: Drive
and open the Temp folder.
4 Locate the software installer program:
“XSA_Installer_A.XX.XX.exe”.
5 Double-click on the installer.exe.
6 A window appears showing the extraction
process.
7 Follow the on-screen prompts to continue
the installation.
When you see the message Programming FPGAs...Do NOT turn off
power to the instrument, be sure to do as it says and DO NOT turn
off the instrument power at this time for ANY reason. If this process is
interrupted the instrument most likely will need to be sent back to an Agilent Service
Center for servicing before it will be usable again.
It may take a minute or two for the installer to
start.
Following the extraction screen, there may be
a short period where there is no activity on the
screen. The desk top may be displayed for a
short period.
70 Getting Started Guide
Page 70

Installing the Software
Step Notes
Test Set Operating System 3
The installation process can take up to 45 minutes. Do not turn the instrument
power off or serious damage may occur. If any pop up windows appear, click
OK or Ignore to proceed.
8 When the installation has finished, select
Yes, I want to restart my computer
now, Finish.
9 After the instrument restarts, the newly
installed version of the X-Series instrument
software will run.
It is possible a newer version of the instrument software is available on the web at http://
www.agilent.com/find/ext.
Additional recovery steps may be required to fully recover the system to a
more current working state. This could involve restoring your own backups of
the instrument configuration, including re-installing applications, data, and
performing system customizations.
Configuring recovery prompt timing
You can configure the time at which the test set power -up process waits for the selection
of the recovery process by performing the following steps:
Getting Started Guide 71
Page 71

3 Test Set Operating System
Step Notes
1 Right-click My Computer, and click
Properties.
2 Click the Advanced tab.
3 In the Startup and Recovery section,
click Settings.
4 Under the System Startup section:
• you can either clear the Time to
display a list of operating
systems check box,
or,
• select the Time to display
recovery option
when needed check box and
change the seconds to
delay for it
You must be logged in as an administrator to change these settings. See “User
Accounts"
on page 44 for more information.
This accesses the System Properties tabbed
page.
72 Getting Started Guide
Page 72

Agilent X-Series Wireless Communications Test Set
Getting Started Guide
4
Using Microsoft Wi ndows Operating
System
The capabilities described in this section are Microsoft Windows features.
The following information provides some guidelines for using the
capabilities with the test set. You need to refer to the Windows help
documentation for more information. Your version of W indows may not
match these instructions exactly.
You need an external keyboard and mouse to fully use these features.
• “Navigating Windows Without a Mouse" on page 74
• “Remote Desktop: Using the X-Series test set remotely" on page 78
• “Embedded Web Server: Using the X-Series Test Set Remotely" on page 92
• “Capturing/Printing Displays and Windows" on page 103
• “Windows Shortcuts and Miscellaneous Tasks" on page 1 04
Agilent Technologies
73
Page 73

4 Using Microsoft Windows Operating System
Navigating Windows Without a Mouse
Key Presses Actions
Esc Exits/closes a Windows dialog box (does not exit an Application
window)
Enter Does the current "default action". If a menu item or a button is currently
highlighted, then the Enter key activates that menu item or button.
Alt Moves focus/control to the pull down menus bar in the active Window
Right Arrow In pull-down menu: opens the next menu to the right, or opens a
submenu
In a dialog box: selects an option button
Left Arrow In pull-down menu: opens the next menu to the left, or opens a submenu
In dialog box: selects an option button
Up Arrow In pull-down menu: Moves to next selection up in the menu
In dialog box: selects an option button
Down Arrow In pull-down menu: Moves to next selection down in the menu
In dialog box: selects an option button
Tab In dialog box: moves to the next/previous field
Del Deletes the currently selected item
Alt + Tab Switches between the next/previous Application
Alt + Enter Shows the Properties of the currently selected item
Alt + Esc Cycles through items in the order that they had been opened
Backspace In My Computer or Windows Explorer: move up one level
In Internet Explorer: works like the BACK arrow ke y
Ctrl + Left arrow Moves to the left one word at a time
Ctrl + Right arrow Moves to the right one word at a time
Ctrl + Tab In dialog box: moves to the next/previous Tab location
Alt + Space Opens the window control menu for the currently active window,
allowing you to minimize, maximize, move and restore (size) the
window
Ctrl + Esc Opens the Windows Start Menu
Ctrl + Alt + Delete Opens the Windows Task Manager
74 Getting Started Guide
Page 74

Using Microsoft Windows Operating System 4
Using the interactive Help system without a mouse
To open the Help window for any menu Choose the desired menu, then press the front panel
green Help key .
To toggl e focus between the Navigation and topic
Press the
Next Window key
panes:
In the navigation pane In the topic pane
T o scroll up or down the topic list:
Press the
Up or Down Arrow key.
T o expand or collapse the tree for the
selected topic:
Press the
Right or Left Arrow key.
To display the selected topic:
Press the
Enter key.
To scroll horizontally
or vertically:
Press
Ctrl+Left, Right, Up, or
Down Arrow keys.
To switch tabs:
Press
Ctrl+Tab keys.
To scroll up or down:
Press the Up or Down Arrow key .
To go to the next
or previous page:
Use the Tab keys to
select the
Left pointer button
Right or
(in the Topic Pane)
Press
Enter.
To go back or forward:
Press the
Alt+Left or Right
Arrow key.
To close the Help window:
Press the Cancel (Esc) key.
Getting Started Guide 75
Page 75

4 Using Microsoft Windows Operating System
Navigation
Pane
Document
Pane
Navigation
Pane
Navigating Acrobat (PDF) without a mouse
When you open an Acrobat (PDF) document, it is displayed in the Adobe Reader Window , which appears
as shown below.
In the navigation pane In the document pane
To go to next or previous
Bookmark:
Press the
Up or Down Arrow key.
To expand or collapse the selected
Bookmark:
Press the
Right or Left Arrow key.
T o display the content of the selected
Bookmark:
Press the
Enter key.
To scroll up or do wn:
Press the
Down Arrow key.
Up or
To zoom in or ou t:
Press the
Alt+Left or Right
Arrow key.
To Zo om to:
a) Fit page in window: Press
b) Page actual size Press
To switch tabs:
Press Ctrl+Tab keys.
c) Fit page to width Press
c) Fit visible object Press
Ctrl + 0 keys
Ctrl + 1 keys
Ctrl + 2 keys
Ctrl + 3 keys
76 Getting Started Guide
Page 76

Using Microsoft Windows Operating System 4
In the navigation pane In the document pane
To select Thumbnails,
and Display pages
(from Pages T ab):
Press the Left/Right/Up/Down
keys to navigate, then press
To go to a specific page:
Press the
the
page number using the Numeric
keypad, and press
Enter to display a selected Page.
To print all or part of a document:
Press the Print key to open the Adobe Reader Print Dialog,
then use the Tab keys to set options, and select OK to print.
To Exit Adobe Reader:
Press
Alt + Select keys to open the File menu.
Use the
Down Arrow key to select Exit, then press Enter.
Next Window key to open
Go to Page dialog, then enter the
Enter.
Getting Started Guide 77
Page 77

4 Using Microsoft Windows Operating System
Remote Desktop: Using the X-Series test set remotely
Windows Remote Desktop is recommended for remote control of the test set. It offers
fully-interactive control, that is almost identical to direct face-to-face control of the test
set. You can also remotely control the test set using the Embedded Web Server interface.
The Embedded Web Server functionality provides a communications method that does
not require login to the test set. However, due to its slower response time, it is only
recommended for setup and data exchanges that do not involve test set control.
The Remote Desktop functionality is a Microsoft Windows capability. The
following discussion provides some guidelines for using this capabil ity
with the test set. Y ou need to refer to the W indows help documentation for
more information. As Windows evolves, these instructions may no longer
be exact.
You need an external keyboard and mouse to fully use this functionality.
Overview of Remote Desktop operation
Using the Remote Desktop functionality of the test set allows you to control and interact
with the test set from a remote computer, as though you were sitting in front of the test
set.
When you have configured the test set for remote connectivity, and configured a separate
computer to act as a Remote Desktop Host, you can send commands to the test set from
the remote computer, and you can see the test set display on the screen of the remote
computer.
This section provides full details of how to set up the test set for remote connectivity , and
also how to set up a computer running any 32-bit version of Microsoft Windows as a
Remote Desktop Host.
Setting up Remote Desktop operation
Setting up the test set
Before the test set can be controlled through a Remote Desktop Connection, it must be
set up to allow connection from a remote computer.
78 Getting Started Guide
Page 78

Using Microsoft Windows Operating System 4
Basic setup for remote desktop operation
Setting up a remote desktop connection
Step Notes
1 To perform this operation successfully,
you must have Administrator level access
to the test set.
2 On the test set, open the Windows
Control Panel.
• From the test set application, press
System, Control Panel,
or,
• From the Windows Desktop, click
Start, Control Panel.
3 Select System.
• From the Control Panel Category View,
click Performance and Maintenance,
then click System.
or,
• From the Control Panel Classic View,
double-click System.
4 Click the
Remote tab. A Warning Message appears, informing you
that it may be necessary to configure your
internet connection sharing or personal firewall
to permit Remote Desktop connections. The
details of such configuration are beyond the
scope of this document.
5 Click the Allow users to connect
remotely to this computer checkbox.
6 To add users, click Select Remote Users,
Add.
• Follow the on screen instructions.
Getting Started Guide 79
Page 79

4 Using Microsoft Windows Operating System
Setting up the remote computer
The procedure depends on whether the Remote Computer to be set up is running
Windows XP, Windows 7, or another version of Microsoft Windows.
Remote computer running Windows XP or Windows 7 Windows XP and
Windows 7 include the Remote Desktop Connectivity Client software, so no additional
setup is required.
Remote computer running another version of Windows You can use any 32-bit
version of Windows (Windows 95, 98, ME, NT4, or 2000) to install and run the Client
software for Remote Desktop Connectivity. However, you need to have available a
Windows XP or Windows 7 installation CD-ROM, because that contains the Client
software.
The following instructions relate to software provided by Microsoft
Corporation. Agilent offers no warranty regarding the operation of such
software. The procedure described here may be changed by Microsoft at
some future time.
Installing the Client software
Step Notes
1 When the Welcome Screen appears, click
Perform additional tasks
2 From the What do you want to do?
screen, click
Connection
3 Click
4 To access the installed software, click
Start > All Programs > Accessories >
Communications > Remote Desktop
Connection
Set up Remote Desktop
.
Next. Follow the on screen instructions provided by
.
The Remote Desktop Connection InstallShield
Wizard appears.
the Wizard.
How to locate the computer name of the test set
T o connect a remote computer to the test set, you need to know its Computer Name. The
Computer Name can be displayed as follows:
80 Getting Started Guide
Page 80

Using Microsoft Windows Operating System 4
Locating the name from the Agilent application
Step Notes
• On the test set front panel, press System,
Show, System.
A page listing various parameters appears.The
test set’s computer name is shown in the list
next to the title Computer Name.
Locating the name from the Windows desktop (with a mouse):
Step Notes
1 Click
Start, Control Panel. If the Control Panel window appears in
Category View, click
Maintenance
, then System, to display the
Performance and
System Properties dialog. If the Control Panel
appears in Classic View, double-click
to display the System Properties dialog.
2 Click the
Computer Name tab of the
System Properties dialog.
3 To close the System Pr operties dialog, click
Cancel.
Locating the name from the Windows desktop (without a mouse):
Step Notes
System
1 Press
2 Use the
3 Press
Ctrl+Esc to display the Windows
Start menu.
Up Arrow or Down Arrow keys to
select the
Control Panel item.
Enter to open the Control Panel
dialog.
4 In Category View, press
Performance and Maintenance, then press
the
Tab again to select System,
Tab to select
or,
in Classic View, press the
Arrow keys to select System, then press
Enter.
5 Press
Ctrl+Tab until the Computer Name
Tab and the
tab is selected.
6 Press Tab to select the
Cancel button, then
press Enter.
The System Properties dialog is displayed.
The Computer Name is displayed under Full
computer name.
Getting Started Guide 81
Page 81

4 Using Microsoft Windows Operating System
Locating the name from the Windows desktop (without a mouse):
Step Notes
7 To close the Control Panel dialog:
• Press Alt+Select to open the drop-down
File menu
• Press the Down Arrow until the Close
menu item is selected
• Press Enter to close the Control Panel
dialog.
Running a Remote Desktop session
Initializing a Remote Desktop session
To init ialize a Remote Desktop Session, you need to know the Computer
Name of the test set. This information can be shown on the test set display
by following the procedure in the section “How to locate the computer
name of the test set" on page 80.
After setting up both the test set and the remote computer for Remote Desktop
Connectivity, as described in “Setting up Remote Desktop operation" on page 78, you
are ready to start a Remote Desktop session.
Starting a session
Step Notes
1 Click
2 Enter the computer name of the test set.
3 Click
4 Enter the login account name and
Start > All Programs > Accessories
>
Communications > Remote Desktop
Connection.
Connect. A login dialog box appears.
password.
A Remote Desktop Connection dialog
appears:
The default account name is Instrument and
the default password is measure4u, but these
parameters may be changed by instrument
users.
82 Getting Started Guide
Page 82
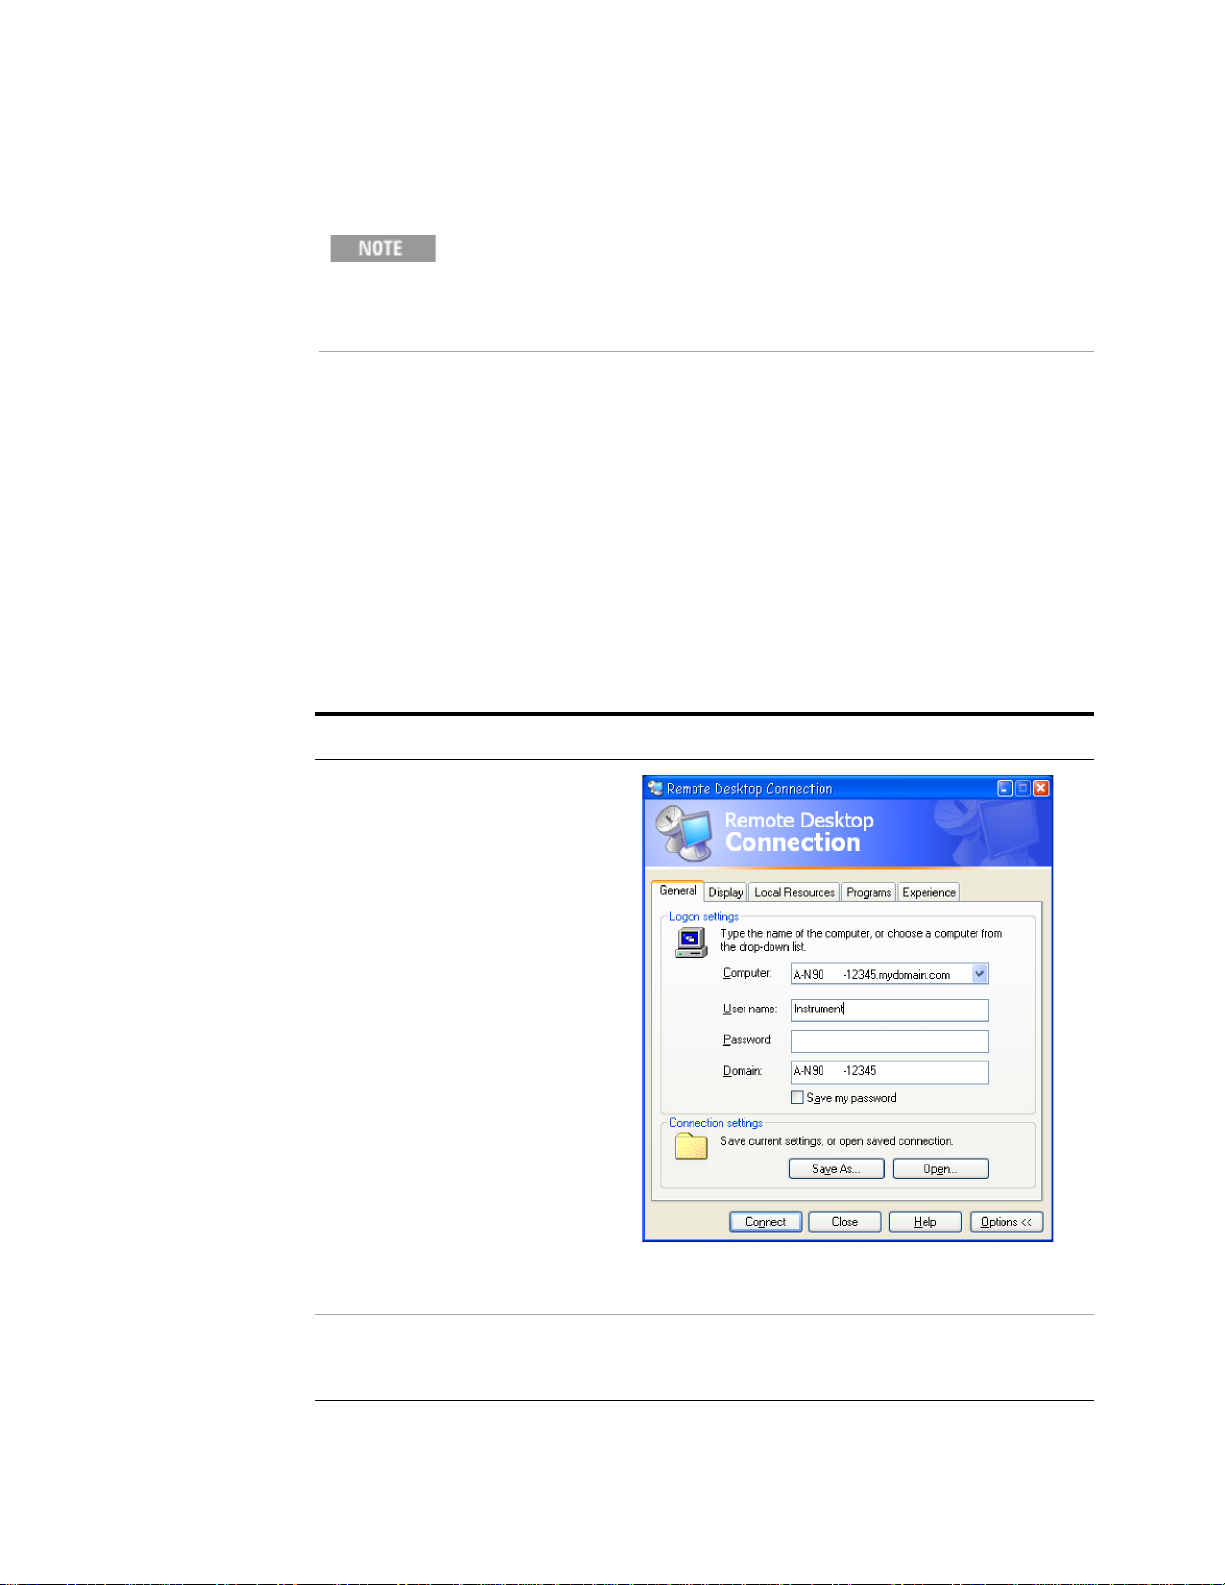
Using Microsoft Windows Operating System 4
Only the current User or an Administrator can remotely log into the test
set. To see who the current user of the test set is, press
test set until you can view the current user name on the Start menu. If no
one is currently logged into the test set, any valid instrument user can
remotely log in.
Ctrl+Esc on the
The test set display appears on the screen of the remote computer. Because the test set
front-panel keys are not available when using the test set remotely, three alternative
methods are available to perform the functions of the front-panel keys, as detailed in the
following sections:
• “Accessing menus for Remote Desktop operation" on page 86
• “Keycode commands for Remote Desktop operation" on page 87
• “The Virtual Front Panel" on page 91
Setting Remote Desktop options
Step
1 On the Remote Desktop
Connection menu, click
Notes
Options.
The Options dialog has several tabs. Generally, the
default settings are correct.
2 Under the
the Computer name, User name
and Domain name are set correctly .
Getting Started Guide 83
General tab, ensure that
You may choose to enter the password and save it for
future sessions, by checking the
box.
Save my password
Page 83

4 Using Microsoft Windows Operating System
Step
3 Click the
Display tab.
• Under Remote desktop size,
you may select the size of the
window in which the test set
display appears. Do not select
any size smaller than 1024 x 768
pixels. Selecting a remote
desktop size smaller than 1024 x
768 results in the test set display
not being fully visible. In such
circumstances, scroll bars do not
appear, so portions of the display
are not accessible.
• Under Colors, you may select
any setting that uses 15 bits or
more. Selecting a color setting
that uses less than 15 bits results
in dithering and incorrect color
rendition of the remote desktop
window.
4 Click the
Local Resources tab.
• Selecting the Disk Drives
checkbox enables you to transfer
data between the remote desktop
and the local PC.
To transfer data, click
the task bar of the remote
computer, then click
Computer
the remote computer and
displays the drives of both the
remote computer and the local
computer.. You can now copy
and paste between the two disk
drives.
. Explorer opens on
Start on
My
Notes
84 Getting Started Guide
Page 84

Using Microsoft Windows Operating System 4
Step
5 Click the
Notes
Experience tab. To Optimize the performance of the Remote Desktop
session, choose the appropriate connection format from
the drop-down list.
Getting Started Guide 85
Page 85

4 Using Microsoft Windows Operating System
Accessing menus for Remote Desktop operation
Using the mouse, right-click the application display window to access the following
remote desktop menus, which may be used as an alternative to the front-panel keys:.
The function of each selection in the menu is generally identical to that of the
corresponding front-panel key. The following lists additional functionality:
Exit – Selecting this item closes the Application software.
Utility > Page Setup – Selecting this item opens a printer setup dialog.
Utility > Virtual Front Panel – Selecting this item opens the Virtual Front Panel
window, as described in the Section “The Virtual Front Panel" on page 91.
The menus are also available when using the test set directly, provided
that a mouse or other pointing device is attached to it.
86 Getting Started Guide
Page 86

Using Microsoft Windows Operating System 4
Keycode commands for Remote Desktop operation
When using the test set in remote desktop mode, the following combinations of remote
keyboard keys can be used to perform the operation of the test set front-p anel keys.
Keycode commands
To initiate the following front-panel key: Press these keys on the remote computer
keyboard:
AMPTD Y Scale
Auto Couple Ctrl+Shift+C
Bk Sp Backspace
BW
Cancel (Esc) Esc
Getting Started Guide 87
Ctrl+Shift+A
Ctrl+Alt+B
Page 87

4 Using Microsoft Windows Operating System
Keycode commands
To initiate the following front-panel key: Press these keys on the remote computer
Cont Ctrl+Alt+C
Ctrl Ctrl
Decrease Audio Volume the Volume Control slider
keyboard:
Del
Down Arrow Down Arrow
Enter
File Ctrl+F
FREQ Channel Ctrl+Shift+F
Full Screen Ctrl+Shift+B
Help F1
Increase Audio Volume the Volume Control slider
Input/Output
Left Arrow Left Arrow
Marker
Marker -> Ctrl+Alt+N
Marker Function Ctrl+Alt+F
Meas Ctrl+Alt+M
Meas Setup Ctrl+Alt+E
Menu (Alt) Alt
Delete
Enter (Return)
Ctrl+Shift+O
Ctrl+Alt+K
Mode Ctrl+Shift+M
Mode Preset Ctrl+M
Mode Setup Ctrl+Shift+E
Mute the Mute checkbox under the Volume Control
Next Window
Peak Search Ctrl+Alt+P
Print Ctrl+P
Quick Save Ctrl+Q
Recall Ctrl+R
Restart Ctrl+Alt+R
Return Ctrl+Shift+R
Ctrl+Shift+N
88 Getting Started Guide
Page 88

Using Microsoft Windows Operating System 4
Keycode commands
To initiate the following front-panel key: Press these keys on the remote computer
keyboard:
Right Arrow Right Arrow
Save
Ctrl+S
Select Space Bar
Single
Ctrl+Alt+S
Softkey 1 Ctrl+Shift+F1
Softkey 2 Ctrl+Shift+F2
Softkey 3 Ctrl+Shift+F3
Softkey 4 Ctrl+Shift+F4
Softkey 5 Ctrl+Shift+F5
Softkey 6 Ctrl+Shift+F6
Softkey 7 Ctrl+Shift+F7
Source Ctrl+Alt+U
SPAN X Scale Ctrl+Shift+S
Split Screen Ctrl+Shift+L
Sweep/Control Ctrl+Shift+W
System Ctrl+Shift+Y
Tab Tab
Trace/Detector Ctrl+Alt+T
Trigger Ctrl+Shift+T
Up Arrow Up Arrow
User Preset
Ctrl+U
View/Display Ctrl+Shift+V
Zoom Ctrl+Shift+Z
1
2
3
4
5
6
a
1
a
2
a
3
a
4
a
5
a
6
Getting Started Guide 89
Page 89

4 Using Microsoft Windows Operating System
Keycode commands
To initiate the following front-panel key: Press these keys on the remote computer
keyboard:
7
8
9
–Use the – key to enter a negative value, as
. (Decimal Point)
0 (Zero)
a
7
a
8
a
9
appropriate
. (Period)
a
0 (Zero)
a
a
a. For remote keyboards that feature a numeric keypad, use either the appropriate
numeric keypad key or the main keypad key.
The effect of pressing
Ctrl+Alt+Delete on the keyboard of the remote
computer always applies to the remote computer, and not to the test set.
Generally, the effect of pressing this key combination is to display the
Windows Task Manager. Therefore, pressing this key combination on the
remote computer does not allow you to reboot the test set.
Ending a Remote Desktop session
There are two ways to disconnect the remote computer from the test set to end the
session:
Step Notes
1 Click the
X, then click OK. For full-screen, the X appears at the top center
of the window.
For non full-screen, the X appears in a red box
at the right of the window’s title bar.
or
2 When the remote desktop is full screen,
move the cursor to the bottom left of the
window:
• Click Start, Disconnect.
• Click Disconnect.
You are asked to confirm that you want to
disconnect.
90 Getting Started Guide
Page 90

The Virtual Front Panel
The Virtual Front Panel is a software equivalent of the front-panel key set, which
provides another alternate method for test set control. It may be displayed in a separate
window on the test set (or remote desktop) display.
Using Microsoft Windows Operating System 4
The Virtual Front Panel is also available when using the test set directly,
provided that a mouse or other pointing device is attached to it.
Using the mouse, right-click the application display window , then select
Front Panel
. The Virtual Front Panel appears, as shown below:
Utility > Virtual
When you click a button in the Virtual Front Panel, it performs the operation of the
corresponding test set front-panel key. The buttons at the left of the panel, named Key 1
through Key 7, perform the operation of the respective softkeys. The Rpg Up and Rpg
Down keys perform the operation of the knob.
Getting Started Guide 91
Page 91

4 Using Microsoft Windows Operating System
Embedded Web Server: Using the X-Series Test Set Remotely
The test set can be controlled using either the Embedded Web Server or Windows
Remote Desktop. The Embedded Web Server is a good solution wh en you do not want to
log into the user account on the test set. This allows you to view the display or control
the test set, without logging the current user off. Windows Remote Desktop must be used
when the remote computer keyboard is needed as an input device (such as for editing
filenames, or setting the title.) Also, Windows Remote Desktop generally has a faster
response time.
Accessing the test set through the Internet
It is possible to access and control the test set through the Internet and World Wide Web,
or a local internet, using the built-in Embedded Server functionality. This section
provides details of how to use this functionality.
The test set may also be accessed and controlled using the Windows Remote Desktop
functionality (see the section “Remote Desktop: Using the X-Series test set remotely" on
page 78, for details).
The test set Embedded Server capabilities are fully compliant with the LXI (LAN
eXtensions for Instrumentation) standard.
To gain access to the test set from the LAN, you need to know its
hostname (or IP Address). For details of how to locate this information
using the test set display, see “How to locate the computer name of the
test set" on page 80.
Accessing the test set
Step Notes
1 Enter a URL corresponding to the
test set hostname or IP Address.
In this example, the test set IP address is
141.121.85.155.
This functionality is only fully
supported when using Internet
Explorer.
When the connection is
made, the welcome
page appears.
92 Getting Started Guide
Page 92

Using Microsoft Windows Operating System 4
Accessing the test set
Step Notes
2 Click
Advanced information about
this Web-Enabled E6607B
This control (near the bottom of the screen) displays
further settings and configuration information.
At the left side
of the page are
a set of tabs
that provide
access to
configuration
information for
the test set, plus
the ability to
control it
through the
web interface.
Getting Started Guide 93
Page 93

4 Using Microsoft Windows Operating System
Selecting the View and Modify Configuration tab
Step Notes
1 Click
Verify and Modify
Configuration
2 Click on
This displays a web page, which shows the currently-
.
assigned IP address and other TCP/IP parameters of
the test set.
Modify Configuration. A password entry dialog appears.
By default, this password is set at the factory as
“agilent”. However, you may subsequently change the
password. (Press
Password
System, I/O Config, Reset Web
on the test set front panel to change the
password.)
When the correct password has been entered, the
Modify Configuration web page appears.
94 Getting Started Guide
Page 94

Using Microsoft Windows Operating System 4
Selecting the View and Modify Configuration tab
Step Notes
3 Enter new settings as required, then
click
Apply to cause the new
settings to take effect.
4 Use
Start Identify and Stop Identify
to enable and disable the LXI status
indicator in the test set.
Before clicking Apply, you may use the
Changes
button to revert all settings to their previous
values.
T ool tips are available for each of
the configuration buttons on this
page.
Undo
Getting Started Guide 95
Page 95

4 Using Microsoft Windows Operating System
Accessing the Web Control tab
Selecting this tab lets you view, control and interact with the test set through the web
server.
Step Notes
1 Click
Control A password entry dialog appears.
By default, this password is set at the factory as
“agilent”. However, you may subsequently change the
password. (Press
Password
password.)
When the correct password is entered, the test set
control web page appears.
System, I/O Config, Reset Web
on the test set front panel to change the
To view the test set display, the
test set application must be
running.
2 Click
96 Getting Started Guide
Display Front Panel Keys This brings up a virtual keyboard that can be used to
control the test set.
Page 96

Step Notes
Using Microsoft Windows Operating System 4
Selecting the Get Data tab
Selecting the Get Data tab allows you to capture results from the currently active
measurement on the test set. Depending on the current measurement type, captured
results consist of either Trace Data or Measurement Results.
The captured data is formatted as a Comma Separated Value (CSV) file, which may be
saved on the client computer’s hard disk, or opened with a spreadsheet application such
as Microsoft Excel, or imported into a database application such as Microsoft Access.
To capture data using the web server, the test set application must be
running.
Getting Started Guide 97
Page 97

4 Using Microsoft Windows Operating System
A typical Get Data web page display is shown below:
If the measurement currently running does not support the selected result type, the web
page indicates this:
Selecting the Get Image tab
Selecting the Get Image tab captures a screen from the test set display.
To capture a screen image using the web server, the test set application
must be running.
The image is captured as a Portable Network Graphics (PNG) file, to the default file
name Screen.png. The image file can be saved to the client computer hard disk, or
copied to the Windows clipboard.
98 Getting Started Guide
Page 98

Using Microsoft Windows Operating System 4
A typical screen capture image appears as follows:
Getting Started Guide 99
Page 99

4 Using Microsoft Windows Operating System
Selecting the SCPI Telnet tab
Selecting the SCPI Telnet tab opens a Telnet session between the test set and the client
computer. The test set TCP/IP port used for SCPI access is 5023.
To run a SCPI Telnet session, the test set application must be running.
Step Notes
1 Click
SCPI Telnet A password entry dialog appears.
By default, this password is set at the factory as
“agilent”. However, you may subsequently change the
password. (Press
Password
password.)
When the correct password is entered, the connection
window appears.
System, I/O Config, Reset Web
on the test set front panel to change the
2 Click
100 Getting Started Guide
SCPI Telnet Session The telnet command line interface appears.
Page 100

Step Notes
3 To exit the telnet session, press
Ctrl+] on the client computer
keyboard.
Using Microsoft Windows Operating System 4
SCPI commands and
queries may be entered
using the command line
interface.
Getting Started Guide 101
 Loading...