

Key Digital KD-X411ProK, KD-X411POHK Operating Instructions Manual
HDBaseT/HDMI via Single CAT5e/6 (Tx+Rx Set) Extenders, with
Audio De-embedding, EDID Control, Hot Plug Control, Full Buffer System,
IR Sensor, Up/Down IR & RS-232, support Ultra HD/4K & HDCP2.2
Power over HDBaseT/HDMI via Single CAT5e/6 (Tx+Rx Set) Extenders,
with Audio De-embedding, EDID Control, Hot Plug Control, Full Buffer
System, IR Sensor, Up/Down IR & RS-232, support Ultra HD/4K & HDCP2.2
KD-X411ProK
KD-X411POHK
Rev 0 – Sept 2015
Operating Instructions
Key Digital®, led by digital video pioneer Mike Tsinberg,
develops and manufactures high quality, cutting-edge
technology solutions for virtually all applications where
high-end video and control are important. Key Digital
®
is at the forefront of the video industry for Home Theater
Retailers, Custom Installers, System Integrators,
Broadcasters, Manufacturers, and Consumers.
The Experts in Digital Video Technology and Solutions
™
Key Digital® Systems :: 521 East 3rd Street :: Mount Vernon, NY 10553
Phone : 914.667.9700 Fax : 914.668.8666 Web : www.keydigital.com
KD-X411ProK_X411POHK_Manual.indd 2-3 11/17/15 12:40 PM

4 1
About KD-X411ProK/KD-X411POHK
KD-X411ProK/KD-X411POHK HDBaseT/HDMI (Tx & Rx) Extenders are an HDCP
2.2 compliant product that extend 4K/UHD 24/25/30 (4:4:4) and 4K/UHD 60 (4:2:0)
signals up to 150 ft. using Key Digital® KD-CAT6STP1X Super CAT6A Shielded cable,
or up to 125 ft. using a single third-party CAT5e/6 cable. 1080p/60, 1920x1200, 3D
signals are extended up to 250 ft. via single Key Digital® KD-CAT6STP1X Super CAT6A
shielded cable, or up to 230 ft. using a single third-party CAT5e/6 cable. In addition to
HDMI video and audio signals, KD-X411ProK/POHK carries IR, RS-232 and TCP-IP
signals for controlling remotely located equipment. Audio de-embed ports on the Tx
unit enable external audio connectivity with audio distribution systems and amplifiers.
Key Features
➔
HDBaseT via Single CAT5e/6 UTP/STP Extension:
With fully automatic
adjustment of feedback, equalization, and amplification depending on
cabling length
➔
KD-X411POHK:
Features power extension from Tx to Rx with Power Over
HDBaseT, Rx unit does not require power supply
➔
Signal Extension:
» Up to 150 ft. @ 4K 24/25/30(4:4:4)/60(4:2:0) using KD-CAT6STP1X cabling
» Up to 125 ft. @ 4K 24/25/30(4:4:4)/60(4:2:0) using third-party CAT5e/6
UTP/STP cabling
» Up to 250 ft. @ 1080p / 1920x1200 using KD-CAT6STP1X cabling
» Up to 230 ft. @ 1080p / 1920x1200 using third-party CAT5e/6 UTP/STP
cabling
➔
4K/Ultra HD Resolution:
Support for 4096x2160 or 3840x2160 24/25/30Hz at
4:4:4/8 Bit or 60Hz at 4:2:0/8 Bit
➔
Audio De-Embedding:
Audio from the HDMI input is de-embedded through the
Coax digital (PCM) and/or Analog L/R audio output
➔
HDMI® and HDCP Licensing:
Fully licensed and compatible with HDCP 2.2 and
HDMI latest technology such as 4K/UHD 4:2:0/8bit at 60f/s
➔
EDID Control:
Internal library features 15 default EDID configurations and
native EDID data from Output/Display devices connected via Rx
Table of Contents
About KD-X411ProK/KD-X411POHK ..................................1
Quick Setup Guide ................................................3
Installation and Operation ...........................................3
Application Example ...............................................5
Connections .....................................................6
Audio De-Embedding Outputs........................................8
Extending IR or RS-232 Control.......................................9
Settings.........................................................12
LED Indicator Lights ...............................................16
RS-232 Commands ...............................................17
Specifications ....................................................19
Important Product Warnings & Safety Instructions .........................20
How to Contact Key Digital
®
.........................................21
Warranty Information ...............................................22
© 2015 Key Digital, Inc. All rights reserved.
Please read all instructions to insure safe operation of the product.
KD-X411ProK_X411POHK_Manual.indd 1 11/17/15 12:40 PM
2 3
➔
Hot Plug Detection Control:
Enables integrator to choose if active signal
voltage is forced to connected input devices
➔
Full Buffer System™:
Manages TMDS re-clocking / signal re-generation,
HDCP authentication with source & display, EDID Control handshake,
and Hot Plug control
➔
IR Sensor:
Sensor powering via +5V on Rx unit’s IR In port collects line-of-sight
IR from remote(s) without external IR connecting block
➔
Up/Down IR:
Two channels of IR enable control to/from devices connected
to Tx and Rx units
➔
RS-232:
Bi-Directional control to/from Tx and Rx unit on 3.5mm connector
➔
Rotary Switch RS-232 Control Mode:
Provides control of Tx unit as well as
connectivity status
➔
3D:
Support for standard 3D stereoscopic signal formats
➔
Deep Color Support:
12bit Deep Color video / 8bit color for 4K/UHD
➔
Lossless compressed digital audio:
Support for Dolby® TrueHD, Dolby® Digital
Plus and DTS-HD Master Audio
™
➔
CEC Support:
For inter-device control between main input and output
HDMI channel
➔
I2C Communication:
EDID and HDCP authentication to Display and Source
➔
Control System Support:
Compatible with Compass Control®, AMX®,
Control4®, Crestron®, RTI®, Savant, URC®, Leviton® etc.
KD-X411ProK Accessories
➔ (2) 5V 2A DC Power Supplies (Screw-In Type), (2) Mounting Brackets,
(1) IR Emitter, (1) IR Sensor
➔ KD-X411ProK requires power on both Tx and Rx units
KD-X411POHK Accessories
➔ (1) 12V 2A DC Power Supply (Screw-In Type), (2) Mounting Brackets,
(1) IR Emitter, (1) IR Sensor
➔ KD-X411POHK only requires power on the Tx unit, which extends power
to the Rx unit
Quick Setup Guide
Step 1: Find a safe and convenient location to mount or place your
KD-X411ProK/KD-X411POHK units
Step 2: Begin with the KD-X411ProK/KD-X411POHK Tx/Rx units and all
input/output devices turned off with power cables removed
Step 3: Connect your HDMI source to the input port of your
KD-X411ProK/KD-X411POHK Tx unit
Step 4: Connect your HDMI displays to the output port of your
KD-X411ProK/KD-X411POHK Rx unit
Step 5: Connect KD-X411ProK/KD-X411POHK Tx unit to
KD-X411ProK/KD-X411POHK Tx with CAT5e/6 cable
Step 6: Connect additional IR/RS-232 control connections and IR sensors
Step 7:
BEFORE connecting power supply to power outlet,
screw-in the power
supply to the KD-X411ProK/KD-X411POHK Tx units and KD-X411ProK
Rx unit
Step 8:
AFTER all connections are made, plug-in power supplies to
power outlets
Step 9: Power on input/output devices
Installation and Operation
Before permanently securing the unit for final installation, test for proper operation
of the unit and cables in your system. It is recommended that you leave enough
ventilation space to provide sufficient airflow and cooling.
You MUST use the Power Supply provided with your unit or you VOID
the Key Digital
®
Warranty and risk damage to your unit and associated
equipment.
KD-X411ProK_X411POHK_Manual.indd 3 11/17/15 12:40 PM
4 5
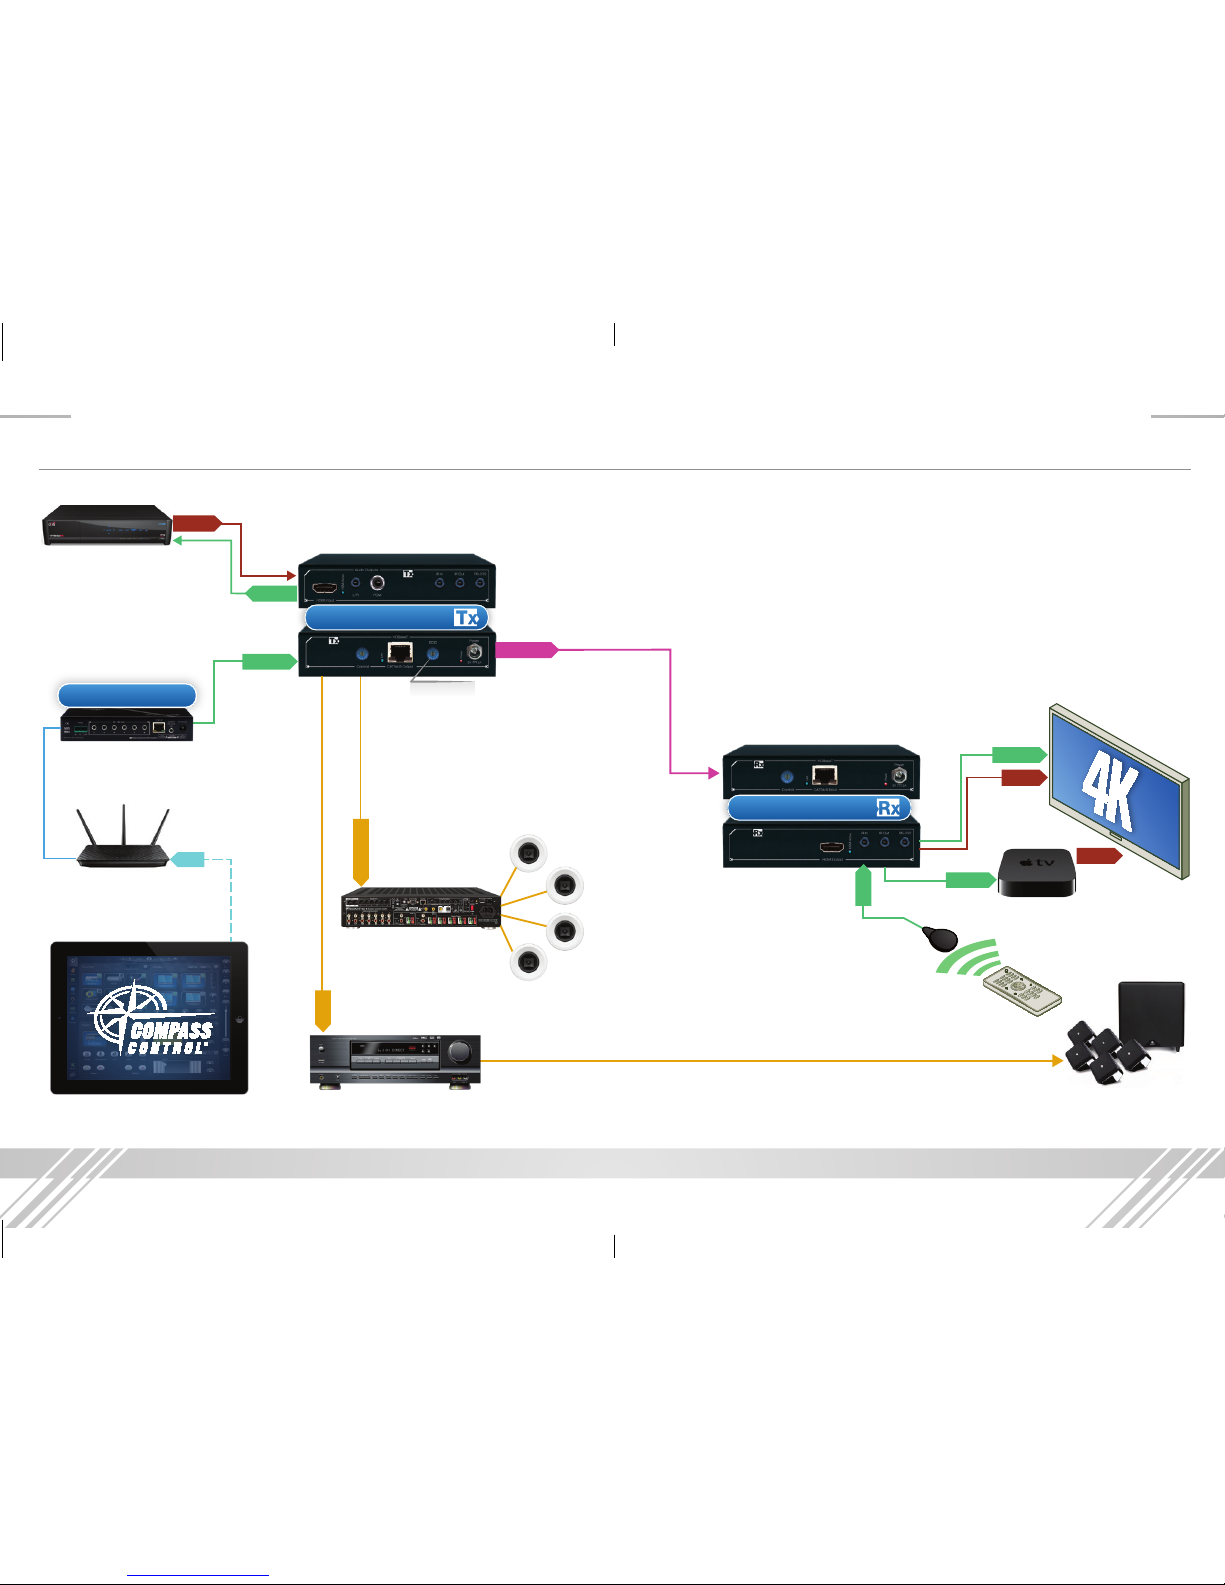
Application Example
iPad
WiFi
EDID Control
KD-MC1000
Master Controller
Satellite
RS-232
HDMI
CAT5e/6
KD-X411ProK
KD-X411ProK
IR Out
Satellite
Remote
IR Sensor
IR In
WiFi Router
AVR
Surround
Multi-Zone Audio
4K up to 150’ with
Key Digital
®
KD-CAT6STP1X
Display
RS-232
IR Out
HDMI
HDMI
Apple TV
PCM
L/R Audio
KD-X411ProK_X411POHK_Manual.indd 4-5 11/17/15 12:40 PM
6 7
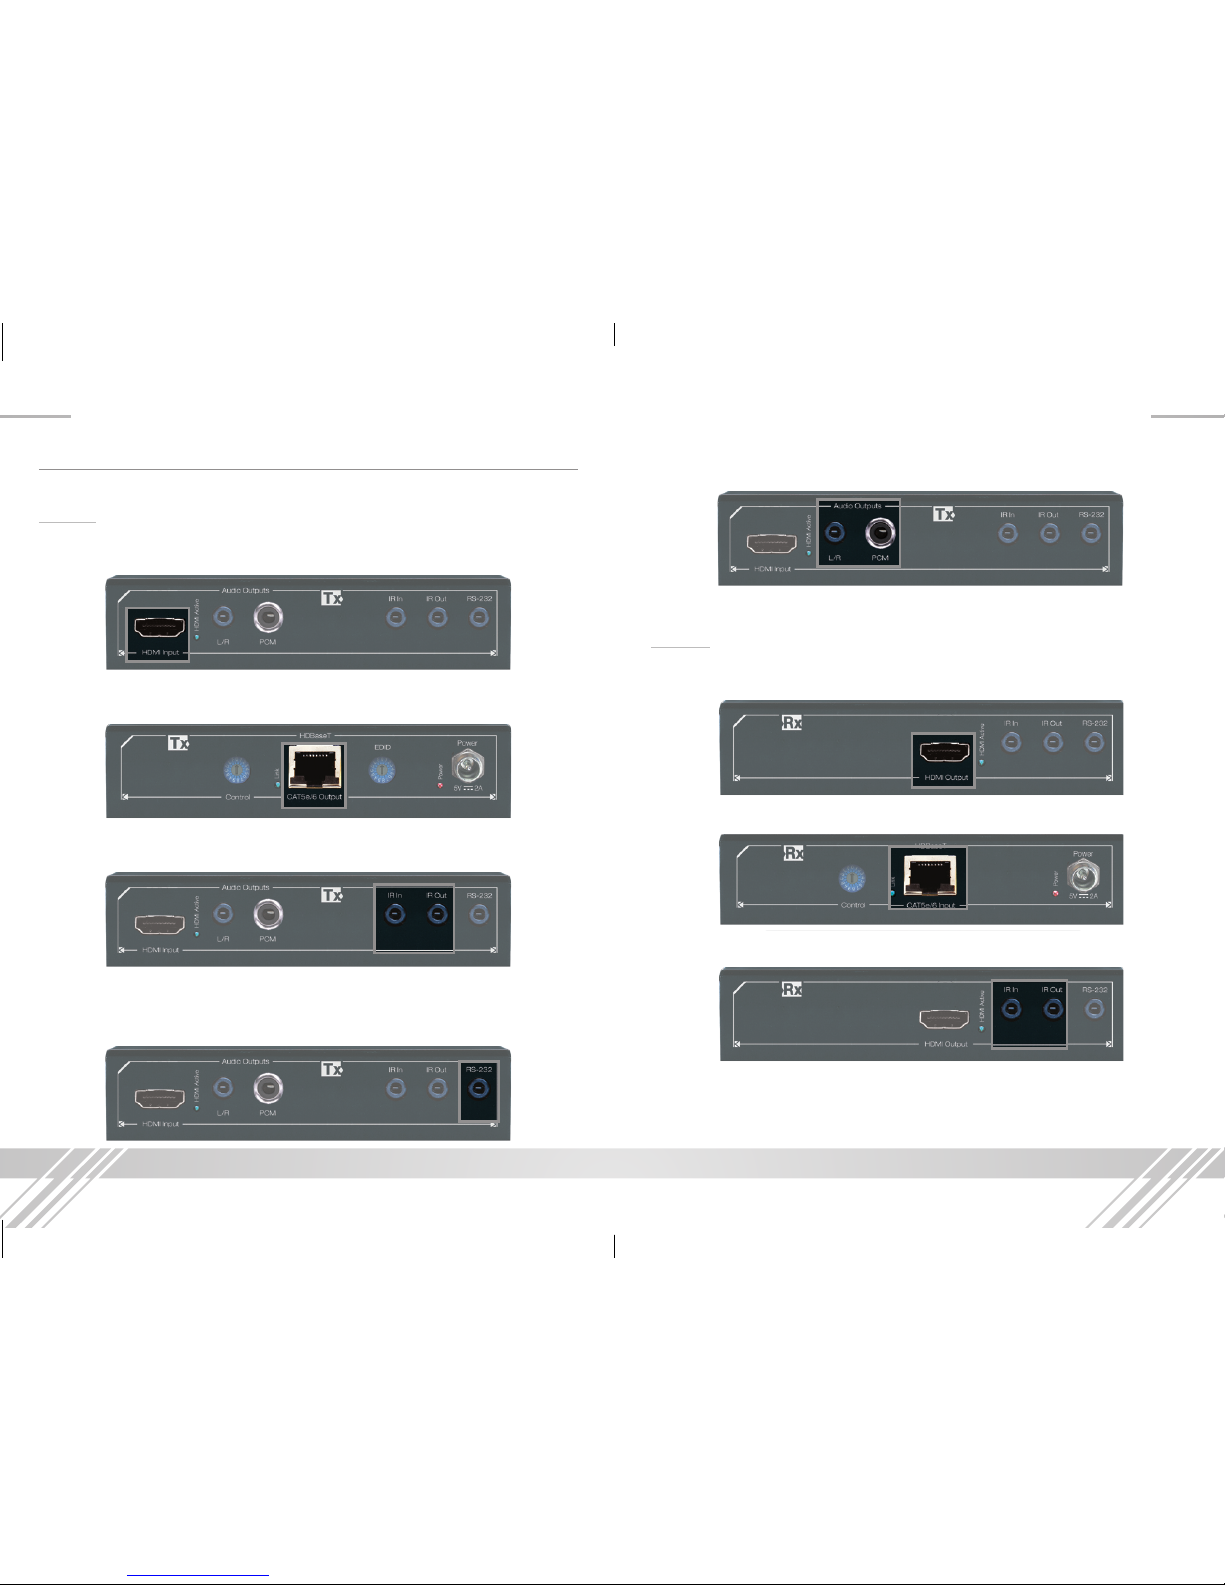
➔ Use the 3.5mm analog audio and/or PCM coaxial digital audio de-embed ports to
integrate with audio distribution systems, amplifiers, or AV receivers.
Rx Unit:
➔ Using a short HDMI cable, connect your output / display device to the HDMI port
labeled “HDMI Output”.
➔ Connect the CAT5e/6 cable at the port labeled “CAT5e/6 Input”.
➔ If you are sending or receiving IR, connect included IR Sensor and/or IR Emitter
Connections
Before making any connections, power off your source and display devices.
Tx Unit:
➔ Using a short HDMI cable, connect your source device to the HDMI port labeled
“HDMI Input”. To connect DVI or Display Port, use appropriate adapters.
➔ Connect the CAT5e/6 cable that connects to the Rx Unit at the port labeled
“CAT5e/6 Output”.
➔ Make IR In and Out connections to receive (IR In port) or send (IR Out port)
control signals.
Refer to the “Extending IR & RS-232 Control” for more information.
➔ Connect a 3.5mm Stereo cable for bi-directional RS-232 control.
Refer to the “Extending IR or RS-232 Control” and the “RS-232 Commands”
section for more information.
KD-X411ProK_X411POHK_Manual.indd 6-7 11/17/15 12:40 PM
 Loading...