

Key Digital KD-X40MRx Operating Instructions Manual
KD-X40MRx
4K/18G HDBT Rx (40m) with L/R Audio De-Embed,
IR, RS-232. Receiver Only.
Operating Instructions
The Experts in Digital Video Technology and Solutions
™

4
Table of Contents
Introduction .................................................................... 4
Quick Setup Guide ............................................................... 2
Integration Options ............................................................... 2
Use with third-party HDBaseT Tx or Rx ................................................6
Specifications ................................................................... 7
Important Product Warnings & Safety Instructions: ........................................8
Contacting Key Digital .............................................................9
Warranty Information.............................................................. 9
Please visit www.keydigital.com for the latest
product documentation and software downloads.
Product features and specifications are subject
to change without notice.
Always follow the instructions provided in this Operating Manual.
Introduction
Key Digital® KD-X40MRx is a 4K/UHD, HDCP2.2 compliant HDBaseT receiver with 18Gbps bandwidth
for extension of digital video signals with the latest standards in resolution, HDR, and Chroma.
KD-X40MRx is sold a la carte to natively integrate with Key Digital HDBaseT wall-plate transmitters,
KD-X2x1WDTx or KD-X2x1WVTx. Other integration options are possible. KD-X40MRx supports flexible
PoH for powering of the wall plate transmitter, and audio de-embed output for ease of integrating the
selected wall plate source with audio systems. 4K/UHD 18G signals are extended up to 40m / 131ft
and 1080p up to 70m / 230ft via single CAT5e/6 cable. In addition to AV signals, KD-X40MRx extends
IR and RS-232 for controlling remotely located equipment.

Key Features
› Tx Options: Sold a-la-carte to integrate natively with KD-X2x1WDTx and KD-X2x1WVTx wall-plate
transmitters (sold separately).
› Flexible Power over HDBaseT: Rx powers Tx when integrated with KD-X2x1WDTx / KD-X2x1WVTx.
Rx is powered by Tx when integrated with KD-PS42 / KD-UPS42
› Audio De-embedding: Audio of the incoming source is de-embedded at the unit’s analog L/R audio
connection for ease of integration with audio systems
› CEC Manager
KD-UPS42 for monitors & projectors
› Ultra HD/4K: Supports up to 4096x2160 or 3840x2160 24/25/30/60hz at 4:4:4
(signals up to 18Gbps bandwidth)
› 4K Support: 4096x2160 or 3840x2160 24/25/30/60hz at 4:4:4 (signals up to 18Gbps bandwidth)
› Low Profile: Super slim chassis design
› Signal Extension: For resolution and cable quality
» 4K/UHD (18G): Up to 40m / 131ft
» 1080p: Up to 70m / 230ft
› 10G Pass-thru: Mode enables uncompressed 10.2Gbps signal extension
› HDR10 and Dolby Vision: More life-like images through a greater range of luminance levels
› HDCP 2.2: Compliancy up to HDCP 2.2 and backward compliant
› Deep Color Support: Up to UHD/4K 60Hz 4:2:0 12bits or 4:2:2 12bits
› IR Sensor: Sensor powering via +5V on IR In ports collects line-of-sight IR from remote(s) without
external IR connecting block
› Up/Down IR: Two channels of IR enable control to/from devices or control systems connected to Tx
and Rx units
› RS-232: Bi-Directional control to/from Tx and Rx/Presentation Switch unit on Phoenix connector
› Lossless Compressed Digital Audio: Dolby
and Dolby
™
: Passes through CEC control signals generated by KD-PS42 /
®
®
Atmos
TrueHD, Dolby® Digital Plus, DTS-HD Master Audio™,
1
Included Accessories
› Mounting bracket (qty 2)
› IR Sensor (qty 1)
› IR Emitter (qty 1)
› 3-pin phoenix terminal (qty 1)
› Power Supply, 48V 0.41A, 20W, KDPS20W48VC
2
HDBT
KD-X40MRx
HDMI
HDMI
KD-X2x1WDTx
DisplayPort
Quick Setup Guide
Tx UNITS SOLD SEPARATELY. Go to http://www.keydigital.com/category_Presentation.html
for compatible Tx models.
CONNECT:
Begin with the Tx, Rx unit / presentation switch, and all input/output devices turned off with power
cables removed. Ensure that all desired functionality is achieved before installing units.
1. Connect HDMI, Display Port, USB-C, and VGA sources to the input port(s) of the Tx unit /
Presentation Switch
2. Connect HDMI display to the output port of Rx unit
3. Connect CAT5e/6 cabling to Tx / presentation switch and Rx unit. Use 568-B standard termination
on both ends avoiding couplers and excess CAT cable length
4. Connect IR Sensor, IR Emitter, and/or RS-232 cabling from control system if controlling external
devices.
5. To send audio of the selected source into audio systems, connect from the audio de-embed output
of the Rx unit
6. BEFORE connecting power supply to power outlet, secure power into screw connector on Rx unit /
presentation switch
7. AFTER all connections are made, plug-in power supply to power outlet
8. Power on input/output devices
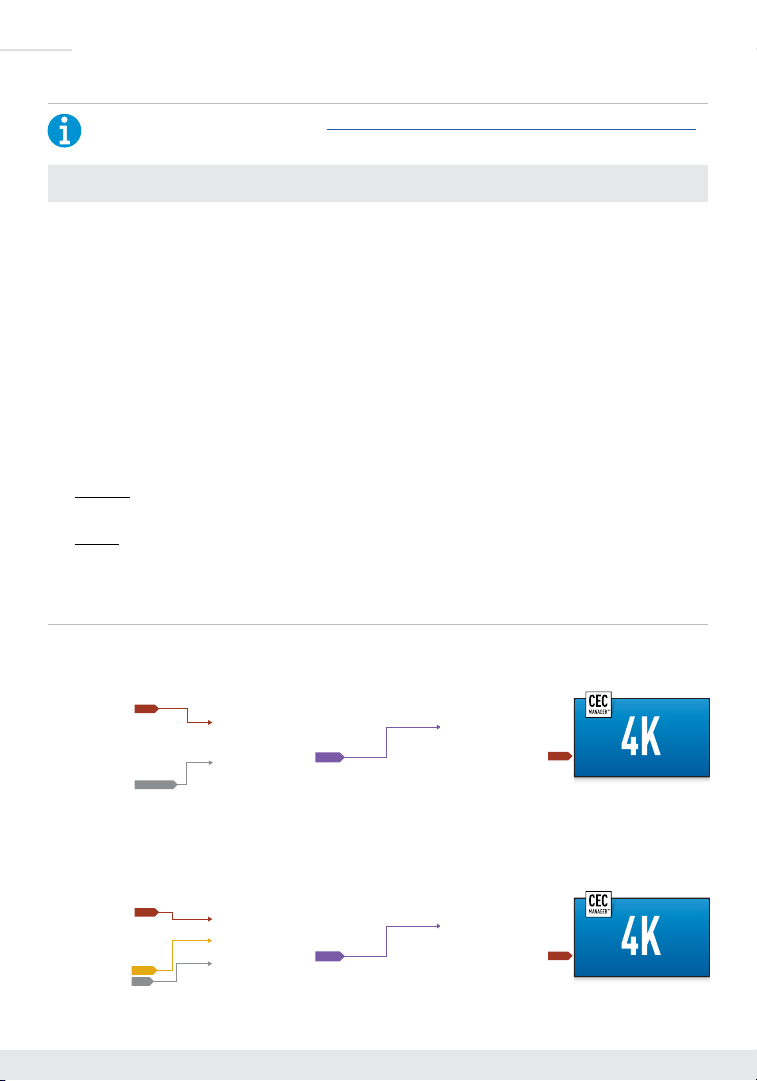
Integration Options
Integration with KD-X2x1WDTx:
HDMI
DisplayPort
KD-X2x1WDTx
Integration with KD-X2x1WVTx:
HDMI
Audio
VGA
KD-X2x1WVTx
HDBT
HDBT
KD-X40MRx
HDMI
KD-X40MRx
HDMI
 Loading...