

Page 1
KD-PS42
4K/18G Presentation Switcher with
4 Inputs (HDBT, 3xHDMI), 2 Mirrored Outputs
(HDBT, HDMI), Audio De-Embed, IR, RS-232,
IP, CEC Manager™. Includes Rx.
Quick Setup Guide
The Experts in Digital Video Technology and Solutions
™
Page 2
4
Table of Contents
CONNECT ..................................................................... 2
CONFIGURE ................................................................... 4
CONTROL ..................................................................... 6
Always follow the instructions provided in this Quick Setup Guide.
Default IP Address: 192.168.1.239
Please visit www.keydigital.com for the latest product
documentation and software downloads. Product features and
specifications are subject to change without notice.
KD-PS42
Key Digital® KD-PS42 is a 4K/18G KD-App Ready Presentation Switcher kit with CEC Manager™, auto
switching, and audio de-embedding creating a user-friendly, simplified presentation system. KDPS42 features three HDMI and one HDBaseT input which integrates natively with HDMI + Display Port
wall plate, KD-X2x1WDTx (sold separately). Mirrored HDMI and HDBaseT outputs enable audience
+ presenter views and the HDBaseT output marries in with the included KD-X40MRx for integrating
monitors or projectors up to 40m / 131ft away when the selected source is outputting 4K/UHD (up to
70m / 230ft at 1080p). Designed for professional audio video installations in conference rooms, board
rooms, classrooms, lecture halls, auditoriums, and more, KD-PS42 enables multiple video sources to
be displayed on up to two connected displays while analog (balanced/unbalanced) and digital (PCM)
audio de-embed ports feed audio of the selected source into an amplifier, DSP, or sound bar. Integrating
KD-PS42 with KD-AMP220 will enable an app-ready all-in-one solution for control of video switching
with sound and speech enforcement. Key Digital CEC Manager
of the connected displays for a simplistic all-in-one integration system. KD-PS42
presentation switcher supports all SD, HD, VESA and Ultra HD/4K video standards with
HDR header information included in a variety of 4K EDID handshakes. In addition to IR,
RS-232, and TCP/IP control, KD-PS42 can also be controlled via trigger voltage and features statusmonitoring LEDs.
™
enables basic controls
Page 3

Key Features
› Presentation Switcher Kit: Includes KD-PS42 and KD-X40MRx. Add KD-X2x1WDTx wall plate
HDBaseT transmitter for plug-in on walls, floor and table boxes
› Presentation Switching: 3 HDMI, 1 HDBaseT source selection by push button, IP, RS-232, IR, auto
switching, or trigger control.
› Ultra HD/4K: Supports up to 4096x2160 or 3840x2160 24/25/30/60hz at 4:4:4 (signals up to
18Gbps bandwidth)
› Auto-Sensing: Automatic selection of newly detected source and switching from newly disconnected
source when enabled
› CEC Manager
additional control wiring. Selection of desired CEC command recipient.
› KD-App Ready: Network scan & detect populates pre-built GUI including connected display/projector
controls via CEC Manager™
› Audio De-embedding: Audio of the selected source is de-embedded at the unit’s analog L/R
balanced/unbalanced and PCM digital audio connectors.
› KD-AMP220 Control Mode: Command forward to KD-Amp220 for an all-in-one user-friendly control
UI of video switching, audio and speech enforcement
› HDCP Licensing: Fully licensed and compatible with HDCP 2.2
› HDR10 and Dolby Vision: More life-like images through a greater range of luminance levels
› Power Over HDBaseT:
› Installation: Half-rack width with rack and under-table mounting ears included
› Signal Extension: For resolution and cable quality
» 4K/UHD (18G): Up to 40m / 131ft
» 1080p: Up to 70m / 230ft
› Deep Color Support: Up to UHD/4K 30Hz 4:4:4/12 bits or 60Hz 4:4:4/8 bit
› Full Buffer System
source & display, EDID Control handshake, and Hot Plug Detection Voltage
› EDID Management: Internal library with 15 internal EDID handshakes including 4K with HDR in
addition to native EDID data copied from the Rx display/device
› RS-232: Bi-Directional control to/from Tx and Rx/Presentation Switch unit
› Unit Control Mode: Provides TCP/IP and RS-232 control and status of/from Tx unit
› EDID Management: Internal library with 15 internal EDID handshakes including 4K with HDR in
addition to native EDID data copied from the output/display 1
› Lossless Compressed Digital Audio: Dolby
and Dolby
› Control System Support: Key Digital
all IR, RS-232, and TCP/IP supported control systems via open API.
™
: Power, volume, and muting controls of the connected display/projector without any
Rx unit (included) and wall plate Tx unit (sold separately) powered by KD-PS42
™
: Manages TMDS re-clocking / signal re-generation, HDCP authentication to
®
®
Atmos
TrueHD, Dolby® Digital Plus, DTS-HD Master Audio™,
®
App ready. Compass Control® Pro ready. Fully controllable by
1
Page 4

2
CONNECT:
Test for proper operation of the unit and cables in your system before permanently
securing the unit for final installation. Ensure that you leave enough ventilation
space to provide sufficient airflow and cooling.
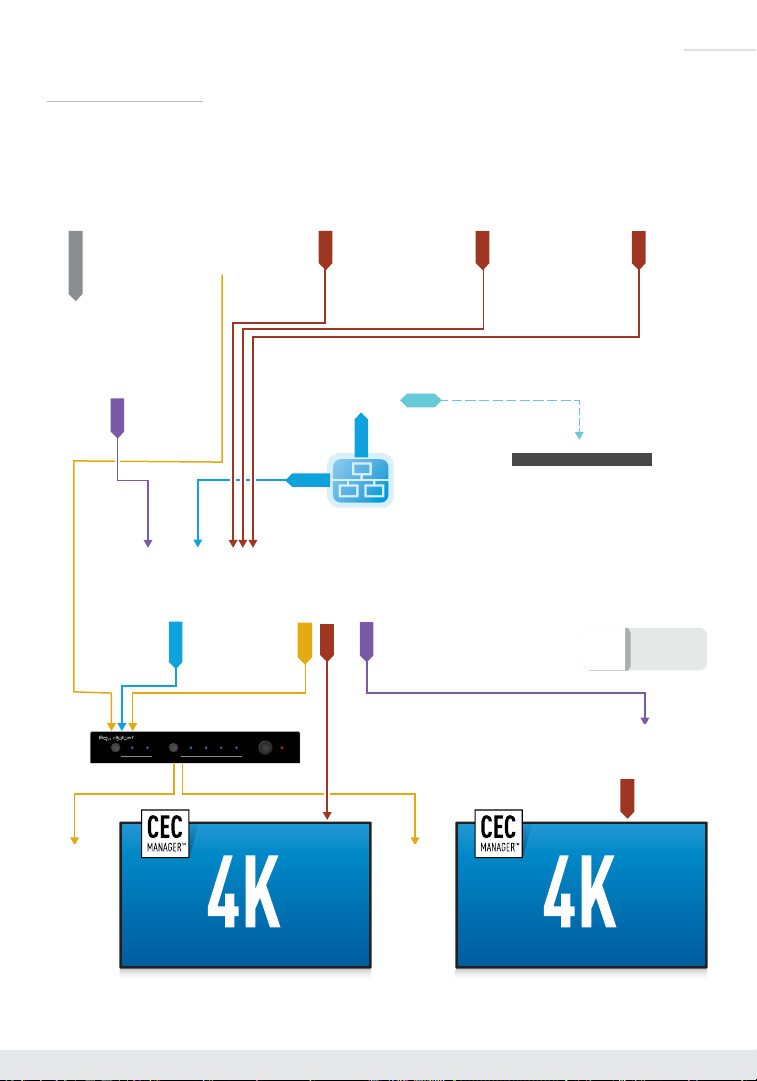
Begin with the KD-PS42 unit, KD-X40MRx, Key Digital wall-plate transmitter (sold separately),
all input/output devices, and audio system powered off.
1. Connect HDMI sources to the input ports of KD-PS42 unit
2. (Optional) Connect HDMI and Display Port / VGA sources to wall-plate transmitter (sold separately)
3. Connect HDMI displays / projectors to KD-PS42’s HDMI output and the HDMI output port of KD-
X40MRx unit
4. Connect CAT wire from KD-PS42’s HDBaseT outputs to KD-X40MRx HDBaseT input and (optional)
from KD-PS42’s HDBaseT input to wall-plate transmitter (sold separately)
5. Connect analog or digital audio to audio system
6. If utilizing KD-AMP220 integration control mode, connect RS-232 wiring from KD-PS42 Tx and
Ground into KD-AMP220 Rx and Ground. See Operation Manual for more info.
7. For unit control, connect control system and/or PC to TCP/IP, RS-232, or place IR emitter
over IR sensor
8. Connected monitors are controlled by CEC Manager
Alternately, connect IR/RS-232 wiring from control system into pass-thru ports of
KD-PS42 and IR/RS-232 ports of the KD-X40MRx
9. Screw-in power supply to the KD-PS42 unit, and then connect power to outlets.
10. Power on HDMI sources and displays
™
on the HDMI connection.
Page 5
IR Out
Audio
KD-AMP220
Input Control
Vol
Mic
Mute
Line BassL/R PCM
1
2
Treble
KD-AMP220
AppleTV
HDMI
HDBT
KD-PS42
3
Application Example
DisplayPort
HDBT
RS-232
Table Laptop
Mic
TCP/IP
HDMI
TCP/IP
KD-PS42
HDMI
Audio
HDBT
WiFi Router
WiFi
AppleTV Video ConferencingPodium Laptop
HDMI
Presentation Switcher KD-PS42 with KD-AMP220
HDMI
K EY DIGITAL
APP READY
1
2
Input Control
KD-AMP220
Mic
Line BassL/R PCM
KD-AMP220
Treble
Mute
Vol
Note: 18Gbps signal extension requires all 18Gbps supported HDMI cables.
KD-X40MRx
HDMI
Page 6

4
CONFIGURE:
Configure and control KD-PS42 with Key Digital® Management Software™ Pro (KDMS™ Pro)
(Download here: https://goo.gl/ZcyHui).
1. Connect to KD-PS42 from your PC using the USB micro port on the face of the unit
2.
Open the
perform a USB scan (fig. 1)
3. Choose the detected device from the Devices window (fig. 2a)
4. Set the desired Device Name in the KD-PS42 Information window
(fig. 2b)
5. In the Network Settings section of the Properties window, enter the desired IP settings (fig. 2c)
6. Save (fig. 2d)
Key Digital® Management Software™ Pro
» a. IP Address (default is 192.168.1.239)
» b. Subnet Mask (default is 255.255.255.0)
» c. Gateway (default is 192.168.1.1)
» d. Port (default is 23)
» Note: If using KD-App, please do not change the port number.
software and
Page 7

7. Use the EDID rotary on the rear of the unit to choose the desired handshake that you wish to provide
to your connected HDMI source.
8. If using KD-App or
Key Digital® Management Software™
(KDMS™) set the desired Input/Output names
by entering the Input/Output Settings section of the properties window, and selecting the Change
Input/Output Name button (fig. 3a), selecting the desired input/output and entering the name (fig. 3b):
9. If utilizing KD-AMP220 integration control mode, choose the KD-AMP220 Control selection box in
the Audio/Video properties section. To control the mix level of KD-AMP220’s microphone input,
choose the selection box for Microphone Control (fig. 4):
5
10. Additional settings may be adjusted in the KDMS software. Full access to all settings/commands is
achieved via terminal session using Tera Term or PuTTy software.
11. Ensure that CEC is enabled on your displays/projectors. Depending on the manufacturer, HDMI-
CEC may be given a different name. View THIS article for a list of CEC names and how to enable
CEC on popular displays.
12. Your unit is now ready to control from the KDMS Control Panel, KD-App, or by professional
control system.
Page 8
6
KDMS™ Pro
Download Page
KDMS
™
Download Page
CONTROL
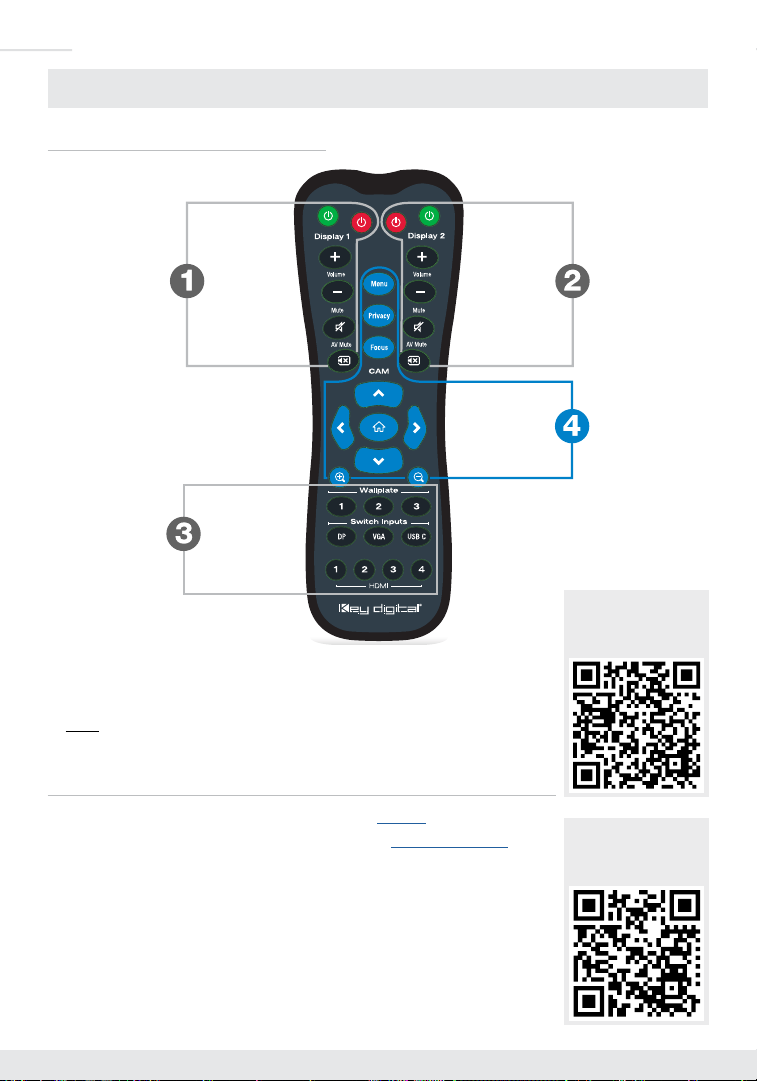
Option 1: Control via Remote Control
Display 1
Controls:
Power
Volume
Mute
AV Mute
Display 2
Controls:
Power
Volume
Mute
AV Mute
KD-CAMUSB
Controls:
(Not compatible
with KD-PS42)
Source
Selection:
Wallplate 1
HDMI 1-3
› Display Control via CEC Manager
› Input selection via buttons at bottom
› Note: Blue buttons at center are for KD-CAMUSB control.
™
buttons at top left and top right
KD-CAMUSB does not natively integrate with KD-PS42.
Option 2: Control via KD-App, Key Digital® Management Software
KD-PS42 is controllable by Key Digital’s user-friendly iOS App (downloadable in
the App Store) or Key Digital® Management Software™ (downloadable here).
› Connect and Configure your KD-PS42 as described in this Connect &
Configure sections
› Download and open KD-App and/or KDMS
› Ensure the iOS device and/or PC computer are on the same network with
KD-PS42
› Perform a network scan in the KD-App/KDMS
› Select and control the selected KD-PS42
™
™
Key Digital® App
on the App Store
™
KDMS
Download Page
™
Page 9

Option 3: Control via professional control system
KD-PS42 allows control over serial interface for bi-directional communication.
Pin: 1 2 3 4 5 6
› For RS-232 control use pins 4, 5, and 6 of the Main Control port
› For TCP/IP control, the default static IP address is 192.168.1.239, with port 23
Default static IP address:
192.168.1.239, port 23
› For the past 10 years, most Key Digital switches have supported a standard HDMI switching
command. KD-PS42 is also controllable by this command, so if you have previously integrated Key
Digital matrixes by third-party control systems you may have success using the same driver/module.
» Switching – Video + Audio together (two commands supported)
» SPO01SIyy yy = input number (01-02)
» SPOSIyy yy = input number (01-02)
7
Test for proper operation of the unit and cables in your system before permanently
securing the unit for final installation. Ensure that you leave enough ventilation
space to provide sufficient airflow and cooling.
Visit keydigital.com for a Complete Manual
Please visit www.keydigital.com for the full manual
and software downloads.
Page 10

8
Important Product Warnings:
1. Connect all cables before providing power to the unit.
2. Test for proper operation before securing unit behind walls or in hard to access spaces.
3. If installing the unit into wall or mounting bracket into sheet-rock, provide proper screw support
with bolts or sheet-rock anchors.
Safety Instructions:
Please be sure to follow these instructions for safe operation of your unit.
1. Read and follow all instructions.
2. Heed all warnings.
3. Do not use this device near water.
4. Clean only with dry cloth.
5. Install in accordance with the manufacturer’s instructions.
6. Do not install near any heat sources such as radiators, heat registers, stoves, or other apparatus
(including amplifiers) that produce heat.
7. Only use attachments/accessories specified by the manufacturer.
8. Refer all servicing to qualified service personnel. Servicing is required when the device has been
damaged in any way including:
» Damage to the power supply or power plug
» Exposure to rain or moisture
Power Supply Use:
You MUST use the Power Supply PROVIDED with your unit or you VOID the Key Digital® Warranty
and risk damage to your unit and associated equipment.
Page 11

9
Contacting Key Digital
®
Technical Support
For technical questions about using Key Digital® products, please contact us at:
› Phone: 914-667-9700
› E-mail: [email protected]
Repairs and Warranty Service
Should your product require warranty service or repair, please obtain a
Key Digital® Return Material Authorization (RMA) number by contacting us at:
› Phone: 914-667-9700
› E-mail: [email protected]
Warranty Information
All Key Digital® products are built to high manufacturing standards and should provide years of trouble-free
operation. They are backed by a Key Digital Limited 3 Year Product Warranty Policy.
http://www.keydigital.com/warranty.htm
Page 12
Rev 0 – May 2019
Key Digital®, led by digital video pioneer Mike Tsinberg,
develops and manufactures high quality, cutting-edge
technology solutions for virtually all applications where
®
high-end video and control are important. Key Digital
is at the forefront of the video industry for Home
Theater Retailers, Custom Installers, System Integrators,
Broadcasters, Manufacturers, and Consumers.
Key Digital® :: 521 East 3rd Street :: Mount Vernon, NY 10553
Phone : 914.667.9700 Fax : 914.668.8666 Web : www.keydigital.com
© 2019 Key Digital, Inc. All rights reserved.
 Loading...