

Page 1
521 East 3rd Street, Mount Vernon, NY 10553
Phone :: 914.667.9700 Fax :: 914.668.8666
Web :: www.keydigital.com
KD-PC2 Operating Instructions
Operating Instructions
Key Digital™, led by digital video pioneer Mike Tsinberg,
develops and manufactures high quality, cutting-edge
technology solutions for virtually all applications where
high quality video imaging is important. Key Digital™
is at the forefront of the video industry for Home
Theater Retailers, Custom Installers, System Integrators,
Broadcasters, Manufacturers, and Consumers. We
provide
total video system solutions because we
know and help drive the technology, the industry, the
business, and all the latest up-and-coming standards.
But most of all, we know exactly what you need for your
unique application - the right solution.
Rev 2 – Sept 2006
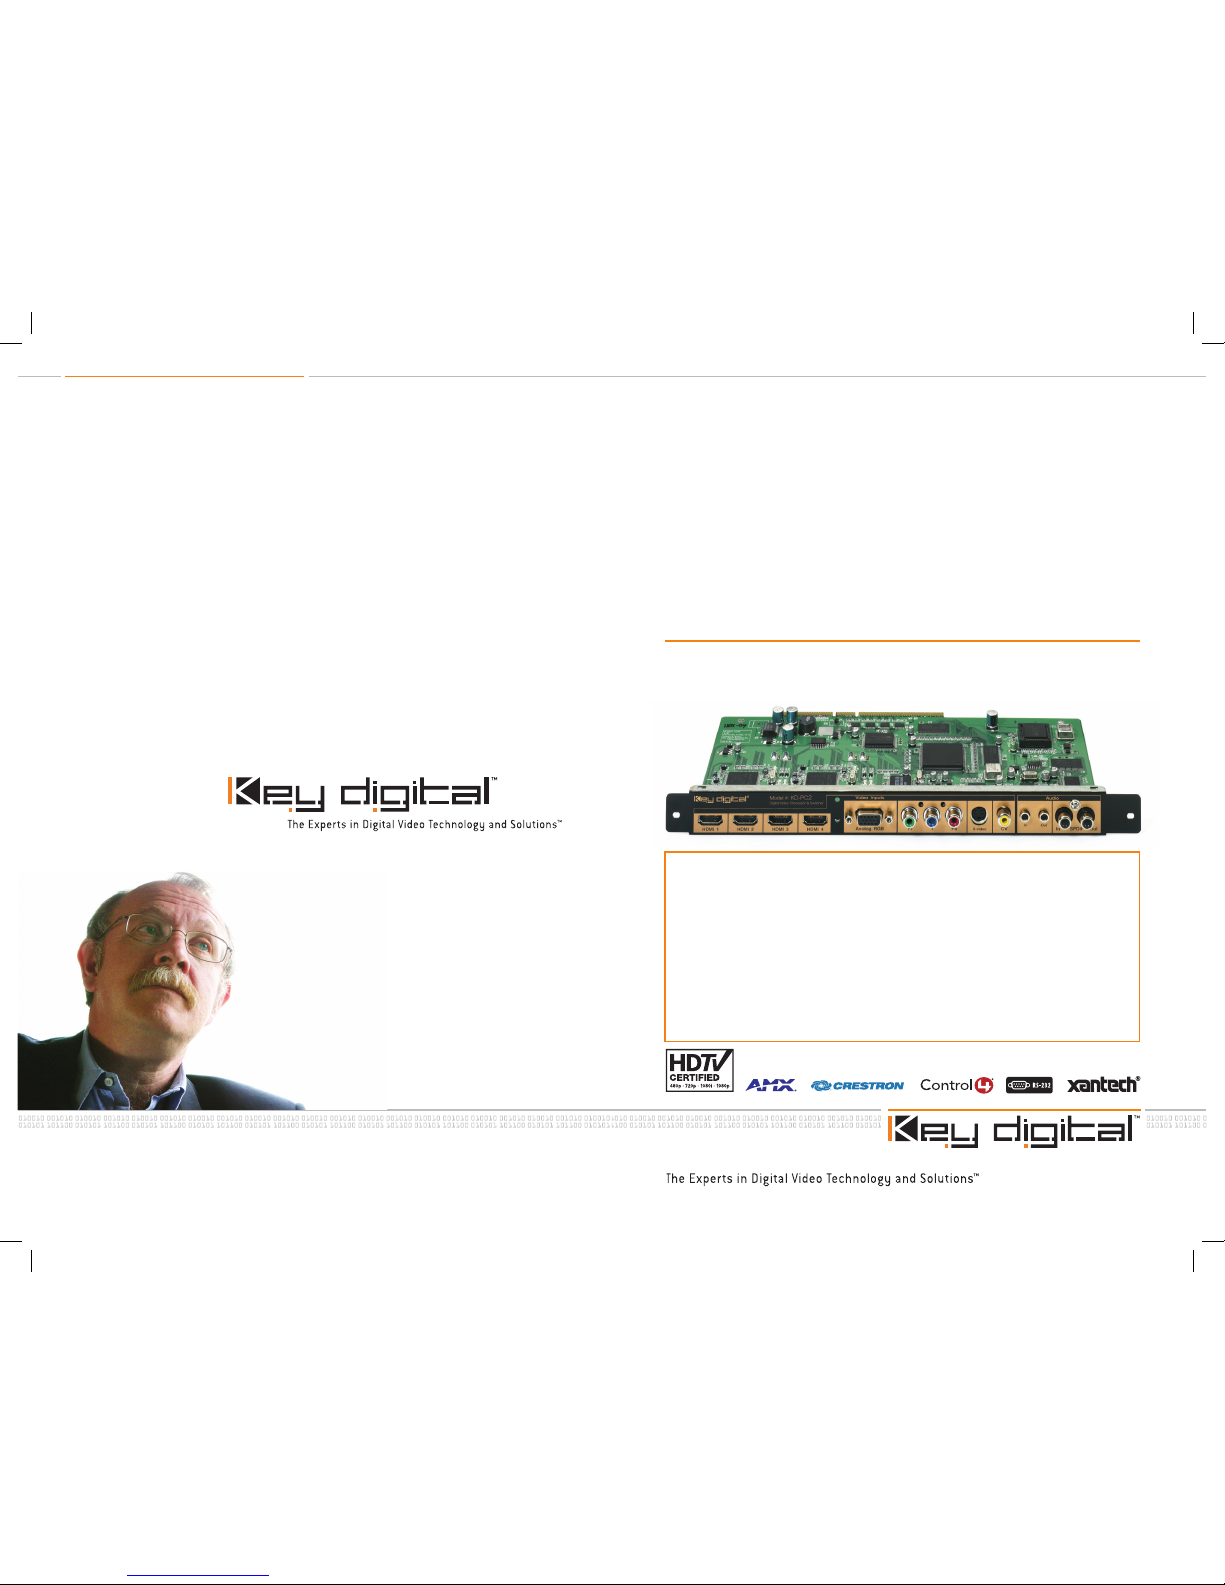
KD-PC2 by Key Digital™ is the most advanced full-function digital video processor and
video switcher plug-in card* available today for Pioneer Plasma Displays. HDMI (HDCP)
digital (and multiple analog) video inputs are sized precisely to match the native resolution
of Pioneer Plasma displays. KD-PC2 accepts all popular HD and SD source formats and
resolutions at 60 and 50 Hz (including NTSC and PAL).
KD-PC2 supports the following Pioneer™ Plasma Displays:
United States model s PDP-425CMX, PDP-434CMX, PDP-504CMX, PDP-505CMX,
PDP-507CMX, PDP-607CMX
European and International models PDP-43MXE1, PDP-43MXE1-S, PDP-50MXE1,
PDP-50MXE1-S
Pioneer™ is a registered trademark of Pioneer.
*Follow Caution procedures as described in this Operating Manual when inserting the KD-PC2 into the Pioneer Plasma Display.
›
›
KD-PC2
Digital Video Card & Processor for Pioneer™ Plasma Displays
KD-PC2_Manual.indd 2-1 10/18/06 1:52:27 PM
Page 2
KD-PC2 Operating Instructions
Page 2
KD-PC2 Operating Instructions
Page 1
Read these instructions.
Keep these instructions.
Heed all warnings.
Follow all instructions.
Do not use this apparatus near water.
Clean only with dry cloth.
Do not block any ventilation openings. Install in accordance with the manufacturer’s
instructions.
Do not install near any heat sources such as radiators, heat registers, stoves, or other
apparatus (including amplifiers) that produce heat.
Do not defeat the safety purpose of the polarized or grounding-type plug. A polarized plug
has two blades with one wider than the other. A grounding type plug has two blades and
a third grounding prong. The wide blade or the third prong are provided for your safety. If
the provided plug does not fit into your outlet, consult an electrician for replacement of the
obsolete outlet.
Protect the power cord from being walked on or pinched particularly at plugs, convenience
receptacles, and the point where they exit from the apparatus.
Only use attachments/accessories specified by the manufacturer.
Use only with the cart, stand, tripod, bracket, or table specified by the manufacturer, or sold
with the apparatus. When a cart is used, use caution when moving the cart/apparatus
combination to avoid injury from tip-over.
Unplug this apparatus during lightning storms or when unused for long periods of time.
Refer all servicing to qualified ser vice personnel. Servicing is required when the apparatus
has been damaged in any way, such as power-supply cord or plug is damaged, liquid has
been spilled or objects have fallen into the apparatus, the apparatus has been exposed to
rain or moisture, does not operate normally, or has been dropped.
1.
2.
3.
4.
5.
6.
7.
8.
9.
10.
11.
12.
13.
14.
Important Safety Instructions.
Please be sure to follow these instructions for safe operation of your unit
WARNING – To reduce the risk of fire or electric shock , do not expose his
apparatus to rain or moisture.
Apparatus shall not be exposed to dripping or splashing and no objects filled with
liquids, such as vases, shall be placed on the apparatus.
Table of Contents
Important Installation Issue. . . . . . . . . . . . . . . . . . . . . . . . . . . . . . . . . . . . . . . . . . . . . . . . . . . . . 2
Important Warnings . . . . . . . . . . . . . . . . . . . . . . . . . . . . . . . . . . . . . . . . . . . . . . . . . . . . . . . . . . 4
Key Features . . . . . . . . . . . . . . . . . . . . . . . . . . . . . . . . . . . . . . . . . . . . . . . . . . . . . . . . . . . . . . . 5
About the KD-PC2 . . . . . . . . . . . . . . . . . . . . . . . . . . . . . . . . . . . . . . . . . . . . . . . . . . . . . . . . . . 8
Getting Started . . . . . . . . . . . . . . . . . . . . . . . . . . . . . . . . . . . . . . . . . . . . . . . . . . . . . . . . . . . . .10
Basic Operation of the KD-PC2 . . . . . . . . . . . . . . . . . . . . . . . . . . . . . . . . . . . . . . . . . . . . . . . . .15
IR Remote Control . . . . . . . . . . . . . . . . . . . . . . . . . . . . . . . . . . . . . . . . . . . . . . . . . . . . . . . . . . 28
OSD Menu Tree . . . . . . . . . . . . . . . . . . . . . . . . . . . . . . . . . . . . . . . . . . . . . . . . . . . . . . . . . . . . 30
Firmware Upgrades . . . . . . . . . . . . . . . . . . . . . . . . . . . . . . . . . . . . . . . . . . . . . . . . . . . . . . . . . .31
Technical Specifications . . . . . . . . . . . . . . . . . . . . . . . . . . . . . . . . . . . . . . . . . . . . . . . . . . . . . . 32
How to Contact Key Digital™ . . . . . . . . . . . . . . . . . . . . . . . . . . . . . . . . . . . . . . . . . . . . . . . . . . 36
© 2006 Key Digital, Inc. All rights reserved.
KD-PC2_Manual.indd 2-1 10/18/06 1:52:29 PM
Page 3
KD-PC2 Operating Instructions
Page 2
KD-PC2 Operating Instructions
Page 3
Important Installation Issue
AFTER INSTALLING THE KD-PC2 CARD, WHAT TO DO IF THE PICTURE ON YOUR
DISPLAY APPEARS SHIFTED TO THE RIGHT?
The KD-PC2 is simple to install and operate. The single most common problem encountered
when installing the KD-PC2 into the Pioneer Plasma Display is failure to match the output display
resolution of the KD-PC2 to the native resolution of your particular Pioneer Plasma Display. Such a
mismatch results in a shift of the picture to the right on the display.
Follow these steps to correct the problem:
1. Check to see if your Pioneer Plasma Display model listed in the table below is set to its native
resolution. Follow the instructions provided with the Pioneer Plasma Display.
Market Pioneer™ Plasma Display Display’s Native Resolution
USA PDP-425CMX 1024 x 768p [XGA]
PDP-434CMX 1024 x 768p [XGA]
PDP-504CMX 1280 x 768p [WXGA]
PDP-505CMX 1280 x 768p [WXGA]
PDP-507CMX 1360 x 768p
PDP-607CMX 1360 x 768p
Europe & International PDP-43MXE1 & PDP-43MXE1-S 1024 x 768p [XGA]
PDP-50MXE1 & PDP-50MXE1-S 1280 x 768p [WXGA]
2. If you find your model of Pioneer Plasma Display is NOT configured for its native resolution, be
sure to reset the display to factory default settings. For example, instructions for resetting the
model PDP-425CMX are provided below:
PDP-425CMX: Reset all settings to default
Set to 1024 x 768 output.
In the Integrator Menu (get into the INTEGRATOR menu by holding down the display button on
the Pioneer remote for 5 seconds followed by pressing the menu button):
i. H pos 67
ii. V pos 126
iii. H size +7
iv. V size +1
v. FRC set to off
vi. Gamma 2.2
vii. Brightness, contrast, color, tint and sharpness set for best dynamic range and
image quality (only a slight adjustment may be required)
›
➔
➔
»
»
»
»
»
»
»
3. The KD-PC2 video card is set at the factory to directly output (via an all-internal digital
connection) 1280x768p [WXGA] to your Pioneer Plasma Display. Follow instructions as provided
in the Pioneer Plasma Display Operating Instructions Guide to set your Pioneer Plasma Display
for WXGA resolution. If your display only supports up to 1024 x 768p [XGA] resolution, then the
KD-PC2 must be configured to output this resolution. In addition, output resolutions of 1360
x 768p and 1280 x 720p from the KD-PC2 card will be available in the future to support the
Pioneer Plasma Displays listed in the table above, as Firmware Upgrades downloadable from our
website. Check the Key Digital website at www.keydigital.com.
To select the output resolution of the KD-PC2, follow the instructions provided in this Operating
Manual in the section BASIC OPERATION OF THE KD-PC2 CARD under the Bring Up Main
Menu, menu item 5 Set Up >> 4 Output Video:
Set Up [miscellaneous setup controls]
Firmware Upgrade Mode
Move Menu [Moves the OSD location on the screen]
Transparency [Adjusts the opaqueness of the OSD]
Output Video [WXGA, XGA, 1360x768p*, or 1280x720p*]
*Note: 1360 x 768p and 1280 x 720p will be available in the future
as a Firmware Upgrade
Go into this menu and set the KD-PC2 to match the native resolution of your particular
model of Pioneer Plasma Display. See the table provided in this manual for the native
resolution of your particular model display. Be sure your Pioneer Plasma Display is itself set
to display in its native mode. Follow the instructions provided with your display.
›
1.
2.
3.
4.
KD-PC2_Manual.indd 2-3 10/18/06 1:52:31 PM
Page 4
KD-PC2 Operating Instructions
Page 4
KD-PC2 Operating Instructions
Page 5
The KD-PC2 video processor card is currently intended for use ONLY WITH THE
FOLLOWING PIONEER PLASMA DISPLAYS:
Market Pioneer™ Plasma Display Models Supported by the
Key Digital™ KD-PC2
USA PDP-___CMX models 425, 434, 504, 505, 507 & 607
Europe &
International
PDP-__MXE1 &
PDP-__MXE1-S
43 & 50
The KD-PC2 video processor card should ONLY BE INSERTED AS INSTRUCTED
HERE IN THE APPROPRIATE EXPANSIONS SOLUTIONS (“ES”) SLOT of these
Pioneer Plasma Displays. See the Pioneer Plasma Display Operating Instructions
Guide for more details.
Important Warnings
Proper handling of the KD-PC2 card ensures a safe installation. The KD-PC2 card
is STATIC SENSITIVE. Please use EXTREME CAUTION when installing the KD-PC2
card inside the Pioneer Plasma Displays that support this card. The Pioneer
Plasma Display must be turned OFF and the power cord must be UNPLUGGED
before inserting the KD-PC2 card inside the Pioneer Plasma Display, or else
damage may occur to the products. Do not reapply power to the Pioneer Plasma
Display until the KD-PC2 card is properly installed in the display.
Key Digital will not be held liable or responsible for any damages, nor will Key
Digital honor the warranty, if proper set-up procedures are not followed when
installing the Key Digital KD-PC2 card. Key Digital reserves the right to inspect
the products for proper set up procedures.
Always be sure that the Pioneer™ Plasma Display is turned off and UNPLUGGED
FROM THE POWER SOURCE before connecting any A/V equipment to the KDPC2 video card.
When performing a Firmware Upgrade, you MUST use the Firmware Upgrade
Cable PROVIDED WITH YOUR KD-PC2 AT TIME OF PURCHASE and carefully
follow each step of the instructions for Firmware Upgrade of your KD-PC2 Video
Card, as provided on our web site at www.keydigital.com. Failure to follow these
instructions may lead to the inoperability of your KD-PC2 card.
Key Features
KD-PC2 is a high-quality video card and processor specifically engineered for operation in Pioneer
Plasma Displays. All internal connections from the KD-PC2 card to the Pioneer Plas ma Display via
the Pioneer Plasma ES (Expansion Solutions) card slot ensure pristine picture quality.
With your KD-PC2 card, you can connect and select multiple digital and analog video
sources, and audio, to your Pioneer Plasma Display. But the power of your KD-PC2
does not end with its multiple video interfaces. An easy-to-operate, full-function, highquality Video Processor is built into your switcher. For each input, you can control a
broad range of functions, from Brightness and Contrast, to Size, Position, and even
“Zoom” - Aspect Ratio adjustments. Test patterns are built-into the KD-PC2 to help
set-up your video system.
Pioneer Plasma Displays Supported by the KD-PC2:
Market Pioneer™ Plasma Display Display’s Native Resolution*
USA PDP-425CMX 1024 x 768p [XGA]
PDP-434CMX 1024 x 768p [XGA]
PDP-504CMX 1280 x 768p [WXGA]
PDP-505CMX 1280 x 768p [WXGA]
PDP-507CMX 1360 x 768p [UWXGA]
PDP-607CMX 1360 x 768p [UWXGA]
Europe & International PDP-43MXE1 & PDP-43MXE1-S 1024 x 768p [XGA]
PDP-50MXE1 & PDP-50MXE1-S 1280 x 768p [WXGA]
*Note: The KD-PC2 video card is set at the factory to directly output (via an all-internal digital connection) WXGA
(1280x768) to your Pioneer Plas ma Display. Follow instructions as provided in the Pioneer Plasma Display
Operating Instructions Guide to set your Pioneer Plasma Dis play for WXGA resolution. If your display supports
only up to 1024 x 768p [XGA] resolution, then the KD-PC2 must be configured to output this resolution. In
addition, output resolutions of 1360 x 768p [UWXGA] and 1280 x 720p from the KD-PC2 card will be available in
the future to support the Pioneer Plasma Displays listed in the table above, as Firmware Upgrades downloadable
from our website. Check the Key Digital website at www.keydigital.com.
HD
M
I1
RG
B
HDMI2
HDMI3
H
DM
I4
COMPONENT
S-VIDEO
VI
D
EO
BRIGHT
CONT
SAT
EDGE
UPGRADE
1
2 3
4
5 6
7
809
RECALL
INFO
STILL
ASPECT
EXIT PCM
POWER
MENU
EXIT
LIP-SYNCVOL
MUTE
SET
KD-PC2_Manual.indd 4-5 10/18/06 1:52:34 PM
Page 5
KD-PC2 Operating Instructions
Page 6
KD-PC2 Operating Instructions
Page 7
Input Resolutions Accepted by the KD-PC2 Card:
Accepts the following scan inputs:
480i, 480p, 576i, 576p, 720p, 768p and 1080i/540p
Accepts the following video standards:
HDTV
SDTV
Analog NTSC and PAL on the S-Video and Composite Video inputs
Accepts and automatically detects the following input field or frame rates:
60 and 50 Hz
The output frame rate is the same as the input frame rate
Accepts the following 60 Hz resolutions:
720 x 480i @ 60 Hz
720 x 480p @ 60 Hz
1024 x 768* @ 60 Hz
1280 x 720p @ 60 Hz
1280 x 768p* @ 60 Hz
1920 x 1080i @ 60 Hz
*The Component Video input does not support the following resolutions:
1024 x 768p
1280 x 768p
Connect and Select any Digital HDMI or Analog Video Input:
Four (4) HDMI Digital Video inputs
HDMI is plug-and-play and also supports audio
Supports HDCP Copy Protection
To support DVI-D Video, use Key Digital HDMI>DVI adapter cable(s)
Analog Video (individual analog video connectors for each of the following video interfaces):
RGB(HV)
Component Video (YPbPr)
The Component Video input does not support the following resolutions:
1024 x 768p
1280 x 768p
S-Video: NTSC, PAL
Composite Video (CV): NTSC, PAL
›
➔
›
➔
➔
➔
›
➔
➔
›
➔
➔
➔
➔
➔
➔
»
➛
➛
›
➔
➔
➔
›
➔
➔
»
➛
➛
➔
➔
Audio Inputs and Outputs Supported:
Analog audio left and right stereo pair input and output
SPDIF coax digital audio input and output
Dolby Digital is passed-thru unprocessed and output on the SPDIF coax, requiring an external
Dolby Digital processor
HDMI PCM digital audio input and output
Processes and Scales any HDMI or Analog Video Input to Match the Native
Resolution of your Pioneer Plasma Display:
Using Key Digital’s award-winning Clear Matrix Pro™ technology
A full-function, high-quality Video Processor is included
Supports most popular source formats and resolutions
Accepts and automatically detects 60 Hz and 50 Hz input formats (the output frame rate will be
the same as the input frame rate) , and PAL analog on the S-Video and Composite Video inputs
Calibration for RGB gain and setup
Built-in Test Patterns available through the IR Remote as well as RS-232
Easy to Control and Operate:
Built-in On-screen Display (OSD)
Store your custom settings (like brightness, contrast, much more) for each of the HDMI and
Analog Video Inputs
Easy-to-operate IR Remote Control
RS-232 through the Pioneer Plasma Display (optional Pioneer Plasma Display Expansion
Solutions Slot Communications Card must be installed in your display to support this feature)
Firmware upgradeable
Receives power directly from the Expansion Solutions Slot of the Pioneer Plasma Display
Does not interfere with the operation of your Pioneer Plasma Display
Does not interfere with A/V sources connected directly to your Pioneer Plasma Display
Key Digital™ Technology:
The Technology drives all Key Digital products. The cutting-edge technologies engineered into your
KD-PC2 video processor and switcher plug-in card for your Pioneer Plasma Dis play include:
›
›
➔
›
›
›
›
›
›
›
›
›
›
›
›
›
›
›
Key Digital® Exclusive Technologies Supported Technologies
KD-PC2_Manual.indd 6-7 10/18/06 1:52:34 PM
Page 6
KD-PC2 Operating Instructions
Page 8
KD-PC2 Operating Instructions
Page 9
About the KD-PC2
Thank you for purchasing the Key Digital™ KD-PC2, the most advanced and sophisticated
digital video processor and video switcher plug-in card available today for the Pioneer™ Plasma
Displays (see the list of supported USA and European/International models, above). KD-PC2
is a full-function digital video processor that pristinely converts input video formats to the native
resolution of the Pioneer Plasma display. You can select among 4 HDMI digital inputs with HDCP
copy protection support (or DVI-D with an adapter cable), and separate analog RGB, Component
(YPbPr), S-Video, or Composite video inputs. KD-PC2 also supports analog audio left and right
stereo pair input and output, output, SPDIF coax digital audio input and output, and HDMI PCM
digital audio input and output. With its own On-screen Display (OSD), all features are easily
controlled with the IR remote control (provided), and can be controlled by the Pioneer Plasma
RS-232.
The solution you’ve been waiting for, the solution you’ve been looking for…
The KD-PC2 digital video processor plug-in card is ideally suited to interface to your Pioneer
Plasma Display, greatly enhancing the capability of the display. KD-PC2 lets you take full advantage
of your high-quality Pioneer Plasma Display by providing multiple digital and analog video input
ports, and world-class video processing like deinterlacing, scaling, and much more.
Pioneer™ Plasma Displays
The high-quality Pioneer Plasma Displays are provided with a built-in ES (Expansion Solutions) Slot
Interface to allow the installation of cards for the connection of external devices, thus enhancing
their expansion potential.
Market Pioneer™ Plasma Display Display’s Native Resolution
USA PDP-425CMX 1024 x 768p [XGA]
PDP-434CMX 1024 x 768p [XGA]
PDP-504CMX 1280 x 768p [WXGA]
PDP-505CMX 1280 x 768p [WXGA]
PDP-507CMX 1360 x 768p
PDP-607CMX 1360 x 768p
Europe & International PDP-43MXE1 & PDP-43MXE1-S 1024 x 768p [XGA]
PDP-50MXE1 & PDP-50MXE1-S 1280 x 768p [WXGA]
The KD-PC2 plug-in card is so versatile, and supports so many input sources:
The KD-PC2 digital video processor and video switcher plug-in card is ideally suited to interface a
wide array of source products to your Pioneer Plasma Display. With four HDMI or DVI inputs, and a
wide variety of analog input connectors, you can interface your DVD player, Satellite Box, HD DVR,
Set Top Box, and your PC to your Pioneer Plasma Display.
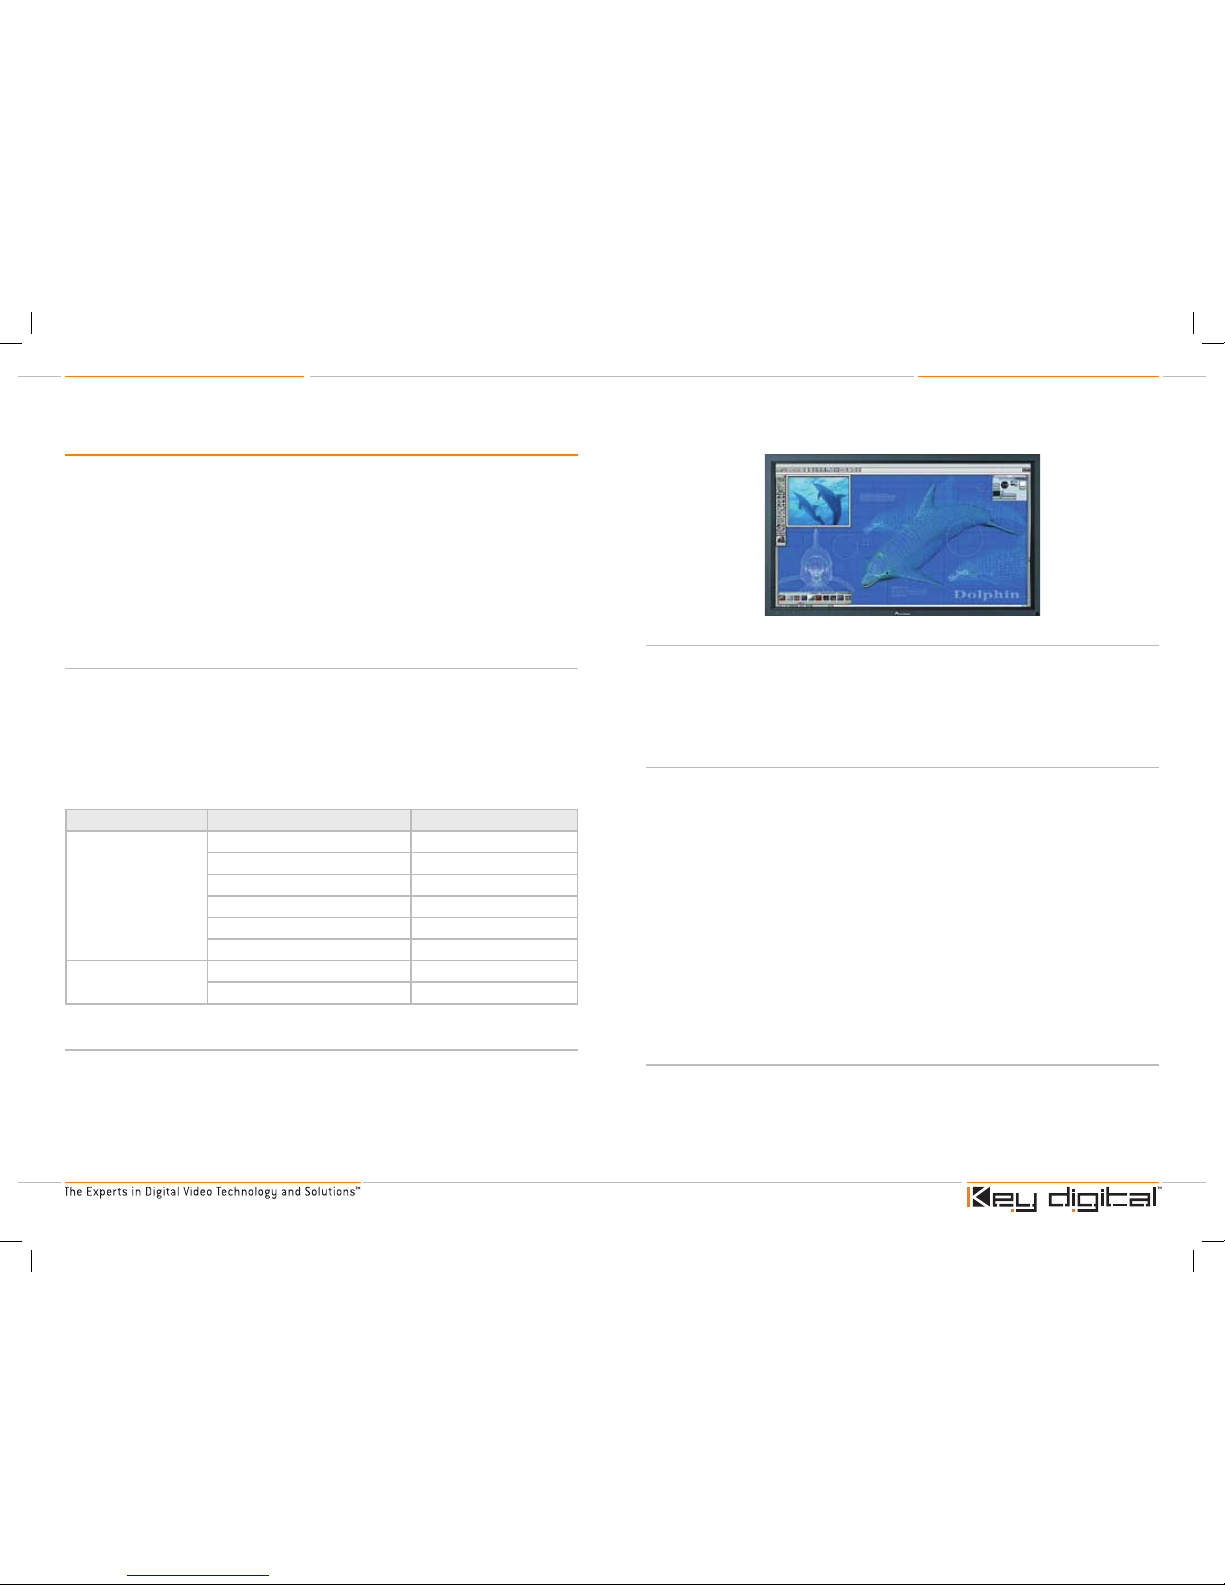
For example, the Pioneer Plasma 50” Professional Plasma Display, Model PDP-504CMX
All-digital interface to your Pioneer Plasma Display:
Take advantage of KD-PC2’s all-digital interfaces for Pioneer Plasma Display installation
applications. The four (4) HDMI all-digital inputs provide crystal-clear interfaces to the Plasma
display, and add the flexibility of a multiple-input switcher so you can input multiple sources to
your
display. The output of your KD-PC2 directly interfaces to the Pioneer Plasma through a digital RGB
internal connection, guaranteeing an all-digital connection from source to display, and eliminating any
conversions to analog which could corrupt your signal and degrade the picture quality.
Versatile video and audio Inputs and Outputs:
Next, let’s look at the versatility offered by your KD-PC2 card. Your KD-PC2 supports a wide array
of video inputs, providing flexibility as well as the means for all-digital interfaces to your Pioneer
Plasma Display.
For HDMI Digital Video (HDMI is plug-and-play and also supports audio) with HDCP copy
protection support, there are four (4) separately selectable and customizable inputs. For Analog
Video, there are individual analog video inputs that are customizable, for each of the following video
interfaces:
RGB
Component Video (YPbPr)
The Component Video input does not support the following resolutions:
1024 x 768p
1280 x 768p
S-Video (NTSC and PAL)
Composite Video (CV) (NTSC and PAL)
Your KD-PC2 also supports analog audio left and right stereo pair input and output, SPDIF coax
digital audio input and output, and HDMI PCM digital audio input and output
A built-in Video Processor:
With Key Digital’s award-winning Clear Matrix Pro™ technology built right into your KD-PC2 card,
any selected video input can be scaled exactly to match the native resolution of your display. It
provides superior quality scaling of all popular HDTV & SDTV input formats (480i, 480p, 576i, 576p,
720p, 768p, and 1080i/540p), and analog NTSC and PAL video formats. KD-PC2’s many video
input interfaces and format options provide flexibility and pristine deinterlacing and scaling to the
native resolution of your Pioneer Plasma Display.
›
›
›
➔
➔
›
›
KD-PC2_Manual.indd 8-9 10/18/06 1:52:35 PM
Page 7
KD-PC2 Operating Instructions
Page 10
KD-PC2 Operating Instructions
Page 11
So easy to control and operate:
With so many features and versatility, you may be wondering: Is the KD-PC2 card easy to control
and operate? Installing and using your KD-PC2 card couldn’t be simpler. KD-PC2:
Plugs right into the Pioneer Plasma Expansion Solutions Slot
Has an all-digital internal connection to the Pioneer Plasma Display
Has its own On-screen Display (OSD) and IR Remote Control that is easy to operate
Uses the RS-232 port on your Pioneer Plasma Display (optional Pioneer Plasma Display
Expansion Solutions Slot Communications Card must be installed in your display to support this
feature)
Is Firmware Upgradeable
Does not interfere with the operation of your Pioneer Plasma Display
Does not interfere with A/V sources connected directly to your Pioneer Plasma Display
Getting Started
Follow these instructions to quickly and easily install and set-up your KD-PC2 Pioneer Plasma
Display video plug-in card.
Open the package and you will find the following contents:
One (1) KD-PC2 Card with installation warning label
IR Remote Control with batteries included
Two (2) Audio Cables
One (1) Cable for Firmware Upgrades
Operating Instructions Manual
Warranty card
Installing your KD-PC2 Pioneer Plasma Display video plug-in card:
Your Key Digital KD-PC2 video processor card is easy to install, configure, and operate. Follow the
directions below to install the KD-PC2 video processor card in your Pioneer Plasma Display.
1. Install the KD-PC2 video proces sor card in your Pioneer Plasma Display, models listed
below
›
›
›
›
›
›
›
1.
2.
3.
4.
5.
6.
Be sure you have a model of Pioneer Plasma Display that supports the KD-PC2 video
card. See the list of supported Pioneer models, above.
The Pioneer Plasma display must be turned OFF and the power cord must be
UNPLUGGED before attempting to insert the KD-PC2 video card in your display.
Lay the Pioneer Plasma Display face down on a sturdy and smooth work surface. Use care
not to scratch the face of the display, and follow any precautions provided in your Pioneer
Plasma Display Operating Instructions Guide.
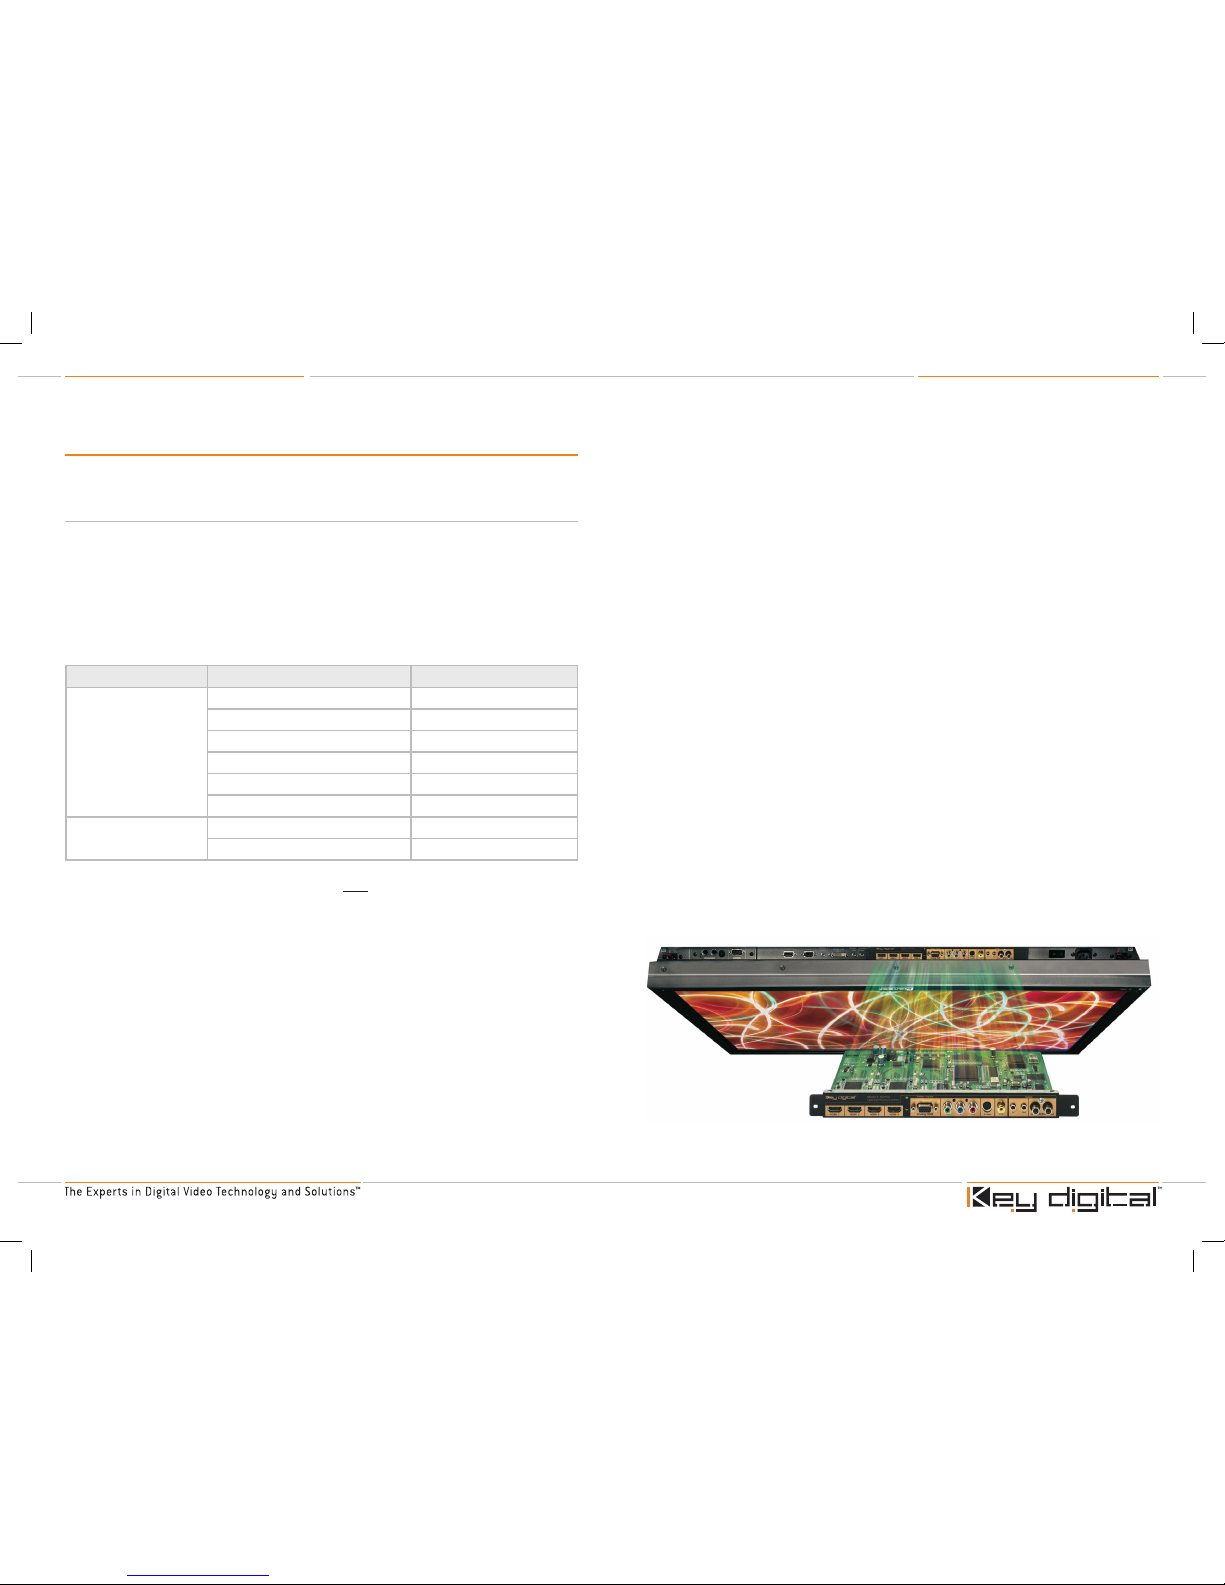
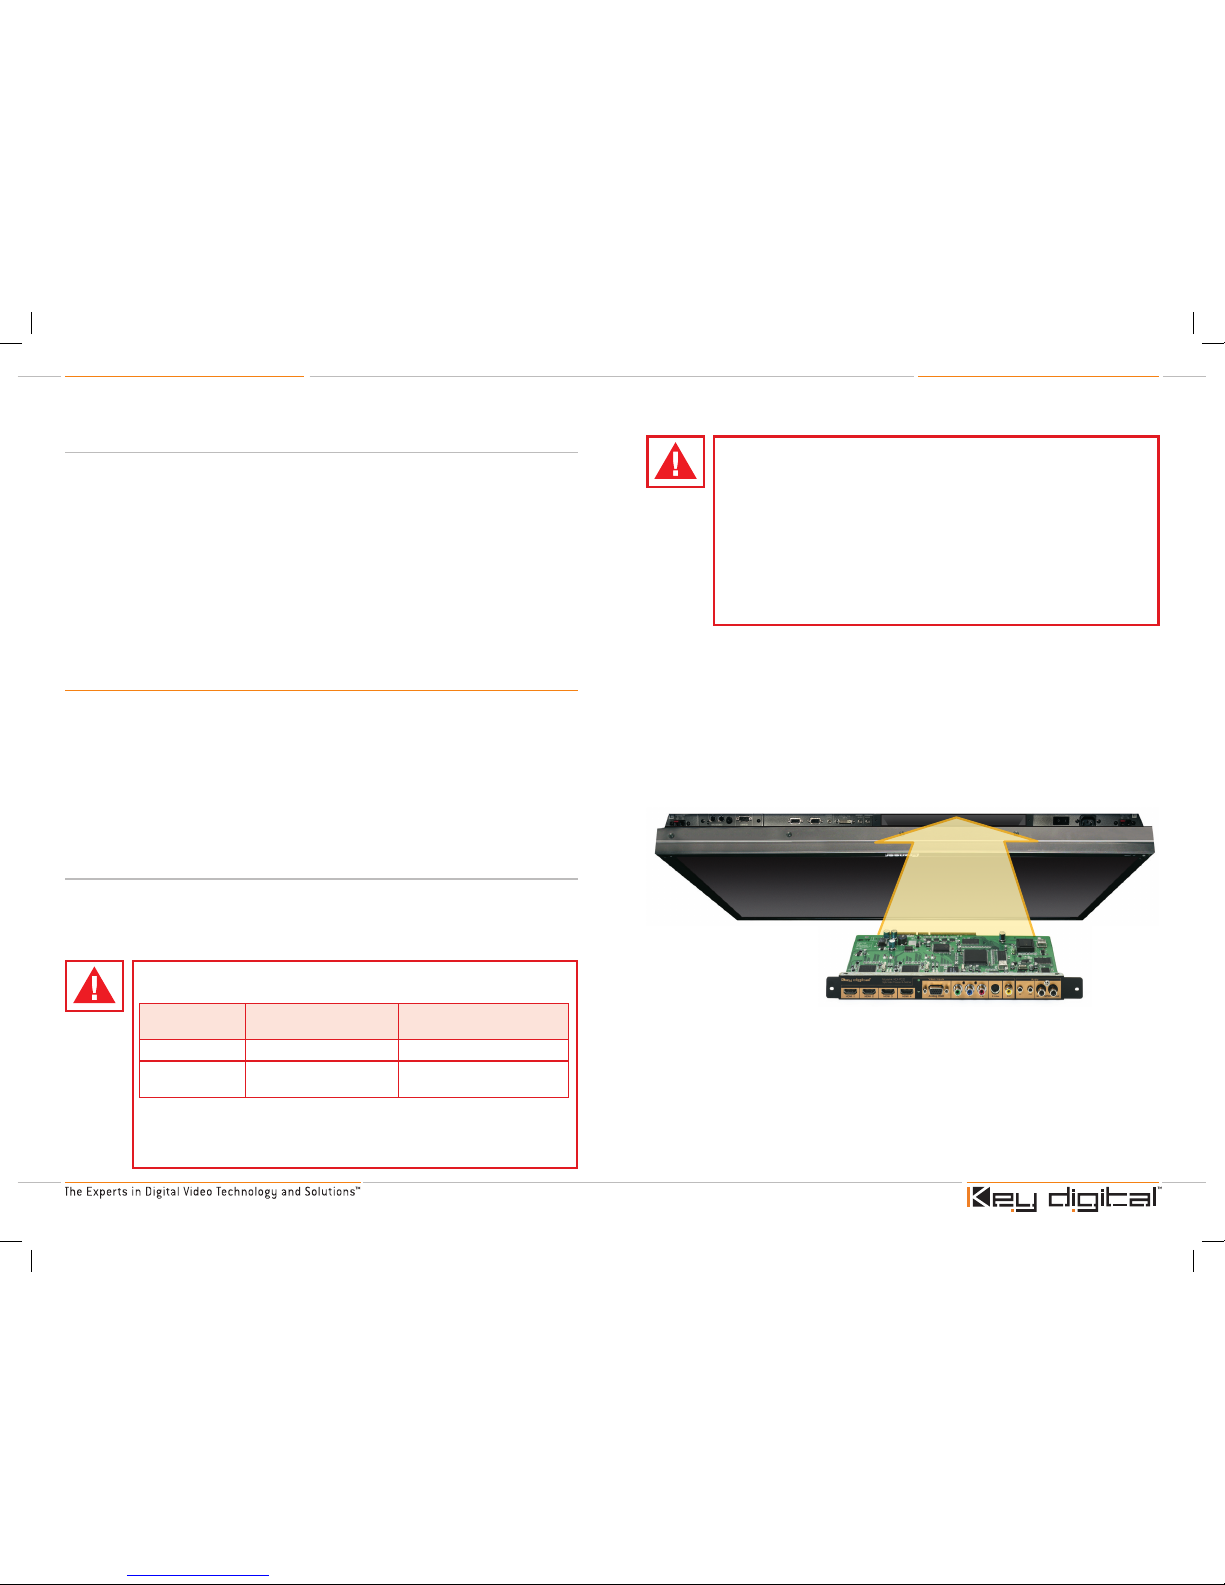
Locate the Expansions Solutions (“ES”) Slot on the underside of your Pioneer Plasma Display,
as shown below.
Orient your KD-PC2 video card as shown above and insert in the appropriate Expansions
Solutions (“ES”) Slot of your Pioneer Plasma Display. Using care not to damage the card, be
sure it is properly seated within the Pioneer Plasma Dis play and fully inserted, so the outer
flanges of the KD-PC2 video card are flush with the display case. You may need to “wobble”
the card slightly left and right, up and down, before the card is properly aligned with the
connector inside the Pioneer Plasma Display.
Note: If while installing the KD-PC2 video card it gets jammed or stuck in the slot, or
if you ever need to remove the KD-PC2 video card from your Pioneer Plasma
display, it is suggested you use the pull ring on the card. This pull ring can also be
used to facilitate installation of the card in the slot in the Pioneer Plasma Di splay.
a.
b.
c.
d.
e.
The KD-PC2 video processor card is currently intended for use ONLY WITH THE
FOLLOWING PIONEER PLASMA DISPLAYS:
Market Pioneer™ Plasma Display Models Supported by the
Key Digital™ KD-PC2
USA PDP-___CMX models 425, 434, 504, 505, 507 & 607
Europe &
International
PDP-__MXE1 &
PDP-__MXE1-S
43 & 50
The KD-PC2 video processor card should ONLY BE INSERTED AS INSTRUCTED
HERE IN THE APPROPRIATE EXPANSIONS SOLUTIONS (“ES”) SLOT of these
Pioneer Plasma Displays. See the Pioneer Plasma Display Operating Instructions
Guide for more details.
Proper handling of the KD-PC2 card ensures a safe installation. The KD-PC2 card
is STATIC SENSITIVE. Please use EXTREME CAUTION when installing the KD-PC2
card inside the Pioneer Plasma Displays that support this card. The Pioneer
Plasma Display must be turned OFF and the power cord must be UNPLUGGED
before inserting the KD-PC2 card inside the Pioneer Plasma Display, or else
damage may occur to the products. Do not reapply power to the Pioneer Plasma
Display until the KD-PC2 card is properly installed in the display.
Key Digital will not be held liable or responsible for any damages, nor will Key
Digital honor the warranty, if proper set-up procedures are not followed when
installing the Key Digital KD-PC2 card. Key Digital reserves the right to inspect
the products for proper set up procedures.
ES Slot to use for installing
your KD-PC2 video card
Use care and fully insert the
KD-PC2 video card in the
Pioneer Plasma ES Slot
KD-PC2_Manual.indd 10-11 10/18/06 1:52:38 PM
Page 8
KD-PC2 Operating Instructions
Page 12
KD-PC2 Operating Instructions
Page 13
See below for the proper insertion of your KD-PC2 video card in the Pioneer Plasma Display.
Your KD-PC2 video card can be controlled via the RS-232 port on your Pioneer Plasma
Display (if provided on the display). This is a good time to note if that capability is already
provided on your Pioneer Plasma Display. Check to see if the optional Pioneer Plasma
Display Expansion Solutions Slot Communications Card is installed in your Pioneer Plasma
Display. Look for the RS-232 female connector in the location shown above.
Return the Pioneer Plasma Display to its upright position, and place in a safe location as
described in your Pioneer Plasma Display Operating Instructions Guide.
Note: You may find it more convenient to connect your sources to the KD-PC2 video
card before returning the display to its upright position. In that event, proceed to
the next step and then return the display to its upright position after all connections
have been made.
2. Connect all of your A/V (Audio/Video) source devices to your KD-PC2 card
You may have several source devices with HDMI and/or various analog outputs that you would like
to conveniently input to your Pioneer Plasma and select for display. KD-PC2 supports a wide array
of video inputs, providing flexibility as well as the means for all-digital interfaces to your Pioneer
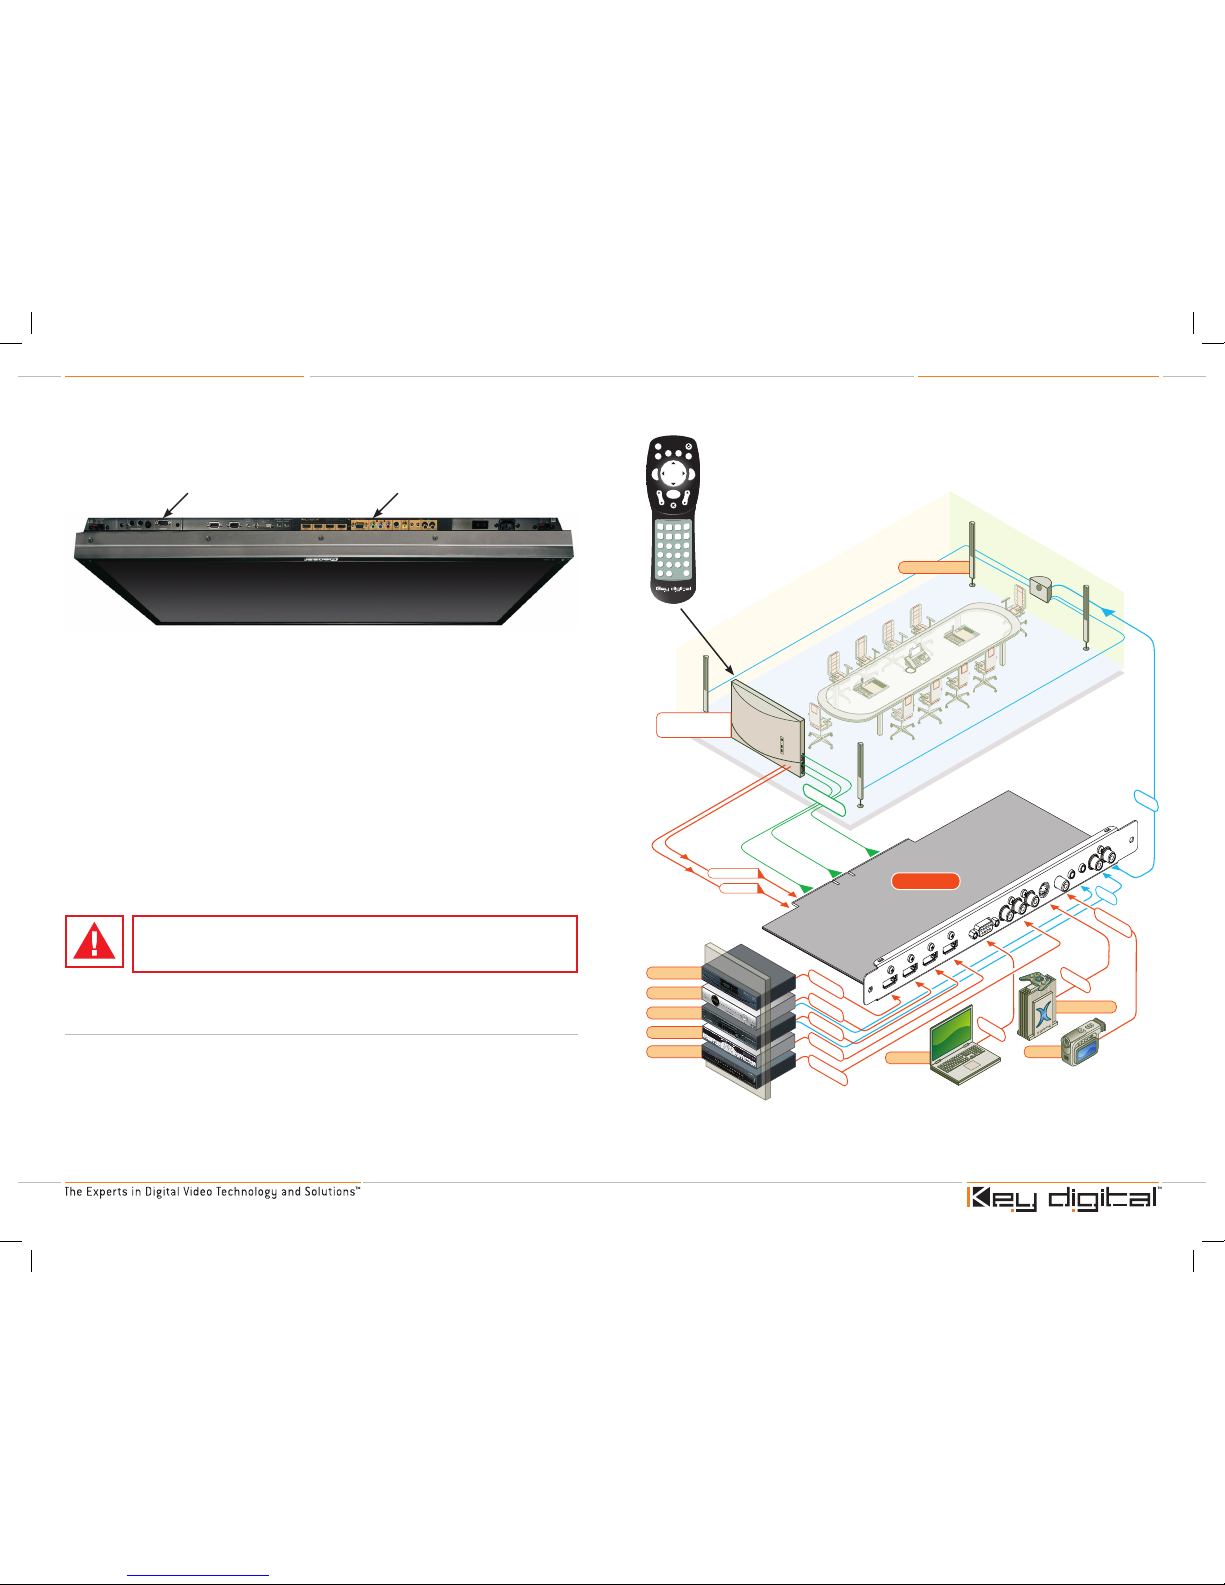
Plasma Display. See the figure below for a typical configuration of source devices you can input to
the KD-PC2 video card for display.
Once power is removed from the Pioneer Plasma Display, you can begin connecting A/V
equipment to your KD-PC2 video card as described below.
a. Connect your Digital Video Inputs:
Note there are four (4) separately selectable and customizable HDMI Digital Video plug-and-play
inputs. HDMI supports audio and HDCP copy protection. Note the 4 x HDMI Type A 19-pin
connectors on the face of your KD-PC2 video card.
If the equipment you would like to connect to your KD-PC2 video card has only DVI-D
connectors, then you should use Key Digital™ HDMI > DVI-D adapter cables to connect the
equipment to your KD-PC2 video card. Remember, while HDMI supports Video and Audio over
the same connection, DVI-D supports Video only and you will need to separately connect your
Audio signals to the KD-PC2 video card.
f.
g.
h.
KD-PC2 video card properly
inserted in the ES Slot of your
Pioneer Plasma Display
Check to see if the RS-232
card is provided with your
Pioneer Plasma Display
Always be sure that the Pioneer™ Plasma Display is turned off and UNPLUGGED
FROM THE POWER SOURCE before connecting any A/V equipment to the
KD-PC2 video card.
Au
d
io
Game Console
Camera
VCR
DVR Player
Cable Box
Satellite Box
DVD Player
Computer
KD-PC2
HDM
I/D
VI
*
Component
S-
Vide
o
Composite
HDM
I/D
VI
*
HDM
I/D
VI
*
HDM
I/D
VI
*
R
GBH
V
*To connect DVI Video use
HDMI < > DVI adapter cables
Surround Sound
Audi
o
Plug-In Card
RS232 Control
IR Control
Plasma
Pioneer
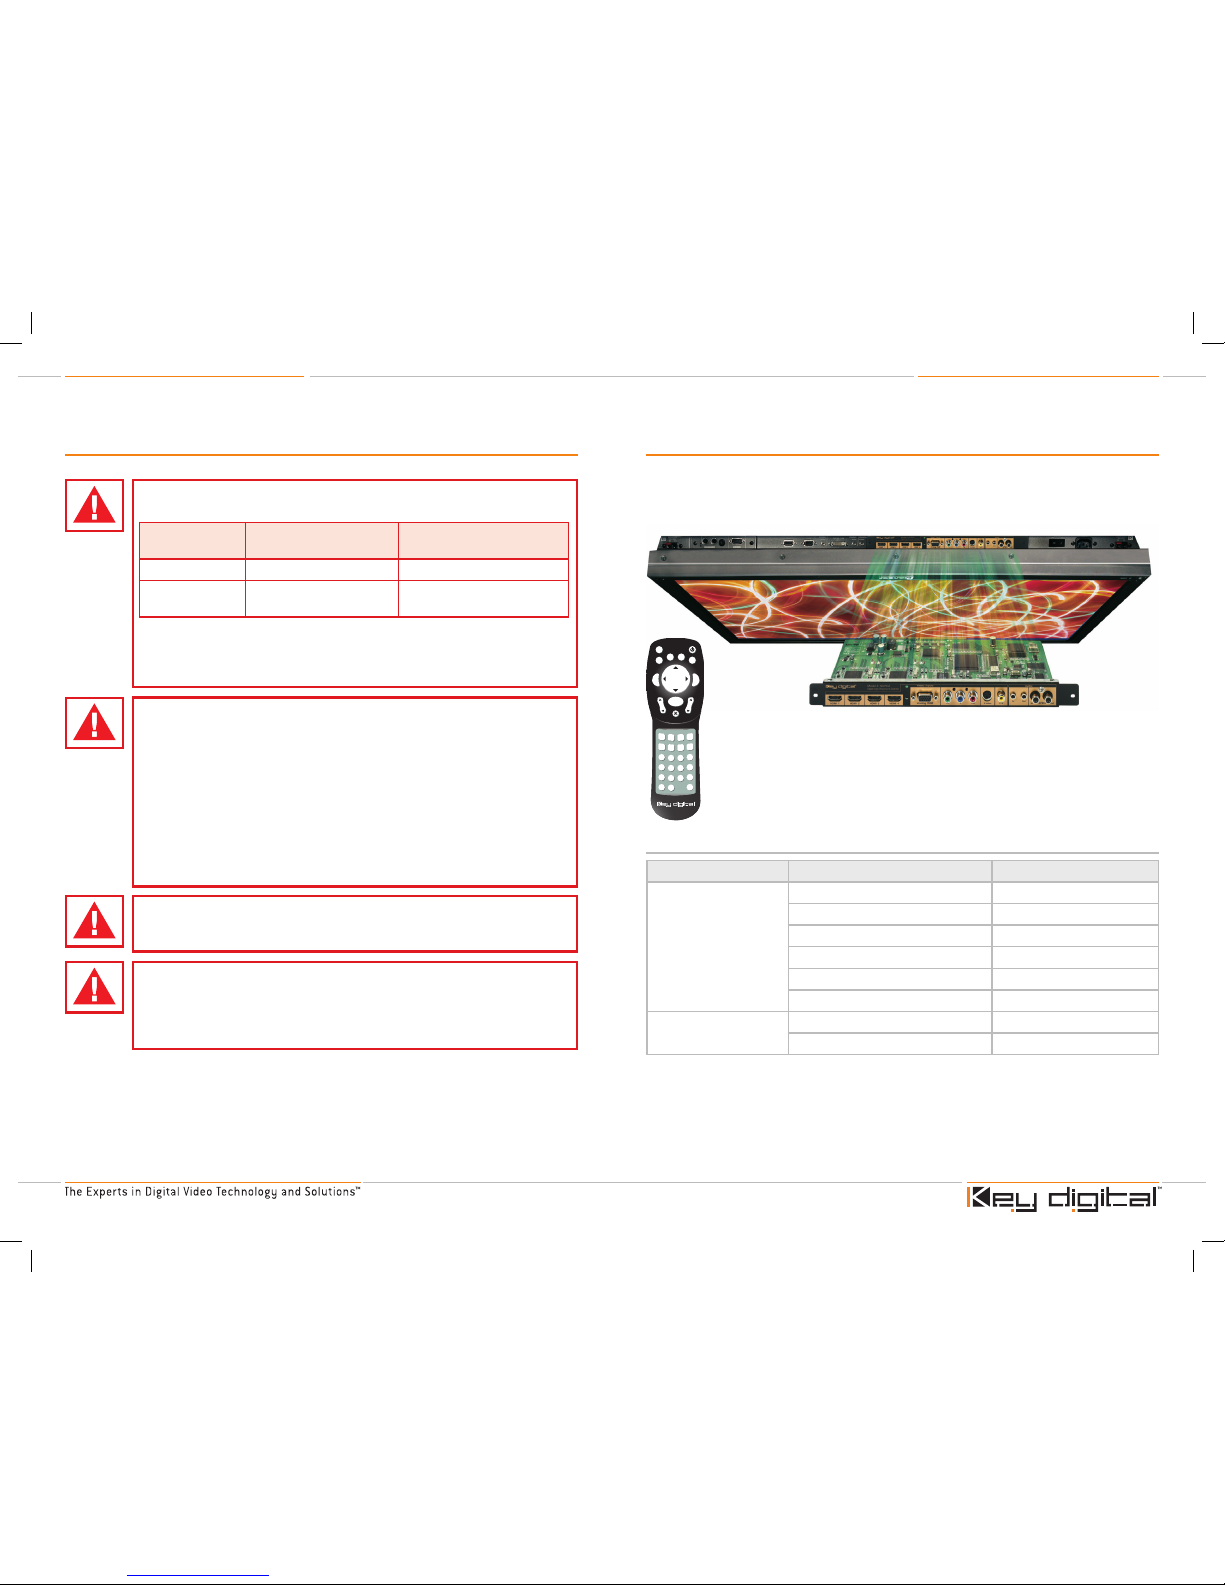
KD-PC2 IR Remote Control:
The IR Remote Control provided with the KD-PC2 controls the
operation of the KD-PC2 via the IR sensor and electronics built
into your Pioneer Plasma Display.
HD
M
I1
RG
B
HDMI2
HDMI3
H
DM
I4
COMPONENT
S-VIDEO
VI
D
EO
BRIGHT
CONT
SAT
EDGE
UPGRADE
1
2 3
4
5 6
7
809
RECALL
INFO
STILL
ASPECT
EXIT PCM
POWER
MENU
EXIT
LIP-SYNCVOL
MUTE
SET
Note: It is recommended that you connect your PC or Laptop video output directly to the VGA
input on the Pioneer Plasma Display. The digital HDMI (or DVI) input to the KD-PC2 is
intended to scale your high definition sources.
KD-PC2_Manual.indd 12-13 10/18/06 1:52:42 PM
Page 9
KD-PC2 Operating Instructions
Page 14
KD-PC2 Operating Instructions
Page 15
b. Connect your Analog Video Inputs:
For Analog Video, there are individual analog video inputs that are customizable, for each of the
following video interfaces:
RGB(HV): mini D-sub 15-pin connector
Component Video (YPbPr): 3 x color-coded RCA female connectors
The Component Video input does not support the following resolutions:
1024 x 768p
1280 x 768p
S-Video: 1 x S-Video connector
Composite Video (CV): 1 x RCA female connector
Note: It is recommended that you connect your PC or Laptop video output directly to the
VGA input on the Pioneer Plasma Display. The analog RGB input to the KD-PC2 is
intended to scale your high definition sources.
c. Connect your Audio Inputs and Outputs:
Your KD-PC2 also supports analog audio left and right stereo pair input and output, SPDIF
coax digital audio input and output, and HDMI PCM digital audio input and output.
For analog stereo Left & Right Audio, there are separate stereo mini jack input and
output connectors
For SPDIF coax digital audio, there are separate RCA female input and output
connectors
d. Connect your RS-232 Control:
As described earlier, in addition to the included IR Remote Control for operation of your KD-PC2
video card, you can also control operation via the RS-232 port on the Pioneer Plasma Display.
The optional Pioneer Plasma Display Expansion Solutions Slot Communications Card must be
installed in your display to support this feature.
3. Supply power to your Pioneer Plasma Display
Once all of the connections have been made to your KD-PC2 video card, plug in the Pioneer
Plasma Display to an appropriate source of electricity, as described in your Pioneer Plasma Display
Operating Instructions Guide. If now or in the future you need to make changes to the A/V
connections to your KD-PC2 video card, you must first disconnect power to the Pioneer
Plasma Display.
»
»
»
➛
➛
»
»
»
»
Basic Operation of the KD-PC2 Card
Now that you have connected your A/V equipment to your KD-PC2 video card and have reapplied
power to your Pioneer Plasma Display, you are ready to operate and control the unit.
Configure the Pioneer Plasma Display to accept inputs from your KD-PC2 video
processing card
a. Power up the Pioneer Plasma Display:
Ensure that power is applied to your display, the KD-PC2 video card is properly inserted in the
ES Slot of the display, and all of you’re A/V inputs are securely connected to the KD-PC2 video
card. You can use the On/Off switch IR Remote Control provided with the KD-PC2, which
controls power to both the Pioneer Plasma Display and the KD-PC2 plug in card.
b. Select “Input 3” on your Pioneer Plasma Display:
So the Pioneer Plasma will display video directly from your KD-PC2 video card, use the Pioneer
Plasma remote control to select “Input 3” as the source. Use the Pioneer Plasma Display
remote control to select other sources connected directly to the display, and for other display
functions. Use the remote control provided with your Pioneer Plasma Display, and follow
instructions as provided in the Pioneer Plasma Display Operating Instructions Guide.
c. The KD-PC2 video card is set at the factory to directly output (via an all-internal digital
connection) 1280x768p [WXGA] to your Pioneer Plasma Display.
Follow instructions as provided in the Pioneer Plasma Display Operating Instructions Guide
to set your Pioneer Plasma Display for WXGA resolution. If your display only supports up to
1024 x 768p [XGA] resolution, then the KD-PC2 must be configured to output this resolution.
In addition, output resolutions of 1360 x 768p and 1280 x 720p from the KD-PC2 card will be
available in the future to support the Pioneer Plasma Displays listed in the table above,
as Firmware Upgrades downloadable from our website. Check the Key Digital website at
www.keydigital.com.
For example, instructions for resetting the model PDP-425CMX are provided below:
PDP-425CMX: Reset all settings to default.
Set to 1024 x 768 output
In the Integrator Menu (get into the INTEGRATOR menu by holding down the display button on
the Pioneer remote for 5 seconds followed by pressing the menu button):
i. H pos 67
ii. V pos 126
iii. H size +7
iv. V size +1
v. FRC set to off
vi. Gamma 2.2
vii. Brightness, contrast, color, tint and sharpness set for best dynamic range and
image quality (only a slight adjustment may be required)
›
➔
➔
➛
➛
➛
➛
➛
➛
➛
KD-PC2_Manual.indd 14-15 10/18/06 1:52:44 PM
Page 10

KD-PC2 Operating Instructions
Page 16
KD-PC2 Operating Instructions
Page 17
To select the output resolution of the KD-PC2, see below under Bring Up Main Menu,
menu item 5 Set Up >> 4 Output Video:
Set Up [miscellaneous setup controls]
Firmware Upgrade Mode
Move Menu [Moves the OSD location on the screen]
Transparency [Adjusts the opaqueness of the OSD]
Output Video [WXGA, XGA, 1360x768p*, or 1280x720p*]
*Note: 1360 x 768p and 1280 x 720p will be available in the future
as a Firmware Upgrade
Go into this menu and set the KD-PC2 to match the native resolution of your particular model of
Pioneer Plasma Display. See the table provided in this manual for the native resolution of your
particular model display. Be sure your Pioneer Plasma Display is itself set to display in its native
mode. Follow the instructions provided with your display.
Optional: Key Digital recommends setting the Pioneer Plasma Display to “FRC Mode 2” in
the “Integrator Menu”:
Press and release the Pioneer remote “Display” button (it is below the Standby button). The
OSD will show the incoming resolution.
While you see the resolution displayed on the OSD, press and HOLD the “Display” button to
put the Pioneer Plasma Display into the “Integrator Mode.”
Press and release the “Menu” button to enter the Integrator Menu.
Go to “Options.” At the end of the Option list you will see FRC modes; set to mode 2.
Become familiar with the basic capabilities of your KD-PC2 Video Processor card
Your KD-PC2 video processor card dramatically expands the capabilities of your Pioneer Plasma
Display. You will control the KD-PC2 video processor card to take advantage of the following
features and functions.
Expands the Video and Audio Inputs:
Select the video input source, which can be in a variety of digital and analog interface formats,
and a variety of resolutions.
Four (4) HDMI Digital Video inputs
RGB Analog Video input
Component Video (YPbPr) input
S-Video input: NTSC, PAL
Composite Video (CV) input: NTSC, PAL
Select the audio input from source from either the analog stereo Left & Right source, the SPDIF
coax digital source, or use the HDMI PCM digital audio on the HDMI source.
1.
2.
3.
4.
1.
2.
3.
4.
›
➔
➔
➔
➔
➔
›
Input Resolutions Accepted by the KD-PC2 Card:
Accepts the following scan inputs:
480i, 480p, 576i, 576p, 720p, 768p and 1080i/540p
Accepts the following video standards:
HDTV
SDTV
Analog NTSC and PAL on the S-Video and Composite Video inputs
Accepts and automatically detects the following input field or frame rates:
60 and 50 Hz
The output frame rate is the same as the input frame rate
Accepts the following 60 Hz resolutions:
720 x 480i @ 60 Hz
720 x 480p @ 60 Hz
1024 x 768* @ 60 Hz
1280 x 720p @ 60 Hz
1280 x 768* @ 60 Hz
1920 x 1080i @ 60 Hz
*The Component Video input does not support the following resolutions:
1024 x 768p
1280 x 768p
Video Processing Functions Provided:
Edge Enhancement, Brightness, Contrast
Saturation, Tint
Individual display Calibrations for RGB Gain and Setup
H & V Size, H & V Position
Zoom (Output Aspect Ratio processing), including options to prevent monitor burn-in for
Letterbox or Pillarbox images:
Normal
Horizontal Zoom In/Out
Vertical Zoom In/Out
Horizontal and Vertical Zoom In/Out
Built-in Test Patterns help you set-up your video system (all patterns available through the OSD
from the IR Remote, as well as RS-232):
White screen
Color bars
Gray scale
Horizontal wide ramp
Vertical wide ramp
›
➔
›
➔
➔
➔
›
➔
➔
›
➔
➔
➔
➔
➔
➔
➔
➔
›
›
›
›
›
➔
➔
➔
➔
›
➔
➔
➔
➔
➔
KD-PC2_Manual.indd 16-17 10/18/06 1:52:44 PM
Page 11
KD-PC2 Operating Instructions
Page 18
KD-PC2 Operating Instructions
Page 19
Operating your KD-PC2 Video Processor card
Your KD-PC2 video processor card is easy to control and operate with the included IR Remote
Control unit. You will now learn how to control the KD-PC2 video card using the navigation buttons
on this remote control, and the On-screen Display (OSD) menu that will appear on your Pioneer
Plasma Display. You may also control the KD-PC2 video card via the RS-232 port on the Pioneer
Plasma Display, if available. The Remote Control for the Pioneer Plasma Display does not directly
control the operation of the KD-PC2 video card.
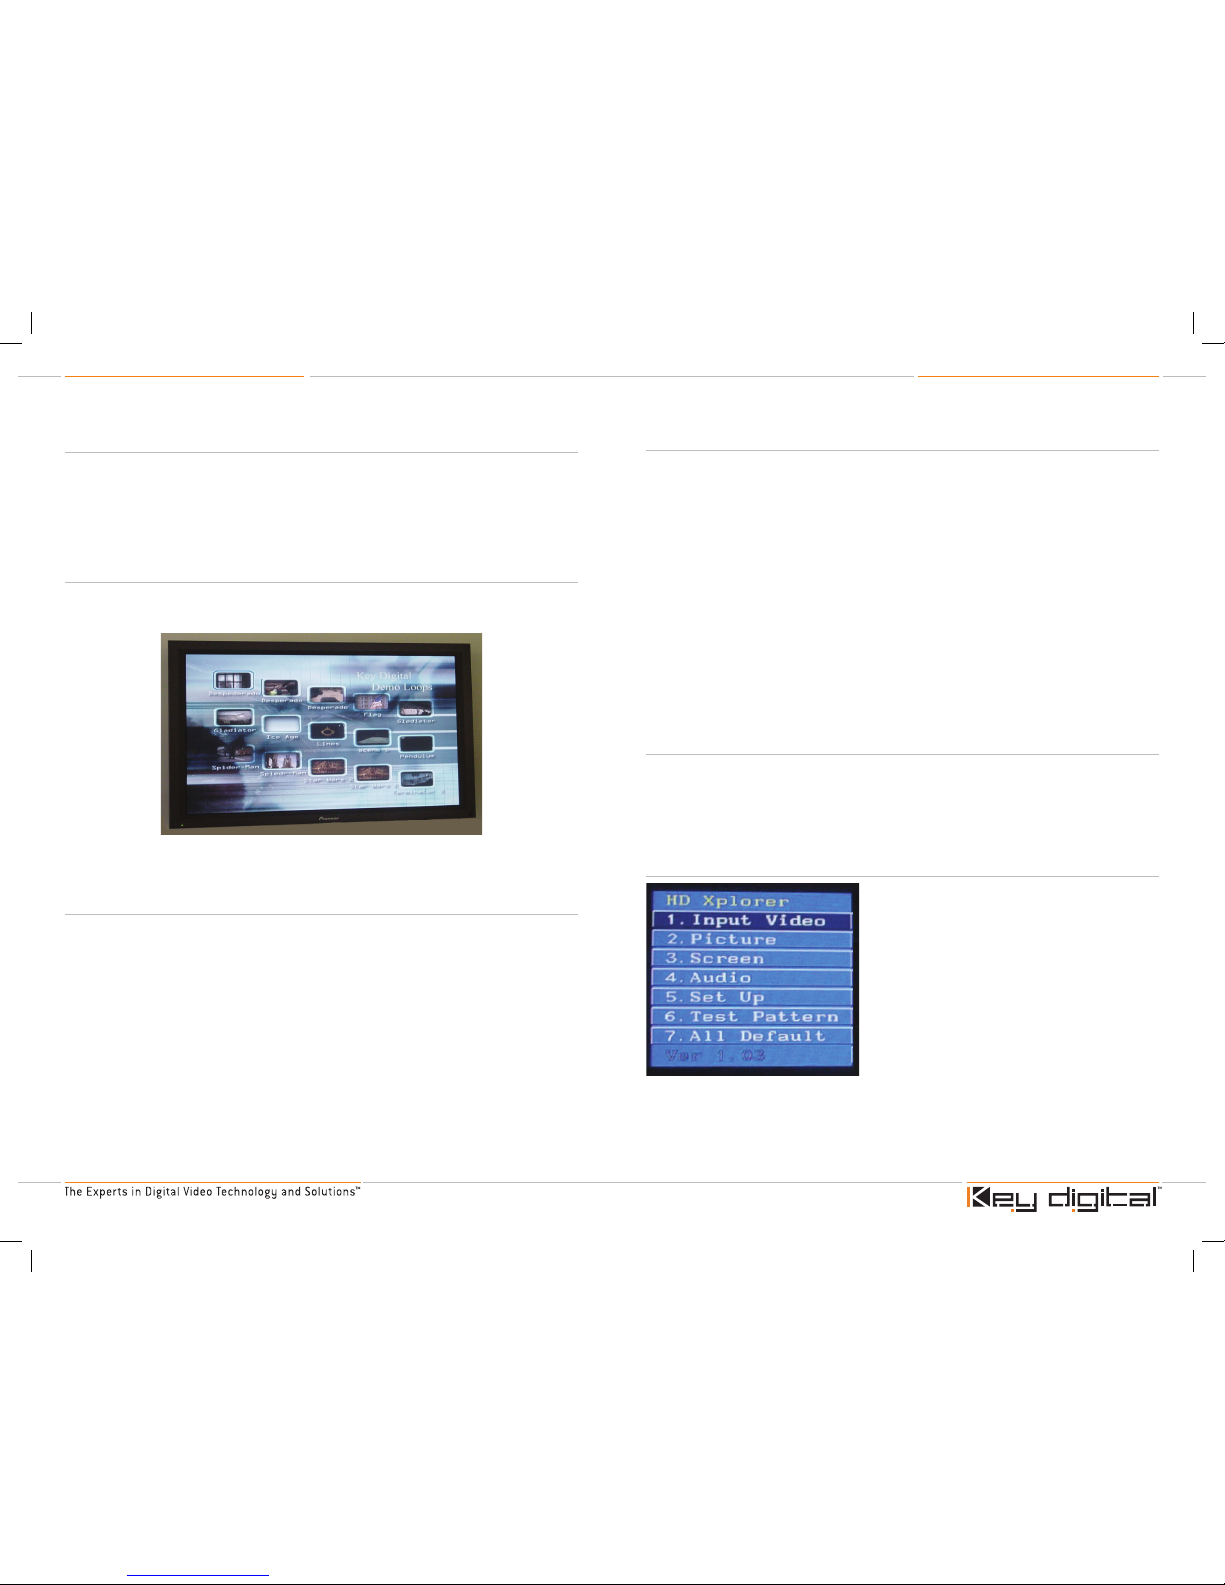
1. Bring up the KD-PC2 OSD
You can bring up the OSD by pressing the “Menu” button on the KD-PC2 IR Remote Control.
See the section later in this Operating Manual entitled “IR Remote Control” for the full operation of
your KD-PC2 IR Remote Control.
Select a live source using the HDMI1, HDMI2, HDMI3, HDMI4, RGB(HV), Component, SVideo, or Composite Video buttons on the KD-PC2 IR Remote Control.
2. Navigate the KD-PC2 OSD Menu
Once you have brought up the OSD from the KD-PC2 video card, you can learn to navigate, or
move through, the menu.
See the section later in this Operating Manual entitled “OSD Menu Tree” for the complete
listing of all menu options for your KD-PC2 video card.
To navigate through the KD-PC2 OSD:
Bring up the KD-PC2 OSD by pressing the MENU button on the KD-PC2 IR Remote Control.
The OSD menu will appear on the Pioneer Plasma Display. The OSD will turn off after about
thirty (30) seconds.
You can navigate through the OSD Menu by using the UP and DOWN arrows, and then the
LEFT and RIGHT arrows to move to the next level of the submenu tree
Press SET to select (invoke) a desired feature, function, or setting in the menu
Pres the EXIT button to return to the prior level of the menu or cancel a selection
➔
›
➔
➔
➔
3. Learn the KD-PC2 IR Remote Control “Hot Buttons”
Use the “Hot Buttons” for instant action without the need for the OSD visual cue:
Input (Source) Selection Hot Buttons:
HDMI1, HDMI2, HDMI3, HDMI4
RGB, COMPONENT, S-VIDEO, VIDEO (Composite Video)
EXT PCM (toggles Analog and Digital Audio)
VOLUME +/MUTE
LIP SYNC +/- (to adjust audio/video “lip sync” delay)
Video Processing Hot Buttons:
STILL (freeze frame)
ASPECT (Aspect Ratio zoom modes)
BRIGHTNESS
CONTRAST
SATURATION
EDGE (2-dimensional edge enhancement, sharpness)
4. Configure and Control the KD-PC2 via the OSD Menu
Once you have brought up the OSD from the KD-PC2 video card and have learned to perform the
basic navigation through the OSD Menu Tree and the use of the IR Remote Control “Hot Buttons,”
you can start to configure, setup, and control your KD-PC2 video card. The OSD is overlaid on the
selected source video input.
Note: The OSD depicted in these Operating Instructions represent typical images generated by the
KD-PC2 video card OSD. Subsequent Firmware Upgrades could change some of the items.
Bring up the MAIN Menu
Press MENU on the KD-PC2
IR Remote Control
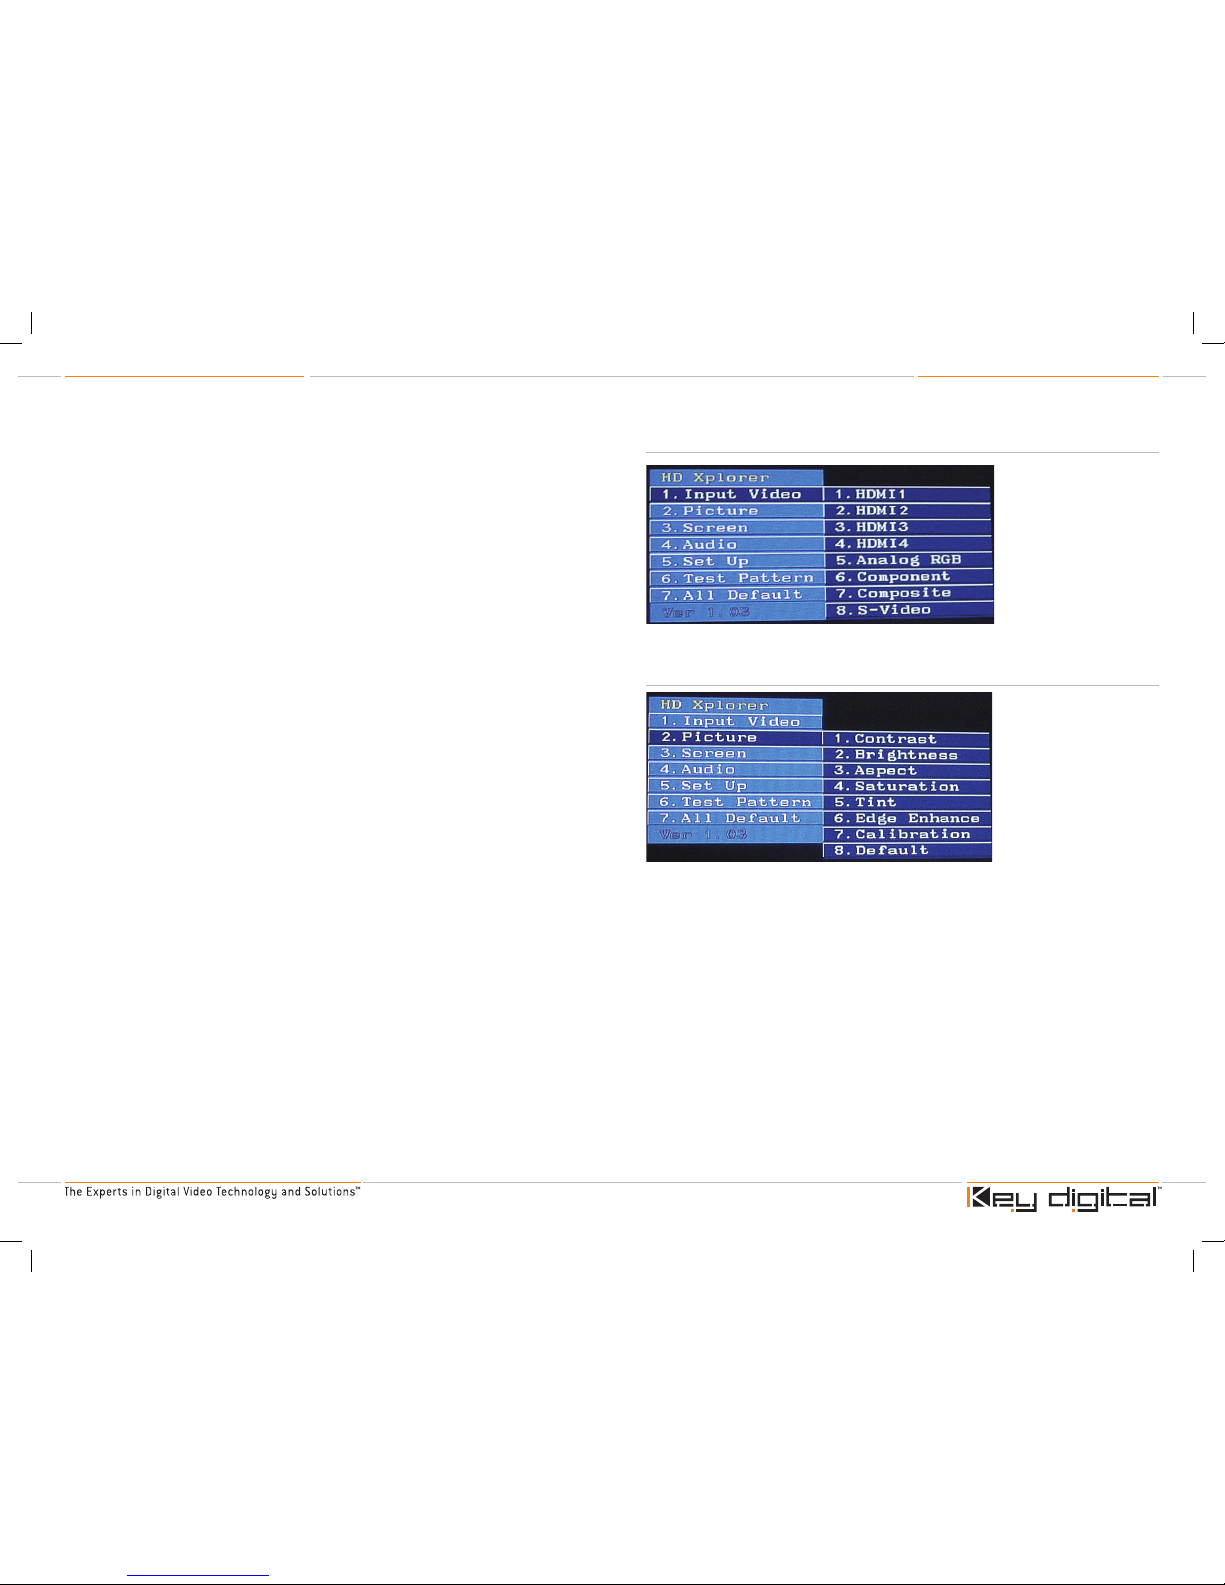
You can select at this level:
1. Input Video [to select the desired Input Video for display]
HDMI1 through HDMI4 Digital Video sources
Analog Video sources
›
➔
➔
➔
›
›
›
›
➔
➔
➔
➔
➔
➔
➔
➔
KD-PC2_Manual.indd 18-19 10/18/06 1:52:46 PM
Page 12
KD-PC2 Operating Instructions
Page 20
KD-PC2 Operating Instructions
Page 21
2. Picture [Video Processing]
Contrast
Brightness
Aspect Ratio Zoom modes
Saturation
Tint
Edge Enhancement
Calibration [Separate RGB gain and set-up]
3. Screen [Image Position]
Horizontal and Vertical Position
Horizontal and Vertical Size
4. Audio
Input Audio select
Lip Sync adjustment
Volume
5. Set Up [miscellaneous setup controls]
Firmware Upgrade Mode
Move Menu [Moves the OSD location on the screen]
Transparency [Adjusts the opaqueness of the OSD]
Output Video [WXGA, XGA, 1360x768p*, or 1280x720p*]
*Note: 1360 x 768p and 1280 x 720p will be available in the future
as a Firmware Upgrade
This is where you must be sure to set the KD-PC2 Output Video resolution to match the native
resolution of your particular model of Pioneer Plasma Display. See the table provided in this manual
for the native resolution of your particular model display. Be sure your Pioneer Plasma Display is
itself set to display in its native mode. Follow the instructions provided with your display.
6. Test Patterns
Normal Display
White Screen
Color Bar
Gray Scale
Horizontal Wide Ramp
Vertical Wide Ramp
7. All Default [Reset the entire KD-PC2 video card to factor y default settings]
➔
➔
➔
➔
➔
➔
➔
➔
➔
➔
➔
➔
➔
➔
➔
➔
➔
➔
➔
➔
➔
➔
Bring up the INPUT VIDEO Menu
Select the input source, or use an IR Remote Control “Hot Key”
Bring up the PICTURE Menu
Contrast, Brightness, Saturation, Tint and Calibration settings
(for each of RGB Gain and Setup) have a range of +/- 45, with a factory default of 0
Edge Enhancement has a range of 0 – 7
KD-PC2_Manual.indd 20-21 10/18/06 1:52:48 PM
Page 13
KD-PC2 Operating Instructions
Page 22
KD-PC2 Operating Instructions
Page 23
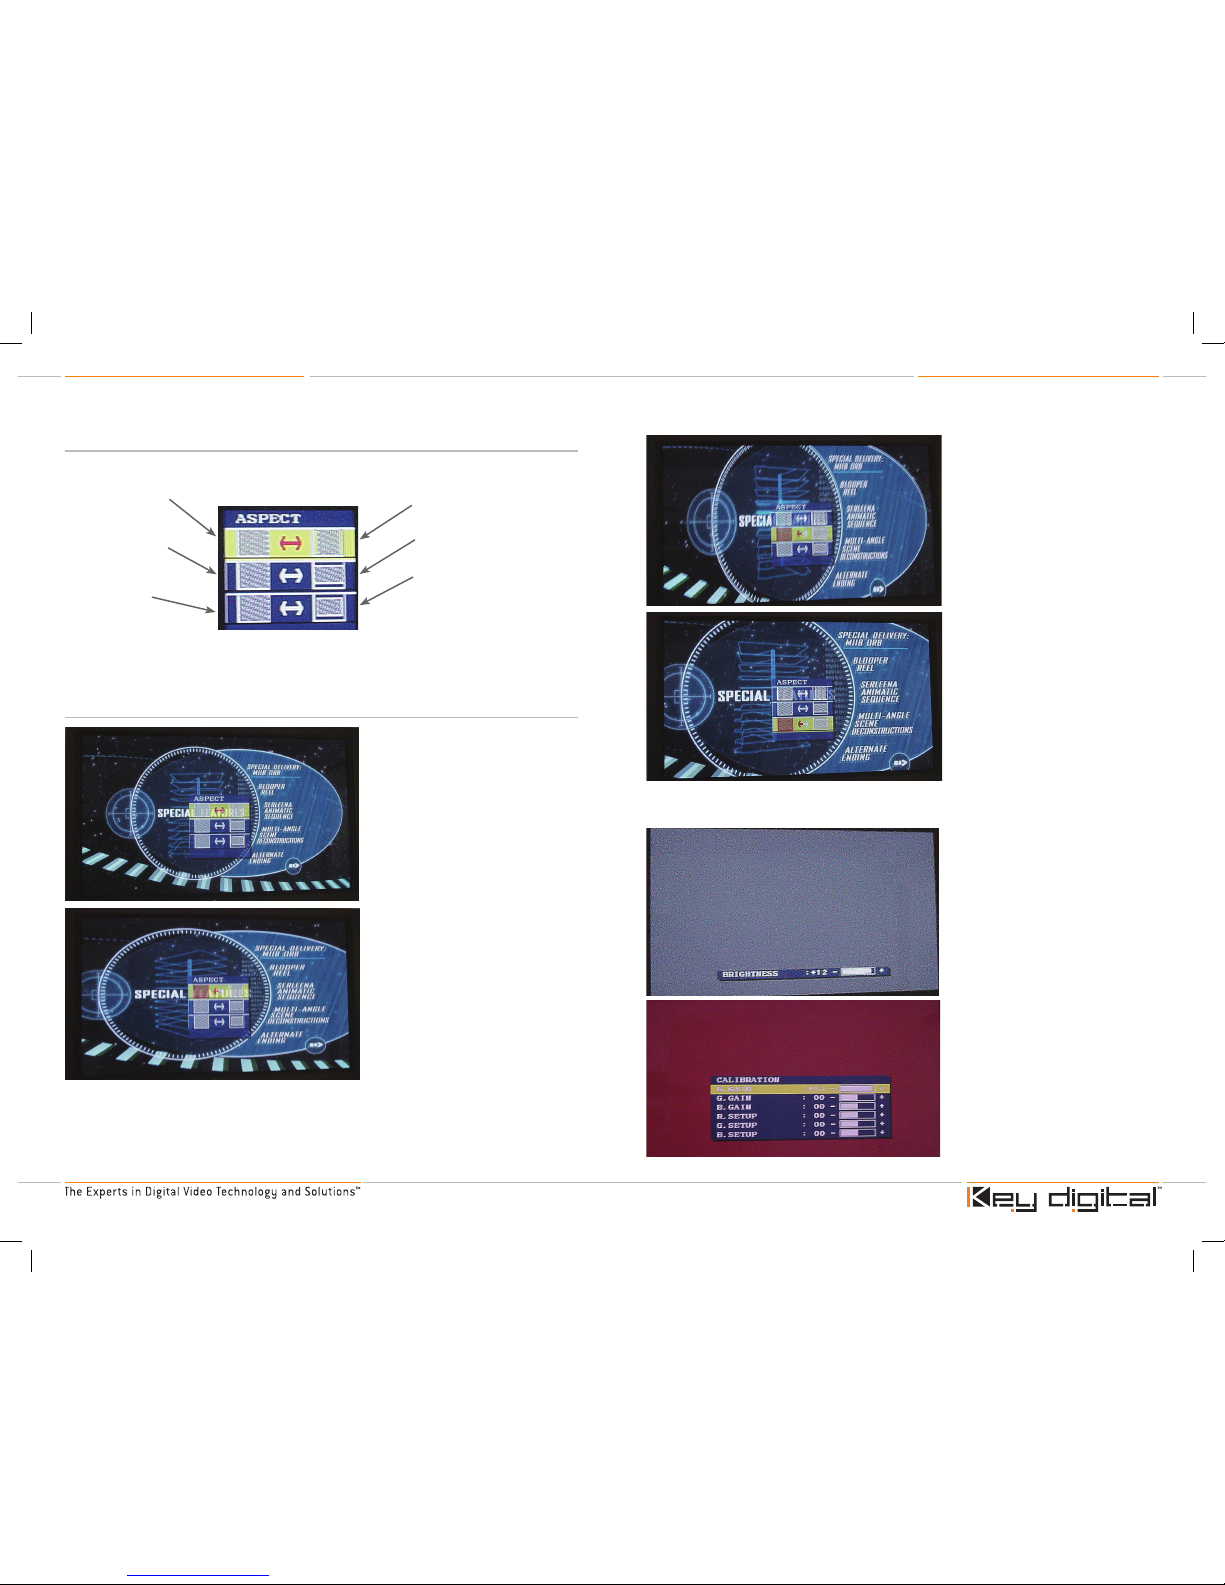
Aspect Ratio – Zoom Selection Examples:
Original Image, 16:9 Aspect Ratio
H Zoom (Horizontal Zoom) Up:
This “H Zoom” feature is particularly useful for
Plasma displays, to stretch the image to fill the
screen and avoid the nasty burn-in. If the input
signal is a Pillarbox, Horizontal Zoom extends
(distorts) the image from left to right to fill the
screen. For example, when a 4:3 movie is
up-converted to HDT V in a studio, it may be
simply released in the Pillarbox format, with
black bars to the left and right of the image in a
16:9 window.
V Zoom (Vertical Zoom) Up:
This “V Zoom” feature is particularly useful for
some Plasma displays, to stretch the image
to fill the screen and avoid the nasty burn-in.
If the input signal is a Letterbox, Vertical
Zoom extends (distorts) the image from top to
bottom to fill the screen. For example, it is ver y
common for a widescreen DVD movie to be
presented in Letterbox, because the original
movie may be captured in 2.35:1 Cinemascope
or some other Aspect Ratio that creates a small
letterbox in a 16:9 window.
H&V Zoom Up:
This mode simultaneously stretches the image
uniformly in both the Horizontal and Vertical
directions, using the same ratios as in H
Zoom and V Zoom. This Zoom mode may be
preferred over the H- or V-Zoom, both of which
geometrically distort the image. Because the
image is “Zoomed,” there will be a slight loss
(cropping) of the image at the top and bottom
for Pillarbox sources, and at the left and right
for Letterbox sources. There is also a slight
processing of the image to scale-up the
resolution.
Sample PICTURE Menu Functions:
BRIGHTNESS:
Increase the Brightness
CALIBRATION:
Increase the Red Gain
Horizontal Zoom Up:
Stretch a 4:3 to 16:9
Reduces screen burn
Vertical Zoom Up:
Stretch a 2.35:1 to 16:9
Reduces screen burn
H&V Zoom Up:
Zoom a 4:3 to 16:9
Zoom a 2.35:1 to 16:9
Reduces screen burn
No geometric distortion
➔
➔
➔
➔
➔
➔
➔
➔
Horizontal Zoom Down:
Squish a 16:9 to 4:3 Pillarbox
Vertical Zoom Down:
Squish a 16:9 to Letterbox
H&V Zoom Down:
Squish a 16:9 into a 4:3 Letterbox
No geometric distortion
➔
➔
➔
➔
Aspect Ratio – Zoom Selection
Your KD-PC2 video card can perform output Aspect Ratio processing, including options to prevent
monitor burn-in for Letterbox or Pillarbox images.
KD-PC2_Manual.indd 22-23 10/18/06 1:52:53 PM
Page 14
KD-PC2 Operating Instructions
Page 24
KD-PC2 Operating Instructions
Page 25
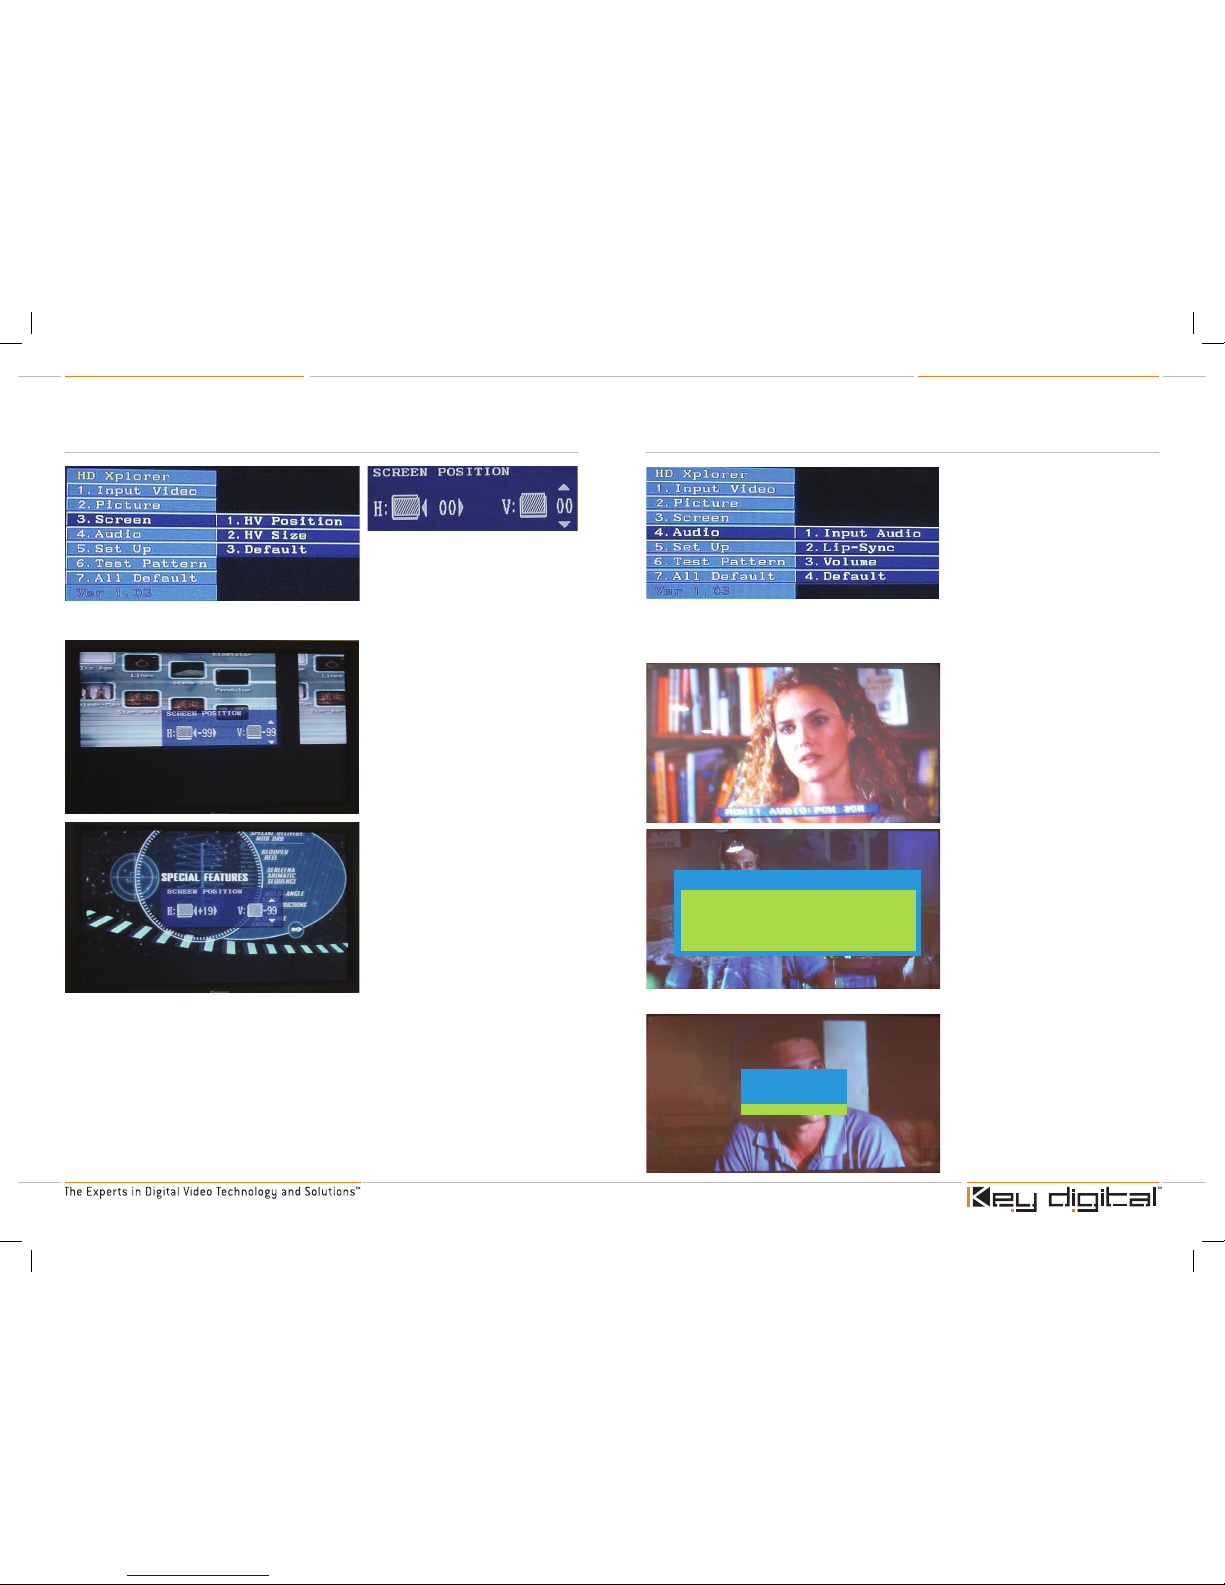
Sample SCREEN Menu Functions:
HV Size:
Increases and/or decreases the size
of the image on the screen, vertically
and/or horizontally
Bring up the AUDIO Menu
Audio Input:
Select Analog or SPDIF Audio
Lip Sync:
Adjust Audio-Video delay due to
Video processing delay
Volume:
Adjust Audio volume for the
selected Audio input
HV Position:
Shifts the image on the screen, left and
right and/or up and down
Bring up the SCREEN Menu
Adjust the Horizontal and Vertical
Position and Size
The KD-PC2 provides informative OSD information that
reflects the characteristics of the current audio selection
and your choice of audio format.
HDMI Audio Source Selection
Whenever you change the HDMI
[Audio] source, the type of HDMI audio
is displayed for a few seconds: In this
example, the HDMI 1 audio source is
PCM 2-channel audio.
IR Remote INFO Button
In this example, the Audio Mode is 32
kHz stereo audio. All of the possible
Audio Modes you may encounter with
the KD-PC2 card are listed here:
PCM:
32 kHz Stereo
44 kHz Stereo
48 kHz Stereo
Not Supported [for the case of DTS/
Dolby Digital] which is a pass-thru
No PCM signal [for the case of no
input audio present]
›
➔
➔
➔
›
›
Info
Input Video : HDMI1
Video Mode : 1920x1080i
Output Video : XGA
Input Audio : HDMI PCM
Audio Mode : 32 kHz Stereo
Audio Input
Input Audio selection is one of the
following options:
L+R Analog Stereo
External PCM Coax
PCM on the HDMI input
➔
➔
➔
AUDIO INPUT
AUDIO L+R
EXT PCM
HDMI PCM
KD-PC2_Manual.indd 24-25 10/18/06 1:52:56 PM
Page 15
KD-PC2 Operating Instructions
Page 26
KD-PC2 Operating Instructions
Page 27
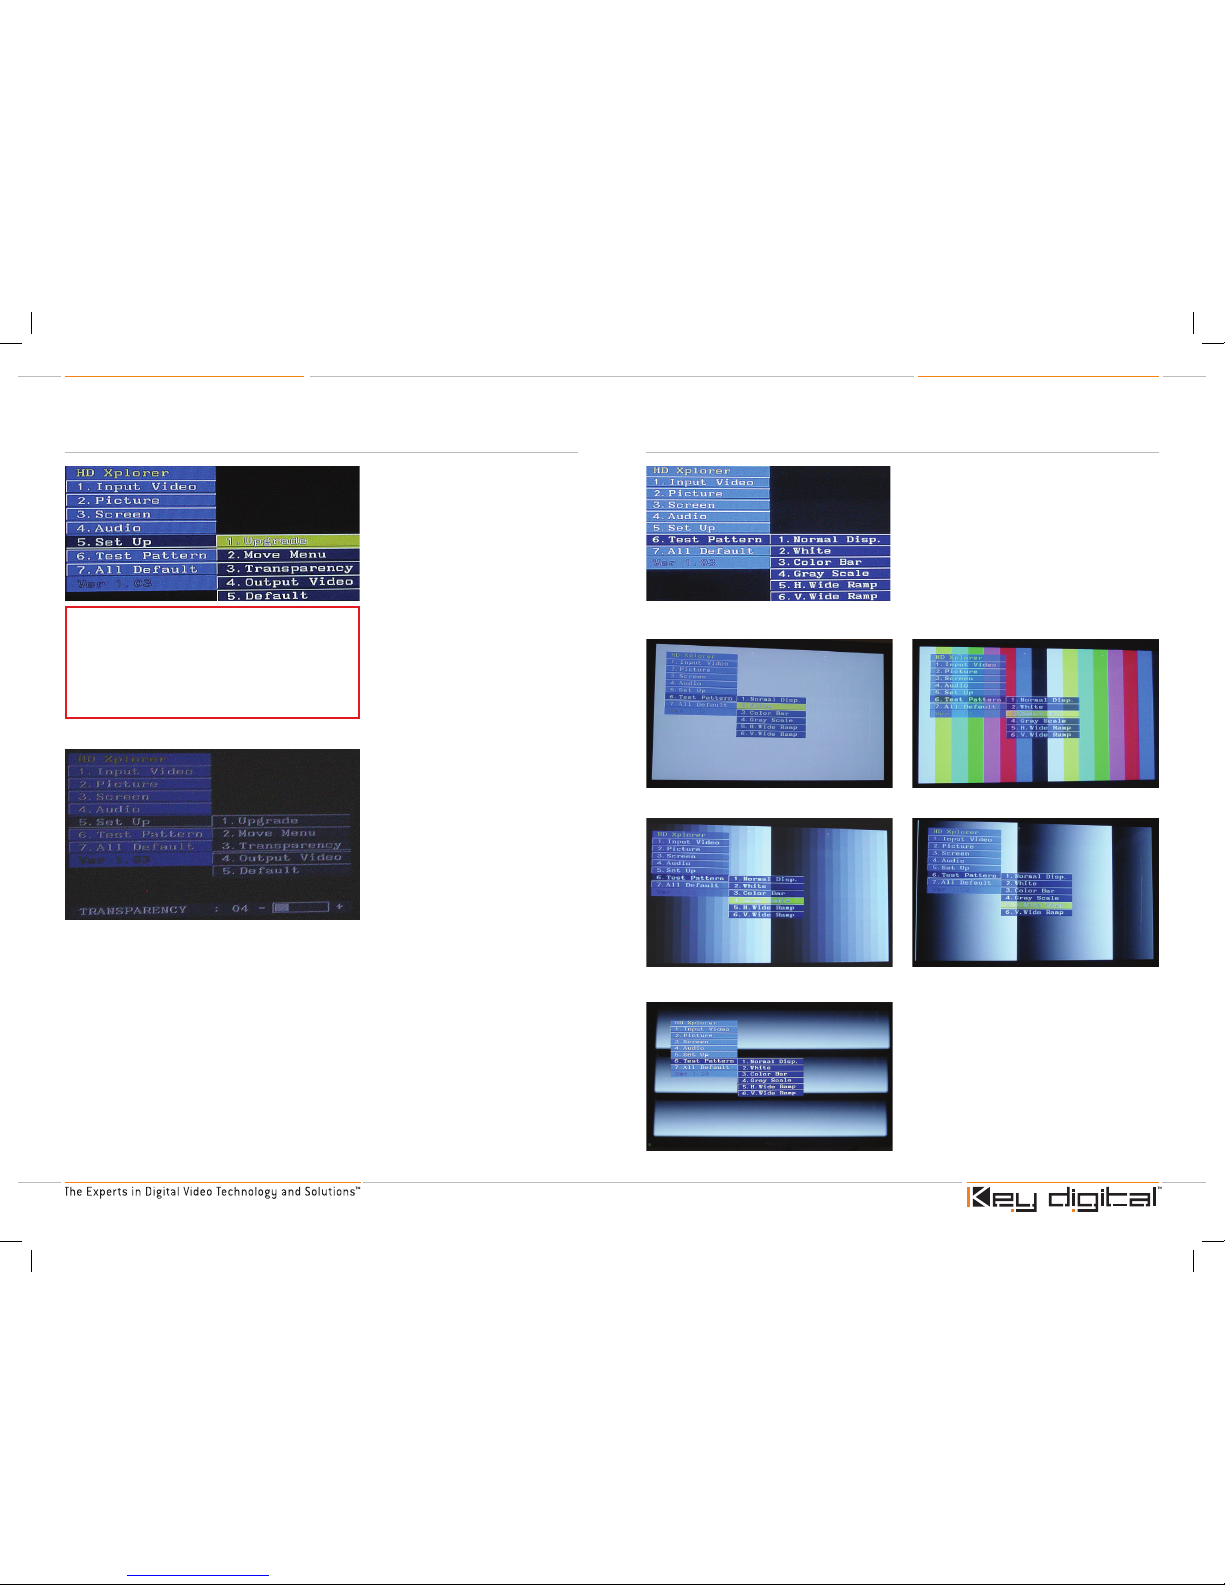
Bring up the SET UP Menu
Upgrade:
Select only if you are performing a
Firmware Upgrade (rare)
Move Menu:
Moves the OSD location on the screen
Transparency:
Adjusts the Opaqueness of the OSD
Output Video:
Select WXGA [1280x768p] or XGA
[1024x768p]
1360 x 768p and 1280 x 720p will be
available in the future as a Firmware
Upgrade
›
›
5. Set Up >> 4. Output Video:
This is where you must be sure to set the KD-PC2 Output Video
resolution to match the native resolution of your particular model
of Pioneer Plasma Display. See the table provided in this manual
for the native resolution of your particular model display. Be sure
your Pioneer Plasma Display is itself set to display in its native
mode. Follow the instructions provided with your display.
Sample SET UP Menu Function:
Transparency:
Increase or decrease the transparency
or opaqueness of the OSD on the
screen, overlaid on the selected source
video input
Bring up the TEST PATTERN Menu
Test Pattern:
Select “Normal Disp.” For normal
display mode.
Select one of five (5) test patterns
›
›
White Screen Test Pattern Color Bars Test Pattern
Gray Scale Test Pattern Horizontal Wide Ramp Test Pattern
Vertical Wide Ramp Test Pattern
KD-PC2_Manual.indd 26-27 10/18/06 1:53:01 PM
Page 16
KD-PC2 Operating Instructions
Page 28
KD-PC2 Operating Instructions
Page 29
IR Remote Control
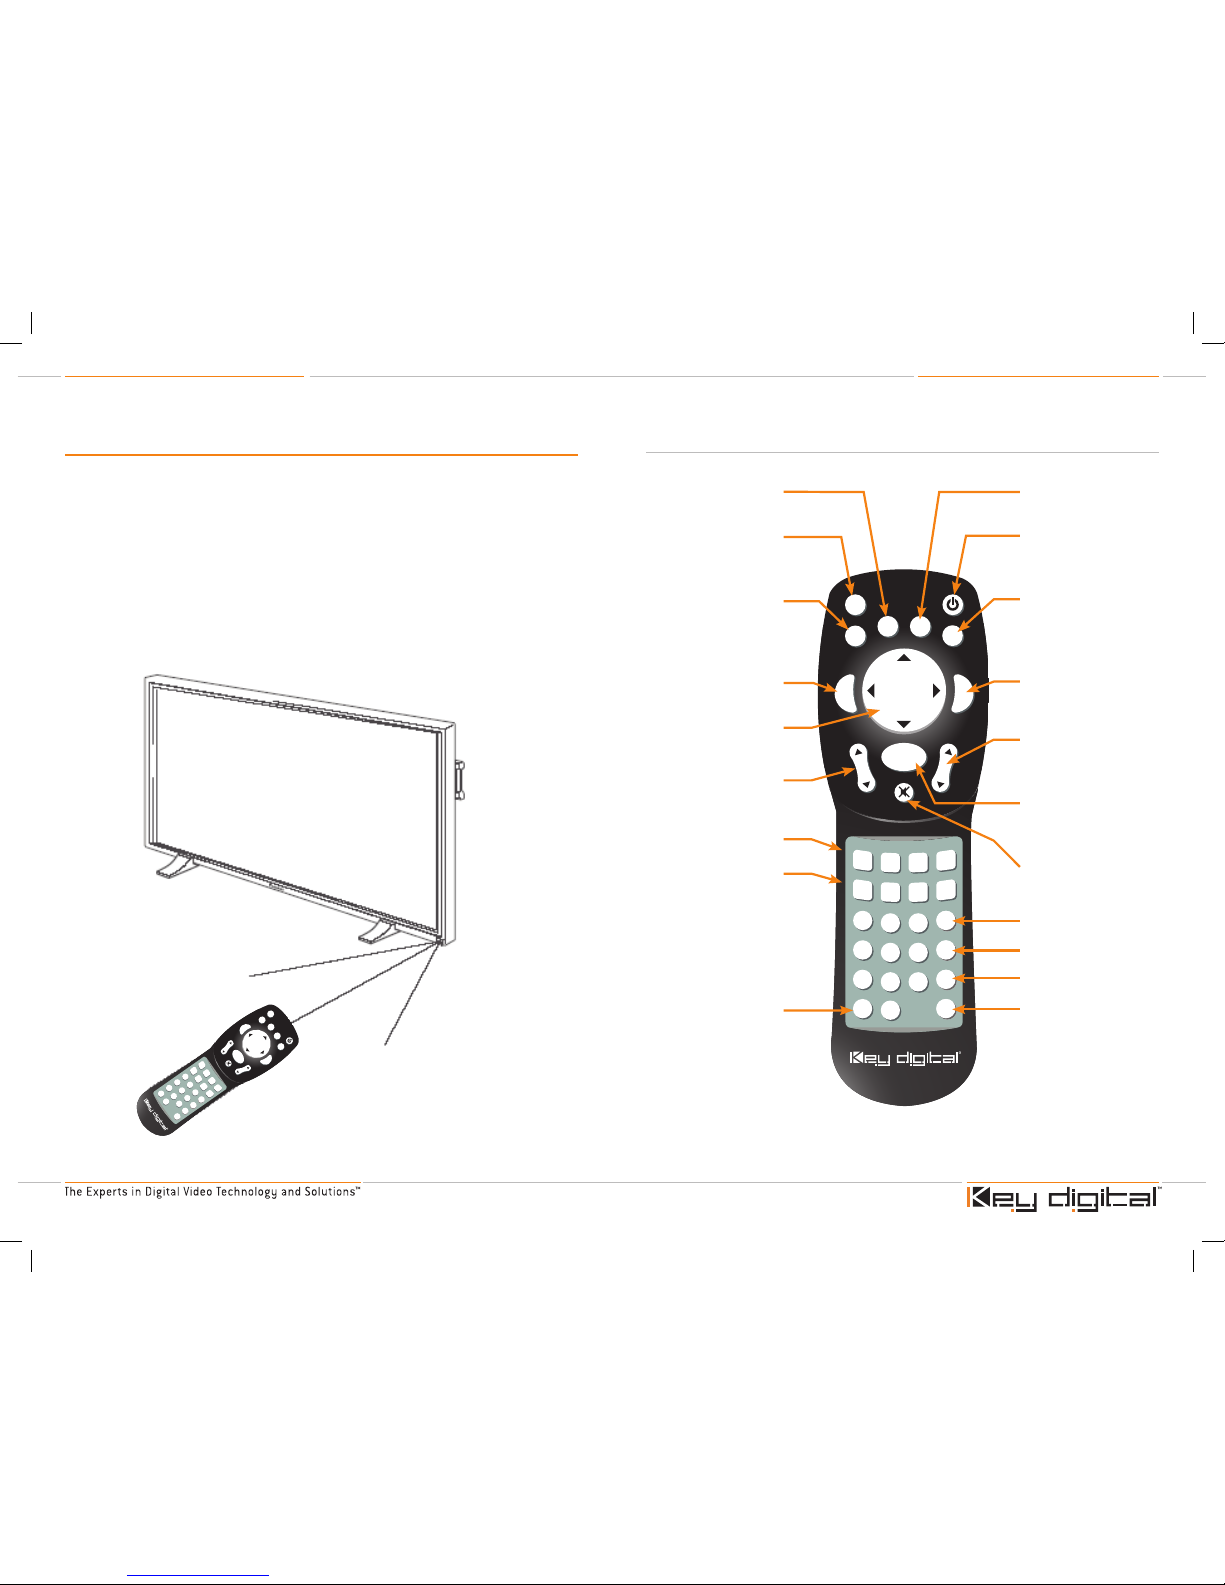
You can control all of the operations of your KD-PC2 video card using the included IR Remote
Control. First be sure the KD-PC2 video card is properly installed in your Pioneer Plasma Display.
Then, select “Input 3” using the Pioneer Plasma Display controls. You are now ready to use your
KD-PC2 video card. Control of the KD-PC2 video card is simple, using the included IR Remote
Control and following the on-screen display (OSD) that is generated by the KD-PC2 video card and
viewed on your Pioneer Plasma Display.
The KD-PC2 IR Remote Control unit must be directed towards the Pioneer Plasma Display for
proper operation. The remote control unit may not operate if there are objects placed between it
and the display. When operating the remote control unit, point it at the remote sensor located on
the bottom right of the front panel of the Pioneer Plasma Display. Replace weak batteries with new
ones because operational distance will gradually become shorter as the batteries begin to wear out.
KD-PC2 IR Remote
Control Unit
HD
M
I1
RG
B
HD
MI
2
HD
MI
3
H
DM
I4
COMPON
EN
T
S-
VI
DEO
VI
D
EO
BRIG
HT
CO
NT
SA
T
ED
GE
UP
GR
AD
E
1
2 3
4
5 6
7
8
0
9
RE
CA
LL
IN
FO
STI
LL
AS
PE
CT
EX
IT
PC
M
PO
WE
R
MENU
EX
IT
LI
P-
SY
NC
VO
L
MUTE
SE
T
Pioneer Plasma Display
Remote Sensor
IR Remote Control buttons
HD
M
I1
RG
B
HDMI2
HDMI3
H
DM
I4
COMPONENT
S-VIDEO
VI
D
EO
BRIGHT
CONT
SAT
EDGE
UPGRADE
1
2 3
4
5 6
7
809
RECALL
INFO
STILL
ASPECT
EXIT PCM
POWER
MENU
EXIT
LIP-SYNCVOL
MUTE
SET
Still:
Freeze frame
Recall:
Input toggle to select the
previous video source
selected
Info:
Displays input video
information, & identifies digital
audio (PCM or Dolby Digital
pass-thru)
Menu:
Brings up the OSD
Navigation Buttons:
Move throughout the
OSD Menu
Audio Controls:
Volume +/-
HDMI Digital Input Select
Analog Video Input Select
Firmware Upgrade Mode
Aspect Ratio
Power: (On/Off)
Controls the power to both
the KD-PC2 and the Pioneer
Plasma display
Ext PCM:
Toggles external digital or
analog L&R Audio
Exit:
Always takes you out of the
current menu
Set:
Invokes the selected
Menu function
Lip Sync control: +/-
Brightness
Contrast
Edge Enhancement
Saturation
Mute
KD-PC2_Manual.indd 28-29 10/18/06 1:53:02 PM
Page 17
KD-PC2 Operating Instructions
Page 30
KD-PC2 Operating Instructions
Page 31
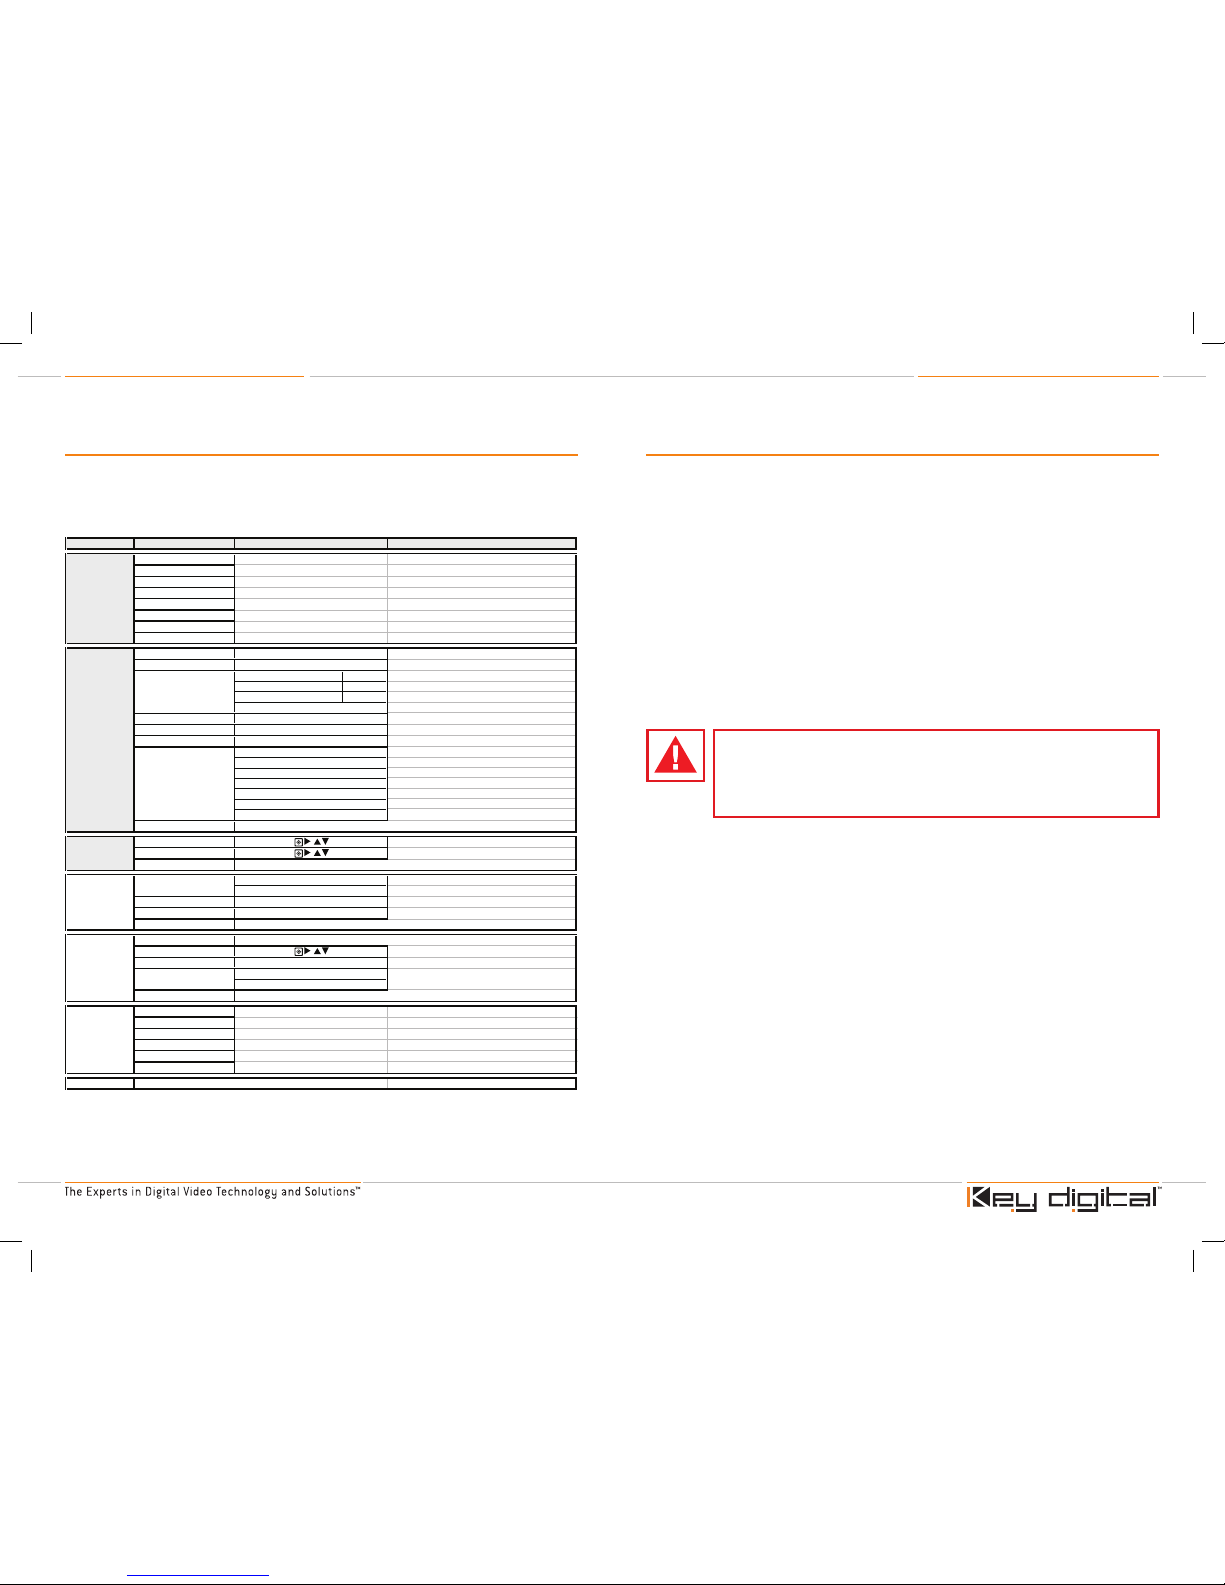
OSD Menu Tree
To configure and control your KD-PC2 card, use the IR Remote Control provided with your KD-PC2
and view the On-Screen Display (OSD) on your Pioneer Plasma Display. Follow the options as
provided in the OSD Menu Tree, below.
Main Menu 1st Sub Menu
1tupni IMDH enil-nO1 IMDH .1
2tupni IMDH enil-nO2 IMDH .2
3tupni IMDH enil-nO3 IMDH .3
4tupni IMDH enil-nO4 IMDH .4
)buS-D( tupni BGR golana enil-nOBGR GOLANA .5
)rP/bP/Y( tupni tnenopmoc enil-nOTNENOPMOC .6
)VC( tupni etisopmoc enil-nOETISOPMOC .7
)OEDIV-S( tupni oediV-S enil-nOOEDIV-S .8
erutcip eht fo tsartnoc eht pu gninuTTSARTNOC .1
erutcip eht fo ssenthgirb eht pu gninuTSSENTHGIRB .2
1. H. ZOOM
IN/OUT
Setting up horizontal aspect ratio
2. V. ZOOM
IN/OUT
Setting up vertical aspect ratio
3. HV ZOOM
IN/OUT
Setting up H/V aspect ratio
Default aspect ratio
erutcip eht fo noitarutas eht pu gninuTNOITARUTAS .4
erutcip eht fo tnit eht pu gninuTTNIT .5
erutcip eht o tnemecnahne egde eht pu gninuTECNAHNE EGDE .6
1. R. GAIN
( + / - )
Tuning up the red gain of the picture
2. G. GAIN
( + / - )
Tuning up the green gain of the picture
3. B. GAIN
( + / - )
Tuning up the blue gain of the picture
4. R. SETUP
( + / - )
Tuning up the red setup of the picture
5. G. SETUP
( + / - )
Tuning up the green setup of the picture
6. B. SETUP
( + / - )
Tuning up the blue setup of the picture
Default calibration
erutcip tluafeDTLUAFED .8
neercs eht fo noitisop V/H eht pu gninuTNOITISOP VH .1
neercs eht fo ezis V/H eht pu gninuTEZIS VH .2
3. DEFAULT
oidua eht fo yaled cnys-pil eht pu gninuTCNYS-PIL .2
oidua eht fo emulov eht pu gnitteSEMULOV .3
4. DEFAULT
)noitarepo oN( edom edargpu erawmriFEDARGPU .1
unem DSO eht fo noitisop eht pu gnitteSUNEM EVOM .2
unem DSO eht fo ycnerapsnart eht pu gnitteSYCNERAPSNART .3
pu tes tluafeDTLUAFED.5
)noitarepo lamroN( yalpsid lamroNYALPSID LAMRON .1
wodniw etihw yalpsiDETIHW .2
wodniw rab roloc yalpsiDRAB ROLOC .3
wodniw elacs yarg yalpsiDELACS YARG .4
wodniw pmar latnoziroh yalpsiDPMAR EDIW .H .5
wodniw pmar lacitrev yalpsiDPMAR EDIW .V .6
7. ALL DEFAULT All default of the KD-PC2
noitcnuFuneM buS dn2
1. INPUT
VIDEO
2. PICTURE
(
+ / -
)
(
+ / -
)
3. ASPECT
4. DEFAULT
(
+ / -
)
(
+ / -
)
(
+ / -
)
7. CALIBRATION
7. DEFAULT
3. SCREEN
/
/
4. AUDIO
1. INPUT AUDIO
1. AUDIO L / R
Setting up the input source of the audio
Choose
between the audio L/Rand the SPDIF
2.
SPDIF
(
+/-
)
(
+/-
)
Setting up KD-PC2 output signal format
(
resolution
)
2. WXGA
6. TEST
PATTERN
5. SET UP
/
(
+/-
)
4. OUTPUT VIDEO
1. XGA
Firmware Upgrades
From time-to-time, Key Digital™ provides the option for you to update the Firmware that operates
and controls your KD-PC2 Video Card and Processor, such as to add a new or improved feature,
or support for additional output resolutions (like 1360 x 768p and 1280 x 720p).
These updates are optional, and you should only perform upgrades as provided and instructed by
Key Digital™.
Check our web site at www.keydigital.com for any firmware updates. Be sure to carefully and
completely follow all of the steps in the Firmware Upgrade instructions on our web site if there is a
Firmware Upgrade for your KD-PC2 Video Card that you are interested to install.
A Firmware Upgrade is performed by downloading the Firmware Upgrade files from the Key
Digital™ web site, to your laptop or personal computer. You will be instructed to connect the special
Firmware Upgrade cable provided with your KD-PC2 Video Card between the parallel printer port
of your computer, and the VGA input on the KD-PC2 card. You will need to use the UPGRADE
Hot Button on your KD-PC2 IR Remote Control, or access the UPGRADE command in the SETUP Menu on the OSD. Detailed instructions for executing the Firmware Upgrade instructions
are available on our web site. If you have any questions or encounter any problems while
performing a Firmware Upgrade, please contact Key Digital™ Technical Support.
When performing a Firmware Upgrade, you MUST use the Firmware Upgrade
Cable PROVIDED WITH YOUR KD-PC2 AT TIME OF PURCHASE and carefully
follow each step of the instructions for Firmware Upgrade of your KD-PC2 Video
Card, as provided on our web site at www.keydigital.com. Failure to follow these
instructions may lead to the inoperability of your KD-PC2 card.
KD-PC2_Manual.indd 30-31 10/18/06 1:53:03 PM
Page 18
KD-PC2 Operating Instructions
Page 32
KD-PC2 Operating Instructions
Page 33
Technical Specifications
General
KD-PC2, Model KD-PC2:
Pioneer Plasma video card and processor
Specifically engineered for operation in Pioneer Plasma Display models:
Market Pioneer™ Plasma Display Display’s Native Resolution
USA PDP-425CMX 1024 x 768p [XGA]
PDP-434CMX 1024 x 768p [XGA]
PDP-504CMX 1280 x 768p [WXGA]
PDP-505CMX 1280 x 768p [WXGA]
PDP-507CMX 1360 x 768p
PDP-607CMX 1360 x 768p
Europe & International PDP-43MXE1 & PDP-43MXE1-S 1024 x 768p [XGA]
PDP-50MXE1 & PDP-50MXE1-S 1280 x 768p [WXGA]
All internal connections from the KD-PC2 card to the Pioneer Plasma Display via the Pioneer
Plasma ES (Expansion Solutions) card slot
Factory-set to directly output 1280x768p [WXGA] to the Pioneer Plasma Display
If the Pioneer Plasma Display only supports up to 1024 x 768p [XGA] resolution, then the
KD-PC2 must be configured to output this resolution
Output resolutions of 1360 x 768p [and 1280 x 720p from the KD-PC2 card will be
available in the future as Firmware Upgrades by downloading from the Key Digital™
website at www.keydigital.com
Four (4) HDMI Inputs:
Select any HDMI digital input (or any analog video input)
To support DVI-D Video I/O, use Key Digital™ HDMI > DVI adapter cable(s)
Supports EDID and HDMI plug-and-play capability
Supports HDCP Copy Protection
Individual Analog Video Inputs supported:
Select any analog video input (or any HDMI digital input)
Separate analog video connectors for RGB(HV), Component Video (YPbPr), S-Video,
Composite Video (CV)
NTSC and PAL
Audio In and Out with individual connectors for:
Analog audio left and right stereo pair and SPDIF coax digital audio
›
➔
➔
➔
➔
»
»
›
➔
›
›
➔
›
➔
➔
➔
›
➔
Process and scale any HDMI digital video or any analog input to match the native resolution of
your Pioneer Plasma Display:
Using Key Digital’s award-winning Clear Matrix Pro™ technology
A full-function, high-quality Video Processor is included
Supports all popular source formats and resolutions
Easy to control and operate:
Easy-to-operate IR Remote Control
RS-232 control via the Pioneer Plasma Display
Does not interfere with the operation of your Pioneer Plasma Display
Does not interfere with A/V sources connected directly to your Pioneer Plasma Display
Video Inputs
HDMI Digital Video (HDMI is plug-and-play and also supports audio):
Four (4) separate Input connectors, labeled “HDMI 1” through “HDMI 4”
To support DVI-D Video, use Key Digital™ HDMI↔DVI adapter cable(s)
Supports HDCP Copy Protection
Analog Video (individual analog video connectors for each of the following video interfaces):
RGB(HV)
Component Video (YPbPr)
The Component Video input does not support the following resolutions:
1024 x 768p
1280 x 768p
S-Video: NTSC, PAL
Composite Video (CV): NTSC, PAL
Audio Inputs and Outputs
Analog audio left and right stereo pair input and output
SPDIF coax digital audio input and output
Dolby Digital is passed-thru unprocessed and output on the SPDIF coax, requiring an external
Dolby Digital processor
HDMI PCM digital audio
Video Input Formats & Resolutions Supported
Accepts the following scan inputs:
480i, 480p, 576i, 576p, 720p, 768p and 1080i/540p
Accepts the following video standards:
HDTV
SDTV
Analog NTSC and PAL on the S-Video and Composite Video inputs
Accepts and automatically detects the following input field or frame rates:
60 and 50 Hz
The output frame rate is the same as the input frame rate
›
➔
➔
➔
›
➔
➔
➔
➔
›
➔
›
➔
›
➔
➔
»
➛
➛
➔
➔
›
›
➔
›
›
➔
›
➔
➔
➔
›
➔
➔
KD-PC2_Manual.indd 32-33 10/18/06 1:53:04 PM
Page 19

KD-PC2 Operating Instructions
Page 34
KD-PC2 Operating Instructions
Page 35
Accepts the following 60 Hz resolutions:
720 x 480i @ 60 Hz
720 x 480p @ 60 Hz
1024 x 768* @ 60 Hz
1280 x 768p* @ 60 Hz
1280 x 720p @ 60 Hz
1920 x 1080i @ 60 Hz
*The Component Video input does not support the following resolutions:
1024 x 768p
1280 x 768p
Video Output Formats Supported
All internal connections from the KD-PC2 card to the Pioneer Plasma Display via the Pioneer
Plasma ES (Expansion Solutions) card slot
Factory-set to directly output 1280x768p [WXGA] to the Pioneer Plasma Display
Output resolutions of 1360 x 768p and 1280 x 720p from the KD-PC2 card will be available
in the future as Firmware Upgrades by downloading from the Key Digital™ website at
www.keydigital.com
Video Processing Functions
Edge Enhancement, Brightness, Contrast
Saturation, Tint
Individual display Calibrations for RGB Gain and Setup
H & V Size, H & V Position
Zoom (Output Aspect Ratio processing), including options to prevent monitor burn-in for
Letterbox or Pillarbox images:
Normal
Horizontal Zoom In/Out
Vertical Zoom In/Out
Horizontal and Vertical Zoom In/Out
Built-in Test Patterns help you set-up your video system (all patterns available through the OSD
from the IR Remote, as well as RS-232):
White screen
Color bars
Gray scale
Horizontal wide ramp
Vertical wide ramp
›
➔
➔
➔
➔
➔
➔
»
➛
➛
›
›
➔
›
›
›
›
›
➔
➔
➔
➔
›
➔
➔
➔
➔
➔
Status and Control
Stores your custom settings for each HDMI and analog video input
Easy-to-operate IR Remote Control
RS-232 control via the Pioneer Plasma Display:
Compatible with Crestron, AMX, Elan, Control4
Firmware-upgradeable directly through the KD-PC2 15-pin VGA connector:
The Firmware Upgrade cable provided with the KD-PC2 must be used
Built-in Test Patterns available through the IR Remote Control, as well as RS-232
Connectors
HDMI Digital Video (also supports audio):
4 x HDMI Type A 19-pin connector
Analog Video:
RGB(HV): mini D-sub 15-pin connector
Component Video (YPbPr): 3 x color-coded RCA female connectors
S-Video: 1 x S-Video connector
Composite Video (CV): 1 x RCA female connector
Audio:
Analog stereo Left & Right Audio:
1 x stereo mini jack input
1 x stereo mini jack output
SPDIF coax digital audio:
1 x RCA female connector input
1 x RCA female connector output
RS-232C: D-sub 9-pin on the Pioneer Plasma Display
Included Accessories
Two (2) Audio cables
One (1) special Firmware Upgrade cable
IR Remote Control with batteries
Mechanical
Product size:
11.2” x 8.6” x 1.0”, fits in the ES (Expansion Solutions) Slot of the Pioneer Plasma Display
Product Weight: 5 lbs.
Input power:
receives power from the ES (Expansion Solutions) Slot of the Pioneer Plasma Display
›
›
›
➔
›
➔
›
›
➔
›
➔
➔
➔
➔
›
➔
›
›
➔
›
›
›
›
›
›
›
›
›
KD-PC2_Manual.indd 34-35 10/18/06 1:53:05 PM
Page 20
KD-PC2 Operating Instructions
Page 36
KD-PC2 Operating Instructions
Page 37
How to Contact Key Digital
™
Repairs and Warranty Service
Should your product require warranty service, please contact Key Digital™ to obtain a Returned
Materials Authorization (RMA) number
Please contact us at either:
Phone:
1-914-667-9700 ext 215
E-mail:
Technical Support
For technical questions about using our products, please contact us at either:
Phone:
1-914-667-9700 ext 301
E-mail:
Customer Support
For customer support questions about using our products, please contact us at either:
Phone:
1-914-667-9700 ext 223
E-mail:
Warranty
All Key Digital™ products are built to high manufacturing standards and should provide years of
trouble-free operation. They are backed by a limited two-year parts and labor warranty.
›
›
➔
➔
›
➔
➔
›
➔
➔
KD-PC2_Manual.indd 36-37 10/18/06 1:53:06 PM
 Loading...