

Page 1
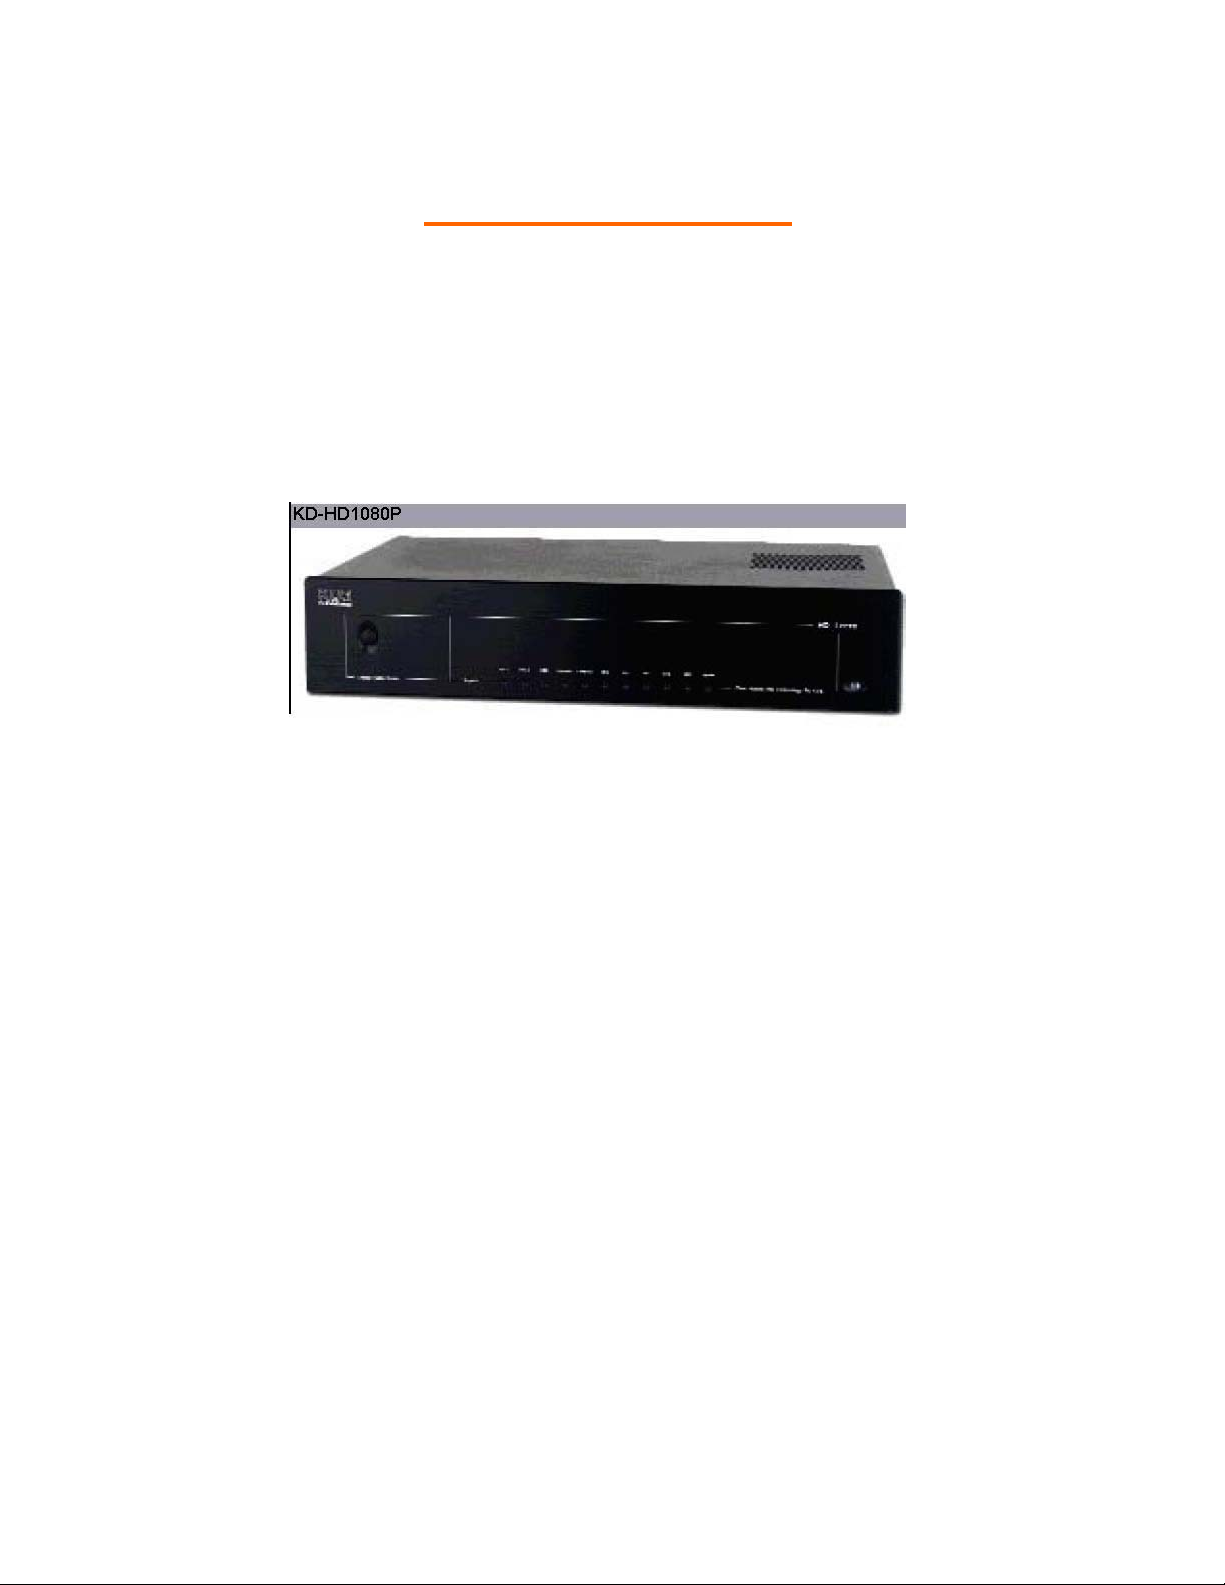
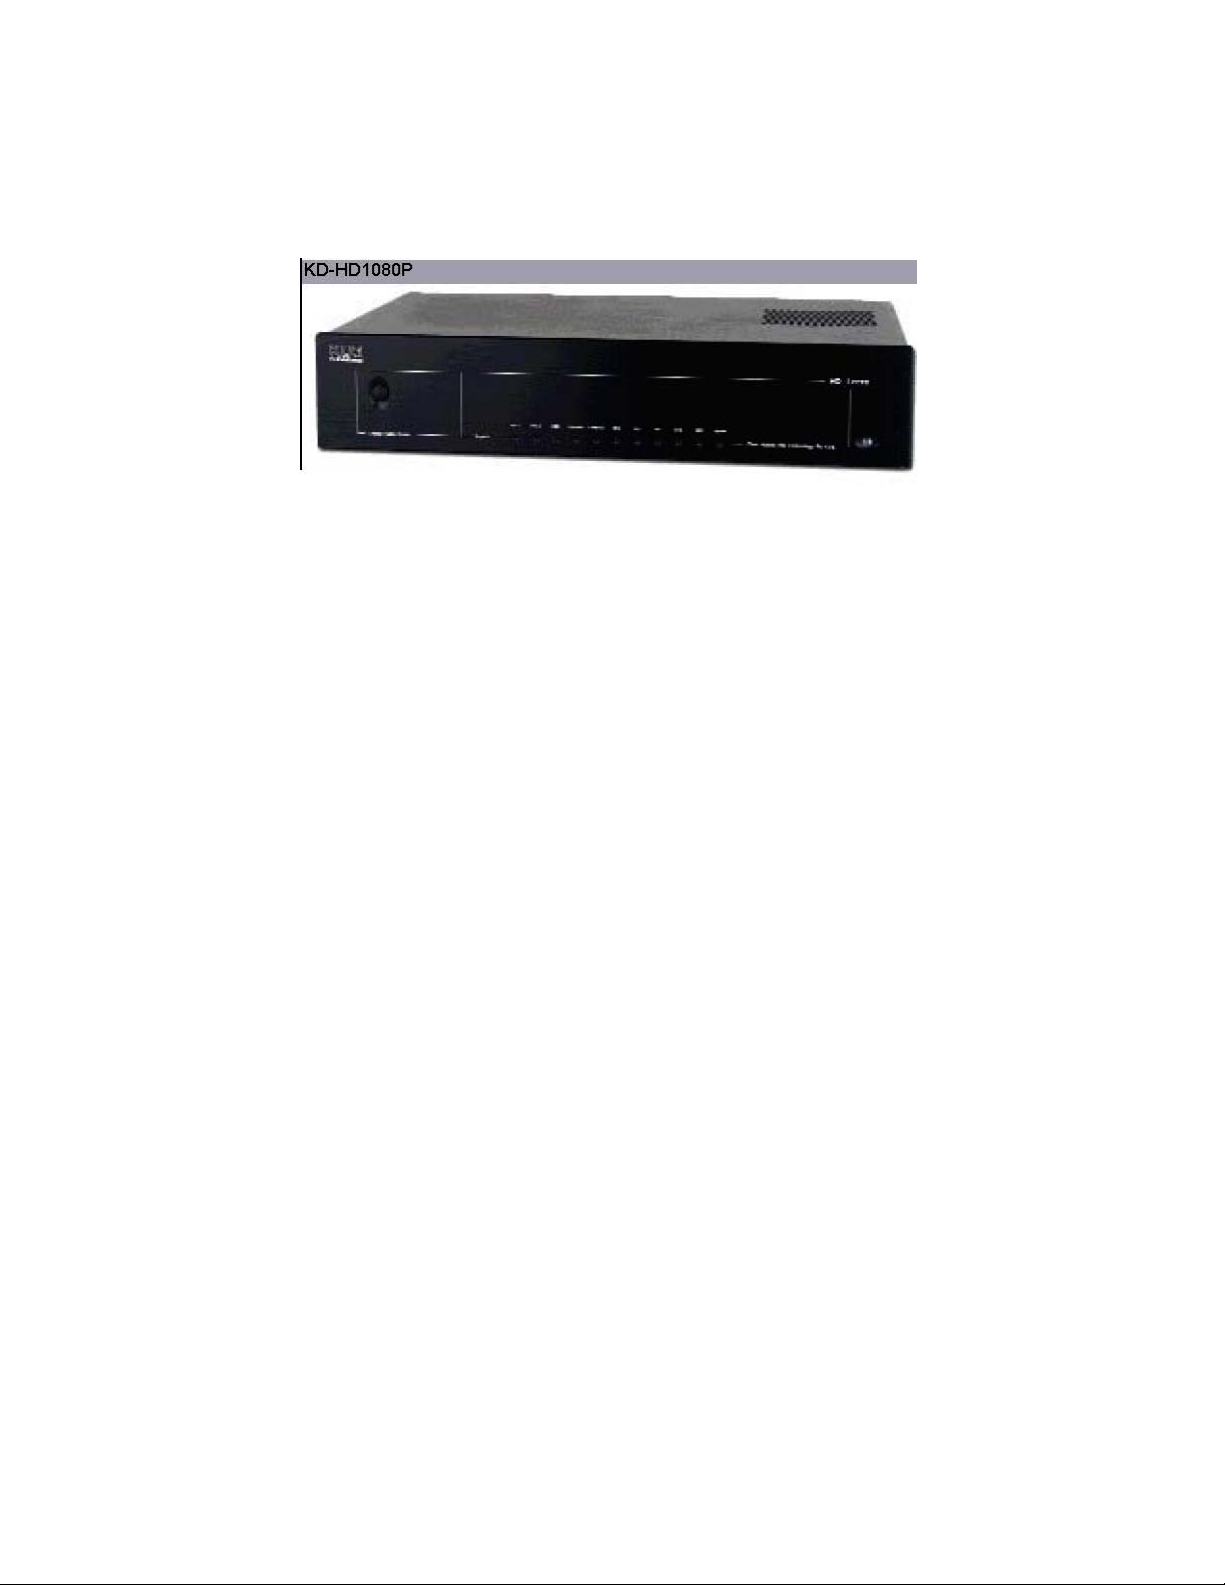
KEY DIGITAL HD LEEZA, MODEL KD-HD1080P
HD LEEZA
Model KD-HD1080P
Video Processor
OPERATING INSTRUCTIONS
HD Leeza, Model KD-HD1080P
A state-of-the-art Home Theater backbone / integration box solution,
combining video processing and switching all in one elegant product
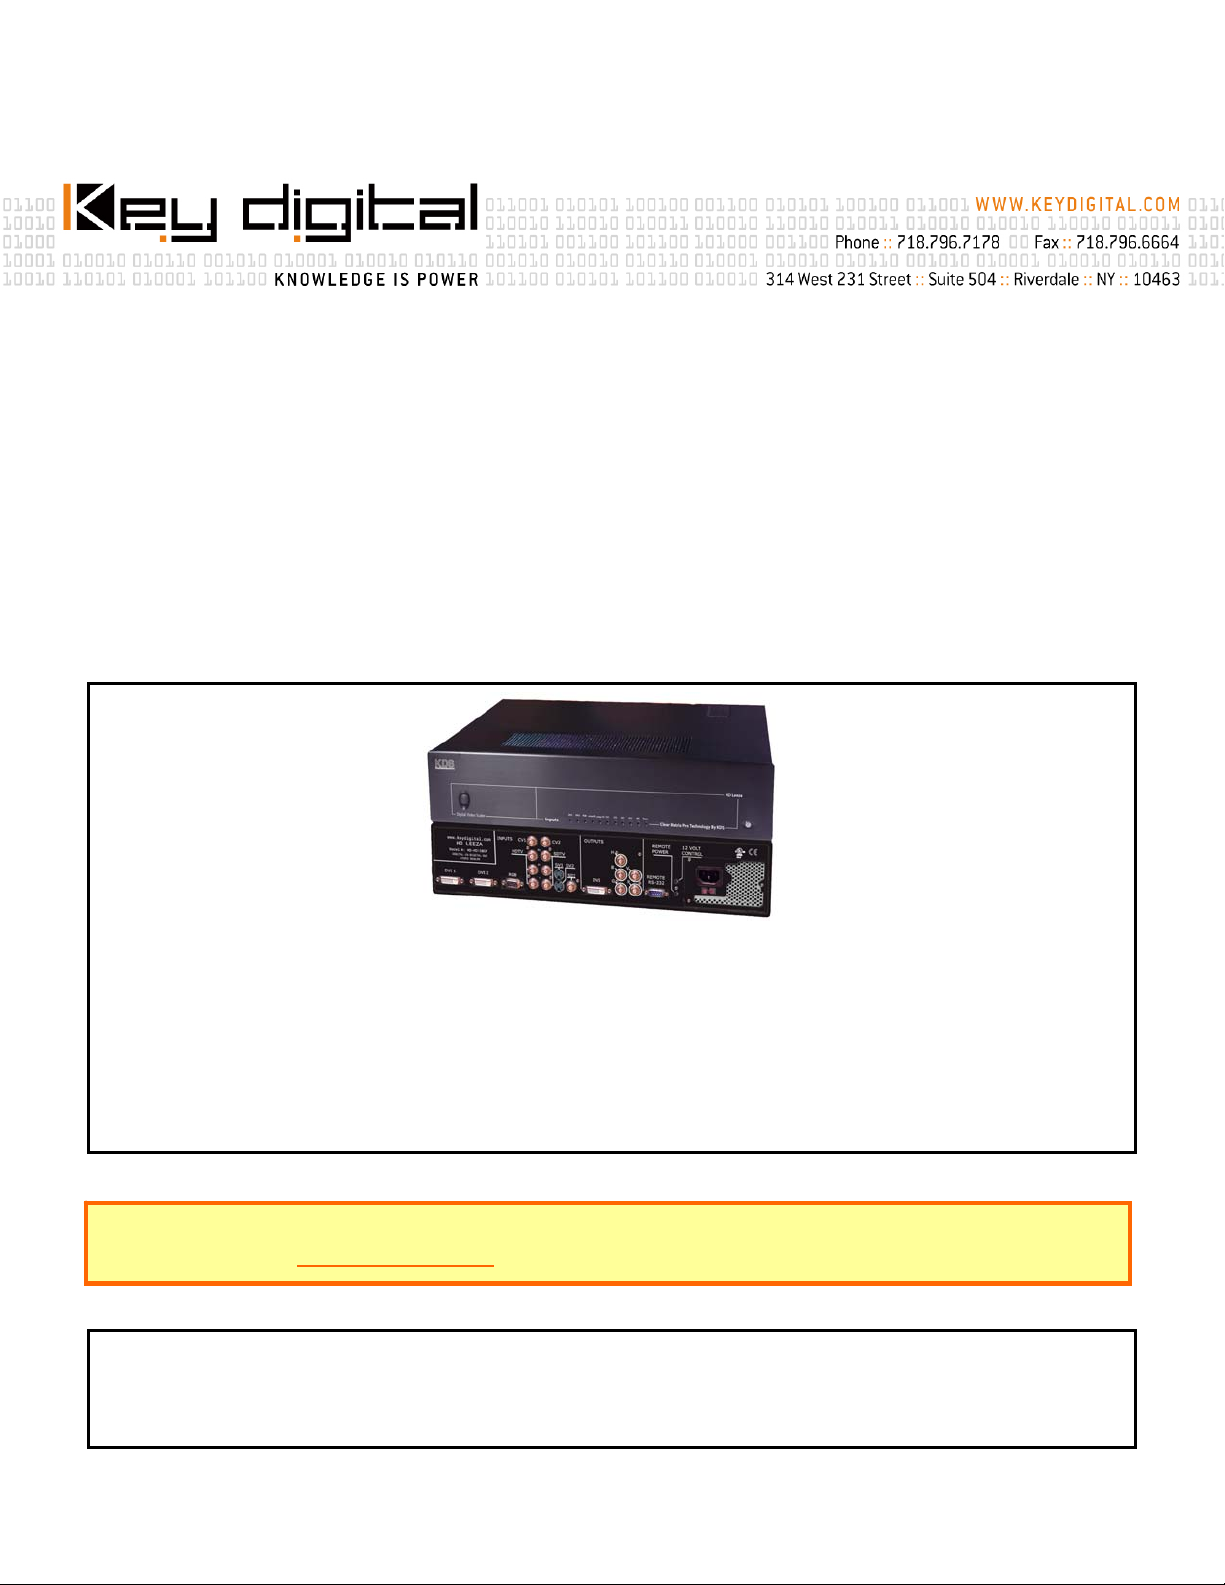
The KD-HD1080P HD Leeza is a full-featured video switcher, video processor, and Home Theater
integration box, all in one. Its state-of-the-art video processor converts interlaced and progressive video
sources to high-quality progressive-scan video, sized precisely to match the native pixel resolution of any
front- or rear-projection display – Plasma, LCOS, DLP®, LCD, DILA, and CRT.
It is suggested that all users always check our web site for the latest version of this Users Manual at:
www.keydigital.com under Literature, User Manuals, HD Leeza
NOTE: These operating instructions are for HD Leeza Model KD-1080P installed with Version 5.5.74
of the firmware. Lower (older) versions of the firmware will not support all functionality described in this
manual. Please contact tech@keydigital.com for a free on-line upgrade. Subsequent (higher) firmware
versions may also require you to follow appended instructions.
Manual_HDL_V3.7_042404_PRINT
Page 2

### This Page Intentionally Left Blank ###
Page 3

KEY DIGITAL HD LEEZA, MODEL KD-HD1080P
HD LEEZA - Video Processor - Model KD-HD1080P
UL LISTED
Safety Instructions – Please be sure to follow these instructions for
safe operation of your unit
*********************************************************************************
1) Read these instructions.
2) Keep these instructions.
3) Heed all warnings.
4) Follow all instructions.
5) Do not use this apparatus near water.
6) Clean only with dry cloth.
7) Do not block any ventilation openings. Install in accordance with the manufacturer’s instructions.
8) Do not install near any heat sources such as radiators, heat registers, stoves, or other apparatus
(including amplifiers) that produce heat.
9) Do not defeat the safety purpose of the polarized or grounding-type plug. A polarized plug has
two blades with one wider than the other. A grounding type plug has two blades and a third
grounding prong. The wide blade or the third prong are provided for your safety. If the provided
plug does not fit into your outlet, consult an electrician for replacement of the obsolete outlet.
10) Protect the power cord from being walked on or pinched particularly at plugs, convenience
receptacles, and the point where they exit from the apparatus.
11) Only use attachments/accessories specified by the manufacturer.
12) Use only with the cart, stand, tripod, bracket, or table specified by the manufacturer, or sold with
the apparatus. When a cart is used, use caution when moving the cart/apparatus combination to
avoid injury from tip-over.
13) Unplug this apparatus during lightning storms or when unused for long periods of time.
14) Refer all servicing to qualified service personnel. Servicing is required when the apparatus has
been damaged in any way, such as power-supply cord or plug is damaged, liquid has been spilled
or objects have fallen into the apparatus, the apparatus has been exposed to rain or moisture, does
not operate normally, or has been dropped.
HD Leeza Instruction Manual Page i
Page 4

KEY DIGITAL HD LEEZA, MODEL KD-HD1080P
*********************************************************************************
HD Leeza Instruction Manual Page ii
Page 5

### This Page Intentionally Left Blank ###
Page 6
KEY DIGITAL HD LEEZA, MODEL KD-HD1080P
HD LEEZA - Video Processor - Model KD-HD1080P
OPERATING INSTRUCTIONS
TABLE OF CONTENTS
Note: Start at Section #7 to skip the Introductory Discussions
BASICS
1. INTRODUCTION TO HD LEEZA, MODEL KD-HD1080P Page 1
2. THE MANY ADVANTAGES OF OWNING HD LEEZA Page 4
3. OUTPUT RESOLUTIONS SUPPORTED BY HD LEEZA Page 4
4. USER-CONTROL FEATURES Page 5
5. SDI INPUT: ANOTHER “HIDDEN” BENEFIT OF HD LEEZA Page 6
6. INCLUDED WITH HD LEEZA Page 6
SET-UP DETAILS
7. QUICK SETUP OF HD LEEZA, MODEL KD-HD1080P Page 7
7.1 Connect HD Leeza into Your Installation
7.2 Make a Picture
7.3 “Fine-tune” the System Settings
Page 8
Page 12
Page 19
8. HOW TO CONTACT KEY DIGITAL Page 25
9. REPAIR AND WARRANTY Page 25
APPENDICES
Appendix A: HD Leeza Technical Specifications Page A1
Appendix B: Firmware Upgrade Instructions Page B1
Appendix C: RS-232C Remote Control Operation Page C1
Appendix D: Handy Summary of Remote Control Commands Page D1
SPECIAL SECTIONS (AT END OF MANUAL)
1. Frequently Asked Questions (FAQs)
2. Firmware Upgrade Log
3. Display Matrix – Preferred HD Leeza Resolution Settings for Popular Displays
Please email any errors, omissions, or suggestions regarding this
HD Leeza Operating Manual to: tech@keydigital.com
HD Leeza Instruction Manual Page ii
Page 7

### This Page Intentionally Left Blank ###
Page 8
KEY DIGITAL HD LEEZA, MODEL KD-HD1080P
1. INTRODUCTION TO HD LEEZA, MODEL KD-HD1080P
Q: HD Leeza (HD LEEZA), Model KD-HD1080P -- What is it?
A: HD LEEZA (HD Leeza), Model KD-1080P:
• Is a video processor and switcher / home theater backbone
• Has flexible and varied input and output formats (physical connectors and video formats)
• Sizes Video precisely to match the “Sweet Spot” (typica lly “Native Resolution”) for any display
Q: What does a Video Processor do?
A: A Video Processor “scales” vide o to match the “Native Resolution” of your display,
and performs Video adjustment functions like brightness, contrast, gamma,
sharpness, etc.
• A Video Scaler:
–Takes one video format IN and converts it to another video format OUT
• The Scaler conversion can include:
–SCAN conversion (like interlaced to progressive)
–Scan RATE conversion (like 50 Hz to 60 Hz)
–RESOLUTION conversion, like 640 pixels to 1920 pixels
–FORMAT conversion, like Analog (RGB, Component Video) to Digital (DVI)
–ASPECT RATIO conversion, like 4:3 to 16:9
HD Leeza Operating Instruction Manual Page 1
Page 9
KEY DIGITAL HD LEEZA, MODEL KD-HD1080P
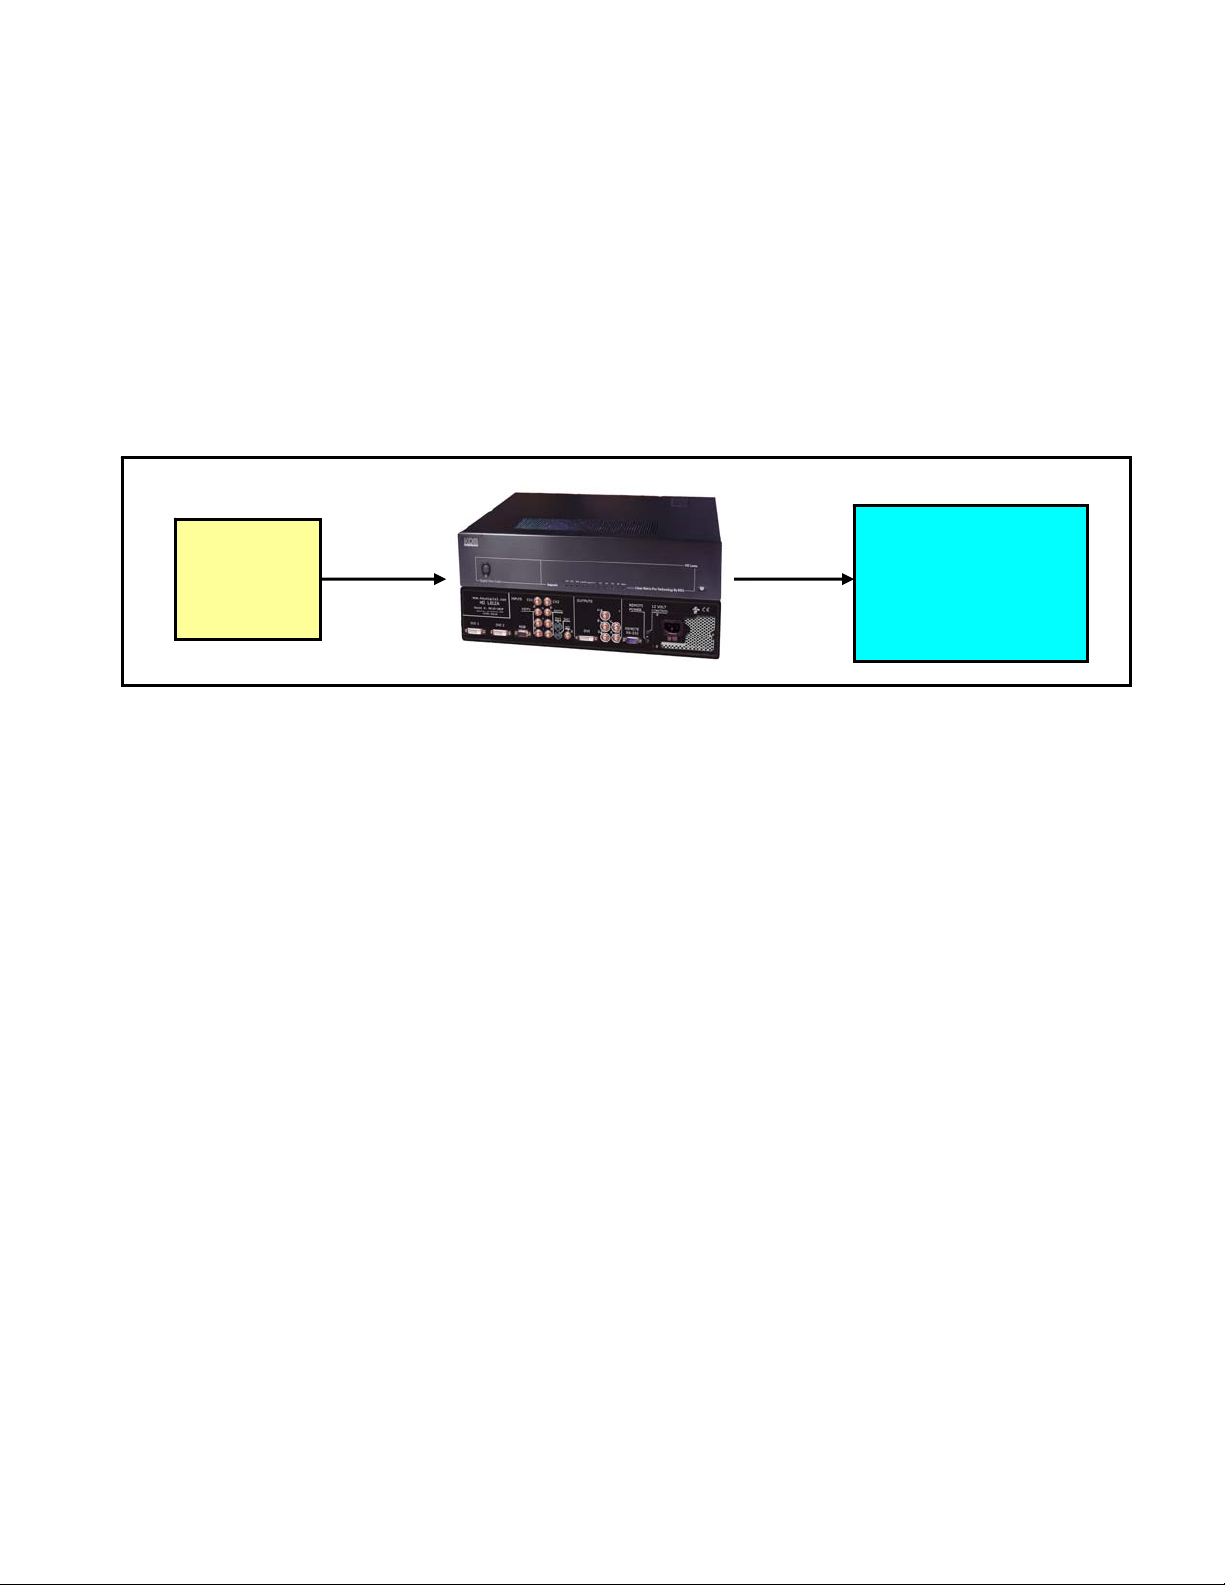
Q: Why do I need a Video Processor?
A: Problem:
• You have a “standard definition” DVD movie you want to watch on your high-resolution
display
Key Digital has the Solution for you:
• Scale your input and adjust the video with your HD Leeza Video Processor
SD Source
DVD
HDTV
Player
Display
Q: But what if my DVD player or even my display already has a Scaler?
A: Turn it OFF and use HD Leeza instead, because HD Leeza has a very high quality built-in
scaler called “Clear Matrix Pro” which takes all the different input formats and lights up your
display in the best way:
• The scaler in your DVD player can’t match the quality of HD Leeza, so turn it Off (use 480
interlaced out) and let HD Leeza perform the video scaling
• The scaler in your display also can’t match the quality of HD Leeza, so be sure to use the
“Native Resolution” or preferred settings for your display that are provided by Key Digital in
the HD Leeza Display Matrix (available on our web site, or contact tech@keydigital.com
• Scale your input and adjust the video with your HD Leeza Video Processor
HD Leeza uses a Key Digital System’s proprietary “Clear Matrix Pro” Advanced Motion Assisted Scaling DeInterlacing Algorithm with film detection inverse 3:2 pulldown detection processing for 60Hz and 72 Hz rates, and
(PAL) 2:2 telecine pulldown processing and detection for 75Hz and 50Hz rates, making it the ultimate ”digital
backbone” for home theater conversion today.
HD Leeza Operating Instruction Manual Page 2
Page 10
KEY DIGITAL HD LEEZA, MODEL KD-HD1080P
HD LEEZA SUMMARY
For many years, the only way to watch TV was with a picture tube, scanning about 480 visible picture
lines from top to bottom of the screen in an alternating odd-and-even process called interlacing. Today,
we have many more choices of video displays, some of which have considerably higher picture
resolution. These new TVs and projectors use imaging devices with fixed, measurable arrays of vertical
and horizontal pixels, and they employ a 'progressive' picture scanning process wherein all lines of
picture information are presented at once.
HD Leeza is the best way to match lower-resolution interlaced and progressive-scan video from a DVD
player, satellite TV receiver, or VHS tape player to higher-resolution plasma, LCD, DLP, and LCoS TVs
and projectors. HD Leeza will also get rid of image flicker by converting from interlaced to progressive
scanning, and correct for any abnormal motion artifacts that can result from this process.
HD Leeza allows you the most flexibility in matching your video sources to the specific resolution of
your Display. Its high-quality Clear Matrix PRO processor provides smooth, film-like images from a
variety of video sources, and user menus let you fine-tune picture quality to your liking. With HD Leeza,
you can also cross-convert between digital TV formats including 480p, 720p, 768p, 1080i/540p, and
1080p.
Note: Digital Light Processing
and DLP are registered trademarks of Texas Instruments Corporation.
HD Leeza Operating Instruction Manual Page 3
Page 11
KEY DIGITAL HD LEEZA, MODEL KD-HD1080P
2. THE MANY ADVANTAGES OF OWNING HD LEEZA,
MODEL KD-HD1080P
HD LEEZA Video Processor
You’ll be delighted by the many convenient and advanced features HD Leeza provides to
your Home Theater:
• HD Leeza is Home Theater “Backbone” Switcher and Video Processor
–All in ONE product
– HD
and SD
• Accepts a wide variety of Inputs & Outputs, like
–Digital and Analog
–RGBHV, DVI with HDCP, Component, YPbPr, SDI
• Regardless of input video format or the Native Resolution of your display
–HD Leeza lets you find that “Sweet Spot” for your display
–Whatever it is
–With only the highest-quality scaling and video processing
3. OUTPUT RESOLUTIONS SUPPORTED BY HD LEEZA,
MODEL KD-HD1080P
• DTV/HDTV standard display formats:
– 720x480p, 1280x720p, 1920x540p, 1920x1080p
• Plasma/LCD standard resolutions:
–
852x480, 1024x512, 1024x1024, 1280x768, 1440x788, 1366x768
• PC standard display formats:
640x480, 800x600, 1024x768, 1280x1024, 1400x1050
–
• Digital Cinema formats:
–1920x1200
• Other display formats:
– 852x576p, 1280x960, 1440x960, 1365x1024
HD Leeza Operating Instruction Manual Page 4
Page 12

KEY DIGITAL HD LEEZA, MODEL KD-HD1080P
4. USER-CONTROL FEATURES FOR HD LEEZA, MODEL
KD-HD1080P
HD Leeza produces pristine digital images with picture adjustment capabilities for brightness, contrast,
saturation, hue, horizontal and vertical position and size, 10 standard and two custom aspect ratios, overscan, and
many more – so video gurus can tweak it to their own special preferences.
• HD Leeza has more controls than any of today’s displays:
–Brightness
–Contrast
–Image position & size
• Plus:
–2-D Enhancement
–Gamma
–Aspect Ratio In & Out
–Non-linear stretch
–Letterbox (vertical and horizontal)
–Independent blue and red saturation
–Test patterns
• IR Remote Control:
–With “Hot” buttons
–Discrete codes available, so you can program your Pronto
• RS-232C Port:
–So you can control HD Leeza from any control system, like Crestron
–So you can upgrade the firmware to add new features as they are provided by Key
Digital over the Internet
• Memory feature lets you store separate preferences for each input device
• Dynamic Non Linear Stretch Mode "Dynamic Stretch Xtreme" (DSX) is also provided
as an added user-option for matching the source material to the aspect ratio of the
display
HD Leeza Operating Instruction Manual Page 5
Page 13
KEY DIGITAL HD LEEZA, MODEL KD-HD1080P
5. SDI INPUT: ANOTHER “HIDDEN” BENEFIT OF HD
LEEZA, MODEL KD-HD10 8 0 P
HD Leeza’s Input supports “SDI” -- the high-quality digital studio standard. This is one of many
benefits HD Leeza has to offer. See the table below – DVI must include HDCP copy protection for high
definition material. Thus, if you have a DVI HD source, you must have a DVI display, because the
analog ports must be disabled, by law. This is not the case for SDI sources, which do not need to abide
by any copy protection standard. The SDI port on HD Leeza gives you the advantage to enjoy highquality digital sources on
DVI is 480
a low-quality scaler. Not so for SDI, which permits 480 interlaced, and hence you can enjoy the benefits
of the high-quality scaling provided by HD Leeza.
please be sure to use 480i (not 480p) source inputs to HD Leeza.
progressive, the source must already be converted from interlaced to progressive, perhaps by
Copy
Protection
Resolution 480i 480p
any display (including DVI). Also, since the lowest resolution supported by
For maximum picture quality, whenever possible,
SDI DVI
YES NO
6. INCLUDED WITH YOUR HD LEEZA, MODEL KD-HD1080P
Open the carton and you will find inside the following contents:
1. HD Leeza unit
2.
Power cord
3.
Special DB9 cable
4.
This Instruction Manual
5.
Rack-mount ears
6.
IR Remote Control and batteries
7.
Warranty card
WARNING!!! The special DB9 (black) cable included with your HD Leeza shipment is for
firmware upgrades only. Please do not plug that cable into HD Leeza for any other reason -- it will
erase ALL the firmware inside and you will need to re-load the firmware.
HD Leeza Operating Instruction Manual Page 6
Page 14
KEY DIGITAL HD LEEZA, MODEL KD-HD1080P
7. QUICK SETUP OF HD LEEZA, MODEL KD-HD1080P
Connecting and using your HD Leeza Video Processor / Home Theater backbone and Switcher is a
simple process.
1. Connect HD Leeza into your installation: understand the functionality of your
HD Leeza Video Processor, and hook up the Inputs and Outputs.
2. Make a picture: learn the basics of the IR Remote Control, and bring up the On-
Screen Display (OSD) menus. Be sure to configure HD Leeza for your particular
display format (DVI, RGB, or Component Video) and Resolution (find that
“Sweet Spot” that makes the best picture).
3. “Fine-tune” the system settings: perform all video processing and set-up
adjustments, and SAVE your preferences for each input.
Please be sure to take note of the following Appendices and Special
Sections at the end of this Manual, should you have a specific need as you
go through this Operating Instructions Manual:
It is truly as easy as 1... 2... 3…
APPENDICES
Appendix A: HD Leeza Technical Specifications Page A1
Appendix B: Firmware Upgrade Instructions Page B1
Appendix C: RS-232C Remote Control Operation Page C1
Appendix D: Handy Summary of Remote Control Commands Page D1
SPECIAL SECTIONS (AT END OF MANUAL)
1. Frequently Asked Questions (FAQs)
2. Firmware Upgrade Log
3. Display Matrix – Preferred HD Leeza Resolution Settings for Popular Displays
You are strongly advised to examine Special Section #2 to review the
latest features and improvements added in each Firmware Upgrade.
HD Leeza Operating Instruction Manual Page 7
Page 15
KEY DIGITAL HD LEEZA, MODEL KD-HD1080P
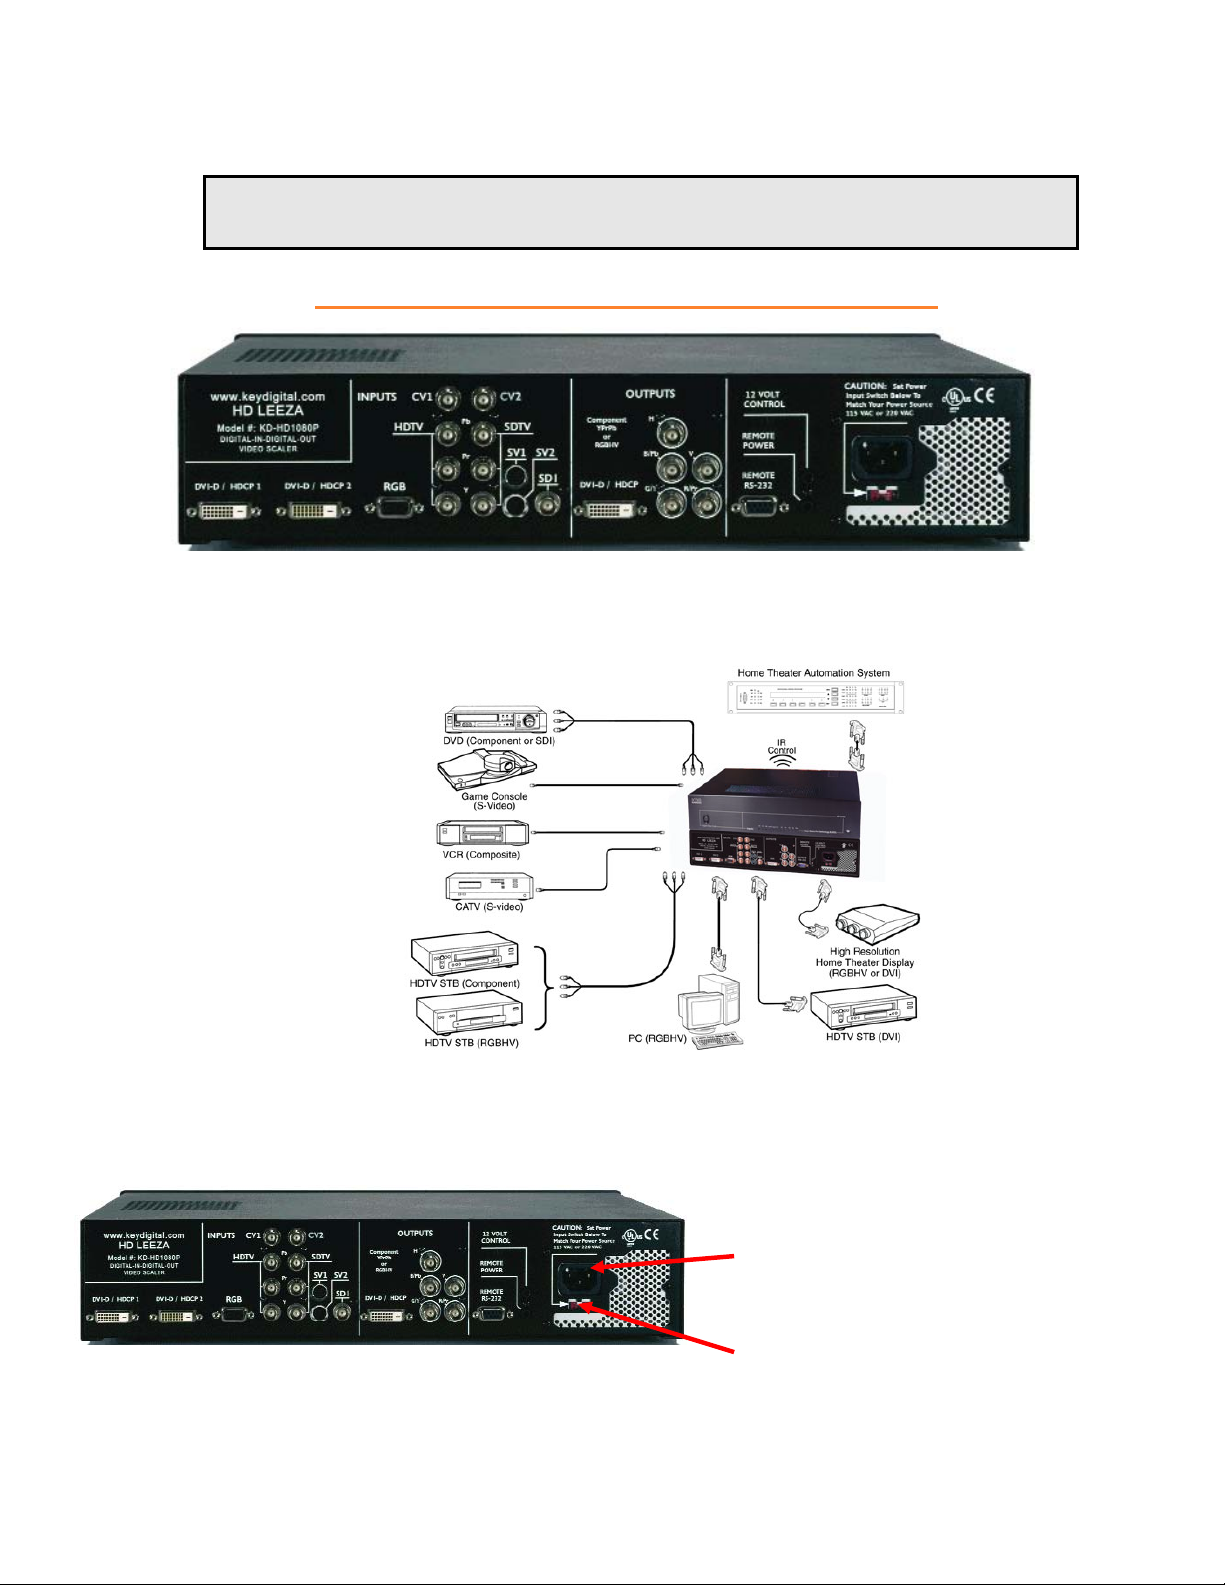
7.1 Connect HD Leeza into Your Installation
Understand the functionality of your HD Leeza Video Processor,
and hook up the Inputs and Outputs.
HD LEEZA INPUT/OUTPUT BACKPANEL
Q: Once I have HD Leeza out of the carton, what do I need to do first?
A: You need to connect HD Leeza into your system. Here are some typical devices connected to the Inputs
and Outputs of HD Leeza:
You must also supply power to your HD Leeza unit. Refer to the following input power specifications:
1. Input Power: 100 to 240V AC, 40
Watts.
2. Insert the line cord at the back of your
HD Leeza unit, and be sure to provide
the proper power for the unit.
3. Be sure to set the Power Input Switch
next to the line cord on the back of
HD Leeza to the proper line voltage,
115 or 220 VAC.
HD Leeza Operating Instruction Manual Page 8
Page 16
KEY DIGITAL HD LEEZA, MODEL KD-HD1080P
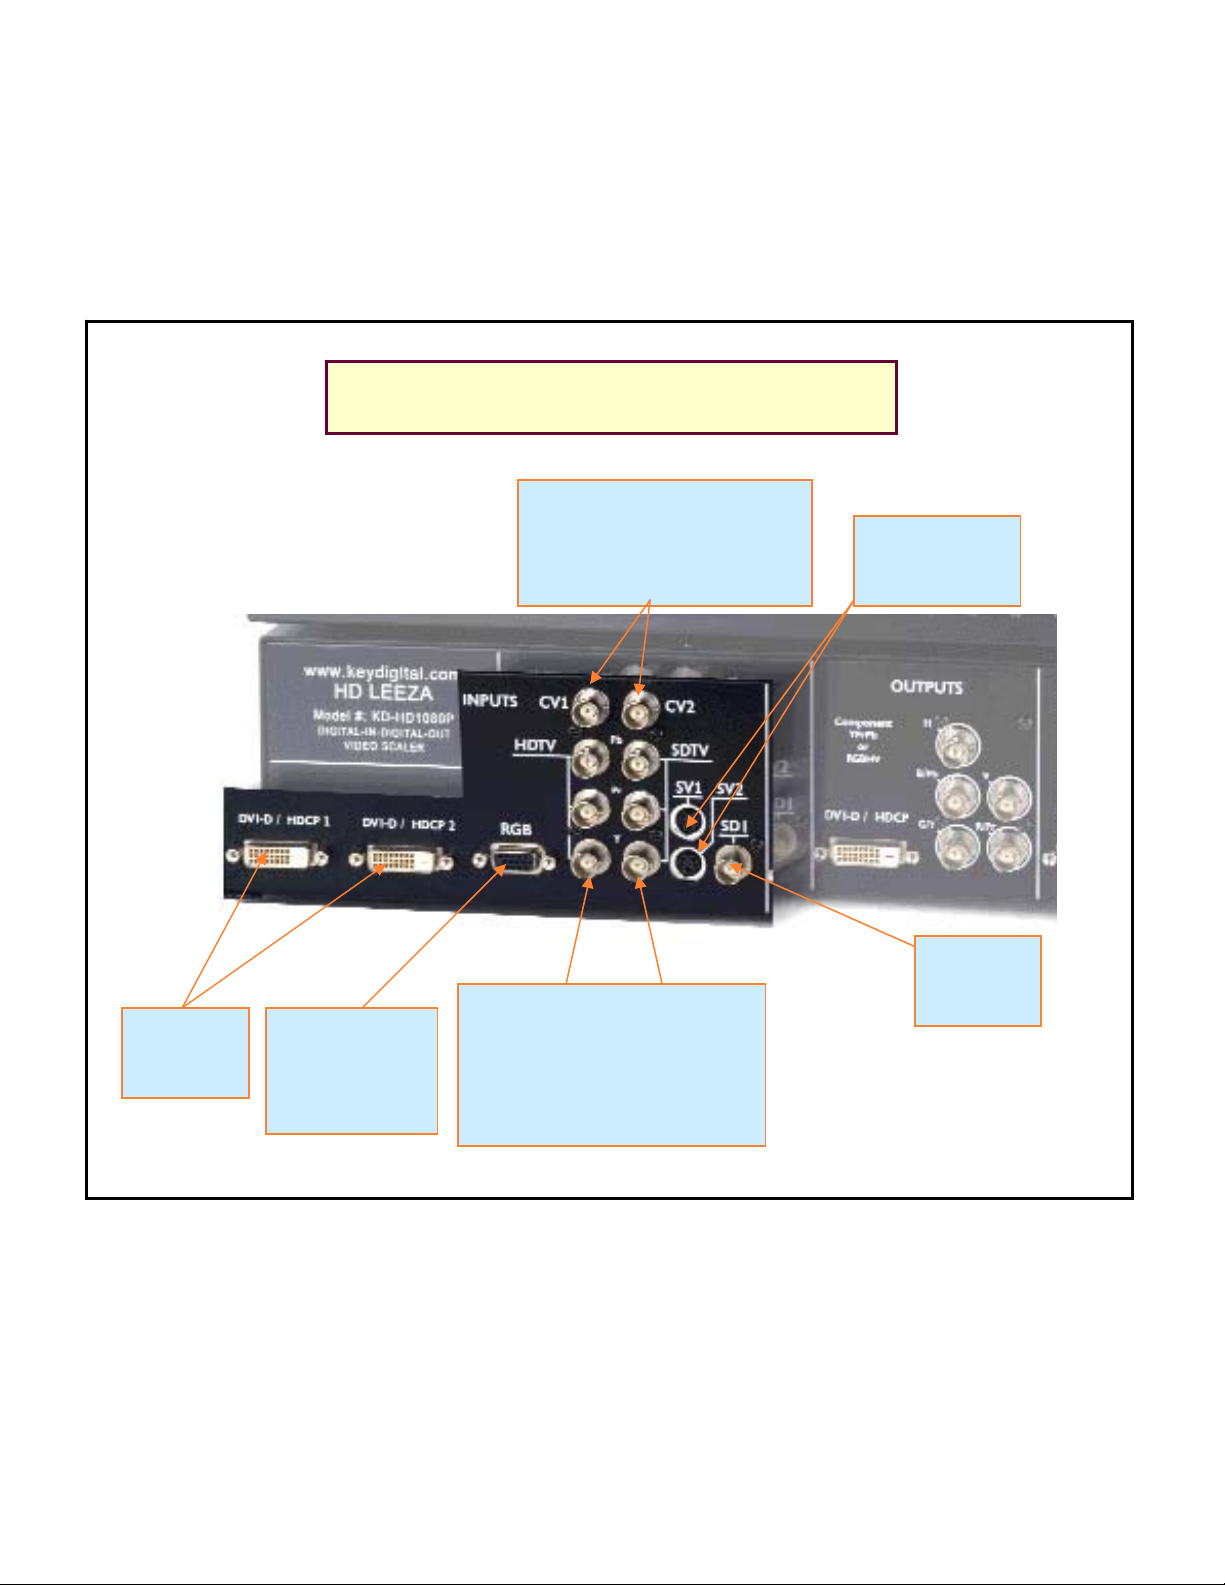
Q: What are HD Leeza’s Inputs and Outputs?
A: Here are the Inputs and Outputs:
INPUTS OUTPUTS
SD (ANALOG) -- BNC:
•
2 Analog Composite Video
• 2 S-Video (DIN)
• Component Video (YPbPr)
HD (ANALOG) -- BNC:
•
Component Video (YPbPr)
DIGITAL:
• 2 DVI-D with HDCP
• 1 SDI 270 Mb/s (BNC)
ANALOG RGB* (15-pin D-sub)
ANALOG BNC:
•
Component Video (YPbPr) or RGBHV**
DIGITAL:
•
DVI-D with HDCP
*Note: RGBHV inputs were adjusted to remove image “banding” with Sony/LG, Bell/ExpressVu, Dish 6000
boxes. This is a by-pass input.
**Note: The Analog Output turns OFF for DVI inputs with HDCP copy protection – this is a mandatory
requirement, and only the DVI Output will be active in this instance.
Q: Do you have any preferred or recommended input devices to connect to HD Leeza?
A: Input devices recommendations:
• If your display is truly capable of DVI/HDCP, you can use the DVI/HDCP input to HD Leeza from your
STB or DVD players. However, if your display is DVI non-HDCP or RGBHV, please avoid using the
DVI/HDCP input. With DVI/HDCP, HD Leeza is only legally authorized to display through the
DVI/HDCP output.
• Recommended signal sources for non-HDCP connections:
o For HDTV formats:
RGBHV set for 1080i – Samsung, Zenith, Sony, ...etc.
YPbPr set for 1080i – Samsung, Zenith, Sony, ...etc.
o For SDTV formats 480i/60 or 576i/50:
SDI, YPbPr, S-Video, and Composite video
A VCR used with HD Leeza must have a Time Base Corrector (TBC). One such VCR we recommend is JVC
HRS9911, and use the S-Video connection from this VCR for best performance. Another recommendation is to
use a stand-alone TBC such as AVT5008 sold at under $200 from this website:
http://www.dvdirect.com/shop/product.asp?sku=AVT5008
HD Leeza Operating Instruction Manual Page 9
Page 17
KEY DIGITAL HD LEEZA, MODEL KD-HD1080P
HD LEEZA INPUT PANEL
Composite Video
CV 1&2
[BNC]
S-VIDEO
1&2
SDI
HD SD
DVI-D
1&2
HD Leeza Operating Instruction Manual Page 10
VGA
(RGBHV)
[DB-15]
Component Video
Y Pb Pr
[BNC]
[BNC]
Page 18

KEY DIGITAL HD LEEZA, MODEL KD-HD1080P
HD LEEZA OUTPUT PANEL
DVI-D
HV
[BNC]
12 Volt
Screen Control
Y Pb Pr
(Component) or RGB (VGA)
[BNC]
Use: Y = G
Pb
Pr =
= B
R
RS-232C
HD Leeza Operating Instruction Manual Page 11
Page 19

KEY DIGITAL HD LEEZA, MODEL KD-HD1080P
7.2 Make a Picture
Learn the basics of the IR Remote Control, and bring up the On-Screen
Display (OSD) menus. Be sure to configure HD Leeza for your particular
display format (DVI, RGB, or Component Video) and Resolution
(find that “Sweet Spot” that makes the best picture).
Q: Once I have HD Leez a connected into my system, what do I do next?
A: Learn the basics of HD Leeza’s IR Remote Control. When using the IR Remote Control, you must
remember to point the remote in the direction of the IR sensor (front right panel of HD Leeza), and press
the right-arrow button to actually “register” your selection on the OSD.
Remote Control Legend
•Power ON •Power OFF
•Numeric Keypad (0-9) •MENU
•Ext. 12V Control •Arrows: Up/Left/Right/Down
•PP (Previous Page) •AR-IN (Input Aspect Ratio)
•NP (Next Page) •IS (Input Select, L-R)
•ANS (DSX Control) •SH (Ext. 12V Toggle)
•SR (Output Resolution) •PA (Picture Adjustment)
•GB (Restore Factory Default Settings) •BR (Brightness)
•CO (Contrast) •SAT (Color Saturation)
•ZO (Digital Image Zoom) •R1 - R8 (Buttons reserved for special operations)
HD Leeza Operating Instruction Manual Page 12
Page 20

KEY DIGITAL HD LEEZA, MODEL KD-HD1080P
HD LEEZA IR REMOTE CONTROL
Power OFF Power ON
Aspect Ratio Menu
<R8> Special DVI out
timing Hot Button
PP Previous Page
ALWAYS moves you OUT of any page
MENU
Brings up the OSD Menu
Input Select Previous
ANS DSX Hot Button
SH Ext 12V control On/Off toggle
SR Scanning Resolution Menu page
HOT BUTTONS:
<R1> – Inhibit OSD
<R2> – SDI Sync
<R3> – No operation
<R4> – Bypass RGBHV
<R6>
– Direct Channel Access
<R7> – Inhibit OSD
<R8> – Special DVI out timing
Numeric Keypad
Ext 12V OFF
Ext 12V ON
Next page
NP
Input Select Next
Menu / OSD
Navigation Arrows
Up, Down, Left, Right
GB Granny Button
PA Picture Adjustment Menu page
MENU PAGES FOR:
BR Brightness
CO Contrast
SAT Saturation
ZO Zoom
HD Leeza Operating Instruction Manual Page 13
Page 21

KEY DIGITAL HD LEEZA, MODEL KD-HD1080P
HD Leeza Remote Control Operation: SPECIAL FUNCTIONS
Granny Button (GB):
This button restores the factory default settings, and is used when you have made an incorrect adjustment
and can no longer see any menu or image on the screen (this could be the result of selecting an output
resolution or refresh rate incompatible with your Display). If this happens, simply hold down the green
GB button for five seconds, then press the right arrow button. HD Leeza will reset itself automatically to
640x480 output resolution with negative sync and RGBHV format. Other default settings after GB
reset: R1,2; R2,2; R7,2; R8,3; R8,9.
NEW FEATURE FOR VERSION 5.5.55 AND HIGHER (MORE RECENT) OF THE FIRMWARE
The user can choose to come up with RGBHV or YPbPr output during GB reset:
Since you may install HD Leeza in a configuration with a Component (YPbPr) or RGBHV display, you
need to be able to instruct HD Leeza to output in the correct format in order to see the OSD on your
target display.
Press the Granny Button for five seconds, followed by:
• Right Arrow will furnish RGB output
• Up or Down Arrows will set HD Leeza to YPbPr output with H and V still ac tive. The
RGBHV and DVI monitor will still work with YPbPrHV but will show a strange green color.
The unit can be changed back to RGBHV through the System Setting Menu. Please
remember: only three standard YPbPr resolutions will be accepted by any component
monitor: 720x480p/60, 1920x540p/60 (this is instead of 1080i format) and 1280x720p/60.
Other resolutions are not standard for Component connection.
External 12V Control:
This function provides 12 Volts to operate compatible AV equipment, such as motorized projection
screens. You can turn on this function from position #6 on the main menu. Connect your compatible
remote AV devices and the 12 Volt source through the 1/8" mini phone jacks on the rear of HD Leeza.
Hot Buttons:
These buttons on the HD Leeza remote will take you directly to specific menu adjustments,
including AR-IN, SR, PA, ZO, SAT, CO, and BR (see call-outs on previous pages).
Please note: Usage of R-related double key Hot Buttons [such as R1 (IOSD, Inhibit OSD), R2
(SSSDI, Separate Sync for SDI), R6 (Direct Access), R7 (aggressive DVI), R8 (DVI phase)] require
that you wait 3 seconds after pressing R#, before pressing the ensuing command #. However, if you
do not make a subsequent # key-press within 60 seconds of pressing any R# button, the selected hot
key choice mode will time-out.
HD Leeza Operating Instruction Manual Page 14
Page 22

KEY DIGITAL HD LEEZA, MODEL KD-HD1080P
HD Leeza Hot Buttons
R1 - Inhibit OSD Hot Button:
R1 is a hot button used in conjunction with the numbers 1 and 2. (R1, 2) is the default setting.
• (R1, 1) puts HD Leeza in a mode where the OSD is not displayed when the input channel is
changed.
• (R1, 2) restores the default mode where OSD is displayed on channel changes.
R2 - Separate Sync on SDI Hot Button:
R2 is a hot button used in conjunction with the numbers 1 and 2. (R2, 2) is the default setting.
• (R2, 1) enables separate sync on SDI inputs. Then the frame can be moved horizontally and
vertically, exactly as with other input channels.
• With (R2, 2), SDI inputs use embedded sync and cannot be moved on the display screen.
R4 - RGBHV Bypass Hot Button:
R4 is a hot button working as a RGBHV bypass switch. It connects the input RGBHV to the output
RGBHV, bypassing HD Leeza processing.
R6 - Direct Input Access Hot Button:
You can select any of HD Leeza’s inputs directly by first pressing the R6 button and then the desired
input number, as follows:
• 0 = DVI Input #1
• 1 = DVI Input #2
• 2 = RGBHV Input
• 3 = Component HD Input
• 4 = Serial Digital Input
• 5 = Component SD Input
• 6 = S-Video Input #1
• 7 = S-Video Input #2*
• 8 = Composite Video Input #1
• 9 = Composite Video Input #2*
*If there is no video source connected to the selected input, its front panel LED will blink (except for Composite
Video #2 and S-Video #2 inputs, and the words "No Signal" will also appear on screen).
NEW FEATURE FOR VERSION 5.5.55 AND HIGHER (more recent) OF THE FIRMWARE
Single digit Direct Access Input Switch:
The input can be switched as usual using (R6, #) as well as new Single key #. The single key mode is
activated once ALL OSD is automatically erased from the screen following 60 seconds of remote-control
inactivity. The single key mode will also activate after the user presses the PP button (at most) 6 times –
effectively erasing all OSD. The single key direct access works the same way as (R6, #} or as theRS232
command (i, #). It switches and plugs individual memories without displaying any OSD.
HD Leeza Operating Instruction Manual Page 15
Page 23

KEY DIGITAL HD LEEZA, MODEL KD-HD1080P
R7 – RGB/DVI Display Hot Button:
R7 is a hot button used together with the numbers 1, 2, or 3. (R7, 1) is the default setting.
• With the (R7, 1) setting, the horizontal and vertical positions are zeroed out before being moved
to their normal values. This enables DVI displays to center the frame correctly. For RGB display
outputs, (R7, 1) is the best setting. With (R7, 1), the extra operations needed for DVI displays are
eliminated resulting in faster response.
• (R7, 2) adds a sync-polarity “flip-flop” follow ing (R7, 1) operation.
R8 - Direct DVI Phase Clock Configuration Hot Button:
You can manually configure the DVI phase clock for DVI output (direct DVI phase clock configuration
may be necessary if your Display does not sync up when output resolutions at 1280x1024/75 Hz and
higher are selected). This is done by pressing the
follows:
• 0 = Phase 0
• 1 = Phase 1
• 2 = Phase 2
• 3 = Phase 3 (factory default)
• 4 = Phase 4
• 5 = Phase 5
• 6 = Phase 6
• 7 = Phase 7
Note: You will not see an adjustment menu on your Display when setting this configuration.
Special X or N DVI Input/Output Mode:
The remote commands (R8, 8) and (R8, 9) can be used to select a special X or N DVI input/output mode
respectively. Stick with the default DVI_PH_N (R8,9) if you have no issues with DVI input/output.
R8 button and then entering the desired number, as
HD Leeza Operating Instruction Manual Page 16
Page 24

KEY DIGITAL HD LEEZA, MODEL KD-HD1080P
g
Q: How do I turn HD LEEZA “On” and “Off” ?
A: You have several options to turn HD Leeza “On” and “Off”. Remember to first be sure the power
switch is properly set at the rear of your HD Leeza unit, and that the HD Leeza power plug is plugged into
an appropriate power source. Then, manual On / Off control (aside from control by e.g., Crestron over the
RS-232C port) is as follows:
1. Front-panel On / Off pushbutton, on the front left of the HD Leeza panel. Pressing this button
toggles the unit On and Off.
2.
Remote control, separate Power On and Power Off pushbuttons:
• Depressing the Power On pushbutton, on the top left of the HD Leeza remote control unit,
either turns your HD Leeza unit “On” if it was Off, or keeps HD Leeza “On”.
• Depressing the Power Off pushbutton, on the top right of the HD Leeza remote control unit,
either turns your HD Leeza unit “Off” if it was On, or keeps HD Leeza “Off”.
3.
Unplugging your HD Leeza will always turn your HD Leeza unit Off. If the power plug is then
plugged into an appropriate power source, HD Leeza ALWAYS WAKES UP IN THE POWER ON
MODE, and retains your previously stored settings.
4.
Power interruption (same as unplugging and plugging back in the power plug) ALWAYS WAKES
UP HD LEEZA IN THE POWER ON MODE, and retains your previously stored settings.
Q: HD LEEZA is connected into my system, I’ve looked at HD Leeza’s Remote Control,
and I’ve turned the unit “On” – now what?
A: You need to bring up the Main MENU, with the user-friendly On Screen Display (OSD).
AT THIS TIME: Configur e HD L eeza to ma tch the
1. Input Type,
2. Output Type, and
3 Output Resolution
for the devices connected to your HD Leeza.
MAIN MENU
NEW FEATURE FOR VERSION 5.5.74 AND HIGHER (more recent) OF THE FIRMWARE
The OSD is designed to respond / operate faster with Version 5.5.74 and higher (more recent) of the
firmware, so please be sure you have installed the latest firmware version by following the detailed
instructions provide in
Appendix B of this manual.
HD Leeza Operating Instruction Manual Page 17
ATTENTION: OSD Menus in this
manual are illustrative -- the
firmware version in your HD Leeza
may produce Menus that vary
htly from these examples
sli
Page 25

KEY DIGITAL HD LEEZA, MODEL KD-HD1080P
The factory default output setting for HD Leeza is 720x480, with composite video input #1 selected.
You will need to set HD Leeza for your particular configuration of Input and Output (display) devices.
HD1080P
-
If you own a DVD player or DTV set-top receiver equipped with serial digital interface (SDI) or digital
visual interface (DVI), use either connection for an all-digital, high-quality signal path to HD Leeza. The
next step is to determine the native pixel count of your Display. This is typically described in the
Specifications section of your owner's manual. The resolution will be expressed as a ratio of horizontal
to vertical pixels, such as 1280x768 or 800x600.
**We highly recommend you refer to the
DISPLAY MATRIX – PREFERRED HD LEEZA
RESOLUTION SETTINGS FOR POPULAR DISPLAYS at the end of this manual, to find the best
RESOLUTION setting (the “Sweet Spot”) to select for HD Leeza, for your display connected to the
output of HD Leeza.
Turn on HD Leeza and your display. Make sure your display is set to the input where you have
connected HD Leeza. Using the supplied IR Remote Control, select the input on Leeza where you have
connected your video source. Press the
menu. Composite, S-Video, component SD, and serial digital inputs will appear under
component HD, RGB, and DVI inputs will appear under
Menu button and scroll to either the HD Input or SD Input sub-
SD Input, while
HD Input. Scroll right to select the desired
input source. After you make this selection, scroll left to return to the main menu. Highlight selection
#5,
Resolution. Then, scroll right. A second menu will appear with a list of output resolution options.
Scroll up or down through the list until you find the output resolution that matches your Display. If you
don't see the desired output resolution, highlight and select
More for more choices. Once the desired
output resolution is highlighted, scroll right button once more. A third menu will appear with five
different picture refresh rate selections from 48 Hz to 75 Hz. Match this selection to the optimum refresh
rate of your Display. If you are not sure which selection to make here, choose the default setting of 60
Hz by scrolling right once more.
IF YOU SELECT A RESOLUTION THAT YOUR DISPLAY DOES NOT SUPPORT, you will
lose the OSD, and be unable to navigate:
•SIMPLY RESET HD LEEZA TO THE FACTORY DEFAULT SETTINGS AND START OVER.
•THE “GB” Button (“Granny Button”) resets all settings to the safe factory default (RGB,
720x480/60)
•Hold down the GB button for 5 seconds, then press the Right-arrow button to invoke the reset.
Your selected output image resolution and picture refresh rate are now activated. The onscreen menus
can be cleared simply by pressing the
video from any of your connected sources by pressing the
Menu key once more, and you can begin watching high-quality
Input Select key on the remote control to
choose among them.
HD Leeza Operating Instruction Manual Page 18
Page 26

KEY DIGITAL HD LEEZA, MODEL KD-HD1080P
g
7.3 “Fine-tune” the System Settings
Perform all video processing and set-up adjustments,
and SAVE your preferences for each input.
Q: Once I have up the OSD and have found that “Sweet Spot” for my display, now
what?
A: Learn how to fully configure your HD Leeza Video Processor / Home Theater backbone / Switcher
with the IR Remote Control and OSD.
MAIN MENU OSD EXAMPLES
ATTENTION: OSD Menus in this
manual are illustrative -- the
firmware version in your HD Leeza
may produce Menus that vary
htly from these examples
sli
Picture
Adjust
MAIN MENU
For ease of initial configuration, the OSD Menus on HD Leeza automatically pop up every
time the input is changed. Since this is not desirable in real-use (for example, when your
Home Theater system is controlled by your Crestron or AMX controller, or for users who
want to surf freely across inputs), you must DISABLE this set-up feature. Using your HD
Leeza IR Remote Control, press button R1, wait 3 seconds, then follow by pressing the
number 1 at the top of the keypad. Make sure you have active video on the screen.
1 INPUT A-R
2 BRIGHTNESS
3 CONTRAST
4 SATURATION
5 HORIZ OFFSET
6 VERTICAL OFFSET
7 EDGE ENH
8 ZOOM
System
Setup
Resolution
HD Leeza Operating Instruction Manual Page 19
Page 27

KEY DIGITAL HD LEEZA, MODEL KD-HD1080P
g
REMEMBER:
• SYSTEM SETUP refers to adjustments you make to your HD Leeza, specific to your
DISPLAY, typically as a one-time system setup.
• PICTURE ADJUST refers to adjustments you make to each input (source) connected to your
HD Leeza.
1. Perform “System Setup” to configure HD Leeza to match the characteristics of the
display connected to the output of HD Leeza. This is generally a one-time setup
process.
ATTENTION: OSD Menus in this
manual are illustrative -- the
firmware version in your HD Leeza
may produce Menus that vary
htly from these examples
sli
System Setup functions are typically one-time setups to match
HD Leeza to the characteristics of one particular display device
Highlight System Setup in the main menu. Adjustments you can make in the System Setup menu
include:
Output AR:
You will see a list of user-selectable output aspect ratios to best match your display. In most cases, you
will choose between 1.33 for a 4:3 screen, or 1.78 for a widescreen Display. Custom mode lets you
define your own aspect ratio.
Output Format:
Use this menu to select either three-wire (YPbPr) or five-wire (RGBHV) component video connections
from HD Leeza to your Display. The factory default setting is for RGBHV output.
Image Position/Size:
These menu selections will allow you to precisely size and position images from HD Leeza. When
finished, press the Previous Page (PP) button to exit this menu as the left arrow button is used to make
image position adjustments.
HD Leeza Operating Instruction Manual Page 20
Page 28

KEY DIGITAL HD LEEZA, MODEL KD-HD1080P
g
Sync Polarity:
Choose between negative and positive picture sync to fine-tune image position. Most TVs and projectors
will accept either, and the factory default setting is negative.
Other Sync-related Issues:
NEW FEATURES FOR VERSION 5.5.55 AND HIGHER (more recent) OF THE FIRMWARE
• Sync is now never lost on S-Video or CVBS when your VCR is used for stopping, starting, or
tape eject --- if input sensing OSD is first inhibited through the use of the remote command
(R1,1). (R1,2) returns to the regular state.
• The user can select “separate sync” for SDI input with an (R2,1) command from the remote. The
user can select “embedded sync” (usual default now) for SDI inputs with (R2,2). Selection for
separate or embedded sync is also possible using RS232 commands (S 1) and (S 2), respectively.
Selection of “separate sync” allows control of SDI-input H and V offset in the “Picture
Adjustment” (PA) menu. That feature is only needed with non-standard SDI signals.
2. Perform “Picture Adjust” (“PA” Menu) to configure HD Leeza specifically for each
source input device connected to your HD Leeza.
Picture Adjustments: You can make adjustments to each video source you connect to HD Leeza.
Using the remote control, depress the
right from here will reveal these adjustments:
Menu key and highlight Picture Adjust (PA). Scrolling to the
OSD MENU
1 INPUT A-R
2 BRIGHTNESS
3 CONTRAST
4 SATURATION
5 HORIZ OFFSET
6 VERTICAL OFFSET
7 EDGE ENH
8 ZOOM
REMEMBER:
• PICTURE ADJUST refers to adjustments you make to each input (source) connected to your
HD Leeza.
• SYSTEM SETP refers to adjustments you make to your HD Leeza, specific to your DISPLAY,
typically as a one-time system setup.
ATTENTION: OSD Menus in this
manual are illustrative -- the
firmware version in your HD Leeza
may produce Menus that vary
htly from these examples
sli
HD Leeza Operating Instruction Manual Page 21
Page 29

KEY DIGITAL HD LEEZA, MODEL KD-HD1080P
HD LEEZA VIDEO PROCESSING FUNCTIONS
Brightness and Contrast:
Use these controls to set the black level (brightness) and white level (contrast) of any video input. It's
helpful to have a calibration DVD on hand to supply the appropriate test patterns. You can also find
grayscale patterns under Menu selection #7.
Saturation:
Set color saturation with this menu. It's best to have a color bar test pattern and a standard blue filter to
make this adjustment. You can find this pattern under Menu selection #7.
Red and Blue Saturation:
RS232 commands are available to set blue and red saturation, to allow you to fine-tune red and blue levels
(adjustments are not available through the IR Remote Control OSD Menus). Use a color bar test pattern and
a blue filter to set correctly. To set blue_saturation, use u<space>{0,1}<space>#. If the number following u
is 0, blue_saturation will be set to a positive number; if the num ber following u is 1, blue_saturation will be
set to a negative number. The legal range is -10 through 10. To set red_saturation, use
e<space>{0,1}<space>#. Other properties are as in the blue_sat case.
Edge Enhancement:
This function controls edge sharpness (peaking). Use it for lower-resolution sources such as V HS tapes
and cable TV programs. Higher-resolution sources typically do not need edge enhancement.
Picture Aspect Ratio:
Your video source may send standard (4:3) aspect ratio or widescreen (16:9) aspect ratio pictures to HD
Leeza. Standard-size images are typical from VHS tapes and regular TV programs, while widescreen
images are more common with DVD players.
To set the correct input aspect ratio, press the AR-IN button. You will see a list of six input aspect ratio
choices and one custom setting. For standard 4:3 program sources, use the buttons to move to and select
1.33 input. For widescreen DVDs, you can use any of the other choices. Check each DVD's packaging to
see what its actual aspect ratio is. Typically, 1.78 or 1.85 will work for widescreen DVDs.
Picture Gamma:
You can adjust the gamma for any input in .05 steps from 1.0 to 1.5. Use a grayscale step pattern from
Menu selection #7 to make this adjustment.
Setting Horizontal and Vertical Input Offset:
• Full-scale (three-digit) control over H and V offsets is available in the PA menu for
versions 5.5.55 and higher (more recent) of the firmware.
Please use the horizontal and vertical offsets in the Picture Adjust menu very carefully – use
•
your
display’s adjustments or HD Leeza’s System Adjust to match HD Leeza’s output to your
display, not Picture Adjust.
• Horizontal centering is maintained for 1.33 Input AR when horizontal size is not default.
HD Leeza Operating Instruction Manual Page 22
Page 30

KEY DIGITAL HD LEEZA, MODEL KD-HD1080P
g
Special Notes When Using H&V Input Offset Controls:
1)
Use of H&V offset should be very restricted to only cases of non-standard input and to compensate
for data line on top of the image in some broadcasts (to-date, from user experience, only one device
was found that need to change the H&V offset to compensate for incorrect framing: Samsung DVD
player DVD-HD931 and only its DVI/HDCP output -- the H&V offsets need to be changed from
default to H=34 and V=30).
2) The V offset default is 127. The H offset default is 255.
3) If you decide to change default numbers – enter desired number in each H or V offset window(s)
followed by right arrow button.
4) Re-select the given channel and follow Individual Setting memory procedure described above.
5) HD Leeza will save your individual setting only for the input resolution you used during settings.
Other input resolutions will be set to system defaults.
3. Storing your preferred video processing settings separately for each source input (up
to 10) connected to your HD Leeza
Lets you store the settings
for the selected input
ATTENTION: OSD Menus in this
manual are illustrative -- the
firmware version in your HD Leeza
may produce Menus that vary
htly from these examples
sli
HD Leeza Operating Instruction Manual Page 23
Page 31

KEY DIGITAL HD LEEZA, MODEL KD-HD1080P
Storing Your Preferred Video Settings
1) Adjust video processing variables in Picture Adjustment: Contrast, Brightness, Saturation, H &V
offset (ONLY IF NEEDED), Edge Enhancement, Zoom feature, VTLBX, and Input Aspect Ratio for
best result at this input. Adjust following variables in System Setting: Horizontal position,
Horizontal size (only firmware later then 5.4.37), Gamma (only firmware later then 5.4.37) for best
result at this input.
2)
Re-select the same input using HD Leeza by navigating your remote through the On Screen Display
(OSD) menu.
3)
After input re-selection, HD Leeza will offer you additional window choices next to selected channel:
MEMORIZE PA or RESTORE PA. To save all described above individual settings - please s elect the
MEMORIZE PA.
4)
When input is selected by OSD navigation method -- use RESTORE PA to restore previously saved
individual settings.
5)
When input is selected by using Direct Access IR (R6 button followed by a number) the Individual
memory will be restored as part of input selection automatically.
6)
When input is selected by using RS232 input select (“i” command followed by a number), the
Individual memory will also be restored as part of the input selection automatically.
NOTE: RS232 and IR Direct access individual memory recall are identical.
HD Leeza Operating Instruction Manual Page 24
Page 32

KEY DIGITAL HD LEEZA, MODEL KD-HD1080P
8. HOW TO CONTACT KEY DIGITAL
Repairs and Warranty Service:
• Should your HD Leeza require warranty service, please contact Key Digital first to obtain a
Returned Materials Authorization (RMA) number
Please contact us at either:
•
o Toll-free 1-203-778-0295 extension 3#
o email tech@keydigital.com
Technical Support:
• For technical questions about using our products, please contact us at either:
o 1-203-778-0295 or Toll-free 1-888-258-2028
o email tech@keydigital.com
Customer Support:
• For customer support questions about using our products, please contact us at either:
o 1-203-778-0295
email customersupport@keydigital.com
o
9. WARRANTY
All Key Digital products are built to high manufacturing standards and should provide years of troublefree operation. They are backed by a limited two-year parts and labor warranty.
### End of HD Leeza KD-HD1080P Product Operation Manual ###
### Appendices Start on Next Page ###
HD Leeza Operating Instruction Manual Page 25
Page 33

### This Page Intentionally Left Blank ###
Page 34

KEY DIGITAL HD LEEZA, MODEL KD-HD1080P
APPENDICES
Appendix A: HD Leeza Technical Specifications Page A1
Appendix B: Firmware Upgrade Instructions Page B1
Appendix C: RS-232C Remote Control Operation Page C1
Appendix D: Handy Summary of Remote Control Commands Page D1
HD Leeza Operating Instruction Manual Appendices
Page 35

### This Page Intentionally Left Blank ###
Page 36

KEY DIGITAL HD LEEZA, MODEL KD-HD1080P
Appendix A: HD Leeza Technical Specifications
HD LEEZA - Video Processor - Model KD-HD1080P
Inputs
• Flexible inputs supported:
o Two Digital DVI with HDCP [DVI-D connectors]
o One Digital SDI 270Mb/s (BNC connector)
o One RGBHV (can also pass-through) (D sub connector)
o Two Component Video (YPbPr) with sync on Y, 1V p-p @ 75 ohms, negative or positive sync,
(each 3 x BNC):
one SD (NTSC & PAL: 480i, 576i)
one HD (480p, 576p, 720p, 1080i/540p)
o Two S-Video Y/C video for NTSC and PAL (2 x DIN connectors)
o Two Composite Video (CV) for NTSC and PAL (2 x BNC connectors)
• All world formats accepted in composite and S-Video: NTSC, PAL, and SECAM
Scaling
• Scaling SDTV and HDTV to popular native resolutions
o DTV/HDTV standard display formats
704x480p, 1280x720p, 1920x540p, 1920x1080p
o Plasma/LCD standard resolutions
852x480, 1024x512, 1024x1024, 1280x768, 1440x768, 1365x768, 1366x768
o PC standard display formats
640x480, 800x600, 1024x768, 1280x1024, 1400x1050
o Other display formats
720x480 NTSC, 852x576 PAL, 1280x960, 1440x960, 1365x1024, 1900x1200
• Film detection with inverse 3:2 or 3:3 telecine; supports 50Hz / 75Hz with PAL sources and 2:2 pull-down
• Scaler equipped with advanced, proprietary motion-assisted de-interlacing algorithm "Clear Matrix Pro"
• Dynamic Non Linear Stretch Mode "Dynamic Stretch Xtreme" (DSX) included
• Aspect Ratios in and out: 1.33, 1.66, 1.78, 1.85, 2.00, 2.35, and accommodates custom settings
Outputs
• Flexible outputs supported:
o Digital DVI with HDCP [DVI-D connector]
o RGBHV (VGA) or YPbPr (Component Video) with sync on Y, 1V p-p @ 75 ohms, negative or
positive sync, [5 x BNC connectors]
• Output refresh rates of 48 Hz, 50 Hz, 60 Hz, 72 Hz and 75 Hz for each resolution
• One High Definition pass-through for RGBHV
Other Connections
• D-sub 9-pin (RS-232C)
• 1/8" mini-plug (Remote Power and 12V Screen Control)
HD Leeza Operating Instruction Manual Appendices Page A-1
Page 37

KEY DIGITAL HD LEEZA, MODEL KD-HD1080P
Bandwidth
• SDTV: 6.5 MHz for Y (luma), 4 MHz for Pb and Pr (chroma)
• HDTV: 37 MHz for Y (luma), 18 MHz for Pb and Pr (chroma)
• RGB passthrough: 300 MHz
Control
• Infrared Remote Control with "hot" buttons; discrete IR co mmands available
• User-friendly on-screen-display
• Picture adjustments include:
o Brightness, contrast, saturation, and hue
o Image size and position
o Plus:
2-D Enhancement
Gamma
Aspect Ratio In & Out
Non-linear stretch
Letterbox (vertical and horizontal)
Independent blue and red saturation
Test patterns
• Six user-programmable input and output aspect ratio settings
• RS232 port equipped with discrete command protocol compatible with control systems (e.g., Crestron,
AMX, CNMSX-PRO)
• Firmware upgradeable
Mechanical
• Easy to install and integrate -- Custom Installer’s dream
• Rack mountable: 2U (brackets included)
• No fan noise
• DVI, BNC, DB15, and S-Video connectors for inputs and outputs
• Size: 17.4" x 10.6" x 3.5"
• Weight: 15.4 lbs.
• Enclosure type: Metal
• Input Power: 100 to 240V AC, 40 Watts (
line cord on the back of HD Leeza to the proper line voltage, 115 or 220 VAC
**Caution: be sure to set the Power Input Switch next to the
)
HD Leeza Operating Instruction Manual Appendices Page A-2
Page 38

KEY DIGITAL HD LEEZA, MODEL KD-HD1080P
Appendix B: Firmware Upgrade Instructions
HD LEEZA - Video Processor - Model KD-HD1080P
Periodically, Key Digital may make firmware upgrades available to you (over the Internet). These
upgrades will enhance the operation of HD Leeza and are easily installed using a desktop or notebook
PC, along with the special serial port cable that came with your HD Leeza accessories. To
your firmware
BOOTLOADER.EXE. These files are obtained from Key Digital technical support. Both files are
compressed in the .ZIP format.
, you will need the most current HD Leeza upgrade file and a program called
WARNING!!!
The special DB9 (black) cable included with your HD Leeza shipment is for firmware
upgrades only. Do not plug this cable into HD Leeza for any other reason -- it will
erase ALL the firmware inside.
upgrade
PLEASE NOTE!!!
It is common NOT to have a Serial Port with the latest PC’s and Laptops. Key
Digital advises that in some cases it may be possible to use a USB-to-serial converter
(such as from Keyspan) to upgrade HDL. However, Key Digital instructs you to use
only the cable and instructions provided here, and you should be prepared if you use
the USB port of your computer that the HD Leeza upgrade may not be successful.
HD Leeza
Your
PC
HD Leeza Operating Instruction Manual Appendices Page B-1
Page 39

KEY DIGITAL HD LEEZA, MODEL KD-HD1080P
Please read these easy-to-follow step-by-step directions
in order to perform a successful Firmware Upgrade of your HD Leeza:
STEP # HD LEEZA FIRMWARE UPGRADE PROCEDURE
1
2
3
4
5
6
7
8
9
10
11 If your PC refuses to connect to COM1 with all proper steps above – please restart your PC.
12
13
14
15
16
17
18
19
20
21
*If there is an interruption with the firmware upgrade process, and/or if ever HD Leeza firmware is
erased – please reboot your computer and repeat the above Firmware Upgrade Procedure.
Do not connect the special DB9 (black) cable to HD Leeza until Step #5. Make sure HD Leeza is
OFF by using your HD Leeza Remote control.
Open the Firmware Upgrade zip file provided by Key Digital, and save the upgrade file
hd_Leeza.#.#.hex and the Bootloader.exe in the same directory on the C drive of your PC.
Make sure that no devices are using the COM1 serial port on your PC. A typical culprit is the
PALM “Hot Sync” program and cradle that is set for a Serial connection. Disconnect the cables and
disable the PALM program or any other programs from usage of COM1.
Double click the Bootloader. Do NOT click the OK button.
Connect the special DB9 black cable to the COM1 serial port on your PC, and the other end to the
RS232 port on HD Leeza. You can extend the cable or use a longer cable provided:
• your RS232 cable has correct connectors on each end,
• it is DIRECT cable, pin-pin, and NOT a NULL CABLE, and
• the extension cable must go between the black RS-232 HD Leeza cable and your PC.
Turn ON HD Leeza, and note that with the special DB9 cable connected, all LED’s on the front panel
of HD Leeza will turn ON, except SDI. At this time all HD Leeza firmware is erased!
Click OK on the Bootloader window.
Click DOWNLOAD on the Bootloader window.
Select the latest firmware upgrade file you received from Key Digital.
Click OPEN on the Bootloader window.
Wait about 4 minutes until HD Leeza is upgraded. Please do not use any other application on
your PC or permit any type of interruption while the upgrade is in progress*.
Only when the Bootloader window shows 100% complete can you use your HD Leeza remote
control to turn OFF HD Leeza.
DISCONNECT the special DB9 cable from HD Leeza.
Click the EXIT button on the Bootloader program.
Turn ON HD Leeza using your remote control – the special DB9 cable MUST be disconnected
from the RS232 port on the back of HD Leeza.
At this point you will see that only one front LED is ON or blinking on HD Leeza. If all LED’s
except SDI are ON after you disconnected the special black cable, then the upgrade was NOT
successful, and you must re-program HD Leeza starting with step #4, above.
You MUST reset HD Leeza after each Firmware Upgrade. This can be achieved by pressing
and releasing the green GB button on your HD Leeza remote control, wait 5 seconds and press and
release the Right Arrow key on the remote control. HD Leeza will reboot to 720x480, 60 Hz
resolution, RGBHV output, Composite 1 (CV1) input.
To select the 480p/60 Hz Component Video output, press the green GB button on your HD Leeza
remote control, wait 5 seconds and press the Up or Down Arrow key on the remote control. HD
Leeza reboots to 720x480p/60 Hz resolution, Component Video output, Composite 1 (CV1) input.
HD Leeza is ready to be used with your new firmware!
Store the serial cable in a safe place for future firmware upgrades. Save your special DB9 cable far
away from HD Leeza -- simply plugging this cable to the RS232 port of HD Leeza will erase the
firmware and you must then reload the firmware following the above steps.
HD Leeza Operating Instruction Manual Appendices Page B-2
Page 40

KEY DIGITAL HD LEEZA, MODEL KD-HD1080P
Appendix C: RS-232C Remote Control Operation
HD LEEZA - Video Processor - Model KD-HD1080P
You can remotely control HD Leeza functions through the rear-panel RS-232C connector, using a
HyperTerminal or other compatible interface. Set your RS-232C connection to 19200 baud, 8 data bits,
no parity. When creating command strings, make sure to insert sufficient time delays before each
command. Test all of your command strings to determine the proper time delay between commands. For
example, to select HD Leeza’s SDI input, you will need to send the command string:
i <(1 second interval)> 4 < (no carriage return)>
Contact
HD Leeza Operating Instruction Manual Appendices Page C-1
tech@keydigital.com for further details of the RS-232C discrete command codes.
LIST OF RS-232C COMMAND CODES
h Help
Displays the help screen
s Status
Displays HDLeeza status
i Input channel selection
Usage: i{0,…,9}<no enter>
See page 14 for input channel identities
r Output resolution and refresh rate selection
Usage: r<space>{0,…,19}<space>{0,…,4}<enter>
The first number selects
0 640x480p
1 720x480p
2 852x480p
3 1024x512p
4 800x600p
5 1440x960p
6 1920x540p
7 852x576p
8 1280x720p
9 1024x768p
10 1280x768p
11 1366x768p
12 1280x960p
13 1024x1024p
14 1280x1024p
15 1365x1024p
16 1400x1050p
17 1920x1080p
18 1920x1200p
19 1440x788p
The second number selects
0 48 Hz
1 50 Hz
2 60 Hz
3 72 Hz
4 75 Hz
Page 41

KEY DIGITAL HD LEEZA, MODEL KD-HD1080P
a Input aspect ratio selection
Usage: a{0,…,5}<no enter>
a0 IAR = 1.33
a1 IAR = 1.66
a2 IAR = 1.78
a3 IAR = 1.85
a4 IAR = 2.00
a5 IAR = 2.35
o Output aspect ratio selection
Usage: o{0,…,5}<no enter>
o0 OAR = 1.33
o1 OAR = 1.66
o2 OAR = 1.78
o3 OAR = 1.85
o4 OIAR = 2.00
o5 OAR = 2.35
u Blue saturation selection
Usage: u<space>{0,1}<space>{0,…10}<enter>
Example 1: u 0 6 sets blue saturation at +6
Example 2: u 1 3 sets blue saturation at –3
e Red saturation selection
Usage: e<space>{0,1}<space>{0,…10}<enter>
Example 1: e 0 10 sets red saturation at +10
Example 2: e 1 2 sets red saturation at –2
S Separate sync for SDI
Usage: S<space>{1,2}<enter>
S 1 selects separate sync for SDI input
S 2 selects embedded sync for SDI input
In both cases the input switches to SDI
W RGB/DVI display selection
Usage: W<space>{1,2,3}<enter>
W 1 is default. Sets output for DVI display
W 2 sets output for RGB display
W 3 sets output for DVI display. Also perform an output sync flip-flop on channel cha ng e .
J Enable OSD
Usage: J<no enter>
j Disable OSD
Usage: j<no enter>
k Toggle OSD
Usage: k<no enter>
B VGA bypass on
Usage: B<no enter>
v VGA bypass off
Usage: v<no enter>
b Toggle VGA bypass
Usage: b<no enter>
P Ext 12 V power on
Usage: B<no enter>
[ Ext 12 V power off
Usage: v<no enter>
p Ext 12 V power toggle
Usage: b<no enter>
HD Leeza Operating Instruction Manual Appendices Page C-2
Page 42

KEY DIGITAL HD LEEZA, MODEL KD-HD1080P
Appendix D: Handy Summary of Remote Control Commands
HD LEEZA - Video Processor - Model KD-HD1080P
Use the special “R” keys located at the bottom of your HD Leeza Remote Control as follows:
KEY HOT BUTTON FUNCTION
R1 Inhibit OSD (R1, 2) is the default setting
• (R1, 1) puts HD Leeza in a mode where the OSD is not displayed when the input channel is changed.
• (R1, 2) restores the default mode where OSD is displayed on channel changes.
R2 Separate Sync for SDI (R2, 2) is the default setting
• (R2, 1) enables separate sync on SDI inputs. Then the frame can be moved horizontally and
vertically, exactly as with other input channels.
• With (R2, 2), SDI inputs use embedded sync and cannot be moved on the display screen.
R3
R4 RGBHV Bypass
R5
-
• Connects the input RGBHV to the output RGBHV, bypassing HD Leeza processing.
-
R6 Direct Input Access
• 0 = DVI Input #1
• 1 = DVI Input #2
• 2 = RGBHV Input
• 3 = Component HD Input
• 4 = Serial Digital Input
• 5 = Component SD Input
• 6 = S-Video Input #1
• 7 = S-Video Input #2
• 8 = Composite Video Input #1
• 9 = Composite Video Input #2
R7 RGB/DVI Display (R7, 1) is the default setting
• With the (R7, 1) setting, the horizontal and vertical positions are zeroed out before being moved to
their normal values. This enables DVI displays to center the frame correctly. For RGB display
outputs, (R7, 1) is the best setting. With (R7, 1), the extra operations needed for DVI displays are
eliminated resulting in faster response.
• (R7, 2) adds a sync-polarity “flip-flop” following (R7, 1) operation.
R8 Direct DVI Phase Clock Configuration
• 0 = Phase 0
• 1 = Phase 1
• 2 = Phase 2
• 3 = Phase 3 (factory default)
• 4 = Phase 4
• 5 = Phase 5
• 6 = Phase 6
• 7 = Phase 7
The remote commands (R8, 8) and (R8, 9) can be used to select a special X or N DVI input/output mode.
HD Leeza Operating Instruction Manual Appendices Page D-1
Page 43

### This Page Intentionally Left Blank ###
Page 44

KEY DIGITAL HD LEEZA, MODEL KD-HD1080P
Please note that the following Sections may be updated periodically
SPECIAL SECTIONS
1. Frequently Asked Questions (FAQs)
2. Firmware Upgrade Log
3. Display Matrix – Preferred HD Leeza Resolution Settings for Popular Displays
HD Leeza Operating Instruction Manual Special Sections
Page 45

### This Page Intentionally Left Blank ###
Page 46

KEY DIGITAL HD LEEZA, MODEL KD-HD1080P
SPECIAL SECTION 1:
Frequently Asked Questions (FAQs)
HD LEEZA - Video Processor - Model KD-HD1080P
Q: “Native Resolution”: What is the best HD Leeza output resolution and scanning setting for my
particular display?
A: It is a common problem that display manufacturers specify “Native Resolution” for marketing
purposes
Resolution” -- please use the table provided at the end of this manual.
Q: What do I do if the screen goes blank and I can’t make a picture or see the On Screen Display
Menu?
A: This might occur if you are switching to a display format that might not be compatible with the
display connected to the output of HD Leeza. If this happens, try one of the following:
Q: I have a “Catch 22” – I only have a component (YPbPr) display, yet HD Leeza’s factory default
output is 720x480 RGB, so I can’t bring up HD Leeza’s OSD.
A: With Version 5.5.55 or greater (more recent) of the firmware, the user can choose to come up with
RGBHV or YPbPr output during GB reset
by:
Q: I can’t navigate out of the Horizontal Position setting submenu. The right-left and up-down arrow
keys all have similar functions -- changing the horizontal position value. Is the only way to get out of
this submenu for me to wait for the menus to time out?
A: No -- you can conveniently use the “PP button” on the top of the left arrow button to navigate out.
Q: When I switch inputs, the menu appears and I have to hit the “Menu” button to get rid of it.
A: That is taken care of from Version 5.4.13 and higher (more recent) of the HD Leeza firmware –
please be sure to upgrade your firmware. Switch by using Direct Access Button R6, followed in 1
second by a digit between 0 and 9 for all ten inputs. For example, SDI is Input #4. That will switch
. HD Leeza lets you find that “sweet spot” for the display, regardless of quoted “Native
• Use the “PP button” (Previous Page) on your remote control. It brings you back to the previous window
selection on the menu, instantly un-freezing the choice and allowing you to continue navigating. This allows
you to go back to the previous resolution setting if you select one that is out of range and causes your screen to
go black.
• Use the “GB button” (Granny Button) on your remote control. Activating this button reverts HD Leeza to
the factory default settings (720x480p @ 60 Hz).
. Press the Granny Button for five seconds, followed
• Right Arrow will furnish RGB output
• Up or Down Arrows will set HD Leeza to YPbPr output with H and V still active. The
RGBHV and DVI monitor will still work with YPbPrHV but will show a strange green color.
The unit can be changed back to RGBHV through the System Setting Menu. Please
remember: only three standard YPbPr resolutions will be accepted by any component
monitor: 720x480p/60, 1920x540p/60 (this is instead of 1080i format) and 1280x720p/60.
Other resolutions are not standard for Component connection.
HD Leeza Operating Instruction Manual SPECIAL SECTIONS
Page 47

KEY DIGITAL HD LEEZA, MODEL KD-HD1080P
to the particular input without OSD and will plug individual PA memory for that input as well. The
OSD switching is useful for initial settings of individual memory.
Q:
The OSD Menus on HD Leeza automatically pop up every time the input is changed. This is not
desirable in real-use (for example, when your Home Theater system is controlled by your Crestron or
AMX controller, or for users who want to surf freely across inputs) – how can I disable this?
A: This feature is only useful during initial system set-up. Using your HD Leeza IR Remote Control to
DISABLE this set-up feature: press button
R1, wait 3 seconds, then follow by pressing the number 1
at the top of the keypad. Make sure you have active video on the screen.
Q:
The OSD Menus on HD Leeza are not as responsive (quick) as I would like. Is there anything I can
do?
A: Please be sure you have Version 5.5.74 and higher (more recent) of the firmware installed in your HD
Leeza. The OSD has been designed to respond / operate faster.
Q: Why do I need to set the horizontal position using HD Leeza’s System Setup Menu? Also, I’ve seen
some values for positioning listed in your matrix table that differ from the ones that work best for my
display.
A: The horizontal position is affected by sync polarity and variances from source to source. Also, each
display may be calibrated differently. That is why we offer horizontal centering as part of the
individual memory for each channel input to HD Leeza.
Q: There is a strange jitter or instability on my DVI display when it is connected to the output of HD
Leeza. Why does this happen, and is there anything I can do to correct it?
A: This means you need to adjust the DVI_OUT_PHASE setting. The default value for
DVI_OUT_PHASE is set to 4. The remote command (R8,#) can be used to set this value to any
integer between the numbers 0 through 7. The user can test various settings to determine the best
result to eliminate the picture instability.
Q: I am using a Samsung or Marantz (DVI Output) DVD player, and how do I center the image on the
display?
A: Go to the HD Leeza OSD for “Picture Adjustments” and adjust the vertical then horizontal positions
to your liking. Then, select HD Input and let HD Leeza memorize (store) your preferred settings.
Q: My DVI display will NOT accept H and V position changes from my DVI source (like those
sourced from HD Leeza).
A: A new feature with Version 5.5.55 or greater (more recent) of the firmware uses Key Digital
System’s special DVI monitor control technology to help installations with “stubborn” DVI monitors
that do not accept H and V position changes from the DVI source. Remote command (R7,1) will set
HD Leeza to a special “aggressive” DVI display control mode. (R7,2) will take you back to the
default RGB/DVI display mode. Users with RGBHV or YPbPr monitors will not need to use (R7,1).
Current users that have no issues with H position may also continue to use regular RGB/DVI mode.
HD Leeza Operating Instruction Manual SPECIAL SECTIONS
Page 48

KEY DIGITAL HD LEEZA, MODEL KD-HD1080P
What happens if the HD Leeza Input source is DVI/HDCP?
Q:
A: Remember that DVI/HDCP requires that the analog output ports of HD Leeza must (by law) be
disabled for HD content, and hence only the DVI output of HD Leeza is permitted to be active for
DVI/HDCP sources.
Q:
The scaled, analog output of my HD Leeza contains dark horizontal bands (perhaps intermittent but
frequent, with the position of the bands changing constantly).
A: There could be two reasons:
1. Your display clamping is not where it supposed to be. You can change the position of the clamping pulse
in the menu of your monitor if you have such setting OR you can adjust the horizontal position of the HD
Leeza output in the System Setting menu. You probably need to move the image right.
2. HD Leeza is clamping in the wrong position. Adjust the HD Leeza input H position -- it is individual for
each input channel.
Q: I have a Sony HDTV Set-top Box (STB) with VGA (RGBHV) and Component YPbPr outputs.
Which mode should I use to connect to HD Leeza?
A: We recommend you use Component YPbPr, 1080i for STB's because YPbPr is the native HD
broadcasting format. The RGBHV is a derived (“second generation”) signal inside the STB. To
make the YPbPr connections, you can use RCA-to-RCA cables and add three RCA-to-BNC jack
converters on the HD Leeza side (e.g., readily available from Radio Shack). To use this connection
make sure the switch on the back of the Sony STB for output TYPE is set for YPbPr, 1080i. On HD
Leeza through the menu you need to switch to HD Inputs, Component HD.
Q: When using VCR tapes at the composite video input to HD Leeza, there seems to be a “timebase”
issue – very “juddery” images. Does HD Leeza require a VCR with a Time Base Corrector (TBC) at
the input? Does HD Leeza have any internal time base correction?
A: While HD Leeza does have a built-in TBC, it is not designed to compensate for large errors tha t may
come from a VCR. It is best to use a VCR that is readily available today with a built-in TBC; or use
an external TBC at the output of the VCR before you feed the signal into HD Leeza.
The HD Leeza test patterns all seem to have a fixed resolution. For example, on my 1024x768
Q:
display, I can only see a little more than 4 color bars, the cross pattern only shows a vertical line far
to the right on the screen, etc.
A: The test patterns are “full” only in 1920x1080. In any other resolution, the test patterns are a
subset of 1920x1080.
Q: I am having trouble with individual memory inputs.
A: Use the following guidelines:
1. First switch to the desired channel using the OSD. Then, set the parameters for Brightness, Contrast, etc.
2. RESELECT that same input using the OSD. After reselection, the OSD will pop offering you an
additional window for "Restore PA" or "Memorize PA". The current HD Leeza settings become individual
memory for that input when you select "Memorize PA".
3. HD Leeza will use these stored settings the next time you use the OSD switching and choose "Restore
PA".
HD Leeza Operating Instruction Manual SPECIAL SECTIONS
Page 49

KEY DIGITAL HD LEEZA, MODEL KD-HD1080P
When I use my PC as an input to HD Leeza, the System Setup H and V positioning adjustments do
Q:
not seem to compensate enough to properly position the video on my display connected to the output
of HD Leeza.
A: You then need to use H offset and V offset in the Picture Adjustment menu to adjust for different H
and V timings generated by different computers.
HD Leeza Operating Instruction Manual SPECIAL SECTIONS
Page 50

KEY DIGITAL HD LEEZA, MODEL KD-HD1080P
SPECIAL SECTION 2:
Firmware Upgrade Logs
HD LEEZA - Video Processor - Model KD-HD1080P
Starting with Version 5.5.74 and later (more recent), you will find below a Log of all the
upgrades provided in each Firmware Upgrade.
HDL FIRMWARE VERSION NUMBER
DATED
PURPOSE
Included in Firmware upgrade
[1] Addition of three new resolutions: 1440X960; 1440X788; 1920X1200
[2] Improvements to the OSD, which is now running faster
[3] The RGBHV is not auto-switched to DVI1 in case of signal fail
[4] Composite Video capture adjusted for less over-scan
[5] RS232 command set has been increased to reflect recent additions to the feature list
5.5.74
2/28/04
This upgrade has improvements, new features and
some fixes
HD Leeza Operating Instruction Manual SPECIAL SECTIONS
Page 51

### This Page Intentionally Left Blank ###
Page 52

KEY DIGITAL HD LEEZA, MODEL KD-HD1080P
SPECIAL SECTION 3:
Display Matrix – Preferred HD Leeza
Resolution Settings for Popular Displays
HD LEEZA - Video Processor - Model KD-HD1080P
Preferred HD Leeza Resolution Settings for Popular Displays
The Table presented below is a “living document” based on actual user-experience with HD
Leeza and various types of displays. Please be sure to check the Key Digital web site
www.keydigital.com, or contact tech@keydigital.com to be sure that you have the latest and most
complete and accurate version of this table.
1. Please refer to the latest version of the HD Leeza User’s Manual for detailed, step-by-step
instructions on how to set up HD Leeza with your display. Check at:
www.keydigital.com
under Literature, User Manuals, HD Leeza
2. Be sure that you have the latest version of this Table by checking our web site:
www.keydigital.com
3. Once you have set up HD Leeza to match the preferred resolution settings for your display,
you must complete the step of adjusting the video display parameters, either with HD Leeza
or with the controls on your display. Please be sure to adjust brightness, contrast, etc. By
using the advanced “memory” feature with HD Leeza, you can store preferred settings
matched to each display input.
4. IMPORTANT NOTE FOR DVI AND HDMI DISPLAY INPUTS: To frame the image to
the display and fine-tune the optimum picture position and size on your display using the
DVI or HDMI interface with HD Leeza, set the H and V Size using HD Leeza, and the H
and V position on the display. This is required because most displays in the DVI or HDMI
mode do NOT accept HD Leeza H and V position adjustments.
Brand Name
& Display
Technology
AMPRO
LCD
DWIN
DLP
Model # Interface
from
HD Leeza
300 RGBHV 1280x1024p 60 H. Position: -15
TV3 DVI 1280x720p 60
Resolution
Used
by HD Leeza
Refresh
Rate
(Hz)
HD Leeza:
Non-default settings
Display:
Non-default settings
HD Leeza Operating Instruction Manual SPECIAL SECTIONS
Page 53

KEY DIGITAL HD LEEZA, MODEL KD-HD1080P
Brand Name
& Display
Technology
Fujitsu
Plasma
Fujitsu
Plasma
Model # Interface
from
HD Leeza
Resolution
Used
by HD Leeza
Refresh
Rate
(Hz)
HD Leeza:
Non-default settings
Display:
Non-default settings
P42HHA10WS DVI 1024x1024p 60 H. Size: 1032 H. Pos.: -8
V. Pos.: -12
P42HHA30WWS DVI 1024x1024p 60 H. Pos.: -9
H. Size: 1032
V. Pos.: -10
V. Size: 1022
Fujitsu
Plasma
Fujitsu
P50XHA10US
P50XHA30US DVI 1366x768p 60 H. Size: 1382 H. Pos.: +10
RGBHV 1280x768p 60 H. Pos.: +33,
H. Size: 1264
DVI 1366x1024p 60 H. Pos.: +4
H. Size: 1334
H. Pos.: Default
V. Pos.: -17
Plasma
Fujitsu
Plasma
P50XHA30YS DVI 1366x768p 60 H. Pos.: +34,
H. Size: 1374
Fujitsu
Plasma
Fujitsu
Plasma
Fujitsu
Plasma
Hughes
LCOS
InFocus
DLP
JVC
D-ILA
JVC
D-ILA
JVC
D-ILA
LG
Plasma
Loewe
Aconda
Marantz
(NEC)
61” Plasma
Marantz
Plasma
Marantz
DLP
Marantz
DLP (front)
Marantz
P50XP1 DVI 1366x768p 60
PDS4241WH
PDS6101W
RGBHV 1280x768p 60 H. Pos. +31
DVI 1366x768p 60 H. Pos.:+5,
H. Size: 1390
H. Pos.: +35
V. Pos.: +5
RGBHV 1920x1080p 60
DVI 1366x768p 60
G1000 RGBHV 1365x1024p 60
ScreenPlay
5700
RGBHV 1280x720p 60 H. Pos.: -60
H. Size: 1320
D-ILA-150CL DVI 1280x720p 60
D-ILA G11 RGBHV 1366x1024p 50, 60,
72, 75
• SDI:
H Pos.: +32
• Comp.:
H. Pos.: +42
Brightness: 45
G-150CLU RGBHV 1920x1080p 60 Lens: 1.33
Screen: 1.78
MU50PZ90V DVI 1365x1024 60 Sync: Negative
ACO9383PB RGBHV 1920x540 60
PD6120D
DVI 1280x720p 60
RGBHV 1280x768p 60 Sync: Positive
PD5040D
DVI 1366x768p 60 Sync: Positive Adjust Horizontal
100%
RGBHV 1366x1024 Sync: Positive
VP-12S1 RGBHV 1280x720p 60 Set to Auto Mode
VP-12S2 DVI,
1280x720p 60 Set to Auto Mode
RGBHV
VP-12S3 DVI 1280x720p 60 Must set HD Leeza Horizontal Size to 1296 to
enable H & V position controls on the projector
HD Leeza Operating Instruction Manual SPECIAL SECTIONS
Page 54

KEY DIGITAL HD LEEZA, MODEL KD-HD1080P
Brand Name
& Display
Technology
Mitsubishi
Model # Interface
from
HD Leeza
Resolution
Used
by HD Leeza
Refresh
Rate
(Hz)
HD Leeza:
Non-default settings
Display:
Non-default settings
WS65903 RGBHV 1920x540p 60
(rear)
Mitsubishi
XC-3730C RGBHV 800x600 72
CRT
Monivision
CRT
DM-6552SW RGBHV 1280x720p 60 H. Pos.: 53
H. Size: 86
V. Pos.: 61
V. Size: 45
NEC
9PG RGBHV 1024x768p 60 Default Default
front CRT
Panasonic
PT-42PD3-P RGBHV 852x480 60
42” Plasma
Pioneer
Plasma
Pioneer
Pioneer
503 CMX DVI and
RGBHV
PDP433 DVI and
RGBHV
PRO-510HD RGBHV 1920x540p 60 Default Default
1280x768p 60 H. Size: 1296
1280x768p 60 Fo r DVI use
Sync: Positive
H. Pos.: 0
V. Pos.: 0
(rear)
Pioneer
Plasma
Pioneer
Plasma
PRO-1000HD
Elite
PRO-1110HD
Elite
RGBHV 1280x768p 60
HDMI 1920x540p 60 HD Leeza H & V
Size adjustments
Must use display’s H
& V Position control.
accepted by display
Runco
CL-710 DVI 1280x720p 60
DLP
Runco
CW43ME DVI 1280x768p 60
Plasma
Runco
Plasma
50” DVI 1024x768p 60 H. Pos.: -72 H. Pos.: -15
V. Pos.: -1
Anamorphic setting
Runco
DTV 1100 RGBHV 1280x960 60
CRT (front)
Runco
CRT 8” guns
(front)
Samsung
Samsung
NEC XG-85 RGBHV 1280x720p 60 H. Pos.: -53
H. Size: 1296
HPN6339 DVI 1280x768p 60
PPM50H3 DVI 1920x1080p 60
Plasma
Samsung
42” Plasma
Sharp
DLP
Sim 2
SPN4235
SharpVision
XV-Z10000
HT250 RGBHV 1280x720p 60
RGBHV 800x600 60
YPbPr 1280x720p
DVI 1280x720p 60 H. Pos.: -23
DLP
Sim 2
DLP
Sony
Sony
HT300XTRA DVI &
RGBHV
Grand Wega
DVI 1920x540 or
KDF70XBR950
KE32TS2U DVI 1280x720p 60
1280x720p 60
60 Default Default
1280x720p
32” Plasma
HD Leeza Operating Instruction Manual SPECIAL SECTIONS
Page 55

KEY DIGITAL HD LEEZA, MODEL KD-HD1080P
Brand Name
& Display
Technology
Sony
Plasma
Sony
LCD (rear)
Sony
CRT (front)
Sony
Toshiba
Plasma
Toshiba
LCOS
Zenith
60” Plasma
Model # Interface
from
HD Leeza
KE37XS910 DVI 1920x540p 60
Wega
KF-60XBR800
WPH G90 RGBHV 1920x1080p 60 Clamp in H/C mode
50KBR950 DVI 1280x720p 60 H. Size: 1296
42HP83P DVI 1280x720p 60 H. Pos.: +16
57HLX82 DVI 1280x720p 60 H. Pos.: –6 None
P60W26 RGBHV 1280x920p 60 H. Size.: 1312
DVI 1280x720p 60
Resolution
Used
by HD Leeza
Refresh
Rate
(Hz)
HD Leeza:
Non-default settings
Sync: Negative
Gamma: 1.1
V. Size: 924
Display:
Non-default settings
*** Please be sure to check our web site for possible updates and additions to this table ***
HD Leeza Operating Instruction Manual SPECIAL SECTIONS
Page 56

### This Page Intentionally Left Blank ###
 Loading...