

Key Digital KD-CATHD500Pro Setup Manual
HDBT/HDMI via Single CAT6/STP (Tx/Rx)
Extenders with EDID Control, RS-232, IR,
HDMI Pass-through and Ethernet
The Experts in Digital Video Technology and Solutions
™
KD-CATHD500Pro
Key Digital® Systems :: 521 East 3rd Street :: Mount Vernon, NY 10553
Phone : 914.667.9700 Fax : 914.668.8666 Web : www.keydigital.com
Rev 0 – May 2013
Setup Guide
Key Digital®, led by digital video pioneer Mike Tsinberg,
develops and manufactures high quality, cutting-edge
technology solutions for virtually all applications where
high quality video imaging is important. Key Digital
®
is at the forefront of the video industry for Home Theater
Retailers, Custom Installers, System Integrators,
Broadcasters, Manufacturers, and Consumers.
KD-CATHD500Pro_Manual.indd 2-3 5/13/13 9:20 AM
4 1
Please read all instructions to insure safe operation of the product.
CAT6/STP CABLING IS REQUIRED. All included specifications are based
on the use of CAT6 STP with properly shielded RJ45 connectors
You MUST use the Power Supply provided with your unit or you VOID
the Key Digital
®
Warranty and risk damage to your unit and associated
equipment.
About KD-CATHD500Pro
Description
KD-CATHD500Pro HDBT/HDMI (Tx/Rx) Extenders extend 1080p/60, 1920x1200,
3D signals up to 400 ft. via single Key Digital® KD-CAT6STP1X Super CAT6
Shielded cable, or up to 300 ft. using a single third-party CAT6 shielded cable.
KD-CATHD500Pro carries IR and RS-232 for controlling remotely located equipment.
Ethernet ports allow 10/100 LAN Network extension.
Key Features
➔ Auto-adjustment of feedback, equalization and amplification depending
on the length of cabling used
➔ Internal EDID Library features 10 default EDID configurations including
native EDID data from any Output/Display
➔ Features both Transmit and Receive IR, RS-232 and Ethernet for bi-directional
control signals
➔ Full support for 12-Bit Deep Color Video
➔ Supports lossless compressed digital audio:
» Dolby
®
TrueHD, Dolby® Digital Plus and DTS™-HD Master Audio
Key Benefits
➔ HDMI, IR, RS-232 and Ethernet signals combined over a single CAT6/STP
➔ HDMI pass-through port on Tx Balun connects additional devices up to 20 ft.
➔ Daisy chaining of Tx and Rx units allows almost unlimited extension
of HDMI, RS-232, IR and Ethernet signals
➔ Supports HDBaseT
™
Technology
Advanced HDMI Features
➔ 3D – Capability to pass 3D stereoscopic signal formats
Accessories
➔ (2) 5V 2A DC Power Supplies � (2) Mounting Brackets
➔ (3) Locking HDMI Cable Clips � (1) Grounding Wire
Table of Contents
About KD-CATHD500Pro ...........................................1
Connections .....................................................2
Extending Ethernet, IR and RS-232 Control .............................4
Application Example ...............................................5
Settings.........................................................6
Specifications ....................................................8
Important Product Warnings .........................................10
Safety Instructions .................................................10
How to Contact Key Digital ..........................................11
Warranty ........................................................11
© 2013 Key Digital, Inc. All rights reserved.
KD-CATHD500Pro_Manual.indd 1 5/13/13 9:20 AM
2 3
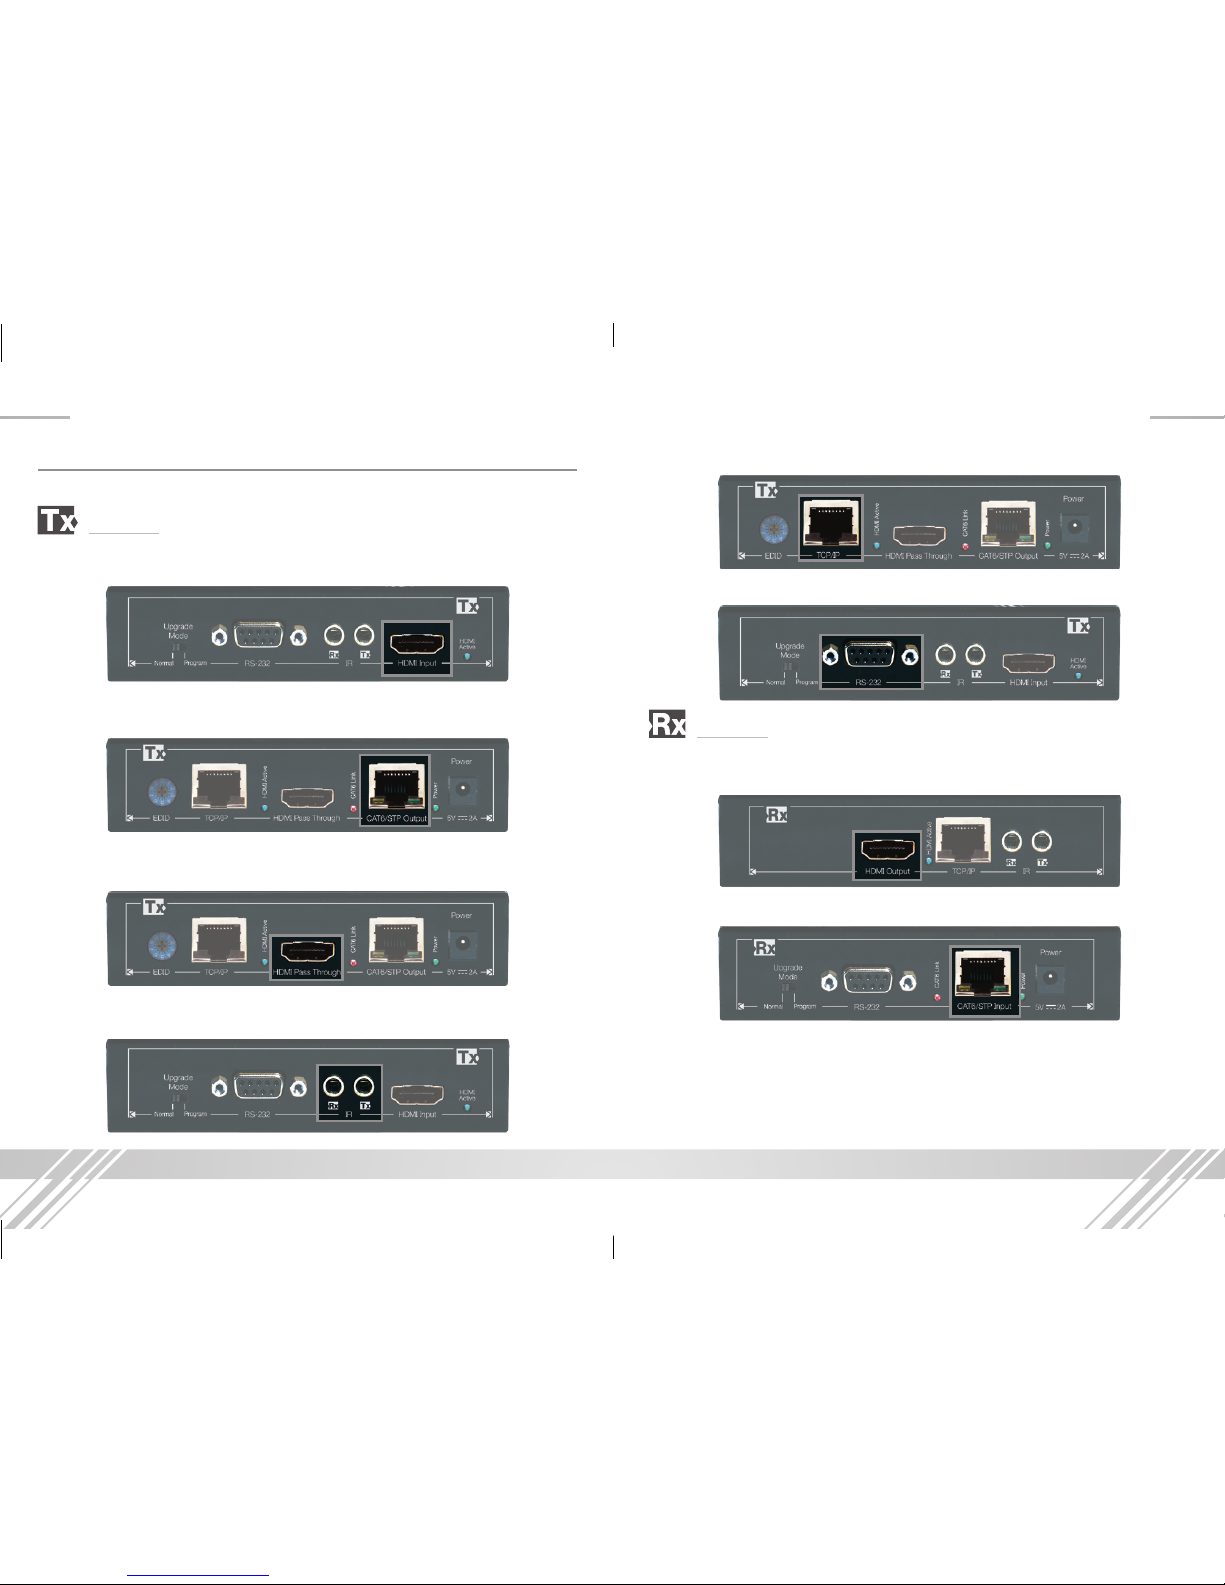
Connections
Before making any connections, power off your source and display devices.
Tx Balun:
➔ Using a short HDMI cable, connect your source device to the HDMI port labeled
“HDMI Input”. To connect DVI, use appropriate DVI to HDMI adapters.
➔ Connect the CAT6 STP cable that connects to the Rx Balun at the port labeled
“CAT6 STP Output”.
➔ You may use the port labeled “HDMI Pass-Through” to connect (up to 20 ft.)
your AVR, display or other device to the Tx unit.
➔ If desired, you may connect your IR signals to send (port labeled Tx), or receive
(port labeled Rx).
➔ Additionally you may connect a 10/100 Ethernet LAN cable to the “TCP/IP” port
➔ and an RS-232 cable to the DB9 port to transmit RS-232 signals.
Rx Balun:
➔ Using a short HDMI cable, connect your display device to the HDMI port labeled
“HDMI Output”.
➔ Connect the CAT6 STP cable at the port labeled “CAT6 STP Input”.
KD-CATHD500Pro_Manual.indd 3 5/13/13 9:20 AM
 Loading...