

Page 1
HDBT/HDMI via Single CAT6/STP (Tx/Rx)
Extenders with EDID Control, RS-232, IR
The Experts in Digital Video Technology and Solutions
™
KD-CATHD300Lite
Key Digital® Systems :: 521 East 3rd Street :: Mount Vernon, NY 10553
Phone : 914.667.9700 Fax : 914.668.8666 Web : www.keydigital.com
Rev 0 – May 2013
Setup Guide
Key Digital®, led by digital video pioneer Mike Tsinberg,
develops and manufactures high quality, cutting-edge
technology solutions for virtually all applications where
high quality video imaging is important. Key Digital
®
is at the forefront of the video industry for Home
Theater Retailers, Custom Installers, System Integrators,
Broadcasters, Manufacturers, and Consumers.
KD-CATHD300Lite_Manual.indd 2-3 6/20/13 11:41 AM
Page 2
4 1
Please read all instructions to insure safe operation of the product.
CAT6/STP CABLING IS REQUIRED. All included specifications are based
on the use of CAT6 STP with properly shielded RJ45 connectors
You MUST use the Power Supply provided with your unit or you VOID
the Key Digital
®
Warranty and risk damage to your unit and associated
equipment.
About KD-CATHD300Lite
Description
➔ The FatCAT Series
™
KD-CATHD300Lite allows extension of 1080p/60,
1920x1200, 3D signals up to 250 ft. when using Key Digital® Super CAT6
Shielded Cabling (Model # KD-CAT6STP1X) or up to 200 ft. when using thirdparty CAT6/STP cabling. KD-CATHD300Lite carries IR and RS-232 for
controlling remotely located equipment.
Key Features
➔ Auto-adjustment of feedback, equalization and amplification depending
on the length of cabling used
➔ Internal EDID Library features 9 default EDID configurations including native EDID
data from any Output/Display
➔ Features both Transmit and Receive IR, RS-232 for bi-directional control signals
➔ Full support for 12-Bit Deep Color Video
➔ Supports lossless compressed digital audio:
» Dolby
®
TrueHD, Dolby® Digital Plus and DTS™-HD Master Audio
Key Benefits
➔ HDMI, IR and RS-232 signals combined over a single CAT6/STP
➔ Daisy chaining of Tx and Rx units allow allows almost unlimited extension
of HDMI, RS-232 and IR signals
➔ Supports HDBaseT
®
Technology
Advanced HDMI® Features
➔ 3D – Capability to pass 3D stereoscopic signal formats
Accessories
➔ (2) 5V 2A DC Power Supplies � (2) Mounting Brackets
➔ (2) Locking HDMI Cable Clips � (1) Grounding Wire
Table of Contents
About KD-CATHD300Lite ...........................................1
Connections .....................................................2
Extending IR and RS-232 Control .....................................4
Application Example ...............................................5
Settings.........................................................6
Specifications ....................................................7
Important Product Warnings .........................................9
Safety Instructions .................................................9
How to Contact Key Digital
®
.........................................10
Warranty ........................................................11
© 2013 Key Digital, Inc. All rights reserved.
KD-CATHD300Lite_Manual.indd 1 6/20/13 11:41 AM
Page 3
2 3
Connections
Before making any connections, power off your source and display devices.
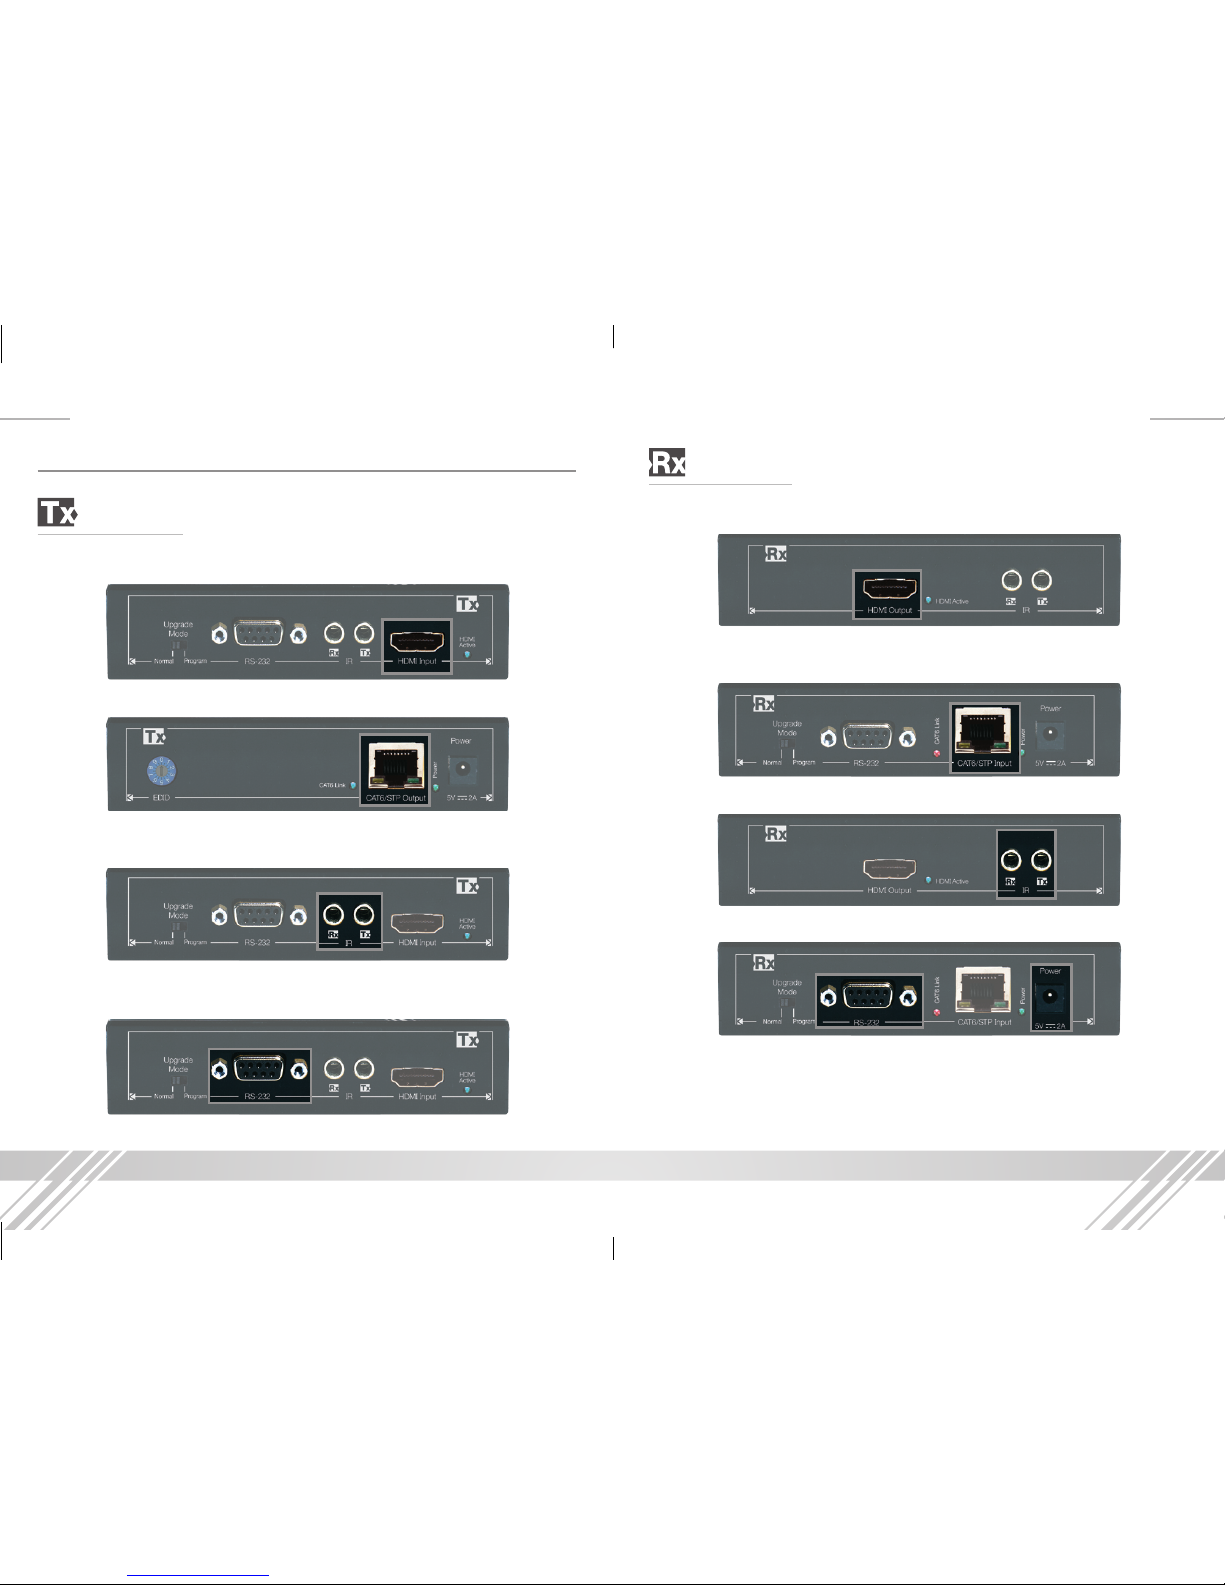
Tx Extender:
➔ Using a short HDMI cable, connect your source device to the HDMI port labeled
“HDMI Input”. To connect DVI use appropriate DVI to HDMI adapters.
➔ Connect the CAT6 STP to the Rx Extender at the port labeled “CAT6 STP Output”.
➔ If desired, you can connect IR signals to either send (port labeled Tx)
or receive (port labeled Rx) at this time.
➔ You may connect an RS-232 cable to the DB9 port to transmit RS-232
control signals.
Rx Extender:
➔ Using a short HDMI cable, connect your display device to the HDMI port labeled
“HDMI Output”.
➔ Connect the CAT6 STP cable to the Tx Extender at the port labeled
“CAT6 STP Input”.
➔ If you are using IR, connect it at this time.
➔ If you are using RS-232, connect to the RS-232 port.
➔ Power up the Extenders using the included power supplies and then power
up your source and display equipment.
KD-CATHD300Lite_Manual.indd 3 6/20/13 11:41 AM
Page 4
4 5
Extending IR and RS-232 Control
➔ RS-232
» You can use the KD-CATHD300Lite to send RS-232 commands for controlling
remote equipment.
» Requires the use of a null-modem cable on one (either) side.
➔ IR
» You may transmit IR information in either direction. The IR input can be from
a dedicated control system or a standard distribution block’s emitter outputs.
Use a fixed 5v input signal with a 3.5mm mono mini jack.
» The sleeve of the 3.5mm Male connector must have good physical contact
with 3.5 mm Female input/output on the KD-CATHD300Lite.
» Some 3.5mm Male plugs feature a plastic sleeve that extends longer than an
average sleeve. This may cause poor grounding
contact. See the example to the right of a sleeve
that may cause poor contact.
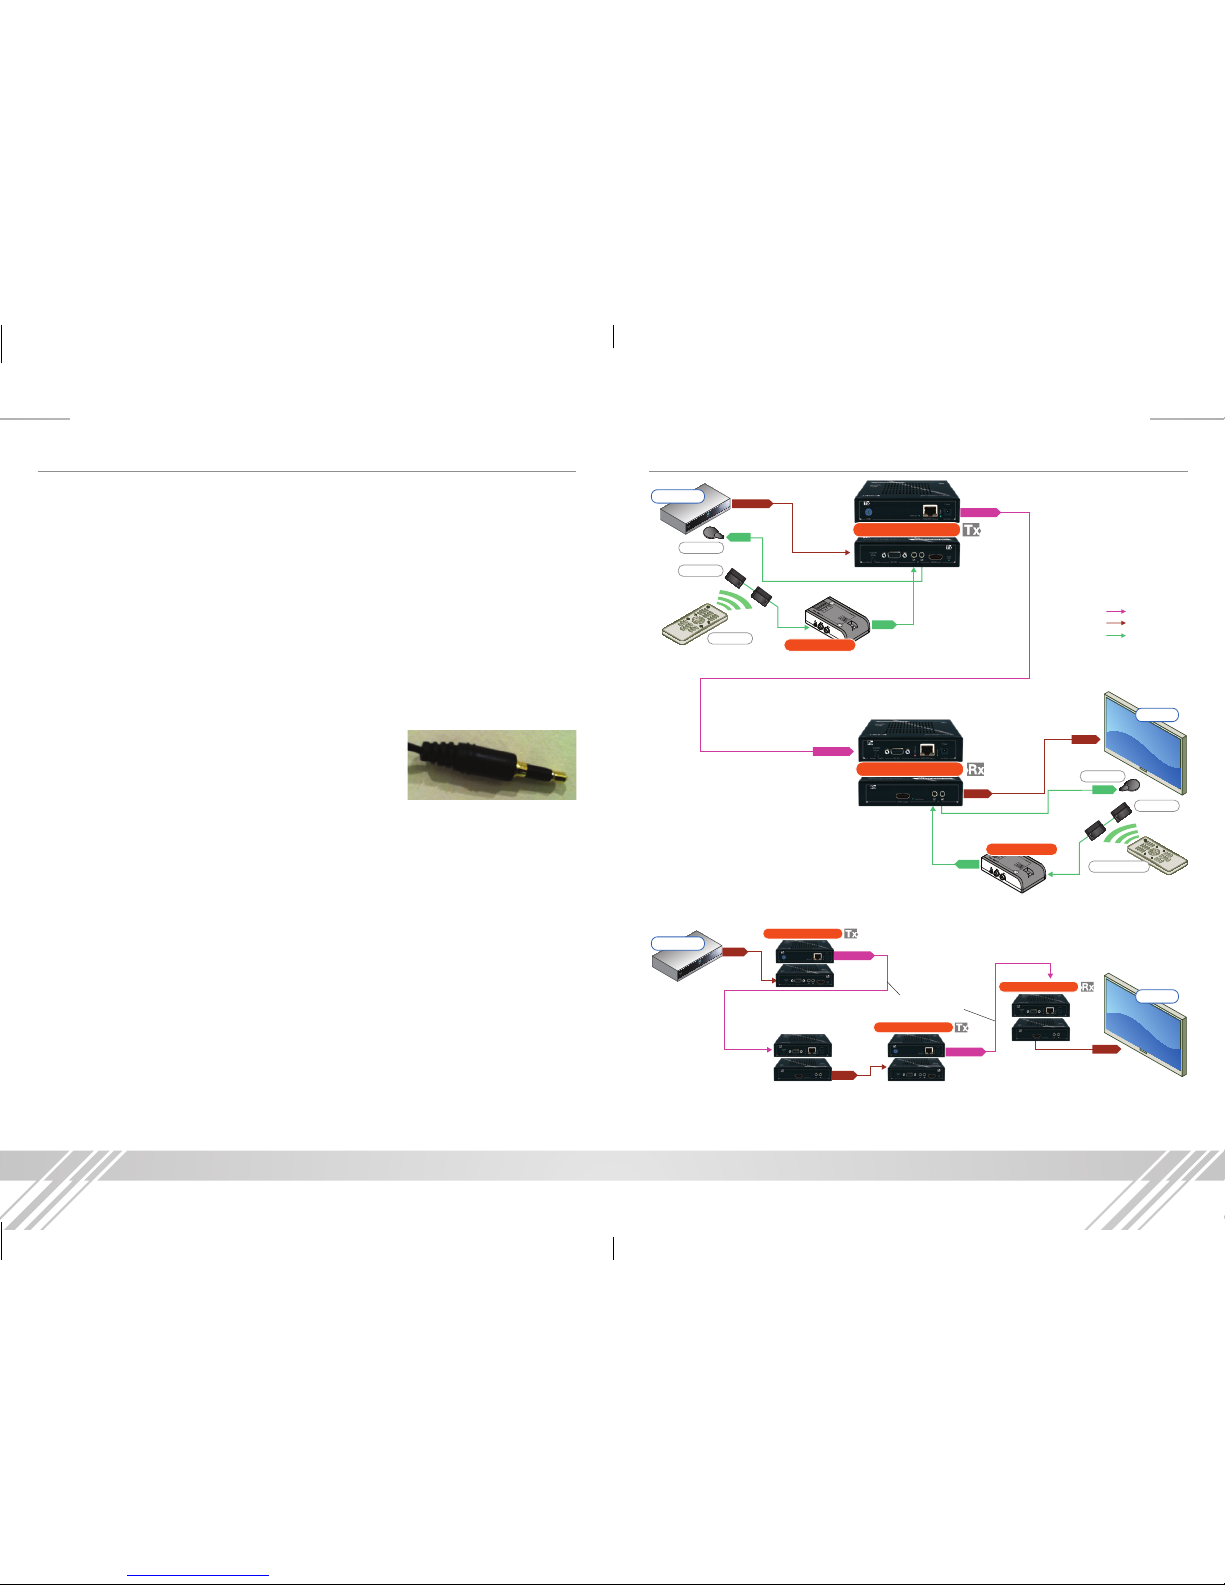
Application Example
HDMI/DVI*
CAT6/STP
IR
Up to 250’ – with Key Digital® KD-CAT6STP1X
Up to 200’ – with 3rd Party CAT6/STP
KD-CATHD300Lite
KD-CATHD300Lite
CAT6/STP
CAT6/STP
IR Rx
IR Rx
IR Tx
HDMI/DVI*
IR Tx
HDMI
HDMI
KD-IRKIT300
KD-IRKIT300
Display
Blu-Ray
IR Emitter
IR Receiver
(to control TV)
TV Remote
IR Emitter
IR Receiver
(to control DVD)
Blu Ray Remote
Daisy Chain Example:
HDMI/DVI*
CAT6/STP
IR
Up to 250’ – with Key Digital® KD-CAT6STP1X
Up to 200’ – with 3rd Party CAT6/STP
Up to 250’ – with Key Digital® KD-CAT6STP1X
Up to 200’ – with 3rd Party CAT6/STP
Achieved Distance: up to 560’
20’
20’
20’
KD-CATHD300Lite
KD-CATHD300Lite
KD-CATHD300Lite
KD-CATHD300Lite
KD-CATHD300Lite
CAT6/STP
CAT6/STP
CAT6/STP
CAT6/STP
IR Rx
IR Rx
IR Tx
HDMI/DVI*
HDMI
HDMI
IR Tx
HDMI
HDMI
HDMI
KD-IRKIT300
KD-IRKIT300
Display
Display
Blu-Ray
Blu-Ray
IR Emitter
IR Receiver
(to control TV)
TV Remote
IR Emitter
IR Receiver
(to control DVD)
Blu Ray Remote
KD-CATHD300Lite_Manual.indd 4-5 6/20/13 11:42 AM
Page 5
6 7
When selecting an EDID from the library, your source device will see the KDCATHD300Lite EDID choice instead of the displays EDID, overriding the display’s
EDID information. If your display is not capable of accepting the video resolution or
audio type selected, you may not see a picture or hear sound. In this case please
choose another more compatible EDID, or use the default EDID.
Range and Resolution:
➔ KD-CATHD300Lite w/ KD-CAT6STP1X Super CAT6 Shielded cabling:
All resolutions up to 1080p, 1920x1200, 3D up to 250 ft.
➔ KD-CATHD300Lite w/ Third-Party CAT6/STP cabling: All resolutions up to
1080p, 1920x1200, 3D up to 200 ft.
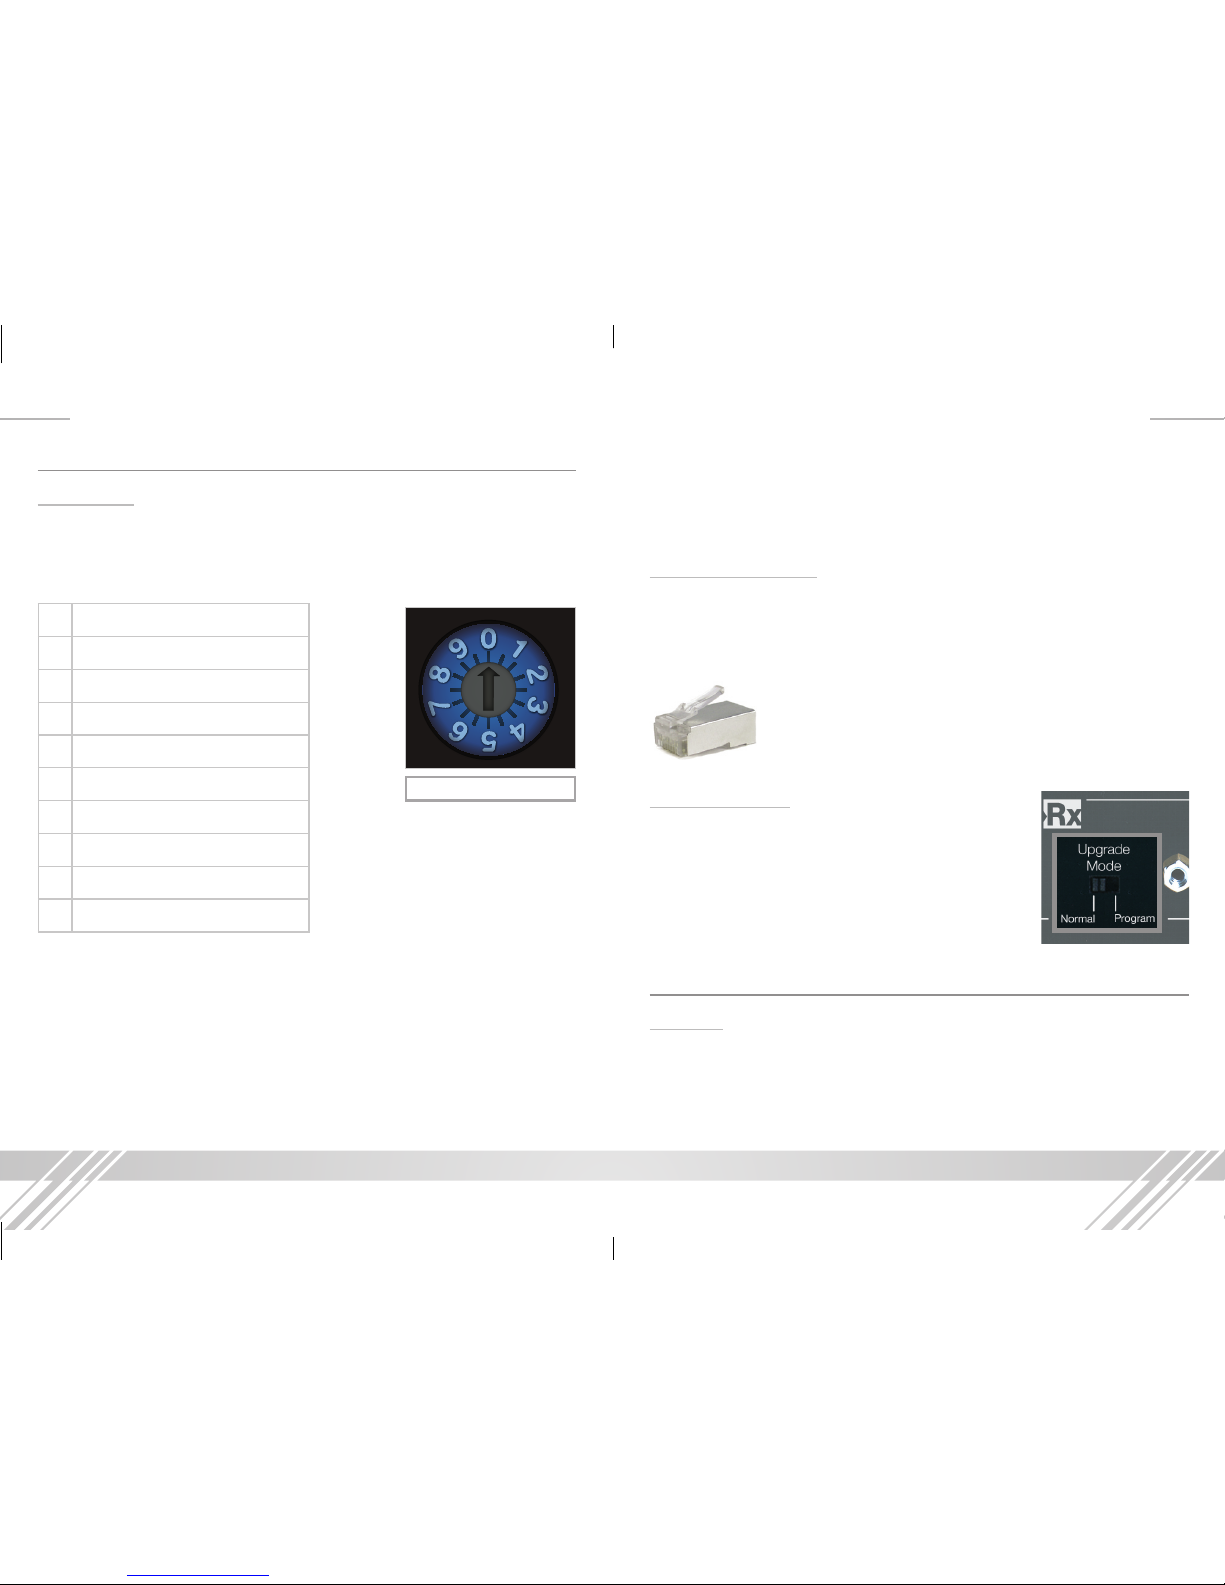
NOTE: Use metal shielded RJ45 connectors with soldered
ground wires when terminating the CAT6 STP.
Firmware Updates:
The KD-CATHD300Lite Tx and Rx have an “Upgrade Mode”
switch located near the RS-232 port. The 2 position slide
switch is marked “Normal” and “Program”. This switch
should only be used in the “Program” position when
updating the unit’s firmware. Be sure the switch is in the
“Normal” mode for standard operation.
Specifications
Technical:
➔ Inputs Tx (Each): 1 HDMI, 1 Serial IR Rx, 1 RS-232,
➔ Outputs Tx (Each): 1 CAT6 STP, 1 Serial IR Tx
➔ Inputs Rx (Each): 1 CAT6 STP, 1 Serial IR Rx
➔ Outputs Rx (Each): 1 HDMI, 1 Serial IR Tx, 1 RS-232
Settings
EDID Control
EDID settings may be necessary when connecting to or from an AV Receiver, or for
passing 3D content derived from a Cable or Satellite source. They can also speed up
the switching process from Cable or Satellite.
The possible EDID settings can range from ‘0’ to ‘9’. (‘0’ is the default).
0
EDID from connected display
1
1080i w/ PCM 2ch Digital Audio
2
1080i w/ HD Audio
3
1080p w/ PCM 2ch Digital Audio
4
1080p w/ HD Audio
5
3D w/ PCM 2ch Digital Audio
6
3D w/ Dolby Audio
7
3D w/ HD Audio
8
DVI 1080p
9
DVI 1080p with Forced HPD
The EDID controls are located on the Tx Extender. To change EDID settings, use a
small flat bladed screwdriver to turn the rotary switch to the desired EDID setting.
The switch clicks at each position to ensure the arrow is pointing at a number and
not in-between. There is no need to power the unit off when adjusting the EDID
settings. The unit will automatically renegotiate the new handshake in a few seconds.
Please follow this procedure for subsequent EDID changes.
Rotary EDID Control Switch
KD-CATHD300Lite_Manual.indd 6-7 6/20/13 11:42 AM
Page 6
8 9
Important Product Warnings:
1. Connect all cables before providing power to the unit.
2. Test for proper operation before securing unit behind walls or in hard to access
spaces.
3. If installing the unit into wall or mounting bracket into sheet-rock, provide proper
screw support with bolts or sheet-rock anchors.
Safety Instructions:
Please be sure to follow these instructions for safe operation of your unit.
1. Read and follow all instructions.
2. Heed all warnings.
4. Do not use this device near water.
5. Clean only with dry cloth.
6. Install in accordance with the manufacturer’s instructions.
7. Do not install near any heat sources such as radiators, heat registers, stoves, or
other apparatus (including amplifiers) that produce heat.
8. Only use attachments/accessories specified by the manufacturer.
9. Refer all servicing to qualified service personnel. Servicing is required when the
device has been damaged in any way including:
» Damage to the power supply or power plug
» Exposure to rain or moisture
Power Supply Use:
You MUST use the Power Supply provided with your unit or you VOID the
Key Digital® Warranty and risk damage to your unit and associated
equipment.
➔ HDMI
®
and HDCP Licensing: Fully licensed and compatible with all HDMI
and HDCP techologies
➔ Link and Range: 1080p/60, 1920x1200, 1080i/60, 720p, 1080p/24; up to 250
ft. when used with KD-CAT6STP1X cabling, 200 ft. when used with third-party
CAT6/STP cabling.
➔ Lossless Compressed Digital Audio Support: Dolby
®
TrueHD, Dolby® Digital Plus
and DTS™-HD Master Audio
➔ DDC Signal (Data): Input DDC Signal: 5 Volts p-p (TTL)
➔ HDMI Video/Audio Signal: Input Video Signal: 1.2 Volts p-p
➔ HDMI Connector: Type A, 19 Pin Female
➔ RJ45 Connector: Shielded Link Connector
➔ IR Connector: 3.5 mm monaural mini jack
➔ RS-232 Connector: D-Sub 9 Pin
➔ I2C Communication: EDID and HDCP bi-directional transparency
from Display to Source
➔ CEC Support: To the main input and output HDMI channel.
General
➔ Regulation: CE, RoHS, WEEE
➔ Enclosure: Black Metal
➔ Product Dimensions (Each): L = 6” W = 4.1” H = 1.2”
➔ Shipping Carton Dimensions: L = 7.48” W = 6.54” H = 5.2”
➔ Product Weight (Each): 1 lb
➔ Shipping Weight: 3 lbs
➔ Power: UL Certified Power Supply – 5V / 2A, 110-240 VAC, 50-60 Hz
➔ Power Consumption: Tx - 2.5 Watts, Rx - 5 Watts
➔ Accessories: (2) Mounting Brackets, (2) Locking HDMI Cable Clips,
(1) Grounding Wire, (2) 5V 2A DC Power Supplies
KD-CATHD300Lite_Manual.indd 8-9 6/20/13 11:42 AM
Page 7

10 11
How to Contact Key Digital
®
System Design Group (SDG)
For system design questions please contact us at:
➔
Phone: 914-667-9700
➔
E-mail: [email protected]
Customer Support
For customer support questions please contact us at:
➔
Phone: 914-667-9700
➔
E-mail: [email protected]
Technical Support
For technical questions about using Key Digital® products, please contact us at:
➔
Phone: 914-667-9700
➔
E-mail: [email protected]
Repairs and Warranty Service
Should your product require warranty service or repair, please obtain a Key Digital®
Return Material Authorization (RMA) number by contacting us at:
➔
Phone: 914-667-9700
➔
E-mail: [email protected]
Feedback
Please email any comments/questions about the manual to:
➔
E-mail: [email protected]
Warranty
All Key Digital® products are built to high manufacturing standards and should provide
years of trouble-free operation. They are backed by a limited two-year parts and
labor warranty.
KD-CATHD300Lite_Manual.indd 10-11 6/20/13 11:42 AM
Page 8

12 13
Installation Notes Installation Notes
KD-CATHD300Lite_Manual.indd 12-13 6/20/13 11:42 AM
 Loading...