

Page 1
The Experts in Digital Video Technology and Solutions.
OPERATING INSTRUCTIONS
The Experts in Digital Video Technology and Solutions.
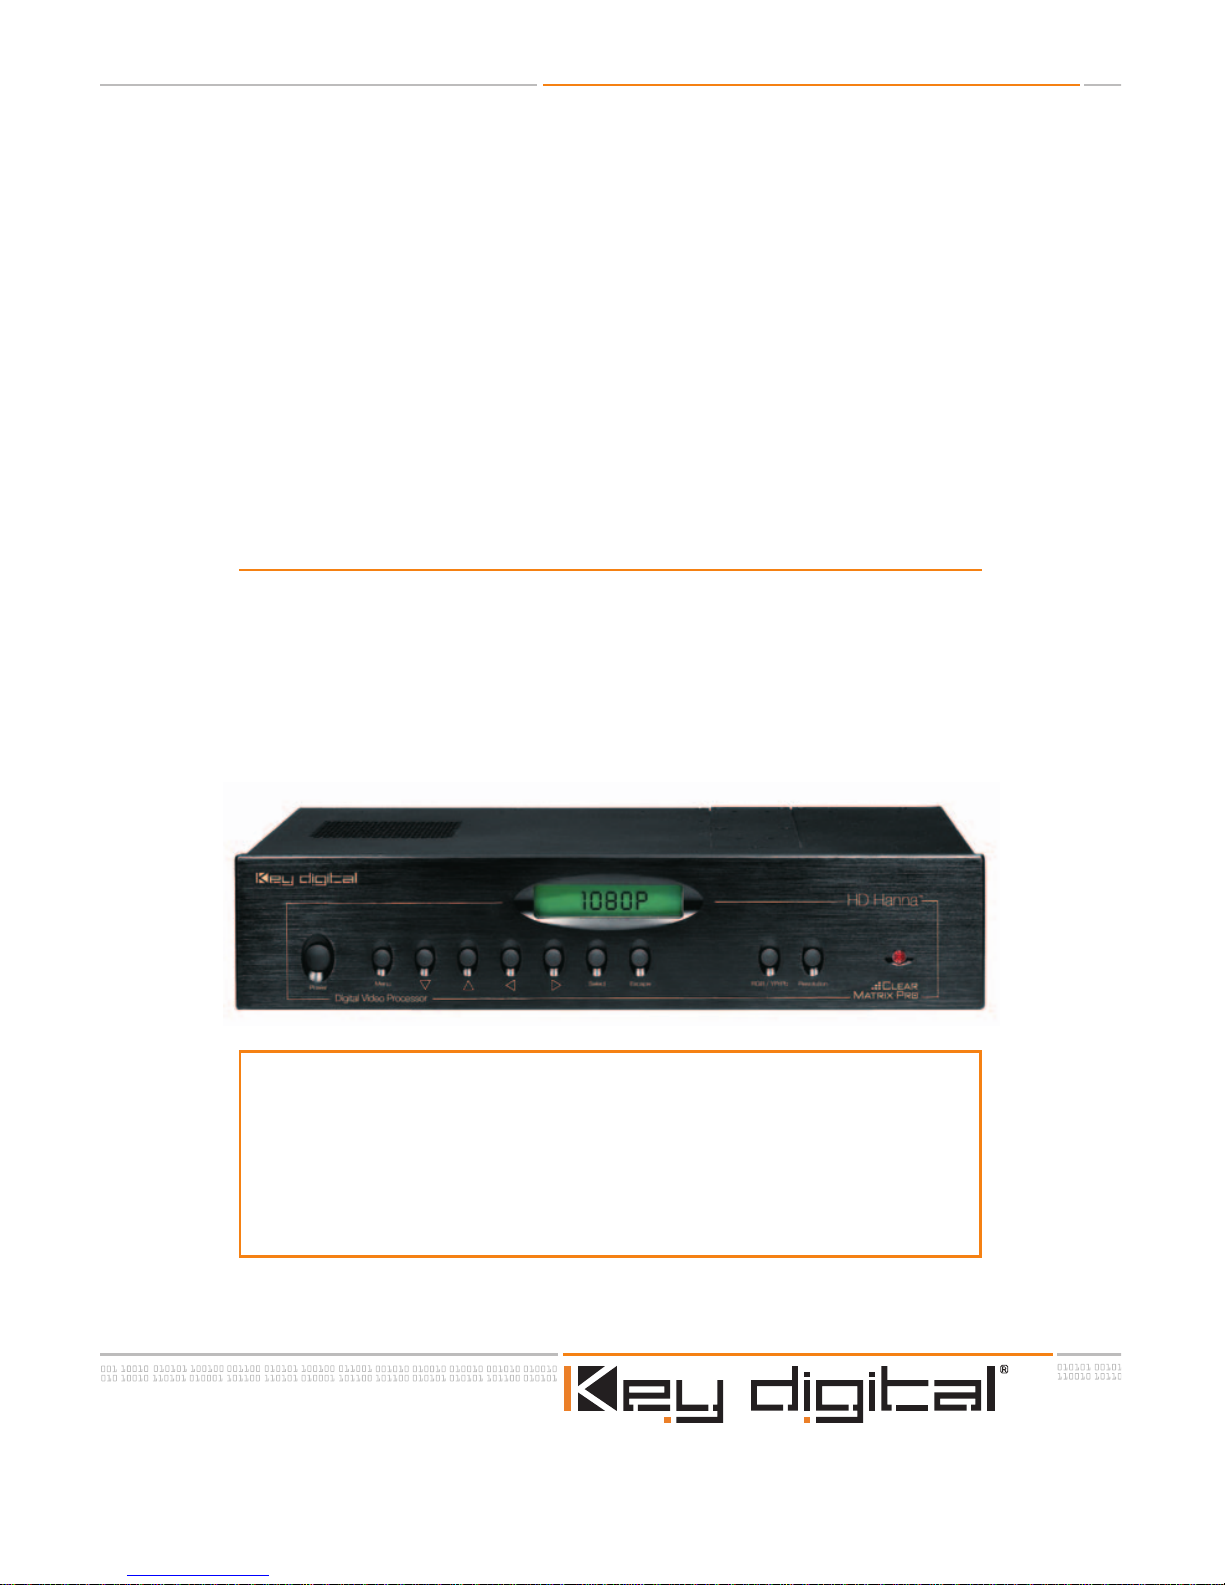
HD Hanna
Digital Video Processor
Model KD-FIRE1080P
The new HD HannaTMhits the “sweet spot” for the Custom
Installation market by providing HD Set Top Box and Scaling functionality in one product, with high quality, versatility, and value. You’ll
enjoy the added functionality of True Digital Path (Digital-In to DigitalOut, including Firewire/5C) and the pristine picture from Key Digital’s
®
renowned Scaler equipped with the proprietary, motion-assisted deinterlacing algorithm Clear Matrix Pro®.
TM
Page 2

The Experts in Digital Video Technology and Solutions.
The Experts in Digital Video Technology and Solutions.
HD HannaTMOperating Instructions
Page 2 of 32
HD HANNATM– Digital STB/Scaler Model KD-FIRE1080P
Safety Instructions – Please be sure to follow these
instructions for safe operation of your unit
1
Read these instructions.
2
Keep these instructions.
3
Heed all warnings.
4
Follow all instructions.
5
Do not use this apparatus near water
6
Clean only with dry cloth.
7
Do not block any ventilation openings. Install in accordance with the manufacturer’s
instructions.
8
Do not install near any heat sources such as radiators, heat registers, stoves, or other
apparatus (including amplifiers) that produce heat.
9
Do not defeat the safety purpose of the polarized or grounding-type plug. A polarized
plug has two blades with one wider than the other. A grounding type plug has two
blades and a third grounding prong. The wide blade or the third prong are provided
for your safety. If the provided plug does not fit into your outlet, consult an electrician
for replacement of the obsolete outlet.
10
Protect the power cord from being walked on or pinched particularly at plugs, con-
venience receptacles, and the point where they exit from the apparatus.
11 Only use attachments/accessories specified by the manufacturer
12
Use only with the cart, stand, tripod, bracket, or table specified by the manufacturer, or
sold with the apparatus. When a cart is used, use caution when moving the
cart/apparatus combination to avoid injury from tip-over.
13
Unplug this apparatus during lightning storms or when unused for long periods of
t
ime
.
14
Refer all servicing to qualified service personnel. Servicing is required when the
apparatus has been damaged in any way, such as power-supply cord or plug is dam-
aged
,
liquid has been spilled or objects have fallen into the apparatus, the apparatus
has been exposed to rain or moisture, does not operate normally, or has been
dr
opped
.
Page 3

The Experts in Digital Video Technology and Solutions.
Page 3 of 32
HD HannaTMOperating Instructions
BASICS
1.INTRODUCTION TO HD HANNATM, MODEL KD-FIRE1080P....................................................4
1.1 What is HD Hanna
TM
? ..................... .............................................................................4
1.2 Why you need HD Hanna
TM
........................................................................................5
1.3 Summary Specifications for HD Hanna
TM
..................................................................5
2. INCLUDED WITH HD HANNA
TM
, MODEL KD-FIRE1080P......................................................6
SET-UP DETAILS
3. QUICK SETUP OF HD HANNATM, MODEL KD-FIRE1080P ..................................................7
3.1 Determine your particular application requirements..................................................7
3.2 Connect the A/V Inputs and Outputs to suit your particular configuration...........9
3.3 Place your HD Hanna
TM
unit in a convenient location.............................................11
3.4 Make the final connections........................................................................................11
3.5 Learn to operate HD Hanna
TM
with its user-friendly OSD and controls................11
4. HOW TO CONTACT KEY DIGITAL
®
.........................................................................................23
5. REPAIR AND WARRANTY........................................................................................................23
APPENDICES
Appendix A: HD HannaTMTechnical Specifications..................................................................24
Appendix B: Firmware Upgrade Instructions............................................................................27
Appendix C: Controlling HD Hanna
TM
from your Home Theater Automation System...........28
Page 4
The Experts in Digital Video Technology and Solutions.
The Experts in Digital Video Technology and Solutions.
1.INTRODUCTION TO HD HANNATM, MODEL
KD-FIRE1080P
Key Digital’s®“HD HannaTM” (Model KD-FIRE1080P) is a state-of-the-art ATSC/NTSC Set Top
Box that also provides high-quality scaling to your display’s native resolution. It offers flexible
analog and digital I/O, including DVI-D with HDCP out and Firewire I/O with 5C.
1.1 What is HD HannaTM?
HD HannaTMis a very versatile all-in-one ATSC/NTSC Set Top Box and Video Scaler that
receives, decodes, and scales the video program to match your display’s native resolution.
Custom Installers and Home Theater buffs will be delighted with HD HannaTM, because it
offers so much value and quality all in one economical unit, including:
Video decoding (ATSC and NTSC, PAL, PAL-M, SECAM)
High-quality scaling to HD and SD resolutions
Flexible I/O with:
- Two IEEE 1394 Firewire I/O ports with 5C, capable of HDTV and SDTV
- Inputs: RF (ATSC and all analog formats), Component Video (YPbPr) for 480i, all
world formats accepted in Composite and S-Video, and an optional plug-in card
available for DVI-D/HDCP HDTV digital input
- Outputs: HD RGBHV and Component, DVI-D/HDCP, Composite and S-Video
Scales to output resolutions of:
- 1080 and 480: interlaced and progressive scan
- 1280x720, 1280x768 and 1368x768, 1920x540,1400x1050: progressive scan
- 1920 x 1080 @ 24 Hz is also available.
Delivers simultaneous HD and SD outputs (480i) for each output resolution
Analog audio I/O; Toslink optical and digital coaxial audio out
U
se
r-friendly on-screen-display, front-panel pushbutton controls, and a programmable IR
Re
mo
te with “Hot” buttons
Picture adjustments, linked to each input and conveniently stored and include: sharpness,
brightness, contrast, saturation, and hue
Works with all control systems (like Crestron)
Customers can upgrade firmware over the Internet
It is rack-mountable, has no fan noise, and is easy to install and integrate into your home
theater system
HD HannaTMOperating Instructions
Page 4 of 32
Page 5

The Experts in Digital Video Technology and Solutions.
1.2 Why you need HD Hanna
TM
Key Digital®engineered HD HannaTM(Model KD-FIRE1080P) as a convenient, high-quality Set
Top Box (STB), Scaler, and home theater I/O backbone.
HD HannaTMoffers just what the
custom home theater buffs and installers are looking for -– a unique “one-stop shopping”
solution for applications where you need the Input/Output flexibility to decode off-the-air or
Cable (RF) ATSC & NTSC, Firewire/5C, or select 480i baseband (YPbPr, CVBS Composite
and S-Video) input signals, and scale them to the native resolution of your display.
HD HannaTMincorporates a high-quality Scaler equipped with Key Digital’s®advanced,
motion-assisted de-interlacing algorithm called “Clear Matrix Pro”, that lets you up-, down-,
and cross-convert the STB RF or baseband input to your display’s native resolution.
HD
Hanna
TM
accepts all world formats at its inputs, and can scale to output formats of interlaced
and progressive scan 1080 and 480; and progressive scan 1280x720, 1280x768 and
1368x768,1920x540, and 1400x1050; 60 Hz output refresh rates; and aspect ratios in and
out of 16:9 and 4:3.The HD Hanna
TM
can scale to an output resolution of 1920 x 1080 @ 24
Hz.
HD HannaTMalso handles your audio requirements, with four analog inputs (Left & Right
stereo pairs). The audio output of
HD HannaTMprovides for analog (Left & Right stereo pairs),
digital coaxial audio, and Toslink optical audio. This audio I/O flexibility allows you to take
maximum advantage of all the video input ports on your
HD HannaTMunit and correspond-
ingly switch the associated program audio.
With its user-friendly On-Screen-Display (OSD), programmable IR Remote with “Hot” buttons
(discrete IR commands are available), and user-selectable output resolutions and aspect
ratios,
HD HannaTMis easy to control and operate. It is rack-mountable (2RU), has no fan
noise, and is easy to install and integrate into your system. The RS-232C port is equipped
with discrete command protocol compatible with all control systems (like Crestron, AMX,
CNMSX-PRO), and is even designed to allow customers to upgrade firmware over the
Internet.
1.3 Summary Specifications for HD Hanna
TM
Features:
• Scaler equipped with advanced, motion-assisted de-interlacing algorithm Clear Matrix Pro
TM
• HDTV and SDTV Colorimetry Matrix
• 3-D Comb Filtering for Composite Video
• Optional HD Input plug-in card, for DVI-D/HDCP inputs and HD baseband scaling applica-
tions
• Flexible I/O, including Firewire with 5C
• User-friendly on-screen-display
• IR Remote with “Hot” keys
• Channel / status display and controls for complete navigation and operation from the front
panel
• Picture adjustments are linked to each input and conveniently stored and include: sharp-
ness, brightness, contrast, saturation, and hue
• RS-232C por
t for external control of
HD HannaTM(Cr
e
s
t
r
on-compatible), and firmware
upgrades
Page 5 of 32
HD HannaTMOperating Instructions
Page 6

The Experts in Digital Video Technology and Solutions.
The Experts in Digital Video Technology and Solutions.
Supported Input types include:
• Video Inputs:
- two IEEE 1394 5C-enabled Firewire I/O ports supporting HDTV and SDTV
- two RF tuner inputs supporting ATSC (8 VSB) and analog TV (NTSC, PAL, PAL-M,
SECAM)
- two Component Video (YPbPr) supporting 480i baseband
* one Component input available for pass-through
- two each Composite Video (CV) and S-Video accepting all world formats (NTSC,
PAL, PAL-M, SECAM)
- one RGBHV pass-through
- optional plug-in card available for DVI-D/HDCP HDTV inputs
- 60 Hz refresh rates
- 16:9 and 4:3 Aspect Ratios
•
Audio Inputs:
- four analog (standard line-type Left & Right pairs) inputs
Supported Output types include:
• Video Output Formats:
- 1080 interlaced and progressive, 720 and 768 progressive, and 480 interlaced
and progressive
- 60 Hz output refresh rates
- both SD (480i) out and HD out simultaneously for each output resolution
- 1920 x 1080 @ 24 Hz is also available.
•
Video Outputs:
- two IEEE 1394 5C-enabled Firewire I/O ports supporting HDTV and SDTV
- one HD Component Video (YPbPr)
- one HD RGBHV
- one DVI-D with HDCP
- one SD Composite Video and S-Video
•
Audio Outputs:
- one analog (standard line-type Left & Right pairs) output
- one digital coaxial audio output
- Toslink optical audio output
2. INCLUDED WITH HD HANNATM, MODEL KD-FIRE1080P
Open the carton and you will find inside the following contents:
1
. One
HD HannaTMunit
2. Standard power cord
3. IR Remote Control with 2 AAA batteries included
4. Rack mounting hardware: brackets, screws, and clips
5. This Instruction Manual
6. Warranty card
HD HannaTMOperating Instructions
Page 6 of 32
Page 7
The Experts in Digital Video Technology and Solutions.
3. QUICK SETUP OF HD HANNA
T
M
, MODEL KD-FIRE1080P
Connecting and using your Key Digital®HD HannaTM(Model KD-FIRE1080P) combination Set
Top Box and Scaler with flexible analog and digital I/O is straightforward:
1. Become familiar with
HD HannaTM.
2.Determine your particular application requirements.
3.Connect the A/V Inputs and Outputs to suit your particular configuration.
4.Place the unit in a convenient location.
5.Make the final connections.
6.Learn to operate the unit with its user-friendly OSD and controls.
Please follow these Steps carefully, as described below.
3.1 Determine your particular application requirement
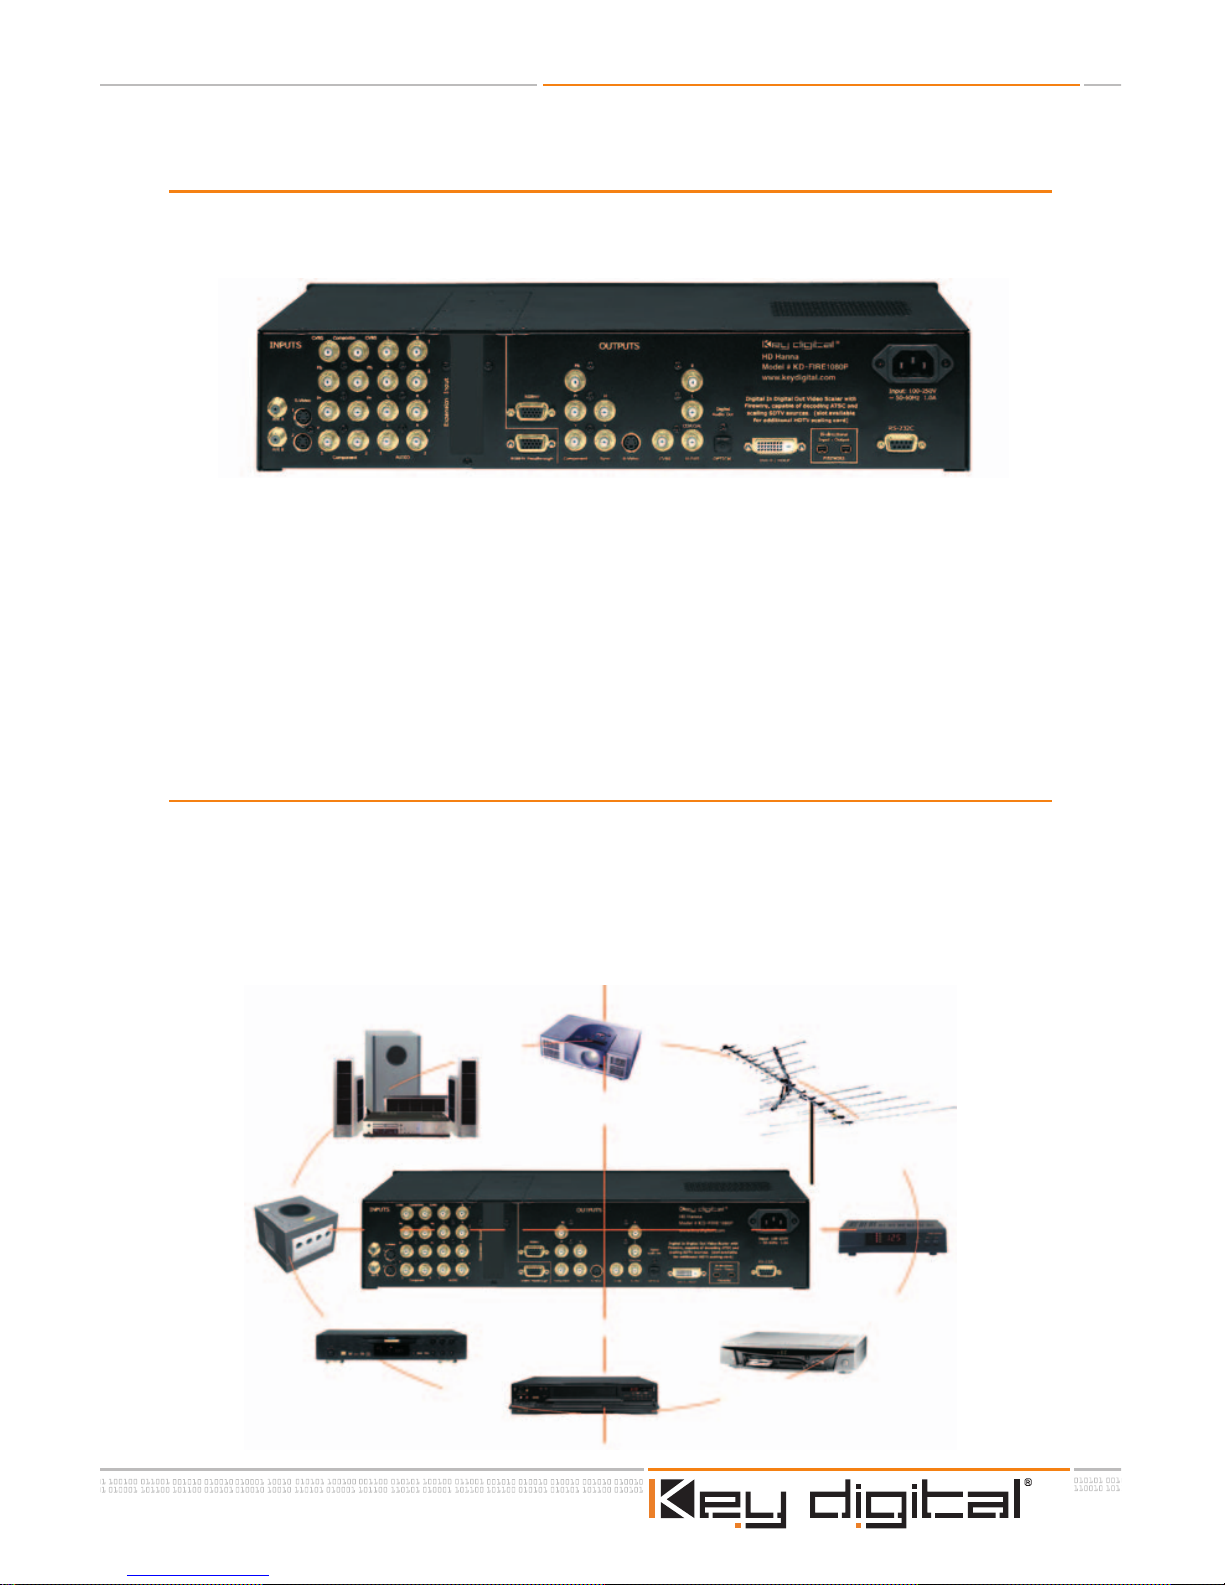
A typical application for HD HannaTMis in your home theater environment where you have an
off-the-air or cable ATSC/NTSC (or any world format) feed that you want to decode and scale
to the native resolution of your display. You may need scaling for Firewire/5C digital, or baseband analog video as well. With
HD HannaTM, you have all of these capabilities in one con-
venient package. Some typical Application configurations are depicted in the example below.
Page 7 of 32
HD HannaTMOperating Instructions
Page 8

The Experts in Digital Video Technology and Solutions.
The Experts in Digital Video Technology and Solutions.
When considering the type of configuration you require, you’ll need to know your Video and
Audio Input and Output requirements.
HD HannaTMsupports the following Video Inputs:
• two IEEE 1394 5C-enabled Firewire I/O ports supporting HDTV and SDTV
• two RF tuner inputs supporting ATSC (8 VSB) and analog TV (NTSC, PAL, PAL-M,
SECAM) for off-the-air or cable
• two Component Video (YPbPr) inputs supporting 480i baseband
- one Component input available for pass-through
• two each baseband Composite Video (CVBS) and S-Video inputs accepting all
world formats TV (NTSC, PAL, PAL-M, SECAM)
• one RGBHV pass-through
• optional plug-in card available for DVI-D with HDCP HDTV input
HD HannaTMsupports the following Audio Inputs:
• four analog (standard line-type Left & Right pairs) inputs
On the output side,
HD HannaTMsupports interlaced and progressive scan displays at 1080
and 480; and progressive scan displays at 1280x720, 1280x768 and 1368x768, 1920x540, and
1400x1050. Video Output format of 1920 x 1080 @ 24 Hz is also available. You’ll need to
determine if you are driving a DVI/HDCP, Component Video (YPbPr), or VGA (RGBHV) display.
The audio can be analog, digital, or Toslink optical. Both SD (480i) out and HD out are available simultaneously for each output resolution, one of many sought-after features provided by
HD HannaTM.
HD HannaTMsupports the following Video Outputs:
• two IEEE 1394 5C-enabled Firewire I/O ports supporting HDTV and SDTV
• one HD Component Video (YPbPr) output
• one HD VGA (RGBHV) output
• one DVI-D with HDCP output
• one SD Composite Video output
• one SD S-Video output
HD HannaTMsupports the following Audio Outputs:
• one analog (standard line-type Left & Right pairs) output
• one digital coaxial audio output
• Toslink optical audio output
HD HannaTMOperating Instructions
Page 8 of 32
Page 9
The Experts in Digital Video Technology and Solutions.
3.2 Connect the A/V Inputs and Outputs to suit your particular configuration
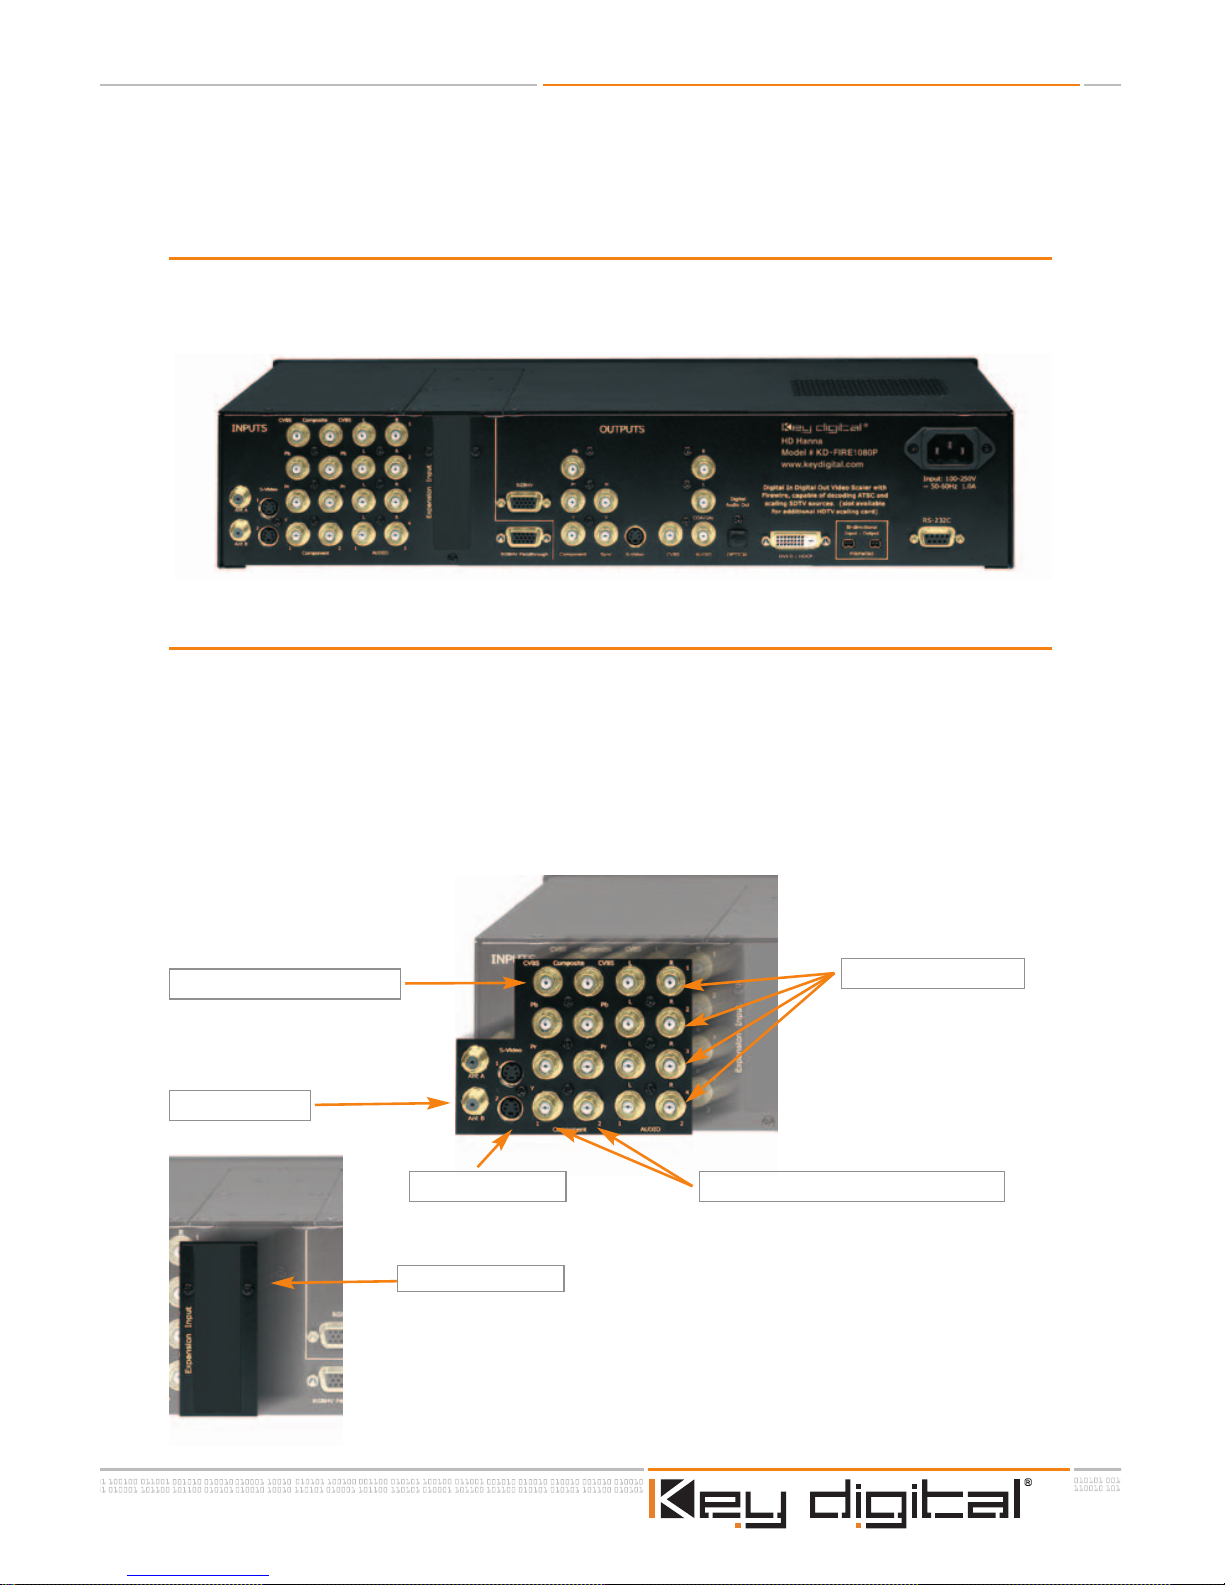
First, become familiar with the I/O back panel, which is at the rear of your HD HannaTMunit.
HD HANNA
T
M
INPUTS
The INPUTS to HD HannaTMare to the left when looking at the back panel and include:
• two F-type RF (cable or antenna) inputs (Ant A&B)
• two S-Video input connectors
• two separate Composite Video (CVBS) and Component Video (YPbPr) BNC con-
nector banks
• four separate audio left and right BNC stereo pairs
• one DB-15 VGA (RGBHV) by-pass input
To the right of the Input section of the
HD HannaTMback panel is the
Expansion Input s
lo
t t
o accommodate a DVI-D/HDCP HD input
(optional card).
NOTE: if you separately purchase this optional
Expansion Input card, it is recommended that you install it at this
time using the instructions provided separately with the card,
before proceeding further with these instructions
Note the back (rear) panel configuration of
HD HannaTMfor all I/O
Audio L&R 1,2,3,4
Composite 1&2 (CVBS)
Ant A & B
S-Video 1&2 Component Video (YPbPr) 1&2
Page 9 of 32
HD HannaTMOperating Instructions
Page 10
The Experts in Digital Video Technology and Solutions.
The Experts in Digital Video Technology and Solutions.
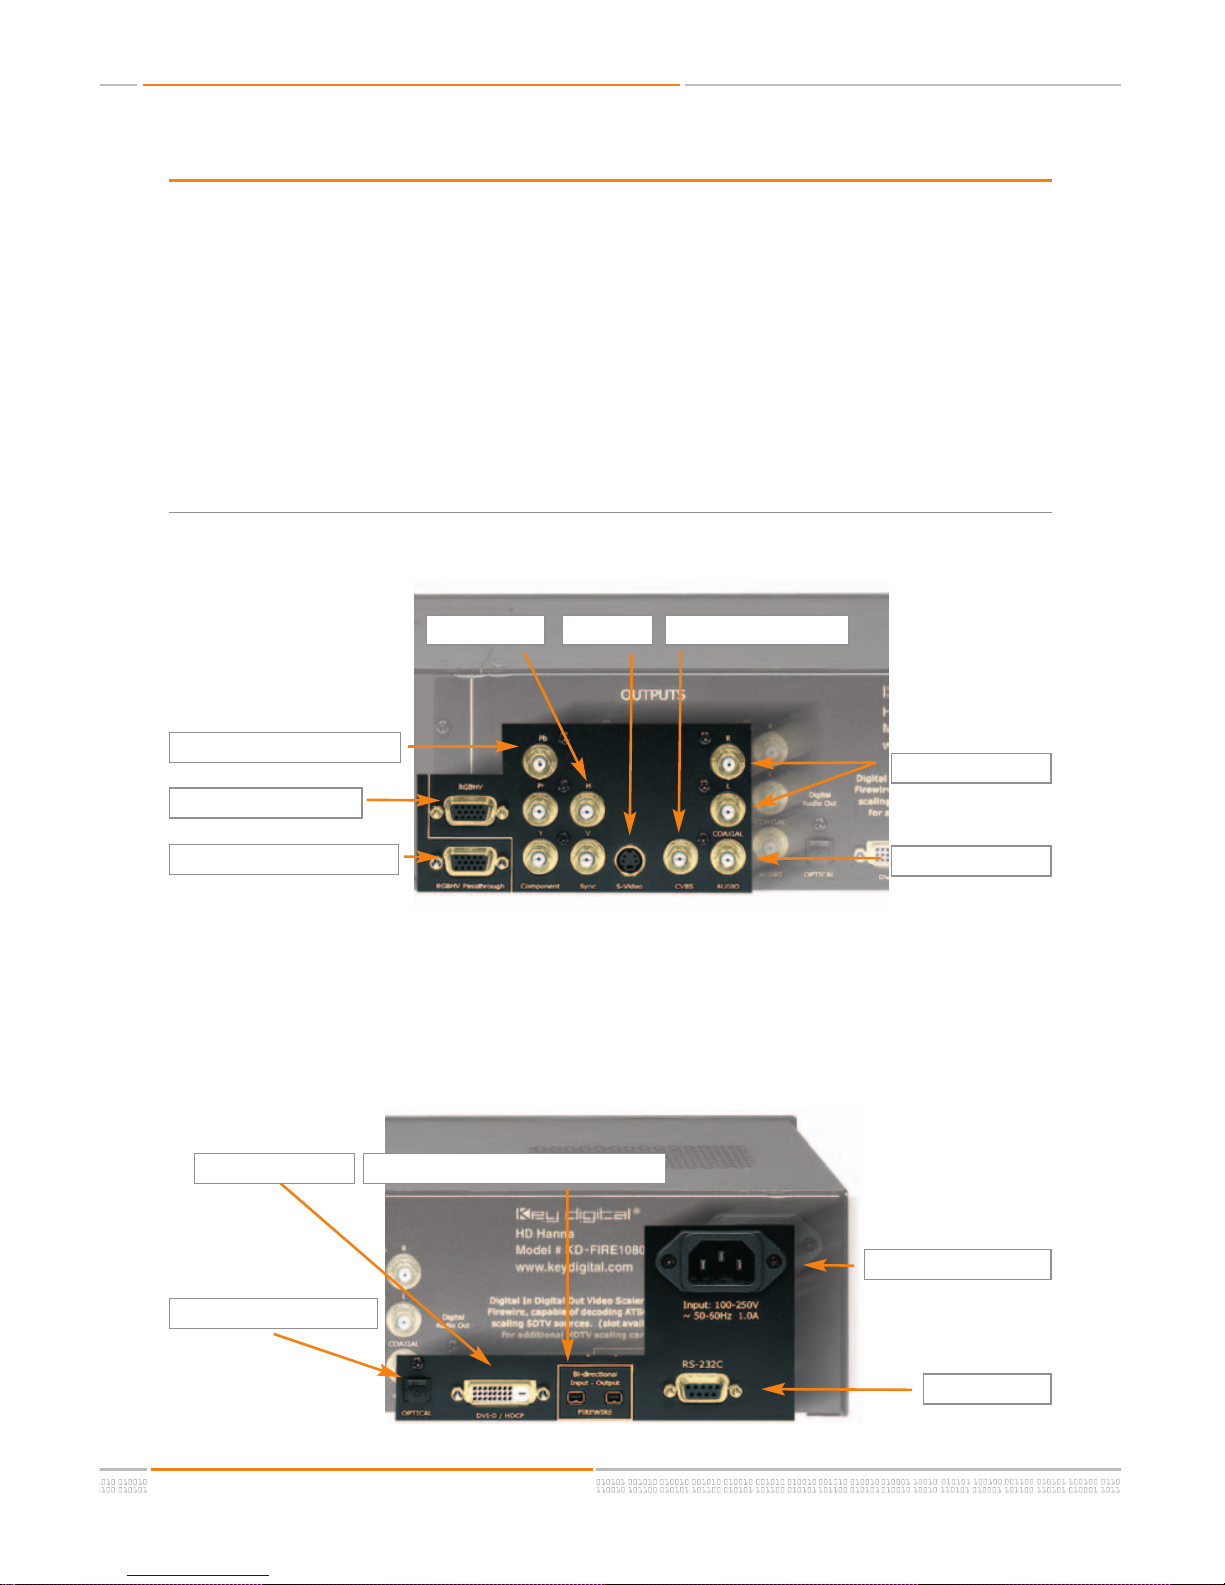
HD HANNA
T
M
OUTPUTS
To the right of the Expansion Input slot is the DB-15 VGA (RGBHV) by-pass input, followed by
the
HD HannaTMOUTPUTS towards the center when looking at the back panel, which
include:
• one VGA (RGBHV) DB-15 connector video output
• one Component Video (YPbPr) BNC bank
• separate H and V sync BNC outputs
• one S-Video output connector
• one CVBS Composite Video BNC output
• one analog audio standard line-type Left & Right pairs BNC outputs
• one digital audio BNC coaxial output
HD HANNATMOUTPUTS
The remaining connectors are to the far-right when looking at the back panel of HD HannaTM,
and include:
• Toslink optical audio output
• one DVI-D connector (supports HDCP) output
• two IEEE 1394 5C-enabled Firewire I/O ports supporting HDTV and SDTV
• one RS-232, D-sub 9-pin female connector
• one standard power plug
Audio L&R
Digital Coaxial
Composite (CVBS)S-VideoH&V Sync
RS-2
32C
Standard power plug
Two Firewire I/O (bi-directional)DVI-D/HDCP out
Component Video (YPbPr)
VGA (RGBHV) output
VGA (RGBHV) bypass input
Toslink optical audio out
HD HannaTMOperating Instructions
Page 10 of 32
Page 11

The Experts in Digital Video Technology and Solutions.
3.3 Place your HD Hanna
T
M
unit in a convenient location
This is a good time to rack-mount your HD HannaTMunit, with the 2 RU mounting hardware
included. The unit weighs 10 pounds. Rubber feet also allow you to place the unit on a
counter. Note that the top left of the unit has a grate with openings, which you should keep
unobstructed to permit air-flow to the power supply and the rest of the unit. Also, do not
obstruct the IR path for the IR Remote Control (a red lens on the right side of the front panel).
3.4 Make the final connections
Be sure to connect the power cord to the rear of the unit and to a standard wall outlet (Input
Power requirements: 100 to 240V AC, 1 A). If you have set-up your
HD HannaTMand then
unplug the unit or lose power, it will store the most-recent values before the power was lost.
You may also connect the RS-232C port to your Home Theater Automation System (like
Crestron, AMX, or CNMSX-Pro), or in the future use this port with your personal computer for
HD HannaTMfirmware upgrades. Please see the Appendices at the end of this manual for
instructions on using the RS-232C port for firmware upgrades and external control of your
HD Hanna
TM
unit.
3.5 Learn to operate HD Hanna
T
M
with its user-friendly
OSD and controls
First learn the basics of NAVIGATION / CONTROL of your HD HannaTM. Then, use the controls to bring the user-friendly ON-SCREEN DISPLAY (OSD) MENUS and actually configure
and operate your HD Hanna
TM
unit.
NAVIGATION / CONTROL
It is most convenient to operate your HD HannaTMunit with the provided IR Remote Control.
However, you also have the option to go directly to the front panel and use the front-panel
Pushbutton switches. It is recommended that you first learn the basic functionalities of the
front-panel Pushbuttons / LCD, IR Remote Control, and On-screen Display (
OSD) menus to
set-up and control your
HD HannaTMunit. If you have set-up your HD HannaTMand then
unplug the unit or lose power, it will store the most-recent values before the power was lost.
You first need to “Navigate” (learn to get to the functions you wish to configure and control)
and then “Control” (actually invoke the set-up, function, or operation) your
HD HannaTMunit.
Navigating and Controlling your Key Digital
®
HD HannaTMcombination Set Top Box and Scaler
with flexible analog and digital I/O is straightforward:
1.
First, follow the Quick Set-Up instructions provided in this Operating Manual to physically
connect
HD HannaTMinto your system.
2.Next, you will start “Navigating” and “Controlling” your HD HannaTMunit, with the front-
panel Pushbutton switches, LCD display, and basic IR Remote Control functions.
3.Bring up the OSD Main Menu on your output display.
4.Learn the basic operations provided by the OSD menus.
5.Learn the “Hot” Pushbuttons on the front panel.
6.Learn the “Hot” buttons on your Remote Control.
Page 11 of 32
HD HannaTMOperating Instructions
Page 12

The Experts in Digital Video Technology and Solutions.
The Experts in Digital Video Technology and Solutions.
You will now be walked step-by-step through these six steps. Please follow these Steps
carefully, as described below.
Step-by-step Navigating and Controlling Directions
for your HD HannaTM, Model KD-FIRE1080P
1. First, follow the Quick Set-Up instructions provided in this Operating Manual to physically
connect
HD HannaTMinto your system.
Then, apply power to the unit and batteries to your Remote Control, and turn the unit “On”
with either the front-panel
Power switch on the far left, or the red POWER switch on the
Remote Control. The front panel Power switches toggle the unit On/Off. When you Power
On, the
HD HannaTMfront-panel LCD Display will indicate the power-up status by scrolling
“Welcome to HD Hanna
TM
” as the unit goes through its power-up cycle. When you turn the
unit Off, the LCD will display “Bye” and can then display the current time-of-day. Please note
that the remote control has two separate buttons for Power On and Off.
2.
Next, you will start “Navigating” and “Controlling” your HD HannaTMunit, with the front-
panel Pushbutton switches and basic IR Remote Control functions.
To learn to Set-up and Control HD HannaTM, you will need to Navigate the OSD Menus with
either the front-panel Pushbuttons, or the IR Remote Control provided with
HD HannaTM.As
you Navigate and Control, you will receive feedback through the front-panel LCD Display on
your
HD HannaTMunit. Much more detail is provided via the OSD that will appear on the pic-
ture display(s) connected to any of the
HD HannaTMoutputs.
HD HannaTMOSD (On-screen Display) Menus
The OSD Menus are intuitive and will appear on any of your display devices you connect to
the output of
HD HannaTM. You will need to understand that the OSD Menus are in “Levels”.
You will Navigate between Levels and make your selections. For example, consider the Main
Menu that appears when you press the front-panel
Menu Pushbutton, or the MENU button
on the IR Remote Control:
NOTE:
OSD Menus in this manual are
illustrative -- the firmware version in
your
HD HannaTMmay produce
Menus that vary slightly from these
example
s
“LEVEL 1” “
LEVEL 2”
HD HannaTMOperating Instructions
Page 12 of 32
Page 13

The Experts in Digital Video Technology and Solutions.
Now, familiarize yourself with HD Hanna’sTMfront-panel Pushbuttons and LCD Display.
HD HannaTMfront-panel Pushbuttons and LCD Display
HD HannaTMFront-panel LCD Display
The front-panel LCD provides convenient indication of the status of your HD HannaTMunit. For
more detailed operations you will want to take advantage of the user-friendly On-screen
Display menus and use the included IR Remote Control, but it is handy to have the capability
to walk up to your
HD HannaTMunit and perform operations from the front-panel Pushbuttons
without the need of your display device. The figure below shows how the LCD on the frontpanel of
HD HannaTMindicates Output Type and Output Resolution selected, as well as the
Input Source. If the Input Source selected is RF (like from an antenna or STB), then the LCD
also indicates the Signal Strength and Channel Number.
Menu
P
ower On/Off
Pushbutton Toggle
L
CD Display
L
ens for IR Remote (do not obstruct)
Down
Menu (OSD & LCD) NAVIGATION Pushbuttons OUTPUT RESOLUTION ControlPushbutton
Up Left Right Select Escape RGB/YPbPr Resolution
Signal Strength Indicator Selected Output Mode
Selected Output Resolution Selected Input Source, or Channel Number for RF Inputs
Page 13 of 32
HD HannaTMOperating Instructions
Page 14

The Experts in Digital Video Technology and Solutions.
The Experts in Digital Video Technology and Solutions.
HD Hanna
T
M
IR Remote Control
Examine the IR Remote Control included with your HD HannaTMand become familiar with the
basic functionality for navigation and control, comparable to the control provided by the frontpanel Pushbuttons. Then, you can learn the remote control “Hot Buttons”. At this time, you
will want to focus on the simple navigation control buttons on the provided IR Remote
Control:
•
POWER ON
• POWER OFF
• MENU (brings up the OSD menu)
•
EXIT ((Duplicates the function of the Escape front-panel Pushbutton)
• UP, DOWN, RIGHT, and LEFT (OSD navigation arrows: UP and DOWN let you
navigate within any given Level of the OSD menu; LEFT and RIGHT let you go to
the next or previous Level (respectively) of the OSD menu
• OK (like the Select front-panel Pushbutton)
Other HD HannaTMRemote Control Keys To Note:
It is possible that the version of the Remote Control supplied with your HD HannaTMmay have
silk-screened on its face some labels which are not pertinent to the operation of the unit. For
example, the following functions are not used:
DSX, 12V, SR, PA, GB. However, the
silkscreen under these buttons indicate the true operation of these buttons:
INFO, OR, OC,
DP, CP.
INFO: Display Current Input and Output Status Using Small OSD
OR: Select Output Resolution
OC: Select Output Color Space
DP: DSUB Input is Pass-through Function to DSUB output
CP: Component Input is Pass-through Function to Component Output
To change program Channels, use the Up and Down Arrow buttons.
To adjust Audio Volume, use the Left and Right Arrow buttons.
HD HannaTMOperating Instructions
Page 14 of 32
Page 15

The Experts in Digital Video Technology and Solutions.
P
ower ON
EPG Program Guide
Channels above 99
Sub-channel
P
ower OFF
SEE END OF THIS MANUAL FOR A SUMMARY OF THESE BUTTONS
Numeric Keypad
(Channel Numbers)
Aspect Ratio
Select
(INFO [ignore“DSX”]
(Display Current I/O
Status)
CP [ignore “GB”]
(Component Video
pass-through)
SAT (Saturation)
FREEZE
MUTE
Favorite Channels
ADD / DELETE
UP / DOWN
Previous Channel
EXIT (Escape)
OSD Navigation
Arrows: UP, DOWN,
LEFT, RIGHT
OSD MENU
OK, or “Select”
INPUT Select
DP [ignore “PA”]
(DSUB pass-through)
OR [ignore “12V”]
(Output Resolution
select)
OC [ignore “SR”]
(Output Color Space)
BR (Brightness
Control)
CO (Contrast Control)
SLEEP
(auto power-OFF)
AUDIO Select
HD Hanna
T
M
IR Remote Control
Page 15 of 32
HD HannaTMOperating Instructions
Page 16

The Experts in Digital Video Technology and Solutions.
The Experts in Digital Video Technology and Solutions.
3.Bring up the OSD Main Menu on your output display by either:
• Pressing the MENU button on the Remote Control
• Pressing the
Menu Pushbutton on the front panel of the unit
If the OSD (On-Screen Display) does not appear after engaging the menu button, please go
to the front panel and press the escape button to exit the menu system. (Please note that if
you are in the middle of the menu system, the front panel resolution and RGB/YPrPb will not
function.) Then press the front panel resolution button which will then go to the next output
resolution available. Continue cycling through the available resolutions till you get resolution
status on your display. You can then continue with the process of going through the available
menus. If you can not get output or resolution status to show on your display, recheck your
connections from the output of the HD Hanna to your display.
For further information please contact Key Digital at the email address or phone numbers listed in this manual.
4.
Learn the basic operations provided by the OSD menus.
Once you bring up the main Menu, push the Navigation arrows on the Remote Control or
four fr
ont-panel Pushbuttons, as follows:
• Pressing the
Down and Up arrows allows you to scroll within a “Level” of the
menu through the different options. For example, if you are in the “SYSTEM SET”
menu, you can scroll through the main Video functions in that Level, like
“Resolution” or “Aspect (Ratio) Control”.
•
The selected function has white text with blue highlighting on the OSD.
• Pressing the Left and Right arrows allows you to go to the next or previous logi-
cal “Level” of the menu. For example, if you are in the “SYSTEM SET” / “RESOLUTION” menu, you can then press “Right” to bring you to the next Level of the
menu, namely the various Resolution options, like 1920x540p, 720x480p, or
720x480i. Then, press Down and Up arrows to scroll through the resolutions
until you have reached the desired one, such as 720x480p. See the example
OSD Menu below:
How to select Video Output Resolution on the RGB port to be 720x480p:
“LEVEL 1” “LEVEL 2” “LEVEL 3”
a Use the Left and Right arrows <> to navigate from Level-to-Level.
b Scroll Up and Down within any level until you find the function you would like to con-
trol (the selected function will be highlighted).
c T
he
n u
s
e t
he
Select P
u
shbu
tt
on (
OK on t
he Re
mo
t
e Con
trol) to invoke your selection
HD HannaTMOperating Instructions
Page 16 of 32
Page 17

• When you are in a Menu and have reached your desired selection, such as in the
“SYSTEM SET” / “Resolution” / “1280x768p” example, then press the
Select
(front-panel) or OK (Remote Control) button to make and store your selection.
• You can go back to the prior level using
Escape (front-panel) or EXIT (Remote
Control).
• When you are completed with your set-up, you can press Escape (front-panel) or
EXIT (Remote Control) to remove the OSD and resume normal viewing.
• Normally when the unit is ON with an RF input and you are not “Navigating”, the
LCD will display the Channel Number.
5.
Learn the “Hot” Pushbuttons on the front panel.
You may want to go directly to a particular Menu function, without having to
“Navigate” from the Main Menu. This time-saving feature is provided for via an extensive list
of buttons on the IR Remote Control, Additionally, you have two “Hot” buttons available on
the front panel of your
HD HannaTM:
RESOLUTION
“Hot
” P
ushbutton:
By pressing this button and observing the LCD front-panel display, you can cycle
through the various output resolution options available, namely 1920x1080p,
1920x1080i,1280x720p, 1280x768p and 1368x768p, 1920x540 p, 1400x1050p,
480p, 480i.
This is a particularly useful feature in the event you use the front-panel navigation
to select an output display option that is not compatible with your current display
device, and you “lose” the OSD feature. Simply press the front-panel Resolution
button and make your selection by observing the LCD display on the front-panel
of your
HD HannaTMunit.
RGB / YPbPr “
Hot”
Pu
shbutton:
By pressing this button and observing the LCD front-panel display, you can toggle the active output mode between VGA (RGB) and Component Video (YPbPr).
Note that the 480i output (like Composite Video CVBS) is always simultaneously
active on the output of your
HD HannaTMunit.
The Experts in Digital Video Technology and Solutions.
This is a good time to point out that the configuration selections you make (like output
Resolution type, Brightness, Positioning, etc.) for each HD Hanna
TM
output are stored in
memory. This handy feature allows you to customize each output to your particular
display and viewing conditions/preferences.
Page 17 of 32
HD HannaTMOperating Instructions
Page 18

The Experts in Digital Video Technology and Solutions.
The Experts in Digital Video Technology and Solutions.
6.Learn the “Hot” buttons on your Remote Control.
In addition to Remote Control unit pushbuttons described above, and the VOL. +/- (Volume
Up/Down),
MUTE, and CH +/- (Channel Up/Down) pushbuttons, consider these “Hot” but-
tons on the Remote Control provided with your HD HannaTMthat will take you directly to specific menu adjustments
:
You may also use the upper area of the Remote Control unit to select the channel number
and add/delete channels to your “Favorite” channel list.
OSD MENUS
OSD Menus: Now that you know how to navigate through the basic Main Menu functions for
HD HannaTMusing the Remote Control or front-panel Pushbutton switches, learn the full
extent of the OSD Menus. The OSD Menus allow you to configure HD HannaTMto match
your specific application and configuration requirements. The user-friendly
OSD Menu
Structure for your HD HannaTMunit is outlined below. The structure also gives you a clear
idea of what aspects of HD HannaTMyou can configure and control. Level 1 is the Main OSD
Menu, and each level thereafter provides further detail of the selected feature.
You can see that the first and second levels in the OSD Menu Structure include user controls as listed in the following table. You would use the Down and Up arrows on the Remote
Control or front-panel Pushbuttons to scroll through the first-level controls, then use the Left
and Right arrows to move from Level-to-Level. The function or operation you select will have
white text with blue highlighting on the OSD.
• GUIDE [EPG, Electronic Program Guide]
• ASPECT [Output Aspect Ratio selection,16:9 or 4:3, letter box, pillar box]
• INPUT [Select Antenna A/B (1/2), Component, S-Video, or Composite Video In]
• OC [Output Color Space for selection of RGB/YPbPr]
• BR [Brightness Control]
• CO [Contrast Control]
• OR [Output Resolution select]
HD HannaTMOperating Instructions
Page 18 of 32
Page 19

The Experts in Digital Video Technology and Solutions.
HD HANNATMOSD MENU STRUCTURE LEVELS 1 AND 2
N
O
TE:
O
SD M
e
nu
s in t
hi
s manu
al ar
e illustrative -- the firmware version in your HD Hanna
TM
may produce Menus that vary slightly from these examples
Page 19 of 32
HD HannaTMOperating Instructions
Page 20

The Experts in Digital Video Technology and Solutions.
The Experts in Digital Video Technology and Solutions.
The actual Menus provided by the HD HannaTMOSD (On-screen Display) are summarized
here.
We will now look at the Level 1 Functions, and the corresponding Level 2 and 3
options. Remember, when you are Navigating within the Menus, the selected function has
white text with blue highlighting on the OSD.
LEVEL 1: 1 - TUNER options
[Note: Ant 1&2 on the On-screen Display Menu refer to Ant A&B silk-screened respectively
on the back panel of HD Hanna
TM]
LEVEL 1: 2 - INPUT SELECT options
“LEVEL 2”
For selected
“TUNER” LEVEL 1
“LEVEL 3”
For selected “CH
EDIT”LEVEL2
“LEVEL 2” “LEVEL 3”
HD HannaTMOperating Instructions
Page 20 of 32
Page 21

LEVEL 1: 3 - SYSTEM SET options
LEVEL 1: 4 - PICTURE ADJUSTMENT options
LEVEL 1: 5 - AUDIO options
The Experts in Digital Video Technology and Solutions.
“LEVEL 2” “LEVEL 3”
“LEVEL 2”
“LEVEL 2” “LEVEL 3”
Page 21 of 32
HD HannaTMOperating Instructions
Page 22

The Experts in Digital Video Technology and Solutions.
The Experts in Digital Video Technology and Solutions.
LEVEL 1: 6 - FIREWIRE options
LEVEL 1: 7 - TEST/RESET options
Built-in Video Test Patterns available: V-Ramp, Color Bars, Gray Scale, Cross Hatch, White
Window, and Black Window
“LEVEL 2” “LEVEL 3”
HD HannaTMOperating Instructions
Page 22 of 32
Page 23

The Experts in Digital Video Technology and Solutions.
4. HOW TO CONTACT KEY DIGITAL
®
Repairs and Warranty Service:
n
Should your HD HannaTMrequire warranty service, please contact Key Digital®to obtain a
Returned Materials Authorization (RMA) number
n
Please contact us at either:
n
Toll-free 1-914-667-9700
n
email tech@keydigital.com
Technical Support:
n
For technical questions about using our products, please contact us at either:
n
1-914-667-9700 or Toll-free 1-888-258-2028
n
email tech@keydigital.com
Customer Support:
n
For customer support questions about using our products, please contact us at either:
n
1-914-667-9700
n
email customersupport@keydigital.com
5. WARRANTY
All Key Digital®products are built to high manufacturing standards and should provide years of
trouble-free operation. They are backed by a limited two-year parts and labor warranty.
Page 23 of 32
HD HannaTMOperating Instructions
Page 24

The Experts in Digital Video Technology and Solutions.
The Experts in Digital Video Technology and Solutions.
Product Summary
Combination ATSC/NTSC Set Top Box and SD/HD Video Scaler that converts to any dis-
play’s native resolutions, with flexible analog and digital (Firewire I/O with 5C, and DVI-D
HDCP Output) ports
Inputs
• Video inputs supported:
- two IEEE 1394 Firewire I/O ports supporting HDTV/5C and SDTV
- two RF tuner inputs, each accept ATSC and analog TV (NTSC, PAL, PAL-M,
SECAM) formats
- two Component Video (YPbPr) (480i)
one Component input available for pass-through
- one RGBHV pass-through
- two Composite Video (CV)
- two S-Video
- optional HD Input plug-in card, for DVI-D/HDCP inputs and HD baseband
scaling applications
•
Audio inputs s
upported:
-
f
our analog (standard line-type Left & Right pairs) Audio inputs
Appendix A: HD HannaTMTechnical Specifications
HD HannaTMOperating Instructions
Page 24 of 32
Page 25

The Experts in Digital Video Technology and Solutions.
Scaling and Processing
• Scaling SDTV and HDTV to popular native resolutions and output formats of:
- 1920x1080i, 1920x1080p, 1920x540p
- 1400x1050p
- 1368x768p, 1280x768p
- 1280x720p
- 720x480i and 720x480p
- 1920 x 1080p @ 24 Hz
• Scaler equipped with advanced, motion-assisted de-interlacing algorithm “Clear Matrix Pro”
• Aspect Ratios in and out: 16:9 and 4:3
• HDTV and SDTV Colorimetry Matrix
• 3-D Comb Filtering for Composite Video
• Optional HD Input plug-in card, for DVI-D/HDCP inputs and HD baseband scaling applica-
tions
Outputs
• Supports output formats of:
- 1920x1080i, 1920x1080p, 1920x540p
- 1400x1050p
- 1368x768p, 1280x768p
- 1280x720p
- 720x480i and 720x480p
- 1920 x 1080p @ 24 Hz
• 60 Hz output refresh rate
• Both SD (480i) out and HD out simultaneously for each output resolution
•
Video outputs supported:
- two IEEE 1394 5C-enabled Firewire I/O ports supporting HDTV and SDTV
- one HD Component Video (YPbPr)
- one HD RGBHV
- one DVI-D with HDCP
- one SD Composite Video
- one S-Video
•
Audio outputs supported:
- one analog (standard line-type Left & Right pairs) output
- one digital coaxial audio output
- Toslink optical audio output
• Built-in
Video Test Patterns available: H-Ramp, V-Ramp, Color Bars, Gray Scale, Cross
Hatch, and White Window
Control
• User-control of Brightness, Contrast, Saturation, Hue, and Sharpness
• Infrared Remote Control with “Hot” buttons; discrete IR commands available
• User-friendly on-screen-display
• LCD Display on front panel
• Picture adjustments include: sharpness, brightness, contrast, saturation, and hue
• Picture adjustment settings are linked to each input and conveniently stored
• Each audio input can be matched to any video source via the menu
•
R
S2
3
2 port equipped with discrete command protocol compatible with control systems
(e
.g
., Crestron, AMX, CNMSX-PRO)
• Firmware upgradeable
Page 25 of 32
HD HannaTMOperating Instructions
Page 26

The Experts in Digital Video Technology and Solutions.
The Experts in Digital Video Technology and Solutions.
Connectors
• Input Video Connectors:
- two F-type RF tuner inputs, both capable of ATSC (8 VSB) and analog TV
(NTSC)
- two sets of three BNC connectors for Component Video (YPbPr)
- two S-Video connectors
- two sets of BNC connectors for Composite Video (CVBS)
- one VGA (RGBHV) DB-15 connector for video input bypass
•
Input Audio Connectors:
- four pairs of BNC connectors for analog Audio (standard line-type stereo
Left & Right pairs)
• Output Video Connectors:
- one set of three BNC connectors for HD Component Video (YPbPr) out
- one HD VGA (RGBHV) DB-15 connector video out
- one DVI-D with HDCP output connector
- one SD Composite Video BNC connector
- one S-Video connector
- separate H&V sync output BNC connectors
•
Output Audio Connectors:
- one analog (standard line-type Left & Right pairs) BNC pairs
- one digital BNC coaxial
- Toslink optical audio output
•
Other Connectors:
- two IEEE 1394 5C-enabled Firewire I/O ports supporting HDTV and SDTV
- RS-232C D-sub 9-pin female connector
- Standard power plug
Mechanical
• Rack mountable: 2U (brackets included)
• No fan noise
• Size: 17” x 10” x 3.5” (W x D x H)
• Weight: 10 lbs.
• Enclosure type: Metal
• Input Power: 100 to 240V AC, 1 A
HD HannaTMOperating Instructions
Page 26 of 32
Page 27

The Experts in Digital Video Technology and Solutions.
Appendix B: Firmware Upgrade Instructions
From time to time, Key Digital®may offer firmware upgrades for HD HannaTM. These
upgrades will enhance the operation of your HD HannaTMunit, and are easily installed by con-
necting the RS-232C port (D-sub, 9-pin female connector) on the upper-left rear panel of your
HD HannaTMunit to a desktop or notebook PC using a standard RS-232 cable. The files you
will need to perform any upgrades are available via e-mail by contacting us at tech@keydigital.com, or you can download them from our Key Digital®web site at
http://www.keydigital.com/downloads/FIRE1080Pupgrade.zip
Once you have downloaded the necessary executables and firmware upgrade files from our
Key Digital
®
web site onto your computer, please follow these simple steps for Firmware
Upgrade using the Boot Loader:
1
With your HD HannaTMunit in the Power-OFF condition, connect the RS-232C port of
your
HD HannaTMunit to the COM port of your computer using a pin-pin RS-232
cable (not a null modem cable).
2
Execute “flashman.exe” on your PC and select a COM port (COM1 or COM2). If you
select an occupied COM port, an error message will alert you to close the program
and execute it again.
3
Press the [LOAD] button and select the binary file (“flash_xxxx.bin”). If the file is
loaded correctly, the program will display a check sum value that must have the
same value as in file name.
4
Press the [PROGRAM] button ( “Looking for a STB connected... “) and press the
POWER button on the HD HannaTMfront panel (Power-ON). If the download process
is proceeding properly, a message will advise you of the download progress. The
download process may take up to 8 minutes — please wait for the entire download to
complete, and do not disrupt this process.
5
NOTE: If the “flashman.exe” does not execute properly, then repeat the steps 2 – 4
above. The “flashman.exe” generates a “flashman.cfg” file in the first execution. If the
download message does not appear, try powering OFF and ON your
HD Hanna
TM
unit.
6
If the download has been successful, the “All Programming Done” message will
appear. At this time, Power OFF your
HD HannaTMunit. Then, close the Boot Loader
program and again turn ON the Power to your
HD HannaTMunit, execute the “FACTO-
R
Y DEFAULT” in the menu function, and check the unity.
7
It is now a good idea to check the basic operation of your HD HannaTMunit to be sure
that it is working properly and the upgrade was indeed successful. Should you
e
ncounter any problems during or after your firmware upgrade procedure, call us toll-
free at 1-888-258-2028 or contact us by e-mail at
tech@keydigital.com.
WARNING!!! Do not plug this cable into HD Hanna
TM
for any other reason -- it will erase
ALL the firmware inside and you will need to follow all the steps below to reset HDHanna
TM
.
Page 27 of 32
HD HannaTMOperating Instructions
Page 28

The Experts in Digital Video Technology and Solutions.
The Experts in Digital Video Technology and Solutions.
Appendix C: Controlling HD HannaTMfrom your
Home Theater Automation System
For integration with your existing equipment, your HD HannaTMunit can be conveniently controlled from your existing Home Theater Automation System (like Crestron, AMX, or CNMSXPro) by using the discrete command protocol. You will need to locate the RS-232C port (Dsub, 9-pin female connector) on the Lower-left rear panel of your HD HannaTMunit, and connect it to your Home Theater Automation System using a standard RS-232-cable. You will be
able to use your existing Home Theater Automation System to control the following HD
Hanna
TM
functions:
HD HannaTMOperating Instructions
Page 28 of 32
Page 29

The Experts in Digital Video Technology and Solutions.
Page 29 of 32
HD HannaTMOperating Instructions
Page 30

The Experts in Digital Video Technology and Solutions.
The Experts in Digital Video Technology and Solutions.
Se
e an Example o
f t
he command
s on the following page.
HD HannaTMOperating Instructions
Page 30 of 32
Page 31

The Experts in Digital Video Technology and Solutions.
Following is an example of how to use a communication program (such as Hyper Terminal)
to generate the commands to control the above functions of your HD Hanna
TM
unit using the
discrete command protocol:
1
With your HD HannaTMunit in the Power-OFF condition, use a straight RS-232 cable
(not a null modem cable) to connect the RS-232C port of your HD Hanna
TM
unit to the
RS-232C port on your PC. Use the following settings:
• Set the Hyper Terminal to COM1*
• Baud Rate: 57600
• Data: 8-bit
• Parity: None
• Stop: 1 bit
*Note: make sure you are not running any other active program using COM1, such as the
“Hot Sync” Palm program
2
WTurn ON the Power to your HD HannaTMunit. In your Hyper Terminal window, press
[ENTER]. You will be prompted with:
Key Digital
®
HD HannaTMRS-232C control
HDHanna>
The help menu and the rest of the commands should be very simple
The commands of the above table are listed.
Note that in RS-232C command mode, the HD Hanna
TM
Remote Control and
front-panel Pushbuttons are non-functional.
3
WIf at any time you want to escape from the RS-232C command mode, type "exit" on
your terminal and press [ENTER].
4
WShould you encounter any problems during any of these steps, call us toll-free at 1888-258-2028 or contact us by e-mail at tech@keydigital.com.
August 2004
Page 31 of 32
HD HannaTMOperating Instructions
Page 32

The Experts in Digital Video Technology and Solutions.
The Experts in Digital Video Technology and Solutions.
The Experts in Digital Video Technology and Solutions.
Web :: www.keydigital.com
Phone
:: 914-667-9700 Fax :: 914-668-8666
Key Digital®, led by digital video pioneer Mike Tsinberg,
develops and manufactures high quality, cutting-edge
technology solutions for virtually all applications where
high quality video imaging is important. Our products are
used by professional broadcasters, corporations, custom
installers, home theater retailers, and consumers.
HD HannaTMOperating Instructions
 Loading...