

Page 1
1
ATKey.Pro User Guide rev: 1.3
Page 2

2
| Table of Content
• About ATKey.Pro ………………………………… Page 3
• Outlook ……………………………………………… Page 4
• Functionalities …………………………………… Page 5
• Fingerprint enrollment ………………………. Page 6
• APP – ATKey for Windows ………………….. Page 9
• Windows Hello …………………………………… Page 11
• FIDO2: Azure AD ………………………………… Page 14
• FIDO2: Microsoft account ………………….. Page 16
• FIDO U2F ……………………………………………. Page 18
• LED …………………………………………………….. Page 20
Page 3
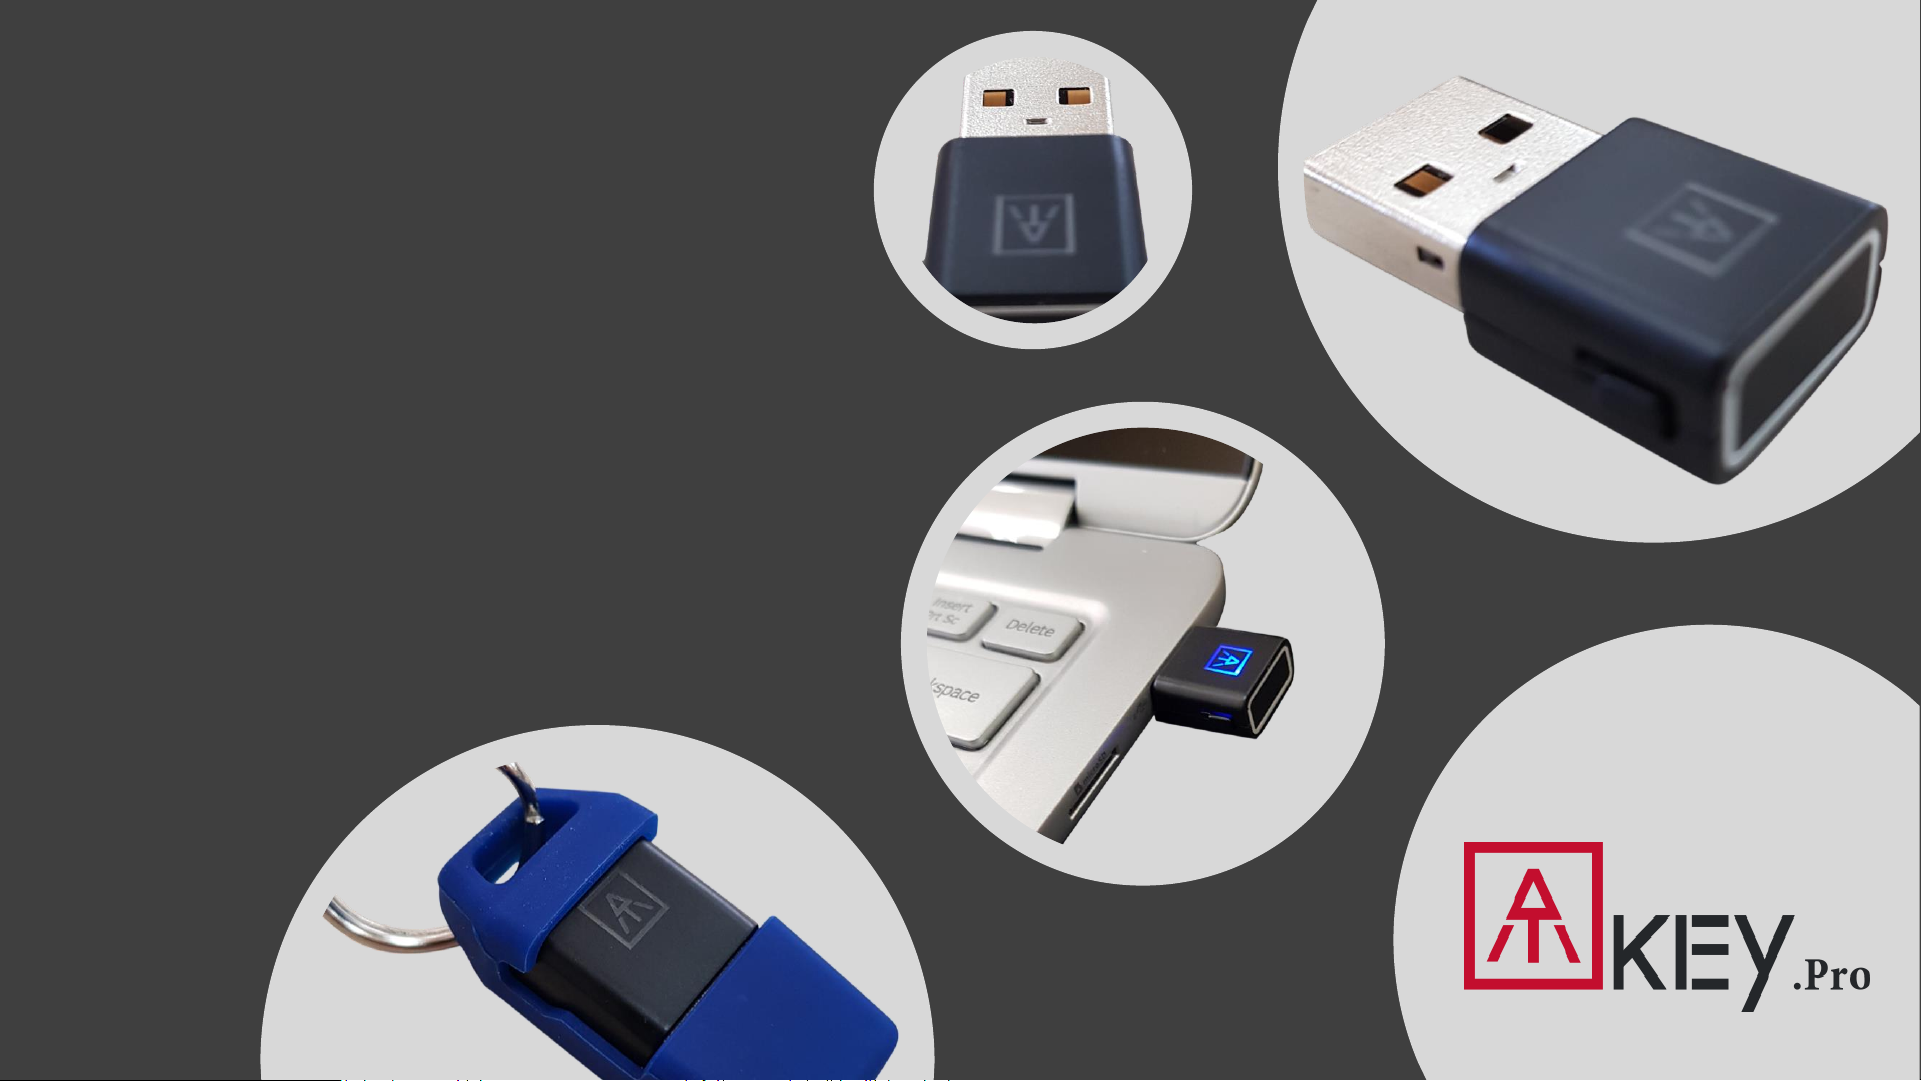
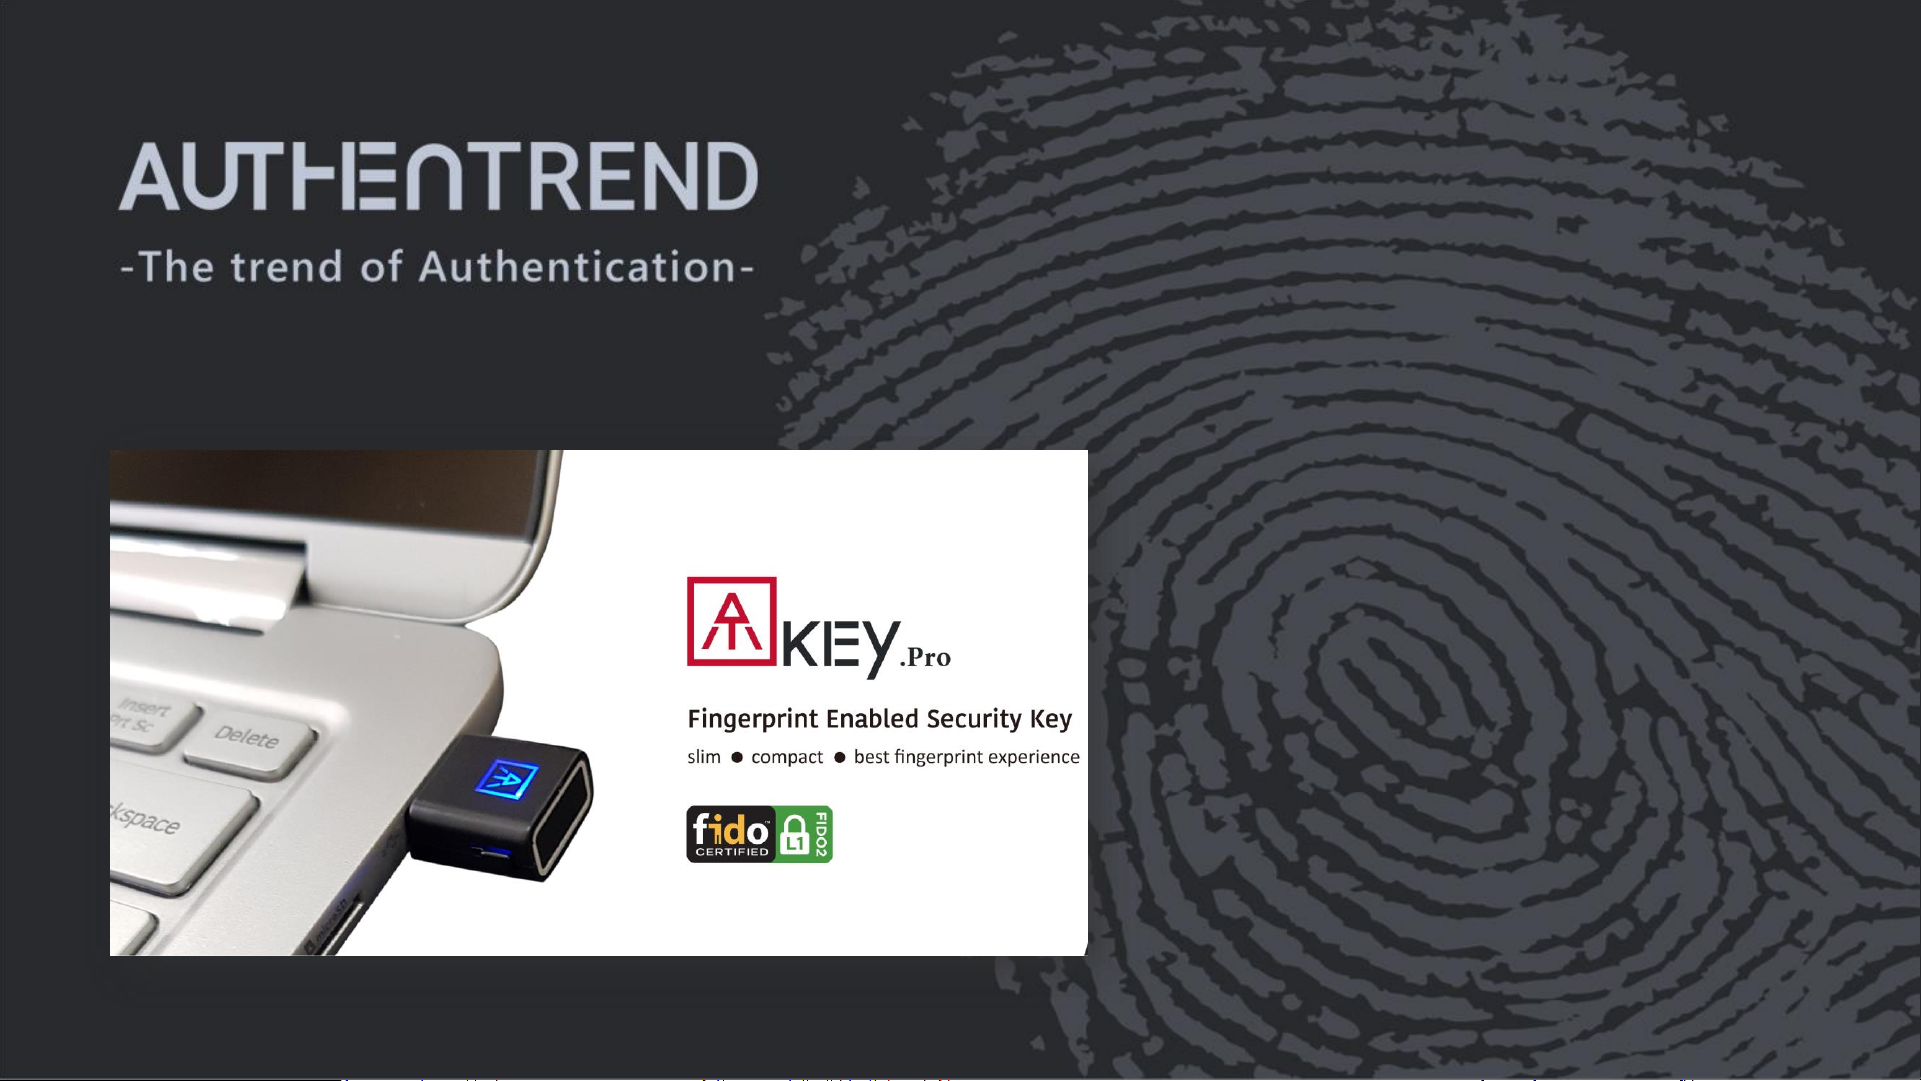
Fingerprint enabled USB security key
• HID device, no driver needs
• Portable key for any Windows, Mac or Chromebook
• Up to 10x fingerprints, matching < 1 sec., FAR < 1/50,000,
FRR < 2 %
• FIDO2 certificate
Page 4
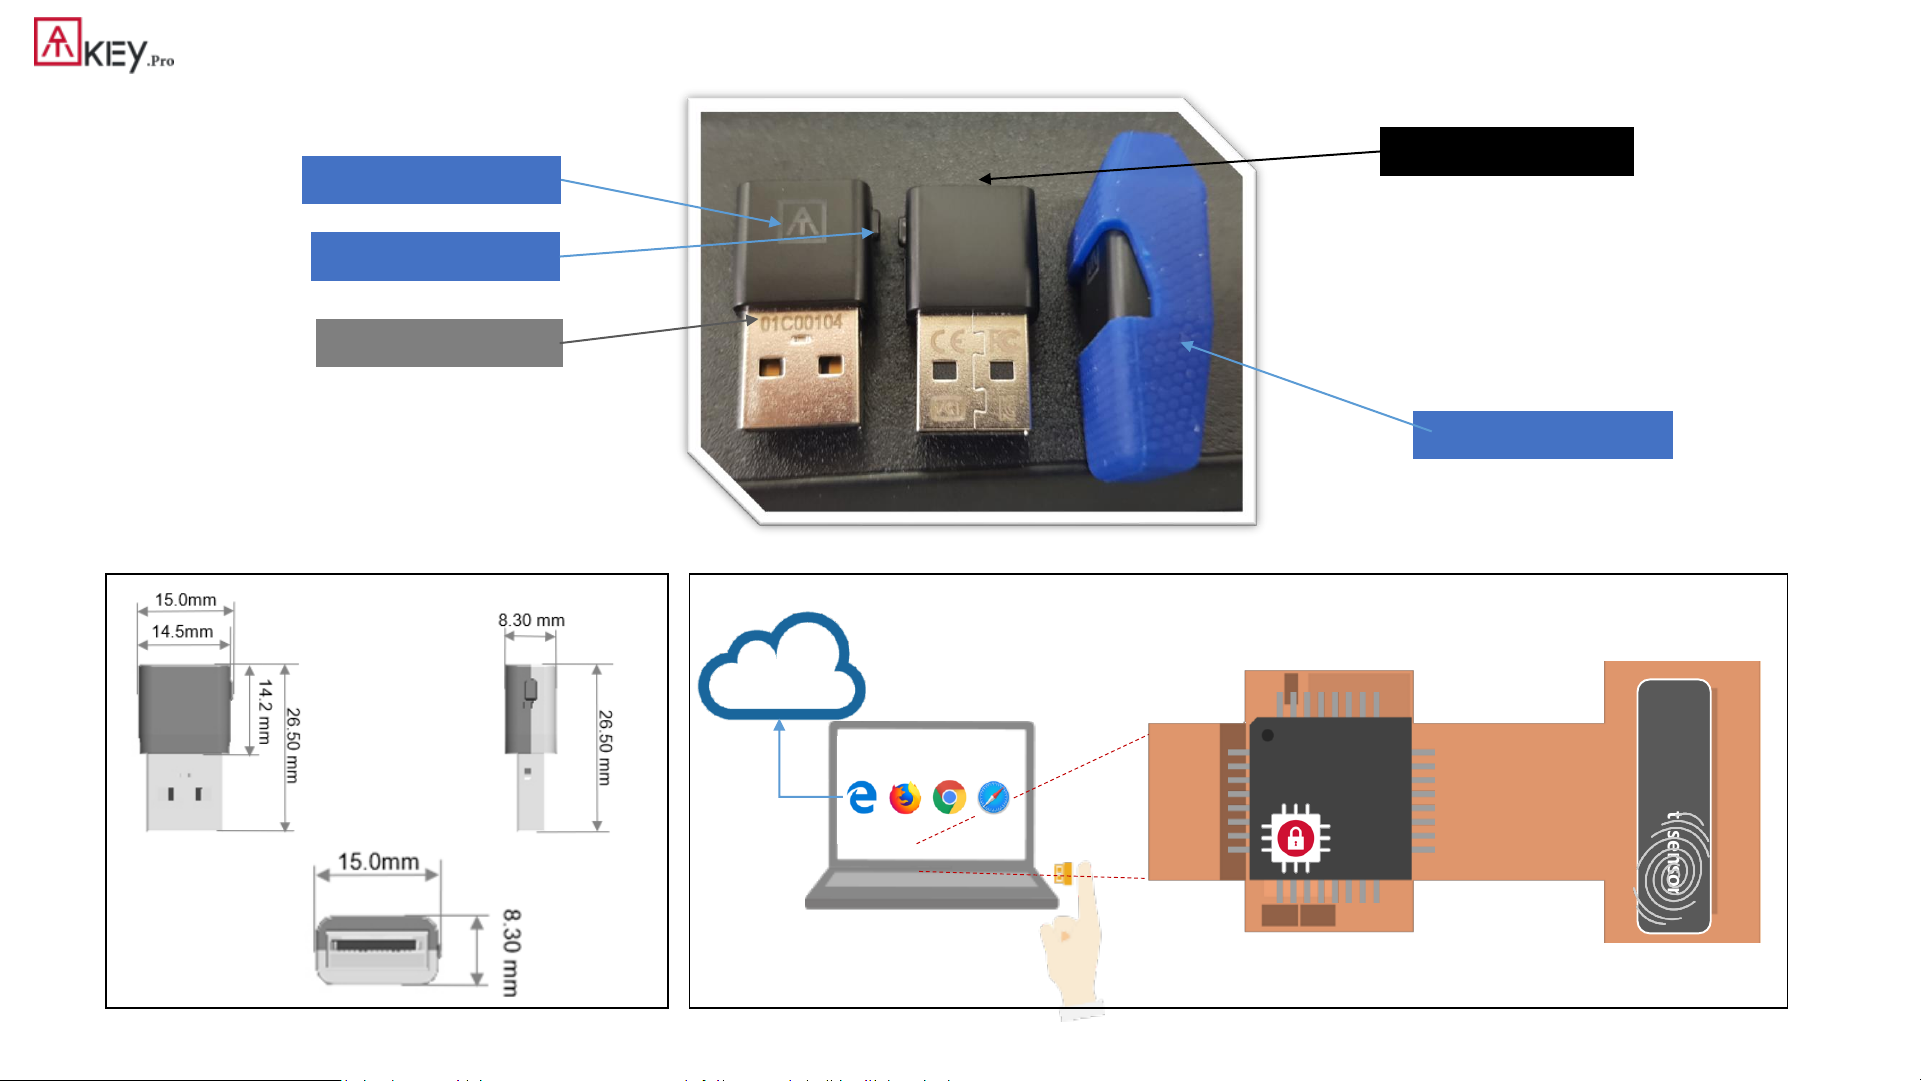
4
FP
USB
Crypto engine
Fingerprint sensor
Secure MCU
Silicon keychain
Fingerprint sensor
Tri-color LED/Logo
Click-able button
Keycode
| Outlook
• Each key has his own unique keycode
• It’s equal to serial number
• Check keycode for production records,
customer service and warranty
Page 5
5
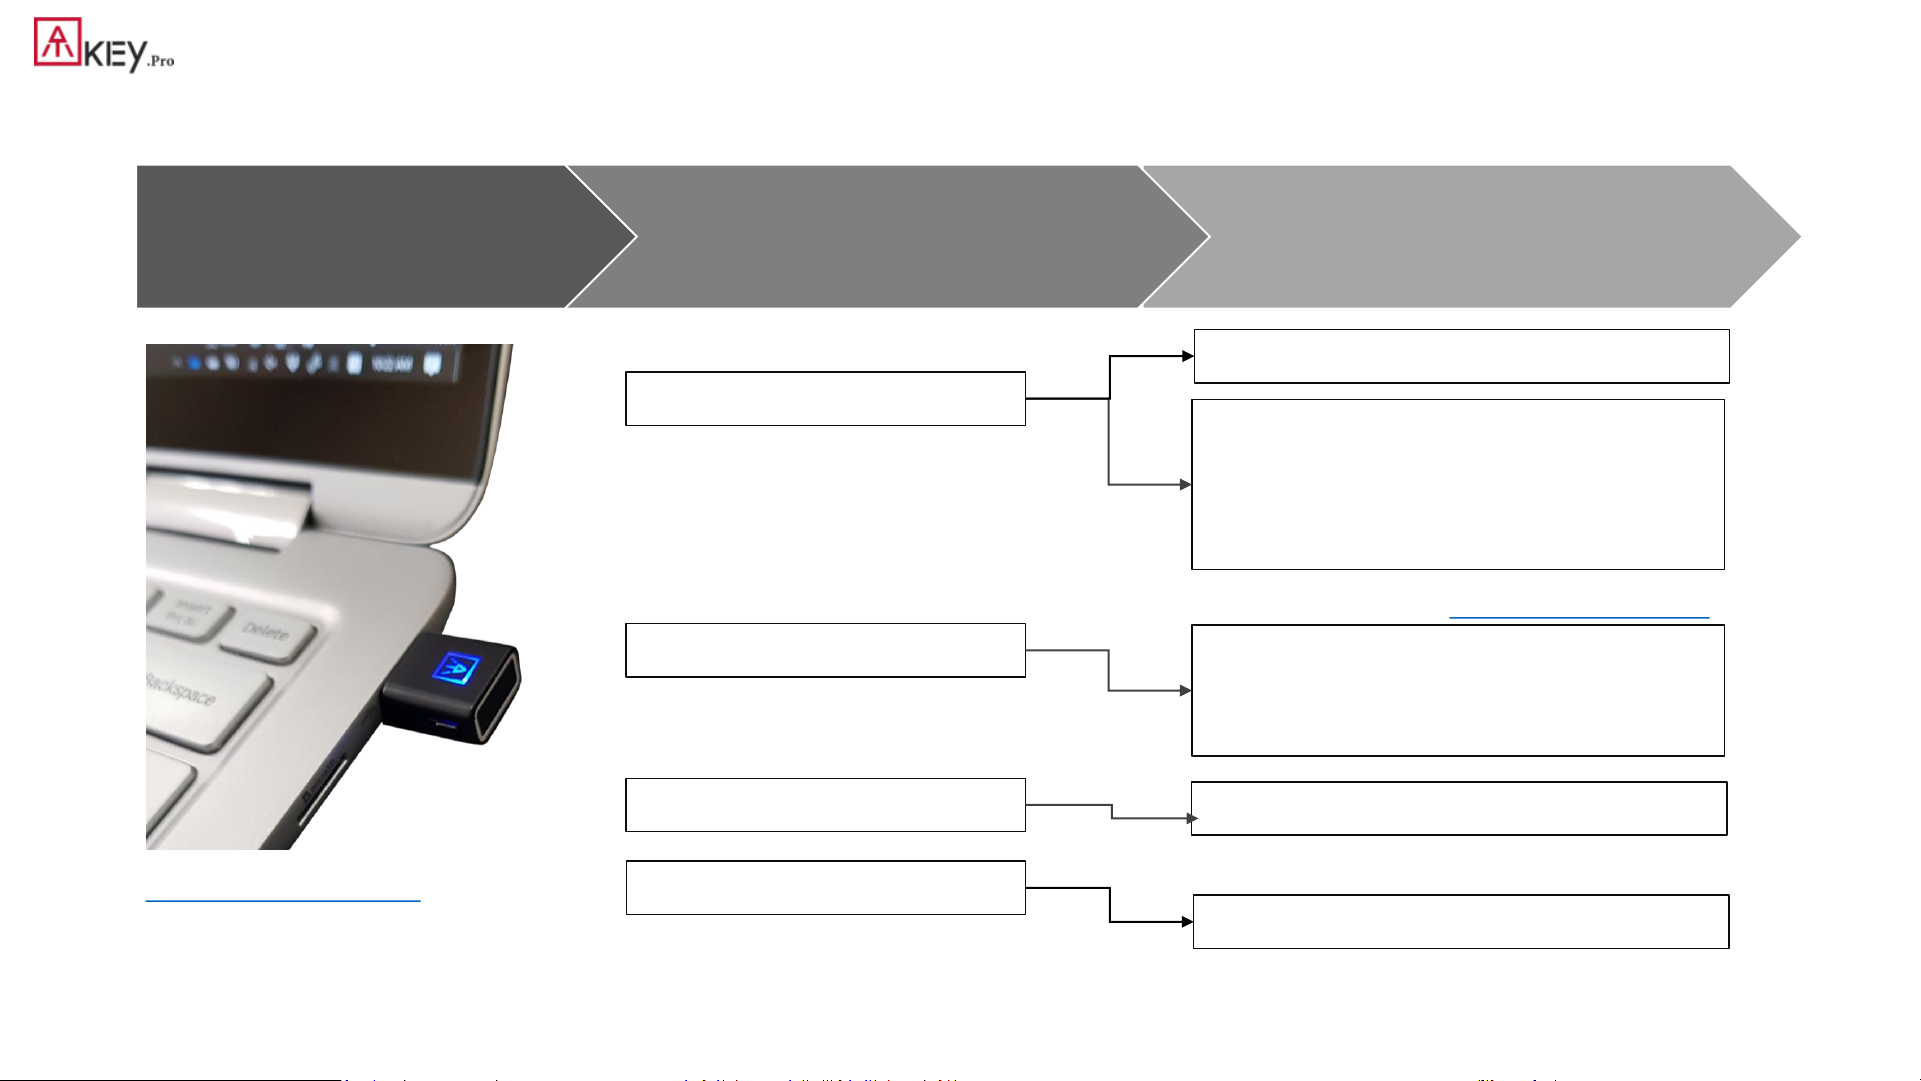
| Functionalities
Step 3
Fingerprint matching for authentication
Step 2
Register ATKey to device or Service
Step 1
Enroll fingerprint to ATKey
Windows Hello (option)
FIDO U2F
FIDO2
Windows Logon (via CDF)
Login Google, Facebook, Dropbox,
Salesforce, Gitlab via Chrome
browser as 2ndfactor
Passwordless login Microsoft account
or other FIDO2 authentication via
Browsers on Windows , Mac and
Chromebook
OTP (option)
2FA via OTP
Azure AD Passwordless logon
Standalone enrollment (patent filing)
https://youtu.be/lDrcZxWXAL4
or through Windows Settings (build 1903)
or through “ATKey for Windows” app
* If your Windows joined Azure AD, don’t enable this one
* This is only for customization projects or customers
You can find FIDO security key readiness services from here:
https://www.dongleauth.info/
Page 6
6
| Fingerprint Enrollment (up to 10x fingerprints)
• Insert ATKey.Pro into USB port
• Check Youtube video here for the detail:
https://youtu.be/lDrcZxWXAL4
• LED is BLUE ON, quick click side-button 3x
times (by nail) to go into enrollment mode:
• If there is no any fingerprint enrolled, LED
turns to WHITE
• If there are any enrolled fingerprints,
LED is GREEN flashing, please verify
enrolled fingerprint to start enrolling
new finger
• Put your specific finger on sensor, touch and
lift your finger (LED is WHITE flashing, from
slow to faster), repeat it more than 12 times
till LED shows GREEN (13thtime), then your
fingerprint is enrolled
• If you want to quit from standalone
enrollment, click button once, LED will turn to
Blue, back to normal state.
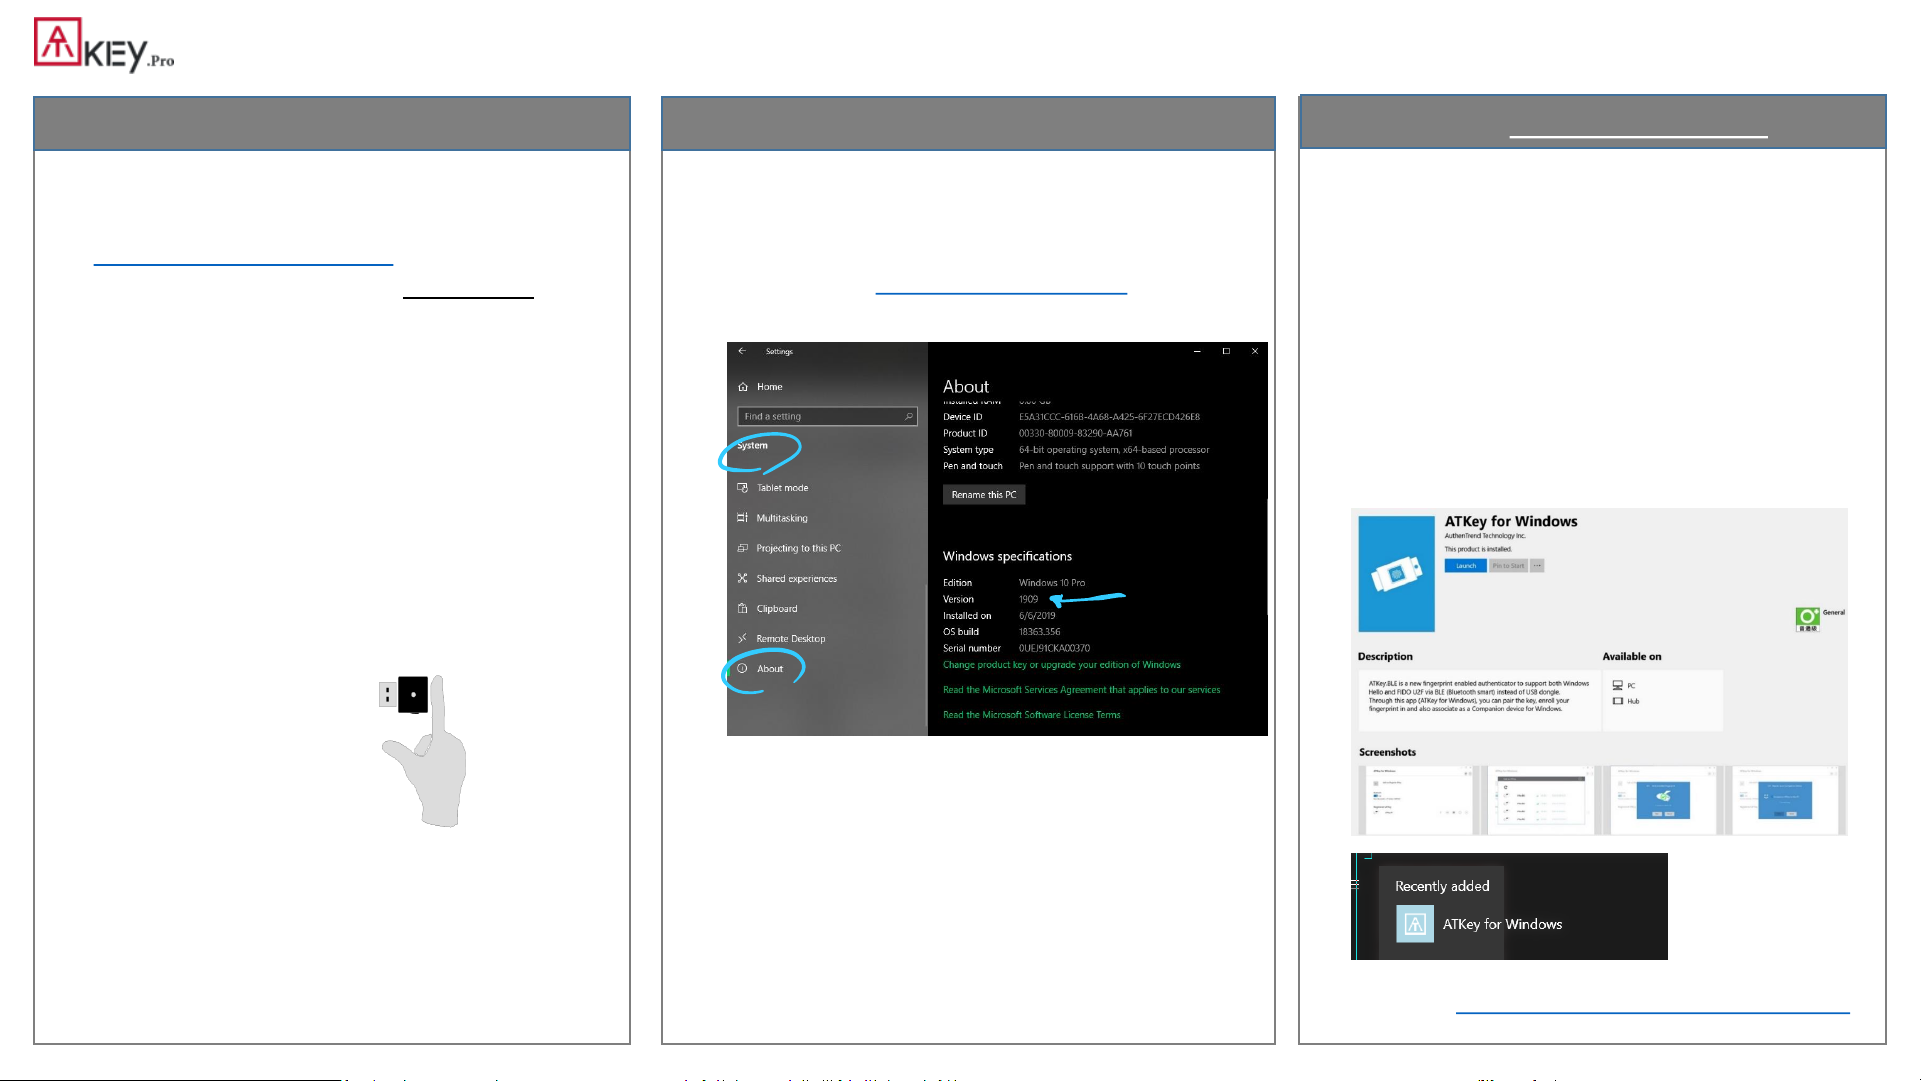
• If your OS is Windows 10 build 1903 or later
versions, you can manage ATKey as security key
• PIN code, add/delete fingerprints, reset
• jump to “Windows Settings” page for the detail
• Windows Settings => System => About
• Download “ATKey for Windows” app from
Windows Store to manage ATKey:
• Enroll fingerprint
• Add/delete fingerprint
• ATKey information
• Companion ATKey to Windows (Windows
Hello login)
• Firmware upgrade
• Search “ATKey” or “AuthenTrend” from
Windows Store to find the app, download
and install
• Jump to “ATKey for Windows” for the detail
Standalone enrollment Enroll from Windows Settings
Enroll from ATKey for Windows app
Page 7
7
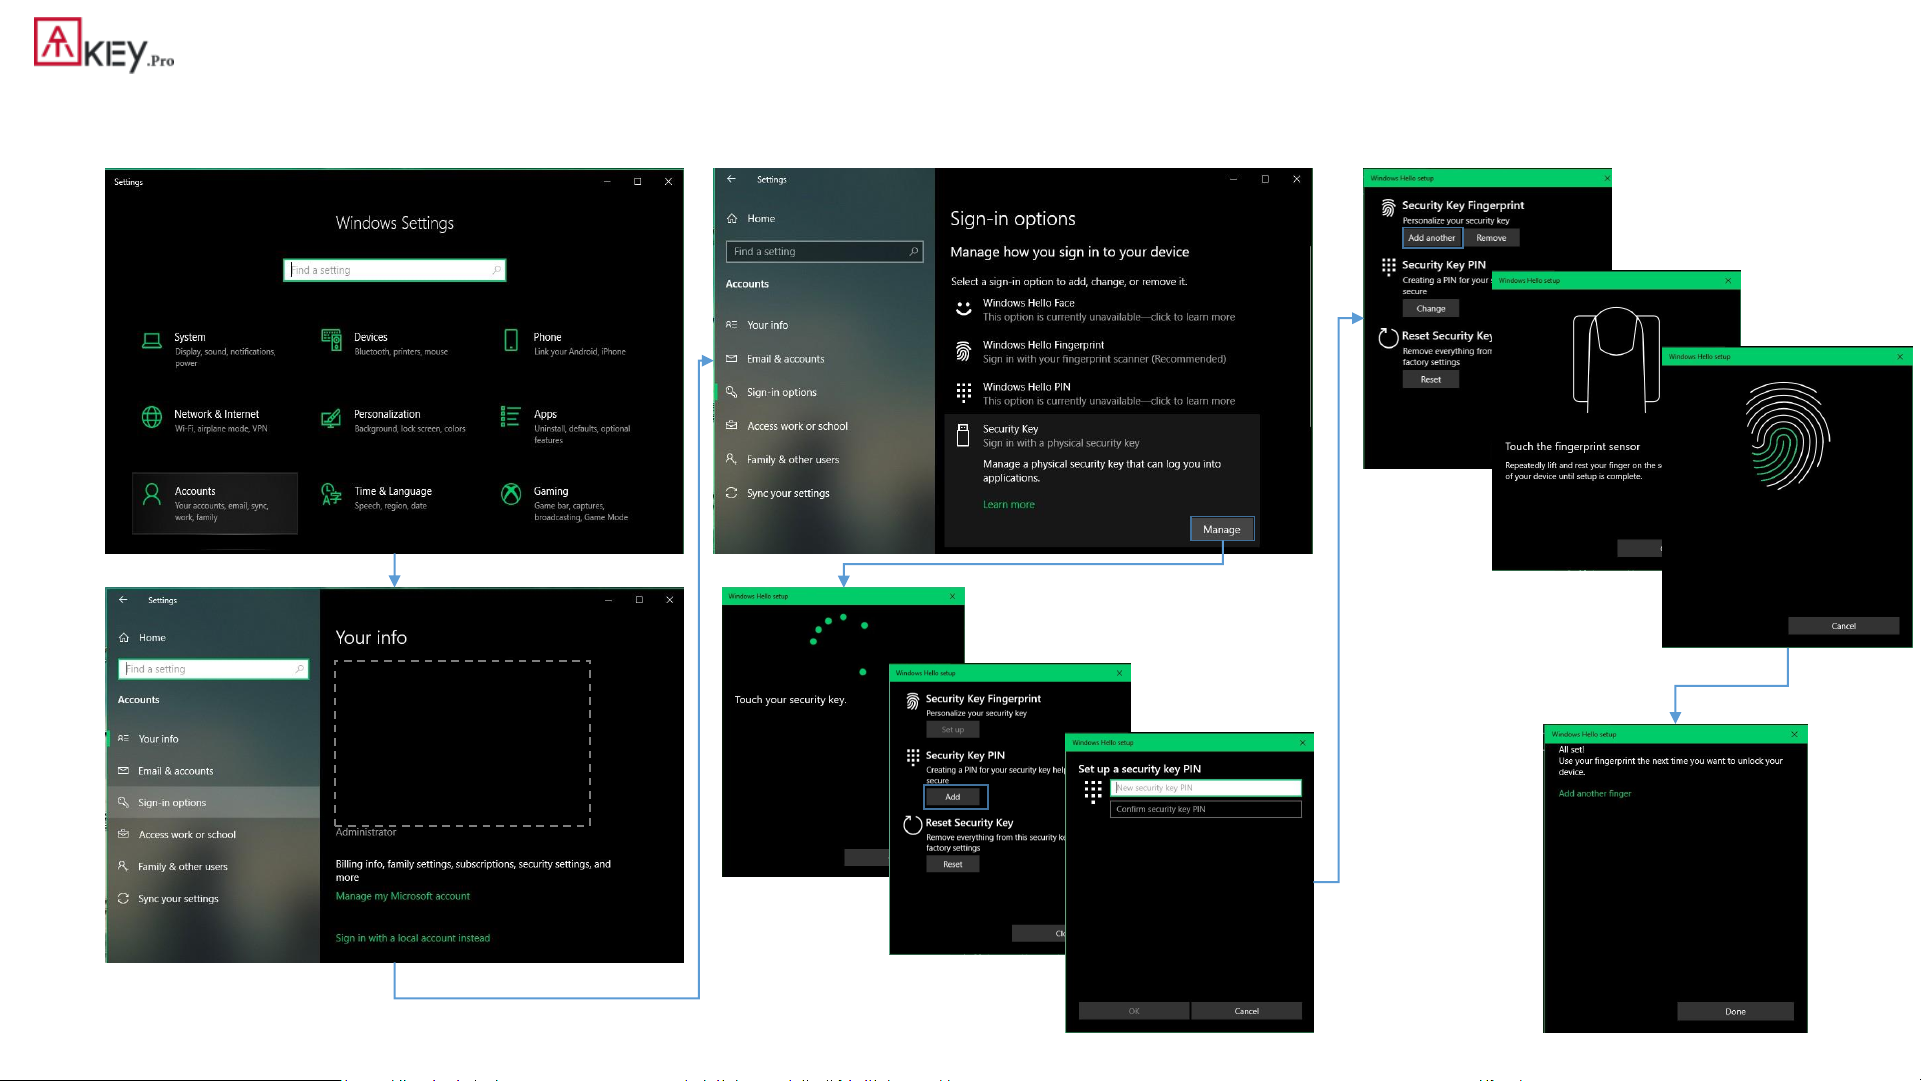
| Windows Settings (OS build is 1903 or later version) – Enroll fingerprint
• Windows Settings => Account => Sign-in options => Security Key => add “PIN code” and enroll “Fingerprints”
Click “Manage”,
touch fingerprint sensor to setup
Add “Security Key PIN” first;
this PIN code will write into
ATKey.Pro
• Setup “Security Key
Fingerprint”
• Type-in PIN code, following
screen hint to enroll
fingerprint, until “All Set!”
Page 8

8
| Windows Settings (OS build is 1903 or later version) – Reset Key
• Windows Settings => Account => Sign-in options => Security Key => Reset Security key (Delete PIN code and erase all fingerprints)
1. Cyan LED is flashing
2. Remove ATKey.Pro and re-insert to
USB port
3. Cyan LED is flashing
4. Touch by any finger to reset or
cancel it - please make it done
(Reset) within 10 sec
1. Blue LED is flashing
2. Remove ATKey.Pro and re-insert to
USB port
3. Blue LED is flashing
4. Touch by any finger to reset or
cancel it - please make it done
(Reset) within 10 sec
Click “Process”
[firmware 1.00.6 or later version]
[firmware 1.00.5 or previous version]
Page 9

9
| App “ATKey for Windows” – Enroll fingerprint
• Launch “ATKey for Windows” app (version 2.0.57.0 or later version)
• Click “Add and Register ATKey” – please make sure ATKey.Pro inserts to USB port and LED shows blue ON
Click to refresh the page
around 12 times touch/enroll to finish ONE fingerprint enrollment
Verify enrolled fingerprint to confirm
ATKey.Pro fingerprint enrolled and
register for management by app
Default name is -: ATKey.Pro + Keycode
Page 10

10
| App “ATKey for Windows” – Key Management
• ATKey management – information, rename, firmware upgrade
• “Check for Update”
• Select encrypted firmware image to upgrade manually
• Please wait till 100% done, then plug ATKey.Pro off USB port; re-insert to USB port,
waiting ~15 sec to boot to new firmware (LED from White to Blue ON).
• read firmware version here
• Read “keycode” here
Page 11

11
| Fingerprint Highlights
• Up to 10x fingerprints, when it’s full (10x fingerprints), user can’t enroll new fingers in.
• For new fingerprint enrollment, it always needs authorization from enrolled fingerprints (verify by enrolled fingerprint first).
• For fingerprint enrollment, users need to touch sensor continuously around 12 times to complete the “template”.
• Following FIDO2 spec., adding PIN code into ATKey.Pro is preferred; user can add PIN code into ATKey.Pro through Windows
Settings (1903 or later builds) or adding from ATKey for Windows (2.0.58.0 or later version).
• Following FIDO2 spec., it allows 3 times continuous failure during one “cycle” (LED will be static RED), user needs to remove the
dongle from USB and re-insert for next cycle; if it fails 5 cycles continuously, Key will be locked, using PIN code to login.
• If you feel fingerprint matching failed most time suddenly or something wrong from the matching, please DO “Sensor Calibration”
from ATKey app to re-calibrate the sensor, during calibration, don’t touch the fingerprint sensor till it’s done.
• “Delete fingerprint” will delete all enrolled fingerprints (from Windows Settings or ATKey app)
• Only when LED is Blue flashing (LED of ATKey.Pro), you can touch to verify your fingerprint
• From FIDO2 spec., there are 2 types fingerprint sensor touching:
• User presence – touch fingerprint sensor by any finger (LED is cyan flashing)
• This is for “RESET” commands from host
• User verifications – touch fingerprint sensor to verify (LED is blue flashing)
• This is for challenge response from RP/FIDO server, Browsers, Windows, …
Page 12

12
| App “ATKey for Windows” – Windows Hello
• ATKey management – Companion with Windows (Windows Hello login via CDF)
• If your Windows 10 joined Azure AD, please ignore this page since FIDO2 is ready for Azure AD login, it may conflict with Windows Hello
• Type in “Windows Hello PIN” to allow the companion;
• Some Corp. or Org. may disable this group policy by IT
Admin, if you saw the message, please contact your IT.
This icon means it’s a companion key for
Windows Hello via CDF (Companion Device
Framework)
Guidelines for Windows Hello:
• Windows Unlock with Windows Hello
companion devices
• How to Enable or Disable users to use
Companion device to sign in to Windows
10
• Enable or disable Domain users to sign in
with PIN to Windows 10
Page 13

13
| App “ATKey for Windows” – add/delete fingerprints
• ATKey management – Add/Delete fingerprints, fingerprint sensor calibration
• Enroll new fingerprint in by ~12 times touch,
following UI message; up to 10x fingerprints
• Here will delete all enrolled fingerprints, “OK”
to delete them
• It needs Windows PIN code to authorize.
• If you feel something wrong of fingerprint,
doing Calibration to re-calibrate the sensor
• Don’t put your finger on during calibration; LED
will be WHITE flashing then back to Blue
Page 14

14
| ATKey for Azure AD Passwordless login (Admin-Backend)
• Does your company/org. license Azure AD?
• If yes, does your authentication policy allow “add method” including “security key”? P1 needs
• Please check below links to learn how to enable security key for Azure AD:
• Passwordless Security Keys
• Passwordless Windows 10
• Passwordless On-premises
• Passwordless authentication options – Security Key
1. A new Authentication methods blade in your Azure AD admin portal that
allows you to assign passwordless credentials using FIDO2 security keys and
passwordless sign-in with Microsoft Authenticator to users and groups.
2. Updated capabilities in the converged Registration portal for
your users to create and manage FIDO2 security keys.
Page 15

15
| ATKey for Azure AD Passwordless login (Client)
User registration and management of FIDO2 security keys
1. Browse to https://myprofile.microsoft.com
2. Sign in by ID/Password or app
3. Click Security Info
• If the user already has at least one Azure Multi-Factor
Authentication method registered, they can immediately register
a FIDO2 security key.
• If they don’t have at least one Azure Multi-Factor Authentication
method registered, they must add one.
4. Add a FIDO2 Security key by clicking Add method and
choosing Security key
5. Choose USB device or NFC device
6. Have your key ready and choose Next
7. A box will appear and ask you to create/enter a PIN for your
security key, then perform the required gesture for your key
either biometric or touch.
8. You will be returned to the combined registration experience
and asked to provide a meaningful name for your token so
you can identify which one if you have multiple. Click Next.
9. Click Done to complete the process
Page 16

16
| ATKey for FIDO2 online login
• Passwordless login Microsoft account by security key:
• For Password-less login to Microsoft account - Windows
10 build 1809 or later version via Edge/Chrome
browser, USB mode:
• You can login to add ATKey.Pro as security key for your
Windows account from here:
https://account.microsoft.com/account
• Login by ID/Password first
• Step by step to setup security key
• Click “Security” from banner bar
• Click “more security options” from bottom
• From “Windows Hello and security keys” section, click “Set up
a security key”
• Touch your enrolled fingerprint to verify
• Fingerprint matched, type in name
of the key (default name following
keycode)
Page 17

17
| ATKey for FIDO2 online login
• You can find all your registered keys, click “Manage your sign-in methods”
• Sign-out to logon by security key (password-less)
Fingerprint verified to login
Use security key
Page 18

18
| ATKey for FIDO U2F
• ATKey.Pro is FIDO U2F ready, it can be a security key for 2
nd
factor authentication.
• Here are FIDO2 U2F ready service:
• Or you can search and find available FIDO U2F certified server
here: https://fidoalliance.org/certification/fido-certified-
products/?appSession=8YT7Z25V0DOH6M41OQG26WI22N0F6D5MF9W19F58545OZ
WKJPBOH5XMB874A6596S8432G491GGF12B5Y7PIAM6PKR09S5G9Z3Q9T0FLK91C544
5079DO1NWZFP8714Q
• But, Chrome browser only
• Google:
• Turn on 2-Step Verification,
https://support.google.com/accounts/answer/185839?co=GENIE.Platf
orm%3DDesktop&hl=en
• Use a security key for 2-Step Verification,
https://support.google.com/accounts/answer/6103523?co=GENIE.Plat
form%3DAndroid&hl=en
• Facebook: https://www.facebook.com/help/148233965247823
• Gitlab: Enable 2FA via U2F device,
https://docs.gitlab.com/ee/user/profile/account/two_factor_authentication.ht
ml
• Salesforce:
https://help.salesforce.com/articleView?id=security_u2f_enable.htm&t
ype=5
• Dropbox: https://help.dropbox.com/teams-admins/team-member/enable-
two-step-verification
• (e.g.) Google account – add ATKey.Pro as security to Google account:
Insert ATKey.Pro into
USB port
Touch enrolled
fingerprint to verify
Click “Allow”
Ready, type in name of
security key
Page 19

19
| ATKey for FIDO U2F
• (e.g.) Google account – login via ATKey.Pro
1stfactor: ID and password still
2ndfactor: verify your enrolled fingerprint
Done and login!
If you want to login your google account with ATKey.Pro later, please
uncheck “Don’t ask again on this computer” (default is checked).
But if you checked and login, but you want to use ATKey.Pro as 2
nd
factor to login again, please revoke all “device you trust” as below:
Page 20

20
| LED
Flashing
Touch your enrolled
fingerprint to verify
Standalone enrollment
(flashing from slow to fast,
then done by GREEN
meaning enrolled
fingerprint verified PASS);
Fingerprint calibration
(white flashing, done back
to blue)
User touch needs (but
any finger is ok)
Static ON
Power on, normal
state
Fingerprint verified
PASS (for a second)
•
Fingerprint
verified Failed
•
Erase fingerprint
•
Reset key
• Fingerprint sensor
calibration
•
Power on, but
firmware booting
failed
blue
green
red
white
cyan
Page 21

21
| Certificate and Regulation
Page 22

Thank You!!
www.authentrend.com
contact@authentrned.com
 Loading...