


KEWTECH
KT45 digital LOOP PSC tester with
Instruction manual

Contents
1 Safety Notice 1
2 Features 3
3Principles of measurement 10
4 Operating instructions 16
5 General 21
6 Battery Replacement 22
7 Servicing & Calibration 23
The KT45 incorporates Anti Trip Technology (ATT) which
electronically by-passes most RCDs at Distribution
Boards. This saves time and money by not having to take
the RCD out of circuit during testing and is a safer
procedure to follow.
With the ATT function, a test current of 15mA or less is
applied between line - earth. It enables LOOP
measurement without tripping most RCDs.
If there is doubt as to whether this tester will by-pass a
particular RCD, contact Kewtech with details of
manufacturer, model no., rating and sensitivity.
Pleasereadthisinstructionmanualcarefullybeforeusing
thisinstrument.

1
1 Safety Notice
Electricity can cause severe injuries even with low voltages
or currents. Therefore it is extremely important that you
read the following information before using this Tester.
1.1 This instrument must only be used by a competent trained
person and in strict accordance with the instructions.
Kewtech will not accept liability for any damage or injury
caused by misuse or non-compliance with instructions or
safety procedures.
1.2 This instrument is only intended for single phase operation,
230V AC+10%-15% phase to earth or phase to neutral
operation. Although fully protected (no bangs), it must never
be connected phase to phase (400 VAC).
1.3 When conducting a test, particularly on earth spikes, do not
touch any exposed metal work. This is because the earth has
a current flowing through it for the duration of the test.
1.4 Never open the instrument case (except for battery
replacement and in this case disconnect all leads first)- there
are dangerous voltages present. Only trained, competent
Electronic engineers should open the case. Send the unit to
Kewtech, if a fault develops.
1.5 This instrument is primarily protected by HRC Ceramic
fuses. Do not attempt to replace them if they fail. If they do,
contact Kewtech.
1.6 If the overheat symbol appears in the display, disconnect the
instrument from the mains and allow to cool down.
1.7 When testing, always be sure to keep your fingers behind
the safety barriers on the test leads.
1.8 Always inspect your Instrument and test leads before use for
any sign of abnormality or damage. If any abnormal
conditions exist (broken test leads, cracked case, display
faulty, inconsistent readings, etc) do not attempt to take any

2
measurements. Return to Kewtech for repair.
1.9 This meter has been designed with your safety in mind.
However, no design can completely protect against
incorrect use. Electrical circuits can be dangerous and/or
lethal when a lack of caution or poor safety practice is used.
Use caution in the presence of voltages above 33V as these
pose a shock hazard.
1.10 Pay attention to cautions and warnings which will inform
you of potentially dangerous procedures.
1.11 Never assume an installation circuit is not live. Confirm it is
de-energized before commencing testing using a suitable
tester.
1.12 Replace worn and/or damaged leads with new ones
approved by Kewtech immediately. Only use accessories
recommended by Kewtech as they are designed to work
with the tester. The use of any other items is prohibited as
they may not have the same safety features built in, and may
degrade performance.
1.13 Users of this equipment and/or their employers are
reminded that Health and Safety Legislation require them to
carry out valid risk assessments of all electrical work so as
to identify potential sources of electrical danger and risk of
electrical injury such as from inadvertent short circuits.
Where the assessments show that the risk is significant then
the use of fused test leads constructed in accordance with
HSE guidance note GS38 Electrical test Equipment for use
by Electricians should be used.

3
2 Features
2-1 Instrument layout
1......LCD
2......Power Switch
3......Test Button
4......Function / Range Switch
5......Wiring Check LEDs
LED indication of correct polarity is that the P-E and P-N LEDs
are lit. P and N are reversed when the reverse LED is lit.
6......Noise override Switch
LCD display
5
6
4
1
2
3
Fig 1
Fig 2
4
2-2 Accessories
▲KAMP11UK mains test lead with IEC Connector
▲ACC016E Distribution board fused test lead
(Fuse: 10A/600V fast acting ceramic)
▲Test lead carry pouch
forhandsfree
forhandsfree
Black
neutral
Red
KAMP11UK
ACC016E
phase
Green
earth
Fig 3

5
2-3 Features
▲ ATT In the ATT mode, LOOP
(Anti Trip Technology) measurement can be done without
tripping RCDs rated at 30mA or more.
▲ Wiring Check Three LEDs indicate if the wiring of
the circuit under test is correct.
▲ Over temperature Detects overheating of the internal
protection resistor displaying a warning symbol
() and automatically halting
further measurements.
▲ Main Voltage When connecting Test Lead to circuit,
Indication voltage between L- PE is displayed. If
the voltage is lower than 100V,
displayed as "V L- PE Lo". If the
voltage is between 260V and 300V,
voltage and "V L- PE Hi" is displayed
alternately. When the voltage is 300V
or more, "V L- PE Hi" is displayed.
▲ Low battery warning " "symbol appears in the display if
the battery voltage drops below
8V(ATT 9.2V).
▲ Auto power off Automatically switches the instrument
off after approximately 10 minutes.

2-4 Measurement specification
Loop impedance
Prospective Short-circuit Current
(*1): If the impedance between L-N is 20Ω or more, "no" is
displayed on the LCD and no measurement can be made. In this
case, disables ATT function and make measurement.
6
Measuring
Nominal test current at
Intrinsic
Range
range
0Ω external loop:
accuracy
Magnitude/Duration
20Ω 0.00-19.99Ω 25A/10ms
200Ω 0.0-199.9Ω 2.3A/20ms ±(3%rdg+4dgt)
2000Ω 0-1999Ω 15mA/360ms
20Ω 0.00-19.99Ω
(ATT) (*1)L-N<20Ω P-N:25A/30ms
±(3%rdg+6dgt)
200Ω 0.0-199.9Ω N-E:11mA/approx. 2s
(ATT) (*1)L-N<20Ω
Measuring
Nominal test current at
Intrinsic
Range
range
0Ω external loop:
accuracy
Magnitude/Duration
200A 0.0-199.9A 2.3A/20ms
2000A 0-1999A 25A/10ms
20kA 0.00-1.99kA 25A/10ms
200A 0.0-199.9A
(ATT) (*1)L-N<20Ω
2000A 0.0-1999A P-N:25A/30ms
(ATT) (*1)L-N<20Ω N-E:11mA/approx. 2s
20kA 0.00-1.99kA
(ATT) (*1)L-N<20Ω
PSC accuracy is
derived from the
loop impedance
accuracy
PSC(ATT)
accuracy is
derived from the
loop (ATT)
impedance
accuracy

7
Measuring range Intrinsic accuracy
100-300V (*2): ±(2%rdg+4dgt)
Voltage
(*2): The voltage and "V L- PE Hi" is displayed on the LCD
alternately when the voltage is 260V or more and under 300V.
2.5 Reference conditions
Ambient temperature: 23±5℃
Relative humidity: 60±15%
Nominal system voltage 230V, 50Hz
and frequency:
Altitude: Less than 2000m

2-6 Operating error
Loop impedance(IEC61557-3)
The influencing variations used for calculating the Operating
error are:
2.7 General specification
Operating 0 to 40℃,relative humidity
temperature and 85%or less, no condensation.
humidity.
Storage -20 to+60℃,relative humidity
temperature and 85%or less, no condensation.
humidity.
Battery type Eight AA R6 or LR6 batteries
Measurement times: approx 1500 times or more.
(ATT 500 times or more.)
Dimensions: 175 x 115 x 85.7mm
Weight: 810g
Maximum altitude: 2000m
Over range indication: 'OL'
8
Range
Operating range compliant
with EN61557-3 operating error
20Ω 0.35 to 19.99Ω
200Ω 20.0 to 199.9Ω
2000Ω 200 to 1999Ω
Ambient temperature: 0゜and 35℃
Phase angle: 0゜to 18℃
System frequency: 49.5Hz to 50.5Hz
System voltage: 195V to 253V
Supply voltage: 8V to 13.8V

9
Input voltage greater than 'VLP-E Hi' and
260V indication: voltage(alternating)
Input voltage greater than 'VLP-E Hi'
300V indication:
Over temperature
indication
Low battery indication
ATT mode indication
Noise indication
(ATT Mode)
2.8 Applied standards
Instrument operating IEC/EN61557-1,3(1997)
standard
Safety standard IEC/EN 61010-1(2001), CATIII
(300V) -Instrument
IEC/EN 61010-031(2001),
CATIII (300V)-Test Lead
Protection degree IEC 60529(1989 + A1)IP40
This manual and product may use the following symbols
adopted from International Safety Standards;
CAT.III Designed to protect against transient overvoltages in a
building wiring installation (low-voltage distribution level)
Equipment protected throughout by DOUBLE
INSULATION or REINFORCED INSULATION;
Caution (refer to accompanying documents)

10
3 Principles of Measurement
3.1 Principles of Measurement (Fault Loop Impedance)
If an electrical installation is protected by over-current protective
devices including circuit breakers or fuses, the earth loop
impedance should be measured.
In the event of a fault the earth fault loop impedance should be
low enough (and the prospective fault current high enough) to
allow automatic disconnection of the electrical supply by the
circuit protection device within a prescribed time interval. Every
circuit must be tested to ensure that the earth fault loop
impedance value does not exceed that specified or appropriate
for the over-current protective device installed in the circuit.
KT45 takes a current from the supply and measures the
difference between the unloaded and loaded supply voltages.
From this difference it is possible to calculate the loop resistance.
For a TT system the earth fault loop impedance is the sum of
the following impedances;
▲Impedance of the power transformer secondary winding.
▲Impedance of the phase conductor resistance from the power
transformer to the location of the fault.
▲The impedance of the protective conductor from the fault
location to the earth system.
▲Resistance of the local earth system (R).
▲Resistance of the power transformer earth system (Ro).
The figure below shows in marked line the Fault loop impedance
for TT system.
Fig 4

11
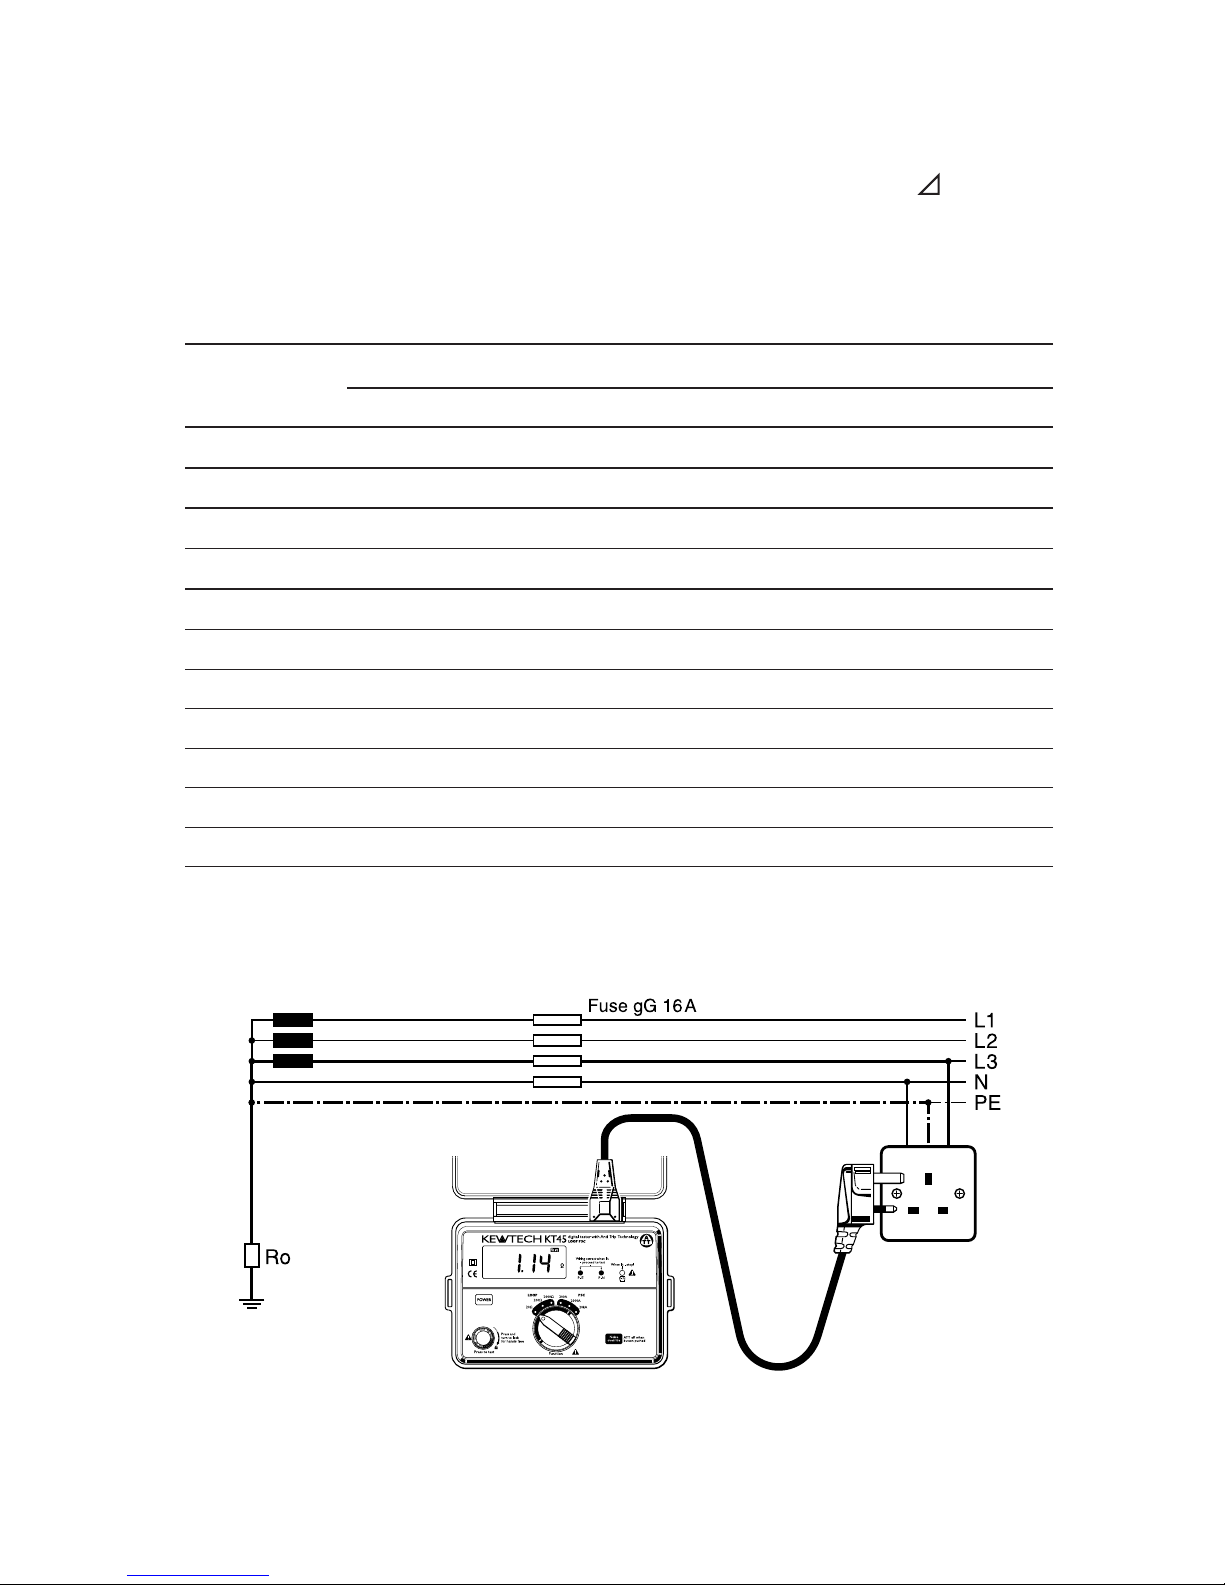
For TN systems the earth fault loop impedance is the sum of
the following impedances.
▲Impedance of the power transformer secondary winding.
▲Impedance of the phase conductor from the power
transformer to the location of the fault.
▲Impedance of the protective conductor from the fault location
to the power transformer.
The figure below shows in marked line the Fault loop impedance
for TN system.
In accordance with the international standard IEC 60364 for a TT
system the following condition shall be fulfilled for each circuit.
RA must be
<
_
50/ Ia
where;
RA is the sum of the resistances of the local earth system R and
the protective conductor connecting it to the exposed conductor
part. 50V is the maximum voltage limit (it may be 25V in certain
circumstances).
Ia is the value of current that causes automatic disconnection of
the protective device within 5 seconds.
Fig 5

12
When the protective device is a residual device (RCD), Ia is the
rated residual operating current IΔn. For example in a TT
system protected by an RCD the maximum RA values are as
follows:
Rated residual
operating cur- 10 30 100 300 500 1000
rent I n mA
Ra (at 50V)Ω 5000 1667 500 167 100 50
Ra (at 25V)Ω 2500 833 250 83 50 25

13
For this example the maximum value is 1667Ω, the loop tester
reads 12.74Ω and consequently the condition RA is
<
_
50/Ia is
met. It also important to test the operation of the RCD using a
dedicated RCD tester in accordance with the international
standard IEC60364 for a TN system. The following condition
shall be fulfilled for each circuit.
Zs
<
_
Uo/Ia where Zs is the earth fault loop impedance voltage is
the nominal voltage between phase and earth and Ia is the
current that causes the automatic disconnection of the
protective device within the time stated in the following table.
Uo (Volts) T (seconds)
120 0.8
230 0.4
400 0.2
>400 0.1
Fig 6
14
Note:
▲When the protective device is a residual current device
(RCD), Ia is the rated residual operating current I n.
For instance in a TN system with a nominal mains voltage of
Uo = 230V protected by type gG fuses the Ia and maximum
Zs values could be:
If the prospective fault current is measured, its value must be
higher than the Ia value of the protective device concerned.
Rating Disconnecting Time 5s Disconnecting Time 0.4s
(A) Ia (A) Zs (Ω) Ia (A) Zs (Ω)
6288.20 47 4.90
10 46 5.00 82 2.80
16 65 3.60 110 2.10
20 85 2.70 147 1.56
25 110 2.10 183 1.25
32 150 1.53 275 0.83
40 190 1.21 320 0.72
50 250 0.92 470 0.49
63 320 0.71 550 0.42
80 425 0.54 840 0.27
100 580 0.39 1020 0.22
Fig 7

15
The maximum value of Zs for this example is 2.1Ω (16 amp gG
fuse, 0.4 seconds). The loop tester reads 1.14Ω and
consequently the condition Zs
<
_
Uo/Ia is met.
3.2 Principles of the measurement (line impedance and
prospective short circuit current)
Line impedance on a single phase system is the impedance
measured between phase and neutral terminals.
Measurement principles for line impedance are exactly the same
as for earth fault loop impedance measurement with the
exception that the measurement is carried out between phase
and neutral.
The protective short circuit or fault current at any point within
an electrical installation is the current that would flow in the
circuit if no circuit protection operated and a complete (very low
impedance) short circuit occurred.
The value of this fault current is determined by the supply voltage
and the impedance of the path taken by the fault current.
Measurement of prospective short circuit current can be used to
check that the protective devices within the system will operate
within safety limits and in accordance with the safe design of the
installation. The breaking current capacity of any installed
protective device should be always higher than the prospective
short circuit current.
Fig 8

16
4. Operating instructions
4.1 Initial Checks: to be carried out before any testing;
4.1.1 Preparation
Always inspect your test instrument and lead accessories for
abnormality or damage-If abnormal conditions exist DO
NOT PROCEED WITH TESTING. Have the instrument
checked by Kewtech.
(1) Operate the Power button and turn on the instrument.
Turn the Function switch and set it to any range at the
LOOP or PSC.
(2) Insert the Test Lead into the instrument.(Fig.3)
(3) Pressing the Noise override switch disables ATT mode.
Then the "ATT" mark on the LCD will disappear.
▲ ATT mode enables a measurement without tripping the
RCDs with the rated residual current of 30mA or more.
▲ Measurement in ATT mode requires longer time than that
is required for the other measurements (approx. 10 sec).
When measuring a circuit with a large electrical noise, the
'NOISE' mark is displayed on the LCD and the
measurement time will be extended to 20 sec. When the
noise is so great as to influence the test result the 'NOISE'
symbol will flash and --- will appear in the screen. If the
'NOISE' mark is displayed on the LCD, it is recommended
to disable the ATT mode and take a measurement (RCDs
may trip).
▲ If the impedance of 20Ω or more exists between L-N, "no"
is displayed on the LCD and no measurement can be made.
In this case, disable the ATT function and make
measurement. When a large contact voltage exists in the

17
circuit under test, "no" is displayed on the LCD and no
measurement can be made. In this case, disable the ATT
function and make measurement. Be aware that if the ATT
mode is disabled, RCDs may trip.
▲ ATT mode is automatically enabled after one measurement
when making a measurement with ATT mode disabled.
4.1.2 Wiring Check
After the connection, ensure that the LEDs are is in the following
status before pressing the test button.
▲ P-E Green LED must be ON
▲ P-N Green LED must be ON
▲ Red LED must be OFF
If the above sequence is NOT displayed or the RED LED is on
for any reason, DO NOT PROCEED AS THERE IS INCORRECT
WIRING. The cause of the fault must be investigated and
rectified.
4.1.3 Voltage Measurement
When the instrument is first connected to the system, it will
display the phase-earth voltage which is updated every 1s. This
mode is cancelled the first time the test button is pressed. If this
voltage is not normal or as expected, DO NOT PROCEED.
NOTE: This is a single phase (230V AC) instrument and under
no circumstances should it be connected to 2- phases or a
voltage exceeding 230VAC+10%.
If the input voltage is greater than 260V the display will indicate
'VP-E Hi' and Loop or PSC measurements can not be made even
if the Test button is pressed.

18
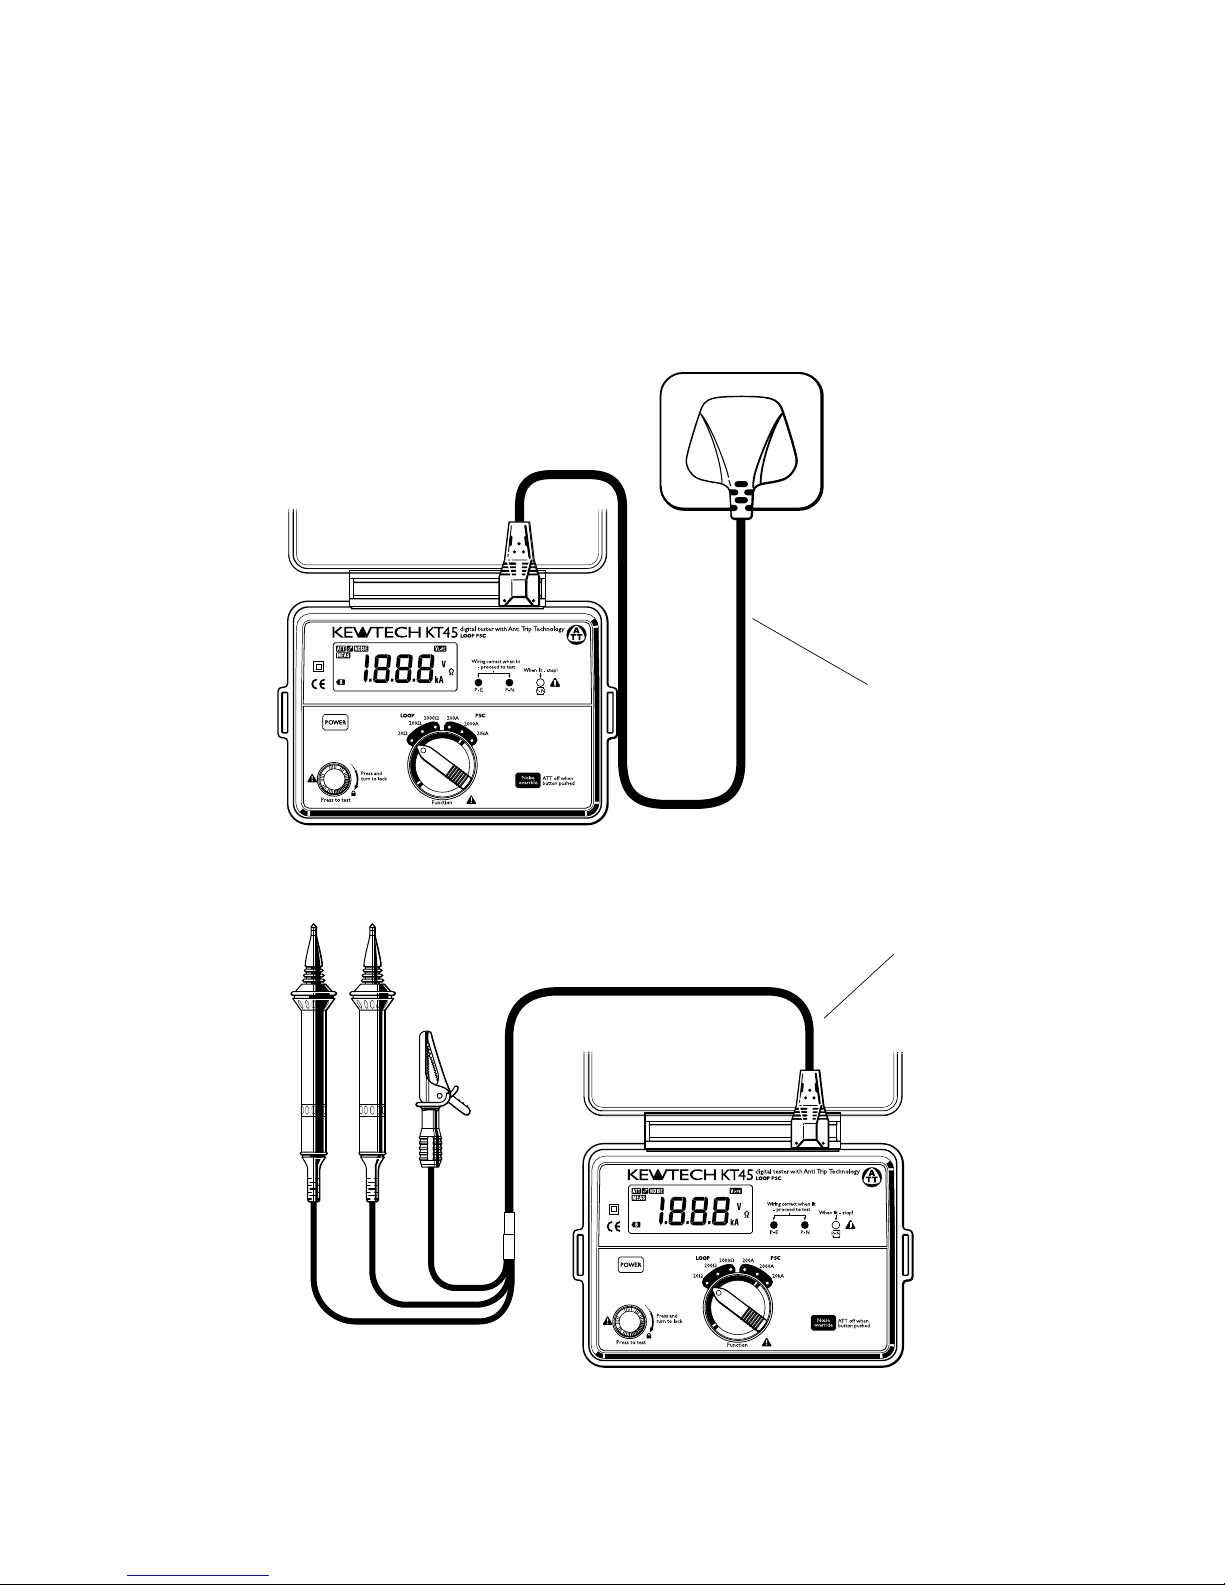
4.2 Measurement of Loop impedance
a. Loop Impedance at Mains Socket Outlet
Connect the mains lead to the IEC socket of the instrument.
Plug the molded plug of the mains lead into the socket to be
tested.
Carry out the initial checks.
Press the test button. A beep will sound as the test is
conducted and the value of loop impedance will be displayed.
If the display shows 'OL' then this usually means the value
measured exceeds the range selected, e.g. if the 20Ω range
was selected then the loop impedance is greater than 19.99Ω
and you must switch up a range to the 200Ω range.
b. Loop impedance at the distribution board
Warning: Although it is fully protected (no bangs), never
connect phase to phase (400VAC) to this instrument
Select the 20Ω, 200Ω or 2000Ω range as required. Connect
the distribution board lead model ACC016E to the IEC socket
on the instrument.
Connect the green crocodile clip of the ACC016E to the
earth, the black neutral lead to the neutral of the distribution
board and the red phase lead to 1 phase of the distribution
board.
Carry out the initial checks
Press the test button. A beep will sound as the test is
conducted and the value of loop impedance will be displayed.
When disconnecting from the distribution board, it is good
practice to disconnect the phase first.

19
c. Loop impedance at 3-phase equipment
Use the same procedure as (b) ensuring only 1-phase is
connected at a time i.e. FIRST test-red prod to phase 1,
black prod to neutral, green crocodile clip to earth;
SECOND test-red prod to phase 2, black prod to neutral,
green crocodile clip to earth etc.
d. The ACC016E can also be used for testing at light fittings.
Testing as described in (a), (b), (c) and (d) will measure the
Phase-Earth loop impedance. If you wish to measure the
Phase-Neutral loop impedance in items (b), (c), (d), then same
procedure should be followed except the earth clip should be
connected to the neutral of the system i.e. the same point as
the black neutral probe.
If the system has no neutral then you must connect the black
neutral probe to the earth i.e. same point as the green earth
clip. This will only work if there is no RCD in this type of
system.
4.3 Measurement of PSC (Prospective Short Circuit
Current)
Warning: Although it is fully protected (no bangs), never
connect phase to phase (400VAC) to this instrument.
This is normally measured at the distribution board between the
phase and neutral.
Connect the ACC016E distribution board lead to the IEC socket
on the instrument
Connect the red phase probe of the ACC016E to the phase of
the system, the black probe to the neutral of the system and

20
the green crocodile clip to the neutral of the system
Carry out the initial checks Press the test button. A beep will
sound as the test is conducted and the value of PSC will be
displayed.
It is good practice to disconnect the phase lead first
Note:
PSC function has a power factor correction of 0.84.
Voltage(V)
PSC = x 0.84
LOOP(Ω)
If the PSC ranges are selected whilst connected to a socket
outlet via the mains lead KAMP11UK, a test will take place
between Phase and Earth due to the fixed wiring of the mould-
ed mains plug i.e. a Phase-Earth fault current test.
When measuring the Phase-Earth fault current with the ATT
mode activated, RCD won't trip as well as at the LOOP test.

21
5 General
5.1 If the symbol ( ) appears, this means that the test resistor
is too hot and the automatic cut out circuits have operated.
Allow the instrument to cool down before proceeding. The
overheat circuits protect the test resistor against heat
damage.
5.2 The test button may be turned clockwise to lock it down. In
this auto mode, when using distribution board lead
ACC016E, tests are conducted by simply disconnecting and
reconnecting the red phase prod of the ACC016E avoiding
the need to physically press the test button i.e. 'hands free'.
5.3 When the display shows the low battery indication, ( ),
disconnect the test leads from the instrument. Remove the
battery cover and the batteries.
5.4 If at any time during testing there is a momentary
degradation of reading, this may be due to excessive
transients or discharges on the system or local area. Should
this be observed, the test should be repeated to obtain a
correct reading. If in doubt, always contact Kewtech.
22
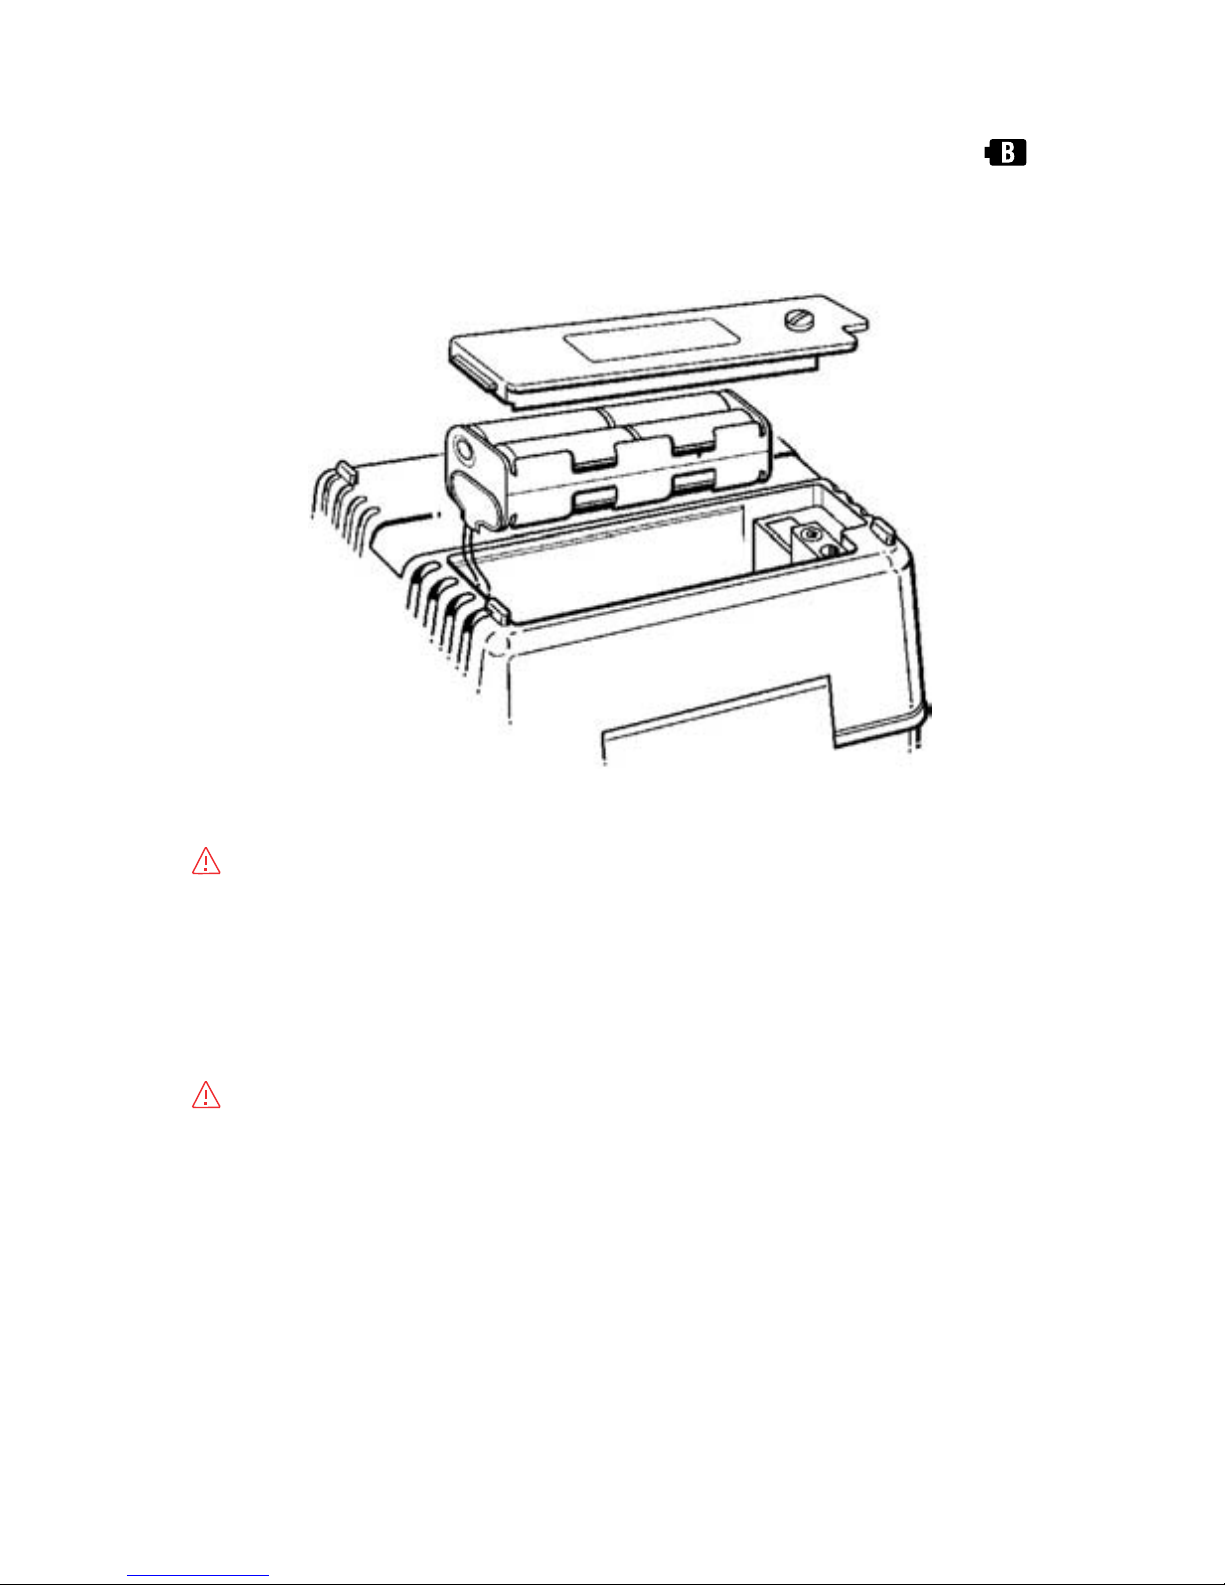
6 Battery replacement
When the display shows the low battery indication, ( ),
disconnect the test leads from the instrument. Remove the
battery cover and the batteries.
DANGER
Never open the battery compartment cover while making
measurement. To avoid possible electrical shock, disconnect the
test probe before opening the cover for battery replacement.
CAUTION
Install batteries in correct polarity as marked inside.
1. Disconnect Test Lead from the instrument.
2. Open the battery compartment cover by unscrewing the
metal captive screw to reveal battery compartment. Always
replace all eight batteries with new ones at the same time.
Battery type: Eight AA R6 or LR6 batteries
Fig 9

23
7 Servicing and Calibration
If this tester should fail to operate correctly, return it to Kewtech
marked for the attention of the Service Department. stating
exact nature of fault. Make sure that:
a. operating instructions have been followed
b. leads have been inspected
c. the unit is returned with all accessories
Regular re-calibration is recommended for this instrument. We
recommend that with normal use, the instrument is calibrated at
least once in every 12 month interval. When this is due for recalibration return it to Kewtech marked for the attention of the
Calibration Department and be sure to include all accessory
leads, as they are part of the calibration procedure. The mains
lead supplied with this instrument (model KAMP11UK) for
testing at sockets is part of the instrument. It directly affects the
accuracy of the loop and PSC readings. As such always keep it
with the instrument and remember to return it with the
instrument when servicing and calibration is required. In a similar
way the ACC016E is part of the instrument. The ACC016E leads
are fused and fuses are rated at 10A/600V high rupture ceramic
types. If they should blow always return the instrument to
Kewtech for checking. The fuses are special and should only be
replaced by equivalent types. Returning the product to Kewtech
will ensure this. If other leads are used then reading may not be
correct unless they are calibrated with the instrument.
If this product needs cleaning use a damp cloth to wipe its
surfaces.
DO NOT use strong cleaning agents as these may damage
the plastic surfaces. Kewtech reserve the right to change
specifications and design without notice and without obligation.

24
Case, strap, shoulder-pad and test lead pouch assembly
Assemble the shoulder strap through the case lugs and the test
lead pouch in the following sequence:
1 Pass the strap down through the
first lug, under the case and up
through the other lug.
2 Slide the shoulder pad onto the
strap
3 Feed the strap down through
the slots in the back of the test
lead pouch.
4 Pass the strap through the buckle,
adjust the strap for length and
secure.

KEWTECH
Kewtech Corporation Limited
St. Catherine’s Grove
Lincoln LN5 8NA
www.kewtechcorp.com
Distributor
92-1650 05-02
 Loading...