


I. Safety Information
Read the following safety information carefully before
attempting to operate or service the meter.
Use the meter only as specified in this manual; otherwise,
the protection provided by the meter may be impaired.
Environment Conditions
Altitude up to 2000 meters
Relative humidity 90% max.
Operation Ambient 0 to 40°C
Maintenance & Clearing
Repairs or servicing not covered in this manual should
only be performed by qualified personnel.
Periodically wipe the case with a dry cloth. Do not use
abrasives or solvents on this instrument.
Safety symbols
Comply with EMC
When servicing, use only specified replacement
parts.
II、General Description
Thank you for using our Light Meter. To ensure that you can
get the most from it, we recommend that you read and
follow the manual carefully before use. The Light Meter has
been designed, manufactured, and delivered under strict
quality control criteria by a factory certified.
Easy to use
Automatic zero
Automatic range
III、Specifications
Measuring ranges:
0.00 to 39.99/399.9/3999/39990 lx
0.000 to 3.999/39.99/399.9/3999 fc
automatic/manual selection of range
Resolution: 0.01 lx ~ 10 lx ; 0.001 fc ~ 1 fc
Accuracy: ±3﹪rdg ±5 dgts
Temperature characteristics: ±0.1﹪/ °C
Response time: 0.5 sec.
Light detector: Si Photodiode
Operation temp./ humidity:
0°C ~ 40°C (32°F ~ 104°F),0 ~ 80﹪RH
Storage temp./ humidity:
-10°C ~ 50°C (14°F ~ 122°F),0 ~ 70﹪RH
Over range: "----" display
Power supply:
one 9V battery,006P or IEC 6F22 or NEDA 1604
Power life: Approx. 170 hours (Alkaline battery)
Dimensions:
196(L) X 54(W) X 33(H) mm
7.7(L) X 2.1(W) X 1.3(H) inch
Weight: Approx. 180g
Accessories: 9V battery, instruction manual
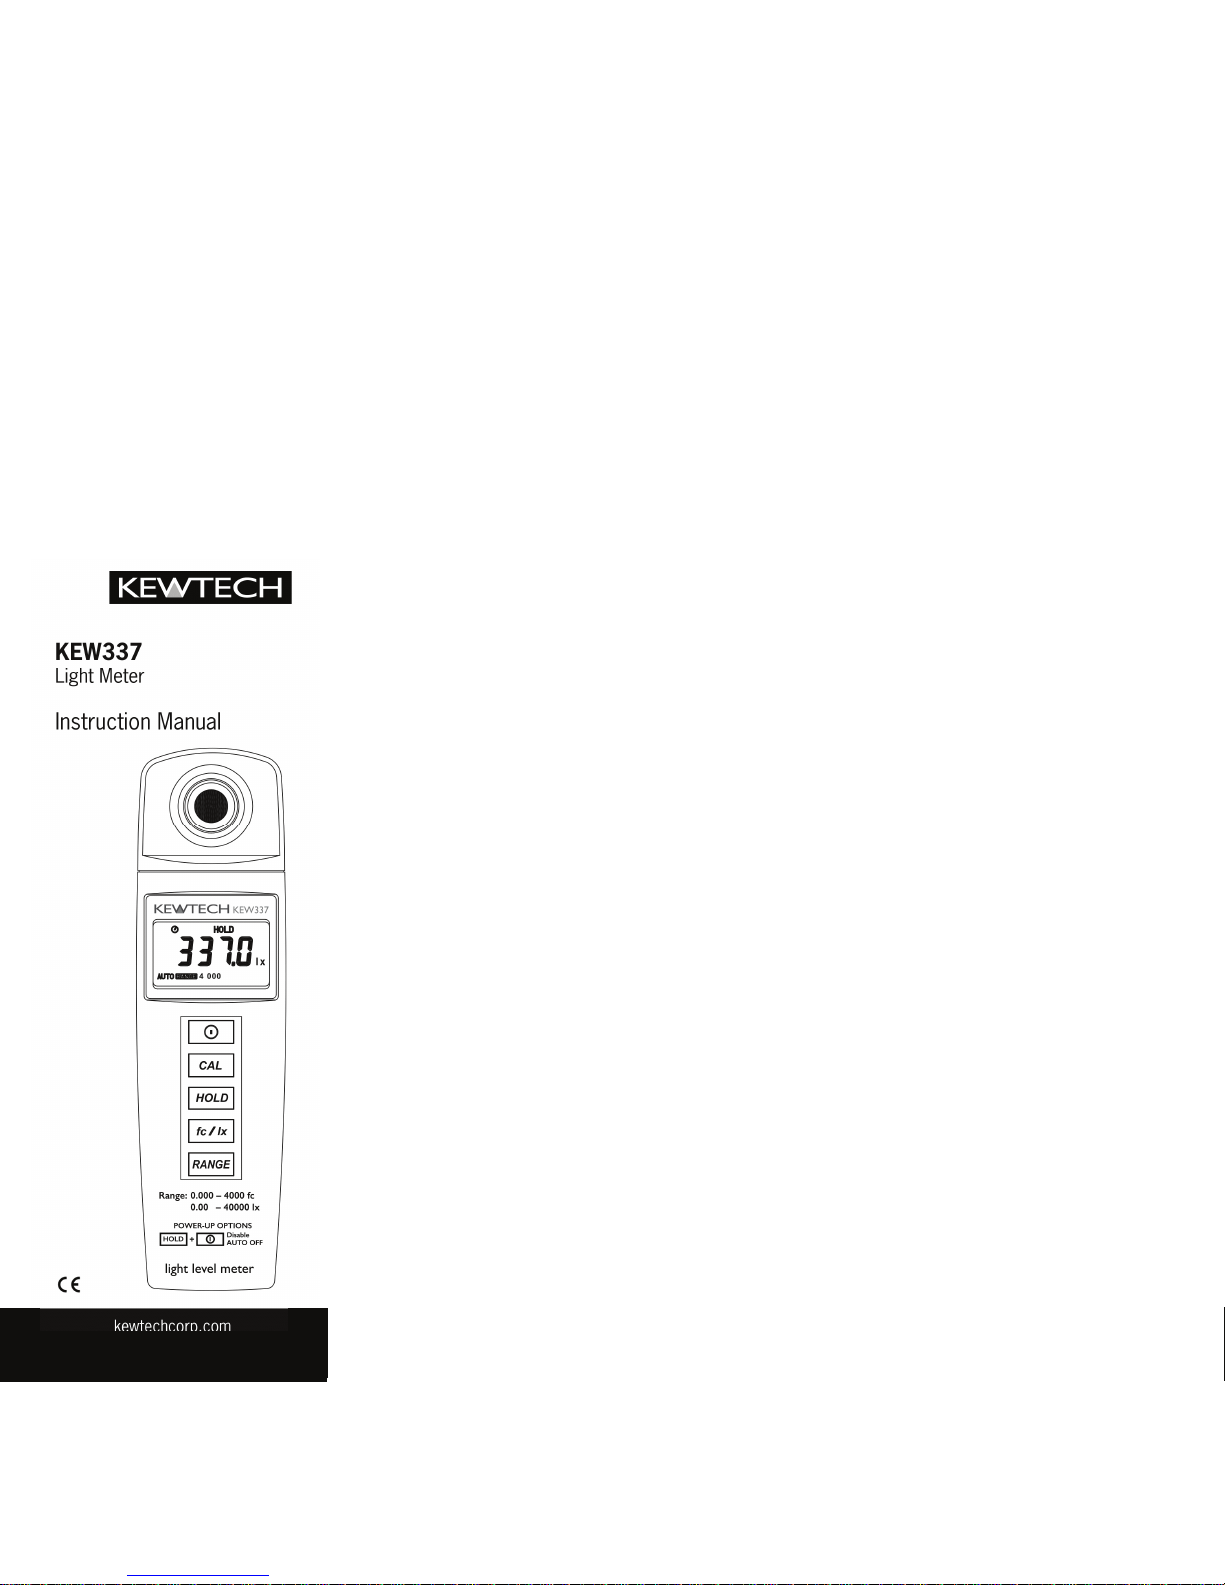
IV、Name and functions
○
1
Light detecting surface
○
2
Protect cover
○
3
LCD display
○
4
Power button
○
5
CAL button: quick enter measuring mode
During the measuring mode, press CAL button and the
value of zero will be auto-displayed.
○
6
HOLD button:
The user may hold the present reading and keep it on the
LCD display by pressing the “HOLD” button. To release the
held data operation by pressing it again. The user can
press the button when the value is hard to read, such as
measuring in the dark place.
○
7
fc/lx selector button
○
8
Range selector button:
This button is used to select automatic range and manual
range. Manual range enables an arbitrarily four range to be
set. If a fixed range is used, measuring values will
response quickly. The user can read easily.
The range configuration is as follows:
Auto , 40 , 400 , 4000 , 40000 lx
Auto , 4 , 40 , 400 , 4000 fc
○
9
Battery cabinet cover
○
10
Indicate low battery voltage
○
11
Measuring readout
○
12
Indicate automatic range mode
○
13
Indicate meter in automatic power off mode
This Light Meter provides an automatic power-off function
in order to avoid using up the battery if you forget to turn
off the power. The meter will power off itself after 30
minutes if no key is operated.
○
14
Indicate data hold
○
15
Unit of illuminance
○
16
Indicate range
Note: 1fc=10.76lx
V、Operation
Press the power button to turn on the power. Notice that
covering the light-detecting surface with the cap.. will
auto-appear on the LCD display. After appears, the
meter enters the automatic zero adjustment. When automatic
zero adjustment is completed, disappears and “0.00 ”
appears. After confirming the “0.00 ” display, remove the cap
to start measuring.
After the measurement has been completed, press the power
button again to turn off the power, and cover the light-detecting
surface with the cap for protecting against stray light.
Note:
If appears, check the cap to make sure it is on
properly.
Press and hold the HOLD button, and then power on the meter,
release all button to disable the AUTO POWER OFF function.
“ ”symbol will disappear on the LCD display.
VI、Replacement of battery
When the battery voltage drops below the operating voltage ,
a“ “ symbol will appear on the LCD display. In this
case, replace a new battery immediately.
VII、Characteristics of relative
visible-spectrum response
400 500 600 700 800
0
20
40
60
80
100%
Spectral Sensitivity
Wavelength(nm)
R
e
l
a
t
i
v
e
S
e
n
s
i
t
i
v
i
t
y
CIE Photopic Curve
Light Meter
VIII、Precautions on handling
Operating carefully, and do not drop the meter or hit it with a
hard object. Avoid using the meter in a dirty, dusty, or salt-air
area or where there are corrosive gases. If dirt or dust
adhered to the surface of detecting light, will decrease
accuracy of the measuring value. To clean the surface by
wiping with a soft and dry cloth.
GABKEW337-02000
 Loading...