

KEUCO 14312 171351, Royal Lumos Series, 14314 171351, 14313 171351, Edition 400 Series Instructions For Use Manual
...
Royal Lumos
US ES
Instruction for use Manual de instrucciones de uso
14312 171351
CA
Instructions de utilisation
14313 171351
14314 171351
311855_001/08.2018

US Read all instructions before using or installing this product.
IMPORTANT SAFETY
INSTRUCTIONS
DANGER -
shock:
– Always unplug this furnishing from the electrical
outlet before installation and cleaning.
To reduce the risk of electric
WARNING - To reduce the risk of burns,
fi re, electric shock, or injury to persons:
– Unplug from outlet before putting on or taking off
parts.
– Close supervision is necessary when this fur-
nishing is used by, or near children, invalids or
disabled persons.
– Use this furnishing only for its intended use as
described in these instructions. Do not use attachments not recommended by the manufacturer.
– Never operate this furnishing if it has a damaged
cord or plug, if it is not working properly, if it has
been dropped or damaged, or dropped into water.
Return the furnishing to the service center for exa-
mination and repair.
– Never drop or insert any object into any opening.
– Do not use outdoors.
– Do not operate where aerosol (spray) products are
being used or where oxygen is being administe-
red.
– Before disconnect turn all controls to the off
position. Also turn the electricity off at the circuit
breaker or fuse box.
– For loading always put heavier items at the bottom
and not near the top in order to help prevent the
possibility of the furnishing tipping over.
– Each surface intended to support a load shall have
a corresponding statement in the use instructions
specifying the maximum intended load for that
surface in pounds (kilograms).
– This product must be installed by a qualifi ed
installer, in accordance with local codes
and regulations and according to the
instructions for use in the enclosed manual.
Correct installation reduces the risk of fi re,
electric shock, burns and injury.
– Consult a qualifi ed electrican to ensure cor-
rect branch circuit conductor.
– Connect the receptacle circuit to a branch circuit
protected with a Class A GFCI device.
– Do not start the appliance if it or the power
supply cable is damaged, but have it replaced
by the manufacturer, its customer service or by
an equally qualifi ed person.
– The voltage supply must be separately
switchable.
– It must be ensured that the wall can support the
weight of the mirror cabinet.
– Use only genuine replacement parts and
accessories. The use of other parts will result in
voiding of the warranty.
Approval and conformity
This mirror cabinet complies with
applicable requirements of the referenced
standard(s):Safety Household and
Commercial Furnishings.( UL962, 4rd ed.
portable Luminaires CSA C22.2 #250.4 )
Intended use
FOR HOUSEHOLD USE ONLY.
As a mirror cabinet with dimmable lighting for use
in wet rooms such as bathrooms and toilets.
The product is suitable only for mounting indoors!
Caution! Only install in frost-free rooms.
Symbols and their meaning
Caution! Warning of personal injury or material
damage
Caution! Warning of electric shock.
Caution! Warning of water damage.
WARNING - California Prop 65
– This product can expose you to chemicals inclu-
ding Di(2-ethylhexyl)phthalate (DEHP), which is
known to the State of California to cause cancer.
For more information, go to www.P65Warnings.
ca.gov.
SAVE THESE INSTRUCTIONS
2
Note, tip or reference
Correct assembly/functional test
Incorrect assembly
On/off switch
US Read all instructions before using or installing this product.
Technical data
– Maximal load each shelf: max 3.3 lb
– Supply voltage: 120 V AC / 50/60 Hz
– Required electrical outlet: 15 A / 1800 VA
– Max. power consumption:
Prod. No.: Width
- 14312 171151: 31-1/2" 52.92 lb 54 W
- 14313 171151: 35-7/16" 59.53 lb 54 W
- 14314 171151: 39-3/8" 63.93 lb 54 W
Maximal load mirror cabinet total:
- 14312 171151: 79.37 lb
- 14313 171151: 85.98 lb
- 14314 171251: 90.39 lb
– Degree of protection: NEMA 1
– Ambient conditions:
Operating temperature 32° – 113° F
Storage temperature -40° – 158° F
– Luminous color 2700 – 6500 Kelvin
Mounting dimensions, see page 11 and 12.
Modes
The device can be operated in two modes.
Mode 1 (ex works):
Lighting On/Off at the device button (Off
automatically after power returns).
Mode 2:
Lighting On/Off at the external light switch (Off
automatically after power returns).
Weight
Light
• Fix the mirror cabinet in the installation opening
with the screws
• Glue the batten under the mirror cabinet to cover
the gap that may be present
• Place the glass shelf holders in the mirror cabinet
see fi gure 7.
• Place the glass shelves in the mirror cabinet,
see fi gure 8.
• Observe the maximum load on the glass shelves
(3.3 lb),
• Adjust the doors of the mirror cabinet,
10 –12 on page 16 and 17.
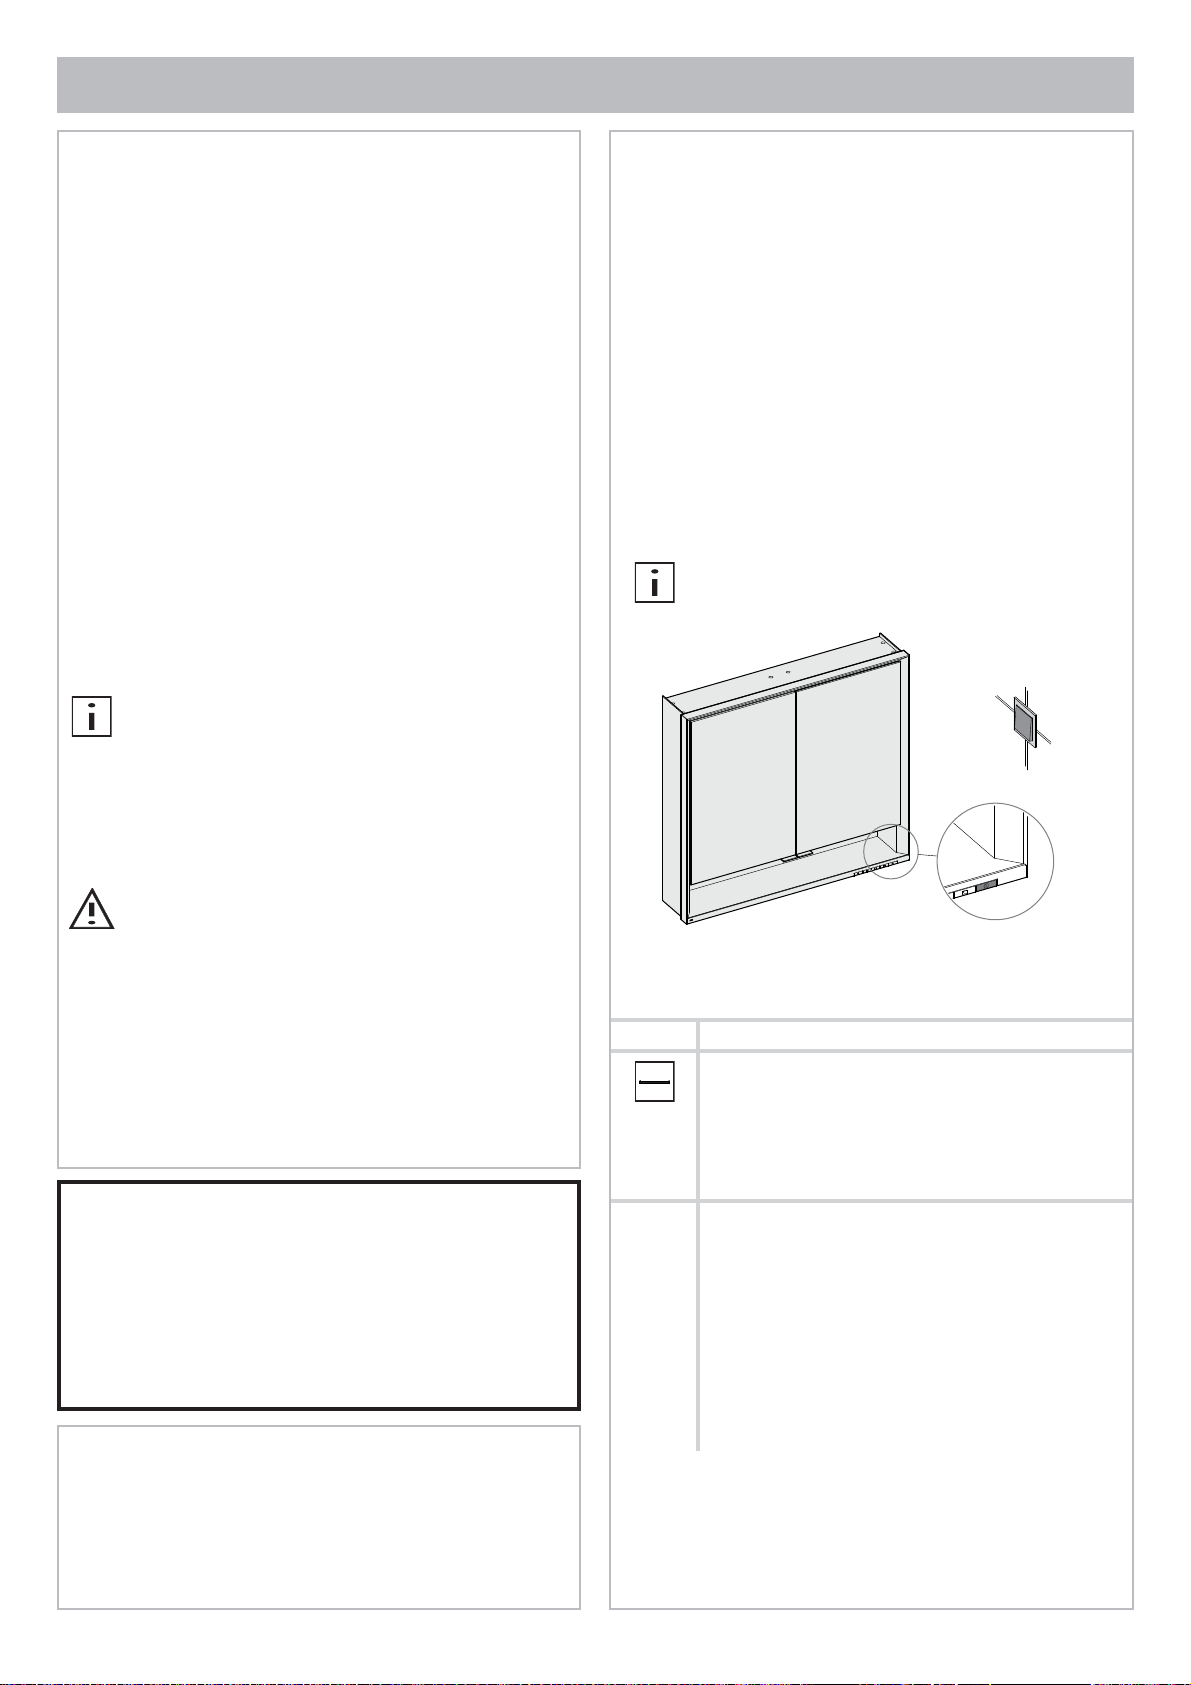
Operation
see fi gure 9.
The mirror can be optionally actuated similar
to a toggle switch with a button on the mirror
(A) or with an external light switch (B), see
circuit diagram fi gure 2 on page 13.
, see fi gure 5.
, see fi gure 6.
see fi gure
B
,
CAUTION: Risk of personal injury: This
product is very heavy. Get assistance lifting the
cabinet.
Before installation check whether the fastening materials
included are suitable for the anchoring base. The fastening materials are suitable exclusively for stud walls with
timber constructions or for drywall constructions with
timber wood reinforcement.
Installation, see fi gure 1 onwards on page 13.
• Check the mounting position, see fi gure 1.
WARNING - GROUNDING
INSTRUCTIONS
This product must be connected to a grounded metal, permanent wiring system, or an equiment-grounding conductor must be run with the circuit conductors and connected to the equipment-grounding
terminal or lead on the product.
Wiring diagram, see fi gure 2 on page 13.
A
Button functions
Button Function
Light on/off
• Pressing the button switches the mirror cabinet on with the selected settings. The white
LED goes off.
• Pressing the button again switches the mirror
cabinet off. The white LED lights up.
To change mode
• Switch off the refl ector.
• Press the button and hold it down for 15
seconds.
- The light comes on again if the mode has
been changed.
Repeat the procedure described to re-enable
mode 1.
• Connect the mirror cabinet to the power supply
see fi gure 3a/3b.
• Place the mirror cabinet in the installation opening
see fi gure 4.
,
,
3

US Read all instructions before using or installing this product.
Button Function
• The white LED can be deactivated.
– Switch on the mirror cabinet.
– Press and hold the button for 15 seconds.
- The lighting gets lighter or darker.
- The lighting switches off briefl y and the
white LED is deactivated.
To switch the white LED back on, repeat the
described procedure.
Front and wall lighting
• The front and wall lighting is switched on
by pressing the button when light mirror is
switched on.
• Pressing the button again switches the light
off.
Washbasin lighting
• The washbasin lighting is switched on by
pressing the button when light mirror is
switched on.
• Pressing the button again switches the light
off.
When both lightings are switched off, the light
mirror also switches off.
Replacement parts with order numbers, see page 19.
The light sources may only be replaced by the
manufacturer, its customer service or by an
equally qualifi ed person.
For information about warranty and maintenance, see the enclosed Care Instructions
and Warranty Card.
Disposal instructions
This category of device does not belong in
the domestic waste, but must be disposed of
separately in accordance with the relevant
local national regulations.
Dimming the front, wall and washbasin
lighting
• Press the button when the light mirror is
switched on and hold until the desired brightness or the end value has been reached.
The setting is stored and reproduced when
switched on again (only for connection type 1,
see fi gure 2 on page 13).
Setting the light colour cooler
• Press and hold daylight white button and the
light colour fades to cool white.
• Release when the desired light colour has
been reached.
The setting is stored and reproduced when
switched on again (only for connection type 1,
see fi gure 2 on page 13).
Adjusting light colour - daylight white (cool
white)
• Press button and the colour temperature sets
to 6500 Kelvin.
Setting the light colour warmer
• Press and hold warm white button and the
light colour fades to warm white.
• Release when the desired light colour has
been reached.
The setting is stored and reproduced when
switched on again (only for connection type 1,
see fi gure 2 on page 13).
Adjusting light colour - warm white
• Press button and the colour temperature sets
to 2700 Kelvin.
4
ES Lea todas las instrucciones antes de usar o instalar este producto.
INSTRUCCIONES
IMPORTANTES DE
SEGURIDAD
PELIGRO -
carga eléctrica:
– Desenchufe siempre este mobiliario de la toma de
corriente antes de la instalación y limpieza.
Para reducir el riesgo de des-
ADVERTENCIA - Para reducir el
riesgo de quemaduras, incendios, descargas eléctricas o lesiones para las personas:
– Desenchúfelo de la toma de corriente antes de
poner o quitar piezas.
– Es necesaria una supervisión estricta cuando este
mobiliario esté cerca o sea utilizado por niños,
inválidos o personas discapacitadas.
– Use este mobiliario exclusivamente para su uso
previsto tal y como se describe en estas instrucciones. No utilice accesorios no recomendados
por el fabricante.
– Nunca utilice este mobiliario si tiene un cable o
un enchufe dañado, si no funciona correctamente,
si se ha caído o dañado o si se ha caído al agua.
Devuelva el mobiliario al centro de servicio para
su examen y reparación.
– Nunca deje caer ni introduzca ningún objeto en
ninguna abertura.
– No lo utilice en exteriores.
– No lo utilice allí donde se usen productos de aero-
sol (espray) o donde se esté administrando oxígeno.
– Antes de la desconexión, ponga todos los interrupto-
res en la posición de apagado. Desconecte también la
electricidad en el interruptor o en la caja de fusibles.
– Coloque siempre los artículos más pesados en la
parte inferior del armario y no cerca de la parte
superior para evitar la posibilidad de que el mobi-
liario vuelque.
– Cada superfi cie destinada a soportar una carga
debe tener una declaración correspondiente en
las instrucciones de uso que especifi que la car-
ga máxima prevista para esa superfi cie en libras
(kilogramos).
ADVERTENCIA - California Prop 65
– Este producto puede exponerte a productos quími-
cos como el Di(2-ethylhexyl)phthalate (DEHP), que
es conocidos por el Estado de California causar
cáncer . Para más información ve a www.P65War-
nings.ca.gov .
– Este producto debe ser instalado por un técnico
cualifi cado, de acuerdo con los códigos y regula-
ciones locales y conforme a las instrucciones de
uso en el manual adjunto.
La instalación correcta reduce el riesgo de incendio, descarga eléctrica, quemaduras y lesiones.
– Consulte a un electricista cualifi cado para
asegurar la correcta instalación del conductor de circuito derivado.
– Conecte el circuito del receptáculo a un circuito
derivado protegido con un dispositivo GFCI
Clase A.
– No encienda el aparato si el mismo o si el
cable de la fuente de alimentación estuvieran
dañados. Contacte con el fabricante, el servicio
al técnico o con una persona con cualifi cación
equivalente y pida una sustitución.
– La fuente de alimentación debe ser conectable
por separado.
– Se debe asegurar que la pared puede soportar
el peso del armario con espejos.
– Utilice exclusivamente repuestos y accesorios
originales. El uso de otras piezas provocará la
anulación de la garantía.
Aprobación y conformidad
Este armario con espejos cumple con los
requisitos aplicables de la(s) norma(s) a
la(s) que se hace referencia:Mobiliario
doméstico y comercial de seguridad
(UL962, 4ª ed. luminarias portátiles CSA
C22.2 #250.4)
Uso previsto
EXCLUSIVAMENTE PARA USO DOMÉSTICO.
Armario con espejos con iluminación atenuable
para uso en habitaciones húmedas, tales como
cuartos de baño y aseos.
¡El producto solo es adecuado para su montaje
en interiores!
¡Precaución! Instálelo exclusivamente en espacios resguardados de heladas.
Símbolos y su signifi cado
¡Precaución! Advertencia de lesiones personales
o daños materiales
¡Precaución! Advertencia de descarga eléctrica.
¡Precaución! Advertencia de daños por agua.
Nota, sugerencia o referencia
Montaje correcto/prueba funcional
Montaje incorrecto
GUARDE ESTAS INSTRUCCIONES
Interruptor ON/OFF
5

ES Lea todas las instrucciones antes de usar o instalar este producto.
Datos técnicos
– Carga máxima cada estante: máx. 3.3 lb
– Voltaje de alimentación: 120 V AC / 50/60 Hz
– Toma de corriente requerida: 15 A / 1800 VA
– Consumo de energía máx.:
Nº de Prod.: Anchura
- 14312 171151: 31-1/2" 52,92 lb 54 W
- 14313 171151: 35-7/16" 59,53 lb 54 W
- 14314 171151: 39-3/8" 63,93 lb 54 W
Carga total del armario con espejos total:
- 14312 171151: 79,37 lb
- 14313 171151: 85,98 lb
- 14314 171251: 90,39 lb
– Grado de protección: NEMA 1
– Condiciones ambientales:
Temperatura de uso 32° – 113° F
Temperatura de almacenamiento -40° – 158° F
– Color luminoso 2700 – 6500 Kelvin
Dimensiones de montaje, véase la página 11 y 12.
Modos de servicio
El equipo se puede utilizar de dos modos
diferentes.
Modo de servicio 1 (estado de suministro):
Iluminación On/Off en la tecla del equipo
(desconectado automáticamente después del
retorno de la tensión)
Modo de servicio 2:
Iluminación On/Off en el interruptor de luz
externo (conectado automáticamente después
del retorno de la tensión)
PRECAUCIÓN: Riesgo de lesiones
personales: Este producto es muy pesado.
Obtenga ayuda para levantar el armario.
Antes de la instalación, compruebe si los materiales de fi jación
incluidos son adecuados para la base de anclaje. Los materiales de fi jación son adecuados exclusivamente para paredes
de construcción ligera con construcciones de madera o para
construcciones de paneles de yeso con refuerzo de madera.
Instalación, véase fi gura 1 más adelante en la
página 13.
Peso
Luz
Diagrama de cableado, véase la fi gura 2 en la
página 13.
• Conecte el armario con espejos a la fuente de
alimentación
• Coloque el armario con espejos en la abertura de
instalación, véase la fi gura 4.
• Fije el armario con espejos en la abertura de
instalación con los tornillos, véase la fi gura 5.
• Pegue el listón debajo del gabinete del espejo para
cubrir el espacio que pueda estar presente
la fi gura 6.
• Coloque los soportes de estantes de vidrio en el
armario con espejos
• Coloque los estantes de vidrio en el armario con
espejos
• Observe la carga máxima en los estantes de vidrio
(3.3 lb),
• Ajuste las puertas del armario con espejos, véase la
fi gura 10 – 12 en la página 16 y 17.
Operación
, véase la fi gura 3a/3b.
, véase
, véase la fi gura 7.
véase la fi gura 8.
véase la fi gura 9.
El espejo se puede accionar opcionalmente
como con una conexión conmutable a través
de la tecla en el espejo (A) o por medio de un
interruptor de luz exterior (B), véase esquema
eléctrico imagen 2 en la página 13.
B
A
• Verifi que la posición de montaje, véase la fi gura 1.
ADVERTENCIA INSTRUCCIONES DE
CONEXIÓN A TIERRA
Este producto debe conectarse a un sistema de
cableado fi jo, de metal con conexión a tierra o bien,
un conductor de puesta a tierra del equipo deberá
estar incorporado con los conductores del circuito y
conectado al terminal de conexión a tierra del equipo o al cable del producto.
6
Funciones de los botones
Botón Función
Luz ON/OFF
• Al pulsar el botón el armario con espejos se
conecta con la confi guración seleccionada.
El LED blanco se apaga.
• Pulsando el botón de nuevo el armario con espejos se desconecta. El LED blanco se enciende.
 Loading...