

Page 1
SG1
Training and operating
instructions
GB
Page 2

2
GB
Training and operating instructions
Table of Contents
Safety instructions 2
• Service 2
•Your safety 2
Short description 3
• Display area / display 3
• Keys 3
• Resetting the Display 3
•Type of pulse measurement 3
• Device interface 3
• Selecting Language 3
• Display Settings 3
•Values and Symbols Displayed 4
Quick start (to become familiar) 4
•Training stand-by 4
• Beginning of training 4
• Interruption of training 4
•Stand-by 4
Main Menu 5
Menu -> Users 5
• Selecting User 5
• Entering User Data 5
• Sample Data “Thomas” 5
Menu -> Programme 5
•Performance (manual) 6
•Performance (preset) Profile 6
•Performance (individual) 6
• HRC (manual) 6
• HRC (preset) Profile 6
• HRC (individual) 6
Tra ining 7
Select a training programme 7
• Performance (manual) “Count Down” 7
Current default settings 7
Training stand-by 7
•Performance (fixed) 7
Current default settings 7
Mode: Time or distance 8
Training stand-by 8
• Manual pulse input 8
“HRC Count Down” 8
Current default settings 8
Training stand-by 8
• Pulse-profile HRC (fixed) HRC-Profil 1 8
Current default settings 8
Training stand-by 8
Beginning of training 9
• Adjusting the Display 9
Training functions 9
•Operating mode
independent from / dependent on rotation speed 9
• Monitoring of rotation speed/performance 9
• Pulse monitoring
Target pulse 10
Maximum pulse 10
•(recover y pulse measuring) 10
• Interruption or end of training 10
• Resume training 11
Individual training profiles
Editing 11
•Performance (individual) 11
• HRC (individual) 11
Main menu -> Default Settings 12
• 1. Display & functions 12
• 2. Training values 13
• 3. Pulse default settings 13
Main menu - > Settings 14
• 1. Units 14
• 2. Display 14
• 3. Time and date 14
• 4. Stand-by 15
• 5. Factory Settings 15
General information 15
•System beeps 15
• Recovery 15
• Switching time / distance 15
•Profile display during training 15
• Operation dependent on rotation speed 15
• Operation independent from rotation speed 15
• Calculating the average value 15
• Information on pulse measuring 15
with ear clip 15
with chest strap 16
• Malfunction of the training computer 16
• Information on the interface 16
Training instructions 16
• Endurance training 16
• Stress intensity 16
• Amount of stress 16
Glossary 16
This emblem in the instructions refers to
the glossary, where the respective term is
explained.
Safety instructions
Please observe the following instructions for your
own safety:
• The training appliance must be erected on a suitable
and stable surface.
• Before putting into operation for the first time and
after the appliance has been in operation for approximately 6 days, all connections must be checked to
ensure a secure fit.
• In order to prevent injuries caused by incorrect loading or overloading, the training appliance may
only be used as per instructions.
•A permanent erection of the appliance in damp
rooms is not recommended since rust will form.
• Conduct regular checks to ensure that the functional
efficiency and general overall condition of the training appliance are as they should be.
• The Operator's responsibilities also include technical
safety checks and must be conducted at regular
intervals and with the required thoroughness and
precision.
• Defective or damaged components must be replaced
immediately.
• Use only original KETTLER spare parts
• The appliance must not be used until repair work
has been completed.
•The level of safety of the appliance can only be
maintained if it is checked at regular intervals for
damage and wear-and-tear.
For your safety:
• Before taking up training, consult your GP to
ensure that your state of health is such that the
appliance is a suitable form of training for you.
Your own personal training programme should
be based on the medical findings. Incorrect or
excessive training can damage your health.
G
Page 3
The cross ergometer EXT7 is additionally equipped with hand pulse sensors.
Appliance interface
The USB interface to the PC is located at the backside of the
display panel.
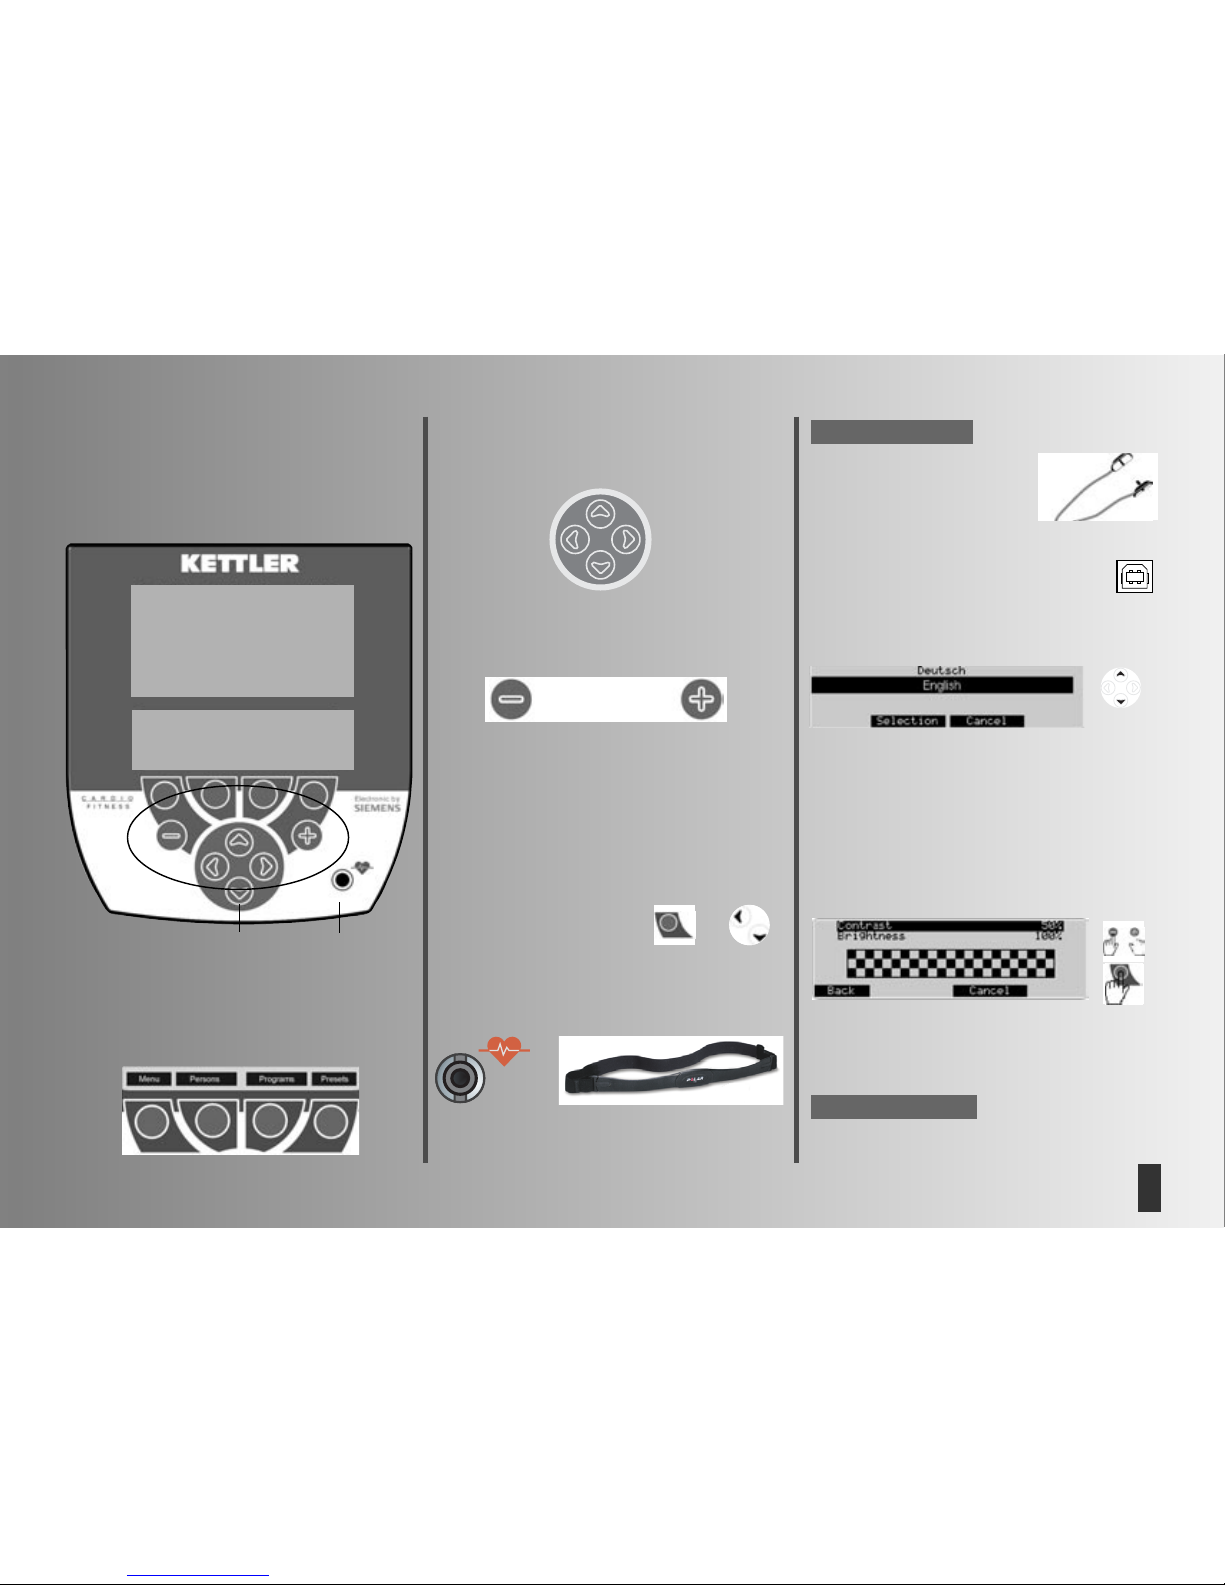
Selecting Language
When switched on for the first time, the language menu.
Use navigation keys “ Up ” and “Down” to select language.
Press “Select” to accept language selection and to open the
“Display” menu.
Press “Cancel” to get back to the main menu. Settings will not
be saved, display will be shown when switched on again.
Display Settings
After selecting the language, the menu for selecting brightness
and contrast of the display is shown.
Press “Back” to get back to the main menu. The set-
tings will be saved.
Press “Cancel” to get back to the main menu instantly. Settings
will not be saved, display will be shown when switched on
again.
When the optimal contrast is set, there will be no heavy shades. The setting “Contrast” applies to the lower display and
“Brightness” to both displays.
Note:
Remark:
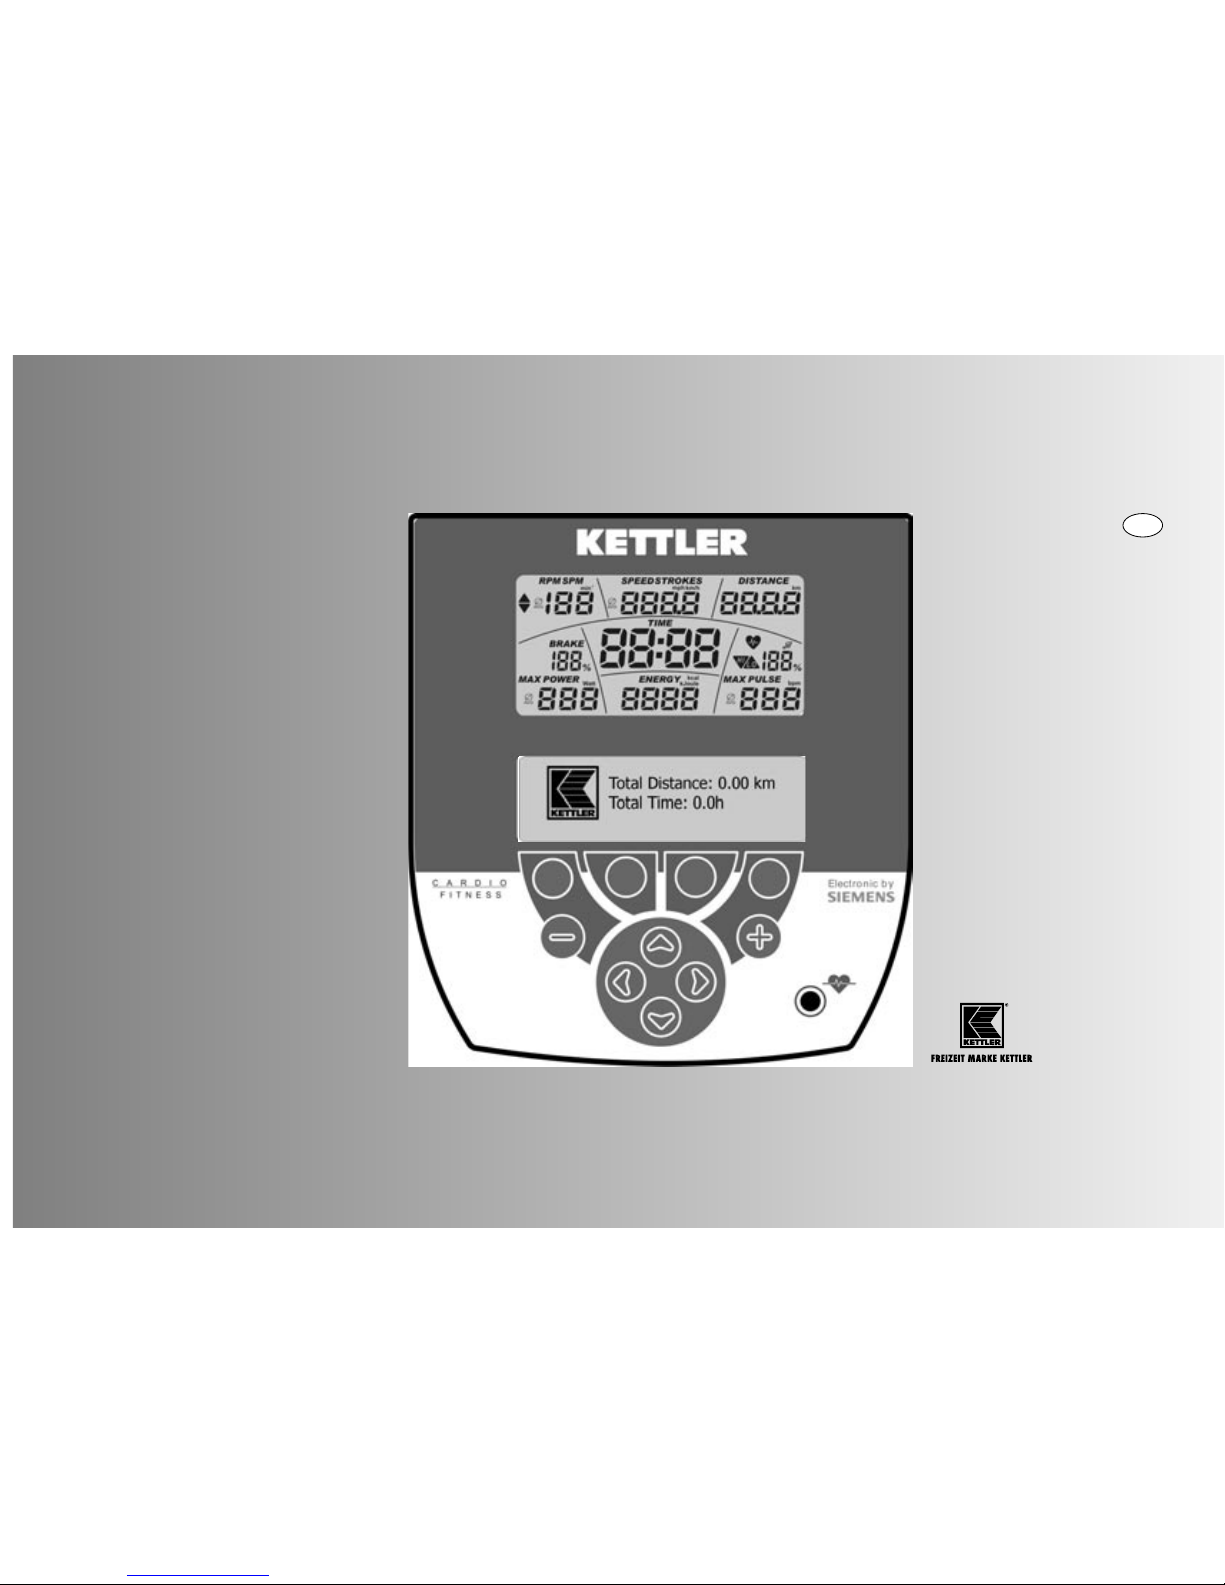
Short descriptionv
The electronic unit consists of function keys and a display.
Display area / Display
Function keys
By means of these 4 keys, you can activate functions, which
are then shown in the above display, e.g. Back, Menu etc. The
functions of the keys may vary from one menu to the other.
Navigation keys
Use the navigation keys to select menu features or menu entry
fields.
Enter keys minus - / plus +
By means of these keys, you can alter values, adjust the stress
values for training and shift profiles.
• “Plus” increases the values or alters settings
• “Minus” reduces the values or alters settings
•Press “Plus” or “Minus” for a longer period of time > quick
modification
•Press “Plus” and “Minus” at the same time:
• Stress skips to smallest performance
•Programmes skips to default setting
•Value input skips to Off
Resetting the Display (Software-Reset)
Pressing the three keys at the same
time, will restart the equipment.
Type of pulse measurement
The pulse measurement can be carried out in two ways:
1. Ear clip
The plug is put into the pulse female connector;
2. built-in receiver and Polar chest strap T34 (please refer to
the appropriate instructions) Ear clips must be taken off.
Keys
Pulse female connector
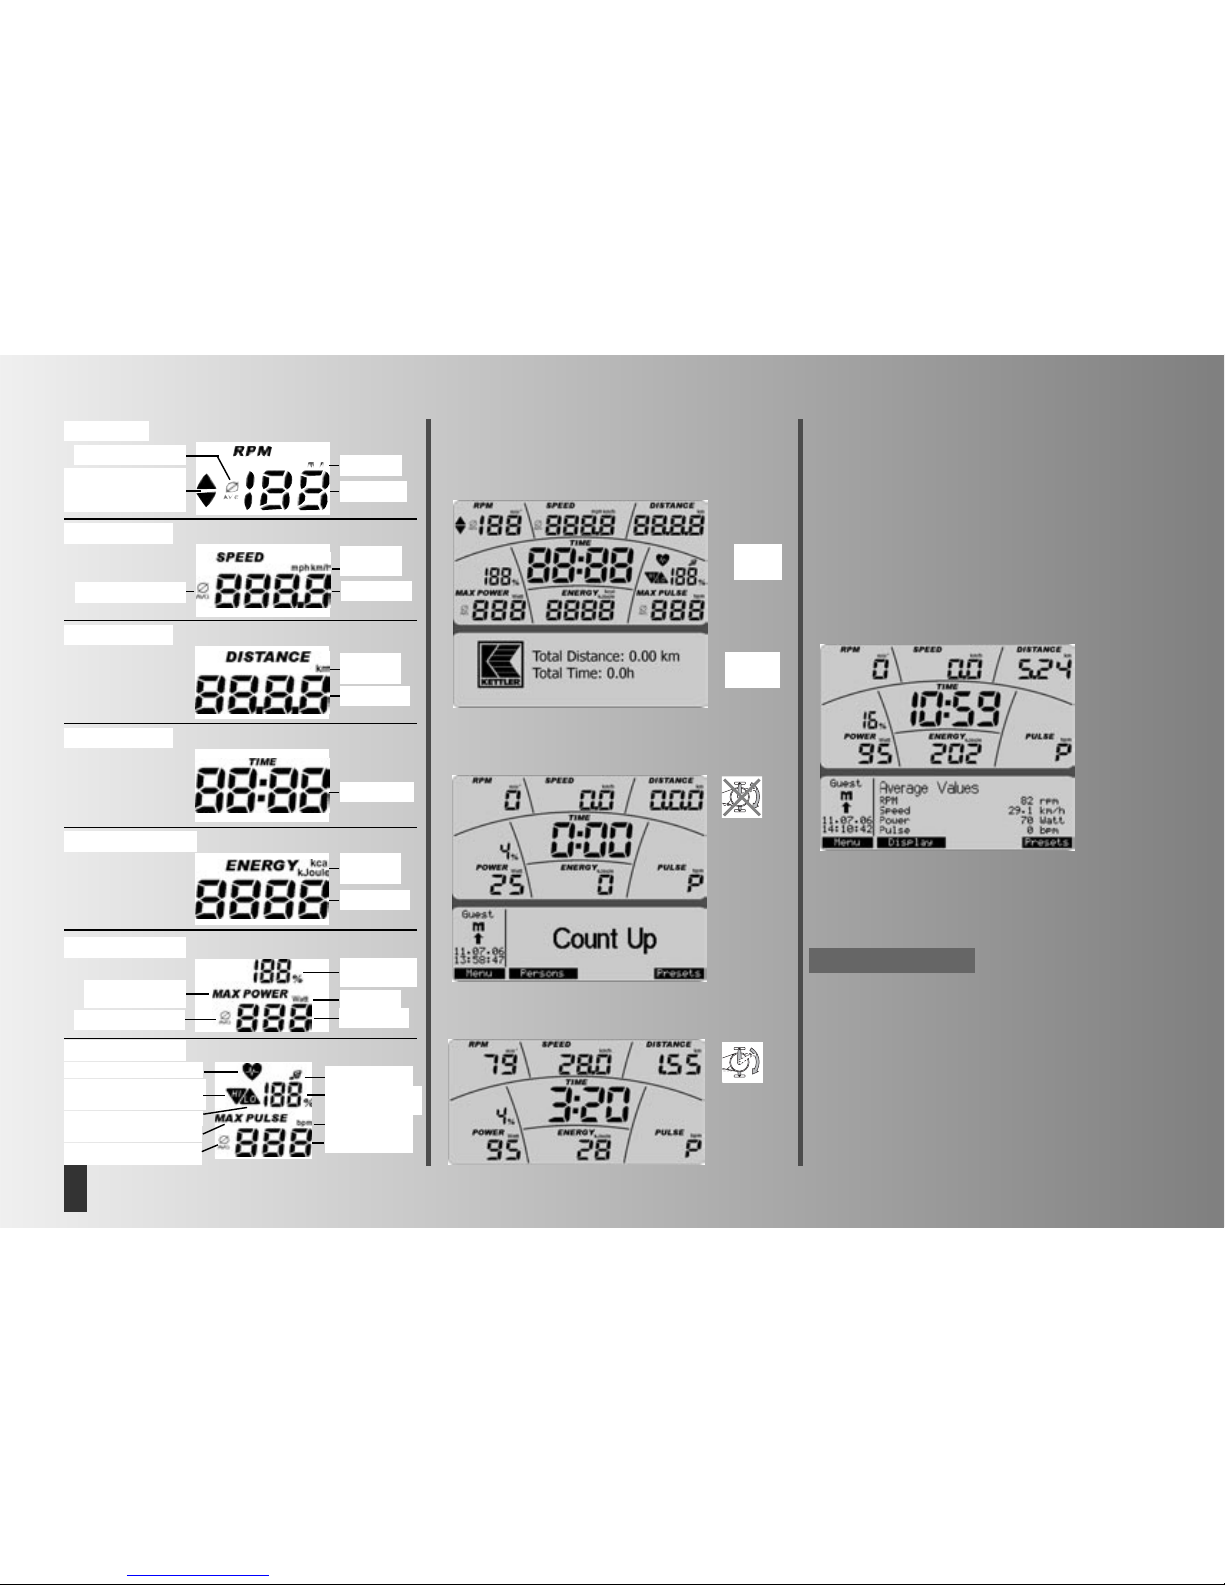
Display values
The illustrations show the operation as
wheel ergometer.
If the rotation speed corresponds to the
example values on the display, the
values for speed and distance at the
cross ergonometers are lower
At a pedal rate of 60 min-1
Wheel ergometer = 21.3 km/h
Cross ergometer = 9.5 km/h
+
3
GB
Page 4
4
GB
Training and operating instructions
Quick Start
(Introduction, no settings)
After turning on the power switch, first all features will be
displayed, then the total distance and total time.
Training stand-by
• After 10 seconds: Display Training Programme “Count Up”
Beginning of training
During pedalling the value displays are counting up.
Display: : current values
Pedal rate, Speed, Distance, Work Out Time, Performance,
Energy Consumption and Pulse (if activated). The % indication
above POWER shows the ratio of current performance to
maximum performance to be set individually by each user.
Changing performance during training:
Press “Plus” to increase performance by 5 points
Press “Minus” to decrease performance by 5 points
Interruption of training
If you achieve less than 10 pedal rotations/min, the electronic
system will recognise a training interruption. Pedal rate and
speed are displayed with “0”.
Display: Average values,
pedal rate, speed, performance and pulse (if measuring is
active)
Display : Total values
distance, energy consumption and training time
“Menu”, “User” will be explained on page 5 ff, “Display”on
page 9, “Presettings” on page 7“, CoolDown” and “WarmUp
on page 14 and the function “Fix/Var” on page 9.
Stand-by (sleep mode)
If there are no more workout impulses and no keys will be
pressed, the display switches to standby mode. The only feature being displayed is “POWER“. The switch off time can be
set in the menu “Settings/Standby”. Pressing a key or resuming work out, will activate the workout mode again.
Note:
Pedal rate
Value 0 – 199
Conversion
Average (AVG
Request:
pedal slower/faster
Average (AVG
Speed
Conversion
selectable
Value 0 – 99,9
Distance
Value 0 – 249
Time
Value 0 – 99,59
Energy Consumption
Conversion
selectable
Conversion
selectable
Value 0 – 9999
Performance
Puls
Maximal Puls
Average (AVG
Heart symbol (blinks)
Target pulse undershot -11
Warning (blinks) max.pulse +1
Target pulse overshot +11
Value 0 – 220
Conversion
Alarm ON/OFF
Percentage
Curr. pulse/max pulse
Conversion
Value 0 – 600
Average (AVG
Max. perform. achie-
ved in HRC mode
Curr. perform./
Max perform.
1“
10“
Page 5
5
GB
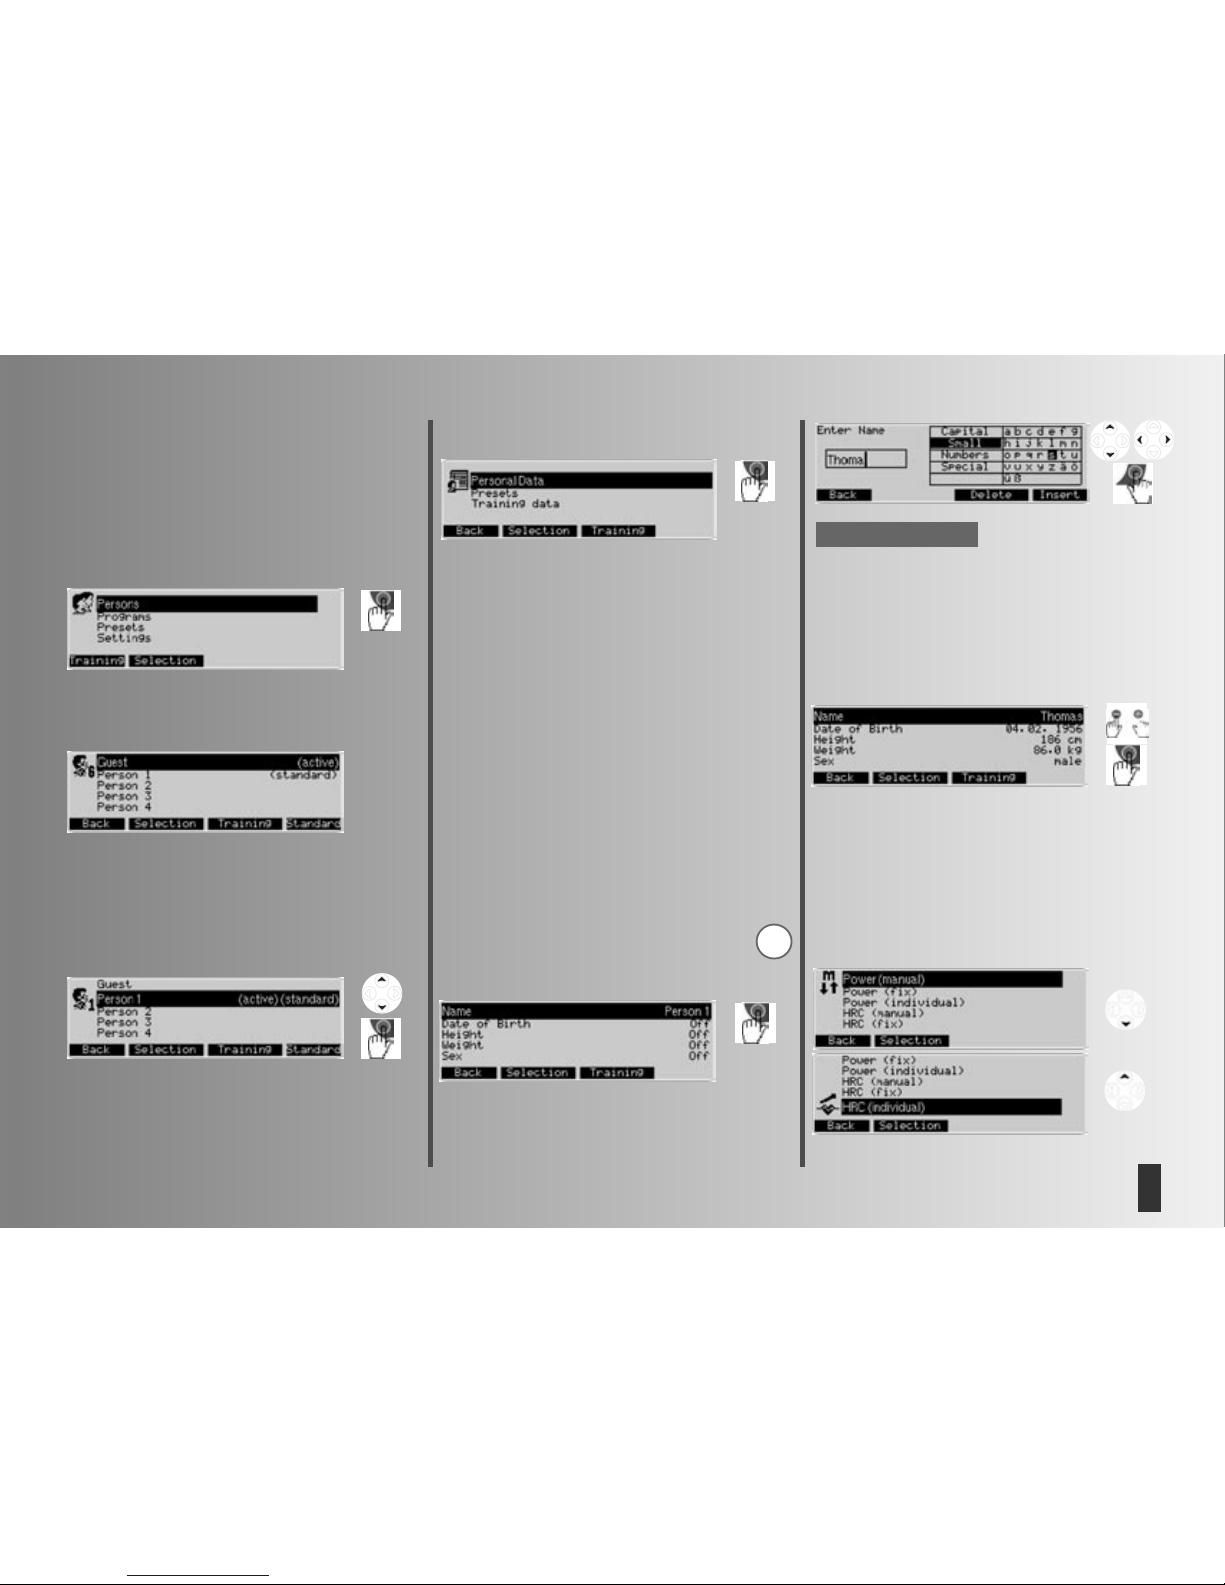
Main menu:
The functions of the 4 menus: Users, Programmes, Presettings
and Settings are grouped by topics.
Users
Use this menu to enter users and their individual data and settings and to select who will be the users during the next work
out and who will be the users the next time the equipment will
be switched on.
Press “Select” to access the submenu under the menu option
highlighted in black.
Press “Training” to jump to the standard workout programme of the “active” user.
Example:
“Guest” (active) will be working out next.
“User 1” (standard) is to be activated the next time the equip-
ment is switched on.
This setting will be saved until changed again.
User -> select User
“Zurück” drücken springt zum Menü “Personen”
zurück.
Press “Back” to jump to the “Users” menu.
Press “Training” to jump to the user's standard workout pro-
gramme.
Press “Standard” to set the user highlighted in black as user
the next time the equipment is switched on.
Press “Select” to open the respective submenu of the user
highlighted in black.
In this menu, you can choose from 3 submenus:
User Data
Use to enter user-related data.
Presettings
Use to enter data related to display and functions, set workout
options and pulse rates.
Workout Data
Use to access overall workout data.
User -> User 1 -> User Data
Press “Select” to access the “User Data” submenu: “User 1”.
Enter user-related data into this menu.
User 1 -> User Data
Enter user-related data into this menu.
• Here, entering the name replaces “User 1”.
• The Date of Birth affects the pulse-rate presettings.
• The height affects the B.M.I. calculation.
• The weight affects the B.M.I. calculation.
• At this stage, the user's “Sex” is irrelevant.
The “BMI” will be calculated from your data.
User data -> enter Name
Highlight “Name” and press “Select” to acces the submenu
”Enter Name”.
Delete the entry User 1 before entering name
Use the navigation keys to select areas and/or characters.
The active area is highlighted in black.
Press “Insert” to insert the selected character. A maximum of
8 characters may be entered.
Press “Back” to enter the entry. Enter at least 1 character,
otherwise the option “Back” will not be displayed.
Use the -/+ keys to adjust “Age”, “Height” and “Weight” and
to select the “Sex”.
The personal data of our fictitious user “Thomas” could look
like this.
Menü:
Programme
This menu contains the overview of the equipment’s workout
programmes.
Note:
G
Page 6
Training and operating instructions
6
GB
If the content of a menu cannot be displayed within the space of
the display, use the navigation keys “Up” and “Down” to scroll
the display. The selection will move and be highlighted in black
as you scroll. For the first menu option, the highlighting will be
on top, for the last ones it will be on the display's bottom.
Performance (manual):
Changing the performance while working out. Features such
as Time, Distance... may be increased or decreased.
Performance (preset):
The performance will be controlled by performance profiles.
Performance (individual)
Adjust the performance profile according to your requirements.
HRC (manual) HRC=Heart Rate Control.
Enter a pulse rate and the performance will be controlled
automatically by your pulse rate.
HRC (fixed)
Pulse-profile programmes control the performance according
to changing pulse rates.
HRC (individual)
Adjust basic pulse-profile programmes according to your requirements.
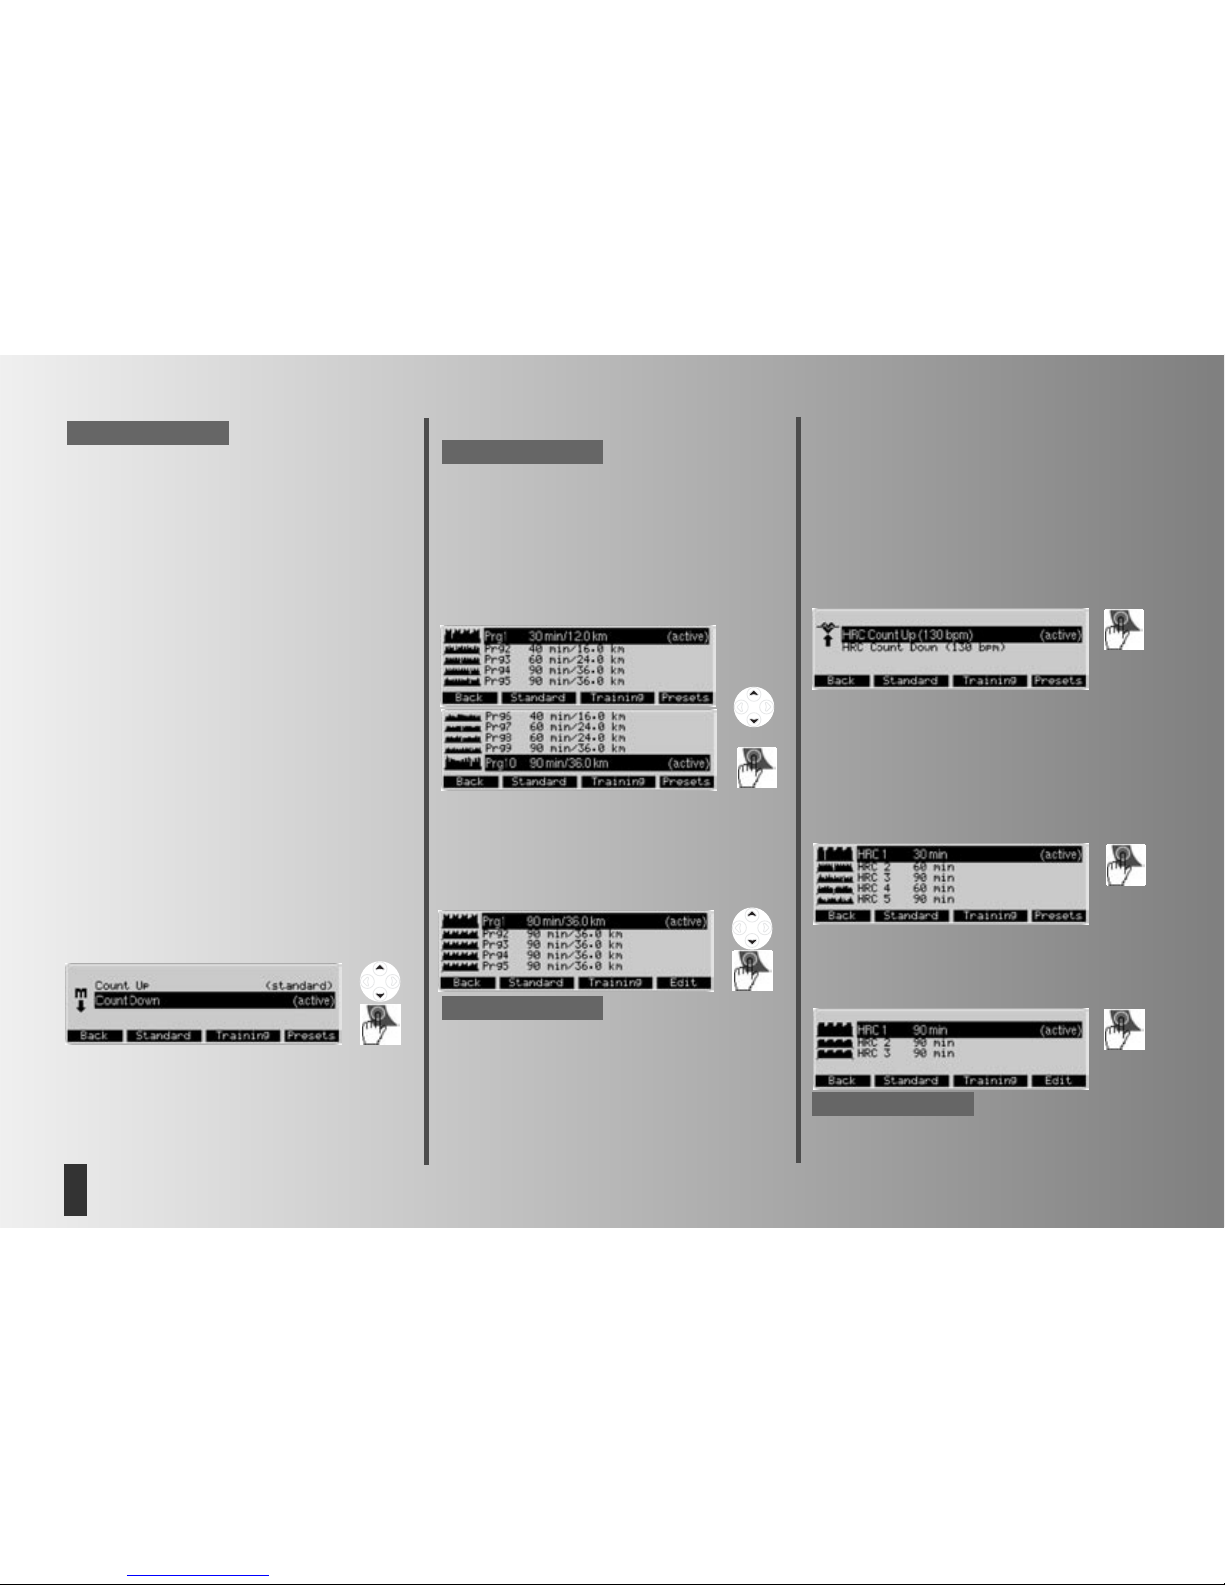
Programmes -> Performance (manual)
Under the option “Performance (manual)”, there are two workout programmes: “Count Up” and “Count Down”. Use both
programmes to adjust the performance while working out.
“Count Up” increases and “Count Down” decreases the settings you entered or that were taken over from the menu:
Presets -> Workout Settings
Use the navigation keys “Up” and “Down” to highlight the
selection in black and to activate.
Press “Standard” to select the highlighted programme as
Standard programme of the “active” user.
Press “Training” to select the highlighted programme and to
view the “Ready for Training“ mode.
“Presets” displays the Presets that yet need to be or
Note:
Programmes - > HRC programmes (manual)
The menu item “HRC (manual)” contains two training programmes: “Count Up” and “Count Down”. In both programmes a target pulse is achieved by performance regulation and
is maintained over the training period. The target pulse is eit-
her adopted from the default settings in the menu: Default
Settings - > Default Setting Pulse or is set to 130, if no data is
available. The values, which you preset or which have been
adopted from the default settings in the menu: Default Settings
- > Training values, are counted up in the “Count Up” mode
and are counted down in the “Count Down” mode.
Programmes - > HRC (fixed)
The menu item “HRC (fixed)” contains 5 training profiles,
which differ in duration and intensity. In these programmes,
changing target pulses are achieved by performance regulation. The profile height of the programme depends on the entries of your maximum pulse in the menu: Default Settings - >
Default Setting Pulse. If no data is available, an age of 50
years and a maximum pulse of 170 are set automatically.
Programmes - > HRC (individual)
The menu item “HRC (individual)” contains 3 training profiles.
You can edit the duration and the intensity of these profiles.
On how to create an “HRC (individual)” pressing “Edit”, please see page 15.
Note:
have already been entered into “active“ programmes.
The functions assigned to the function keys do not change
when selecting a workout programme. To avoid redundancy,
they will not be repeated in the following.
Programmes -> Performance Profiles (fixed)
Under the option “Performance Profile (preset)”, 10 training
profiles of varying duration and intensity are listed.
Performance will be adjusted according to profile presets.
Next to the programme number, the duration and the distance
of the programme are indicated.
Use the navigation keys “Up” and “Down” to highlight in
black and to activate.
Programmes -> Performances (individual)
Under the option “Performance Profiles (individual)”, 5 workout profiles are listed. Duration, distance and intensity of
these profiles may be changed.
On how to create“Performance Profiles (individual)” pressing
“Edit”, please see page 14.
Note:
Remark:
Page 7

7
GB
Display: Current default settings
The default settings are the values, which the active user
“Thomas” entered beforehand under Default Settings - >
Training values and pulse default settings:
Energy consumption = 800 kJoule
Training time = 30 min
Workout distance = 7.50 km
Maximum pulse (selected) = 170 bpm
Alarm at exceeding the maximum pulse = on
Target pulse monitoring = on
Fitness (75%) = active
By pressing “Training” you will adopt the values and settings and you skip to the view “Training stand-by”
Training stand-by
This image illustrates values and settings
Display : Top
Current pedal rate = 0 min -1
Current speed = 0.0 km/h
The following was taken over from “Thomas'” presets: workout
distance = 7.50 km
Duration of work out = 30:00 min
Energy consumption = 800 kJoule
Current performance ratio = 4 % (current performance to set
maximum performance 600 watt.) preset performance = 25 watt
Current pulse = 70 bpm [beats/min] Current pulse ratio = 41%
(current pulse to maximum pulse)
Display: Bottom
Active person = Thomas
Programme symbol
Current date and time
Active programme = perform. (manual) Count Down
Press “Menu” to jump back.
Press “User” to jump back to the “Users” menu
Press “Presets” to jump to the “Current Presettings“ menu to
display the presettings that yet need to be or have already
been entered in “active“ programmes.
The performance can be increased or decreased by 25 Watt
by means of the navigation keys or by 5 Watt by means of
the -/+ keys during training stand-by or training
1b
Selecting a training programme with performance profile: e.g.
Performance (fixed) Programme 1”
By pressing “Presets”, you will skip to the menu “Current
Default Settings” and the default settings, which are to be
entered or which have already been entered at the “active”
programme are displayed.
Display : Current default settings
Mode = time
Programme length = 30 min
Max. pulse (selected)= 170 bpm
Alarm at exceeding the maximum pulse = on
Here the default settings are the values, which the active user
“Thomas” entered beforehand under Default Settings -> Pulse
default settings:
Note:
Trai ning
Selecting a training programme
You can select two different programmes:
1. Training according to performance default settings
a) Manual performance input
b) Performance profiles
2. Training according to pulse default settings
a) Manual pulse input
b) Pulse profiles
1a
Selecting a training programme by means of manual perfor-
mance input e.g. “Count Down”
By pressing “Presets” you will skip to the menu “Current default
settings”. The menu displays the default settings, which are to be
entered or have already been entered at the “active programme”.
Performance (manual) - > Current default settings
In this menu, you can view, change or maintain the default
settings for the active programme.
Page 8

8
GB
Training and operating instructions
Programme Mode Time or Distance
Pressing “- /+” will switch the mode of the programme from
time to distance. Under programme length, you can adjust the
time from 20 - 90 minutes and the distance from 8 kilometres
to 36 kilometres (cross ergometer 4 - 18 kilometres).
Display: Current default settings
Mode = Distance
Programme length = 12.0 km
By pressing “Training” the values and settings are adopted
and you skip to the view “Training stand-by”.
With the bike ergometer, 1 minute corresponds to 400
metres. With a cross ergometer it is 200 metres.
Training stand-by
Display: To p
Distance = 12.0 km
Display: Bottom
Displaying programme profile in distance mode
The performance profile may be increased or decreased while
working out or in the training stand-by mode by 5 watt by using
the -/+ keys or by 25 watt by using the navigation keys left/right.
Note:
Note:
2a
Selecting a training programme, entering
the pulse manually, e.g. “HRC Count Down
By pressing “Presets”, you will skip to the menu “Current
Default Settings” and the default settings, which are to be
entered or which have already been entered at the “active”
programme are displayed.
Display: Current Default Settings
The value 128 is selected as pulse default setting for the training by selecting Fitness (75%) actively as target pulse.
By pressing “Training” the values and settings are adopted
and you skip to the view “Train stand-by”.
Training stand-by
Display: Training stand-by
• The values were adopted from the current default settings of
the programme.
The target pulse can be increased or reduced by the - / +
keys during training stand-by or during training.
Note:
2b
Selecting a training programme with pulse profiles: e.g. “HRC
(fixed) HRC Profile 1”
By pressing “Presets”, you will skip to the menu “Current
Default Settings” and the default settings, which are to be
entered or which have already been entered at the “active”
programme are displayed.
By pressing “Training” the values and settings are adopted
and you will skip to the view “Training stand-by”
Training stand-by
Display: Training stand-by
• The values were adopted from the current default settings of
the programme.
The pulse profile height can be increased or reduced by the
- / + keys: during training stand-by the entire profile and
during training only the workout.
Note:
Page 9

9
GB
Trai ning
The training programme “Performance (manual) Count Down”
is used as an example for the training display.
Display: Training stand-by
If you pedal with more than 10 rpm, the training display will start.
During training, you can change the multi-purpose display in
order to view more information.
Pressing “Display” switches the information from “Current
Training” to “Programme Indication”, then to “Pulse
Information”, then “Average Values” etc.
Display : Current Training
The upper display shows the Presettings in count-down mode
and the lower display shows workout values in count-up
mode.
In this example the performance has been increased to 125
Watt and the pulse has increased to 90 beats/min.
Display: Programme indication
The current programme is displayed
Display: Puls information
The pulse settings and default settings are displayed.
Display: Average values
The average values are displayed.
If a default setting has counted down to “Zero”, a count-up
mode will start. When the last default setting has been reached, you can hear a short beep.
Training Functions
Shifting from rotation-speed independent to rotationspeed dependent operating mode.
At the beginning of the training the appliance is always in
rotation-speed independent mode. Pedal rate is only
displayed as a value.
Press “Fix/Var” to switch between the rpm-linked and
non-rpm-linked modes.
Display: A double arrow in the pedal-rate display signals
rpm-linked mode
Press “Fix/Var” again to change back to the non-rpm-linked
mode
The equipment’s power limit is inactive while in rpm-mode.
Now, performances of up to 999 watt may be achieved
Rpm and Performance Control
If the displayed performance cannot be achieved at a given
pedal rate in non-rpm-linked mode, an upwards- or down-
wards-pointing arrow will be displayed.
Note:
Note:
G
G
Page 10

10
GB
Training and operating instructions
For technical reasons, a performance of 400 watt cannot be
achieved at 50 rpm, for instance, or 25 watt at 120 rpm, for
that matter. The arrows indicate that you need to pedal faster
or slower to make it possible to achieve a given performance.
Pulse Monitoring (Target Pulse)
If you activated the monitoring mode in target pulse, your
pulse will be monitored before and during the work out. Our
fictitious user “Thomas” activated a target pulse of 128. If the
target is overshot by 11 beats (139), the control function
displays a downward pointing HI arrow.
Conversely, if the target is undershot by 11 beats (117), an
upward pointing LO arrow will be displayed.
The lower limit will only be displayed, if you are training and
the target pulse had been reached before.
Pulse Monitoring (Maximum Pulse)
If maximum pulse has been activated in pulse monitoring and
the maximum pulse has been overshot, MAX and a blinking
HI arrow will be displayed. If the alarm signal has been activated (note symbol), an audible double alarm signal will also
be given.
Recovery Pulse Taking
Recovery pulse means taking the pulse within one minute while counting down. Your pulse will be taken twice,
at the beginning and at the end of the time interval;
from the difference, a level of fitness will be calculated. Press
“Recovery” to start a new function.
Note:
Display: : Recovery Pulse Rate
Counting down, displaying current pulse rate and pulse rate
at the start of the recovery pulse rate function. The percentage
indicates the ratio of current pulse rate to maximum pulse
Press “Cancel” to stop the recovery pulse taking and to jump
to the training stand-by mode, displaying average values.
The recovery pulse function will only be offered, if the pulse
rate is being displayed.
Display: Recovery Pulse Rate
End of recovery pulse taking, displaying the end pulse after 60
seconds, from the difference between the pulse rates at the start
and the end a fitness level will be determined accordingly.
In this function, the centrifugal mass will be decelerated automatically. Further training is not productive.
Note:
Note:
Press “Back ” to jump to the training stand-by mode, display-
ing average values.
Recovery Pulse Taking and Pulse Loss
If the pulse taking is interrupted, the count down will be completed, without calculating a fitness level.
Press “Back” to jump to the training stand-by mode, displaying average values.
Interrupting or Terminating the training
If there are less than 10 pedal rotations/min or the “recovery”
function is being pressed the electronic equipment registers
interruptions in the work out. Average values will be displayed.
Display:
The training data will be displayed as long as has been set in
the menu “Settings -> Standby”. If you do not press any keys
and do not work out in this time, the electronic equipment will
switch to the standby mode.
G
Page 11

11
GB
Resuming the Training
If you resume the training within the “Standby Time”, your last
values will be continued or counted down.
Individual training Profiles (Edit)
The menu “Programmes” includes an option for creating individual performance profiles and HRC-profile programmes.
Performance (individual)
There are 5 performance programmes with the same distance
and duration, which may be adjusted individually.
Press “Edit” to change to the submenu “Editing Programmes”.
Each minute will be displayed as a bar. The workout time
(duration) may be set between 20 and 90 minutes. Use -/+
keys to shorten or extend the training time by 10 minutes.
The navigation keys left/right mark a bar. It will be displayed
blinking. The applicable period of time will be displayed
under TIME and the performance under POWER. Use the navi-
gation keys up/down to change the performance of the blinking bar.
An adjusted programme could look like this. Press “Back” to
save your individual profile.
Display: programme selection with adjusted programme 1
HRC (individual)
You can chose from 3 pulse profiles for editing.
Press “Edit” to change to the submenu “Editing Programme”.
Each minute will be displayed as a bar. The training time
(duration) may be set between 20 and 90 minutes. Use -/+
keys to shorten or extend the workout time by 10 minutes.
Use the navigation keys left/right to mark a bar. It will be
displayed blinking. The applicable period of time will be
displayed under TIME and the pulse under PULSE.
Use the navigation keys up/down to change the target pulse
of the blinking bar.
The target pulse of a given bar, will be displayed in percent
and in beats and refers to your maximum pulse, provided you
entered it in. The target pulse may be adjusted by 20 - 100%
of the maximum pulse.
If the maximum pulse of the active person is not available, a
50-year-old standard user with a maximum pulse of
170=100% will be used.
An adjusted programme could look like this. Press “Back” to
save your individual profile.
Display: Programme Selection with adjusted programme 1
The adjusted individual programmes and profiles will be
saved under each individual user and will not replace the programmes and profiles of other users.
Note:
Note:
Page 12
12
GB
Training and operating instructions
Menu
Presets
Under “Presets” all users (guest, U1-U4) may adjust and save
settings and presettings for the long term, irrespective of each
other. The settings entered under guest will be replaced by
standard values when the equipment is restarted.
This menu includes 3 submenus:
1. Display & Functions
Access to set your performance values, speeds and how the
energy consumption is displayed.
2. Training Values
Access to set values for energy, workout time and distances
that will be taken over as standard values under Presets.
3. Presetting Pulse Rates
Access to set how your pulse will be monitored and which
value will is to be used.
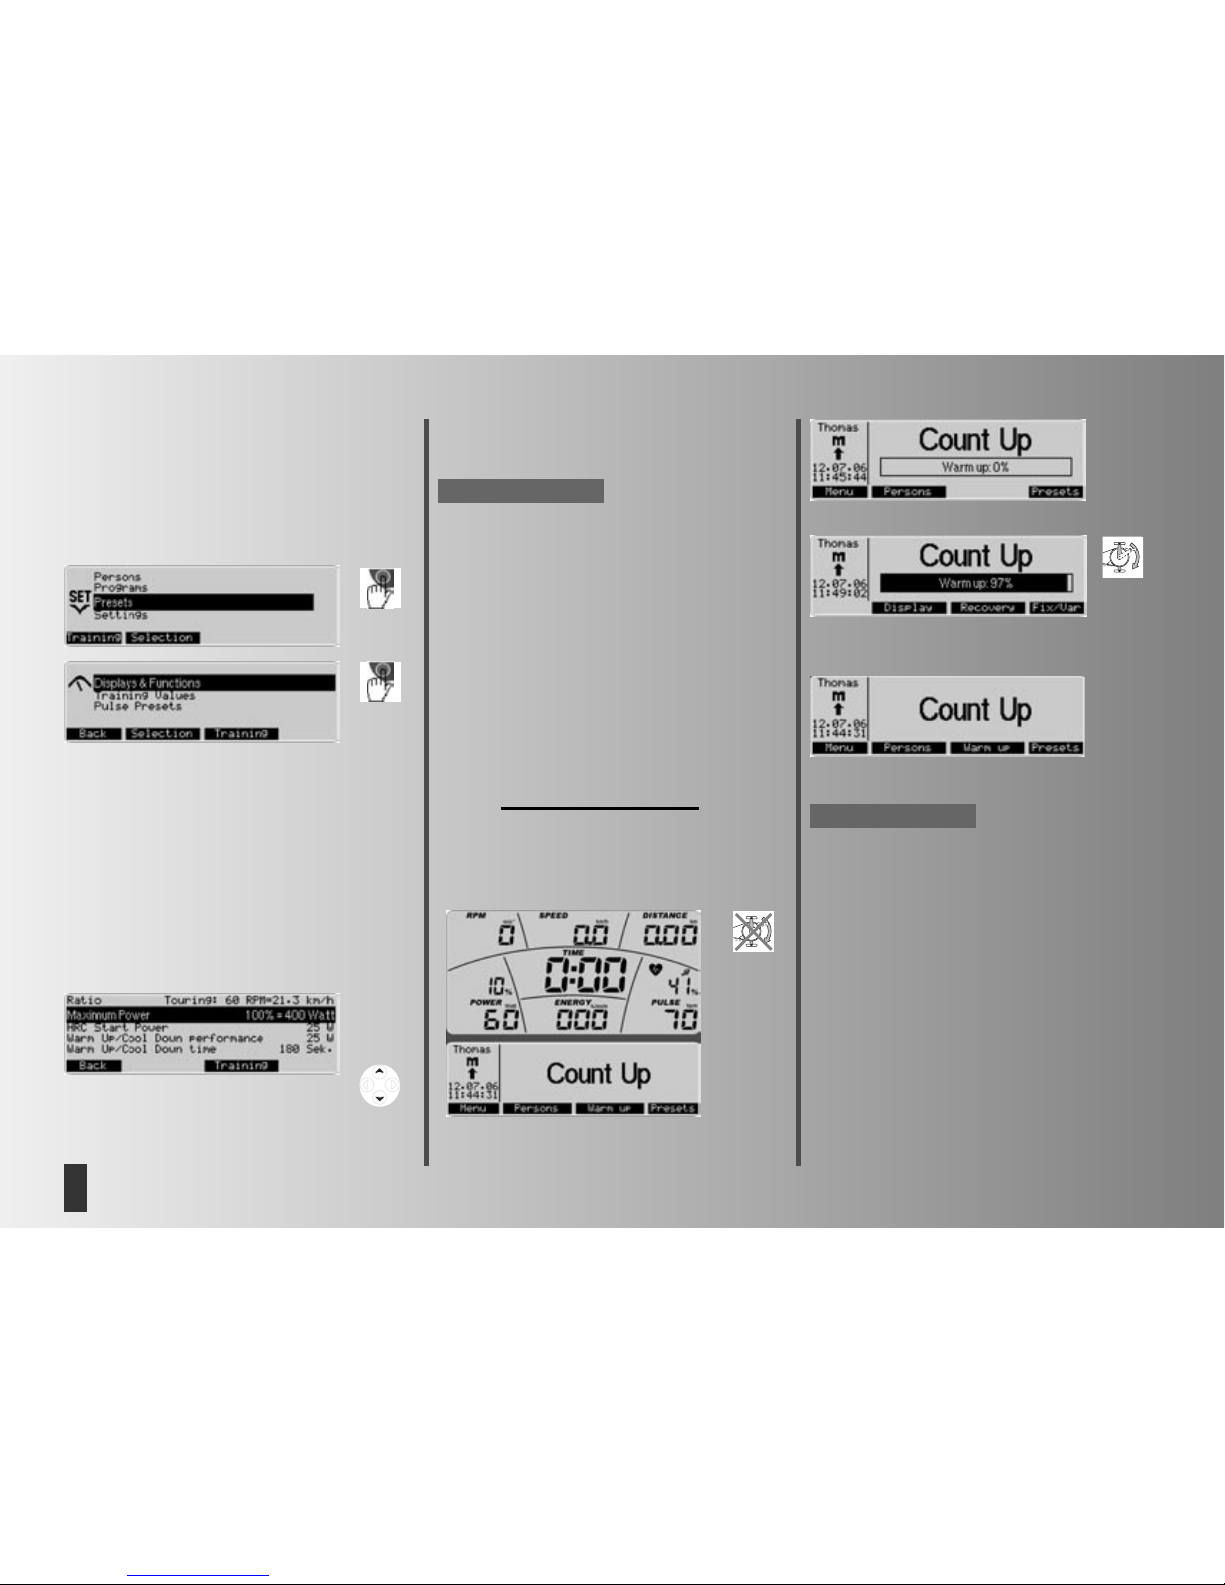
Presettings -> 1. Display & Functions
• Use “Transmission” to set the speed that is to be displayed:
Mountain: 60 pedal rotations result in 15.5 km/h, Touring:
21.3 km/h and Racer: 25.5 km/h.
This menu option is not included in the Cross Ergometer.
• Use “Maximum Performance” to retain or limit the maximum performance of the equipment. Above this limit, no performance will be tolerated. The % bar in the performance
display shows the current ratio to the set maximum performance.
• Use “HRC Start Performance” to set the starting performance between 25 - 100 watt in pulse-monitored programmes, if
the preset value appears too high or too low to you.
• Use “WarmUp- / CoolDown Performance” to enter a value
between 25 - 100 watt as target performance, resulting in an
automatic performance increase in the programmes Count
Up/Count Down (WarmUp) or performance decrease
(CoolDown) in relation to the target performence.
• Use “WarmUp-/CoolDown-Duration” to set the duration of
the WarmUp-/CoolDown function between 60-240 seconds.
WarmUp
During the initial 30 seconds, the performance remains constant, then the performance will be increased until the target
performance is reached (previously set performance).
Press “WarmUp” to display a progress bar.
The progress bar standing at 0%.
When pedalling, the progress bar is growing to 100%. In this
example, the performance increased from 25 to 60 watt.
When 60 watt = 100% have been reached, there will be
three sound signals before the function will be terminated.
The function “WarmUp” will only be offered, if the performance set is higher than the WarmUp-/CoolDown- performance under Display & Functions.
Note:
Note:
Page 13
13
GB
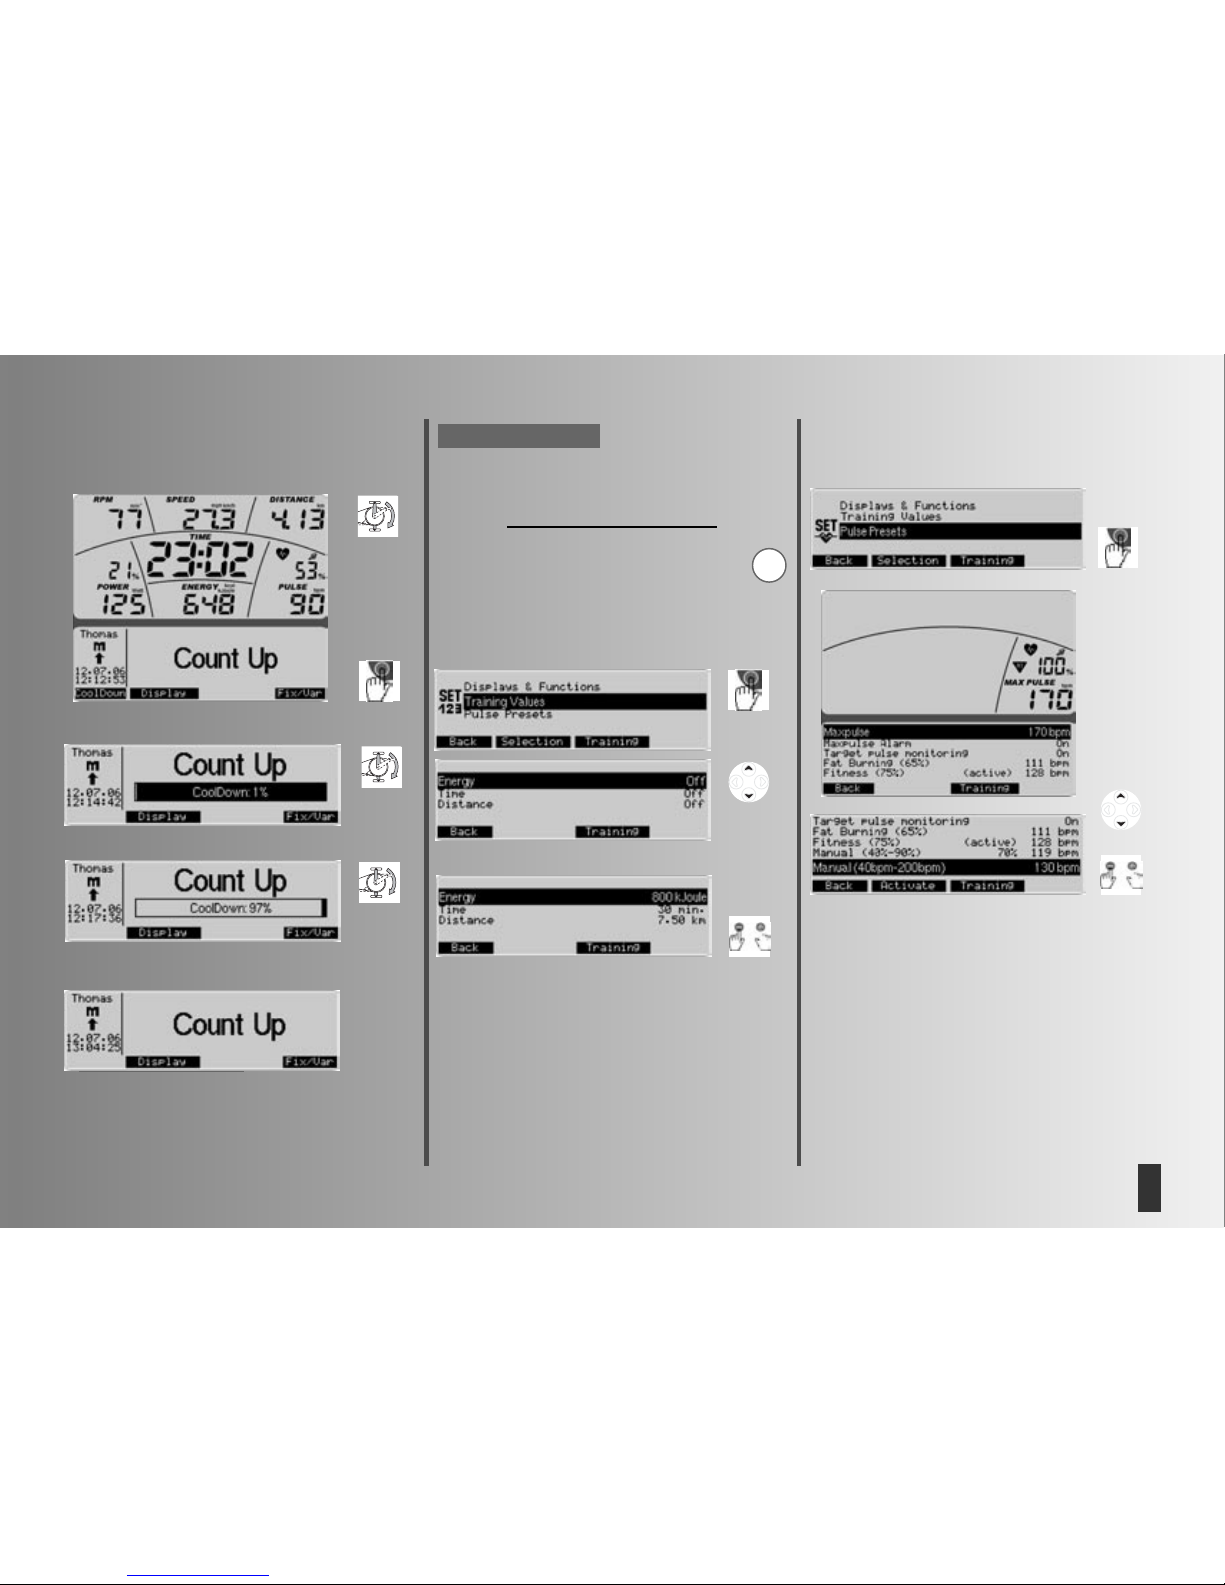
The “CoolDown” function will only be offered, if the current
workout performance is higher than the WarmUp/CoolDown
performance under Display & Functions. Press “CoolDown” to
display a progress bar.
• Use “Energy Calculation” to set whether, your energy
consumption (in real terms) or the energy turnover of
the ergometer (physical) is to be displayed.
• Use “Energy Unit” to set whether energy consumption is to
be displayed in kJoule or kcal.
Presettings -> 2. Training Values
When accessing the menu initially, values are set to “Off”.
After entering energy consumption, workout duration and
distances, the values could look like this. When you enter
workout values, they will be loaded into the “ready for work
out ” mode of the workout programmes. These values may still
be changed. At the start of the work out, these values will be
counted down, at zero blinking characters indicate that the
values preset have been reached. The values will not influence
the operation of the ergometer.
Note:
CoolDown
The performance will be lowered down to the WarmUp/
CoolDown performance which will be kept for 30 seconds until
the WarmUp/CoolDown duration has been reached.
Press “CoolDown” to display a progress bar.
The progress bar standing at 1%.
Example: When the CoolDown performance = 100% is reached, there will be 3 audible signals and the function terminates.
Presettings -> 3. Pulse Settings
Once the user data of the “active” user has been entered,
some pulse-rate values will be displayed. If not, the display
will show ”Off” instead of the values.
• The Value “Maximum Pulse” 170. This value has been
informed by the user's data (220 - age), e.g., Thomas' (50
years). Medically founded, it indicates the maximum tolerable
pulse rate that users of a given age may have but should not
have while working out.
G
Note:
Page 14

14
GB
Training and operating instructions
• Use “Maximum Pulse” to reduce or deactivate this value.
The pulse rate indicated in % refers to this value: Current pulse
to maximum pulse and the depths of sections of pulse programmes. You may enter values to select target pulse values.
• Use “Alarm if Maximum Pulse Exceeded” to set whether an
audible alarm should be activated when the maximum pulse
has been exceeded. If “Maximum Pulse” has been set to Off,
the alarm will also be deactivated.
• In “Target Pulse”, you have 2 options: “Target Pulse
Control” On or Off.
Off will disable the target pulse monitoring function.
On gives you further options, if “Maximum Pulse” has been
set to On:
“Fat Burning (65%)”. This means that 65% of your age-speci-
fic maximum pulse will be controlled or monitored according
to the user's data (220 - age) as pulse rate value.
Example: 111
“Fitness (75%)”. This means that 75% % of your age-specific
maximum pulse has been used as a basis.
Example: 128
“Manual (40%-90%)”. This means that you may enter a value
in % between 40% and 90 % by using the -/+ keys.
Example: 128 (70% will be calculate as recommended value)
On gives you just one option, if “Maximum Pulse” has been
set to Off:
Manual (40bpm - 200bpm). This means that you may enter a
non-age-specific pulse value between 40 and 200 by using
the -/+ keys.
Example: 130 (Will be displayed as recommended value)
Press “Activate” to activate the selection highlighted in black
(active).
The selected target pulse will be used as presetting for pulse
programmes. During the work out, this value will be achieved
and held constant by performance control. For the other workout programmes, it will be used as a guideline to achieve
pulse values that are 10 beats below or over the workout target pulse. This pulse rate will be controlled by two arrows in
the pulse display.
Press “Back” to save the settings.
Menu
Settings (for all users)
This menu offers the possibility to carry out display- and appliance-specific settings and adjustments in 5 sub menus. These
adjustments apply to all users.
Settings -> 1. Units
Here you determine in which language the menus are displayed, the display of speed and distance in kilometres or miles.
You can also delete the values of the overall kilometres and
the overall training time.
Press “Delete” followed by “Delete OK” to execute this operation.
Press “Back” to save the settings.
“Delete OK” deletes the total kilometre values and the total
time.
Note:
Settings -> 2. Display
Here you can adjust the contrast and the brightness of the
display.
Press “Back” to jump back to the main menu. The settings will
be saved.
Press “Cancel” to jump back to the main menu. The settings
will not be saved.
When the optimal contrast is set, there will be no heavy shades. The setting “Contrast” applies to the lower display and
“Brightness” to both displays.
Settings -> 3. Time and Date.
In this menu you may set time and date, display formats and
other display options.
Use “-/+” to change settings, formats and values.
Press “Back” to save the settings.
Note:
Page 15

15
GB
Settings -> 4. Standby
In this menu, you may set the period of time the display takes
to switch off after the work out when no more keys will be
pressed.
Press “Back” to save the settings.
Settings -> 5. Factory Settings
In this menu, the original programmes of the different groups
of programmes can be restored. Any programme changes will
be deleted.
Press “Delete” to get to the function “Delete OK”.
Press
“ Delete OK” to delete the entries and changes of the
menu options highlighted in black. For programmes, the original settings will only be restored for active users.
Press All Settings to delete all settings of all users.
Press “Back” to jump to the menu “Settings”.
General Information
System beeps
Switch-on
Upon switching-on during the segment test, a short beep
is heard.
End of programme
A programme end (profile programmes, count-down) is
indicated by a short beep.
Exceeding maximum pulse
If the preset maximum pulse is exceeded by one pulse
beat, every 5 seconds two short beeps can be heard.
Error indication
In case of an error, 3 short beeps can be heard.
Recovery
In this function, the flywheel mass is braked automatically.
Further training is not recommended.
Calculation of the fitness grade (F):
Grade (F) = 6.0 – (
10 x (P1–P2)
)
2
P1
P1 stress pulse, P2 = recovery pulse
F1.0 = very good, F6.0 = insufficient
Switching time/distance
With the programmes “Performance Profiles”, you can switch
the profile per column in the settings from time mode (1 minute) to distance mode (400 metres or 0.2 miles). Cross ergometer: (200 metres or 0.1 miles).
Rotation-speed independent mode
(constant performance)
The electromagnetic eddy-current brake regulates the braking torque to the preset performance in case of alternating pedal rates.
Arrows pointing upwards/downwards
(Rotation-speed independent mode)
If a certain performance cannot be achieved with the rotation
speed (e.g. 600 Watt at 50 pedal rotations), the upward or
downward arrow indicates when faster or slower pedalling is
required.
Rotation-speed dependent mode
(constant braking torque)
The eddy-current brake sets a constant braking torque. Only
pedalling will change the performance.
Calculation of the average values
The calculation is effected per training session.
Information on pulse measuring
The pulse calculation starts when the heart symbol in the display
flashes according to your pulse beat.
With ear clip
The pulse sensor operates with infra-red light and measures the
changes in the light permeability of your skin caused by your pulse
beat. Before fastening the pulse sensor to your ear lob, please rub it
strongly 10 times in order to increase blood circulation.
Avoid interfering impulses.
• Fasten the ear clip carefully at your ear lob and try to find the most
favourable point for sensoring (heart symbol flashes without interruption).
• Do not train directly under strong incidence of light, e.g. neon light,
halogen light, spot light, sunlight.
• Completely avoid any vibrations and wobbling of the ear sensor
including cable. Always fasten the cable with the clip at your clothes
or - even better - at a headband.
Page 16

16
GB
Training and operating instructions
You should select the Watt performance in such a way as to
maintain your muscle stress over an extended period of time.
Higher performances (Watt) should be effected in connection
with a higher pedal rate. Too low a pedal rate (less than 60
rpm) leads to a static stress on the muscles and thus to premature fatigue.
Warm-Up
At the beginning of each training session you should limber
up for about 3-5 minutes, slowly increasing the exercise so as
to get your cardiovascular system and your muscles going
Cool-Down
So-called “cooling down” is equally important. After each training session (after/without recovery), you should carry on pedalling with a small pedal resistance for a further 2-3 minutes.
The stress in your further endurance training should first of all be
increased via the amount of stress, e.g. instead of 10 minutes,
do 20 minutes a day; or instead of training 2x a week, train 3x.
Along with structuring your endurance training to suit your personal requirements, you can always fall back on the training programmes integrated in your training computer.
Glossary
Age
Input for the calculation of the maximum pulse.
B.M.I
Body Mass Index: Value depending on weight and height.
Calculation of the BMI:
Weight (kg)
------------------- = Body Mass Index
Height
2(m2
)
Example of Thomas:
Weight 86 kg
Height 1.86 m
86 (kg)
------------------- = 24.9
1.86
2(m2
)
With a chest strap
Please read the instructions on the back of the packaging.
Mobile telephones, TV sets and other electronic equipment
generating an electric field may create problems for heart-frequency measurement.
Malfunction in the training computer
Turn the main switch off and then on again. In case of a malfunction at the date or time display, change the battery on the
backside of the display panel. (See assembly instructions)
Information on interface
The programme “ERGO-KONZEPT II”, item no. 7926-500, to be
bought from your specialised dealer, permits the control of this
KETTLER appliance with a customary PC through this interface.
You will find further information on the possibilities of this interface and on software updates (firmware) of this appliance at
our homepage
www.kettler.de.
Training Instructions
You can determine whether or not your course of training has
had the desired effects after a few weeks by doing the following:
1. You achieve a certain level of staying power with less cardiovascular output than before;
2. You achieve a certain level of staying power for a longer
period of time, though with the same cardiovascular output;
3. After achieving a certain level of cardiovascular output,
you recover more quickly than previously.
Standard values for endurance training
Maximum pulse rate: Maximum stress means achieving the
individual maximum pulse rate. The achievable maximum
heart rate depends on the age.
The following rule of thumb applies: The maximum heart rate
per minute equates to 220 pulse beats minus your age.
Example: Age 50 years > 220 - 50 = 170 pulse beats/min
Weight: Another criterion for determining the optimal training
data is the weight. The target specification for stress is 3
Watt/kg weight for men and 2.5 Watt/kg weight for women.
You must also take into consideration that the physical efficiency decreases at the age of 30 and beyond: with men approx.
1% and with women approx. 0.8% per life year.
Example: Man, age 50; weight 75 kg
> 220 - 50 = 170 pulse beats/min maximum pulse
3 Watt x 75 kg = 225 Watt
> Minus “age discount” (20% of 225 = 45 Watt)
> 225 -45 = 180 Watt (target specification in case of stress)
Stress intensity
Stress pulse: The optimal stress intensity is achieved at 65 75% (see diagram) of the individual cardiovascular performance. This value will change, depending on the age.
Amount of stress
Duration of a training session and frequency per week:
The amount of stress can be regarded as ideal when 65 75% of your personal cardiovascular performance is achieved
over an extended period of time.
Rule of thumb:
Either 10 min / per training session for daily training,
or approx. 30 min / per training session for training 2-3x
weekly,
or approx. 60 min / per training session for training 1-2x
weekly.
Pulsediagramm
Fitness and Fat Burner
220
200
180
160
140
120
100
80
Pulse
Ag
e
20 25 30 35 40 45 50 55 60 65 70 75 80
Maximalpulse
(220 minus Age)
Fitnesspulse
(75% of Max.Pulse)
Fat combustion pulse
(65% of Max.Pulse)
90
Page 17

17
GB
Standard values:
Age BMI
19-24 years 19-24
25-34 years 20-25
35-44 years 21-26
45-54 years 22-27
55-64 years 23-28
> 64 years 24-29
The result of Thomas (50 years) shows a BMI of 24.9, which
is a normal value. Deviating from the standard values can
result in damages to your health. Please consult your doctor.
Control
The electronic system regulates the performance and the pulse
on manually entered or preset values.
Dimension
Units for displaying km/h or mph, Kjoule or kcal, hours (h)
and performance (Watt).
Energy (realistic)
Bike ergometer:
The energy metabolism of the body is calculated with a
degree of efficiency of 25% necessary for the mechanic output. The other 75% are converted into heat.
Cross ergometer:
Here the ratio is 16.7% and 83.3%.
Fat consumption pulse
Calculated value: 65% max. pulse
Fitness pulse
Calculated value: 75% max. pulse
Manual
Calculated value from: 40 - 90% max. pulse
Maximum pulse
Calculated value: 220 - age
Pulse monitoring
If an arrow appears, which is pointing downwards, your
pulse is 11 beats above the target pulse. If an arrow appears,
which is pointing upwards, your pulse is 11 beats below the
target pulse.
Menu
Display, in which values are shown or settings are changed
Percentage scale
Comparison between the current performance and the maximum preset appliance performance.
Performance
Current value of the mechanic (braking) power in Watt. This is
the power, which the appliance converts into heat.
Profiles
A bar display showing performances or pulses over a period
of time or a distance.
Programmes
Training possibilities which present manual performances or
target pulses or performances or target pulses determined by
the programme.
Pulse
Measuring the heart beat per minute.
Recovery
Measuring the recovery pulse at the end of the training. A difference is calculated from the starting and the end pulse and
a fitness grade is calculated on that basis. If you do not change your training, the improvement of this grade is an indicator of your fitness.
Reset
Delete the contents and restart the display
Interface
USB female connector for data transfer with a PC.
Tar get pulse
Pulse value, which is to be achieved, either manually or determined by the programme.
Classification m f
Underweight <20 <19
Normal weight 20-25 19-24
Overweight 25-30 24-30
Adiposity 30-40 30-40
Severe adiposity >40 >40
Page 18

18
GB
Training and operating instructions
 Loading...