


Printer VZ-330
Operating Manual

Precautions in the Printer
• DO NOT insert any foreign objects such as a piece of metal or any liquid in the internal parts or slot of the printer.
Doing so may cause re or electric shock.
• DO NOT put the printer into water in a place where it could get wet.
Doing so may cause re, a failure or other accidents.
• DO NOT put the printer into ne particles in a place where it could get ne particles.
Doing so may cause accidents.

1. Printer and Accessories ................................................ 4
2. Part Names ................................................................... 5
3. Operation Panel ............................................................ 6
4. Connecting AC Adapter ................................................ 7
5. Loading the Paper ......................................................... 8
6. Connecting the Printer .................................................. 9
7. DIP SW Settings ........................................................... 1 0
8. Test Print ....................................................................... 1 3
9. Handling the Battery Pack ............................................ 1 4
10. Maintenance ................................................................. 1 6
11. Trouble shooting ........................................................... 1 8
12. Specications ................................................................ 2 0
Contents

4
2. Accessories
Once you have opened th e c ar ton, make sure it
contains the printer and all accessories.
1. Printer
Thermal paper AC adapter AC cable
*
The shape of the printer cable in different according to the measuring instrument used.
Battery pack Printer cable
Manual
Function setting guide
1. Printer and Accessories
(The battery pack is set in the printer)

5
Power lamp
Power Switch
Paper cover window
Paper cover
1. Front 2. Back
3. Bottom
Battery pack cover
Power supply jack
Parallel inputconnector
Serial input connector
Ground screw
2. Part Names

6
4
Power LED
Indicates the power is on. Blinks once every second
to indicate the battery is being charged. Blinks once
every 1/2 second to indicate the battery is low.
5
ONLINE LED
Indicates the printer is ONLINE. Blinks to indicate
there is data in the buffer memory when the printer is
OFFLINE.
6
OFFLINE LED
Indicates the printer is OFFLINE. If the paper is not
set or has run out, the LED flashes. When an error
occurs, both the ONLINE and off-line LEDS light.
*
<ONLINE>
Set the printer ONLINE to print by receiving the data.
*
<OFFLINE>
Set the printer OFFLINE to feed paper with the FEED
button or to stop printing. (Print data and commands
cannot be input in OFFLINE mode.)
*
Be sure the thermal head is in the home position (at
the far left) before turning off the power switch. If left
away from the home position for a long period, the
print quality might deteriorate.
2. Operation Panel
1
Power Switch
Slide the power switch to turn the power on (ONLINE)
or off.
2
FEED button
Feeds thermal paper when pressed in OFFLINE mode.
3
ONLINE button
Press to toggle between OFFLINE and ONLINE.
4
Power LED
5
ONLINE LED
1
Power Switch
6
OFFLINE LED
3
ONLINE button
2
FEED button
1. Names
3. Operation Panel

7
*
Always use an specified adapter.
*
Connect the ground terminal to ground screw with
ground wire.
*
DO NOT touch the pins of the DC plug.
*
To remove the AC adapter, turn off the power switch
first, then unplug the AC adapter and the DC plug.
Ground wire
Ground screw
DC plug
Power supply jack
1
Turn off the power.
2
Plug the DC plug on the AC adapter into the power
supply jack on the printer.
3
Plug the AC adapter into an outlet.
4
Turn on the power.
4. Connecting AC Adapter

8
Insertion Slot
The printing surface
is the outside of the
thermal paper roll.
5
Keep pressing the FEED button until the thermal
paper feeds straight and smoothly.
6
Close the paper cover and push down on it to lock it
into place.
*
Load th e paper in an are a prot ected from direct
sunlight.
*
When the thermal p a p e r i s s e t c o rrectly, t h e
OFFLINE LED stops blinking and stays on to indicate
the printer is still in OFFLINE mode.
*
When the paper is about to run out, red lines appear
on both sides of the paper.
1
Lightly push up on the front of the paper cover with
your thumb and rotate it toward the back of the printer.
2
Turn on the power.
3
Cut the tip of the thermal paper straight across. New
Paper can be inserted as is. (See gure on right)
4
Push the tip of the thermal paper into the inlet at
the bottom of the paper holder, until the auto-loader
catches it and feeds about 10cm of it through the
paper cutter.
5. Loading the Paper

9
1
Turn off the printer and measuring instrument.
2
Connect the printer to the measuring instrument with
an printer cable.
<Parallel> Secure with veil lock.
<Serial> Secure with screws.
3
Set the software DIP switches (DIP SW) to match the
input method. (See P10 [DIP SW Settings] )
4
Turn on the printer and the measuring instrument.
The connection in completed it printed data is sent
fr o m the meas uring ins trument, a n d it is pr inted
correctly.
<Parallel>
<Serial>
Measuring
instrument
Measuring
instrument
*
The driver wight not be used according to
the connector shape of the printer cable.
6. Connecting the Printer

10
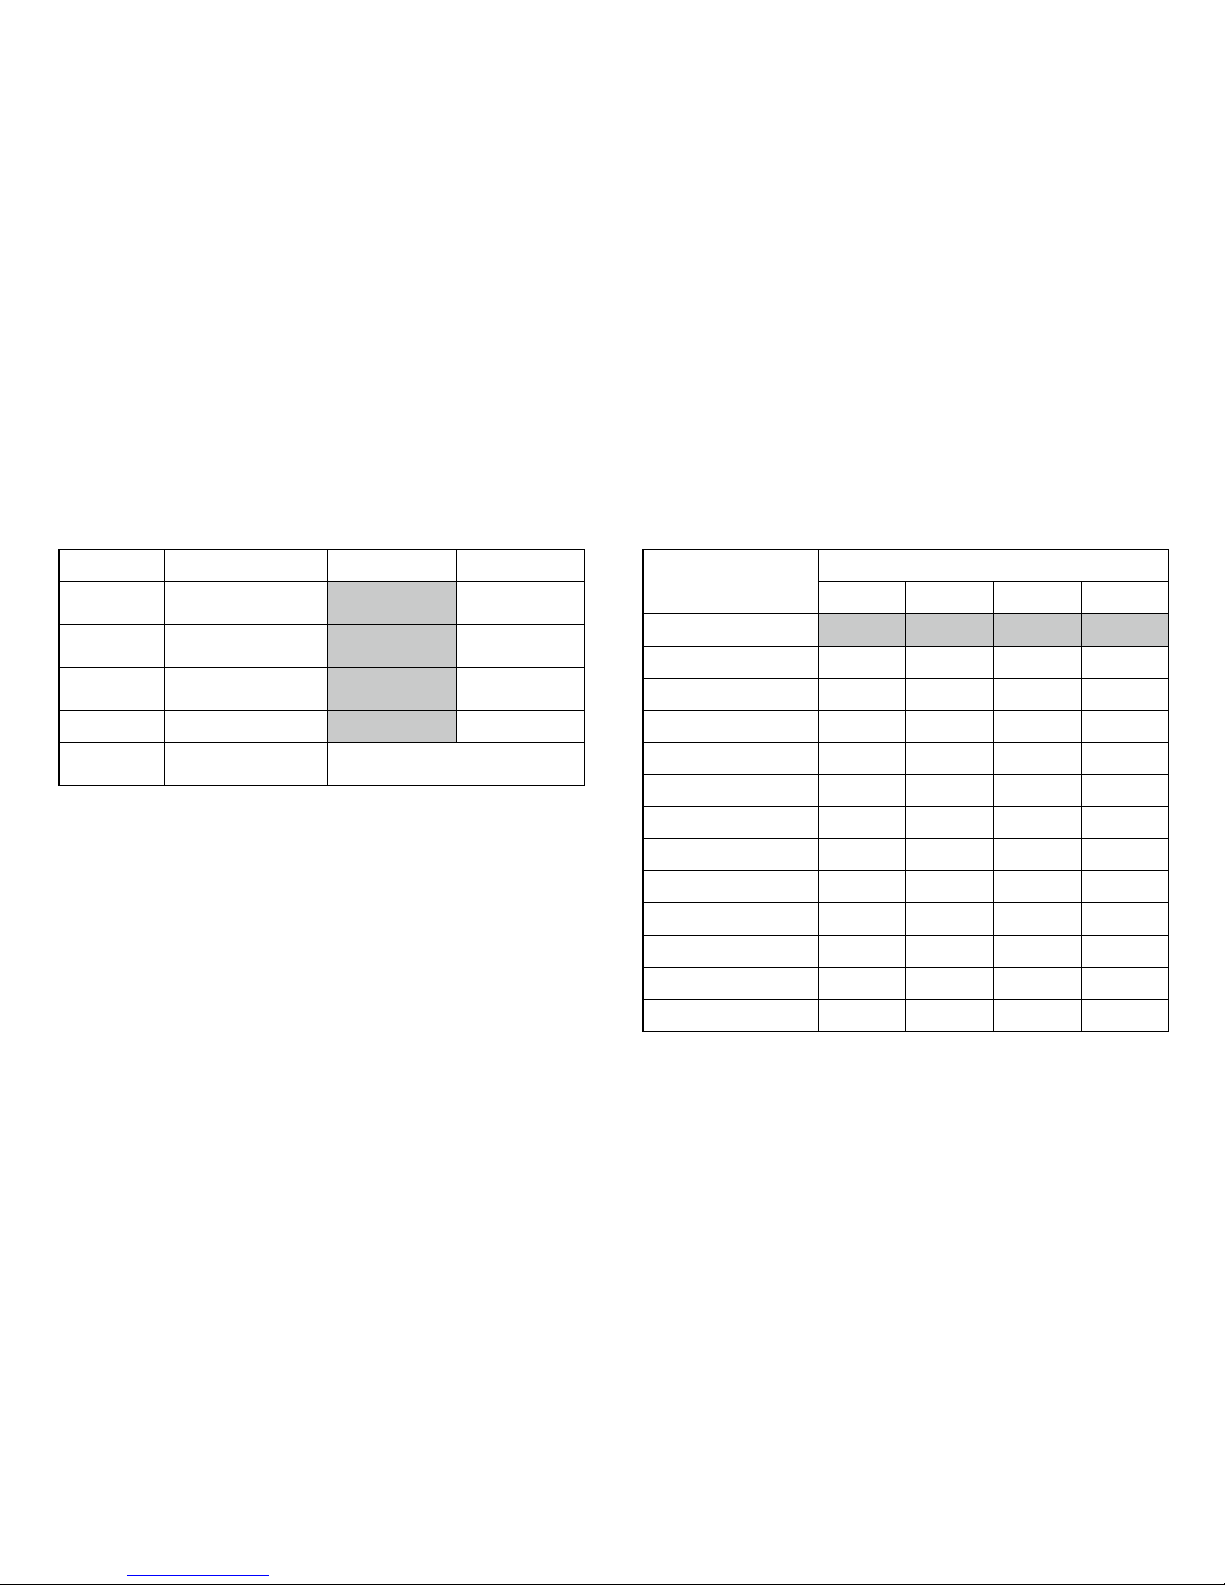
1. DIP SW1
Switch No. Function ON OFF
1 Input Method Parallel Serial
2 Printing speed High Low
3 Auto loading ON OFF
4 CR function
Carriage return
and line feed
Carriage
return
5
DIP SW Setting
Command
Enable Disable
6 to 8 Print density See the table below
Switch No.
Print Density (%)
72 79 86 93 100 107 114 121
6 ON ON ON ON OFF OFF OFF OFF
7 ON ON OFF OFF ON ON OFF OFF
8 ON OFF ON OFF ON OFF ON OFF
*
DO NOT set switches 5 to 8 a setting other than that
shown in the table.
The startup settings and input method can be set by
the software DIP switches (DIP SW).
*
It is necess a r y to c h a ng e the setting with the
me asu ring instrument used . Ple ase se e attached
paper "VZ-330 function setting guide" in detail.
*
The setting cannot be discontinued until ending it the
setting is started on the way. Please never turn of f
power while setting it.
*
in dicates factory default setting.
7. DIP SW Settings
11
2. DIP SW2
Switch No. Function ON OFF
1 Print mode
No.rmal printing
(40 columns)
Condensed printing
(80 columns)
2
User-dened
characters back-up
ON OFF
3 Chatacter type
Ordinary
characters
Special
characters
4 Zero font 0
φ
5 to 8
International
character set
See the table below
Character set
Switch No.
5 6 7 8
Japanese ON ON ON ON
American ON ON ON OFF
German ON ON OFF ON
English ON ON OFF OFF
French ON OFF ON ON
Spanish 1 ON OFF ON OFF
Italian ON OFF OFF ON
Swedish ON OFF OFF OFF
Danish 1 OFF ON ON ON
Danish 2 OFF ON ON OFF
Norwegian OFF ON OFF ON
Spanish 2 OFF ON OFF OFF
Latin American OFF OFF ON ON

12
Baud rate
Switch No.
5 6 7 8
75 ON ON ON ON
110 ON ON ON OFF
150 ON ON OFF ON
300 ON ON OFF OFF
600 ON OFF ON ON
1200 ON OFF ON OFF
2400 ON OFF OFF ON
4800 ON OFF OFF OFF
9600 OFF ON ON ON
19200 OFF ON ON OFF
75 OFF ON OFF ON
75 OFF ON OFF OFF
75 OFF OFF ON ON
75 OFF OFF ON OFF
75 OFF OFF OFF ON
75 OFF OFF OFF OFF
3. DIP SW3
Switch No. Function ON OFF
1 Data bit length Eight bits Seven bits
2 Parity permission Without With
3 Parity condition Odd Even
4 Flow control H/W BUSY XON /XOFF
5 to 8 Baud rate See the table below

13
2. Print Sample
In a test print, characters 20H to FEH are printed
in condensed, ordin ary and d ouble -width modes
according to the international, special character and
zero font settings of the software DIP switches. This is
followed by a small checkered pattern and solid black
pattern printed dot by dot, after which the current
settings are printed.
1. Procedure
1
Turn off the power.
2
Make sure the thermal paper is inserted correctly.
3
Turn on the power while pressing the FEED button to
start the self-test.
4
Release the FEED button as soon as the self-test
starts.
8. Test Print
*
The printer stops automatically after the test print.
DO NOT turn off the power to the printer while it is
printing.

14
1. Inserting the Battery Pack
1
Turn the printer over and open the battery cover as
shown in Figure 1.
2
Connect the battery pack as shown in Figure 2, turn
it so the label is visible, insert it into the printer, and
close the battery cover. Close the battery cover.
2. Removing the Battery Pack
1
Turn the printer over and open the battery cover as
shown in Figure 3.
2
Pull out the battery pack, grab the connector with your
thumb and index nger, and remove it by pulling up on
it. Close the battery cover.
Even if AC adapter is not used, this printer can be
used by the battery pack.
*
The battery pack has already been installed as for
this printer at purchase. Please charge it before use,
because it is not charged enough.
*
The battery discharges when it is not used for a long
time, therefore, immediately recharge the battery
after long periods of storage.
*
Always use an specified battery pack.
*
A fully charged battery pack can print about 3000
lines.
Connector
Battery pack
Label
Battery pack cover
Figure 1 Figure 2 Figure 3 Figure 4
9. Handling the Battery Pack

15
4. When the Battery Gets Low During Printing
When the power LED starts blinking about once every
0.5 seconds and the printer goes OFFLINE, connect
the AC adapter. The ONLINE LED will blink if there
is data left in the memory buffer. In order to print the
remaining data, connect the AC adapter as quickly as
possible and push the ONLINE button.
5. When Using the Rechargeable Battery
Turn off the power switch after use.
6. When Using the AC Adapter
If you are not using the printer, turn off power switch,
and unplug the AC adapter.
3. Charging the Battery
1
Turn the power OFF.
2
Connect the AC adapter to the printer. The POWER
LE D will blink o n c e every second indicatin g t he
battery is charging. It takes about 10 hours to fully
charge the battery. When the battery is fully charged,
the power LED stops blinking and goes off.
3
Disconnect the AC adapter.
*
Always charge the battery in a location that is from 5
to 40℃ otherwise it may lead to a degradation of the
battery.
*
It takes about 15 hours to charge the battery with
the pow e r O N . B a t t e r y ch a r g i ng is temporari l y
disrupted while the printer is printing and resumed
automatically when printing is completed.

16
Both the ONLINE and OFFLINE lamps light and data input and paper feed are disabled when one of the following four
errors occurs.
1. Errors
10. Maintenance
Situation Considered cause, solution method
• The head does not return to the home position even
when the power is turned on.
• The head d o es not ret urn to the h o m e position at
interval home return.
Are there any dust such as a piece of paper in the
printer head?
Turn off the power switch. Remove any foreign objects.
• The case that online lamp and offline lamp remain
turning on.
Is the temperature of use extremely low or high?
Use the printer at 0 to 40 ℃ (32 to 104℉).
Is the battery consumed?
Please charge it, connecting to AC adopter.
• The ofine lamp is blinking and it can’t be online.
Is the paper set into the printer? Furthermore, is the
paper running short during printing?
If you put th e paper into the printe r, of fline lamp
changes from blinking to turning on light. Please push
online switch and print.

17
*
Interval Home Return
To protect the printer, the head returns to the home
position (the leftmost position) automatically when;
1
data is not sent from the measuring instrument.
2
the ONLINE button is pressed to set the printer
OFFLINE.
3
the printer runs out of thermalpaper.
2. Caring For The VZ-330 Printer
If the outside of your printer gets dirty, wipe it with a
soft, dry cloth. If it gets very dirty, wet a soft cloth
with mild detergent diluted with water, squeeze it well,
and clean the printer.
*
DO NOT us e t h i n n e r, b e n z i n e , o r other volat i l e
chemicals.
*
DO NOT allow water to get inside the printer.

18
11. Trouble shooting
Symptoms Check Point Action
1
The power does not turn on.
(The power LED is off.)
Is the power switch on? Turn on power switch.
Is the AC adapter connected correctly?
Is power being supplied from the outlet?
See Section 4.
Plug other electrical appliances into the outlet to
check that it is working.
Is the battery recharged?
(When using a battery)
See Section 9, charge the battery pack.
2
Smoke
Smells
Over heat
Strange noise
The inside of the printer is abnormal.
Please pull out the AC plug from the outlet, and
remove the battery pack at once. Please contact your
vender to repair the product.
3
The thermal paper does
not feed.
Is the thermal paper loaded correctly? See Section 5.
Is there foreign matter in the paper inlet? Remove any foreign objects.
Are the ONLINE and OFFLINE LEDs on? An error has occurred. See Section 6.
Is the ONLINE LED off? Set the printer OFFLINE.
4
The printer does not print
or stops during printing.
Is the OFFLINE LED ashing? The thermal paper has run out. Load more paper.
Are the ONLINE and OFFLINE LEDs on? An error has occurred. See Section 6.
Is the OFFLINE LED on? Set printer ONLINE.
Is the OFFLINE LED ON and the Power
LED blinking?
If you cannot set it ONLINE, the battery has
discharged. Connect the AC adapter.
Is the ONLINE LED ashing? Connect the AC adapter and set the printer ONLINE.

19
Symptoms Check Point Action
4
The printer does not print
or stops during printing.
Are the SWDIP switches set correctly? Set them according to the “Function setting guide”.
Is the printer cable connected correctly?
Please conrm whether for the cable to left out or to
be connected correctly.
Is the print setting of the measuring
instrument correct? (Only the measuring
instrument with the print setting)
Please conrm whether to be set correctly referring
to the operating manual of the measuring instrument.
Please set it correctly when it is not correct.
Are you using back of paper? The outside is the front. See Section 5.
5
The printing is light or
dark.
Is the temperature very high or low? Use the printer at 0 to 40℃.
Are the SWDIP switches set correctly?
Please conrm whether the setting is suitable for the
measuring instrument referring to attached paper
"Function setting guide". Please set it correctly when
not suitable.
Please set it referring to Section 7 when you want to
change the density arbitrarily.
6
Both the ONLINE and
OFFLINE LEDs on, and
the buttons cannot be
operated.
Do the head return to the home position
even when the power is turned on?
Do the head return to the home position at
interval home return?
Turn off the Power Switch. And remove the foreign
material.
Is printing attempted at extremely low or
high ambient temperatures?
Use the printer at 0 to 40 ℃.
Do the battery runs out? See Section 9, charge the battery pack.

20
• Printing method : Thermal serial dot
• Character mode
Total number of dots : 9 × 320 dots / line
Character matrix : 9 dot high × 7 dot wide
Space between characters
: 1dot
Columns :
40 column (normal), 80 column (condensed)
Printing direction :
Unidirectional or bidirectional logical seek
• Bit-image graphics mode
Total number of dots : 8 × 320 dots / line
Printing direction : Unidirectional logical seek
• Printing width : 89.6mm
• Printing speed : Max. 52.5cps (normal),
: Max. 80cps (condensed)
• External dimensions : 160mm×170mm ×66.5mm
• Mainframe weight : Approx. 580g (excluding battery)
• Life : Approx. 500, 000 lines
(continuous printing of 40 columns of “8”)
(when print density is 100%)
• Temperature : 0 to 40
℃
• Humidity : 33 to 80% RH (non-condensing)
• Thermal paper specications
Width : 112mm
Outer diameter : 48mm
Roll length : Approx. 28m
• AC adapter specications
Input : AC100V~240V, 50/60Hz
Output : DC7.0V, 2.5A
External dimensions
: 77.5×51.8×39.2mm
Cable length : 1.5m
weight : Approx. 165g
• Battery pack specications
Cell type : Ni-MH
Rated Voltage : 4.8V
weight : Approx. 120g
11. Specifications

21
MEMO


1309・PA・0101・050
 Loading...