


PATENT NO. PCT/1B2014/064440
www.ketla.co.za | www.justinbonello.com | www.cookedinafrica.com
BRAAI

CONTENTS
Pg 3. Introduction by Justin Bonello
Pg 5.
Pg 21. Warnings
Pg 22. Gas & Regulator Installation and Leak Testing
Pg 23. Gas Warning and Safety
Pg 24. Operation
Pg 25. Storage
Pg 26. Care and Maintenance
Pg 27. Parts List
Pg 29. Assembly Instructions
Pg 36. Leak Testing Illustration
Pg 37. Technical Specifications and Troubleshooting
Pg 38. Call centre info
Recipes
pg 2

pg 3
First up, let me congratulate you for buying your Ketla. Good man. I promise that your
braaing experience is about to leap into the stratosphere.
Before we get kicking, let’s first clear some things up: If you, like me, were only a charcoal
or wood fire freak before this purchase, don't worry. I've spent a lot of time making sure
that this gas kettle braai delivers great flavour in a fraction of the time of a traditional
braai, with all that smokiness that you love to get from a braai… and it’s as simple as click,
cook, serve…
Here are a couple of tips:
Unlike a charcoal kettle braai, with the Ketla, the two air vents on top of the lid are used
to increase or decrease the heat in a reverse of the way vents are used in a traditional
kettle braai. Open the vents to decrease the temperature in the Ketla, and close them to
increase the heat. The real trick here is that, in conjunction with the vents and the two gas
burners, you have really precise control of heat in the Ketla – and this is critical if you
want to be a master of the fire.
The two gas rings: One of the best innovations of the Ketla is the fact that you have two
gas rings – an inner and an outer that distribute heat evenly in the Ketla, but also add
precise heat control. I use the inner gas ring (with both vents open) to slow-cook perfect
potjies over 4-6 hours, and use the outer gas ring on high to seal o and caramelize meat
so it has that awesome colour and flavour that’s created by the Maillard Reaction (Google
it if you don’t know what this is – it helps to understand what happens when we put meat
on the fire). The two funnels prevent fat from clogging the gas rings – so always make
sure that they are in, and correctly seated, or the heat distribution goes awry.
Smoke: The big debate… How can gas give you that awesome umami that’s created from
wood smoke and the fat dripping on the coals and that you’re used to getting from the
braai? Easy – there are three ways:
In your new Ketla kit, there is a stainless-steel smoking box that clips in over the inner
funnel. Before you braai, soak some wood chips in water – then, place a couple of embers
in the smoking box, sprinkle the wet wood chips over them, and then braai. This works
great for quick and short braais. If you don’t have another fire handy or burning for the
kuier fire and the embers to put in the smoking box, simply soak the wood chips, put
them in the smoking box, clip it over the inner funnel, crank up the temperature of the
Ketla to 250° C (or more), and voila, the smoking chips will start smouldering, releasing
that smokiness we all know and love… just remember to drop the heat by closing o
either of the two gas burners once the chips are smoking.
The second way also uses the staineless-steel smoking box, but instead of clipping the
box over the inner funnel, simply place the box on top of the grid.
The last way (and my preferred way of adding smoke to the fire), is to put a couple of
smoking embers or coals in the smoking tray that clips on the drip pan under the Ketla
and add some wet wood chips. Because heat rises, and cold air is sucked in from the
bottom of the Ketla, the smoke gets drawn up into the kettle, wafting over your meat. The
great thing about this is it works like a bomb on longer cooking, barbecue-style cuts of
meat, and the beauty is that you can add more smoke at any time, without losing heat or
having to take the grid o.

pg 4
The Drip Tray: This is yet another amazing innovation. Normally when you light the fire, all
that delicious fat that drips onto the coals is instantly incinerated, and disappears into a pu
of smoke. With the Ketla, the fat is collected in the drip tray and can be used to make
delicious gravies or to coat roast potatoes or, or, or – you get the idea.
Lastly, I still light a fire for the kuier – and leave the Ketla for the cooking. That way, I still get
to enjoy that time with my mates around the fire with a cold one in hand, instead of
spending all my time managing coals, wondering if the temperature is right… or even worse,
dealing with wet wood that just never seems to burn or create coals…
Please don’t get me wrong, there’s still a place and time for a fire – especially when you’re
heading out into the great outdoors with the wife, kids and mates. The Ketla just makes it
easy to come home from work, click it on, braai some shisa nyama and serve up
mouthwatering food.
Best
Justin
Ps. I’ve included a couple of recipes to get you going – and one thing that you’ll quickly see,
is that the Ketla adds a bit of science to the cooking process, and takes away the guesswork
– the end result is that anyone can cook great food on the open fire.

pg 5

For information on all of Justin’s titles, please visit
www.penguinbooks.co.za
pg 6

pg 7

pg 8

pg 9

pg 10

pg 11

pg 12

pg 13

pg 14

pg 15

pg 16

pg 17

pg 18

pg 19

Extracted from Justin Bonello Cooks for Friends; Ultimate Braai Master and
Cooked in the Karoo all by Justin Bonello, written by Helena Lombard (Penguin)
and Cooked in Africa by Justin Bonello (Penguin)
For information on all of Justin’s titles, please visit www.penguinbooks.co.za
pg 20

pg 21
etre

pg 22
-
-
‘
“OFF”
“OFF”
pg 23

pg 24
light
the “OFF” position.
Hold knob in this position for 2-3 seconds for ignition.
To turn the braai o, turn the cylinder valve or regulator.
two

pg 25

pg 26
three

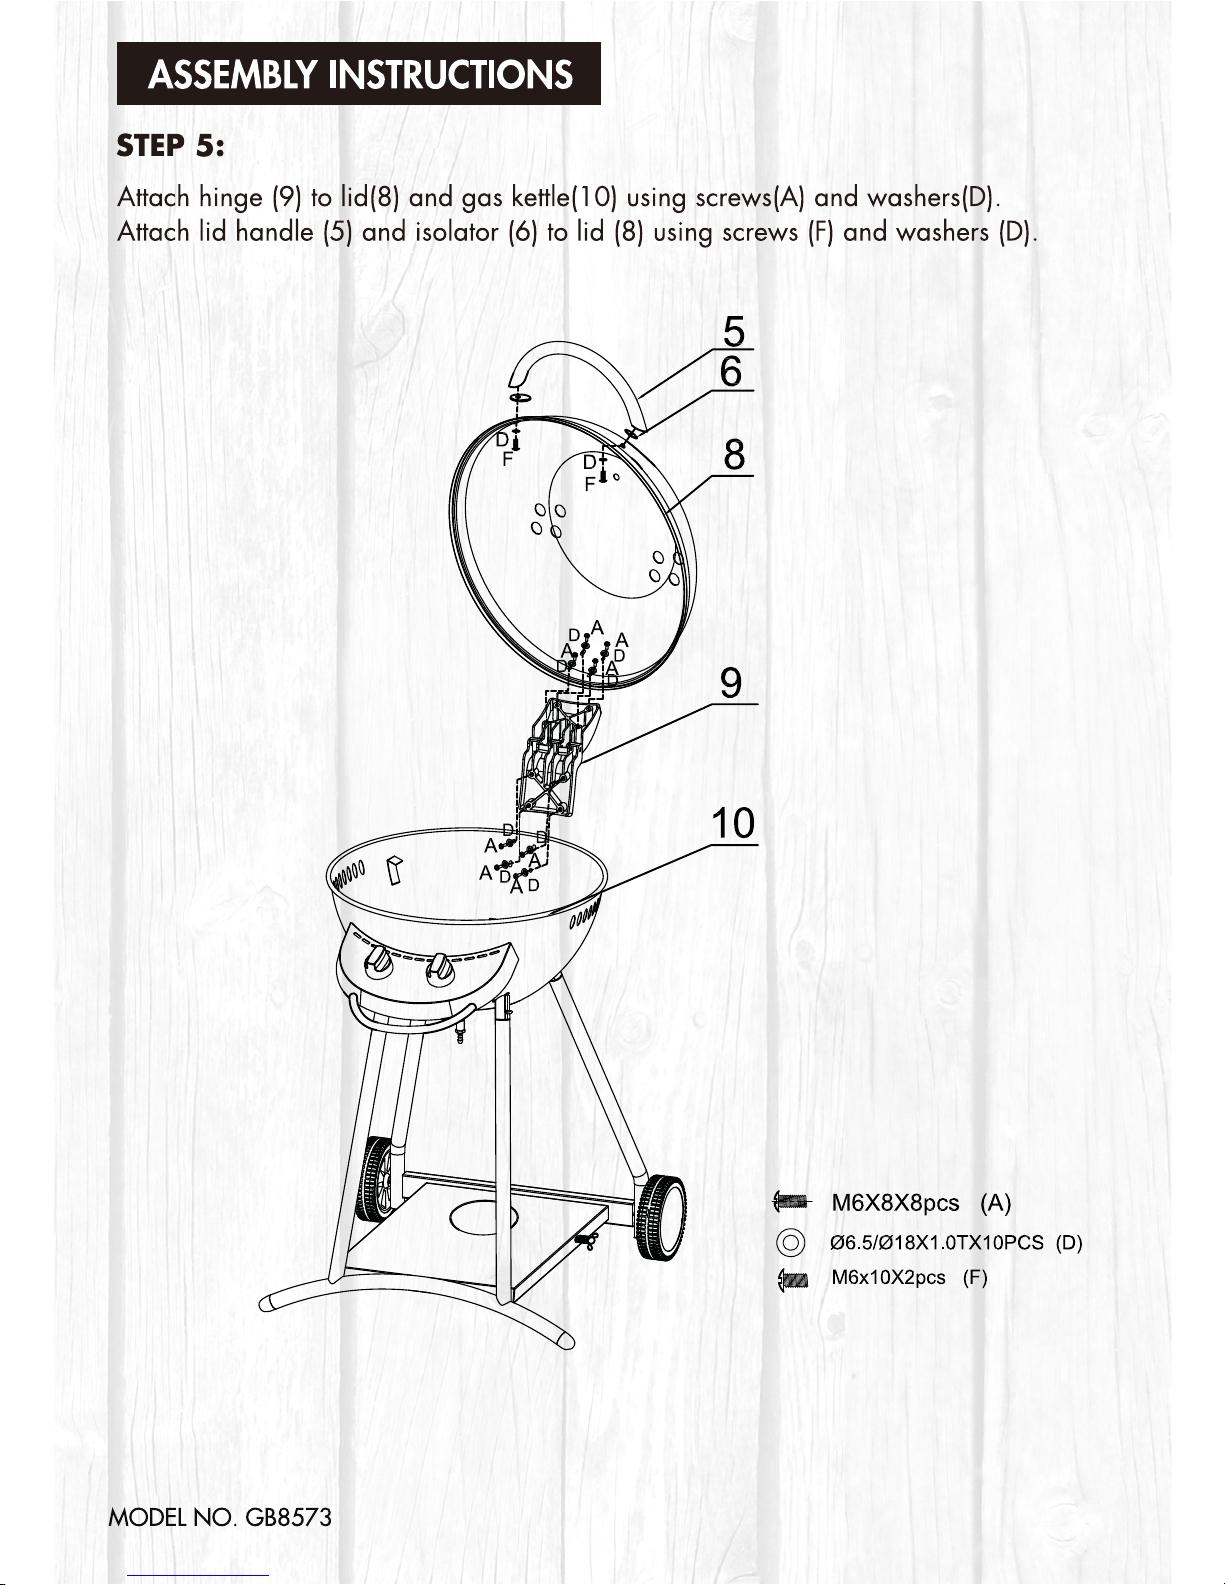
pg 27

pg 28
(continued)
2pcs 1pc 1pc
1pc
12pcs 6pcs 2pcs
5pcs
3pcs
4pcs
13pcs

pg 29
mallet
adjustable
two

pg 30
.

pg 31
pg 32

pg 33

pg 34

pg 35

pg 36

pg 37
For assistance or queries please contact M5 SPORTS GROUP.
GAUTENG SERVICE CENTRE
Raceway Industrial Park
Cnr Silverstone and Catalunya Street
Rand Airport Road
Elandsfontein
Germiston
tel: +27 (0)11 079 0000
KWA-ZULU NATAL SERVICE CENTRE
Unit 3, Imvubu Place
Riverhorse Valley
Durban
tel: +27 (0)31 569 2018
WESTERN CAPE SERVICE CENTRE
Unit 9, Glenkey Place
Aviation Crescent
Airport City
Cape Town
tel: +27 (0)21 934 0862
EASTERN CAPE SERVICE CENTRE
94 Paterson Road
North End
Port Elizabeth
tel: +27 (0)41 487 0573
FREE STATE SERVICE CENTRE
Cnr State Way and Fifth Street
Welkom Industrial
Welkom
tel: +27 (0)57 352 9702
www.ketla.co.za | www.justinbonello.com | www.cookedinafrica.com
Park
pg 38
 Loading...