

Page 1

FOLDING WORK TABLE | TABLE DE TRAVAIL
PLIANTE | ZUSAMMENLEGBARE WERKBANK |
MESA DE TRABAJO PLEGABLE
Instruction Manual | Guide d’utilisation | Bedienungsanleitung | Manual
de Instrucciones
KETER.COM
54 6275-V 2
Page 2

CONTENTS
FOLDING WORK TABLE
Instruction Manual ................................................................................... 1
TABLE DE TRAVAIL PLIANTE
Guide d’utilisation ............................................................................................. 5
ZUSAMMENLEGBARE WERKBANK
Bedienungsanleitung ....................................................................................... 9
MESA DE TRABAJO PLEGABLE
Manual de Instrucciones ...............................................................................13
THANK YOU FOR CHOOSING KETER
MERCI D’AVOIR CHOISI KETER
VIELEN DANK, DASS SIE SICH FÜR KETER ENTSCHIEDEN HABEN!
¡ GRACIAS POR ELEGIR KETER !
Page 3

FOLDING WORK TABLE
Instruction Manual
IMPORTANT SAFETY INSTRUCTIONS
1. Do not load with more than 1000 lbs. (453 kg). Do not leave heavy loads on work surface for
extended periods of time.
2. Do not apply an unbalanced load which could cause the workbench to tip over.
3. Do not use the work centre as a stepladder or standing platform. Do not use the lower
platform as a step.
4. Do not store workbench outdoors or in a damp location.
5. Avoid applying excessive force when clamping with the supplied clamps.
6. Be sure that the legs are fully open and the centre support is in position and locked before
use.
7. When using a power tool with the workbench, follow the safety instructions in the tool’s
instruction manual.
8. Do not mount or clamp power tools to any surface.
9. Always wear safety glasses when operating power tools.
10. Cutting or drilling into work surface may weaken supports, damaging tool or workbench.
11. Caution required when using high temperature tools (heat guns, torch, solder iron, etc.). May
damage work surface and reduce clamping capability.
12. Do not store flammable liquids on the workbench.
KETER.COM
SAVE THESE INSTRUCTIONS FOR FUTURE USE
1
Page 4

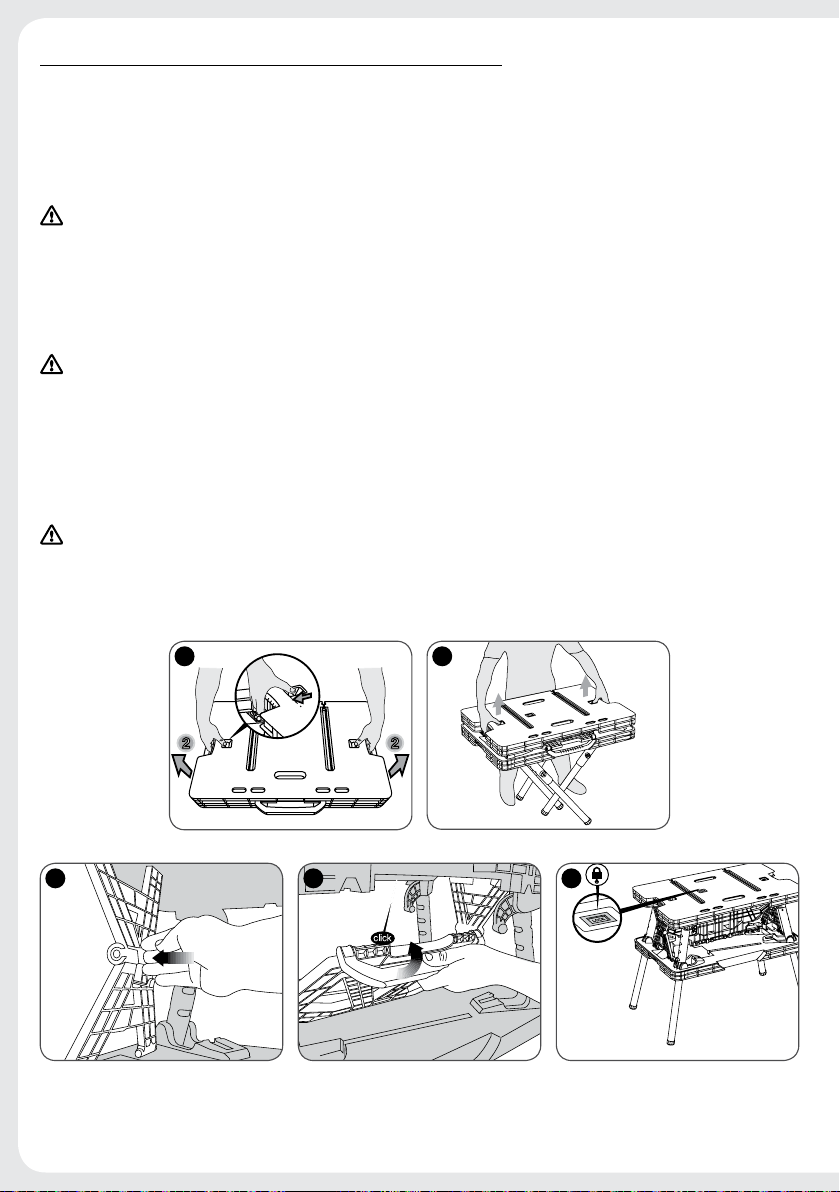
OPERATION: OPENING THE WORKBENCH
â
The Portable Clamping Workstation is packaged completely folded.
To open:
1. Place the workbench flat on the floor.
2. Grasp the openings on both sides of the table top and pull out on the release latches as
shown in figure A.
CAUTION: Do not pull the legs out when the workbench is in a closed position.
3. With the release latches pulled in, lift the table top. The four legs will drop down and lock into
place and the side supports will lift up. (figure B)
4. To lock the side supports, push out from the inside until the support locks into position (figure C).
CAUTION: Risk of Unsafe Operation. Make sure all four legs and both side supports are
locked in place.
5. After locking the side supports in place, lift the centre support section by the carrying handle
until you hear it “click” into place as shown in figure D.
6. When the centre support section is properly locked in position, the LOCK button shown in
figure E will be visible.
CAUTION: Risk of Unsafe Operation. Make sure the centre support section is locked in place.
A
C E D
2
B
Page 5

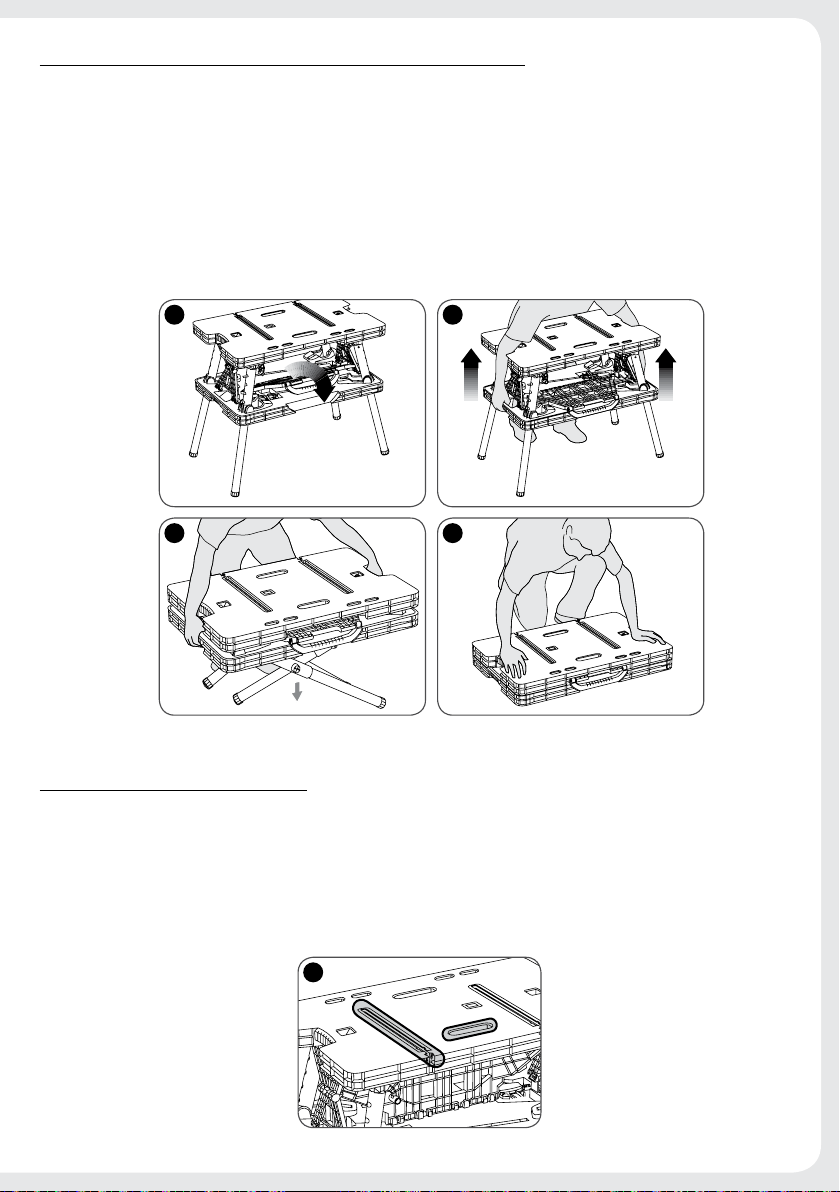
OPERATION: CLOSING THE WORKBENCH
1. Fold the centre support section down and push in on the side supports to unlock them (figure F)
2. Reach through the openings in the table top and grasp the lower section of the bench. Pull up
on the lower section to begin collapsing the legs. (figure G)
3. Lower the unit to the ground as shown in figure H.
4. Once the unit is flat on the ground, press down on the table top to place the unit into its fully
closed position as shown in figure I.
F
H
G
I
ADJUSTABLE CLAMPS
The two adjustable clamps can be used in both a vertical and horizontal mode. The long channels in
the table top allow the clamps to be anchored in a stationary horizontal position. The shorter slots in
the table top allow for the clamps to be used in a vertical position (figure J). J1 through J6 illustrate
how to use the clamps in both horizontal and vertical modes.
J
3
Page 6

J1 - To expand the opening of the clamp jaws, press in on the release lever and move the jaw as
2
1
2
shown. The jaw that is attached to the handle can also be moved in the same manner or by
squeezing and releasing the front handle.
J2 - Line up the round post on the end of the clamp bar with the mating openings on both sides of
the main slot in the tabletop as shown.
J3 - To lock the clamp in a horizontal position, squeeze the front handle and line up the round protruding
tabs with the mating openings in the tabletop (behind the openings mentioned in J2 above).
J4 - With the clamp in a fully horizontal position, release the front handle to lock the clamp in place.
(To remove the clamp, squeeze the handle and lift up.)
J5 - Depress the release lever and move the front jaw into position against the material to be
clamped. Squeeze the front handle to apply pressure.
J6 - To clamp vertically, insert the clamp through the slot in the tabletop as shown.
J1 J2
J4
TRANSPORTING
Carry the unit by the convenient carrying handle as shown in
figure K.
MAINTENANCE
Use only mild soap and damp cloth to clean the tool. Never let
any liquid get inside the tool; never immerse any part of the
tool into a liquid.
Patents Pending
J3
J6 J5
K
FOR CUSTOMER SERVICE PLEASE VISIT OUR WEBSITE AT: WWW.KETER.COM
4
Page 7

TABLE DE TRAVAIL PLIANTE
Guide d’utilisation
DIRECTIVES DE SÉCURITÉ IMPORTANTES
1. Ne pas charger plus de 453 kg (1000lb). Ne pas laisser de charges très lourdes sur la surface
de travail pour des périodes de temps prolongées.
2. Équilibrer toujours les charges pour éviter un basculement de l’établi.
3. Ne pas utiliser l’atelier comme escabeau ou plate-forme fixe. Ne pas utiliser la plate-forme
inférieure comme marche.
4. Ne pas ranger l’établi à l’extérieur ou dans un endroit humide.
5. Éviter d’utiliser une force excessive lors de l’utilisation des serre-joints fournis.
6. S’assurer que les pattes sont complètement déployées et que la surface centrale de soutien
est en position et bien bloquée avant d’utiliser l’établi.
7. Lors de l’utilisation d’un outil électrique avec l’établi, suivre les consignes de sécurité de
l’outil décrites dans le mode d’emploi de celui-ci.
8. Ne pas assembler ou fixer les outils électriques à une surface.
9. Toujours porter des lunettes protectrices lors de l’utilisation d’outils électriques.
10. Couper ou percer des trous dans la surface de travail de l’établi risque d’affaiblir la structure
de soutien, d’endommager l’outil ou l’établi.
11. Être prudent lors de l’utilisation d’outils chauffants à haute température (pistolets
thermiques, chalumeau, fer à souder et autres). Ces outils risquent d’endommager la
surface de travail et de réduire la stabilité de l’établi lors de la fixation de matériel.
12. Ne pas ranger de liquides inflammables dans l’établi.
KETER.COM
CONSERVER CES DIRECTIVES POUR UN USAGE ULTÉRIEUR
5
Page 8

FONCTIONNEMENT: DÉPLOIEMENT DE L’ÉTABLI
â
L’établi portatif avec serre-joints est livré complètement plié.
Pour déployer l’établi:
1. Déposer l’établi à plat sur le sol.
2. Saisir les ouvertures des deux côtés du dessus de l’établi et tirer sur les loquets de blocage
comme indiqué à la figure A.
MISE EN GARDE: ne pas déployer les pattes lorsque l’établi est plié (position fermée).
3. Avec les loquets en position ouverte, relever le dessus de l’établi. Les quatre pattes se
déploieront et se bloqueront en position. Les appuis latéraux se déploieront également
(figure B). Pour bloquer les appuis latéraux, appuyer sur leur surface interne jusqu’à ce qu’ils se
bloquent en position (figure C).
MISE EN GARDE: Risque d’utilisation dangereuse. S’assurer que toutes les pattes (4) et les
deux appuis latéraux sont correctement bloqués en position.
4. Une fois les appuis latéraux en position, soulever la section centrale de soutien par la poignée de transport jusqu’à ce qu’elle s’enclenche au centre (figure D).
5. Une fois la section centrale de soutien correctement bloquée en position, le bouton de VERROUILLAGE, comme indiqué à la figure E, sera visible.
MISE EN GARDE: Risque d’utilisation dangereuse. S’assurer que la section centrale de sou-
tien est bloquée en position.
A
C E D
6
B
Page 9

FONCTIONNEMENT: FERMETURE DE L’ÉTABLI
1. Replier la section centrale de soutien et poussez les appuis latéraux vers l’intérieur pour les
débloquer. (figure F)
2. Saisir la section inférieure de l’établi en passant par les ouvertures du dessus de l’établi. Relever la
section inférieure pour replier les pattes. (figure G).
3. Abaisser le module au sol comme indiqué à la figure H.
4. Une fois le module bien à plat, appuyer sur le dessus de l’établi pour fermer complètement le
module comme indiqué à la figure I.
F
H
G
I
SERRE-JOINTS RÉGLABLES
Les deux serre-joints réglables s’utilisent en position verticale ou horizontale. Les deux grandes
rainures sur le dessus de l’établi permettent de fixer les serre-joints en position horizontale stable.
Les rainures plus courtes permettent l’utilisation des serre-joints en position verticale. (figure J).
Les figures J1 à J6 illustrent l’utilisation des serre-joints en positions horizontale et verticale.
J
7
Page 10

J1 - Pour ouvrir les mâchoires du serre-joint, enfoncer le levier de dégagement et déplacer la mâ-
2
1
2
choire libre comme indiquée. Il est également possible de déplacer la mâchoire fixe de la poignée
de la même façon ou en pressant et en relâchant la poignée avant.
J2 - Aligner les goupilles, à l’extrémité de la barre du serre-joint, avec les ouvertures correspondantes, des deux côtés de la rainure principale du dessus de l’établi comme indiqué.
J3 - Pour bloquer le serre-joint en position horizontale, presser la poignée avant et aligner les
onglets ronds en saillie avec les ouvertures correspondantes du dessus de l’établi (elles sont derrières les ouvertures pour les goupilles mentionnées précédemment en J2).
J4 - Une fois le serre-joint bien horizontal, relâcher la poignée avant pour le verrouiller en position.
(pour dégager le serre-joint, presser la poignée et relever la barre).
J5 - Enfonce le levier de dégagement et appuyer la mâchoire avant contre le matériau à fixer. Presser sur la poignée avant pour appliquer une pression. J6 - Pour installer le serre-joint en position
verticale, l’enfiler dans la rainure comme indiqué.
J1 J2
J4
TRANSPORT
J3
J6 J5
K
Transporter le module par la poignée de transport commode
comme indiqué à la figure K.
ENTRETIEN
Entretien N’utiliser qu’un détergent doux et un chiffon humide
pour nettoyer l’outil. Ne jamais laisser de liquide pénétrer dans
l’outil et n’immerger aucune partie de l’outil dans un liquide.
IMPORTA NT: pour assurer la SÉCURITÉ et la FIABILITÉ de ce produit, toutes les opérations
de réparation, d’entretien et de réglage (autres que celles décrites aux présentes) doivent être
effectuées dans un centre de service autorisé ou par du personnel qualifié; on ne doit utiliser
que des pièces de rechange identiques.
Brevets en instance
POUR CONTACTER NOTRE SERVICE CLIENTÈLE, VISITEZ NOTRE SITE WEB: WWW.KETER.COM
8
Page 11

ZUSAMMENLEGBARE WERKBANK
Bedienungsanleitung
WICHTIGE SICHERHEITSHINWEISE
1. Nicht mit mehr als 453 Kg (1000 lbs) belasten. Lassen Sie schwere Gegenstände nicht für
längere Zeit auf der Arbeitsoberfläche liegen.
2. Legen Sie keine unausgeglichenen Gegenstände auf die Werkbank, da diese sonst umkippen könnte.
3. Benutzen Sie die Arbeitsoberfläche nicht als Stehleiter oder Plattform zum Stehen und
benutzen Sie die untere Ebene nicht als Tritt.
4. Lagern Sie die Werkbank nicht im Freien oder an einem feuchten Ort.
5. Vermeiden Sie übermäßige Kraftanwendung beim Benutzen der Einspannvorrichtung.
6. Vergewissern Sie sich vor der Verwendung, dass die Standbeine völlig geöffnet sind und der
Mittelträger sich in der richtigen Position befindet und gesichert ist.
7. Achten Sie beim Gebrauch eines Elektrowerkzeugs auf die Sicherheitshinweise.
8. Elektrowerkzeuge dürfen auf der Arbeitsfläche nicht befestigt oder eingespannt werden.
9. Tragen Sie bei der Arbeit immer eine Schutzbrille.
10. Das Schneiden oder Bohren in die Arbeitsfläche kann die Stützteile beeinträchtigen und das
Werkzeug oder die Werkbank beschädigen.
11. Vorsicht beim Umgang mit heißen Werkzeugen (Heißluftpistolen, Lötlampen, Lötmasse usw.). Die
Arbeitsfläche kann dabei beschädigt und die Möglichkeit zum Einspannen beeinträchtigt werden.
12. Lagern Sie keine entflammbaren Flüssigkeiten auf der Werkbank.
KETER.COM
BEWAHREN SIE DIESE BEDIENUNGSANLEITUNG FÜR EINE ZUKÜNFTIGE
VERWENDUNG SORGFÄLTIG AUF
9
Page 12

BEDIENUNG: ÖFFNEN DER WERKBANK
â
Die tragbare Werkbank mit einspannvorrichtung ist vollständig zusammengeklappt.
Aufklappen:
1. Legen Sie die Werkbank flach auf den Boden.
2. Fassen Sie die Öffnungen wie in Abbildung A gezeigt auf beiden Seiten der Oberseite an und
entriegeln Sie die Sperren durch Herausziehen.
ACHTUNG: Ziehen Sie nicht die Beine heraus, solange sich die Werkbank in einer
geschlossenen Position befindet.
3. Ziehen Sie die Arbeitsfläche beim Entriegeln der Sperren nach oben. Die vier Beine fallen
dabei nach unten und rasten in ihrer Position ein. Die Seitenteile stellen sich dabei auf.
(Abbildung B).
4. Verriegeln Sie die Seitenteile durch Drücken von Innen, bis diese in ihrer Position eingerastet sind
(Abbildung C).
ACHTUNG: Vermeiden Sie das Risiko einer unsicheren Bedienung. Vergewissern Sie sich,
dass alle vier Beine und die Seitenteile in der richtigen Position eingerastet sind.
5. Heben Sie das mittlere Stützteil nach dem sich die Seitenteile in Ihrer Position befinden am
Griff an bis es mit einem „Klick“ in seiner Position eingerastet ist, wie in Abbildung D gezeigt.
6. Sobald das mittlere Stützteil in der richtigen Position eingerastet ist, wird der Sperrknopf wie
in Abbildung E gezeigt, sichtbar.
ACHTUNG: Gefahr durch unsachgemäße Handhabung. Vergewissern Sie sich, dass das
mittlere Stützteil in der richtigen Position eingerastet ist.
A
C E D
10
B
Page 13

BEDIENUNG: EINKLAPPEN DER WERKBANK
1. Klappen Sie das mittlere Stützteil herunter und drücken Sie auf die Seitenteile, um diese zu
entriegeln (Abbildung F).
2. Fassen Sie durch die Aussparungen der Arbeitsplatte und ergreifen Sie das untere Teil
der Werkbank. Ziehen Sie das untere Teil nach oben, damit die Beine einklappen können.
(Abbildung G)
3. Legen Sie die Werkbank wie in Abbildung H gezeigt auf den Boden.
4. Wenn die Werkbank flach auf dem Boden liegt, drücken Sie die Arbeitsfläche wie in Abbildung I
gezeigt in die vollständig geschlossene Position.
F
H
G
I
VERSTELLBARE ZWINGEN
Die beiden verstellbaren Zwingen können sowohl senkrecht als auch waagerecht verwendet
werden. Die langen Nuten in der Arbeitsplatte ermöglichen das Verankern der Zwingen in einer
festen waagerechten Position. Die kürzeren Nuten ermöglichen die Verwendung der Zwingen in
einer senkrechten Position (Abbildung J). Die Abbildungen J1 bis J6 veranschaulichen, wie die
beiden Zwingen sowohl in der waagerechten als auch in der senkrechten Position verwendet
werden können
J
11
Page 14

J1 - Zum Erweitern der Öffnung zwischen den Zwingenbacken drücken Sie den Klemmhebel und
2
1
2
verschieben die Backe wie gezeigt. Die am Griff befestigte Backe kann auf die gleiche Weise
verschoben werden oder auch durch das Drücken und Entspannen des vorderen Griffs.
J2 - Setzen Sie der Abbildung entsprechend das runde Teil am Ende der Zwingenschiene in die dafür
vorgesehene Öffnung in der Hauptnut der Arbeitsplatte ein.
J3 - Zum Verriegeln der Zwinge in waagerechter Position drücken Sie den vorderen Griff und setzen die
runden, vorstehenden Nasen in die passenden Öffnungen auf der Arbeitsplatte ein (hinter den, in J2
erwähnten Öffnungen).
J4 - Wenn sich die Zwinge vollständig in waagerechter Position befindet, verriegeln Sie die Zwinge
durch das Loslassen des vorderen Griffs (zum Entfernen drücken Sie den Griff und heben die
Zwinge heraus).
J5 - Drücken Sie den Klemmhebel herab und schieben Sie die vordere Zwinge in die Position gegen
das einzuspannende Material. Drücken Sie den vorderen Griff, um Druck anzuwenden.
J6 - Führen Sie die Zwinge wie gezeigt zum senkrechten Einspannen durch die Aussparung auf der
Arbeitsplatte ein.
J1 J2
J4
TRANSPORT
Tragen Sie die Werkbank wie in Abbildung K gezeigt an dem
praktischen Tragegriff.
PFLEGE
Verwenden Sie zur Reinigung des Werkzeugs eine milde
Seifenlauge und einen feuchten Lappen. Lassen Sie keine
Flüssigkeit in das Werkzeug eindringen; tauchen Sie nie ein
Teil des Werkzeuges in Flüssigkeiten ein.
J3
J6 J5
K
Patents Pending
12
FÜR UNSEREN KUNDENDIENST SUCHEN SIE BITTE UNSERE
WEBSITE AUF UNTER: WWW.KETER.COM
Page 15

MESA DE TRABAJO PLEGABLE
Manual de Instrucciones
INSTRUCCIONES IMPORTANTES SOBRE SEGURIDAD
1. No cargue más de 453 kg (1000 lb). No deje cargas pesadas sobre la superficie de trabajo
durante períodos prolongados.
2. No coloque una carga desequilibrada que pueda volcar el banco.
3. No utilice el centro de trabajo como un escalón o una plataforma. No use la plataforma inferior como
un escalón.
4. No guarde el banco a la intemperie o en un lugar húmedo.
5. Evite aplicar fuerza excesiva cuando use las abrazaderas suministradas.
6. Asegúrese de que las patas estén completamente abiertas y de que el soporte central esté en
posición y trabado en el lugar.
7. Cuando use una herramienta eléctrica con el banco, siga las instrucciones de seguridad del manual
de la herramienta.
8. No monte ni asegure herramientas eléctricas a ninguna superficie.
9. Cuando opere herramientas eléctricas, utilice siempre lentes de seguridad.
10. Cortar o taladrar sobre la superficie de trabajo puede debilitar los puntos de apoyo o dañar la
herramienta o el banco.
11. Tenga cuidado cuando use herramientas de altas temperaturas (pistolas de calor, sopletes,
soldadores, etc.). Pueden dañar la superficie de trabajo y reducir la capacidad de sujeción.
12. No guarde líquidos inflamables en el banco.
KETER.COM
CONSERVE LAS INSTRUCCIONES PARA VOLVER
A CONSULTAREN EL FUTURO
13
Page 16
FUNCIONAMIENTO: CÓMO ABRIR EL BANCO
â
El banco de sujeción portátil viene completamente plegado.
Para abrirlo:
1. Coloque el banco horizontal en el piso.
2. Agarre las aberturas en ambos costados de la parte superior de la mesa y tire de los
cerrojos de liberación, como se muestra en la figura A.
PRECAUCIÓN: No tire de las patas cuando el banco esté cerrado.
3. Con los cerrojos de liberación hacia adentro, levante la parte superior de lames a. Las cuatro
patas se desplegarán y se trabarán en el lugar y los puntos de apoyo laterales se levantarán.
(Figura B)
4. Para trabar los puntos de apoyo laterales, empuje hacia afuera desde el interior hasta que traben
en el lugar (Figura C).
PRECAUCIÓN: Riesgo de operación insegura. Asegúrese de que las cuatro patas y ambos
puntos de apoyo laterales estén trabados en el lugar.
5. Para levantar la sección de apoyo central, después de bloquear los puntos de apoyo en
posición, arrastre el mango hasta que escuche que encaja en el lugar, como se muestra en la
figura D.
6. Cuando la sección de apoyo central esté correctamente trabada en el lugar, podrá ver el
botón de bloqueo (LOCK) que se muestra en la figura E.
PRECAUCIÓN: Riesgo de operación insegura. Asegúrese de que la sección de apoyo central
esté trabada en el lugar.
A
C E D
14
B
Page 17
FUNCIONAMIENTO: CÓMO CERRAR EL BANCO
1. Pliegue la sección de apoyo central hacia abajo y empuje hacia adentro en los puntos de apoyo
laterales para trabarlos.(Figura F)
2. Alcance las aberturas en la parte superior de la mesa y tome la sección inferior del banco. Tire
hacia arriba de la sección inferior para comenzar a plegar las patas.(Figura G)
3. Baje la unidad al piso como se muestra en la figura H.
4. Una vez que la unidad está horizontal en el piso, presione la parte superior de la mesa hacia
abajo para cerrar la unidad por completo, como se muestra en la figura I.
F
H
G
I
ABRAZADERAS AJUSTABLES
Las dos abrazaderas ajustables se pueden usar en posición vertical y horizontal. Los canales largos
en la parte superior de la mesa permiten que las abrazaderas se fijen en posición horizontal. Las
ranuras más cortas en la par te superior de la mesa permiten que las abrazaderas se usen en posición vertical. (Figura J). Las figuras J1 a J6 m uestran cómo usar las abrazaderas en las posiciones
vertical y horizontal.
J
15
Page 18

J1 - Para expandir la abertura de las mordazas de las abrazaderas, presione la palanca de libera-
2
1
2
ción y mueva la mordaza como se muestra. La mordaza que está acoplada al mango también
se puede mover de la misma manera o apretando y liberando el mango delantero.
J2 - Alinee el poste redondo en el extremo de la barra de la abrazadera con las aberturas corres-
pondientes en ambos lados de la ranura principal en la parte superior de la mesa, como se
muestra.
J3 - Para trabar la abrazadera en posición horizontal, apriete el mango delantero y alinee las lengüetas
redondas que sobresalen con las aberturas correspondientes en la parte superior de la mesa (detrás
de las aberturas mencionadas en J2).
J4 - Con la abrazadera completamente en posición horizontal, libere el mango delantero para tra-
bar la abrazadera en el lugar. (Para quitar la abrazadera, apriete el mango y levante).
J5 - Oprima la palanca de liberación y mueva la mordaza delantera contra el material que desea
sujetar. Apriete el mango delantero y aplique presión.
J6 - Para sujetar en posición vertical, introduzca la abrazadera en la ranura que está en la parte
superior de la mesa, como se muestra.
J1 J2
J4
J3
J6 J5
TRANSPORTE
Transporte la unidad del mango de transporte correspondiente, como se muestra en la figura K.
K
MANTENIMIENTO
Para limpiar la herramienta, sólo utilice jabón suave y un paño
húmedo. Nunca permita que penetre líquido dentro de la herramienta, ni sumerja ninguna de las piezas en un líquido.
IMPORTANTE: para garantizar la SEGURIDAD y la CONFIABILIDAD del producto, las reparaciones, el mantenimiento y los
ajustes deberán efectuarse en centros de servicio autorizado u otras organizaciones de servicio calificado, que utilicen siempre refacciones idénticas.
Patentes Pendientes
PARA SERVICIOS DE ATENCIÓN AL CLIENTE, VISITE NUESTRO SITIO WEB EN: WWW.KETER.COM
16
Page 19

17
Page 20

Help us spread the word
facebook.com/KeterPlastic
Follow us on Twitter
@ KeterTweets
KETER.COM
 Loading...