

Kestrel Sportsman 4500 Instruction Manual

AVAILABLE WITH
Wireless Data Transfer
G1-G7 BALLISTICS
CALCULATIONS BY
APPLIED BALLISTICS
INSTRUCTION MANUAL

2
To maximize the accuracy and reliability of your readings:
• Ensure that your Kestrel Ballistics Weather Meter is in good repair and within factory calibration.
• Take readings frequently and carefully according to the guidelines above.
• Allow your meter’s readings to stabilize after signicant changes in temperature or humidity (i.e., changing location
from indoors to outdoors).
• Allow a margin of safety for changing conditions and reading errors (2-3% of reading is recommended).
Your Kestrel Ballistics Weather Meter is designed to provide accurate measurement
of current conditions only. Depending on your location and environment,
conditions may change rapidly.
Rapid temperature and humidity changes (i.e., moving your meter from indoors to outdoors) may cause inaccurate readings of
temperature and humidity as well as all readings that rely on either of these values. Before relying on a Kestrel Ballistics Weather
Meter readings, use care to either a) force air ow over the sensors by waving or slinging your meter through the air; or b) wait
until your unit’s readings have stabilized, indicating it has equilibrated to its new environment.
Use extra care and good judgment when referring to your Kestrel Ballistics Weather Meter to make
any decisions regarding safety, health or property protection.
CAUTION
!

3
Features & Options .............................................. 4
Getting to Know Your Kestrel ............................ 5
Battery Installation .............................................. 6
Compass Calibration and Setup ....................... 7
Barometric Pressure & Altitude Setup ............. 9
BALLISTICS MODE
Basic Navigation and Getting Started ............. 10
Gun Selection ....................................................... 11
Gun Library & Information Screen ................... 12
Target Screen ........................................................ 15
Environment Screen............................................ 16
Range Card Screen .............................................. 17
Ballistics Screen ................................................... 18
Bluetooth Setup ................................................... 19
Quick Keys ............................................................. 20
WEATHER MODE
Setup and Options .............................................. 21
Screen Navigation ............................................... 24
Impeller Replacement ........................................ 25
Using the Bootloader ......................................... 26
Glossary of Terms................................................. 27
Ballistic & Environmental Quick Ref ................. 28
Full Range Card Data Sample ............................ 29
Specications ....................................................... 30
Choosing & Using Batteries ............................... 32
Warranty ................................................................ 35
OVERVIEW
*for BLUETOOTH®-enabled models ONLY
NK, manufacturer of Kestrel brand Ballistics Weather Meters
is available to answer questions and provide support.
Contact NK by phone: 610.447.1555; fax: 610.447.1577;
email: info@NKhome.com; or web: NKhome.com
4
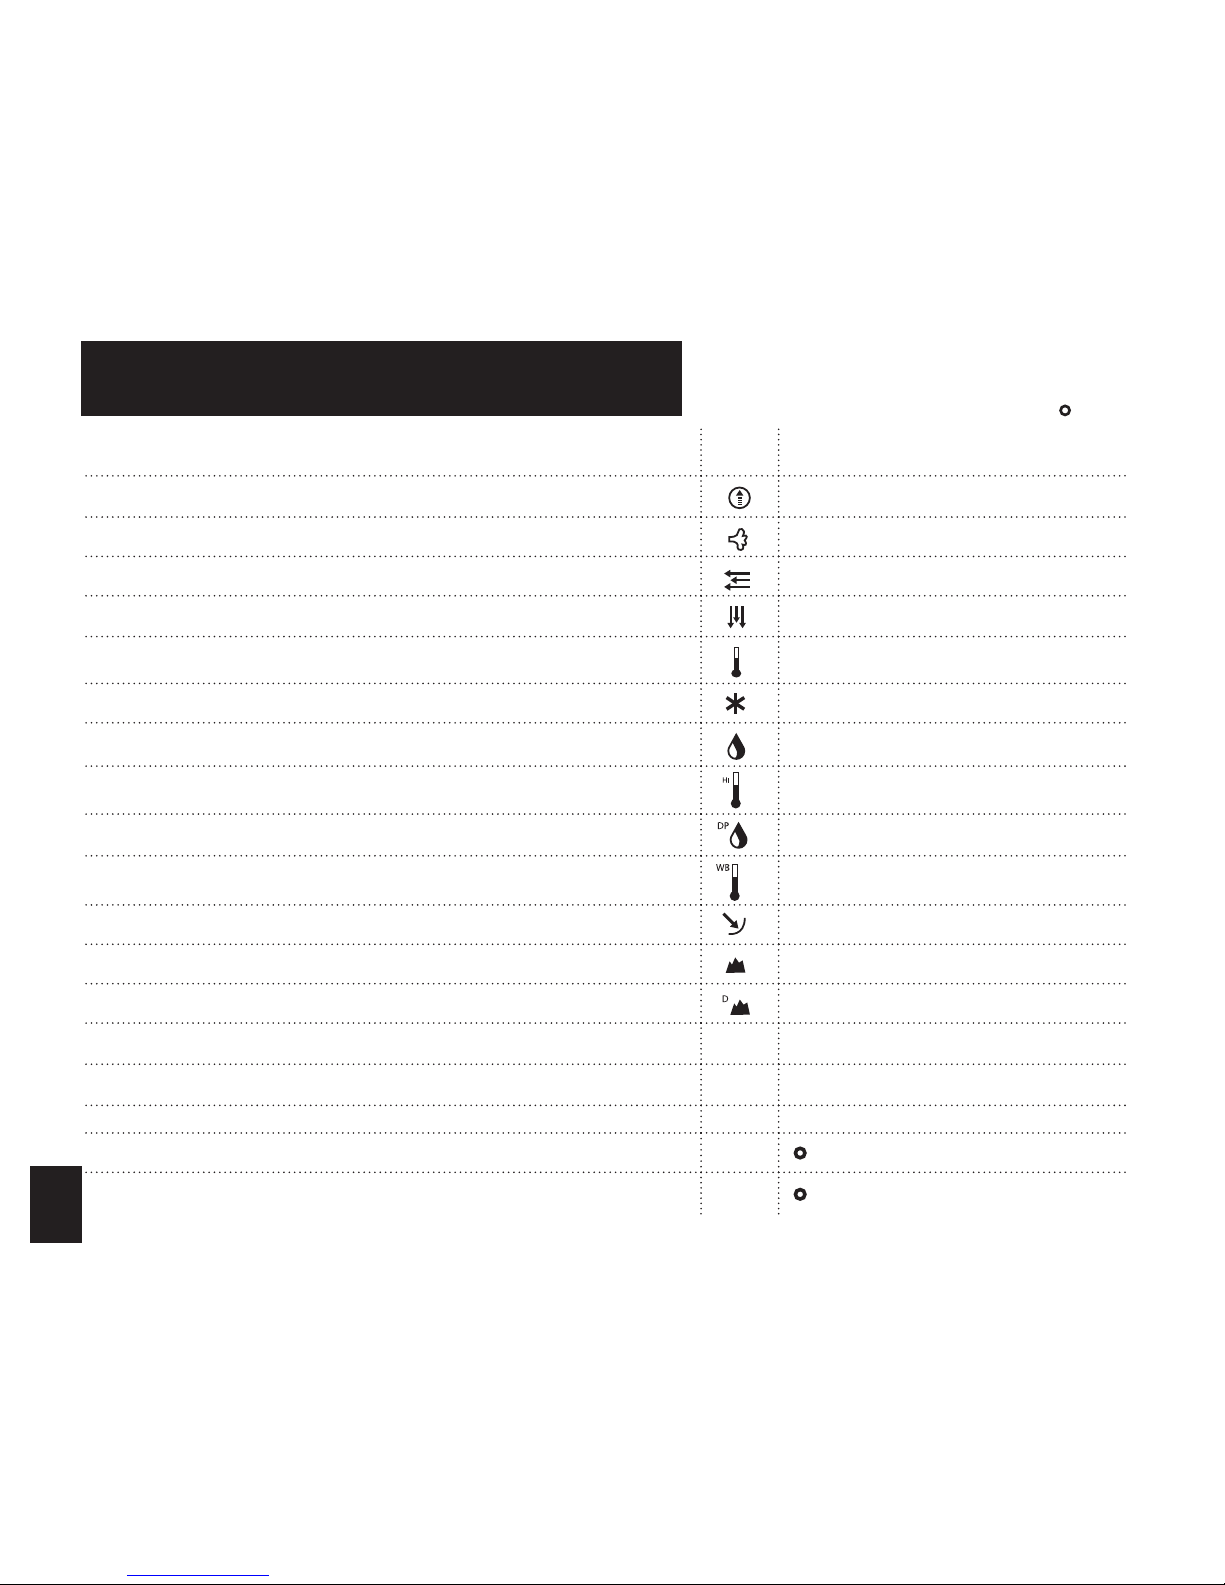
FEATURES & OPTIONS
Standard • | Optional
Measurement/ Units of Measure Icon Kestrel Sportsman
Wind Direction (Cardinal Points, Degrees)
.
Wind Speed | Air Speed (mph | fpm | Bft | m/s | km/h | kt)
.
Crosswind Calculation (mph | fpm | Bft | m/s | km/h | kt)
.
Headwind | Tailwind (mph | fpm | Bft | m/s | km/h | kt)
.
Temperature* (˚F | ˚C)
.
Wind Chill (˚F | ˚C)
.
Relative Humidity (Gpp | G/kg)
.
Heat Stress Index (˚F | ˚C)
.
Dewpoint Temp (˚F | ˚C)
.
Wet Bulb Temp (˚F | ˚C)
.
Barometric Pressure (inHg | hPA | psi | mb)
.
Altitude, m | ft
.
Density Altitude, m | ft
.
Pressure Trend
.
Backlit Display
.
Data Storage Points 2900
BLUETOOTH®
NV Backlight
5
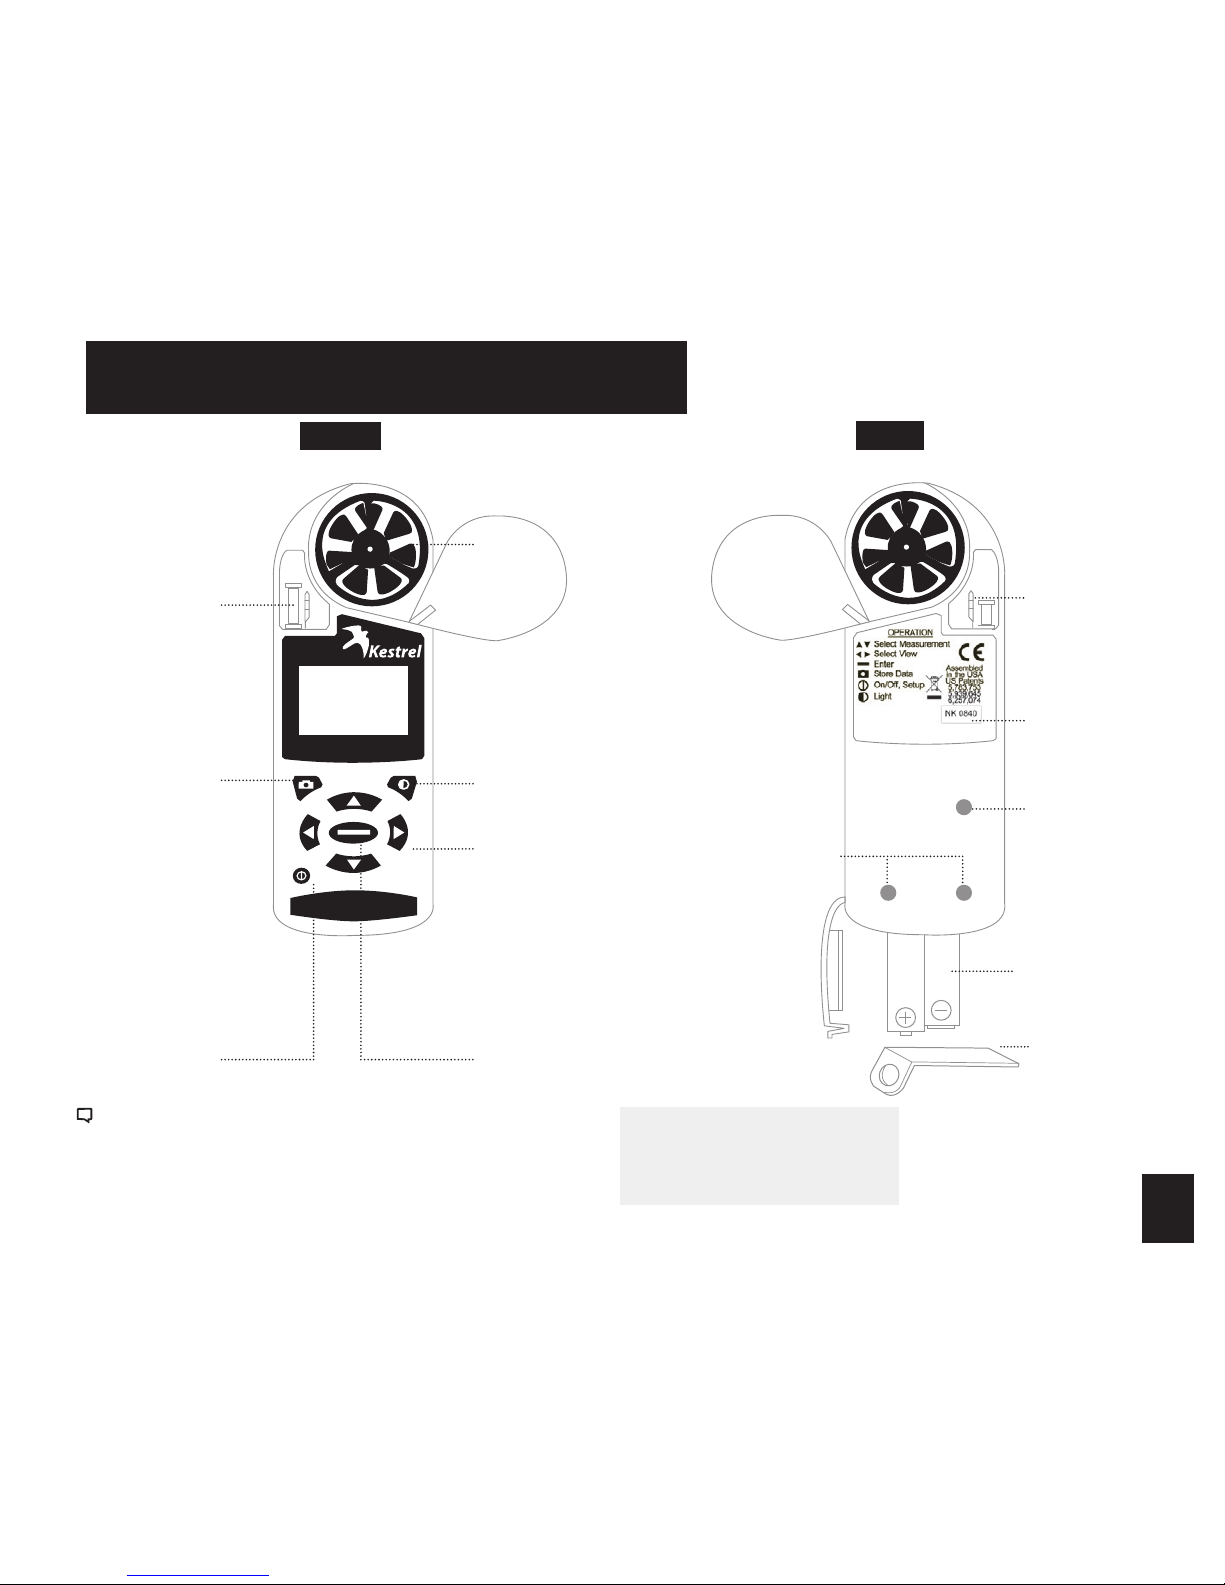
GETTING TO KNOW YOUR KESTREL
BACK
DATA UPLOAD
OPTICAL COUPLER
SERIAL NUMBER
AAA BATTERIES (2)
(Lithium recommended)
AMBIENT
TEMPERATURE
SENSOR
WIDE RANGE
PRESSURE
SENSOR
STABILIZING
BATTERY
ORIENTATION SHIM
FRONT
MANUAL
MEMORY
BUTTON
POWER / SETUP
BUTTON
BACKLIGHT
BUTTON
NAVIGATION
BUTTONS
SELECT / EXIT
BUTTON
HUMIDITY
SENSOR
REPLACEABLE
IMPELLER
Even when the Kestrel display is o, the unit will still automati-
cally collect and store data at the dened rate (see “Memory
Options” ). To completely power down the unit, you must
remove the batteries (and lose time / date and other settings)
* All Kestrel Meters with
temperature measurement
allow you to measure air,
water and snow temperature.
6
• Insert batteries into bottom of
Kestrel unit as shown on battery
door.
• Snap door closed.
Turning ON and OFF
• Press
to turn on the meter.
• Hold for 2 seconds to turn o
the meter.
You can also select “O” on the
Main Setup Menu options.
Date & Time
• Press
to enter the Main Setup
Menu.
• Use
or to highlight Date
& Time.
• Press to enter the Date & Time
Screen.
• Press
or to change each value.
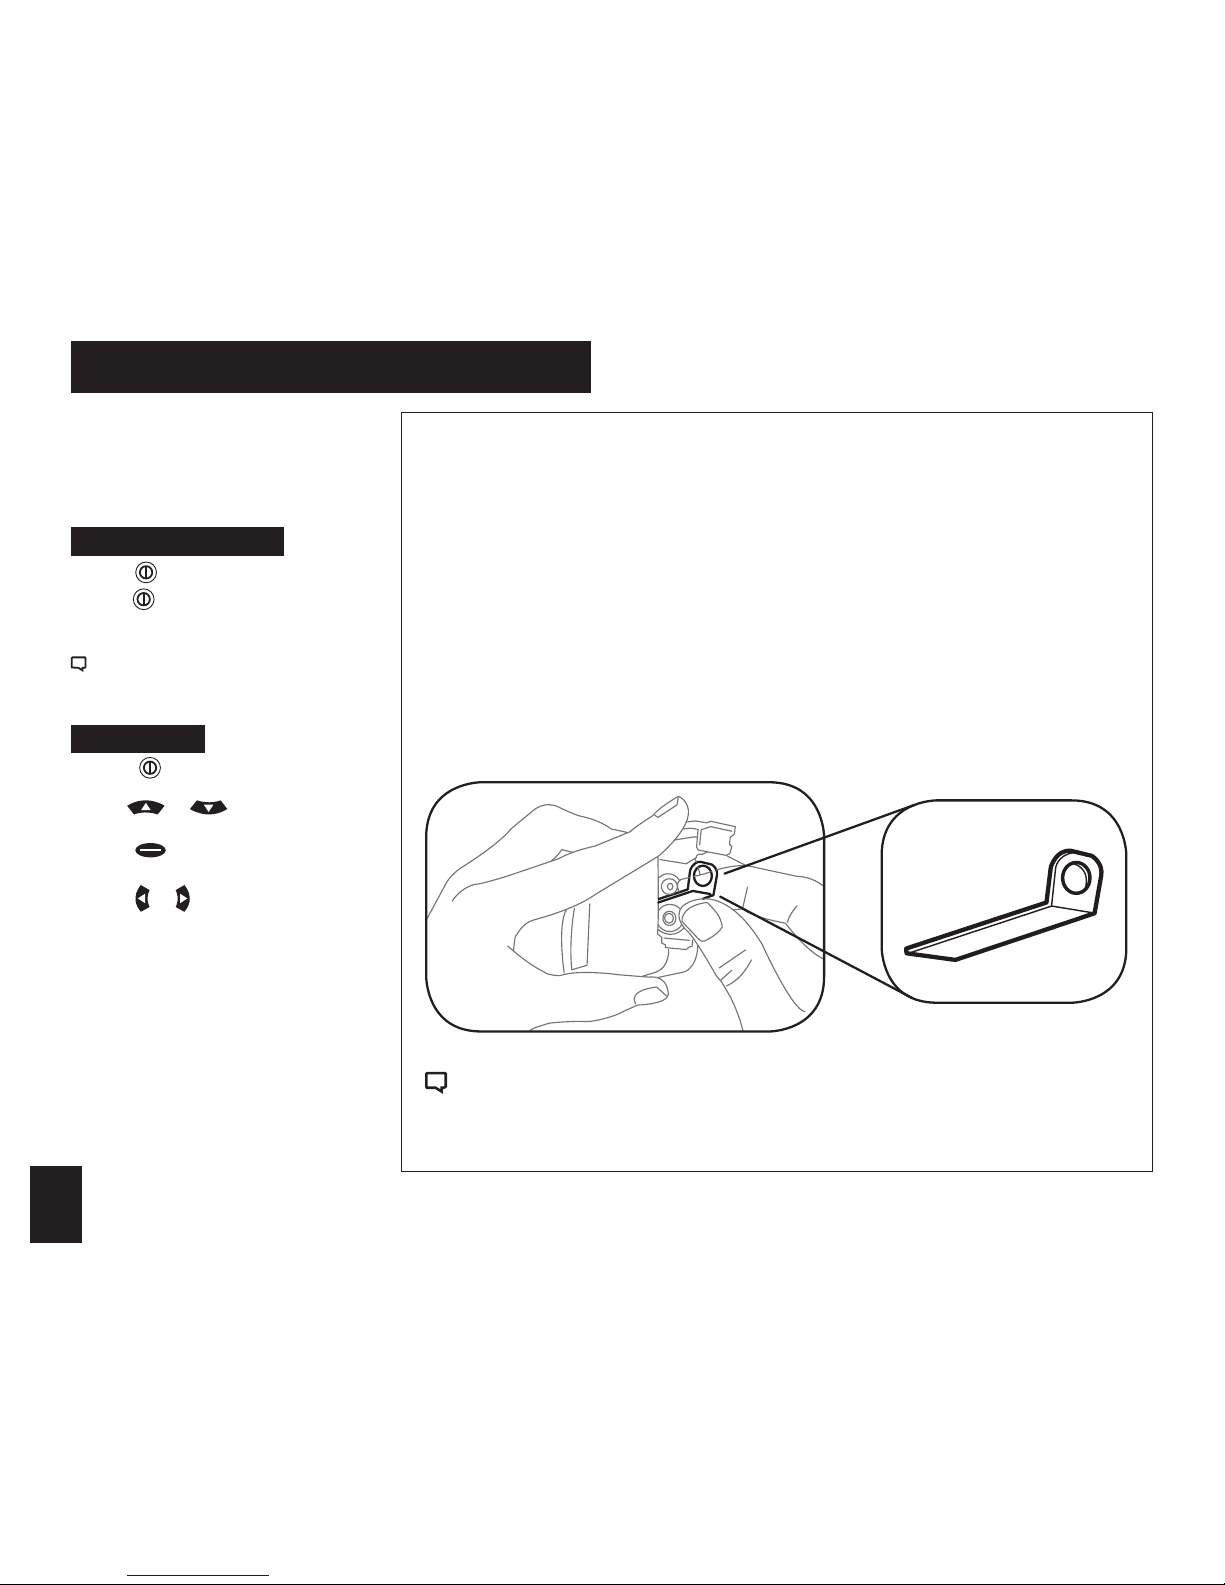
BAT TERY INSTALLATION
KESTREL 4500:
AAA batteries have a magnetic signature strong
enough to aect the Kestrel 4500’s compass
readings. Please follow this extra step to ensure
the batteries stay in proper orientation.
Before closing the door, push the plastic shim
(provided with unit) between batteries and place
clear ring on end over positive battery “bump.”
When replacing batteries in the Kestrel 4500, always keep
the shim and re-insert with new batteries as described.
7
In addition to Wind Speed and Wind Chill, the Kestrel
Sportsman also measures Direction, Headwind/Tailwind
and Crosswind.
Digital Compass Calibration
The Kestrel meter's digital compass must be calibrated
to correct for the AAA batteries’ magnetic eld. It must
be re-calibrated every time the battery door is opened,
and it will not display or log any direction values until
calibration is complete.
**Impeller should be removed during calibration for best
results.
• Remove the impeller by pressing the edges to pop it out
(reinsert after calibration is complete).
To Calibrate:
• In Main Setup Menu, use
or to highlight
“System”, then press
.
• Press
to highlight “Compass Cal”, then press .
Follow the prompts on screen:
• Press
to start.
• Slowly spin the upright meter around three (3) full times.
• Each rotation should take approximately 10 seconds.
• When calibration is nished, the screen will read
“Cal Complete”.
• Press
to exit to Main Menu.
To verify the digital compass’ accuracy, test it against a
compass; the Kestrel meter readings should be within
±5° of the reference compass or better. If readings appear
incorrect, simply run the calibration routine again.
Unit should be held vertically with the back facing the
direction being measured.
Calibration Error Messages
There are three error messages that the meter may
display during calibration. Press
to exit the error
screen and run the calibration again.
• Magnetic Batteries: The magnetic eld of the Kestrel’s
batteries is interfering with calibration. Try opening
the battery door, rotate one or both batteries, and run
the calibration again. If
error persists, try using a
dierent brand of battery.
• Too Slow: The unit was
spun too slowly during
calibration.
• Too Fast: The unit was
spun too quickly during
calibration.
COMPASS CALIBRATION AND SETUP
3x
Figure 1

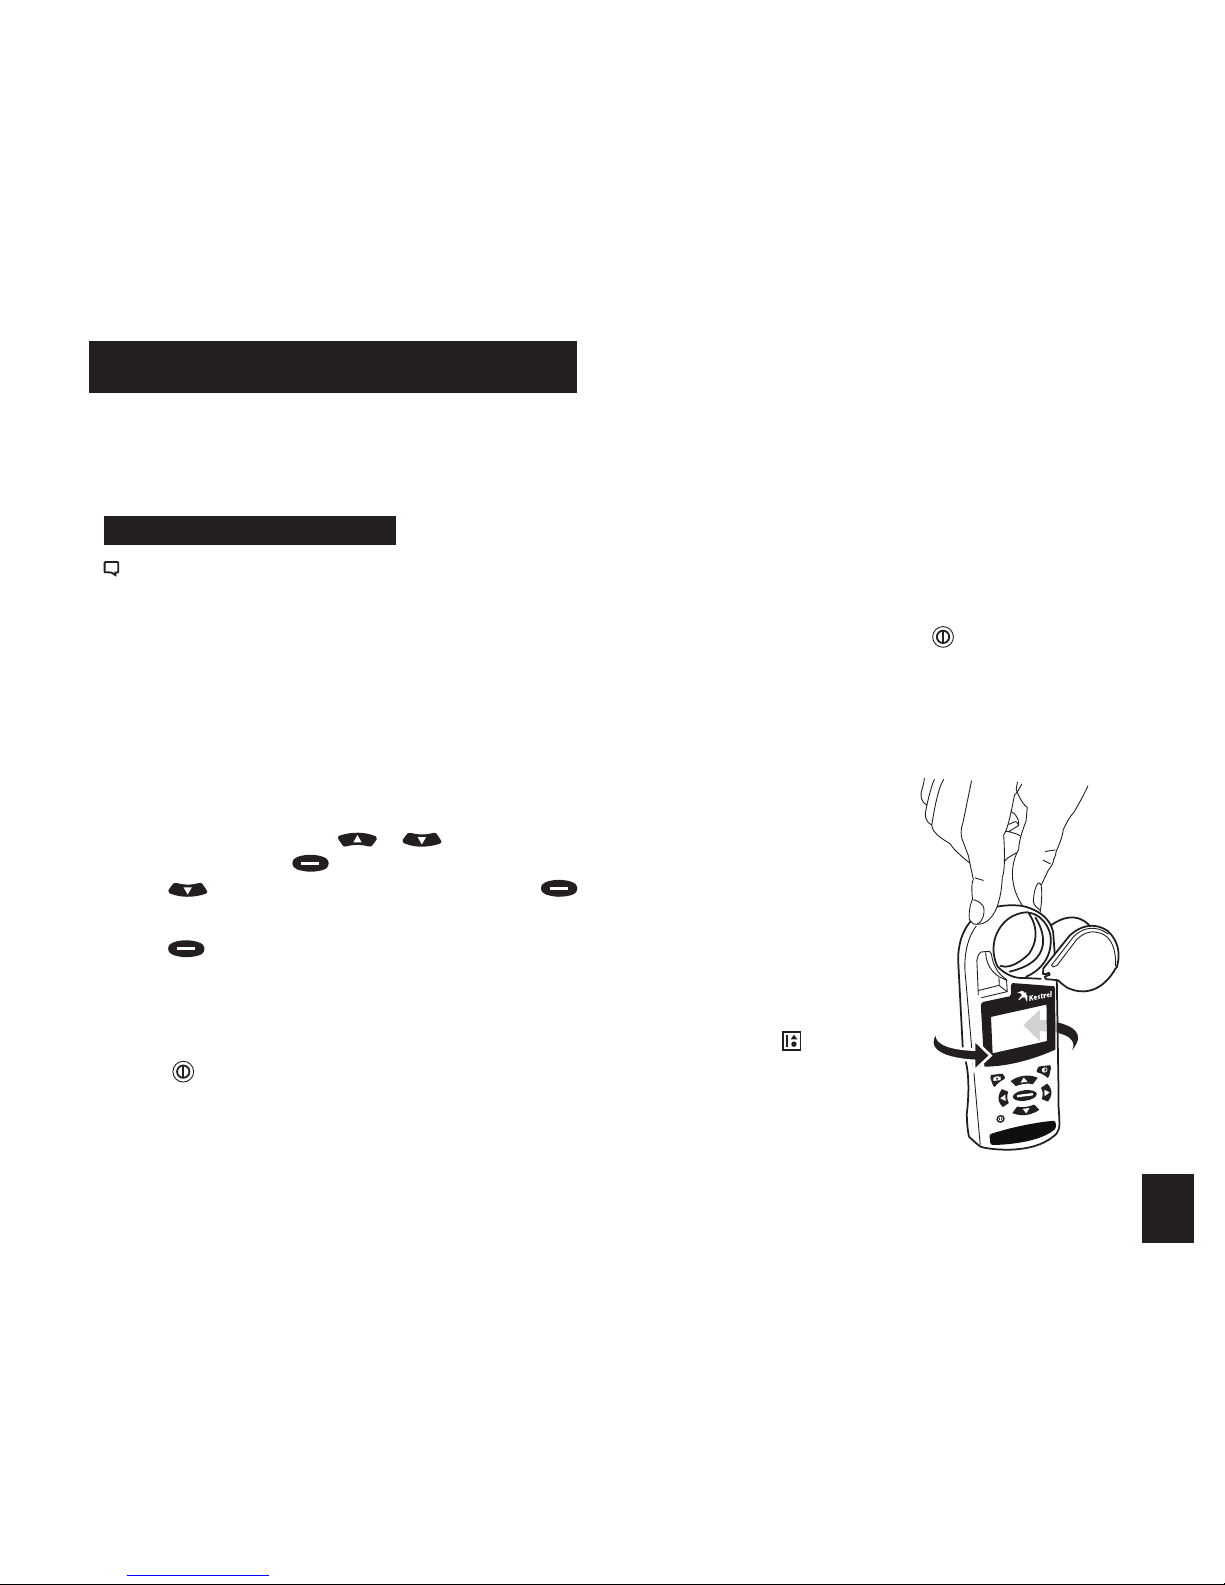
8
Measuring Direction
The Kestrel 4500’s digital compass must be vertical to
achieve accurate readings. Keep the unit positioned as
close to vertical as possible when using any compassrelated feature. After opening the battery door, you
must re-run the calibration routine or readings will not
register. For maximum accuracy, the impeller should be
spinning while measuring to eliminate its magnetic pull.
True North vs. Magnetic North Readings
The Kestrel 4500's default Direction display mode is
Magnetic North.
To view Direction in True North mode:
• Go to weather mode in the Direction screen, press
.
• Use
or to choose your mode.
• If you choose True North, use
to highlight “Varia-
tion”, then use
or to input the Variation for your
location.
To measure Direction:
• Hold the unit vertically and point the BACK of the unit
toward the direction you want to measure.
• The unit will display the cardinal direction and degrees.
The Direction measurement does not record Max and
Average and will display N/A on that mode screen.
Measuring Headwind/Tailwind & Crosswind
The Kestrel 4500 automatically calculates Headwind and
Crosswind with respect to a runway or target direction.
You must rst set the “Heading” to view these measurements:
• Press
while on the Headwind or Crosswind screen.
• Use
or to choose “Auto Set” or “Manual Set”,
then press
.
In Auto Set: Point the unit down the runway or target,
then press
to automatically set the heading.
In Manual Set: Use
or to enter the known runway
or target heading, and press
to save.
Both screens will always display the Magnetic North
heading at the top (even if the Direction screen is set to
True North mode).
• After setting the heading, scroll to the desired
parameter and orient the Kestrel so the wind blows
directly through the impeller.
This is independent from the dof and wind direction for
ballistic solutions. Info for Wind Speed & Direction of re
for ballistic solutions can be found on pg 16.
COMPASS CALIBRATION AND SETUP CONT.

9
Setting Barometric Pressure & Altitude
The Kestrel meter measures “station pressure”, which
changes in response to both changes in altitude and
changes in atmosphere. Barometric pressure is a
measurement of the air pressure adjusted to sea level.
Station pressure is displayed if the reference altitude
is set to zero. These values do not aect your ballistic
solution.
If you want to know your Barometric Pressure and/or
Altitude be sure to adjust your reference measurements
for altitude and/or barometric pressure when you
change your location or when there have been
dramatic changes in weather conditions.
Obtaining Station Pressure
• In the Main Setup Menu, use or to highlight
“Weather Mode”, then press .
• Use or to scroll to highlight the “BARO” screen
• Press to enter the “REF BARO” screen
• Set the reference altitude to zero for station pressure.
Set it to your current altitude if you want barometric
pressure
Baro—Displays current Barometric Pressure
Ref Alt—Use
or
to set the known Altitude
Sync Alt—Use or to switch “On” and sync the Baro
reading to the “Altitude” screen
When “Sync Alt” is turned “On,” the current
“Density Altitude” screen data is calculated from the
absolute values of station pressure, relative humidity
and temp., and is not aected by the reference values
entered in the “Baro” and “Altitude” screens.
BAROMETRIC PRESSURE & ALTITUDE SETUP
Barometric Pressure data is automatically used as a
reference for Altitude, and both screens will show
accurate readings.
syncs
REF ALT
Alt 877
Ref. Baro 30.97
Sync Baro On
adjust exit
REF BARO
Baro
Ref. Alt 877
Sync Alt
adjust exit
Setting Altitude
• In the Main Setup Menu, use or to highlight
“Weather Mode”, then press .
• Use or to highlight the “Baro” screen
• Press to enter the “REF ALT” screen
• Set the reference altitude to your current altitude.
When “Sync Baro” is turned “On,” the current Altitude
data is automatically used as a reference for Barometric
Pressure, and both screens will show accurate readings.
REF BARO
Baro 30.15
Ref. Alt 115
Sync Alt On
adjust exit
syncs
REF ALT
Alt
Ref. Baro 30.15
Sync Baro
adjust exit
10
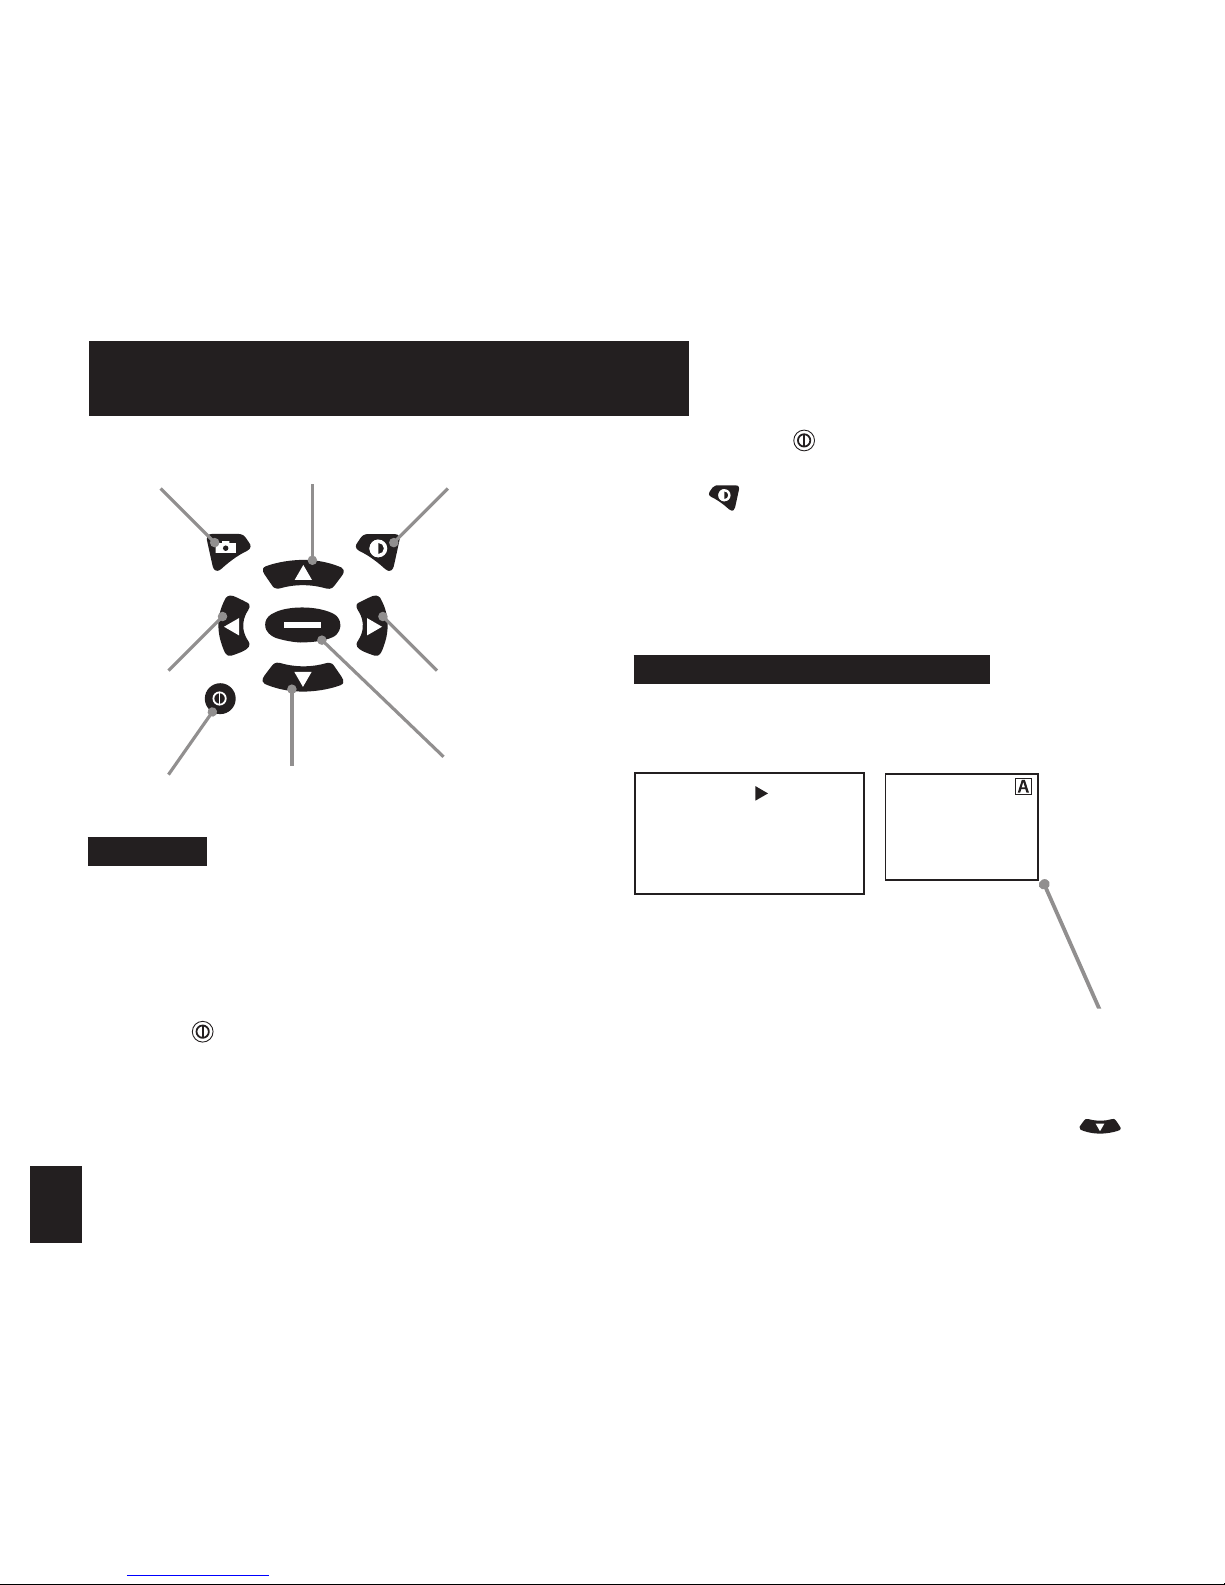
BASIC NAVIGATION & GETTING STARTED
Up-Arrow
Down-Arrow
Left-Arrow
Right-Arrow
Center Key
Capture
Power On/
Escape Key
Backlight
Quick Tips:
• Your Kestrel Sportsman can operate in Weather mode
or Ballistics mode. For instructions related to Weather
Mode, see page 23.
• Compass must be calibrated in order for directional
features to work in Ballistics mode. Compass calibration
can be done from the main menu screen. See page 7.
• Pressing
will allow you to exit out of a particular
screen.
• When a ballistics parameter is underlined, this indicates
that the value cannot be changed manually. This is
either because it is a calculated value or determined
by the sensors.
THE KESTREL HAS SEVEN NAVIGATION KEYS:
• Press and hold for 2 seconds to power down the
Kestrel regardless of current screen.
• Press twice in rapid succession to instantly
change between Weather mode and Ballistics mode.
• Any changes in information are automatically saved
upon exiting the current screen. There are three
exceptions to this rule where an “accept” screen
appears upon exiting: the Target Range estimator, the
Target Speed estimator, and the MV.
Getting started with Ballistics Mode
The three main data input groups are gun, target and
environment. The aiming solutions for Elevation and
Windage are displayed on the Main Ballistics screen.
1. Gun Information 2. Target
Active
TR
DoF
Ide
g
Icos
TS
TD
WD
WS1
WS2
TARGET
Yes
1000
000º
0˚
1.000º
0mph
L-R
12oc
5mph
10mph
A box indicates amount of
data shown on display.
Data below box indicates
additional information
available by pressing .
*Note: Please see p. 28 for
abbreviation glossary.
GUN Laru308
MV 2550FPS
DC G1
BC 0.475
BW 175gr
BD 0.308in
ZR 100m
BH 2.75in
EUNIT mil
Eclck n/a
Wunit mil
Wclck n/a
Cal MV
11
3. Environment
These three main data groups
determine an accurate ring solution.
The rst step in getting a ring
solution is selecting your gun.
Gun Selection
The Gun Selection screen allows you
to choose a precongured gun or
build your own. You may create and store up to 16 guns.
A user-created gun is dened as a gun that has been
modied for one or more parameter values of the New
Gun or any of the precongured guns. A precongured
gun is any gun loaded onto the Kestrel using the AB Gun
Loader software. No guns are preloaded on the device.
When a New Gun is modied, the name instantly
changes to UserGunX (where X is a number sux to
ensure the name is unique). If a precongured gun
(whose name ends in a letter) is modied, a number
will appear at the end to create a unique name. If a
precongured gun (whose name ends in a number)
is modied, a letter will appear at the end to create a
unique name.
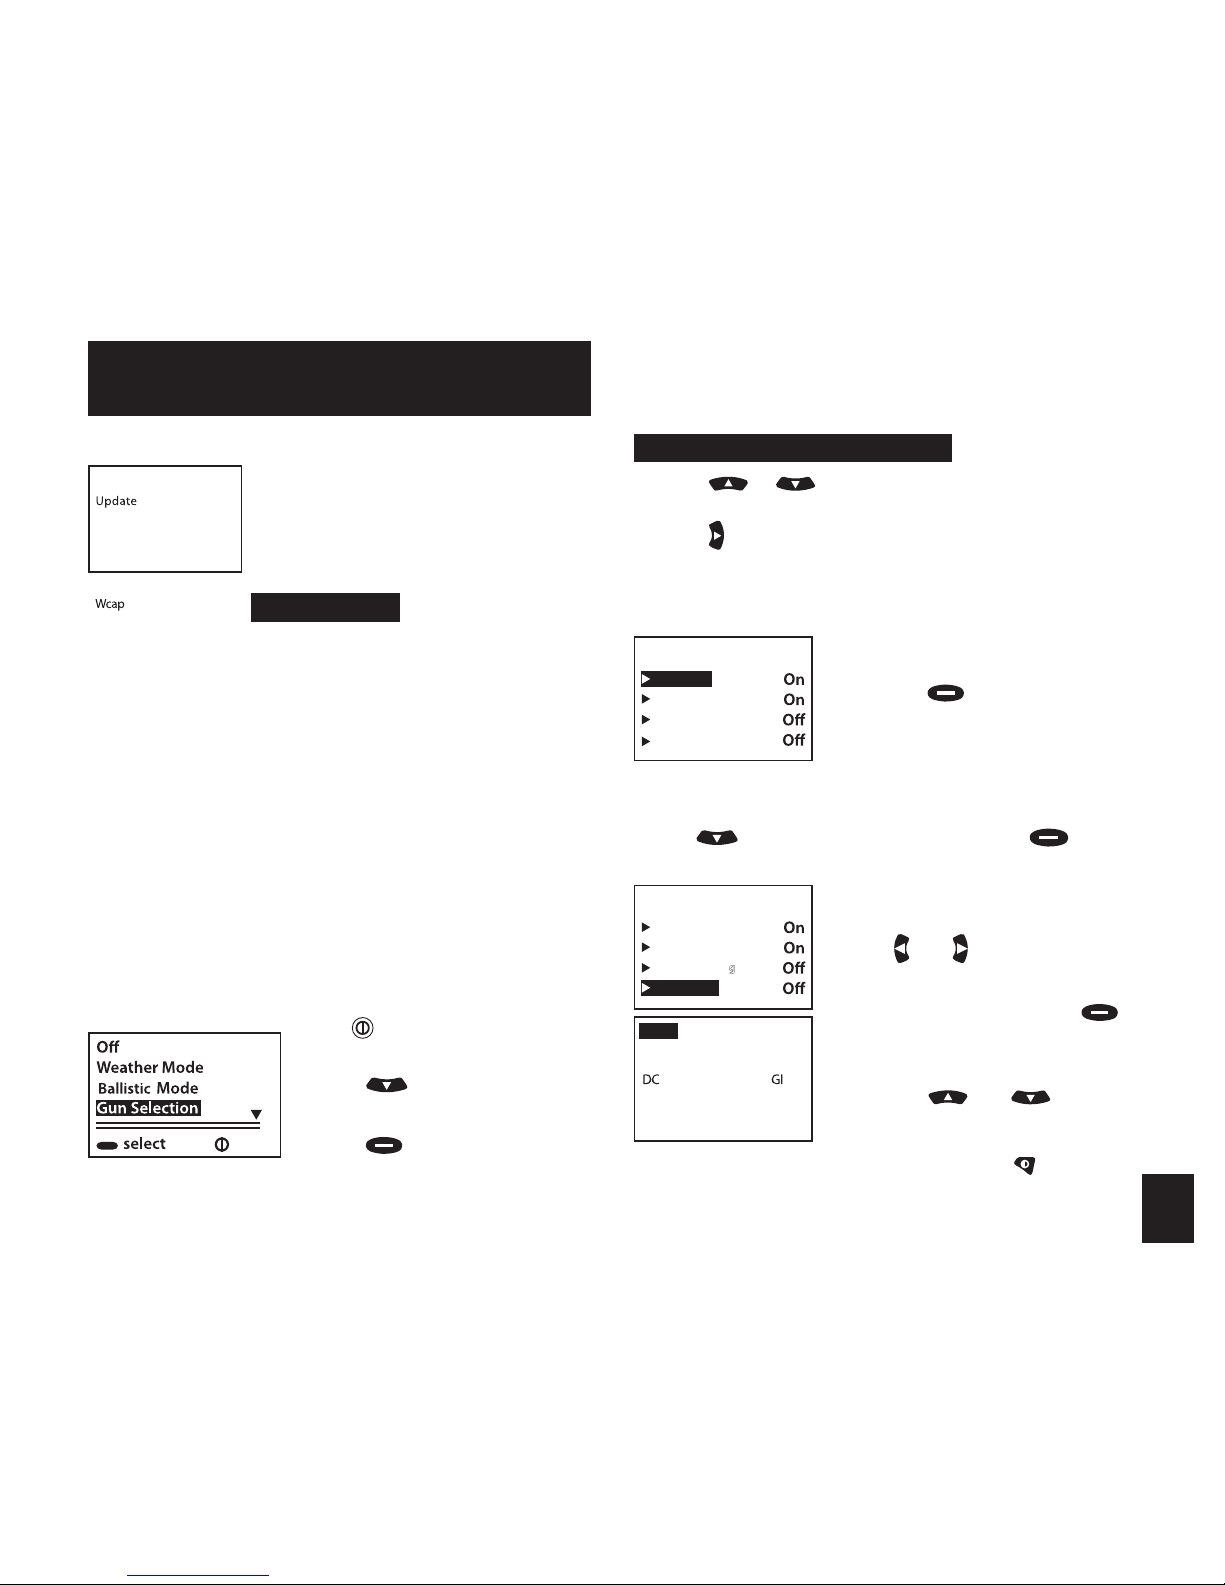
• Turn on the unit. From the Main Ballistic screen,
press to access the Main
Setup Menu.
• Press to highlight “Gun
Selection.”
• Press to enter Gun
Selection Screen. Here, you may
choose a precongured gun or
build your own.
GUN SELECTION
To Choose a Precongured Gun:
• Press or to scroll through the dierent
guns.
• Press to turn your selected gun “on” or “o.” “On”
means the gun is available to be selected in AB
mode. “O” means the gun is not available to be
selected. For example, setting multiple guns to “On”
allows you to quickly switch gun congurations
without going back to the Main
Setup Menu.
• Pressing on a gun gives
you the option to edit or delete
this gun.
To Build A Gun:
You can build and name your gun on the gun selection
screen.
• Use to highlight New Gun and press .
• This will take you to the gun information screen
where you may adjust all gun
parameters. Press up or down to
highlight the gun parameters.
• Use and to adjust each
value.
• To name your gun, scroll up to
highlight “Gun” and press .
• You will see a cursor appear
under the rst letter of New
Gun.
• Use the and buttons
to scroll through the alphabet
and numbers 0-9 and several
symbols. Pressing inserts a
space between characters.
11 Gun select
Laru308
User Gun2
User Gun
300WinMag2
11 Gun select
MaruGun308
AR15a
300WinMag1
New Gun
exit
Temp
SP
RH
Dalt
ENVIRONMENT
No
75˚F
29.48inHg
50%
1729ft
Onetgt
GUN New Gun
MV
BC
BW
2900f
ps
0.533
190
g
r
 Loading...