


USER GUIDE
Kestrel 5500 Fire Weather Pro
Kestrel 5400 Fire Weather Pro with WBGT
Find Quality Products Online at: sales@GlobalTestSupply.com
www.GlobalTestSupply.com

CAUTION
!
WARNING
!
Your Kestrel Weather/Environmental Meter is designed to provide accurate
measurement of current and historical conditions only. Depending on your
Rapid temperature and humidity changes (i.e., moving your meter from indoors to outdoors) may cause temporarily inaccurate readings
of temperature and humidity as well as all readings that rely on either of these values. Before relying on temperature readings from your
Kestrel Meter, be sure to let it equilibrate or force air ow over the sensors by waving or slinging your meter through the air. For Humidity
readings, wait until your unit’s readings have stabilized, indicating it has equilibrated to its new environment. Humidity readings may take
more than 15 minutes to equilibrate to a new environment.
To maximize the accuracy and reliability of your readings:
• Ensure that your Kestrel Meter is in good repair and within factory calibration.
• Take readings frequently and carefully according to the guidelines above.
• Allow your meter’s readings to stabilize after signicant changes in temperature or humidity (i.e., changing location from indoors
to outdoors).
• Allow a margin of safety for changing conditions and reading errors (2-3% of reading is recommended).
Use care and good judgment when referring to your Kestrel Meter to make any decisions regarding safety,
health or property protection.
To reduce the risk of injury or death to persons, read and follow these guidelines!
Your Kestrel Weather/Environmental Weather Meter may provide one or more of these measurements relating to estimation of danger of
injury to people or animals from heat or cold: Heat Stress Index, Wind Chill Index, Wet Bulb Globe Temperature (“WBGT ”), Thermal Work
Limit (“TWL”). Note that guidance tables based on these values are based on typical physiological response. Certain individuals or animals
may be more susceptible to harm relating to environmental conditions and require additional precautions. For example, very young or
elderly individuals, individuals with asthma, and individuals who have not become acclimatized to hot conditions are likely to be more
prone to heat injury.
• Know yourself and the individuals and items you are responsible for.
• Where appropriate, seek the guidance of a medical professional.
• Know what to do in the event of heat or cold injury and be prepared with supplies.
• In the case of heat illness, remember the rule – “Cool rst, transport second.” An inexpensive ice bath can mean the dierence
between life and death.
Your Kestrel Weather/Environmental Meter is not a medical device. It is only one source of information and
must be employed with care and good judgment.
2
location and environment, conditions may change rapidly.
Find Quality Products Online at: sales@GlobalTestSupply.com
www.GlobalTestSupply.com

CONTENTS
Contact .................................................................................. 4
Batteries ................................................................................ 4
Measurements And Features ............................................ 5
Getting To Know Your Kestrel ............................................ 7
Buttons .................................................................................. 8
Kestrel Options Menu ......................................................... 8
Weather Mode Screens ....................................................... 9
Kestrel Menu Navigation ...................................................10
Getting Started .................................................................... 11
Probability of Ignition and Fine Dead Fuel Moisture....12
Congure WBGT ...................................................................13
Custom Flag Settings ..........................................................14
Measuring Direction ........................................................... 14
Altimeter And Barometer ...................................................15
Using Min/Avg/Max ............................................................16
Connecting To Devices Using LiNK ................................... 16
Creating, Viewing, & Exporting Data Logs ...................... 18
Thermal Work Limit (TWL) .................................................20
Weather Glossary.................................................................21
Impeller Replacement ........................................................ 23
Warranty Certicate ............................................................24
3
Find Quality Products Online at: sales@GlobalTestSupply.com
www.GlobalTestSupply.com

CONTACT
This User Guide contains only the information you need
to get started using your Kestrel meter. For FAQ’s, chat
and e-mail support w
For more information on regional, sport,
or organizational WBGT guidelines, or
for more information on heat stress
safety, visit us as
4
BATTERIES
We recommend that ONLY Lithium AA batteries
be used in your Kestrel Weather/Environmental
Meter to provide the widest operating
temperature range and to avoid damage caused
by leaking lead-acid batteries. If you must use
conventional AA batteries, please do not store
your Kestrel Meter with the batteries in place.
Damage caused by battery corrosion is not
covered under warranty.
WARNING: Lithium is a toxic substance and
ingestion may cause serious injury or death. Keep
lithium batteries out of the reach of children. If
swallowed, immediately seek medical help. Have
doctor phone 24-hour hotline at (202) 625-3333,
call collect if necessary. Dispose of batteries
properly and according to local regulations. Do
not puncture or burn batteries. If the battery
compartment does not close securely, stop using
the product and keep it away from children.
WARNING: Utilizing the alert light and buzzer
in your Kestrel Heat Stress Tracker places a
higher demand on the battery. To ensure the
alert light and buzzer operate when needed,
replace the battery when a third or less of
battery life remains, as indicated on start up.
Find Quality Products Online at: sales@GlobalTestSupply.com
www.GlobalTestSupply.com

MEASUREMENTS Icon 5000
Wind Speed | Air Speed
(mph | fpm | Bft | m/s | km/h | kt)
Temperature (˚F | ˚C)
Wind Chill (˚F | ˚C)
Relative Humidity (%)
Probability of Ignition
Fine Dead Fuel Moisture
Heat Stress Index (˚F | ˚C)
Dewpoint Temp (˚F | ˚C)
Wet Bulb Temp (˚F | ˚C)
Station Pressure (inHg | hPA | psi | mb)
Barometric Pressure (inHg | hPA | psi | mb)
Altitude(m | ft )
Density Altitude (m | ft)
Wind Direction (Cardinal Points, Degrees)
Crosswind
(mph | fpm | Bft | m/s | km/h | kt)
Headwind | Tailwind
(mph | fpm | Bft | m/s | km/h | kt)
o
optional
Environmental
5500
Weather
5400
HST
5500
Fire
• • • • •
• • • • •
• • • • •
• • • • •
• •
• •
• • • • •
• • • • •
• • • • •
• • • • •
• • • • •
• • • • •
• • • • •
• o • •
• o • •
• o • •
5400
Fire
5
Find Quality Products Online at: sales@GlobalTestSupply.com
www.GlobalTestSupply.com

MEASUREMENTS
Wet Blub Globe Temperature (WBGT) (˚F | ˚C)
Thermal Work Limit (T WL) (˚F | ˚C)
Globe Temperature (˚F | ˚C)
Naturally Aspirated Wet Bulb Temp (˚F | ˚C)
FEATURES
LiNK Connectivity & Kestrel LiNK Mobile App
Backlit Display switchable white or
Night-Vision preserving red
o optional
6
Icon 5000
Environmental
5000
Environmental
N/A
N/A
o o o o
• • • • •
5500
Weather
5500
Weather
5400
5500
HST
Fire
• •
• •
• •
• •
5400
5500
HST
Fire
5400
Fire
5400
Fire
•
Find Quality Products Online at: sales@GlobalTestSupply.com
www.GlobalTestSupply.com

GETTING TO KNOW YOUR KESTREL
BLACK GLOBE
SENSOR*
ZONE ALERT
LIGHT*
TEMPERATURE
SENSOR
SUNLIGHT
READABLE
AY
DISPL
OPTIONS/EXIT
SELECT
POWER
*Only available on 5400 Fire Weather Pro WBGT.
FRONT
REPLACEABLE
IMPELLER
CAPTURE
BACKLIGHT
SCROLL/ADJUST
IMPELLER COVER
SERIAL NUMBER
PRESSURE
SENSOR
DATA TRANSFER
PORT
LANYARD
ATTACHMENT
BACK
BATTERY DOOR LATCH
HUMIDITY SENSOR
AA BATTERY (1)
(Lithium recommended)
BATTERY DOOR
7
Find Quality Products Online at: sales@GlobalTestSupply.com
www.GlobalTestSupply.com

BUTTONS
Button Name Function
POWER Turns Kestrel on and o.
OPTIONS/
EXIT
SELECT Access Settings on any
UP/DOWN Scroll up and down through
LEFT/
RIGHT
CAPTURE Manually capture all
BACKLIGHT
8
Press for on, hold for two
seconds to turn o.
Enter the main Options
menu or exit a menu.
measurement screen or
select a menu option to
enter its submenu or conrm
a task.
measurement screens or
menus. Adjust values when
entering text in name
menus.
Scroll options left and
right. Adjust values in
combo menus and setting
submenus.
environmental values.
Turn backlight on or o.
(Also turns o automatically
after one minute.)
KESTREL OPTIONS MENU
Most system-wide and weather setup options are accessed
from the main Options menu by pressing the
from any Weather Measurement Screen.
• BLUETOOTH
» Bluetooth On/O
» Conct
• DATA PORT
• MEMORY OPTIONS
» Clear Log
» Auto Store
» Store Rate
» Overwrite
• GRAPH SCALE
• DISPLAY
» Auto Shutdown
» Contrast
» Backlight
• SYSTEM
» Time & Date
» Compass Cal
» Measurements
» Units
» Lang
» Batt
» Factory Restore
• ABOUT
» Version
» Legal
button
Find Quality Products Online at: sales@GlobalTestSupply.com
www.GlobalTestSupply.com
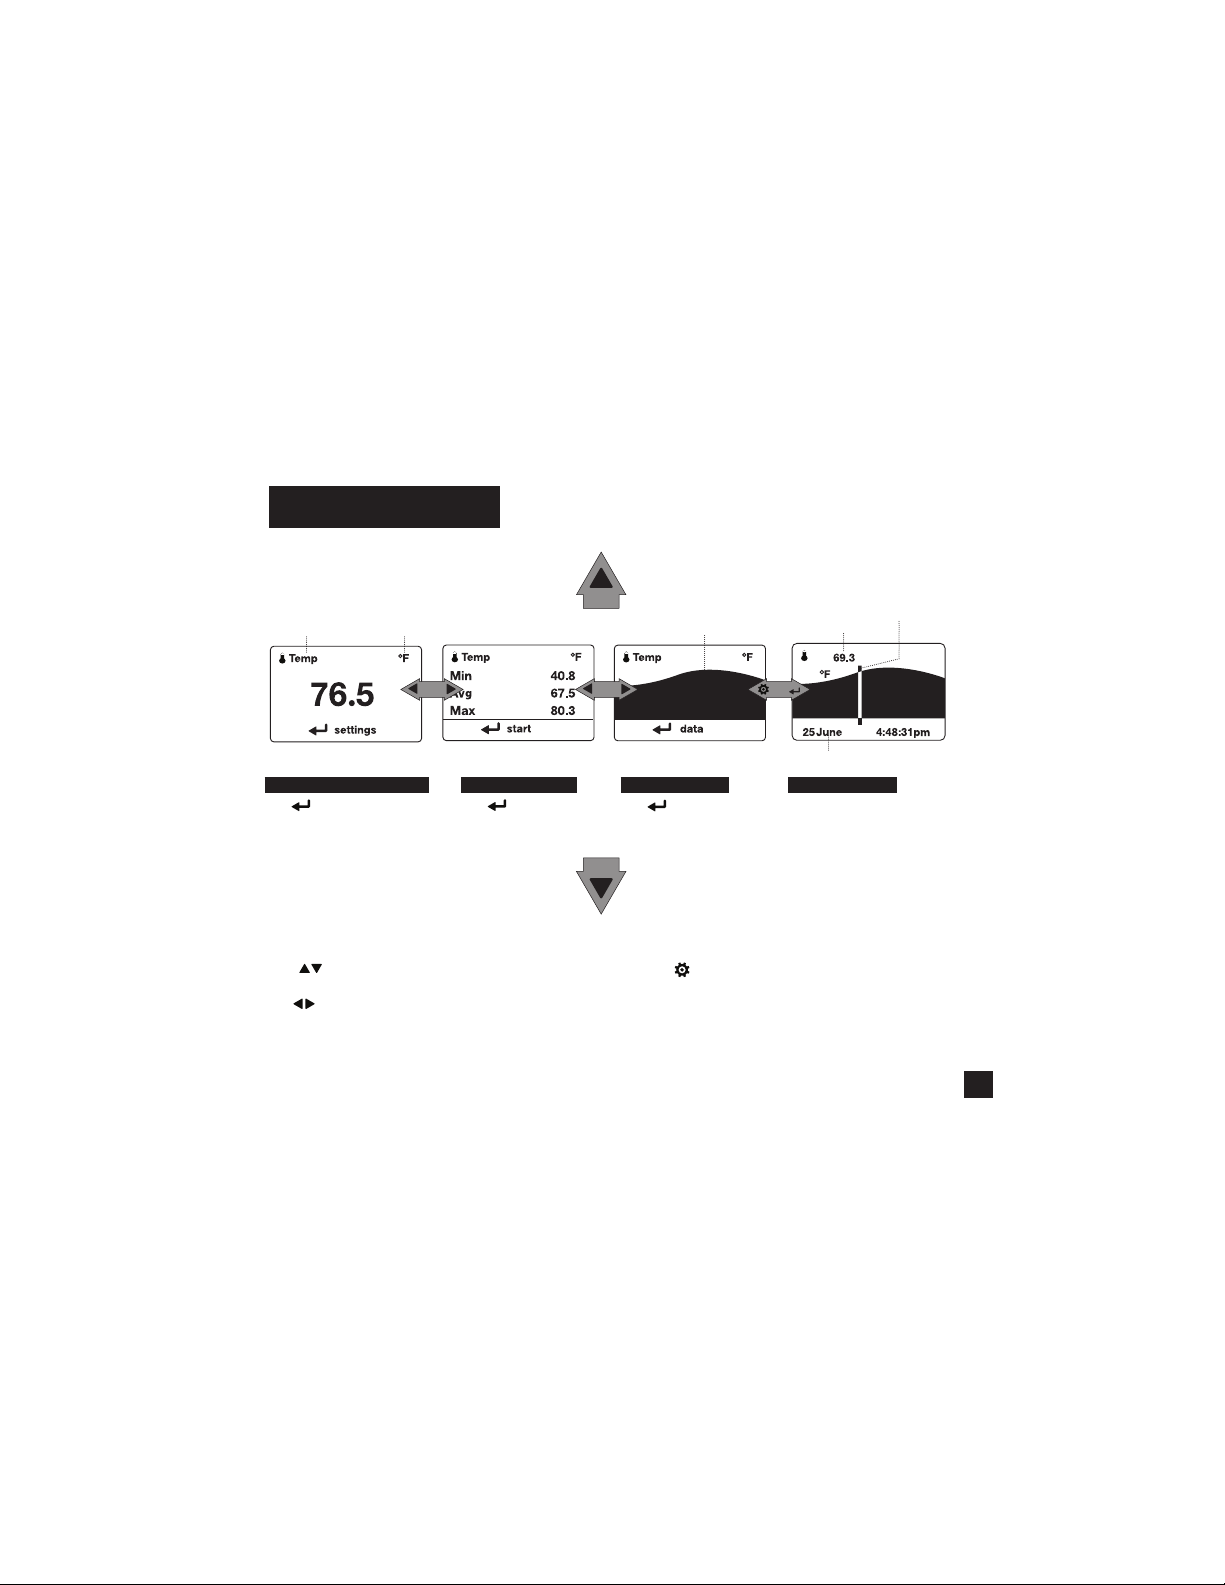
WEATHER MODE SCREENS
MORE MEASUREMENTS
Measurement
& Icon Units
Current Measurement Screen
SELECT to enter settings
Press
menu for that measurement.
Min Avg Max Screen
SELECT to s tart, stop
Press
and clear t he Min/Avg/Max
tracking.
MORE MEASUREMENTS
» The UP/DOWN buttons navigate between all weather
measurements set to “On” in Options|Measurements.
LEFT/RIGHT buttons scroll between the three
» The
display screens for the measurement.
Graph of Sto red Data Log
Data Graph Screen
SELECT to enter
Press
the Data Lo g Detail Scre en to
view log ged data point s.
OPTIONS button exits the settings submenu
» The
and Data Log Detail Screen.
Data Point Value
Data Points Screen
Press LEFT/R IGHT to scroll through
data poin ts. Press OPTI ONS to exit
Data Log D etails Screen .
Data Point S croll Bar
Data Point T ime Stamp
9
Find Quality Products Online at: sales@GlobalTestSupply.com
www.GlobalTestSupply.com

KESTREL MENU NAVIGATION
TYPES OF MENU ITEMS
WBGT MEASUREMENT SCREEN
» Tasks are executed by highlighting the eld and pressing Select.
» The presence of a submenu is indicated by a “…” following a eld.
» Highlight the eld and press Select to enter a submenu.
» Adjust a setting by pressing left or right.
» An arrow indicates there are additional elds o screen.
» Adjust the value of a Combo Field by pressing left or right.
» Enter the Combo Field sub menu by pressing select.
» Navigation buttons indicate available actions on the current screen.
» Locked values are either driven by another value or cannot be edited on
the current screen.
» Locked values may have submenus which are entered by pressing select.
WBGT Out °F
88.5
Zone : Red
10
» Units
» Indoor/Outdoor Setting
» WBGT Measurement
» Zone/”Selected Guideline”: Current Zone
Note! While WBG T is measured in Fahrenheit an d Celsius, the scale of WBGT
values is not comparable to standard temperature readings.
Find Quality Products Online at: sales@GlobalTestSupply.com
www.GlobalTestSupply.com

GETTING STARTED
1. INSTALL BATTERY. Slide the battery door latch and open
door. Insert the provided AA lithium battery as indicated
by the label. Replace the battery door, ensuring it “clicks”
fully into place.
2. ENTER OPTIONS MENU. Press
Menu.
3. SET DATE AND TIME. Scroll to and select System. Scroll
to and select Time & Date. Adjust the time and date.
4. SET AUTO STORE RATE. Scroll to and select Memory
Options. Scroll to Auto Store and ensure it is set to ON.
Scroll to Store Rate and adjust to desired frequency of
automatic weather data logging.
5. SET OVERWRITE. Scroll to and select Memory Options.
Scroll to Overwrite and set to On to allow the data log to
wrap once full and to OFF to stop logging when full.
6. SET GRAPH SCALE. Scroll to and select Graph Scale.
Scroll to and select the desired measurement type. Adjust
the Set High and Set Low values to bound the desired
Note: Ensure that date a nd time are set correctl y when using PIG or
FDFM or measurement s will be incorrect. D ate and time need to be
reset afte r removing the batter y.
display values.
7. SET AUTO SHUTDOWN. Scroll to and
select Display. Scroll to Auto Shtdwn
and choose a time window after which
the Kestrel will shut down without any
button presses.
3x
8. CALIBRATE THE COMPASS.
Scroll to and select System. Scroll to
and select Compass Cal.
to enter the Options
Follow the on-screen instructions:
» Place the base of the Kestrel on a at surface at least 3
feet from any large metal objects.
» Start the calibration routine. Rotate the Kestrel around
its vertical axis 3 times, keeping the unit as vertical as
possible and taking approximately 10 seconds per full
rotation. You may need to restart the routine a few
times until you get the timing correct.
Note: When takin g compass readings, kee p the Kestrel as
vertical as possible for maximum accuracy.
9. SET BACKLIGHT COLOR. Scroll to and select Display.
Scroll to Backlight and set to either White or Red.
White is very bright and ideal for any dim light use. Red
is reduced brightness and a wavelength selected to
preserve adapted night vision for true dark operations.
10. TURN MEASUREMENT SCREENS ON/OFF. Scroll to
and select System. Scroll to and select Measurements.
Set measurement screens to either On or O as
desired.
11. SET UNITS. Scroll to and select System. Scroll to and
select Units. To change all units select Global, then set
Global to Imperial or Metric, and then scroll to Apply
and select Go. To set units individually, scroll to each
measurement type in the Units submenu and set to
the desired units. Units can also be set in the Settings
menu for each measurement.
12. SET LANGUAGE. Scroll to and select Lang. Adjust
to desired language: English, Deutsche, Francais,
Espanol.
11
Find Quality Products Online at: sales@GlobalTestSupply.com
www.GlobalTestSupply.com

PROBABILITY OF IGNITION AND FINE DEAD FUEL MOISTURE
The Probability of Ignition (PIG) and Fine Dead Fuel Moisture
(FDFM, also known as Reference Fuel Moisture or 1 Hour Fuel
Moisture) measurements in the Kestrel Fire Weather Pro meters
come from the tables in the National Wildre Coordinating
Group, Incident Response Pocket Guide, 2014, with nighttime
measurements following the recommendation from the
National Wildre Coordinating Group, Fire Behavior Field
Reference Guide, 2014.
Setting User Inputs for PIG and FDFM
1. In the settings menu of the PIG Current Measurement
Screen, scroll to Shade and set it to match the shade
conditions of the location of interest.
2. Scroll to Aspect and set it to match the primary
direction the slope of the location of interest is facing.
Alternatively, the direction can be captured by selecting
Aspect and then scrolling to Capture and following the on
screen instructions. Hold the Kestrel vertically and face
the back of the Kestrel away from the slope face, then
press Select.
3. Scroll to Slope and set it to match the slope of the
location of interest.
4. Scroll to Fire Elevation and set it to match the relative
position of the location of interest.
Warning! It is impo rtant to ensure the Date and T ime settings in your
Kestrel are corre ct when using PIG and FDFM measure ments. After
removing the b attery, Date and Tim e will need to be reset. If D ate
and Time are n ot set correctly, PIG and FDFM measure ments will be
incorrect.
12
Note! When the ti me set in the Kestrel is earli er than 08:00
or later than 19:59, The Shade Set ting will be locked to
50%-100% per the recomm endations in the Fire Beh avior
Field Reference Guide. Between 08:00 and 19:59, Shade
will return to th e previous value set by the use r.
Note! When Temperature values are outside the extreme
high or low value s listed in the PIG and FDFM tables, th e
nearest extreme temperature value displayed on the table
will be substitu ted to derive PIG and FDFM.
Note! It is not nece ssary to set the Date and T ime format
to 24 hour format when u sing PIG or FDFM.
Note! The Data G raph Screen for the PIG measu rement
only display s a log of PIG measurements . FDFM
measurements are not logged.
Find Quality Products Online at: sales@GlobalTestSupply.com
www.GlobalTestSupply.com

CONFIGURE WBGT
1. POWER ON KESTREL. Press to power on Kestrel.
2. CONFIGURE WBGT SET TINGS.
1. Scroll to the WBGT Current Measurement Screen and
press select.
2. Set Ty pe to either Indoor or Outdoor, depending
on your environment.
3. To use the colored WBGT zones (also known as Flag
Settings), scroll to Zones… and set to On. The zones
increase from White to Black in order of severity of
risk of heat injury.
4. To access one of the pre-saved WBGT guidelines,
scroll to Zones… and press select, then scroll to
Guide… and press select. Follow the menu options
to nd your organization’s WBGT guidelines. If
additional workload or clothing inputs are required,
wet Workload and Clothing to appropriate values
for your situation.
5. For information on setting custom threshold ag
settings see page13.
6. To receive light or buzzer alerts when WBGT is above
a zone threshold, scroll to and select Alerts… in the
WBGT Settings menu. You may set Light and Buzzer
individually. Selecting a zone for Light or Buzzer will
cause that alert to activate when conditions reach
the threshold for the selected zone.
Warning: In addit ion to monitoring WBGT valu es, please refer
to your state or organ ization’s requirements fo r measuring
WBGT, heat acclimatization guidelines, work /rest ratios and
water consumptio n.
Note: To highlight the seve rity of conditions, i f the Red Warning
Zone is reached , the line indicating the cu rrent zone will ash. If
the Black Warning Zone is reached, the measurement value will
ash inverted .
Note: If an aler t is activated, pressin g
Measurement S creen will deactivate th e alert until the ne xt
higher thresh old is reached or until the WB GT measurement dips
below the threshold and then raises above it again.
Note: In the Opti ons Menu under Display, there is an Alerts
Tes t function which w ill activate the light and b uzzer. When
using the unit in a ne w situation, test the ale rts to familiarize
yourself with their intensity.
HOW TO MEASURE WBGT ACCURATELY:
» When changing environments (moving form an air
conditioned room to outdoors or removing the unit
from your pocket) the unit may require more than 15
minutes to equilibrate to its surroundings before taking
readings.
» Take measurements at least 3 feet o the ground and in
the same wind or air ow conditions as the people you
are monitoring. Ensure the Kestrel is oriented into the
wind and able to measure the full wind value. A tripod
or pole mount and the Kestrel Rotating Vane Mount are
ideal for ensuring accurate measurements.
» Dierences in the reectivity of ground surfaces such
as grass or asphalt will impact measurements. Be sure
to take measurements in the same solar/radiant heat
environment as the people you are monitoring.
on the WBGT
13
Find Quality Products Online at: sales@GlobalTestSupply.com
www.GlobalTestSupply.com

CUSTOM FLAG SETTINGS
If you do not wish to follow one of the WBGT guidelines
pre-loaded into the Kestrel Heat Stress Tracker, you may
set custom zones and zone thresholds. Your Kestrel Heat
Stress Tracker allows you to activate and set up to six
customized heat stress warning zones identied by color
names on screen.
SETTING CUSTOM WBGT ZONES:
1. In the Settings Menu of the WBGT Current
Measurement Screen, scroll to and select Zones.
2. Scroll to the colored zones you wish to edit and press
select. Editing any value from a preset guideline in
the Zone Settings Menu will automatically change the
name of the guideline to Custom.
3. In the Zone submenu you can turn zones on or o
by setting Status to ON or OFF as well as change the
lower temperature bound of the zone by adjusting the
Threshold value.
4. The threshold for a zone cannot be greater than the
zone above or less than the zone below it.
5. Zone thresholds cannot be adjusted if the Status is
set to O.
6. If the Status of a zone is set to OFF and the thresholds
of the zones above and below are set one tenth of a
degree apart (the minimum resolution available) the
Status of the intermediary zone cannot be set to On.
Warning: Whil e the Kestrel LiNK a pp for mobile d evices (compatibl e with
LiNK enab led units only) do es have a threshol d alerts featu re, it does not
currently s ynch with the zone t hresholds set in th e Kestrel 5400 whi ch
must be set se parately.
14
MEASURING DIRECTION
» The Kestrel’s compass is intended for measuring
wind direction. The Kestrel must be held vertically
with the back of the unit pointed towards the
direction to be determined.
» Using a Kestrel Vane mount adjusted to level will
provide the most accurate wind and direction
measurements.
Find Quality Products Online at: sales@GlobalTestSupply.com
www.GlobalTestSupply.com

ALTIMETER AND BAROMETER
The Kestrel employs a stable, accurate pressure sensor to
measure station pressure, the unadjusted air pressure in
your location.
» To use your Kestrel to measure barometric pressure
(station pressure adjusted for local elevation), you
must enter a correct reference value for your altitude.
Accurate barometric readings require that no elevation
changes be made while taking measurements.
» To use your Kestrel to measure altitude changes
(changes in station pressure associated with changes
in elevation), you must enter a correct reference
value for your starting barometric pressure. Accurate
altitude readings depend on stable, weather related
barometric air pressure while measurements are taken.
» Synched values between the Altitude and Barometer
measurement screens allow reference value updates
on either screen to automatically update reference
values on the other.
Note! You cannot use your Kes trel as a barometer and al timeter
simultaneously.
SETTING REFERENCE VALUES ON BARO
MEASUREMENT SCREEN:
» Scroll to the Baro measurement screen and
select Settings.
» Adjust either the Altitude or the Barometric
Pressure value to a local, known value obtained
from a mapping reference, GPS, or accurate
weather station in the same location.
SETTING REFERENCE VALUES ON ALTITUDE
MEASUREMENT SCREEN:
» Scroll to the ALTITUDE measurement screen
and select Settings.
» Adjust either the Altitude or the Barometric
Pressure value to a local, known value obtained
from a mapping reference, GPS, or accurate
weather station in the same location.
Note! You should enter n ew reference values when ever
you are using the Alt imeter or Barometer f unctions and
your referen ce value is no longer accurate (Ref B aro
for Alt, Ref Alt f or Baro) due to a change in weath er or
location.
15
Find Quality Products Online at: sales@GlobalTestSupply.com
www.GlobalTestSupply.com

USING MIN/ AVG/ MAX
Pressing the right scroll button from any Current
Measurement Screen will open the Min/Avg/Max Screen.
The capture process is linked for all measurement screens,
capturing Min/Avg/Max values on one measurement
screen will capture Min/Avg/Max values over the same
time period for all measurements. Each new Min/Avg/Max
capture overwrites the previously captured value from all
measurements.
CAPTURING MIN/AVG/MAX VALUES:
» Scroll to the Min/Avg/Max Screen of the desired
measurement. This can be done by scrolling right from
the desired Current Measurement Screen or scrolling
vertically from another measurement’s Min/Avg/Max
Screen.
» Press Select to Start a new Min/Avg/Max capture.
» Press Select to Stop the capture time period and view
Min, Avg, and Max values.
» Press Select to Clear the Min/Avg/Max values.
16
CONNECTING TO DEVICES USING LiNK
If your Kestrel is marked LiNK on the bottom front label,
it can be connected wirelessly to other LiNK-compatible
devices. LiNK is powered by Bluetooth Smart®, also known
as Bluetooth® LE, which is available in most iOS devices
released after 2014 and Android devices released after
2015, as well as in a USB Dongle available from Kestrel
that supports connectivity to Windows and Mac OS
devices. LiNK-enabled Kestrel units can connect to mobile
devices running Kestrel LiNK to install rmware updates.
LiNK-enabled units can can be run wirelessly to computers
using the Kestrel Dongle.
CONNECTING TO A COMPUTER, MOBILE PHONE OR
TABLET:
» On your phone or tablet, follow the links at
to locate Kestrel LiNK
for iOS or Android in the App or Play store and install
on your mobile device.
OR
» On your computer, follow the links at
and install on your
computer. Insert your Kestrel USB Dongle (available
separately) into an open USB port.
» On the Kestrel, open the Options Menu and select
Bluetooth. Set Bluetooth to On.
» On your Kestrel select Conct from the Bluetooth
Options menu and set to PC/Mobile. In PC/Mobile
mode, the Kestrel’s Status will change to Available,
indicating that it is available for pairing with a
computer or mobile device.
Find Quality Products Online at: sales@GlobalTestSupply.com
www.GlobalTestSupply.com

» Ensure the computer or mobile device is
searching and in range. When Status changes
from Available to Connected, the pairing is
active and your Kestrel is ready to communicate.
CONNECTING TO A NEW LiNK-COMPATIBLE
DEVICE:
» Follow directions for your LiNK-compatible
Device to power it on and put it in pairing mode.
» On the Kestrel, open the Options Menu and
select Bluetooth. Set Bluetooth to On.
» Set Conct to Device.
» Scroll to Name and select New, then wait for the
list of available devices in range to populate.
» Select a device from the available list. Once
connected, the settings menu for that device
will open, allowing you to manage the device’s
settings.
» Exit to the Bluetooth menu. Status should
indicate Connected, meaning the pairing is
active and your Kestrel is ready to communicate.
CONNECTING TO/ADJUSTING A PREVIOUSLY
PAIRED LINK-COMPATIBLE DEVICE:
» Follow the directions for connecting to a new
device except instead of selecting New in the
Name eld, scroll left or right to nd the desired
device.
» Status will change to Searching. If the device
is in range and in active pairing mode, a
connection will be made and Searching will change
to Connected, indicating that the pairing is active
and your Kestrel is ready to communicate.
Note! LiNK rang e is typically 100 ft /30M line of sight. Shor ter
distances should b e expected if the re are obstacles such as
walls or metal enc losures. Range is also imp acted by the
signal streng th of the other device.
CONNECTING TO COMPUTERS USING USB CABLE:
All Kestrel 5 Series units can connect to a computer via
the Data Transfer Port using the USB Data Transfer Cable
available separately. Kestrel LiNK software is available
for Windows and Mac for downloading logged weather.
data and installing rmware updates.
17
Find Quality Products Online at: sales@GlobalTestSupply.com
www.GlobalTestSupply.com

CREATING, VIEWING, & EXPORTING DATA LOGS
In addition to taking live measurements, your Kestrel 5
Series weather meter is a powerful data logger. The Kestrel
will automatically create a time stamped data log of all
measurements at the logging interval you set. Additional log
points can also be captured manually. Logged data can be
accessed four ways:
» Viewed on the Kestrel Meter on the Data Graph Screen and
Data Log Detail Screens.
» Exported to an iOS or Android mobile device using the
Kestrel LiNK mobile apps available in the App Store and
Google Play Store. Requires a Kestrel LiNK-enabled meter
and a compatible Bluetooth® Smart/LE devices.
» Exported to a PC or Mac using Kestrel LiNK software and a
Kestrel USB Dongle (available separately). Requires a Kestrel
LiNK-enabled meter
» Exported to your Windows or Mac computer using Kestrel
LiNK software and a Kestrel USB Data Transfer Cable
(available separately). All 5 Series Kestrel meters can connect
to Kestrel LiNK using a Kestrel USB Data Transfer Cable.
TURNING ON AND ADJUSTING AUTOMATIC DATA LOGGING:
» In the main Options menu, scroll to and select Memory
Options. Scroll to and select Auto Store and set to ON.
Scroll to Store Rate and adjust to desired frequency of
automatic weather data logging.
» In the Memory Options sub menu scroll to Overwrite and
set to On to allow the data log to wrap once full and O to
stop logging when full.
» When Auto Store is set to On, the Kestrel unit will
automatically begin logging at the rate set in Store Rate.
18
MANUAL DATA LOGGING:
» Individual data points can be added to the log at
any time by pressing the Capture button.
» Manual capture simply adds every measurement
to the data log at the capture time/date.
VIEWING LOGGED DATA ON THE KESTREL METER:
» Scroll to the Graph Data Screen of the desired
measurement. This can be done by scrolling right
from the desired Current Measurement Screen or
scrolling vertically from another measurement’s
Graph Data Screen.
» A graph of the most recently logged data points
will be displayed and continue to grow at the
selected store rate.
» To view individual data log points, or to view
graph data older than what is shown in the Graph
Data Screen, press Select to open the Data Log
Detail Screen. Scrolling left or right will move the
bar highlighting individual data points. Log values
are shown in the upper left and the time stamp is
shown along the bottom. Press Exit to return to
the Graph Data Screen.
» To change the resolution of the graph, scroll to
and select Graph Scale in the Options menu.
Scroll to and select the desired measurement
type. Adjust the Set High and Set Low values to
bound the desired display values.
EXPORTING DATA LOGS TO A MOBILE DEVICE:
» Follow the links at
Find Quality Products Online at: sales@GlobalTestSupply.com
www.GlobalTestSupply.com

to locate Kestrel LiNK in the App or Play store and
install on your mobile device.
» Follow the directions in the Kestrel LiNK app and
in the section of this manual titled Pairing with a
Computer, Mobile Phone or Tablet: to connect the
mobile device to the Kestrel.
» The Kestrel’s new logged data will automatically be
added to the app’s log whenever the devices are
connected.
» To export logged data to a .csv le for further
analysis, go to the Stats page of the app or the
Manage Data Logs screen on the Manage page.
» Hit the Expor t Data button. Choose a method for
exporting the data and follow the in-app prompts
to send.
EXPORTING DATA LOGS TO A COMPUTER:
» Follow the links at
to download Kestrel LiNK to a PC or Mac computer.
Install.
Use one of the following two methods to connect
your Kestrel to your computer.
1. Connect your LiNK-enabled Kestrel Meter to
your computer wirelessly:
» Purchase a Kestrel LiNK Dongle and install in
your computer’s USB port.
» Follow the instructions in the “Pairing with a
Computer, Mobile Phone or Tablet” section
of this manual along with the Kestrel LiNK
program to pair the Kestrel and your computer.
2. Connect your Kestrel 5 Series Meter to your
computer using a Kestrel USB Data Transfer Cable:
» Purchase a Kestrel USB Data Transfer Cable.
» In the main Options menu, scroll to and select Data
Port and set to On.
» Insert the USB Data Transfer Cable into an open USB
port and the Data Transfer Port on the back of the
Kestrel unit.
Once connected
» Follow the directions in the Kestrel LiNK program to
conrm the connection.
» In the Kestrel LiNK software, choose a data log from the
Logs window and click on the Export to File button.
» Choose a le export directory on your computer and
click on the Ok button.
19
Find Quality Products Online at: sales@GlobalTestSupply.com
www.GlobalTestSupply.com

THERMAL WORK LIMIT TWL
The Kestrel 5400 also displays a measure of human heat
stress known as “Thermal Work Limit,” or “TWL.” Unlike WBGT,
which is a measure of the environment, TWL is an estimate
of the cooling capacity of a human body in given conditions.
Accordingly, a higher TWL is safer because a person is able to
eliminate more heat from their body. TWL provides four work
level recommendations (Unrestricted, Acclimatization, Buer,
and Withdraw) to help guide work management in thermally
dangerous conditions.
*Unacclimatized workers are dened as new workers who have been o work for more than 14 days due to illness or leave (outside the tropics).
20
TWL CURRENT MEASUREMENT SCREEN
TWL w/m
2
154.2
Acclime
» Units
» Measurement & Icon
» TWL Measurement
» Working Zone
Find Quality Products Online at: sales@GlobalTestSupply.com
www.GlobalTestSupply.com

CONFIGURING TWL:
» In the Settings Menu of the TWL Current
Measurement Screen, scroll to and select the clothing
setting that most closely reects the clothing worn
by the people you are monitoring. A check mark will
appear next to the chosen clothing setting.
» Clothing Setting Options:
» Men’s business suit: Long sleeve shirt/tweed suit
jacket & long, loose trousers
» Short sleeve shirt/denim shorts
» Work Clothes: Short sleeve shirt/long trousers
(denim)
» Work Clothes & Coveralls
» Pressing select a second time will open a sub menu
displaying the preset values dening that clothing
setting.
» If none of the four provided clothing settings reect
the clothing worn by the people you are monitoring, a
custom clothing setting can be congured. To create
a custom clothing setting, scroll to Custom and press
select.
» Press select a second time to open the custom
setting submenu. Scroll to the parameter you wish
to customize and adjust it up or down to match your
situation.
Note: To highlight the seve rity of conditions, w hen the meter
detects that Acclimatization is the current recommendation
zone, Acclim will ash on the T WL Current Measurement
Screen. In the Buer or Withdrawal zones, the measurement
value will ash inve rted.
WEATHER GLOSSARY
DIRECTION – Compass heading in true or magnetic
WIND SPD – Wind Speed is the measurement of
the wind passing through the impeller. For greatest
accuracy, point the back of the Kestrel directly into
the wind.
CROSWND – Crosswind uses the internal compass
and a user selected heading to calculate the crosswind
component of the full wind.
HEADWND – Headwind uses the internal compass and
a user selected heading or target direction to calculate
the headwind component of the full wind.
TEMP – Ambient Temperature is the temperature
measured at the thermistor. For best results, ensure
the thermistor is not exposed to direct sunlight and is
exposed to good airow.
CHILL – Wind Chill is a calculated value of the
perceived temperature based on temperature and
wind speed.
HUMIDITY – Relative Humidity is the amount of
moisture currently held by the air as a percentage of
the total possible moisture that the air could hold.
PIG – Probability of Ignition yields an estimate of
the probability that a dened release of a ammable
material will ignite if exposed to an ignition source.
21
Find Quality Products Online at: sales@GlobalTestSupply.com
www.GlobalTestSupply.com

FDFM – Fine Dead Fuel Moisture, also known as 1 Hr
Moisture Content, is an estimate of the moisture content of
dead fuel between 0-1/4” in diameter.
HEAT INDEX – Heat Index is a calculated value of the
perceived temperature based on temperature and relative
humidity.
GLOBE TEMP – Globe Temperature is dened as the
temperature measured inside a 6-inch copper globe
painted black. On the Kestrel HST, the temperature inside
the 1-inch|25 mm globe is converted to the equivalent
temperature for a standard globe. The closest equivalence
will be obtained with airow greater than 2.2 mph|1 m/s.
NWB TEMP – Natural Wet Bulb Temperature is a measure
of evaporative cooling in an environment with unforced,
naturally occurring air ow.
WBGT – Wet Bulb Globe Temperature is a measure of human
heat stress resulting from the combination of eects due
to temperature, humidity, wind speed (wind chill), and
visible and radiant heat. Outdoor WBGT is calculated from
a weighted sum of Natural Wet Bulb Temperature, Globe
Temperature and dry bulb Temperature.
TWL – Thermal Work Limit is a measure of the heat
energy a person can dissipate from their surface area in
Watts per square met
22
DEW POINT – Dew Point is the temperature at which
water vapor will begin to condense out of the air.
WET BULB – Wet Bulb is the lowest temperature that
can be reached in the existing environment by cooling
through evaporation. Wet Bulb is always equal to or
lower than ambient temperature.
BARO – Barometric Pressure is the local station (or
absolute) pressure with the pressure dierential
associated with the locations altitude above sea level
subtracted. An accurate reading depends on an
accurate initial altitude input and unchanging altitude
while measuring.
ALTITUDE – Altitude is the change in vertical distance
associated with a change in atmospheric pressure.
An accurate reading depends on an accurate initial
barometric pressure input and stable barometric
pressure while measuring.
STATION – Station Pressure (Absolute Pressure) is the
pressure exerted by the earth’s atmosphere at any
given point.
DENS ALT – Density Altitude is the altitude at which
the density of the theoretical standard atmospheric
conditions (ISA) would match the actual local air
density.
Find Quality Products Online at: sales@GlobalTestSupply.com
www.GlobalTestSupply.com

IMPELLER REPLACEMENT
Press only the si des of the impel ler when removi ng and inserti ng
to avoid dama ging the precisi on hub bearing. [ Figure 1] .
» Press FIRMLY on the impeller module to remove it.
» Insert the new impeller so the side that has the
small triangle (close to the perimeter) faces the
front of the Kestrel when installed.
Figure 1
» Orient one “arm” of the module straight up .
[Figure 2]. The impeller can be pushed in from either
side.
Figure 2
23
Find Quality Products Online at: sales@GlobalTestSupply.com
www.GlobalTestSupply.com

5YEAR LIMITED PRODUCT WARRANTY
Your Kestrel Weather/Environmental Meter is warrantied to be free of defects in materials and workmanship for a period
of FIVE YEARS from the date of its rst consumer purchase. NK will repair or replace any defective meter or part when
notied within the warranty period, and will return the meter via domestic ground shipping or NK’s choice of method
of international shipping at no charge. The following are excluded from warranty coverage: damage due to improper
use or neglect (including corrosion); damage caused by severe or excessive impact, damage caused by failed or leaking
batteries, crushing or mechanical harm; modications or attempted repairs by someone other than an authorized
NK repair agent; impeller failure not caused by a manufacturing defect; normal usage wear and failed batteries.
Measurement accuracy is warranted to be within the specications on the supplied Certicate of Conformity including
specied drift since date of manufacture. If no warranty registration or proof of purchase is provided, the warranty period
will be measured from the meter’s date of manufacture.
Except for the warranties set forth herein, NK disclaims all other warranties, expressed, implied or statutory,
including, but not limited to, the implied warranties of merchantability or tness for a particular purpose.
Any implied warranties that may be imposed by applicable law are limited to the term of this warranty. In no
event shall NK be liable for any incidental, special or consequential damages, including, but not limited to,
loss of business, loss of prots, loss of data or use, whether in an action in contract or tort or based on a warranty,
arising out of or in connection with the use or recalibration, performance of an NK product, even if NK has been
advised of the possibility of such damages. You agree that repair, and (upon availability) replacement,
as applicable, is your sole and exclusive remedy with respect to any breach of the NK
Limited Warranty set forth herein.
All product liability and warranty options are governed exclusively by the laws
of the Commonwealth of Pennsylvania.
24
WARRANTY CERTIFICATE
Find Quality Products Online at: sales@GlobalTestSupply.com
www.GlobalTestSupply.com
 Loading...