

Page 1
3000
Pocket Weather ® Meter
with Backlight
Revised 05/07
INSTRUCTION MANUAL
Thank you for purchasing the Kestrel 3000 Pocket
Weather Meter. This instrument will measure the following
environmental conditions:
• wind speed • wind chill
• maximum wind gust • relative humidity
• average wind speed • heat stress
• temperature (air, water, snow) • dewpoint
This instrument also features a data hold function, a backlight,
and an automatic power-down function. Every unit is
fully tested at our factory for measurement accuracy and
waterproof integrity.
OPERATION
1. Slide off cover.
2.
Turn on. Press the center button ( or ) to turn on the unit.
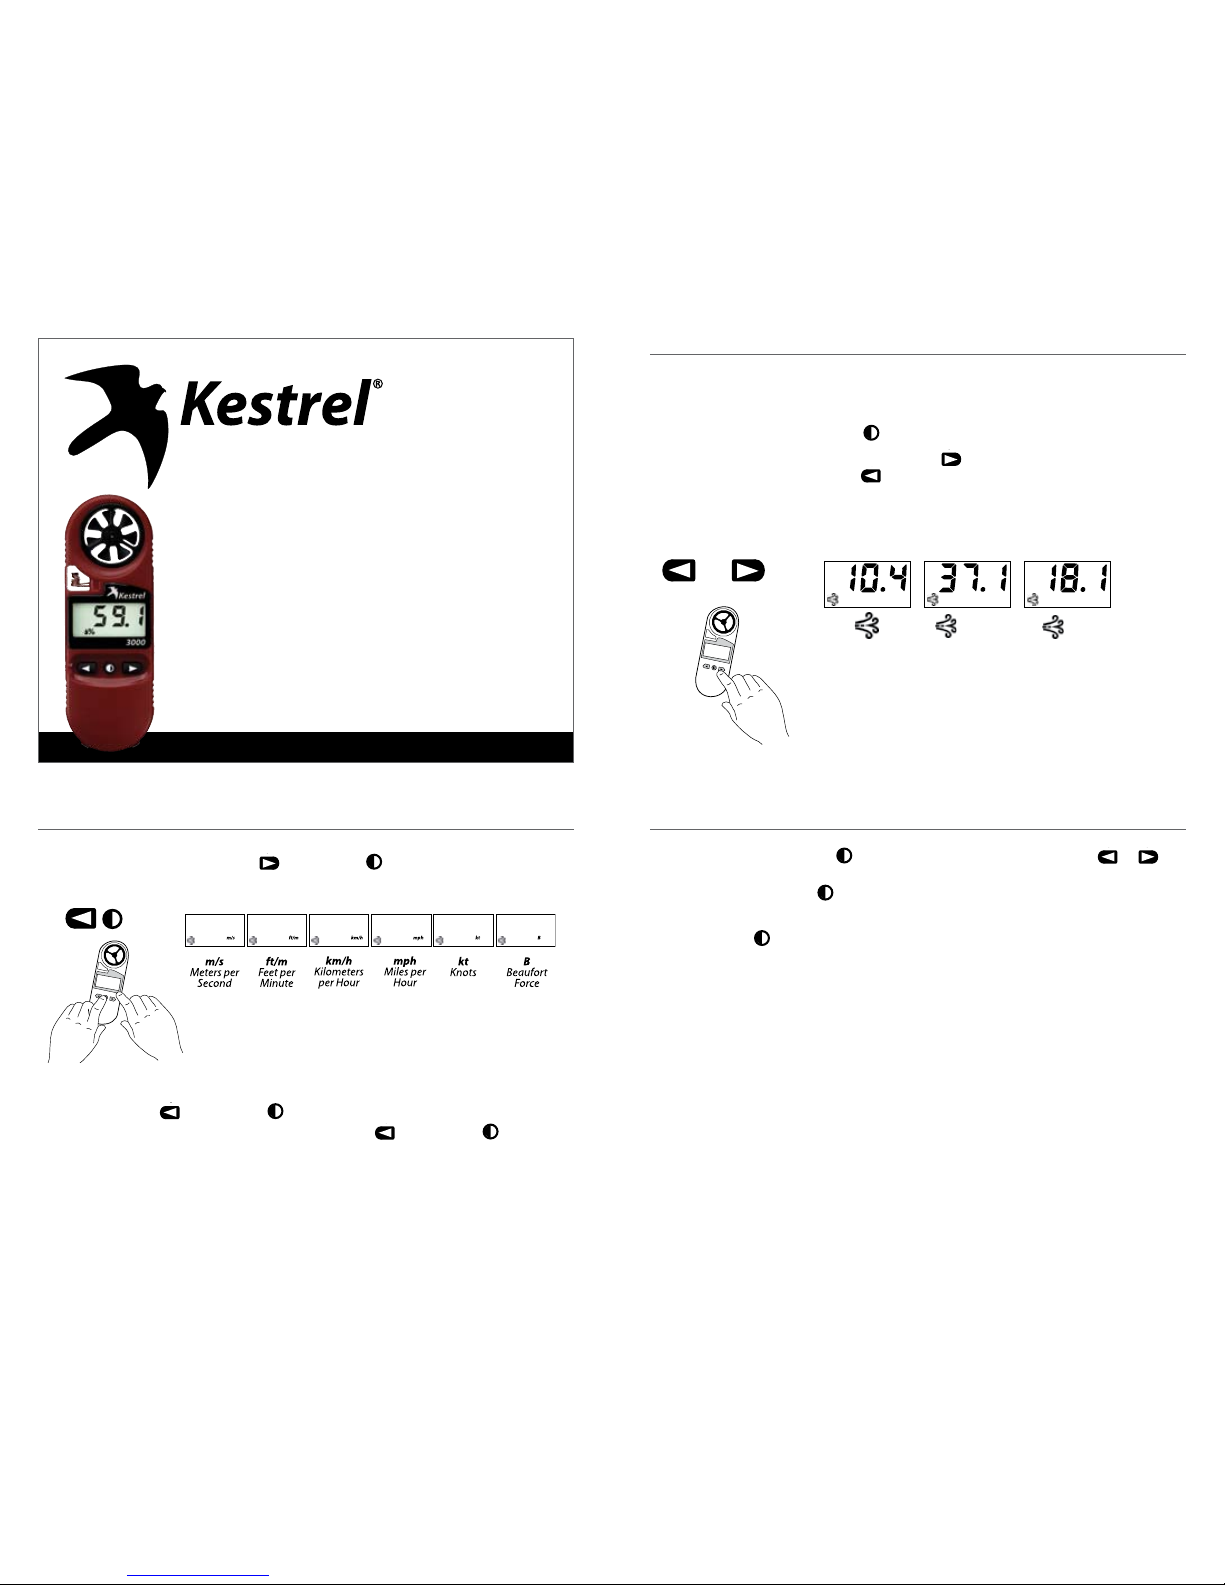
3. Select operating mode. Press the right arrow (
) to scroll through the measurements
listed below. Press the left arrow ( or ) to scroll through the measurements in reverse
order. The instantaneous measurements will be displayed. (See Understanding the
Measurements section for more information.)
mph
mph
MAX
mph
AVG
Current
Wind Speed
Maximum 3Second Gust
Since Power On
Average Wind
Speed Since
Power On
MAX
AVG
or
2
4. Select the units of measure. Press
while holding or to scroll through the units
of measure.
5.
Hold mode. Press or while holding or to hold the measured value on the display. The
word “HOLD” will blink to indicate the Hold Mode. Press or while holding or to exit
the Hold Mode. This mode can be useful for taking measurements when unable to view
the display, as within a duct. The Max and Avg Wind Speed Modes will continue to work
as usual.
3
6. Turn on the backlight. Press or to activate the backlight for 10 seconds. If or or
are pressed while the backlight is illuminated, the backlight will remain illuminated for
another 10 seconds. Press or while the backlight is illuminated to manually turn off the
backlight.
7.
Turn off. Hold or for 2 seconds to manually turn off the unit. The unit will automatically
turn off if no buttons have been pressed for 45 minutes.
UNDERSTANDING THE MEASUREMENTS
Wind Speed - average over the previous three seconds. The measurement will be accurate
for air flow through the front or rear of the unit.
Maximum Wind Gust - maximum 3 - second wind speed since the unit was turned on.
Average Wind Speed - average wind speed since the unit was turned on.
Temperature - instantaneous temperature of the thermistor, which is located at the end
of the long coiled leads in the open cavity below the impeller. The exposed thermistor will
respond quickly to changes in temperature when air flows past it. For fastest response, either
hold the unit into the wind or wave the unit side to side for 15 seconds. Readings should be
taken in the shade. Water and snow temperatures can be taken by hold the unit in the water
or snow.
4
Page 2

Wind Chill - combination of wind speed and temperature, as defined by the US National
Weather Service. Wind chill is the effective temperature on a human or animal at low
temperatures due to wind speed. Wind chill readings will be the same as the temperature
readings above 45ºF or below 3 mph.
Relative Humidity - amount of moisture in the air compared to the amount of moisture the
air can hold for the given temperature, represented as a percent. Because relative humidity is
also a function of the temperature, the response time will be dependent on the temperature
response time (see temperature section above). Readings should be taken in the shade.
Heat Stress – combination of temperature and humidity, as defined by the US National
Weather Service. Heat stress is the effective temperature on a human or animal at high
temperatures due to humidity. Heat stress readings will be the same as the temperature
readings below 70ºF.
Dewpoint – calculated based on temperature and humidity measurements, as a measure of
moisture content in the air. If the dewpoint is very close to the temperature, the air is humid.
If the temperature and dewpoint are the same, dew will form. If this happens below freezing,
frost will form.
5
MAINTENANCE & TROUBLESHOOTING
Environmental
Every Kestrel Meter is fully waterproof and floats, and has passed mil-spec drop testing.
Storing Your Kestrel
Avoid storing your Kestrel where it will be exposed to temperatures below -30°C [-22°F] or
above 60° C [176° F] for extended periods of time. Doing so may cause permanent damage.
(Note that the inside of a car parked in the hot sun can reach very high temperatures.)
Use of the Lanyard and Cover
The cover can be captured on the lanyard to avoid loss. First, remove the cord poplock. Then
feed the lanyard end through the large opening in the over and out the slot. Replace the
poplock on the lanyard.
Replacing the Battery
When your display becomes dim or disappears, replace the
battery. Use a large coin to open the battery compartment.
Use only new CR2032 coin cell batteries (available where
watch batteries are sold). Wipe the battery clean of any
fingerprints and insert the positive (+) pole up, angling the
battery downward and pressing it firmly into place. When
replacing the battery door, be sure to keep the black rubber
o-ring seated in the groove on the case back.
Replacing the Battery
6
Why does the Impeller Appear Imbalanced?
It is NORMAL for the impeller to oscillate as it comes to a stop. It is NOT imbalanced. Rather,
it contains a very small magnet that responds to the earth’s magnetic fields. This does not
affect the accuracy of the wind speed readings because the magnetic field applies both a
braking and an accelerating force which cancel each other. The impeller has been calibrated
to provide wind speed readings accurate to within at least ± 3%.
High Speed Use
After several hours of sustained operation over 25 M/S (~49
KT, 90 KM/H, 56 MPH or 4,923 FPM), the Kestrel will lose some
accuracy due to wear of the sapphire bearings in the impeller.
Replacing the Impeller
You may recalibrate the wind speed readings by replacing
the impeller. Press FIRMLY on the sides of the black impeller
housing with your thumbs to remove the entire assembly.
When inserting the new impeller, be sure the arrow is facing
the display side of the unit, and is aligned with the top of the
meter. Press on the sides of the housing rather than the center.
Taking Accurate Humidity, Heat Stress and Dewpoint Measurements
The patented system for measuring relative humidity allows for extremely fast and accurate
readings. The sensor is located in the large hole on the rear of the unit. Even extreme and
abrupt changes in the surrounding humidity will be measured within several minutes. To test
this, place your hand around the rear of the unit. Within several seconds, the humidity will
Replacing the Impeller
7
increase dramatically. After removing your hand, the humidity will quickly begin to decrease.
Next, place your hand near the rear of the unit and wave the unit back and forth. The
humidity will not change because the air flow is diluting the humidity from your hand.
This example shows the importance of keeping air flow past the sensor while taking a
measurement. If there is no natural air flow past the sensor, wave the unit back and forth.
It is also reasonable to lay the unit down on a solid surface for several minutes to allow the
sensor to adjust.
Sensors & Calibration
Kestrel Pocket Weather Meters use precision sensors to measure the environment. These
sensors have all been factory calibrated to NIST-traceable standards, and are accurate within
the stated specifications at the time of manufacture.
The wind is measured with the patented user-replaceable impeller. It is mounted on a
sapphire bearing that begins to measure readings in the slightest of breezes.
The patented external temperature sensor is mounted on long, coiled leads that help
to further isolate the bulb from the case. This ensures that the Kestrel is reading the air
temperature and not the case temperature, may be warmer if the unit was in your pocket or
warmed by your hand.
The patented relative humidity sensor is designed to adjust quickly to abrupt changes in
humidity, and maintains this accuracy and speed in extremely low humidity conditions.
The RH sensor is located on the back of the unit and is protected by a membrane. DO NOT
puncture this membrane. It will damage the sensor and require replacement.
8
Page 3

For recalibration of the sensors, the unit may be returned to NK for factory calibration. The
wind and humidity sensors can all also be field-calibrated. To recalibrate the wind speed,
simply replace the impeller. Visit www.nkhome.com for information on the RH fieldcalibration kit. The temperature sensor does not need to be recalibrated.
BEAUFORT SCALE
The Beaufort Scale is a system for estimating
wind force without the use of instruments based
on the visible effects of the wind on the physical
environment. The behavior of smoke, waves, trees,
etc., is rated on a 13 point scale. The scale was
devised in 1805 by the British naval Commander Sir
Francis Beaufort (1774-1857) and is still commonly
used by mariners.
KESTREL POCKET WEATHER METERS
WARRANTY
NK does not believe in “disposable electronics.” We know that Kestrel Meters don’t typically
lead pampered lives, and we design them for years of performance in tough conditions.
Every Kestrel is designed and manufactured at NK’s facility in Boothwyn, PA. We guarantee
every Kestrel Pocket Weather Meter to be free of defects in materials and workmanship
for a period of TWO YEARS from your date of purchase. We will repair or replace any
Force Description Kts
0 Calm 0
1 Light Air 1-3
2 Light Breeze 4-6
3 Gentle Breeze 7-10
4 Moderate Breeze 11-16
5 Fresh Breeze 17-21
6 Strong Breeze 22-27
7 Near Gale 28-33
8 Gale 34-40
9 Strong Gale 41-47
10 Storm 48-55
11 Violent Storm 56-63
12+ Hurricane 64+
9
defective product or part when notified within the warranty period, and will return the
product via domestic ground shipping at no charge. Additionally, each Kestrel has a 30-day
money back guarantee.
The following issues do not result from a manufacturing defect and are not covered under
this warranty: damage due to improper use or neglect (including corrosion), impact damage,
modifications or attempted repairs by someone other than an authorized NK repair agent,
impeller failure not caused by a manufacturing defect, normal wear from use of the product,
failed batteries, and re-calibration beyond 30 days from your date of purchase.
Your warranty period will be measured from your date of purchase. The best way to ensure
full warranty coverage is to REGISTER your NK product promptly on our website:
www.kestrelweather.com. We keep your registration information strictly confidential and
do not sell it, share it, or use it for anything but product-related information bulletins (which
you may decline receiving). If you do not register and cannot provide proof of purchase,
your warranty period will be measured from our date of manufacture, determined by
serial number.
We request that you contact NK if you feel your product is not working properly. We can
often solve product issues by phone or e-mail, saving you the time and expense of returning
the unit. If we require the product to be returned, we will issue a Return Authorization to
expedite the handling of your warranty claim.
The Kestrel Pocket Weather Meters are covered by the following patents: 5,783,753,
5,939,645, 6,257,074, and 7,059,170.
10
LIFETIME CUSTOMER CARE WARRANTY
NK wants you to be an NK customer for life, so we take care of you even beyond the terms of
the above warranty with our Customer Care Program. Trade-in any Kestrel Pocket Weather
Meter, no matter the age or condition, and receive a generous discount on the replacement
product (same model only). Our Customer Care Program applies only as long as we
manufacture the product, and does not cover product upgrades.
CALIBRATIONS, CERTIFICATIONS AND SERVICE
Every NK product is tested and calibrated before it leaves our factory. We guarantee that it
will perform within specifications when you receive it. Each Kestrel comes with a Certificate
of Conformity, with the stated specifications for that product on the back. If you feel an
NK product is not meeting specs when you receive it, call us and we’ll make sure you are
operating it correctly. If it still appears that it may be out of spec, return it to us within 30 days
of purchase and we will test and recalibrate all values at no charge. Beyond 30 days, we offer
reasonably-priced tests, calibration services and N.I.S.T. certified calibrations as well as Kestrel
tune-ups.
All of our measurements are traceable to the National Institute of Standards and Technology,
ensuring the highest level of accuracy. Our primary Calibration Standards are sent for
calibration in accordance with N.I.S.T. requirements and based on a regular schedule.
Only approved laboratories and N.I.S.T themselves are used for these calibration services.
Incoming and outgoing data is supplied with the certificate of calibration.
11
We also offer full factory service on every product we manufacture for as long as we make
the product (and as long after as component availability permits). If we can’t repair a product,
we will offer you a brand-new replacement under our Customer Care Program (even for
accidental damage and misuse).
ADDITIONAL INFORMATION
What is a “Kestrel”? The American Kestrel is the smallest North American falcon.
Beautiful and highly adaptable, it can be found virtually everywhere in North
America. It is unique among falcons for its ability to both hover at very low speeds
and dive at very high speeds.
Assembled in the USA. The Kestrel 3000 is protected by US Patents 5,783,753, 5,939,645 and
6,257,079. Nielsen-Kellerman reserves the right to change product specifications. © 2007.
Kestrel, the Kestrel logo, Pocket Wind, NK and the NK logo are trademarks of the NielsenKellerman Co.
12
Page 4

NIELSEN-KELLERMAN
21 Creek Circle, Boothwyn, PA 19061
Phone: (610) 447-1555
Fax: (610) 447-1577
Web: www.kestrelweather.com
Email: kestrel@nkhome.com
Register your Kestrel® Pocket Weather® Meter online at www.kestrelweather.com.
 Loading...