

Page 1
KERN & Sohn GmbH
Ziegelei 1
D-72336 Balingen
E-Mail: info@kern-sohn.com
Phone: +49-[0]7433- 9933-0
Fax: +49-[0]7433-9933-149
Internet: www.kern-sohn.com
Operating manual
Platform balance
KERN ILJ-C/ILS-C
Version 2.0
10/2013
GB
ILJ-C/ILS-C-BA-e-1320
Page 2

GB
KERN ILJ-C/ILS-C
Version 2.0 11/2013
Operating manual
Platform balance
Contents
1 Technical data ................................................................................................... 5
1.1 Dimensions ............................................................................................................................... 7
2 Appliance overview ........................................................................................... 8
2.1 Display and Keyboard Summary ............................................................................................ 9
2.1.1 Navigation buttons / numeric input ....................................................................................... 11
3 Basic instructions ........................................................................................... 12
3.1 Proper use ............................................................................................................................... 12
3.2 Improper Use .......................................................................................................................... 12
3.3 Warranty .................................................................................................................................. 12
3.4 Monitoring of Test Resources ............................................................................................... 13
4 Basic Safety Precautions ................................................................................ 13
4.1 Pay attention to the instructions in the Operation Manual ................................................ 13
4.2 Personnel training .................................................................................................................. 13
5 Transport and storage .................................................................................... 13
5.1 Testing upon acceptance ...................................................................................................... 13
5.2 Packaging / return transport ................................................................................................. 13
6 Unpacking, Setup and Commissioning ......................................................... 14
6.1 Installation Site, Location of Use .......................................................................................... 14
6.2 Unpacking and checking ....................................................................................................... 14
6.3 Placing ..................................................................................................................................... 15
6.4 Mains connection ................................................................................................................... 16
6.4.1 Turning On the Power .......................................................................................................... 16
6.5 Connection of peripheral devices ......................................................................................... 16
6.6 Initial Commissioning ............................................................................................................ 16
7 Adjustment ....................................................................................................... 17
7.1 Automatic adjustment using internal weight (ILJ-C only) .................................................. 18
7.2 Menu settings ......................................................................................................................... 19
7.2.1 P1.1 INT.JUST. – Internal adjustment (models ILJ-C only) ................................................. 19
7.2.2 P1.2 EXT.JUST.- External adjustment (ILS only) ................................................................ 20
7.2.3 P1.3 BE.JUST. User adjustment (model ILS-C only) .......................................................... 21
7.2.4 P1.4 TEST JUST. – Adjustment report (models ILJ-C only) ................................................ 22
7.2.5 Printing adjustment reports .................................................................................................. 23
7.3 Verification .............................................................................................................................. 24
2 ILJ-C/ILS-C-BA-e-1320
Page 3

8 Menu ................................................................................................................. 26
8.1 Navigation in the menu .......................................................................................................... 26
8.2 Menu overview ........................................................................................................................ 27
8.3 Exit menu / back to weighing mode ..................................................................................... 31
9 Entry by navigation keys ................................................................................ 32
10 User ............................................................................................................... 33
10.1 Login/logout ............................................................................................................................ 33
10.2 Authorisation levels ............................................................................................................... 34
11 Weighing ....................................................................................................... 35
11.1 Switch on-off balance ............................................................................................................ 35
11.2 Weighing ................................................................................................................................. 35
11.3 Weighing units switch-over ................................................................................................... 36
11.4 Taring ....................................................................................................................................... 36
11.4.1 Entering a tare value manually (pre-tare) ........................................................................ 36
11.4.2 Deleting the tare value ..................................................................................................... 36
11.5 Underfloor weighing ............................................................................................................... 37
11.6 Selecting the operating mode ............................................................................................... 38
11.6.1 Invoking operating modes: ............................................................................................... 38
11.6.2 To select operating modes: ............................................................................................. 39
12 Weighing scale settings operating mode weighing .................................. 40
12.1 Filter - adaptation to ambient conditions and weighing options ...................................... 40
12.2 Rest position control .............................................................................................................. 41
12.3 Auto Zero ................................................................................................................................. 42
12.4 Hide last decimal place .......................................................................................................... 43
12.5 Environmental conditions ..................................................................................................... 44
12.6 Printout mode ......................................................................................................................... 45
12.7 Setting weighing units ........................................................................................................... 46
12.7.1 How to enable weighing units .......................................................................................... 46
12.7.2 How to set a standard weight unit.................................................................................... 47
12.8 Information display ................................................................................................................ 48
12.8.1 Special information .......................................................................................................... 49
12.8.2 Shortcut keys ................................................................................................................... 50
13 Additional operating modes ....................................................................... 51
13.1 Parts counting ........................................................................................................................ 51
13.2 Weighing with tolerance range ............................................................................................. 56
13.3 Dosing...................................................................................................................................... 59
13.4 Percent determination............................................................................................................ 62
13.5 Animal weighing ..................................................................................................................... 64
13.6 Statistics .................................................................................................................................. 66
13.7 Totalization .............................................................................................................................. 69
13.8 HOLD function ........................................................................................................................ 72
ILJ-C/ILS-C-BA-e-1320 3
Page 4

14 Further useful functions “P6 OTHER“ ....................................................... 73
14.1 Language ................................................................................................................................. 73
14.2 Authorisations ........................................................................................................................ 74
14.3 Acoustic signal for key operation ......................................................................................... 75
14.4 Background illumination and brightness control for display ............................................ 76
14.5 Date .......................................................................................................................................... 77
14.6 Time ......................................................................................................................................... 78
14.7 Date format .............................................................................................................................. 79
14.8 Time format ............................................................................................................................. 80
15 GLP/ISO report “P5.3 GLP PRINT“ ............................................................. 81
16 Data output RS 232 and USB ...................................................................... 83
16.1 Technical data ......................................................................................................................... 83
16.2 Setting interface RS 232 ........................................................................................................ 84
16.3 Interface cable ........................................................................................................................ 85
16.4 Output log ............................................................................................................................... 85
16.4.1 Issue after pressing the PRINT ´button ........................................................................... 85
16.4.2 Remote control instructions ............................................................................................. 86
17 Connecting external devices ...................................................................... 88
17.1 Printer settings ....................................................................................................................... 89
17.1.1 Setting an adjustment report ............................................................................................ 90
17.1.2 Set header ....................................................................................................................... 91
17.1.3 Print measured result ....................................................................................................... 92
17.1.4 Adjust footer ..................................................................................................................... 92
18 Data bases .................................................................................................... 93
18.1 Data base USER ...................................................................................................................... 93
18.2 Data base products ................................................................................................................ 97
18.3 Data base Taring ................................................................................................................... 100
18.4 Data base Weighing processes .......................................................................................... 101
18.5 Alibi memory ......................................................................................................................... 104
18.6 Exporting and importing data bases .................................................................................. 105
19 Servicing, maintenance, disposal ............................................................ 108
19.1 Clean ...................................................................................................................................... 108
19.2 Servicing, maintenance ....................................................................................................... 108
19.3 Disposal ................................................................................................................................. 108
20 Instant help ................................................................................................. 109
20.1 Error messages .................................................................................................................... 110
21 Declaration of conformity ......................................................................... 111
4 ILJ-C/ILS-C-BA-e-1320
Page 5
KERN
ILJ 25K-4CM
Readability (d)
0.1 g
Weighing range (max)
25 kg
Minimum load (Min)
5 g
Verification value (e)
1 g
Verification class
II
Reproducibility
0.1 g
Linearity
± 0.4 g
Stabilization time
3 sec.
Adjustment weight
internal
Warm-up time
2 h
Weighing Units
g, kg, ct
Smallest part weight for
piece counting
100 mg
Reference quantities at
piece counting
10, 20, 50, 100 freely selectable
Weighing plate, stainless
steel [mm]
347 x 259
Net weight (kg)
19.9
Permissible
ambient condition
+10° C to +40° C
Humidity of air
80 % relative (not condensing)
Input voltage
100 - 240 V AC, 50 Hz
Power pack
secondary voltage
15 V
Interface
RS 232C
Underfloor weighing device
Hooks
1 Technical data
ILJ-C/ILS-C-BA-e-1320 5
Page 6
KERN
ILS 30K-4C
ILS 50K-4C
Readability (d)
0.1 g
0.1 g
Weighing range (max)
30 kg
50 kg
Reproducibility
0.2 g
0.2 g
Linearity
± 0.4 g
± 0.4 g
Recommended adjusting
weight not supplied (class)
30 kg (E2)
50 kg (E2)
Warm-up time
2 h
4 h
Stabilization time
3 sec.
Weighing Units
g, kg, ct, lb, oz, ozt, dwt, tlh, tls, tlt, tlc, mom, gr, ti, N, baht, tola
Smallest part weight for
piece counting
100 mg
Reference quantities at
piece counting
10, 20, 50, 100 freely selectable
Weighing plate, stainless
steel [mm]
347 x 259
Net weight (kg)
13.5
Permissible
ambient condition
+10° C to +40° C
Humidity of air
80 % relative (not condensing)
Input voltage
100 - 240 V AC, 50 Hz
Power pack
secondary voltage
15 V
Interface
RS 232C
Underfloor weighing device
Hooks
6 ILJ-C/ILS-C-BA-e-1320
Page 7
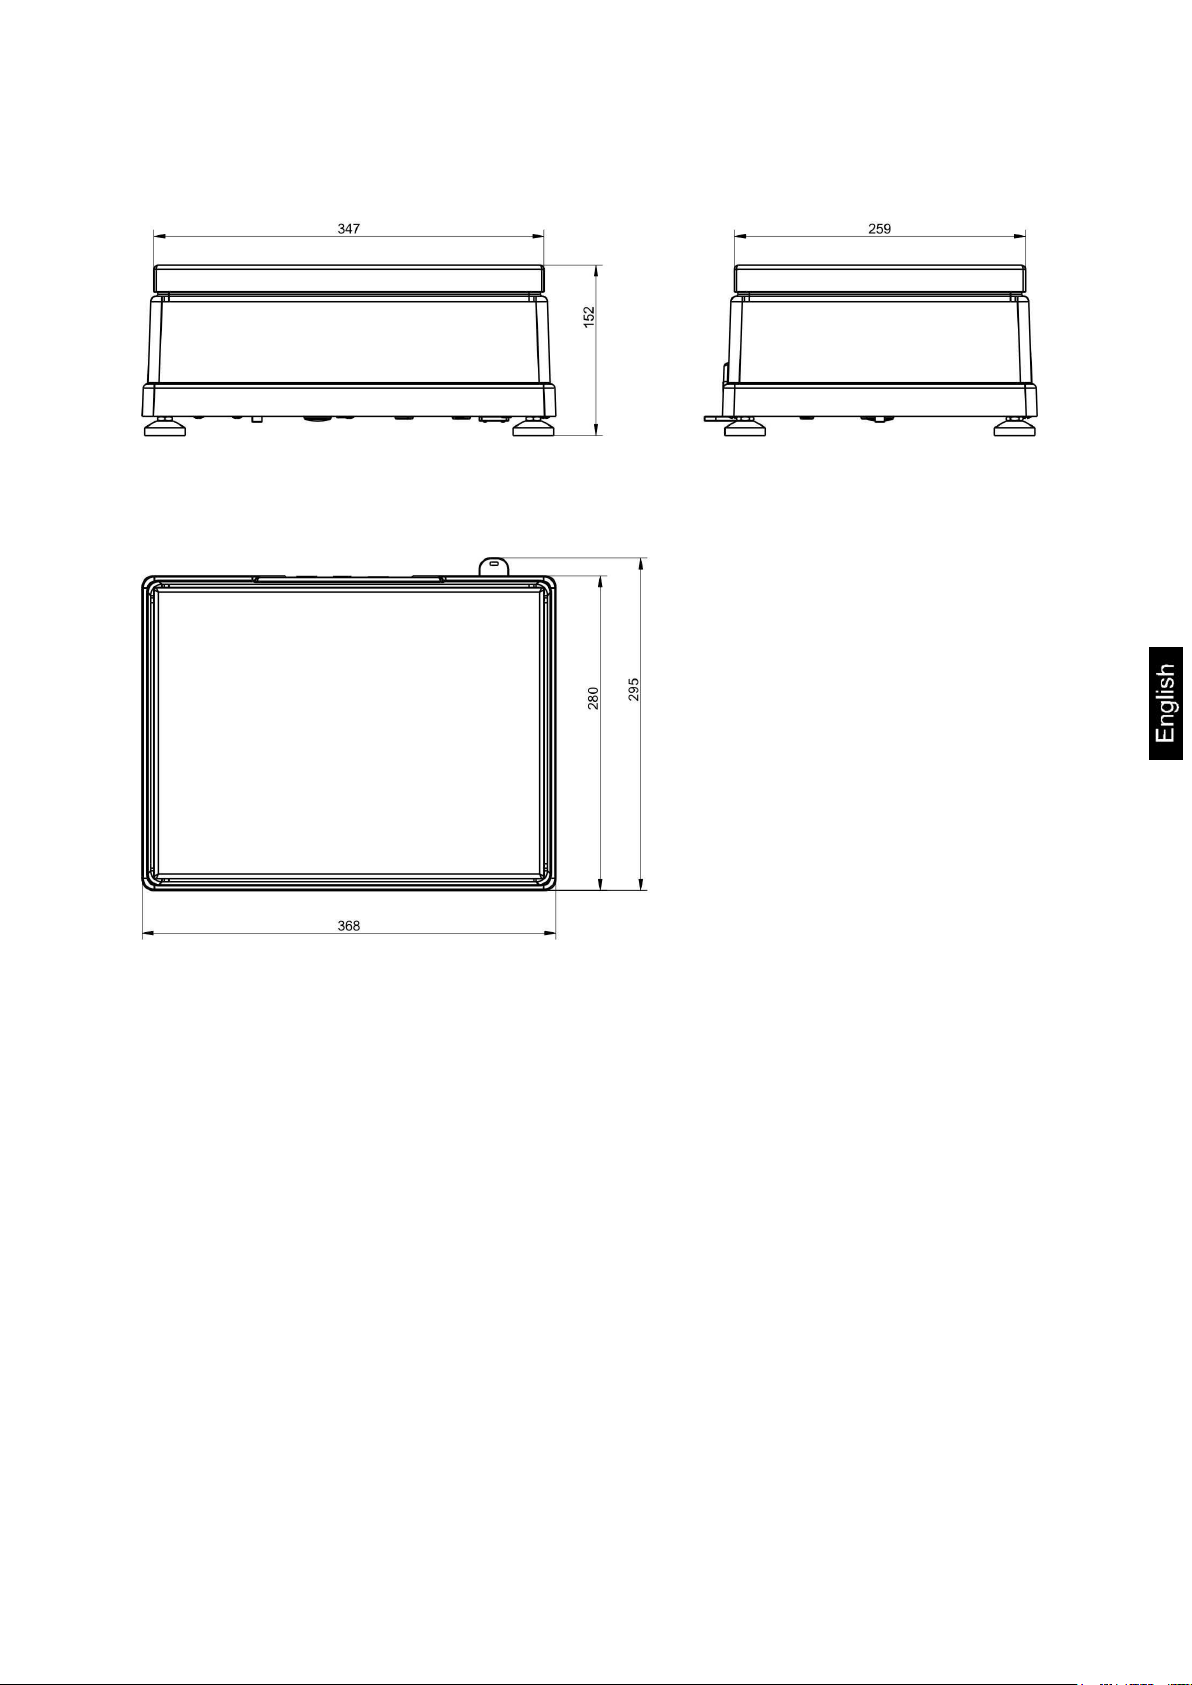
1.1 Dimensions
ILJ-C/ILS-C-BA-e-1320 7
Page 8
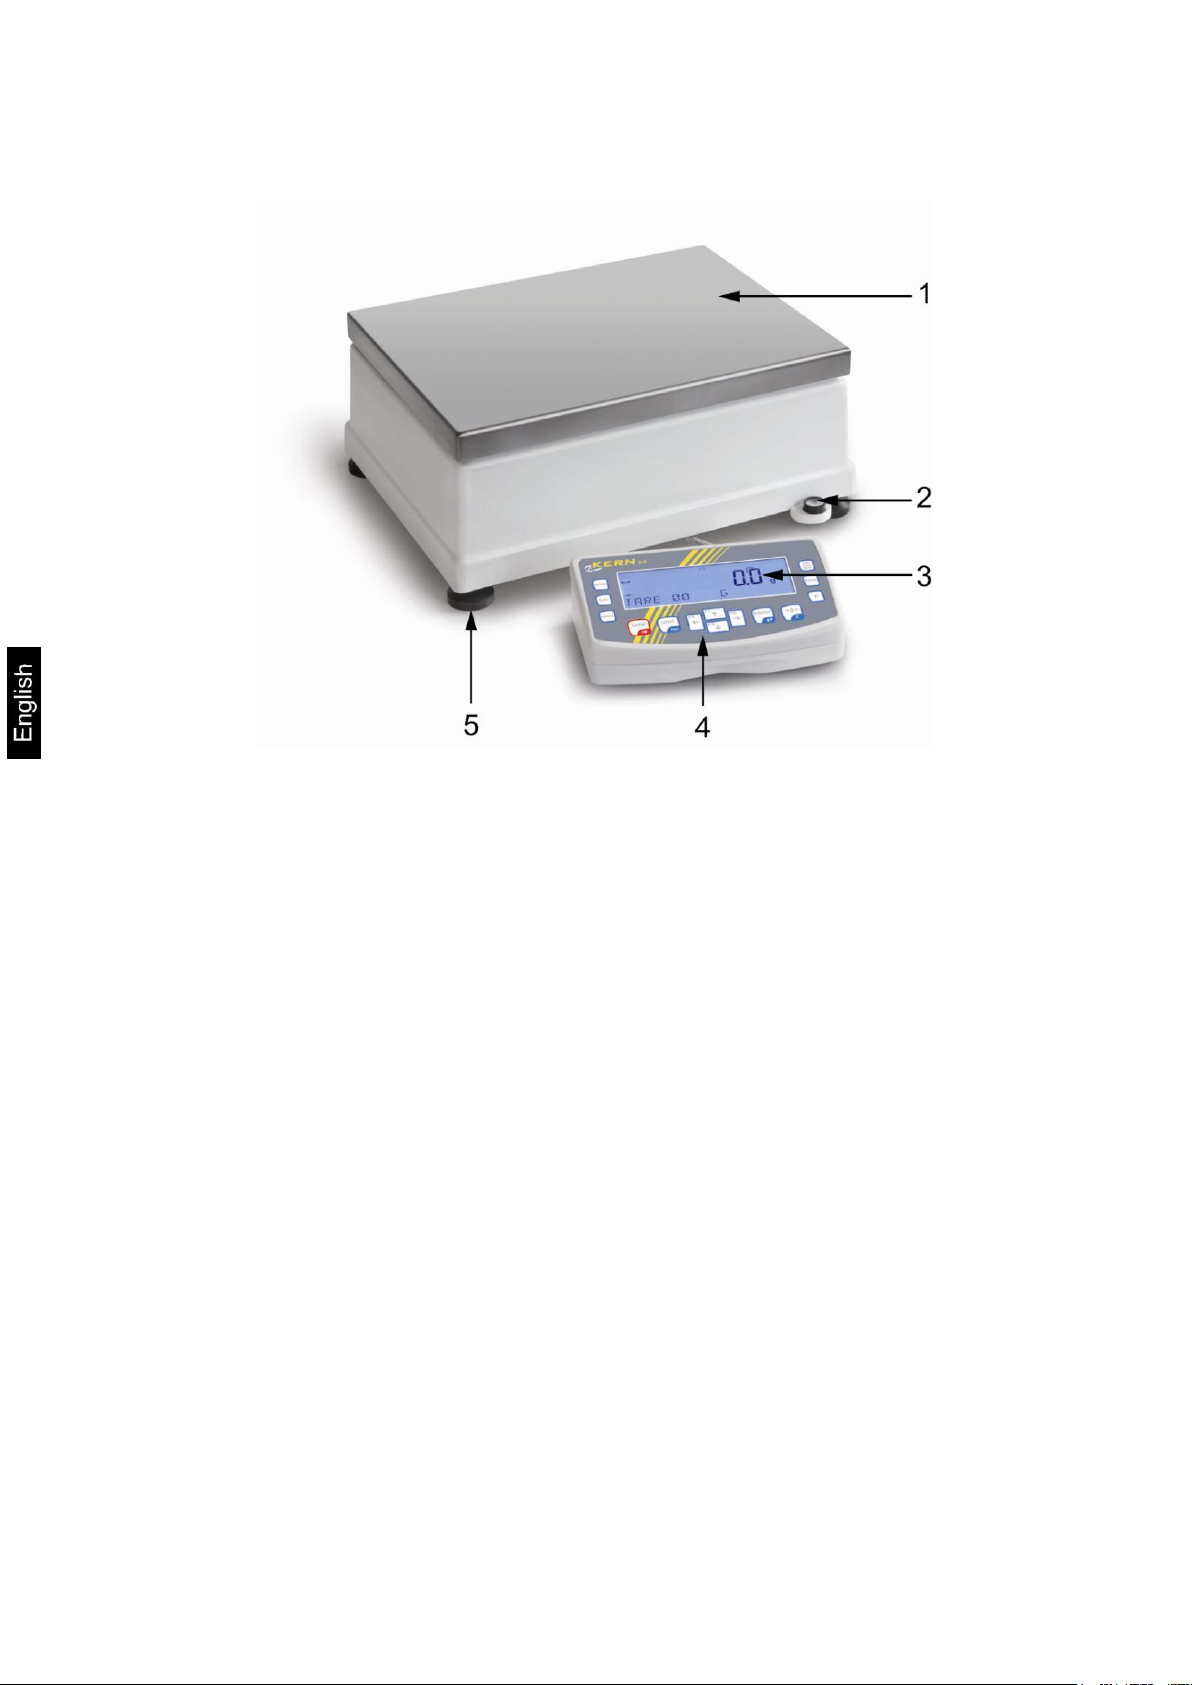
1. Weighing plate
2. Bubble level
3. Display
4. Buttons
5. Levelling screw
2 Appliance overview
Example KERN ILS-C:
8 ILJ-C/ILS-C-BA-e-1320
Page 9
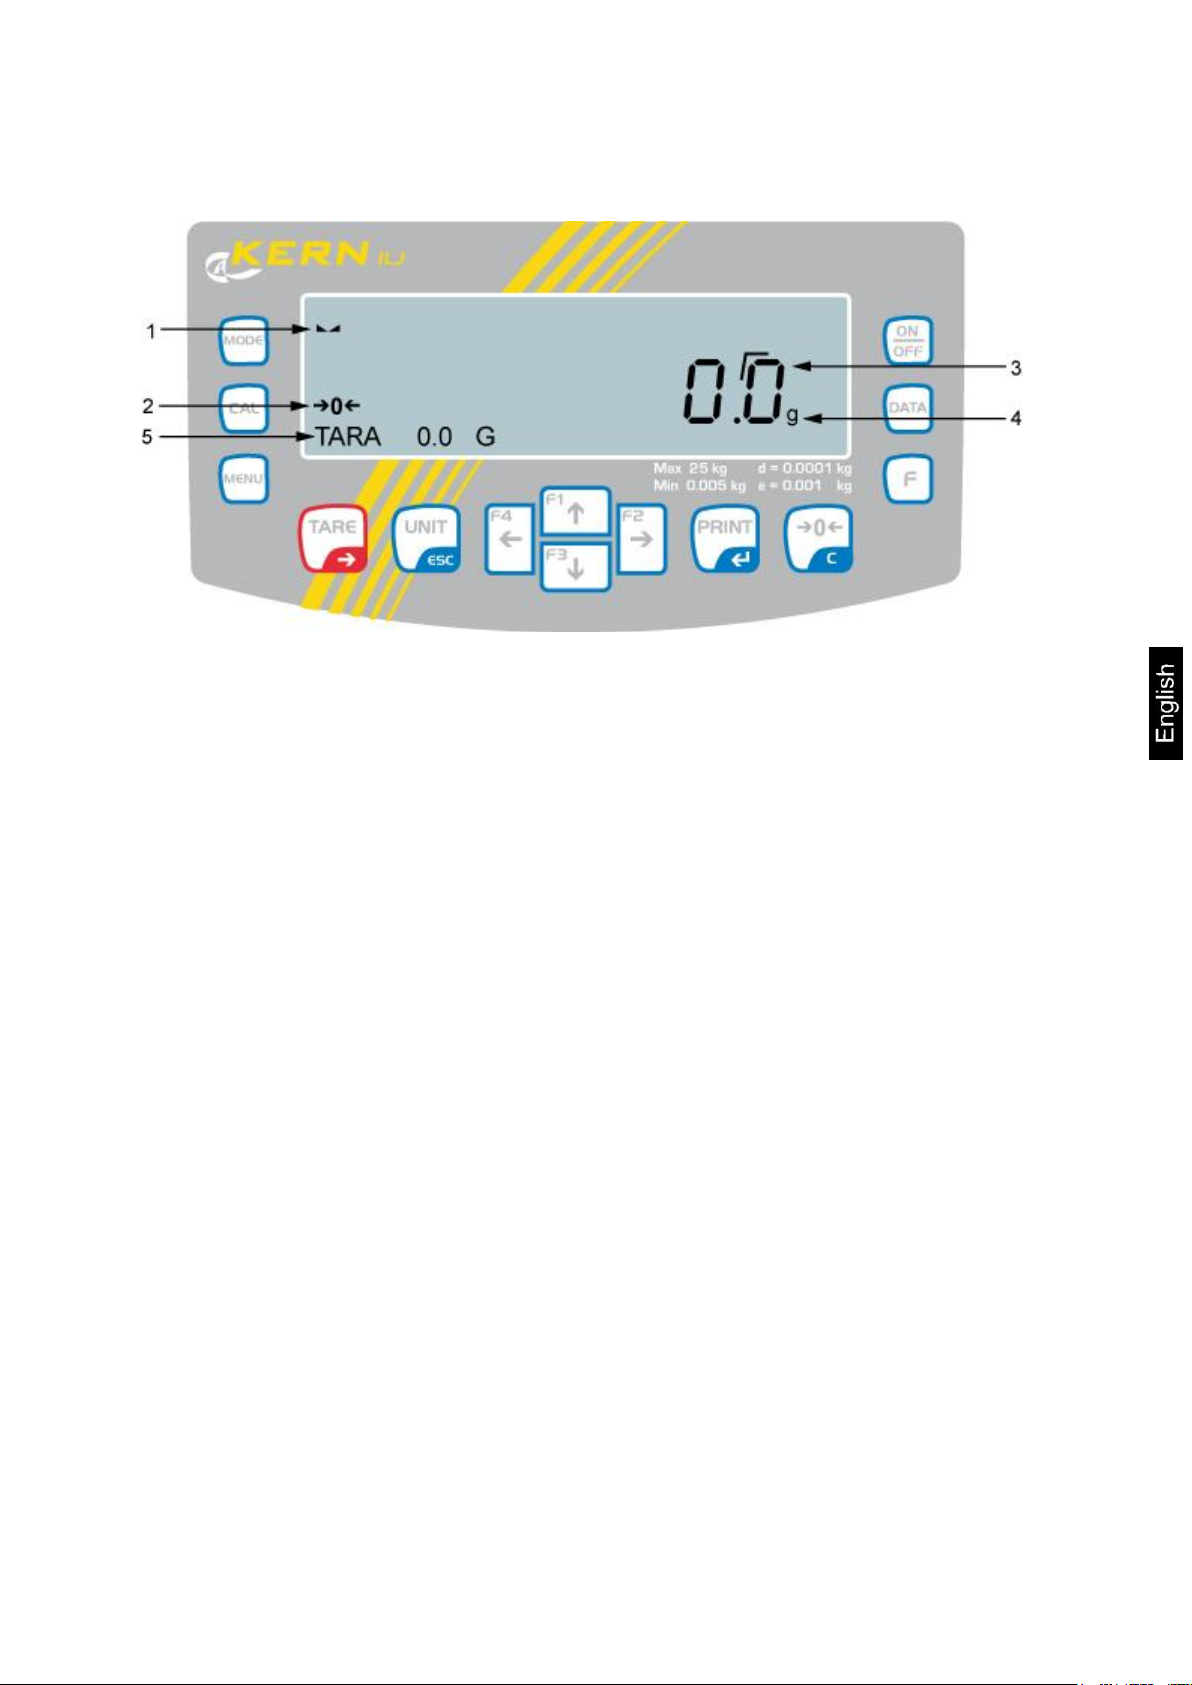
2.1 Display and Keyboard Summary
Example ILJ-C:
1. Stability display
2. Zero indicator
3. The non-verified value is given in brackets in verified scales.
4. Weighing unit “g“
5. Information line
ILJ-C/ILS-C-BA-e-1320 9
Page 10
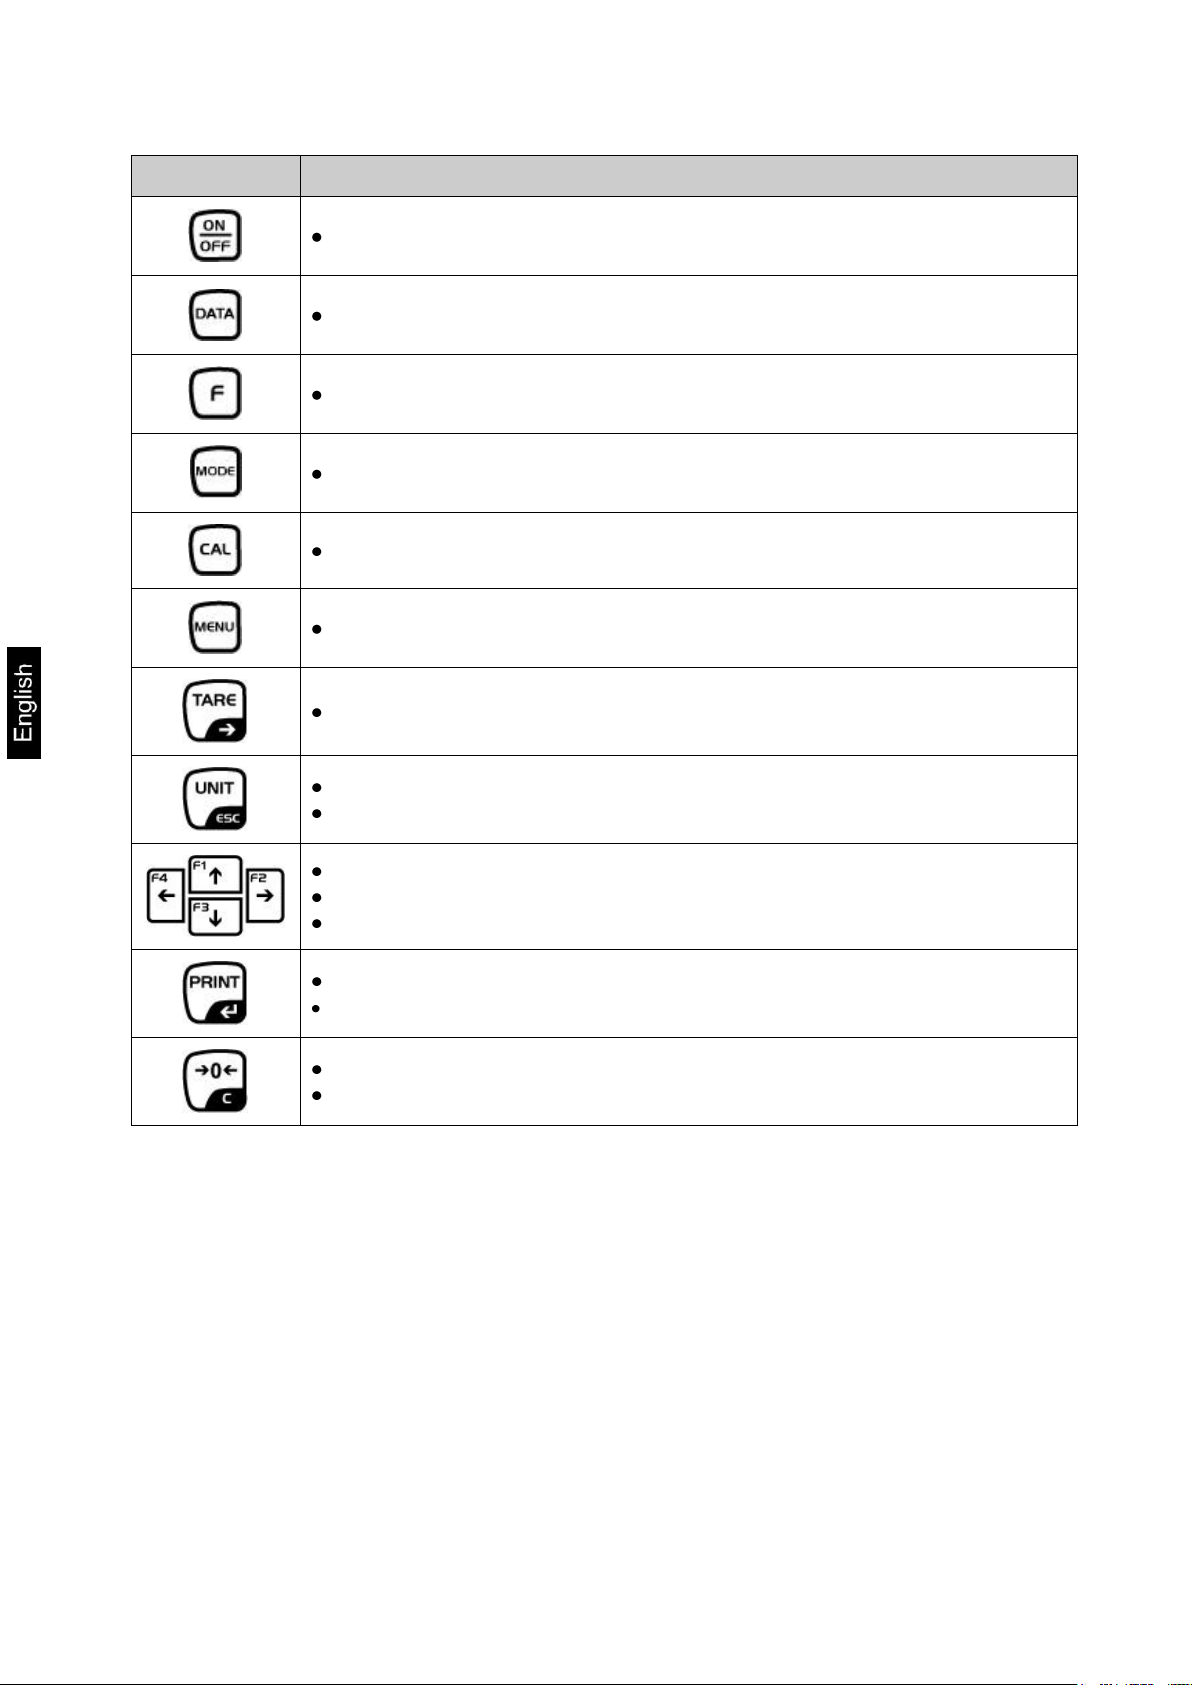
Button
Function
Turn on/off
Invoke data bases
Function key
Selection of operating mode
Invoke adjustment
Call up menu
Taring
Switch-over weighing unit
In menu: Return to weighing mode
Scroll backwards in menu
Scroll forward in menu
Navigation key, see chap. 2.1.1
Calculate weighing data via interface
Confirm/save in menu
Zeroing
Delete entry in data base
10 ILJ-C/ILS-C-BA-e-1320
Page 11
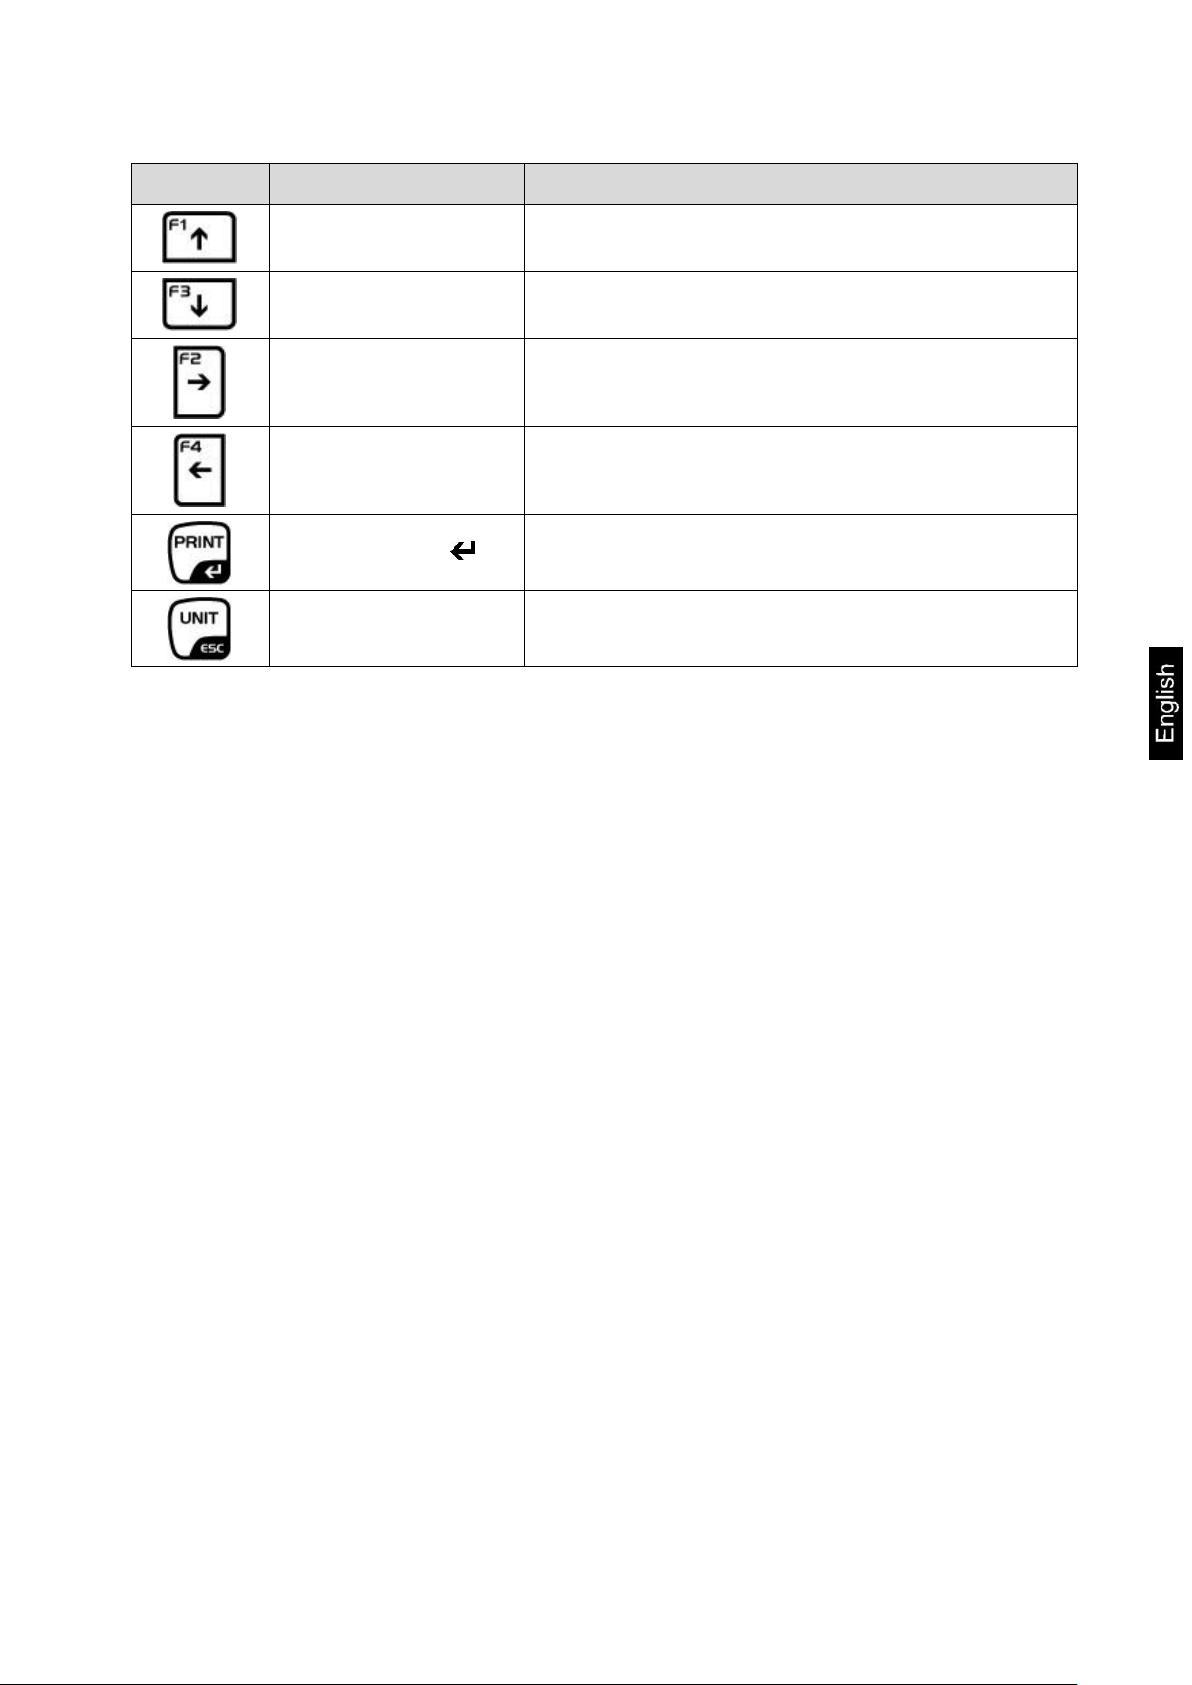
Button
Designation
Function
Navigation button
Increase flashing digit
Navigation button
Decrease flashing digit
Navigation button
Digit selection to the right
Navigation button
Digit selection to the left
Navigation button
Confirm entry
ESC
Cancel input
2.1.1 Navigation buttons / numeric input
ILJ-C/ILS-C-BA-e-1320 11
Page 12

3 Basic instructions
3.1 Proper use
The balance you purchased is intended to determine the weighing value of material
to be weighed. It is intended to be used as a “non-automatic balance”, i.e. the
material to be weighed is manually and carefully placed in the centre of the weighing
plate. As soon as a stable weighing value is reached the weighing value can be read.
3.2 Improper Use
Do not use balance for dynamic add-on weighing procedures, if small amounts of
goods to be weighed are removed or added. The “stability compensation“ installed in
the balance may result in displaying an incorrect measuring value! (Example: Slowly
draining fluids from a container on the balance.)
Do not leave permanent load on the weighing plate. This may damage the measuring
system.
Impacts and overloading exceeding the stated maximum load (max) of the balance,
minus a possibly existing tare load, must be strictly avoided. Balance may be
damage by this.
Never operate balance in explosive environment. The serial version is not explosion
protected.
The structure of the balance may not be modified. This may lead to incorrect
weighing results, safety-related faults and destruction of the balance.
The balance may only be used according to the described conditions. Other areas of
use must be released by KERN in writing.
3.3 Warranty
Warranty claims shall be voided in case
Our conditions in the operation manual are ignored
The appliance is used outside the described uses
The appliance is modified or opened
Mechanical damage or damage by media, liquids, natural wear and tear
The appliance is improperly set up or incorrectly electrically connected
The measuring system is overloaded
12 ILJ-C/ILS-C-BA-e-1320
Page 13

Carefully read this operation manual before setup and
commissioning, even if you are already familiar with KERN balances.
All language versions contain a non-binding translation.
The original German is binding.
Keep all parts of the original packaging for a possibly required
return.
Prior to dispatch disconnect all cables and remove loose/mobile
parts.
Secure all parts such as the weighing plate, power unit etc.
against shifting and damage.
Only use original packaging for returning.
3.4 Monitoring of Test Resources
In the framework of quality assurance the measuring-related properties of the
balance and, if applicable, the testing weight, must be checked regularly. The
responsible user must define a suitable interval as well as type and scope of this test.
Information is available on KERN’s home page (www.kern-sohn.com with regard to
the monitoring of balance test substances and the test weights required for this. In
KERN's accredited DKD calibration laboratory test weights and balances may be
calibrated (return to the national standard) fast and at moderate cost.
4 Basic Safety Precautions
4.1 Pay attention to the instructions in the Operation Manual
4.2 Personnel training
The appliance may only be operated and maintained by trained personnel.
5 Transport and storage
5.1 Testing upon acceptance
When receiving the appliance, please check packaging immediately, and the
appliance itself when unpacking for possible visible damage.
5.2 Packaging / return transport
ILJ-C/ILS-C-BA-e-1320 13
Page 14

Balance, see chap. 2
Mains adapter
Operating manual
Protective cover
Flush-mounted hook
Transport locking device (models ILJ-C only)
6 Unpacking, Setup and Commissioning
6.1 Installation Site, Location of Use
The balances are designed in a way that reliable weighing results are achieved in
common conditions of use.
You will work accurately and fast, if you select the right location for your balance.
Therefore, observe the following for the installation site:
Place the balance on a firm, level surface;
Avoid extreme heat as well as temperature fluctuation caused by installing
next to a radiator or in the direct sunlight;
Protect the balance against direct draughts due to open windows and doors;
Avoid jarring during weighing;
Protect the balance against high humidity, vapours and dust;
Do not expose the device to extreme dampness for longer periods of time.
Non-permitted condensation (condensation of air humidity on the appliance)
may occur if a cold appliance is taken to a considerably warmer environment.
In this case, acclimatize the disconnected appliance for ca. 2 hours at room
temperature.
Avoid static charge of goods to be weighed or weighing container.
If electro-magnetic fields or static charge occur, or if the power supply is unstable
major deviations on the display (incorrect weighing results) are possible. In that case,
the location must be changed.
6.2 Unpacking and checking
Remove device and accessories carefully from packaging, remove packaging
material and place device at the planned work place. Verify that there has been no
damage and that all packing items are present.
Scope of delivery / serial accessories:
14 ILJ-C/ILS-C-BA-e-1320
Page 15
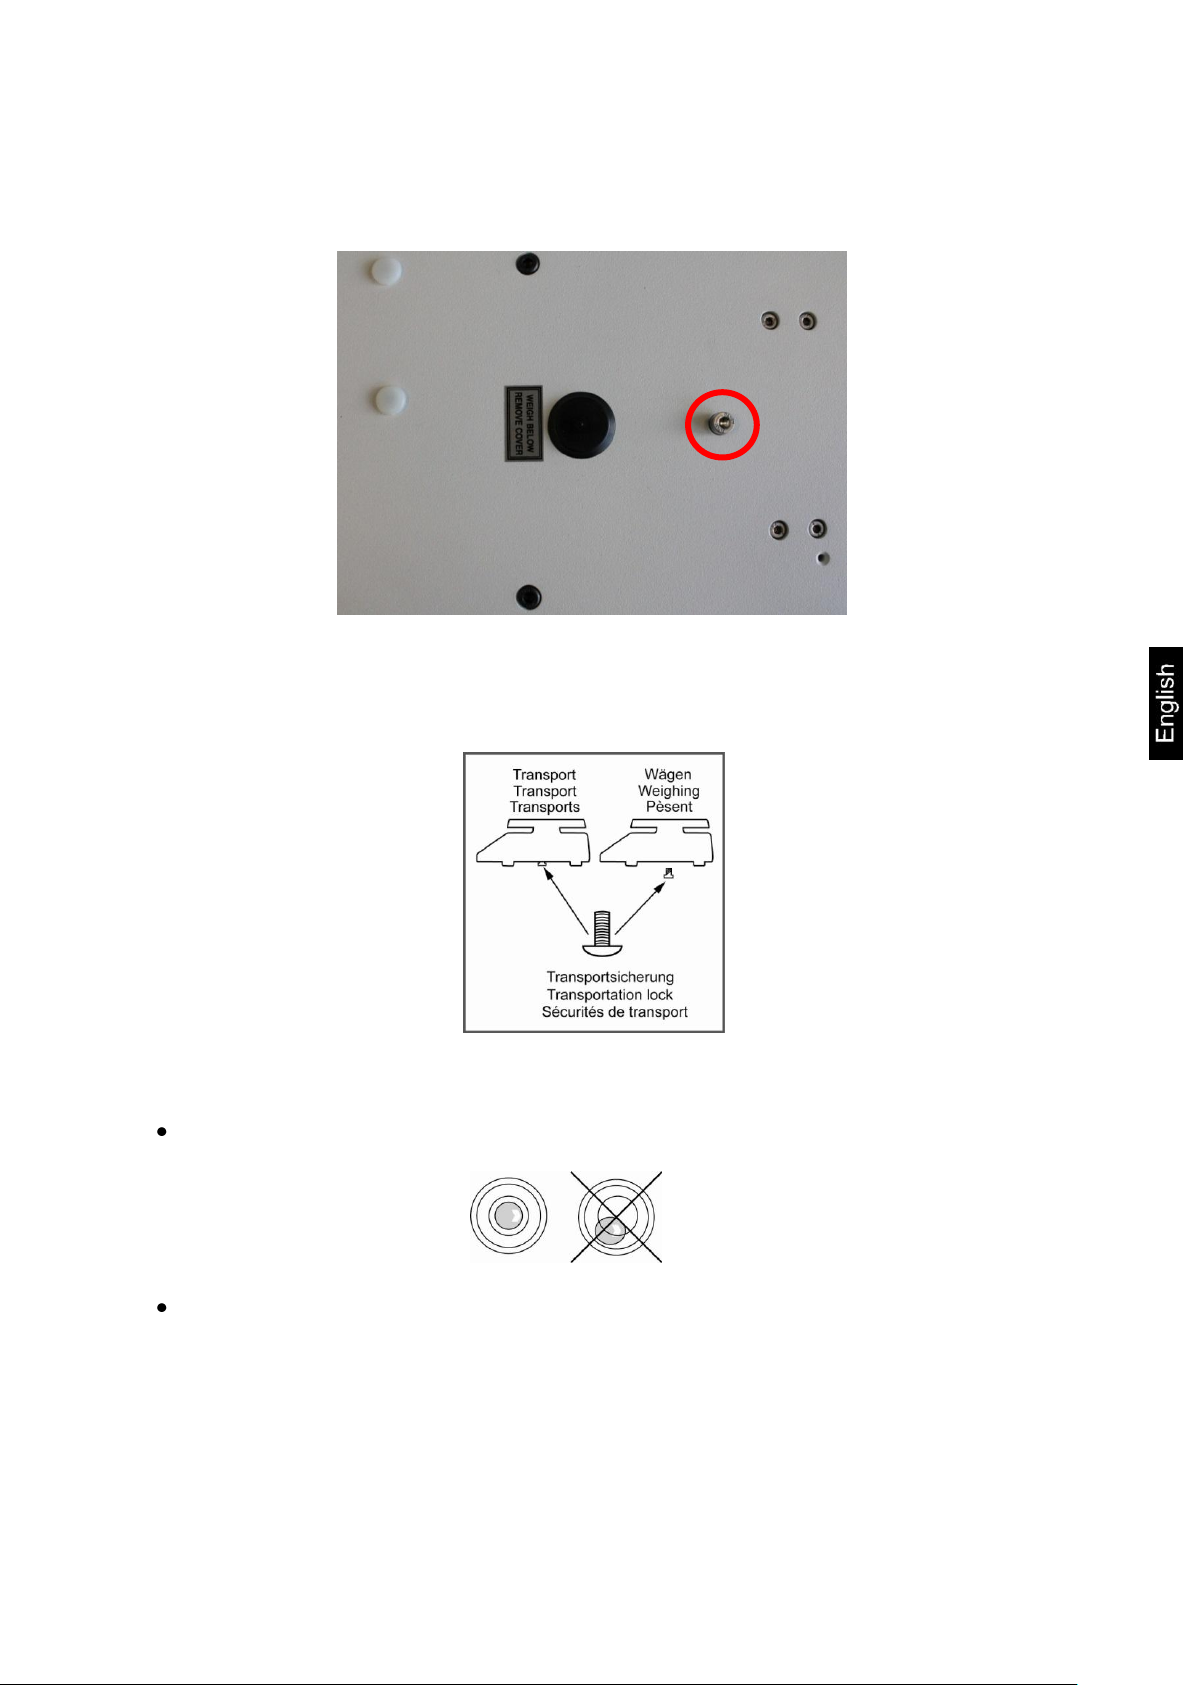
Remove transport locking (only models ILJ-C)
To detach transport locking device, unscrew locking screw.
For transportation screw in locking screw carefully right up to the limit stop.
Level balance with foot screws until the air bubble of the water balance is in the
prescribed circle
Check levelling regularly
6.3 Placing
ILJ-C/ILS-C-BA-e-1320 15
Page 16

Supply balance with power via the mains adapter. The display unit lights up and
shown the software version. The weighing scale carries out a self-test and
automatically moves into weighing mode.
When “CAL” is displayed, adjustment will be taking place automatically
(ILJ models only).
6.4 Mains connection
Power is supplied via the external mains adapter. The stated voltage value must be
the same as the local voltage.
Only use original KERN mains adapters. Using other makes requires consent by
KERN.
6.4.1 Turning On the Power
6.5 Connection of peripheral devices
Before connecting or disconnecting of additional devices (printer, PC) to the data
interface, always disconnect the balance from the power supply.
With your balance, only use accessories and peripheral devices by KERN, as they
are ideally tuned to your balance.
6.6 Initial Commissioning
In order to obtain exact results with the electronic balances, your balance must have
reached the operating temperature (see warming up time chap. 1).
During this warming up time the balance must be connected to the power supply
(mains, accumulator or battery).
To adapt the balance to ambient conditions, open wind screen doors.
The accuracy of the balance depends on the local acceleration of gravity.
Strictly observe hints in chapter Adjustment.
The accuracy of the balance depends on the local acceleration of gravity.
Strictly observe hints in chapter Adjustment.
16 ILJ-C/ILS-C-BA-e-1320
Page 17

Adjustment can only be carried out when the weighing plate is free of
objects. Any loads remaining on the weighing plate will be indicated by error
message Er1Hi.
You can cancel the adjustment by pressing the UNIT-key.
7 Adjustment
As the acceleration value due to gravity is not the same at every location on earth,
each balance must be coordinated - in compliance with the underlying physical
weighing principle - to the existing acceleration due to gravity at its place of location
(only if the balance has not already been adjusted to the location in the factory). This
adjustment process must be carried out for the first commissioning, after each
change of location as well as in case of fluctuating environment temperature. To
receive accurate measuring values it is also recommended to adjust the balance
periodically in weighing operation.
Possible adjustments include:
Automatic adjustment by internal weight (models ILJ only)
Chap. 7.2.1
Manual adjustment by internal weight is triggered by pressing CAL
Adjustment with external weight, see chap. 7.2.2
ILJ-C/ILS-C-BA-e-1320 17
Page 18
In weighing scales with type approval certificate
Adjustment takes place every 3 hours
7.1 Automatic adjustment using internal weight (ILJ-C only)
With the internal adjustment weight, the weighing accuracy can be checked and readjusted at any time.
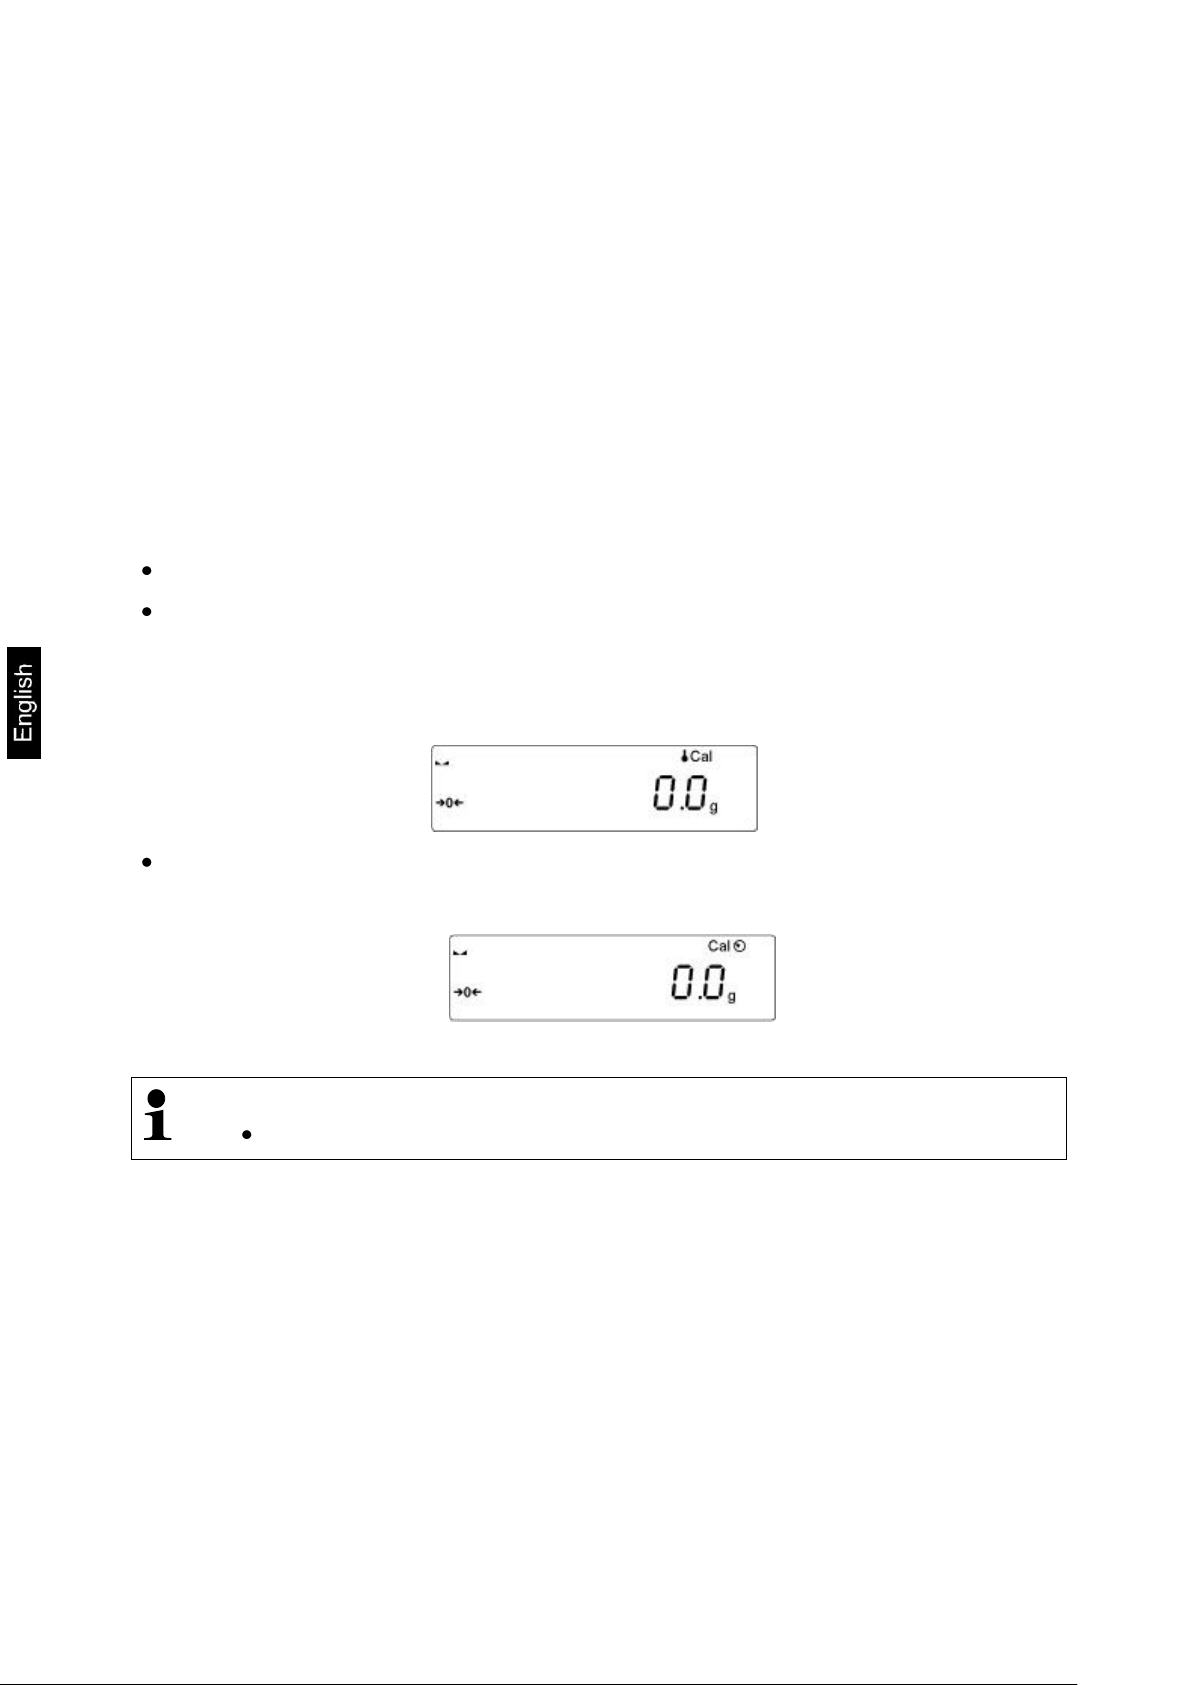
The automatic adjustment function is always enabled. You can start adjustment at
any time by pressing the CAL-key manually.
If a load is present on the weighing plate, the message LIMIT EXCEEDED will
appear on the display. If the weight on the weighing plate is below 4% of max, the
weighing scale nevertheless will be adjusted.
Automatic adjustment is carried out:
When balance was disconnected from the mains.
When the temperature is changing
The moment a change in temperature of 3°C is detected by the temperature
sensor, the weighing scale will carry out a fully automatic adjustment. The °C
symbol indicates the pending adjustment.
at the end of a time interval
After the time interval (selectable 1-12 h) specified in the menu has passed.
18 ILJ-C/ILS-C-BA-e-1320
Page 19
ILJ-C
ILS-C
P1.1 INT.JUST.
-
Internal adjustment, ILJ-C only
-
P1.2 EXT.JUST.
External adjustment *
-
P1.3 BE.JUST.
User adjustment
P1.4 TEST JUST.
-
Adjustment test
Ensure that there are no objects on the weighing plate.
You can cancel the adjustment by pressing the UNIT-key.
After successful adjustment the weighing scale will return automatically to
the menu item. To return to weighing mode, press UNIT.
7.2 Menu settings
Menu item „P1 ADJUSTMENT“ [Adjustment]
* = Locked in weighing scales with type approval certificate [Er 9 lock].
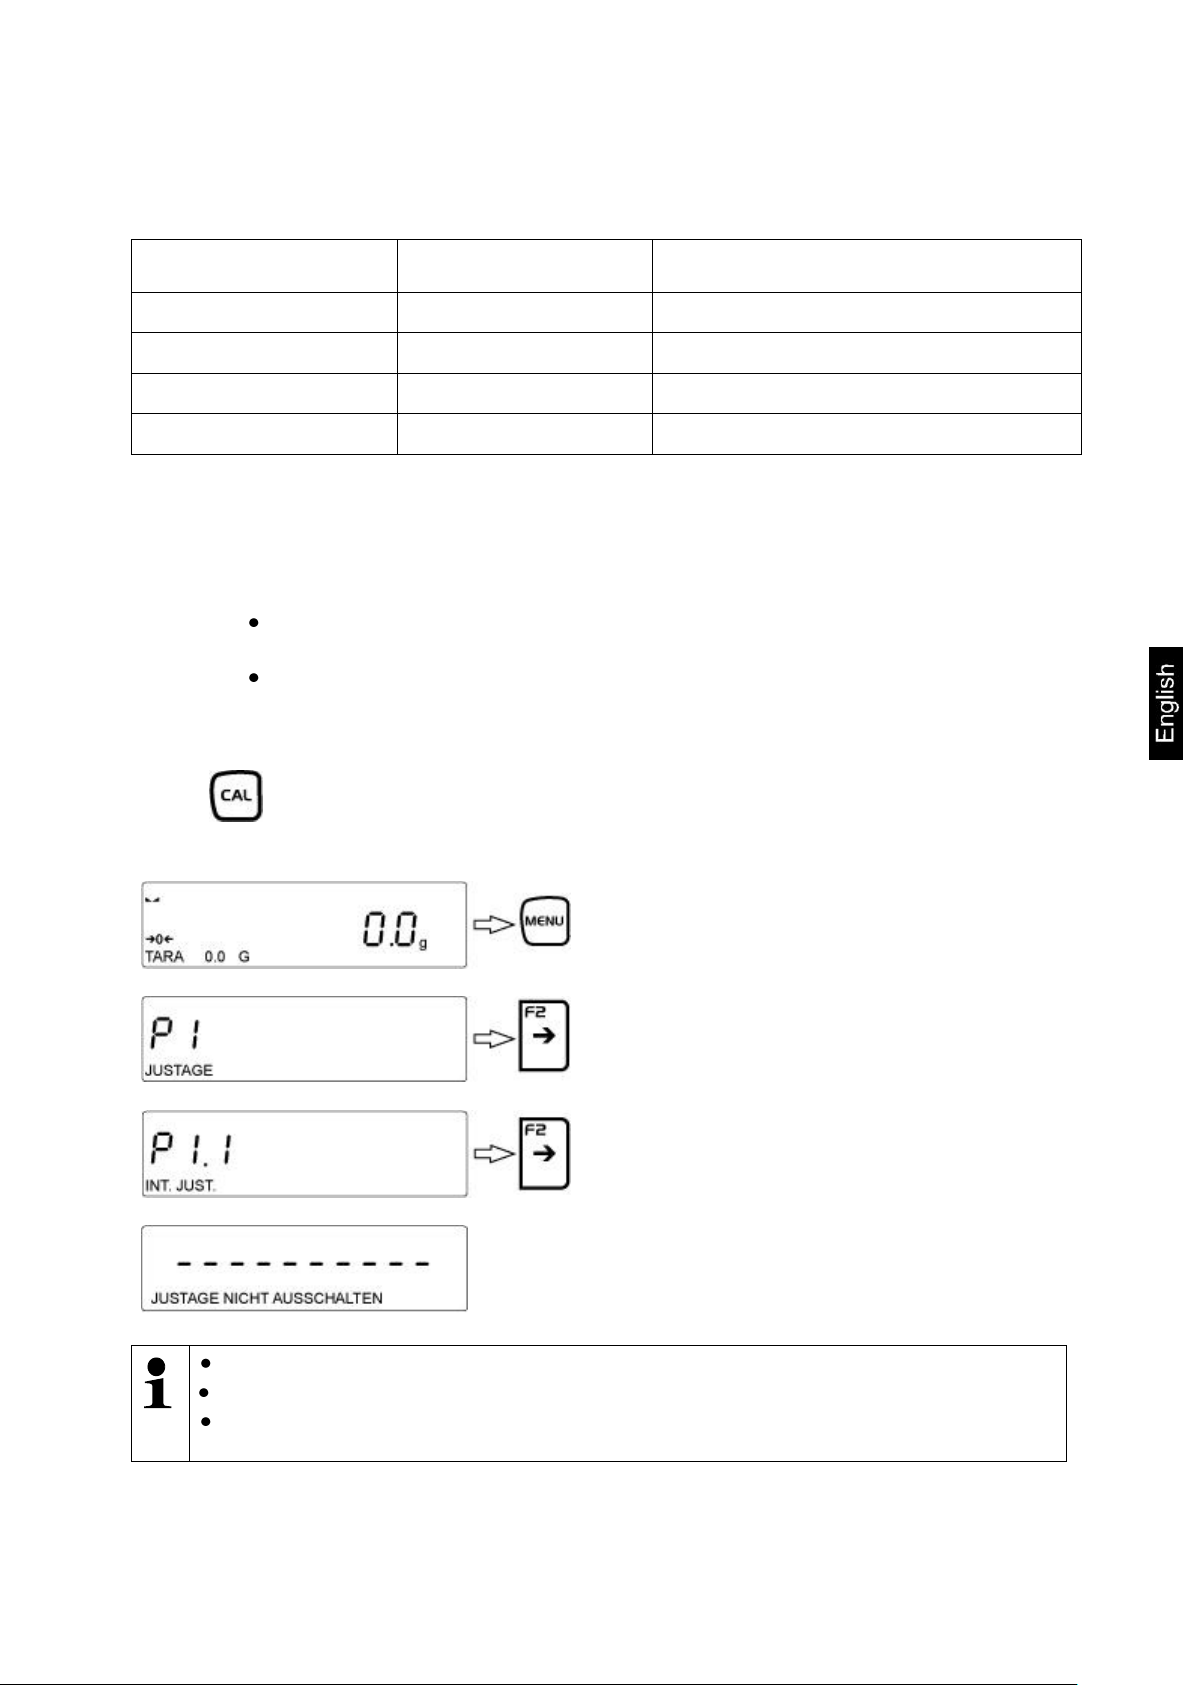
7.2.1 P1.1 INT.JUST. – Internal adjustment (models ILJ-C only)
For automatic internal adjustment see chap. 7.1
Press the CAL-key or invoke menu “P1.1 INT.JUST.“
Press
or
Starting internal adjustment manually
Internal adjustment will be taking place.
ILJ-C/ILS-C-BA-e-1320 19
Page 20

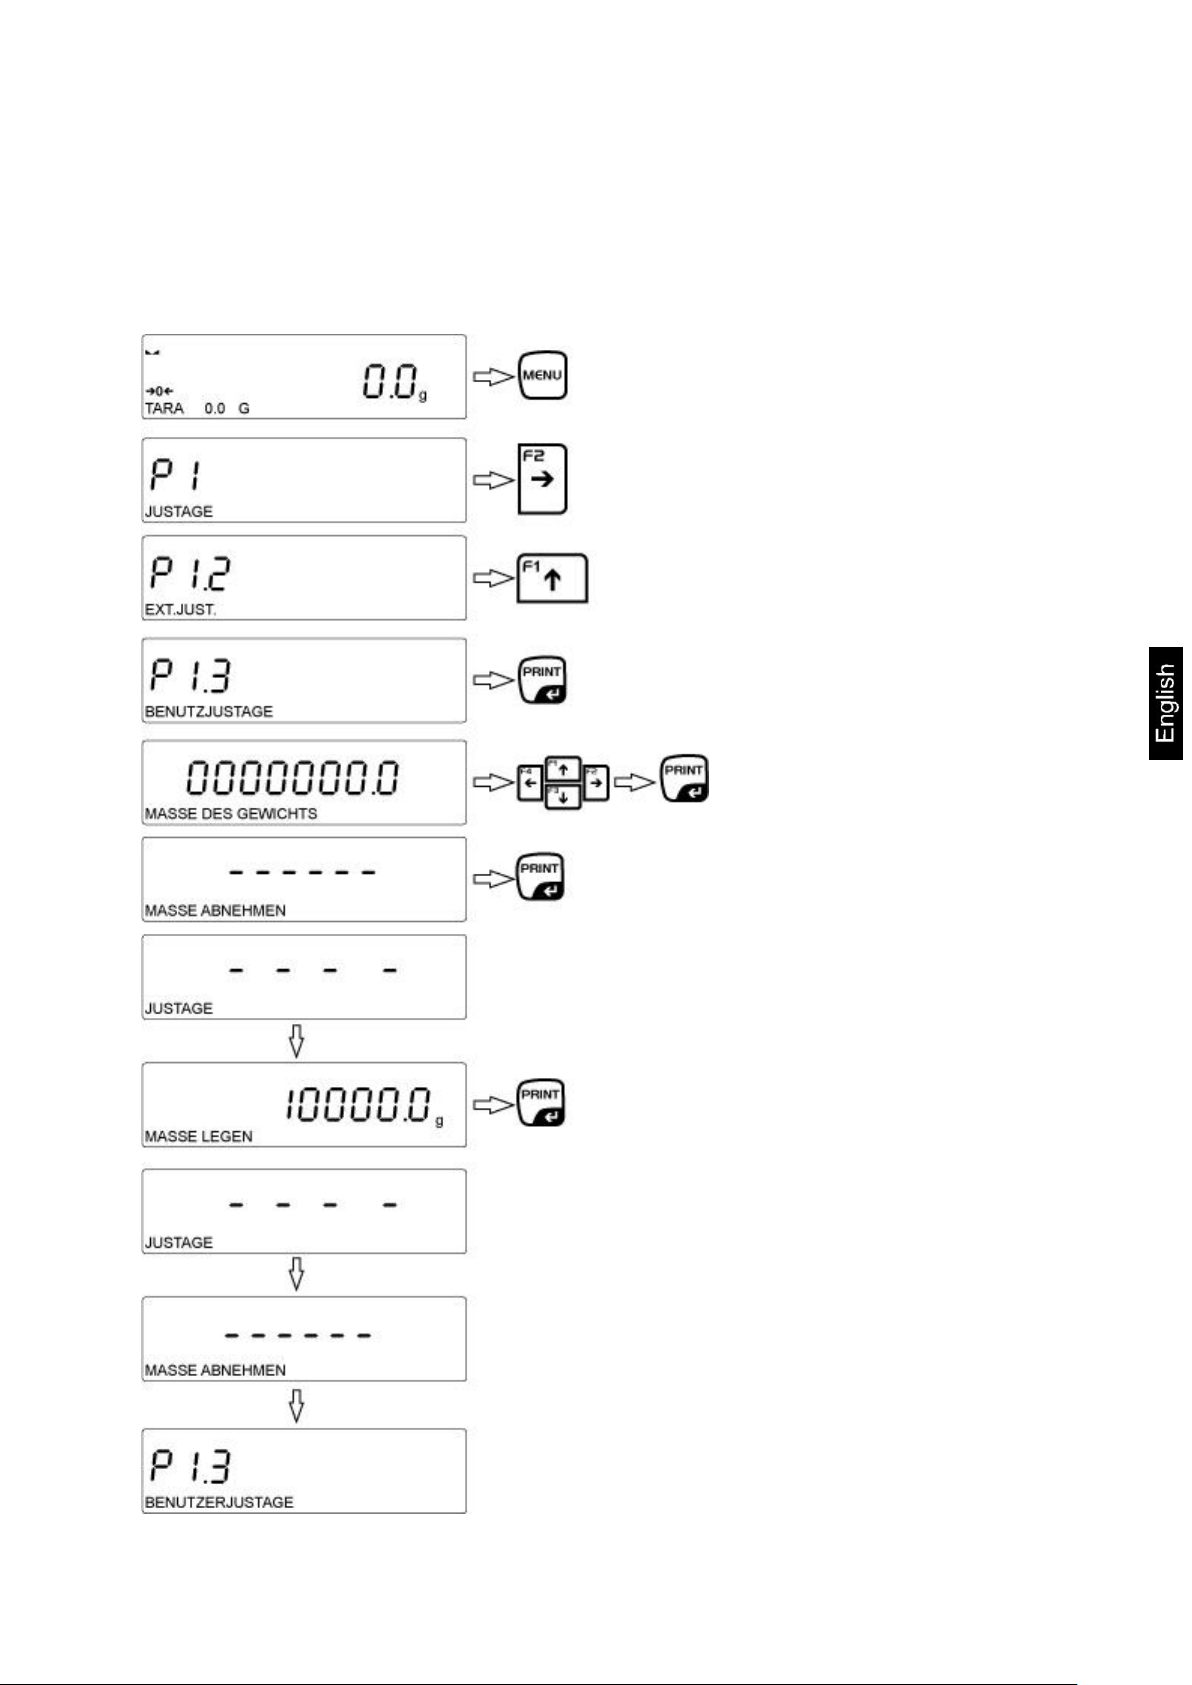
This function is locked in weighing scales with type approval certificate.
Ensure that there are no objects on the
weighing pan. Press PRINT-key,
JUSTAGE will be shown.
Wait until the weighed value for the
required adjustment weight appears.
(Example)
Place the required adjustment weight
carefully in the centre of the weighing plate
and press the PRINT key.
The display is showing JUSTAGE,
adjustment is starting.
Adjustment is completed when the
message REMOVE LOAD appears;
remove adjustment weight. After
successful adjustment the weighing scale
will return automatically to sub-menu item
P 1.2.
To return to weighing mode, press the
UNIT key.
7.2.2 P1.2 EXT.JUST.- External adjustment (ILS only)
Carry out adjustment with the help of the recommended adjustment weight (see
chapter 1 “Technical Specifications”).
Observe stable environmental conditions. A warming up time (see chapter 1) is
required for stabilization.
20 ILJ-C/ILS-C-BA-e-1320
Page 21
Start the process in weighing mode
as shown on the picture.
Digits will appear on the display, with
the digit on the left flashing. Use the
arrow keys to enter your desired
adjustment weight and confirm by
pressing PRINT.
Care should be taken to ensure that
there are no objects on the weighing
plate, then confirm by pressing
PRINT.
Wait until the weighed value for the
set adjustment weight appears.
Place the required adjustment
weight carefully in the centre of the
weighing plate and press the PRINT
key.
The display is showing JUSTAGE,
adjustment is starting.
Adjustment is completed when the
message REMOVE LOAD appears;
remove adjustment weight. After
successful adjustment the weighing
scale will automatically return to submenu item P 1.3.
Return to weighing mode by
repeatedly pressing UNIT
7.2.3 P1.3 BE.JUST. User adjustment (model ILS-C only)
This function allows the user to select a test weight of an arbitrary weight value.
Having said this, the test weight should not amount to less than 30% of the maximum range.
This function is not accessible in calibrated weighing scales!
ILJ-C/ILS-C-BA-e-1320 21
Page 22
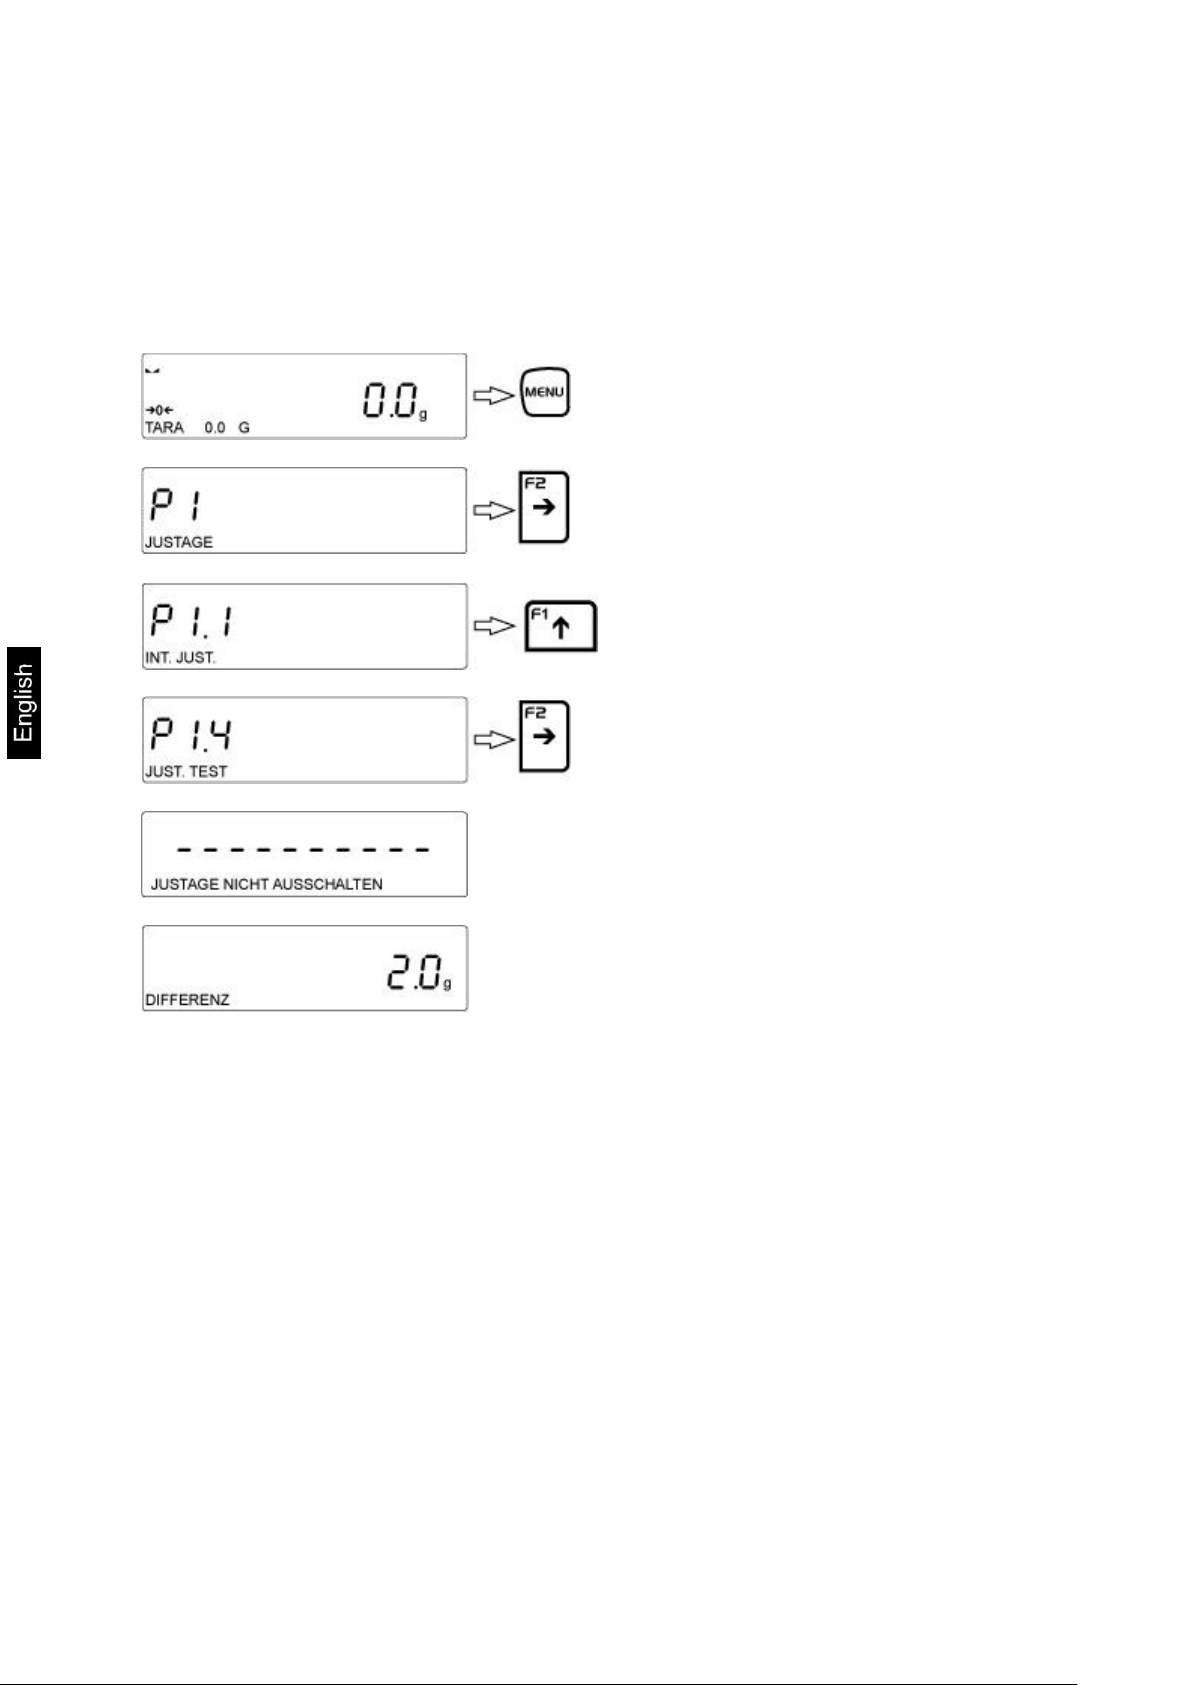
7.2.4 P1.4 TEST JUST. – Adjustment report (models ILJ-C only)
This function is applied to compare the internal adjustment weight with the saved
value. The test is carried out automatically. The result will be shown on the display
and issued via the interface if an optional printer is connected.
Press UNIT to return to the menu item and into weighing mode
22 ILJ-C/ILS-C-BA-e-1320
Page 23
-------------------Just.Prot.-----------------Art Just External
User Kern
Draft
Date 21.11.2013
Time 9:54:39
ID Balance 132051
Diff.Adjust. -0.2 g
Signature
7.2.5 Printing adjustment reports
An adjustment report will be generated automatically after an adjustment and sent to
the RS232 connection COM 1.
For setting of adjustment report see chap. 17.1.1
Sample adjustment record:
ILJ-C/ILS-C-BA-e-1320 23
Page 24

Verification of the balance is invalid without the seal.
The seal marks attached on balances with type approval point out that the
balance may only be opened and serviced by trained and authorised
specialist staff. If the seal mark is destroyed, verification looses its validity.
Please observe all national laws and legal regulations. In Germany a reverification will be necessary.
7.3 Verification
General introduction:
According to EU directive 2009/23/EC balances must be officially verified if they are
used as follows (legally controlled area):
a) For commercial transactions if the price of goods is determined by weighing.
b) For the production of medicines in pharmacies as well as for analyses in the
medical and pharmaceutical laboratory.
c) For official purposes
d) For manufacturing final packages
In cases of doubt, please contact your local trade in standard.
Verification notes:
An EU type approval exists for balances described in their technical data as
verifiable. If a balance is used where obligation to verify exists as described above, it
must be verified and re-verified at regular intervals.
Re-verification of a balance is carried out according to the respective national
regulations. The validity for verification of balances in Germany is e.g. 2 years.
The legal regulation of the country where the balance is used must be observed!
24 ILJ-C/ILS-C-BA-e-1320
Page 25
Balances with obligation to verify must be taken out of operation if:
The weighing result of the balance is outside the error limit. Therefore, in
regular intervals load balance with known test weight (ca. 1/3 of the max. load) and
compare with displayed value.
The reverification deadline has been exceeded.
Position of the “official seals“:
ILJ-C/ILS-C-BA-e-1320 25
Page 26
Call up menu
In weighing mode press the MENU-key and the first menu
block “P1 JUSTAGE” will appear.
Select menu block
Use the cursor key to select the individual menu blocks
one by one.
Use the cursor key to scroll down.
Use the cursor key to scroll up.
Select menu item
Confirm selected menu command by pressing . The first
menu item of the selected menu block will be shown.
Use the cursor key to select individual menu items one by
one.
Use the cursor key to scroll down.
Use the cursor key to scroll up.
Select setting
Confirm selected menu item with and the current setting
will be shown
Change settings
Use the cursor keys to change to the available settings.
Use the cursor key to scroll down.
Use the cursor key to scroll up.
Confirm setting / back
to menu
Either confirm by pressing the PRINT-key or reject by
pressing the TARE-key.
Save / back to
weighing mode
see chap. 8.3
8 Menu
8.1 Navigation in the menu
26 ILJ-C/ILS-C-BA-e-1320
Page 27

8.2 Menu overview
The menu is sub-divided into eight menu blocks (P1 – P8).
P1 Adjustment [Adjustment]
P1.1 INT JUST. [Internal adjustment] ILJ-C only
P1.2 EXT. JUST. [External adjustment] *
P1.3 USER ADJUSTMENT [Entry adjustment weight]
P1.4 TEST JUST [Adjustment test] ILJ-C only*
P1.5 AU.TEM.JUST [not documented]
P1.6 AU:ZEIT:JUST [not documented]
* = locked in devices with type approval certificate
P2 OPERATING MODULES [Operating modes]
P2.1 ACCESS [Function selection]
P2.1.1 WEIGHING YES/NO
P2.1.2 QUANTITY YES/NO
P2.1.3 CHECK WEIGHING YES/NO
P2.1.4 DOSING YES/NO
P2.1.5 DEVIATION YES/NO
P2.1.6 SOLIDS-DENSITY YES/NO
P2.1.7 LIQUIDS-DENSITY YES/NO
P2.1.8 ANIMAL WEIGHING YES/NO
P2.1.9 STATISTICS YES/NO
P2.1.10 TOTALIZING YES/NO
P2.1.11 MAX.HOLD YES/NO
P2.2 WEIGHING [Weighing mode]
P2.2.1 READING
P2.2.1.1 FILTER BY MEANS OF/MEDIUM/SLOW/VERY.SLOW/VERY.FAST/FAST
P2.2.1.2 RESULT.DETERMINATION FAST+ACCURATE/ACCURATE/FAST
P2.2.1.3 AUTOZERO YES/NO
P2.2.1.4 LASTDIGIT ALWAYS/NEVER/WHEN STABLE
P2.2.1.5 ENVIRONMENT UNSTABLE/STABLE
P2.2.2 PRINT MODE
P2.2.2.1 MODE ALL/WHEN STABLE/AUTO
P2.2.2.2 AUTO.SCHW. 0.0
P2.2.3 UNITS
P2.2.3.1 ACCESS
P2.2.3.1.1 Each unit can be enabled or disabled by selecting YES or NO
P2.2.3.2 ST-UNIT G
P2.2.3.3 B.UNIT 1
P2.2.3.4 B.UNIT 2
P2.2.4 INFORM
P2.2.5 SPECINFORM
P2.2.6 SHORTCUTS
ILJ-C/ILS-C-BA-e-1320 27
Page 28

P2.3 QUANTITY [Piece counting]
For sub-menus see menu item P2.2
Additional: P2.3.3 INFOM REF.WEIGHT
P2.3.6 ACAI YES
P2.4 CHECK WEIGHING [Check weighing]
For sub-menus see menu item P2.2.1
P2.5 DOSING [Dosing]
For sub-menus see menu item P2.2.1
P2.6 DEVIATION [Determination of percentage]
For sub-menus see menu item P2.2.1
P2.7 DENSITY OF SOLIDS [Determination of density of solids, not recorded]
For sub-menus see menu item P2.2.1
P2.8 DENSITY OF LIQUIDS [Determination of density of liquids, not recorded]
For sub-menus see menu item P2.2.1
P2.9 ANIMAL WEIGHING [Animal weighing]
For sub-menus see menu item P2.2.1
P2.10 STATISTICS [Statistics function]
For sub-menus see menu item P2.2.1
P2.11 ADDING UP [Adding up function]
For sub-menus see menu item P2.2.1
P2.12 MAX.HOLD [Hold function]
P2.12.1 READING
For sub-menus see menu item P2.2.1
P2.12.2 INFORM NET/GROSS/USER/PRODUCTS/SPECINFORM/NO/TARE
P2.12.3 SPECINFORM
P2.12.4. SHORTCUTS
P2.12.4.1 F1 PRINT HEADER
F2 LOGIN
F3 PRINT HEADER
F4 SELECT PRODUCT
P2.12.5. THRESHOLD 1.0
P3 COMMUNICATION [Interface parameter]
P3.1 COM 1 [Transmission parameter COM 1]
P3.1.1 BAUD RATE 4800/9600/19200/38400/57600/115200/2400
P3.1.2 PARITY NONE/PAIRED/UNPAIRED
P3.2 COM 2 [Transmission parameter COM 2]
For sub-menus see menu item P3.1
P3.3 WIFI [W-LAN-connection]
P3.3.1 STATUS NONE
P3.3.2 SELECT NET
P3.3.3 NET-PAR.
P3.3.3.1 NAME
P3.3.3.2 PASSWORD
P3.3.3.3 CHANNEL NR AUTO/1/2/…14
P3.3.3.4 IP 10.10.1.250
P3.3.3.5 MASK 255.255.0.0
P3.3.4 WI-FI
28 ILJ-C/ILS-C-BA-e-1320
Page 29

P4 DEVICES [Connecting devices]
P4.1 COMPUTER [Connection to computer]
P4.1.1 PORT COM 1/COM 2/USB/WIFI/NONE
P4.2 PRINTER [Connection to printer]
P4.2.1 PORT COM 1/COM 2/USB/WIFI/NONE
P4.3 BARCODE READER [not documented]
P4.3.1 PORT NONE/COM 1/COM 2/NONE
P4.4 ADDITIONAL DISPLAY SCREEN [not documented]
P4.4.1 PORT COM 1/COM 2/NONE
P4.5 EXTERNAL KEYS ILJ-C only
P5 PRINTOUTS [Printer settings]
P5.1 ADJUST.REP. [Printout of adjustment report]
P5.1.1 DRAFT _/0-9/A….Z
P5.2 HEADER [Printout of header]
P5.2.1 LINES YES/NO
P5.2.2 OPER.MODUL YES/NO
P5.2.3 DATE YES/NO
P5.2.4 TIME YES/NO
P5.2.5 BALANCE TYPE YES/NO
P5.2.6 ID BALANCE YES/NO
P5.2.7 USER YES/NO
P5.2.8 PRODUCT YES/NO
P5.2.9 VARIABLE 1 YES/NO
P5.2.10 VARIABLE 2 YES/NO
P5.2.11 EMPTY LINE YES/NO
P5.2.12 ADJUST.REP. YES/NO
P5.2.13 SPECPRINT NONE/SPECPRINT 1-4
P5.3 GLP PRINT [Printer settings]
P5.3.1 DATE YES/NO
P5.3.2 TIME YES/NO
P5.3.3 USER YES/NO
P5.3.4 PRODUCT YES/NO
P5.3.5 VARIABLE 1 YES/NO
P5.3.6 VARIABLE 2 YES/NO
P5.3.7 TARE YES/NO
P5.3.8 GROSS YES/NO
P5.3.9 CURRENT RESULT YES/NO
P5.3.10 ADJUST.REP YES/NO
P5.3.11 SPECPRINT NONE/SPECPRINT 1-4
ILJ-C/ILS-C-BA-e-1320 29
Page 30

P5.4 FOOTER [Printout of footer]
P5.4.1 OPERATING MODULES YES/NO
P5.4.2 DATE YES/NO
P5.4.3 TIME YES/NO
P5.4.4 BALANCE TYPE YES/NO
P5.4.5 ID BALANCE YES/NO
P5.4.6 USER YES/NO
P5.4.7 PRODUCT YES/NO
P5.4.8 VARIABLE 1 YES/NO
P5.4.9 VARIABLE 2 YES/NO
P5.4.10 LINES YES/NO
P5.4.11 EMPTY LINE YES/NO
P5.4.12 ADJUST.REP. YES/NO
P5.4.13 SIGNATURE YES/NO
P5.4.14 SPECPRINT NONE/SPECPRINT 1-4
P5.5 SPECPRINT 1 [Special printout no.1]
P5.6 SPECPRINT 2 [Special printout no.2]
P5.7 SPECPRINT 3 [Special printout no.3]
P5.8 SPECPRINT 4 [Special printout no.4]
P5.9 VARIABLE 1 [Printout Variable 1]
P5.10 VARIABLE 2 [Printout Variable 2]
P6 OTHER [additional useful functions]
P6.1 LANGUAGE GERMAN [Select menu language Poli./Engl./Germ/Span./French]
P6.2 AUTORIZ.ADMIN [Access steps for editing menu]
P6.3 KEYPAD TONE YES [Keypad tone on/off]
P6.4 BACKGROUND ILLUMINATION 70 [Background illumination]
P6.5 DATE 06.11.2013 [Setting the date]
P6.6 TIME 12:30:04 [Setting the time]
P6.7 DATE–FORM DDMMYYYY [Date format]
P6.8 TIME-FORM [Time format]
P7 INFO [Balance settings]
P7.1 ID BALANCE 123456 [Balance ID]
P7.2 BALANCE TYPE [Balance model]
P7.3 PROGRAM VERSION [Software status]
P7.4 TEMPERATURE 25.3 °C [Temperature]
P7.5 ADJUSTMENT-DR [Printer settings]
30 ILJ-C/ILS-C-BA-e-1320
Page 31

Some settings are identical in every particular but there are additional specific
settings for each menu item.
P8 IMPORT/EXPORT only ILS_C [Import/export data]
IE1 Export [Exporting data]
IE2 Import [Import data]
8.3 Exit menu / back to weighing mode
Any changes carried out are stored by pressing the PRINT key.
To cancel changes, press the UNIT-ESC-key.
Then the balance returns automatically into the weighing mode.
ILJ-C/ILS-C-BA-e-1320 31
Page 32

Input via cursor keys
Overview data input / data output:
Lower-case letters have to be entered via a keyboard (such as on a computer).
Examples:
Data input
Data output
1. Upper case characters
OP1_WILK
2. Lower case characters
op1_wilk
Selection of the number
to be changed to the
right (the respective
active position flashes)
Selection of the number
to be changed to the left
(the respective active
position flashes)
Increasing the value for selected numeral or number
Decreasing the value for selected numeral or number
9 Entry by navigation keys
32 ILJ-C/ILS-C-BA-e-1320
Page 33

10 User
To access all user parameters and data bases, the user must be logged-in as
ADMINISTRATOR. The password for the administrator is 1111.
This setting was preset by the factory. Login is not required.
The software allows you to create 10 users with different authorisations.
10.1 Login/logout
Login:
Select weighing mode and press the DATA-key. “b1 USER“ will be displayed.
Confirm by pressing PRINT and press to select “ADMIN“; confirm by pressing
PRINT.
Use the arrow keys for entering the admin password “1111“, and confirm by
pressing PRINT.
When logging in next time, select respective user and enter password. The weighing
scale starts operation according to the authorisations of the selected user.
Logout:
Select user and confirm “NONE“ by pressing PRINT.
The balance returns automatically into weighing mode.
For creating new users and allocating authorisations, see chap. 18.1.
ILJ-C/ILS-C-BA-e-1320 33
Page 34

Weighing is accessible at any time after weighing scale start-up.
Authorisations
Authorisation levels
USER
Access to editing of parameters
Sub-menu P2.2.1 READING
Main menu P6 OTHER (apart from DATE and TIME)
The user is entitled to:
Carry out all weighing processes
Has access to view information in the data base
Is permitted to define variables
Add new users and delete existing users, see chap. 18.1
ADVANCED USER
Access to editing of parameters
Sub-menu P2.2.1 READING
Sub-menu FUNCTIONS
Main menu P3 COMMUNICATION
Main menu P4 DEVICES
Main menu P6 OTHER (apart from DATE and TIME)
The user is entitled to:
Carry out all weighing processes
ADMINISTRATOR
Access to all user parameters, functions and to editing of
data bases
10.2 Authorisation levels
The software of the weighing scale operates on three authorisation levels.
ADMINISTRATOR
ADVANCED USER
USER
Authorisations are set in menu chap. 8 under menu item P6.2 (See chap 18.1).
34 ILJ-C/ILS-C-BA-e-1320
Page 35

For warm-up time required for stabilisation (see chap. 1)
11 Weighing
11.1 Switch on-off balance
The weighing scale will carry out a self-test after having been connected to the
power supply and will then automatically go into weighing mode.
To turn off press the ON/OFF-key; time will be displayed. The balance is now in
stand-by mode No warming-up up time is required and it will be ready for
operation immediately after switching on (Press ON/OFF-key).
To switch-off the balance completely, separate balance from power supply.
11.2 Weighing
Check zero display [ ] and set to zero with the help of the TARE key, as
required.
Place goods to be weighed on balance.
Wait until the stability display appears ( ).
Read weighing result
When an optional printer is connected, the weighing value can be edited.
ILJ-C/ILS-C-BA-e-1320 35
Page 36

Weighing scales with type approval options are restricted to [g] [kg]
[ct].
When the balance is unloaded the saved taring value is displayed with
negative sign.
To delete the stored tare value, remove load from weighing plate and
press TARE.
The taring process can be repeated any number of times. The limit is
reached when the whole weighing range is exhausted.
11.3 Weighing units switch-over
The weighing unit selected here remains even after disconnection from the mains.
Press UNIT repeatedly until the desired setting is displayed.
To enable or disable individual units go to the menu (See chap. 9.1 menu overview)
For setting options see chap. 12.7
11.4 Taring
The dead weight of any weighing container may be tared away by pressing a button,
so that the following weighing procedures show the net weight of the goods to be
weighed.
Put vessel of goods to be weighed on weighing plate and close the wind
screen doors.
Wait until the stability display appears ( ), then press TARE. The weight of
the container is now internally saved.
Weigh the goods to be weighed and close the wind screen doors.
Wait until the stability display appears ( ).
Read net weight.
11.4.1 Entering a tare value manually (pre-tare)
In weighing mode press F button
Press to select setting ENTER TARE and confirm by pressing PRINT.
Use the arrow keys for entering the tare value and confirm by pressing PRINT.
The entered tare value will be displayed with a “-“
11.4.2 Deleting the tare value
To delete the tare value, press the TARE-key or enter value“0.000“.
36 ILJ-C/ILS-C-BA-e-1320
Page 37

CAUTION
Always ensure that all suspended objects are stable enough to hold
the desired goods to be weighed safely (danger of breaking).
Never suspend loads that exceed the stated maximum load (max)
(danger of breaking)
Always ensure that there are no persons, animals or objects that
might be damaged underneath the load.
After completing the underfloor weighing the opening on the bottom of
the balance must always be closed (dust protection).
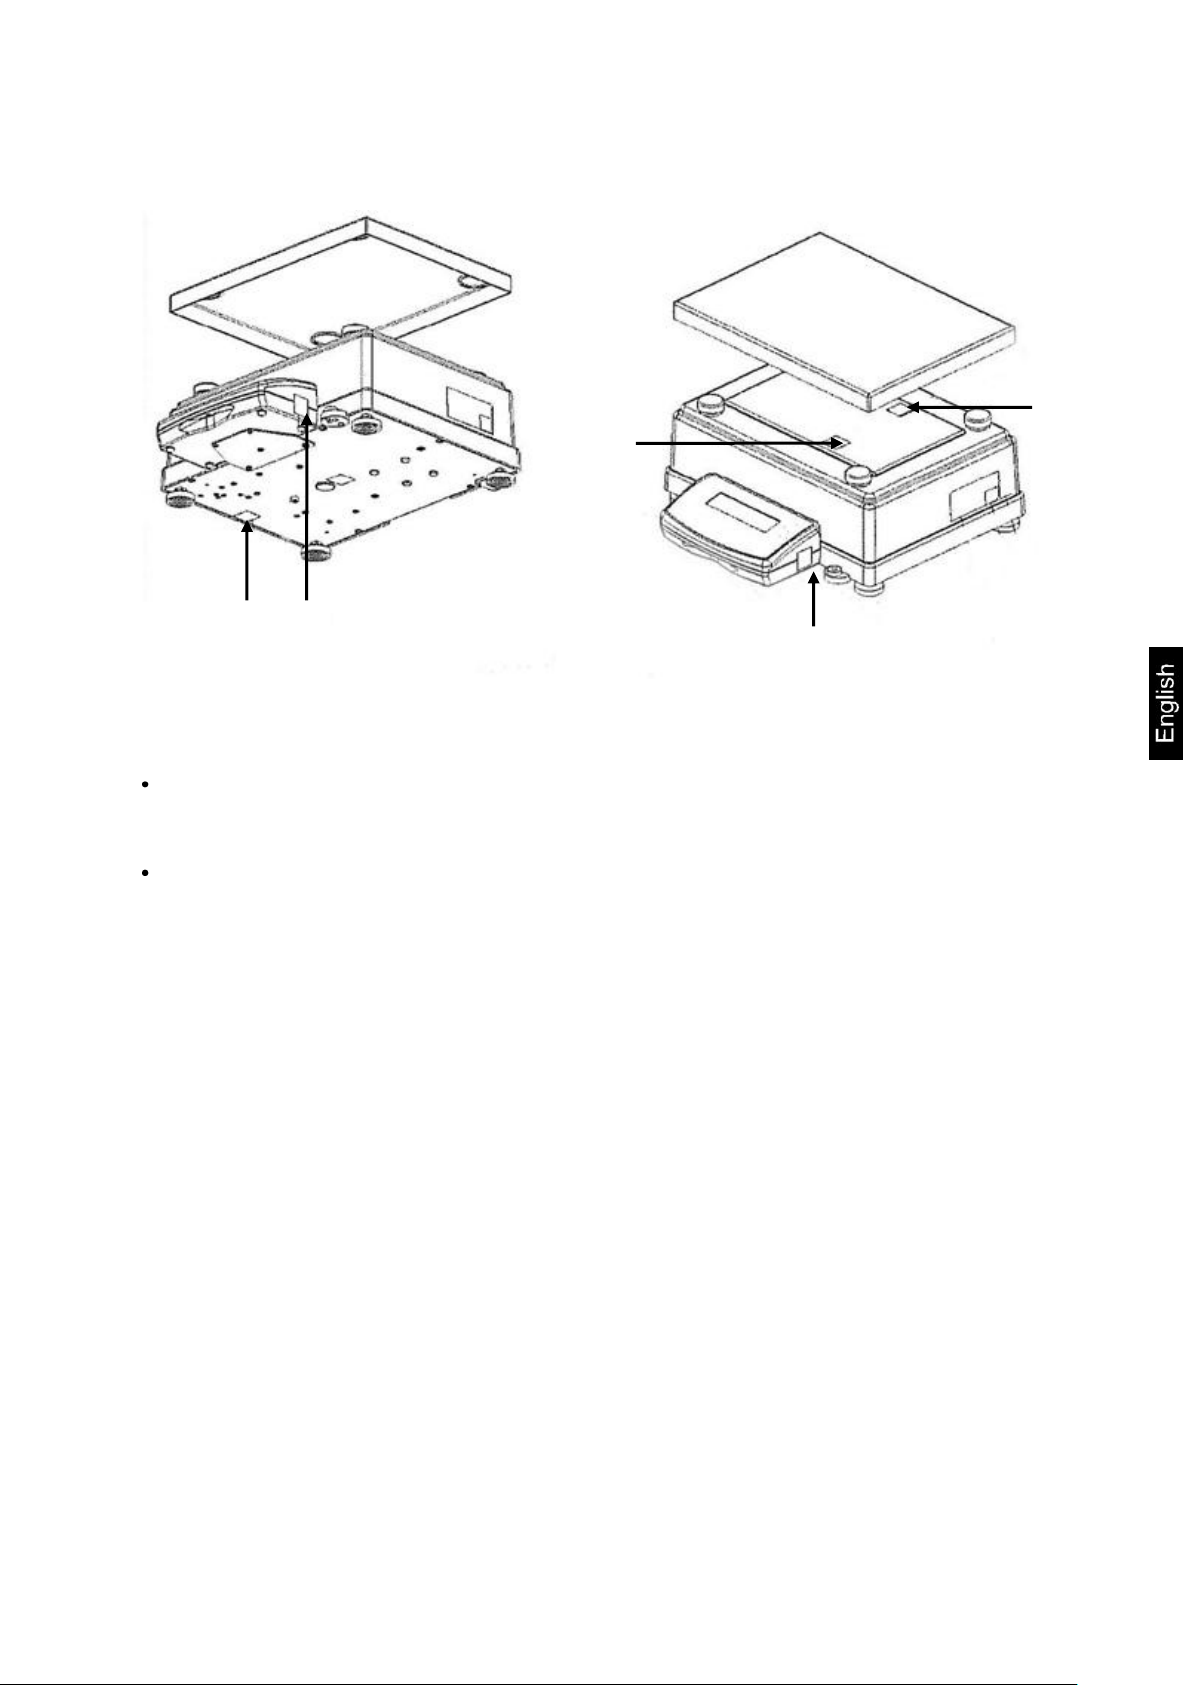
11.5 Underfloor weighing
Objects unsuitable for placing on the weighing scale due to size or shape may be
weighed with the help of the flush-mounted platform.
Proceed as follows:
Switch off the balance.
Open closing cover at the balance bottom.
Screw in hook for under-floor weighing carefully and completely, see fig. 1.
Place weighing balance over an opening.
Attach load to hook and carry out weighing procedure.
Fig.1: Setup of balance for underfloor weighing
ILJ-C/ILS-C-BA-e-1320 37
Page 38

11.6 Selecting the operating mode
To enter individual operating modes, go to the “P2 OPERATING MODULES“ menu
(see chap. 8 Menu).
11.6.1 Invoking operating modes:
Press the MODE-key and the name of the first available operating mode will be
displayed.
Weighing mode
To go to other functions press or .
Piece counting (example)
Select desired function by pressing .
Select additional functions in the same way (See chap. 8 menu – P2 operating
modules).
38 ILJ-C/ILS-C-BA-e-1320
Page 39

11.6.2 To select operating modes:
To enable operating modes that are available to the user without having to go to the
menu every time. Afterwards all enabled operating modes are available for invoking
via MODE.
For this proceed as follows:
Use the arrow keys to select operating modes.
(example)
(example)
YES will be flashing
Either confirm with or with go to NO and then acknowledge with .
Please repeat this sequence of operations for any other operating mode available.
Press and the scales will return to weighing mode.
ILJ-C/ILS-C-BA-e-1320 39
Page 40

Available settings for instance under menu item P2.2 WEIGHING
Filter setting
Balance
MEDIUM
Normal ambient conditions
SLOW – S.SLOW
The balance reacts slowly and in a robust
manner - busy set-up location
FAST – S.FAST
Weighing scale reacts sensitively and fast
– Quiet place of installation
MEDIUM will be flashing; change
between settings, using the arrow keys
(example)
Save your selected setting by pressing
PRINT
You have successfully saved your filter
setting and the weighing scale will return
to menu. To return to weighing mode,
press UNIT repeatedly.
12 Weighing scale settings operating mode weighing
This menu block can be used to adapt the behaviour of the weighing scale to your
requirements (such as ambient conditions, special weighing procedures) for any
operating mode.
12.1 Filter - adaptation to ambient conditions and weighing options
Set the filter according to operating conditions for the weighing scale.
Example: Menu item P2.2.1 invoke READING, press
40 ILJ-C/ILS-C-BA-e-1320
Page 41

RESULT.BEST. FAST+ACCURATE will
be displayed
(example)
FAST+ACCURATE will be flashing.
FAST +ACCURATE: Quiet place of
installation
ACCURATE: Noisy place of
installation
FAST: very quiet site
Use the arrow keys to select your desired
setting
(example)
Save your selected setting by pressing
PRINT
The setting is saved in such a way that
the weighing scale returns to the menu.
To return to weighing mode, press UNIT
repeatedly.
12.2 Rest position control
Adaptation of weighing speed
Example: Menu item P2.2.1 invoke READING, press
ILJ-C/ILS-C-BA-e-1320 41
Page 42

2x
AUTOZERO YES will be displayed
Yes will be flashing
Use the arrow keys to change between
YES and NO
YES - – Auto zero enabled
NO – Auto zero disabled
(example)
To save desired setting, press PRINT
The setting is saved in such a way that
the weighing scale returns to the menu.
To return to weighing mode, press UNIT
repeatedly.
12.3 Auto Zero
This function is used to tare small variations in weight automatically.
In the event that small quantities are removed or added to the material to be
weighed, incorrect weighing results can be displayed due to the “stability
compensation“. (e.g. slow flow of liquids from a container placed on the balance,
evaporating processes).
When apportioning involves small variations of weight, it is advisable to switch off this
function.
Example: Menu item P2.2.1 invoke READING, press
42 ILJ-C/ILS-C-BA-e-1320
Page 43

4x
LAST DIGIT ALWAYS will be displayed
ALWAYS will be flashing
Use the arrow keys to change between
ALWAYS, NEVER and IF STABLE.
ALWAYS – last decimal place is
displayed
NEVER – last decimal place is
hidden
IF STABLE – last decimal place is
only displayed for stable weighing
values.
(example)
To save desired setting, press PRINT
The setting is saved in such a way that
the weighing scale returns to the menu.
To return to weighing mode, press UNIT
repeatedly.
12.4 Hide last decimal place
Readability may be reduced by 1 digit on the weighing balances, as required. The
last decimal place will be rounded and removed from the display.
Example: Menu item P2.2.1 invoke READING, press
ILJ-C/ILS-C-BA-e-1320 43
Page 44

5x
AMBIENCE UNSTABLE will be displayed
UNSTABLE will be flashing
Use the arrow keys to change between
UNSTABLE and STABLE.
UNSTABLE – difficult ambient
conditions (vibrations, etc.)
STABLE – normal ambient
conditions
(example)
To save desired setting, press PRINT
The setting is saved in such a way that
the weighing scale returns to the menu.
To return to weighing mode, press UNIT
repeatedly.
12.5 Environmental conditions
This menu item allows you to adjust the weighing scale to its ambient conditions. You
have the option of selecting between STABLE and UNSTABLE ambient conditions.
Example: Menu item P2.2.1 invoke READING, press
44 ILJ-C/ILS-C-BA-e-1320
Page 45

P2.2.2.1
Weighing scale printing:
ALL: For all users
IF STABLE: When weighing scale is stable
AUTO: Automatically when weighing scale is stable
P2.2.2.2
Weighing scale printing:
AUTOTHRESH: The moment the threshold value is
exceeded.
How to enter a threshold value:
Invoke P2.2.2.2, press F2 and you can enter the threshold
value, using the arrow keys. Confirm with PRINT.
ALL will be flashing.
Use the arrow keys to select your desired
setting
(example)
Confirm with PRINT
You have successfully saved this setting.
To return to weighing mode, press UNIT.
12.6 Printout mode
This menu item is used to specify print settings:
Invoke menu item P2.2.2, go to PRINTOUT MODE, press
ILJ-C/ILS-C-BA-e-1320 45
Page 46

G YES will be displayed.
G will be flashing.
You can now enable (YES) or disable
(NO) the weight unit gram.
Use the arrow keys to select the desired
setting.
(example)
Confirm with PRINT
The weight unit gram has now been
disabled and will no longer be displayed
on pressing the UNIT-key.
To return to weighing mode, press UNIT.
Weighing scales with type approval options are restricted to [g] [kg]
[ct].
12.7 Setting weighing units
12.7.1 How to enable weighing units
Individual weight units can be enabled and disabled in the menu as follows:
Go to menu and select the following menu item:
For all other weight units follow the same sequence of operations.
46 ILJ-C/ILS-C-BA-e-1320
Page 47

The previously set standard weighing unit
will be displayed.
G will be flashing.
Use the arrow keys to select the desired
standard weighing unit.
(example)
Confirm with PRINT
KG is now set as standard weighing unit.
To return to weighing mode, press UNIT.
12.7.2 How to set a standard weight unit
The unit set in this function will remain after turning on or off and after disconnection
from the mains.
Go to menu and select the following menu item:
ILJ-C/ILS-C-BA-e-1320 47
Page 48

INFORM TARE is displayed
TARE is flashing
(example)
To change between the individual items of
information use the arrow keys.
To save desired setting, press PRINT
The setting is saved in such a way that
the weighing scale returns to the menu.
To return to weighing mode, press UNIT
repeatedly.
The information display shows GROSS.
12.8 Information display
This function allows the display of additional information on the line at the lower
margin of the display.
Items of information available for display include:
TARE
NET
GROSS
USER
PRODUCT
SPECINFORM
NONE
48 ILJ-C/ILS-C-BA-e-1320
Page 49

INFORM TARE is displayed
TARE is flashing
Use to scroll down to SPECINFORM.
Confirm with PRINT.
You have selected the setting SPECIAL
INFORMATION.
To return to weighing mode, press UNIT
repeatedly.
Enter the text for your SPECIAL INFORMATION:
Select menu item SPECIAL
INFORMATION
The first character is flashing; use the
arrow keys to enter your text.
(example)
Confirm with PRINT.
The entered text will be displayed as
special information.
Press UNIT repeatedly until the balance
is in weighing mode.
The entered text will be displayed on the
information line.
12.8.1 Special information
This function allows the user to display arbitrary text of up to 19 lines.
First select the setting SPECIAL INFORMATION as follows:
ILJ-C/ILS-C-BA-e-1320 49
Page 50

F1 PRINT HEADER is displayed
F1-key is allocated a function
PRINT HEADER is flashing
Use the arrow keys to select the desired
function
(example)
To save desired setting, press PRINT
This function is now allocated to the F1key.
To return to weighing mode, press UNIT
repeatedly.
If the F1-key is pressed in weighing
mode, the set function will appear.
12.8.2 Shortcut keys
You can allocate functions to the 4 F-keys so as to have access to
these functions by merely pressing these keys.
The following functions of operating mode WEIGHING are suitable for allocation:
PRINT HEADER / PRINT FOOTER / VARIABLE 1 and 2 / NO / SELECT PRODUCT /
LOGIN / ENTER TARE / SELECT TARE
Allocating function to respective key:
50 ILJ-C/ILS-C-BA-e-1320
Page 51

Weighing, see chap. 11
Parts counting
Checkweighing
Dosing
Deviation (determination of percentage)
Density determination of solids
Determining density of liquids
Animal weighing
Statistics function
Totalization
HOLD function
13 Additional operating modes
Menu item P2 OPERATING MODULES
The weighing scale offers the following operating modes:
Chapter 11.6 first describes how to enable the desired operating modes.
13.1 Parts counting
Before the balance can count parts, it must know the average part weight (i.e.
reference). Proceed by putting on a certain number of the parts to be counted. The
balance determines the total weight and divides it by the number of parts (the socalled reference quantity). Counting is then carried out on the basis of the calculated
average piece weight.
As a rule:
The higher the reference quantity the higher the counting exactness.
ILJ-C/ILS-C-BA-e-1320 51
Page 52

4x
The previous setting will be displayed.
(example)
The previous setting for the F1-key will
be flashing.
Use the arrow keys to select ENTER
REFERENCE WEIGHT.
This completes the allocation of the
function used to enter the reference
weight to the F1-key.
Set operating mode PIECE COUNTING
The ENTER REFERENCE WEIGHT function is allocated to the F1-key.
In piece counting mode this enables you to invoke the function used to enter the
reference weight by pressing F1.
52 ILJ-C/ILS-C-BA-e-1320
Page 53

If this is the first time that a reference weight is entered 0 will be displayed.
If a reference weight was entered at an earlier date, the previous entry will be
displayed.
Use the arrow keys to enter the
desired reference weight.
(example)
You have successfully entered a
reference weight and piece counting
can be started.
Selecting piece counting mode and entering reference weight
Return to weighing mode
Press MODE and F1 WEIGHING will be displayed. Confirm by pressing PRINT and
the weighing scale will change to weighing mode.
ILJ-C/ILS-C-BA-e-1320 53
Page 54

4x
The previous setting will be displayed.
(example)
The setting is flashing. Press F2 to make
entries for the F2-key
(example)
The previous setting for the F2-key will
be flashing.
Use the arrow keys to select
DETERMINE REFERENCE WEIGHT.
This completes the allocation of the
function used to determine the reference
weight by weighing to the F2-key.
Determining reference weight by weighing
The DETERMINE REFERENCE WEIGHT function is allocated to the F2-key.
In piece counting mode this enables you to invoke the function used to determine
the reference weight by pressing F2.
54 ILJ-C/ILS-C-BA-e-1320
Page 55

Selecting reference quantity
First go to the menu and select the setting ACAI:
P2.3 – Select QUANTITY, press F2, P2.3.1 – READ will be displayed;
Repeatedly press F2 until ACAI YES is displayed.
If NO is displayed: Press F2 and use the arrow keys to set YES, then confirm by
pressing PRINT.
The last selected setting will be shown.
Place the reference weight on the pan
and confirm by pressing PRINT.
The weight as well as the number of
pieces matching this weight will be
displayed.
Remove reference weight. The balance is now in parts counting mode and counts all
units on the weighing plate.
ILJ-C/ILS-C-BA-e-1320 55
Page 56

1
Goods to be weighed below tolerance limit
2
Goods to be weighed within tolerance
range
3
Goods to be weighed above tolerance limit
4
Lower limit (example)
5
Upper limit (example)
13.2 Weighing with tolerance range
For weighing with tolerance ranges you can enter individual upper and lower limits.
For tolerance controls such as dosaging, apportioning or sorting the scale will display
violated upper or lower limits and show the tolerance tag.
The symbol in the upper part of the display shows whether the load is within the two
tolerance limits.
The tolerance marker is only in operation during operating mode tolerance weighing;
it is otherwise not visible.
The tolerance marker provides the following information:
56 ILJ-C/ILS-C-BA-e-1320
Page 57

4x
P2.4.5.1 will be displayed showing the
previous setting entered for the F1-key.
(example)
2x
Press F1 to select F3.
(example)
The settings to be selected will be
flashing. Use the arrow keys to select
ENTER THRESHOLDS.
Confirm with PRINT.
This completes the allocation of the
ENTER THRESHOLDS function for
control weighing to the F3-key.
The ENTER THRESHOLD function is allocated to the F3-key.
In control weighing mode this allows you to invoke the function used to enter limits
by pressing F3.
ILJ-C/ILS-C-BA-e-1320 57
Page 58

2x
You have set the operating mode
control weighing.
The symbols for the limits are
displayed at the upper margin of the
display.
The entered limits are displayed at
the lower margin.
Entering limits:
The display for entering the lower
limit value will appear. MIN is
displayed at the bottom left. The left
digit will be flashing.
Use the arrow keys to enter the
lower limit.
(example)
The lower limit value is thus
entered.
The display changes to the prompt
for entering the upper limit value.
Enter limits
Set the weighing mode for operating mode control weighing as follows:
58 ILJ-C/ILS-C-BA-e-1320
Page 59

Both limits have now been entered;
the display changes to control
weighing mode.
If invalid values are entered such as lower tolerance limit greater than
upper tolerance limit, the balance will issue the error message and
return automatically to weighing mode.
Select dosing mode
4x
The information strip shows the two limits. The MIN symbol will appear at the upper
margin of the display as 0 is the point from which values drop below the lower limit.
The weighing scale is ready for control weighing. Use the symbols MIN-OK-MAX to
check whether the load is within, above or below the intended tolerance.
Return to weighing mode
Press MODE and F1 WEIGHING will be displayed. Confirm by pressing PRINT and
the weighing scale will change to weighing mode.
13.3 Dosing
If dosing mode is enabled, the weighing scale will work at increased display speed.
Please keep in mind that the weighing scale reacts very sensitively to ambient
conditions.
Enter the target weight (reference weight) along with the tolerance:
The ENTER REFERENCE WEIGHT function is allocated to the F4-key.
ILJ-C/ILS-C-BA-e-1320 59
Page 60

P2.5.5.1 will be displayed showing the
previous setting for the F1-key.
(example)
3x
Press F1 to select F4.
(example)
The settings to be selected will be
flashing. Use the arrow keys to select
ENTER REFERENCE WEIGHT.
Confirm with PRINT.
This completes the allocation of the
ENTER REFERENCE WEIGHT function
used for dosing to the F4-key.
Operating mode dosing has now
been set.
The symbol for dosing will be
displayed at the upper margin of the
display.
The setting REFERENCE WEIGHT
0.0 will be displayed at the lower
margin.
Entering target weight:
The display used to enter the target
weight appears with the left digit
flashing.
In dosing mode this allows you to enter the target weight along with the
corresponding tolerance by pressing F4.
Enter target weight
Setting weighing mode in operating mode dosing:
60 ILJ-C/ILS-C-BA-e-1320
Page 61

Use the arrow keys to enter the
target weight and confirm by
pressing PRINT.
The display used to enter the
tolerance appears. Enter tolerance
and confirm by pressing PRINT.
(example)
The target weight is displayed on the information
line. The symbol for dosing and the MIN symbol
will appear at the upper margin as no load has is
present on the weighing plate. The target weight is
displayed as negative value.
Weight smaller than target weight
Weight within tolerance
Weight greater than target weight
Return to weighing mode
Press MODE and F1 WEIGHING will be displayed. Confirm by pressing PRINT and
the weighing scale will change to weighing mode.
ILJ-C/ILS-C-BA-e-1320 61
Page 62

This completes setting the operating
mode weighing by percentage.
The percent symbol will be
displayed at the upper margin of the
display. The setting REFERENCE
WEIGHT 0.0 G will be displayed at
the lower margin.
Put the reference weight equalling
100% on the weighing plate.
(example)
Example: 1 kg is supposed to be
equivalent to 100%.
The reference weight of 1 kg has now been saved
as 100% value.
13.4 Percent determination
Percent determination allows weight display in percent, in relation to a reference
weight. The reference weight may be determined by weighing or by entering it
numerically.
Determining reference by weighing
The DETERMINE REFERNCE WEIGHT function is allocated to the F1-key.
Go to menu and select P2.6 DEVIATION
Use the arrow keys to select P2.6.5 SHORTCUTS
Press F2, P2.6.5.1 will be displayed along with the previous function for the
F1-key.
Again press F2 and the information line will start flashing.
Use the arrow keys to select DETERMINE REFERENCE WEIGHT and
Confirm by PRINT; this function has now been allocated to F1.
In weighing mode:
Remove reference weight and place load. The weight will be displayed in
percent according to reference weight.
62 ILJ-C/ILS-C-BA-e-1320
Page 63

This completes setting the operating
mode weighing by percentage.
The previously entered reference
weight will be displayed on the info
line.
Use the arrow keys to enter the
reference weight equalling 100%
and confirm by pressing PRINT.
(example)
Example: 2 kg
The reference weight of 2 kg has now been saved
as 100% value.
Return to weighing mode
Press MODE and F1 WEIGHING will be displayed. Confirm by pressing PRINT and
the weighing scale will change to weighing mode.
Determining reference weight by weighing
The ENTER REFERENCE WEIGHT function is allocated to the F2-key.
Go to menu and select P2.6 DEVIATION
Use the arrow keys to select P2.6.5 SHORTCUTS
Press F2, P2.6.5.1 will be displayed along with the previous function for the
F1-key.
Press F1 and entry for the F2-key will take place
Press F2.
Use the arrow keys to select ENTER REFERENCE WEIGHT and
Confirm by PRINT; this function has now been allocated to F2.
In weighing mode:
Remove reference weight and place load. The weight will be displayed in
percent according to reference weight.
ILJ-C/ILS-C-BA-e-1320 63
Page 64

Medium time
This is the time required for taking the measurement; the
mean value is taken
Threshold
This allows you to enter a threshold from which
measurements are to be taken
Auto start
This allows you to decide when measurement is to be
started:
Manually – after pressing a key or
Automatically – after selecting the START function
Use the arrow keys to select
AUTOSTART NO.
To return to weighing mode, press UNIT:
Use the arrow keys to select F8 animal
weighing function.
Return to weighing mode
Press MODE and F1 WEIGHING will be displayed. Confirm by pressing PRINT and
the weighing scale will change to weighing mode.
13.5 Animal weighing
The following options are available:
Manual confirmation
In weighing mode:
64 ILJ-C/ILS-C-BA-e-1320
Page 65

The animal symbol will appear on the
display.
Measuring is started by pressing F2.
The mean value will be determined.
(example)
Afterwards the weighing result will be
displayed.
Use the arrow keys to select
AUTOSTART YES.
To return to weighing mode, press UNIT:
Place weighing goods and press
To end weighing, press UNIT.
Return to weighing mode
Press MODE and F1 WEIGHING will be displayed. Confirm by pressing PRINT and
the weighing scale will change to weighing mode.
Carrying out automatic measuring
In weighing mode:
ILJ-C/ILS-C-BA-e-1320 65
Page 66

Use the arrow keys to select F8 animal
weighing function.
The animal symbol will appear on the
display.
The weighing scale will start
determining the mean value
automatically.
(example)
Afterwards the weighing result will be
displayed.
N
Number of samples
SUM
Total weight of samples
AVG
Mean value derived from batch
MIN
Min value in batch
MAX
Max value in batch
SDV
Standard Deviation
DIV
Difference between max and min in batch
SDV
Standard deviation for batch
RDV
Variance factor
Place goods to be weighed on balance.
To end weighing, press UNIT.
Return to weighing mode
Press MODE and F1 WEIGHING will be displayed. Confirm by pressing PRINT and
the weighing scale will change to weighing mode.
13.6 Statistics
The statistics function allows you to collect data from a series of weighing processes
that afterwards are statistically evaluated.
Statistics data available for calculation:
66 ILJ-C/ILS-C-BA-e-1320
Page 67

The statistics symbol appears on the
display.
1. Put-on sample
(example)
Confirm with PRINT. The value will be
saved to the alibi memory and printed
out if a printer is connected.
(example)
The information line shows “1“ for the
first weighing process.
Remove the sample from the weighing
plate and apply the same sequence of
operations for additional samples.
(example)
After all values have been saved, the
results are ready for evaluation under
statistics.
Press the F-key.
The arrow keys allow you to display all
data:
F9 Selecting statistics:
Examples:
N 9
SUM 455.600 G
AVG 50.6222 G
MIN 49.939 G
MAX 51.380 G
DIF 1.441 G
SDV 0.39605 G
RDV 0.78 %
PRINTING
ILJ-C/ILS-C-BA-e-1320 67
Page 68

If the setting PRINT was selected, the
statistical data can be printed out by
pressing PRINT.
Use the arrow keys to select FINISH.
Press PRINT and remove load.
The start window for the statistics
function will appear. Weighing data
has been deleted.
12:27 29/11/13
----------------------Statistics------------------
N 3
Sum 11439.5 g
Avg 3813.17 g
Min 457.0 g
Max 10000.0 g
Dif 9543.0 g
Sdv 4380.009 g
Rdv 114.87 %
----------------------------------------------------
Example of report:
F9 Delete statistics:
Return to weighing mode
Press MODE and F1 WEIGHING will be displayed. Confirm by pressing PRINT and
the weighing scale will change to weighing mode.
68 ILJ-C/ILS-C-BA-e-1320
Page 69

1
Symbol total
2
Quantity ingredients
3
Total weight of ingredients
Place load A and wait until the stability
display appears, the press PRINT.
(example)
Weight is displayed as total, the
weighing scale automatically tared
(NET appears) followed by the zero
display. “1“ is displayed for number of
ingredients.
13.7 Totalization
This function can be applied to add weighing different components of a
compound. The adding-up function is available for up to 30 components.
Set F10 add-up:
Add up:
ILJ-C/ILS-C-BA-e-1320 69
Page 70

Place load B and confirm by pressing
PRINT.
(example)
“2“ is displayed for number of
ingredients and the weight added to
the summation memory.
With the further ingredients proceed as described above.
(example)
Once all ingredients have been added:
The total weight for the ingredients will
be displayed and printed out if a
printer is connected. The report
contains the weight for all ingredients,
the total and the tare weight.
70 ILJ-C/ILS-C-BA-e-1320
Page 71

-------------------Adding-up------------------
1. 1000.0 g
2. 2000.0 g
--------------------------------------------------Sum 3000.0 g
Tare 0.0 g
----------------------------------------------------
Example of summation report:
Delete data
To return to the start window of the adding-up function press UNIT. Data is reset to
zero.
Return to weighing mode
Press MODE and F1 WEIGHING will be displayed. Confirm by pressing PRINT and
the weighing scale will change to weighing mode.
ILJ-C/ILS-C-BA-e-1320 71
Page 72

The display for entering a threshold
value will appear with the left digit
flashing. Use the arrow keys to enter
the threshold value in grams and
confirm by pressing PRINT.
The Hold function is now enabled.
The net weight will be displayed on the
info line.
The weighing scale is ready for
measuring.
(example)
The maximum weight above the
threshold value will be displayed on
the main display. In addition the max
symbol will appear.
To carry out additional measurements,
remove the sample from the weighing
plate and press UNIT.
13.8 HOLD function
This function is used to determine the maximum value during a weighing
process.
You may enter a threshold value from which measurement is to take place.
Set threshold value:
We recommend entering the threshold value in grams.
As soon as this value is exceeded, the weighing scale will start measuring and the
maximum value will be displayed.
Carry out measuring:
Return to weighing mode
Press MODE and F1 WEIGHING will be displayed. Confirm by pressing PRINT and
the weighing scale will change to weighing mode.
72 ILJ-C/ILS-C-BA-e-1320
Page 73

Previous language (example GERMAN)
will be displayed.
GERMAN will be flashing.
Use the arrow keys to select the
language of your choice.
(example)
Example: Confirm SPANISH by pressing
PRINT.
(example)
The desired language is now set.
To return to weighing mode, press UNIT
repeatedly.
14 Further useful functions “P6 OTHER“
Here, you can set the parameters that influence the operation of the balance, such as
background illumination and key sounds.
14.1 Language
The following languages are available for the weighing menu:
GERMAN/SPANISH/FRENCH/POLISH/ENGLISH
Each language can be set as follows:
ILJ-C/ILS-C-BA-e-1320 73
Page 74

AUTHORISED ADMIN is displayed
ADMIN is flashing.
Use the arrow keys to select the desired
authorisation.
(example)
Example: Confirm USER by pressing
PRINT.
(example)
The authorisation USER is now set.
To return to weighing mode, press UNIT
repeatedly.
14.2 Authorisations
Three authorisation levels (See chap. 9.2) can be set for the access to the weighing
scale menu:
ADMIN/USER/ADVANCED
Setting authorisations:
74 ILJ-C/ILS-C-BA-e-1320
Page 75

(example)
The previous setting for the audio signal
will be displayed.
YES will be flashing.
Use the arrow keys to select the desired
setting.
(example)
Example: Confirm NO by pressing
PRINT.
(example)
The key-operated audio signal is now
disabled.
To return to weighing mode, press UNIT
repeatedly.
14.3 Acoustic signal for key operation
This setting allows you to enable or disable the audio signal by pressing any key.
ILJ-C/ILS-C-BA-e-1320 75
Page 76

(example)
The previous setting for the background
illumination brightness will be displayed.
80 will be flashing.
Use the arrow keys to select the desired
setting.
(example)
Example: Confirm 100 by pressing
PRINT.
(example)
The brightness for the Background
illumination is now set to 100, i.e.
maximum brightness.
To return to weighing mode, press UNIT
repeatedly.
14.4 Background illumination and brightness control for display
This menu item allows you to set the brightness of the display. In addition,
Background illumination can be disabled completely.
100 Maximum brightness of display
10 Minimum brightness of display
NONE Background illumination switched-off
76 ILJ-C/ILS-C-BA-e-1320
Page 77

(example)
The previous date will be displayed.
The date format will be displayed.
YYYY.MM.DD – Year-Month-Day
and next to it the digits for the date
settings. One of the digits will be
flashing.
Use the arrow keys to set the current
date.
(example)
Confirm with PRINT
(example)
The current date is now set.
To return to weighing mode, press
UNIT repeatedly.
14.5 Date
ILJ-C/ILS-C-BA-e-1320 77
Page 78

(example)
The previous time will be displayed.
The time format will be displayed
HH:MM – hours:minutes
and next to it the digits for the time
settings. One of the digits will be
flashing.
Use the arrow keys to enter the
current time.
(example)
Confirm with PRINT
(example)
The current time is now set.
To return to weighing mode, press
UNIT repeatedly.
14.6 Time
You can set the current time as follows:
78 ILJ-C/ILS-C-BA-e-1320
Page 79

(example)
The previous date format will be
displayed.
The date format
DD.MM.YYYY – Day-Month-Year
will be flashing.
Use the arrow keys to select the desired
format.
(example)
Confirm with PRINT
(example)
The format settings will be displayed.
To return to weighing mode, press UNIT
repeatedly.
14.7 Date format
This menu item allows you to set a date for the printout.
YYYY Year
MM Month
DD Date
The following settings are possible:
YYYY.MM.DD / YYYY.DD.MM / DD.MM.YYYY / MM.DD.YY
ILJ-C/ILS-C-BA-e-1320 79
Page 80

(example)
The previous time format will be
displayed.
24 H will be flashing.
Use the arrow keys to select the desired
format.
(example)
Confirm with PRINT
(example)
The format settings will be displayed.
From now on time will be displayed in
this format.
To return to weighing mode, press UNIT
repeatedly.
14.8 Time format
You can set a time format (12H/24H) for the printout.
If the 12 H format is set, time will be shown with an A or P next to it.
A Hours before noon
P Hours after noon
The time on the printout will be printed with AM or PM next to it.
80 ILJ-C/ILS-C-BA-e-1320
Page 81

P5.3.1
DATUM
YES
Issue date of measurement
P5.3.2
TIME
YES
Issue time of measurement
P5.3.3
USER
YES
Issue name of logged-in user
P5.3.4
PRODUCT
YES
Issue name of product
P5.3.5
VARIABLE 1
NO:
Issue value of variable 1
P5.3.6
VARIABLE 2
NO:
Issue value of variable 2
P5.3.7
TARE
YES
Tare value is issued
P5.3.8
GROSS
YES
Gross value is issued
P5.3.9
CURRENT
RESULT
YES
Current weighing result (net weight) is issued
P5.3.10
ADJUST.REP.
NO:
The last adjustment report is issued according
to the settings for the printout of an adjustment
report.
P5.3.11
SPECPRINT
NO:
One of the four special printouts is issued
--------------------------------------------------Date 21.11.2013
Time 9:54:39
User Kern
Product Flour
Tare 1000 g
Gross 2000 g
Current result 2000 g
----------------------------------------------------
15 GLP/ISO report “P5.3 GLP PRINT“
Quality assurance systems require logs of weighing results as well as of correct
adjustment of the balance stating date and time and balance identification. The
easiest way is to have a printer connected.
The content for data output is configured specified in the ”P5.3 GLP PRINT“ menu.
All parameters set to “YES“ will be issued.
Examples:
Definition of a standard log:
P5.3 GLP PRINT
Printout example:
ILJ-C/ILS-C-BA-e-1320 81
Page 82

The previous setting will be displayed
NO will be flashing
Use the arrow keys to select YES.
Confirm with PRINT
The date will be printed on the GLP
report.
Press F1 to change to next setting.
P5.3.1 DATE – issue date
P5.3.2 TIME – Issue time
Press , current setting will be flashing
Press to select among the following settings:
NO: = Do not display time
YES = Display time
Confirm settings by pressing the PRINT key. Weighing balance returns to menu.
Press and the next menu item P5.5.5 USER will appear.
Follow the same sequence of operations for the remaining settings.
82 ILJ-C/ILS-C-BA-e-1320
Page 83

Baud rate
4800/9600/19200/38400/57600/115200 selectable
Parity
None, paired, unpaired
Transfer modes
Manually after pressing the PRINT key
Automatically according to stability display
Continuously, according to setting
On request by external device
(remote control commands)
16 Data output RS 232 and USB
You can print weighing data automatically via the RS 232C interface or manually
pressing the PRINT button via the interface according to the setting in the menu.
This data exchange is asynchronous using ASCII - Code.
The following conditions must be met to provide successful communication between
the weighing balance and the printer.
Use a suitable cable to connect the display unit to the interface of the printer.
Faultless operation requires an adequate KERN interface cable.
Communication parameters (baud rate, bits and parity) of display unit and
printer must match.
16.1 Technical data
ILJ-C/ILS-C-BA-e-1320 83
Page 84

COM 1
RS 232 interface
COM 2
RS 232 interface
USB type A
Connection to computer keyboard, barcode scanner or USB stick
USB type B
Connection to printer or computer
WIFI
WIFI connection
Go to menu and select menu item P3.1.
To set the baud rate, press F2.
The previous baud rate will be displayed.
Again press F2, setting will start flashing.
Use the arrow keys to select the desired
baud rate and confirm by pressing
PRINT.
(example)
The baud rate is now set.
Press UNIT repeatedly until the weighing
scale has returned to weighing mode.
Menu item P3 COMMUNICATION allows you to adjust settings. The weighing scale
is set up to communicate with the following external devices:
USB connections cannot be configured.
16.2 Setting interface RS 232
Go to COM 1 or COM 2 and adjust settings as follows:
Setting of baud rate
Set parity
Select menu item P3.1.2 and adjust settings for parity as described above.
84 ILJ-C/ILS-C-BA-e-1320
Page 85

The printout of unstable values is blocked in calibrated weighing
scales.
1 2 3
4 - 12
13
14 - 16
17
18
Stability
symbol
Blank
Character
Weight
Blank
Unit
CR
LF
Stability symbol
[blank space]
If stable
[?]
If stable
[^]
If error (Command + exceeded)
[v]
If error (Command – exceeded)
Character
[blank space]
For positive and negative values
Weight
9 digits
With right justifications
Unit
3 digits
With left justification
16.3 Interface cable
Cable weighing scale - computer (RS232):
16.4 Output log
16.4.1 Issue after pressing the PRINT ´button
ILJ-C/ILS-C-BA-e-1320 85
Page 86

XX_A
CR LF
Instruction accepted; will be executed
XX_I
CR LF
Instruction received; impossible to carry out
XX_^
CR LF
Command accepted but max range exceeded
XX_v
CR LF
Command accepted but min range exceeded
XX_E
CR LF
Error during execution, timeout for stable weighing value
exceeded
XX
Name of command
1 – 3 4 5 6 7
8 – 16
17
18 - 20
21
22
Command
Blank
Stability
symbol
Blank
Character
Weight
Blank
Unit
CR
LF
Instruction:
1-3
Character
Stabilisation
symbol
[blank space]
If stable
[?]
If stable
[^]
If error (Command + exceeded)
[v]
If error (Command – exceeded)
Character
[blank space]
For positive and negative values
Weight
9 digits
With right justifications
Unit
3 digits
With left justification
16.4.2 Remote control instructions
Feedback by weighing scale after sending remote control command:
86 ILJ-C/ILS-C-BA-e-1320
Page 87

Command
Description
Z
Balance zeroing
T
Tare weighing scale
UT
Enter tare value
LT
Set tare
S
Send stable result in standard unit
SI
Send result immediately in standard unit
SU
Send stable result in current unit
SUI
Send result immediately in current unit
C1
Enable continuous data output in standard unit
C0
Disable continuous data output in standard unit
CU1
Enable continuous data output in current unit
CU0
Disable continuous data output in current unit
PC
Send all implemented commands
Each command must end in CR LF suffix.
List of remote control commands
ILJ-C/ILS-C-BA-e-1320 87
Page 88

17 Connecting external devices
To adjust settings for external devices go to menu item P4 DEVICES:
Adjusting connection to computer
Go to menu item P4 DEVICES and set menu item P4.1 COMPUTER.
Select port where computer is to be connected.
Confirm port by pressing PRINT and press UNIT to return to weighing mode.
Optional connections:
COM 1 or COM 2: RS232 interfaces
USB type B USB connection
WIFI connection
Adjust connection to computer
Select menu item P4 DEVICES and set menu item P4.2 PRINTER.
Select port where computer is to be connected.
Confirm port by pressing PRINT and press UNIT to return to weighing mode.
Optional connections:
COM 1 or COM 2: RS232 interfaces
88 ILJ-C/ILS-C-BA-e-1320
Page 89

Stable weighing value
5000.1 g
Instable weighing value
? 5000.1 g
Negative weighed value
- 5000.1 g
Positive weighing value
5000.1 g
Overload
^
Percent determination
24.9 %
Piece counting
10 pcs
17.1 Printer settings
Printout examples
ILJ-C/ILS-C-BA-e-1320 89
Page 90

P5.1.1
DRAFT
Enter a project name, maximum 16 characters
P5.1.2
ART ADJUST
YES
Print kind of adjustment
P5.1.3
USER
YES
Print name of user
P5.1.4
DRAFT
YES
Print project name (See. P5.1.1)
P5.1.5
DATUM
YES
Print date of adjustment
P5.1.6
TIME
YES
Print time of adjustment
P5.1.7
ID BALANCE
YES
Print serial number of weighing scale
P5.1.8
DIFF.ADJUST.
YES
Print difference between currently adjustment
weight and previous adjustment weight.
P5.1.9
LINES
YES
Print line between date and signature
P5.1.10
SIGNATURE
YES
Print box for signature of implementing person
-------------------Just.Prot.-----------------Art Just External
User Kern
Draft
Date 21.11.2013
Time 9:54:39
ID Balance 132051
Diff.Adjust. -0.2 g
Signature
……………………………………………..
17.1.1 Setting an adjustment report
The following settings can be enabled (printout takes place) or disabled (printout
blocked) by selecting YES or NO.
Sample adjustment record:
Select P 5.1 and adjust the desired settings.
Sample adjustment record:
Printout example adjustment report:
90 ILJ-C/ILS-C-BA-e-1320
Page 91

P5.2.1
LINES
YES
Print line
P5.2.2
OPERATING
MODULE
YES
Print name of operating mode
P5.2.3
DATUM
YES
Print date on header
P5.2.4
TIME
YES
Print time on header
P5.2.5
BALANCE TYPE
YES
Print weighing scale type
P5.2.6
ID BALANCE
YES
Print serial number
P5.2.7
USER
YES
Print name of logged-in user
P5.2.8
PRODUCT
YES
Print name of product currently selected
P5.2.9
VARIABLE 1
YES
Print name of variable 1
P5.2.10
VARIABLE 2
YES
Print name of variable 2
P5.2.11
EMPTY LINE
YES
Print empty dividing line
P5.2.12
ADJUST.REP.
YES
Print report for last adjustment
P5.2.13
SPECIAL
PRINTOUT
NONE
SPEC 1
SPEC 2
SPEC 3
SPEC 4
Placing one of the four special printouts on the
header
---------------------------------------------------Operating module Weighing
User Kern
Date 21.11.2013
Time 9:54:39
ID Balance 132051
----------------------------------------------------
17.1.2 Set header
Select P 5.2 and adjust the desired settings.
Print header example:
Printout example header:
ILJ-C/ILS-C-BA-e-1320 91
Page 92

P5.3.1
DATUM
YES
Print date of measurement
P5.3.2
TIME
YES
Print time of measurement
P5.3.3
USER
YES
Print name of logged-in user
P5.3.4
PRODUCT
YES
Print name of weighed product
P5.3.5
VARIABLE 1
YES
Print value of variable 1
P5.3.6
VARIABLE 1
YES
Print value of variable 2
P5.3.7
TARE
YES
Print tare value
P5.3.8
GROSS
YES
Print gross value
P5.3.9
CURRENT
RESULT
YES
Print net weight in current unit
P5.3.10
ADJUST.REP.
YES
Print report for last adjustment
P5.3.11
EMPTY LINE
YES
Print empty dividing line
P5.3.12
SPECIAL
PRINTOUT
NONE
SPEC 1
SPEC 2
SPEC 3
SPEC 4
Placing one of the four special printouts on the
header
--------------------------------------------------Date 21.11.2013
Time 9:54:39
User Kern
Product Flour
Tare 1000 g
Gross 2000 g
Current result 2000 g
----------------------------------------------------
17.1.3 Print measured result
You can adjust the settings that are to appear on the printout of the measured result.
Select P 5.3 GLP PRINTOUT and adjust the desired settings.
Example:
Printout example:
17.1.4 Adjust footer
You can adjust the settings to be printed on the footer.
Select P 5.3 and adjust the desired settings.
92 ILJ-C/ILS-C-BA-e-1320
Page 93

USER
10 different users
PRODUCTS
1000 different products
TARING
10 different packaging weights
WEIGHINGS
1000 measurements
ALIBI
100,000 measurements
Delete selected entry in data base
Add new entry to data base
18 Data bases
The weighing scale software contains three editable data bases (USER, PRODUCTS
and TARING) and two data bases (WEIGHING and ALIBI) in which all
measurements are stored.
Capacity of data bases:
Navigation in data bases USER, PRODUCTS and TARING:
18.1 Data base USER
The following data can be entered for each user:
NAME (30 characters), CODE (6 characters)
PASSWORD (8 characters, numerals only)
AUTHORISATIONS (USER, ADVANCED, ADMIN)
LANGUAGE (all languages available in the weighing scale)
Authorisation levels:
The software contains three authorisation levels (See chap. 10.2)
Add user name
ILJ-C/ILS-C-BA-e-1320 93
Page 94

N will be flashing
Use the arrow keys to enter user name
(example)
You have successfully entered a user
name.
A short line will appear
Use the arrow keys to enter the 6-digit
numeric code and confirm by pressing
PRINT.
For details on authorisation levels please see chap. 10.2
(example)
The code for this user is now saved in
the data base.
After entering the user name, enter the following additional data with respect to the
user:
Add user code (max 8 characters, numerals only)
94 ILJ-C/ILS-C-BA-e-1320
Page 95

A short line will appear
Use the arrow keys to enter the
password and confirm by pressing
PRINT.
The password for this user is now
stored in the data base.
User name will be flashing.
Use the arrow keys to select the
desired authorisation and confirm
by pressing PRINT.
For further details on authorisations see chap. 10.2
Authorisation as administrator has now
been assigned to the user.
Add user password (max 8 characters)
Setting authorisations for the user
ILJ-C/ILS-C-BA-e-1320 95
Page 96

The language set previously will be
flashing. Use the arrow keys to
select the desired language and
confirm by pressing PRINT.
(example)
The language has now been assigned
to the user.
Use the arrow key to select the user to
be deleted.
DELETE will appear.
Confirm with PRINT.
This indicates that the user has been
deleted.
Select menu language for user
After entering all data press UNIT to return to weighing mode.
For selecting users see chap. 10.1 Login/logout
Deleting a user
Select b4.1 as described above
After entering all data press UNIT to return to weighing mode.
96 ILJ-C/ILS-C-BA-e-1320
Page 97

NAME (30 characters)
CODE (6 characters)
EAN (16 characters)
MASS
According to accuracy of the weighing scale’s scale interval “d“
TARE
Weight of packaging for the product according to accuracy of the
weighing scale’s scale interval „d“
MIN
Lower threshold for operating mode CONTROL WEIGH, entry
according to accuracy of the weighing scale’s scale interval „d“
MAX
Upper threshold for operating mode CONTROL WEIGH, entry
according to accuracy of the weighing scale’s scale interval „d“
TOLERANCE
Threshold for tolerance on +/- for operating mode DOSING,
entry as target weight %
The previous setting will be
displayed.
NEW will be displayed. “N“ will be
flashing. Use the arrow keys to enter
the name for the product and confirm by
pressing PRINT.
(example)
You have now saved the new
product and name to the data base.
18.2 Data base products
The product data base can store up to 1000 products. You can create the following
data for every product:
Add product and assign product name
ILJ-C/ILS-C-BA-e-1320 97
Page 98

Select b4.2.1.2 CODE
An empty space will be
flashing.
Use the arrow keys to enter
the desired code for the
product and confirm by
pressing PRINT.
CODE 12345 (example) will be displayed and has been allocated to the product.
Select b4.2.1.3 EAN
An empty space will be
flashing.
Use the arrow keys to enter
the desired barcode for the
product and confirm by
pressing PRINT.
Barcode (example) will be displayed and has been allocated to the product.
Select b4.2.1.4 Weight
Presented 000000
Use the arrow keys to enter
the weight for the product and
confirm by pressing PRINT.
WEIGHT 1000.00 g (example) will be displayed and has been allocated to the product.
Select b4.2.1.5 TARE
Presented 000000
Use the arrow keys to enter
the weight of the packaging for
the product and confirm by
pressing PRINT.
TARE 200.00 g (example) will be displayed and has been allocated to the product.
Entering code for product
Entering EAN (barcode) for the product
Entering weight for product
Entering tare weight of packaging for product
98 ILJ-C/ILS-C-BA-e-1320
Page 99

Select b4.2.1.6 MIN
Presented 000000
Use the arrow keys to enter
the lower limit and confirm by
pressing PRINT.
MIN 200.00 g (example) will be displayed and has been allocated to the product.
Select b4.2.1.7 MAX
Presented 000000
Use the arrow keys to enter
the lower limit and confirm by
pressing PRINT.
MAX 1500.00 g (example) will be displayed and has been allocated to the product.
Select b4.2.1.8 MAX
Presented 000000
Use the arrow keys to enter
the threshold value and
confirm by pressing PRINT.
TOLERANCE 220.00 g (example) will be displayed and has been allocated to the
product.
Entering lower limit during control weigh
Entering upper limit during control weigh
Entering threshold value during dosage
ILJ-C/ILS-C-BA-e-1320 99
Page 100

NAME (30 characters)
TARE
Weight of packaging for the product according to accuracy of the
weighing scale’s scale interval „d“
The previous setting will be
displayed.
NEW will be displayed, N will be
flashing.
Use the arrow keys to enter name of
packaging and confirm by pressing
PRINT.
(example)
The new product has been saved
under its name to the data base. You
may immediately afterwards enter
the weight of the packaging.
Entering weight of packaging
Use the arrow keys to enter the tare
value and confirm by pressing
PRINT.
(example)
The weight value of the packaging
has been saved.
18.3 Data base Taring
This data base can store up to 10 different packaging weights. You can allocate the
following data to each packaging.
Add name of packaging
100 ILJ-C/ILS-C-BA-e-1320
 Loading...