

Page 1

Table of Contents
What is GCUHb Monitoring System for? .............................................................. 3
Important Information.............................................................................................................. 4
Items in the Package.................................................................................................................. 6
Items Need to be Purchased Separately .................................................................................. 6
Getting to Know GCUHb Blood Glucose/ Cholesterol/ Uric Acid /
Hemoglobin Multi-Function Monitoring System .................................................................... 7
Blood Glucose/ Cholesterol/ Uric Acid/ Hemoglobin Test Strips ...................... 7
Setting Up Your GCUHb Multi-Function Monitoring System ............................. 8
Setting Date and Time............................................................................................................. 8
Checking the Unit of Measurement....................................................................................... 9
Changing the Unit of Measurement ...................................................................................... 10
The Batteries Installation....................................................................................................... 10
Using Check Strip to Check the Meter.................................................................................. 11
Control Check with Glucose/ Cholesterol/ Uric Acid/ Hemoglobin Control Solutions 12
When to Run a Control Check with Glucose/ Cholesterol/ Uric Acid/ Hemoglobin Control Solutions?
12
Items You Need..................................................................................................................... 12
Steps for Running a Glucose Control Check ........................................................................ 12
Steps for Running a Cholesterol Control Check ................................................................... 14
Steps for Running a Uric Acid Control Check ....................................................................... 15
How to Read the Label on the Test Strip Vial?...................................................................... 19
Analyzing Your Control Results............................................................................................. 20
Blood Glucose/ Cholesterol/ Uric Acid/ Hemoglobin Testing ............................................. 21
......
Steps for Running a Hemoglobin Control Check .................................................................. 17
Page 2

Structure of Puncturer and Lancet ........................................................................................ 22
Steps for Using the Puncturer............................................................................................... 23
Testing Your Blood Glucose Level......................................................................................... 24
Understanding Your Blood Glucose Test Results.................................................................. 26
Testing Your Blood Cholesterol Level.................................................................................... 27
Understanding Your Blood Cholesterol Test Results............................................................. 29
Testing Your Blood Uric Acid Level........................................................................................ 30
Understanding Your Blood Uric Acid Test Results................................................................. 32
Using the Meter Memory.......................................................................................................... 36
Review the Stored Glucose Test Results.............................................................................. 36
Review the Stored Cholesterol Test Results......................................................................... 37
Review the Stored Uric Acid Test Results............................................................................. 37
Deleting the Stored Memory of Blood Glucose / Cholesterol / Uric Acid / Hemoglobin Test Results
39
Taking Care of Your Meter ....................................................................................................... 39
Maintaining the Meter............................................................................................................ 39
The Battery Replacement ..................................................................................................... 39
Cleaning the Meter................................................................................................................ 40
Troubleshooting Guide ............................................................................................................ 40
Specifications ........................................................................................................................... 46
Customer Services................................................................................................................... 48
Labeling and Information......................................................................................................... 48
Preparing the Puncturer (Lancing Device)............................................................................ 21
Items You Need..................................................................................................................... 21
Testing Your Blood Hemoglobin Level ................................................................................. 33
Understanding Your Blood Hemoglobin Test Results............................................................. 3
Review the Stored Hemoglobin Test Results............................................................................. 38
5
Page 3

What is GCUHb Monitoring System for?
The self-testing
GCUHb Blood Glucose/Cholesterol/Uric Acid/Hemoglobin
Multi-Function Monitoring System is designed for in vitro diagnostic use only
(external use only). The system is for healthcare professionals and persons with diabetes
or hypercholesterolemia or hyperuricemia to measure glucose, cholesterol and uric acid
values in fresh capillary wholeblood from finger stick quantitatively. Frequent monitoring of
whole blood glucose, cholesterol, uric acid and hemoglobin is an adjunct to the care of
persons with diabetes, hypercholesterolemia and hyperuricemia.Simply apply a drop of blood to the test
strip, the test result will be displayed on the screen after 10 seconds for glucose, 150 seconds
for cholesterol and 20 seconds for uric acid and 10 seconds for hemoglobin.
The
GCUHb Monitoring System is suitable for diabetes, hypercholesterolemia
and hyperuricemia management at home or professional use.
The GCUHb meter can only be used with
Blood Glucose, Cholesterol
,Uric Acid and Hemoglobin Test Strips. The use of any other test strips may give
incorrect results.
Before using the products to test your blood glucose, cholesterol ,uric acid and hemoglobin levels,
read all the instructions carefully. It includes all the information you need to know in order
to o get the accurate blood glucose, cholesterol and uric acid readings.
Do not change
your medical plan without doctor’s approval.The
GCUHb Monitoring
System should not be used for the diagnosis of diabetes, hypercholesterolemia and
hyperuricemia or for the test of newborns.
3
Page 4

Important Information
Blood specimens containing ascorbic acid (Vitamin C) greater than 5mg/dL, uric acid greater
than 20mg/dL, acetaminophen greater than 15mg/dL, L-Dopa greater than 1.25 mg/dL,
Dopamine greater than 3 mg/dL, Methyl-Dopa greater than 5 mg/dL, Glibenclimide greater
than 10 mg/dL, creatinine greater than 20 mg/dL and Billirubin greater than 20 mg/dL may
give inaccurate glucose results.
Blood specimens containing ascorbic acid (Vitamin C) greater than 5mg/dL, acetaminophen
greater than 15mg/dL, L-Dopa greater than 1.25 mg/dL, Dopamine greater than 3 mg/dL,
Methyl-Dopa greater than 5 mg/dL, Glibenclimide greater than 10 mg/dL, creatinine greater
than 20 mg/dL and Billirubin greater than 20 mg/dL may give inaccurate cholesterol results.
Blood specimens containing ascorbic acid (Vitamin C) greater than 5mg/dL, acetaminophen
greater than 15mg/dL, L-Dopa greater than 1.25 mg/dL, Dopamine greater than 3 mg/dL,
Methyl-Dopa greater than 5 mg/dL, Glibenclimide greater than 10 mg/dL, creatinine greater
than 20 mg/dL and Billirubin greater than 1.85 mg/dL may give inaccurate uric acid results.
Cholesterol up to 500 mg/dL or triglycerides up to 3000 mg/dL do not significantly affect
the glucose results. Grossly lipaemic patient samples have not been tested and are not
recommended for testing glucose level with the GCUHb Monitoring System.
Hematocrit (percentage of red blood cells in your blood) below 30% or higher than 55% was
found to cause a higher or lower reading, respectively. No significant effect on the reading
was found for hematocrits in the blood sample between 30% and 55%.
4
Page 5

The monitoring system will not work properly at altitudes greater than 8,000 feet.
The System is designed to use at temperatures between 57.2°F and 104°F (14°C and 40°C)
and below 85% of relative humidity. If you use the system outside the proposed conditions, it
can give false results.
Be sure to store the test strips between 40°F and 86°F (4°C and 30°C) and avoid direct
sunlight.
Be sure to follow your local regulations for proper disposal of used test strips and lancets.
Do not use this meter in a dry environment, especially if synthetic materials are present.
Synthetic clothes, carpets, etc., may cause damaging static discharges in a dry environment.
Do not use this meter near cellular or cordless telephones, walkie talkies, garage door
openers, radio transmitters, or other electrical or electronical equipment that are sources of
electromagnetic radiation, as these may interfere with the proper operation of the meter.
5
Page 6

Items in the Package
GCUHb Meter
GCUHb User’s Manual
Puncturer (lancing device)
Log Book
Lancets
Check Strip
Wallet
Two AAA Batteries
6
Items Need to be Purchased Separately
Blood Glucose, Cholesterol, Uric Acid and Hemoglobin Test Strips
(comes with a code key)
Glucose/Cholesterol/Uric Acid Control Solutions (normal).
(3 ml for glucose and uric acid;1 ml for cholesterol and 1 ml for Hemoglobin)
Page 7

Getting to Know GCUHb Blood Glucose/ Cholesterol/
Uric Acid / Hemoglobin Multi-Function Monitoring System
mmol/L( mol/L))
Blood Glucose/ Cholesterol/ Uric Acid/ Hemoglobin Test Strips
5 mm
Sample target area
Sample target area
Strip handle
(You may touch here)
(You may apply your
blood on either side
of the sample target
area.)
Contact bars(Insert this
end to the test strip slot
on the meter)
Target area
(You must fill the
whole white area
with blood)
Sample target area
Sample target area
Strip handle
(You may touch here)
(You may apply your
blood on either side
of the sample target
area.)
Contact bars(Insert this
end to the test strip slot
on the meter)
Target area
(You must fill the
whole black area
with blood)
Sample target area
Sample target area
Strip handle
(You may touch here)
(You may apply your
blood on either side
of the sample target
area.)
Contact bars(Insert this
end to the test strip slot
on the meter)
Target area
(You must fill the
whole yellow area
with blood)
Sample target area
Strip handle
(You may touch here)
Contact bars(Insert this
end to the test strip slot
on the meter)
Target area
(You must fill the
whole white area
with blood)
Hemoglobin
(g/dL)
7
Page 8

Setting Up Your GCUHb Multi-Function Monitoring
System Setting Date and Time
NOTE:
When you install the batteries into the meter every time or replace the batteries, the meter
will enter setting mode automatically. You can set correct time and date before you begin
testing.
6. When you finish
setting,the meter
will turn off
automatically in
30 seconds.
1. The meter will automaticallyenterthe
setting mode after you install the batteries.
8
3. Press “S” button to
obtain correct month.
4. Press “M” button to confirm th e
month setting and shift to the date setting.
5. Repeat the same steps to set
the date,hour and minute.
2. The month will flash.
Page 9

Checking the Unit of Measurement
Before you get started…
GCUHb meter can measure your blood glucose and cholesterol in metric unit, mmol/L
or milligrams per deciliter, mg/dL;
GCUHb meter can measure your uric acid in metric
unit, μmol/L or milligrams per deciliter, mg/dL.
GCUHb meter can measuse your
hemoglobin in metric unit,mmol/L or grams per deciliter,g/dL.You should check this setting every
time you put batteries into your meter.
Ensure that unit changing switch is in the “down” position to read unit in mg/dL(g/dL).
In the “down” position, the switch has been pushed toward the middle of the battery
compartment.
NOTE:
The unit of blood glucose and cholesterol test results displayed on the screen is either mg/dL
or mmol/L, depending on which unit of measurement you have selected. The mmol/L results
always include a decimal point; mg/dL results do not include a decimal point.
The unit of blood uric acid test result displayed on the screen is either mg/dL or μmol/L,
depending on which unit of measurement you have selected. The mg/dL results always
include a decimal point; μmol/L results do not include a decimal point.
The unit of blood hemoglobin test results displayed on the screen is either g/dL or mmol/L,
depending on which unit of measurement you have selected. The mmol/L results always include
a decimal point; g/dL results do not include a decimal point.
9
Page 10

3. Insert batteries and slide battery cover back.
The Batteries Installation
NOTE:
Your meter comes with two AAA size batteries (1.5V).
Changing the Unit of Measurement
1. Slide battery cover off the back of the meter and remove batteries.
2.
There is a unit-changing switch in battery compartment. Use a screwdriver to adjust the
switch.If you push it up,the glucose,cholesterol and hemoglobin unit changes to mmol/L;
the uric acid unit changes from mg/dL to μmol/L. If you pull it down, the glucose, cholesterol
and uric acid unit is mg/dL ; the hemoglobin unit is g/dL.
10
Page 11

1. Slide battery cover off from the back of the meter.
2. Insert two AAA size batteries (1.5V) into battery slot.
3. Slide battery cover back.
CAUTIONS:
◎
Make sure the “+” and “-“ ends of the batteries match the marks in the battery
compartment.
◎
Always replace both batteries at same time. Both batteries should be the same brand.
Using Check Strip to Check the Meter
You would need to use the check strip to check the meter when
You use GCUHb Monitoring System for the first time.
You drop the meter.
You think there is something wrong with the results you got and you want to check whether
meter and test strips are working correctly or not.
1. Insert the check strip into the test strip slot on the meter.
2.
The screen should display ”OK”. If “X” appears on the screen, remove the check
strip and reinsert it. If “X”displays again, stop the test and
call our customer
support.
OK
11
Page 12

Glucose control solution
.
Steps for Running a Glucose Control Check
CAUTIONS:
◎
Always check the glucose code key number to make sure it matches the number labeled
on the test strip vial when you run a glucose control test. Otherwise you may get incorrect
results.
◎
Always write down the opening date of your vial and test strip vial
Both of them are good for only 3 months after first opening or until the expiration date,
whichever comes first.
Control Check with Glucose/ Cholesterol/ Uric Acid/ Hemoglobin Control Solutions
When to Run a Control Check with Glucose/ Cholesterol/ Uric Acid
/ Hemoglobin Control Solutions?
You think there is something wrong with the glucose, cholesterol , uric acid or h emo glo bin
measurement you got and you want to check whether meter and test strips are working correctly.
Items You Need
Glucose/ Cholesterol/ Uric Acid / Hemoglobin Control Solutions
GCUHb Meter
Blood Glucose Test Strips
Blood Cholesterol Test Strips
Blood Uric Acid Test Strips
Glucose/ Cholesterol/ Uric Acid/ Hemoglobin Code Keys in the test strips box
◎
The result will be stored in memory and appear just like the blood glucose result.
Blood Hemoglobin Test Strips
12
Page 13

1.Insert the code key come with the glucose test strips into
the code key slot on the back of the meter.
2. Take one strip from the vial. Close the vial quickly.
3. Insert the test strip into the test strip slot on the meter. The
, then the blood
Glu
Code
6005
Cautions:
Make sure that the code number shown on the screen is the same as the code number
printed on the glucose test strip vial, otherwise you may get incorrect measurement.
4.
Hold the glucose control solution bottle upside down, slowly squeeze the
bottle to form a small drop, discard the first drop of the solution, let the
second drop touch the edge of the sample target area on the test strip.
The control solution will be drawn into the reaction zone automatically.
5.
You will hear a “Beep” sound. Close the cap of the control solution
immediately. The meter starts to count down 10 seconds then show
your result on the screen.
6. Check if the displayed glucose value falls within
the acceptable range shown on the test strip vial.
7. Remove the test strip from the meter and discard it.
Glu
pm
pm
mg/dL
Glu
80
symbol along with date
.
Glu
pm
meter will first display code number
p
m
G
l
u
13
Page 14

Cautions:
Make sure that the code number shown on the screen is the same as the code number
printed on the Cholesterol test strip vial, otherwise you may get incorrect measurement.
1.
2.
3.
Steps for Running a Cholesterol Control Check
CAUTIONS:
Always check the Cholesterol code key number to make sure it matches the number
labeled on the test strip vial when you run a Cholesterol control test. Otherwise you may
get incorrect results.
Always write down the opening date of your Cholesterol control solution vial and test strip
vial. Both of them are good for only 2 months after first opening or until the expiration date,
whichever comes first.
The result will be stored in memory and appear just like the blood cholesterol result.
Insert the cholesterol code key into the code key slot on the back of the meter.
Take one strip from the vial. Close the vial quickly.
Insert the test strip into the test strip slot on the meter.
Themeter will first display code number ,
then the bloodsymbol along with date
.
CHOL
Code
9005
CHOL
pm
14
Page 15

Steps for Running a Uric Acid Control Check
CAUTIONS:
Always check the Uric Acid code key number to make sure it matches the number labeled
on the test strip vial when you run a Uric Acid control test. Otherwise you may get incorrect
results.
Always write down the opening date of your Uric Acid control solution vial and test strip vial.
Both of them are good for only 2 months after first opening or until the expiration date,
whichever comes first.
The result will be stored in memory and appear just like the blood uric acid result.
4.
Hold the Cholesterol control solution bottle upside down,slowly
squeeze the bottle to form a small drop, discard the first drop of the
solution, let the second drop touch the edge of the sample target area
on the test strip.The control solution will be drawn into the reaction zone
automatically.
5.
You will hear a “Beep” sound. Close the cap of the control solution
immediately.The meter starts to count down 150 seconds then show
your result on the screen.
6.
Check if the displayed cholesterol value falls within the
acceptable range shown on the test strip vial.
7.
Remove the test strip from the meter and discard it.
CHOL
pm
pm
mg/dL
CHOL
p
m
C
H
O
L
15
Page 16

8
5 50
1. Insert the uric acid code key into the code key slot on the back of the meter.
2.
Take one strip from the vial. Close the vial quickly.
3.
Insert the test strip into the test strip slot on the meter.
The meter will first display code number
,
UA
8004
then the blood symbol along with date
.
UA
Cautions:
Make sure that the code number shown on the screen is the same as the code number
printed on the Uric Acid test strip vial, otherwise you may get incorrect measurement.
4.
Hold the Uric Acid control solution bottle upside down, slowly squeeze the
bottle to form a small drop, discard the first drop of the solution, let the second
drop touch the edge of the sample target area on the test strip. The control
solution will be drawn into the reaction zone automatically.
5.
You will hear a “Beep” sound. Close the cap of the control solution
immediately. The meter starts to count down 20 seconds then show
your result on the screen.
6.
Check if the displayed uric acid value falls within the
acceptable range shown on the test strip vial.
7.
Remove the test strip from the meter and discard it.
UA
8
55
5.6
0
20
UA
8
55 0
p
m
U
A
16
Page 17

Cautions:
Make sure that the code number shown on the screen is the same as the code number
printed on the Hemoglobin test strip vial, otherwise you may get incorrect measurement.
1.
2.
3.
Steps for Running a Hemoglobin Control Check
CAUTIONS:
Always check the Hemoglobin code key number to make sure it matches the number
labeled on the test strip vial when you run a Hemoglobin control test. Otherwise you may
get incorrect results.
Always write down the opening date of your
Hemoglobin control
solution vial and test strip
vial. Both of them are good for only 2 months after first opening or until the expiration date,
whichever comes first.
The result will be stored in memory and appear just like the blood cholesterol result.
Insert the hemoglobin code key into the code key slot on the back of the meter.
Take one strip from the vial. Close the vial quickly.
Insert the test strip into the test strip slot on the meter.
The meter will first display code number ,
then the blood symbol along with date
.
Hb
Code
8702
Hb
pm
17
Page 18

4.
Hold the Hemoglobin control solution bottle upside down,slowly
squeeze the bottle to form a small drop, discard the first drop of the
solution, let the second drop touch the edge of the sample target area
on the test strip.The control solution will be drawn into the reaction zone
automatically.
5.
You will hear a “Beep” sound. Close the cap of the control solution
immediately.The meter starts to count down 10 seconds then show
your result on the screen.
6.
Check if the displayed
Hemoglobin
value falls within
the
acceptable range shown on the test strip vial.
7.
Remove the test strip from the meter and discard it.
Hb
pm
pm
g/dL
Hb
p
m
H
b
18
Page 19
SH101-25
Hemoglobin
Lot.NO:GS50810A
Control(N):3-6 mg/dL
Control(H
Exp. Date:2007/03
(Example)
19
3026
Lot.NO:GS50810A
Control(N):3-6 mg/dL
Control(H):7.8-11.3 mg/dL
Exp. Date:2007/03
(Example)
Code number of this lot
of test strip
The measured Glucose
level using the control
solution should fall within
the specified ranges.
Expiry date YYYY/MM
You should fill in the
opening date here.
8004
Lot.NO:GS50810A
Control(N):3-6 mg/dL
Control(H):7.8-11.3 mg/dL
Exp. Date:2007/03
(Example)
Code number of this lot
of test strip
The measured Uric Acid
level using the control
solution should fall within
the specified ranges.
Expiry date YYYY/MM
You should fill in the
opening date here.
9006
Lot.NO:GS50810A
Control(N):3-6 mg/dL
Control(H):7.8-11.3 mg/dL
Exp. Date:2007/03
(Example)
Code number of this lot
of test strip
The measured Cholesterol
level using the control
solution should fall within
the specified ranges.
Expiry date YYYY/MM
You should fill in the
opening date here.
8702
):7.8-11.3 mg/dL
Code number of this lot
of test strip
The measured Hemoglobin
level using the control
solution should fall within
the specified ranges.
Expiry date YYYY/MM
You should fill in the
opening date here.
Page 20

Analyzing Your Control Results
You will find the acceptable range of glucose, cholesterol, uric acid and hemoglobin levels for
the normal and high controls on the test strip vial label.
If your control results fall within the acceptable range, you can begin to test your blood glucose,
cholesterol ,uric acid or hemoglobin levels.
If your control results are not within the acceptable range, check the following items:
Are your glucose/ cholesterol/ uric acid /hemoglobin test strips or control solutions expired?
Have you ever forgotten to close your glucose/ cholesterol/ uric acid/hemoglobin test strip
vials or control solution bottles?
Does the code in the meter match the code on the test strip vial?
Do you follow all the operation instruction correctly?
Repeat the control test with a new test strip, following the steps exactly.
CAUTION:
If you continue to receive control values that are outside of the accepted range,
discontinue your blood testing and contact Customer Service or your healthcare
provider immediately.
20
Page 21

Blood Glucose/ Cholesterol/ Uric Acid / Hemoglobin Testing
Items You Need
GCUHb Meter
Blood Glucose Test Strips
Blood Cholesterol Test Strips
Blood Uric Acid Test Strips
Glucose Code Key (green color) in the glucose test strips box
Cholesterol Code Key (blue color) in the cholesterol test strips box
Uric Acid Code Key (orange color) in the uric acid test strips box
Puncturer
Lancets
Alcohol Swab (not included)
Log Book
Preparing the Puncturer (Lancing Device)
NOTE:
To increase blood flow: warm fingers using warm water to wash hands, hang down arm.
Blood Hemoglobin Test Strips
Hemoglobin Code Key (pink color) in the hemoglobin test strips box
21
Page 22

CAUTIONS:
◎
For safety and to prevent cross-contamination, always place the protective cover back
before discarding the used lancets.
◎
To avoid infection, you should-
- Never reuse the lancets.
- Never share your puncturer with others.
- Use an alcohol pad to wipe off blood from puncturer’s tip.
◎
To avoid accidental injury, do not leave a lancet in the puncturer. Always remove the used
lancet immediately after a test.
Structure of Puncturer and Lancet
22
Page 23

Steps for Using the Puncturer
1
4
1. Unscrew and remove the puncturer’s
adjustable tip.
2. Insert a lancet into the carrier.
3. Twist off the protective cover.
4. Replace the adjustable tip tightly.
Choose a desired skin penetration
depth by rotating the top portion of the
adjustable tip until the setting number
lines up to the arrow. Settings are
based on skin type:
Depth 1~2: for soft or thin skin
Depth 3: for average skin
Depth 4~5: for thick or calloused skin
5. Hold the tip of the puncturer with one
hand and pull the sliding barrel with
the other hand. When a click is felt, the
trigger rises up. Release the sliding
barrel, it will move back to its original
position.
2
5-1
3
5-2
23
Page 24

Testing Your Blood Glucose Level
CAUTIONS:
You can only use blood glucose test strips and check strip on
GCUHb meter.
1.
When you first time use the
GCUHb meter or open a new test strip
vial, insert the code key from the test strip vial. Each test strip vial contains
one code key. Make sure the number on the code key matches the code
number on the vial of test strips you use.
2. Take one strip from the vial. Close the vial quickly.
Cautions:
The test strips can be damaged when they are not capped and stored properly.
3.
Insert the test strip into the test strip slot on the meter. The meter will first
display code number, then the blood symbol along with date.
4.
5. Place the puncturer on your finger.
When the screen shows blood symbol , clean your finger with
alcohol swab. Let it dry completely.
24
Page 25
NOTE:
The best puncture site is on the side of fingertip, because it has the best blood supply.
6. Press the trigger on the puncturer.
7. Lift up the puncturer.
8. Get a drop of blood.
9.
Put the drop of blood on one side or the other side of the test strip target
area. The blood will be absorbed and cause the target area to turn red. The
testing reaction starts when the meter beeps. The meter starts to count down
10 seconds then show your result on the screen. The meter stores your result
in its memory automatically.
NOTE:
How much blood should be applied?
Although only a small amount of blood is needed,it is very important that
you put enough blood on your test strip so that the entire reaction zone is
covered with blood. This ensures that your meter can give accurate and reliable
results.
Cautions:
If you don’t apply enough blood, you need to use a new test strip to do the test again.
10.
In about 10 seconds, the screen will display measured glucose value.
Record the glucose value in your log book.
25
Page 26

11.
Pull the test strip out of the meter. The meter will turn off by itself.
12. Unscrew the adjustable tip of the puncturer.
13. Put the protective cover of the lancet back on the lancet.
Grip the puncturer holder firmly and pull the lancet out.
14.
Discard the used lancet in an appropriate container with a lid.
15. Screw the adjustable tip back on the puncturer.
CAUTIONS:
To avoid accidental injury, do not leave used lancet in the puncturer. Always remove the used
lancet immediately after each test.
Be sure to follow your local regulations for proper disposal of used test strips and lancets.
Understanding Your Blood Glucose Test Results
According to the suggestions of American Diabetes Association:
Normal fasting blood glucose is 70~104 mg/dL. (3.9~5.8 mmol/L)
However, the above range is just a reference, and it may not apply for every person.
Consult your doctor for the appropriate range for you.
26
Page 27

Testing Your Blood Cholesterol Level
CAUTIONS:
You can only use blood cholesterol test strips and check strip on
GCUHb
meter.
1.
When you first time use the
GCUHb meter or open a new test strip
vial, insert the code key from the test strip vial. Each test strip vial contains
one code key. Make sure the number on the code key matches the code
number on the vial of test strips you use.
2. Take one strip from the vial. Close the vial quickly.
Cautions:
The test strips can be damaged when they are not capped and stored properly.
3.
Insert the test strip into the test strip slot on the meter. The meter will first
display code number, then the blood symbol along with date.
4.
5. Place the puncturer on your finger.
NOTE:
The best puncture site is on the side of fingertip, because it has the best blood supply.
When the screen shows blood symbol , clean your finger with
alcohol swab. Let it dry completely.
27
Page 28

6. Press the trigger on the puncturer.
7. Lift up the puncturer.
8. Get a drop of blood.
9. Put the drop of blood on one side or the other side of the test strip target area. The blood
will be absorbed and cause the target area to turn red. The testing reaction starts when the
meter beeps. The meter will start to count down 150 seconds then show your result on
the screen. The meter stores your result in its memory automatically.
NOTE:
How much blood should be applied?
Although only a small amount of blood is needed,
it is very important that you put enough blood on your
test strip so that the entire reaction zone is covered
with blood. This ensures that your meter can give
accurate and reliable results.
Example:
The blood volume needed in cholesterol test is more than that in glucose test. You need to apply
15μl blood sample in cholesterol test and 4μl blood sample in glucose test.
15 l
4 l
28
Page 29

Cautions:
If you don’t apply enough blood, You might need to use a new test strip to do the test again.
10.
11.
12.
13.
In about 150 seconds, the screen will display measured cholesterol value. Record the
cholesterol value in your log book.
Pull the test strip out of the meter. The meter will turn off by itself
Unscrew the adjustable tip of the puncturer.
Put the protective cover of the lancet back on the lancet.
Grip the puncturer holder firmly and pull the lancet out.
14. Discard the used lancet in an appropriate container with a lid.
15. Screw the adjustable tip back on the puncturer.
Cautions:
To avoid accidental injury, do not leave used lancet in the puncturer.
Always remove the used lancet immediately after each test.
Be sure to follow your local regulations for proper disposal of used
test strips and lancets.
Understanding Your Blood Cholesterol Test Results
Normal fasting blood cholesterol is below 200 mg/dL.(5.2mmol/L)
However, the above range is just a reference, and it may not apply for every person.
Consult your doctor for the appropriate range for you.
29
Page 30

Testing Your Blood Uric Acid Level
CAUTIONS:
You can only use blood uric acid test strips and check strip on GCUHb meter.
1.
When you first time use the
GCUHb meter or open a new test strip
vial, insert the code key from the test strip vial. Each test strip vial contains
one code key. Make sure the number on the code key matches the code
number on the vial of test strips you use.
2. Take one strip from the vial. Close the vial quickly.
Cautions:
The test strips can be damaged when they are not capped and stored properly.
3.
Insert the test strip into the test strip slot on the meter.The meter will first
display code number, then the blood symbol along with date.
4.
5. Place the puncturer on your finger.
When the screen shows blood symbol
, clean your finger with
alcohol swab. Let it dry completely.
30
Page 31

NOTE:
The best puncture site is on the side of fingertip, because it has the best blood supply.
6. Press the trigger on the puncturer.
7. Lift up the puncturer.
8. Get a drop of blood.
9.
Put the drop of blood on one side or the other side
of the test strip target area. The blood will be absorbed
and cause the target area to turn red. The testing reaction
starts when the meter beeps. The meter will start to
count down 20 seconds then show your result on the screen.
The meter
stores your result in its memory automatically.
NOTE:
How much blood should be applied?
Although only a small amount of blood is needed, it is very important
that you put enough blood on your test strip so that the entire reaction zone
is covered with blood. This ensures that your meter can give accurate and
reliable results.
Cautions:
If you don’t apply enough blood, You might need to use a new test strip to do the test again.
10. In about 20 seconds, the screen will display measured uric acid value.
Record the uric acid value in your log book.
31
Page 32

11.
Pull the test strip out of the meter. The meter will turn off by itself.
12. Unscrew the adjustable tip of the puncturer.
13.
Put the protective cover of the lancet back on the lancet.
Grip the puncturer holder firmly and pull the lancet out.
14.
Discard the used lancet in an appropriate container with a lid.
15. Screw the adjustable tip back on the puncturer.
CAUTIONS:
To avoid accidental injury, do not leave used lancet in the puncturer. Always remove the used
lancet immediately after each test.
Be sure to follow your local regulations for proper disposal of used test strips and lancets.
Understanding Your Blood Uric Acid Test Results
The expected blood uric acid value is as following:
Male:3~7.2 mg/dL(179~428μmol/L
)
Female:2~6 mg/dL(119~357μmol/L
)
However, the above range is just a reference, and it may not apply for every person.
Consult your doctor for the appropriate range for you.
32
Page 33

Testing Your Blood Hemoglobin Level
CAUTIONS:
You can only use blood hemoglobin test strips and check strip on
GCUHb meter.
1.
When you first time use the
GCUHb meter or open a new test strip
vial, insert the code key from the test strip vial. Each test strip vial contains
one code key. Make sure the number on the code key matches the code
number on the vial of test strips you use.
2. Take one strip from the vial. Close the vial quickly.
Cautions:
The test strips can be damaged when they are not capped and stored properly.
3.
Insert the test strip into the test strip slot on the meter.The meter will first
display code number, then the blood symbol along with date.
4.
5. Place the puncturer on your finger.
When the screen shows blood symbol
, clean your finger with
alcohol swab. Let it dry completely.
Hb
Hb
33
8702
Page 34

NOTE:
The best puncture site is on the side of fingertip, because it has the best blood supply.
6.
Press the trigger on the puncture
r
.
7. Lift up the puncture
r
.
8.
Get a drop of blood.
9.
P
u
t
t
h
e
dro
p
o
f
bloo
d
o
n
on
e
s
id
e
o
r
t
h
e o
t
he
r
s
id
e
o
f
th
e test
strip
target
area.
The
blood
will
be
absorbed
and
cause the
target
area
to
turn
red.
The
testing
reaction
starts
when
t
h
e
m
e
t
e
r
bee
ps.
T
h
e
m
e
t
e
r
wil
l
st
a
r
t
to
c
ou
n
t
dow
n
2
0
s
ec
on
d
s
t
he
n
s
ho
w
y
ou
r
r
e
s
u
l
t
o
n
t
h
e
s
c
ree
n
.
T
he
m
e
t
e
r
stores your result in its memory automaticall
y.
NOTE:
How much blood should be applied?
A
lthoug
h
onl
y
a
small
amou
n
t
o
f
bloo
d
is
neede
d
,
it
is
ve
r
y
impo
r
t
an
t
th
a
t
y
o
u
p
u
t
enoug
h
bloo
d
o
n
you
r
t
e
s
t
s
t
ri
p
s
o
th
a
t the
entire
reaction
zone
is
covered
with
blood.
This ensures
that your meter can give accurate and
reliable results.
Cautions:
I
f
y
o
u
don
’
t appl
y
enoug
h
bloo
d
, Y
o
u might need to use a new test strip to do the test again.
10.
In
about
10
seconds,
the
screen
will
display
measured
hemoglobin value.
Record the hemoglobin value in your log book.
Hb
Hb
Hb
20
34
Page 35

11.
Pull the test strip out of the meter. The meter will turn off by itself.
12. Unscrew the adjustable tip of the puncturer.
13.
Put the protective cover of the lancet back on the lancet.
Grip the puncturer holder firmly and pull the lancet out.
14.
Discard the used lancet in an appropriate container with a lid.
15. Screw the adjustable tip back on the puncturer.
CAUTIONS:
To avoid accidental injury, do not leave used lancet in the puncturer. Always remove the used
lancet immediately after each test.
Be sure to follow your local regulations for proper disposal of used test strips and lancets.
Understanding Your Blood Hemoglobin Test Results
The expected blood hemoglobin value is as following:
Male:14~17 g/dL
(
8.68~10.55 mmol/L
)
Female:12~16 g/dL(7.44~9.92 mmol/L
)
However, the above range is just a reference, and it may not apply for every person.
Consult your doctor for the appropriate range for you.
35
Page 36
Using the Meter Memory
GCUHb
meter can automatically store 200 glucose, 50 cholesterol ,50 hemoglobin
and 50 uric acid most recent test results. You can review the test results in order from the newest
to the oldest. If the memory is full, the oldest result is deleted as the newest result is added.
The memory is not affected by replacing / removing the batteries.
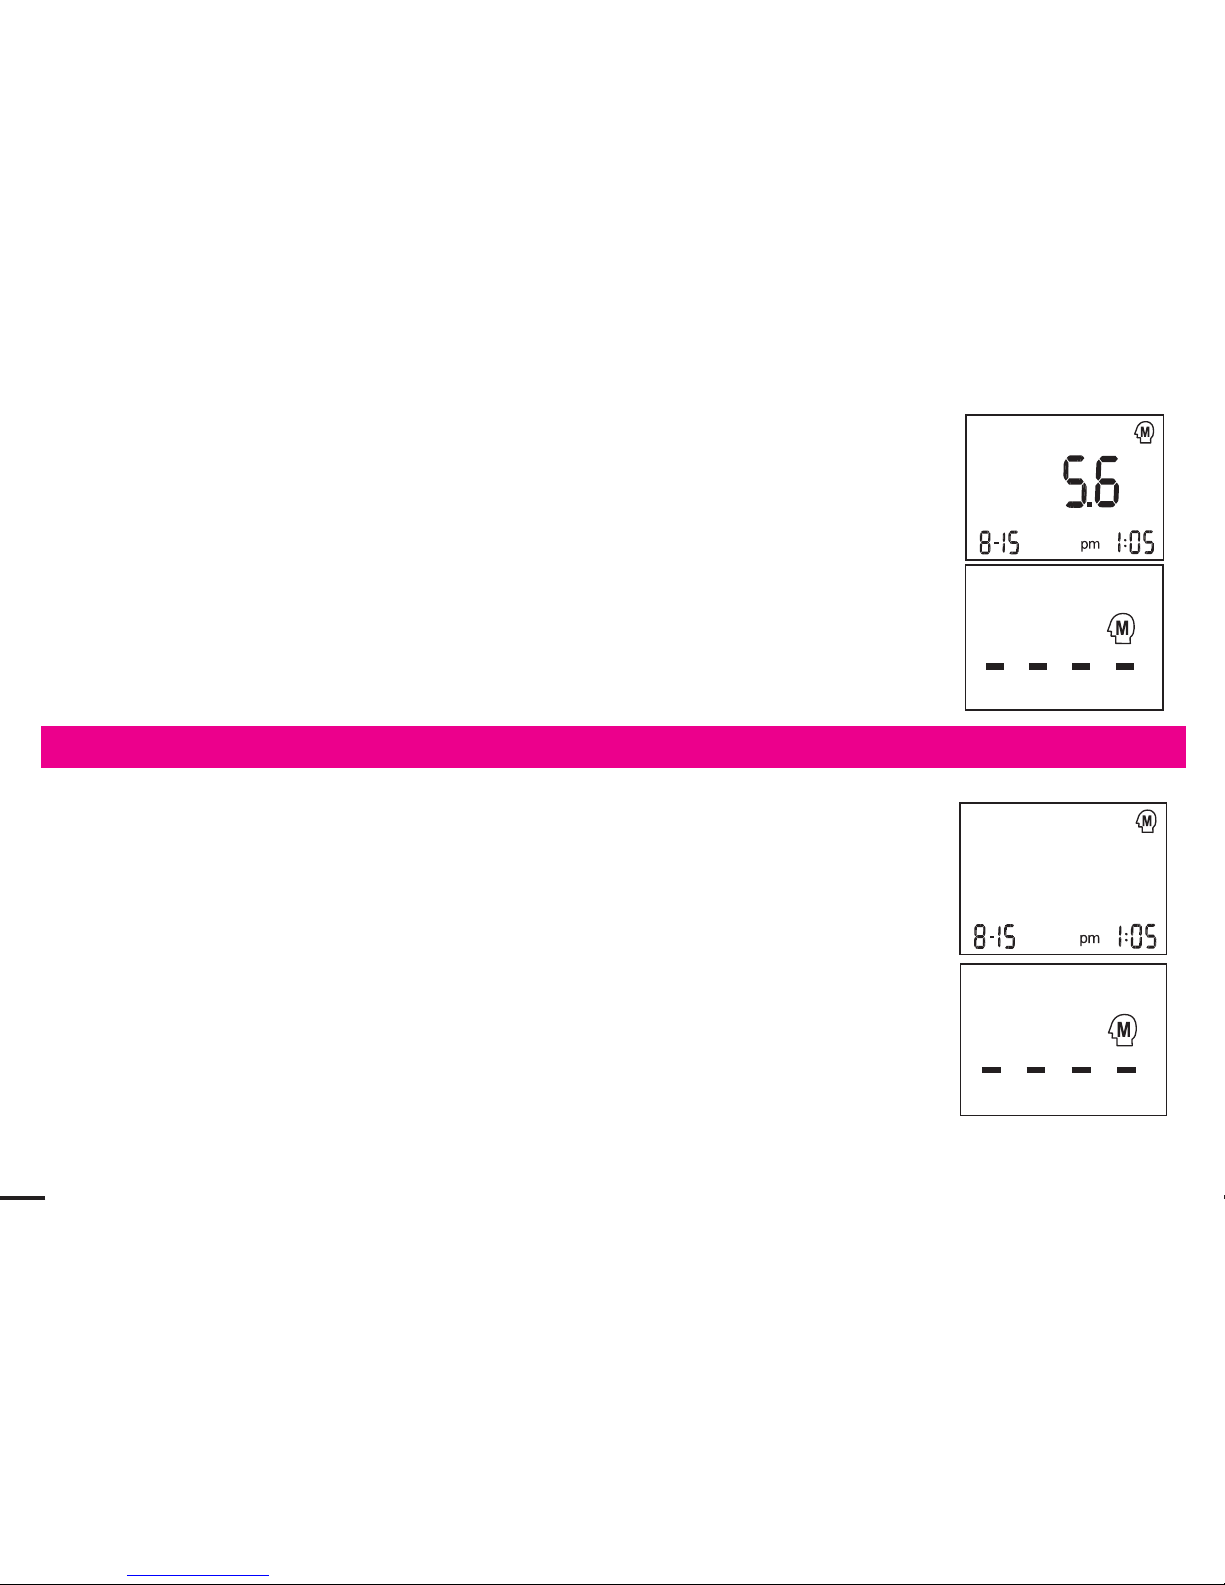
Review the Stored Glucose Test Results
1. Insert the glucose code key (green color) into the code key slot on the meter.
2.
Pressing the “M” button,the 7-day average,14-day average and 28-day average will be
displayed on the screen in order.
80
Glu
mg/dL
DAY
AVG
mg/dL
DAY
AVG
85
Glu
mg/dL
DAY
AVG
86
Glu
3.
After the 28-day average, the newest blood glucose test result with date will be displayed
via pressing the “M” button.
4.
The stored results with date are displayed in order from the most recent to the oldest via pressing
the “M” button. The meter will turn off automatically in 3 seconds when the symbol “----”
is displayed on the screen.
mg/dL
pm
84
Glu
36
Page 37
5.
If you decide to stop checking the results, stop pressing the “M” button. The
meter will turn off automatically in 30 seconds or via pressing “S” button.
6.
No test can be performed when you are checking the stored results. If you
wish to perform a new test, please turn off the meter first and restart the
steps described in the section
【Blood Glucose/ Cholesterol/ Uric Acid/ Hemoglobin Testing】.
Glu
Review the Stored Cholesterol Test Results
1. Insert the cholesterol code key (blue color) into the code key slot
on the meter.
m
g
/
d
L
p
m
C
HO
L
C
H
O
L
2.
The stored results with date are displayed in order from the most recent to the
oldest via pressing the “M” button.The meter will turn off automatically in
3 seconds when the symbol “----” is displayed on the screen.
3.
If you decide to stop checking the results, stop pressing the “M” button.
The meter will turn off automatically in 30 seconds or via pressing “S” button.
4.
No test can be performed when you are checking the stored results. If you
wish to perform a new test, please turn off the meter first and restart the steps
described in the section
【Blood Glucose/Cholesterol/Uric Acid/Hemoglobin Testing 】.
Review the Stored Uric Acid Test Results
1.insert the uric acid code key (orange color) into the code key slot on the meter.
37
Page 38
Review the Stored Hemoglobin Test Results
1.
insert the hemoglobin code key (pink color) into the code key slot on
the meter.
g/dL
Hb
2.3.The stored results with date are displayed in order from the most recent
to the oldest via pressing the “M” button. The meter will turn off automatically
in 3 seconds when the symbol “----” is displayed on the screen.
If you decide to stop checking the results, stop pressing the “M” button. The
meter will turn off automatically in 30 seconds o via pressing “S” buttonr.
Hb
4.
No test can be performed when you are checking the stored results. If you
wish to perform a new test, please turn off the meter first and restart the
steps described in the section【Blood Glucose/Cholesterol/ Uric Acid/
Hemoglobin Testing】.
mg/dL
UA
2.3.The stored results with date are displayed in order from the most recent
to the oldest via pressing the “M” button. The meter will turn off automatically
in 3 seconds when the symbol “----” is displayed on the screen.
If you decide to stop checking the results, stop pressing the “M” button. The
meter will turn off automatically in 30 seconds o via pressing “S” buttonr.
UA
4.
No test can be performed when you are checking the stored results. If you
wish to perform a new test, please turn off the meter first and restart the
steps described in the section【Blood Glucose/Cholesterol/ Uric Acid/
Hemoglobin Testing】.
38
20
Page 39

Taking Care of Your Meter
Maintaining the Meter
Do not drop, hit or smash your meter.
Keep your meter between
14°F and 140°F (-10°C and 60°C) and below 95% of relative
humidity. Do not store meter in areas such as the kitchen, bathroom, laundry room or car.
Keep the meter away from water.
Do not use glass/household-cleaning solutions to clean the meter. Simply use an alcohol
pad to wipe the surface of the meter, but do not wipe the test strip slot or code key slot.
Do not disassemble the meter.
If you have any questions, please contact Customer Service or your healthcare provider.
The Battery Replacement
When the symbol” ” is displayed on the screen, please replace batteries immediately.
1. Slide battery cover off from the back of the meter.
2. Remove old batteries and insert 2 new AAA size batteries (1
.5V) into the battery compartment.
1. When the newest blood g l uco se/ c ho l est ero l / uric acid/hemoglobin test result is displayed
,press “S” button for 3 seconds.The newest blood g l uc o se/ cho l est ero l /uric acid/
hemoglobin test result is deleted as soon as you hear the “Beep” sound from the meter.
2.
The stored results can be deleted in order from the most recent to the oldest via press “S”
button for 3 seconds.
3.
If you decide to stop deleting the results, stop pressing the “S” button.The meter can
automatically turn off in 30 seconds.
Deleting the Stored Memory of Blood Glucose/Cholesterol/Uric Acid/Hemoglobin Test Results
39
Page 40

3. Slide battery cover back and turn on your meter.
Cleaning the Meter
You can clean your meter with 70% isopropyl alcohol swab
CAUTIONS:
◎
Do Not spray any cleaning solution directly onto the meter.
◎
Do Not dampen the code key slot or the test strip slot.
◎
Do Not soak the meter in liquid.
Troubleshooting Guide
SYMBOL WHAT IT MEANS ACTION
This is the code number stored
in the meter.
Make sure that this code
number matches the code
number on the vial of the test
strips you are using.
The system is ready to measure
your glucose/cholesterol/uric
acid /hemoglobin level.
You may now apply the blood
sample.
Glu
code
6005
code
9005
CHOL
code
8004
UA
pm
Glu
pm
CHOL
pm
UA
code
8702
Hb
pm
Hb
40
Page 41

The battery power is low. Replace new batteries.
“LO” flashes 5 times before the
meter turning off automatically.
The batteries are dead.
LO
LO
pm
The environmental temperature
is too low to perform a test.
“LO” flashes 5 times.
Repeat the test in a warm place
about 57.2°F~104°F (14°C~40°C).
You may need to wait as long
as 20 minutes for the meter to
warm up before testing again.
The environmental temperature
is too high to perform a test.
“HI” flashes 5 times.
Repeat the test in a cool place
about
57.2°F~104°F (14°C~40°C).
You may need to wait as long
as 20 minutes for the meter to
cool down before testing again.
HI
pm
Replace new batteries.
The meter starts to count down
then show your result on the
screen (10 seconds for glucose;
150 seconds for cholesterol
;
20 seconds for uric acid;10
seconds for hemoglobin
after the beep sound).
No action required.
Glu
pm
pm
CHOL
pm
UA
pm
Hb
SYMBOL
WHAT IT MEANS ACTION
41
Page 42

Your blood glucose level is
higher than 600 mg/dL (33.3
mmol/L). The blood glucose
test result with a suggestion to
check your ketone levels.
Re-check your blood glucose
level. If “HI” is displayed again,
call your doctor immediately.
Your blood glucose level is
lower than 20 mg/dL (1.1mmol/
L).
Re-check your blood glucose
level. If “LO” is displayed again,
call your doctor immediately.
pm
HI
KETONES?
Glu
LO
pm
Glu
Your blood cholesterol level is
higher than 400 mg/dL (10.4
mmol/L).
Re-check your blood
cholesterol level. If “HI” is
displayed again, call your doctor
immediately.
HI
pm
CHOL
(Example)
pm
mg/dL
KETONES?
Glu
24
SYMBOL WHAT IT MEANS ACTION
42
Re-check your blood glucose
level.Follow the instructions of
your healthcare professional
regarding ketone testing.
If the result is over 240 mg/dL,
the blood glucose test result
with a suggestion to check your
ketone levels.
Page 43

Page 44

mg/dL
DAY
AVG
85
Glu
Average of the last 14 days
(028 means that 28 tests were
performed within the period)
No action required.
mg/dL
DAY
AVG
86
Glu
Average of the last 28 days
(056 means that 56 tests were
performed within the period)
No action required.
A blood glucose/ cholesterol/
uric acid /hemoglobin test result
is stored in the memory.
No action required.
The oldest glucose/ cholesterol
uric acid/ hemoglobin test result
stored in memory appears.
The meter will be turned off
automatically after 3 seconds.
No action required.
SYMBOL WHAT IT MEANS ACTION
mg/dL
pm
84
Glu
mg/dL
pm
84
CHOL
mg/dL
UA
g/dL
Hb
Glu CHOL
UA Hb
44
20
Page 45

pm
E0
1
Using a wrong test strip.
2.
New meter hasn’t been code.
1
.Please use blood
glucose/cholesterol/uric acid/
hemoglobin test strips.
2.Insert the code key.
pm
E02
The code key is damaged. Contact Customer Service.
SYMBOL WHAT IT MEANS ACTION
45
Page 46

Specifications
GCUHb Multi-Function Monitoring System
Model: All Glucose Cholesterol Uric acid
Measuring Range
20 ~ 600 mg/dL
(1.1 ~ 33.3mmol/L)
100~400 mg/dL
(2.6 ~ 10.4mmol/L)
3 ~ 20 mg/dL
(179~1190μmol/L)
Calibration Plasma equivalent
Test Time 10 seconds 150 seconds 20 seconds
Memory Capacity 200 test results 50 test results 50 test results
Operating Condition
Temperature
Humidity
57.2~104˚F (14 ~ 40˚C)
85% Relative Humidity
Meter Storage Condition
(Transportation Condition)
Temperature
Humidity
14 ~140˚F (-10 ~ 60˚C)
95% Relative Humidity
Sample Volume
4 μL 15 μL 4 μL
Sample Type Capillary whole blood
Hematocrits Range 30 ~ 55%
Power Supply 1.5V (AAA) x 2
Hemoglobin
7~26 g/dL
(4.34~ 16.14 mmol/L)
10 seconds
50 test results
0.8 μL
46
Page 47

Meter Dimension
HxWxD (mm) 88 x 64 x 22
Display LCD display (35 x 45 mm)
Weight 59 grams, without Batteries
Life of Battery More than 1000 times
Technology Used Electrode-based Biosensor
Model: All
47
Page 48

Labeling and Information
Do not reuse Consult instruction for use
Temperature limitation Keep away from sunlight
Manufacturer Used by
Caution, consult accompanying
documents
Authorised representative in the
European Community
Batch code Catalogue number
SN
Serial number
CONTROL
Control
In vitro diagnostic device
STERILE R
Sterilized using irradiation
48
Customer Services
Thank you for choosing the GCUHb
Blood Glucose/ Cholesterol/ Uric Acid/
Hem o g l o b i n Multi-Function Monitoring System.Kernel lnt't Corp. is honored to present this
new product to you. Our customer services include:
(1) Our Customers are entitled to free repair and repla cement of spare parts. If you have problems with the product, please
contact local distributor/ agent for further information. However the following damages resulted from improper use or acc
idents are excluded (such as smash, moisture, unauthorized repair,disassemble, and natural catastrophes).
(2)
Kernel lnt't Corp. is not responsible for any accidents and worsening illness
resulted from buyers’/
users’ improper
use of device without the instructions of
professionals (e.g. medical personnel). Consumers may not request for
compensation in this regard.
(3) Please read this manual thoroughly before using this monitoring system. If you have any questions, please contact local
distributor.
 Loading...