

Page 1

KERN & Sohn GmbH
Ziegelei 1
D-72336 Balingen
E-Mail: info@kernsohn.com
Tel: +49-[0]7433- 9933-0
Fax: +49-[0]7433-9933-149
Internet: www.kern-sohn.com
Operating Manual
Electronical Compact Balance
KERN WTB
Version 1.3
08/2009
GB
WTB-BA-e-0913
Page 2

WTB-BA-e-0913
2
English
1 Introduction
Thank you for purchasing a KERN WTB scale. These scales are rugged, simple to operate, and can be
used without connection to an external power supply. The scale has a menu system which allows it to
be adapted to your needs.
Please read through these Operating Instructions carefully, and always follow them!
1.1 Safety and the environment
– Read through these Operating Instructions carefully, even if you already have ex-
perience of KERN scales. Only ever use your scale as described in the Operating
Instructions. Be sure to follow the instructions for putting your new scale into
operation.
– Do not use the scale in a explosive environment.
– For connection to the power supply use only the AC adapter delivered with the scale.
Before you connect the scale to the power supply check that the voltage stated on the
AC adapter is the same as the local power supply voltage. If it is not, do not connect
the AC adapter under any circumstances but contact your dealer.
– Although your scale is very ruggedly constructed, it is nevertheless a precision
instrument. Impacts to the weighing pan, or placing excessively heavy loads on it, can
damage the scale.
– Observe local and national environmental regulations when disposing of the scale.
The scale is fitted with a storage battery that contains heavy metals. Do not dispose
of the battery as normal waste! Observe local regulations for disposal of environmen-
tally harmful substances.
1.2 Selecting a location
Selecting a suitable location makes a decisive contribution to precise measurement results
and lengthens the service life of the scale:
– Choose a stable, vibration-free surface which is as horizontal as possible.
– Ensure there are no excessive fluctuations in temperature, and no direct sunlight.
– Make sure that the environmental conditions are met (Chapter 9.1).
– Avoid drafts (e.g. from fans or air conditioning).
– After any major change of geographical position, the scale should be newly adjusted
(calibrated) (Chapter 4.3).
Page 3

WTB-BA-e-0913
3
English
2 Putting the scale into operation
2.1 Remove the transport arrestment
• Remove the 3 screws of the transport arrestment in the weighing-pan
support and the 3 plastic inserts between the weighing-pan support
and the scale housing.
• Place the weighing pan on the scale.
2.2 Leveling the scale
• Level the scale horizontally by turning the leveling screws. The air
bubble of the level indicator must lie within the black inner circle.
2.3 Power supply
The scale is normally powered by the built-in storage battery. The AC adapter is only used for charging
the storage battery. While the battery is being charged, the scale receives power from the power supply
network, so you can still work with the scale even if the battery needs recharging. Battery charging also
continues while the scale is switched off. The time required for recharging depends on how low the charge
in the battery has become. However, to avoid overcharging the battery, do not leave the scale connected
to the power supply with the AC adapter for more than 24 hours.
Battery operation (AC adapter not connected)
Observe the red LED above the battery symbol Y:
LED is not lit: The battery is sufficiently charged.
LED flashes: The charge of the battery is almost exhausted. Connect
the AC adapter as soon as possible to recharge the battery.
Charging the battery/operating from the power supply
The connecting socket for the AC adapter is located underneath the
balance adjacent to the front-left leveling screw. Remove the rubber
plug and connect the AC adapter to the scale and to the power supply.
Observe the red LED above the battery symbol d:
LED flashes: The scale is receiving power from the power supply
network, the battery is being charged.
LED is continuously lit: The battery is fully charged, the AC adapter
can be disconnected again.
Page 4

WTB-BA-e-0913
4
English
3 Daily operation
3.1 Switching the scale on and off
To switch the scale on: Check that there is nothing on the weighing pan.
Press the ON/OFF key until the display appears. After the scale has been
switched on, it performs a self-test in which all the segments and then
various items of information about the scale are briefly displayed. When
the weight display appears, the scale is ready to weigh and is
automatically set to zero (the LED above the a symbol is lit).
To switch the scale off: Press the ON/OFF key and hold it down until
“OFF” appears in the display. The display then goes out, and the scale
is switched off.
Energy-saving function and automatic switchoff
For battery operation the scale has an energy-saving function and
an automatic switchoff function which can be both activated and
deactivated in the menu (Chapter 4).
If the energy-saving function is activated (factory setting), when the
scale is powered from the battery it automatically switches into
“Standby” mode after two minutes if no weight change takes place
and no key is pressed. The display is filled with decimal points instead
of digits. As soon as a weight is placed on the pan or a key is pressed,
the scale returns to normal weighing mode.
If the automatic switchoff function is activated (it is deactivated at
the factory), the scale switches off automatically after 15 minutes in
“Standby” mode.
3.2 Simple weighing
• Set the scale to zero with the a key. The LED above the a symbol lights as confirmation.
• Place the item to be weighed on the pan. The LED above the a
symbol goes off.
• Read off the weighing result. The LED to the right of the weighing
result shows the current weighing unit (the unit can be changed in
the menu, see Chapter 4).
3.3 Weighing with tare
z000
0FF
......
z000
r478
Page 5
WTB-BA-e-0913
5
English
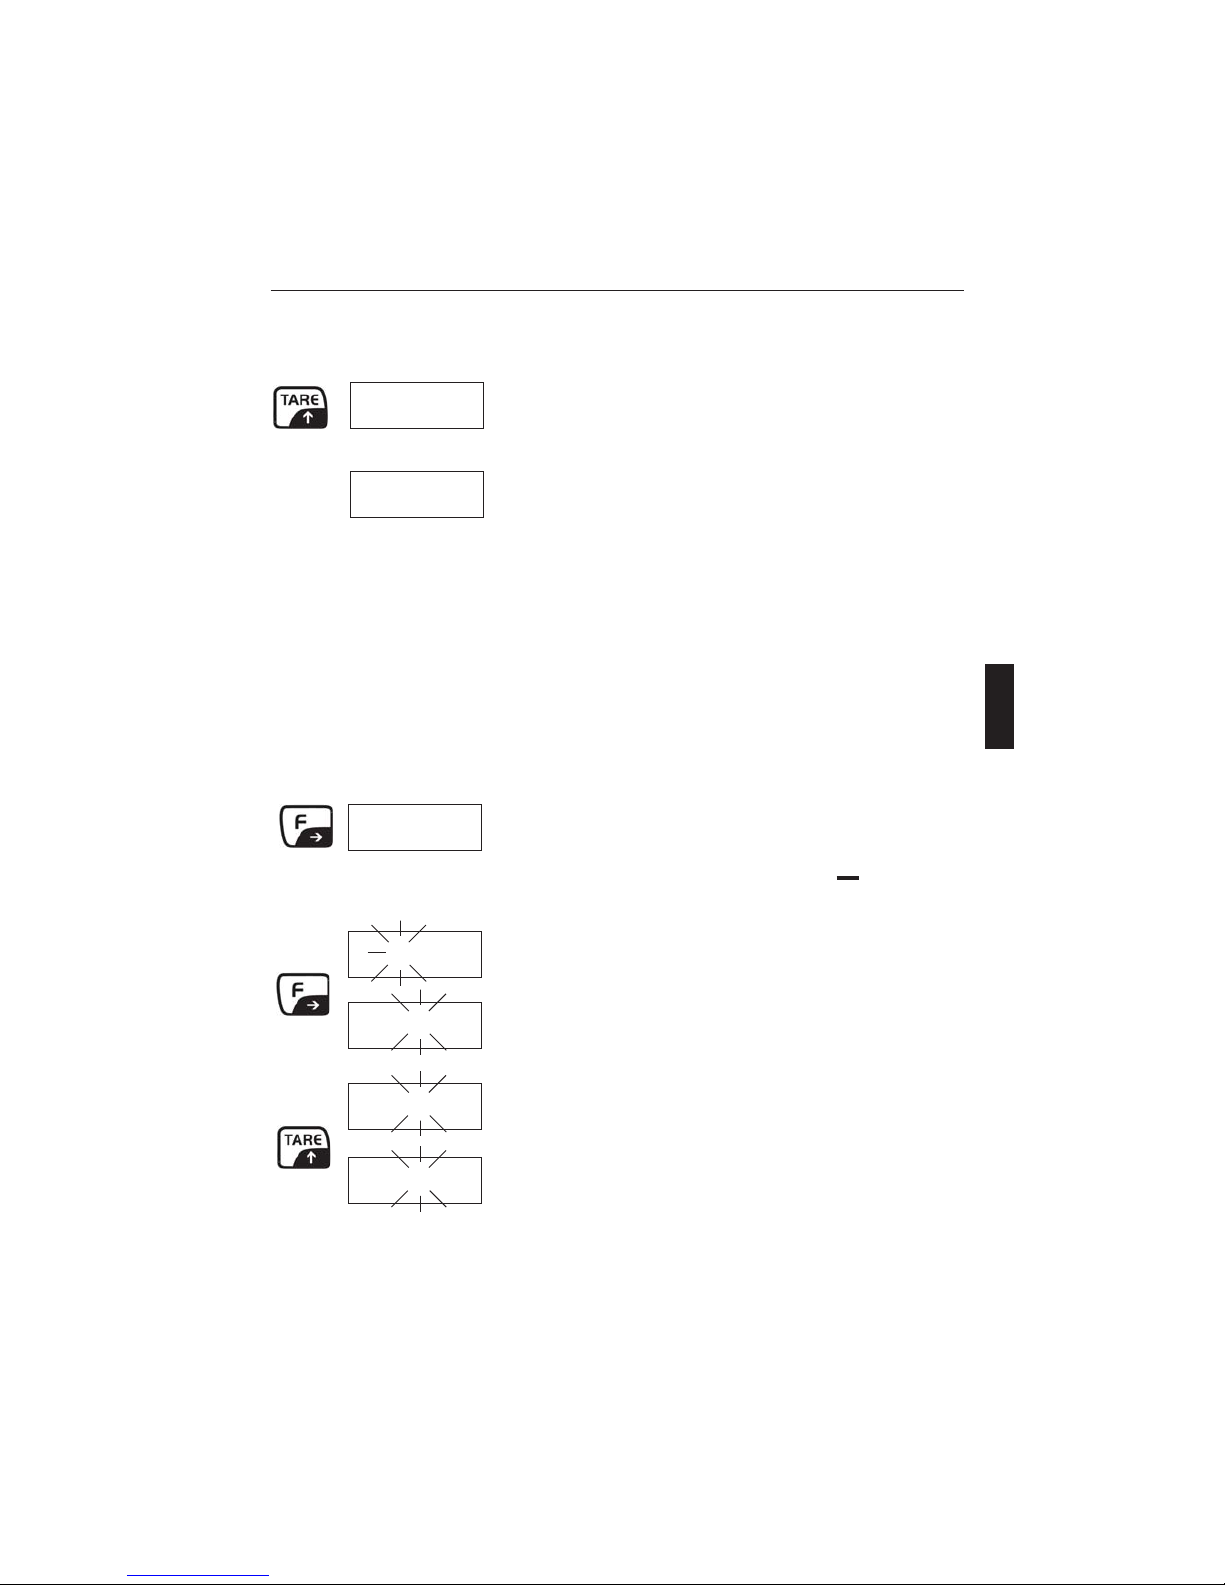
• Place the empty weighing container or packaging component on the weighing pan and press the TARE
key to tare the scale. The zero display appears and the LED above the NET (net weight) symbol is lit.
• Place the item to be weighed on the scale and read the result (net
weight of the item being weighed).
The saved tare weight is retained until you either define a new tare, or
press the TARE key when the weighing pan is empty, or switch off the
scale.
Defining limit values
• Press the F key. The current upper limit value is displayed (the LED
above the
+ symbol is lit). If you want to set an upper limit value,
continue with the next step. If you want to set a lower limit value,
z000
t352
press the ON/OFF key and the LED above the symbol will be lit.
Every time the ON/OFF key is pressed, the scale changes between the
upper and the lower limit value.
• The first digit of the selected limit value flashes and can now be
changed. If you do not want to change the first digit, press the F key
and the second digit will start to flash. Each time the F key is
pressed, the display moves to the next digit. After the last digit the
display returns to the first digit.
• To change the selected (flashing) digit, press the TARE key repeatedly until the desired number is displayed. Then press the F key to
move to the next digit and change this digit.
• To complete the input, press the a key. The scale stores the limit
value and returns to weighing mode.
4 The menu
r400
r400
r400
r400
r500
3.4 Weighing with limit values
You can define an upper and a lower limit value and thereby ensure that the amount of substance weighed
is always exactly within the defined tolerances.
Note: Limit-value monitoring is switched off at the factory and must be activated in the menu if required
(Chapter 4.2, menu item S3). You can also specify in the menu whether the balance should warn of
violations of limit values.
Page 6
WTB-BA-e-0913
6
English
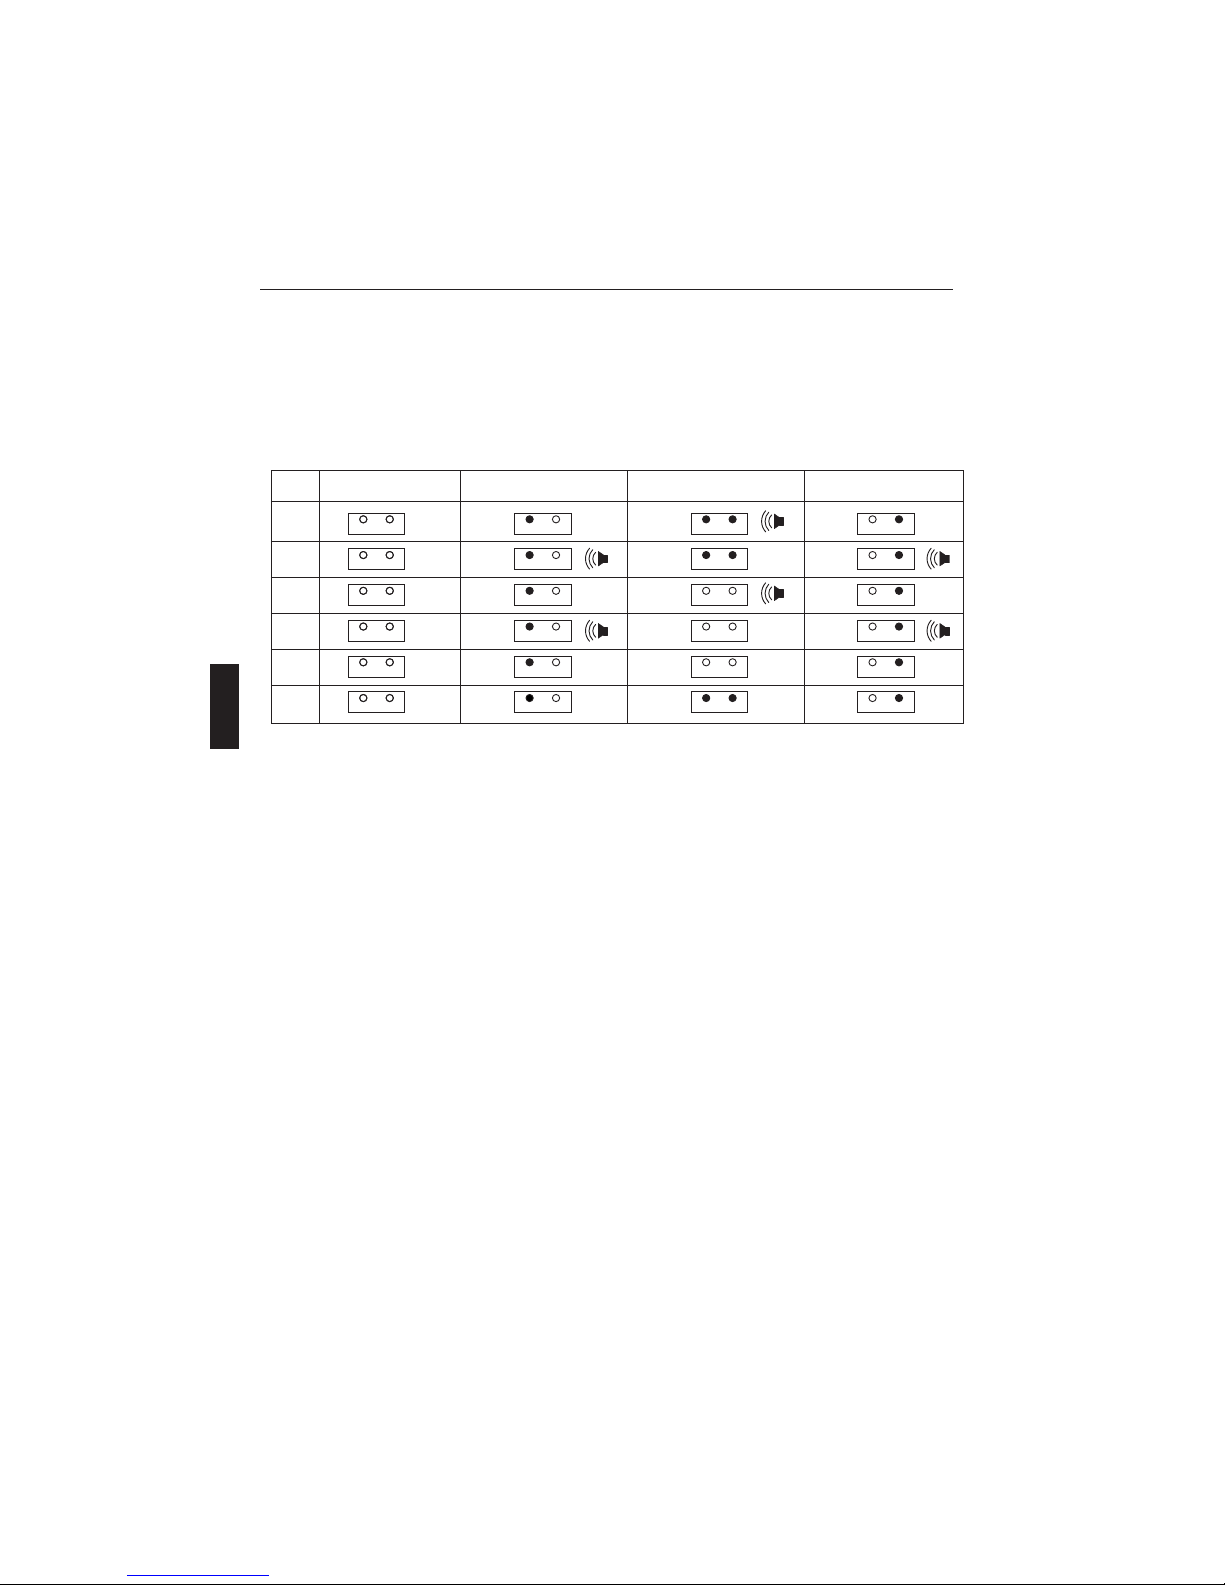
Weighing with limit values
Weighing in Weighing Mode is made easier for you by the two LEDs above the UNDER and OVER symbols
as well as a beep. The behavior of the two LEDS and the beep depend on the respective setting in the menu
(Chapter 4.2, menu item S3). The table below shows how the two LEDs and the beep behave for various
settings in menu item S3.
S3 = No load on balance Load < lower limit value Load between limit values Load > upper limit value
1
2
3
4
5
6
UNDER OVER
UNDER OVER
UNDER OVER
UNDER OVER
UNDER OVER
UNDER OVER
UNDER OVER
UNDER OVER
UNDER OVER
UNDER OVER
UNDER OVER
UNDER OVER
UNDER OVER
UNDER OVER
UNDER OVER
UNDER OVER
UNDER OVER
UNDER OVER
UNDER OVER
UNDER OVER
UNDER OVER
UNDER OVER
UNDER OVER
UNDER OVER
UNDER OVER
UNDER OVER
UNDER OVER
UNDER OVER
UNDER OVER
UNDER OVER
Page 7

WTB-BA-e-0913
7
English
The menu can be used to change the settings of the scale and activate functions. The menu consists of two
parts, the user menu and service mode (see overview in Chapter 4.2).
The user menu contains frequently used settings and functions and is easy to call up.
Service mode provides the same possibilities as the user menu as well as additional functions for the
service technician. To call up service mode a tool is required.
4.1 Operating the menu
Calling up the user menu
With the scale switched off, press the a key and hold it down. Switch on the scale with the ON/OFF key.
“Setup” appears briefly in the display and then the first menu block of
the user menu (“S1”) appears.
Calling up service mode
Remark: If the scale is verified, the offical seal has to be destroyed.
Once this seal has been destroyed, the scale must be reverified by an
accredited organization, and a new offical seal must be affixed
before the instrument may be used as a verified scale again!
With the scale switched on, remove the cover of the storage battery
underneath the scale (6 screws). Remove the calibration plate (2
screws). To remove the calibration plate, the sticker has to be
destroyed which covers one of the two screws.
Use a small flat-tip screwdriver to short-circuit the two contacts in the
rectangular opening (see arrow).
“Setup” appears briefly in the display and then the first menu block
of service mode (“CTY”) appears.
Selecting the menu block
Press the ON/OFF key to confirm the setting in the current menu block
and then select the next menu block.
Changing the setting
After you have selected the desired menu block, you can use the
TARE key to switch between the available settings. The number of
available settings differs according to the menu block.
Confirming the setting
S1 OFF
S1 OFF
S2 ON
CTX EU
S2 ON
S2 OFF
Page 8

WTB-BA-e-0913
8
English
When the desired setting has been made (or if there is no need to change
the current setting), it must be confirmed by pressing the ON/OFF key.
The next menu block then appears automatically in the display.
Navigating backwards in the menu
If you wish to navigate backwards in the menu, i.e. display the
previous menu block again, you can do so at any time with the F key.
This way you can check the settings you made and change them
again if necessary.
Quitting the menu
When you have made all the desired settings, press the a key.
You will be asked whether you wish to save the settings (“SAVE”).
Note: This question also appears after the last menu block.
Saving the settings
If you want to save the settings, press the ON/OFF key. When the save
has been done, the scale automatically returns to weighing mode.
Rejecting the settings
If you do not want to save you changes, press the TARE key. The
display shows “Abort”. Press the ON/OFF key and the scale returns to
weighing mode without the changed settings being saved.
Restoring the factory settings
The factory settings can only be restored in service mode in the menu
block “DEF” (“Default”). If you want to restore the factory settings,
select “DEF YES” and confirm with the ON/OFF key. Then press the
a key and confirm the “SAVE” prompt with the ON/OFF key. Note:
When the factory settings are restored, all individual settings are
lost!
4.3 Adjusting (calibrating) the scale
S2 OFF
S3 O
S3 O
S2 OFF
SAVE
r478
ABOMT
r478
DEF NO
DEFXES
SAVE
Page 9

WTB-BA-e-0913
9
English
4.2 Menu overview (user menu and service mode)
Menu block Settings Explanation
CTY Selects the region (determines which weighing units are available under “S5”)
EU Europe
GE USA
DEF Restores the factory settings
No Do not restore the factory settings
Yes Restore the factory settings (happens immediately after confirmation!)
S1 Automatic switchoff function (see description in Chapter 3.1)
Off Deactivates the automatic switchoff function
On Activates the automatic switchoff function
S2 Energy-saving mode (see description in Chapter 3.1)
On Activates the energy-saving mode
Off Deactivates the energy-saving mode
S3 Limit-value monitoring (see description in Chapter 3.4)
0 No limit-value monitoring (F key and alarm via beep and LEDs deactivated)
1
2
3 Limit-value monitoring activated, behavior of LEDs and beep (see description in Chapter 3.4).
4
5
6
Page 10

WTB-BA-e-0913
10
English
Menu block Settings Explanation
S4 Adaptation to the environmental conditions (filter)
0 Very stable environmental conditions, weak filtering of the weighing signal
1 Normal environmental conditions, average filtering of the weighing signal
2 Unstable environmental conditions, stronger filtering of the weighing signal
3 Very unstable environmental conditions, very strong filtering of the weighing signal
4 As for setting 0, but with slower updating of the display value
5 As for setting 1, but with slower updating of the display value
6 As for setting 2, but with slower updating of the display value
7 As for setting 3, but with slower updating of the display value.
S5 Weighing unit
g Gram
kg Kilogram (only available if the region is set to “EU” (Europe), see menu block “CTY”)
lb Pound (only available if the region is set to “GE” (USA), see menu block “CTY”)
oz Ounce (only available if the region is set to “GE” (USA), see menu block “CTY”)
S6 Brightness of the display
0 Very bright
1 Bright
2 Dark
3 Very dark
DSP (S7) Type of display
On Weight value is only displayed when stable
Off Weight value is displayed continuously, irrespective of whether it is stable
S8 Resolution of the scale (only available in the user menu when “S9” = “On”)
Off 3000d
On 6000d/7500d (depending on the capacity of the scale)
S9 Access to menu item S8 from the user menu
Off Menu item S8 is not available in the user menu (S8 is only accessible in service mode)
On Menu item S8 is available in the user menu
S10 Extended display
Off Normal weight display depending on the resolution of the balance (see menu item S8)
On Only for tests: Display in d (max. scale capacity = 30,000d), keys a and b disabled
S11 Display of negative weight values
On Display of negative weight values disabled (display shows “oooooo”), taring not possible
Off Display of negative weight values enabled, taring possible (not allowed for certified balances)
S12 Speed of display when removing the load
On Return to zero by display is fast
Off Display returns to zero at normal speed
BAT Type of internal power supply
CH Rechargeable storage battery
D Commercial battery size “D” (IEC “R20”)
GEO Geo adjustment value (adaptation to local gravitational conditions, see table in Chapter 5)
0 ... 31 Factory setting according to region
CAL Scale adjustment (calibration)
No Do not perform adjustment
Yes Perform adjustment (see description in Chapter 4.3)
Except where the factory settings are shown bold, the factory setting depends on the country in which the balance was purchased, on the model of
the balance, or on the respective weights and measures law.
Only the menu blocks shown above with a gray background are available in the user menu; the other menu blocks are only accessible in service mode.
Page 11

WTB-BA-e-0913
11
English
The scale was adjusted at the factory. However, we still recommend adjusting the scale when it is put into
operation for the first time, and thereafter at regular intervals, especially after a change of location.
Adjustment can only be done in service mode (see chap.4.1). Before doing the adjustment, the geo
adjustment value must be checked for correctness in the “GEO” menu block (see table in Chapter 7).
• In service mode call up the “CAL” menu block. With the TARE key select “CAL YES” and then start the
adjustment with the ON/OFF key.
• Select the desired weight unit for the adjustment and confirm with
the ON/OFF key. The units available depend on the selected region
(menu block “CTY”): for the setting “EU” (Europe) only “kg” is
available while for the setting “GE” (USA) there is a choice between
“kg” and “lb”.
• Select the maximum capacity of the scale (this is printed below
the display, adjacent to the level indicator) and confirm it with the
ON/OFF key. Note: The values in the display have a 1000x
higher resolution, i.e. a displayed value of 6000 represents 6 kg
or 6 lb (depending on the unit selected previously) and a displayed value of 15000 represents 15 kg or 15 lb.
• The scale prompts you to empty the weighing pan. Remove any
loads on the pan and confirm this with the ON/OFF key. The scale
then performs a zero setting during which a counter is displayed
which counts backwards from 5 to 1.
• After the zero setting, your are prompted to place an adjustment
weight on the pan which corresponds to 2/3 of the selected capa-
city (in this example 4 kg/lb, corresponding to 2/3 of the weigh-
ing capacity of 6kg/lb). Confirm that the weight has been placed
on the pan with the ON/OFF key. While the weight is being measur-
ed, a counter is again displayed which counts backwards from 5
to 1.
• The scale now prompts you to load the weighing pan with the
adjustment weight which corresponds to the selected capacity (in
this example 6kg/lb). Confirm that you have placed the weight on
the pan by pressing the ON/OFF key. While the weight is being
measured, a counter is again displayed which counts backwards
from 5 to 1.
• The adjustment is complete. Press the ON/OFF key to save the
result and quit service mode. If you do not want to save the result,
press TARE and confirm the “Abort” message with the ON/OFF key.
7 Table of geo adjustment values
After a major change of geographical location, the geo adjustment
value must be changed according to the following table, and the scale
must then be readjusted accordingly (Chapters 4.2 and 4.3).
CAL NO
CALXES
H9
1B
3000
6000
------
4000
6000
SAVE
Page 12

WTB-BA-e-0913
12
English
4.4 Monitoring the test substances
The metrology features of the balance and any possible available adjusting weight must be
checked at regular intervals within the scope of quality assurance. For this purpose, the
answerable user must define a suitable interval as well as the nature and scope of this check.
Information is available on KERN’s home page (www.kern-sohn.com) with regard to the
monitoring of balance test substances and the test weights required for this. Test weights and
balances can be adjusted quickly and at a reasonable price in KERN’s accredited DKD calibration
laboratory (return to national normal).
4.5 Verification
General:
According to the EU guideline 90/384/EEC balances must be verified officially if they are to be used
as follows (legally regulated area):
a) For commercial transactions if the price of goods is determined by weighing
b) For the production of medines in pharmacies as well as for analyses in the medical
and pharmaceutical laboratory
c) For official purposes
d) For the production of finished packages
In case of doubt, please contact your local office of weights and measures.
Verification information: (see chapter 9.3 Declaration of conformity)
An EU qualification approval is available for those balances marked as appropriate for verification
in the technical data. In the event that the balance is applied in an area subject to verification as
described above, it must be officially verified and re-verified at regular intervals.
Re-verification of a balance is carried out in compliance with the respective legal provisions of the
states. The term of verification validity for balances in Germany, for example, is normally 2 years.
The legal provisions of the country of use are to be observed.
Page 13

WTB-BA-e-0913
13
English
5 Error messages
Display Cause and remedy
E11, E16, E18 Internal error (RAM/ROM/EEPROM). Contact dealer.
E48 Error in the scale configuration. Check all parameters in service mode.
ERROR Software error. Restart the scale with the ON/OFF key. If the error still occurs,
replace the storage battery (Chapter 8).
------ The weight value is unstable or zero setting is not possible. Check the environmental conditions (drafts, vibrations, etc.). If necessary, change the filter settings in the menu (menu block “S4”, see Chapter 4). Under certain conditions
there could also be a difference of air pressure between the scale housing and
the surroundings. Unscrew the rear leveling screws until the ventilation openings
under them are free. If water drains out, contact you dealer.
nnnnnn Overload (load exceeds weighing capacity by more than 9 display steps). Re-
move the load and set the display to zero with the a key. Readjust (calibrate) the scale if necessary.
WWWWWW When zero was set there was a weight on the scale. When the load is removed
this error message appears. Ensure that there is no weight on the pan and then
press the a key. If the error message occurs again, the scale must be adjusted (calibrated).
Note: If the setting “S11” = “Off” was selected in the menu (Chapter 4.2), when
zero-setting is done with a weight on the balance and the weight is then removed, the negative weight value is displayed instead of this error message.
6 Cleaning the scale
• Disconnect the scale from the power supply before starting to clean!
• Use a soft cloth (no acids, alkalis, or strong solvents).
• Do not use abrasive cleaning agents: they can scratch the display.
• If badly soiled, remove the weighing pan and leveling screws, and clean them separately.
• Observe company-internal and industry-specific regulations regarding cleaning intervals and permitted
cleaning agents.
Page 14

WTB-BA-e-0913
14
English
0 325 650 975 1300 1625 1950 2275 2600 2925 3250
325 650 975 1300 1625 1950 2275 2600 2925 3250 3575
0 1060 2130 3200 4260 5330 6400 7460 8530 9600 10660
1060 2130 3200 4260 5330 6400 7460 8530 9600 10660 11730
0° 0' - 5° 46' 54433221100
5° 46' - 9° 52' 55443322110
9° 52' - 12° 44' 65544332211
12° 44' - 15° 6' 66554433221
15° 6' - 17° 10' 76655443322
17° 10' - 19° 2' 77665544332
19° 2' - 20° 45' 87766554433
20° 45' - 22° 22' 88776655443
22° 22' - 23° 54' 98877665544
23° 54' - 25° 21' 99887766554
25° 21' - 26° 45' 109988776655
26° 45' - 28° 6' 1010998877665
28° 6' - 29° 25' 11 10 10 9 9 8 8 7 7 6 6
29° 25' - 30° 41' 11 11 10 10 9 9 8 8 7 7 6
30° 41' - 31° 56' 12 11 11 10 10 9 9 8 8 7 7
31° 56' - 33° 9' 12 12 11 11 10 10 9 9 8 8 7
33° 9' - 34° 21' 13 12 12 11 11 10 10 9 9 8 8
34° 21' - 35° 31' 13 13 12 12 11 11 10 10 9 9 8
35° 31' - 36° 41' 14 13 13 12 12 11 11 10 10 9 9
36°
41' - 37° 50' 14 14 13 13 12 12 11 11 10 10 9
37° 50' - 38° 58' 15 14 14 13 13 12 12 11 11 10 10
38° 58' - 40° 5' 15 15 14 14 13 13 12 12 11 11 10
40° 5' - 41° 12' 16 15 15 14 14 13 13 12 12 11 11
41° 12' - 42° 19' 16 16 15 15 14 14 13 13 12 12 11
42° 19' - 43° 26' 17 16 16 15 15 14 14 13 13 12 12
43° 26' - 44° 32' 17 17 16 16 15 15 14 14 13 13 12
44° 32' - 45° 38' 18 17 17 16 16 15 15 14 14 13 13
45° 38' - 46° 45' 18 18 17 17 16 16 15 15 14 14 13
46° 45' - 47° 51' 19 18 18 17 17 16 16 15 15 14 14
47° 51' - 48° 58' 19 19 18 18 17 17 16 16 15 15 14
48° 58' - 50° 6' 20 19 19 18 18 17 17 16 16 15 15
50° 6' - 51° 13' 20 20 19 19 18 18 17 17 16 16 15
51° 13' - 52° 22' 21 20 20 19 19 18 18 17 17 16 16
52° 22' - 53° 31' 21 21 20 20 19 19 18 18 17 17 16
53° 31' - 54° 41' 22 21 21 20 20 19 19 18 18 17 17
54° 41' - 55° 52' 22 22 21 21 20 20 19 19 18 18 17
55° 52' - 57° 4' 23 22 22 21 21 20 20 19 19 18 18
57° 4' - 58° 17' 23 23 22 22 21 21 20 20 19 l9 18
58° 17' - 59° 32' 24 23 23 22 22 21 21 20 20 19 19
59° 32' - 60
° 49' 24 24 23 23 22 22 21 21 20 20 19
60° 49' - 62° 9' 25 24 24 23 23 22 22 21 21 20 20
62° 9' - 63° 30' 25 25 24 24 23 23 22 22 21 21 20
63° 30' - 64° 55' 26 25 25 24 24 23 23 22 22 21 21
64° 55' - 66° 24' 26 26 25 25 24 24 23 23 22 22 21
66° 24' - 67° 57' 27 26 26 25 25 24 24 23 23 22 22
67° 57' - 69° 35' 27 27 26 26 25 25 24 24 23 23 22
69° 35' - 71° 21' 28 27 27 26 26 25 25 24 24 23 23
71° 21' - 73° 16' 28 28 27 27 26 26 25 25 24 24 23
73° 16' - 75° 24' 29 28 28 27 27 26 26 25 25 24 24
75° 24' - 77° 52' 29 29 28 28 27 27 26 26 25 25 24
77° 52' - 80° 56' 30 29 29 28 28 27 27 26 26 25 25
80° 56' - 85° 45' 30 30 29 29 28 28 27 27 26 26 25
85° 45' - 90° 00' 31 30 30 29 29 28 28 27 27 26 26
Page 15

WTB-BA-e-0913
15
English
Replacing the storage battery does not cause loss of data (menu settings)!
• Remove the weighing pan, turn the scale over, and with the weighing-pan support facing down place
the scale on a clean, stable working surface.
• Remove the cover from the storage battery underneath the balance (6 screws).
• Remove the retaining bracket of the storage battery (4 screws).
• Carefully lift the storage battery out of the scale
and pull off the two cable clips. Take care that
the two cable clips do not touch each other!
• Connect the cable clips to the new storage
battery: red cable to plus pole, black cable to
minus pole.
• Insert the new storage battery into the scale and
screw the retaining bracket tight.
• Check the condition and correct seating of the
rubber seal in the battery cover. Place the battery
cover into position and screw it on tightly.
• Connect the AC adapter to the scale and the
power supply to charge the new storage battery
(Chapter 2.3).
• Dispose of the old storage battery according to
the applicable environmental regulations!
9 Specifications and standards
9.1 Technical data
Models WTB 1,5K0.5IPM WTB
3K1IPM WTB 6K2IPM WT B
15K5IPM
Weighing range (Max) 1.5 kg (3 lb) 3 kg
(6 lb) 6 k g (15 lb) 15 kg
(30 lb)
Page 16

WTB-BA-e-0913
16
English
Readout (d) 0,5 g (0,001 lb) 1 g (0,002 lb) 2 g (0,005 lb) 5 g (0,01 lb)
Verific. value 1,5 g 1 g 2 g 5 g
Min. load (Min) 10 g 20 g 40 g 100 g
Weighing pan Stainless steel
Housing ABS light gray
IP65
Displays 6-digit LED displays on front and rear of scale, variable brightness, character height 25 mm/1in.,
9 integrated status LEDs
Keypad 4 keys with action point
Leveling With level indicator (built into the front of the housing) and 4 leveling screws
Power supply Lead/acid storage battery, 6V/5Ah, chargeable in balance using AC adapter supplied with scale
(scale operates from mains while charging), charging time 15 h, mains-free operation up to 50 h
Operating conditions –10°C ... +40°C, 10 % ... 95% rel. humidity, non-condensing
Storage conditions –25°C ... +50°C, 10 % ... 95% rel. humidity, non-condensing
Weighing units g, kg, lb
Weight of scale 4.4 kg (incl. storage battery and weighing pan)
Models WTB 1,5K0.5IP WTB 3K1IP WTB 6K2IP WTB 15K5IP
Weighing range 1.5 kg (3 lb) 3 kg (6lb) 6 kg (15 lb) 15 kg (30 lb)
Readout 0,5 g (0,001 lb) 1 g (0,002 lb) 2 g (0,005 lb) 5 g (0,01 lb)
Weighing pan Stainless steel
Housing ABS light gray
IP65
Displays 6-digit LED displays on front and rear of scale, variable brightness, character height 25 mm/1in.,
9 integrated status LEDs
Keypad 4 keys with action point
Leveling With level indicator (built into the front of the housing) and 4 leveling screws
Power supply Lead/acid storage battery, 6V/5Ah, chargeable in balance using AC adapter supplied with scale
(scale operates from mains while charging), charging time 15 h, mains-free operation up to 50 h
Operating conditions –10°C ... +40°C, 10 % ... 95% rel. humidity, non-condensing
Storage conditions –25°C ... +50°C, 10% ... 95% rel. humidity, non-condensing
Weighing units g, kg, lb
Weight of scale 4.4 kg (incl. storage battery and weighing pan)
Page 17

WTB-BA-e-0913
17
English
9.2 Dimensions
All dimensions in millimeters. Height measured with leveling screws completely screwed in.
180
127
230
310230
Page 18

KERN & Sohn GmbH
D-72322 Balingen-Frommern
Postfach 4052
E-Mail: info@kern-sohn.de
Tel: 0049-[0]7433- 9933-0
Fax: 0049-[0]7433-9933-149
Internet: www.kern-sohn.de
Konformitätserklärung
EC-Konformitätserklärung EC-Declaration of -Conformity
EC- Déclaration de conformité EC-Declaración de Conformidad
EC-Dichiarazione di conformità EC-Conformiteitverklaring
EC- Declaração de conformidade EC- Prohlášení o shode
EC-Deklaracja zgodności EC-Заявление о соответствии
D
Konformitätserklärung
Wir erklären hiermit, dass das Produkt, auf das sich diese Erklärung bezieht,
mit den nachstehenden Normen übereinstimmt.
GB
Declaration of
conformity
We hereby declare that the product to which this declaration refers conforms
with the following standards.
CZ
Prohlášení o
shode
Tímto prohlašujeme, že výrobek, kterého se toto prohlášení týká, je v souladu
s níže uvedenými normami.
E
Declaración de
conformidad
Manifestamos en la presente que el producto al que se refiere esta
declaración está de acuerdo con las normas siguientes.
F
Déclaration de
conformité
Nous déclarons avec cela responsabilité que le produit, auquel se rapporte la
présente déclaration, est conforme aux normes citées ci-après.
I
Dichiarazione di
conformità
Dichiariamo con ciò che il prodotto al quale la presente dichiarazione si
riferisce è conforme alle norme di seguito citate.
NL
Conformiteitverklaring
Wij verklaren hiermede dat het product, waarop deze verklaring betrekking
heeft, met de hierna vermelde normen overeenstemt.
P
Declaração de
conformidade
Declaramos por meio da presente que o produto no qual se refere esta
declaração, corresponde às normas seguintes.
PL
Deklaracja
zgodności
Niniejszym oświadczamy, że produkt, którego niniejsze oświadczenie dotyczy,
jest zgodny z poniższymi normami.
RUS
Заявление о
соответствии
Мы заявляем, что продукт, к которому относится данная декларация,
соответствует перечисленным ниже нормам.
Page 1 of 6 WTB_CE_MULTI_0920
Page 19

Scale Series: KERN WTB
Mark applied EU Directive Standards
Approval/
Testcertificate N°
2006/95/EC
Low Voltage Directive
EN 60950-1 : 2006
2004/108/EC
EMC Directive
EN61326-1: 2006 (Class B)
EN61000-3-2
EN61000-3-3
year
1259
90/384/EEC
Non-automatic Weighing
Instruments Directive
EN45501 1) T6682 1)
gilt nur für geeichte Waagen applies only to certified balances
valable uniquement pour les balances vérifiées sólo aplicable a balanzas verficadas
la dichiarazione vale solo per le bilance omologate Geldt uitsluitend voor geijkte weegschalen
vale só para balanças com aferição platí jen pro cejchované váhy
1)
dotyczy tylko wag legalizowanych действует только для поверенных весов
Date: 17.09.2009 Signature:
Gottl. KERN & Sohn GmbH
Management
Gottl. KERN & Sohn GmbH, Ziegelei 1, D-72336 Balingen, Tel. +49-[0]7433/9933-0,Fax +49-[0]7433/9933-149
Page 2 of 6 WTB_CE_MULTI_0920
Page 20

English Important notice for verified weighing instruments
Weighing instruments verified at the place of manufacture bear the preceding mark on
the packing label and a green M-sticker on the descriptive plate. They may be set to
work immediately.
M
Weighing instruments which are verified in two steps has no green "M" on the
descriptive plate, bear the aforementioned identification on the packing label. The
second step of the verification must be carried out by the W&M authorities
The first step of the verification has been carried out at the manufacturing plant. It comprises all tests
according to EN 45501-8.2.2. If national regulations in individual countries limit the period of validity of
the certification, the operator of such a scale is himself responsible for its timely re-certification.
Deutsch Wichtiger Vermerk für geeichte Waagen in EU-Ländern
M
Werksgeeichte Waagen tragen vorstehendes Kennzeichen auf dem Packetikett und
eine grünen M-Kleber auf dem Eichschild. Sie dürfen sofort in Betrieb genommen
werden.
M
Waagen die in zwei Schritten geeicht werden und kein grünes "M" auf dem Eichschild
haben, tragen vorstehendes Kennzeichen auf dem Packetikett.
Der zweite Schritt der Eichung ist durch den Eichbeamten durchzuführen.
Der erste Schritt der Eichung wurde im Herstellerwerk durchgeführt. Er umfasst alle Prüfungen gemäß
EN45501-8.2.2. Sofern gemäß den nationalen Vorschriften in den einzelnen Staaten die
Gültigkeitsdauer der Eichung beschränkt ist, ist der Betreiber einer solchen Waage für die rechtzeitige
Nacheichung Selbst verantwortlich.
Français
Remarque Importante pour les Instruments de pesage vérifiées dans les pays
membre de l’Union Européenne
M
Les instruments de pesage vérifiés en usine sont identifiés par un M sur leur
emballage et par un sticker M vert sur la plaque d'identification.
Ils peuvent être utilisés après leur installation.
M
Les instruments de pesage vérifiés en deux étapes portent l'identification M barré sur
leur emballage. La seconde étape de la vérification doit être effectuée par l’assistant
technique de l’administration des poids et mesures.
La première étape de la vérification a été effectuée en usine. Cela comprend tous les essais suivant la
norme EN45501-8.2.2. Dans la mesure où la durée de la vérification est limitée en fonction des
prescriptions nationales dans les différents pays, I’ utilisateur ďune telle balance est lui-même
responsable de la vérification ultérieure dans les délais.
Español Nota importante para balanzas verificadas en paises de la UE
M
Las balanzas verificadas en origen llevan esta indicación en la etiqueta del embalaje y
con la etiqueta M sobre fondo verde en la placa de caracteristicas pueden ser
utilizadas inmediatamente.
M
Balanzas cuya verificación se realiza en dos fases llevan esta indicación en la etiqueta
del embalaje. La segunda fase de la verificación debe ser realizada por el asistente
técnico de la oficina de contraste.
La primera fase de la verificación ha sido realizada en origen. Incluye todos los ensayos según lo
norma EN45501-8.2.2. Si el plazo de validez de la verificación está limitado por las normas nacionales
de cada estado, el usuario será responsable de las verificaciones posteriores reglamentarias de su
balanza.
Italiano Nota Importante per la bilance approvate nei paesi UE
M
Le bilance verificate in fabbrica portano questo contrassegno sull'etichetta dell'imballo
e con il sigillo M su sfondo verde sulla targhetta metrologica possono essere messe in
uso immediatamente.
M
Le bilance che vengono verificate in due fasi, portano questo contrassegno
sull'etichetta dell'imballo. La seconda fase della verifica deve essere eseguita dal
servizio assistenza tecnica dell'ufficio di pesi e misure.
La prima fase della verifica è stata eseguita dal produttore e comprende tutte le prove previste dalla
norma EN 45501-8.2.2. Se la durata di validità della verifica è limitata in accordo con le prescrizioni
nazionali vigenti nei singoli paesi, l’utente stesso di una bilancia di tale tipa sarà responsabile
dell’esecuzione, entro le date di scadenza previste, delle verifiche periodiche.
Page 3 of 6 WTB_CE_MULTI_0920
Page 21

Netherlands Belangrijke aanmerking voor geijkte weegschalen in EG-landen
M
In de fabriek geijkte weegschalen dragen dit kenteken op het emballage-etiket en een
groene M-sticker op het ijklabel. Deze kunnen meteen in gebruik genomen worden.
M
Bij weegschalen die in twee stappen geijkt moeten worden en geen groene “M” op het
ijklabel hebben, staat dit kenteken op het emballage-etiket.
De tweede stap van de ijking moet door het ijkwezen uitgevoerd worden.
De eerste stap van de ijking werd in de fabriek doorgevoerd. Deze omvat alle inspecties conform
EN45501-8.2.2. Voor zover in overeenstemming met de nationale voorschriften in de individuele
staten de geldigheidsduur van de ijking beperkt is, is de exploitant van een dergelijke weegschaal voor
een tijdige herijking zelf verantwoordelijk.
De eerste stap van de ijking werd in de fabriek uitgevoerd. Deze stap omvat alle tests overeenkomstig
EN45501-8.2.2. Bij weegschalen met een analoge weegbruggenaansluiting moet aanvullend de
nauwkeurigheid overeenkomstig EN45501-3.5.3.3 getest worden. Deze controle is niet nodig als de
terminal het serienummer van de weegbrug heeft.
Português Nota importante para as balanças aferidas em países EU
M
As balanças aferidas pela fábrica levam o cartaz identificador sobre a etiqueta de
pacote e um adhesivo M verde sobre a placa de aferição.
Têm que colocar-se em funcionamento sem demora.
M
As balanças que foram aferidas em dois passos e que não tenham um "M" verde
sobre a placa de aferição, têm o rótulo antecedente na etiqueta de pacote.
O segundo passo da aferição tem que ser feito por um empregado público de aferição.
A primeira fase da aferição foi feita na fábrica do produtor. Abrange todas as inspecções segundo
EN45501-8.2.2. Logo que segundo as normas nacionais nos estados individuais a duração de validez
da aferição esteja limitada, o usuário-proprietário duma tal balança é mesmo responsável pela
aferição posterior a tempo.
Česky Důležitý pokyn pro cejchované váhy v zemích EU
M
Váhy ocejchované ve výrobním závodě jsou opatřeny výše uvedenou značkou na
etiketě balení a zelenou nálepkou M na cejchovacím štítku. Takže se mohou okamžitě
uvést do provozu.
M
Váhy se cejchují ve dvou etapách, a jestliže nemají zelené M na cejchovacím štítku,
mají na etiketě balení výše uvedenou značku.
Druhou etapu cejchování provádí cejchovní úřad.
První fáze cejchování byla provedena ve výrobním závodě. Zahrnuje všechny testy podle EN45501-
8.2.2. Pokud je podle národních předpisů v jednotlivých státech omezená časová platnost cejchování,
je provozovatel takových váh sám odpovědný za včasné přecejchování.
Polski Adnotacje dotyczące legalizowanych wag w państwach UE
M
Legalizowane u producenta wagi mają wystające oznaczenie na opakowaniu i zieloną
nalepkę M na znaku legalizacji. Takie wagi można natychmiast eksploatować.
M
Wagi, które są legalizowane w dwóch etapach i nie mają zielonego „M“ na znaku
legalizacji, mają wystające oznaczenie na etykiecie opakowania.
Drugi etap legalizowania musi przeprowadzić pracownik urzędu miar i wag.
Pierwszy etap legalizowania przeprowadzono w zakładzie producenta. Obejmuje wszystkie kontrole
według EN45501-8.2.2. Jeśli okres ważności legalizacji wagi jest ograniczony zgodnie z narodowymi
przepisami obowiązującymi w poszczególnych państwach, użytkownik ponosi wyłączną
odpowiedzialność za przeprowadzenie w odpowiednim czasie ponownej legalizacji wagi.
Pyccкu Примечание для поверенных весов в странах ЕЭС
M
Поверенные на заводе весы помечаются вышеуказанным символом на
упаковочной этикетке и зеленой наклейкой "M" на табличке поверки.
Они могут немедленно приниматься в эксплуатацию.
M
Весы, которые поверяются в два этапа и не имеют зеленой наклейки "M" на
табличке поверки, помечаются вышеуказанным символом на упаковочной
этикетке. Второй этап поверки должен производиться поверочным ведомством.
Первый шаг поверки был выполнен на заводе-изготовителе. Он включает все проверки
согласно EN45501-8.2.2. Если в соответствии с национальными предписаниями отдельных
государств срок действия поверки ограничен, эксплуатирующая организация сама несет
ответственность за своевременную повторную поверку таких весов.
Page 4 of 6 WTB_CE_MULTI_0920
Page 22

Page 5 of 6 WTB_CE_MULTI_0920
Notice: Certified balances and balances used for legal applications have the EU type approval. The
year of the initial verification is shown next to the CE mark. Such balances are verified in the factory
and carry the „M“ mark on the actual balance and the packaging. The year of initial verification is
shown next to the CE mark. The GEO value of verified balances explains for which location of use the
balance has been verified. This GEO value is shown on the balance itself and on the packing. Further
details see GEO value table.
Hinweise: Für geeichte/eichpflichtige Waagen liegt eine EU Bauartzulassung vor. Das Jahr der ersten
Eichung ist neben dem CE Zeichen aufgeführt. Solche Waagen sind ab Werk geeicht und tragen die
Kennzeichnung „M“ auf dem Gerät selbst und auf der Verpackung. Der GEO-Wert gibt bei vom
Hersteller geeichten Waagen an, für welchen Aufstellungsort die Waage geeicht ist. Dieser GEO-Wert
befindet sich auf der Waage sowie der Verpackung. Genaueres ist der GEO-Wert-Tabelle zu
entnehmen.
Remarques : Les balances vérifiées/admissibles à la vérification font l’objet d’une approbation de
modèle UE. L’année de la vérification primitive est indiqués à côté de la marque CE. Ces balances
sont vérifiées d’origine et portent la marque „M“ sur l’appareil lui-même et sur l’emballage. Le valeur
GEO indique le lieu d’utilisation pour lequel la balance été vérifiée. Ce valeur GEO se trouve sur la
balance ainsi que sur l’emballage. Veuillez trouver plus de détails dans le tableau GEO.
Notas: Las balanzas verificadas/verificables cuentan con una aprobación de modelo UE. El año de la
primera verificación está indicado al lado del distintivo CE. Estas balanzas están verificadas en fábrica
y llevan la designación „M“ sobre el propio aparato y sobre el embalaje. El valor GEO indica el lugar
de ubicación por lo cual la balanza está verificado. El valor se encuentra sobre la balanza así como
sobre el embalaje. Por favor tomen los demás detalles de la tabla GEO.
Avvertenza: Per le bilance approvate esiste un’approvazione CE del tipo. L´anno della prima verifica
è indicato a fianco della marcatura CE. I tipi marcati con un contrassegno „M“ su sfondo verde
possono essere impiegati da subito. Il coefficiente GEO di bilance omologate indica per quale luogo la
bilancia è stata omologata. Questo coefficiente GEO si trova sulla bilancia e sull’imballo. Ulteriori
informazioni vedi tabella coefficiente GEO
Opmerkingen: Voor geijkte weegschalen/weegschalen, die verplicht geijkt moeten worden, ligt er een
EG-modelgoedkeuring ter inzage. Het jaar van de eerste ijking werd naast het EG-conformiteitsteken
vermeld. Dergelijke weegschalen werden in de fabriek geijkt en dragen het identificatielabel „M“ op het
apparaat zelf en op de verpakking. De GEO-waarde geeft bij door de fabrikant geijkte weegschalen
aan, voor welke plaats van opstelling de weegschaal geijkt is. Deze GEO-waarde bevindt zich op de
weegschaal en ook op de verpakking. Meer details kan er uit de tabel met de GEO-waarde afgeleid
worden.
Instruções: Para as balanças aferidas / obrigadas à aferição existe uma homologação de tipo
construtivo da EU. O ano da primeira aferição fica ao lado do simbolo CE. Tais balanças foram
aferidas na fábrica e levam o rótulo „M“ no mesmo aparelho e na embalagem. O valor GEO indica nas
balanças aferidas pelo produtor para qual lugar de colocação a balança foi aferida. Este valor GEO
encontra-se na balança assim como na embalagem. Mais pormenores podem ver-se na tablela dos
valores GEO.
Poznámky: Pro ocejchované a cejchování podléhající váhy existuje povolení EU podle typu
konstrukce. Rok prvního cejchování se uvádí vedle značky CE. Takové váhy se cejchují ve výrobním
závodě, a jsou označeny znakem „M“ na vlastním přístroji, i na obalu. Hodnota GEO udává u
výrobcem cejchovaných vah, pro jaké místo instalace je váha ocejchována. Tato hodnota GEO se
nachází na váze, jakož i na obalu. Přesnější je odečíst hodnotu GEO z tabulky.
Wskazówki: Dla wag legalizowanych/podlegających obowiązkowi legalizowania istnieje dokument
dopuszczenia rodzaju konstrukcji UE. Rok pierwszej legalizacji jest podany obok znaku CE. Takie
wagi są legalizowane w zakładzie producenta i mają oznaczenie „M“ na sobie i na opakowaniu. W
przypadku wag legalizowanych u producenta wartość geograficzna podaje, dla jakich miejsc
ustawienia waga została legalizowana. Ta wartość geograficzna znajduje się zarówno na wadze jak i
na opakowaniu. Dokładne informacje znajdują się w tabeli wartości geograficznych.
Указания. Калиброванные/подлежащие поверке весы получают допуск на конструкцию ЕС. Год
первой поверки приведен рядом с символом CE. Такие весы поверены на заводе и имеют
маркировку „M“ на самом устройстве и на упаковке. Значение GEO на откалиброванных
изготовителем весах указывает, для какого места установки произведена калибровка весов.
Это значение GEO находится на весах и на упаковке. Более подробная информация
содержится в таблице значений GEO
 Loading...