

Page 1

KERN & Sohn GmbH
Ziegelei 1
E-mail:info@kern-sohn.com
Phone: +49-[0]7433- 9933-0
Internet: www.kern-sohn.com
Operating instructions
Precision balance
KERN PCD
Version 1.5
09/2016
GB
D-72336 Balingen
Fax: +49-[0]7433-9933-149
PCD-BA-e-1615
Page 2

KERN PCD
Precision balance
GB
Version 1.5 09/2016
Operating instructions
Contents
1 Technical data ................................................................................................ 4
2 Basic Information (General) .......................................................................... 7
2.1 Proper use .................................................................................................................................. 7
2.2 Improper Use .............................................................................................................................. 7
2.3 Warranty ..................................................................................................................................... 7
2.4 Monitoring of Test Resources ..................................................................................................... 7
3 Basic Safety Precautions .............................................................................. 8
3.1 Pay attention to the instructions in the Operation Manual .......................................................... 8
3.2 Personnel training ....................................................................................................................... 8
4 Transport and storage ................................................................................... 8
4.1 Testing upon acceptance ........................................................................................................... 8
4.2 Packaging / return transport ....................................................................................................... 8
5 Unpacking, Setup and Commissioning ....................................................... 9
5.1 Installation Site, Location of Use ................................................................................................ 9
5.2 Unpacking/installation ................................................................................................................. 9
5.3 Mains connection ...................................................................................................................... 12
5.4 Operation using a rechargeable battery (optional) ................................................................... 12
5.5 Connection of peripheral devices ............................................................................................. 13
5.6 Initial Commissioning ................................................................................................................ 13
5.7 Linearisation ............................................................................................................................. 14
5.8 Adjustment ................................................................................................................................ 16
5.9 Adjustment ................................................................................................................................ 17
6 Operating elements ..................................................................................... 18
6.1 Overview of display ................................................................................................................... 18
6.2 Keyboard overview ................................................................................................................... 18
7 Basic Operation ........................................................................................... 19
7.1 Start-up ..................................................................................................................................... 19
7.2 Switching Off............................................................................................................................. 19
7.3 Weighing ................................................................................................................................... 19
7.4 Taring........................................................................................................................................ 20
7.5 Pre-Tare function ...................................................................................................................... 21
7.6 Plus/minus weighings ............................................................................................................... 21
7.7 Parts counting ........................................................................................................................... 22
7.8 Net-total weighing ..................................................................................................................... 23
7.9 Percent determination .............................................................................................................. 24
2 PCD-BA-e-1615
Page 3

8 Menu ............................................................................................................. 25
8.1 Navigation in the menu ............................................................................................................. 25
8.2 Menu overview .......................................................................................................................... 28
8.3 Description of individual menu items ........................................................................................ 30
8.3.1 Weighing Units ......................................................................................................................... 30
8.3.2 Dosing and Zero-tracking ......................................................................................................... 31
8.3.3 Selection of adjustment weight ................................................................................................. 32
8.3.4 Filterfunction ............................................................................................................................. 33
8.3.5 Display background illumination ............................................................................................... 34
8.3.6 Animal weighing function .......................................................................................................... 35
8.3.7 Foot switch ................................................................................................................................ 36
8.3.8 Reset to factory setting ............................................................................................................. 36
8.4 Interface parameters ................................................................................................................ 37
8.4.1 Data transfer mode ................................................................................................................... 37
8.4.2 Printout ..................................................................................................................................... 38
8.4.3 Printout example ....................................................................................................................... 39
8.4.4 Baud rate .................................................................................................................................. 39
9 Data output RS 232 C .................................................................................. 40
9.1 Technical data .......................................................................................................................... 40
9.2 Pin allocation of balance output bushing: ................................................................................. 40
9.3 Explanation of the data transfer ................................................................................................ 41
9.4 Output on bar code printer ........................................................................................................ 43
10 Service, maintenance, disposal .................................................................. 44
10.1 Cleaning .................................................................................................................................... 44
10.2 Service, maintenance ............................................................................................................... 44
10.3 Disposal .................................................................................................................................... 44
11 Instant help ................................................................................................... 45
12 Declaration of -Conformity .......................................................................... 46
PCD-BA-e-1615 3
Page 4

1 Technical data
Recom. adjustment weight, not
8.3.3
Operating time 24 h with display background illumination
loading time 8 h
KERN PCD 250-3 PCD 300-3
Readability (d) 0.001 g 0.001 g
Weighing r ange (max) 250 g 350 g
Taring range (subtr active) 250 g 350 g
Reproducibility 0.002 g 0.002 g
Linearity ±0.005 g ±0.005 g
Minimum unit weight at
piece counting
Warm-up time 2 hours 2 hours
Reference quantities at
piece counting
Weighing Units
added (class)
Details about „Selection of
adjustment weight“ see chap.
Stabilization time (typical) 3 sec. 4 sec.
Operating temperature + 5° C .... + 35° C
Humidity of air max. 80 % (not condensing)
Dimensions, completely assembled
(W x D x H) mm
Windshield rec t angular mm
inside: 146x146x70
outside: 158x158x63
0.002 g 0.002 g
5, 10, 20, 25, 50 5, 10, 20, 25, 50
Details „Weighing units“ see chpt. 8.3.1
250 g (F1) 350 g (F1)
165 x 245 x 142 165 x 245 x 142
inside: 146x146x80
outside: 157x157x80
Dimensions Display housing
Weighing plat e m m Ø 10.5
Weight kg (net) 1.1
Electric Supply 220V-240V AC, 50 Hz / 9 V, 300 mA
Battery operation 9 V compound battery (optional)
Rechargeable battery (optional)
Interface RS232
Operating time 48 h without display background
illumination
4 PCD-BA-e-1615
140 x 75 x 46
Page 5

Recom. adjustment weight, not
8.3.3
Operating time 24 h with display background illumination
loading time 8 h
KERN PCD 2500-2 PCD 3000-2
Readability (d) 0.01 g 0.01 g
Weighing r ange (max) 2500 g 3.5 kg
Taring range (subtr active) 2500 g 3.5kg
Reproducibility 0.02 g 0.02 g
Linearity ±0.05 g ±0.05 g
Minimum unit weight at
piece counting
Warm-up time 2 hours 2 hours
Reference quantities at
piece counting
Weighing Units
added (class)
Details about „Selection of
adjustment weight“ see chap.
Stabilization time (typical) 3 sec.
Operating temperature + 5° C .... + 35° C
Humidity of air max. 80 % (not condensing)
Dimensions, completely assembled
(W x D x H) mm
Dimensions Display housing
0.02 g 0.02 g
5, 10, 20, 25, 50
Details „Weighing units“ see chpt. 8.3.1
2500 g (F1) 3 kg (F1)
165 x 280 x 73
140 x 75 x 46
Weighing plat e m m 160x160
Weight kg (net) 1.6 1.9
Electric Supply 220V-240V AC, 50 Hz / 9 V, 300 mA
Battery operation 9 V compound battery (optional)
Rechargeable battery (optional)
Interface RS232
Operating time 48 h without display background
illumination
PCD-BA-e-1615 5
Page 6

Recom. adjustment weight, not
8.3.3
Operating time 24 h with display background illumination
loading time 8 h
KERN PCD 6K-4 PCD 10K0.1 PCD 10K3
Readability (d) 0.1 g 0.1 g 1 g
Weighing r ange (max) 6000 g 10 kg 10 kg
Taring range (subtr active) 6000 g 10 kg 10 kg
Reproducibility 0.1 g 0.1 g 1 g
Linearity ±0.3 g ±0.3 g ±3 g
Minimum unit weight at
piece counting
Warm-up time 2 hours 2 hours 30 min.
Reference quantities at
piece counting
Weighing Units
added (class)
Details about „Selection of
adjustment weight“ see chap.
Stabilization time (typical) 3 sec.
Operating temperature + 5° C .... + 35° C
Humidity of air max. 80 % (not condensing)
Dimensions, completely assembled
(W x D x H) mm
Dimensions Display housing
0.2 g 0.2 g 2 g
5, 10, 20, 25, 50
Details „Weighing units“ see chpt. 8.3.1
6000 g (F1) 10 kg (F1) 10 kg (M1)
165 x 280 x 73
140 x 75 x 46
Weighing plat e m m 160x160
Weight kg (net) 1.6 1.6 1.6
Electric Supply 220V-240V AC, 50 Hz / 9 V, 300 mA
Battery operation 9 V compound battery (optional)
Rechargeable battery (optional)
Interface RS232
Operating time 48 h without display background
illumination
6 PCD-BA-e-1615
Page 7

2 Basic Information (General)
2.1 Proper use
The balance you purchased is intended to determine the weighing value of material
to be weighed. It is intended to be used as a “non-automatic balance”, i.e. the
material to be weighed is manually and carefully placed in the centre of the weighing
plate.. As soon as a stable weighing value is reached the weighing value can be
read.
2.2 Improper Use
Do not use balance for dynamic weighing. In the event that small quantities are
removed or added to the material to be weighed, incorrect weighing results can be
displayed due to the “stability compensation“. (Example: Slowly draining fluids from a
container on the balance).
Do not leave permanent load on the weighing plate. This may damage the
measuring system.
Impacts and overloading exceeding the stated maximum load (max) of the balance,
minus a possibly existing tare load, must be strictly avoided. Balance may be
damage by this.
Never operate balance in explosive environment. The serial version is not explosion
protected.
The structure of the balance may not be modified. This may lead to incorrect
weighing results, safety-related faults and destruction of the balance.
The balance may only be used according to the described conditions. Other areas of
use must be released by KERN in writing.
2.3 Warranty
Warranty claims shall be voided in case
• Our conditions in the operation manual are ignored
• The appliance is used outside the described uses
• The appliance is modified or opened
• Mechanical damage and damage caused by media, liquids
• natural wear and tear
• The appliance is improperly set up or incorrectly electrically connected
• The measuring system is overloaded
2.4 Monitoring of Test Resources
In the framework of quality assurance the measuring-related properties of the
balance and, if applicable, the testing weight, must be checked regularly. The
responsible user must define a suitable interval as well as type and scope of this
test. Information is available on KERN’s home page (www.kern-sohn.com) with
regard to the monitoring of balance test substances and the test weights required for
this. In KERN’s accredited DKD calibration laboratory test weights and balances may
be calibrated (return to the national standard) fast and at moderate cost.
PCD-BA-e-1615 7
Page 8

3 Basic Safety Precautions
3.1 Pay attention to the instructions in the Operation Manual
Carefully read this operation manual before setup and
commissioning, even if you are already familiar with KERN
balances.
3.2 Personnel training
The appliance may only be operated and maintained by trained personnel.
4 Transport and stora ge
4.1 Testing upon acceptance
When receiving the appliance, please check packaging immediately, and the
appliance itself when unpacking for possible visible damage.
4.2 Packaging / return transport
Keep all parts of the original packaging for a possibly
required return.
Only use original packaging for returning.
Prior to dispatch disconnect all cables and remove
loose/mobile parts.
Reattach possibly supplied transport securing devices.
Secure all parts such as the glass wind screen, the
weighing platform, power unit etc. against shifting and
damage.
8 PCD-BA-e-1615
Page 9

5 Unpacking, Setup and Commissioning
5.1 Installation Site, Location of Use
The balances are designed in a way that reliable weighing results are achieved in
common conditions of use.
You will work accurately and fast, if you select the right location for your balance.
On the installation site observe the following:
• Place the balance on a firm, level surface;
• Avoid extreme heat as well as temperature fluctuation caused by installing next to
a radiator or in the direct sunlight;
• Protect the balance against direct draughts due to open windows and doors;
• Avoid jarring during weighing;
• Protect the balance against high humidity, vapours and dust;
• Do not expose the device to extreme dampness for longer periods of time. Non-
permitted condensation (condensation of air humidity on the appliance) may
occur if a cold appliance is taken to a considerably warmer environment. In this
case, acclimatize the disconnected appliance for ca. 2 hours at room
temperature.
• Avoid static charge of goods to be weighed and weighing container.
• Do not operate in areas with hazard of explosive material or in potentially
explosive atmospheres due to materials such as gasses, steams, mists or dusts.
• Keep away chemicals (such as liquids or gasses), which could attack and
damage the balance inside or from outside.
• Keep IP protection of the device.
• If electro-magnetic fields or static charge occur, or if the power supply is unstable
major deviations on the display (incorrect weighing results) are possible. In that
case, the location must be changed.
5.2 Unpacking/installation
Carefully remove the balance from the packaging, remove plastic cover and setup
balance at the intended workstation.
Scope of delivery / serial accessories
• Balance
• Weighing plate
• Mains adapter
• Protective cover
• Operating instructions
• Windshield (only models PCD 400-3)
PCD-BA-e-1615 9
Page 10

Mount the display unit in a way that facilitates operation and where it is easy to see.
After that the display unit can be placed freely.
1. Display unit assembled
For disassembly remove the assembly sheet by loosening the marked screws.
2. Display unit freely placed
10 PCD-BA-e-1615
Page 11
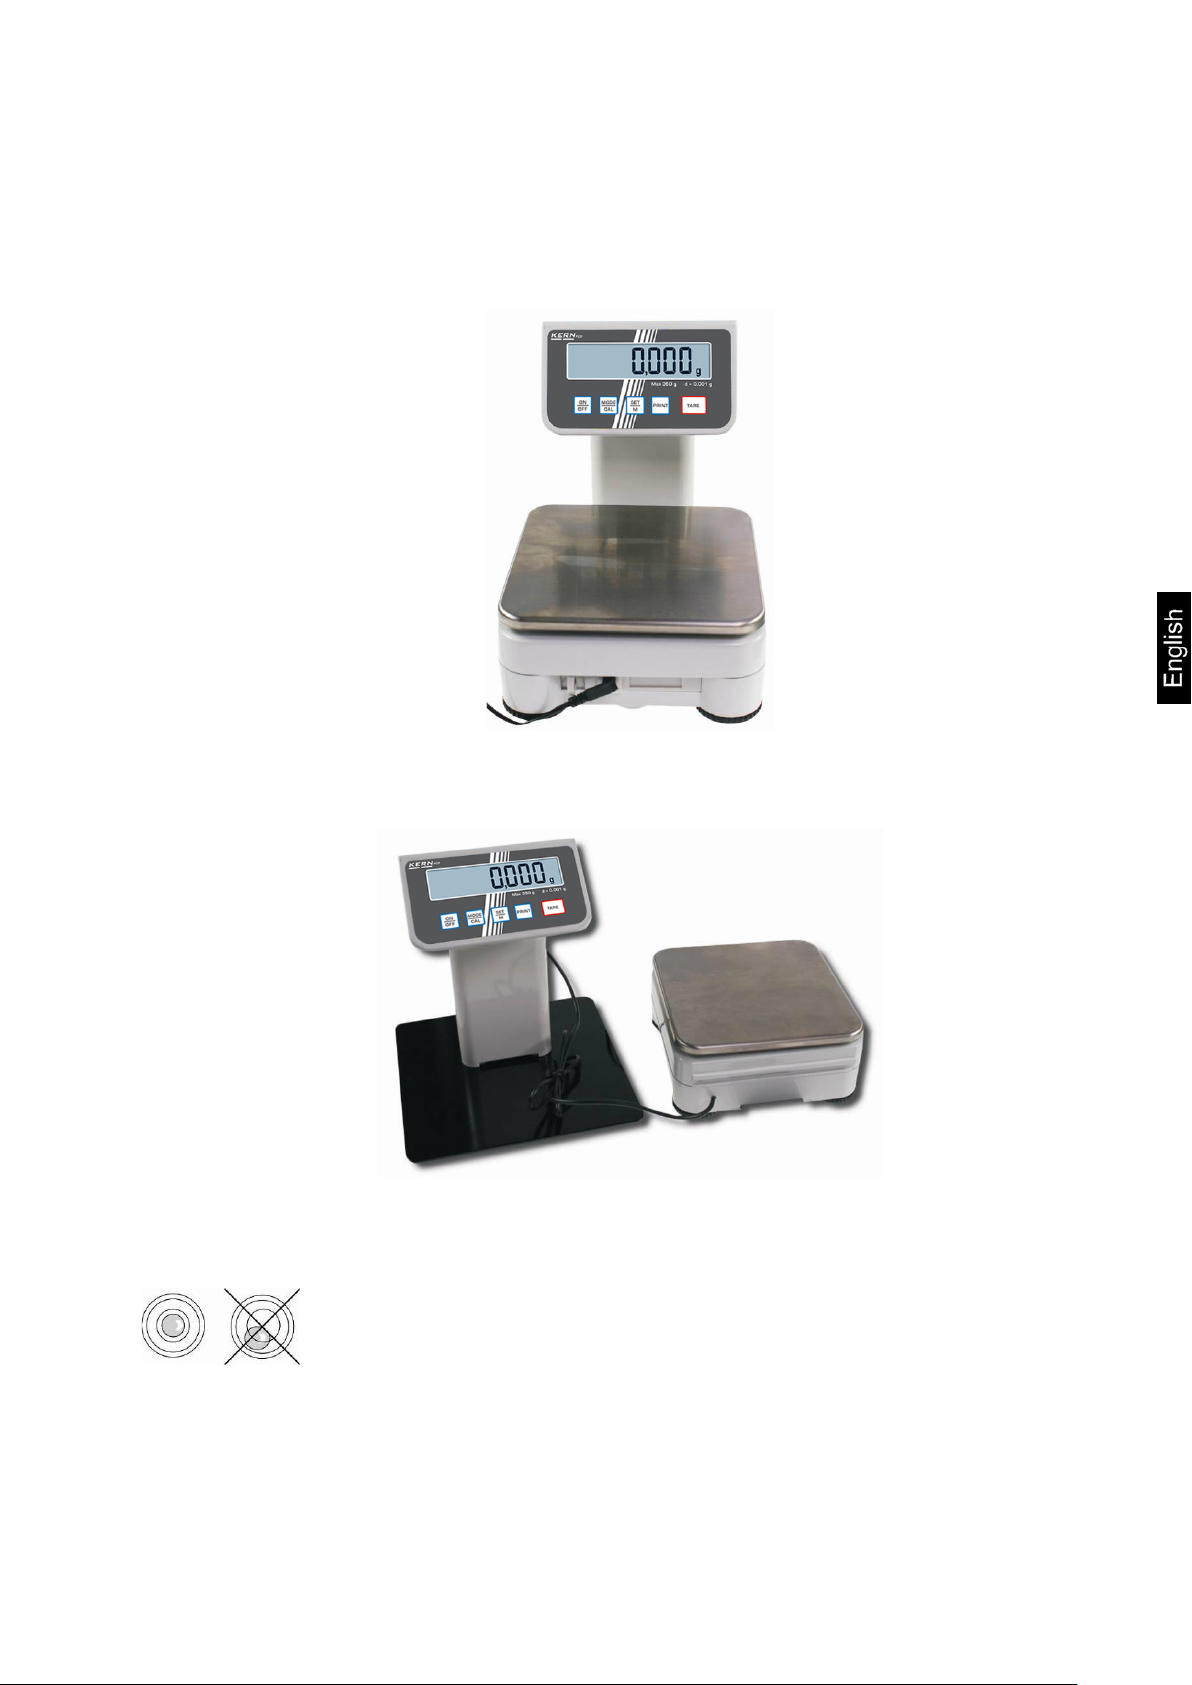
3. Using w i th tri pod (optional)
In order to raise the display, the display unit can be assembled to an optionally
available tripod (KERN PCD-A03).
Assembly see installation instructions of the tripod.
or
The balance must be installed in a way that the weighing plate is exactly in horizontal
position.
Level balance with foot screws until the air bubble of the
water balance is in the prescribed circle.
PCD-BA-e-1615 11
Page 12

5.3 Mains connection
„AF on“:
In order to save the battery, the balance switches automatically
„AF off“:
Switch-off function deactivated.
Power is supplied via the external mains adapter. The stated voltage value must be
the same as the local voltage. Only use original KERN mains adapters. Using other
makes requires consent by KERN.
5.4 Operation using a rechargeable battery (optional)
Lift-off the battery cover on the lower side of the balance. Connect 9 V compound
battery.
Replace the battery compartment cover.
For battery operation the balance has an automatic switch-off function which can be
activated or deactivated in the menu.
In weighing mode keep the PRINT key pressed until “Unit“ appears.
Press MODE key repeatedly until „AF“ appears.
Use the SET key to confirm.
Use the MODE key to choose between the two following settings:
off after 3 minutes without weighing.
Use the SET key to confirm selection. The balance returns to weighing mode.
12 PCD-BA-e-1615
Page 13

Connection of rechargeable battery
Connection of battery
The empty battery is indicated on the display by “LO“. Press ON/OFF-key and
replace the battery immediately.
If the balance is not used for a longer time, take out the batteries and store them
separately. Leaking battery liquid could damage the balance.
If there exists an optional rechargeable battery, it has to be connected in the battery
compartment via a separate plug-in socket. Now the mains adapter delivered with
the rechargeable battery must be applied.
5.5 Connection of peripheral devices
Before connecting or disconnecting of additional devices (printer, PC) to the data
interface, always disconnect the balance from the power supply.
With your balance, only use accessories and peripheral devices by KERN, as they
are ideally tuned to your balance.
5.6 Initial Commissioning
In order to obtain exact results with the electronic balances, the balance must have
reached the operating temperature (see warming up time chap. 1. During this
warming up time the balance must be connected to the power supply (mains,
accumulator or battery).
The accuracy of the balance depends on the local acceleration of gravity.
Strictly observe hints in chapter Adjustment.
PCD-BA-e-1615 13
Page 14

• Carrying out linearization is restricted to specialist staff possessing
see chapter 3.4 “Testing instruments control”
Adjustment
weight
1.
50 g
50 g
500 g
500 g
2.
100 g
150 g
1000 g
1500 g
3.
150 g
250 g
1500 g
2500 g
4.
200 g
300 g
2000 g
3000 g
5.
250 g
350 g
2500 g
3500 g
Adjustment
weight
1. - - - 2. - - - 3. - - - 4. - - - 5. - -
-
5.7 Linearisation (only models PCD 250-3, PCD 2500-2)
Linearity shows the greatest deviation of a weight display on the scale to the value of
the respective test weight according to plus and minus over the entire weighing
range.
If linearity deviation is discovered during a monitoring of test resources, you can
improve this by means of linearization.
well acquainted with the workings of weighing scales.
• The test weights to be used must be adapted to the weighing scale’s
specifications; see chapter 3.4 “Testing instruments control”.
• Observe stable environmental conditions. Stabilisation requires a
certain warm-up time.
• After successful linearization you will have to carry out calibration;
Tab. 1: Adjustment points
PCD 250-3 PCD 300-3 PCD 2500-2 PCD 3000-2
PCD 6K-4 PCD 10K0.1 PCD 10K3
Operation Display
How to carry out linearization:
Switch on balance
Press repeatedly until UNIT is
displayed
14 PCD-BA-e-1615
Page 15

to zero display.
Press repeatedly until LinEAr is
displayed
Ensure that there are no objects on the
weighing pan.
Start linearisation with . The value of the
first adjustment weight will be displayed.
Place adjustment weight and acknowledge by
. The scales will change to zero display.
Take away adjustment weight. After a short
time the value of the second adjustment weight
appears in the display.
Place second adjustment weight and
acknowledge by . The scales will change
to zero display.
(example)
(example)
Take away adjustment weight. After a short
time the value of the third adjustment weight
appears in the display.
Place third adjustment weight and
acknowledge by . The scales will change
Take away adjustment weight. After a short
time the value of the forth adjustment weight
appears in the display.
Place forth adjustment weight and
acknowledge by . The scales will change
to zero display.
Take away adjustment weight. After a short
time the value of the fifth adjustment weight
appears in the display.
(example)
(example)
(example)
PCD-BA-e-1615 15
Page 16

Place fifth adjustment weight and acknowledge
by . The scales will change to zero
display.
Take away adjustment weight. After a short
time CAL F is displayed.
Finally the balance will switch off automatically. Now the linearization is concluded
successfully.
In case of an adjustment error or incorrect adjusting weight the display will show an
error message; repeat linearization process.
5.8 Adjustment
As the acceleration value due to gravity is not the same at every location on earth,
each balance must be coordinated - in compliance with the underlying physical
weighing principle - to the existing acceleration due to gravity at its place of location
(only if the balance has not already been adjusted to the location in the factory).
This adjustment process must be carried out for the first commissioning, after each
change of location as well as in case of fluctuating environment temperature. To
receive accurate measuring values it is also recommended to adjust the balance
periodically in weighing operation.
16 PCD-BA-e-1615
Page 17

5.9 Adjustment
The adjustment should be made with the recommended adjustment weight (see
chap. 1 "Technical data"). Adjustment is also possible with the weights of other
nominal values (see table 1), but not the optimum for measuring technique.
Procedure when a djusting:
Observe stable environmental conditions. A warming up time (see chapter 1) is
required for stabilization.
Turn on balance by pressing the ON/OFF key.
Press the MODE key and keep it pressed, in the display appears shortly
„CAL“. After that the exact size appears flashing in the display
(see chapter. 8.3.3) of the adjustment weight.
Now set the adjusting weight in the centre of the weighing plate.
Press the SET key. Short time later there appears „CAL F“, then the automatic
return to the weighing mode. In the display there appears the value of the
adjustment weight.
An error during adjustment or the use of an incorrect adjusting weight will
result in an error message „CAL E“. Repeat adjustment.
Keep the adjustment close to the balance. Daily control of the weighing exactness is
recommended for quality-relevant applications.
PCD-BA-e-1615 17
Page 18

6 Operating elements
6.1 Overview of display
6.2 Keyboard overview
Key Description Function
• Calculate weighing data via interface
PRINT button
• Call up menu (keep key pressed until UNIT appears)
• Conf irm settings in the menu
SET button
• Save and exit menu
• How to select menu items
MODE button
• Change settings in the menu
• Adjustment
TARE button
• Taring
ON/OFF button
• Turn on/off
18 PCD-BA-e-1615
Page 19

7 Basic Operation
ON
OFF
ON
OFF
7.1 Start-up
7.2 Switching Off
Press ON button.
The balance will carry out a self-test As soon as the
weight display appears, the balance is ready for
weighing.
Press OFF button, the display disappears
7.3 Weighing
Place goods to be weighed on balance.
Wait for standstill control, after the standstill control, the
weighing unit appears right hand in the display
(e.g. g or kg)
Read weighing result.
If the material to be weighed is heavier than the
weighing range, the display will show "Error"
(=Overload).
PCD-BA-e-1615 19
Page 20

7.4 Taring
TA R E
TA R E
Place an empty weighing container, the weight of the
weighing container will be displayed.
Press the TARE button, the zero display disappears.
The tare weight is saved until it is deleted.
W eigh the material, the net weight will be indicated.
The taring process can be repeated any num ber of times,
e.g. when adding several components for a mixture
(adding). The limit is reached when the whole weighing
range is exhausted.
Delete tare
After removing the weighing container, the weight of the
weighing container appears as negative display.
The tare weight is saved until it is deleted.
Unload the balance and press the TARE button, the zero
display appears.
20 PCD-BA-e-1615
Page 21

7.5 Pre-Tare function
MODE
CAL
Using this function the weight of a tare vessel is stored. Even
MODE
CAL
TA R E
after turning off/on the weighing balance will continue working
with the saved tare value.
In weighing mode put tare vessel on the weighing plate
Press repeatedly the MODE key until „PtArE“ flashing
appears.
Use SET key to store the current weight on the weighing
plate as a PRE-TARE value.
Delete PRE-TARE
Unload the balance and set the TARE button to zero
value
Press repeatedly the MODE key until „PtArE“ flashing
appears.
Use the SET key to confirm. The PRE-TARE value is
deleted, the zero display appears.
7.6 Plus/minus wei ghi ngs
For example unit weight control, fabrication control etc.
Put the nominal weight on the weighing plate and tare
using the TARE button.
Remove the nominal weight
Put the test objects subsequently on the weighing plate,
the respective deviation from the nominal weight is
displayed with the respective sign to „+“ and „-“.
According to the same procedure also packages with the
same weight can be produced, referring to a nominal
weight.
Back to weighing mode by pressing the TARE button.
PCD-BA-e-1615 21
Page 22

7.7 Parts counting
MODE
CAL
SET
M
During piece counting parts can either be counted into a
parts the average weight per part has to be determined with a
The larger the reference quantity, the higher the counting
High reference must be selected for small parts or
The larger the reference quantity, the more accurate the parts
• Back to weighing mode by
pressing the MODE button.
• Error message „Er 1“
reference determination.
• Taring
button to tare out the container.
container or out of a container. T o count a greater number of
small quantity (reference quantity).
exactness.
parts with considerably different sizes.
counting.
The process has four steps:
Tare the weighing container
Determine the reference unit
Original weighing of reference weight
Count the items
In weighing mode press MODE key shortly. Reference
piece number „5
By pressing the MODE button several times other
reference quantities 5, 10, 20, 25 and 50 can be called up.
PCS
“ appears flashing.
Place as many pieces to count on the weighing plate as the
set reference quantity requires.
Use the SET key to confirm. The balance is now in parts
counting mode counting all units on the weighing plate.
Piece below minimum weight of piece (See chpt. 1
“Technical specifications“): Press MODE key and restart
The tare vessels can also be used for piece counting.
Before starting piece counting use the TARE
22 PCD-BA-e-1615
Page 23

7.8 Net-total weighing
SET
M
It is useful if a mixture of several components is weighed into a
tare vessel and finally the sum weight of all weighed
total, i.e.
components is necessary for control purposes (netthe weight of the tare vessel).
Example:
1. Place tare container on the weighing plate. Press the TARE
2. Weigh-in component . Press the SET button, the zero
3. Weigh-in component and press SET key. Net-total (sum
4. Press the SET button, the zero display disappears.
5. Weigh-in component and press SET key. Net-total (sum
button, the zero display disappears.
display disappears. [] is displayed on the right border of
the display.
weight of the components and ) is displayed.
weight of the components and and .) is displayed.
If necessary, also fill the formula up to the desired final
value. For every component more repeat the steps 4-5.
Back to weighing mode by pressing the TARE button.
PCD-BA-e-1615 23
Page 24

7.9 Percent determination
MODE
CAL
SET
M
Percentage calculation facilitates weight display in percent
related to a reference weight equivalent to 100 %.
In weighing mode press MODE key repeatedly,
until “100 %“ is displayed flashing.
Put a reference weight which corresponds to 100 %.
Store by pressing the SET key. If the display stops
flashing, remove the reference weight.
Place goods to be weighed on balance.
The weight of the sample is displayed in percentage in
terms of the reference weight.
Back to weighing mode by pressing the MODE button.
24 PCD-BA-e-1615
Page 25

8 Menu
P R IN T
MODE
CAL
SET
M
MODE
CAL
SET
M
8.1 Navigation in the menu
Access to menu
In weighing mode keep the PRINT key
pressed until „Unit“ appears.
How to select menu items
Change settings
Using the MODE key the individual menu
items can be selected one after the
other.
Acknowledge selected menu item using
SET key, the current setting is displayed.
Change the settings using the MODE
key. At any pressing of the MODE key,
the next setting is displayed, see chapter
.8.2 „Menu Overview“.
1. Save change of a menu item and
exit the menu
Press the SET key; balance will
return to weighing mode.
PCD-BA-e-1615 25
Page 26

SET
M
MODE
CAL
TA R E
SET
M
2. Change settings of several menu
items
Acknowledge selected menu item using
SET key, the current setting is displayed.
Use the MODE key to change settings.
Press the TARE key, „Exit“ is displayed.
Either
Acknowledge with SET key (yes),
„StorE“ is displayed. Save (SET key) or
reject (PRINT key) and exit the menu,
or
Press PRINT key (no) and make the
changes on the other menu items as
described above
26 PCD-BA-e-1615
Page 27

SET
M
SET
M
PRINT
Save/reject and exit the menu
Save
Reject
Either
Any changes carried out are stored by
pressing the SET key (yes). The balance
returns automatically into weighing
mode.
or
To cancel changes, press the PRINT key
(no). The balance returns automatically
into weighing mode.
PCD-BA-e-1615 27
Page 28

8.2 Menu overview
UNIT
g*
Gram
oz
Pound
ozt
Ounce
ct
Carat (dependent on model)
tlh
Tael Hongkong
tlt
Tael Taiwan
gn
Grain (dependent on model)
Pennyweight (dependent on
model)
mo
Momme
Tol
Tola
FFA
Freely selectable factor
Data transfer mode (see
PR
Data output via remote control
commands (see chapter . 9.3)
Data output by pressing the
PRINT key (see chapter 9.3)
Continuous data output (see
chapter 9.3)
Printout on barcode printer (see
chapter 9.4)
Autom. data output of stable
9.3)
Selection printer output
LAPr
Hdr*
Edition of the headlines
GrS
Edition of the total weight
Net
Issue of net weight
tAr
Issue of tare weight
N7E
Edition of the stored weight
PCS
Edition of quantity
AUJ
Issue of piece weight
Rqt
Edition of the reference quantity
when printout is started
when printout is ended
Description of function Function Parameter
s
Weighing units switching
over (see chap. 8.3.1)
dwt
chapter 8.4.1)
rE CR*
Description of options
(see chapter 8.4.2)
Pr PC
AU PC
bA Pr
AU Pr
FFd
weighing values (see chapter
Issue of a page forward feed
28 PCD-BA-e-1615
FFE
Issue of a page forward feed
Page 29

19200
9600*
4800
2400
1200
3 min without changing load ON
3 min without changing load OFF
on*
On
off
Off
400
4000
1
Fast display
2
Normal display
3
Slow display
(see chapter 5.7)
on*
Background illumination on
off
Background illumination off
stable weighing value.
off*
Off
3
5
10
15
no*
no
yes
yes
Baud rate
(see chap. 8.4.4)
Auto off
(battery operation), see
(chap. 5.4)
Auto Zero
(see chapter 8.3.2)
Selection adjustment
weight (see chapter 8.3.3)
Filter function
(see chapter 8.3)
bAUd
AF
tr
CAL
StAbiL
on*
off
Automatic switch-off function after
Automatic switch-off function after
*dependent on model
Linearisation
Background illumination
of the display, (see chap.
8.3.4)
Animal weighing function
(see chapter 8.3.5)
Foot switch
(see chap. 8.3.6)
LinEAr
bL
ANL
FOOt S
CH
tAr
Pr
*dependent on model
The background illumination will
be switched off automatically
10 sec after having reached a
Period 3 seconds
Period 5 seconds
Period 10 seconds
Period 15 seconds
Tare balance by pressing the
foot switch
Print the weighing value by
pressing the foot switch
Reset to factory setting
(see chap. 8.3.7)
* = default setting
PCD-BA-e-1615 29
rSt
Page 30

8.3 Description of individual menu items
Display
Conversion factor *
1 g =
Gram
g
1. Ounce
oz
0.035273962
Troy ounce
ozt
0.032150747
Tael Hongkong
tlh
0.02671725
Tael Taiwan
tlt
0.0266666
Grain (dependent on model)
gn
15.43235835
Pennyweight
(dependent on model)
dwt
0.643014931
Momme
(mom)
0.2667
Tola
tol
0.0857333381
Carat (dependent on model)
ct 5
Freely selectable factor *)
FFA
xx.xx
8.3.1 Weighing Units
In weighing mode keep the PRINT key pressed until [Unit]
appears.
Press SET key, the selected unit is displayed.
Use the MODE key to select between the different units (see
following table).
Use the SET key to confirm the selected unit
30 PCD-BA-e-1615
*) Input conversion factor
As specified above, press repeatedly the MODE key until „FFA“
appears.
To enter the factor, press the SET key; the enabled digit starts
flashing.
Using the MODE button, the displayed value is increased by 1,
with the PRINT button it is reduced by 1.
With the TARE key selection of the number to the left.
Confirm input by pressing the SET key.
Press repeatedly the SET key to take over the „Freely
selectable factor“ as current weighing unit.
Page 31

8.3.2 Dosing and Zero-tracking
The Auto-Zero function is used to tare small variations in weight
In the event that small quantities are removed or added to the
material to be weighed, incorrect weighing results can be
When apportioning involves small variations of weight, it is
however is switched off, the weighing display
automatically.
displayed due to the “stability compensation“. (Example: Slowly
draining fluids from a container on the balance).
advisable to switch off this function.
If Zero-Tracking
becomes more busy.
In weighing mode keep the PRINT key pressed until “Unit“
appears.
Press the MODE button several times until „tr“ is displayed.
Acknowledge using SET key, the current setting is displayed.
Select the desired settings by pressing the MODE key.
tr on
tr off
Function activated
Function deactivated
Use the SET key to confirm selection.
PCD-BA-e-1615 31
Page 32

8.3.3 Selection of adjustment weight
In the model series KERN PCD, the adjustment weight can be
quality weighing results in the sense of the measuring technology,
it is recommended to select the nominal value as high as
can be
Adjustment
Points
1.
50 g
50 g
500 g
500 g
2.
100 g
150 g
1000 g
1500 g
3.
150 g
250 g
1500 g
2500 g
4.
200 g
300 g
2000 g
3000 g
5.
250 g
350 g
2500 g
3500 g
Adjustment
Points
1.
1 kg
2 kg
2 kg
2.
2 kg
5 kg
5 kg
3.
5 kg
7 kg
7 kg
4.
6 kg
10 kg
10 kg
5. - -
-
Possible Adjustment Points:
selected from pre-set nominal values (refer also to following table,
factory setting with grey background). In order to achieve high-
possible. The non delivered adjustment weights
purchased from KERN as option.
In weighing mode keep the PRINT key pressed until [Unit]
appears.
Press the MODE key several times until „CAL“ is displayed.
Acknowledge using SET key, the current setting is displayed.
Select the desired settings by pressing the MODE key.
Use the SET key to confirm selection.
PCD 250-3 PCD 300-3 PCD 2500-2 PCD 3000-2
PCD 6K-4 PCD 10K0.1 PCD 10K3
32 PCD-BA-e-1615
Page 33

1
Filter 1:
up location.
2
Filter 2:
The scale reacts normally, normal installation site
3
Filter 3:
location
8.3.4 Filterfunction (except PCD 10K-3)
This menu item allows the balance to be set according to
specific ambient conditions and measuring purposes.
In weighing mode keep the PRINT key pressed until [Unit]
appears.
Press the MODE button several times until „StAbiL“ is
displayed.
Acknowledge using SET button, the current setting is
(Example)
displayed.
Select the desired settings by pressing the MODE button.
The balance reacts quickly and in a sensitive manner, q uiet set-
The balance reacts slowly and in a robust manner, busy set-up
Use the SET key to confirm selection.
PCD-BA-e-1615 33
Page 34

8.3.5 Display background illumination
bl
on
Background illumination
switched on
Contrastful display which can
also be red in the darkness.
bl
off
Background illumination
Battery saving
bl
Ch
The background illumination
weighing value.
Battery saving
In weighing mode keep the PRINT key pressed until “Unit“
appears.
Press the MODE button several times until „bl“ is displayed.
Acknowledge using SET key, the current setting is displayed.
Select the desired settings by pressing the MODE key.
switched off
will be switched off
automatically 10 sec after
having reached a stable
Use the SET key to confirm selection.
34 PCD-BA-e-1615
Page 35

8.3.6 Animal weighing function
The animal weighing function can be applied for busy weighings.
During a defined period the mean value of the weighing results is
The more unquiet the weighed item, the longer the period should
formed.
be selected.
In weighing mode keep the PRINT key pressed until “Unit“
appears.
Press the MODE button several times until „ANL“ is displayed.
Acknowledge using SET key, the current setting is displayed.
Select the desired settings by pressing the MODE key
ANL 3
ANL 5
ANL 10
ANL 15
ANL off
Period 3 seconds
Period 5 seconds
Period 10 seconds
Period 15 seconds
Animal weighing not active
Use the SET key to confirm selection.
Put the weighing good (animal) on the weighing plate and
press the SET button. In the display runs a „Countdown“.
The average value of the weighing results is displayed and
remains displayed on the screen.
Use the SET key to change between animal weighing and
normal weighing.
Press the SET key to restart the weighing cycle for animal
weighing.
PCD-BA-e-1615 35
Page 36

8.3.7 Foot switch
This function resets all balance settings to factory setting.
rSt
yes
Balance will be reset to factory setting.
rSt
no
The balance keeps its individual setting
The foot switch is used to send the weighing values to a printer or to a PC.
Alternatively can also be tared.
Connection and operation see in the operating instructions supplied with this foot
switch.
8.3.8 Reset to factory setting
In weighing mode keep the PRINT key pressed until “Unit“
appears.
Press the MODE button several times until „rSt“ is displayed.
Acknowledge using SET key, the current setting is displayed.
Select the desired settings by pressing the MODE key
Use the SET key to confirm selection. The balance returns to
weighing mode.
36 PCD-BA-e-1615
Page 37

8.4 Interface parameters
rE CR
Pr PC
PRINT
AU PC
bA Pr
AU Pr
Data output is carried out via interface RS 232 C.
General
The previous condition for the data transfer between balance and a periphericall
device (e.g. printer, PC ...) is that the appliances are set to the same interface
parameters (e.g. baud rate, transfer mode ...).
8.4.1 Data transfer mode
In weighing mode keep the PRINT key pressed until “Unit“
appears.
Press the MODE button several times until „Pr“ is displayed.
Acknowledge using SET key, the current setting is displayed.
Select the desired settings by pressing the MODE key
Data output via remote control commands
Data output using the
key
Continuous data output
Output on bar code printer
Autom. data output of stable weighing values
Use the SET key to confirm selection. The balance returns to
weighing mode.
PCD-BA-e-1615 37
Page 38

8.4.2 Printout
Using this function data are selected which are to be sent via the
Hdr
Edition of the headlines
GrS
Edition of the total weight
Net
Edition of net weight
tAr
Edition of tare weight
N7E
Edition of the stored weight
PCS
Edition of quantity
AUJ
Edition of piece weight
Rqt
Edition of the reference quantity
FFd
Edition of a page forward feed when printout is started
FFE
Edition of a page forward feed when printout is ended
sent to a printer or to a PC.
RS232C (not valid for data transfer mode BAPr ).
In weighing mode keep the PRINT key pressed until “Unit“
appears.
Press the MODE key several times until „LAPr“ is displayed.
Acknowledge using SET key, the current setting is displayed.
Select the desired output parameter by pressing the MODE key
After actuating the SET button, the current state is displayed
( on / off ).
Use MODE and PRINT key to change the status
„on off“.
Use the SET key to confirm selection. The balance returns to
weighing mode.
By that way the user can configure his own data block, which then is
38 PCD-BA-e-1615
Page 39

8.4.3 Printout example
Page forward feed when started
line1
Edition of the headlines
line 2
line 3
line 4
line 5
G
135.81 g
Total weight N 28.27 g
Net weight T 1.49 g
Tare weight M 12.25 g
Saved weight P 5 pcs
Quantity A 5.63 g
Piece weight R 2 pcs
Reference quantity
Page forward feed when ended
The baud rate defines the transfer speed vie the interface, 1 Baud =
8.4.4 Baud rate
1 Bit/second.
In weighing mode keep the PRINT key pressed until “Unit“
appears.
Press the MODE key several times until „bAUd“ is displayed.
Acknowledge using SET key, the current setting is displayed.
Use MODE key select the desired settings
9600 4800 2400 1200 19200
Use the SET key to confirm selection. The balance returns to
weighing mode.
PCD-BA-e-1615 39
Page 40

9 Data output RS 232 C
5 1
9 6
9.1 Technical data
• 8-bit AS CII Code
• 1 start bit, 8 data bits, 1 stop bit, no parity bit
• Baud rate selectable at 1200, 2400, 4800, 9600 and 19200 Baud
• Miniature plug-in necessary (9 pole D-Sub)
• For operation with interface faultless operation is only ensured with the correct
KERN – interface cable (max. 2m)
9.2 Pin allocation of balance output bushing:
Front view:
Pin 2: Transmit data
Pin 3: Receive data
Pin 5: Signal ground
40 PCD-BA-e-1615
Page 41

9.3 Explanation of the data transfer
1 2 3 4 5 6 7 8 9
10
11
12
13
14
15
16
17
18
M S
N1
N2
N3
N4
N5
N6
N7
N8
N9
N10
B
U1
U2
U3
CR
LF
1 2 3 4 5 6 7 8 9
10
11
12
13
14
15
16
17
18
B
B
B
B
B
B
B
B
B
B
B
E
r
r
o
r
CR
LF
1 2 3 4 5 6 7 8 9
10
11
12
13
14
15
16
17
18
M
S
N1
N2
N3
N4
N5
N6
N7
N8
N9
N10
B
U1
U2
U3
CR
LF
1 2 3 4 5 6 7 8 9
10
11
12
13
14
15
16
17
18
B
B
B
B
B
B
B
B
B
B
B
E
r
r
o
r
CR
LF
1 2 3 4 5 6 7 8 9
10
11
12
13
14
15
16
17
18
M
S
N1
N2
N3
N4
N5
N6
N7
N8
N9
N10
B
U1
U2
U3
CR
LF
1 2 3 4 5 6 7 8 9
10
11
12
13
14
15
16
17
18
B
B
B
B
B
B
B
B
B
B
B
E
r
r
o
r
CR
LF
1 2 3 4 5 6 7 8 9
10
11
12
13
14
15
16
17
18
M
S
N1
N2
N3
N4
N5
N6
N7
N8
N9
N10
B
B
B
B
CR
LF
Pr PC
Press the PRINT key, at stable weight the format is transferred from LAPR.
a. Format for stable values for weight/quantity/percentage
b. Format in case of fault
AU Pr:
As soon as the weighing value is stable, the format is automatically transferred from
LAPR.
c. Format for stable values for weight/quantity/percentage
d. Format in case of fault
AU PC:
The weighing values are sent automatically and continuously, no matter if the value
is stable or unstable.
e. Format for stable values for weight/quantity/percentage
f. Format in case of fault
g. Format for unstable values for weight/quantity/percentage
PCD-BA-e-1615 41
Page 42

rE Cr:
s
Function:
Stable weighing value for the weight is sent via the RS232
interface
w
Function:
Weighing value for the weight (stable or unstable) is sent
via the RS232 interface
t
Function:
No data are sent, the balance carries out the tare function.
1 2 3 4 5 6 7 8 9
10
11
12
13
14
15
16
17
18
M
S
N1
N2
N3
N4
N5
N6
N7
N8
N9
N10
B
U1
U2
U3
CR
LF
1 2 3 4 5 6 7 8 9
10
11
12
13
14
15
16
17
18
B
B
B
B
B
B
B
B
B
B
B
E
r
r
o
r
CR
LF
1 2 3 4 5 6 7 8 9
10
11
12
13
14
15
16
17
18
M
S
N1
N2
N3
N4
N5
N6
N7
N8
N9
N10
B
B
B
B
CR
LF
The remote control commands s/w/t are sent from the remote control unit to the
balance as ASCII code. After the balance having received the s/w/t commands, it will
send the following data.
Take into account that the following remote control commands must be sent
without a subsequent CR LF.
h. Format for stable values for weight/quantity/percentage
i. Format in case of fault
j. Format for unstable values for weight/quantity/percentage
42 PCD-BA-e-1615
Page 43

Symbols
M Blank or M
S Space character or negative sign (-)
N1 … N10 10 numeric ASCII codes for weight values including decimal places or
blanks
U1 … U3 3 ASCII codes for weighing unit pcs. / % / or blank
B Blank
E, o, r ASCII code or “E, o, r”
CR Carriage Return
LF (Line Feed)
9.4 Output on bar code printer
The data transfer mode has to be set on „BA Pr“ (chapter 8.4.1).
As bar code printer the Zebra printer model LP2824 is provided.
Take into account that the output format of the balance is fixedly defined and cannot
be changed.
The printer format is stored in the printer, i.e. in case of a failure the printer cannot be
changed with a new one from factory, previously it is necessary that KERN installs
the respective software.
The Zebra printer and the balance must be connected to the delivered interface
cable when they are switched off.
After switching-on both appliances, and after reaching the status ready-for-operation,
a label will be printed out when pressing the PRINT button.
PCD-BA-e-1615 43
Page 44

10 Service, maintenance, disposal
Before any maintenance, cleaning and repair work disconnect the
appliance from the operating voltage.
10.1 Cleaning
Please do not use aggressive cleaning agents (solvents or similar agents), but a
cloth dampened with mild soap suds. Take care that the device is not penetrated by
fluids and polish it with a dry soft cloth.
Clean the stainless-steel parts with a soft cloth soaked with a cleaning agent
suitable for stainless steel.
For stainless steel parts do not use any cleaning agents which contain sodium
hydroxide solution, acetic, hydrochloric, sulphuric or citric acid.
Do not use metal brushes or cleaning sponges of steel wool, as this causes
superficial corrosion.
10.2 Service, maintenance
The appliance may only be opened by trained service technicians who are
authorized by KERN.
Ensure that the balance is regularly calibrated, see chap. Testing instruments
control.
10.3 Disposal
Disposal of packaging and appliance must be carried out by operator according to
valid national or regional law of the location where the appliance is used.
44 PCD-BA-e-1615
Page 45

11 Instant help
• Battery is inserted incorrectly or is empty.
• No batteries inserted.
The displayed weight is permanently
In case of an error in the program process, briefly turn off the balance and
disconnect from power supply. The weighing process must then be restarted from
the beginning.
Help:
Fault Possible cause
The displayed weight does not glow.
changing
The weighing value is obviously
• The balance is not switched on.
• The mains supply connection has been
interrupted (mains cable not plugged
in/faulty).
• Power supply interrupted.
• Draught/air movement
• Table/floor vibrations
• The weighing plate is in contact with
foreign matter.
• Electromagnetic fields / static charging
(choose different location/switch off
interfering device if possible)
• The display of the balance is not at zero
wrong
Should other error messages occur, switch balance off and then on again. If the error
message remains inform manufacturer.
PCD-BA-e-1615 45
• Adjustment is no longer correct.
• Great fluctuations in temperature.
• Electromagnetic fields / static charging
(choose different location/switch off
interfering device if possible)
Page 46

12 Decl a ration of -Conformity
To view the current EC/EU Declaration of Conformity go to:
www.kern-sohn.com/ce
46 PCD-BA-e-1615
 Loading...