

Page 1

KERN & Sohn GmbH
Ziegelei 1
D-72336 Balingen
E-Mail: info@kern-sohn.com
Tel: +49-[0]7433- 9933-0
Fax: +49-[0]7433-9933-149
Internet: www.kern-sohn.com
Operating instruction
Set for density determination
KERN ALS/PLS-A01
Version 1.5
04/2008
E
ALS/PLS-A01-BA-e-0815
Page 2

GB
KERN ALS/PLS-A01
Version 1.5 04/2008
Operating instruction
Set for density determination for precision and analytical
balances KERN ALT, KERN PLT, KERN ALS/ALJ, KERN
ALS..N/ALJ..N, KERN PLS/PLJ
Contents:
1 INTRODUCTION ............................................................................................................................ 4
1.1 SCOPE OF DELIVERY................................................................................................................. 4
2 INSTALLATION OF DENSITY DETERMINATION SET................................................................6
3 PRINCIPLE OF DENSITY DETERMINATION............................................................................. 10
3.1 INFLUENCING MAGNITUDES AND ERROR SOURCES .................................................................... 11
4 DENSITY DETERMINATION OF SOLIDS................................................................................... 12
4.1 MODELS KERN ALS/ALJ/PLS/PLJ........................................................................................ 13
4.2 MODELS ALJ..N/ALS..N ........................................................................................................ 18
4.3 MODELS KERN ALT, PLT...................................................................................................... 21
5 DENSITY DETERMINATION OF LIQUIDS ................................................................................. 27
5.1 MODELS KERN ALS/ALJ/PLS/PLJ........................................................................................ 29
5.2 MODELS KERN ALJ..N/ALS..N.............................................................................................. 33
5.3 MODEL KERN ALT, PLT........................................................................................................ 36
6 DENSITY TABLE FOR WATER .................................................................................................. 41
7 RECOMMENDATIONS................................................................................................................42
ALS/PLS-A01-BA-e-0815 3
Page 3

1 Introduction
When acquiring a density set as accessory for your electronic balance there are
2 models available:
KERN ALS-A01 for analysing balances of the KERN ALT, KERN ALS/ALJ and
KERN ALS..N/ALJ..N series (only suitable for models with
readability d = 0.1 mg).
KERN PLS-A01 for analysing balances of the KERN PLS/PLJ and KERN PLT
series (only suitable for models with readability d = 1 mg).
This manual only descries working with the density determination set. For further
information concerning operation of your balance please refer to the operating
manual of the respective balance.
1.1 Scope of delivery
KERN ALS-A01:
No. Denomination
1 Platform for beaker 9 Sample dish
2 Frame 10 Wire
3 Glass sinker 11 Sieve dish
4 Beaker 12 Additional weights (see chap. 5)
5 Holder for thermometer 13 Additional frame (Storage for sample
dishes/sinker)
6 Thermometer Pincers w/o picture
7 Wire Operating instruction
8 Hook for sinker
4 ALS/PLS-A01-BA-e-0815
Page 4

KERN PLS-A01
No. Denomination
1 Frame 7 Thermometer
2 Sieve dish 8 Holder for thermometer
3 Wire 9 Glass sinker
4 Sample dish 10 Platform for beaker
5 Beaker 11 Additional frame (Storage for
sample dishes/sinker)
6 Hook for sinker Pincers w/o picture
Operating instruction
ALS/PLS-A01-BA-e-0815 5
Page 5

2 Installation of density determination set
Ö Remove the following parts from the balance
Model KERN ALT:
Model KERN ALS/ALJ:
1
2
3
(1) Weighing plate
(2) Screening ring
(1) Weighing plate
(2) Support for weighing plate
(3) Screening ring
6 ALS/PLS-A01-BA-e-0815
Page 6

Model KERN PLS/PLJ, PLT:
Ö Installation of density determination set
Models KERN ALS/ALJ, KERN ALT: Central 1-point receptacle
(1) Windshield cover
(2) Windshield
(3) Weighing plate
ALS/PLS-A01-BA-e-0815 7
Page 7

Models KERN ALS..N/ALJ..N,: Central 1-point receptacle
8 ALS/PLS-A01-BA-e-0815
Page 8

Models KERN PLS/PLJ, PLT: 4-point receptacle
Attention:
• The platform for the beaker must not touch the frame!
• When the density set is installed, adjustment is not possible.
For adjustment, re-install weighing plate.
ALS/PLS-A01-BA-e-0815 9
Page 9

3 Principle of density determination
g
g
g
A
A-B
Three physical magnitudes are the volume and the mass of bodies as well as the
density of matter. Mass and volume are connected with each other in density:
Density [ ( ] is the relation of mass [ m ] to volume [ V ].
SI-unit of density is kilogram divided by cubic meter (kg/m³). 1 kg/m³ equals the
density of a homogenous body that, for a mass of 1 kg, has the volume of 1 m³.
Other frequently used units are:
Using our set for density determination in combination with our balances KERN
ALS/ALJ/PLS/PLJ, KERN PLT and KERN ALT enables you to determine the density
of solids and liquids fast and correctly. Our set uses the "Principle of Archimedes"
to determine density:
Buoyancy is a force. It affects a body that is immersed in a liquid. A
body’s buoyancy is as large as the weight of the liquid it displaces.
Buoyancy is effective vertically upwards.
Thus, density is calculated according to the following formulas:
For density determination of solids
Our balances enable you to weigh solids in air [ A ] as well as in water [ B ]. If the
density of the buoyancy medium is known [ ρo ] the density of the solid [ ρ ] is
calculated as follows:
ρ = Density of the sample
A = Weight of the sample in air
B = Weight of the sample in measuring liquid
ρo = Density of the measuring liquid
ρ =
ρ =
m
V
,
k
1
m
1
3
,
l
1
ρ
3
cm
o
10 ALS/PLS-A01-BA-e-0815
Page 10

For density determination of liquids
G
A-B
The density of a liquid is determined by using a sinker, whose volume ([ V ] is known
see embossment). The sinker is weighed in air [ A ], as well as in sample liquid [ B ].
According to the law of Archimedes, a body that immersed in a liquid is exposed to
buoyancy [ G ]. The absolute value of this force equals the weight of the liquid
displace by the volume of the body.
The volume [ V ] of the immersed body equals the volume of the displaced liquid.
ρ =
ρ =
V
V
+
ρ
L
G = Buoyancy of the sinker
Buoyancy of the sinker =
Weight of the sinker in air [ A ] - weight sinker in sample liquid [ B ]
Thus follows:
ρ = Density of sample liquid
A = Weight of sinker in air
B = Weight of sinker in sample liquid
V = Volume of the sinker
= Air density (0.0012 g/cm³)
ρ
L
3.1 Influencing magnitudes and error sources
Ö Air pressure
Ö Temperature
Ö Volume deviance of the sinker (± 0,005 cm
Ö Surface tension of the liquid
Ö Air bubbles
Ö Immersion depth of the sample dish of sinker
Ö Porosity of the solid
ALS/PLS-A01-BA-e-0815 11
3
)
Page 11

4 Density determination of solids
Prepare balance as in chapter 2 "Installation of density determination set".
Ö Install holder for the thermometer on beaker rim.
Ö Suspend thermometer
Ö Fill your measuring liquid, whose density ρo is known, into the beaker. Filling
height should be approx. ¾ of the capacity.
Ö Place beaker in the centre of the platform
Ö Suspend sample dishes from the centre of the frame
Ö Heat measuring liquid until temperature is constant.
12 ALS/PLS-A01-BA-e-0815
Page 12

4.1 Models KERN ALS/ALJ/PLS/PLJ
Key Display Description
or
Turn on balance; balance will
carry out self-check.
Wait until the stability and
balance zero-display shows
Menu selection:
Press TARE -key; the display
shows horizontal lines; while this
display is shown, press the
F -key. The first function “Add“
or “Pieces” appears.
Keep the F –key pressed until
the density function for solids
ALS/PLS-A01-BA-e-0815 13
"Co" is displayed.
Confirm your selection.
The balance is now in density
determination mode for solids.
Page 13

O
O
O
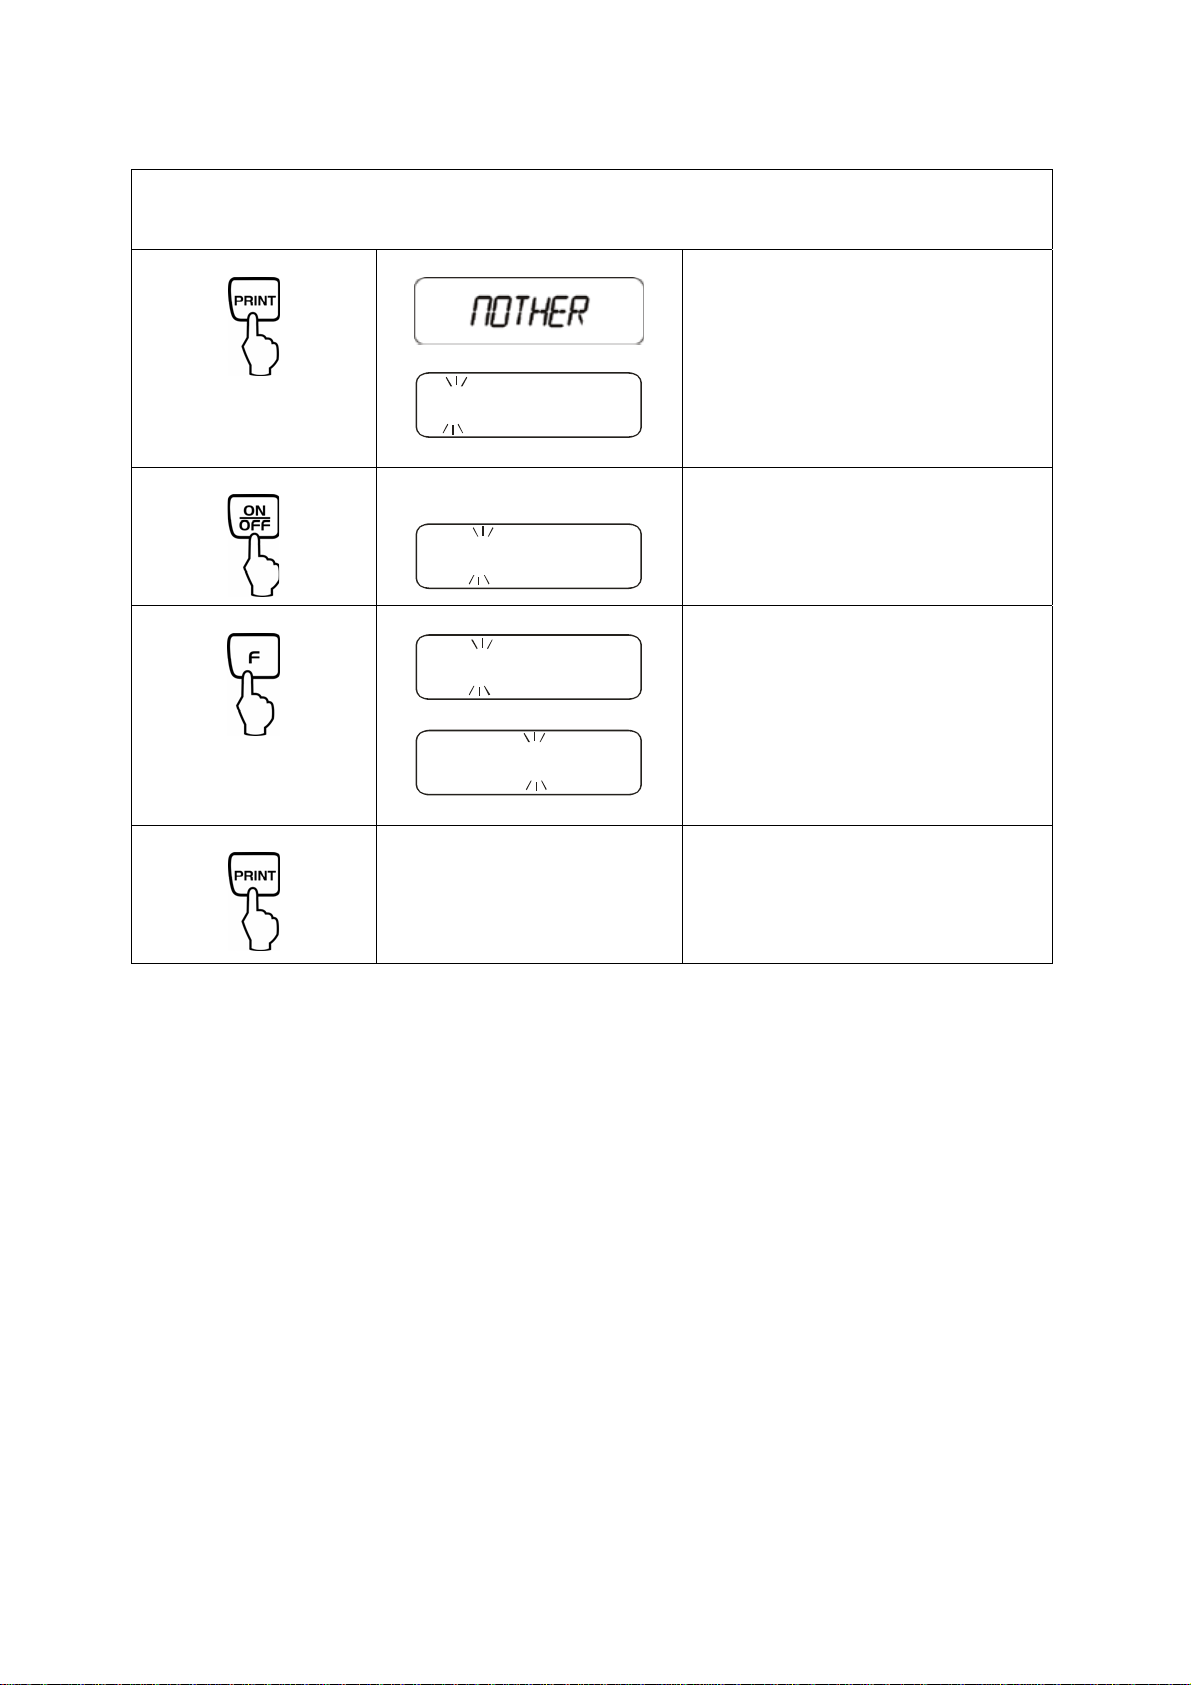
Select measuring liquid:
If you selected distilled water or ethanol as measuring liquid, enter the temperature
of the measuring liquid in the next menu step.
TE-L 0
Use the F -button to choose
between the following settings:
H20 = Distilled water
C2H5OH = Ethanol
nother = Measuring liquid
of your choice,
whose density is
known
Confirm your selection.
Read the temperature of the
measuring liquid from the
suspended thermometer and
then enter it as follows (current
number is blinking).
Use the F – key to change the
TE-L 2
TE-L 2
value of the number
Use the ON/OFF – key to select
the place you want to change,
the currently active place is
blinking
Confirm your entry.
14 ALS/PLS-A01-BA-e-0815
Page 14
If you selected “nothEr“ as measuring liquid enter the density of your measuring
liquid in the next menu step.
z00000O
z00000O
z90000O
Confirm your selection.
Enter the density of your
measuring liquid (the current
number is blinking).
Use the ON/OFF – key to select
the place you want to change,
the currently active place is
blinking
Use the F – key to change the
value of the number
z997800
Confirm your entry.
ALS/PLS-A01-BA-e-0815 15
Page 15

After entering the parameters for the measuring liquid follow the automatic user
interface of the balance.
LQADA
Place the solid in the upper
sample dish
1.928
LQADL
g
Wait until the weight display of
the balance is stable.
Actuating the PRINT -key will
safe the weight of the sample
in air.
The display Load L prompts
you to remove the sample from
the upper sample dish and to
place it into the lower sieve
dish.
To do this, use the supplied
pincers and ensure that there
are no air bubbles adhere to
the solid.
16 ALS/PLS-A01-BA-e-0815
Page 16

1.788
F 1.990
Remove sample; the measuring result still on display.
g
g
Wait until the weight display of
the balance is stable.
Actuating the PRINT – key will
save the weight of the
sample in measuring liquid.
The density of the sample (ρ)
is now automatically calculated
and shown on the display
[ g/cm3 ].
Data output to the serial
interface RS 232.
The result is issued in g/cm³.
Use the TARE -key to return to
weighing mode.
ALS/PLS-A01-BA-e-0815 17
Page 17

4.2 Models ALJ..N/ALS..N
Procedure:
− Press key . Pressing UNITS key, choose F6 d_Co.
− Press PRINT to start density function.
− Press UNITS key and select liquid in with density will be determined.
Ø
Thickness of solids can be tested in one of 3 liquids:
• H2O (distilled water),
• C2H5OH (spirit 100% +/- 0.1% in temp. 20°C),
• AnotHEr (another liquid with known thickness).
− After selecting liquid confirm by PRINT.
− If H2O or C2H5OH are selected the program moves to following step,
introducing actual liquid temperature. The information on the display
enables to introduce liquid temperature from the thermometer. Enter the
temperature using UNITS or key.
− After adjusting the temperature, press PRINT key to confirm it.
18 ALS/PLS-A01-BA-e-0815
Page 18

If AnotHEr liquid was selected after pressing PRINT key the program moves to
following step when the density of the liquid should be noted. Introduce the density
value of this liquid by function key of the balance.
− Press the UNITS or key to change the digit value.
− Press the F key to select the digit.
− After adjusting the temperature press PRINT key to confirm it.
After writing information about the liquid parameters the balance software moves to
following process steps automatically. Commands which inform user that the
software is ready to receipt following data (mass of the sample in air and in liquid)
necessary to correct counting density of examined sample.
When the balance shows LOAD A, then zero, put sample on the top pan. Sample
mass in air is presented on the display.
Press the PRINT key when the result is stable. This mass is recorded in the balance
memory as mass in the air.
ALS/PLS-A01-BA-e-0815 19
Page 19

− LoAd L appears on the display.
It is order to take a sample off top pan and put it on the bottom pan.
Press the PRINT key when the result is stable. This mass is noted in the balance
memory as mass in liquid and density of a sample is counted automatic.
Check if there are any air bubbles fastened to a sample. It could cause errors during
measurements.
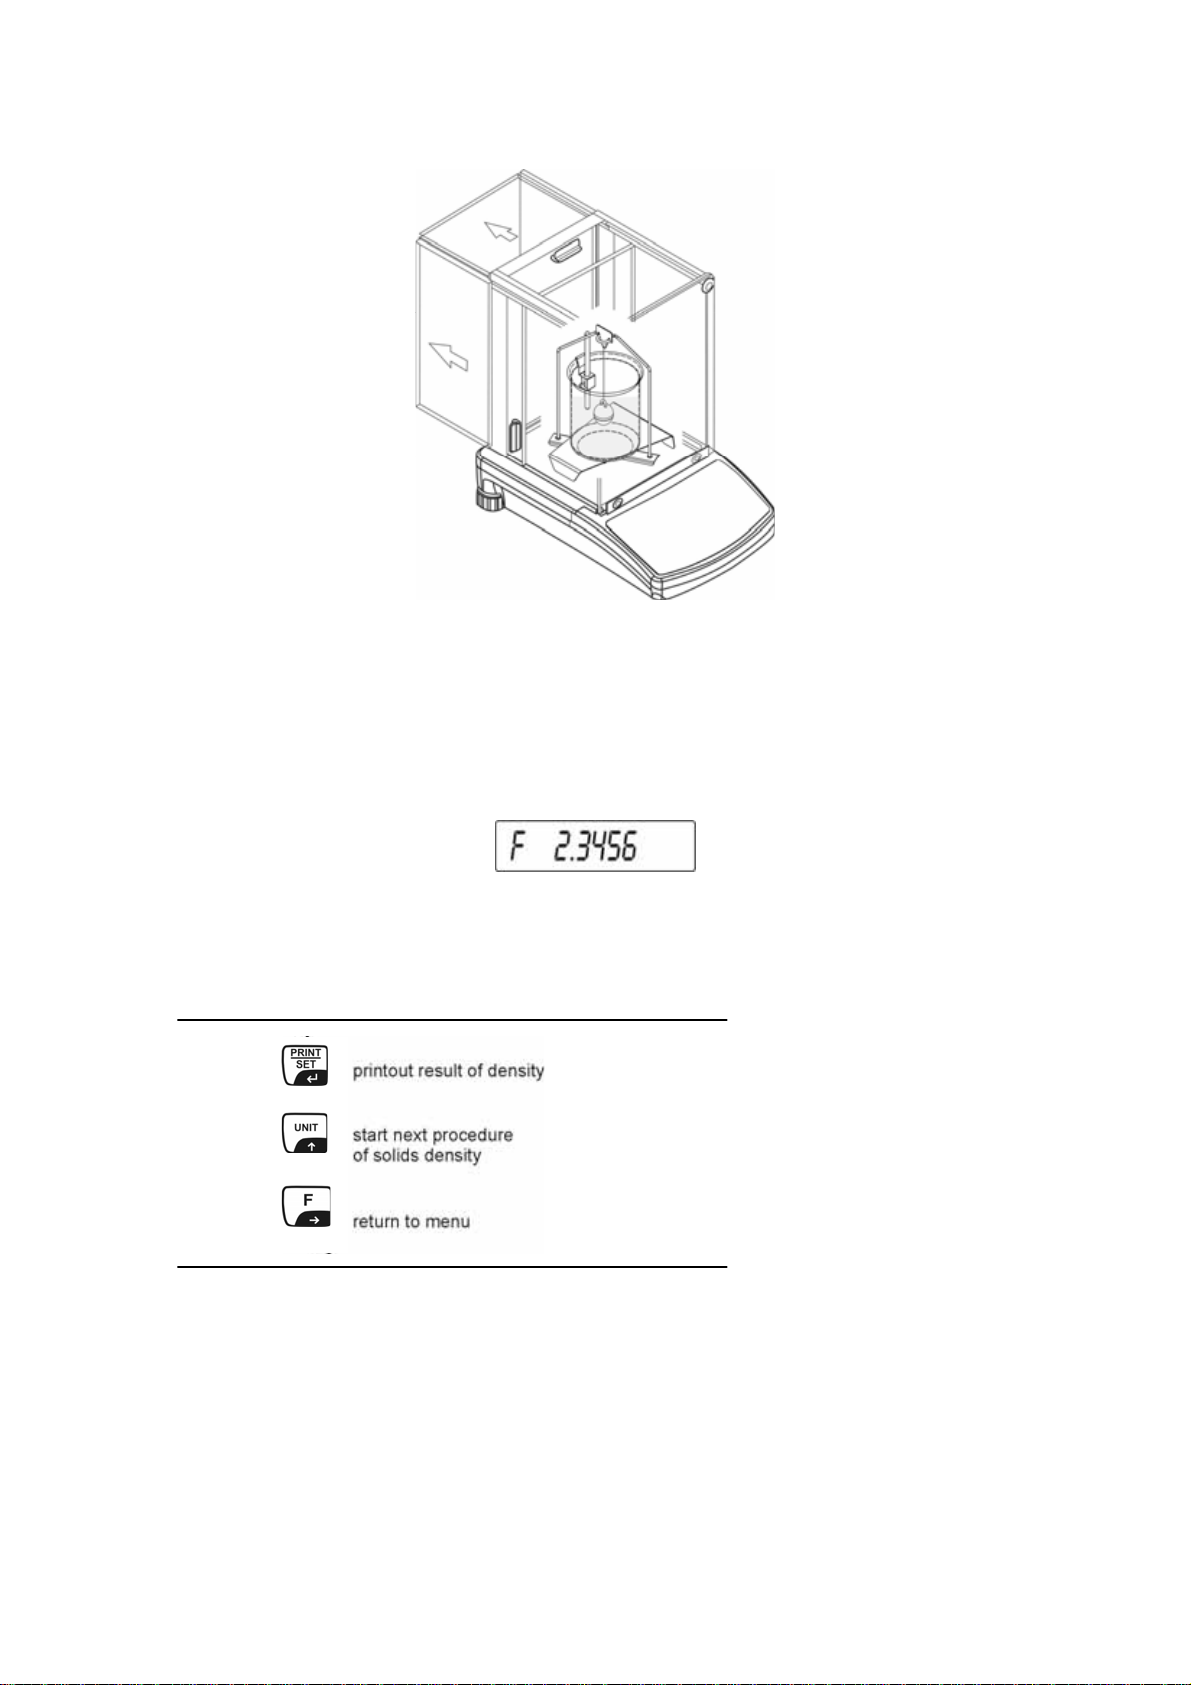
Key function after procedure
The result is presented on the display in [g/cm3]. It does not change even when the
sample is taken off. Press F key to do back to menu.
20 ALS/PLS-A01-BA-e-0815
Page 20
4.3 Models KERN ALT, PLT
Key Display Description
20.02.05
P8
01 Parts Count
02 Checkweighing
03 Filling
04 Percont
05 Animal
06 Density
07
Formulation
Statistics
08
M0 Basic weig hing
M1 Parts counting
M2 Checkweighing
M3 Filling
M4 Percent
M5 Animal weighing
M6 Density
Density setup
M6
01 Pro cedure
02 Liquid
03 Temperature
04 Density
05 Statistics
06 Run
Mode
Mode20.02.05
ableden
1
ableddis
0
1
sableden
disabled
0
enabled
1
ableden
1
1
enabled
SOLID DENSITY
WATER
22
1.0546
OFF
C
g/cm3
Activate “Density” in the
operation mode menu (see
operating instructions Balance)
Use the cursor (►) to select
menu item "M6 Density"
The parameter selection is
displayed.
Here, your parameters for
density determination are saved.
Use the cursor (►) to select
parameter.
or
Parameter 01 Procedure
Density setup
M6
01 Pro cedure
Sinker volume
2
0
3
0 Statistics
4
or
0 Run
Density setup
M6
01 Pro cedure
02 Liquid
03 Temperature
04 Density
05 Statistics
06 Run
LIQUID
DENSITY
g/cm3
0000
1.0
OFF
SOLID DENSITY
WATER
22
1.0546
OFF
C
g/cm3
The current menu item is blinking
Activate setting for "Solid"
Confirm your selection.
The balance is now in density
determination mode for solids.
ALS/PLS-A01-BA-e-0815 21
Page 21

Parameter 02 Liquid
The current menu item is blinking
or
Density setup
M6
01 Pro cedure
02 Liquid
03 Temperature
04 Density
05 Statistics
06 Run
SOLID DENSITY
WATER
22
1.0546
OFF
C
g/cm3
Select your measuring liquid:
Water = Distilled water
Alcohol = Ethanol
Other = Measuring liquid of
your choice whose
density is known
Confirm your selection.
If you selected distilled water or ethanol, enter the temperature of the measuring
liquid in the next menu step:
Parameter 03 Temperature
The current menu item is blinking
or
Density setup
M6
01 Pro cedure
02 Liquid
03 Temperature
04 Density
05 Statistics
06 Run
SOLID DENSITY
WATER
22
1.0546
OFF
C
g/cm3
Read the temperature of the
measuring liquid from the
suspended thermometer and
enter it using the arrow keys
(value between 15°C – 35°C)
Confirm your selection.
22 ALS/PLS-A01-BA-e-0815
Page 22

If you selected Other as measuring liquid enter the density of your measuring liquid
(temperature dependent) in the next menu step.
Parameter 04 Density
Density setup
M6
01 Pro cedure
02 Liquid
03 Temperature
04 Density
05 Statistics
06 Run
SOLID DENSITY
WATER
22
1.0546
OFF
C
g/cm3
Enter the density of your
measuring liquid (the current
menu item is blinking)
Change the value of the number
or
Select the place to be changed,
the active place is blinking
or
Confirm your selection.
Parameter 05 Statistics
When activating the combination density/statistics, actuating the " UNIT -key" will
accept the value for the statistics (see operating instructions balance).
ALS/PLS-A01-BA-e-0815 23
Page 23

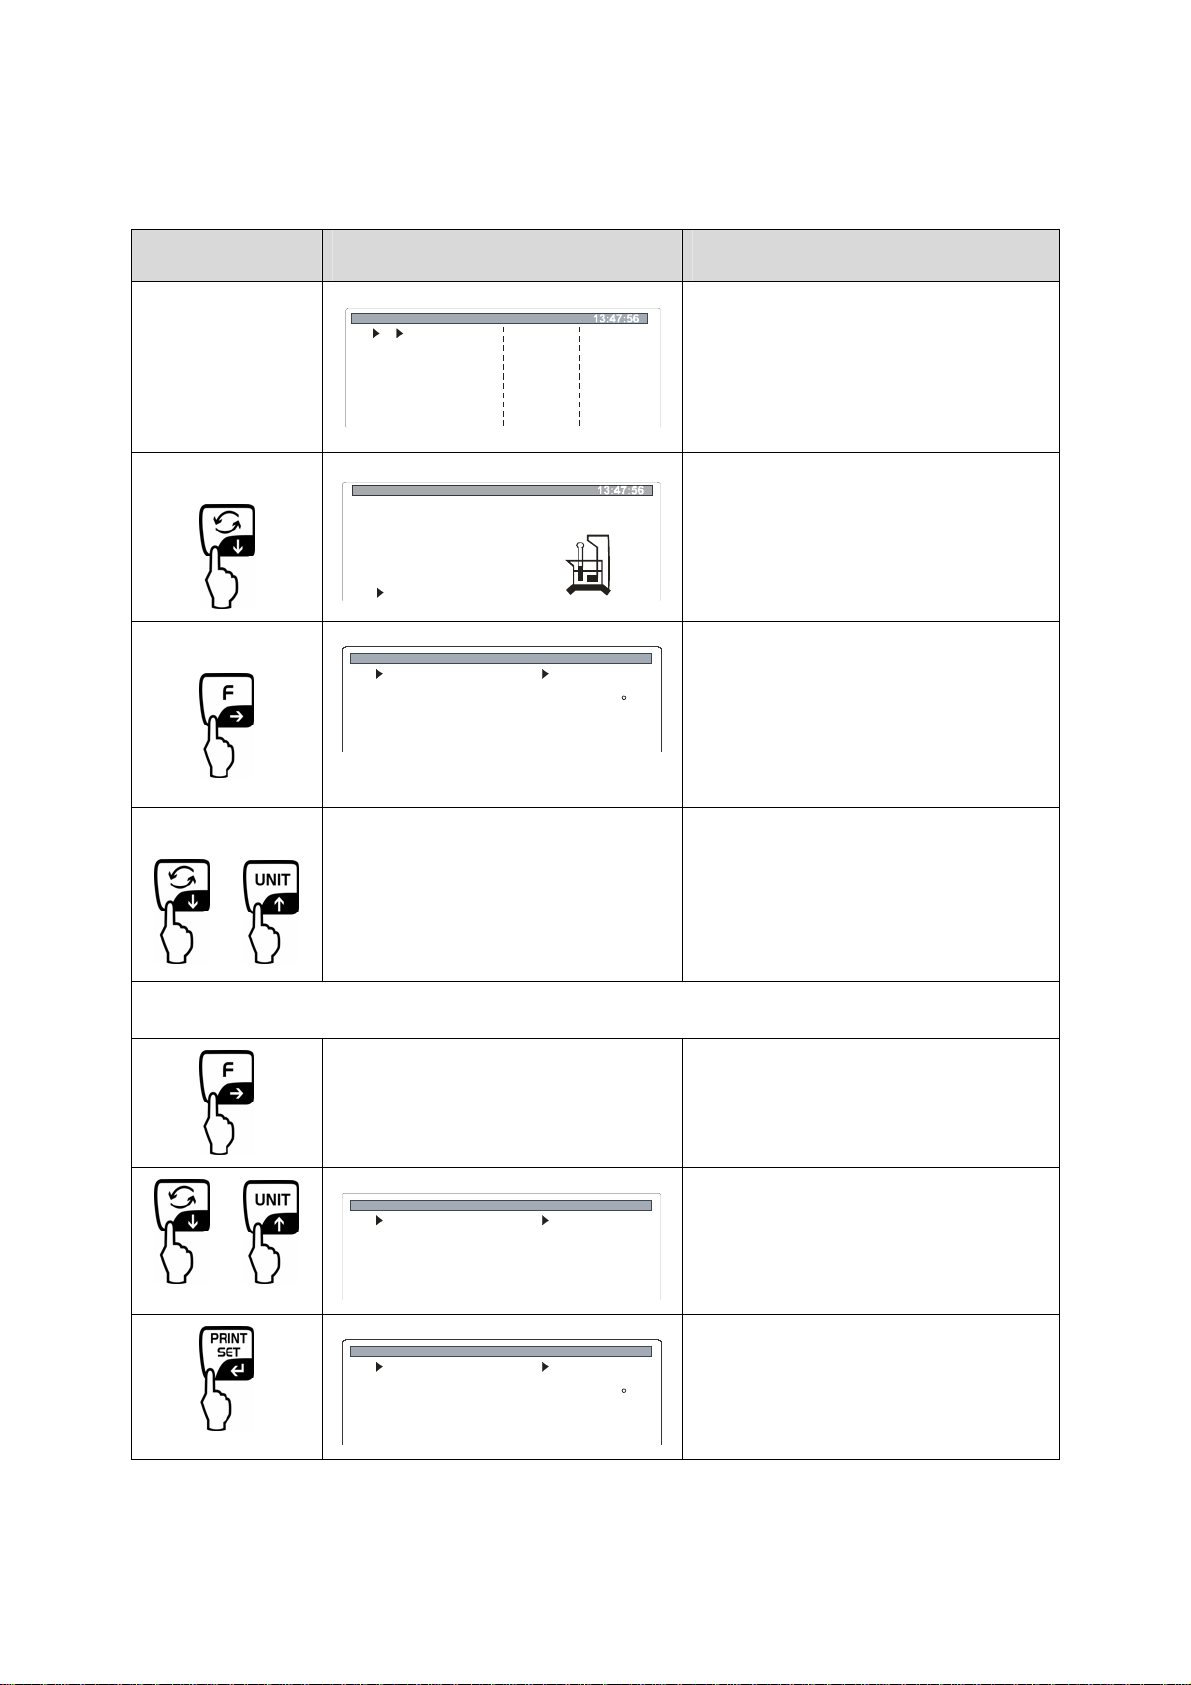
Parameter 06 Run
After entering the parameters, follow the automatic user interface of the balance to
determine density.
Density setup
M6
01 Pro cedure
02 Liquid
03 Temperature
04 Density
05 Statistics
06 Run
27.3.05
0%
SOLID DENSITY
WATER
22
1.0546
OFF
Density
W eighing in the air.
Place an object [ Enter]
0.0001
C
g/cm3
g
100%
With the parameter selection
"06 Run" to get into density
determination mode and the
graphic display appears.
27.3.05
0%
Density
W eighing in the air.
Place an object [ Enter]
0
0.0000
g
100%
Wait until the stability and balancezero display shows.
Place the solid into the upper
sample dish.
27.3.05
0%
Density
W eig h in g in th e a ir.
Place an object [ Enter]
252.00
g
100%
Wait until the weight display of the
balance is stable. Actuating the
PRINT-key will safe the weight of
the sample in air.
24 ALS/PLS-A01-BA-e-0815
Page 24

27.3.05
0%
27.3.05
0%
Density
W eighing in a liquid
Place an object [ E nter]
2.5200
Density
W eighing in a liquid
Place an object [ E nter]
000.00
g
g
100%
100%
You will be prompted to remove
the sample from the upper sample
dish and place it into the lower
sieve dish.
To do this, use the supplied
pincers and ensure that there are
no air bubbles adhere to the solid.
Wait until the weight display of the
27.3.05
0%
Density
W eighing in a liquid
Place an object [ E nter]
2.0035
g
100%
balance is stable.
Actuating the PRINT-key will save
the weight of the sample in the
measuring liquid .
27.3.05
W1=2.5200
0%
Density
W2=2.0035 D=0.9986
... to c o n tin u e [U n its ]
4.87
g /
cm3
100%
The density of the sample (ρ) is
now automatically calculated and
shown on the display [ g/cm³ ].
Remove sample; the measuring result still on display.
To start a new measuring cycle,
press the UNIT-key.
Data output to the serial interface
RS 232.
The result is issued in g/cm³.
ALS/PLS-A01-BA-e-0815 25
Page 25

Return to weighing mode:
M0 Basic weighing
M1 Parts counting
M2 Checkweighing
M3 Filling
M4 Percent
M5 Animal weighing
M6 Density
Mode20.02.05
15.10.01 13:47:32
Weighing
0.0000
Overview of display:
6 345
27.3.05
W1=2.5200
0%
1. Density of the sample (ρ)
2. Measurement unit of the density
3. Dense measuring liquid
4. Weight of the sample in measuring liquid
5. Operating mode (status bar)
6. Weight of the sample in air
Density
W2 =2 .0 03 5 D=0.9 98 6
... to c o n t in u e [ U n its ]
Cursor (►) to „M0 Basic
weighing“
g /
4.87
1
cm3
100%
2
26 ALS/PLS-A01-BA-e-0815
Page 26

5 Density determination of liquids
Prepare balance as described in chapter 2 "Installation of density determination set".
PLS/PLJ
ALS/ALJ
Ö Install holder for the thermometer on beaker rim.
Ö Suspend thermometer
Ö Fill your measuring liquid into the beaker. Filling height should be approx. ¾ of the
capacity.
Ö Heat measuring liquid until temperature is constant.
Ö Prepare glass sinker
ALS/PLS-A01-BA-e-0815 27
Page 27

Ö If the display shows the error message "
balancing the removed weighing plate on the side of the frame.
noKK
", mount the additional weights for
additional weights
28 ALS/PLS-A01-BA-e-0815
Page 28

5.1 Models KERN ALS/ALJ/PLS/PLJ
Key Display Description
-
-
L
VOL
Turn on balance; balance will
carry out self-check.
Wait until the stability and
balance zero-display shows
Menu TARE-key; the display
shows horizontal lines; while this
display is shown, press the
F -key. The first function “Add“
appears.
Keep the F- key pressed, until
the density function for liquids
die "Li" appears.
Confirm your selection.
The balance is now in density
determination mode for liquids.
The display vol prompts you to
enter the volume of the
sinker (see embossment on
suspension hook).
Enter as many decimal digits as
the balance can display.
ALS/PLS-A01-BA-e-0815 29
Page 29

0
8
0
0
8
00000.00
00009.99
Enter the volume of the sinker
(see embossment on suspension hook, information in cm3 e.g. 9.9984 cm³):
g
g
For first commissioning, the
display will only show zeroes.
If density determinations have
been carried out previously the
volume of the sinker last used
is displayed.
00000.00
00009.00
00009.99
g
g
g
Use the ON/OFF – key to
select the place you want to
change, the currently active
place is blinking
Use the F – key to change the
value of the number
Confirm your entry.
Entry is saved.
LQADA
30 ALS/PLS-A01-BA-e-0815
Wait until the stability and
balance zero-display shows
Page 30

Determination of the weight sinker in air
10.256
Suspend sinker from the
centre,
Measurement is carried out
without beaker
Wait until the weight display
g
of the balance is stable.
Actuating the PRINT – key
will save the weight of the
sinker in air.
Determination of the weight sinker in sample liquid
LQADL
Remove sinker
Place beaker with measuring
liquid in the centre of the
platform.
Immerse sinker in measuring
liquid and suspend from
frame.
The measuring liquid should
cover the sinker at 10 -15
mm.
ALS/PLS-A01-BA-e-0815 31
Page 31

9.563
F 0.925
Remove sample; the measuring result still on display.
g
g
Wait until the weight display of
the balance is stable.
Actuating the PRINT – key will
save the weight of the sinker
in the sample liquid.
The density of the liquid (ρ) is
now automatically calculated
and shown on the display
[ g/cm3 ].
Data output to the serial
interface RS 232.
The result is issued in g/cm³.
Use the TARE -key to return to
weighing mode.
32 ALS/PLS-A01-BA-e-0815
Page 32

5.2 Models KERN ALJ..N/ALS..N
Procedure:
− Press key . Pressing UNITS key, choose F7 d_Li.
Ø
− Press PRINT to start density function.
− Order to write float capacity vol appears on the display.
− The volume of float can be noted with the same accuracy as the balance
shows. If actual scale interval is 0.001 g in the balance the volume
stamped on the float hook should be noted with accuracy to 3rd place after
the decimal point.
Write the volume of float using the keys:
− Press the or UNITS key to change the digit value.
− Press the F key to select the digit.
− Press PRINT key to confirm value.
If the density of liquid is performed last float capacity appears on the display. Check if
it is the same as the volume of the float stamped on the hook.
ALS/PLS-A01-BA-e-0815 33
Page 33

The volume of the float is noted into the balance memory. LoAd A and 0.000
appears on the display.
Weight the float in air, hook it on the pan stand without beaker.
− To note this value into the balance memory, press the PRINT key when
result is stable.
− LoAd L appears on the display – it is order to weight float in examined
liquid.
Take float off pan stand and set beaker with liquid on beaker stand. Adjust the
amount of liquid in order float was immersed 10 - 15mm below the liquid surface.
Immerse float in liquid and hook it on stand. Its mass in the liquid appears on the
display.
34 ALS/PLS-A01-BA-e-0815
Page 34
− When the result is stable, press the PRINT key to note this value into the
balance memory.
− The result of liquid density is presented and kept on the display.
− To avoid mistakes in measure units the letter F is before the result.
Check if there are any air bubbles fastened to a float. It could cause errors during
measurements.
Key function after procedure
The result is presented on the display in [g/cm
sample is taken off.
3
]. It does not change even when the
ALS/PLS-A01-BA-e-0815 35
Page 35

5.3 Model KERN ALT, PLT
Key Display Description
20.02.05
P8
01 Parts Count
02 Checkweighing
03 Filling
04 Percont
05 Animal
06
Density
07 Formulation
08
Statistics
M0 Basic weig hing
M1 Parts counting
M2 Checkweighing
M3 Filling
M4 Percent
M5 Animal weighing
M6 Density
Density setup
M6
01 Pro cedure
02 Liquid
03 Temperature
04 Density
05 Statistics
06 Run
Mode
Mode20.02.05
disabled
1
enable d
0
1
disabled
disabled
1
enable d
0
disabled
1
0
enable d
SOLID DENSITY
WATER
22
1.0546
OFF
C
g/cm3
Activate “Density” in the
operation mode menu (see
operating instructions Balance,
chapter 8.1)
Use the cursor (►) to select
menu item "M6 Density"
The parameter selection is
displayed.
Here, your parameters for
density determination are saved.
Use the cursor (►) to select
parameter.
or
Parameter 01 Procedure
Density setup
M6
01 Pro cedure
02 Liquid
03 Temperature
04 Density
oder
05 Statistics
06 Run
Density setup
M6
01 Pro cedure
0
2
Sinker volume
0 Statistics
3
0 Run
4
SOLID DENSITY
WATER
22
1.0546
OFF
LIQUID
1.0
OFF
0000
C
g/cm3
DENSITY
g/cm3
The current menu item is blinking
Activate setting for "Liquid"
Confirm your selection.
The balance is now in density
determination mode for liquids.
36 ALS/PLS-A01-BA-e-0815
Page 36

Parameter 02 sinker volume
Enter the volume of the sinker
(see embossment on suspension hook, information in cm³ e.g. 10.085 cm³):
Density setup
M6
01 Pro cedure
0
2
Sinker volume
0 Statistics
3
0 Run
4
LIQUID
0000
1.0
OFF
DENSITY
g/cm3
The current menu item is blinking
Change the value of the number
or
Select the place to be changed,
the active place is blinking
or
Density setup
M6
01 Pro cedure
0
2
Sinker volume
0 Statistics
3
0 Run
4
LIQUID
0 0850
1.
OFF
DENSITY
g/cm3
Confirm your setting.
Parameter 03 Statistics
When activating the combination density/statistics, actuating the " UNIT-key" will
accept the value for the statistics (see operating instructions balance).
Parameter 04 Run
After entering the parameters, follow the automatic user interface of the balance.
Density setup
M6
01 Pro cedure
0
2
0 Statistics
3
0 Run
4
27.3.05
0%
Sinker volume
Density
W eighing in the air.
Place a [ E nter]sinker
0.0001
LIQUID
0 0850
1.
OFF
DENSITY
g/cm3
g
100%
With the parameter selection
"04 Run" to get into density
determination mode and the
graphic display appears.
ALS/PLS-A01-BA-e-0815 37
Page 37

Determination of the weight sinker in air
27.3.05
0%
Density
W eighing in the air.
Place a [ E nter]sinker
0
0.0000
g
100%
Wait until the stability and balancezero display shows.
Suspend sinker from the centre,
Measurement is carried out
without beaker
27.3.05
0%
27.3.05
0%
Density
W eighing in the air.
Place a [ E nter]sinker
24 9617.
Density
W eighing in a liquid
Place a [ E nter]sinker
24 9617.
g
g
100%
100%
Wait until the weight display of the
balance is stable.
Actuating the PRINT – key will
save the weight of the sinker in
air .
38 ALS/PLS-A01-BA-e-0815
Page 38

Determination of the weight sinker in sample liquid
27.3.05
0%
Density
W eighing in a liquid
Place a [ E nter]sinker
0.0000
g
100%
KERN ALT:
Remove sinker,
place beaker with sample liquid in
the centre of the platform.
Immerse sinker in the measuring
liquid and suspend above from the
suspension eyelet.
The sample liquid should cover the
KERN PLT:
sinker at 10 -15 mm.
27.3.05
0%
Density
W eighing in a liquid
Place a [ E nter]sinker
14 8795.
g
100%
27.3.05
W1=2 .4 9617
0% 100%
Density
W2= .14 8795 D= .10 0850
... to c o n t in u e [ U n its ]
09987.
g /
cm3
Wait until the weight display of the
balance is stable.
Actuating the PRINT-key will save
the weight of the sinker in
sample liquid.
The density of the sample liquid
(ρ) is now automatically calculated
and shown in the display [ g/cm
3
].
ALS/PLS-A01-BA-e-0815 39
Page 39

Remove sample or sinker, the measuring result is still on display.
To start a new measuring cycle,
press the UNIT-key.
Return to weighing mode:
M0 Basic weighing
M1 Parts counting
M2 Checkweighing
M3 Filling
M4 Percent
M5 Animal weighing
M6 Density
15.10.01 13:47:32
Overview of display:
Data output to the serial interface
RS 232.
The result is issued in g/cm³.
Mode20.02.05
Cursor (►) to „M0 Basic
weighing“
Weighing
0.0000
6 345
27.3.05
W1=2 .4 9617 W2= .14 8795 D= .10 0850
0%
1. Density of the sample liquid (ρ)
2. Measurement unit of the density
3. Volume of the sinker
4. Weight of sinker in sample liquid
5. Operating mode (status bar)
6. Weight of sinker in air
Density
... to c o n t in u e [ U n its ]
09987.
1
g /
cm3
100%
2
40 ALS/PLS-A01-BA-e-0815
Page 40

6 Density table for water
* The star indicates that the numeral to the left of the decimals is decreased by 1.
Table from "Mass determination" by M. Kochsiek, M. Gläser
ALS/PLS-A01-BA-e-0815 41
Page 41

7 Recommendations
• To form a reproducible mean value several density measurement are necessary
• Remove fat from solvent-resistant sample /glass sinker /beaker.
• Regularly clean sample dishes/glass sinker/beaker, do not touch immersed part
with your hands
• Dry sample/glass sinker/pincers after each measurement.
• Adjust sample size to sample dish (ideal sample size > 5 g).
• Only use distilled water.
• When immersing for the first time, lightly shake sample dishes and sinker, in order
to remove air bubbles.
• Always ensure that, when re-immersing into the liquid no additional bubbles
adhere; it is better to use pincers to place the sample.
• Remove firmly adherent air bubbles with a fine brush or a similar tool.
• To avoid adherent air bubbles smoothen samples with rough surface.
• Ensure that when weighing "Sample in measuring liquid", no water drips from the
pincers onto the upper sample dish.
• In order to reduce the surface tension of water and the friction of the liquid on the
wire, add three drops of a common detergent (washing-up liquid) to the
measuring liquid (the changed density of distilled water by adding detergent is
negligible).
• Oval samples can be held more easily with pincers when you cut grooves into
them.
• The density of porous solids may only be determined approximately. When
immersing into the measuring liquid, not all the air is displaces from out of the
pores, which leads to buoyancy errors.
• To avoid great vibrations of the balance, place sample carefully.
• Avoid static charging, e.g. Only use cotton cloth to dry glass sinker.
• If the density of your solid only deviates slightly from that of distilled water,
ethanol can be used a measuring liquid. Please check in advance whether the
sample is solvent resistant. Furthermore, when working with ethanol, always
observe the valid safety regulations.
• Handle glass sinker with care
(no warranty claims in case of damage).
42 ALS/PLS-A01-BA-e-0815
 Loading...