

Page 1

KERN & Sohn GmbH
Ziegelei 1
D-72336 Balingen
E-Mail: info@kern-sohn.com
Phone: +49-[0]7433- 9933-0
Fax: +49-[0]7433-9933-149
Internet: www.kern-sohn.com
Operating and Installation
Instructions
Digital weighing plat form
KERN KDP
Version 1.0
2017-11
GB
KDP-BA_IA-e-1710
Page 2

KDP-BA_IA-e-1710 2
GB
KERN KDP
Version 1.0 2017-11
Operating and installat ion instructions
Digital weighing platform
Contents
1 Technical data ................................................................................................ 3
2 Declaration of conformity ............................................................................. 4
3 Appliance overview ....................................................................................... 5
4 Basic Information (General ) .......................................................................... 6
4.1 Proper use .................................................................................................................................. 6
4.2 Improper Use .............................................................................................................................. 6
4.3 Warranty ..................................................................................................................................... 6
4.4 Monitoring of Test Resources .................................................................................................... 7
5 Basic Safety Precauti on s .............................................................................. 7
5.1 Pay attention to the instructions in the Operation Manual.......................................................... 7
5.2 Personnel training ....................................................................................................................... 7
6 Transport and storage ................................................................................... 7
6.1 Testing upon acceptance ........................................................................................................... 7
6.2 Packaging / return transport ....................................................................................................... 7
7 Unpacking and placing .................................................................................. 8
7.1 Installation Site, Location of Use ................................................................................................ 8
7.2 Unpacking and checking ............................................................................................................ 8
7.3 Assembly and installation ........................................................................................................... 9
8 Connection to your system ......................................................................... 10
8.1 USB .......................................................................................................................................... 10
8.2 Bluetooth .................................................................................................................................. 10
8.3 Ethernet .................................................................................................................................... 11
8.4 WLAN ....................................................................................................................................... 12
9 Adjustment ................................................................................................... 14
10 Carrying out measurements ....................................................................... 15
10.1 Using your own software .......................................................................................................... 15
10.1.1 Request weight values ......................................................................................................... 15
10.1.2 Zeroing and taring ................................................................................................................ 15
10.2 Using the BalanceConnection software ................................................................................... 15
10.2.1 Functions .............................................................................................................................. 18
Page 3

3 KDP-BA_IA-e-1710
1 Technical data
KERN (type) KDP 300-3 KDP 3000-2
Readability (d) 0.001 g 0.01 g
Weighing range (max) 350 g 3.5 kg
Reproducibility 0.002 g 0.02 g
Linearity ± 0.005 g
± 0.05 g
Recommended
adjusting weight not
supplied (class)
350 g (F1) 3 kg (F1)
Warm-up time 120 min 120 min
Net weight (kg) 1,2 1,6
Glass wind screen yes no
Dimensions fully
mounted (W x D x H)
mm
165 x 166 x 140 mm 165 x 166 x 75 mm
Dimensions (W x D x H)
mm
outside: 157 x 157 x 80 -
inside: 146 x 146 x 80 -
Weighing surface,
stainless steel
105 mm 165 x 165 mm
Permissible
ambient condition
+5° C to +35° C
Humidity of air 80 % relative (not condensing)
Electric Supply USB
Interfaces USB-Host/Master (Standard)
WLAN (factory option; KERN KDP-A01)
Ethernet (factory option; KERN KDP-A02)
Bluetooth 4.0 (factory option; KERN KDP-A03)
Page 4

KDP-BA_IA-e-1710 4
KERN (type) KDP 10K-3 KDP 10K-4
Readability (d) 0.1 g 1 g
Weighing range (max) 10 kg 10 kg
Reproducibility 0.1 g 1 g
Linearity
0.3 g
3 g
Recommended
adjusting weight not
supplied (class)
10 kg (M1) 10 kg (F1)
Warm-up time 30min 120 min
Net weight (kg) 1.4 1.4
Glass wind screen no
Dimensions fully
mounted (W x D x H)
mm
165 x 166 x 75 mm
Weighing surface,
stainless steel
165 x 165 mm
Permissible
ambient condition
+5° C to +35° C
Humidity of air 80 % relative (not condensing)
Electric Supply USB
Interfaces USB-Host/Master (Standard)
WLAN (factory option; KERN KDP-A01)
Ethernet (factory option; KERN KDP-A02)
Bluetooth 4.0 (factory option; KERN KDP-A03)
2 Declaration of conformity
The current EC/EU Conformity declaration can be found online in:
www.kern-sohn.com/ce
Page 5

5 KDP-BA_IA-e-1710
3 Appliance overview
Model d = 0.001 g
Models d > 0.01 g
Pos. Description
1 Glass wind screen
2 Weighing plate
3 Footscrews
4 Connections
5 Spirit level (for models d > 0.01 g under the weighing
plate)
Page 6

KDP-BA_IA-e-1710 6
4 Basic Information (General)
4.1 Proper use
The weighing platform you purchased is intended to determine the weight value of
material to be weighed. It is intended to be used as a “non-automatic weighing
system”, i.e. the material to be weighed is manually and carefully placed in the centre
of the weighing plate. As soon as a stable weight value is reached the weight value
can be read.
4.2 Improper Use
Do not use the digital weighing platform for dynamic weighing. In the event that small
quantities are removed or added to the material to be weighed, incorrect weighing
results can be displayed due to the “stability compensation“ in the display unit.
(Example: Slowly draining fluids from a container on the balance.)
Do not leave permanent load on the weighing plate. This may damage the measuring
system.
Impacts and overloading exceeding the stated maximum load (max) of the weighing
plate, minus a possibly existing tare load, must be strictly avoided. This may damage
the weighing plate or the digital weighing platform.
The digital weighing platform should never be operated in area where there is a risk
of explosion. The serial version is not explosion protected.
The construction of the digital weighing platform may not be changed. This may lead
to incorrect weighing results, safety-related faults and des tr uction of the display unit .
The digital weighing platform may only be used as specified here. Other areas of use
must be released by KERN in writing.
4.3 Warranty
Warranty claims shall be voided in case
• Our conditions in the operation manual are ignored
• The appliance is used outside the described uses
• The appliance is modified or opened
• Mechanical damage or damage by media, liquids, natural wear and tear
• The appliance is improperly set up or incorrectly electrically connected
• The measuring system is overloaded
Page 7
7 KDP-BA_IA-e-1710
4.4 Monitoring of Test Resources
In the framework of quality assurance the measuring-related properties of the digital
platform and, if applicable, the testing weight, must be checked regularly. The
responsible user must define a suitable interval as well as type and scope of this test.
Information is available on KERN’s home page (www.kern-sohn.com with regard to
the monitoring of display units’ test substances and the test weights required for this.
In KERN’s accredited DKD calibration laboratory test weights and digital weighing
platforms may be calibrated (return to the national standard) fast and at moderate
cost.
5 Basic Safety Precautions
5.1 Pay attention to the instructions in the Operation Manual
Carefully read this operation manual before setup and
commissioning, even if you are already familiar with KERN balances.
All language versions contain a non-binding translation.
The original German is binding.
5.2 Personnel training
The appliance may only be operated and maintained by trained personnel.
6 T ransport and storage
6.1 Testing upon acceptance
When receiving the appliance, please check packaging immediately, and the
appliance itself when unpacking for possible visible damage.
6.2 Packaging / return transport
Keep all parts of the original packaging for a possibly
required return.
Only use original packaging for returning.
Prior to dispatch disconnect all cables and remove
loose/mobile parts.
Reattach possibly supplied transport securing devices.
Secure all parts such as the glass wind screen, the
weighing plate, power unit etc. against shifting and damage.
Page 8

KDP-BA_IA-e-1710 8
7 Unpacking and placing
7.1 Installation Site, Location of Use
The digital weighing platforms are designed in a way that reliable weighing results
are achieved in common conditions of use.
Precise and fast work is achieved by selecting the right place for your digital weighing
platform and your weighing plate.
On the installation site observe the following:
• Place the weighing platform on a firm, level surface;
• Avoid extreme heat as well as temperature fluctuation caused by installing
next to a radiator or in the direct sunlight;
• Protect the digital weighing platform from dir e c t draug hts fr om open windows
and doors;
• Avoid jarring during weighing;
• Protect the digital weighing platform from high air humidity, fumes and dust;
• Do not expose the digital weighing platform to strong humidity for extended
periods. Non-permitted condensation (condensation of air humidity on the
appliance) may occur if a cold appliance is taken to a considerably warmer
environment. In this case, acclimatize the disconnected appliance for ca. 2
hours at room temperature.
• Avoid static charge of goods to be weighed or weighing container.
Major display deviations (incorrect weighing results) may be experienced should
electromagnetic fields (e.g. due to mobile phones or radio equipment), static
electricity accumulations or instable power supply occur. Change location or remove
source of interference.
7.2 Unpacking and checking
Take the digital weighing platform out of the packaging, remove the packaging
material and install at the designated workstation. Check if that there has been no
damage and that all packing items are present.
Scope of delivery / serial accessories:
• Digital weighing platform, see chapter. 3
• Mains adapter
• USB A to USB B cable
• These installation instructions
• Description of interfaces (KCP-ZB)
• KERN BalanceConnection software (online operating
instructions)
Page 9

9 KDP-BA_IA-e-1710
7.3 Assembly and installation
The correct location is a key factor in the accuracy of the weighing results.
Levelling
Exact alignment and stable installation are an essential
requirement for repeatable results. You can
compensate for minor unevenness or tilts of the
footprint by levelling the weighing balance.
Level balance with foot screws until the air bubble of the
water balance is in the prescribed circle.
Check levelling regularly.
Installation of weighing plate
Connection to the power supply (USB)
using the enclosed power pack or the USB host (e.g. computer)
In order to obtain exact results with the electronic balances, the digital
weighing platform must have reached the operating temperature (see warming
up time chap. 1).
The digital weighing platform must be connected to the power
supply during this warming up period.
The accuracy of the digital weighing plat
form is dependent on the local
acceleration due to gravity.
Strictly observe hints in chapter Adjustment.
Connection to your system (configuration) as described in the chapter 8
Carry out adjustment as described in the chapter 0
Communication and using the balance via the interface protocol (see
interface protocol description)
The chapter 10.1 describes the ideal way to use the balance using the
BalanceConnection software.
Page 10

KDP-BA_IA-e-1710 10
8 Connection to your system
The digital weighing platform is configured and operated using the KCP
communication protocol and the built-in interfaces. KCP is described in the additional
KCP-ZB interface description (enclosed and available online). The following sections
describe how to connect the weighing platform to your system using your preferred
communications interface.
KCP (KERN Communications Protocol):
KCP is a standardized set of interface commands for KERN balances and
other appliances, which allows all of the relevant parameters and functions to
be called up and controlled. KERN devices
that have KCP can use it to
connect easily to computers, industrial control systems and other digital
systems.
8.1 USB
Connect the device to the host computer using the enclosed USB cable. It will be
recognized as a virtual COM port and will be assigned a corresponding numbered
connection.
Example (Microsoft Windows Device Manager):
In modern devices the USB driver required for the weighing platform has already
been pre-installed. If the system is not recognized automatically, you can obtain the
correct driver from the Downloads area at http://www.kern-sohn.com.
8.2 Bluetooth
The weighing platform is optionally available with Bluetooth Low Energy (BLE) and
will then be visible to Bluetooth Master devices using its serial number.
To access this, please use an appropriate software programme / app which supports
Bluetooth Low Energy (BLE). Applications using Bluetooth Classic (BLC) will not
work.
Page 11
11 KDP-BA_IA-e-1710
8.3 Ethernet
The weighing platform’s factory setting uses DHCP, i.e. it connects automa tic ally to
your network. The system can communicate using the UDP protocol (Port 187) and
also the Telnet protocol (Port 23).
In standard configuration the weighing platform uses the DHCP mechanism to log
onto the network. In DNS the scale registers using its serial number, so it can also be
accessed using its name.
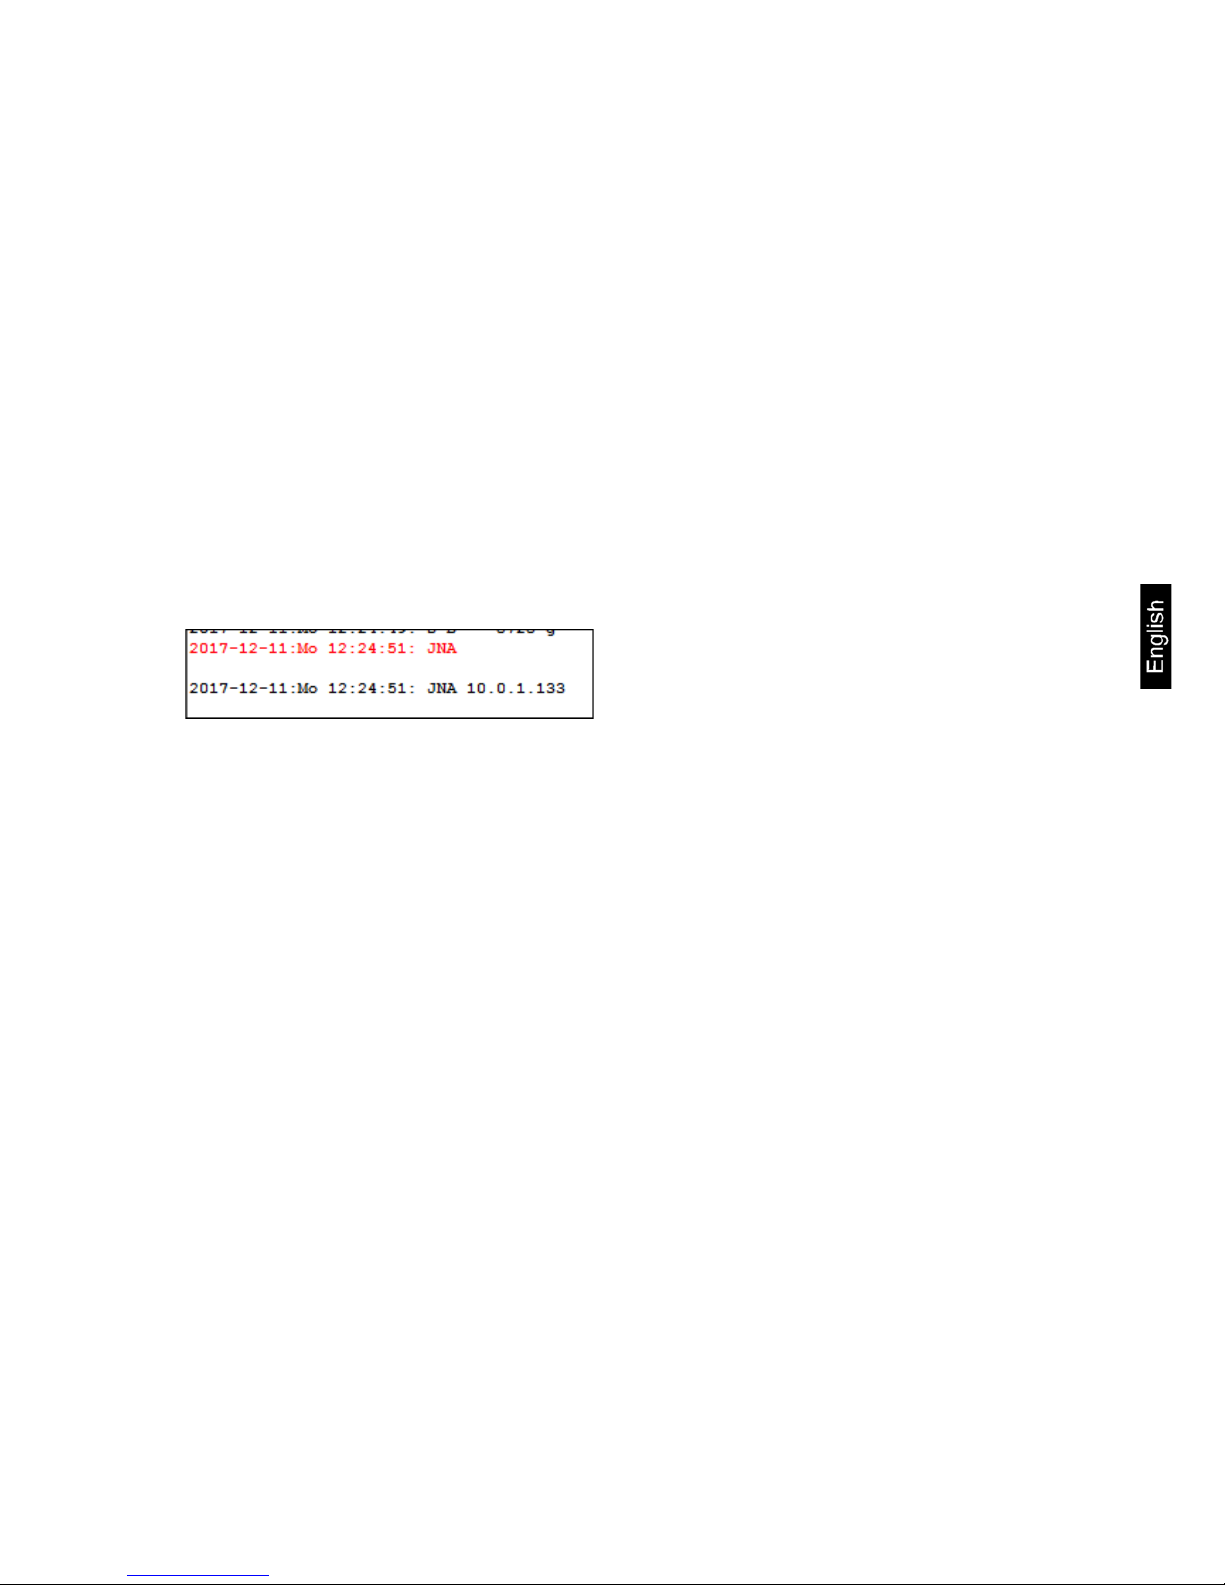
To request or configure the weighing platform’s IP address, connect it to the
computer using the USB cable (see "USB" chapter) and use the following commands
to request or set the network configuration:
• JNA: Query / set network address (IP)
• JNK: Query / set network mask
• JNG: Query / set gateway address
Example:
The weighing platform can then be accessed through the following ports:
• TCP:23 (Telnet)
• UDP:187 (Raw)
Page 12

KDP-BA_IA-e-1710 12
8.4 WLAN
If there are no configuration settings when it is turned on, the device will initially
create a WiFi access point using the name "E SP_...".
Use your computer to connect to this access point. Your computer will receive one
via DHCP and then use a web browser to go to the IP address 192.168.4.1 (the
configuration website).
Select your network under "WiFi Association" and enter your password.
After saving, the weighing platform logs on to the selected network and is available at
the new IP address (see corresponding report on the web interface).
Page 13

13 KDP-BA_IA-e-1710
Enter a static IP address if required:
The weighing platform can now be accessed in your target software using the
assigned IP address at port 23 (e.g. using "Telnet" software).
Example configuration KERN BalanceConnection:
The connection must be shown in green:
Page 14

KDP-BA_IA-e-1710 14
9 Adjustment
As the acceleration value due to gravity is not the same at every location on earth,
every digital weighi ng platfor m must be c oordinated - in compliance with the
underlying physical weighing principle - to the existing acceleration due to gravity at
its place of location (only if the weighing system has not already been adjusted to the
location in the factory). This adjustment process must be carried out for the first
commissioning, after each change of location as well as in case of fluctuating
environment temperature. To receive accurate measuring values it is also
recommended to adjust the digital weighing platform in weighing operation.
• Prepare the required adjustment weight. The adjustment weight to be
used depends on the capacity of the weighing system. Carry out
adjustment as near as possible to the weighing system’s maximum
weight. Info about test weights can be found on the Internet at:
http://www.kern-sohn.com.
•
Observe stable environmental conditions. Stabilisation requires a certain
warm-up time.
Performance of adjustment
Adjustment can be initiated using the commands "JZ", "JG" as well as "JS" in the
KCP protocol.
1) Emptying the weighing pan.
2) Sending the command to adjust the zero point ("JZ").
The balance sends a confirmation ("JZ A").
3) Place the adjustment weight specified in chapter 1 on the balance.
(query the adjustment weight using the command "JDC")
4) Send the command to accept the adjustment load ("JG").
The balance sends a confirmation ("JG A").
5) Save the adjustment u sing the command "JS".
This chapter 10.1 describes the ideal way to adjust the balance using the
BalanceConnection software.
Page 15
15 KDP-BA_IA-e-1710
10 Carrying out measurements
10.1 Using your own software
Measurements may be requested using various KCP protocol commands.
10.1.1 Request weight values
Central commands for the request are:
• „S“: Transmit the next stable value
• „SI“: Transmit the current value
• „SIR“: T ransmit the current net weight value continuously
10.1.2 Zeroing and taring
The device can be zeroed and tared using the following commands:
• „Z“: Zeroing the display on the balance
• „T“: Taring the balance
• „TA“: Setting or requesting the current tare value
10.2 Using the BalanceConnection software
The enclosed "KERN BalanceConnection" software includes an example
configuration for work i ng with the KDP weighing platform. The example configuration
switches the balance to continuous transmission, displays the current weight value
on-screen and includes the most important commands (adjustment, zeroing, taring,
printing).
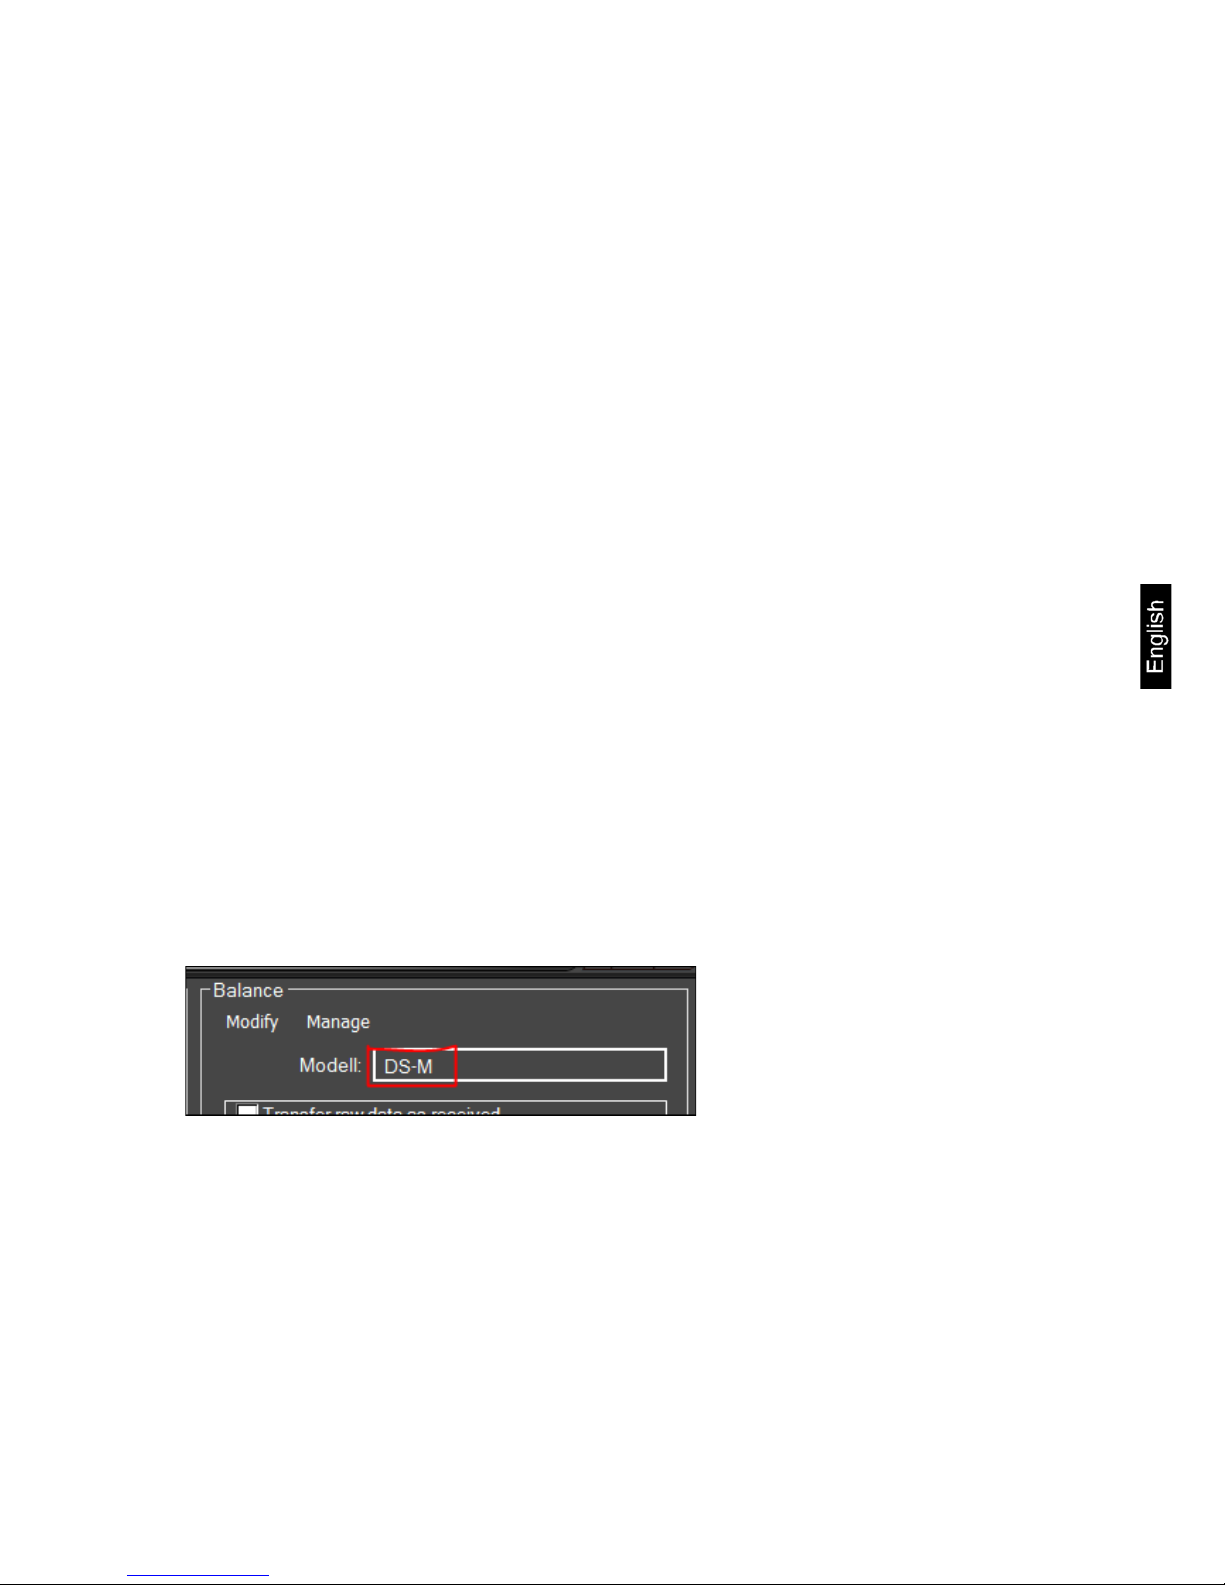
To activate the example configuration, please select the "KDP" model from the list of
models.
After confirmation the software loads the example configuration and restarts.
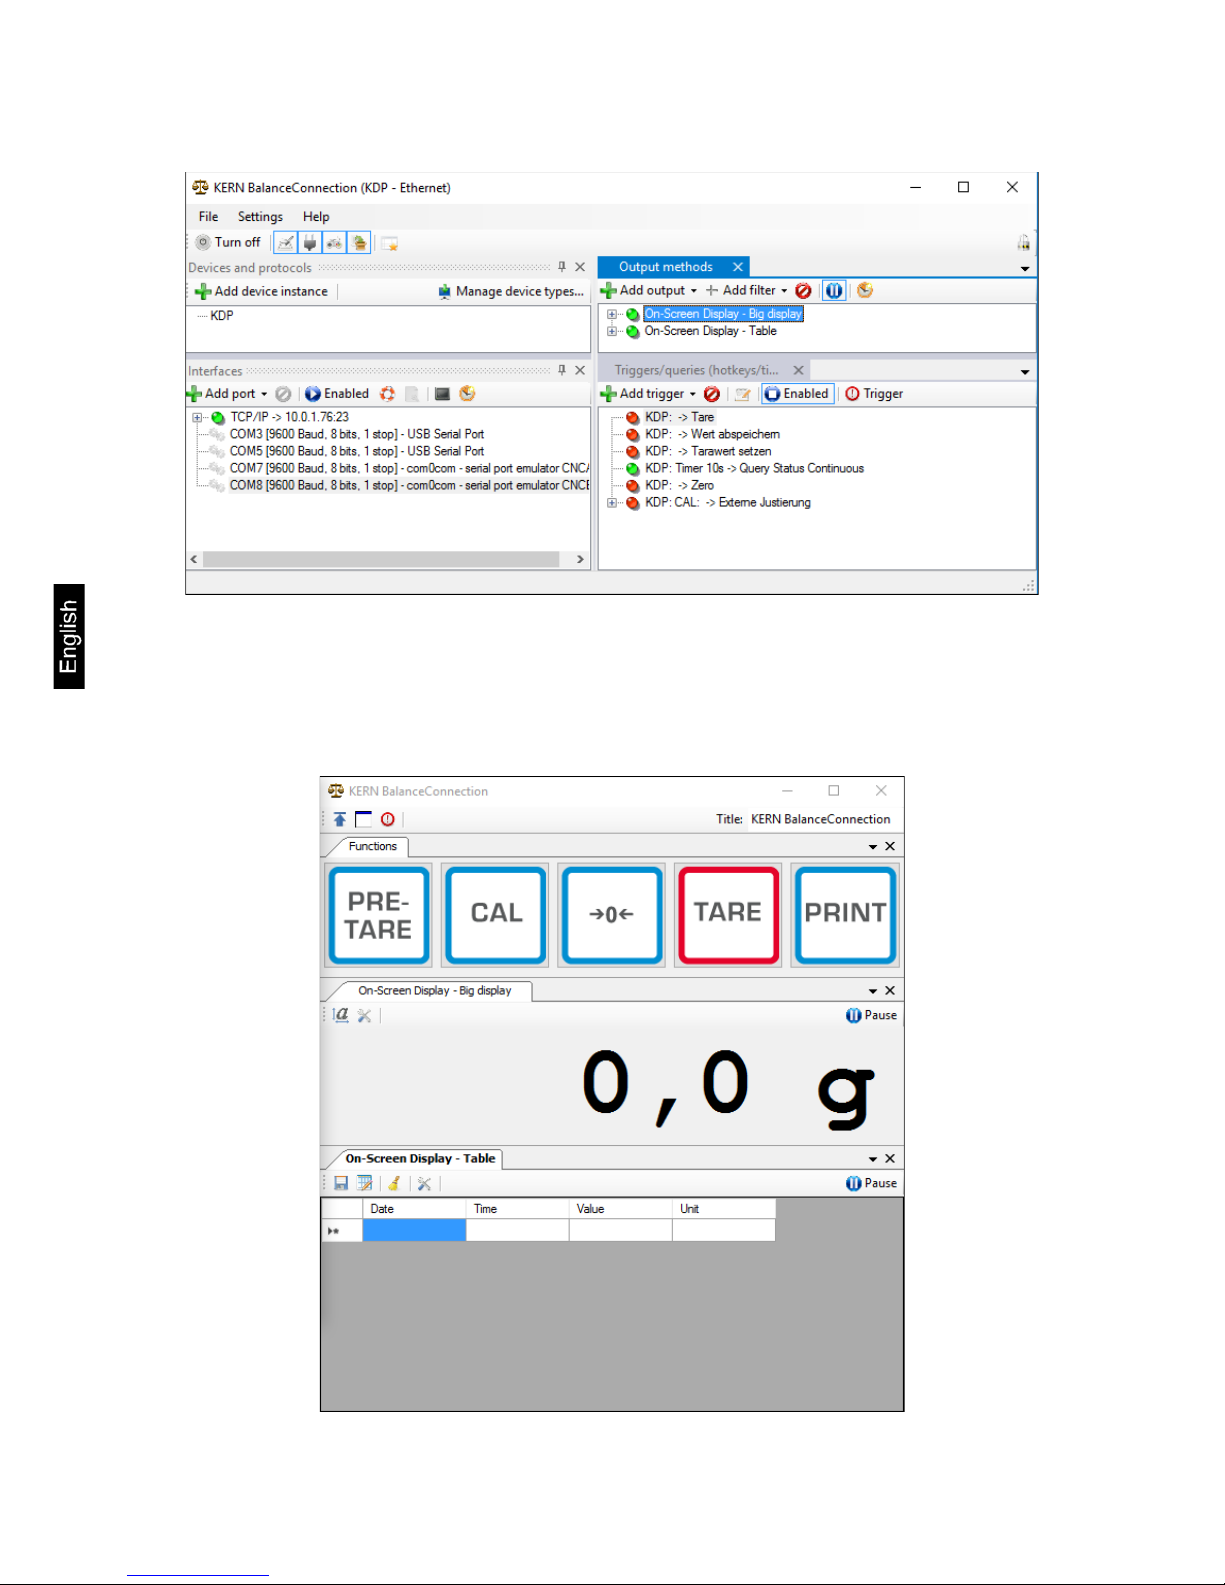
You will see the following items (two windows):
Page 16
KDP-BA_IA-e-1710 16
1) Main window BalanceConnection:
2) On-screen display window with three areas:
a. Main functions
b. Current weight value
c. Table listing weight values, which can be requested using "PRINT".
Page 17
17 KDP-BA_IA-e-1710
Important:
In the standard configuration COM1 is selected as the interface. Please adjust this on
your balance. For access through Ethernet, WLAN or Bluetooth, please enter the
relevant port in the software.
For details on changing the configuration please refer to the instructions for the
BalanceConnection software.
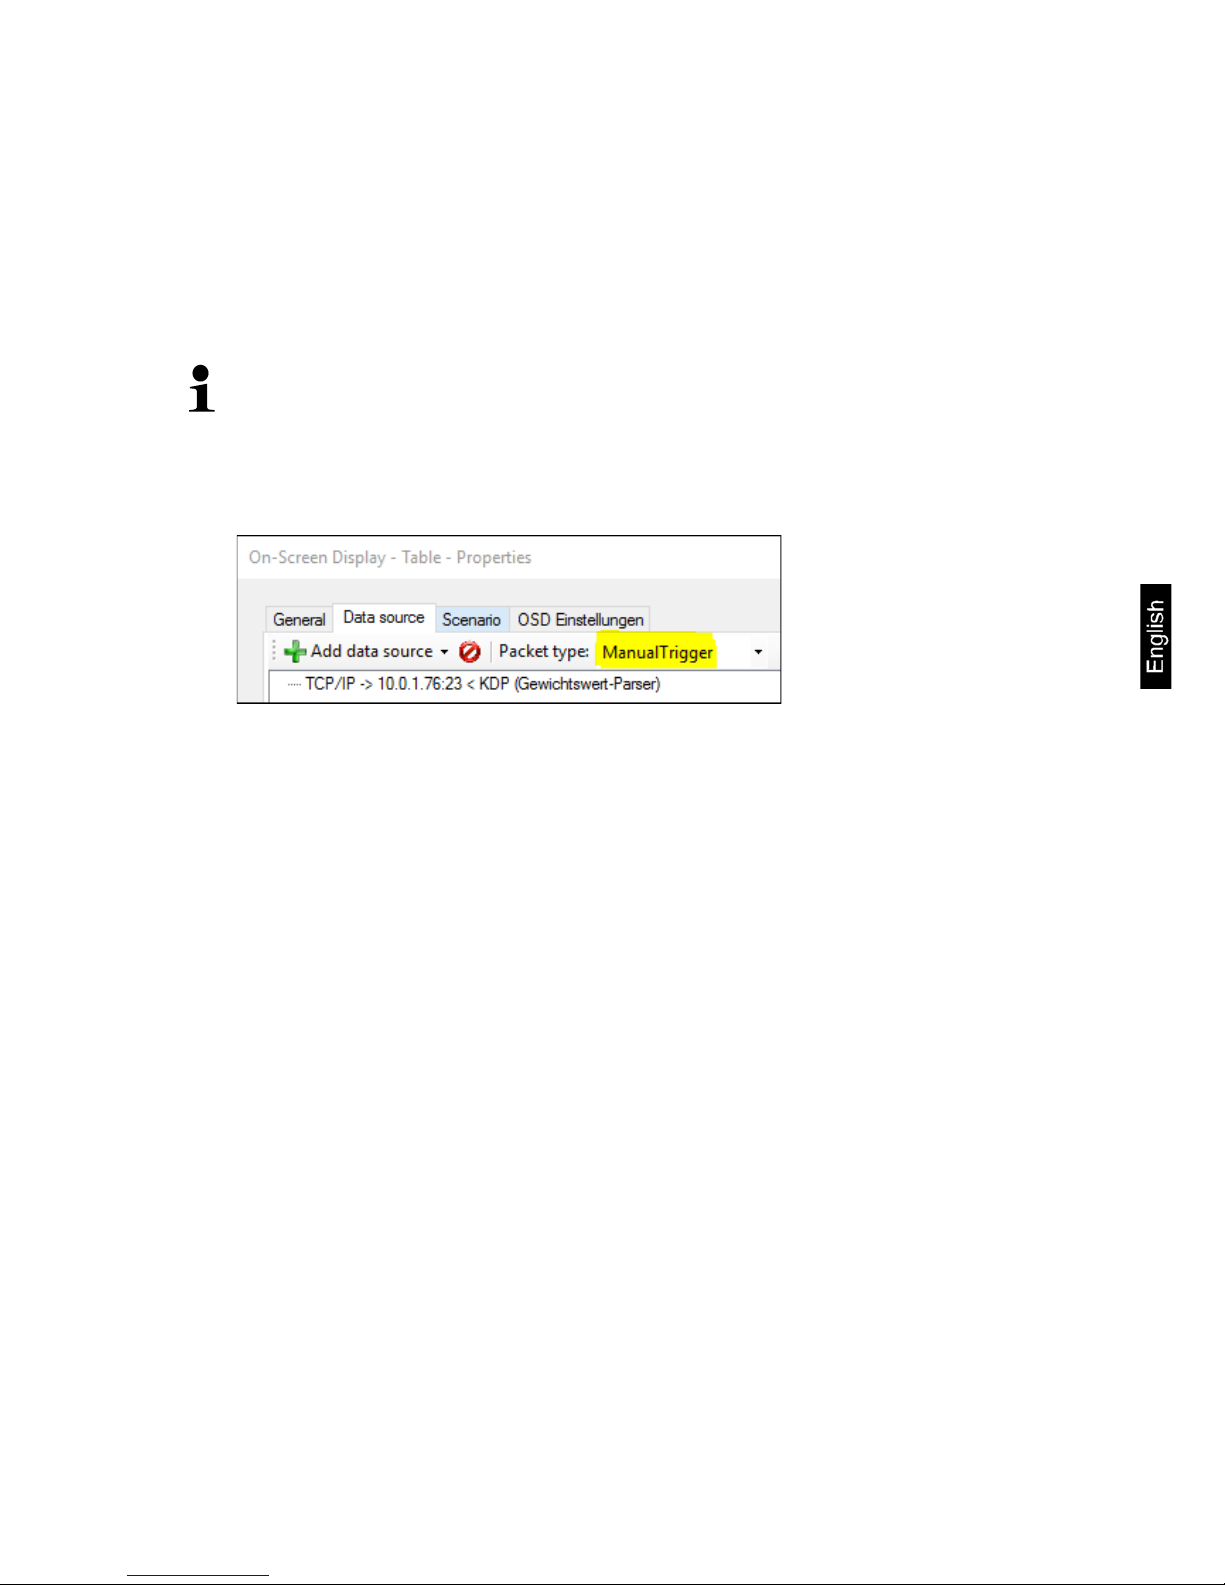
In the example configuration the weighing platform sends data constantly.
The weight values would normally all be forwarded to the output methods.
If you only want to keep the
current value, then please use the operation "Save
value" to accept the value. In the output method, the package type must be set
to manual trigger.
Page 18
KDP-BA_IA-e-1710 18
10.2.1 Functions
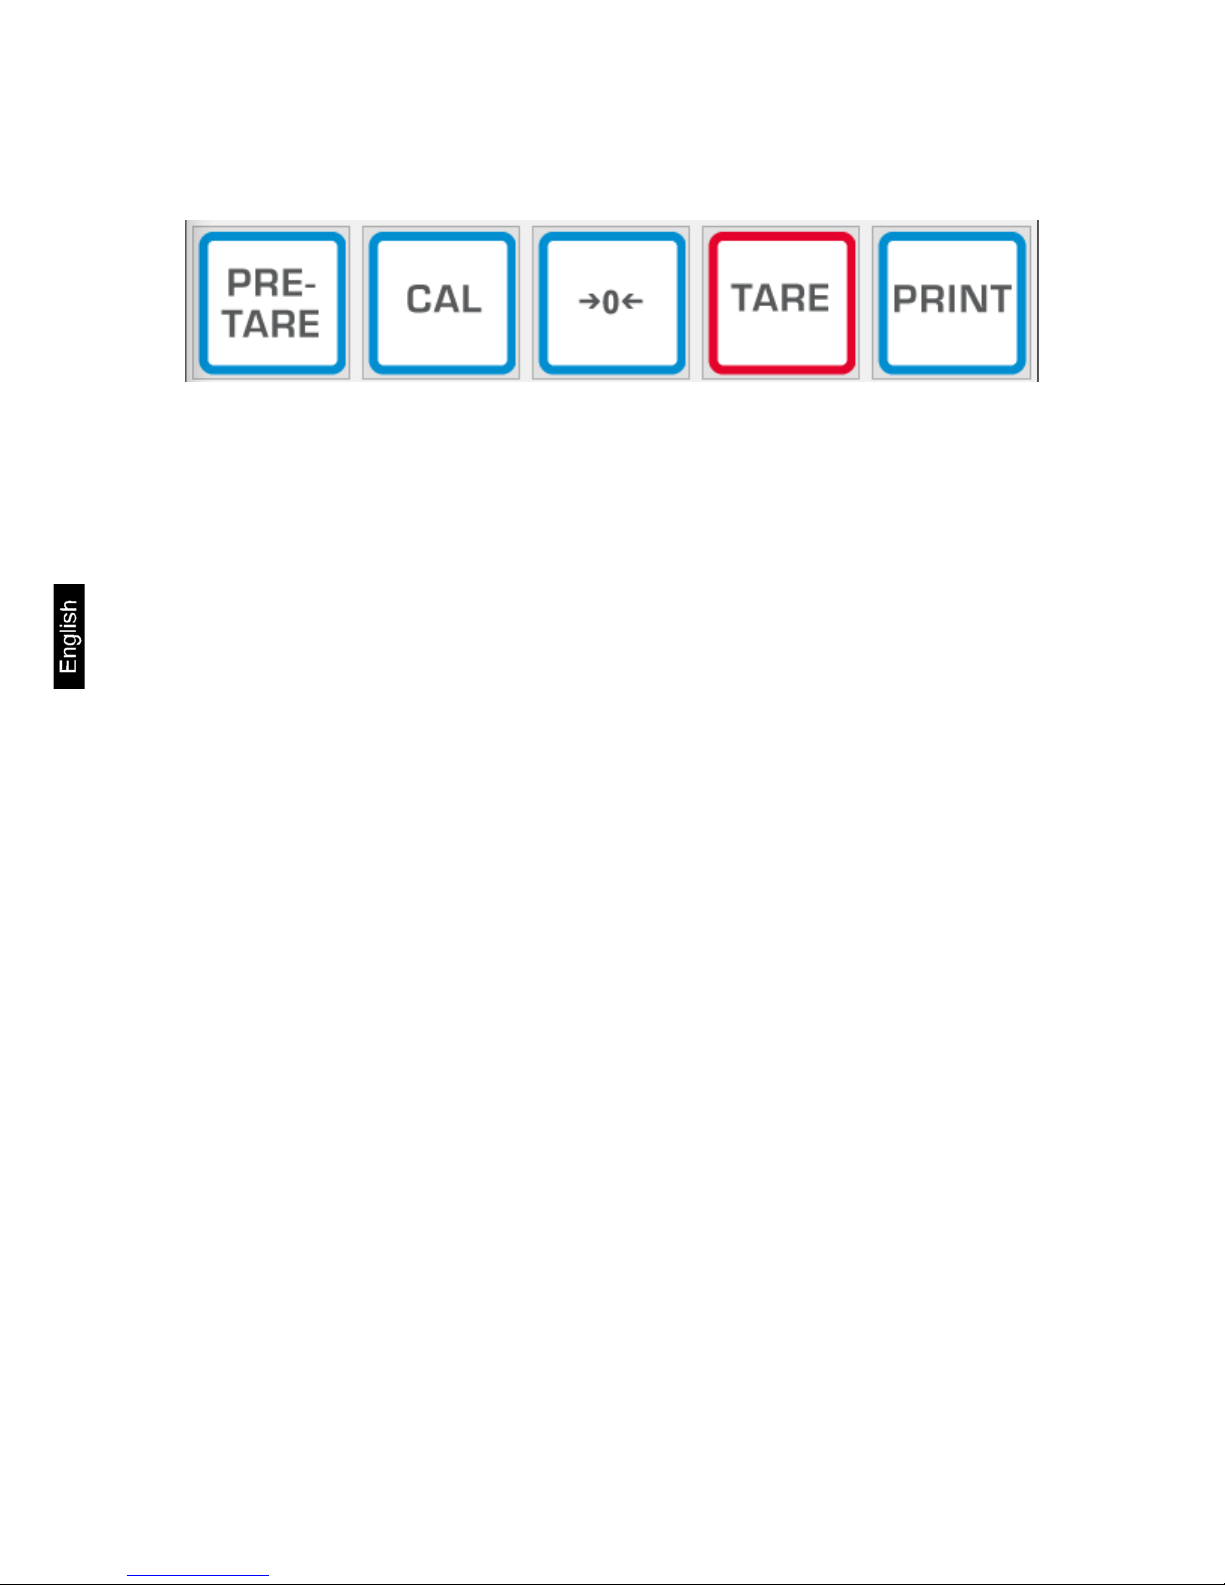
In the example configuration the following functions are pre-configured:
Zeroing (->0<-):
The display on the balance is set to zero, the full weighing range is available.
Taring (TARE):
The current weight value is adopted as the tare value. The new net value is
displayed.
Pre-TARE:
You can define a tare value (please specify in and with the weighing unit).
PRINT:
The current weight displayed on the balance is adopted as a value into the
assigned output methods .
Adjustment (CAL):
Adjustment of the platform is illustrated in the example configuration by a
sequence of commands, which corresponds to the adjustment procedure in the
chapter 9. Please follow the instruction displayed on the screen.
 Loading...