

KERN ILT series, ILT 30K0.2DM, ILT 60K0.5DM, ILT 120K1DM, ILT 12K0.1DM Operating Instructions Manual
Page 1

KERN & Sohn GmbH
Ziegelei 1
D-72336 Balingen
E-Mail: info@kern-sohn.com
Tel: +49-[0]7433- 9933-0
Fax: +49-[0]7433-9933-149
Internet: www.kern-sohn.com
Operating instruction
Platform scale
KERN ILT
Version 1.2
04/2006
GB
ILT-BA-e-0612
Page 2

ILT-BA-e-06122
GB
KERN ILT
Version 1.2 04/2006
Operating instruction
Platform scale
Contents
1 Technical data__________________________________________________ 4
2 Declaration of conformity ________________________________________ 6
3 Appliance overview _____________________________________________ 8
4 Basic Information (General)______________________________________ 10
4.1 Proper use______________________________________________________ 10
4.2 Improper Use ___________________________________________________ 10
4.3 Warranty _______________________________________________________ 10
4.4 Monitoring of Test Resources ______________________________________ 10
5 Basic Safety Precautions________________________________________ 11
5.1 Pay attention to the instructions in the Operation Manual_______________ 11
5.2 Personnel training _______________________________________________ 11
6 Transport and storage __________________________________________ 11
6.1 Testing upon acceptance _________________________________________ 11
6.2 Packaging ______________________________________________________ 11
7 Unpacking, Setup and Commissioning ____________________________ 11
7.1 Installation Site, Location of Use ___________________________________ 11
7.2 Unpacking ______________________________________________________ 12
7.2.1 Setup ______________________________________________________________ 13
7.2.2 Scope of delivery _____________________________________________________ 13
7.3 Mains connection ________________________________________________ 13
7.4 Connection of peripheral devices___________________________________ 13
7.5 Initial Commissioning ____________________________________________ 13
Page 3

ILT-BA-e-0612 3
8 User menu ____________________________________________________ 14
8.1 User principle of the menu control __________________________________ 17
8.2 Operation of the balance with PS/2-keyboard _________________________ 18
8.3 Menu selection __________________________________________________ 19
8.3.1 P1 Calibration (adjustment) _____________________________________________ 19
8.3.2 P2 GLP (Good laboratory practice) _______________________________________ 25
8.3.3 P3 Date/time_________________________________________________________ 27
8.3.4 P4 Readout__________________________________________________________ 29
8.3.5 P5 RS-232 __________________________________________________________ 32
8.3.6 P6 Printout __________________________________________________________ 34
8.3.7 P7 Units ____________________________________________________________ 40
8.3.8 P8 Operating modes___________________________________________________ 40
8.3.9 P9 Globals __________________________________________________________ 41
9 Operation_____________________________________________________ 42
9.1 Operating modes (P8) ____________________________________________ 44
9.1.1 Simple weighing______________________________________________________ 46
9.1.2 Counting____________________________________________________________ 47
9.1.3 Checkweighing (weighing with tolerance range) _____________________________ 55
9.1.4 Filling ______________________________________________________________ 57
9.1.5 Percent weighing _____________________________________________________ 58
9.1.6 Animal weighing (dynamic weighing)______________________________________ 60
9.1.7 Formulation__________________________________________________________ 63
9.1.8 Statistics: ___________________________________________________________ 67
10 Data output _________________________________________________ 70
10.1 Technical data___________________________________________________ 70
10.2 Pin allocation of the balance output plug (front view) __________________ 70
10.3 Remote control instructions _______________________________________ 71
11 Service, maintenance, disposal_________________________________ 72
11.1 Cleaning _______________________________________________________ 72
11.2 Service, maintenance_____________________________________________ 72
11.3 Disposal________________________________________________________ 72
12 Instant help _________________________________________________ 73
Page 4

ILT-BA-e-06124
1 Technical data
KERN ILT 12K0.1DM ILT 30K0.2DM
Readability (d) 0.1/0.2 g 0.2/0.5 g
Weighing range (max) 6/12 kg 12/30 kg
Minimum load 5/10 g 10/25 g
Verification value 1/2 g 2/5 g
Verification class II II
Reproducibility 0.2/0.4 g 0.4/1 g
Linearity ± 0.2/0.4 g ± 0.4/1 g
Recommended adjusting
weight (not supplied)
10 kg (F2) 20 kg (F2)
Minimum piece weight for
counting function
> 0.1 g > 0.2 g
Stabilization time 4 sec.
Weighing units
(calibrated appliances)
g, kg
Weighing units
(non-calibrated appliances)
g, kg, ct, lb, oz, ozt, dwt, t {h}, t {S}, t {t}, mom, GN, N, t,
freely programmable
Reference quantities at
piece counting
10, 20, 50,100, freely selectable
Weighing plate, stainless
steel
300 x 300 mm
Dimensions of the housing
(B x D x H)
300 x 300 x 75 (platform)
197 x 110 x 35 ( display)
Net weight (kg) 7,7
Permitted environmental
condition
-15° C to 30° C
Humidity of air max. 80 % relative (not condensing)
Voltage 230 V/50Hz
Page 5
ILT-BA-e-0612 5
KERN ILT 60K0.5DM ILT 120K1DM
Readability (d) 0.5/1 g 1/2 g
Weighing range (max) 30/60 kg 60/120 kg
Minimum load 25/50 g 50/100 g
Verification value 5/10 g 10/20 g
Verification class II II
Reproducibility 1/2 g 2/4 g
Linearity ± 1/2 g ± 2/4 g
Recommended adjusting
weight (not supplied)
50 kg (F2) 100 kg (F2)
Minimum piece weight for
counting function
> 1 g > 1 g
Stabilization time 4 sec.
Weighing units
(calibrated appliances)
g, kg
Weighing units
(non-calibrated appliances)
g, kg, ct, lb, oz, ozt, dwt, t {h}, t {S}, t {t}, mom, GN, N, t,
freely programmable
Reference quantities at
piece counting
10, 20, 50,100, freely selectable
Weighing plate, stainless
steel
410 x 410 mm
Dimensions of the housing
(B x D x H)
410 x 410 x 90 (platform)
197 x 110 x 35 ( display)
Net weight (kg) 13
Permitted environmental
condition
-15° C to 30° C
Humidity of air max. 80 % relative (not condensing)
Voltage 230 V/50Hz
Page 6

ILT-BA-e-06126
2 Declaration of conformity
KERN & Sohn GmbH
Konformitätserklärung
Declaration of conformity for apparatus with CE mark
Konformitätserklärung für Geräte mit CE-Zeichen
Déclaration de conformité pour appareils portant la marque CE
Declaración de conformidad para aparatos con marca CE
Dichiarazione di conformitá per apparecchi contrassegnati con la marcatura CE
English
We hereby declare that the product to which this declaration refers conforms with the
following standards.
Deutsch
Wir erklären hiermit, dass das Produkt, auf das sich diese Erklärung bezieht, mit den
nachstehenden Normen übereinstimmt.
Français
Nous déclarons avec cela responsabilité que le produit, auquel se rapporte la présente
déclaration, est conforme aux normes citées ci-après.
Español
Manifestamos en la presente que el producto al que se refiere esta declaración est´´a de
acuerdo con las normas siguientes
Italiano
Dichiariamo con ciò che il prodotto al quale la presente dichiarazione si riferisce è
conforme alle norme di seguito citate.
Electronic Balance: KERN ILT
Mark applied EU Directive Standards
89/336/EEC EMC
EN45501
EN55022
73/23/EEC Low Voltage EN60950
Date: 30.01.2006 Signature:
Gottl. KERN & Sohn GmbH
Management
Gottl. KERN & Sohn GmbH, Ziegelei 1, D-72336 Balingen, Tel. +49-[0]7433/9933-0,Fax +49-[0]7433/9933-149
Page 7
ILT-BA-e-0612 7
KERN & Sohn GmbH
Konformitätserklärung
Declaration of conformity for apparatus with CE mark
Konformitätserklärung für Geräte mit CE-Zeichen
Déclaration de conformité pour appareils portant la marque CE
Declaración de conformidad para aparatos con marca CE
Dichiarazione di conformitá per apparecchi contrassegnati con la marcatura CE
English
We hereby declare that the product to which this declaration refers conforms with the
following standards.
This declaration is only valid with the certificate of conformity by a notified body.
Deutsch
Wir erklären hiermit, dass das Produkt, auf das sich diese Erklärung bezieht, mit den
nachstehenden Normen übereinstimmt.
Diese Erklärung gilt nur in Verbindung mit der Konformitätsbescheinigung einer
benannten Stelle.
Français
Nous déclarons avec cela responsabilité que le produit, auquel se rapporte la présente
déclaration, est conforme aux normes citées ci-après.
Cette déclaration est valide seulement avec un certificat de conformité dun
organisme notifié.
Español
Manifestamos en la presente que el producto al que se refiere esta declaración está de
acuerdo con las normas siguientes.
Esta declaración solo será válida acompañada del certificado de conformidad de
conformidad de la parte nominal.
Italiano
Dichiariamo con ciò che il prodotto al quale la presente dichiarazione si riferisce è
conforme alle norme di seguito citate.
Questa dichiarazione sarà valida solo se accompagnata dal certificato di conformità
della parte nominale.
Model: KERN ILT
EU Directive Standards
EC-type-approval certificate no. Issued by
90/384/EEC EN 45501 PL 06 001
GUM
Date: 30.01.2006 Signature:
Gottl. KERN & Sohn GmbH
Management
Gottl. KERN & Sohn GmbH, Ziegelei 1, D-72336 Balingen, Tel. +49-07433/9933-0,Fax +49-074433/9933-149
Page 8
ILT-BA-e-06128
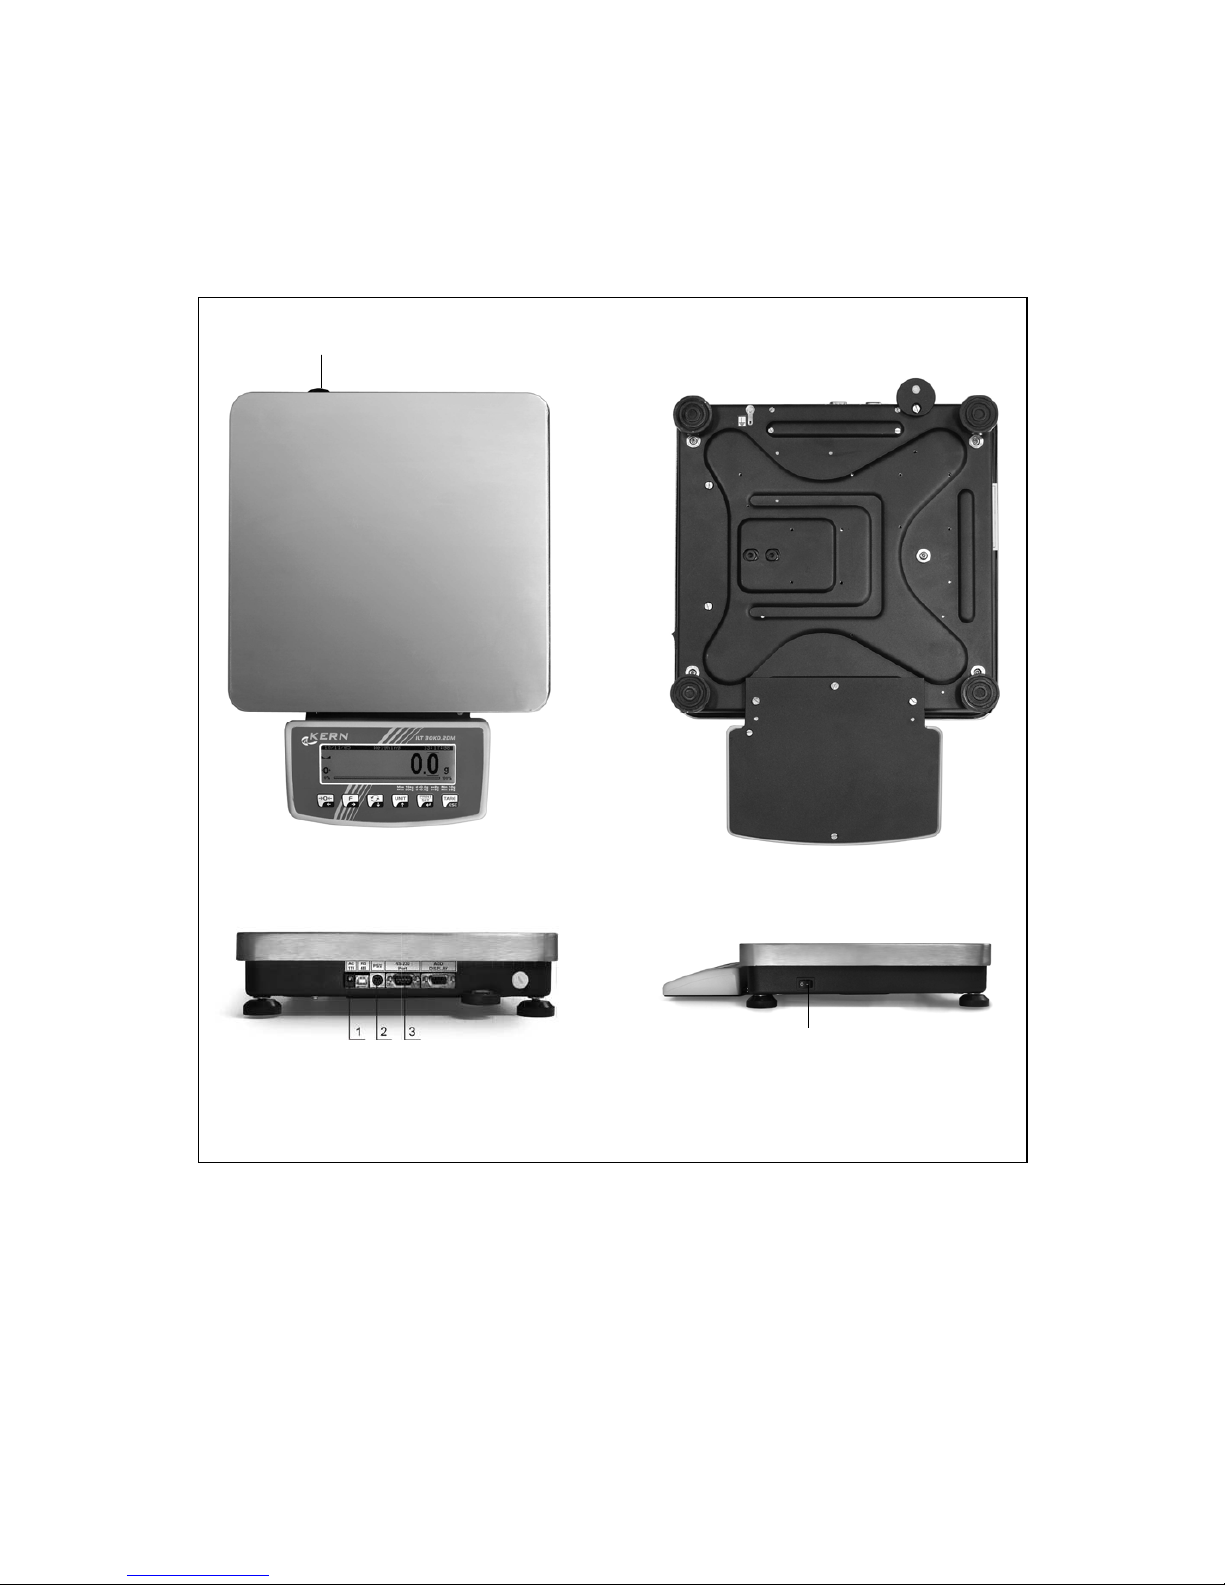
3 Appliance overview
Models: ILT 12K0.1DM, ILT 30K0.2M
1. Mains connection
2. PS/2 keyboard
3. RS 232 interface
Air bubble
ON/OFF switch
Page 9

ILT-BA-e-0612 9
Models: ILT 60k0.50M, ILT 120K1DM
1. ON/OFF switch
2. Mains connection
3. PS/2 keyboard
4. RS 232 interface
Air bubble (underneath weighing plate)
Page 10

ILT-BA-e-061210
4 Basic Information (General)
4.1 Proper use
The balance you purchased is intended to determine the weighing value of material
to be weighed. It is intended to be used as a non-automatic balance, i.e. the
material to be weighed is manually and carefully placed in the centre of the weighing
plate. As soon as a stable weighing value is reached the weighing value can be read.
4.2 Improper Use
Do not use balance for dynamic add-on weighing procedures, if small amounts of
goods to be weighed are removed or added. The stability compensation installed in
the balance may result in displaying an incorrect measuring value! (Example: Slowly
draining fluids from a container on the balance.)
Do not leave permanent load on the weighing plate. This may damage the measuring
system.
Impacts and overloading exceeding the stated maximum load (max) of the balance,
minus a possibly existing tare load, must be strictly avoided. Balance may be
damage by this.
Never operate balance in explosive environment. The serial version is not explosion
protected.
The structure of the balance may not be modified. This may lead to incorrect
weighing results, safety-related faults and destruction of the balance.
The balance may only be used according to the described conditions. Other areas of
use must be released by KERN in writing.
4.3 Warranty
Warranty claims shall be voided in case
Our conditions in the operation manual are ignored
The appliance is used outside the described uses
The appliance is modified or opened
Mechanical dammage or dammage by media, liquids, natural wear and tear
The appliance is improperly set up or incorrectly electrically connected
The measuring system is overloaded
4.4 Monitoring of Test Resources
In the framework of quality assurance the measuring-related properties of the
balance and, if applicable, the testing weight, must be checked regularly. The
responsible user must define a suitable interval as well as type and scope of this test.
Information is available on KERNs home page (www.kern-sohn.com with regard to
the monitoring of balance test substances and the test weights required for this. In
KERNs accredited DKD calibration laboratory test weights and balances may be
calibrated (return to the national standard) fast and at moderate cost.
Page 11

ILT-BA-e-0612 11
5 Basic Safety Precautions
5.1 Pay attention to the instructions in the Operation Manual
Carefully read this operation manual before setup and commissioning, even if you
are already familiar with KERN balances.
5.2 Personnel training
The appliance may only be operated and maintained by trained personnel.
6 Transport and storage
6.1 Testing upon acceptance
When receiving the appliance, please check packaging immediately, and the
appliance itself when unpacking for possible visible damage.
6.2 Packaging
Keep all parts of the original packaging in case you need to return the appliance.
Only use original packaging for returning.
Before sending, disconnect all connected cables and loose/movable parts.
Attach possibly existing transport safeguards. Secure all parts, e.g. weighing plate,
power unit etc., to prevent slipping and damage.
7 Unpacking, Setup and Commissioning
7.1 Installation Site, Location of Use
The balances are designed in a way that reliable weighing results are achieved in
common conditions of use.
You will work accurately and fast, if you select the right location for your balance.
Therefore, observe the following for the installation site:
Place the balance on a firm, level surface;
Avoid extreme heat as well as temperature fluctuation caused by installing
next to a radiator or in the direct sunlight;
Protect the balance against direct draughts due to open windows and doors;
Avoid jarring during weighing;
Protect the balance against high humidity, vapours and dust;
Do not expose the device to extreme dampness for longer periods of time.
Non-permitted condensation (condensation of air humidity on the appliance)
may occur if a cold appliance is taken to a considerably warmer environment.
In this case, acclimatize the disconnected appliance for ca. 2 hours at room
temperature.
Avoid static charge of goods to be weighed or weighing container.
Page 12
ILT-BA-e-061212
If electro-magnetic fields or static charge occur, or if the power supply is unstable
major deviations on the display (incorrect weighing results) are possible. In that case,
the location must be changed.
7.2 Unpacking
Carefully remove the balance from the packaging and setup balance at the intended
workstation.
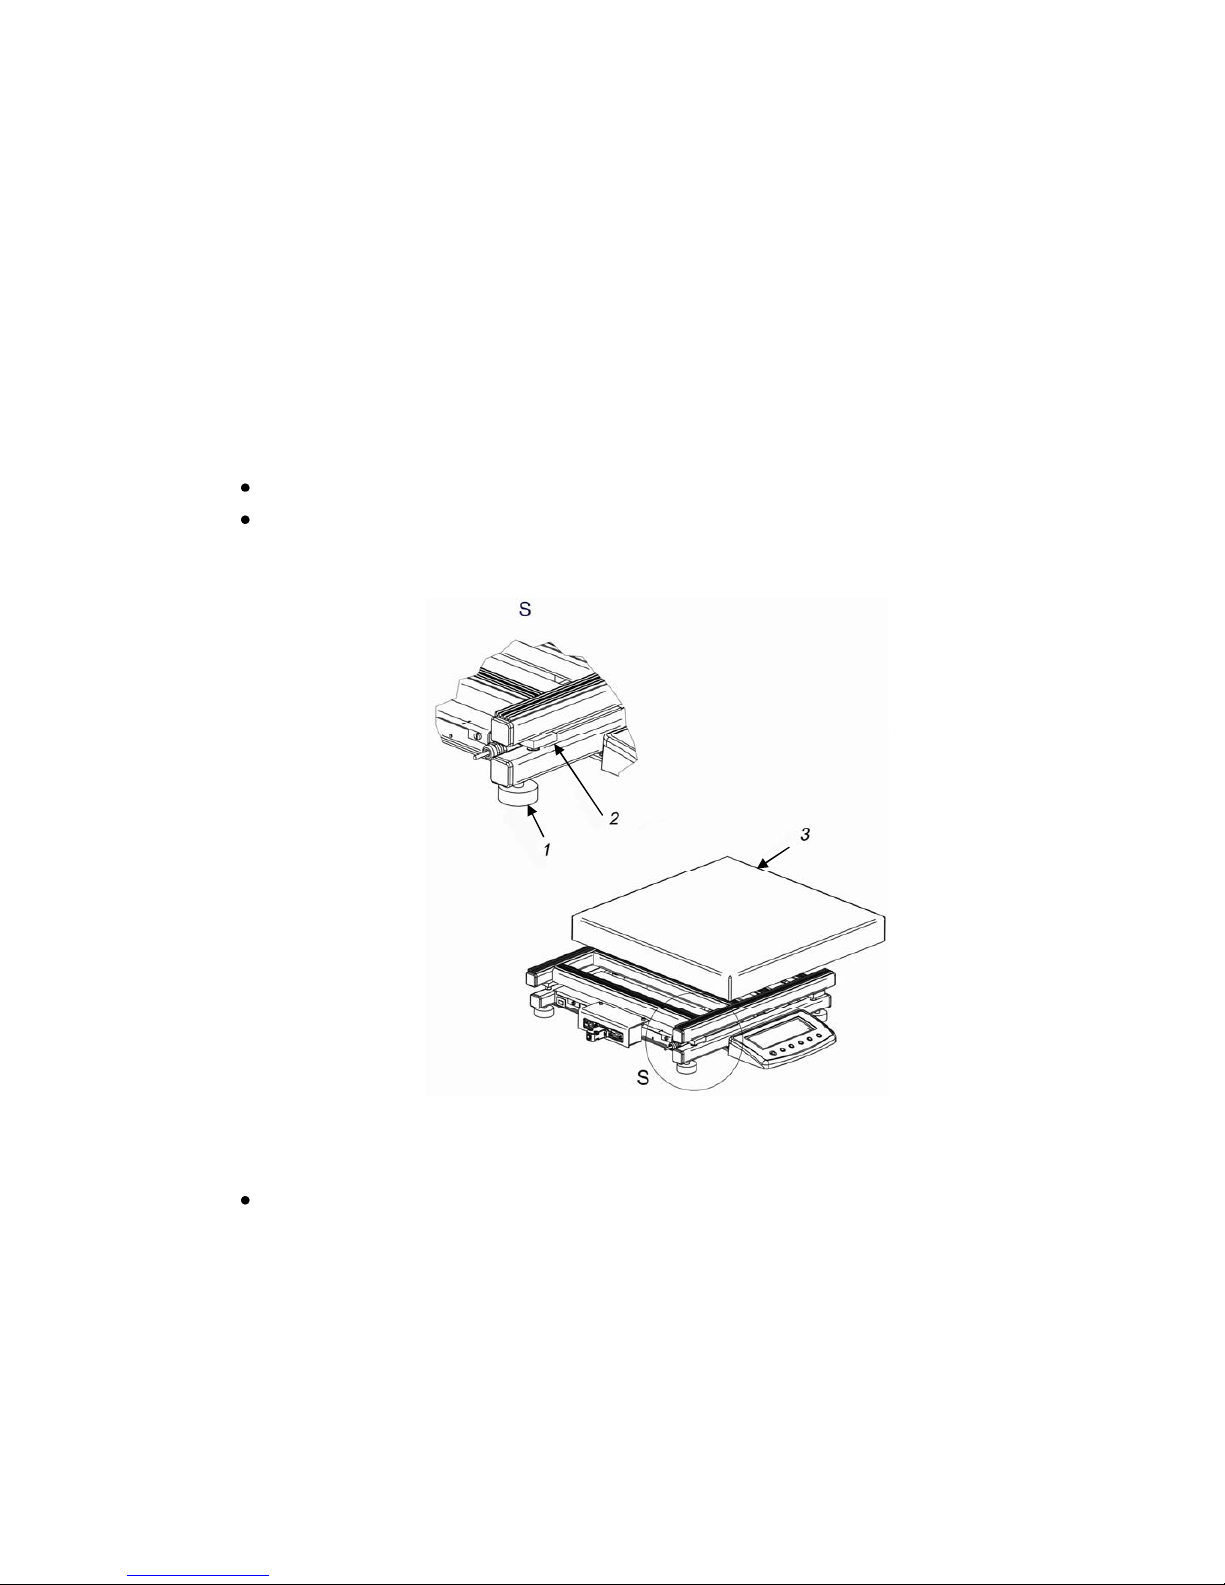
Remove the transport arrestment (models ILT 60k0.50M, ILT 120K1DM):
Screw in the 4 foot screws
Remove the 4 plastic inserts (2)
Place the weighing pan (3) on the balance
Page 13

ILT-BA-e-0612 13
7.2.1 Setup
Level balance with foot screws until the air bubble of the water balance is in the
prescribed circle.
7.2.2 Scope of delivery
Serial accessories:
Balance
Weighing plate
Mains power supply
Operating Manual
Safety hood above control panel
7.3 Mains connection
Power is supplied via the external mains power supply. The stated voltage value
must be the same as the local voltage.
Only use original KERN mains power supplies. Using other makes requires consent
by KERN.
7.4 Connection of peripheral devices
Before connecting or disconnecting of additional devices (printer, PC) to the data
interface, always disconnect the balance from the power supply.
With your balance, only use accessories and peripheral devices by KERN, as they
are ideally tuned to your balance.
7.5 Initial Commissioning
A warming up time of 15 minutes after switching on stabilizes the measuring values.
The accuracy of the balance depends on the local acceleration of gravity.
Strictly observe hints in chapter Adjustment.
Page 14
ILT-BA-e-061214
8 User menu
The user menu has nine main menus (P1 - P9), arranged in the following sub-menus:
P1 Calibration
01 External calibration * * * * * * * * Function
02 User calibration * * * * * * * * Function
03 Calibration test * * * * * * * * Function
04 Print report 1 on
P2 GLP
01 User
02 Project
03 Time print 1 on
04 Date print 1 on
05 User print 1 on
06 Project print 1 on
07 Id printout 1 on
08 Last Cal. print 1 on
P3 Date/time
01 Date format 0 DA/MO/YR
02 Time format 0 24 hour
03 Time * * * * * * * * Function
04 Date * * * * * * * * Function
05 Display time 1 on
06 Display date 1 on
P4 Readout
01 Filter 3 normal
02 Med. filter 1 active
03 Disp.refresh 1
04 Auto zero 1 on
05 Last digit 1 always
06 Negative 0 disabled
Page 15
ILT-BA-e-0612 15
P5 RS-232
01 Baud rate 1 4800
02 Parity 0 None
03 Data bits 2 8 bit
04 Stop bits 1 1 Stop bit
05 Handshake 0 none
06 Auto. Print 0 None
07 Interval 1 * 0.04 s
08 Min. mass 4 10 d
09 Print on stab 1 enabled
10 Pause 1 * 0.1 s
P6 Printouts
01 Prontout men. * * * * * * * * Function
02 1. Printout dest. 0 RS+Mem
03 Printout No. 0 Standard
04 Printout Mem. No. 0 Standard
05 1. Printout start 1
06 1. Printout stop 1
07 2. Printout start 1
08 2. Printout stop 1
.. .
13 1. String
14 2. String
.. .
92 80. String
P7 Units
01 Gram 1 enabled
02 Kilogram 0 disabled
03 Pound 0 disabled
04 Ounce 0 disabled
05 Troy ounce 0 disabled
06 Carat 0 disabled
07 Dwt 0 disabled
08 Teal Hk. 0 disabled
09 Teal S. 0 disabled
10 T.eal T 0 disabled
11 Momme 0 disabled
12 Grain 0 disabled
13 Newton 0 disabled
14 Tical 0 disabled
15 User defined 0 disabled
16 User factor 0.1
P8 Operating modes
01 Parts Count 1 enabled
02 Checkweighing 1 enabled
03 Filling 1 enabled
04 Percent 1 enabled
05 Animal 1 enabled
06 Density 1 enabled
07 Formulation 1 enabled
08 Statistics 1 enabled
Page 16

ILT-BA-e-061216
P9 Globals
01 ID setting * * * * * * * * Function
02 ID autoprint 0 no
03 Beep 1 on
04 Language * * * * * * * * Function
05 Backlight 1 on
06 Contrast * * * * * * * * Function
07 Screensaver 0 disabled
08 Balance Id WL141475
09 Software rev. MBT 1b24
10 Parameter printout * * * * * * * * Function
11 Parameter receive. * * * * * * * * Function
Main menu:
1. Menu number (P1 - P9)
2. Menu designation
3. Cursor ( ) indicates the current
menu item
Submenu:
1. Main menu number (P1 P9)
2. Sub-menu number and designation
3. Parameter value or ****** i.e. this
menu item is stored as function
4. Description of function
5. Cursor ( ) shows the current
menu item (e.g. P1).
6. Cursor ( ) shows the current
setting (e.g. 06).
7. Status
8. Use the arrow key to modify the
parameter value, the active
parameter blinks.
Page 17

ILT-BA-e-0612 17
8.1 User principle of the menu control
In the menu the settings of the balance can be modified and functions can be
activated.
This way, the balance can be adjusted to individual weighing requirements. Proceed
as follows:
Switch on the balance using the -key
After actuating the key the display shows the main menus that can be set
P1 Calibration
P2 GLP
P3 Date/Time
P4 Readout
P5 RS-232
P6 Printouts
P7 Units
P8 Modes
P9 Global
s
Setup2.02.05
Use the cursor ( ) to select your setting
Use the key to move the cursor ( ) down, the key to move it up
The key confirms your selected setting, the display shows the sub-menu or the
active menu item blinks:
Setup
P1
01 Int. calibr.
02 Ext. calibr.
03 User calibr.
04 Calibr. test
05 Weight. corr.
06 Aut calibr.
07
Print report
o
Auto cal. time
08
********
********
********
********
0.0
0
1
fu nc tio n
fu nc tio n
fu nc tio n
off
on
fu nc tio n
31.01.05
1
1 hou r
Use the arrow keys to move within and enter into the menu:
Cursor control up
Parameter selection within function
Increasing the value for selected numeral or number
Access to main menu
Access to sub-menu
Move to next menu item
on the right inside menu
Selection of the number
to be changed to the
right (the respective
active position flashes)
Return to main menu
Selection of the number
to be changed to the left
(the respective active
position flashes)
Cursor control down
Parameter selection within function
Decreasing the value for selected numeral or number
Page 18

ILT-BA-e-061218
Actuating the -key will confirm your setting; to interrupt use the -key
Press -key to return to menu
Actuate -key again, a message will inquire whether you want to save the
changes you made.
Actuating the key will save the selected setting.
If you do not want to save your selected setting, press the key
The balance returns automatically into weighing mode.
Weighing
0.0000
g
0% 100%
0
27.01.05
8.2 Operation of the balance with PS/2-keyboard
Using a PS/2 keyboard will help you to enter numbers and texts faster and easier.
Key allocation:
Balance keyboard
PS- keyboard
Page 19

ILT-BA-e-0612 19
8.3 Menu selection
8.3.1 P1 Calibration (adjustment)
As the acceleration value due to gravity is not the same at every location on earth,
each balance must be coordinated - in compliance with the underlying physical
weighing principle - to the existing acceleration due to gravity at its place of location
(only if the balance has not already been adjusted to the location in the factory). This
adjustment process must be carried out for the first commissioning, after each
change of location as well as in case of fluctuating environment temperature. To
receive accurate measuring values it is also recommended to adjust the balance
periodically in weighing operation.
Procedure when adjusting:
Observe stable environmental conditions. A warming up time of ca. 1 hour is required
for stabilization.
Note!
During the adjustment process no objects should be on the weighing plate.
In calibrated balances the adjustment function is switch locked. To carry out an
adjustment, the switch must be unlocked, see chpt. 8.3.1.2
Operation Display
Call up menu item "P1 Calibration" (see chapt. 8.1)
Press -button
P1 Calibration
P2 GLP
P3 Date/Time
P4 Readout
P5 RS-232
P6 Printouts
P7 Units
P8 Modes
P9 Globals
Setup2.02.05
01 Ext. Cal - adjustment with external weight (locked for verifiable devices)
Use the cursor ( ) to select "01 Ext. cal."
Einstellungen
P1
01
02
03
04
Ext.
test
Pr
User calibr.
C
int report
calibr.
alibr.
********
********
********
1
fu n c tio n
fu n c tio n
on
fu n c tio n
29.12.04
Press -button
Ensure that there are no objects on the weighing
plate.
Press -key, on the display appears the weight
value of the adjusting weight.
Page 20
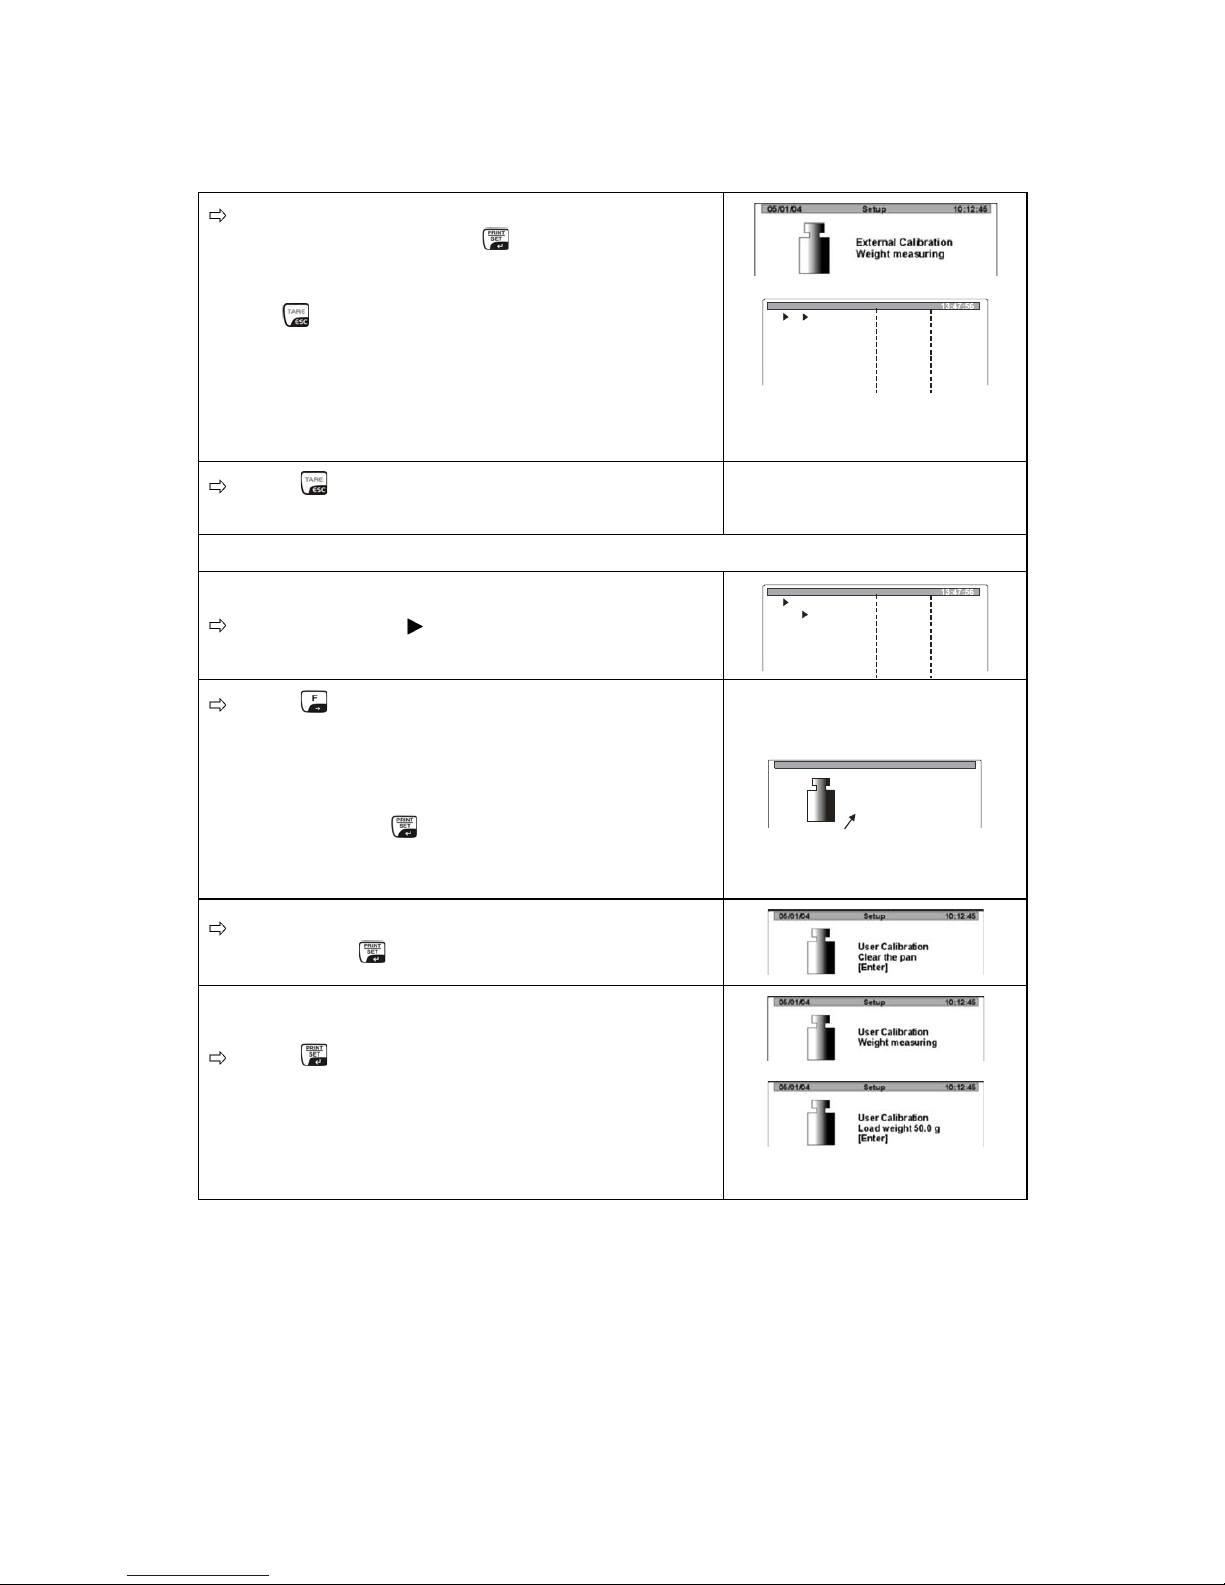
ILT-BA-e-061220
Now move the adjusting weight to the centre of
the weighing plate, press -key. If the
adjustment was successful, this will be followed
by automatic reset to the menu.
The -key may be used to cancel the
adjustment. Errors during adjustment or the use
of an incorrect adjusting weight will result in an
error message. Repeat adjustment.
Einstellungen
P1
01
02
03
04
Ext.
test
Pr
User calibr.
C
int report
calibr.
alibr.
********
********
********
1
fu n c tio n
fu n c tio n
on
fu n c tio n
29.12.04
Press -key until you enter the menu/weighing
mode (see chapt. 8.1)
02 User cal. (locked in calibrated appliances)
Use the cursor ( ) to select 02 User cal.
Einstellungen
P1
01
02
03
04
Ext.
test
Pr
calibr.
alibr.
User calibr.
C
int report
********
********
********
1
fu n c tio n
fu n c tio n
on
fu n c tio n
29.12.04
Press -key, on the display appears the weight
value of the adjusting weight. The first digit of the
displayed value is flashing. Now you can change
the weight value by pressing the arrow keys.
After adjusting, confirm your new adjusting weight
by pressing the -key.
Einstellungen
Benutzerk ierungalibr
Masse eingeben g :
12000.00
[ ]
Ensure that there are no objects on the weighing
plate. Press -button
Press -key, the display shows the weight
value of the adjusting value set by you
Page 21
ILT-BA-e-0612 21
Now move the adjusting weight to the centre of
the weighing plate, press -key. If the
adjustment was successful, this will be followed
by automatic reset to the menu.
The -key may be used to cancel the
adjustment.
Errors during adjustment or the use of an
incorrect adjusting weight will result in an error
message. Repeat adjustment.
Einstellungen
P1
01
02
03
04
Ext.
test
Pr
calibr.
alibr.
User calibr.
C
int report
********
********
********
1
fu n c tio n
fu n c tio n
on
fu n c tio n
29.12.04
We recommend:
Carry out all adjustments as close as possible to the maximum load of the
balance. Info about test weights can be found on the Internet at: http://www.kernsohn.com
03 Cal. test
Here, deviation from the last adjustment is determined. This is only a check, i.e. no
values are changed.
Use the cursor ( ) to select "03 Cal. test"
Einstellungen
P1
01
02
03
04
Ext.
test
Pr
calibr.
alibr.
User calib r.
C
int report
********
********
********
1
fu n c tion
fu n c tion
on
fu n c tion
29.12.04
Press -button
Calibration
Calibration check
Clear the pan
[Enter]
Press -key, on the display appears the weight
value of the adjusting weight.
Calibration
Calibration check
weight measuring
Einstellungen
Calibration check
Load weight
[ ]
12000.0g
Enter
Now set the adjusting weight in the centre of the
weighing plate. Press -key; calibration test will
be executed automatically
Kalibrierung
Kalibrierungstest
Bitte warten
The result is displayed
Calibration
Check results
Cal.: 180.1354
Act.: 180.1438
Diff.: - 0.0084
Page 22

ILT-BA-e-061222
04 Print report printout of adjusting data
Use the cursor ( ) to select "04 Print report"
Press -key, the current menu items starts
flashing
Highlight your settings by using the arrow keys
0 Print report deactivated
1 Print report activated
Einstellungen
P1
01
02
03
04
Ext.
test
Pr
calibr.
alibr.
User calibr.
C
int report
********
********
********
1
fu n c tio n
fu n c tio n
on
fu n c tio n
29.12.04
Confirm with the -key
With "Print report" activated, you will receive a printout of your adjustment data
after each adjustment (example):
8.3.1.1 Verification
General introduction:
According to EU directive 90/384/EEC balances must be officially verified if they are
used as follows (legally controlled area):
a) For commercial transactions if the price of goods is determined by weighing
b) For the production of medicines in pharmacies as well as for analyses in the
medical and pharmaceutical laboratory
c) For official purposes.
d) For manufacturing final packages.
In cases of doubt, please contact your local trade in standard.
Verification instructions
An EU type approval exists for balances described in their technical data as
verifyable. If a balance is used where obligation to verify exists as described above, it
must officially verified and re-verified in regular intervals.
Re-verification of a balance is carried out according to the respective national
regulations. The validity for verification of balances in Germany is e.g. 2 years.
The legal regulation of the country where the balance is used must be observed!
***Report of external calibration***
Calibration : external
Diff.. : 0.0038 g
Signature.
Page 23

ILT-BA-e-0612 23
Seal of approval
Balances with obligation to verify must be taken out of operation if:
The weighing result of the balance is outside the error limit.
Therefore, in regular intervals load balance with known test weight (ca.
1/3 of the max. load) and compare with displayed value.
The reverification deadline has been exceeded.
8.3.1.2 Seals and unlocking switch
After verification the balance is sealed at the indicated positions.
Verification of the balance is invalid without the "seal".
1. Top of the balance
Remove weighing plate
2. Lateral view
Seal of approval
Unlocking switch
Page 24

ILT-BA-e-061224
Unlock the balance for the adjusting process:
Operation Display
Remove the seal of approval
(Attention: Verification no longer valid!)
Switch off the balance
Switch on the balance whilst keeping the
adjusting switch pressed down
As soon as the pictograph for balance appears,
release the adjusting switch.
Wait until the balance is in weighing mode
Press -button
13:47:32
0.0000
Weighing29.12.04
P1 Calibration
P2 GLP
P3 Date/Time
P4 Readout
P5 RS-232
P6 Printouts
P7 Units
P8 Modes
P9 Globals
Setup2.02.05
Access to service menu P0 factory settings:
Press -button
P0 Factory
n
P2 GLP
P3 Date/Time
P4 Readout
P5 RS-232
P6 Printouts
P7 Units
P8 Modes
P9 Globals
P1 Calibratio
Setup2.02.05
Press -key, selection of parameters appears
Trigger parameter 18 LFT by pressing the
-key and select 0 setting. Your balance is
now unlocked for the adjusting process and all
weighing units are activated.
Einstellungen
P 0
14 Autozero delay 6 2.0 s
15 Stable range 10 1.0 d
16 Stable speed 4 0.8 s
17 Filter range 7 100 d
18 LFT 0 off
Confirm and store by pressing the -key
(see chpt. 8.1)
To reset the balance to the calibrated setting,
select setting "1 for parameter 18 LFT. Now only
the metric weighing units (g, kg) are activated.
Page 25

ILT-BA-e-0612 25
8.3.2 P2 GLP (Good laboratory practice)
Quality assurance systems require printouts of weighing results as well as of correct
adjustment of the balance stating date and time and balance identification. The
easiest way is to have a printer connected.
Definition of a standard log:
Operation Display
Call up menu item "P2 GLP" (see chapt. 8.1)
Press -button
P1 Calibration
P2 GLP
P3 Date/Time
P4 Readout
P5 RS-232
P6 Printouts
P7 Units
P8 Modes
P9 Globals
Setup20.02.05
01 User
Use the cursor ( ) to select "01 User"
Press -key, the current menu item is flashing
Use the arrow keys, to enter user name or
number (maximal 8 characters) with the arrow
keys.
Setup
P2
01 User
02 Pr
03 Time print
04 Date print
05 User print
oject
ojekt
Last Cal
06 P print
07 Id print
08 Print
WX /235
0
1
No w ak
0
1
1
0
off
on
off
on
on
off
31.01.05
Confirm with -key
02 Project
Use the cursor ( ) to select "02 Project"
Press -key, the current menu item is flashing
Use the arrow keys, to enter project name or
number (maximal 8 characters)
Setup
P2
01 User
02 Pr
03 Time print
04 Date print
05 User print
oject
ojekt
Last Cal
06 P print
07 Id print
08 Print
W X /235
0
1
Now a k
0
1
1
0
off
on
off
on
on
off
31.01.05
Confirm with -key
All other settings (03 - 08) are executed in the same
way.
Page 26

ILT-BA-e-061226
All settings that are supposed to be printed must be activated with "1 / yes" .
Example 1:
Setting Printout
P2 03 Printout time
1
yes
P2 04 Printout date
1
yes
P2 05 User printout
1
yes
P2 06 Project printout
1
yes
P2 07 ID-printout
1
yes
P2 08 Cal. printout
1
yes
Example 2:
Setting Printout
P2 03 Printout time
0 no
P2 04 Printout date
1 yes
P2 05 User printout
1 yes
P2 06 Project printout
0 no
P2 07 ID-printout
1 yes
P2 08 Cal. printout
0 no
Date : 18.01.05
Time : 10:41:05
User : Mustermann
Project : AB/007
Balance no: : WL 041078
----------------------------
18.01.05 07:48
Automatic calibration
Deviation : 0.003[5] g
-----------------------------------
10.429[0] g
Date: 22/10/2004
User: Mustermann
Balance no: 10
---------------------------------------
13.0521 g
Page 27

ILT-BA-e-0612 27
8.3.3 P3 Date/time
Under this menu item you can set output and formatting of date and time in the status
bar.
Operation Display
Call up menu item "P3 Date/time" (see chap. 8.1)
Press -button
P1 Calibration
P2 GLP
P3 Date/Time
P4 Readout
P5 RS-232
P6 Printouts
P7 Units
P8 Modes
P9 Global
s
Setup20.02.05
01 Date format
Use the cursor ( ) to select "01 Date format"
Press the -key; the current menu item blinks
Use the -key to select between the following
settings:
1 Month/Day/Year
0 Day/Month/Year
Setup
P3
01
02
03
04
05
Date format
Time format
Time
Date
Disp. time
Date06 Disp. 1
1
0
1
DA/MO/YR
24 S td .
********
Fu n ction
********
On
O n
Fu n ction
29.12.04
Confirm with -key
02 Time format
Use the cursor ( ) to select "02 Time format"
Press the -key; the current menu item blinks
Use the -key to select between the following
settings:
0 24 hours
1 12 hours (PM/AM)
Setup
P3
01
02
03
04
05
Date format
Time format
Time
Date
Disp. time
Date06 Disp. 1
1
0
1
DA/MO/YR
24 S td .
********
Fu n ction
********
On
O n
Fu n ction
29.12.04
Confirm with -key
Page 28

ILT-BA-e-061228
03 Time
Use the cursor ( ) to select "03 Time"
Setup
P3
01
02
03
04
05
Date format
Time format
Time
Date
Disp. time
Date06 Disp. 1
1
0
1
DA/MO/YR
24 S td .
********
Fu n ction
********
On
O n
Fu n ction
29.12.04
Press -button
Use the - or -key to trigger your selection
Use the -key to confirm your selection (e.g.
hours), the current menu item blinks
Use the -key, to increase and the -key to
decrease the number value
Use the - and -keys to select the place to be
changed (the respective active place blinks)
Use the -key to confirm your selection (e.g.
hours).
To change minutes and seconds proceed in the
same way.
Confirm with -key
04 Date
Use the cursor ( ) to select "04 Date"
Setup
P3
01
02
03
04
05
Date format
Time format
Time
Date
Disp. time
Date06 Disp. 1
1
0
1
DA/MO/YR
24 S td .
********
Fu n ction
********
On
O n
Fu n ction
29.12.04
Press -button
Setup
Year 200
Mo 11
10
4
nth
Day
APRIL 2004
Setup
29.12.04
All other settings are made in the same way as time
(03 Time).
Page 29

ILT-BA-e-0612 29
05/06 Displ. Time/Date
Use the cursor ( ) to select e.g.
"05 Displ.time/date"
Press the -key; the current menu item blinks
Use the -key to select between the following
settings:
0 Time/date is displayed in the status bar
1 Time/date is not displayed in status bar
Setup
P3
01
02
03
04
05
Date format
Time format
Time
Date
Disp. time
Date06 Disp. 1
1
0
1
DA/MO/YR
24 S td .
********
Fu n ction
********
On
O n
Fu n ction
29.12.04
Confirm with -key
8.3.4 P4 Readout
Operation Display
Call up menu item "P4 Readout" (see chapt. 8.1)
Press -button
P1 Calibration
P2 GLP
P3 Date/Time
P4 Readout
P5 RS-232
P6 Printouts
P7 Units
P8 Modes
P9 Global
s
Setup20.02.05
01 Filter
Use the cursor ( ) to select "01 Filter"
Press the -key; the current menu item blinks
Use the - and -key to select between the
following settings:
1 Very quiet and stable environment:
Balance works very fast but is more
sensitive to external influences
5 Busy environment:
Balance works more slowly but is less
sensitive to outside influences
Setup
P4
01 Filter
0
0
0
02 Med. Filter
3 Disp refresh
4 Autozero
5 Last digit
06 Negative
5
1
Slow e st.
en ab led
0.08 s
On
Alw ays
1
1
1
0 dis ab led
Setup
29.12 .05
Confirm with -key
Page 30

ILT-BA-e-061230
02 Med. Filter
This is a filter that is adjustable for e.g. 50 sample weighing procedures/ collects,
organizes, averages during a certain interval e.g. in 1 s. Especially useful in case of
impacts or shocks.
Use the cursor ( ) to select "02 Med. filter"
Press the -key; the current menu item blinks
Use the - and -key to select one of the
following settings:
0 blocked
1 active
Setup
P4
01 Filter
0
0
0
02 Med. Filter
3 Disp refresh
4 Autozero
5 Last digit
06 Negative
5
1
Slow e st.
en ab led
0.08 s
On
Alw ays
1
1
1
0 dis ab led
Setup
29.12 .05
Confirm with -key
03 Disp.refresh
Use the cursor ( ) to select "03 Disp.refresh"
Press the -key; the current menu item blinks
Use the - and -key to set the time it takes
before the display is refreshed after the weight value
has changed.
1 0.08/ s
5 1.0 s
Setup
P4
01 Filter
0
0
0
02 Med. Filter
3 Disp refresh
4 Autozero
5 Last digit
06 Negative
5
1
Slow e st.
en ab led
0.08 s
On
Alw ays
1
1
1
0 dis ab led
Setup
29.12 .05
Confirm with -key
04 Autozero
Use the cursor ( ) to select "04 Autozero"
Press the -key; the current menu item blinks
Use the - and -key to select one of the
following settings:
0 Deviations from the Zero display are
not automatically tared.
1 Deviations from the Zero display are
automatically tared.
Setup
P4
01 Filter
0
0
0
02 Med. Filter
3 Disp refresh
4 Autozero
5 Last digit
06 Negative
5
1
Slow e st.
en ab led
0.08 s
On
Alw ays
1
1
1
0 dis ab led
Setup
29.12 .05
Confirm with -key
Page 31

ILT-BA-e-0612 31
05 Last digit
Use the cursor ( ) to select 05 Last digit"
Press the -key; the current menu item blinks
Use the - and -key to select one of the
following settings:
0 Last fractional digits are omitted
1 All fractional digits
Setup
P4
01 Filter
0
0
0
02 Med. Filter
3 Disp refresh
4 Autozero
5 Last digit
06 Negative
5
1
Slow e st.
en ab led
0.08 s
On
Alw ays
1
1
1
0 dis ab led
Setup
29.12 .05
Confirm with -key
06 Negative
Use the cursor ( ) to select 06 Negative"
Press the -key; the current menu item blinks
Use the - and -key to reverse the colour
setting of the display
0 blocked
1 active
Setup
P4
01 Filter
0
0
0
02 Med. Filter
3 Disp refresh
4 Autozero
5 Last digit
06 Negative
5
1
Slow e st.
en ab led
0.08 s
On
Alw ays
1
1
1
0 dis ab led
Setup
29.12 .05
Weighing
0.0000
g
0% 100%
0
27.01.05
Wiegen
100%
27.01.05
0.0000
g
0%
0
27.01.05
Weighing
Confirm with -key
Page 32

ILT-BA-e-061232
8.3.5 P5 RS-232
In this menu item you can save your settings for the interface.
Operation Display
Call up menu item "P5 RS-232" (see chapt. 8.1)
Press -button
P1 Calibration
P2 GLP
P3 Date/Time
P4 Readout
P5 RS-232
P6 Printouts
P7 Units
P8 Modes
P9 Global
s
Setup20.02.05
01 -10 Parameter selection
Use the cursor ( ) to select your parameters
(01 - 10)
Setup
P5
01 B ud rate
02 Parity
03 Data bits
04 Stop bits
05 Handshake
a
Min.mass
09 Print on stab 1 enabled
06 Auto print
07 Inetrval
08
0
0
2
0
96 0 0
8 bits
1 bit
2
1
* 0.1 s
1 d
25
none
1
none
none
29.12.04
01 Baud rate 0
2400
1
4800
2
9600
3
19200
02 Parity 0
none
1
even
2
uneven
03 Data bits 1
7 Bit
2
8 Bit
04 Stop bits 1
1 Stop bit
2 2 Stop bit
05 Handshake 0
None
1
RTS/CTS
2
XON/XOFF
06 Autom. Printout 0
None No data output
1
steady
Continuous serial data
output
2
interval
(discrete)
Serial data output after a
certain interval, defined in
parameter 07 Interval
3
at resting
Unique autom. Data output
for steady weighing value.
New output only after
removing the weight and
new loading
Page 33

ILT-BA-e-0612 33
07 Interval
1 9999
(Enter via
arrow keys)
Definition of an interval after which data output
is executed.
Pulse = parameter value x 0.1 sec
08 Min. measuring
value
1
1 d
2
2 d
3
5 d
13
10000 d
Definition of a minimum measuring
value from which serial data output
is executed
0
blocked
09 Printout at stab.
1
active
Data output for steady weighing
value.
10 Pause 1(factor)
* 0.1s
Period of time between variables
sent by the balance
Press -key, the current menu items starts flashing
Highlight your settings by using the arrow keys
Confirm with -key
Page 34

ILT-BA-e-061234
8.3.6 P6 Printout
In this menu item you can select between 5 different types of data output:
Operation Display
Call up menu item "P6 Printout" (see chapt. 8.1)
Press -button
P1 Calibration
P2 GLP
P3 Date/Time
P4 Readout
P5 RS-232
P6 Printouts
P7 Units
P8 Modes
P9 Global
s
Setup20.02.05
01 Printout memory This is where you can store and file your standard printouts or,
if required, new printouts can be made
Press -key
The memory capacity is displayed
(max. 500 000 characters).
After data output has taken place (e. g. of 17
printouts) your data will be displayed in the
memory. Use the cursor ( ), to select one of
the settings below:
Run: Input as from which printout you require
printouts/deletions
Stop : End, up to which printout you require
printouts/deletions
Print : Printing of data selected by you
Erase : Deletion of data selected by you
Press the -key; the current menu item blinks
Use the - and -key, to select your settings
Use the -key, to confirm your selection
Setup
P6
01 Printout
0 Pr. 1 start
0 Pr. 1 stop
0
0
mem
02 Printout dest.
03 Printout No.
04 Pr. Mem. No.
5
6
7
8
9
10
11
12
3
4
Pr. 2 start
Pr. 2 stop
0 Pr. 3 start
Pr. 3 stop
Pr. 4 start
Pr. 4 stop
1 String 1
1 String 2
88 String 79
89 String 80
0
0
********
2 R s + M em
functio n
0 s ta ndard
0 sta n dard
0
0
0
29.12.04
Page 35

ILT-BA-e-0612 35
02 Printout dest.
Use the cursor ( ), to select 02 Printout dest.
Press -key, the current menu items starts
flashing
Highlight your settings by using the arrow keys
0 Rs for RS 232 interface
1 Mem for the memory /archive
2 Rs +Mem for RS 232 interface and memory
Setup
P6
01 Printout
0 Pr. 1 start
0 Pr. 1 stop
0
0
mem
02 Printout dest.
03 Printout No.
04 Pr. Mem. No.
5
6
7
8
9
10
11
12
3
4
Pr. 2 start
Pr. 2 stop
0 Pr. 3 start
Pr. 3 stop
Pr. 4 start
Pr. 4 stop
1 String 1
1 String 2
88 String 79
89 String 80
0
0
********
2 R s + M em
functio n
0 sta ndard
0 s ta n dard
0
0
0
29.12.04
03 Printout no.
Use the cursor ( ) to select 03 Printout no."
Press the -key; the current menu item blinks
Use the - and -key to select one of the
settings below:
0 standard
1 1. Printout
4 4. Printout
Setup
P6
01 Printout
0 Pr. 1 start
0 Pr. 1 stop
0
0
mem
02 Printout dest.
03 Printout No.
04 Pr. Mem. No.
5
6
7
8
9
10
11
12
3
4
Pr. 2 start
Pr. 2 stop
0 Pr. 3 start
Pr. 3 stop
Pr. 4 start
Pr. 4 stop
1 String 1
1 String 2
88 String 79
89 String 80
0
0
********
2 R s + M em
functio n
0 sta ndard
0 s ta n dard
0
0
0
29.12.04
Use the -key to confirm your selection
8.3.6.1 Standard data output (0 standard)
Data output is carried out by actuating the -key.
Definition of the log header is executed in menu item P2 GLP.
Examples.
*: ? = instable measuring value
Date: 22/10/2004
Time: 13.16.49
User: Mustermann
Project: XW/456
Balance 10
? 62.685 g *
Date: 22/10/2004
Time: 13.04.23
User: Mustermann
Project: XW/456
0.008 g
Page 36

ILT-BA-e-061236
8.3.6.2 User-defined data output (1. Printout 4. Printout )
Here you can define 4 different types of data output.
The content of the data output is defined as follows.
First line 1. Printout start - 1, i.e. text begins at line 1 (1. Text)
Last line 1. Printout stop - 20, i.e. text ends at line 20 (20. Text)
Text input per line is carried out via the arrow keys (see chapter 8.1)
in the respective strings.
1. string Start of text input
20. string End of text input
During text input lines may overlap, e.g.:
1. Printout start - 1
1. Printout stop - 40
2. Printout start - 20
2. Printout stop - 40
Text input:
Max. 640 characters
80 lines
8 characters per line
After each line confirm your text input using the -key.
After completely entering the text use the -key to confirm (see chapt. 8.1).
Page 37

ILT-BA-e-0612 37
Apart from flow text (characters, numbers and numerals) the following variables
are stored in the menu:
General variables
%%
Printout of 1 character % (i.e. in order to print out 1 character %, two
%% must be entered)
%N
Net weight
%d
Current date
%t
Current time
%i
Balance ID-no.
%R
Program no.
%P
Project no.
%U User no.
%F Current function (operating mode)
%C Date and time of last adjustment
%K Type of last adjustment
%I
Deviation from last adjustment
%1-5
Code 1-5
Print related variables
\\
Printout of 1 character / (i.e. in order to print out 1 character /, two //
must be entered)
\c
CRLF (carriage return line feed)
line beginning next line
\r
CR (carriage return)
line beginning
\n
LF (line feed) next line
\t
Tabulator
\s
Next "Text"
\0
End of data input
Page 38

ILT-BA-e-061238
Variables in the various operating modes
Variable Description Operating mode
%W
Reference quantity Parts counting
%H
Lower limit
%L
Upper limit
Weighing with tolerance range
%Z
Nominal value Filling
%B
Reference mass Percent weighing
%A
Sensitivity
%b
Mean Value
Dynamic weighing
(animal weighing)
%I
Liquid
%p
Method
%c
Temperature
%a
Density liquid
%v
Sinker
Density determination
Variable for statistics
%n
Number weighing processes
%x
Mean Value
%S
Sum of all measuring values
%m
Min value
%M
Max value
%D
Difference min and max value
%s
Standard Deviation
%r
Variance
Page 39

ILT-BA-e-0612 39
Examples for text input:
Example 1: Max mass can not exceed 11.250 g!
Text
Parameter No.
1 2 3 4 5 6 7 8
20 string 10 M a x m a s s
21 string 11
c a n n o t
22 string 12
e x c e e d
23 string 13 1 1 . 2 5 0 g
24 string 14
!
25 string 15
Example 2: Kern & Sohn GmbH
Date:
Time:
Weight:
*****Signature:..........
*** Weighing with tolerance range ***
Text
Parameter No.
1 2 3 4 5 6 7 8
26 string 16 K e r n & S
27 string 17 o h n G m b H
28 string 18 \ c D a t u m :
29 string 19 % d \ c Z e i t
30 string 20 : % t \ r \ n G
31 string 21 e w i c h t : %
32 string 22 N \ c \ c * * *
33 string 23 * * U n t e r s
34 string 24 c h r i f t : .
35 string 25 . . . . . . .
36 string 26 . . \ c * * % F
37 string 27 * * * *
Page 40

ILT-BA-e-061240
8.3.7 P7 Units
In this menu item you can activate various different weighing units (see chapter 1
Technical data). The switchover to the activated units is achieved by pressing the
- key several times.
Operation Display
Call up menu item "P7 Weighing units"
(see chapt. 8.1)
Press -button
P1 Calibration
P2 GLP
P3 Date/Time
P4 Readout
P5 RS-232
P6 Printouts
P7 Units
P8 Modes
P9 Global
s
Setup20.02.05
01 -16 Parameter selection
Use the cursor ( ) to select your setting (01 -16)
Press -key, the current menu items starts
flashing
Highlight your settings by using the arrow keys
0 Weighing unit deactivated
1 Weighing unit activated
Setup
P7
01 Gram
02 gram
03 K
04 P
05
m
Kilo m
arat
fund
Unze
Troy Unze
Dwt
T
Mommes
Grains
Newtons
Tical
Custom
Custom factor
06
07
08 Taels Hk.
09 Taels S
10 Taels .
11
12
13
14
15
16
0
0
1
0
1
0
0
0
0
0
0
0
0
0
0
1.0
enabled
dis abled
enabled
disabled
disabled
disabled
disabled
disabled
disabled
disabled
disabled
disabled
disabled
disabled
disabled
Setup
29.12.05
Use the -key to confirm your selection
Save (see chapter 8.1)
8.3.8 P8 Operating modes
See Chapter 9.1
Page 41

ILT-BA-e-0612 41
8.3.9 P9 Globals
Operation Display
Call up menu item "P9 Global" (see chapt. 8.1)
Press -button
P1 Calibration
P2 GLP
P3 Date/Time
P4 Readout
P5 RS-232
P6 Printouts
P7 Units
P8 Modes
P9 Global
s
Setup20.02.05
01 -11 Parameter selection
Use the - and -key to select the parameters
01 - 11
P9
01
02
03
04
05
ID setting
ID autoprint
Beep
Language
Backlight
Contrast
Screensaver
8 Balance ID
09 Software rev..
0 Par. printout
11 Par. receive
06
07
0
1
1
0
1
F cun tio n
1
on
F cun tio n
On
On
********
********
********
F cun tio n
u n tionF c
Setup29.12.04
********
Off
W l04305
MX A 0.4 0
********
u n tionF c
01 ID setting
Entering a user code
02 ID autoprint
User code can also be printed
03 Beep
Tone on/off
04 Language
User control options available in German, English, French,
Spanish, Polish and Czech
05 Backlight
Back lighting of the display on/off
06 Contrast
Contrast of the display
07 Screensaver
Back lighting automatically switches off as soon as a stable
measuring value is reached (Condition: Backlight on)
08 Balance Id
Balance identification no.
09 Software rev.
Software issue
10 Par. Printout
Balance parameters are printed out
11 Par. receive.
Not documented
Press the -key; the current menu item blinks.
Use the - and -key to activate/deactivate parameters
Confirm your selection with the -key
Page 42

ILT-BA-e-061242
9 Operation
Operating elements
Display:
Overview of display:
Weighing
0.0000
g
0% 100%
0
27.01.05
Stability display
Balance zero-display
Balance zero display:
If the balance does not show exactly zero although the pan scale is unloaded, press
the -button and the balance will be reset to zero. (Display [ 0 ] )
Stability display:
If the display shows the stability display [ ] the balance is in a stable status. If
the status is instable the [ ] display disappears.
Page 43

ILT-BA-e-0612 43
Weighing
0.0000
g
0%
100%
4
1
3
6 5
7
0
2
27.01.05
1.
Weight display
2.
Balance zero display
3.
Stability display
4.
Capacity display
5.
Operating mode (status)
6.
Current date
7.
Current time
Keyboard overview:
Key Function
Turn on/off
Set weight display at zero
Menu item to the left
Access to the user menu
Menu item to the right
Switch-over key into operating modes
Decreasing the value for selected numeral or number
Parameter selection (cursor control down)
Switching-over to other weighing units
Parameter selection (cursor control up)
Increasing the value for selected numeral or number
Printout of the weighed value on an external appliance
(printer or PC)
Confirm/save settings
Taring
Leave menu
Page 44

ILT-BA-e-061244
9.1 Operating modes (P8)
Under this menu item you can activate or test weigh the following operating modes of
the balance
P8 01: Parts count
P8 02: Checkweighing
P8 03: Filling
P8 04: Percent weighing
P8 05: Animal weighing
P8 06: Density
P8 07: Formulation
P8 08: Statistics:
Notice: Some operating modes may be combined (e.g. statistics/counting,
statistics/Percent determination). Further details are described in the
respective chapters.
Activation/deactivation of the operating modes:
In main menu call up menu item P8 "Operating mode" (see chapt. 8.1)
Press the -key; the overview of the operating modes is displayed:
Mode
P8
01 Parts Count
02 Checkweighing
03 Filling
04 Perc nt
05 Animal
e
Formulation
08
06 Density
07
Statistics
0
1
0
disabled
1
1
0
1
ena bled
disabled
disabled
disabled
ena bled
ena bled
20.02.05
Use the arrow keys (see chapt. 8.1) to activate (1) or deactivate (0) the desired
operating modes.
Confirm your selection with the key.
Save (see chapter 8.1)
All activated operating modes are now stored in a sub-menu (M0 - M8) and can be
directly called up directly with the key:
M0 Basic weighing
M1 Parts counting
M2 Checkweighing
M3 Filling
M4 Percent
M5 Animal weighing
M6 Density
M7 Formulation
M8 Statistics
Mode20.02.05
Page 45

ILT-BA-e-0612 45
Navigating in operating modes mode:
Press -button
Use the cursor ( ) to select your operating
mode
M0 Basic weighing
M1 Parts counting
M2 Checkweighing
M3 Filling
M4 Percent
M5 Animal weighing
M6 Density
M7 Formulation
M8 Statistics
Mode20.02.05
Press the -key; the parameter selection appears
Use the cursor ( ) to select parameter
Press the -key; the current menu item blinks
Use the arrow keys (see chapter 8.1) to save your settings.
All possible settings are described in the chapters of the respective operating
mode
Confirm your selection with the key.
Press -key again; the graphic display of the
respective operating mode is displayed.
You are now in operating modes mode.
0.0000
g
0% 100%
Dif=- 60.0000Hi
Lo
Hi=70.0000
Lo=50.0000
LO
Checkweighing
29.12.0 4
Return to weighing mode:
Press -button
Cursor ( ) for "M0 Weighing"
M0 Basic weighing
M1 Parts counting
M2 Checkweighing
M3 Filling
M4 Percent
M5 Animal weighing
M6 Density
M7 Formulation
M8 Statistics
Mode20.02.05
Press the - or -key
13:47:32
0.0000
Weighing29.12.04
Page 46

ILT-BA-e-061246
9.1.1 Simple weighing
Operation: Display:
Switch on the balance using the -key
or
Use the key to call the menu item M0 Weighing"
(chap.9.1)
Your balance is ready to weigh as soon as the 0.000" display
appears.
0,0000
Put on items to be weighed; after stability time the measuring
value is displayed.
19.6879 g
Pressing the -key provides option to switch to a different
weighing unit, e.g. ct (see chapt. 8.3.7 " P7 Weighing units")
98.4380 ct
To turn off the balance press the -key
9.1.1.1 Taring
The dead weight of any weighing container may be tared away by pressing a button,
so that the following weighings show the net weight of the goods to be weighed.
Operation: Display:
Switch on the balance using the -key
Your balance is ready to weigh as soon as the 0.0000"
display appears.
0.0000 g
Put on items to be weighed, weighed value is displayed.
19.6879 g
Press the -key to start the tare procedure.
The weight of the container is now saved internally.
0.0000 g
Place the goods to be weighed into the tare container. Read
the weight of the goods on the display.
53.2587 g
The taring process can be repeated any number of times, e.g. when adding several
components for a mixture (adding).
The limit is reached when the whole weighing range is exhausted.
After removing the taring container the total weight is displayed as negative display.
Page 47

ILT-BA-e-0612 47
9.1.2 Counting
Before the balance can count parts, it must know the average part weight (i.e.
reference). This is either entered manually or determined by weighing. Proceed by
putting on a certain number of the parts to be counted. The balance determines the
total weight and divides it by the number of parts (the so-called reference quantity).
Counting is then carried out on the basis of the calculated average piece weight.
As a rule:
The higher the reference quantity the higher the counting exactness.
Display overview for parts counting operation:
1. Number of all parts on the weighing plate
2. Weighing assistance coarse/fine (only displayed for active dispensing)
3. Operating mode (status bar)
4. Reference weight
5. Weight of all parts on the weighing plate
6. Tolerance marker (only displayed for active tolerance weighing)
too light
nominal
value
too heavy
7. Display for parts counting operation
Operation Display
Call up menu item "M1 Counting" (see chap. 9.1)
Press -button
Use the cursor ( ) to select your setting (01 - 07)
Parts counting setup
M1 01 Unit weight
02 Recall sam ple
03 Store sample
04 Checkweig hting
05 Fillin g
06
07 Run
Statistics
5.0000 g
ON
ON
OFF
01 Reference weight manual entering of the reference weight
Press the -key; the current menu item blinks.
Use the arrow keys to enter the reference weight for a
unit. Confirm with -key.
Page 48

ILT-BA-e-061248
Press -key; the display changes into parts counting
operation
The balance is now in parts counting mode counting all
units on the weighing plate
01 Reference weight determination of reference weight through weighing
Press -key; display changes to counting mode
Parts counting setup
M1 01 Unit weight
02 Recall sam ple
03 Store sample
04 Checkweig hting
05 Fillin g
06
07 Run
Statistics
5.0000 g
OFF
OFF
OFF
Press the -key; select reference quantity (factory-
defined are quantities of 10, 20, 50,100, or freely
selectable) with the arrow keys, use the -key to confirm
Place as many counting parts on the weighing plate as
the set reference quantity requires, confirm by pressing
the -key. If you are using a weighing container first
tare your balance pressing the key.
Press -button
The symbol ( ) in the display indicates that automatic
reference optimization is switched on. Every time more
pieces are added the balance carries out optimization
automatically. It is not necessary to press another key to
start the optimization process. For each reference
optimization the average piece weight (reference) is
newly calculated. As the additional pieces increase the
base for the calculation, the reference also becomes
more exact.
Operate the -key. The reference quantity is saved
under "01 Unit weight".
Press the -key; the balance is now in parts counting
mode counting all units on the weighing plate.
Page 49

ILT-BA-e-0612 49
02 Recall sample calling up a reference weight from the data base
Use the cursor ( ) to select "02 Recall sample"
Press -key; the sub-menu "02 Recall sample" is
displayed.
Use the arrow keys to select the desired reference
weight
M1
01 BBBB 01
02 BBBB
03 CCCC
49 AAAA
50 AAAA
02
03
49
50
1.5000
0.4520
1.0032
0.0015
2.0300
g
g
g
g
g
02
Parts counting setup
Use the -key to confirm; the selected reference weight
appears under 01 Unit weight.
Press the -key; the balance is now in parts counting
mode counting all units on the weighing plate.
03 Store sample - saving a reference weight in the database
The reference weight stored in menu item "01 Reference weight" can be saved in the
data base as follows (max. 200 parameters):
Use the cursor ( ) to select "03 Store sample"
Press -key; the sub-menu "03 Store sample" is
displayed.
Page 50

ILT-BA-e-061250
Use the arrow keys to select the parameter no.
Press the -key; use the arrow keys to enter
parameter name (max. 10 characters)
Use the -key, to confirm, the blinking section stops
flashing
Use the -key, to return to menu
04 Checkweighing
The combination Counting / Checkweighing enables you to check whether your
reference weight is within your set tolerance
Use the cursor ( ) to select "04 Checkweighing".
Press -button
Parts counting setup
M1 01 Unit weight
02 Recall sample
03 Store sample
04 Checkweightin g
05 Filling
06
07 Run
Statistics
5.0000 g
OFF
on
OFF
Press the -key; the current menu item blinks
Activate operating mode Checkweighing via the arrow
keys (yes).
Set tolerance markers
Each time confirm by pressing the -key
Use the -key, to return to menu
Parts counting setup
M1 01 Unit weight
02 Recall sample
03 Store sample
04 Checkweightin g
05 Filling
06
07 Run
Statistics
5.0000 g
OFF
on
OFF
Page 51

ILT-BA-e-0612 51
05 Filling
The combination Counting/Filling enables you to define a target quantity
Use the cursor ( ) to select "05 Filling"
Press -button
Parts counting setup
M1 01 Unit weight
02 Recall sam ple
03 Store sample
04 Checkweig hting
05 Fillin g
06
07 Run
Statistics
5.0000 g
OFF
on
on
Press the -key; the current menu item blinks
Activate operating mode "Filling" via arrow keys
Enter value for target weight
Each time confirm by pressing the -key
Use the -key, to return to menu
Parts counting setup
M1 01 Unit weight
02 Recall sam ple
03 Store sample
04 Checkweig hting
05 Fillin g
06
07 Run
Statistics
5.0000 g
OFF
on
on
06 Statistics
When combining parts counting /statistics the displayed value is accepted by pressing the
-key.
Use the cursor ( ) to select 06 Statistics"
Press -button
Press the -key; the current menu item blinks
Use the cursor ( ) to select menu item "03 Clear"
Press -button
Use the -key, data will be deleted
Page 52

ILT-BA-e-061252
Use the cursor ( ) to select "01 Statistics"
Press -button
Activate operating mode statistics via the arrow keys
and confirm by pressing the -key
Use the -key, to return to menu
Press -key; display changes into parts counting mode
After each measuring (stable measuring value) press the
-key; the displayed value will be saved and added to
the saved number of values (N).
How to call statistical results after, for example,
10 measurements (N=10)
Use the -key, to call the menu
Use the cursor ( ) to select menu item "06
Statistics"
Confirm with -key
Use the cursor ( ) to select menu item "02 Results"
Use the -key, to confirm; your statistical results will be
shown on the display
Page 53

ILT-BA-e-0612 53
By actuating the -key you can print your statistical results on a connected printer
(see example).
Press -button
Press -key to return to menu
07 Run
With parameter selection "M1 07 Run" (confirm with -key) you will get directly into
counting mode.
Number weighing processes
Sum of all weighing procedures
Mean Value
Smallest value
Largest value
MAX MIN
Standard Deviation
Variance
N : 10
SUM : 40 pcs
X : 4 pcs
MIN : 4 pcs
MAX : 5 pcs
D : 1 pcs
SDV : 2 pcs
RDV : 52,7 %
Page 54

ILT-BA-e-061254
9.1.2.1 Data output in counting mode
Standard data output:
Key Display GLP parameter Data output
Zählen
17
pcs
0%
100%
APW=5.000 WGH=100.000
20.1.05
P2 03 Printout Time 0: no
P2 04 Printout Date 0: no
P2 05 User printout 0: no
P2 06 Proj. Printout 0: no
P2 07 ID- printout 0: no
P2 08 Cal. printout 0: no
17 pcs
Zählen
17
pcs
0%
100%
APW=5.000 WGH=100.000
20.1.05
P2 03 Printout Time 1: yes
P2 04 Printout Date 1: yes
P2 05 User printout 1: yes
P2 06 Proj. Printout 1: yes
P2 07 ID- printout 1: yes
P2 08 Cal. printout 1: yes
Date: 16/01/2004
Time: 13:12:30
User: Maier
Project: Checking.
Weight: 11111111
Last calibration:
---------------------16/01/2004 13:02
External calibration:
0.0001 g
--------------------- 17 pcs
User-defined data output
Key Display Variable selection Data output
Zählen
15
pcs
0% 100%
0%
90% 110%
90%
N=10
APW= 5.000
WGH=100.000
20.01.05
%d;
%t;
%i;
%R;
%P;
%U;
%F;
%V;
%N;
%W;
%n;
%x;
%S;
%m;
%M;
%D;
%s;
%r;
%C;
%K;
%I;
17/01/2004
08:16:09
11111111
MBA 0.01
Checking.
Mustermann.
Pieces
15 pcs
15.048 g
5.30000 g
13
15 pcs
195 pcs
15 pcs
17 pcs
2 pcs
0 pcs
0.00 %
16/01/2004 13:02
External calibration
0.01 g
Page 55

ILT-BA-e-0612 55
9.1.3 Checkweighing (weighing with tolerance range)
Overview of display:
1. Current weighing value
2. Weighing assistance
3. Operating mode
4. Nominal value
5. Upper limit (Hi), lower limit (Lo)
6. Tolerance marker
too light
nominal
value
too heavy
Operation Display
Call up menu item "M2 Checkweighing"
(see chap. 9.1)
Press -button
01 - 02 Lower/upper limit entering limit values
Use the cursor ( ) to select 01 Lower limit or
02 Upper limit
Press the -key; the current menu item blinks.
Use the arrow keys, to enter the limits and confirm by
pressing the -key
Notice: First enter upper limit.
Page 56

ILT-BA-e-061256
Use the cursor ( ), to select 04 Run or press the
-key several times. Confirm with -key
The balance is now in checkweighing mode
Put on goods to be weighed, tolerance control is
started
03 Statistics - combination Checkweighing/Statistics
Use the cursor ( ) to select 03 Statistics",
All other steps are the same as for combination Parts
counting /Statistics (chpt. 9.1.2)
Page 57

ILT-BA-e-0612 57
9.1.4 Filling
Display overview for dispensing operation:
1. Residue filling quantity
2. Weighing assistance coarse /fine
3. Operating mode
4. Target weight
5. Current net weight
Operation Display
Call up menu item "M3 Filling" (see chap. 9.1)
Press -button
Use the cursor ( ) to select menu item "01 Target
weight"
Press the -key; the current menu item blinks.
Use the arrow keys, to enter the target amount.
Confirm with -key
Use the cursor ( ) to select menu item "03 Run";
confirm with -key.
The balance is now in filling mode
02 Statistics - combination Filling/Statistics
Use the cursor ( ) to select menu item "02
Statistics"
All other steps are the same as for combination Parts
counting /Statistics (Chapt. 9.1.2)
Page 58

ILT-BA-e-061258
9.1.5 Percent weighing
Percent determination allows weight display in percent, in relation to a
reference weight.
Display overview for percent determination operation:
1. % - deviation to reference weight
2. Weighing assistance (is only displayed if dispensing is activated)
3. Operating mode
4. Current net weight
5. Reference weight
6. Tolerance marker (only displayed for active tolerance weighing)
7. Percent determination mode
Operation Display
Call up menu item "M4 Percent weighing"
(see chap. 9.1)
Press -button
01 Reference weight numeric entering of the reference weight
Use the cursor ( ) to select menu item 01
Reference weight"
Press the -key; the current menu item blinks.
Use the arrow keys, to enter the reference weight and
confirm by pressing the -key.
Press the -key; the balance is now in percent
determination mode.
Now you can place the test objects onto the weighing
plate; the percentage in regards to the reference
object is displayed
Page 59

ILT-BA-e-0612 59
01 Reference weight determination of reference weight through weighing
Call up Percent weighing mode
Percent setup
M4 01 Reference
02 Decimal places
03 Checkweigh ing
04 Filling
05 Statistics
06 Run
0.0000
1 PLACE
OFF
OFF
ON
g
Press -button. Put on reference weight; if necessary,
tare first
Press -key, the weight is taken as reference (100%).
Min. weight: readout d x 1000
Percent
100,0
%
0%
100%
L
REF =100.000
WGH=0.000
24.01.05
Now you can place the test objects onto the weighing
plate; the percentage is displayed
Percent
17,3
%
0%
100%
L
REF =100.000
WGH=0.000
24.01.05
02 Decimal places
Use the cursor ( ) to select menu item 02 Decimal
places"
Press the -key; the current menu item blinks.
Use the arrow keys, to enter the fractional digit, confirm
by pressing the -key.
Press the -key; the balance is now in percent
determination mode.
03 Check weighing
04 Filling
05 Statistics
06 Run
Use the cursor ( ) to select menu item 03 - 06"
All other steps are the same as for combination Parts
counting /Statistics (chpt. 9.1.2)
Page 60

ILT-BA-e-061260
9.1.6 Animal weighing (dynamic weighing)
For unsteady items to be weighed (e.g. animals) or strong vibrations you can activate
the dynamic weighing function with automatic or manual start. During a certain period
of time the balance determines weight values and calculates an average.
In automatic start measuring starts automatically as soon as the weight
changes.
In manual start you trigger measuring by actuating the -key.
Operation Display
Call up menu item "M5 Animal weighing"
(see chap. 9.1)
Press -button
01 Filter filter for adjustment to the environmental conditions
Vibrations are filtered out by increasing the number of measuring cycles.
Use the cursor ( ) to select menu item 01 Filter"
Press the -key; the current menu item blinks. Use the
arrow keys, to enter the sensitivity of the filter and
confirm by pressing the -key.
(insensitive,
very slow very busy set-up location)
slow
standard
fast
very fast (sensitive
very quiet setup location)
Page 61

ILT-BA-e-0612 61
02 Threshold
(precondition: 03 - Auto start activated)
Use the cursor ( ) to select menu item
02 Threshold value"
Animal weighing setup
M5 01 F ilter
02 Thr esho ld
03
04
05 Run
Autostart
Statistics
FAST
10 DIV
ON
OFF
Press the -key; the current menu item blinks. Use the
arrow keys, to set how many measurements are enlisted
to determine the mean value. Confirm with -key.
10 DIV
1000 DIV
03 Weighing with automatic start
After selecting your parameters and with 03 Auto start
activated, carry out weighing as follows:
Animal weighing setup
M5 01 F ilter
02 Thr esho ld
03
04
05 Run
Autostart
Statistics
FAST
10 DIV
ON
OFF
Use the cursor ( ) to select menu item 05 Run";
confirm with the -key
Animal weighing setup
M5 01 F ilter
02 Thr esho ld
03
04
05 Run
Autostart
Statistics
FAST
10 DIV
ON
OFF
If you are using a weighing container use the -key for
taring
Put goods to be weighed on weighing plate
Dynamic weighing is started automatically.
When weighing is complete the weight is shown in the
display
To start a new weighing cycle relieve the balance
Press -key to return to menu
Page 62

ILT-BA-e-061262
03 Weighing with manual start
After selecting your parameters and with 03 Auto start
deactivated, carry out weighing as follows:
Animal weighing setup
M5 01 F ilter
02 Threshold
03
04
05 Ru
n
Autostart
Statistics
FAST
10 DIV
O
OFF
FF
Use the cursor ( ) to select menu item 05 Run";
confirm with the -key
If you are using a weighing container use the -key
for taring
Put goods to be weighed on weighing plate
The dynamic weighing is started by pressing the
-key
When weighing is complete the weight is shown in the
display
To start a new weighing cycle relieve the balance and
press the -key
The -key will take you back to the menu
Page 63

ILT-BA-e-0612 63
9.1.7 Formulation
The formula function allows to add on various components of a mixture. To check,
the overall weight of all components can be called up.
Overview of display:
Formulation
0,000
0% 100%
0%
90% 110%
90%
WGH =10.000
3
6
2
1
5
SUM=0.000
24.01.05
Item
IC=0
g
7
4
1. Current net weight
2. Weighing assistance coarse /fine)
3. Operating mode
4. Sum memory
5. Target value of the ingredients (determined in parameter 04 Formula)
6. Designation of the ingredients (determined in parameter 04 Formula)
7. Number of the added on ingredients
Operation Display
Call up menu item "M7 Formulation" (see chap. 9.1)
Press -button
M0 Basic weighing
M1 Parts cou nting
M2 Checkweig hing
M3 Filling
M4 Percent
M5 Animal weighing
M6 Density
M7 Formulatio
n
Mode
01 07 Parameter selection
Use the cursor ( ) to select menu items "01 - 07"
Formulation setup
M7 01
02
03
04
05
06
07
Hints
Auto. print
Number of item
Formula
printout
tics
Run
Formula
Statis
OFF
OFF
1
OFF
Page 64

ILT-BA-e-061264
Press the -key; the current menu item blinks.
01 Hints yes Data of the individual
ingredients of a formula are
shown on the display
no Setting for producing a
mixture by weighing
02 Autom. print. yes Autom. Data output
no No autom. Data output
03 Number of items Memory space for 20
ingredients
04 Formulation Designation of the ingredients
(max 10 characters) and
quantity
05 Formula printout Printout of formula
06 Statistics Combination with statistics
07 Run Call up of formula mode
Formulation
0.0000
g
0% 100%
0%
01 1= .0000WGH
SUM=0.0000
90% 110%
90%
20.01.05
Item
IC=0
Formulation
0.0000
g
0% 100%
SUM=0.0000
20.01.05
IC=0
M7 01 BBBB 01
02 BBBB
03 CCCC
9 AAAA
0 AAAA
02
03
49
50
1
2
1.5000
0.4520
1.0032
0.0015
2.0300
g
g
g
g
g
04
Formulation setup Formula
Use the arrow keys to activate/deactivate parameters,
confirm your selection with the -key
Use the cursor ( ) to select menu item 05 Run";
confirm with the -key, the balance is now in
formula mode.
Formulation
0.0000
g
0% 100%
0%
01 1= .0000WGH
SUM=0.0000
90% 110%
90%
20.01.05
Item
IC=0
From here, you start adding on the various ingredients
for a mixture:
Producing a mixture according to a defined formula
If you are using a weighing container use the key
for taring
Formulation
0.0000
g
0% 100%
0%
01 1= .0000WGH
SUM=0.0000
90% 110%
90%
20.01.05
Item
IC=0
Page 65

ILT-BA-e-0612 65
Add on ingredient 1; see target value (WGH) on the
display
Formulation
10.001
g
0% 100%
0%
10= .000W G H
SUM=0.0000
90% 110%
90%
20.01.05
Item
IC=0
As soon as the weighing value is stable, press key,
ingredient 1 is stored, the display shows the target
value ingredient 2 (WGH), total of the saved
ingredients (SUM), as well as the number of already
poured ingredients (IC)
Formulation
0.0000
g
0%
100%
0%
2 0= .000WG H
SUM= 0.001 1
90% 110%
90%
20.01.05
Item
IC 1=
Add on ingredient 2; see target value (WGH) on the
display
Repeat these steps until you have added all
ingredients.
Press -button
Formulation
g
0% 100%
F o r m u l a f i n is h e d
. .. .To c o n tin u e (U ni ts)
109 024.
24.01.05
Confirm completion of the mixture with the -key
The -key will take you back to the menu
Generating a mixture by adding on
Parameter selection:
01 Hints no
02 Autom.printout yes if formula printout
required
Use the cursor ( ), trigger menu item 04 Formula;
confirm by pressing the -key.
Formulation
0.0000
g
0% 100%
SUM=0.0000
20.01.05
IC=0
If you are using a weighing container use the -key
for taring
Add on ingredient 1
Formulation
10.002
g
0% 100%
SUM=0.0000
20.01.05
IC=0
As soon as the weighing value is stable, press key,
ingredient 1 is stored, the display shows the total of
the saved ingredients (SUM), as well as the number
of already poured ingredients (IC)
The weight display returns to zero.
Formulation
0.000
g
0% 100%
SUM= 0.001 2
20.01.05
IC 1=
Page 66

ILT-BA-e-061266
Add ingredient 2; as soon as the weighing value is
stable, press -key
Repeat this step until you have added all
ingredients.
Formulation
0.000
g
0% 100%
SUM= 0.012 21
20.01.05
IC 5=
Enter last ingredient and confirm with -key
Press -key; formula is printed out.
Formulation
g
0% 100%
F o r m u l a f i n is h e d
. .. .To c o n tin u e (U ni ts)
120 021.
24.01.05
The -key will take you back to the menu
Example for a data output (standard printout)
Key Display GLP Parameters Data output
Rezeptieren
g
0%
100%
E n d e d e r R e z e p tu r
.... U m fo rt zu s e tz te n (U n it s)
30 002.
24.01.05
P2 03 Printout Time 0: no
P2 04 Printout Date 0: no
P2 05 User printout 0: no
P2 06 Proj. Printout 0: no
P2 07 ID- printout 0: no
P2 08 Cal. printout 0: no
1 10,000 g
2 10,000 g
3 10,002 g
---------------------SUM 30,002 g
Rezeptieren
g
0%
100%
E n d e d e r R e z e p tu r
.... U m fo rt zu s e tz te n (U n it s)
30 002.
24.01.05
P2 03 Printout Time 1: yes
P2 04 Printout Date 1: yes
P2 05 User printout 1: yes
P2 06 Proj. Printout 1: yes
P2 07 ID- printout 1: yes
P2 08 Cal. printout 1: yes
Date: 16/01/2004
Time: 13:12:30
User: Mustermann
Project: xxxxx
Balance no: :WL041055
Last calibration:
---------------------16/01/2004 13:02
Automatic calibration
Deviation: 0.0001 g
---------------------1 10,000 g
2 10,000 g
3 10,002 g
---------------------SUM 30,002 g
Page 67

ILT-BA-e-0612 67
9.1.8 Statistics:
The statistic function is possible for display values in g, piece or %.
By actuating the -key the currently displayed value is saved for the statistics.
Overview of display:
1. Current net weight
2. Number of all weighing procedures
3. Sum of all measuring values
4. Mean Value
5. Smallest value
6. Largest value
7. Difference max - MIN
8. Standard deviation SDV:
9. Variance RDV.: (SDV / average) * 100%)
10. Weighing unit
11. Status bar
Operation Display
Call up menu item "M8 Statistics" (see chap. 9.1)
Press -button
01 08 Parameter selection
Use the cursor ( ) to select menu items "01 - 08"
Page 68

ILT-BA-e-061268
Press the -key; the current menu item blinks.
01 Clear Delete data
02 Sum Sum of all weighing procedures
03 Mean value Mean Value
04 Min Minimum
05 Max Maximum
06 Difference Difference min/max
07 Stand. devi. Standard Deviation
08 Rel. devi. Variance
09 Run Call up statistic menu
Use the arrow keys to activate/deactivate
parameters,
confirm your selection with the -key
Press the -key; the balance is now in statistics
mode. All your activated menu items are now
shown in the display
By actuating the -key the currently displayed
value is saved for the statistics.
By actuating the -key you can print your
statistical results on a connected printer.
Printout (Example):
The -key will take you back to the menu
N : 5
SUM : 169.6880 g
X : 33.9376 g
Min : 0.0000 g
MAX : 100.0012 g
D : 100.0012 g
SDV : 42.2166 g
RDV : 124,4 %
Page 69

ILT-BA-e-0612 69
Example for a data output during a measuring sequence:
Key Display GLP Parameters Data output
Statistik
g
0%
100%
N=3
MIN= 0.005 99
SUM= 0.0 015 3 4
MAX= 0.0 05 1 4
X= 0.0 05 1 1
D=0.0005
SDV=0.0003
RDV=0.1
5 990.00
27.1.05
P2 03 Printout Time 0: no
P2 04 Printout Date 0: no
P2 05 User printout 0: no
P2 06 Proj. Printout 0: no
P2 07 ID- printout 0: no
P2 08 Cal. printout 0: no
3 50,0099 g
Statistik
g
0%
100%
N=3
MIN= 0.005 99
SUM= 0.0 015 3 4
MAX= 0.0 05 1 4
X= 0.0 05 1 1
D=0.0005
SDV=0.0003
RDV=0.1
5 990.00
27.1.05
P2 03 Printout Time 1: yes
P2 04 Printout Date 1: yes
P2 05 User printout 1: yes
P2 06 Proj. Printout 1: yes
P2 07 ID- printout 1: yes
P2 08 Cal. printout 1: yes
Date: 16/01/2004
Time: 13:12:30
User: Mustermann
Project: xxxxx
Balance no: :WL041055
Last calibration:
---------------------16/01/2004 13:02
External calibration:
0.0001g
---------------------3 50.0099 g
Statistik
g
0%
100%
N=3
MIN= 0.005 99
SUM= 0.0 015 3 4
MAX= 0.0 05 1 4
X= 0.0 05 1 1
D=0.0005
SDV=0.0003
RDV=0.1
5 990.00
27.1.05
N : 3
SUM : 150.0304 g
X : 50.0101 g
Min : 50.0099 g
MAX : 50.0104 g
D : 0.0005 g
SDV : 0.0003 g
RDV : 0.01 %
Page 70

ILT-BA-e-061270
10 Data output
10.1 Technical data
8 data bits
Baud rate selectable at 2400, 4800, 9600 and 19200 Baud
Miniature plug-in necessary (9 pole D-Sub)
For operation with interface faultless operation is only ensured with the correct
KERN interface cable (max. 2m)
10.2 Pin allocation of the balance output plug (front view)
5 1
9 6
Pin 2: Rxd
Pin 3: Txd
Pin 4: DTR
Pin 5: GND
Pin 6: Tara
Pin 7: RTS
Pin 8: CTS
Pin 9: Print
Page 71

ILT-BA-e-0612 71
10.3 Remote control instructions
Commands Function
R CR LF
Reset to manufacturer setting - reset
PC CR LF
Command to call up the values of the balance
S CR LF
Measuring value stable
SI CR LF
Measuring value instable
SU CR LF
Last stable measuring value
SU CR LF
Current measuring value
Z CR LF
Zeroing stable value
ZI CR LF
Zeroing instable value
T CR LF
Taring stable value
TI CR LF
Taring instable value
C0 CR LF
Cancel continuous data output
C1 CR LF
Start continuous data output
CU0 CR LF
Cancel continuous data output (operating mode)
CU1 CR LF
Start continuous data output (operating mode)
NB CR LF
Serial no. of balance
FS CR LF
Weighing range max.
RV CR LF
Software issue
PD CR LF
Date display
PD CR LF
Time display
PMCR LF
Operating mode
PS CR LF
Balance parameters are printed out
B CR LF
Tone
ER CR LF
Call up error message
DS CR LF
Display check
CS CR LF
Delete display check
DH CR LF
Display check header
CH CR LF
Delete display check header
DF CR LF
Display check bar graph (footer)
CF CR LF
Delete display check bar graph (footer)
CL CR LF
Start internal adjustment from outside
KL CR LF
Lock keyboard
KU CR LF
Unlock keyboard
E0 CR LF
Keytone off
E1 CR LF
Keytone on
O0 CR LF
Balance off
O1 CR LF
Balance on
A0 CR LF
Auto zero off
A1 CR LF
Auto zero on
TC0 CR LF
Automatic adjustment off
TC1 CR LF
Automatic adjustment on
Page 72

ILT-BA-e-061272
11 Service, maintenance, disposal
11.1 Cleaning
Before cleaning, please disconnect the appliance from the operating voltage.
Please do not use aggressive cleaning agents (solvents or similar agents), but a cloth
dampened with mild soap suds. Ensure that no liquid penetrates into the device and
wipe with a dry soft cloth.
Loose residue sample/powder can be removed carefully with a brush or manual
vacuum cleaner.
Spilled weighing goods must be removed immediately.
11.2 Service, maintenance
The appliance may only be opened by trained service technicians who are authorized
by KERN.
Before opening, disconnect from power supply.
11.3 Disposal
Disposal of packaging and appliance must be carried out by operator according to
valid national or regional law of the location where the appliance is used.
Page 73

ILT-BA-e-0612 73
12 Instant help
In case of an error in the program process, briefly turn off the balance and disconnect
from power supply. The weighing process must then be restarted from the beginning.
Help:
Fault Possible cause
The displayed weight does
not glow.
The balance is not switched on.
The mains supply connection has been interrupted
(mains cable not plugged in/faulty).
Power supply interrupted.
The displayed weight is
permanently changing
Draught/air movement
Table/floor vibrations
Weighing plate has contact with other objects.
Electromagnetic fields / static charging (choose
different location/switch off interfering device if
possible)
The weighing result is
obviously incorrect
The display of the balance is not at zero
Adjustment is no longer correct.
Great fluctuations in temperature.
Electromagnetic fields / static charging (choose
different location/switch off interfering device if
possible)
Should other error messages occur, switch balance off and then on again. If the error
message remains inform manufacturer.
 Loading...