

Page 1
KERN & Sohn GmbH
Ziegelei 1
E-Mail: info@kern-sohn.com
Phone: +49-[0]7433- 9933-0
Internet: www.kern-sohn.com
Operating instructions
Density Scale
KERN EMB-V
Version 2.1
07/2013
GB
D-72336 Balingen
Fax: +49-[0]7433-9933-149
EMB-V-BA-e-1321
Page 2

2
KERN EMB-V
Density Scale
GB
Version 2.1 07/2013
Operating instructions
Contents
1 Technical data ................................................................................................ 4
2 Appliance overview ....................................................................................... 5
2.1 KERN EMB 200-3V with installed density k it KERN YDB-01...................................... 6
2.2 KERN EMB 2000-2V with installed density kit KERN YDB-02 .................................... 7
2.3 Keyboard overview .................................................................................................... 8
2.3.1 Numeric entry ............................................................................................................................. 8
3 Basic Information (General) .......................................................................... 9
3.1 Proper use ................................................................................................................. 9
3.2 Improper Use ............................................................................................................. 9
3.3 Warranty .................................................................................................................... 9
3.4 Monitoring of Test Resources ...................................................................................10
4 Basic Safety Precautions ............................................................................ 10
4.1 Pay attention to the instructions in the Operat ion Manual .........................................10
4.2 Personnel training .....................................................................................................10
5 Transport and storage ................................................................................. 10
5.1 Testing upon acceptance ..........................................................................................10
5.2 Packaging / return t ransport .....................................................................................10
6 Unpacking, Setup and Commissioning ..................................................... 11
6.1 Installation Site, Location of Use ...............................................................................11
6.2 Unpacking, Scope of delivery ...................................................................................11
6.3 Mains connection ......................................................................................................12
6.4 Battery operation (optional) .......................................................................................12
6.5 Initial Commission in g ................................................................................................12
6.6 Adjustment................................................................................................................13
7 Basic Operation ........................................................................................... 15
8 Density determination ................................................................................. 17
8.1 Principle of Density Determination ............................................................................17
8.1.1 Influencing magnitudes and error sources ............................................................................... 18
8.2 Density determination of solids .................................................................................19
8.2.1 Density determination while using the density kits KERN YDB-01 or YDB-02 ........................ 19
8.2.2 Density determination using the suspended weighing device .................................................. 23
8.2.3 Density determination of solid material with a density of less than 1 g/cm3 ............................. 26
8.3 Determining density of liquids ...................................................................................28
8.3.1 Density determination while using the density kits KERN YDB-01 or YDB-02. ....................... 28
8.3.2 Density determination using the suspended weighing device .................................................. 30
EMB-V-BA-e-1321
Page 3

3
9 Preconditions for Precise Measurements ................................................. 33
9.1 Calculation of Results ...............................................................................................33
9.2 Influence Factors for Measurement Er r or s ................................................................33
9.2.1 Air bubbles ................................................................................................................................ 33
9.2.2 Solid body sample .................................................................................................................... 33
9.2.3 Liquids ...................................................................................................................................... 34
9.2.4 Surface ..................................................................................................................................... 34
9.2.5 Sinker for density determination of liquids. ............................................................................... 34
9.3 General information ..................................................................................................34
9.3.1 Density / Relative Density ......................................................................................................... 34
9.3.2 Drift of Balance Display ............................................................................................................ 34
10 Density Table for Fluids .............................................................................. 35
11 Uncertainty of Measurement for Density Determination of Solids .......... 36
12 User Instructions ......................................................................................... 37
13 Menu ............................................................................................................. 38
13.1 Navigat ion in the m enu .............................................................................................38
13.2 Menu overview ..........................................................................................................39
13.3 Desc r ipt ion of individual menu items .........................................................................40
13.4 Interface parameters ................................................................................................43
14 Data output RS 232 C .................................................................................. 44
15 Service, maintenance, disposal .................................................................. 46
15.1 Clean ........................................................................................................................46
15.2 Ser vice, m aint enance ...............................................................................................46
15.3 Disposal ....................................................................................................................46
16 Instant help ................................................................................................... 47
17 Declaration of -Conformity .......................................................................... 48
EMB-V-BA-e-1321
Page 4

4
1 Technical data
(F1)
(F1)
Operating time: 12 h
(With battery operation)
KERN EMB 200-3V EMB 2000-2V
Readability (d) 0.001 g 0.01
Weighing range (max) 200 g 2000 g
Reproducibility 0.002 g 0.02
Linearity ± 0.005 g ± 0.05 g
Recommended adjustment
weight, not added (class)
Stabilization time (typical) 2.5 sec
Warm-up time 2 h
Unit g
Operating temperature +5°C… +35°C
Humidity of air max. 80 % (not condensing)
Housing (B x D x H) mm 170 x 240 x 39
Weighing plate mm Ø 82 Ø 150
Battery operation (optional)
Mains adapter 100 mA / 9V
AUTO-OFF-function
200 g
9V block
3 min.
2000 g
Underfloor weighing Standard hooks
Interface RS-232 standard
EMB-V-BA-e-1321
Page 5
5
2 Appliance overview
bottom side
KERN EMB 200-3V
KERN EMB 2000-2V
Weighing pan
Display
Keyboard
EMB-V-BA-e-1321
RS 232
5
Battery compartment
6
Underfloor weighing
Page 6
6
2.1 KERN EMB 200-3V with installed density kit KERN YDB-01
Upper sample dish of the immersion basket
Weighing plate "density kit"
Beaker
Lower sample dish of the immersion basket
Platform
EMB-V-BA-e-1321
Page 7
7
2.2 KERN EMB 2000-2V w ith installed density kit KERN YDB-02
EMB-V-BA-e-1321
Upper sample dish of the immersion basket
Beaker
Lower sample dish of the immersion basket
Platform
Weighing plate "density kit"
Page 8
8
2.3 Keyboard overview
Key Function
• Turn on/off
• Calculate weighing data via interface
• Menu access (longer pressing of the button)
• Cancel process/input
• Density determination mode to switch over to weighing mode
• Numeric input / dialing digits to the right
• Taring / Setting to zero
• Confirm
• Save and exit menu
• Adjustment menu access (longer pressing of the button)
• Density determination access mode for solids
• Scroll backwards in menu
• Density determination access mode for liquids
• Scroll forward in menu
• Weighing in air
• Weighing in liquid
2.3.1 Numeric entry Key Function
Dialing the digits to the right, each active site flashes.
Each time you press the button, the numerical value of the
flashing digit increases.
Confirm ent ry
EMB-V-BA-e-1321
Page 9

9
3 Basic Information (General)
3.1 Proper use
The scale purchased by you is intended to determine the density of solids and
liquids. The determination of the density is based on the Archimedean Principle, see
chapter 8.1.
Furthermore, the scale can also be used to determine the weighing value of the
weighing object. It is intended to be used as a “non-automatic balance”, i.e. the
material to be weighed is manually and carefully placed in the centre of the weighing
pan. As soon as a stable weighing value is reached the weighing value can be read.
3.2 Improper Use
• Do not use balance for dynamic add-on weighing procedures, if small amounts of
goods to be weighed are removed or added. The “stability compensation“
installed in the balance may result in displaying an incorrect measuring value!
(Example: Slowly draining fluids from a container on the balance.)
• Do not leave permanent load on the weighing pan. This may damage the
measuring system.
• Impacts and overloading exceeding the stated maximum load (max) of the
balance, minus a possibly existing tare load, must be strictly avoided. Balance
may be damage by this.
• Never operate balance in explosive environment. The serial version is not
explosion protected.
• The structure of the balance may not be modified. This may lead to incorrect
weighing results, safety-related faults and destruction of the balance.
• The balance may only be used according to the described conditions. Other
areas of use must be released by KERN in writing.
3.3 Warranty
Warranty claims shall be voided in case
• Our conditions in the operation manual are ignored
• The appliance is used outside the described uses
• The appliance is modified or opened
• Mechanical damage or damage by media, liquids, natural wear and tear
• The appliance is improperly set up or incorrectly electrically connected
• The measuring system is overloaded
EMB-V-BA-e-1321
Page 10
10
3.4 Monitoring of Test Resources
In the framework of quality assurance the measuring-related properties of the
balance and, if applicable, the testing weight, must be checked regularly. The
responsible user must define a suitable interval as well as type and scope of this
test.
Information is available on KERN’s home page (www.kern-sohn.com with regard to
the monitoring of balance test substances and the test weights required for this. In
KERN's accredited DKD calibration laboratory test weights and balances may be
calibrated (return to the national standard) fast and at moderate cost.
4 Basic Safety Precautions
4.1 Pay attention to the instructions in the Operation Manual
Carefully read this operation manual before setup and
commissioning, even if you are already familiar with KERN
balances.
4.2 Personnel training
The appliance may only be operated and maintained by trained personnel.
5 Transport and stora ge
5.1 Testing upon acceptance
When receiving the appliance, please check packaging immediately, and the
appliance itself when unpacking for possible visible damage.
5.2 Packaging / return transport
Keep all parts of the original packaging for a possibly
required return.
Only use original packaging for returning.
Prior to dispatch disconnect all cables and remove
loose/mobile parts.
Reattach possibly supplied transport securing devices.
Secure all parts such as the weighing platform, power unit
etc. against shifting and damage.
EMB-V-BA-e-1321
Page 11

11
6 Unpacking, Setup and Commissioning
• Balance, see chap. 2.0
6.1 Installation Site, Location of Use
The balance is designed in a way that reliable weighing results are achieved in
common conditions of use.
You will work accurately and fast, if you select the right location for your balance.
On the installation site observe the following:
• Place the balance on a firm, level surface.
• Avoid extreme heat as well as temperature fluctuation caused by installing
next to a radiator or in the direct sunlight.
• Protect the balance against direct draughts due to open windows and doors.
• Avoid jarring during weighing.
• Protect the balance against high humidity, vapours and dust.
• Do not expose the device to extreme dampness for longer periods of time.
Non-permitted condensation (condensation of air humidity on the appliance)
may occur if a cold appliance is taken to a considerably warmer environment.
In this case, acclimatize the disconnected appliance for ca. 2 hours at room
temperature.
• Avoid static charge of goods to be weighed or weighing container.
• Do not operate in areas with hazard of explosive material or in potentially
explosive atmospheres due to materials such as gasses, steams, mists or
dusts.
• Keep away chemicals (such as liquids or gasses), which could attack and
damage the balance inside or from outside.
• If electro-magnetic fields or static charge occur, or if the power supply is
unstable major deviations on the display (incorrect weighing results) are
possible. In that case, the location must be changed.
6.2 Unpacking, Scope of delivery
Remove balance and accessories carefully from packaging, remove packaging
material and place device at the planned work place. Verify that there has been no
damage and that all packing items are present.
Scope of delivery / serial accessories:
• Mains adapter
• Flush-mounted hook
• Operating instructions
EMB-V-BA-e-1321
Page 12
12
6.3 Mains connection
„AF on“:
In order to save the battery, the balance switches automatically
off after 3 minutes without weighing.
„AF off“:
Switch-off function deactivated.
Power is supplied via the external mains adapter. The stated voltage value must be
the same as the local voltage.
Only use original KERN mains adapters. Using other makes requires consent by
KERN.
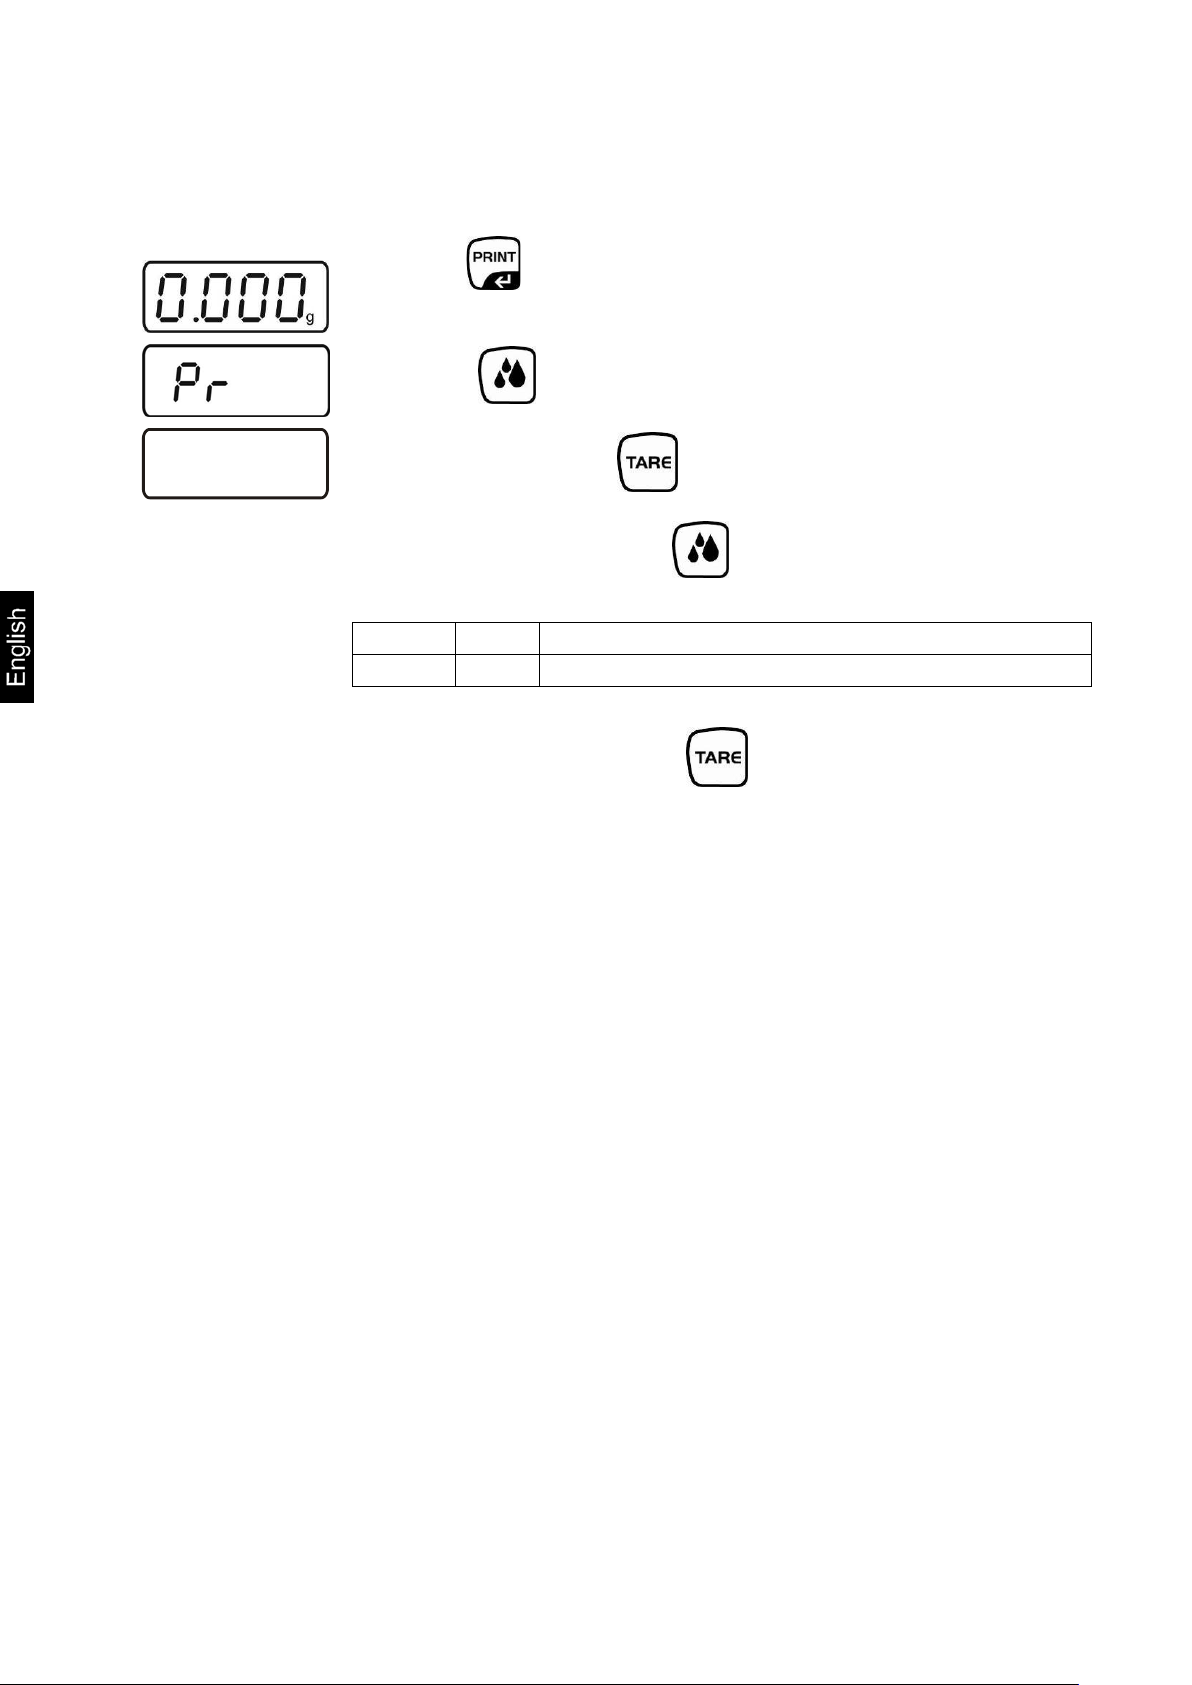
6.4 Battery operation (optional)
Remove the battery compartment cover on the underside of the scale and connect a
9 V block battery. Replace the battery compartment cover.
For battery operation the balance has an automatic switch-off function which can be
activated or deactivated in the menu (chapter 13).
In the weighing mode, press and hold longer until [Pr] is displayed.
Press repeatedly until "AF" appears.
Acknowledge with .
Use now to select between the following two settings:
Acknowledge selection by . The balance returns to weighing mode.
If the batteries are run down, "LO" appears in the display. Press ON/OFF-key and
replace the batteries immediately.
If the balance is not used for a longer time, take out the batteries and store them
separately. Leaking battery liquid could damage the balance.
6.5 Initial Commissioning
A warming up time of 2 hours after switching on stabilizes the measuring values.
The accuracy of the balance depends on the local acceleration of gravity.
Strictly observe hints in chapter “Adjustment”.
EMB-V-BA-e-1321
Page 13
13
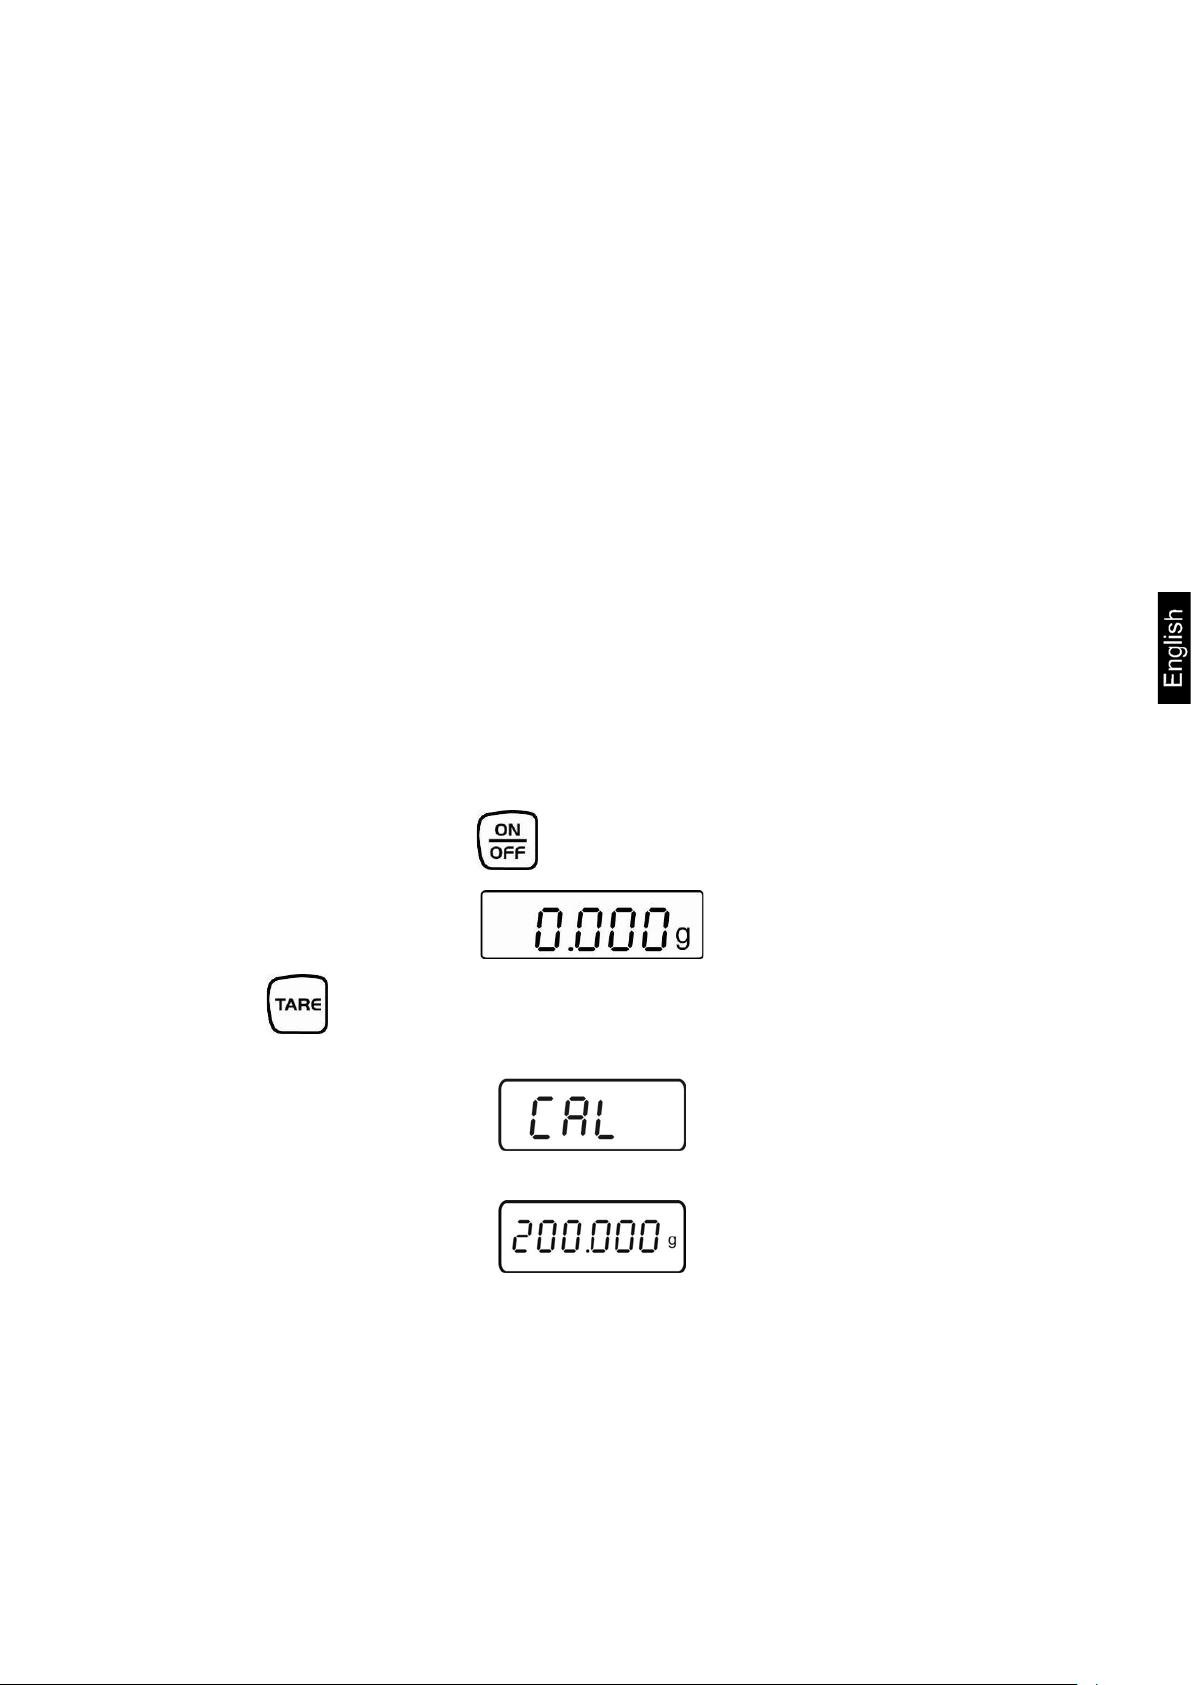
6.6 Adjustment
display shows the exact size of the adjustment weight (See chapter 13.3).
As the acceleration value due to gravity is not the same at every location on earth,
each balance must be coordinated - in compliance with the underlying physical
weighing principle - to the existing acceleration due to gravity at its place of location
(only if the balance has not already been adjusted to the location in the factory). This
adjustment process must be carried out for the first commissioning, after each
change of location as well as in case of fluctuating environment temperature. To
receive accurate measuring values it is also recommended to adjust the balance
periodically in weighing operation.
+ Prepare the required adjustment weight.
The adjustment should be made with the recommended adjustment weight
(see chap. 1 "Technical data"). Adjustment is also possible with the weights
of other nominal values (see table 13.3), but not the optimum for measuring
technique.
+ Observe stable environmental conditions.
+ A warming up time (see chapter 1) is required for stabilization.
+ Ensure that there are no objects on the weighing pan.
Procedure:
EMB 200-3V as an example.
1. Start balance by pressing .
2. Press and hold down longer, the display shows "CAL" briefly. Then the
3. During this display, set the adjustment weight in the middle of the weighing
plate
EMB-V-BA-e-1321
Page 14

14
An error during adjustment or the use of an incorrect adjusting weight will result
exactness is recommended for quality-relevant applications.
4. Press , short time later there appears „CAL F“, then the automatic return
to the weighing mode. In the display there appears the value of the adjustment
weight.
in an error message „CAL E“. Repeat adjustment.
Keep the adjustment close to the balance. Daily control of the weighing
EMB-V-BA-e-1321
Page 15
15
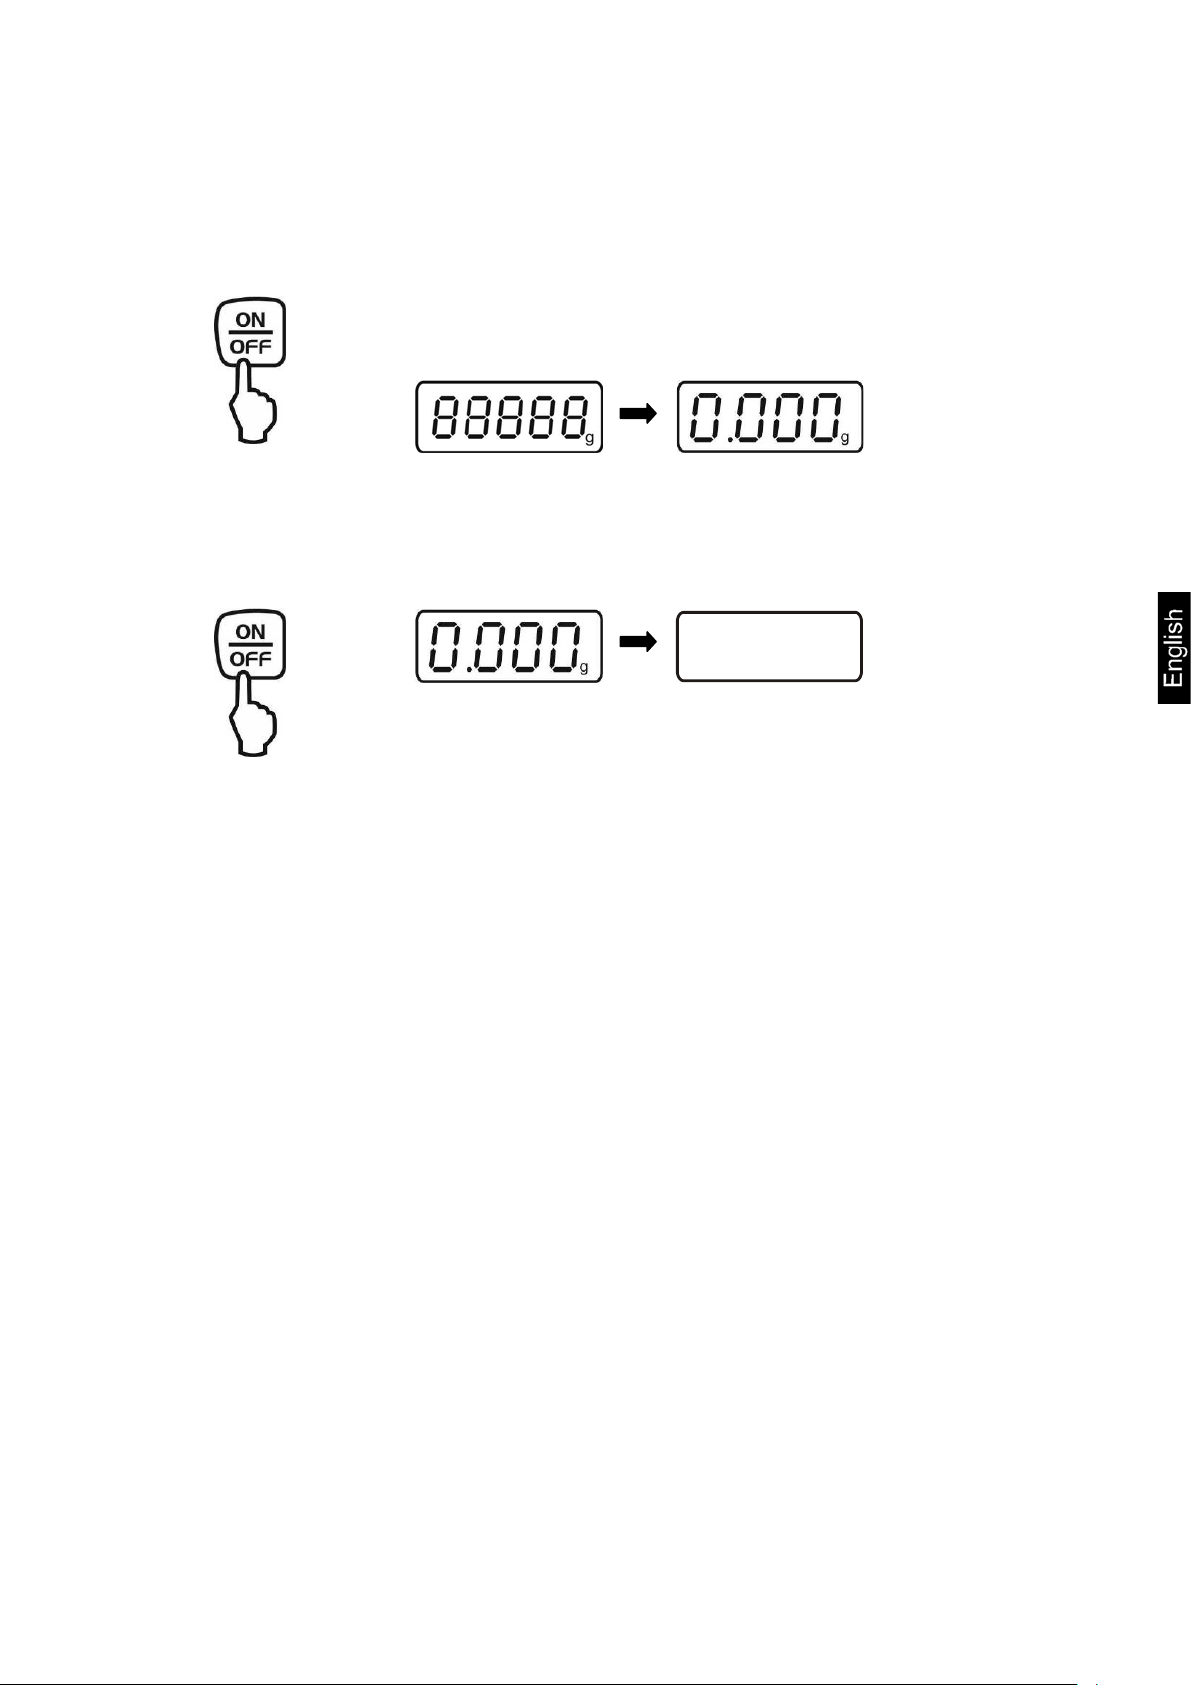
7 Basic Operation
EMB 200-3V as an example.
Start-up
Switching Off
Press the ON/OFF key.
The balance will carry out a self-test As soon as the
weight display appears, the balance is ready for
weighing.
Press ON/OFF button, the display disappears
Weighing
Place goods to be weighed on balance.
Wait for stability display [g]
Read weighing result.
If the weighing object is heavier than the weighing range, the
display shows the error message "E".
EMB-V-BA-e-1321
Page 16

16
Taring
Place an empty weighing container, the weight of the
weighing container will be displayed.
Press the TARE button, the zero display disappears. The
tare weight is saved until it is deleted.
Weigh the material, the net weight will be indicated.
The taring process can be repeated any number of times,
e.g. when adding several components for a mixture
(adding). The limit is reached when the whole weighing
range is exhausted.
Delete tare
After removing the weighing container, the weight of the
weighing container appears as negative display.
The tare weight is saved until it is deleted.
Unload the balance and press the TARE button, the zero
display appears.
EMB-V-BA-e-1321
Page 17

17
ρ =
A
A-B
o
ρ
ρ =
m
V
8 Density determination
1
g
cm
3
1
kg
m
3
1
g
l
8.1 Principle of Density Determination
Three physical magnitudes are the volume and the mass of bodies as well as the
density of matter. In density mass and volume are related.
Density [ ρ ] is the relation o f mass [ m ] to volume [ V ].
SI-unit of density is kilogram divided by cubic meter (kg/m³). 1 kg/m³ equals the
density of a homogenous body that, for a mass of 1 kg, has the volume of 1 m³.
Additional frequently applied units include:
The determination of the density is based on the "Archimedean Principle", which
states that every object that is dipped into a liquid is as much lighter as the liquid that
it displaces.
Thus, density is calculated according to the formulae below:
,
,
Density determination of solids
Our balances enable weighing of solids in air [ A ] as well as water [ B ]. If the density
of the buoyancy medium is known [ ρo ] the density of the solid [ ρ ] is calculated as
follows:
ρ = density of sample
A = weight of the sample in air
B = weight of the sample in the aid liquid
ρ
= density of the aid liquid
o
EMB-V-BA-e-1321
Page 18

18
ρ =
V
A-B
Determining density of liquids
The density of a fluid is determined with the help of a sinker providing a known
volume [ V ]. The sinker is weighed in air [ A ] as well as in the test fluid [ B ].
According to the Archimedes’ Principle a body immersed in a fluid experiences a
force of buoyancy. [ G ]. This force equals the weight force of the fluid displaced by
the volume of the body.
The volume [ V ] of the immersed body equals the volume of the displaced fluid.
G = buoyancy of sinker
Buoyancy of sinker =
Weight of the sinker in air [ A ] - weight sinker in test liquid [ B ]
From this follows:
ρ = density of test liquid
A = weight of sinker in air
B = weight of the sinkers in test liquid
V = volume of sinker*
8.1.1 Influencing magnitudes and error s our ces
Air pressure
Temperature
Volume deviation of the sinker
Surface tension of the liquid
Air bubbles
Immersion depth of the sample dish of sinker
Porosity of the solid
EMB-V-BA-e-1321
Page 19

19
8.2 Density determination of solids
weighing plate.
KERN YDB-01
KERN YDB-02
For the determination of the density of solids, the solid is first weighed in air and then
in the aid liquid, whose density is known. From the weight difference results the
buoyancy from where the software calculates the density.
As aid liquid, usually distilled water or ethanol is used, see density table chapter 10.
8.2.1 Density determination while using the density kits KERN YDB-01
or YDB-02
For the density determination, we recommend to work with the optional density kit
KERN YDB-01 or YDB-02. This contains all the necessary structures and resources
for a comfortable and precise determination of the density.
• If needed, perform necessary adjustment prior to the installation of the
density kit, see chapter 6.6.
• When the density kit is installed, correct adjustment is not possible.
• For reasons of adjustment, take away the density kit and place the standard
EMB-V-BA-e-1321
Page 20

20
Install the density kit
Disconnect scale from power supply.
Remove the standard weighing plate and replace it with the density kit.
! Model EMB 2000-2V
Ensuring correct positioning, see illustration below.
Place the platform for glass containers in a way that it does not touch the
weighing plate.
Place beaker in the centre of the platform Make sure that it has no contact
with the frame.
Hang the immersion basket on the rack. Make sure that it is centred in the
recess.
Pour the liquid into the glass beaker. Filling height should be approx. ¾ of
the capacity. Immerse thermometer
Heat the liquid, the instruments or the displacement body until the
temperature is constant. Observe the warm-up time of the balance.
For more information, please refer to the operating manual supplied
with the density kit.
EMB-V-BA-e-1321
Page 21

21
Procedure
position flashes.
+ Access mode for the density determination of solids.
5. Turn on the scale with , "0.000" is displayed.
6. If the scale does not display "0.000", press
7. Access by pressing density determination mode for solids.
(example water at 19°C)
"SOLId" is briefly displayed, followed by the actual entered density of the aid
liquid. If necessary, change as described later.
+ Enter the density of the aid liquid while tak ing into account the current
temperature (See density table chapter 10).
8. Press and the last digit flashes.
9. Use to increase the numeric value of the flashing cipher.
Use to move the number selection to the right, the respective active
10. Confirm input by .
EMB-V-BA-e-1321
(example water at 23°C)
Page 22

22
12. Press and the weight of the sample in air is shown.
13. Lay the sample into the lower sample dish and immerse it in the aid liquid.
Make sure that the sample is at least 1 cm immersed and has, if possible, no
air bubbles adhering to it.
The scale determines the density of the solid and subsequently displays the result.
+ Density determination solids
11. Lay the solid in the upper sample dish.
(example)
14. Press and for a short time the weight of the sample in the aid liquid is
displayed.
(example)
(example)
When connecting an optional printer, press to print the result.
Printout example KERN YKB-01N:
D-REF: 0.9976 g/cm^3
D-RSL: 8.0409 g/cm^3
W-AIR: 020.000 g
W-LDQ: 017.432 g
Density aid liquid
Result (density of the sample)
Weight of the sample in air
Weight of the sample in liquid
Press ; balance will return to weighing mode. For further measurements start at
step 2.
EMB-V-BA-e-1321
Page 23

23
8.2.2 Density determination using the suspended weighing device
Density determination with help of the suspended weighing device is recommended
for samples that do not fit, due to size or shape, in the sample dish or glass beaker
of the optional density kits.
In this method, the solid is first weighed in air.
Afterwards, the solid is immersed in the aid liquid (at the right temperature), so that it
doesn't touch the bottom of the glass beaker, but is still completely submerged. Now
it is weighed again. From the two weight values, the scale determines the density of
the solid and displays it.
How to prepare the weighing balance
Turn off the scale and turn it around.
Open closing cover at the balance bottom.
Mount the hooks for underfloor weighing.
Place weighing balance over an opening.
Attach the suspension device.
Fill the aid liquid into a glass beaker.
Heat the liquid, the instruments or the sinker until the temperature is
constant. Observe the warm-up time of the balance.
EMB-V-BA-e-1321
Page 24

24
Calculate density
If the scale does not display zero, tare with
position flashes.
+ Access mode for the density determination of solids.
Start balance by pressing
Access by pressing density determination mode for solids.
(example water at 19°C)
"SOLId" is briefly displayed, followed by the actual entered density of the aid
liquid.
+ Enter the density of the aid liquid while taking into account the current
temperature (See density table chapter 10).
Press and the last digit flashes.
Use to increase the numeric value of the flashing cipher.
Use to move the number selection to the right, the respective active
Confirm input by .
(example water at 23°C)
EMB-V-BA-e-1321
Page 25

25
Press and the weight of the sample in air is shown.
If possible, immersed the sample bubble free in the aid liquid. Make sure that
the sample is at least 1 cm immersed and doesn't touch the glass beaker.
displayed.
(example)
The scale determines the density of the solid.
Wait until the result is displayed. (example)
example chapter 8.2.1.
Using the balance returns into the weighing mode.
+ Density determination “solids“
Hang the sample on the suspension device.
(example)
Press and for a short time the weight of the sample in the aid liquid is
When connecting an optional printer, press to print the result, see printout
EMB-V-BA-e-1321
Page 26

26
8.2.3 Density determination of solid material with a density of less than 1
g/cm3
At solid material with density less than 1 g/cm3 , a density determination with two
different methods is possible.
Method 1:
As aid liquid is used a liquid with less density than that of the solid material, e.g.
ethanol approx. 0.8 g/cm3.
This method should be applied when the density of the solid is just slightly different
from that of the distilled water.
Using ethanol is not recommended, when the solid material is being attacked.
When working with ethanol, you must observe the applicable safety regulations.
Method 2:
Here the sample is not placed upon, but under the sample dish. Here, the immersion
basket for floating solids is to be used.
Fig.: Density kit KERN YDB-01 with installed immersion basket for floating solid matter.
EMB-V-BA-e-1321
Page 27

27
Abb.: Density kit KE RN YDB-02 with installed immersion basket for f loat ing s olid mat t er.
Activate function, see chap. 8.2.1.
Input parameter for aid liquid, see chapter 8.2.1.
Density determinations, see chapter 8.2.1, in step 9 enter the sample under the
lower sample dish. If the buoyancy of the sample is so much that the immersion
basket is lifted, place a dummy weight on it and tare it away when weighing in
air.
EMB-V-BA-e-1321
Page 28

28
8.3 Determining density of liquids
At the density determination of liquids, a sinker is used whose density is known. The
sinker is weighed first in air and then in the liquid whose density is to be determined.
From the weight difference results the buoyancy from where the software calculates
the density.
The density of the enclosed steel sinker can be determined as described in chapter,
8.2.1.
Or quickly and inexpensively in our calibration laboratory.
For further information please go to KERN- Hompage (www.kern-sohn.com).
8.3.1 Density determination while using the density kits KERN YDB-01
or YDB-02.
+ Install the density kit, see chapter 8.2.1
+ Mode to call up densi ty determination of liqui ds.
1. Turn on the scale with , "0.000" is displayed.
2. If the scale does not display, "0.000", press
3. Call up the density determination mode of liquids by pressing .
"Liquid" is displayed briefly, followed by the actual entered density of the sinker.
Initial entry or if it is necessary to change them describes will be described later.
While using the same sinker, the entered density stays stored. Skip the following
steps for additional measurements and start by determining the density of the
liquid (step 7).
EMB-V-BA-e-1321
Page 29

29
position flashes.
8. Press and the weight of the sinker in air is displayed.
9. Lay the sinker in the lower sample dish and immerse it into the test liquid.
air bubbles adhere to it.
The scale determines the density of the liquid and then displays the result.
+ Enter the density of the sinker.
4. Press and the last digit flashes.
5. Use to increase the numeric value of the flashing cipher.
Use to move the number selection to the right, the respective active
6. Confirm input by .
+ Density determination liquids
7. Place sinker in the upper sample dish.
(example)
Make sure that the sinker is at least 1 cm submerged and that, if possible, no
10. Press and f or a short time the weight of the sinker in the test liquid is
displayed.
(example)
(example)
EMB-V-BA-e-1321
Page 30

30
When connecting an optional printer, pressing of will print the result.
Printout example KERN YKB-01N:
D-REF: 8.0409 g/cm^3
D-RSL: 0.9984 g/cm^3
W-AIR: 020.000 g
W-LDQ: 017.432 g
Sinker density
Result (Density of the test liquid)
Weight of sinker in air
Weight of the sinker in liquid
Press ; balance will return to weighing mode. For further measurements start at
step 2.
8.3.2 Density determination using the suspended weighing device
How to prepare the weighing balance
Turn off the scale and turn it around.
Open closing cover at the balance bottom.
Mount the hooks for underfloor weighing.
Place weighing balance over an opening.
Attach the suspension device.
Pour the test liquid into a glass beaker.
Control the temperature of the liquid, instruments and the displacement body
until the temperature is constant. Observe the warm-up time of the balance.
EMB-V-BA-e-1321
Page 31

31
+ Mode to call up density determination of liquids.
position flashes.
1. Turn on the scale with , "0.000" is displayed.
2. If the scale does not display, "0.000", press
3. Call up the density determination mode of liquids by pressing .
"Liquid" is displayed briefly, followed by the actual entered density of the sinker.
Initial entry or if it is necessary to change them describes will be described later.
While using the same sinker, the entered density stays stored. Skip the following
steps for additional measurements and start by determining the density of the
liquid (step 7).
+ Enter the density of the sinker.
4. Press and the last digit flashes.
5. Use to increase the numeric value of the flashing cipher.
Use to move the number selection to the right, the respective active
EMB-V-BA-e-1321
Page 32

32
8. Press and the weight of the sinker in air is displayed.
9. If possible, immerse the sinker bubble free in the aid liquid. Make sure that the
sinker is at least 1 cm submerged and doesn't touch the glass beaker.
The scale determines the density of the liquid and then displays the result.
For further measurements
6. Confirm input by .
+ Density determination “liquids“
7. Hang the sinker on the suspension device.
(example)
10. Press and for a short time the weight of the sinker is displayed in the aid
liquid.
(example)
(example)
When connecting an optional printer, pressing of will print the result, see
printout example chapter 8.3.1.
Press , the balance will return to weighing mode.
start at step 2.
EMB-V-BA-e-1321
Page 33

33
ρ =
A
A-B
o
ρ
9 Preconditions for Precise Measurements
There are numerous error possibilities during density determination.
Accurate knowledge and caution are required to achieve precise results when
applying this density kit in combination with the balance.
9.1 Calculation of Results
The balance displays results for density determination by giving four decimal places.
However, this does not mean that the results are accurate down to the last decimal
place as this would be the case for a calculated value. Therefore all weighing results
used for calculations have to be examined closely.
Example for density determination of solids:
To ensure high-grade results, numerators as well as common denominators of the
formula below must show the desired accuracy. If either of them is instable or flawed,
the result, too, will be instable or flawed.
ρ = density of sample
A = weight of the sample in air
B = Weight of the sample in the aid liquid
ρ
= Density of the aid liquid
o
9.2 Influence Factors for Measurement Errors
9.2.1 Air bubbles
A small bubble with a diameter of 1 mm results in a raise of 0.5 mg, while those with
2 mm Ø already produce a raise of 4 mg.
Therefore, make sure that no air bubbles adhere on the fixed object or sinker that is
immersed in the liquid.
An oily surface causes air bubbles when immersing in the liquid, so
degrease the solvent-resistant solid sample
clean all parts that are immersed regularly and don't touch them with bare
fingers
Don't lay solid samples (particularly flat objects) outside of the liquid on the sample
dish, because this results in air bubbles by the joint immersion.
9.2.2 Solid body sample
A sample possessing too great a volume that is immersed in fluid will result in an
increase in fluid level inside the glass pitcher. As a result, part of the suspension
bracket of the sifting bowl will also be immersed causing buoyancy to increase. As a
consequence the weight of the specimen in the fluid will drop.
Samples that change the volume or assimilate fluid are unsuitable for measurement.
EMB-V-BA-e-1321
Page 34

34
9.2.3 Liquids
Solids are generally not sensitive to temperature changes, so that the corresponding
density changes are not relevant. However, since you work with an aid liquid by the
density determination of solids, according to the "Archimedean Principle", its
temperature is taken into account. The temperature change effects liquids greater
and causes changes in the density in order of 0.1 to 1 ‰ per °C. Hereby, the third
digit after the decimal point is affected.
9.2.4 Surface
The suspension bracket of the sample dish penetrates the surface of the fluid. This
state undergoes continuous change. If the sample or the sinker is relatively small,
the surface tension will impair repeatability. The addition of a small amount of
detergent makes the surface tension negligible and
increases repeatability.
9.2.5 Sinker for density determination of liquids.
To save test fluids by the density determination of liquids, a small glass beaker and
an appropriate sinker is to be used. Hereto, it should be noted that a larger sinker
achieves greater accuracy.
Determine the buoyancy and volume of the sinker as accurately as possible. For the
determination of fluid density these results are applied to the common denominator
as well as the numerator of the formula.
9.3 General information
9.3.1 Density / Relative Density
Relative density follows from the weight of a specimen divided by the weight of water
(at 4° Celsius) of the same volume. For this reason relative density does not have a
unit. Density equals mass divided by volume.
The application of the relative density instead of the density of a fluid in a formula
produces an incorrect result. In the case of fluids only their density is
physically meaningful.
9.3.2 Drift of Balance Display
The drifting of a balance does not influence the final result of the density
determination although the shown weight of weighing in air is affected. Accurate
values are merely required if the density of fluids is determined by means of a sinker.
When changing the ambient temperature or location, an adjustment of the balance is
necessary. Hereto, remove the density kit and carry out an adjustment with the
standard weighing plate (See chapter 6.6).
EMB-V-BA-e-1321
Page 35

35
10 Densi t y Table for Fluids
Temperature
Density ρ [g/cm
3
]
Water
Ethyl alcohol
Methyl alcohol
10
0.9997
0.7978
0.8009
11
0.9996
0.7969
0.8000
12
0.9995
0.7961
0.7991
13
0.9994
0.7953
0.7982
14
0.9993
0.7944
0.7972
15
0.9991
0.7935
0.7963
16
0.9990
0.7927
0.7954
17
0.9988
0.7918
0.7945
18
0.9986
0.7909
0.7935
19
0.9984
0.7901
0.7926
20
0.9982
0.7893
0.7917
21
0.9980
0.7884
0.7907
22
0.9978
0.7876
0.7898
23
0.9976
0.7867
0.7880
24
0.9973
0.7859
0.7870
25
0.9971
0.7851
0.7870
26
0.9968
0.7842
0.7861
27
0.9965
0.7833
0.7852
28
0.9963
0.7824
0.7842
29
0.9960
0.7816
0.7833
30
0.9957
0.7808
0.7824
31
0.9954
0.7800
0.7814
32
0.9951
0.7791
0.7805
33
0.9947
0.7783
0.7896
34
0.9944
0.7774
0.7886
35
0.9941
0.7766
0.7877
[°C]
EMB-V-BA-e-1321
Page 36

36
11 Uncer tainty of Measur em e nt f or Density Determination of Solids
Approximate display at density measurements
(when using a balance with a readability of 0.01g*)
Weight of sample
[g/cm3]
1
0.1
0.01
0.003
0.002
0.0005
0.0003
0.0003
0.0002
0.0002
3
0.4
0.04
0.01
0.005
0.001
0.001
0.0005
0.0004
0.0004
5
0.7
0.07
0.01
0.008
0.002
0.001
0.001
0.001
0.0006
8
1.2
0.1
0.02
0.01
0.003
0.002
0.001
0.001
0.001
10
1.5
0.1
0.03
0.02
0.004
0.002
0.001
0.001
0.001
12
1.7
0.2
0.04
0.02
0.004
0.002
0.002
0.001
0.001
20
2.9
0.3
0.06
0.03
0.01
0.004
0.003
0.002
0.002
This table shows the approximate readability of the balance in connection with the
density kit. Observe that these values have only been determined by calculation and
that influent parameters such as described in chapter 6 have not been taken into
consideration.
(g)
Density of sample
1 10 50 100 500 1000 2000 3000 4000
*when using a balance with a readability of 0.1 g , the numbers in this table have to be
multiplied with 10. When using a balance with a readability of 0.001 g, divide the numbers
through 10.
Reading example for table:
In a balance with a resolution of 0.001 g and a sample with a weight of 10 g, whose
density is 5 g/cm3, the display graduation is at 0.007 g/cm3.
EMB-V-BA-e-1321
Page 37

37
12 User Instructions
• T o form a reproducible mean value several density measurement are necessary
• Remove fat from solvent-resistant sample / sinker /beaker.
• Regularly clean sample dishes/ sinker/beaker, do not touch immersed part with
your hands
• Dry sample/ sinker/pincers after each measurement.
• Adjust sample size to sample dish (ideal sample size > 5 g).
• Only use distilled water.
• When immersing for the first time, lightly shake sample dishes and sinker, in
order to Dissolve air bubbles.
• Always ensure that, when re-immersing into the liquid no additional bubbles
adhere; it is better to use pincers to place the sample.
• Remove firmly adherent air bubbles with a fine brush or a similar tool.
• T o avoid adherent air bubbles smoothen samples with rough surface.
• T ake care that no water drips onto the upper sample dish when weighing with the
help of tweezers.
• In order to reduce the surface tension of water and the friction of the liquid on the
wire, add three drops of a common detergent (washing-up liquid) to the aid liquid
(density modification of dest. water occurring due to the addition of tensides can
be ignored).
• Oval samples can be held more easily with pincers when you cut grooves into
them.
• T he density of porous solids may only be determined approximately. Buoyancy
errors occur when not all the air is eliminated from the pores during immersion in
the aid fluid.
• T o avoid great vibrations of the balance, place sample carefully.
• Avoid static charge, e. g. dry sinker with cotton cloth only.
• If the density of your solid only deviates slightly from that of distilled water,
ethanol may be used as aid liquid. However, check beforehand whether the
sample is solvent-proof. In addition you must observe the applicable safety
regulations when working with ethanol.
• T o avoid corrosion, don't leave the density kit immersed in liquid for a long time.
EMB-V-BA-e-1321
Page 38

38
13 Menu
BAUD�
"Menu- Overview".
RE CR�
13.1 Navigation in the menu
Access to menu
In weighing mode keep the PRINT key
pressed until [Pr] appears.
How to select menu items
Change settings
or
With help of , the individual menu
items can be selected one after the
other.
Use to scroll forward
Use to scroll backward
Acknowledge selected menu item using
TARE key, the current setting is
displayed.
Use to scroll forward
Use to scroll backward
Each time you press the button, the next
setting is displayed, see chapter 13.2
How to save settings and to exit the
menu
Press the TARE key; balance will
return to weighing mode.
EMB-V-BA-e-1321
Page 39

39
13.2 Menu overview
Data transfer mode (see
PR
Data output via remote control
commands (see chapter 14)
Data output by pressing the
PRINT key (see chapter 14)
Continuous data output (see
chapter 14)
19200
9600*
4800
2400
1200
3 min without changing load ON
3 min without changing load OFF
on*
On
off
Off
50.000
100.000
150.000
200.000*
SIo*
slow
Hr.
standard
FSt
fast
no*
no
yes
yes
Description of function Function Parameter
s
chapter 13.4)
rE CR*
AU PC
Baud rate
bAUd
(see chapter 13.4).
Auto off
(battery operation), see
AF
on*
chap. 6.4
off
Auto Zero
tr
(see chapter 13.3)
Description of options
Automatic switch-off function after
Automatic switch-off function after
Select the adjustment
weight
Filter (See chapter 13.3)
For adapting to the
ambient conditions.
Reset to factory setting
(see chap. 13.3)
* = default setting
CAL
FiltEr
rSt
slow / insensible
fast/sensitive
EMB-V-BA-e-1321
Page 40

40
13.3 Description of individual menu ite m s
Dosing and
Tl
The Auto-Zero function is used to tare small variations in weight
In the event that small quantities are removed or added to the
ighing results can be
When apportioning involves small variations of weight, it is
ever is switched off, the weighing display
tr
on
Function activated
tr
off
Function deactivated
Zero-tracking
automatically.
material to be weighed, incorrect we
displayed due to the “stability compensation“. (Example: Slowly
draining fluids from a container on the balance).
advisable to switch off this function.
If Zero-Tracking how
becomes more busy.
Keep pressed in the weighing mode until [Pr] is
displayed.
Press repeatedly until "tr" is displayed.
Acknowledge using , the current setting is displayed.
Select desired settings by .
Acknowledge selection by .
EMB-V-BA-e-1321
Page 41

41
Selection
The adjustment weight can be selected out of four (CAL1 / Cal 2)
quality weighing results in the sense of the
measuring technology, it is recommended to select the nominal
With the filter settings, the scale can be tailored to the needs of
SIo*
Hr.
FSt
adjustment
weight
predetermined nominal values (ca. 1/4; 1/2; 3/4; Max). In order to
achieve high-
value as high as possible
Keep pressed in the weighing mode until [Pr] is
displayed.
Press repeatedly until „CAL“ will be displayed.
Acknowledge using , the current setting is displayed.
Select desired setting by .
Acknowledge selection by .
Filter
the specific applications or environmental conditions.
Keep pressed in the weighing mode until [Pr] is
displayed.
Press repeatedly until "FiltEr" is displayed.
Acknowledge using , the current setting is displayed.
Select desired setting by .
slow / insensible
fast/sensitive
Acknowledge selection by .
EMB-V-BA-e-1321
Page 42
42
Reset to factory
RST�
This function resets all balance settings to factory setting.
rSt
yes
Balance will be reset to factory setting.
rSt
no
The balance keeps its individual setting
setting
Keep pressed in the weighing mode until [Pr] is
displayed.
Press repeatedly until "rSt" is displayed.
Acknowledge using , the current setting is displayed.
Select desired setting by .
Acknowledge selection by . The balance returns to
weighing mode.
EMB-V-BA-e-1321
Page 43

43
13.4 Interface parameters
Data transfer
PR�
AU PC
Baud rate
PR�
BAUD�
The baud rate defines the transfer speed vie the interface,
mode
Keep pressed in the weighing mode until [Pr] is displayed.
Acknowledge using , the current setting is displayed.
Select desired setting by .
rE CR
Acknowledge selection by . The balance returns to
weighing mode.
1 Baud = 1 Bit/second.
Keep pressed in the weighing mode until [Pr] is displayed.
Press repeatedly until "bAUd" is displayed.
Data output via remote control commands
Data output using the PRINT key
Continuous data output
EMB-V-BA-e-1321
Acknowledge using , the current setting is displayed.
Use to select the desired settings
9600 4800 2400 1200 19200
Acknowledge selection by . The balance returns to
weighing mode.
Page 44
44
14 Data output RS 232 C
Data output is carried out via interface RS 232 C.
The following conditions must be met to provide successful communication between
the weighing balance and the printer.
• Use a suitable cable to connect the weighing balance to the interface of the
printer/PC.
Faultless operation requires an adequate KERN interface cable (optional).
• Communication parameters (e.g. baud rate) of the scale and printer must
match.
1. Technical data
• 8-bit AS CII Code
• 1 start bit, 8 data bits, 1 stop bit, no parity bit
• Baud rate selectable at 1200, 2400, 4800, 9600 and 19200 Baud
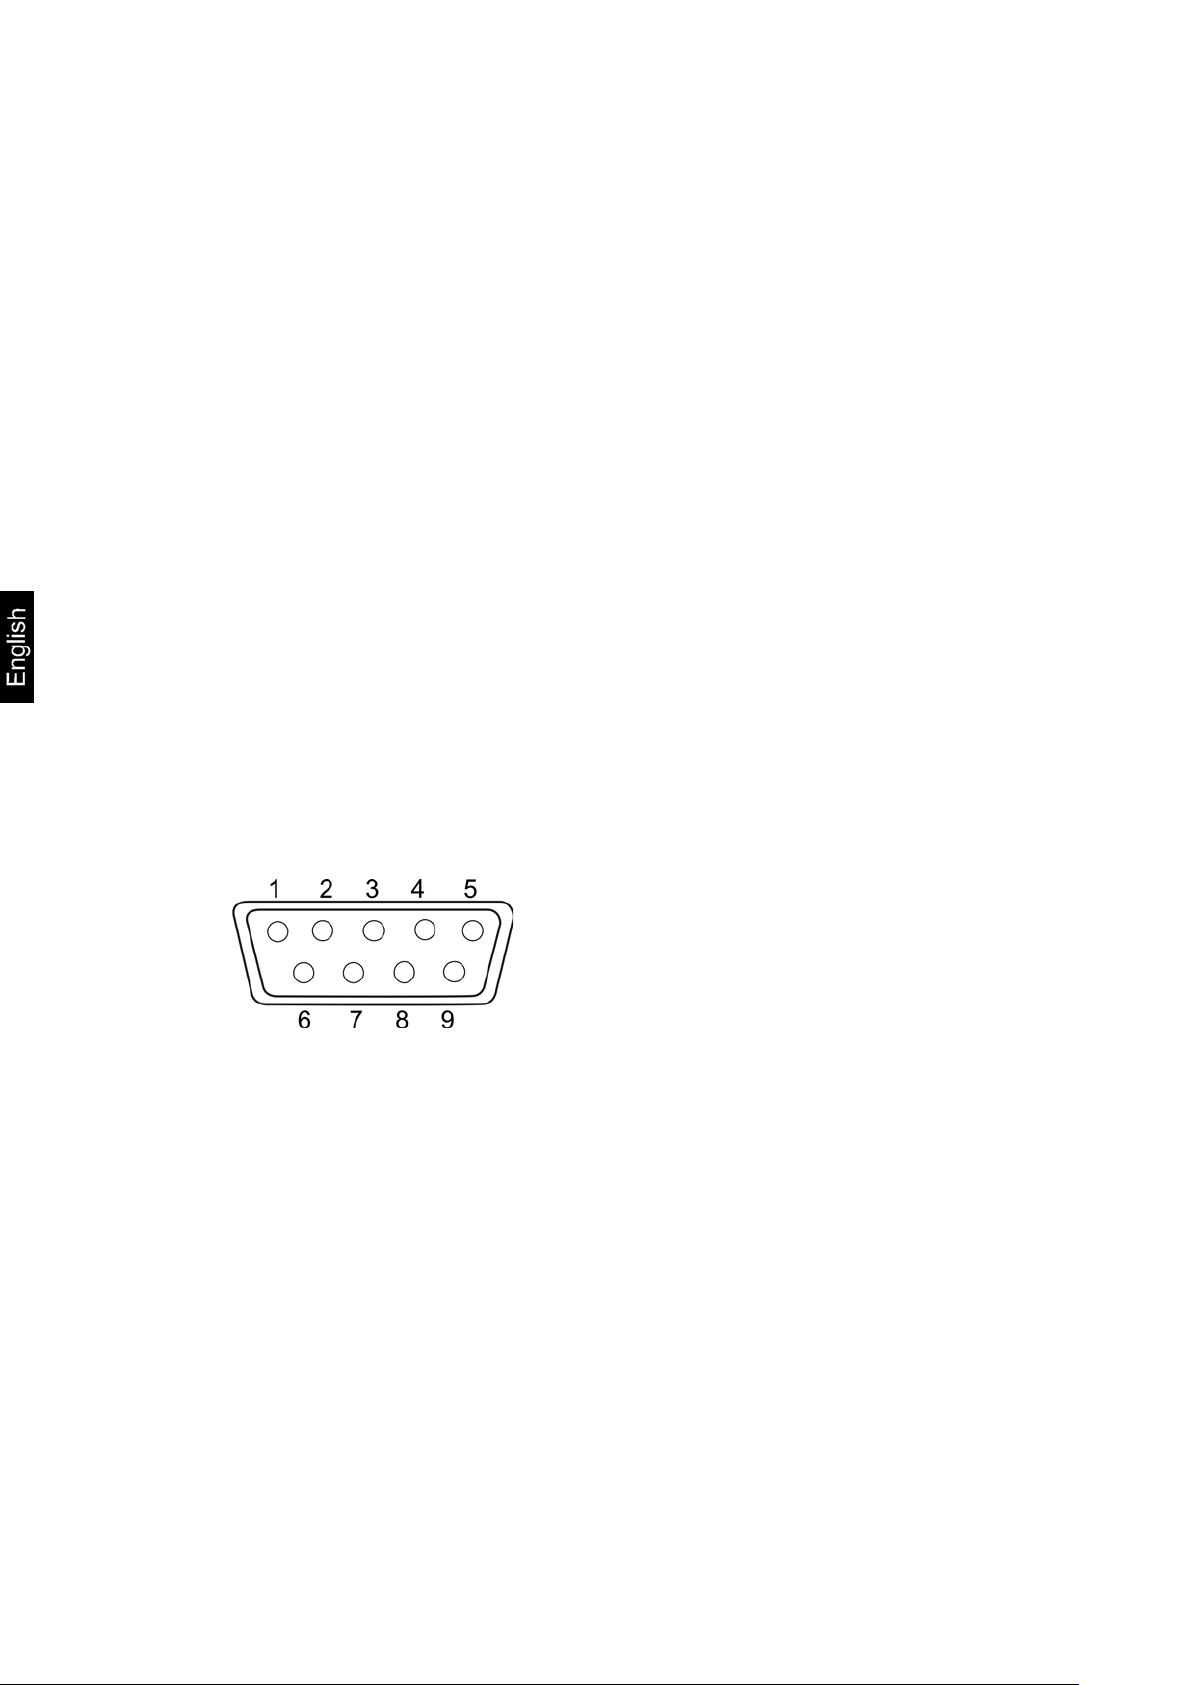
• Miniature plug-in necessary (9 pole D-Sub)
2. Pin allocation of balance output bushing:
Front view:
Pin 2: Transmit data
Pin 3: Receive data
Pin 5: Signal ground
EMB-V-BA-e-1321
Page 45

45
3. Explanation of the data transfer
s
Function:
Stable weighing value for the weight is sent via the RS232
interface
w
Function:
Weighing value for the weight (stable or unstable) is sent
via the RS232 interface
t
Function:
No data are sent, the balance carries out the tare function.
1 2 3 4 5 6 7 8 9
10
11
12
13
14
15
16
17
18
M
S
N1
N2
N3
N4
N5
N6
N7
N8
N9
N10
B
U1
U2
U3
CR
LF
1 2 3 4 5 6 7 8 9
10
11
12
13
14
15
16
17
18
B
B
B
B
B
B
B
B
B
B
B
E
r
r
o
r
CR
LF
1 2 3 4 5 6 7 8 9
10
11
12
13
14
15
16
17
18
M S N1
N2
N3
N4
N5
N6
N7
N8
N9
N10
B
B
B
B
CR
LF
1 2 3 4 5 6 7 8 9
10
11
12
13
14
15
16
17
18
M
S
N1
N2
N3
N4
N5
N6
N7
N8
N9
N10
B
U1
U2
U3
CR
LF
1 2 3 4 5 6 7 8 9
10
11
12
13
14
15
16
17
18
B
B
B
B
B
B
B
B
B
B
B
E
r
r
o
r
CR
LF
1 2 3 4 5 6 7 8 9
10
11
12
13
14
15
16
17
18
M
S
N1
N2
N3
N4
N5
N6
N7
N8
N9
N10
B
B
B
B
CR
LF
rE Cr:
PRINT key
Press the PRINT key, at stable weight is transferred.
Remote control commands
The remote control commands s/w/t are sent from the remote control unit to the
balance as ASCII code. After the balance having received the s/w/t commands, it will
send the following data.
Take into account that the following remote control commands must be sent without
a subsequent CR LF.
a. Format for stable values
b. Format in case of fault
c. Format for unstable values
AU PC:
The weighing values are sent automatically and continuously, no matter if the value
is stable or unstable.
d. Format for stable values
e. Format in case of fault
f. Format for unstable values
EMB-V-BA-e-1321
Page 46

46
Symbols
Before any maintenance, cleaning and repair work disconnect the
appliance from the operating voltage.
M Blank or M
S Space character or negative sign (-)
N1 … N10 10 numeric ASCII codes for weight values including decimal places or
blanks
U1 … U3 3 ASCII codes for weighing unit pcs. / % / or blank
B Space
E, o, r ASCII code or “E, o, r”
CR Carriage Return
LF (Line Feed)
15 Service, mai ntenance, di sposal
15.1 Clean
Please do not use aggressive cleaning agents (solvents or similar agents), but a
cloth dampened with mild soap suds. Take care that the device is not penetrated by
fluids and polish it with a dry soft cloth.
Loose residue sample/powder can be removed carefully with a brush or manual
vacuum cleaner.
Spilled weighing goods m ust be removed immediately.
15.2 Service, maintenance
The appliance may only be opened by trained service technicians who are
authorized by KERN.
Ensure that the balance is regularly calibrated, see chap. Testing instruments
control.
15.3 Disposal
Disposal of packaging and appliance must be carried out by operator
according to valid national or regional law of the location where the appliance
EMB-V-BA-e-1321
Page 47

47
16 Instant help
• Battery is inserted incorrectly or is empty.
• No batteries inserted.
The displayed weight is permanently
In case of an error in the program process, briefly turn off the balance and
disconnect from power supply. The weighing process must then be restarted from
the beginning.
Help:
Fault Possible cause
The displayed weight does not glow.
changing
The weighing value is obviously
• The balance is not switched on.
• The mains supply connection has been
interrupted (mains cable not plugged
in/faulty).
• Power supply interrupted.
• Draught/air movement
• Table/floor vibrations
• The weighing plate is in contact with
foreign matter.
• Electromagnetic fields / static charging
(choose different location/switch off
interfering device if possible)
• The display of the balance is not at zero
wrong
Should other error messages occur, switch balance off and then on again. If the error
message remains inform manufacturer.
EMB-V-BA-e-1321
• Adjustment is no longer correct.
• The balance is on an uneven surface.
• Great fluctuations in temperature.
• Electromagnetic fields / static charging
(choose different location/switch off
interfering device if possible)
Page 48

48
17 Decl a ration of -Conformity
KERN & Sohn GmbH
D-72322 Balingen-Frommern
E-Mail: info@kern-sohn.de
Tel: 0049-[0]7433- 9933-0
Internet: www.kern-sohn.de
D
Konformitätserklärung
Wir erk lären hiermit, dass das Produkt, auf das sich diese Erk lärung bezieht,
mit den nachstehenden Normen übereinstimmt.
GB
Declaration of
conformity
We hereby declare that the product to which this declaration refers conf orms
with the following standards.
CZ
Prohlášení o
shode
Tímto prohlašujem e, že výrobek, kterého se toto prohlášení týká, je v souladu
s níže uvedenými normami.
E
Declaración de
conformidad
Manifestamos en la presente que el producto al que se refiere esta
declaración está de acuerdo con las normas siguientes
F
Déclaration de
conformité
Nous déclarons avec cela responsabilité que le produit, auquel se rapporte la
présente déclaration, est conforme aux normes citées ci-après.
I
Dichiarazione di
conformitá
Dichiariamo con ciò che il prodotto al quale la presente dichiarazione si
riferisce è conforme alle norme di seguito citate.
NL
Conformiteitverklaring
Wij verklaren hiermede dat het product, waarop deze verklaring betrekking
heeft, met de hierna vermelde normen overeenstemt.
P
Declaração de
conformidade
Declaramos por meio da presente que o produto no qual se refere esta
declaração, corresponde às normas seguintes.
PL
Deklaracja
zgodności
Niniejszym oświadczamy, że produkt, którego niniejsze oświadczenie dotyczy,
jest zgodny z poniższymi normami.
RUS
Заявление о
соответствии
Мы заявляем, что продукт, к которому относится данная декларация,
соответствует перечисленным ниже нормам.
EU Directive
Standards
EN 61000-3-3: 2008
2006/95/EC
EN 60950-1:2006+A11: 2009
Signature
Datum
27.03.2013
Ort der Ausstellung
Place of issue
72336 Balingen
Albert Sauter
KERN & Sohn GmbH
Geschäftsführer
Managing director
KERN & Sohn GmbH, Ziegelei 1, D-72336 Balingen, Tel. +49-[0]7433/9933-0
Fax +49-[0]7433/9933-149, E-Mail: info@kern-sohn.com, Internet: www.kern-sohn.com
Postfach 4052
Fax: 0049-[0]7433-9933-149
Declaration of -Conformity
EG-Konformitätserklärung EC-Declaration of -Conformity
Déclaration de conformité EC-Declaración de Confor m i dad
ECEC-Dichiarazione di conformit à EC-Conformiteitverklaring
EC- Declaração de conformidade EC- Prohlášení o shode
EC-Deklaracja zgodności EC-Заявление о соответствии
Electronic Balan ce: KERN E M B-V
2004/108/EC EN 61326-1: 2006
EN 61326-2-2: 2006
EN 61000-3-2: 2006
Date
Signatur
EMB-V-BA-e-1321
 Loading...