

Page 1

E
KERN 572/KB/DS
Version 4.6
Operating Instructions
Electronic Precision and Platform Balances
Contents:
1 TECHNICAL DATA .............................................................................................................................................. 22
1.1
KERN 572 ....................................................................................................................................................... 22
1.2 KERN KB........................................................................................................................................................ 23
1.3 KERN DS ........................................................................................................................................................24
2 DECLARATION OF CONFORMITY .................................................................................................................25
3 INSTALLATION .................................................................................................................................................... 26
3.1 U
NPACKING
...................................................................................................................................................... 26
3.2
P
OWER SUPPLY/MAINS OPERATION
.................................................................................................................. 26
3.3 D
ESCRIPTION OF KEYBOARD FUNCTIONS
.......................................................................................................... 26
3.4 D
ESCRIPTION OF DISPLAY PROMPTS
.................................................................................................................. 27
4 OPERATION........................................................................................................................................................... 27
4.1 T
URN THE BALANCE ON AND OFF
...................................................................................................................... 27
4.2 A
DJUSTING
(CAL)............................................................................................................................................ 27
4.2.1 Adjustment of non verifiable instruments.................................................................................................... 27
4.3 S
ELECTING UNITS: G, KG, OZ, OZT, DWT
, GN, IB, CT........................................................................................ 28
4.3.1 Using the variable factor ............................................................................................................................29
4.4 T
ARE
................................................................................................................................................................ 29
4.5 W
EIGHING
........................................................................................................................................................ 29
4.6 P
IECE COUNTING
............................................................................................................................................... 30
4.7 P
ERCENT DETERMINATION
................................................................................................................................31
4.8 NET-
TOTAL WEIGHING
...................................................................................................................................... 32
4.9 P
RINTOUT OF WEIGHING RESULTS
..................................................................................................................... 32
4.10 T
HE
MODE-P
ROGRAM
..................................................................................................................................... 33
4.10.1 The CLEAR function............................................................................................................................... 33
4.10.2 The Autotare setting ............................................................................................................................... 33
4.10.3 The Enumerator......................................................................................................................................34
4.10.4 The "Fast" setting for fast weighing ....................................................................................................... 34
4.10.5 Auto-off...................................................................................................................................................35
5 INTERFACE RS 232 C .......................................................................................................................................... 35
5.1 T
ECHNICAL DATA
............................................................................................................................................. 35
5.2 D
ESCRIPTION OF THE JACK
............................................................................................................................... 35
5.3 B
AUDRATE
....................................................................................................................................................... 36
5.4 RS 232 C D
ATA OUTPUT VIA INTERFACE
RS 232 C ......................................................................................... 36
5.4.1 General information.................................................................................................................................... 36
5.4.2 Data output via PRINT-Key........................................................................................................................ 36
5.4.3 AUTOPRINT ............................................................................................................................................... 36
5.4.4 AUTOPRINT PC......................................................................................................................................... 37
5.4.5 Remote Control:.......................................................................................................................................... 37
5.4.6 Description of the data transfer:.................................................................................................................37
6 OPTIONS................................................................................................................................................................. 38
6.1 P
RINTER
............................................................................................................................................................ 38
7
IMPORTANT NOTICE.......................................................................................................................................... 38
8 MINOR BREAKDOWNS....................................................................................................................................... 39
572/KB/DS-BA-defsi-0246 21
Page 2

1 Technical data
1.1 KERN 572
KERN 572-33 572-35 572-45 572-49 572-57
Readout 0,01 g 0,01 g 0,1 g 0,1 g 0,2 g
Weighing range 650 g 810 g 6.500 g 10.100 g 16.100 g
Taring range
(subtractive)
650 g 810 g 6.500 g 10.100 g 16.100 g
Reproducibility 0,01 g 0,01 g 0,1 g 0,1 g 0,2 g
Linearity ±0,02 g ±0,03 g ±0,2 g ±0,3 g ±1 g
Minimum weight for
counting parts
0,03 g 0,03 g 0,3 g 0,3 g 0,6 g
Adjusting weight
(class M1)
200 g 500 g 2.000 g 5.000g 5.000 g
Stabilisation time
(typical)
2 sec.
Ambient temperature +10 °C ... + 40 °C
Casing
(W x H x D) mm
180 x 310 x 60
Weighing plate mm Ø 150 Ø 150 160 x 200
Net weight kg 4
22
572/KB/DS-BA-defsi-0246
Page 3

1.2 KERN KB
KERN KB500-2 KB5000-1
Readout 0,01 g 0,1 g
Weighing range 510 g 5.100 g
Taring range (subtractive) 510 g 5.100 g
Reproducibility 0,01 g 0,1 g
Linearity ±0,03 g ±0,3 g
Minimum weight for counting
parts
0,03 g 0,3 g
Adjusting weight (class M1) 200 g 1.000 g
Stabilisation time (typical) 3 sec.
Ambient temperature +10 °C ... + 40 °C
Casing (W x H x D) mm 165 x 230 x 80
Weighing plate mm 130 x 130 150 x 170
Net weight kg 1,8 2,7
Data interface yes
572/KB/DS-BA-defsi-0246 23
Page 4

1.3 KERN DS
KERN DS6K0.1 DS15K0.2 DS36K0.5 DS65K0.1 DS120K2
Readout 0,1 g 0,2 g 0,5 g 1g 2g
Weighing range 6.500 g 16.100 g 36.100 g 65.000g 120.000g
Taring range
(subtractive)
6.500 g 16.100 g 36.100 g 65.000g 120.000g
Reproducibility 0,1 g 0,2 g 0,5 g 1g 2g
Linearity ± 0,3 g ± 0,6 g ± 1,5 g ± 3 g
± 6 g
Minimum weight for
counting parts
0,3 g 0,6 g 1,5 g 3g 6g
Adjusting weight without
Stabilisation time
(typical)
3 sec.
Ambient
temperature
+10 °C ... + 40 °C
Casing (W x H x D)
mm
Platform 310 x 310 x 70
Terminal 200 x 100 x 55
Platform 350 x 450 x 115
Terminal 200 x 100 x 55
Net weight kg 11 12,5
Data interface yes
24
572/KB/DS-BA-defsi-0246
Page 5

2 Declaration of conformity
Declaration of conformity
The electronic precision and platform balances
Type: KERN 572-33
KERN 572-35
KERN 572-45
KERN 572-49
KERN 572-57
KERN KB500-2
KERN KB5000-1
KERN DS6K0.1
KERN DS15K0.2
KERN DS36K0.5
KERN DS65K1
KERN DS120K2
Correspond to the production model described in the EC type-approval certificate
and to the requirements of the following EC directives:
EC EMC directive Version 89/336/ECC
Applied harmonised norms, in particular
EN 61326: 1997
+ A1: 1998
EN 61000-3-2: 1995
+ A1/A2 1998
+ A14 2000
EN 61000-3-3: 1995
If a change is made to the above mentioned appliances without consulting
KERN
this declaration will become invalid.
Date: 07/01/2002 Signature:
Gottl. KERN & Sohn GmbH
Management
Gottl. KERN & Sohn GmbH, Ziegelei 1, D-72322 Balingen-Frommern, Tel. +49-07433/9933-0, Fax +49-07433/9933-149
572/KB/DS-BA-defsi-0246 25
Page 6

3 Installation
3.1 Unpacking
Take the balance carefully out of the packing. Take off plastic wrap. Install the balance at
the place intended for use.
Please retain all items of packaging in case of any future transit requirements. Check the
unit immediately for any visible transit damage and check that all accessories are included.
Standard accessories:
572/KB DS
- Balance with a weighing plate of highgrade steel
- Adapter
- Adjusting weight
- Operating instructions
- Weighing bridge
- Analyse instrument
- Adapter
- Operating instructions
3.2 Power supply/Mains operation
Compare the voltage at the mains adapter with the mains voltage of the supply socket! The
balance may only be connected to the mains unit provided. The supply socket must be
earthed in accordance with electrical codes. Testing is only permitted by approved
specialist electrical companies.
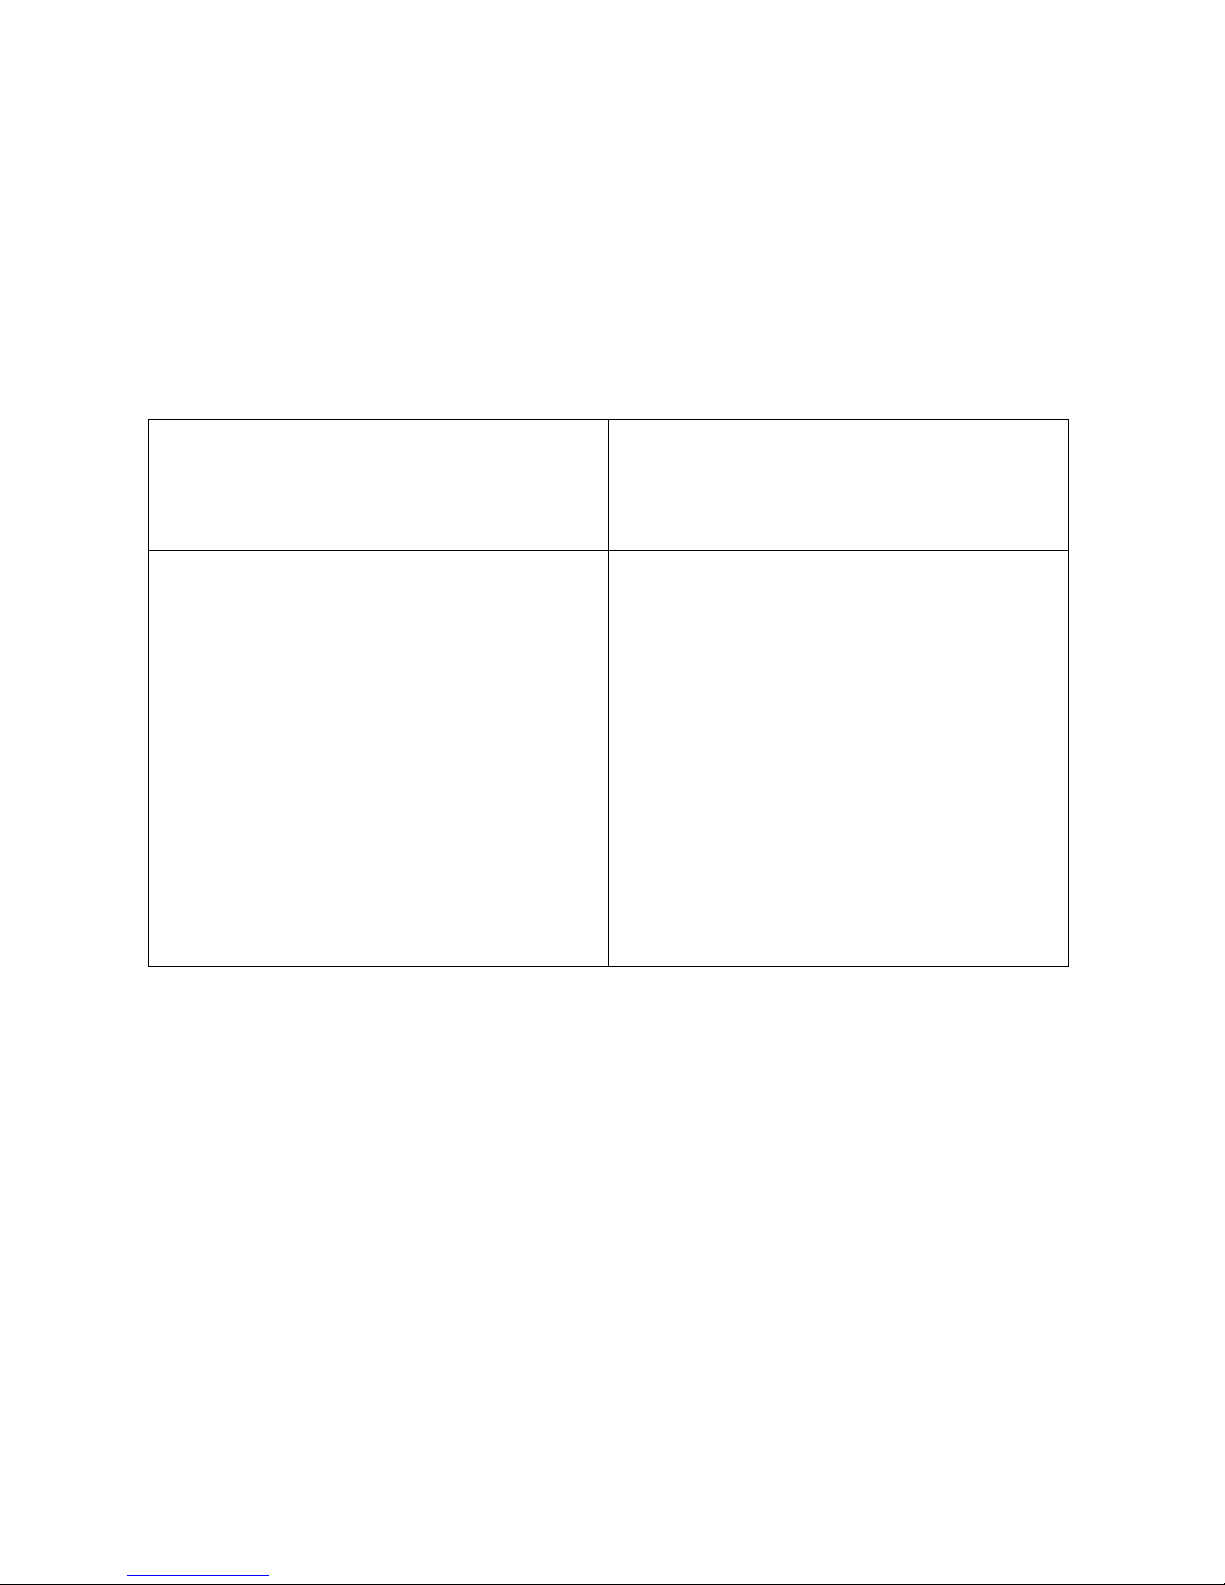
3.3 Description of keyboard functions
Key Function
ON/OFF Switch balance on and off
PRINT Print a weighing result (when printer connected)
REF
-
Determine the set reference (in counting mode resp. Percent
mode).
MODE 1. "CAL" adjusting
2. Printer
-->
2400 Bd, 4800 Bd, 9600 Bd, 19200 Bd. Enumerator,
AUTOPRINT; AUTOPRINT PC.
3. "Count" parts counting
4. "%" Percent determination
5. Variable Factor
6. "Fast" (1 – 5)
7. "Autotare"
8. "Auto off" automatic shutoff
9. "Test" (for service only)
<-> g Switch pieces/percent to weight and back.
Net/Total Function
UNIT Unit Conversion + Variable Value
TARE Tare, set display to zero
YES Confirm in MODE programme/ Fast setting
NO Delete in MODE-programme/Fast setting
26
572/KB/DS-BA-defsi-0246
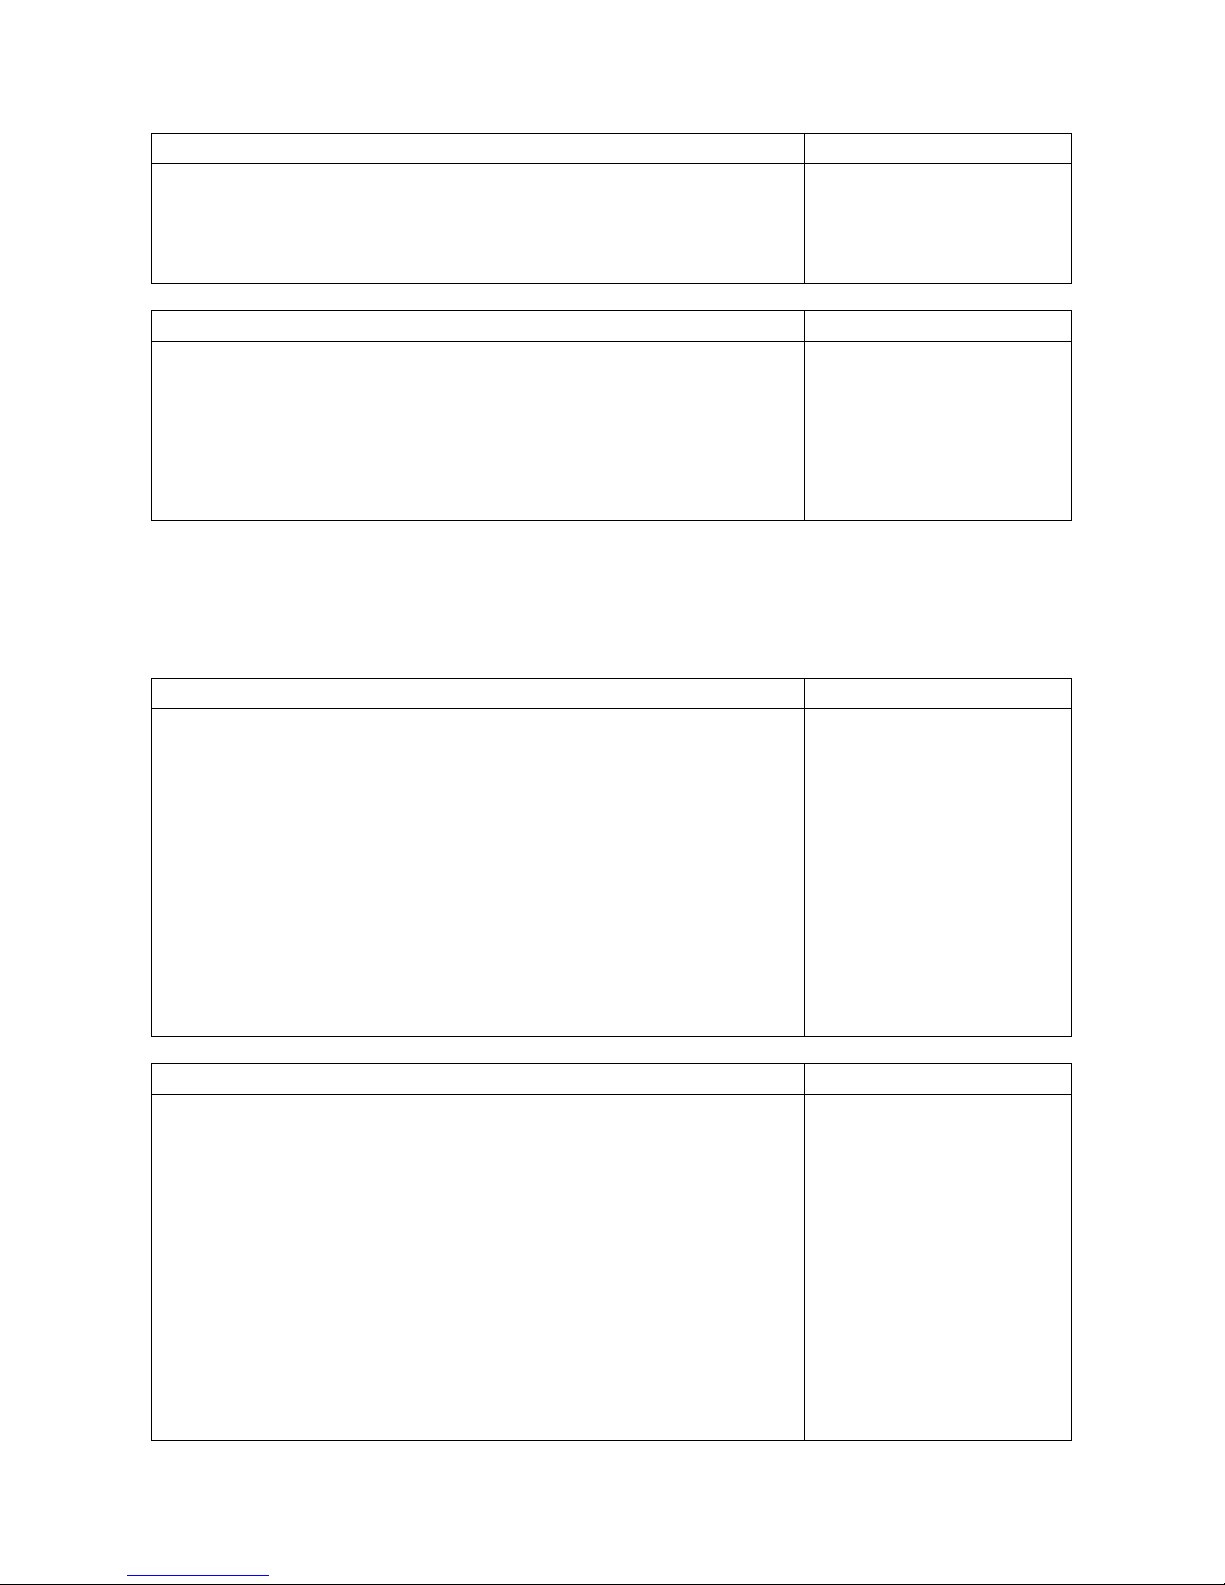
Page 7

3.4 Description of display prompts
Prompt Meaning
====
OVERLOAD
====
or
===================
Overload:
Weighing range exceeded
The display shows minus values
===================
Underload
<< Counting/percent mode: the parts weigh too light.
Opt Counting mode: The balance calculates automatically a better
reference.
X Confirmation sign for selected option in the MODE-program
4 Operation
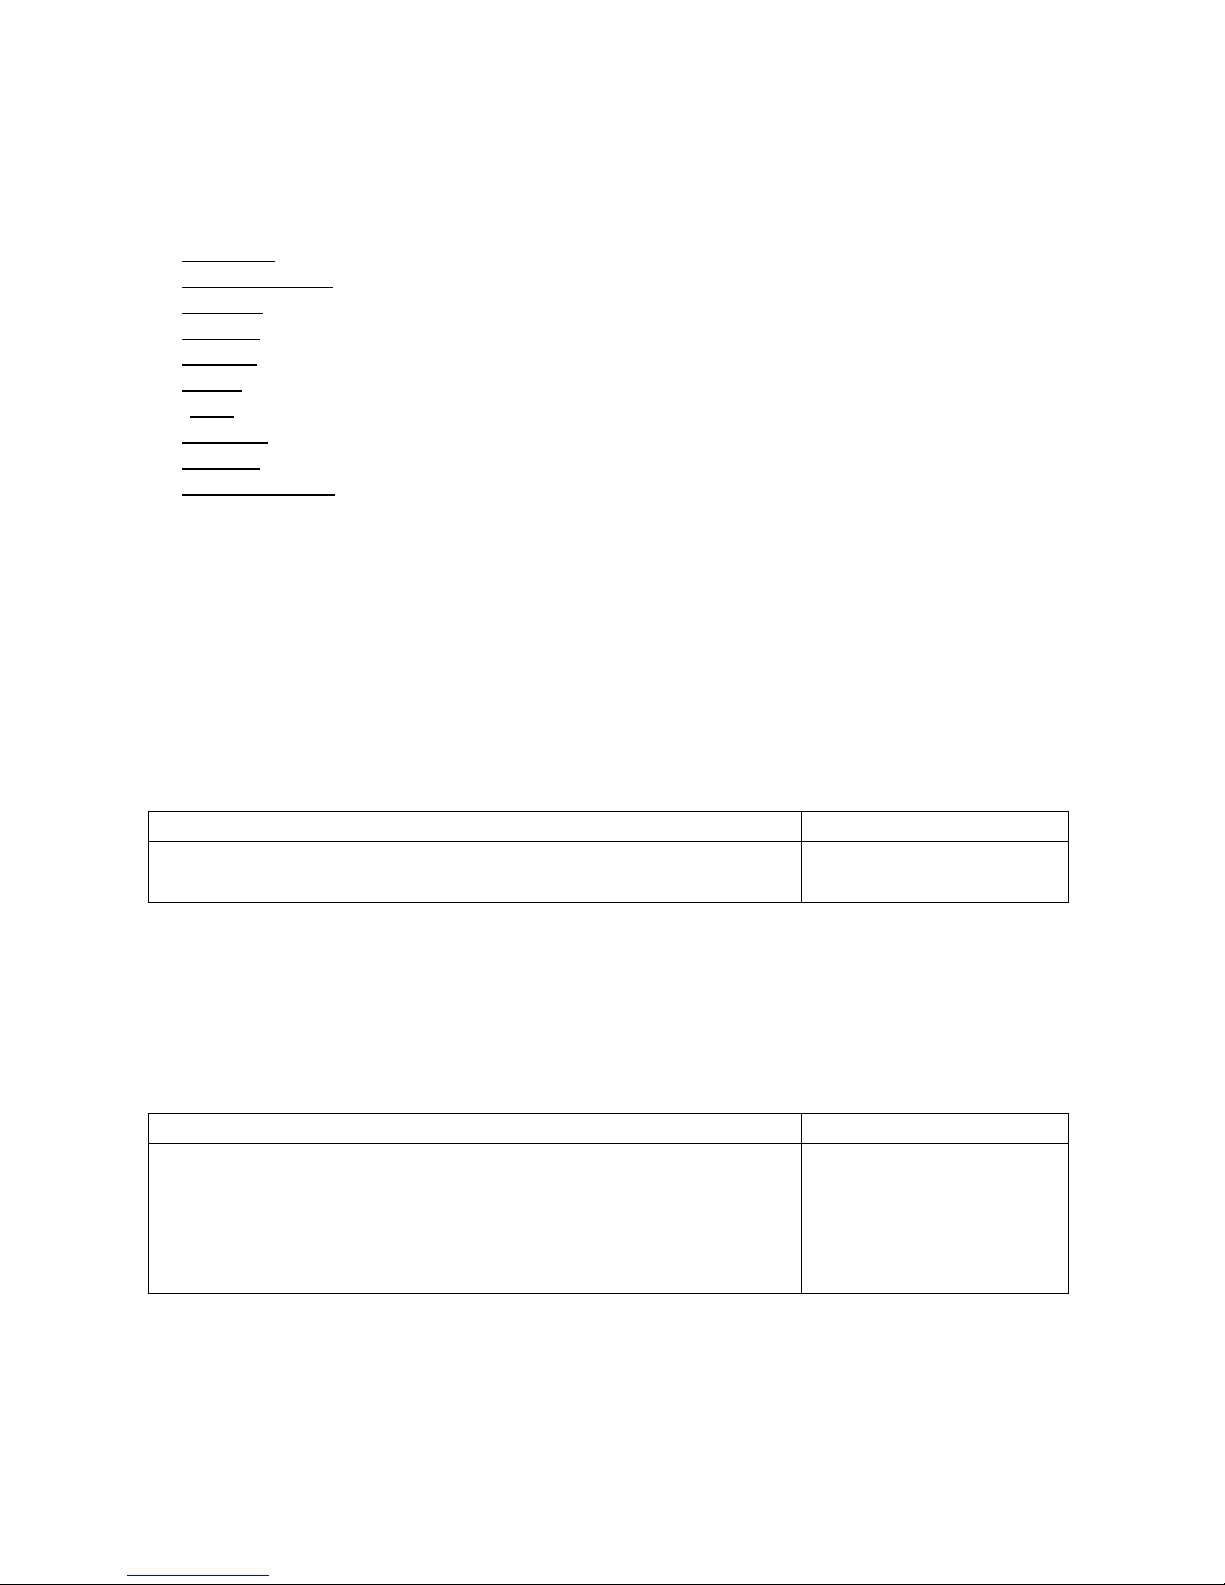
4.1 Turn the balance on and off
Turn the balance on and off Display
1. Press ON/OFF-key
2. The display indicates
3. The weighing range is indicated, e.g.:
4. The display indicates
5. and finally
All segments
- - -6000,0 g- - -
- - - P 7.40 - - -
- - - - - - - - - - - 0,0 g
4.2 Adjusting (CAL)
4.2.1 Adjustment of non verifiable instruments
Prior to first use, it is necessary to adjust the balance at the place intended for use.
The accuracy of the balance can be checked and adjusted at any time with an adjusting
weight. Take care of stable environmental conditions, see "Important Information". A
warming up time of 15 minutes is necessary.
Adjusting (CAL) Display
1. Press TARE-key to put the display to zero:
2. Press MODE-key, "CAL" appears:
3. Press YES-key t.
4. Wait until "PLACE CAL.-WEIGHT" appears:
5. Place the adjusting weight on the weighing plate.
0,0 g
CAL?
CALIBRATION ZERO
PLACE CAL.-WEIGHT
CALIBRATION SPAN
Avoid any vibration of the balance!
6. Adjusting is finished with the steady display of the adjusting
weight, e.g.
500,0 g
Keep the adjusting weight near the balance for daily control of the balance’s accuracy.
572/KB/DS-BA-defsi-0246 27
Page 8
4.3 Selecting units: g, kg, oz, ozt, dwt, GN, Ib, ct
The non-metric units ounce (oz), troy ounce (ozt), tael (tael), pennyweight (dwt), grain (GN),
pound (Ib) and carat (ct) are usual in some countries beside of the metric units gram (g),
kilogram (kg)
The UNIT-key allows you to select one of the mentioned units. The new setting is
permanent and remains if you turn the balance off and on.
The following units are available within the individual models:
KERN 572-33
KERN 572-35
KERN KB400-2
KERN 572-45 KERN DS15K0.2
KERN 572-49 KERN DS36K0.5
KERN 572-57 KERN DS65K1
KERN KB5000-1 KERN DS120K2
KERN DS6K0.1
g
-
oz
ozt
*
dwt
gn
Ib
ct
g
kg
oz
ozt
*
dwt
-
Ib
-
* Variable value
The gram indication can be set again by repeated pressing the UNIT-Key (and not by
pressing the <->g-key).
28
572/KB/DS-BA-defsi-0246
Page 9

4.3.1 Using the variable factor
Example 1:
Entering the specific weight of liquids and solids, can be limited to the volume
by selecting“*“.
Example 2:
Entering a conversion factor for defined sheets of paper, can be limited to g/m²
or g/DINA3, DINA4, DINA5 by selecting „*“.
Setting the variable factor
Press the MODE key repeatedly until VARIABLE FACTOR? appears and confirm with
„YES“. 000.000 *? appears on the display (the first digit flashes). The value can be reduced
by pressing the „NO“ key and increased by pressing the „YES“ key. The digit to be set is
changed and the factor completed by pressing the „g“ key. Press „UNIT“ until * appears on
the display to select a new unit.
4.4 Tare
Tare Display
1. Place the tare cup on the weighing plate
2. Press the TARE-key:
The display indicates ZERO.
(weight)
------
0,0 g
Fill the weighing object into the cup, read out the weight. When pressing TARE upon the
terminated weighing operation 0,0 g appears in the display. The taring operation can be
repeated as often as you like, for instance when weighing in different components to a
mixture. The limit will be reached when the total weighing range is used.
Having removed the tare cup the total weight appears as negative value.
4.5 Weighing
Weighing in Display
1. Place the cup on the weighing plate and tare.
2. Weigh in the sample and read off the weight.
0,0 g
126,5 g
Weighing out Display
1. Place full container on the weighing plate and tare.
2. The amount you remove is displayed with a negative sign.
0,0 g
- 10,0 g
* Formula weighing –
weigh in several components:
For weighing in several components into the same cup, press TARE to start every
weighing at zero.
* Plus-Minus-Weighing– compare objects with a reference piece (nominal weight).
572/KB/DS-BA-defsi-0246 29
Page 10
Determine nominal weight Display
1. Place nominal weight (e.g. 100 g) on the pan.
2. Press TARE-key: the display indicates zero.
3. Remove nominal weight. It is displayed with a negative sign.
100,0 g
0,0 g
- 100,0 g
Determine deviations Display
1. Place sample to be compared with the nominal weight on
the pan.
2. If the object is heavier (e.g. 104,5 g) the deviation is
displayed with a positive sign.
3. If the object is lighter (e.g. 97,5 g) the deviation is displayed
with a negative sign.
4,5 g
-2,5 g
4.6 Piece counting
In order to select the parts counting mode the following keys have to be pressed:
Selection of the reference piece quantity Display
1. Press MODE-key, "CAL? " appears.
2. Press MODE-key, "PRINTER?" appears.
3. Press MODE-key, "Count?" appears.
4. Confirm with YES-key
5. "REF=1" appears.
The desired reference can be selected by the MODE-key.
6. The following references can be selected: 1,5,10 and 20
pieces.
=> The desired reference to be confirmed by the
YES-key.
7. Return with the TARE-key to the weighing mode.
CAL?
PRINTER?
Count?
Count?x
REF=1?
0,0 g
Counting and determine reference (e.g. reference = 10 pcs.) Display
1. Press TARE-key to set the display to zero.
2. Place 10 pieces on the weighing plate.
3. Press REF-key. The balance is ready to count.
The counting accuracy can be improved by the following
proceedings:
4. Double the weighing object: Add (about) another 10 pieces.
The balance calculates the new reference and displays the
new quantity, wait for shortly flashing "opt".
5. Double again (see point 4)
6. The balance is ready to count.
0,0 g
(Weight)
10 PCS
opt 20 PCS
opt 40 PCS
30
572/KB/DS-BA-defsi-0246
Page 11

Hints:
* Any pieces added improve the reference and thus optimise the counting accuracy.
Maximum reference quantity 150 pieces.
* To count very tiny pieces or pieces of relevant varying individual weight, it is
recommended to select a high reference quantity.
* Using cups, tare them before switching over to the COUNTING MODE.
* The determined reference remains active until:
-
the balance is disconnected from the mains.
-
you determine a new reference pressing the REF-key
-
you press the REF-key when the weighing plate is empty.
-
you press the MODE-key, "CLEAR? " appears and you confirm by pressing the
YES-key.
What is the piece’s weight in grams?
* Press <->g-key to switch over the display between piece and weight display. The
former reference remains still active.
4.7 Percent determination
In order to select the percent determination the following keys have to be pressed:
Percent determination Display
1. Press MODE-key. "CAL? " appears:
2. Press MODE-key. "PRINTER? " appears:
3. Press MODE-key. "COUNT? " appears:
4. Press MODE-key. "%?" appears.
5. Confirm with YES-key.
6. Return with the TARE-key to the weighing mode.
CAL?
PRINTER?
COUNT?
%?
%?x
0,0g
Determine reference 100 % Display
1. Press TARE-key to put the display to zero.
2. Place a weight on the weighing plate, e.g. 75 g.
3. Press REF-key. 100 % appears:
75 g are corresponding to 100 %
0,0 g
75,0 g
100 %
Difference percent Display
1. Determine reference 100 % (see page 34).
2. Press REF-key, 0 % D appears:
The percentile difference to the reference weight is
displayed
- 100 % D
Important information:
•
The reference 100 % is active until:
-
the balance is disconnected from the mains.
-
the MODE-key is pressed, "CLEAR?" appears and you confirm by pressing
the YES-key
572/KB/DS-BA-defsi-0246 31
Page 12

•
What is the piece’s weight in grams?
-
Press the <->-g-key to switch over the display between percent and weight
display. The former reference 100 % remains still active.
4.8 Net-total weighing
Useful when a mixture of several components will be weighed in a tare cup, and finally the
sum weight of all components weighed in will be needed for control (net-total, i.e. without
the weight of the tare cup).
Net-total weighing Display
1. Put tare cup on the weighing plate,
confirm with TARE-key
2. Weigh in component I (for instance 50,0 g)
↔
tare with g-key
3. Weigh in component II (for instance 20,0 g)
↔
Press g-key
The total weight of component I and II will be indicated
↔
4. Tare with g-key
5. Etc. ...
0,0 g
50,0 g
NET 0,0 g
NET 20,0 g
SUM 70,0 g
NET 0,0 g
Return with the TARE-key to the weighing mode.
4.9 Printout of weighing results
The PRINT-key serves to print weighing results when a printer is connected. The printout
shows the weight in grams and also the number of parts when the COUNT-Mode is
selected or in percent when the percent mode is selected (see also section 4 Interface).
32
572/KB/DS-BA-defsi-0246
Page 13
4.10 The MODE-Program
The MODE-program can be run to make the following settings:
Adjusting
(see section 4.2.)
Printer settings
(see section 5 Interface)
Counter (parts counting see section 4.6.)
Percent
(see section 4.7.)
CLEAR
(clearance function)
"Fast"
-setting for fast weighing (1 – 5)
"Test
" – (for service only)
Autotare
setting (ON/OFF) to stabilise the balance in the area of zero point.
Auto off
automatic shut off after nearly 60 sec. When not in use.
Variable Faktor
Below the detailed description of the individual functions:
4.10.1 The CLEAR function
The CLEAR function serves to:
a) The return to the weighing mode from the percent mode and the parts counting mode.
b) Put the enumerator to zero.
c) Taring
CLEAR function Display
1. Press MODE-key
2. Press YES-key
CLEAR?
0,0 g
4.10.2 The Autotare setting
The Autotare setting serves to stabilise the zero point of the balance. Minor weight
variations in the zero are tared, the display remains on zero. The standard setting is:
"Autotare" on. The setting can be turned off e.g. for desiccation weighing.
Select/Deselect “Autotare"
Display
1. Press MODE-key repeatedly until display shows:
2. Press NO to deselect Autotare
Press YES to select Autotare
3. Press MODE-key repeatedly until the balance displays in
grams again, or press TARE-key.
Autotare?X
Autotare?
Autotare?X
0,0 g
572/KB/DS-BA-defsi-0246 33
Page 14

4.10.3 The Enumerator
The enumerator counts the weighing if a printer is connected. All printed weighing are
continuously enumerated.
Select/Deselect "Enumerator" Display
1. Press MODE-key repeatedly until display shows.
2. Press YES-key.
3. Press Mode-key repeatedly until the balance displays.
4. Press NO to deselect the enumerator.
Press YES to select the enumerator.
5. Press MODE-key repeatedly until the balance displays in
grams again, or press TARE-key.
Printer?
1200 Bd.
Numerator?
Numerator?
Numerator?X
0,0g
Reset the enumerator to 000:
Reset the "Enumerator"
1. Press MODE-key.
2. Press YES-key.
CLEAR?
0,0 g
4.10.4 The "Fast" setting for fast weighing
The balances can be adjusted to their location in stages from 1 – 5
Stage 1
= good location condition,
fast display
Stage 5
= poor location conditions,
slow display
Volumetric weighing requires a high display speed. This can be set using the “Fast”
option in the MODE programme.
Select/Deselect "Fast" Display
1. Press MODE-key repeatedly until display shows:
2. Increase Fast with the YES key, decrease Fast with the NO
key.
3. Press MODE-key repeatedly until the display shows grams
again, or press TARE-key.
Fast?X
Fast1
Fast5
0,0 g
34
572/KB/DS-BA-defsi-0246
Page 15
4.10.5 Auto-off
The Auto-off function turns off the balance after nearly 60 seconds when it is not used.
Activation of the Auto-off function:
Auto-off Waagenanzeige
1. Press MODE-key repeatedly until display shows:
2. Press YES to select Auto-off
3. Press NO to deselect Auto-off
4. Press MODE-key repeatedly until the balance displays in
grams again, or press TARE-key.
Auto-off?
Auto-off?X
Auto-off?
0,0 g
5 Interface RS 232 C
5.1 Technical Data
8-bit ASCII Code
1 start bit, 8 data bits, 1 stop bits, no parity bit
Baud rate adjustable to 600, 1200, 2400, 4800 and 9600 baud (default)
Miniature DIN plug is necessary type MP-371/C 7
When working with an interface correct operation is secured only if the corresponding
KERN-interface-cable (max. 2m) is used.
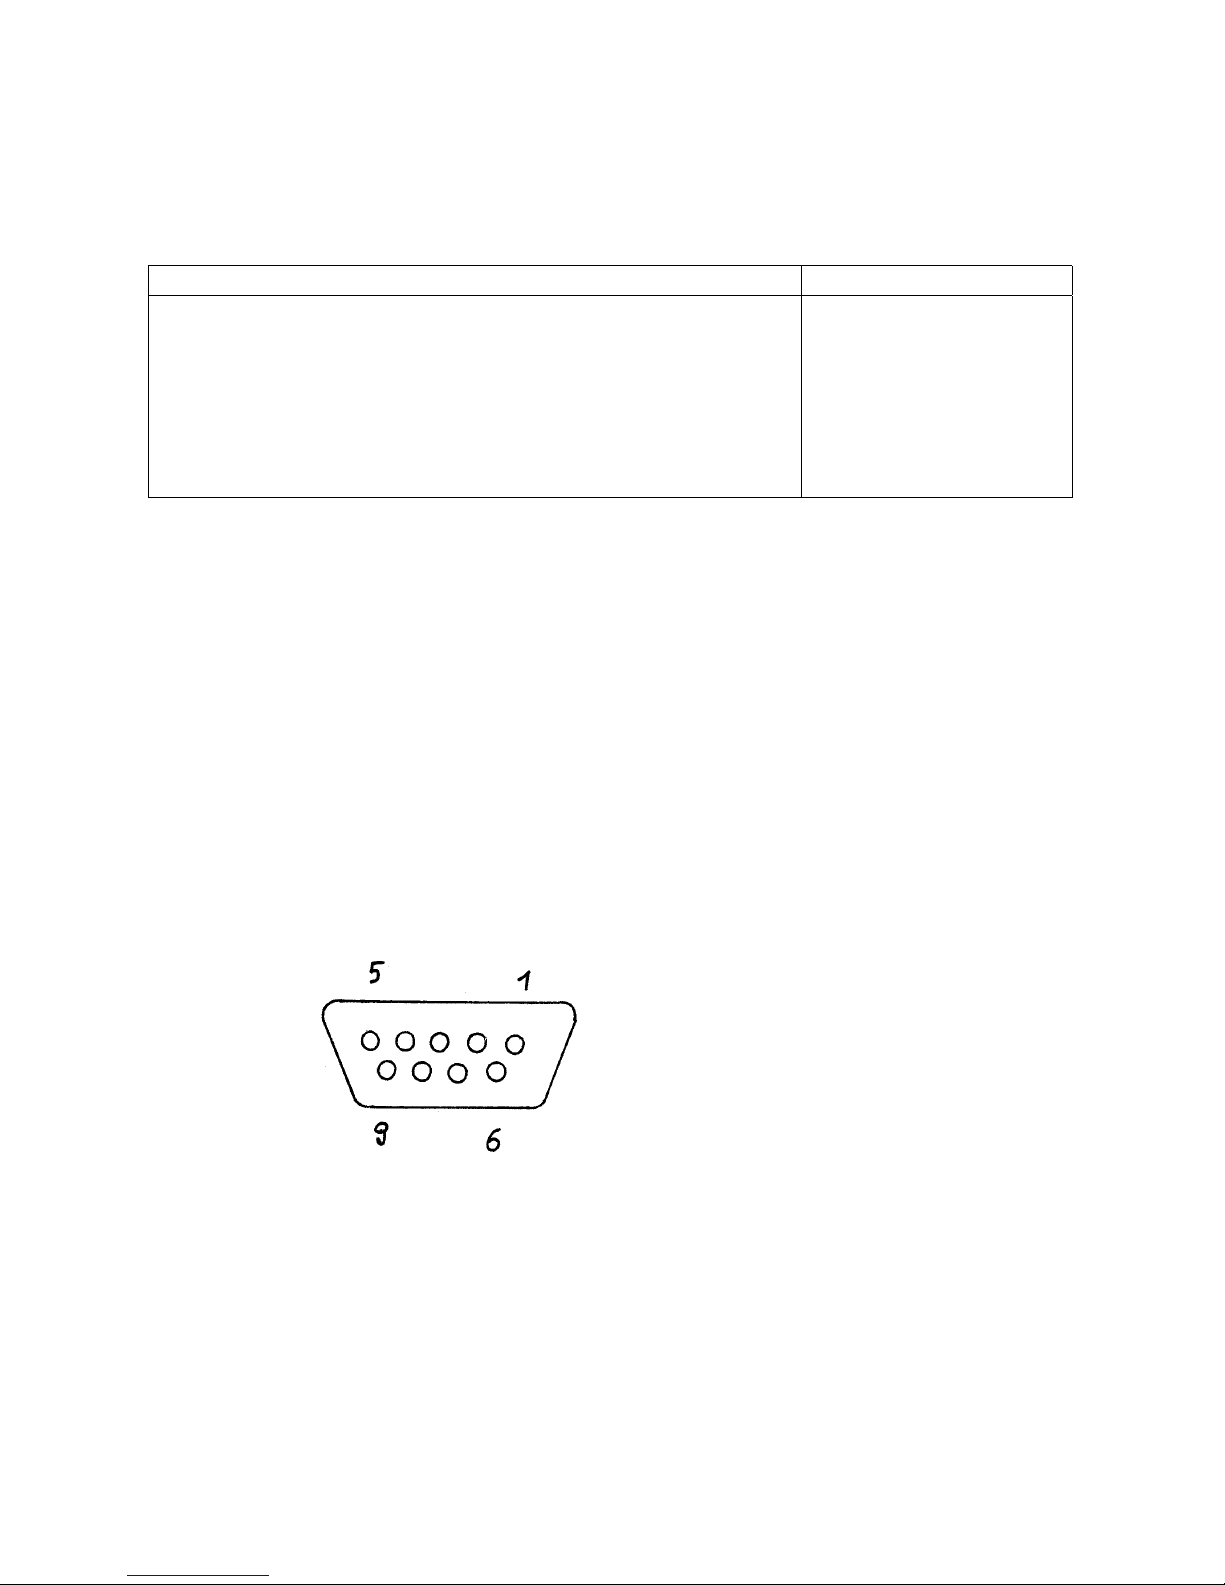
5.2 Description of the jack
Pin 2: transmit data
Pin 3: receive data
Pin 5: signal ground
572/KB/DS-BA-defsi-0246 35
Page 16

5.3 Baudrate
The Baud rate for the data transfer is adjusted with the MODE-key. The following example
demonstrates how to set the Baud rate 4800.
Select Baud rate Display
1. Press MODE-key repeatedly until "PRINTER" is displayed.
2. Press YES-key.
3. Press MODE-key repeatedly until the desired Baud rate
appears (for instance 4800 Baud).
4. Press YES-key to select 4800 Baud. The tick-mark (X)
confirms the new setting.
5. Press MODE-key repeatedly until the balance displays in
grams again, or press tare key.
PRINTER?
2400 Baud
4800 Baud
4800 Baud X
0,0 g
5.4 RS 232 C Data output via interface RS 232 C
5.4.1 General information
As a condition for the data transfer between the balance and a peripheral device (for
instance printer, PC ...) both devise have to be set on the same interface parameter (for
instance baud rate, parity ...).
There are 4 methods for the data output via RS 232 C
1. Data output via PRINT-key (see 5.4.2).
2. Data output, after having loaded the balance, by setting AUTOPRINT (see 5.4.3).
3. Continuous data output by setting AUTOPRINT PC (see 5.4.4).
4. Data output by transfer of remote controls (see 5.4.5)
5.4.2 Data output via PRINT-Key
The printing process can be released by the PRINT-key. In this case the settings
AUTOPRINT and AUTPRINT PC should be deselected.
5.4.3 AUTOPRINT
The setting AUTOPRINT is in the PRINTER-routine, and there it can be selected or
deselected. When AUTOPRINT is active the actual weighing value will be sent via the RS
232 interface when the balance has been unloaded and then loaded after having achieved
the stability.
36
572/KB/DS-BA-defsi-0246
Page 17

5.4.4 AUTOPRINT PC
The setting AUTPRINT PC is in the PRINTER-routine, and there it can be selected or
deselected. When AUTOPRINT PC is active the actual weighing values will be sent
continuously via the RS 232 interface.
5.4.5 Remote Control:
The following functions can be released by the remote controls that will be transferred as
ASCII signs to the balance.
t Tare.
w a weighing value (or unstable) is sent via RS 232 interface.
s a stable weighing value is sent via RS 232 interface.
If the balance receives the command w or s, it acts without printing delay.
5.4.6 Description of the data transfer:
Structure of each data transfer:
Without Numerator:
Bit-Nr. 1 2 3 4 5 6 7 8 9 10 11 12 13 14 15 16 17 18
B B B B B B B B 0
.
0 B g B B CR LF
B*
B*: = Blank or % in the range of zero point.
B, 0,
.
, g: = Blank or weighing value with unit, depending on the load on the
weighing plate.
CR: = Carriage Return
LF: = Line Feed
With Enumerator:
Bit.Nr. 1 2 3 4 5 6 7 8 9 10 11 12 13 14 15 16 17 18 19 20
N N N B* B B B B B B B 0
.
0 B G B B CR LF
N: = Enumerator
572/KB/DS-BA-defsi-0246 37
Page 18

6 Options
6.1 Printer
With the serial data output RS 232 a printer can be connected.
The printout shows the weight in grams. When the counting mode is selected the number of
pieces or the weight is printed.
When the percent mode is selected, the percentage or the weight will be printed.
Press The PRINT-key to print weighing results.
Select the enumerator to number the weighing continuously.
Turn off the balance or use the CLEAR function to Reset the enumerator to (000)
7
Important Notice
These electronic scales are a precision instrument. Electromagnetic fields can cause major
display discrepancies. The scales must then be repositioned away from electromagnetic
fields. All sources of environmental interference, such as drafts and vibrations, should be
avoided. Sudden changes of temperature should be avoided. The scales must be reset to
match changes in temperature.
The scales are not hermetically sealed, therefore avoid high humidity, steam and dust. Do
not bring liquids into direct contact with the scales, as these can penetrate into the
measuring mechanism. Cleaning material should only be dry or barely damp. Do not use
solvents as these can damage paintwork or other plastic parts. Remove damaged items
immediately from the scales.
The measuring mechanism will be stabilised by allowing the scales to warm up for a few
minutes after switching them on. Place items to be weighed carefully on the scales. Do not
place objects on the weighing platform for any period of time, apart from normal use.
Sudden shocks or overloading the scales beyond the maximum permitted weight should
absolutely be avoided, balance could be damaged.
In case of problems operating the weighing program, switch the scales briefly off and on.
The weighing set-up must then be restarted right from the beginning.
Never operate the scales in areas where there is a danger of explosion, the models in this
series are not protected against explosion.
Check the scales regularly against, known, external test weights.
Opening the scales or failing to use them in accordance with the written instructions
will invalidate the warranty.
Please keep all packaging material for possible return of the scales. Scales must only be
returned in their original packaging.
38
572/KB/DS-BA-defsi-0246
Page 19

8 Minor breakdowns
Trouble Possible causes
No indication - Balance is not turned on
- Mains connection does not function (cable not connected,
cable defective).
- Mains supply break down.
Weight indication is
changing permanently
-
Air movements.
-
Vibrations of the table or the floor
-
The pan is in contact with an alien element.
Weighing result is obviously
false
-
Balance has not been tared.
-
No adjusting has been done.
-
Temperature deviations.
When other error messages appear turn off the balance and on again. When the error
message still appears please contact the manufacturer.
572/KB/DS-BA-defsi-0246 39
 Loading...