

Page 1
KERN & Sohn GmbH
Ziegelei 1
D-72336 Balingen
E-Mail: info@kern-sohn.com
Service manual
Precision balances
KERN 572 / 573xxNM
Version 5.1
4/2009
GB
FCBxxB / FKB (M)
KBxxN(M) / DS
Tel: +49-[0]7433- 9933-0
Fax: +49-[0]7433-9933-149
Internet: www.kern-sohn.com
572-SH-e-0951
Page 2

GB
KERN 572 / 573xxNM / KBxxN(M)
DS / FCB
Version 5.1 4/2009
Service Manual
xxB / FKB (M)
Table of Contents
1 Basic Information .......................................................................................................3
2 Introduction................................................................................................................. 4
3 Keyboard Description ................................................................................................4
4 Mode – Menu...............................................................................................................5
5 Troubleshooting .........................................................................................................6
6 Adjustment..................................................................................................................7
6.1 Adjustment of non-verification balances.............................................................................7
6.2 Adjustment of verification balances (KERN 573-NM; KB-NM; FKB-M).............................7
7 Factory Menu .............................................................................................................. 8
Precision Balances
7.1 How to Enter the Factory Menu............................................................................................8
7.2 Display Contrast ....................................................................................................................8
7.3 Factory Adjustment ...............................................................................................................8
7.4 Automatic Linearity Adjustment...........................................................................................9
7.5 Manual Linearity Adjustment................................................................................................9
8 Electronics ................................................................................................................ 10
8.1 Explanation and Connection of Main PCB ........................................................................10
8.2 Layout of Main PCB.............................................................................................................11
2 572-SH-e-0951
Page 3

1 Basic Information
Grundlegende Hinweise
The device must be repaired only by trained specialist staff or personnel with
professional formation (such as a repair-specialist accredited by law
concerning verification).
The service manual is obligatory for repair work.
After repair, original conditions of the device have to be restored.
Only original spare parts should be used.
Instructions about conformity-evaluated scales
Repair must be carried only at 100% compliance with the type approval.
A violation of this specification will result in a loss of the type approval!
After successful repair the balance will have to be reverified before it can be used
again in a statutorily regulated field.
Das Gerät darf nur von geschultem oder beruflich ausgebildetem
Fachpersonal (z. B. eichrechtlich anerkannter Instandsetzer) repariert werden.
Die Serviceanleitung ist bindend für Reparaturen.
Das Gerät muss nach erfolgter Reparatur wieder in den Originalzustand
zurückversetzt werden.
Es dürfen nur Originalersatzteile verwendet werden.
Hinweis zu konformitätsbewerteten Waagen:
Reparatur darf nur in 100% -iger Übereinstimmung mit der
Bauartzulassung erfolgen. Ein Verstoß gegen diese Vorgabe führt zum Erlöschen der
Bauartzulassung!
Nach erfolgreicher Reparatur muss eine Nacheichung erfolgen, um die Waage
wieder im gesetzlich geregelten Bereich verwenden zu können.
:
572-SH-e-0951 3
Page 4
2 Introduction
This service manual covers the 572, 573xxNM, KBxxN(M), DS, FCBxxB, FKB (M) series
and is edited for the authorized servicing personnel.
Note all rights are reserved. Copying any part of this manual is prohibited without our
permission.
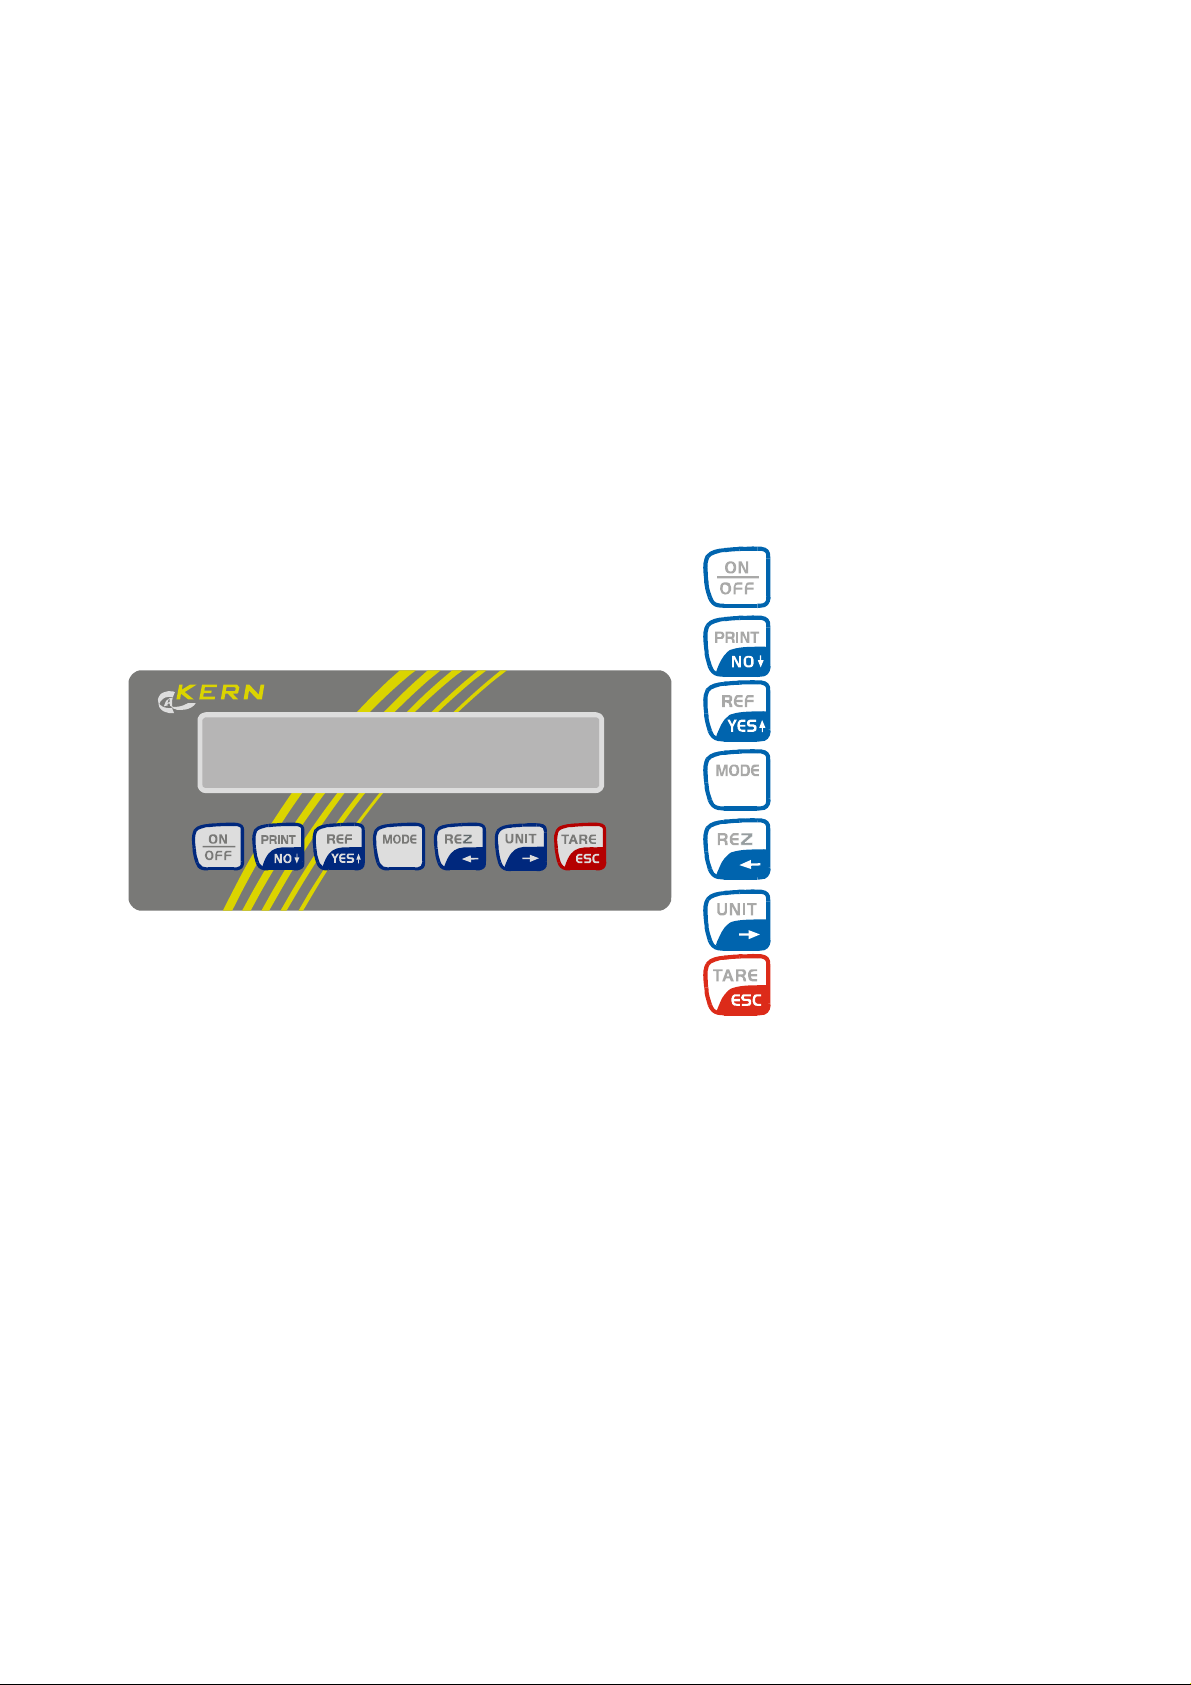
3 Keyboard Description
Keyboard
ON / OFF
Print weighing result
in MODE: No / descending
in % and counting mode:
Form reference
in MODE: Yes / ascending
MODE configuration
Formula weighing
in MODE: to left
Change g-pieces
Unit changeover
in MODE: to right
Tare
in MODE: back in weighing operation
4 572-SH-e-0951
Page 5
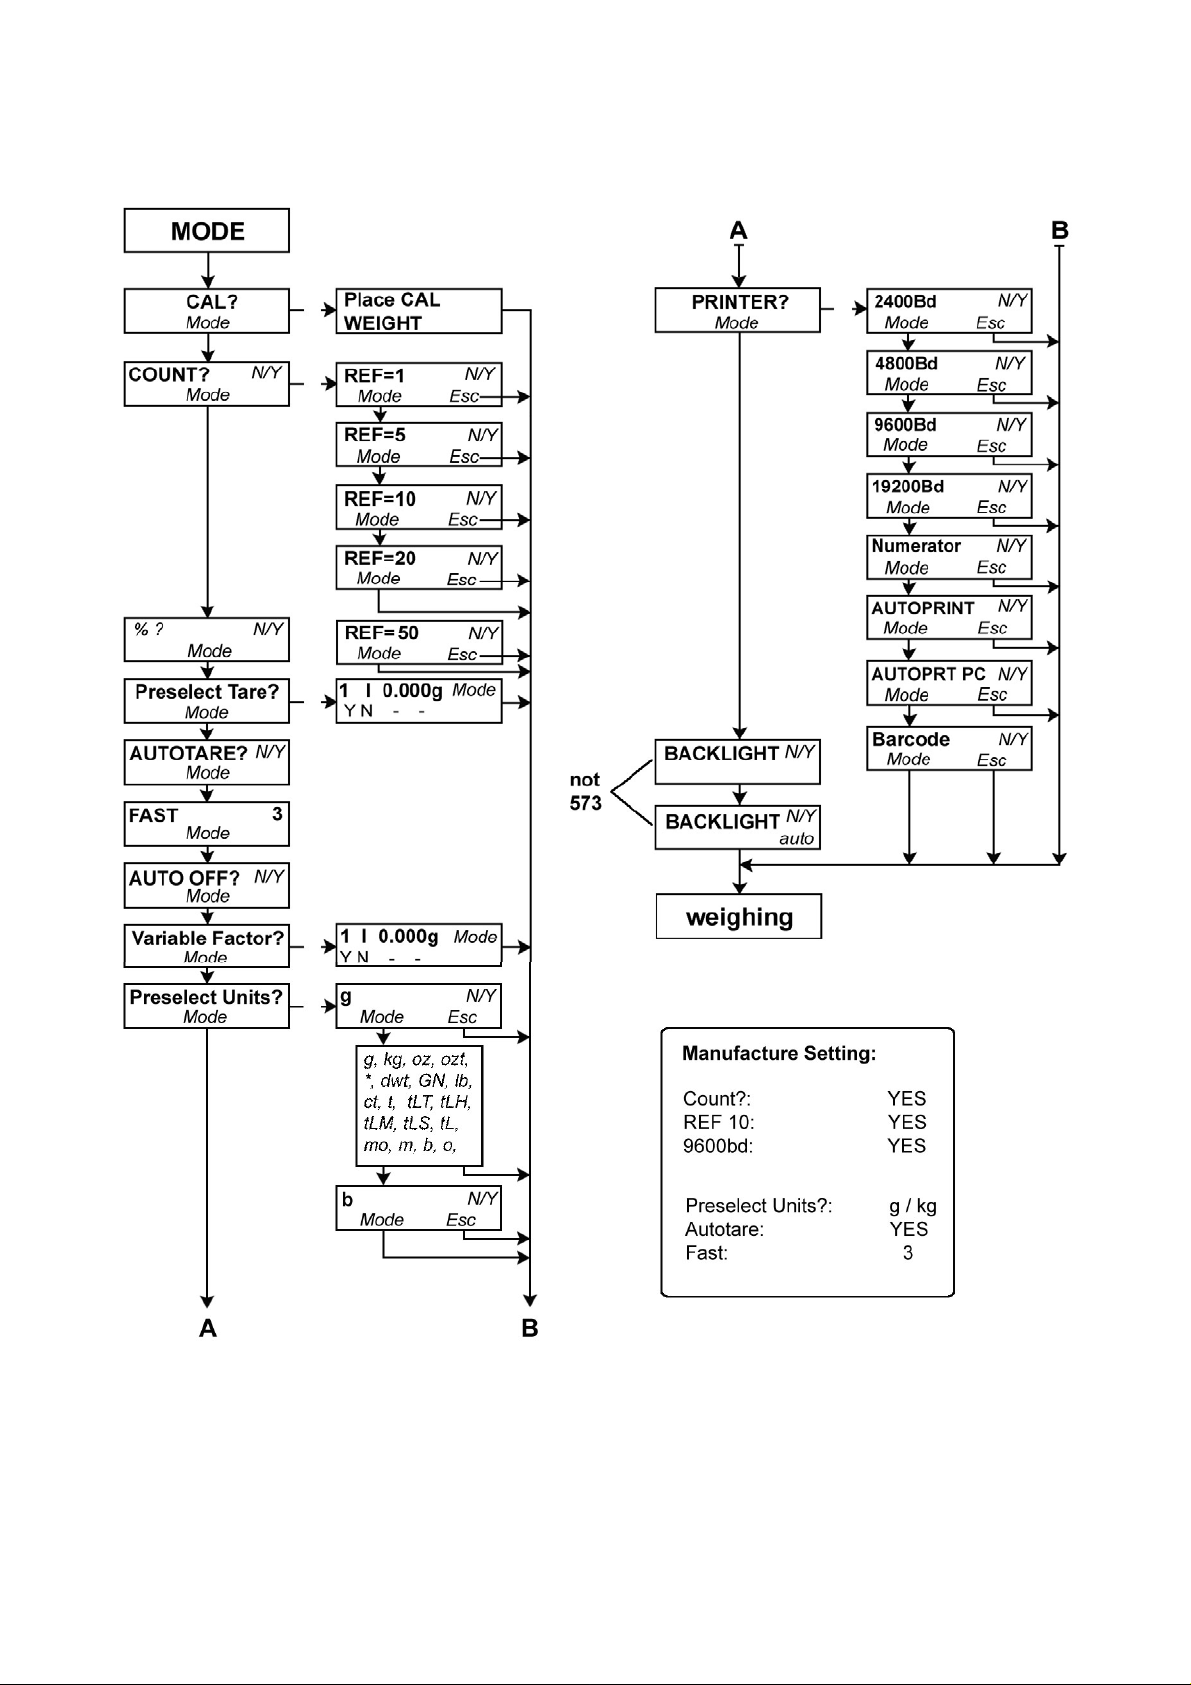
4 Mode – Menu
IMPORTANT!
The modified settings - as well as the adjustment - must be stored when switching-off,
via the ON/OFF button.
572-SH-e-0951 5
Page 6

5 Troubleshooting
Interruption Possible cause
==OVERLOAD==
= ============
<< .
bat .
Weight display is not illuminated.
The weight display changes continually
The weighing result is obviously incorrect
Switch the balance off if other error messages should appear and then switch on again.
Contact the manufacturer if the error message does not disappear.
• Either the scale is overloaded or there is a mechanical
defect
• Underload: Weighing range has been fallen short of
• Mechanical defect or a defect in the main PCB
• In counting and % mode: part too light
• The rechargeable battery is empty and should be
loaded
• The balance is not switched on.
• The mains supply connection has been interrupted
(mains cable not plugged in/faulty).
• Power supply interrupted. .
• Draught/air movement
• Table/floor vibrations
• The weighing plate is in contact with foreign matter.
• Electromagnetic fields / static charging (choose different
location/switch off interfering device if possible)
• The balance display is not set to zero
• Adjustment is no longer correct.
• Great fluctuations in temperature.
• Electromagnetic fields / static charging (choose different
location/switch off interfering device if possible)
6 572-SH-e-0951
Page 7

6 Adjustment
The balance must be adjusted at its place of installation before initial use and at regular
intervals.
A warm-up time of about 4 hours is recommended for stabilisation.
Please use the recommended adjusting weight according to the technical data in the
operating instruction.
6.1 Adjustment of non-verification balances
6.2 Adjustment of verification balances (KERN 573-NM; KB-NM; FKB-M)
Remark: The adjusting is only possible when not being blocked by the adjusting switch.
The switch for this step is located at the bottom of the housing between the two
turning feet.
Switch to the right
This setting has to be selected before starting the adjusting.
Executing the adjusting according to below procedure.
After the adjusting has been completed successfully it is
Switch to the left
Adjusting function is released.
necessary to turn the adjusting switch to the left for blocking.
Adjusting function is blocked.
After the adjusting has been completed successfully the
adjusting has to be blocked by switching to the left.
The balance is now prepared for the procedure of verification.
After the verification the adjusting switch has to be secured by
a verification mark against access.
572-SH-e-0951 7
Page 8

7 Factory Menu
The settings are only possible when not being blocked by the adjusting switch
(see chapter 6.2).
7.1 How to Enter the Factory Menu
1. Turn ON the balance.
2. Press and hold the TARE key approx. 10 seconds until [Factory Reset?]
appears.
3. Press MODE key once.
4. The display appears [Contrast xx]. The balance is now in service mode.
5. Step trough with MODE key, to return to weighing mode press TARE key once.
7.2 Display Contrast
1. Turn ON the balance.
2. Press and hold the TARE key approx. 10 seconds until [Factory Reset?]
appears.
3. Press MODE key once. The display appears [Contrast xx].
4. With the arrow keys , and insert the value and confirm with
MODE key.
5. Press TARE key once to return to weighing mode.
Please notice the LCD segments are intense visible if the stored value is low.
If the stored value is high the LCD segments are low visible.
7.3 Factory Adjustment
1. Turn ON the balance.
2. Press and hold the TARE key approx. 10 seconds until [Factory Reset?]
appears.
3. Press MODE key twice until [Lock ? N] appears.
4. Set “Lock” to ON with key. The display appears [Lock ? Y].
5. Press TARE key once. The balance is now in weighing mode.
6. Press MODE key once. The display appears [Cal ? N].
7. Press key to start the factory adjustment. The display appears [--------],
then [Place CAL Weight].
8. Place the maximum weight on the weighing pan.
9. Balance measuring for approx. one minute.
10. After that balance go back to normal weighing mode.
11. Remove the weight and switch off the balance by pressing the ON/OFF-
key.
12. Now plug off the power su pply and plug in again.
8 572-SH-e-0951
Page 9

7.4 Automatic Linearity Adjustment
1. Turn ON the balance.
2. Press and hold the TARE key approx. 10 seconds until [Factory Reset?]
appears.
3. Press MODE key until [Linear auto ?] appears.
4. Press key to start the automatic linearity adjustment. The display appears
the first linearity point, e.g. [L1 2000.0g ?].
5. Confirm with key or press the MODE key to select another linearity point,
which is outside the permissible tolerances, e.g. [L2 5000.0g ?] and confirm with
key. The display appears [Place Lin Weight].
6. Place the required weight on the centre of the weighing pan and wait until you will
get a stable weighing result.
7. Remove the weight. Now balance is in weighing mode.
8. Switch off the balance by pressing the ON/OFF-key.
9. Now plug off the power supply and plug in again.
Please notice the linearity points were defined and configured in our production line.
Therefore it is not possible to change them afterwards without special configuration
software.
7.5 Manual Linearity Adjustment
1. Turn ON the balance. After warming-up time and adjustment check balance
readings in all measuring points. In case of differences make a note.
2. Press and hold the TARE key approx. 10 seconds until [Factory Reset?]
appears.
3. Press MODE key until [Linear man ?] appears.
4. Press key to start the manual linearity adjustment. The display appears the
first linearity point, e.g. [L 2000.0g +00d].
5. With the arrow keys , and you can change the stored value.
6. Press the MODE key to select another linearity point, which is outside the
permissible tolerances, e.g. [L 5000.0g -07d] and inscribe the correction value
like described above in point (5.) and so on.
7. To return to normal weighing mode press TARE key once.
8. Switch off the balance by pressing the ON/OFF-key.
9. Now plug off the power supply and plug in again.
Information
If there is a positive difference (e.g. 2000.6 g = + 6 digit) you should subtract this difference
to the stored value (e.g. [L 2000.0 -06d]).
If there is a negative difference (e.g. 1999.4 g = - 6 digit) you should add this difference to
the stored value (e.g. [L 2000.0 +06d]).
:
572-SH-e-0951 9
Page 10

8 Electronics
8.1 Explanation and Connection of Main PCB
Pin 1: Power supply (-)
Pin 2: Power supply (+)
Pin 3: RS 232 (TXD)
Pin 4: RS 232 (RXD)
Pin 5: RS 232 (GND)
4 5
1
2 3
Connection of
keyboard overlay
JTAG
Load cell
+IN (+EX)
- IN (-EX)
Shield
+OUT (+SIG)
-OUT (-SIG)
Series resistor
for backlight
(min. 50 ohm)
Top Side
If required set solder bridge
to switch on the scale
automatically after plug in
the mains adapter (without
pressing the ON/OFF key)
Connection
of LCDdisplay
Connection of
LCD display
Resistor for
charging circuit
Bottom Side
10 572-SH-e-0951
Page 11

8.2 Layout of Main PCB
572-SH-e-0951 11
 Loading...