

KERN & Sohn GmbH
Ziegelei 1
D-72336 Balingen
E-Mail: info@kern-sohn.com
Betriebsanleitung Temperatur-Kalibrierset
Operating instruction temperature calibrating set
Tel: +49-[0]7433- 9933-0
Fax: +49-[0]7433-9933-149
Internet: www.kern-sohn.com
Mode d’emploi kit de calibrage de température
KERN DLB_A01
Version 1.1
10/2011
DLB_A01-BA-def-1111
D
KERN DLB_A01
Version 1.1 10/2011
Betriebsanleitung
1 Technische Daten
Temperatur-Kalibrierset
Einheiten
Messbereich
Ablesbarkeit umschaltbar 1°C / 1°F 0,1 °C / 0,1 °C / 1K
Celsius [°C]
Fahrenheit [°F]
Kelvin [K]
-50°C – 1300°C
-58°F - 2000°F
223K -2000K
Bereich Messgenauigkeit
-50°C - 0°C
-58°F – 32°F
± 2°C
± 4°F
100 - 200°C
200 - 400°C
± 1,5°C
± 3,0°C
Batterien 9 V Blockbatterie
Gewicht 210 g
Abmessungen 162mm (H) x 76mm (B) x 38.5mm (T)
Umgebungsbedingungen
Umgebungstemperatur
0°C - 50°C / 32°F - 122°FC
Relative Luftfeuchtigkeit
0% - 80% (0°C - 35°C) (32°F - 95°F)
0% - 70% (35°C - 50°C) (95°F - 122°F)
2 DLB_A01-BA-def-1110
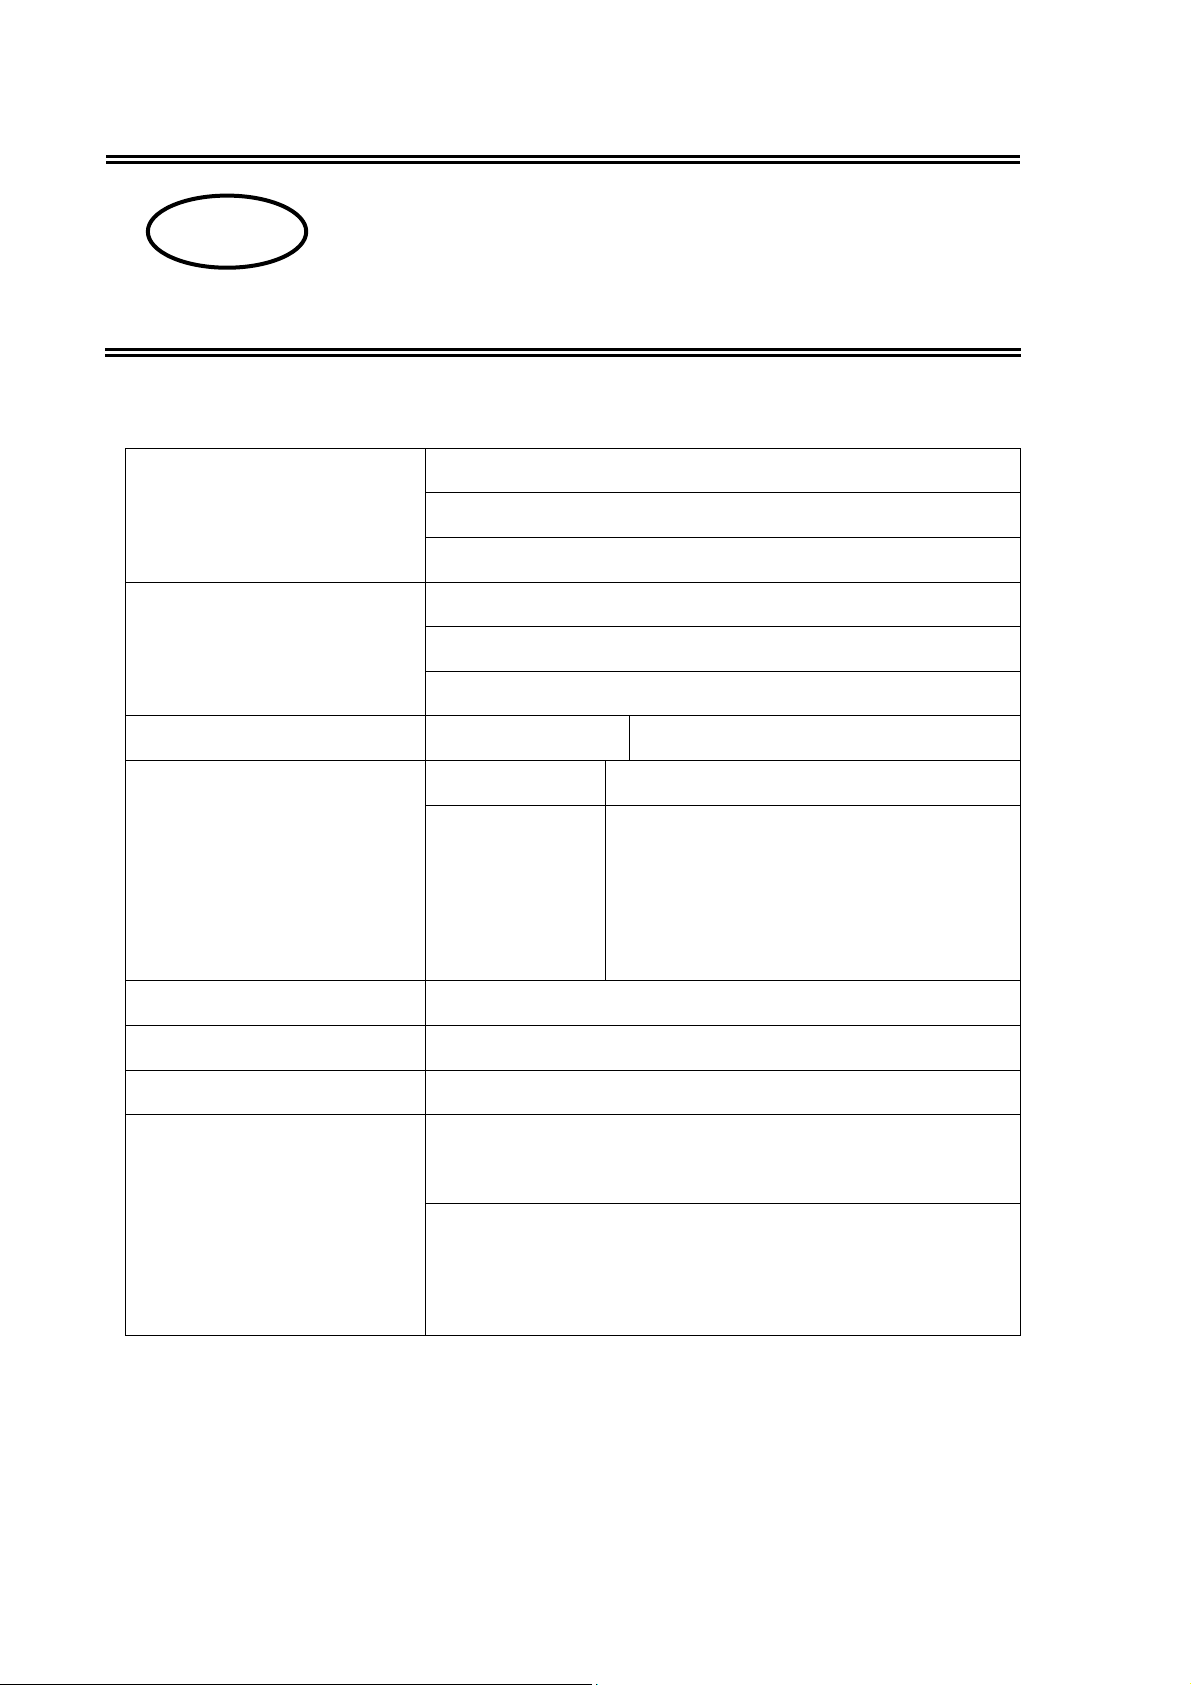
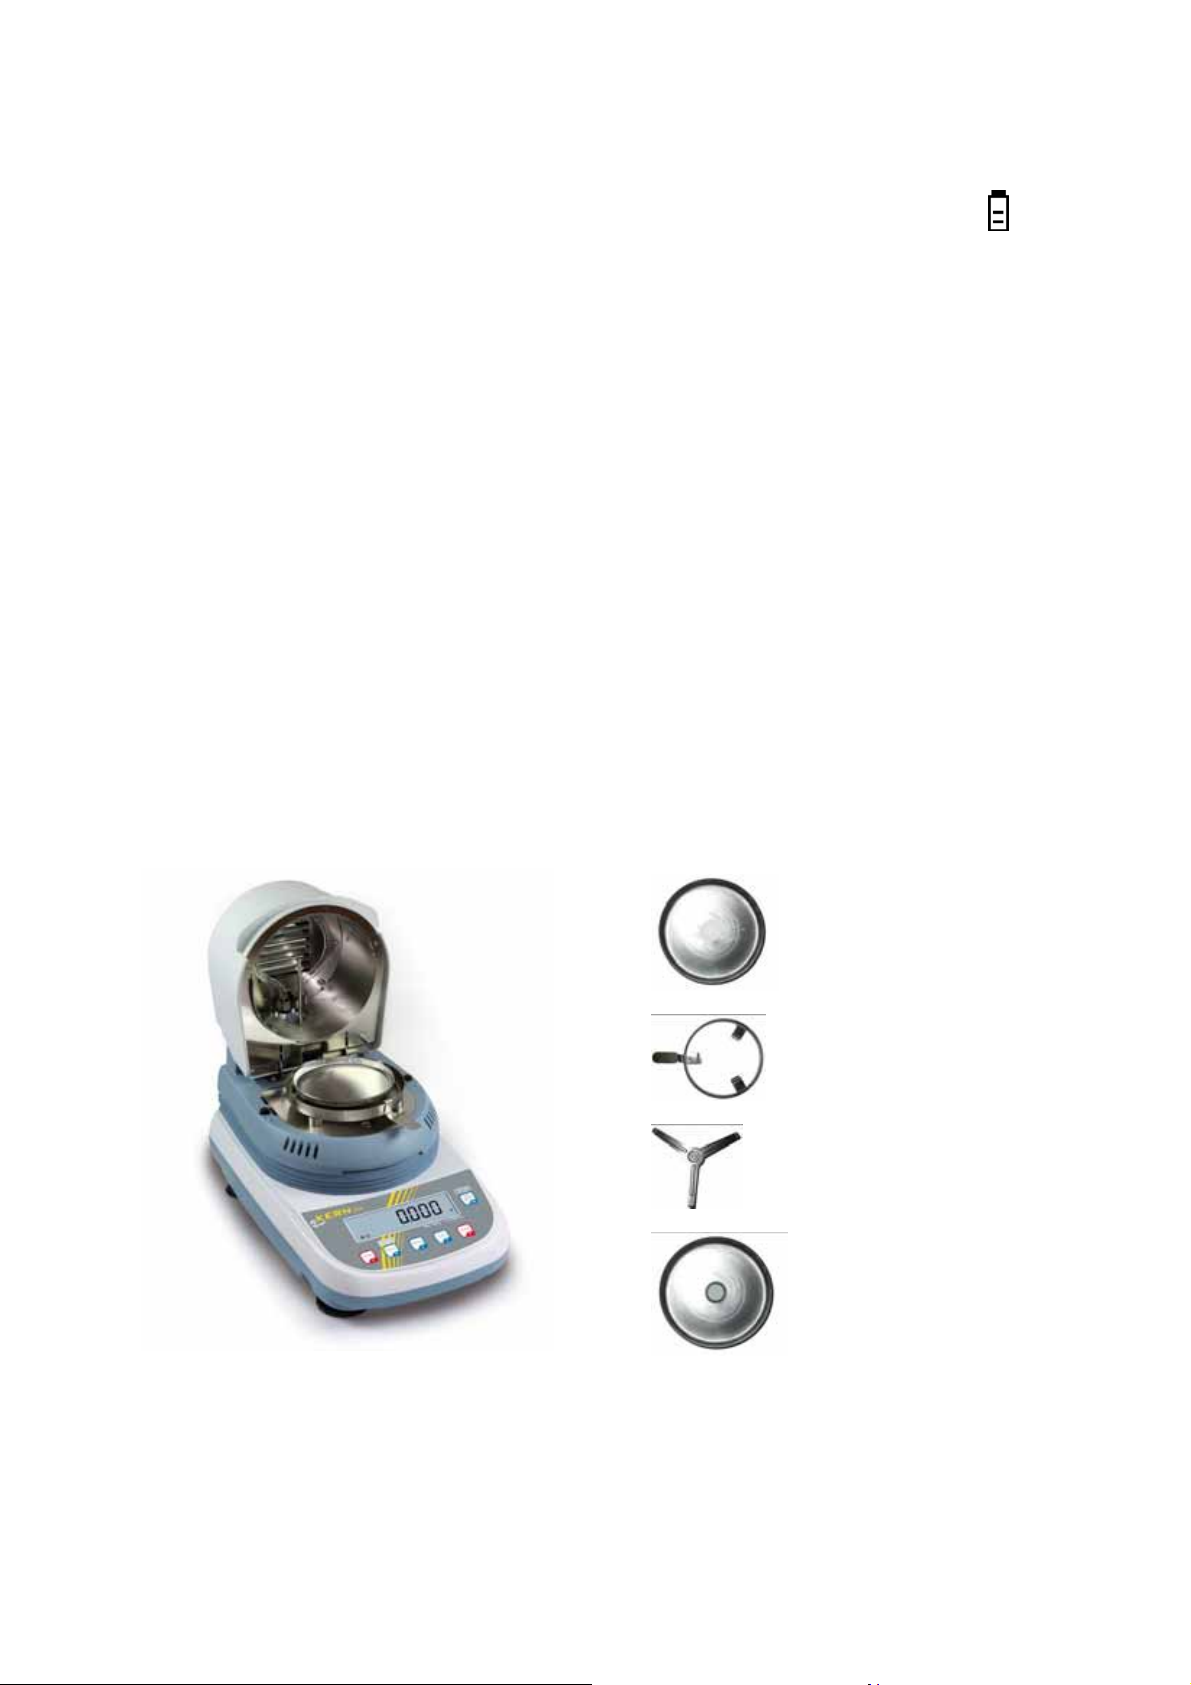
2 Geräteübersicht
1. Anzeige „Anzeigegerät“
2. Tastatur „Anzeigegerät“
3. Temperatursensorplatte
2.1 Anzeigenübersicht
Anzeige Beschreibung
MAX Kennzeichnet den Maximalwert einer Messung
HOLD Kennzeichnet einen festgehaltenen Anzeigenwert
1
Messbereich überschritten
Kapazität der Batterie erschöpft
DLB_A01-BA-def-1110 3
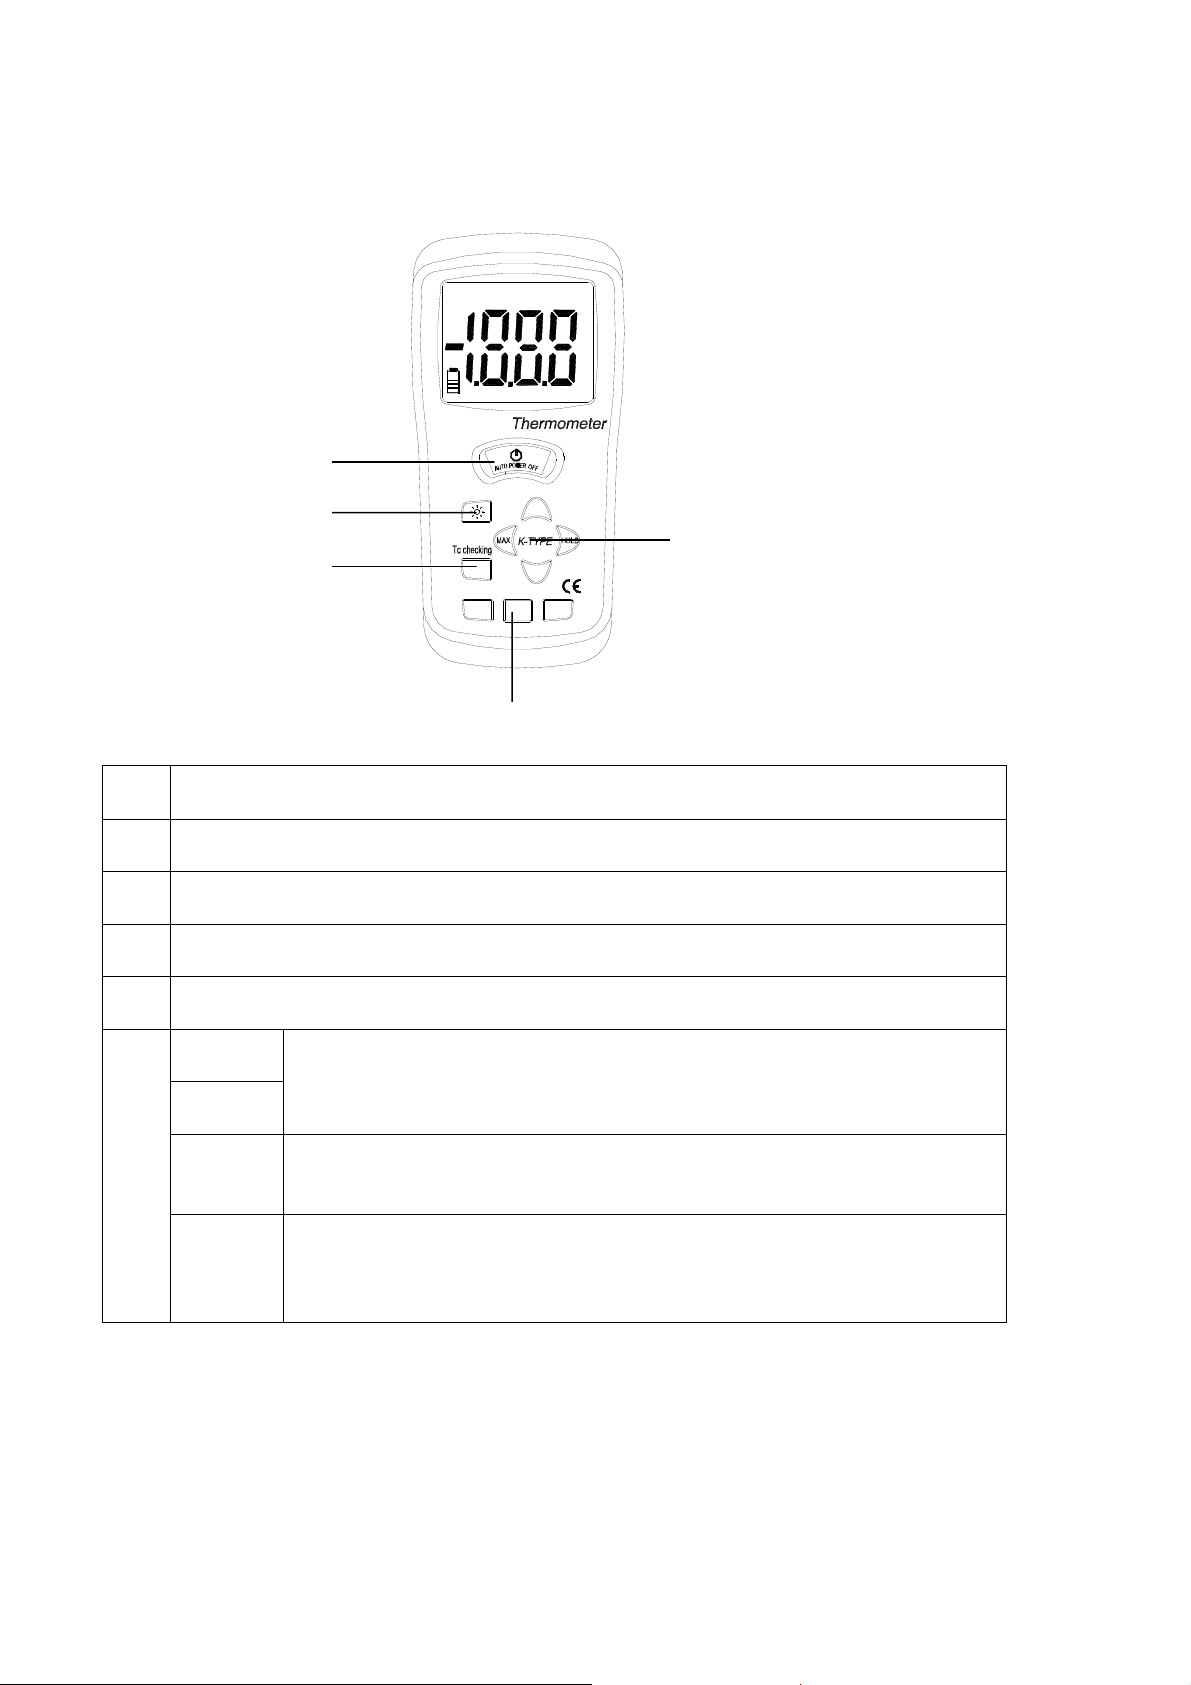
2.2 Tastaturübersicht
1
2
3
MAX
+
BACK-
LIGHT
Tc
°
°
C
°
F
K
10.
°
1°
C
K
F°
Beschreibung
1 Gerät ein- und ausschalten
2 Nach Tastendruck wird die Anzeige für ca. 5 s hinterleuchtet.
3 Nicht dokumentiert
4 Einheit auswählen, °C oder °F oder K
5
0.1°
Ablesbarkeit umschalten 1°C ⇔ 0.1°C / 1°F ⇔ 0.1°F.
1°C
MAX Nach Tastendruck wird der höchste Messwert angezeigt, ge-
kennzeichnet durch den Indikator „MAX“
HOLD Nach Tastendruck wird der aktuelle Anzeigewert festgehalten,
gekennzeichnet durch den Indikator „HOLD“. Er wird solange angezeigt, bis er durch erneuten Tastendruck gelöscht wird.
4 DLB_A01-BA-def-1110
3 Batterie wechseln
Wenn die Batteriespannung nicht mehr ausreicht, erscheint das Batteriesymbol in der
Anzeige.
+ Gerät ausschalten und Kabel zur Temperatursensorplatte entfernen.
+ Deckel des Batteriefachs durch Lösen der Schraube öffnen.
+ Batterie tauschen.
Auf die richtige Polung achten.
+ Den Deckel wieder verschließen.
4 Temperaturwert des KERN DLB-A justieren/kalibrieren
4.1 Vorbereitung
Wir empfehlen den Temperaturwert des DLB-A gelegentlich mit dem optionalen Temperatur-Kalibrierset DLB-A01 zu prüfen. Zuvor sollte sich das Gerät mindestens 3
Stunden nach der letzten Heizphase abgekühlt haben.
Ö Die einzelnen Bauteile „Probenschale“der Reihenfolge nach entfernen
1.
2.
3.
4.
DLB_A01-BA-def-1110 5
Ö Temperatur-Kalibrierset lt. Abb. installieren.
Ö Heizaufsatz an der Rückseite einschalten.
Ö Deckel des Heizaufsatzes schließen.
Ö Temperatur-Kalibrierset einschalten und folgende Einstellungen vornehmen,
s. Kap. 2.2.
Einheit °C wählen,
Ablesbarkeit 1°C
Servicefunktion aufrufen:
Ö Im Wägemodus MENU -Taste drücken, der Menüpunkt „Therm“ wird angezeigt.
Ö Mit PRINT-Taste bestätigen. MENU -Taste wiederholt drücken bis „Service“ an-
gezeigt wird.
Ö PRINT-Taste 2 sec gedrückt halten. Mit der MENU-Taste gewünschte Einstellung
auswählen.
Temperaturkalibrierung
Ð
Temperaturjustierung
Ð
Einstellungen Lampe
6 DLB_A01-BA-def-1110
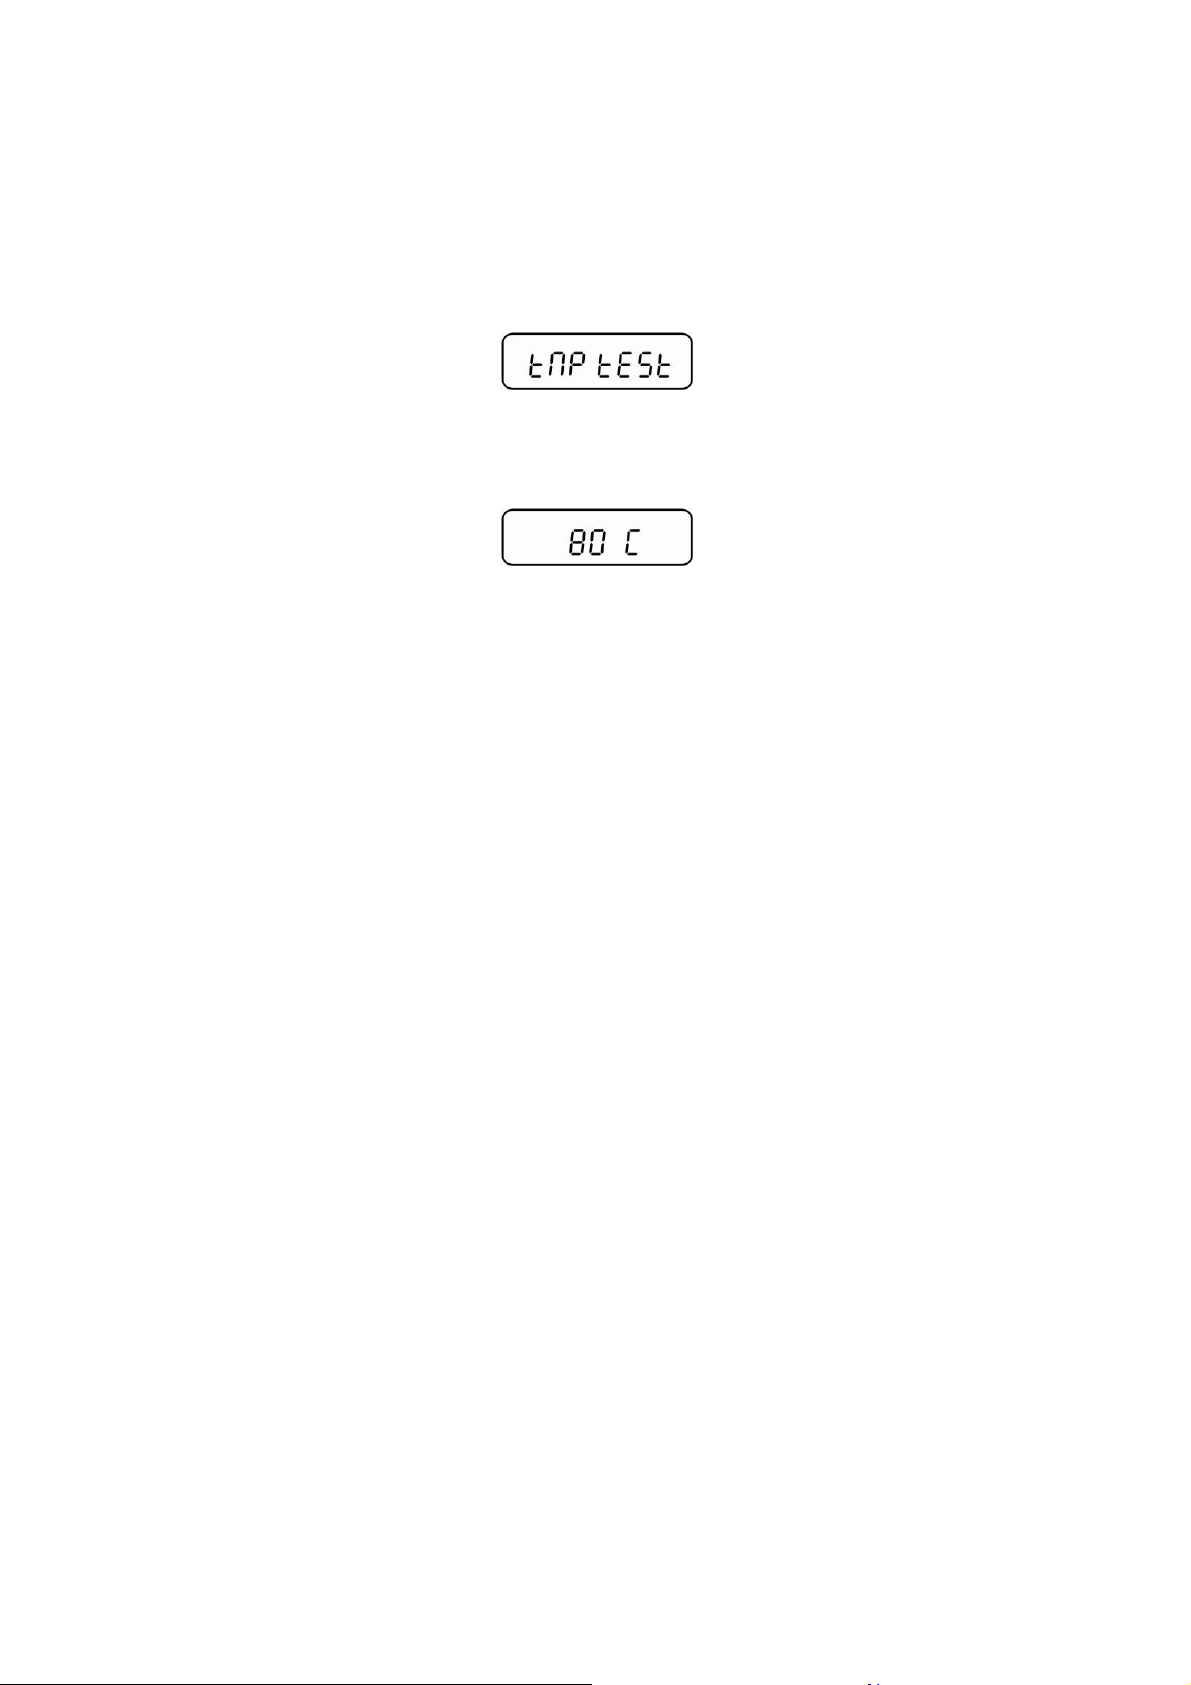
4.2 Temperatur kalibrieren
Bei der Temperaturkalibrierung findet nur eine Überprüfung statt, d.h. es werden keine
Werte verändert.
Ö Servicefunktion „Tmp test“ aufrufen, s. Kap. 4.1.
Ö Mit PRINT-Taste bestätigen. Die aktuelle Einstellung wird angezeigt. Mit den
Navigationstasten Ð Ï Temperatur auswählen, bei der die Überprüfung statt finden soll, wählbar 35- 160°C.
Ö Mit PRINT-Taste bestätigen, das Gerät heizt auf die eingestellte Temperatur auf.
Nach ca. 15 Minuten den angezeigten Temperaturwert am Thermometer mit dem
des Feuchtebestimmers vergleichen. Stimmen die beiden Werten nicht überein,
empfehlen wir eine Temperaturjustierung, s. Kap. 3.
Ö Mit der ON/OFF-Taste wird die Kalibirung beendet.
Ö Mit ON/OFF-Taste zurück in den Wägemodus.
DLB_A01-BA-def-1110 7

4.3 Temperatur justieren
Die Temperatur wird an zwei wählbaren Punkten gemessen und kann an diesen korrigiert werden.
Ö Servicefunktion „Tmp Adj“ aufrufen, s. Kap. 4.1.
Ö Mit PRINT-Taste bestätigen. Die aktuelle Einstellung für den ersten Temperatur-
punkt wird angezeigt. Entweder auf Werkseinstellung 80°C lassen oder mit den
Navigationstasten Ð Ï gewünschte Temperatur auswählen (wählbar 50-130°C).
Ö Mit PRINT-Taste bestätigen, die erste Aufheizphase wird gestartet. Die
verbleibende Zeit wird angezeigt.
Ö Nach 15 Min ist die Temperaturkalibrierung des 1. Punktes beendet. Den
angezeigten Temperaturwert am Thermometer mit dem des Feuchtebestimmers
vergleichen. Stimmen die beiden Werten nicht überein, mit den Navigationstasten
Ð Ï korrigieren und mit PRINT-Taste bestätigen
.
Ö Die aktuelle Einstellung für den zweiten Temperaturpunkt wird angezeigt. Entwe-
der auf Werkseinstellung 150°C lassen oder mit den Navigationstasten Ð Ï ge-
wünschte Temperatur auswählen. Der zweite Temperaturpunkt muss mindestens
30°C über dem ersten liegen, max. 160°C.
Ö Mit PRINT-Taste bestätigen, die zweite Aufheizphase wird gestartet. Die
verbleibende Zeit wird angezeigt.
Ö Nach 15 Min ist die Temperaturkalibrierung des 2. Punktes beendet. Den
angezeigten Temperaturwert am Thermometer mit dem des Feuchtebestimmers
vergleichen. Stimmen die beiden Werten nicht überein, mit den Navigationstasten
Ð Ï korrigieren.
Ö Mit PRINT-Taste bestätigen. Die Justierung ist beendet, das Gerät kehrt zurück
ins Menü. Mit ON/OFF-Taste zurück in den Wägemodus.
Durch die AUTO-PPOWER OFF-Funktion schaltet sich das Anzeigegerät des
Temperatur-Kalibriersets während der Justierung automatisch aus. Gerät erneut
einschalten, die laufendeTemperatur-Justierung wird dadurch nicht gestört.
8 DLB_A01-BA-def-1110

GB
KERN DLB-A01
Version 1.1 10/2011
Operating Instructions
1 Technical data
Temperature calibration set
Units
Measuring range
Readability commutable 1°C / 1°F 0,1 °C / 0,1 °C / 1K
Display exactness ± 0,2°C
ness
Celsius [°C]
Fahrenheit [°F]
Kelvin [K]
-50°C – 1300°C
-58°F - 2000°F
223K -2000K
Range Sensor measuring exact-
-50°C - 0°C
± 2°C
-58°F – 32°F
100 - 200°C
200 - 400°C
± 4°F
± 1,5°C
± 3,0°C
Batteries 9 V compound battery
Battery life 150 hrs.
Weight 210 g
Dimensions 162mm(H) x 76mm(W) x 38.5mm(D)
Environmental conditions
Ambient temperature
0°C - 50°C / 32°F - 122°FC
Relative air humidity
0% - 80% (0°C - 35°C) (32°F - 95°F)
0% - 70% (35°C - 50°C) (95°F - 122°F)
DLB_A01-BA-def-1110 9

2 Appliance overview
1. Display „Display unit“
2. Keyboard „Display unit“
3. Temperature sensor plate
2.1 Overview of display
Display Description
MAX Means the maximum value of a measurement
HOLD Means a recorded display value
1
Measuring range exceeded
Capacity of battery exhausted
10 DLB_A01-BA-def-1110

2.2 Keyboard overview
1
2
3
MAX
+
BACKLIGHT
°
C
°
F
K
1°0.
Tc
1°
C
°
K
F°
Description
1 Switch unit on and off
2 Press button, the display background will be illuminated for approx. 5 s.
3 Not documented
4 Select unit, °C or °F or K
5
0.1°
Switch-over readability 1°C ⇔ 0.1°C / 1°F ⇔ 0.1°F.
1°C
MAX Press button, the highest measured value will be displayed, iden-
tified by the indicator „MAX“
HOLD Press the button to record the current displayed value, identified
by the indicator „HOLD“. It remains displayed until it is deleted by
pressing button again.
DLB_A01-BA-def-1110 11

3 Change battery
If the battery voltage is not more sufficient, the battery symbol will appear in the display.
+ Switch off appliance and remove cable from temperature sensor plate.
+ Open the lid of the battery compartment loosening the screw.
+ Replace battery.
Ensure correct polarisation.
+ Close again the lid.
4 Adjust/calibrate the temperature value of the KERN DLB-A
4.1 Preparation
We recommend sometimes to check the temperature value of the device using the optional temperature calibrating set DLB-A01. Before you do this, allow the device to cool
down for at least 3 hours after the last heating phase.
Ö Remove the separate component parts „sample dish“ according to their sequence
1.
2.
3.
4.
12 DLB_A01-BA-def-1110

Ö Install the temperature-calibration set acc. to fig.
Ö Switch-on the heating top on the rear side.
Ö Close cover of the heating top
Ö Switch-on the temperature calibration set and carry out the following adjustments,
see chap. 2.2. Select unit °C, readability 1°C
Invoke service function:
Ö In weighing mode press the MENU button, the menu item „Therm“ will be dis-
played.
Ö Confirm by pressing the PRINT button. Press repeatedly the MENU button until
„Service“ will be displayed.
Ö Keep pressed the PRINT button for 2 sec. Select the desired settings by pressing
the MENU button
Temperature calibration
Ð
Temperature adjustment
Ð
Settings of lamp
DLB_A01BA-def-1110 13

4.2 Calibrate temperature
During temperature calibration only a check is carried out, i.e. no values are changed.
Ö Invoke service function „Tmp test“, see chap. 4.1.
Ö Confirm by pressing the PRINT button. The current setting will be displayed. Use
the navigation buttons Ð Ï to select the temperature during the check, available
35- 160°C.
Ö Confirm using the PRINT button, the appliance heats up to the set temperature.
After approx. 15 minutes compare the temperature displayed on the thermometer
with that of the moisture analyzer. If the two values do not match, we recommend
a temperature adjustment, see chap. 3.
Ö Use the ON/OFF button to finish the calibration.
Ö Use the ON/OFF button to return into weighing mode.
14 DLB_A01-BA-def-1110

4.3 Adjust temperature
The temperature is measured at two selectable points and it is possible to correct it
there.
Ö Invoke service function „Tmp Adj“, see chap. 4.1.
Ö Confirm by pressing the PRINT button. The current setting for the first tempera-
ture point is displayed. Or leave it on factory setting 80°C or select a desired temperature with the help of the navigation buttons Ð Ï (available 50-130°C).
Ö Confirm with the PRINT button, the first heat-up phase is started. The remaining
time is displayed.
Ö Temperature calibration of first point will take 15 min. Compare the temperature
displayed on the thermometer with that of the moisture analyzer. If the two values
do not match, correct them using the navigation buttons Ð Ï and confirm with the
PRINT button
Ö The current setting for the second temperature point is displayed. Or leave it on
factory setting 150°C or select the desired temperature with the help of the navigation buttons Ð Ï. The second temperature point has to be at least 30°C over
the first one, max. 160°C.
Ö Confirm with the PRINT button, the second heat-up phase is started. The remain-
ing time is displayed.
Ö Temperature calibration of the second point will take 15 min. Compare the tem-
perature displayed on the thermometer with that of the moisture analyzer. If the
two values do not match, correct with the help of the navigation buttons Ð Ï.
Ö Confirm by pressing the PRINT button. The adjustment is completed, the appli-
ance returns into the menu. Use the ON/OFF button to return into weighing mode.
Due to the AUTO-POWER OFF function the display unit of the temperature
calibration set switches off automatically during adjustment. Turn-on appliance again, the current temperature adjustment will not be disturbed.
DLB_A01-BA-def-1110 15

F
KERN DLB-A01
Version 1.0 04/2011
Mode d’emploi
1 Caractéristiques techniques
Kit de calibrage de température
Unités
Plage de mesure:
Lisibilité commutable 1°C / 1°F 0,1 °C / 0,1 °C / 1K
Précision d'affichage ± 0,2°C
capteur
Celsius [°C]
Fahrenheit [°F]
Kelvin [K]
-50°C – 1300°C
-58°F - 2000°F
223K -2000K
Plage Précision de mesure du
-50°C - 0°C
± 2°C
-58°F – 32°F
100 - 200°C
200 - 400°C
± 4°F
± 1,5°C
± 3,0°C
Batteries Batterie monobloc de 9 V
Durée des batteries 150 h
Poids 210 g
Dimensions 162mm(H) x 76mm(B) x 38.5mm(T)
Conditions d'environne-
Température ambiante
ment
0°C - 50°C / 32°F - 122°FC
Humidité de l’air rélative
0% - 80% (0°C - 35°C) (32°F - 95°F)
0% - 70% (35°C - 50°C) (95°F - 122°F)
16 DLB_A01-BA-def-1110

2 Aperçu de l’appareil
1. Affichage „Appareil d’affichage“
2. Clavier „Appareil d’affichage“
3. Plaque capteur de température
2.1 Vue d’ensemble des affichages
Afficheur Description
MAX Signifie la valeur maximale d’un affichage
HOLD Signifie une valeur d’affichage enregistrée
1
Plage de mesure dépassée
Capacité de la batterie épuisée.
DLB_A01-BA-def-1110 17

2.2 Vue d’ensemble du clavier
MAX
+
1
BACK-
LIGHT
2
3
Tc
°
°
C
°
F
K
10.
°
1°
C
K
F°
Description
1 Mise en marche et arrêt de l’appareil
2 Après avoir enfoncée la touche le fond de l’affichage est éclairé env. 5 sec.
3 Non documenté
4 Choisir l’unité, °C ou °F ou K
5
0.1°
Commuter la lisibilité 1°C ⇔ 0.1°C / 1°F ⇔ 0.1°F.
1°C
MAX Enfoncer la touche, la valeur mesurée plus haute est affichée,
identifiée par l’indicateur „MAX“
HOLD Enfoncer la touche pour enregistrer la valeur affichée actuelle,
caractérisée par l’indicateur „HOLD“. Elle continue d’être affichée
jusqu’à ce que soit effacée en appuyant autre fois sur la touche.
18 DLB_A01-BA-def-1110

3 Changement de la pile
Si la tension de la pile ne suffit plus, le symbole de batterie apparaît à l’affichage.
+ Mettre l’appareil à l’arrêt et enlever le câble vers la plaque du capteur de tempé-
rature.
+ Ouvrir le couvercle du compartiment à piles en desserrant la vis.
+ Remplacer la pile.
Veillez à la polarité correcte.
+ Refermer le couvercle.
4 Ajuster/calibrer la valeur de température du KERN DLB-A
4.1 Préparation
Nous recommandons de vérifier occasionnellement la valeur de température de
l’appareil à l’aide du jeu de calibrage de la température en option DLB-A03. Auparavant l’appareil devrait s'être refroidi au moins 3 heures après la dernière phase de
chauffage.
Ö Assembler les différentes pièces constitutives du „plateau porte-échantillon“ dans
l’ordre de succession indiqué.
1.
2.
3.
DLB_A01-BA-def-1110 19
4.

Ö Installer le kit de calibrage de la température conformément à la figure.
Ö Mettre en marche la rehausse de chauffage.
Ö Fermer le couvercle de la rehausse de chauffage
Ö Mettre en marche le kit de calibrage de température et faire les réglages suivants,
voir au chap. 2.2.
Choisir l’unité °C,
lisibilité 1°C
Appel de la fonction du SAV:
Ö Appuyer sur la touche du MENU, le point de menu „Therm“ est affiché.
Ö Confirmez sur la touche PRINT. Répéter la pression sur la touche MENU jusqu’à
ce que „Service“ apparaisse.
Ö Maintenir la touche PRINT pendant 2 sec enclenchée. Sélectionner sur la touche
MENU votre réglage voulu
Calibrage de la température
Ð
Ajustage de température
Ð
Réglages de la lampe
20 DLB_A01-BA-def-1110

4.2 Calibrage de la température
Lors du calibrage de la température seul a lieu un contrôle, c’est-à-dire qu’aucune valeur n’est modifiée.
Ö Appeler la fonction de SAV „Tmp test“, voir sous chap. 4.1.
Ö Confirmez sur la touche PRINT. Le réglage actuel est affiché. Sélectionner sur les
touches de navigation Ð Ï la température, à laquelle doit avoir lieu le contrôle,
sélectionnable entre 35 - 160°C.
Ö Sur la touche PRINT valider que l’appareil se réchauffe à la température réglée.
Après env. 15 minutes comparer la valeur de température sur le thermomètre
avec celle du détecteur d‘humidité. Si ces deux valeurs ne coïncident pas, nous
recommandons de procéder à un ajustage de la température, voir au chap. 3.
Ö Le calibrage est terminé sur la touche ON/OFF.
Ö Sur ON/OFF retour au mode de pesée.
DLB_A01-BA-def-1110 21

4.3 Ajuster température
La température est relevée à deux endroits au choix et peut y être corrigée.
Ö Appeler la fonction de SAV „Tmp test“, voir sous chap. 4.11.
Ö Confirmez sur la touche PRINT. Le réglage actuel est affiché pour le premier point
de température. Soit garder la valeur réglée départ usine à 80°C soit sélectionner
sur les touches de navigation Ð Ï la température voulue (sélectionnable entre
50-130°C).
Ö Valider sur la touche PRINT, la première phase de réchauffement démarre. Le
temps restant est affiché.
Ö Après 15 min le calibrage de température du 1er point est terminé. Comparer la
valeur de température affichée sur le thermomètre avec celle du détecteur
d‘humidité. Si ces deux valeurs ne coïncident pas corriger sur les touches de navigation Ð Ï et valider sur la touche PRINT
Ö Le réglage actuel est affiché pour le second point de température. Soit garder la
valeur réglée départ usine à 150°C soit sélectionner sur les touches de navigation
Ð Ï la température voulue. Le deuxième point de température doit se situer au
moins 30°C au-dessus du premier, au max. à 160°C.
Ö Valider sur la touche PRINT, la seconde phase de réchauffement démarre. Le
temps restant est affiché.
Ö Après 15 min le calibrage de température du 2ème point est terminé. Comparer la
valeur de température affichée sur le thermomètre avec celle du détecteur
d‘humidité. Si ces deux valeurs ne coïncident pas corriger sur les touches de navigation Ð Ï.
Ö Confirmez sur la touche PRINT. La mise au point est terminée, l’appareil retourne
au menu. Sur ON/OFF retour au mode de pesée.
Due à la fonction AUTO-POWER OFF l’appareil d’affichage du kit de
calibrage de température s’éteint automatiquement pendant l’ajustage. Mettre
de nouveau en marche l’appareil, l’ajustage de température en cours n’y est
pas dérangé.
22 DLB_A01-BA-def-1110

D
GB
F
Anhang Konformitätserklärung
Enclosure Declaration of conformity
Annexe Déclaration de conformité
DLB_A01-BA-def-1110 23
 Loading...