

Page 1
PXL-100: SMART ENTRY CONTROLLER
TABLE OF CONTENTS PXL-100
PAGE # DESCRIPTION
2 PXL-100 diagram and installation instructions
5 Installation verification procedure
5 Troubleshooting guide
9 PXL-100 built in diagnostics functions
12 I/O Configuration Guide
13 PXL-100 specifications and network requirements
14 Cable Configuration
15 CE Certificate
.
Related Document List
Each of the following products has a Quick Start Guide associated with it. Please refer to them when
installing other Keri systems networkable access control products. A list is provided below for
reference.
OB-1 01814-001 OB-2 01814-002
OB-3 01814-003 OB-7 01814-007
OB-9 01814-009 OB-100 01814-100
KDF-3E 01815-003 KWS-5E 01815-004
KSI-10E/12E 01815-005 KMI-20E/22E 01815-006
MS-3000 01815-001 MS-5000 01815-002
Page 1
1530 Old Oakland Rd., Ste 100 San Jose, CA 95112 U.S.A. (800)260-5265 (408)451-2520 Fax (408)441-0309
01816-100 Rev. E
Page 2

PXL-100: SMART ENTRY CONTROLLER
1) Warnings
This document should only be used for the design 5 board or later versions. To identify a
design 5 board, look for the two relays in the center of the PC board. If there are two next to
each other, it is a design 5 board.
When disconnecting or reconfiguring any PXL-100 or peripheral products, ensure that the
power has been disconnected. Serious damage such as RAM failure may occur if an option
board or other peripheral product is disconnected while power is on.
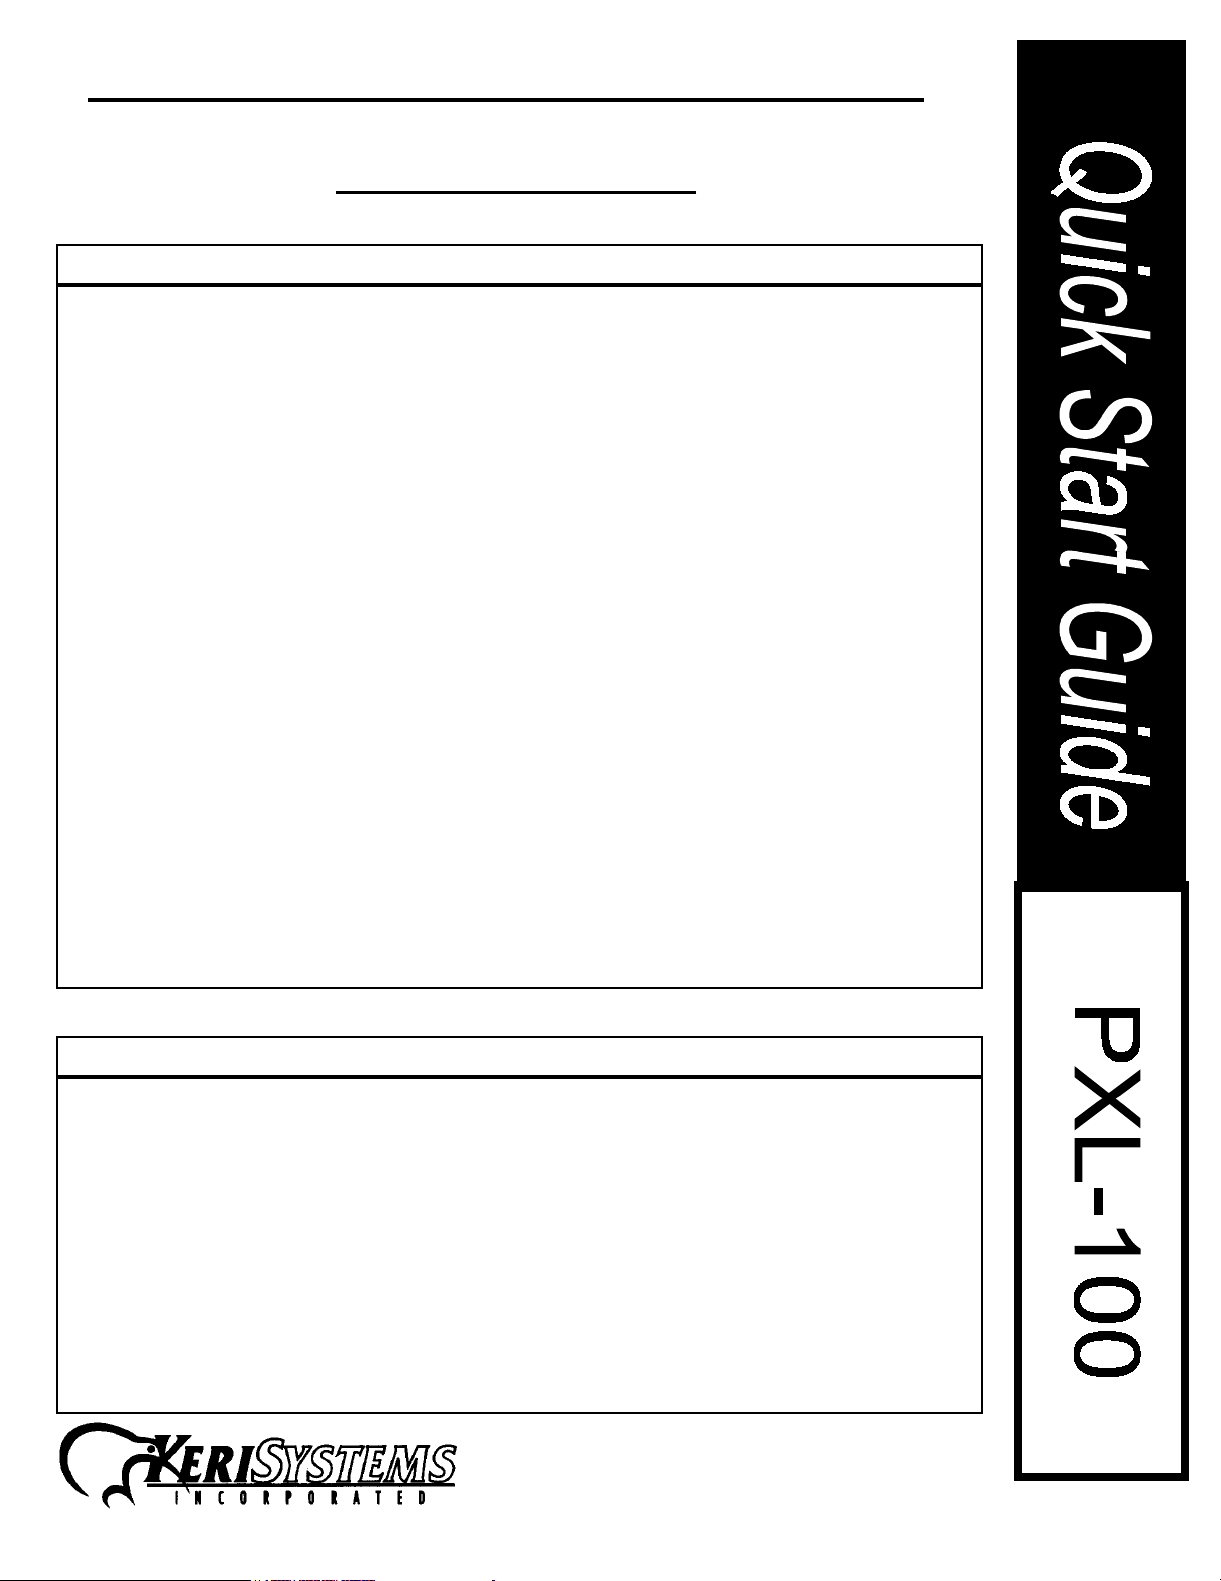
2) PXL-100 Diagram
External Time Zone
Magnetic Door Switch
12 VDC
To Door Lock or Parking Gate
To Primary Proximity Reader
To B Proximity Reader
Exit Button or PIR
Alarm Device
12 VDC Out
Gnd
Relay
Relay
Relay
Green
Red
Black
Blue
Green
Red
Black
Blue
GND
NC
GND
REX (RTE)
GND
NC
(Jumper
Selectable)
NO
COMMON
NC
GRN LED
BEEP
+12 VDC
GND
RDR
RED LED
GRN LED
BEEP
+12 VDC
GND
RDR
RED LED
EARTH
GND
+12 VDC
12 VAC
12 VAC
JP6 J4
Door Lock
Relay
Firmware
Alarm Out
Relay
(new for design 5)
JP3
.
Battery
3 V Lithium
#BR2325
3) Features and Functions of the PXL-100 Smart Entry Controller
The PXL-100 can be used as a stand alone unit or function as a networkable access control system
capable of controlling up to sixty-four doors (with the addition of an option board). Standard features
include: - a database capacity of 7000 unique users per controller
- transaction buffers capable of storing 3000 events per controller
- expansion port for adding special feature option boards
- built in power supply that can run off 12VDC or 12VAC and can power door strikes
or magnetic locks
- RS-232 serial port configurable to communicate with a PC or printer
- an optional RS-485 network communication capable of linking up to 32 controllers
on a single network
- I/O including door status, request to exit, two 10Amp Form-C relay for door strikes
and alarm shunting.
Page 2
1530 Old Oakland Rd., Ste 100 San Jose, CA 95112 U.S.A. (800)260-5265 (408)451-2520 Fax (408)441-0309
01816-100 Rev. E
Page 3

PXL-100:SMART ENTRY CONTROLLER
4) Switch and Jumper Settings
A) Tamper Switch Input
The PXL-100 comes with JP6 jumpered, which closes the tamper circuit. Installing a normally
closed switch across JP6 will allow the unit to work. Removing the jumper or opening the switch
will cause a tamper condition and shut the unit down. A network fault message will be created.
B) PIN Reset vs. PIN and RAM Reset
Installing a jumper on on J4 will cause both the RAM and the PIN
pushed at power up.
complete system reformat. Using this feature will cause all resident card and transaction
data to be irretrievably lost.
the PIN to be reset.
CAUTION - This feature should only be used to reset the RAM during a
Removing the jumper and pushing S1 at power up will only cause
to be reset when the S1 button is
C) Normally Closed/Normally Open Selection for Alarm Out
JP3 controls whether the alarm out relay will be normally open or normally closed. To make it
normally open, jumper pins 1 and 2. To configure it as normally closed, jumper pins 2 and 3. The
marking for this jumper is very difficult to see. It is located just below the alarm out relay. Pin 1 is
on the left side of the jumper if the PXL-100 is oriented with the serial port on the bottom.
5) Connections
BEFORE MAKING ANY OF THE FOLLOWING CONNECTIONS, ENSURE THERE IS NO
POWER TO THE UNIT!!
Orient the PXL-100 so that the serial port is pointed down. With one exception (the serial port), all
connections to the PXL-100 are made on the left side unit. Place each wire into the slot designated
below and tighten the screw on the top of the terminal block. Do not over tighten! Please note that
all of the terminal blocks also lift off the PXL-100 should it become necessary to disconnect
anything. It is recommended to make the connections in the order listed to ensure that power is not
prematurely applied to the system.
A) Request to Exit
Request to Exit devices (REX) generally unlock the door to allow for egress from the building. The
PXL-100 may take input from switches, motion sensors or floor mats. These devices are installed
on pins 3 and 4 on the thirteen position terminal block. Install the ground for the REX device on pin 3
and the signal wire on pin 4.
.
B) Door Status
The Door Status (also known as door switch) sensor indicates the state of the door (open or
closed), and is connected to pins 5 and 6 on the thirteen position terminal block. Install the ground
for the sensor on pin 5 and install the signal lead on pin 6. If a door switch is not used, install a
jumper between pins 5 and 6.
C) Alarm Out
The Alarm Out provides the output to trigger an audible signal when the door is put in an alarm
state. Optionally, it can provide an output to trigger a silent alarm. Install the ground at pin 7 and
the signal at pin 8 on the thirteen position terminal block
D) Lock Power (12VDC Out)
The PXL-100 has a built in power supply capable of supplying 12VDC to power door strikes or
magnetic locks. Install the 12VDC output to the lock on pin 9 and the ground on pin 10 of the
thirteen position terminal block. Jumper pin 9 to pin 12 when the internal power supply of the PXL100 will power the door lock.
Page 3
1530 Old Oakland Rd., Ste 100 San Jose, CA 95112 U.S.A. (800)260-5265 (408)451-2520 Fax (408)441-0309
01816-100 Rev. E
Page 4

PXL-100:SMART ENTRY CONTROLLER
E) Lock Relay
The control relay for the door lock is is hooked up to pins 11,12 an 13. Install the normally open
line (N/O) on pin 11, and the normally closed (N/C) line on pin 13. The common for the relay is
hooked up on pin 12.
F) Proximity Card Readers
These inputs only accept data from Keri Systems proximity readers. Install the reader on the terminal blocks labeled as READER: A. If a 2nd proximity reader is being installed, connect it to the
block labeled READER: B. If the PXL-100 is being used in conjunction with an OB-9 the B reader
may control another door. If an OB-9 is not being used, the B reader must be used on the same
door as the primary reader (typically to control traffic moving in the opposite direction as the primary
reader). Consult the Quick Start Guides for each reader for information on wiring the LED leads.
Primary
Color Func tion
Green LED 14 20
Green B eeper 15 21
Red 12VDC 16 22
Black Ground 17 23
Blue Reader Input 18 24
Red LED 19 25
H) Power Connections
ENSURE THAT THERE IS NO POWER PRESENT ON THE WIRES WHILE THE PXL-100 IS
BEING INSTALLED. APPLY POWER ONLY AFTER ALL OF THE CONNECTIONS HAVE BEEN
COMPLETED. INSTALL THE EARTH GROUND FIRST
TERMINAL STRIP LABELED
The PXL-100 can accept either a 12VDC or a 12VAC input.
DC Connections
Units powered by 12VDC must have the ground installed on pin 2 and +12VDC installed on pin 3 of
the five position terminal strip.
AC Connections
Units powered by 12VAC must have power applied to pins 4 and 5 on the five position terminal
strip.
INPUT POWER
ON PIN 1.
Reader Pin #
! CONNECT IT TO THE FIVE POSITION
B Reader
Pin #
.
I) Serial Port Connections
The serial port can interface with printers, PCs or modems. If you are using one of these devices,
plug it into the serial port using one of the Keri Systems supplied cables. Do not use gender
changers or 25 pin to 9 pin adapters as some of these have internal crossovers that can disrupt
communications. Configure the port with either the Keri Systems HPP-100 or the TAP-100
software. For instructions on how to configure the serial port, consult the manuals for these
products.
J) Global Lock or External Time Zone
In most instances these features are not used. If there is a requirement for one of them, connect
the ground to pin 1 and the signal lead to pin 2 of the thirteen position terminal block.
6) Power On Procedure
Plug in power to the PXL-100 only after all connections to the unit have been made.
Page 4
1530 Old Oakland Rd., Ste 100 San Jose, CA 95112 U.S.A. (800)260-5265 (408)451-2520 Fax (408)441-0309
01816-100 Rev. E
Page 5
PXL-100:SMART ENTRY CONTROLLER
p
p
,
(+)
(+)
g
)
plugg
plugg
p
)
,
)
g
(
g
(
)
y
g
p
p
y
7) PXL-100 Installation Verification
When operating correctly, a PXL-100 will store and process card information, store transactions for
door operations and accept inputs from either a hand held programmer or a PC. To verify that the
controller is working correctly, present a card to the reader. If the card has not yet been enrolled,
the reader will beep once. Verify that the unit is working correctly by enrolling a card with the Keri
Systems HPP-100 or the TAP-100 software.
Consult the operation manuals for the products for instructions on how to enroll a card. Present the
newly enrolled card and listen for a double beep from the reader. This indicates that the card has
been successfully stored in memory. Wait five seconds and present the card again. Listen for the
click made by the relay controlling the door lock. In noisy environments it may be necessary to
place your finger on it to verify that it has actuated. Consult the trouble shooting guide below if the
system does not respond as expected. Additional help may be obtained from the diagnostics guide
beginning on page 8 of this document.
8) Trouble Shooting a PXL-100
Problem Probable Cause Corrective Action
The PXL-100 does not power up.
I.E. there is no display on the LCD
screen.
Reader does not beep or reader
LED does not flash when presentin
a card
Or, Controller keeps resetting.2
With Reader connected, using the
HPP-100 programmer, PXL-100
controller will not accept default PIN
0000
1) No power input
applied, or inadequate
2) Wired incorrectly. AC must be connected to Pins 4 and
1
ANTENNA Terminal.
incorrectly.
3) Reader power is
insufficient.
1)PIN has been
changed.
Enroll it in Time Zone 0 (also known as level 0).
ower applied.
Reader is not
ed into the
Reader is wired
Check main
Measure voltage input at POWER
TERMINAL 12VAC at Pins 4 and 5
+/- 20%
+/- 2 volts.
5 of INPUT POWER TERMINAL.
DC must be connected to Pins 2
and 3(-) of INPUT POWER
TERMINAL
Check to see that the Reader is
ed into the terminal properly---a
in is not slipped.
LED lead (BRN) must be connected
to pin 1 of ANTENNA TERMINAL
BEEP lead (GRN) must be connected
to pin 2 , (RED) lead to pin 3, (BLK
to pin 4 and (BLU) lead to pin 5.
Check to ensure wire is makin
contact with the connector--connector contact is not crimped on
wire insulation.
Measure reader voltage at ANTENNA
TERMINAL pin 3 (+) and pin 4
GND). Ensure 12volts +/- 2 volts is
measured at the reader, usin
Belden 24# wire or larger, reader
distance must be less than 500 feet.
Reset PIN to default value b
removing power and reapplyin
ower with the S1 button on the main
board de
down until a double beep is produced
the reader.
b
ower circuit breaker.
or 12VDC at pins 2 (-) and 3
ressed. Hold the button
.
Page 5
01816-100 Rev. E
1530 Old Oakland Rd., Ste 100 San Jose, CA 95112 U.S.A. (800)260-5265 (408)451-2520 Fax (408)441-0309
Page 6

PXL-100:SMART ENTRY CONTROLLER
(
g
[
g
put,
p
j
g
g;
)
(
,
p
y
g
)
,
gy,
p
g
g
y
,
p
p
jump
g
8) Trouble Shooting a PXL-100 (continued)
Problem Probable Cause Corrective Action
The PXL-100 will not accept card
enrollment commands.
No response to HPP-100
commands---audible or visual.
2) RAM has been
corrupted.
1)Reader’s Blue lead
is connected to the
ANT-B input instead of
the ANT-A. Enroll
cards throu
only.
1) Reader is
erative.
ino
h ANT-A
Reset RAM by placing PXL-100
NODE)into the program mode (enter
PIN) and entering the followin
command: 0999[SEND]--999
SEND].
command will erase all programmed
data.
Connected the enrollment reader to
the ANT A in
Point HPP-100 within a few inches of
the receiver board located at the
base of the main board
DB25M connector. Enter the PIN
and LCD will prompt programmin
commands. If not, check reader
wirin
of the Antenna Terminal for
12volts+/-2volts.
CAUTION:
for card enrollment.
measure voltage at pin 3(red
This
ust above
.
2)Programmer
batteries are dead.
Read Range is very short 1)Very poor ground. Ground the PXL-100, pin 4 of TB-3
2)Unusual electronic
noise hazard present
in the reader location
such as a computer
monitor or a source
roducing an
high level of
i.e., high
ned to mount on
en.
At power up, reader continuousl
beeps and PXL-100 will not accept
a command.
extremel
RFI.
3)Reader cable is not
shielded and is
installed in a location
near a high source of
electromagnetic
ener
voltage.
4)Reader that is not
desi
metal is mounted on a
metal surface.
1)Door sense input
ins 5 and 6 of Master
Board Terminal is
o
HPP-100 Programmer, replace
batteries with two AA Alkaline
1.5volts) The batteries must be
Alkaline.
to a good earth ground.
Measure volta
or the receiver located on the main
board just above the RS232 connector. Voltage should be <1volt.. If
> 1 volt, turn off the monitor or
relocate the source of RFI . Or
relocate the reader. Re-measure the
voltage at TB3, must achieve less
than 1 volt.
Add shielded cable and relocate the
cable. Es
installed in conduit with hi
lines. Use voltage measurement as
in step 1 above.
Relocate reader to a nonmetallic
surface or change reader for one
designed to mount on metal
Place
of Master Board Terminal, or , if
a door switch, check the
usin
switch for proper operation.
e at test point 3(TB3
ecially if the cable is
h voltage
er between pins 5 and 6
Page 6
01816-100 Rev. E
1530 Old Oakland Rd., Ste 100 San Jose, CA 95112 U.S.A. (800)260-5265 (408)451-2520 Fax (408)441-0309
Page 7

PXL-100:SMART ENTRY CONTROLLER
8) Trouble Shooting a PXL-100 (continued)
Problem Probable Cause Corrective Action
PXL-100 will not communicate withPC1)Serial port is not
configured properly.
Reset the PXL-100 which returns the
PIN and serial port to the default
values. Apply power while holding
down the S1 button on the main
board for 10 sec., or a until a double
beep is produced. OR, use the HPP100, input the PIN and press
2 1 SEND].
system values or card file.
Will not affect other
[Level 9
(cont.) 2)PXL-100 to PC
cable is not correct.
continued 3)PC port
configuration is not
correct.
PXL-100 will not communicate with
a serial printer.
PXL-100 will not communicate with
Modem.
1)PXL 100 serial port
is not configured to
communicate with
printer.
2)Cable is wrong. Check PXL-100 manual for the
3)Printer is not set up
properly.
1)PXL-100 serial port
is not configured to
communicate with
modem.
2)Cable is wrong. Check PXL-100 manual for the
3)Modem is the wrong
type.
4) Modem is not
initialized correctly
Check manual for cable description.
KDP-104 is correct cable for 25 pin
PC Input . Note: KDP-104 can be
installed backwards. Check cable
labels or manual for correct pin
assignments. KDP-105 is the
correct cable for 9 pin PC input
Using the TAP-100 under the
main menu, select
and, assign the right comm port to
Prox port
Using the HPP-100, enter PIN,
command
Correct command will produce a
double beep.
correct cable. Check printer manual
cable pin connections; cable
connections may be different than
specified in the manual. Cable
should be the Keri KDP-106.
Check Printer manual and set
controls for printer to a baud rate of
2400 and a format of 8 bit, no parity,
one stop bit.
Using the HPP-100, enter PIN,
command
Correct command will produce a
double beep.
correct cable. Cable should be the
KERI KDP-107.
Check s modem owners manual.
Modem should be Hayes compatible
communication baud rate of 9600 or
faster.
With the KDP-107 cable attached,
reissue the
command
.
[LEVEL] 9 2 0 [SEND].
[LEVEL] 9 2 2 [SEND].
Port Assignment
[LEVEL] 9 2 2 [SEND]
Setup
.
Page 7
01816-100 Rev. E
1530 Old Oakland Rd., Ste 100 San Jose, CA 95112 U.S.A. (800)260-5265 (408)451-2520 Fax (408)441-0309
Page 8

PXL-100:SMART ENTRY CONTROLLER
y
)
prop
y
g
y,
y
g
y
y
y
y
g
,
p
p
p
,
p
)
g
g
g
p
g
,
[
p]
p
,
g
g
[
]
p
g
p
g
p
p
p
p
prog
g
g
p
[
]
g
)
g
p
y
y
8) Trouble Shooting a PXL-100 (continued)
Lock Relay Cycles on and off
continuousl
.
TAP-100 Software will not boot. 1)PC does not have
PC will not communicate with
network.
PC will not communicate with
network via a Modem.
Some PXL-100’s within the
network are not communicatin
with the PC.
Prom is not seated
1
erl
enou
h conventional
memor
.
Visually inspect the E-Prom labeled
and located on the ri
PXL-100 above the lithium batter
to ensure all pins are seated properl
in the Prom socket
Must have 560K b
ht side of the
tes available
of conventional memor
DOS manual memor
manager
for instructions maximizin
available free memory.
1)Cable is wrong. Review the Installation Manual
Figure 4. Proper cable for a PC
in serial input is Model KDP-
9
105. Cable for a PC 25
in
ut is Model KDP-104(since
both ends or the cable are
2)Computer is not
ured to
confi
communicate
throu
h the proper
serial
ort.
sockets
observed
labeled indicatin
Usin
select
menu. In the Setu
select
Assi
ENTER
indicate the PC
‘
olarity’
must be
. KDP-104 cable is
direction..
the TAP-100 software
Setu
from the main
submenu
Port Assi
nments
n the correct port and
The Prox port must
ort in which the
cable is connected.
3)PXL-100 serial
connector is not
confi
ured to
communicate with
the PC.
Set the PXL-100 serial
confi
uration by applying power
with the reset button on the main
board de
or until the reader
double bee
ressed for 10 seconds
roduces a
. This reset
rocedure will also reset the PIN.
This reset will not affect other
rammed data.
1) Wrong type of
modem
2) PXL-100 is not
confi
ured to
communicate with
Must be Hayes compatible with
baud rate of at least 9600
Usin
HPP-100, configure the
PXL-100 serial
ort for remote.
Level] 9 2 2 [SEND
the modem.
Address Clash. Check the address dip switch
1
settin
on each controller option
board.
2)Corrupted RAM in
one or more of the
controllers.
In the
Utilities
Network
menu, enter the
sub-menu. Examine the
network information and note the
Res
On earl
onding
PXL-100’s number.
models this number is
Hexadecimal. Reset the fault
PXL100/s
. Refer to
in serial
.
ort to PC
.
Page 8
01816-100 Rev. E
1530 Old Oakland Rd., Ste 100 San Jose, CA 95112 U.S.A. (800)260-5265 (408)451-2520 Fax (408)441-0309
Page 9

PXL-100:SMART ENTRY CONTROLLER
9) Diagnostics Guide
GENERAL INFORMATION
A program for test and operation analysis (diagnostics) is built-in to every PXL-100 equipped with
an option board and LCD display. Initiating the test does not require the TAP-100 software, PC or
hand-held programmer. The program is designed to be used in the field to test certain card and
controller functions. There are nine tests currently available:
1.
Tag Test
2.
Ram Stability Test
3.
Watchdog Test
4.
Media Test
GETTING STARTED:
To use the test program, the PXL-100 must have a Reader, Option Board and an LCD connected.
The Option Board can be any model with the exception of the OB-1. A hand-held programmer is
required to configure the serial port for all controllers. To enter the program, perform the
following procedure:
1. Remove power from the PXL-100 controller.
2. Locate the
the
3. Reapply power while holding the push-button down until the LCD displays the message
OPTIONS.
4. Release the button and the first test title
---tests that the tags/cards and readers are functioning reliably.
---provides a readout of coded information on a Wiegand or mag-stripe card.
Option Board
switch (SW1) and just to the left of the network LED (D9).
ID
:
---determines whether RAM is affected by switch transients.
---ensures the watchdog is working.
test push-button (S1) located in the upper left corner just above
(TAG TEST)
will appear on the LCD screen.
.
Step through the selection of tests by depressing the option board push-button
screen will display each test in order. To initiate a test, press the push button
test, press the option board push-button once. Use one of the following methods to exit the
DIAGNOSTICS program:
1. Remove and reapply power,or...
2. Using the option board push-button, step through tests until the LCD displays
Double press the push-button and the controller will reset to normal operation, or...
3. Select the
automatically reset to normal operation.
NOTE: When the DIAGNOSTICS test is activated, the controller will not respond to normal door
operation commands, i.e., the controller will not grant access, report attempts or alarms.
WATCHDOG
test. If the
WATCHDOG
is functioning, the system will
twice
. The LCD
once
. To leave a
EXIT
.
Page 9
01816-100 Rev. E
1530 Old Oakland Rd., Ste 100 San Jose, CA 95112 U.S.A. (800)260-5265 (408)451-2520 Fax (408)441-0309
Page 10

PXL-100:SMART ENTRY CONTROLLER
9) Diagnostics Guide (continued)
TEST OPERATION:
Tag Test:
Object Of The Test:
When To Use The Test:
altogether. Assumes that other cards in the system are working.
Procedure:
test in the series) and double press the option board button to enter the test. The LCD
screen will display the message
card to the reader will be acknowledged by a double beep and the internal decimal
number of the card will be displayed on the LCD. Example:
Holding the card in the reader field or re-presenting the card to the reader should have
no effect on the LCD display, i.e., the number displayed should not change---it should
remain stable. If the number changes, it is an indication that the card is unstable and
should be replaced. If the number remains stable, the test has ensured the operation of
the card, reader and the signal path to the controller processor.
Since the card was working and the test has proven its stability, there are three possible
reasons for the card not working:
Place the PXL-100 in the diagnostics mode and step to the
To test the operation and stability of the card/tag (s).
When a card operation is intermittent or quits working
TAG TEST
TAG TEST: 125K
TAG TEST: 125K
A: 2206636772
. Presenting the suspect
(first
.
1.
The Card number may have changed.
TEST should have revealed any instability in the card. If a PC was used with the
TAP-100 software for the original programming, the card/tag number will be listed in
the card file. This number can be compared to the number indicated in TAG TEST. If
the numbers differ, the card is faulty. Discard the faulty card, void its original slot and
enroll a new card.
2.
The Card was voided.
enroll the card. If the card was voided using the remote programmer in which case
the TAP-100 will show the card in file. Using the TAP-100 software, send the card
file to the network.
3.
RAM has been corrupted
PC and TAP-100 version 2.1 or later, use the ‘Install New Reader’ function found in
the
UTILITIES
If using the hand held programmer, enter PIN and the reset command---0999
SEND, 999 SEND.
Resetting the RAM will erase the entire data base of the controller. Be sure to
have a back-up of the card file on disk, or ensure that the PC, TAP-100 card file
is current. It is a good idea to perform the
the RAM.
Ram Stability Test:
Object Of The Test:
locks, motors or other loads, or electrical noise induced into the controller is corrupting
the RAM.
When To Use The Test:
apparent reason, i.e., cards quit working, PIN is erased, time and date off, etc.. Also, us
as a final installation test when connecting the controller to a large inductive load such as
a gate motor or parking barrier. Test will ensure that the electrical isolation of the system
is sufficient and to prove that the electrical noise caused by switching is not corrupting
the RAM.
Procedure:
the RAM STABILITY message displayed on the LCD screen. This test is a nondestructive
menu---
To test whether voltage transients caused by switching power to
Initiate the RAM test by double pressing the option board push-button with
If voided the TAP-100 will not have the card on file. Re-
. Reset the RAM using the reset command. If using a
READERS
Use when changes in the programmed data appear for no
sub-menu.
This possibility is unlikely since the TAG
Ram Stability Test
before resetting
Page 10
01816-100 Rev. E
1530 Old Oakland Rd., Ste 100 San Jose, CA 95112 U.S.A. (800)260-5265 (408)451-2520 Fax (408)441-0309
Page 11

PXL-100:SMART ENTRY CONTROLLER
9) Diagnostics Guide
RAM test. It causes the 10 amp form C relay to toggle on and off while th RAM is
scanned. The RAM check sum is read for each cycle of the relay. If the check sum
changes, the change indicates a RAM failure. The LCD will show the number of times
the relay is cycled and the number of RAM failures:
RAM STABILITY
P= 00000 F=00000
The number of times the relay is cycled is indicated by the P number; RAM failure
is indicated by the F character.
One failure is too many. The RAM must be reset; but before resetting the RAM, isolate
the source of the interference. Disconnect the load from the relay. Run the stability test.
If the RAM does not fail, the problem is in the load. Check all connections and add
suppression. If the RAM continues to fail, disconnect the network cable and rerun the
test. If the test passes, check all network connections and try to isolate the area of
network cable where an electrical interference is occurring. If the RAM continues to fail,
add suppression to the AC power line input.
Watchdog Test:
Object Of The Test:
When To Use The Test:
not working---if the controller locks up and will not reset unless primary power is removed
andreapplied.
Procedure:
is functioning, the completion of the test will exit the diagnostics program. As soon as the
watchdog test is initiated, the LCD will show the following:
Perform this test after all other tests are completed because if the watchdog
To ensure the operation of the watchdog timing circuit is operating.
To check the watchdog, or if symptoms indicate the watchdog is
.
WATCHDOG TEST
COUNTDOWN 4
The countdown number will continue to step to 1 and if the watchdog timer is
functioning the controller will exit the diagnostics program and the LCD will show the KERI
name the day and time.
Media Test:
Object Of The Test:
the proper operation of the reader.
When To Use The Test
Procedure:
Media Test function. Present the card to the reader. If successfully read, the card’s
encoded number will appear on the LCD.
Note: For PXL-100 versions with revision numbers of 2.4 or less, the card encoded
number will be printed in HEXADECIMAL .
With the Wiegand or mag-stripe reader connected to the OB-7, initiate the
To verify the encoded number on a Wiegand or mag-stripe card and
: Final testing the system to check the reader and card operation.
Page 11
01816-100 Rev. E
1530 Old Oakland Rd., Ste 100 San Jose, CA 95112 U.S.A. (800)260-5265 (408)451-2520 Fax (408)441-0309
Page 12

PXL-100:SMART ENTRY CONTROLLER
10) I/O Configuration Guide
The I/O ports can be configured by using S1 on any of the option boards or by using the HPP100, Hand Held Programmer. This activates an
have this message appearing above them. The PXL-100 must be a design 5 PC board (see
section 1
firmware (see the PXL-100 diagram for an indication of where to look for this). If the controller
is an earlier model, the port must be configured with an HPP-100. The system is navigated
using the S1 button on the option board. Do not press the S1 button too rapidly. The system
responds to quick depressions of the switch as a double click. A double click activates the
menu or command you are currently viewing. A single click continues to move you through the
menu. Anytime you select a command (double click), the unit will return you to the main
OPTIONS MENU
Warnings
, to identify a design 5 PXL-100) and must have version 2.3 or later
. You may then move through the menu again. To configure the serial port:
OPTIONS MENU
. All commands below will
1) Locate S1 on the option board. Remove power from the PXL-100.
2) Depress S1 on the option board while reapplying power to the PXL-100.
3) The Display on the option board will read
4) Press the S1 switch again and you will see
come immediately after the
5) Double click on the
6) The message
7) Slowly click the S1 button until the desired port setting is reached. The
options are:
8) Double click on the mode for which you which to configure the serial port.
WARNING!! SYSTEM RESET should only be used to completely reset
the unit. Use of this command will completely and irretrievably erase all
databases in the controller.
CONFIGURATION
VIEW PORT SETTNG
- SET TO PRINTER
- SET TO HOST
- SET TO MODEM
- SET TO MEMORY MODULE
- SYSTEM RESET
DIAGNOSTICS
(direct connect to PC)
DIAGNOSTICS
CONFIGURATION
message.
menu.
(sic) will appear.
.
. It should
.
Page 12
01816-100 Rev. E
1530 Old Oakland Rd., Ste 100 San Jose, CA 95112 U.S.A. (800)260-5265 (408)451-2520 Fax (408)441-0309
Page 13

PXL-100:SMART ENTRY CONTROLLER
11) Specifications and System Requirements
Controller Architecture -
System Configuration
Hand Held Programmer.
System Capacity - Controllers -
- Cardholders -
- Transactions -
-
-
Outputs
- RS-485 network communications when not using the system in stand alone mode
- General purpose inputs and outputs are configurable depending on system setup
Memory Retention
Power Requirements -
Power Output
Current Draw
- PXL-100 + Option Board (400mA max)
- MS-3000/MS-5000/KDF-3E/KWS-5E (100mA max), KMI-20E/KME-22E (250mA max)
- RS-232 serial port for external communications to PC, modem or printer
-12VDC for lock power, 400 mA max, Relay (formerly open collector on design 4 units)
- Not to exceed 900mA (including PXL-100, Reader, and Door Strike)
Single door networkable access control system
- Accomplished with either the TAP-100 DOS based software or the HPP-100
From 1 to 32 controllers (1 to 64 Doors if using in conjunctions with
an OB-9 2nd Door Control Option Board)
7000 cards stored locally at each controller
3000 events stored locally at each controller
Time Zones
Holidays
- 5 year battery back up of RAM
12 VAC @20VA or 12VDC @1.5 Amp
- 32 distinct time zones
- 20 Days
.
Relay Contact Rating
24VDC @ 2Amp max
Inputs -
- REX - Normally Open
- Gen Purpose - Normally Closed
Printer Requirements
PC Requirements
Mbyte of RAM and 520KB free of conventional memory. Keri recommends
installing and running the software from the hard drive.
Door Sense - Normally Closed
2400 BAUD
8 Bit , no parity
1 stop bit
- 32VAC @ 5Amp max
- Serial RS-232
- IBM Compatible, 386 or better, Color monitor, 20 megabyte hard drive and 1
12) Cable and Wiring Requirements
Cable Requirements for Readers -
Reader Type Length with 24AWG Length with 22 AWG
KDF-3E, KWS-5E 450' 600'
MS-3000, MS-5000 350' 500'
KSI-10E, KSE-12E 350' 500'
KMI-20E, KME-22E 300' 450'
Readers (Belden 9536, 22AWG or equivalent. Larger guages
should be used for longer distances.)
1530 Old Oakland Rd., Ste 100 San Jose, CA 95112 U.S.A. (800)260-5265 (408)451-2520 Fax (408)441-0309
Page 13
01816-100 Rev. E
Page 14
PXL-100:SMART ENTRY CONTROLLER
12) Cable and Wiring Requirements
Input Power
- 12VAC or 12VDC at the PXL-100. Allow for power drop over the length of the cable.
(CONT)
(Belden 8461 or equivalent)
Lock Power
- If using the PXL-100 lock power output do not run more than 500’. (Belden 8461 or
equivalent)
RS-232 Cable
- Four conductor shielded 22 AWG wire. Distances of more than 50’ are not
recommended. (Belden 9537 or equivalent, 22 AWG shielded cable, 7 conductor)
RS-485 Network Wiring -
2 twisted shielded pairs (one each data, and ground) is recommended.
(Belden 1419A or equivalent)
13) Serial Cable Configuration
Versions 3.0 firmware of later revisions must use the series 5000 cables for serial connections.
Pre-revision 3.0 units must use the 100 series cables. For pin outs of the 100 series cables, please
consult the tables below. 5000 series cables will be introduced in Summer, 1996.
Model # Guide to Cables and Series
Function 100 Serie s 5000 Series
PXL-100 to PC (25 P in) KDP -104 KDP -5004
PXL-100 to Laptop (9 P in) KD P -105 K D P -5005
PXL-100 to Serial Printer KDP-106 KDP-5006
PXL-100 to M odem KD P -107 K DP -5007
PX L -100
(25 P in S ocke t) Co lor
Pin 2
Pin 3
Pin 7
Pin 8
KDP-104 Pin Out
Green
Red
Black
White
P C
(25 P in S ocke t)
Pin 3
Pin 2
Pin 7
Pin 20
.
PX L -100
(25 P in S o cke t) Color
Pin 2
Pin 3
Pin 7
Pin 8
G reen
Red
Black
White
KDP-106 Pin Out
KDP-105 Pin Out
P X L -100
(25 Pin Socket) Color
Pin 2
Pin 3
Pin 7
Pin 8
G reen
Red
Black
White
KDP-107 Pin Out
PX L -100
(25 P in S o cke t) Color
Pin 2
Pin 3
Pin 4
Pin 5
Pin 7
Pin 8
Pin 20
G reen
Red
Brown
O range
Black
White
Blue
P C
(9 Pin Socket)
Pin 2
Pin 3
Pin 5
Pin 4
P rin te r
(25 Pin Plug)
Pin 3
Pin 2
Pin 7
P in 20
M o d e m
(25 Pin Plug)
Pin 2
Pin 3
Pin 4
Pin 5
Pin 7
Pin 8
Pin 20
Page 14
01816-100 Rev. E
1530 Old Oakland Rd., Ste 100 San Jose, CA 95112 U.S.A. (800)260-5265 (408)451-2520 Fax (408)441-0309
 Loading...