

Page 1
NXT Reader Setup
NXT Readers are used exclusively with Keri’s revolutionary access control system
based on the NXT and the MSC Series of IP-based Controllers. Communication to the
readers is via the controller's RS-485 buses, enabling the data to be encrypted and
allowing the readers to be fully supervised - reader events will be generated in the event
of reader failure or disconnection
- (these reader 'offline' events can be setup as 'alerts' in the software).
Another NXT reader benefit is the fact you can add an NXT Exit reader (supported with
the NXT-MSC controllers). The Exit reader is added to the same bus as the standard
NXT reader but provides you with true In/Out reader capability without burning an additional reader port. Even though the readers are wired into the same bus they show as
independent readers within Doors.NET allowing you to control 4 x read IN and 4 x read
OUT doors with a 4-door controller.
The RS-485 communication method also allows for a maximum cable run distance of
1,000 feet (approx. 300m) from the controller. The readers are compatible with all NXT
Series cards and tags plus the readers can now be configured to read HID 125KHz credentials via a quick firmware upgrade which can be easily performed from the software.
This guide explains how to connect the readers to the controller, how to perform a firmware upgrade, program the reader to read HID credentials and how to add and use an
NXT Exit reader.
Page 1 of 14 P/N: 01999-001 - Rev L
Page 2
NXT Reader Setup
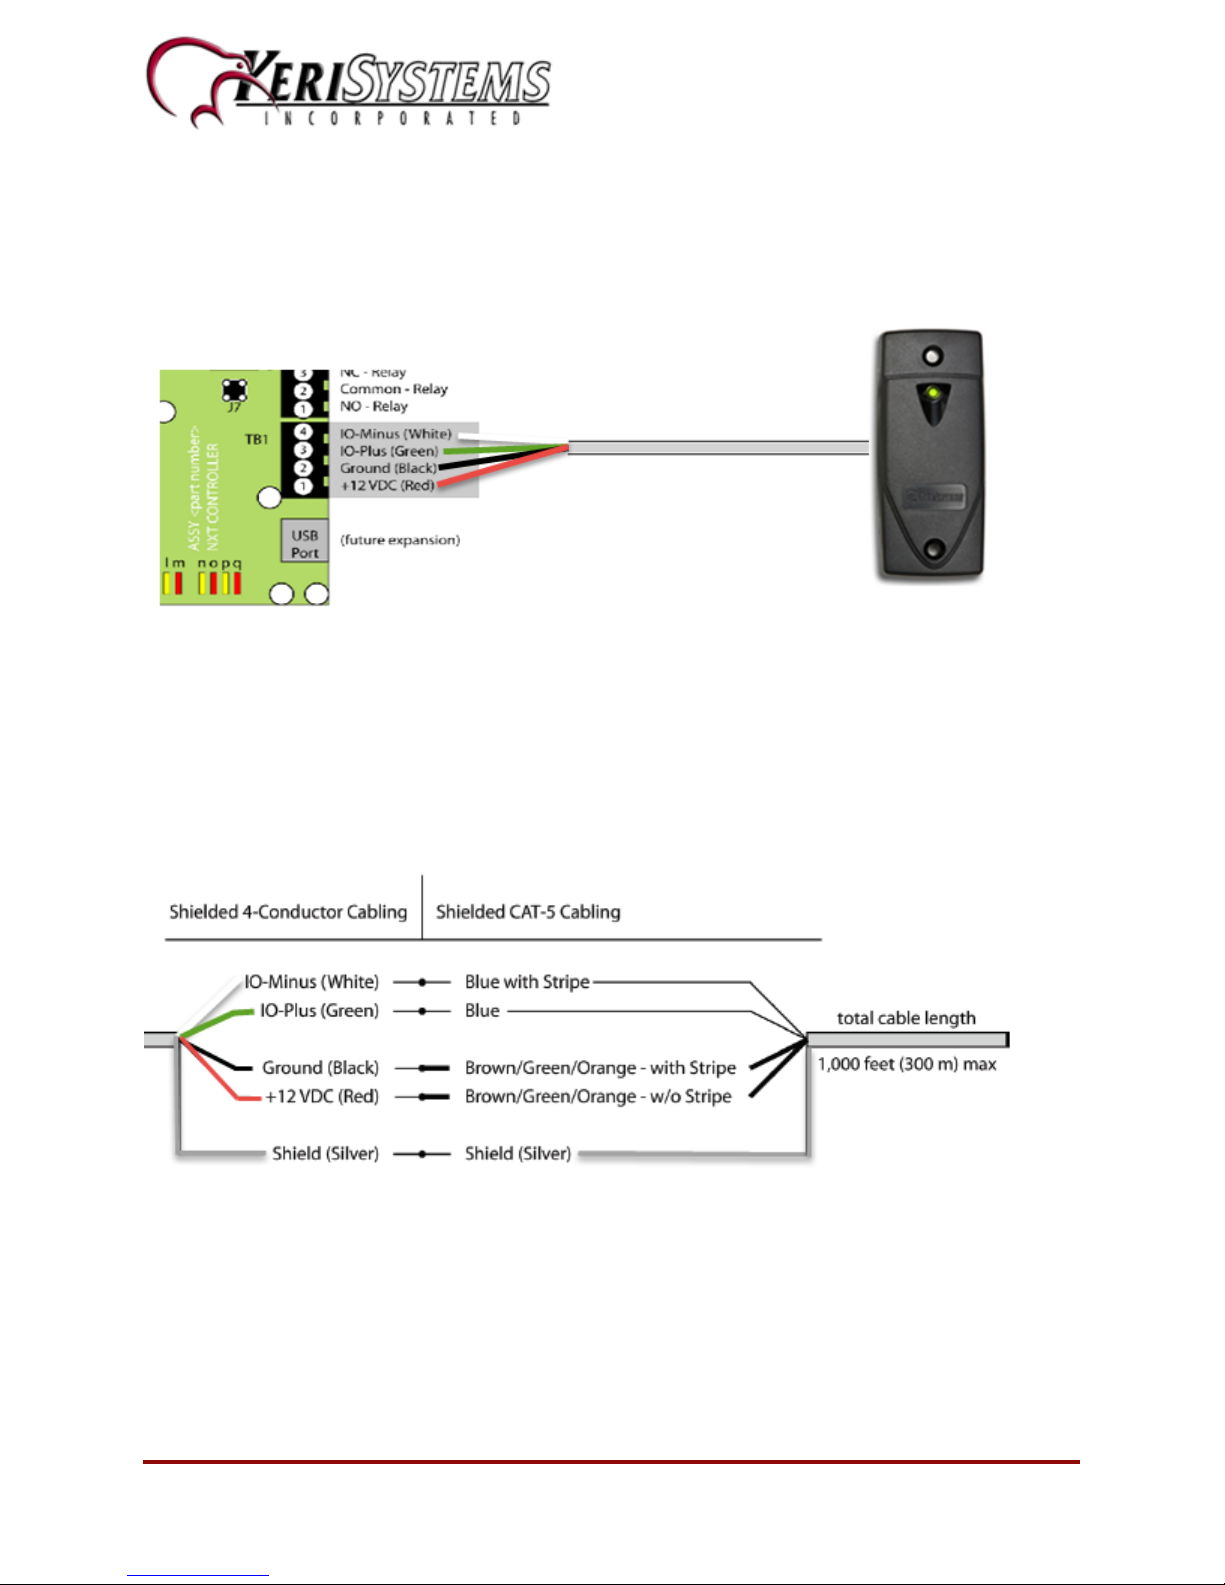
NXT Reader Wiring to the Controller
NOTE: The recommended cable type is shielded, stranded, 4-conductor, (Belden 9534,
or equivalent) or shielded CAT-5.
Wiring when using CAT-5 Cable
Setting the Manufacturer Model
Once the reader has been connected to the controller then the controller will start to communicate to it automatically. You should notice a reader online event in live events when
the reader comes online. You should however, ensure the correct reader model is selected in the reader properties.
Page 2 of 14 P/N: 01999-001 - Rev L
Page 3
NXT Reader Setup
1. Go to Setup >> Hardware Setup >> All this will take you to the hardware tree.
2. Double-click the controller which will be listed beneath the communications gateway.
3. Locate and select the NXT reader by expanding the controller bus.
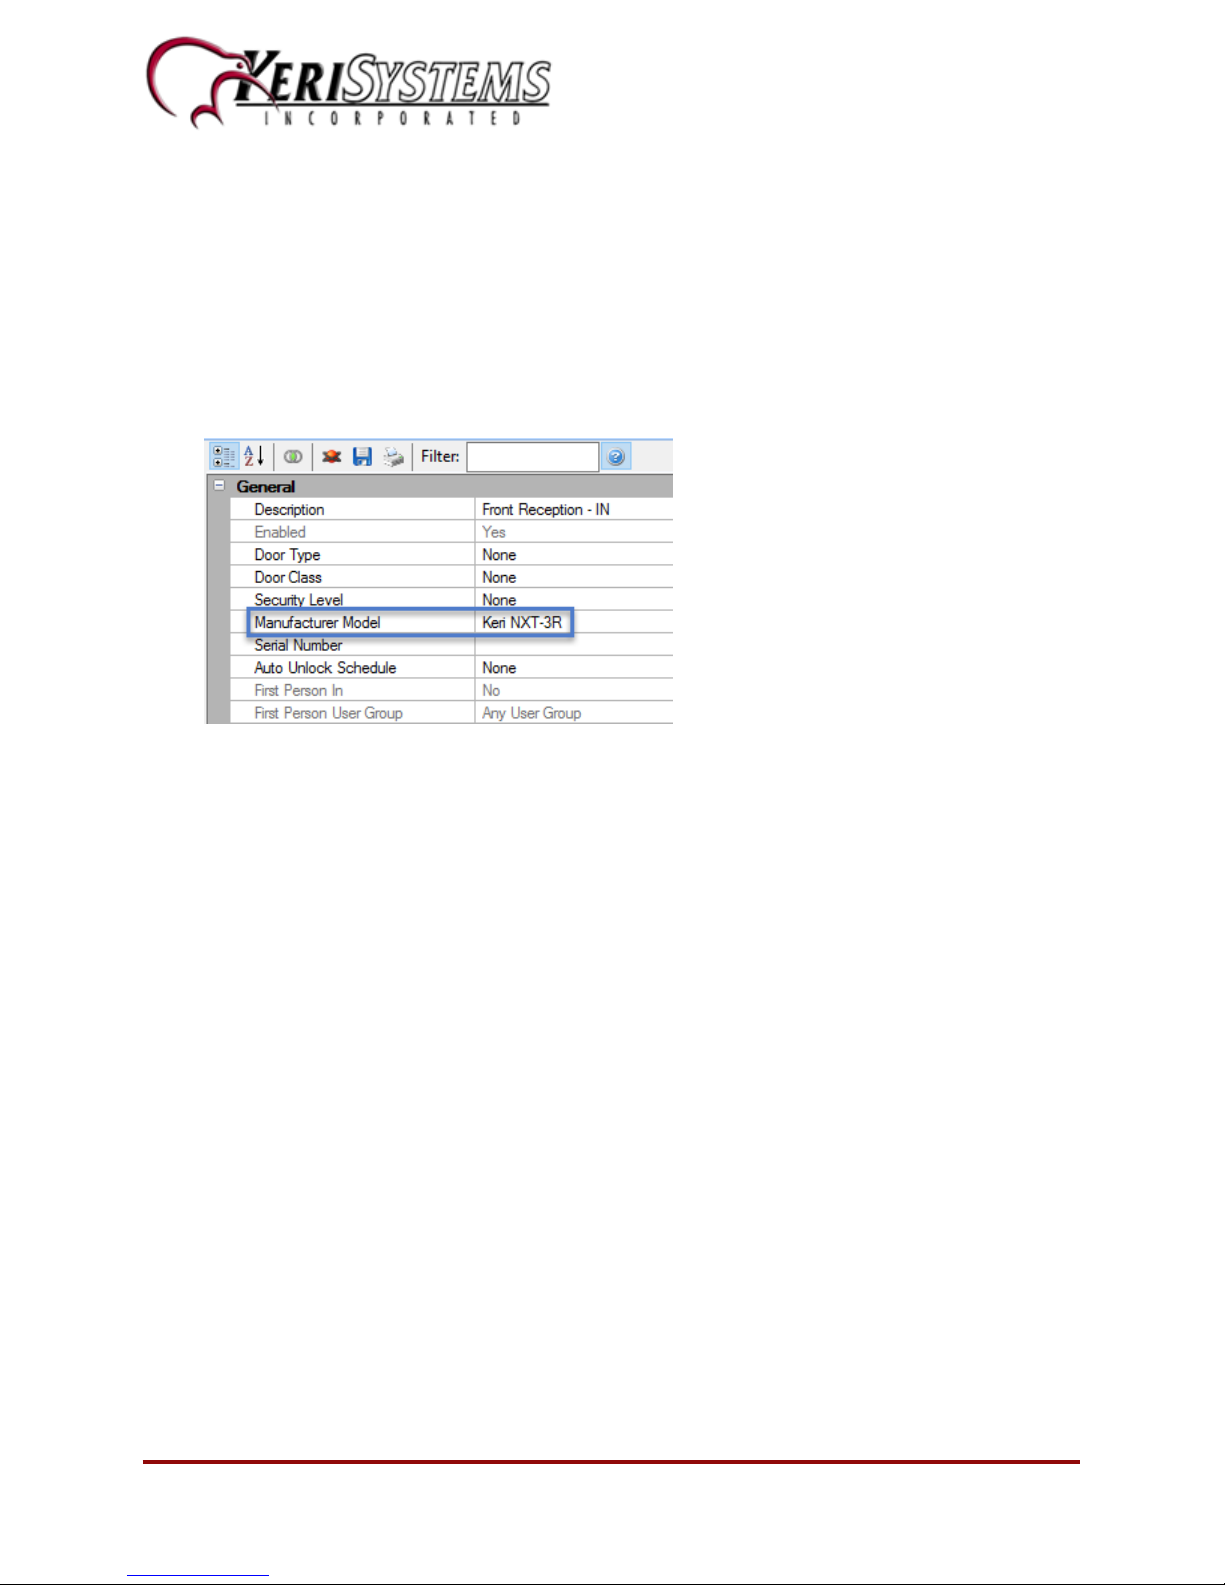
4. Once selected, the reader properties will be displayed on the right.
5. Verify the correct NXT reader model is selected for the Manufacturer Model.
Upgrading the NXT Reader Firmware
Keri NXT readers are now flash upgradable and Doors.NET version 3.5.1.22 includes a
firmware version (04.00.03) that allows the NXT readers to read both NXT credentials
and most 125KHz HID credentials, including; ProxCard II®, ISOProx® II, and
ProxKey®II.
Firmware Upgrade Procedure
Verify the readers are upgradable
Note: Only NXT readers with firmware version 04.00.00 and above can be flash
upgraded. So the first thing to do is check if the reader can be flash upgraded. There are
two ways you can check if the NXT reader is upgradeable:
- Check on the reverse of the reader and you will see a serial number. If the serial number has a letter F suffix then the reader CAN be upgraded.
Or:
1. If the reader is online, highlight it in the hardware tree.
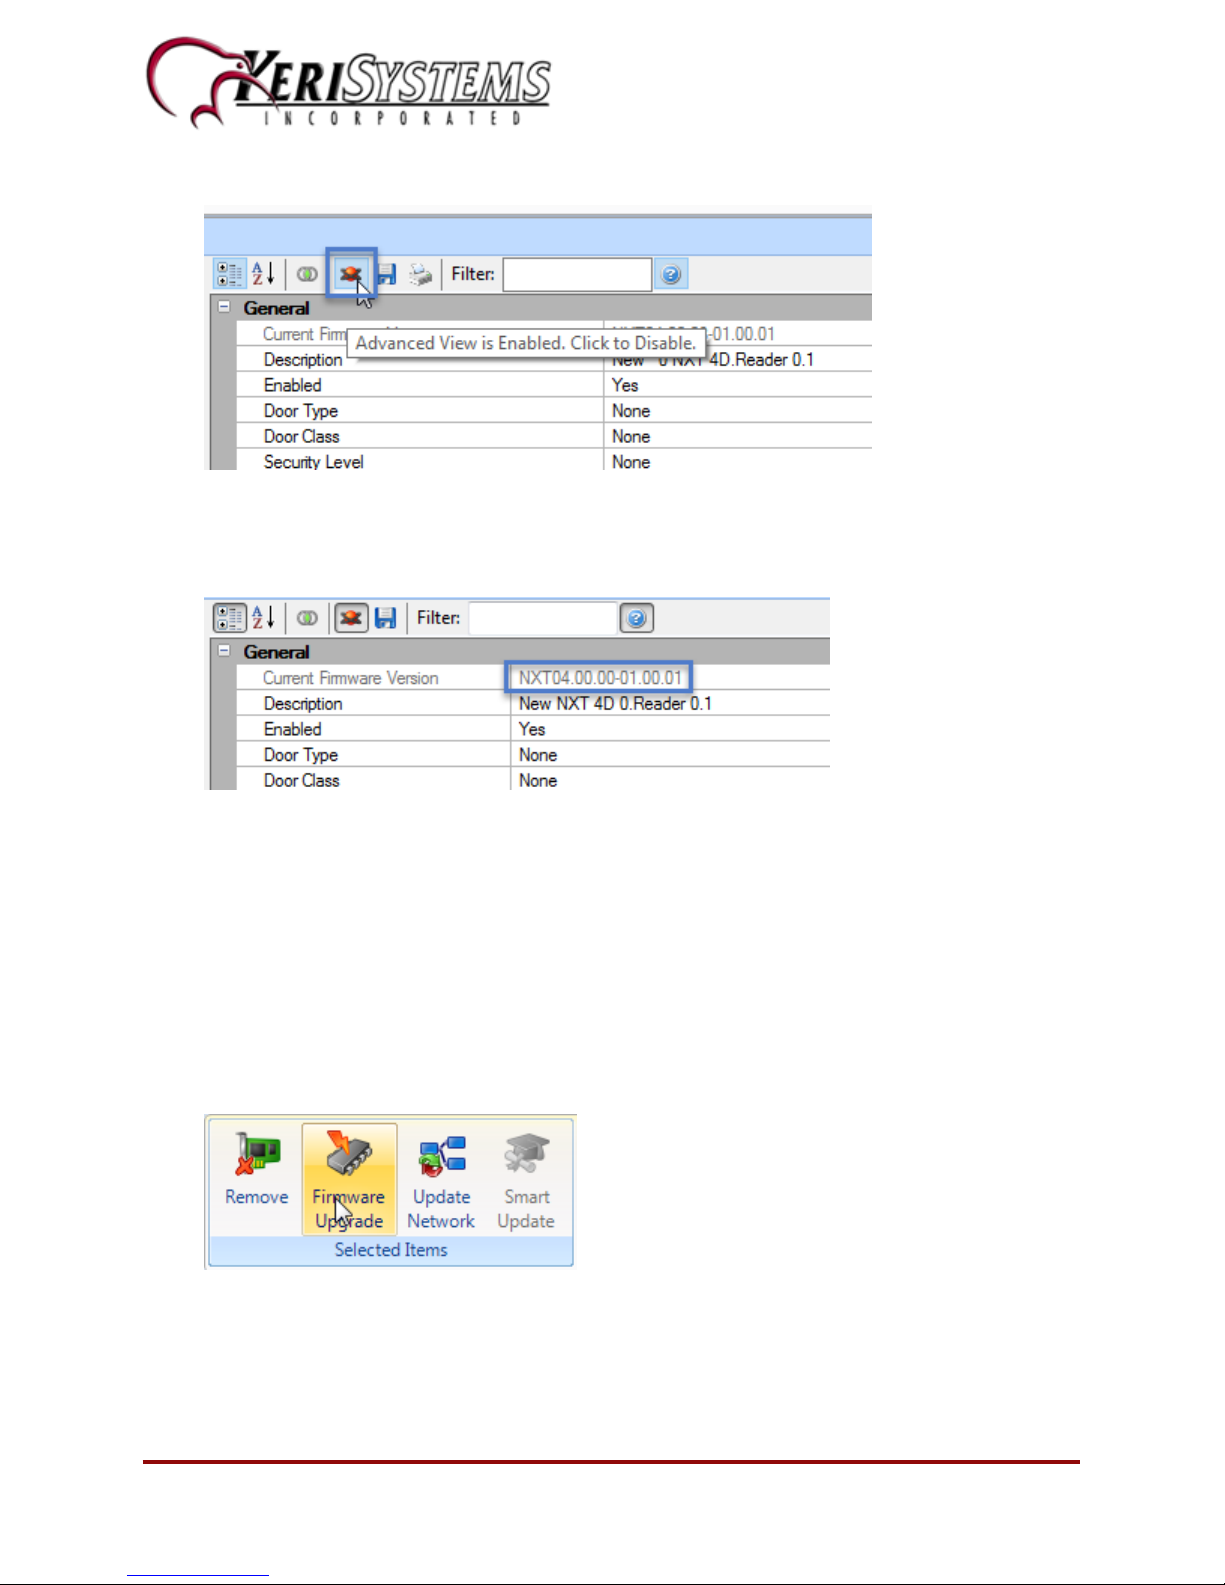
2. Ensure Advanced View is enabled for the reader properties.
Page 3 of 14 P/N: 01999-001 - Rev L
Page 4
NXT Reader Setup
3. At the top of the reader's General properties you will see the current firmware version.
4. If the reader firmware does not begin 04 then the reader CANNOT be upgraded.
Upgrading when using Standard NXT hardware
1. Navigate to the hardware tree.
2. Highlight a standard NXT controller.
3. Click the Firmware Upgrade icon.
4. The firmware upgrade window will appear and the NXT controller will be highlighted.
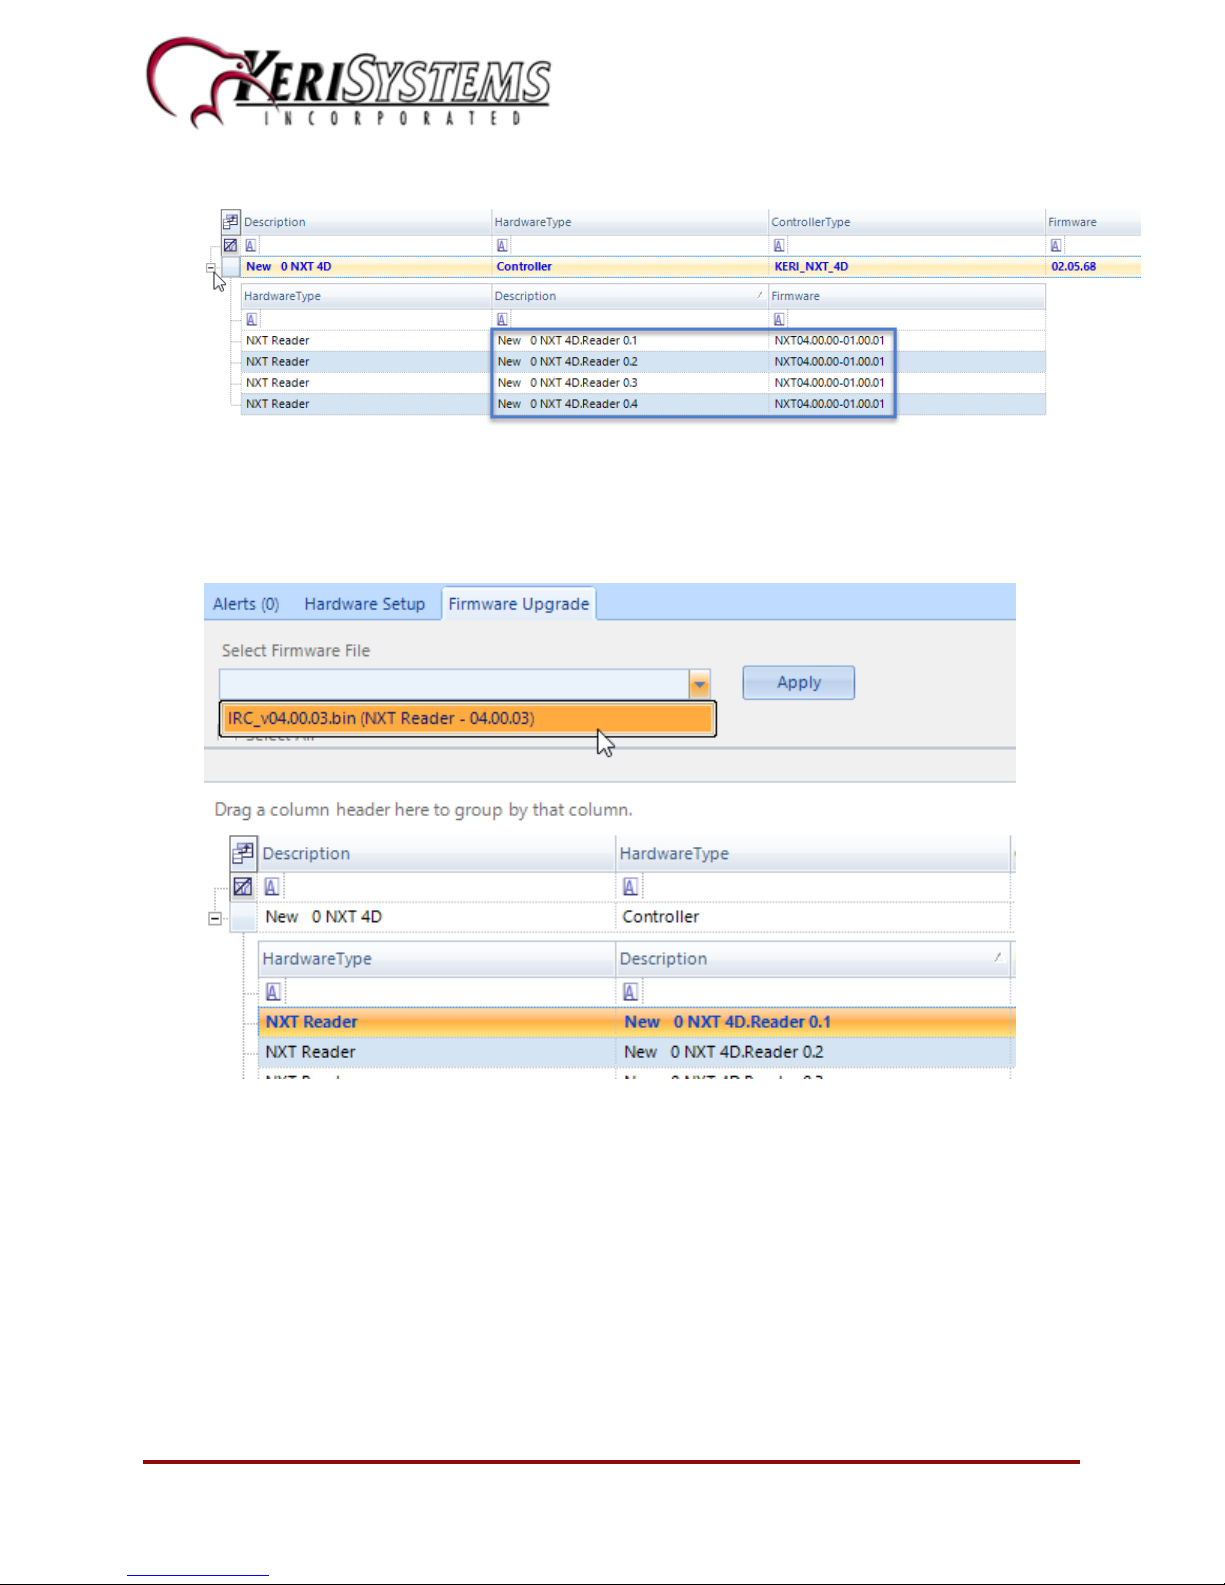
5. Click the expander (plus sign) located to the left of the controller, and you will see
listed the NXT readers which are connected to the controller.
Page 4 of 14 P/N: 01999-001 - Rev L
Page 5
NXT Reader Setup
6. Highlight the first NXT reader in the list.
7. From the Select Firmware File list, select the new 04.00.03 firmware (it will be the
only NXT reader firmware available).
8. Once selected, click the APPLY button.
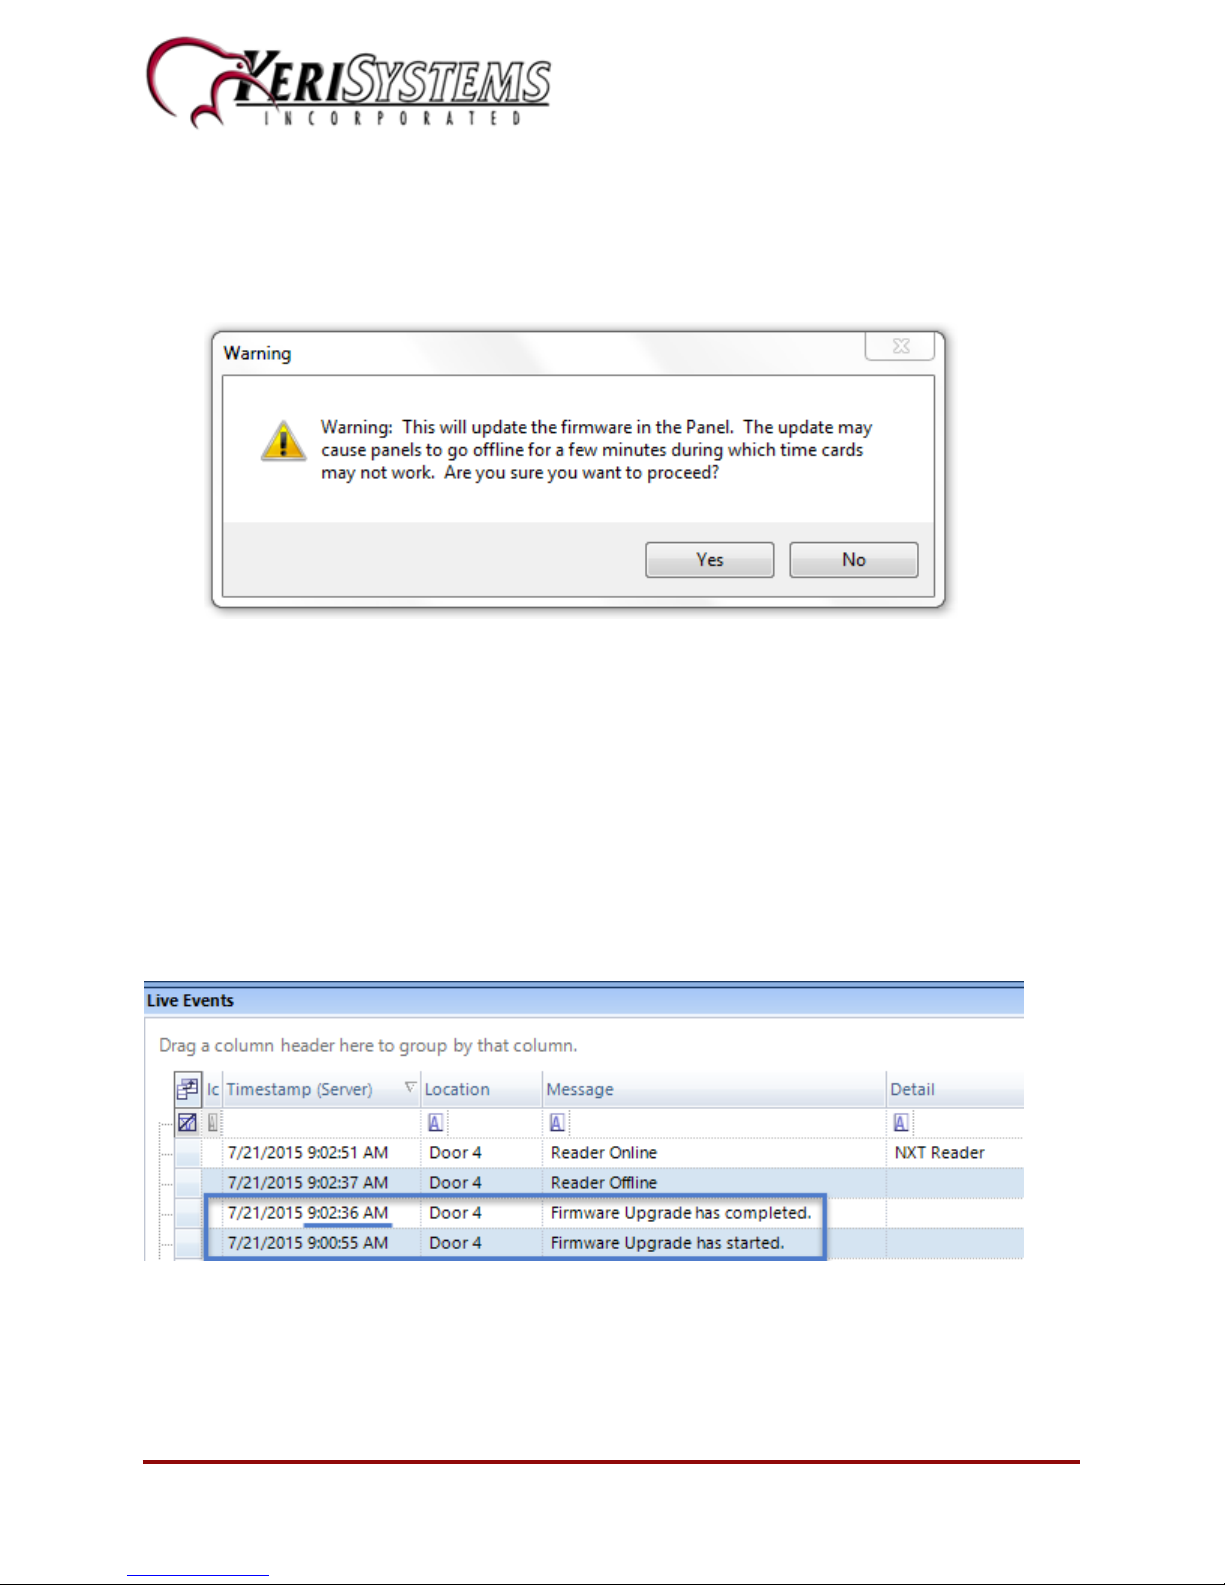
9. You will see a message notifying you that during the upgrade the reader may go offline for a few minutes.
10. If you are happy to proceed click the YES button.
11. The new firmware will be sent to each of the NXT readers connected to the controller (one-after-the-other).
12. While a reader is being upgraded the reader's LED will be quickly flashing. Each
reader should take no longer than 30 seconds to update.
13. A green progress bar will inform you of when the upgrading is complete.
Page 5 of 14 P/N: 01999-001 - Rev L
Page 6

NXT Reader Setup
Note: DO NOT attempt to update the NXT readers on more than one NXT con-
troller at a time.
14. Once complete, the new firmware version will be displaying for all the NXT readers
connected to the controller.
15. You can now close down the firmware upgrade window as the readers are now
ready for use.
Reader Firmware Update Procedure - NXT Mercury Powered
1. From the home tab, click on the controller status icon.
2. The controller status grid should display at the bottom of the screen.
3. Check that the NXT-MSC controller is using firmware version 1.201, or greater
Page 6 of 14 P/N: 01999-001 - Rev L
Page 7

NXT Reader Setup
Note: To upgrade NXT reader firmware using NXT Mercury Powered controllers
you MUST at least have controller firmware v_1.201
4. Click on Setup >> Hardware Setup >> All.
5. Ensure you have Advanced View enabled for the hardware properties.
6. Expand an NXT-MSC controller via a double-click.
7. Expand the controller bus (which has an NXT reader connected to it).
8. Highlight the NXT reader.
9. At the top of the reader properties you will see the reader's current firmware version.
10. With the NXT reader still highlighted, click the Hardware Browser tab.
Page 7 of 14 P/N: 01999-001 - Rev L
Page 8
NXT Reader Setup
11. Click the Firmware Upgrade icon.
12. Select the v_04.00.03 firmware file, then click Open.
13. The following message will appear.
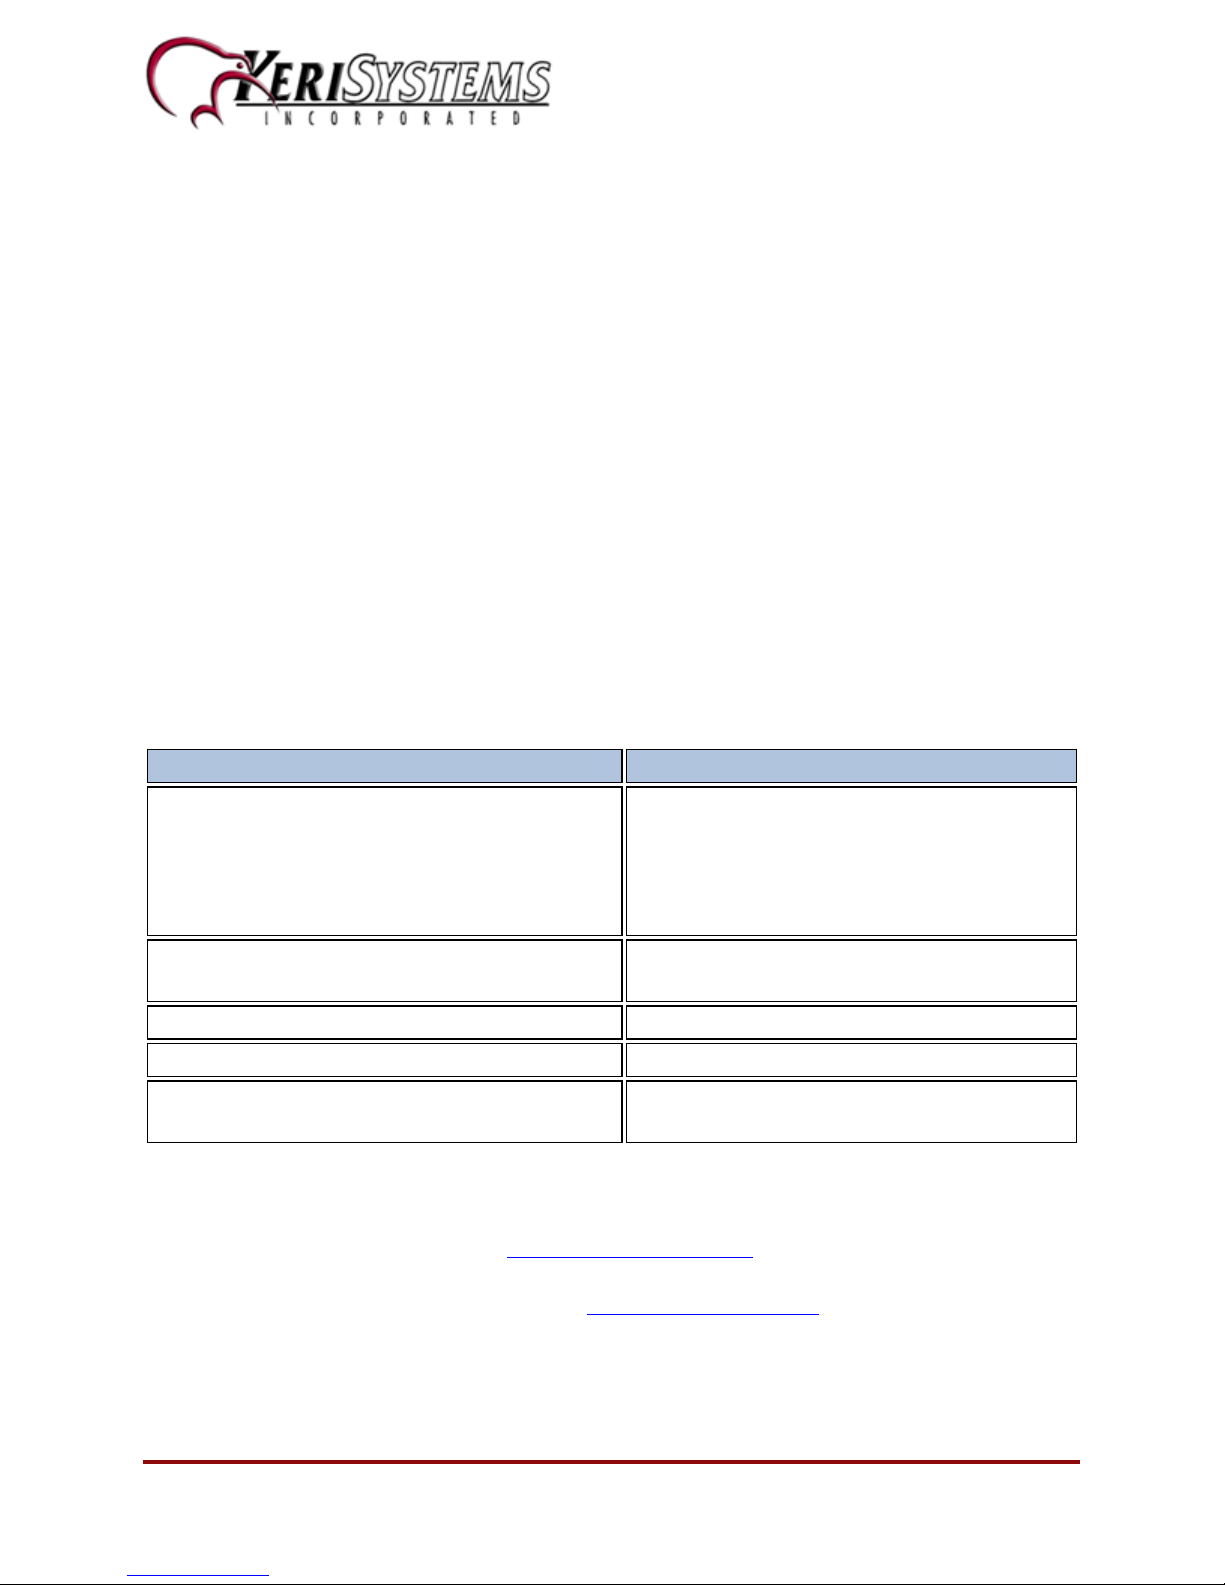
14. Click Yes and the reader firmware will be updated. During the firmware upgrade
the reader's LED will flash: green, red, amber, green, amber, red, amber, etc. If you
cannot see the reader's LED then take a look at the live events grid. You will see a
message has been generated: "Firmware Upgrade has started" - wait for the 'Firmware Upgrade Has Completed' message - Once it is completed the reader's LED
will be a steady amber.
Note: Please be patient during the upgrade process as it will take almost 2 minutes for
the reader upgrade to complete.
WARNING: Do not attempt to update a second NXT reader until the first upgrade is com-
pleted. The NXT-MSC hardware does not support multiple concurrent firmware
upgrades to connected devices. You must upgrade the NXT readers one-at-a-time.
Page 8 of 14 P/N: 01999-001 - Rev L
Page 9

NXT Reader Setup
If the reader is still highlighted in the hardware tree the new firmware version should now
be displaying.
NXT Exit Readers
Typically, a 2-door controller would control access to two individual doors, a proximity
reader is used to enter a room/or an area and a request-to-exit button would be used for
egress.
With an NXT Exit reader you can control two individual doors but with a reader for both
entry and egress. Each reader, although they activate the same lock relay, they are
treated independently in the Doors.NET software (such as for access groups and events
that appear in Live Events).
The NXT Exit reader is connected to the same bus as the standard NXT reader so minimizing installation time as well.
Note: The NXT Exit Reader is only supported when used with the NXT Mercury-
Powered controllers.
Page 9 of 14 P/N: 01999-001 - Rev L
Page 10

NXT Reader Setup
The Process for Adding an NXT Exit reader is as follows:
1. Open the LicenseManager.exe program in the folder where your instance of Doors.NET is installed (typically in the C:\Keri\DoorsNET folder).
2. Click the License tab and scroll through the list of license values until you locate
“Enable NXT Exit Reader”. This item should be set to “True.”
Page 10 of 14 P/N: 01999-001 - Rev L
Page 11

NXT Reader Setup
3. If this item is NOT set to True, you must contact Keri Systems’ Inside Sales department to have your license updated.
4.
Click on the icon from the Setup tab, then click the 'All' tab.
5. Highlight the bus where both the NXT-R (standard) reader and the NXT-RE (Exit)
reader are wired.
6.
The icon will be displayed on the ribbon bar. Click this icon and you will
see the following message.
7. Click Yes to the above message and an NXT Exit reader will be added to the bus
in the hardware tree.
Page 11 of 14 P/N: 01999-001 - Rev L
Page 12

NXT Reader Setup
8. Highlight the new reader in the hardware tree and in the properties, give it a
description.
9. The reader will be automatically configured as the exit reader for that bus.
10. A valid card read at each of the readers will activate the same strike relay but the
reader locations in Live Events will be different.
11. The entrance and exit readers can be assigned to completely different access
groups.
12. Transaction reports can also be run on the readers independently. Click Reports
>> Transactions, then from the Report Type drop down list, select All Messages
(Reader). You will see that both the readers appear in the Hardware Selection list.
Page 12 of 14 P/N: 01999-001 - Rev L
Page 13

NXT Reader Setup
13. You can also run a report that includes both the readers, should you wish to.
Page 13 of 14 P/N: 01999-001 - Rev L
Page 14
NXT Reader Setup
Contact Keri Systems
Keri USA Keri UK, Ireland, Europe
2305 Bering Drive
San Jose, CA 95131
Telephone: (800) 260-5265
(408) 435-8400
Fax: (408) 577-1792 Fax:+ 44 (0) 1763 274 106
Web: www.kerisys.com Web: www.kerisystems.co.uk
E-mail: sales@kerisys.com
techsupport@kerisys.com
Keri Systems YouTube Channel - Keri YouTube Channel
Keri Systems Knowledge Base Website - Keri Knowledge Base
Unit 17 Park Farm Industrial Estate,
Ermine Street, Buntingford
Herts SG9 9AZ UK
Telephone: + 44 (0) 1763 273 243
E-mail: sales@kerisystems.co.uk
tech-support@kerisystems.co.uk
End of document.
Page 14 of 14 P/N: 01999-001 - Rev L
 Loading...