


User Guide
Kerio Technologies

Kerio Technologies. All Rights Reserved.
Release Date: July 3, 2008
This document provides guidance for Kerio MailServer 6.5.2. All additional modifications
and updates reserved.
For current product version, check http://www.kerio.com/kms.
Information regarding registered trademarks and trademarks are provided in appendix A.

Contents
Introduction . . . . . . . . . . . . . . . . . . . . . . . . . . . . . . . . . . . . . . . . . . . . . . . . . . . . . . . . . . . . . . . . . . . 9
1 Kerio WebMail . . . . . . . . . . . . . . . . . . . . . . . . . . . . . . . . . . . . . . . . . . . . . . . . . . . . . . . . . . . . . . . . 12
1.1 Web browsers . . . . . . . . . . . . . . . . . . . . . . . . . . . . . . . . . . . . . . . . . . . . . . . . . . . . . . . . . . . 12
1.2 Authentication to Kerio WebMail . . . . . . . . . . . . . . . . . . . . . . . . . . . . . . . . . . . . . . . . . 12
1.3 The Kerio WebMail environment . . . . . . . . . . . . . . . . . . . . . . . . . . . . . . . . . . . . . . . . . . 17
1.4 Specific features and technical limitations . . . . . . . . . . . . . . . . . . . . . . . . . . . . . . . . 24
1.5 Email . . . . . . . . . . . . . . . . . . . . . . . . . . . . . . . . . . . . . . . . . . . . . . . . . . . . . . . . . . . . . . . . . . . . 26
1.5.1 Toolbar . . . . . . . . . . . . . . . . . . . . . . . . . . . . . . . . . . . . . . . . . . . . . . . . . . . . . . . . . . 26
1.5.2 Message list . . . . . . . . . . . . . . . . . . . . . . . . . . . . . . . . . . . . . . . . . . . . . . . . . . . . . . 28
1.5.3 Message reading . . . . . . . . . . . . . . . . . . . . . . . . . . . . . . . . . . . . . . . . . . . . . . . . . . 29
1.5.4 Moving and copying messages . . . . . . . . . . . . . . . . . . . . . . . . . . . . . . . . . . . . . 33
1.5.5 Message writing . . . . . . . . . . . . . . . . . . . . . . . . . . . . . . . . . . . . . . . . . . . . . . . . . . 35
1.5.6 Spellchecker . . . . . . . . . . . . . . . . . . . . . . . . . . . . . . . . . . . . . . . . . . . . . . . . . . . . . . 41
1.5.7 Spam filter . . . . . . . . . . . . . . . . . . . . . . . . . . . . . . . . . . . . . . . . . . . . . . . . . . . . . . . 43
1.5.8 Automatic check for email addresses . . . . . . . . . . . . . . . . . . . . . . . . . . . . . . 45
1.5.9 Looking up messages . . . . . . . . . . . . . . . . . . . . . . . . . . . . . . . . . . . . . . . . . . . . . 48
1.5.10 Interrupted connection between the server and the browser . . . . . . . . 51
1.6 Contacts . . . . . . . . . . . . . . . . . . . . . . . . . . . . . . . . . . . . . . . . . . . . . . . . . . . . . . . . . . . . . . . . 51
1.6.1 Toolbar . . . . . . . . . . . . . . . . . . . . . . . . . . . . . . . . . . . . . . . . . . . . . . . . . . . . . . . . . . 52
1.6.2 Contacts display . . . . . . . . . . . . . . . . . . . . . . . . . . . . . . . . . . . . . . . . . . . . . . . . . . 53
1.6.3 New contact . . . . . . . . . . . . . . . . . . . . . . . . . . . . . . . . . . . . . . . . . . . . . . . . . . . . . . 54
1.6.4 Private contacts . . . . . . . . . . . . . . . . . . . . . . . . . . . . . . . . . . . . . . . . . . . . . . . . . . 56
1.6.5 Searching in contacts . . . . . . . . . . . . . . . . . . . . . . . . . . . . . . . . . . . . . . . . . . . . . 57
1.6.6 Moving and copying contacts . . . . . . . . . . . . . . . . . . . . . . . . . . . . . . . . . . . . . . 58
1.6.7 Contacts forwarding . . . . . . . . . . . . . . . . . . . . . . . . . . . . . . . . . . . . . . . . . . . . . . 60
1.6.8 Distribution lists . . . . . . . . . . . . . . . . . . . . . . . . . . . . . . . . . . . . . . . . . . . . . . . . . 61
1.7 Calendar . . . . . . . . . . . . . . . . . . . . . . . . . . . . . . . . . . . . . . . . . . . . . . . . . . . . . . . . . . . . . . . . 65
1.7.1 Toolbar . . . . . . . . . . . . . . . . . . . . . . . . . . . . . . . . . . . . . . . . . . . . . . . . . . . . . . . . . . 65
1.7.2 Calendar view . . . . . . . . . . . . . . . . . . . . . . . . . . . . . . . . . . . . . . . . . . . . . . . . . . . . 68
1.7.3 Creating and editing events . . . . . . . . . . . . . . . . . . . . . . . . . . . . . . . . . . . . . . . 71
1.7.4 Private Events . . . . . . . . . . . . . . . . . . . . . . . . . . . . . . . . . . . . . . . . . . . . . . . . . . . . 74
1.7.5 All (multiple) day event . . . . . . . . . . . . . . . . . . . . . . . . . . . . . . . . . . . . . . . . . . . 74
1.7.6 Recurred event . . . . . . . . . . . . . . . . . . . . . . . . . . . . . . . . . . . . . . . . . . . . . . . . . . . 75
1.7.7 Meeting . . . . . . . . . . . . . . . . . . . . . . . . . . . . . . . . . . . . . . . . . . . . . . . . . . . . . . . . . . 76
1.7.8 Moving and copying events . . . . . . . . . . . . . . . . . . . . . . . . . . . . . . . . . . . . . . . . 83
1.7.9 Events forwarding . . . . . . . . . . . . . . . . . . . . . . . . . . . . . . . . . . . . . . . . . . . . . . . . 85
1.8 Tasks . . . . . . . . . . . . . . . . . . . . . . . . . . . . . . . . . . . . . . . . . . . . . . . . . . . . . . . . . . . . . . . . . . . 86
3

1.8.1 Toolbar . . . . . . . . . . . . . . . . . . . . . . . . . . . . . . . . . . . . . . . . . . . . . . . . . . . . . . . . . . 86
1.8.2 Task list display . . . . . . . . . . . . . . . . . . . . . . . . . . . . . . . . . . . . . . . . . . . . . . . . . . 87
1.8.3 Creating and editing tasks . . . . . . . . . . . . . . . . . . . . . . . . . . . . . . . . . . . . . . . . 88
1.8.4 Private Tasks . . . . . . . . . . . . . . . . . . . . . . . . . . . . . . . . . . . . . . . . . . . . . . . . . . . . . 93
1.8.5 Moving and copying tasks . . . . . . . . . . . . . . . . . . . . . . . . . . . . . . . . . . . . . . . . . 94
1.8.6 Forwarding tasks attached to email . . . . . . . . . . . . . . . . . . . . . . . . . . . . . . . . 96
1.9 Notes . . . . . . . . . . . . . . . . . . . . . . . . . . . . . . . . . . . . . . . . . . . . . . . . . . . . . . . . . . . . . . . . . . . 96
1.9.1 Toolbar . . . . . . . . . . . . . . . . . . . . . . . . . . . . . . . . . . . . . . . . . . . . . . . . . . . . . . . . . . 97
1.9.2 Viewing the note list . . . . . . . . . . . . . . . . . . . . . . . . . . . . . . . . . . . . . . . . . . . . . . 97
1.9.3 Create and edit notes . . . . . . . . . . . . . . . . . . . . . . . . . . . . . . . . . . . . . . . . . . . . . 98
1.9.4 Moving and copying notes . . . . . . . . . . . . . . . . . . . . . . . . . . . . . . . . . . . . . . . . 99
1.9.5 Forwarding notes attached to email . . . . . . . . . . . . . . . . . . . . . . . . . . . . . . 101
1.10 Folder Administration . . . . . . . . . . . . . . . . . . . . . . . . . . . . . . . . . . . . . . . . . . . . . . . . . 101
1.10.1 Root folder . . . . . . . . . . . . . . . . . . . . . . . . . . . . . . . . . . . . . . . . . . . . . . . . . . . . . . 102
1.10.2 Creating folders . . . . . . . . . . . . . . . . . . . . . . . . . . . . . . . . . . . . . . . . . . . . . . . . . 103
1.10.3 Folder tools . . . . . . . . . . . . . . . . . . . . . . . . . . . . . . . . . . . . . . . . . . . . . . . . . . . . . 104
1.10.4 Folder content options . . . . . . . . . . . . . . . . . . . . . . . . . . . . . . . . . . . . . . . . . . . 108
1.10.5 Shared and public folders . . . . . . . . . . . . . . . . . . . . . . . . . . . . . . . . . . . . . . . . 111
1.10.6 Folder subscription . . . . . . . . . . . . . . . . . . . . . . . . . . . . . . . . . . . . . . . . . . . . . . 113
1.11 Kerio WebMail configuration . . . . . . . . . . . . . . . . . . . . . . . . . . . . . . . . . . . . . . . . . . . 114
1.11.1 User settings . . . . . . . . . . . . . . . . . . . . . . . . . . . . . . . . . . . . . . . . . . . . . . . . . . . . 115
1.11.2 Out of office . . . . . . . . . . . . . . . . . . . . . . . . . . . . . . . . . . . . . . . . . . . . . . . . . . . . . 125
1.11.3 Change of password . . . . . . . . . . . . . . . . . . . . . . . . . . . . . . . . . . . . . . . . . . . . . 126
1.11.4 Keyboard shortcuts used in the Kerio WebMail . . . . . . . . . . . . . . . . . . . . 127
1.12 Message filtering . . . . . . . . . . . . . . . . . . . . . . . . . . . . . . . . . . . . . . . . . . . . . . . . . . . . . . . 128
1.12.1 List of filtering rules . . . . . . . . . . . . . . . . . . . . . . . . . . . . . . . . . . . . . . . . . . . . . 128
1.12.2 Creating or changing a rule . . . . . . . . . . . . . . . . . . . . . . . . . . . . . . . . . . . . . . 130
1.12.3 Cellular phone notification . . . . . . . . . . . . . . . . . . . . . . . . . . . . . . . . . . . . . . . 134
1.13 Time zones . . . . . . . . . . . . . . . . . . . . . . . . . . . . . . . . . . . . . . . . . . . . . . . . . . . . . . . . . . . . 134
1.13.1 Change of a time zone . . . . . . . . . . . . . . . . . . . . . . . . . . . . . . . . . . . . . . . . . . . 135
1.13.2 Events in different time zones . . . . . . . . . . . . . . . . . . . . . . . . . . . . . . . . . . . . 135
2 Kerio WebMail Mini . . . . . . . . . . . . . . . . . . . . . . . . . . . . . . . . . . . . . . . . . . . . . . . . . . . . . . . . . . 137
2.1 User folders . . . . . . . . . . . . . . . . . . . . . . . . . . . . . . . . . . . . . . . . . . . . . . . . . . . . . . . . . . . 138
2.2 Toolbar . . . . . . . . . . . . . . . . . . . . . . . . . . . . . . . . . . . . . . . . . . . . . . . . . . . . . . . . . . . . . . . 140
2.3 Mail folders . . . . . . . . . . . . . . . . . . . . . . . . . . . . . . . . . . . . . . . . . . . . . . . . . . . . . . . . . . . 142
2.4 Contacts . . . . . . . . . . . . . . . . . . . . . . . . . . . . . . . . . . . . . . . . . . . . . . . . . . . . . . . . . . . . . . 148
2.5 User settings . . . . . . . . . . . . . . . . . . . . . . . . . . . . . . . . . . . . . . . . . . . . . . . . . . . . . . . . . . 152
2.6 Quota . . . . . . . . . . . . . . . . . . . . . . . . . . . . . . . . . . . . . . . . . . . . . . . . . . . . . . . . . . . . . . . . . 154
3 Kerio WebMail on mobile devices . . . . . . . . . . . . . . . . . . . . . . . . . . . . . . . . . . . . . . . . . . . . 155
3.1 Message reading . . . . . . . . . . . . . . . . . . . . . . . . . . . . . . . . . . . . . . . . . . . . . . . . . . . . . . . 156
3.1.1 Toolbar . . . . . . . . . . . . . . . . . . . . . . . . . . . . . . . . . . . . . . . . . . . . . . . . . . . . . . . . . 156
3.1.2 Message header and body . . . . . . . . . . . . . . . . . . . . . . . . . . . . . . . . . . . . . . . . 157
4

3.2 Message writing . . . . . . . . . . . . . . . . . . . . . . . . . . . . . . . . . . . . . . . . . . . . . . . . . . . . . . . 157
3.2.1 Toolbar . . . . . . . . . . . . . . . . . . . . . . . . . . . . . . . . . . . . . . . . . . . . . . . . . . . . . . . . . 158
3.2.2 Message header and contents . . . . . . . . . . . . . . . . . . . . . . . . . . . . . . . . . . . . 158
3.3 Contact list editing . . . . . . . . . . . . . . . . . . . . . . . . . . . . . . . . . . . . . . . . . . . . . . . . . . . . 159
3.3.1 Create and edit contacts . . . . . . . . . . . . . . . . . . . . . . . . . . . . . . . . . . . . . . . . . 160
3.3.2 Creating and editing distribution lists . . . . . . . . . . . . . . . . . . . . . . . . . . . . 160
3.4 Folder Administration . . . . . . . . . . . . . . . . . . . . . . . . . . . . . . . . . . . . . . . . . . . . . . . . . 162
3.5 User settings . . . . . . . . . . . . . . . . . . . . . . . . . . . . . . . . . . . . . . . . . . . . . . . . . . . . . . . . . . 163
4 Data synchronization with mobile devices . . . . . . . . . . . . . . . . . . . . . . . . . . . . . . . . . . . 165
4.1 Supported mobile devices . . . . . . . . . . . . . . . . . . . . . . . . . . . . . . . . . . . . . . . . . . . . . . 165
4.2 Windows Mobile 2002 . . . . . . . . . . . . . . . . . . . . . . . . . . . . . . . . . . . . . . . . . . . . . . . . . . 166
4.2.1 ActiveSync configuration in Windows Mobile 2002 . . . . . . . . . . . . . . . . 167
4.3 Windows Mobile 2003 and 2003 Second Edition . . . . . . . . . . . . . . . . . . . . . . . . . 172
4.3.1 ActiveSync settings in Pocket PC Edition . . . . . . . . . . . . . . . . . . . . . . . . . . 173
4.3.2 ActiveSync settings in Smartphone Edition . . . . . . . . . . . . . . . . . . . . . . . . 179
4.4 Windows Mobile 5.0 . . . . . . . . . . . . . . . . . . . . . . . . . . . . . . . . . . . . . . . . . . . . . . . . . . . 186
4.5 Windows Mobile 5.0 AKU2 . . . . . . . . . . . . . . . . . . . . . . . . . . . . . . . . . . . . . . . . . . . . . 186
4.5.1 ActiveSync settings in Pocket PC Edition . . . . . . . . . . . . . . . . . . . . . . . . . . 187
4.5.2 ActiveSync settings in Smartphone Edition . . . . . . . . . . . . . . . . . . . . . . . . 192
4.6 Windows Mobile 6.0 . . . . . . . . . . . . . . . . . . . . . . . . . . . . . . . . . . . . . . . . . . . . . . . . . . . 197
4.7 Palm Treo . . . . . . . . . . . . . . . . . . . . . . . . . . . . . . . . . . . . . . . . . . . . . . . . . . . . . . . . . . . . . 198
4.7.1 Versa Mail settings . . . . . . . . . . . . . . . . . . . . . . . . . . . . . . . . . . . . . . . . . . . . . . . 199
4.8 Nokia Eseries . . . . . . . . . . . . . . . . . . . . . . . . . . . . . . . . . . . . . . . . . . . . . . . . . . . . . . . . . . 203
4.8.1 Email For Exchange settings . . . . . . . . . . . . . . . . . . . . . . . . . . . . . . . . . . . . . . 204
4.9 Nokia N73 and N95 . . . . . . . . . . . . . . . . . . . . . . . . . . . . . . . . . . . . . . . . . . . . . . . . . . . . 210
4.10 RoadSync . . . . . . . . . . . . . . . . . . . . . . . . . . . . . . . . . . . . . . . . . . . . . . . . . . . . . . . . . . . . . 211
4.11 Apple iPhone . . . . . . . . . . . . . . . . . . . . . . . . . . . . . . . . . . . . . . . . . . . . . . . . . . . . . . . . . . 211
5 Kerio Outlook Connector . . . . . . . . . . . . . . . . . . . . . . . . . . . . . . . . . . . . . . . . . . . . . . . . . . . . . 215
5.1 Software requirements . . . . . . . . . . . . . . . . . . . . . . . . . . . . . . . . . . . . . . . . . . . . . . . . . 215
5.2 Installation . . . . . . . . . . . . . . . . . . . . . . . . . . . . . . . . . . . . . . . . . . . . . . . . . . . . . . . . . . . . 216
5.2.1 Creating a new profile and Kerio account settings . . . . . . . . . . . . . . . . . 216
5.2.2 Data file settings . . . . . . . . . . . . . . . . . . . . . . . . . . . . . . . . . . . . . . . . . . . . . . . . . 222
5.3 Upgrade of the Kerio Outlook Connector . . . . . . . . . . . . . . . . . . . . . . . . . . . . . . . 223
5.4 Changing of user password . . . . . . . . . . . . . . . . . . . . . . . . . . . . . . . . . . . . . . . . . . . . 224
5.5 Shared and public folders . . . . . . . . . . . . . . . . . . . . . . . . . . . . . . . . . . . . . . . . . . . . . . 225
5.5.1 Sharing and mapping of folders . . . . . . . . . . . . . . . . . . . . . . . . . . . . . . . . . . 225
5.5.2 Public and archive folders . . . . . . . . . . . . . . . . . . . . . . . . . . . . . . . . . . . . . . . . 228
5.6 Rules for incoming messages . . . . . . . . . . . . . . . . . . . . . . . . . . . . . . . . . . . . . . . . . . . 229
5.6.1 Creating or changing a rule . . . . . . . . . . . . . . . . . . . . . . . . . . . . . . . . . . . . . . 230
5.6.2 Out of office . . . . . . . . . . . . . . . . . . . . . . . . . . . . . . . . . . . . . . . . . . . . . . . . . . . . . 235
5.7 Spam filter . . . . . . . . . . . . . . . . . . . . . . . . . . . . . . . . . . . . . . . . . . . . . . . . . . . . . . . . . . . . 236
5.7.1 The Spam tab . . . . . . . . . . . . . . . . . . . . . . . . . . . . . . . . . . . . . . . . . . . . . . . . . . . . 236
5

5.8 Address books and contacts . . . . . . . . . . . . . . . . . . . . . . . . . . . . . . . . . . . . . . . . . . . 238
5.8.1 Searching in address books via the MAPI interface . . . . . . . . . . . . . . . . 238
5.8.2 Searching contacts via the LDAP directory service . . . . . . . . . . . . . . . . . 240
5.8.3 Contacts forwarding . . . . . . . . . . . . . . . . . . . . . . . . . . . . . . . . . . . . . . . . . . . . . 244
5.8.4 Distribution lists . . . . . . . . . . . . . . . . . . . . . . . . . . . . . . . . . . . . . . . . . . . . . . . . 245
5.9 Scheduling of meetings . . . . . . . . . . . . . . . . . . . . . . . . . . . . . . . . . . . . . . . . . . . . . . . . 246
5.9.1 Creating a meeting using the Free/Busy server . . . . . . . . . . . . . . . . . . . . 246
5.10 Private items . . . . . . . . . . . . . . . . . . . . . . . . . . . . . . . . . . . . . . . . . . . . . . . . . . . . . . . . . . 248
5.11 Notes . . . . . . . . . . . . . . . . . . . . . . . . . . . . . . . . . . . . . . . . . . . . . . . . . . . . . . . . . . . . . . . . . 249
5.12 Troubleshooting . . . . . . . . . . . . . . . . . . . . . . . . . . . . . . . . . . . . . . . . . . . . . . . . . . . . . . . 249
5.12.1 Spam/Not Spam buttons displaying problems . . . . . . . . . . . . . . . . . . . . . 249
5.12.2 Installation and configuration of MS Outlook 2000 . . . . . . . . . . . . . . . . 250
5.12.3 Messages signed in MS Outlook . . . . . . . . . . . . . . . . . . . . . . . . . . . . . . . . . . 250
5.12.4 Error in settings of contact folders used as address books . . . . . . . . . 251
5.12.5 Problems with displaying of Free/Busy information . . . . . . . . . . . . . . . 252
6 Kerio Outlook Connector (Offline Edition) . . . . . . . . . . . . . . . . . . . . . . . . . . . . . . . . . . . . 255
6.1 Installation . . . . . . . . . . . . . . . . . . . . . . . . . . . . . . . . . . . . . . . . . . . . . . . . . . . . . . . . . . . . 256
6.1.1 Installation on computers where Kerio Outlook Connector has
been installed . . . . . . . . . . . . . . . . . . . . . . . . . . . . . . . . . . . . . . . . . . . . . . . . . . . 256
6.1.2 Profile and Email account settings . . . . . . . . . . . . . . . . . . . . . . . . . . . . . . . . 257
6.1.3 Automatic updates . . . . . . . . . . . . . . . . . . . . . . . . . . . . . . . . . . . . . . . . . . . . . . 259
6.2 The Online/Offline mode . . . . . . . . . . . . . . . . . . . . . . . . . . . . . . . . . . . . . . . . . . . . . . . 259
6.2.1 Offline mode settings . . . . . . . . . . . . . . . . . . . . . . . . . . . . . . . . . . . . . . . . . . . . 260
6.2.2 Synchronization . . . . . . . . . . . . . . . . . . . . . . . . . . . . . . . . . . . . . . . . . . . . . . . . . 260
6.3 Contacts . . . . . . . . . . . . . . . . . . . . . . . . . . . . . . . . . . . . . . . . . . . . . . . . . . . . . . . . . . . . . . 262
6.3.1 Searching in address books via the MAPI interface . . . . . . . . . . . . . . . . 262
6.3.2 Searching contacts via the LDAP directory service . . . . . . . . . . . . . . . . . 264
6.3.3 Contacts forwarding . . . . . . . . . . . . . . . . . . . . . . . . . . . . . . . . . . . . . . . . . . . . . 268
6.3.4 Distribution lists . . . . . . . . . . . . . . . . . . . . . . . . . . . . . . . . . . . . . . . . . . . . . . . . 268
6.4 Calendars . . . . . . . . . . . . . . . . . . . . . . . . . . . . . . . . . . . . . . . . . . . . . . . . . . . . . . . . . . . . . 269
6.4.1 Scheduling of meetings . . . . . . . . . . . . . . . . . . . . . . . . . . . . . . . . . . . . . . . . . . 269
6.4.2 Web Calendars . . . . . . . . . . . . . . . . . . . . . . . . . . . . . . . . . . . . . . . . . . . . . . . . . . 271
6.5 Tasks . . . . . . . . . . . . . . . . . . . . . . . . . . . . . . . . . . . . . . . . . . . . . . . . . . . . . . . . . . . . . . . . . 272
6.5.1 How to create tasks . . . . . . . . . . . . . . . . . . . . . . . . . . . . . . . . . . . . . . . . . . . . . . 272
6.6 Notes . . . . . . . . . . . . . . . . . . . . . . . . . . . . . . . . . . . . . . . . . . . . . . . . . . . . . . . . . . . . . . . . . 272
6.7 Rules for incoming messages . . . . . . . . . . . . . . . . . . . . . . . . . . . . . . . . . . . . . . . . . . . 273
6.7.1 Creating or changing a rule . . . . . . . . . . . . . . . . . . . . . . . . . . . . . . . . . . . . . . 274
6.7.2 The Out Of Office rule . . . . . . . . . . . . . . . . . . . . . . . . . . . . . . . . . . . . . . . . . . . 280
6.7.3 The Spam rule . . . . . . . . . . . . . . . . . . . . . . . . . . . . . . . . . . . . . . . . . . . . . . . . . . . 281
6.8 Spam filter . . . . . . . . . . . . . . . . . . . . . . . . . . . . . . . . . . . . . . . . . . . . . . . . . . . . . . . . . . . . 283
6.9 Grouping and searching of messages . . . . . . . . . . . . . . . . . . . . . . . . . . . . . . . . . . . 283
6.9.1 Message grouping . . . . . . . . . . . . . . . . . . . . . . . . . . . . . . . . . . . . . . . . . . . . . . . 283
6

6.9.2 Looking up messages . . . . . . . . . . . . . . . . . . . . . . . . . . . . . . . . . . . . . . . . . . . . 285
6.10 Folder Administration . . . . . . . . . . . . . . . . . . . . . . . . . . . . . . . . . . . . . . . . . . . . . . . . . 285
6.10.1 Folder Sharing . . . . . . . . . . . . . . . . . . . . . . . . . . . . . . . . . . . . . . . . . . . . . . . . . . . 286
6.10.2 Public folders . . . . . . . . . . . . . . . . . . . . . . . . . . . . . . . . . . . . . . . . . . . . . . . . . . . . 288
6.11 Sender details settings . . . . . . . . . . . . . . . . . . . . . . . . . . . . . . . . . . . . . . . . . . . . . . . . . 289
7 Kerio Synchronization Plug-in . . . . . . . . . . . . . . . . . . . . . . . . . . . . . . . . . . . . . . . . . . . . . . . . 290
7.1 Installation . . . . . . . . . . . . . . . . . . . . . . . . . . . . . . . . . . . . . . . . . . . . . . . . . . . . . . . . . . . . 291
7.2 Synchronization . . . . . . . . . . . . . . . . . . . . . . . . . . . . . . . . . . . . . . . . . . . . . . . . . . . . . . . 292
7.3 SSL-secured synchronization . . . . . . . . . . . . . . . . . . . . . . . . . . . . . . . . . . . . . . . . . . . 296
8 Web calendars in MS Outlook 2007 . . . . . . . . . . . . . . . . . . . . . . . . . . . . . . . . . . . . . . . . . . . 298
8.1 Subscription to calendars . . . . . . . . . . . . . . . . . . . . . . . . . . . . . . . . . . . . . . . . . . . . . . 298
8.2 Calendar publishing . . . . . . . . . . . . . . . . . . . . . . . . . . . . . . . . . . . . . . . . . . . . . . . . . . . 304
9 Support for Windows Calendar . . . . . . . . . . . . . . . . . . . . . . . . . . . . . . . . . . . . . . . . . . . . . . . 308
9.1 Subscription to calendars . . . . . . . . . . . . . . . . . . . . . . . . . . . . . . . . . . . . . . . . . . . . . . 308
9.2 Calendar publishing . . . . . . . . . . . . . . . . . . . . . . . . . . . . . . . . . . . . . . . . . . . . . . . . . . . 311
9.3 Sharing of calendars . . . . . . . . . . . . . . . . . . . . . . . . . . . . . . . . . . . . . . . . . . . . . . . . . . . 313
10 MS Entourage support . . . . . . . . . . . . . . . . . . . . . . . . . . . . . . . . . . . . . . . . . . . . . . . . . . . . . . . . 314
10.1 Basic account settings . . . . . . . . . . . . . . . . . . . . . . . . . . . . . . . . . . . . . . . . . . . . . . . . . 315
10.2 Connection to the LDAP server . . . . . . . . . . . . . . . . . . . . . . . . . . . . . . . . . . . . . . . . . 326
10.3 Scheduling of meetings . . . . . . . . . . . . . . . . . . . . . . . . . . . . . . . . . . . . . . . . . . . . . . . . 328
10.4 Spam . . . . . . . . . . . . . . . . . . . . . . . . . . . . . . . . . . . . . . . . . . . . . . . . . . . . . . . . . . . . . . . . . . 330
10.5 Delegating folders and their connection in MS Entourage 2004 . . . . . . . . . . 330
10.6 Out Of Office . . . . . . . . . . . . . . . . . . . . . . . . . . . . . . . . . . . . . . . . . . . . . . . . . . . . . . . . . . 334
10.7 Secure communication of Kerio MailServer with MS Entourage . . . . . . . . . . . 335
11 Apple iCal Support . . . . . . . . . . . . . . . . . . . . . . . . . . . . . . . . . . . . . . . . . . . . . . . . . . . . . . . . . . . 341
11.1 Setting Apple iCal in Mac OS X 10.3 . . . . . . . . . . . . . . . . . . . . . . . . . . . . . . . . . . . . . 341
11.2 Setting Apple iCal in Mac OS X 10.4 . . . . . . . . . . . . . . . . . . . . . . . . . . . . . . . . . . . . . 346
11.3 Sharing of calendars . . . . . . . . . . . . . . . . . . . . . . . . . . . . . . . . . . . . . . . . . . . . . . . . . . . 350
11.4 Create public calendars . . . . . . . . . . . . . . . . . . . . . . . . . . . . . . . . . . . . . . . . . . . . . . . . 351
11.5 CalDAV support . . . . . . . . . . . . . . . . . . . . . . . . . . . . . . . . . . . . . . . . . . . . . . . . . . . . . . . 351
11.5.1 Settings . . . . . . . . . . . . . . . . . . . . . . . . . . . . . . . . . . . . . . . . . . . . . . . . . . . . . . . . . 352
11.5.2 Synchronization . . . . . . . . . . . . . . . . . . . . . . . . . . . . . . . . . . . . . . . . . . . . . . . . . 354
11.5.3 Scheduling of meetings . . . . . . . . . . . . . . . . . . . . . . . . . . . . . . . . . . . . . . . . . . 355
11.5.4 Delegation of calendars . . . . . . . . . . . . . . . . . . . . . . . . . . . . . . . . . . . . . . . . . . 357
12 Apple Address Book Support . . . . . . . . . . . . . . . . . . . . . . . . . . . . . . . . . . . . . . . . . . . . . . . . . 360
12.1 Apple Address Book pro Mac OS X 10.2 Jaguar . . . . . . . . . . . . . . . . . . . . . . . . . . 360
12.2 Apple Address Book for Mac OS X 10.3 (Panther) and 10.4 (Tiger) . . . . . . . . 361
12.2.1 LDAP searching settings . . . . . . . . . . . . . . . . . . . . . . . . . . . . . . . . . . . . . . . . . 361
12.2.2 Synchronization . . . . . . . . . . . . . . . . . . . . . . . . . . . . . . . . . . . . . . . . . . . . . . . . . 363
7

13 Kerio Sync Connector for Mac . . . . . . . . . . . . . . . . . . . . . . . . . . . . . . . . . . . . . . . . . . . . . . . . 369
13.1 Installation . . . . . . . . . . . . . . . . . . . . . . . . . . . . . . . . . . . . . . . . . . . . . . . . . . . . . . . . . . . . 369
13.2 Synchronization settings . . . . . . . . . . . . . . . . . . . . . . . . . . . . . . . . . . . . . . . . . . . . . . . 371
13.3 The process of the synchronization . . . . . . . . . . . . . . . . . . . . . . . . . . . . . . . . . . . . 376
14 Support for Apple Mail 10.4 . . . . . . . . . . . . . . . . . . . . . . . . . . . . . . . . . . . . . . . . . . . . . . . . . . 378
14.1 Exchange account in Apple Mail . . . . . . . . . . . . . . . . . . . . . . . . . . . . . . . . . . . . . . . . 378
14.2 IMAP account in Apple Mail . . . . . . . . . . . . . . . . . . . . . . . . . . . . . . . . . . . . . . . . . . . . 378
14.3 Learning of the antispam filter . . . . . . . . . . . . . . . . . . . . . . . . . . . . . . . . . . . . . . . . . 379
A Legal Presumption . . . . . . . . . . . . . . . . . . . . . . . . . . . . . . . . . . . . . . . . . . . . . . . . . . . . . . . . . . . 383
Glossary of terms . . . . . . . . . . . . . . . . . . . . . . . . . . . . . . . . . . . . . . . . . . . . . . . . . . . . . . . . . . . . 384
Index . . . . . . . . . . . . . . . . . . . . . . . . . . . . . . . . . . . . . . . . . . . . . . . . . . . . . . . . . . . . . . . . . . . . . . . . 386
8

Introduction
This document provides detailed setting guidance for all applications and modules (email
clients, calendars and address books, data synchronization) supported by Kerio MailServer.
While some of these applications are supported directly (i.e. no additional installations are
needed, it is only necessary to perform specific settings), others require installation of supportive modules and extensions.
In addition to external applications, this document also addresses the Kerio WebMail interface
which is used to access user data and email accounts via the most wide-spread web browsers,
such as Internet Explorer, Firefox or Safari.
This guide addresses features and configuration of the following applications and interfaces:
Kerio WebMail
Kerio WebMail is a comfortable web interface which can be used to maintain email and
other folders saved in mailboxes on a particular server.
Kerio WebMail is available in two versions:
• Kerio WebMail — full version designed for most of supported browsers (see chapter
• Kerio WebMail Mini — a special, lite edition designed for unsupported browsers or for
computers with slow Internet connection (see chapter 2) and for mobile devices (see
chapter 3).
Microsoft Outlook
Support for Microsoft Outlook is allowed by two extension modules which enable better
exploitation of Kerio MailServer’s groupware features:
• Kerio Outlook Connector (Offline Edition) — is an extension for MS Outlook allowing
smoother cooperation of MS Outlook and Kerio MailServer. Kerio Outlook Connector
(Offline Edition) supports groupware features of MS Outlook such as planning of meetings and task assignment. In addition to these features, other are included such as
message grouping, searching in message bodies and offline mode which allows users
working with MS Outlook even without Internet connection. This feature is helpful
especially for notebook users.
In detail, Kerio Outlook Connector (Offline Edition) is described in chapter
• Kerio Outlook Connector — an extension to MS Outlook. It allows scheduling and
sharing different types of data. Thanks to this module, MS Outlook is able to work
with groupware data (contacts, calendar, tasks, notices) stored in Kerio MailServer. In
detail, Kerio Outlook Connector is described in chapter 5.
• Kerio Synchronization Plug-in — this application allows synchronization of personal
calendar, contact and notes folders as well as public folders with calendars and contacts. This application is useful especially to users of notebooks who need to work
6.
1).
9

Introduction
with their email, calendar and contacts offline. In detail, Kerio Synchronization Plug-in
is described in chapter 7.
Windows Calendar
Windows Calendar is an Microsoft Corporation’s application used for management of calendars. Support for Kerio MailServer allows publishing of calendars on the server or
subscription of any Kerio MailServer calendar.
Data synchronization with mobile devices
Kerio MailServer supports data synchronization with mobile devices via the ActiveSync
protocol. ActiveSync allows direct synchronization of data stored in email accounts with
mobile devices (it is not necessary to connect to a desktop synchronization application).
The ActiveSync protocol can use diverse applications in mobile devices (e.g. ActiveSync
on Windows Mobile, the VersaMail email client on Palm Treo, the Mail for Exchange applications in Nokia Eseries and Nseries, the RoadSync applications and others). Chapter 4
provides detailed information on which folders can be synchronized and how the synchronization should be configured on individual devices.
Microsoft Entourage
Microsoft Entourage is an MS Office 2004 for Mac email client which also supports management of personal information and groupware functions. The support provided by
Kerio MailServer is described in detail in chapter 10.
Apple Mail
Apple Mail is an email client developed by Apple Computer. The support provided by
Kerio MailServer allows displaying of calendar and contact folders in this client (for de-
tails, see chapter 14).
Apple iCal
Apple iCal is an Apple Computer’s application used for management of calendars. The
support from Kerio MailServer works as follows:
• Kerio Technologies has developed the Kerio Sync Connector for Mac application which
allows easy data synchronization between Kerio MailServer and Apple iCal. The synchronization with the server allows synchronization of locally created calendars and
To Do items (tasks). Details on the product are provided in chapter 13.
• Apple iCal calendars can be published in Kerio MailServer and it is also possible to
subscribe to any Kerio MailServer calendar. Calendars are created and saved in the
standard iCalendar format (for details, see chapter 11).
• Since version Mac OS X 10.5, Apple iCal supports CalDAV which enables subscription
and viewing of calendars saved in Kerio MailServer. The protocol also supports meeting scheduling (Free/Busy and invitations) and delegating of calendars to other users
(for details, refer to section 11.5).
Apple Address Book
Apple Address Book is an application developed by Apple Computer that is used as a standard address book (contact manager) in Mac OS X operating systems. Contacts can be
synchronized with the Kerio MailServer’s store by the two methods described below:
10

• Contacts stored in the Apple Address Book and in Kerio MailServer can be synchronized
by the Kerio Sync Connector for Mac extension. In addition to Apple Address Book
contacts, this application can also synchronize Apple iCal calendars and To Do items
(for details, see chapter 13).
• The address book can be synchronized with contacts stored in Kerio MailServer also
by using Apple iSync (for details, refer to chapter 12).
11

Chapter 1
Kerio WebMail
The Kerio WebMail is a Web interface that allows users to comfortably access their email and
workgroup features from any location using a web browser. Users can read, write or delete
messages, move them to and from folders, manage contacts, administer folders (create or
delete folders, set access rights, etc.) and change user settings such as passwords, message
filters, Kerio WebMail appearance, work with calendar, free time information (Free/Busy calendar), tasks and notes.
Kerio WebMail enables users to work with email, calendars, tasks, notes and contacts in a way
similar to a mail client using the IMAP protocol (all items are stored in folders on the server
and the client opens only the selected item, i.e. a particular message, event, etc.).
1.1 Web browsers
The full version of Kerio WebMail supports the following browsers:
• Internet Explorer versions 6 and 7,
• Firefox versions 1.5 and 2,
• Safari 1.3, 2 and 3 on Mac OS X 10.5 Leopard.
For technical reasons, the full version of Kerio WebMail cannot be run in older versions of the
listed browsers or in non-listed browsers, but it is possible to run the simplified version Kerio
WebMail Mini (for more information, see chapter 2). Kerio WebMail Mini is run automatically
in older versions of browsers, in text-based browsers such as Lynx or Links, in web browsers
designed for mobile devices (this view type is described in chapter 3). Kerio WebMail Mini does
not require CSS and JavaScript.
To use the secured access to the Kerio WebMail interface (by HTTPS protocol), the browser
must support SSL encryption. If it can be configured (e.g. in Internet Explorer), it is recommend
to enable support for SSL 3.0 and TLS 1.0 versions.
1.2 Authentication to Kerio WebMail
To access the Kerio WebMail interface service using a web browser, insert the IP address
(or the name if it is contained in DNS) of the computer where Kerio MailServer is running.
A protocol has to be specified in the URL — either HTTP for non-secured access or HTTPS
for SSL-encrypted access. The URL can have the following form: http://192.168.1.1 or
https://mail.company.com.
12
1.2 Authentication to Kerio WebMail
It is recommend to use the HTTPS protocol for remote access to the service (simple
HTTP can be tapped and the user login data can be misused). By default, the HTTP
and HTTPS services use the standard ports (80 and 443). If the standard ports are
changed, specify the port number in the URL address, like http://192.168.1.1:8000 or
https://mail.company.com:8080.
Note: The description above focuses accessing email via mobile devices. If it is not
possible to connect to Kerio MailServer, insert URL following one of these formats:
http://server_name/pda or http://ip_address/pda.
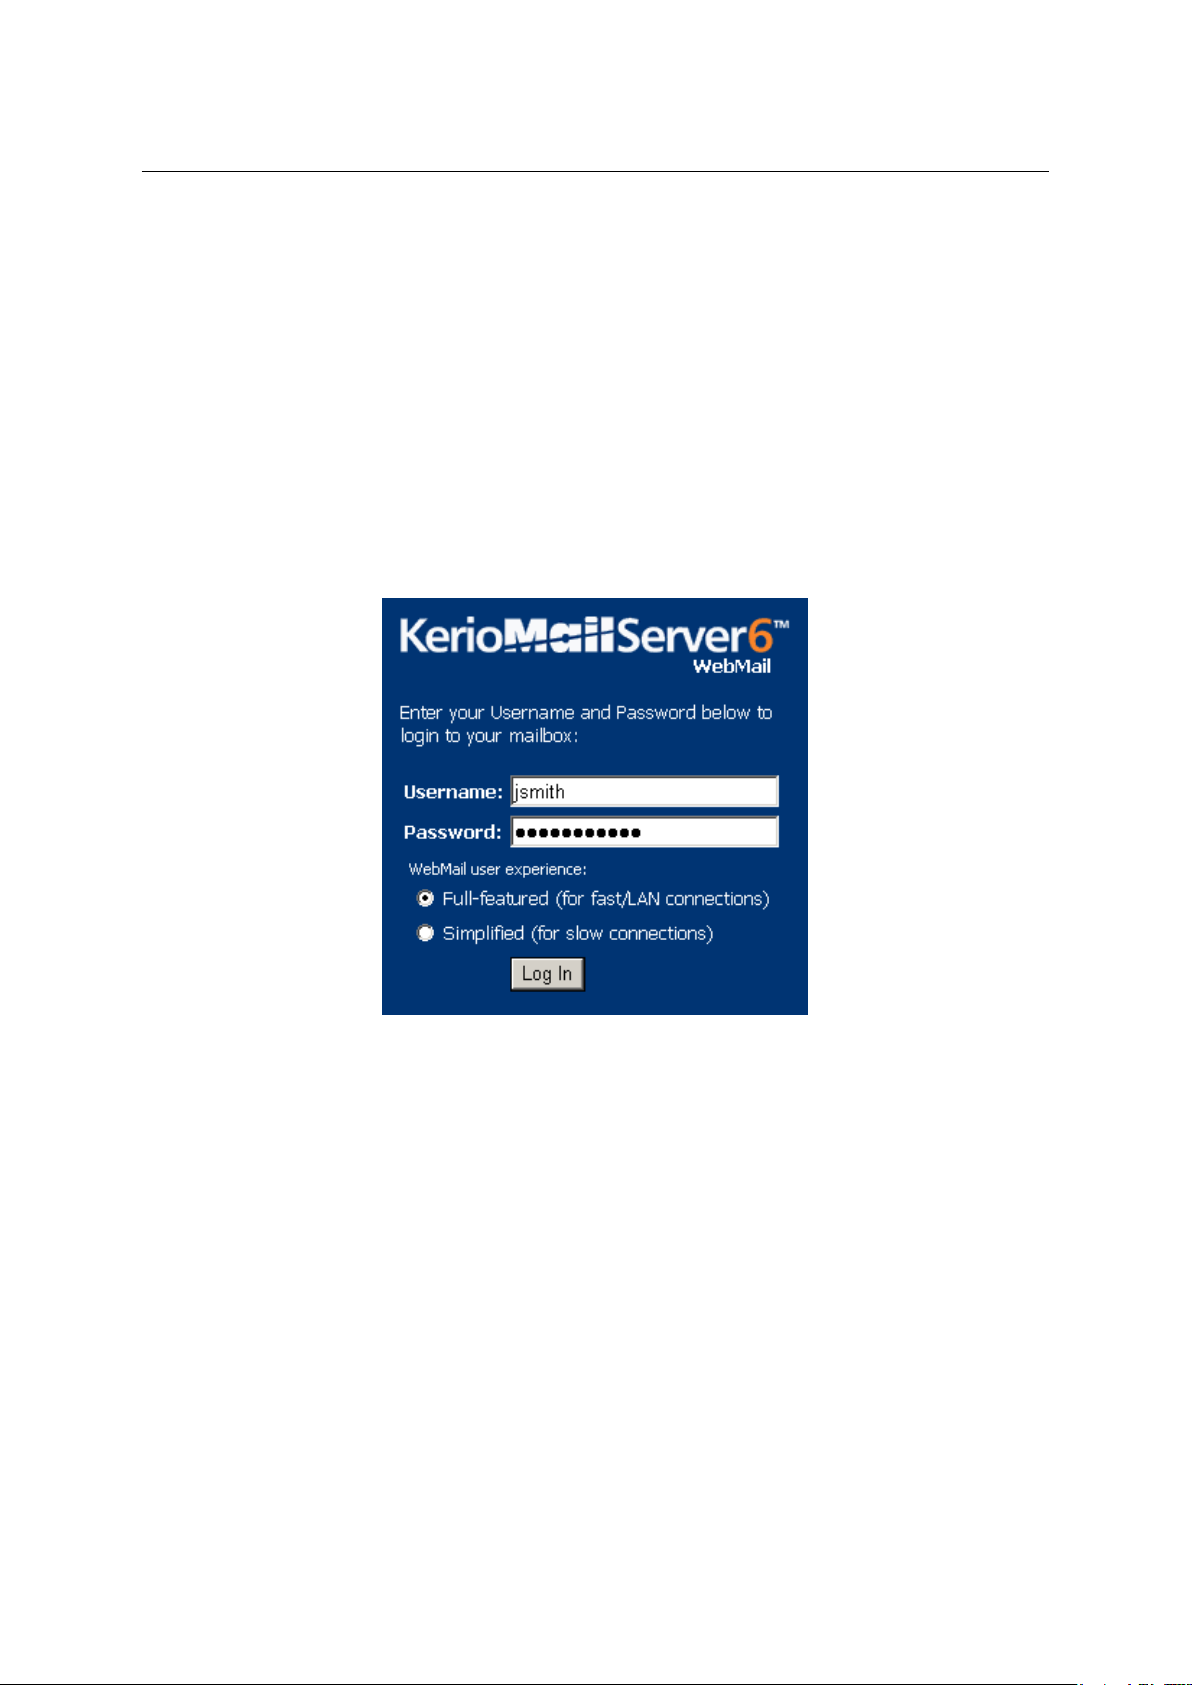
If the URL has been entered correctly, a login page will be displayed in the browser. Enter
the username and password on this page (if the user does not belong to the primary domain,
a complete email address is required).
Figure 1.1 Login page
Full and simplified interface
After the username and password has been entered, users can decide whether to use the full
version of Kerio WebMail or the simplified version — Kerio WebMail Mini— will be used:
The full version of Kerio WebMail is recommended for users with fast internet connection who
require high performance and functionality. The capabilities of the full version include:
• email folders management,
• calendars management,
• contacts management,
• tasks management,
13
Chapter 1 Kerio WebMail
• notes maintenance,
• viewing of public email folders and contact, calendar, tasks and note folders,
• folder management (creating, removing, moving, sharing and subscriptions),
• user’s settings of the interface.
Kerio WebMail Mini is optimized for slower internet connection types, for all browser types as
well as for mobile devices. The capabilities of the simplified version include:
• email folders management,
• contacts management,
• viewing of email and contact public folders,
• folder management (creating, removing, moving, sharing and subscriptions),
• user’s settings of the interface.
Kerio WebMail Mini is described in chapter
2 in more detail.
Connection from Windows Internet Explorer 7.0
Windows Internet Explorer 7.0 requires the new browser settings before the first connection to
the Kerio WebMail interface. The change to be done addresses configuration of security areas.
Brief help guidelines are available through the Recommended browser settings link available
on the Kerio WebMail’s login page. If you miss the link, the helplines are as follows:
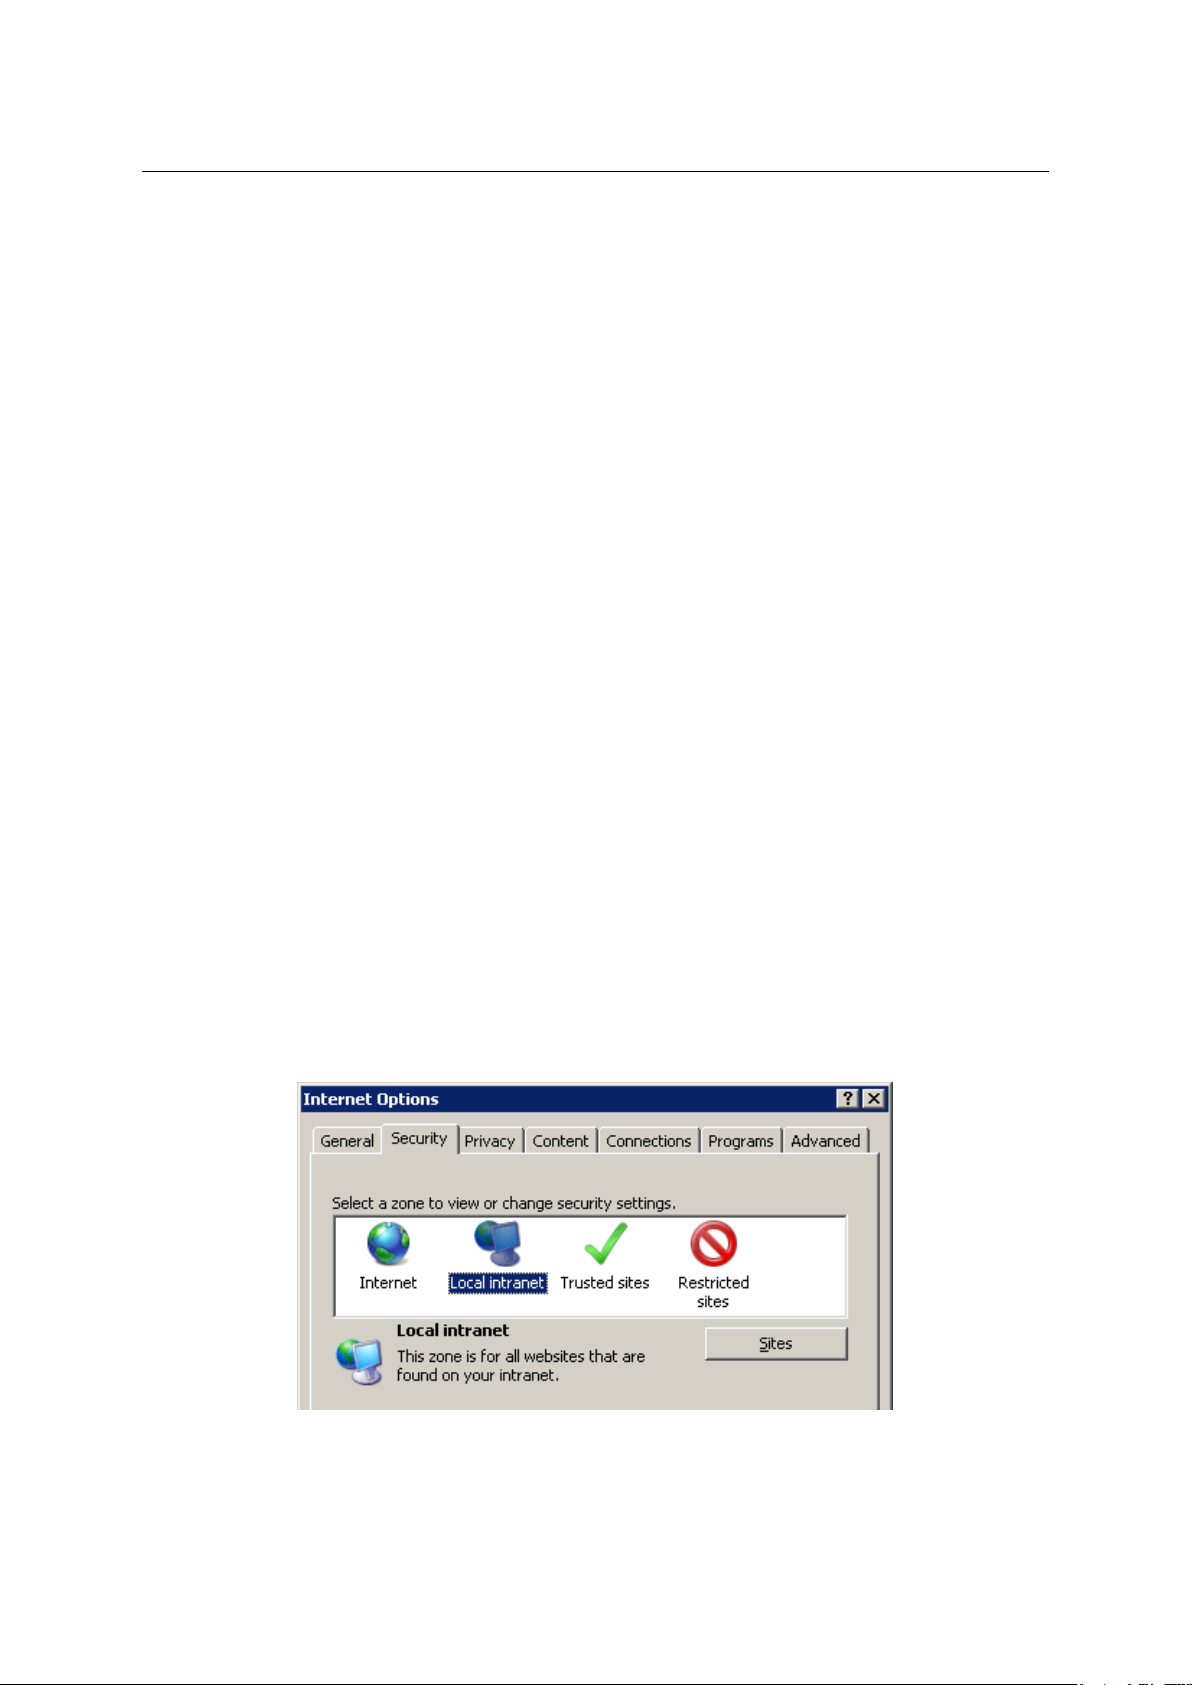
1. Click on Tools → Internet Options and select the Security tab (see figure 1.2).
Figure 1.2 Internet Options → the Security tab
14
1.2 Authentication to Kerio WebMail
2. On the Security tab, click on Local intranet and then use the Sites button.
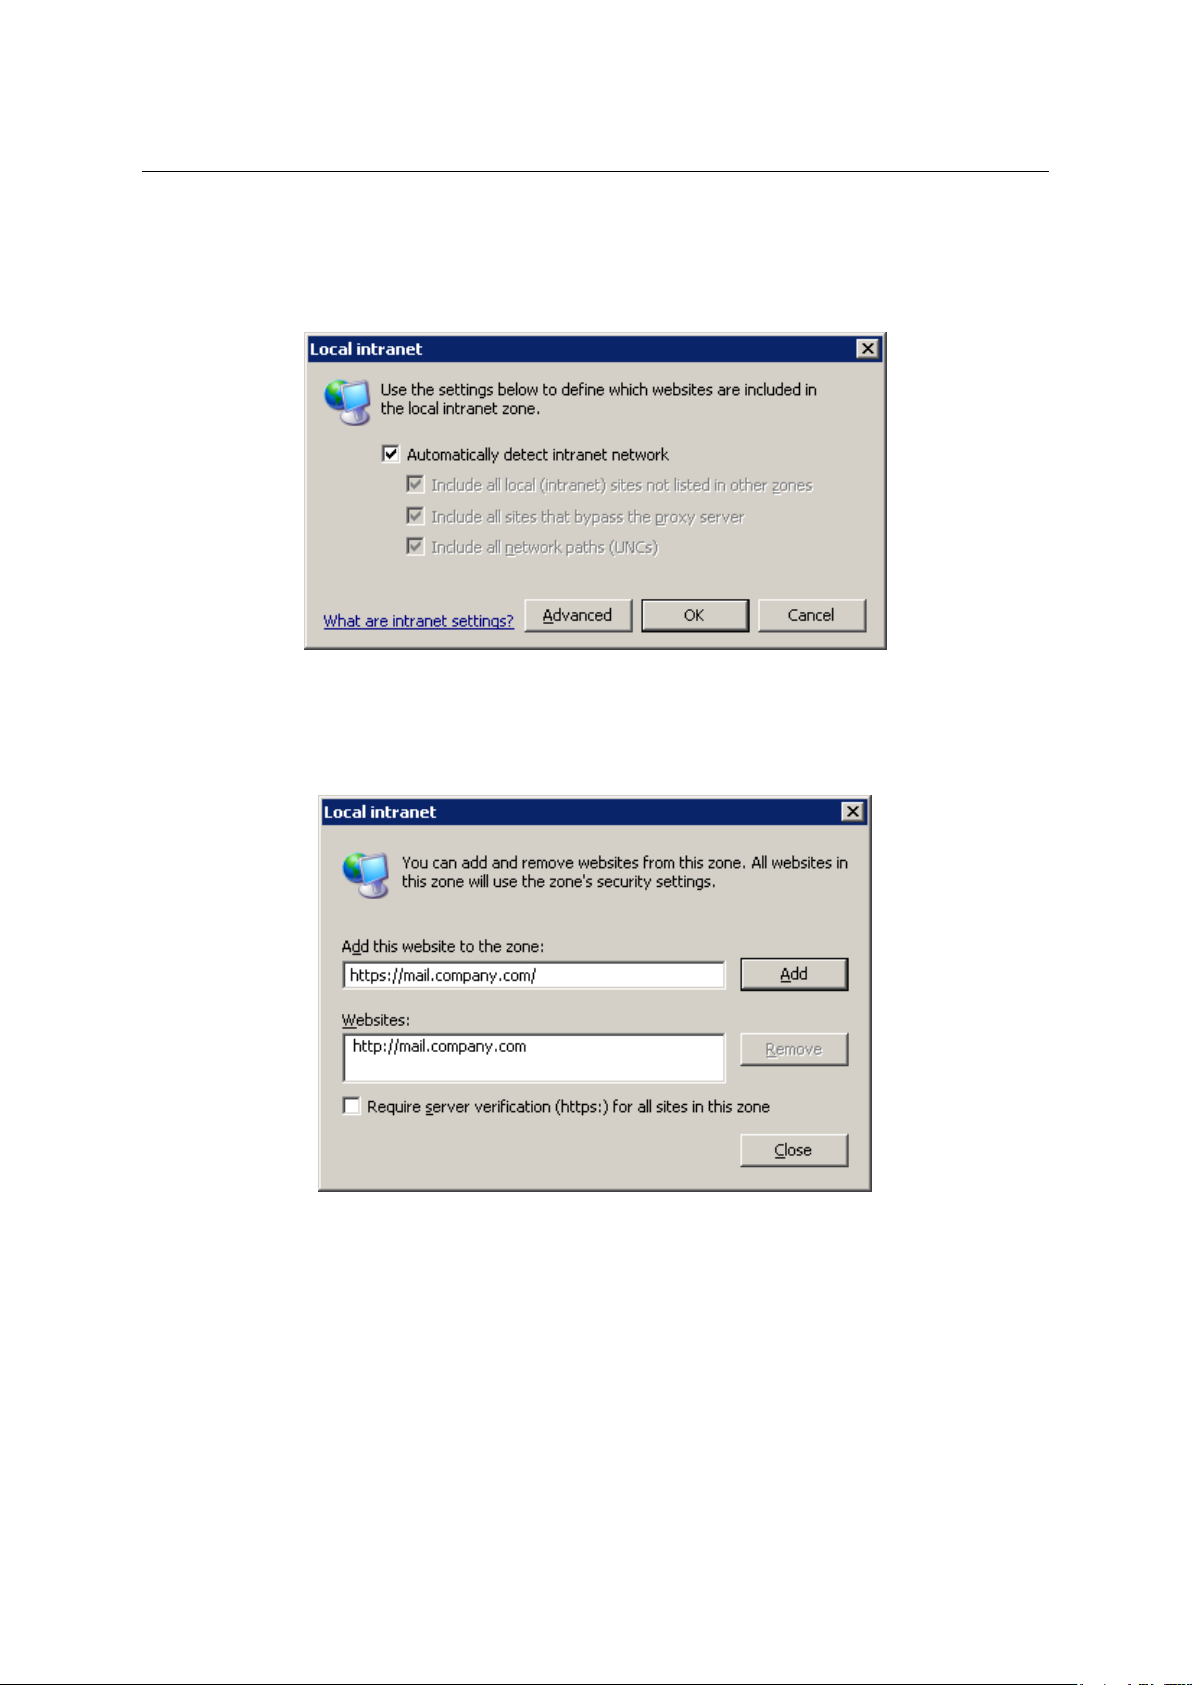
3. In the Local intranet dialog just opened, click on Advanced (see figure 1.3).
Figure 1.3 The Local intranet dialog
4. In the Add this Web site to the zone textfield, specify Kerio MailServer’s URL address (e.g.
http://mail.company.com or https://mail.company.com, see figure 1.4).
Figure 1.4 URL addresses can be specified in the Local intranet dialog
This setting removes the address line displayed in header of every Windows Internet Explorer
7 window.
Connection from Mozilla Firefox 2
Before the first connection to the Kerio WebMail interface, Mozilla Firefox 2 requires special
settings addressing usage of JavaScript in the browser. Brief help guidelines are available
15
Chapter 1 Kerio WebMail
through the Recommended browser settings link available on the Kerio WebMail’s login page.
If you miss the link, the helplines are as follows:
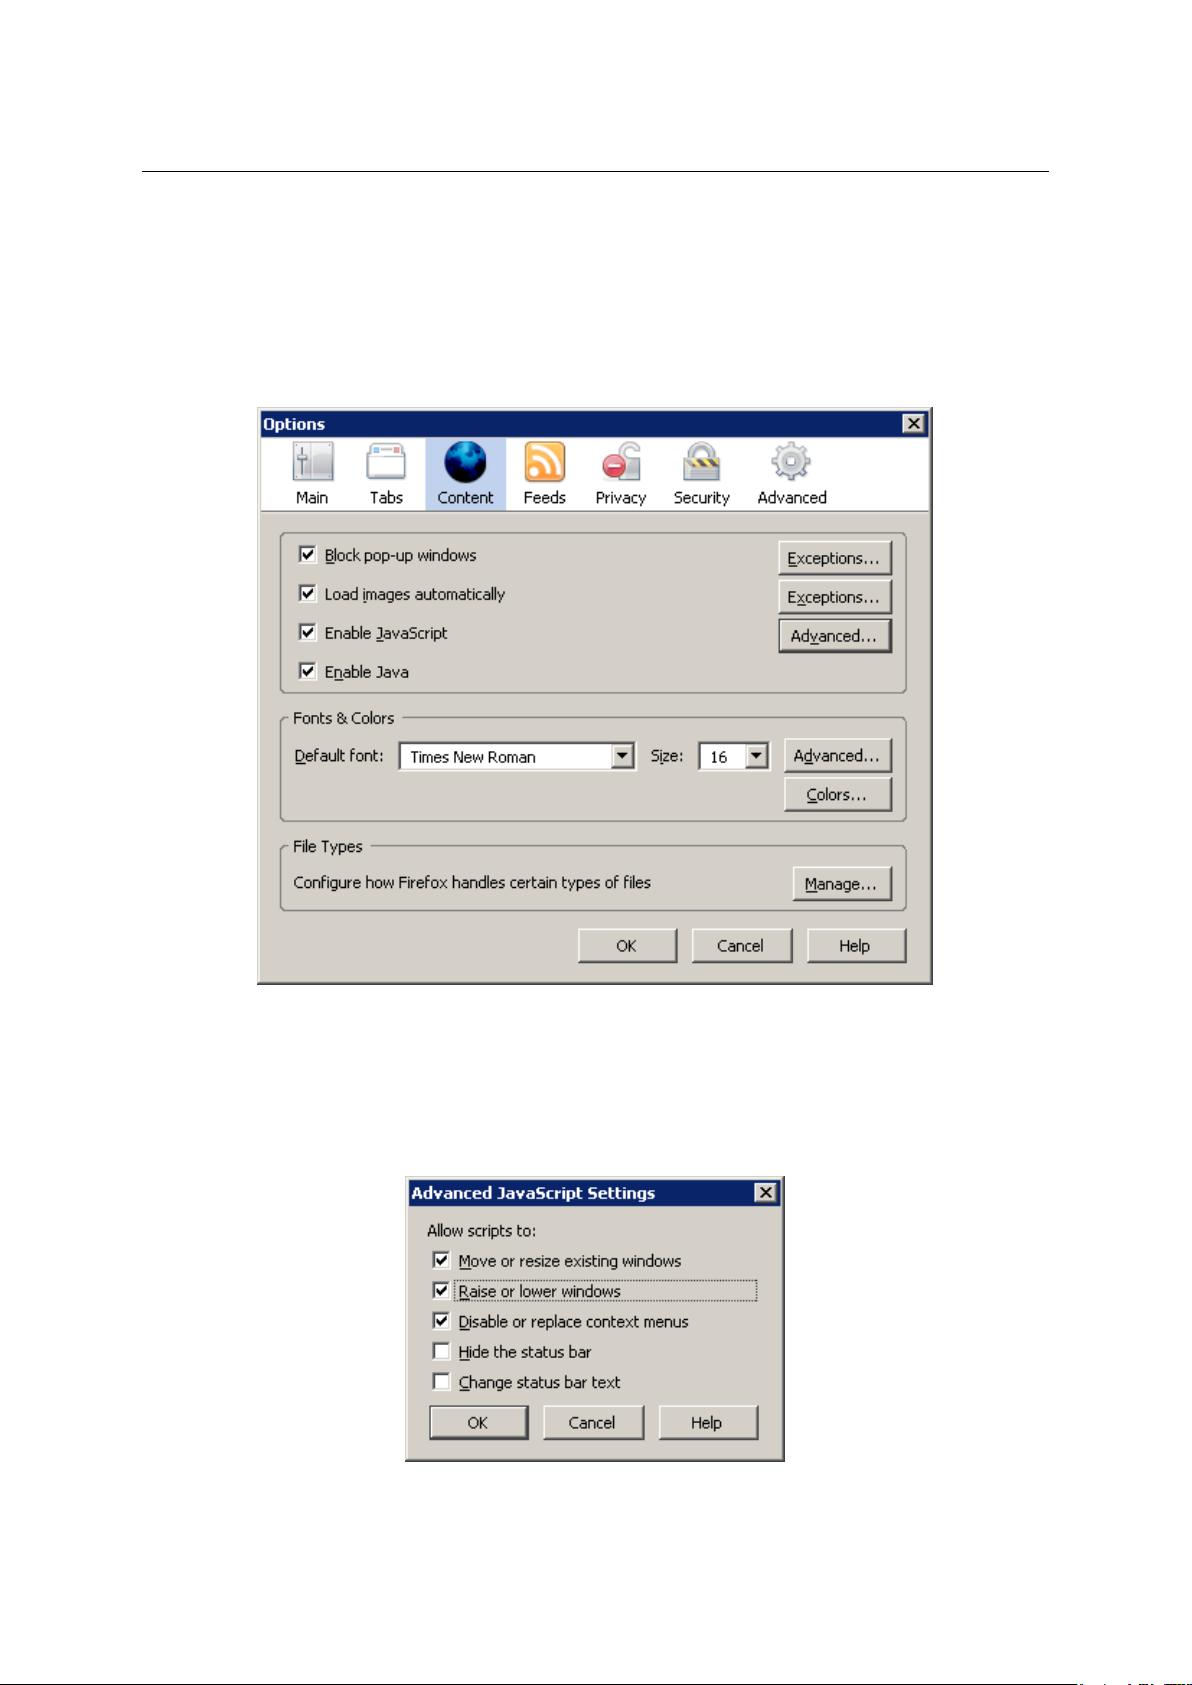
1. On the toolbar, click on Tools → Options.
2. In the Options dialog window just opened, select Content (see figure 1.5).
Figure 1.5 Options → Content
3. Click on the Advanced button next to the Enable JavaScript option.
4. In the Advanced JavaScript Settings dialog (see figure 1.6), enable the Raise or lower
windows option.
Figure 1.6 Advanced JavaScript Settings
16
1.3 The Kerio WebMail environment
This configuration allows proper functionality of displaying of event and task reminders as
well as smooth opening of other Kerio WebMail windows and dialogs.
Log out
Users should always log out when they finish working in Kerio WebMail. To log out, use the
Logout link in the upper right corner of the window. After logout, users get disconnected from
Kerio MailServer immediately, which prevents misuse of such connection.
Note: By disconnection, all windows associated with Kerio MailServer are closed.
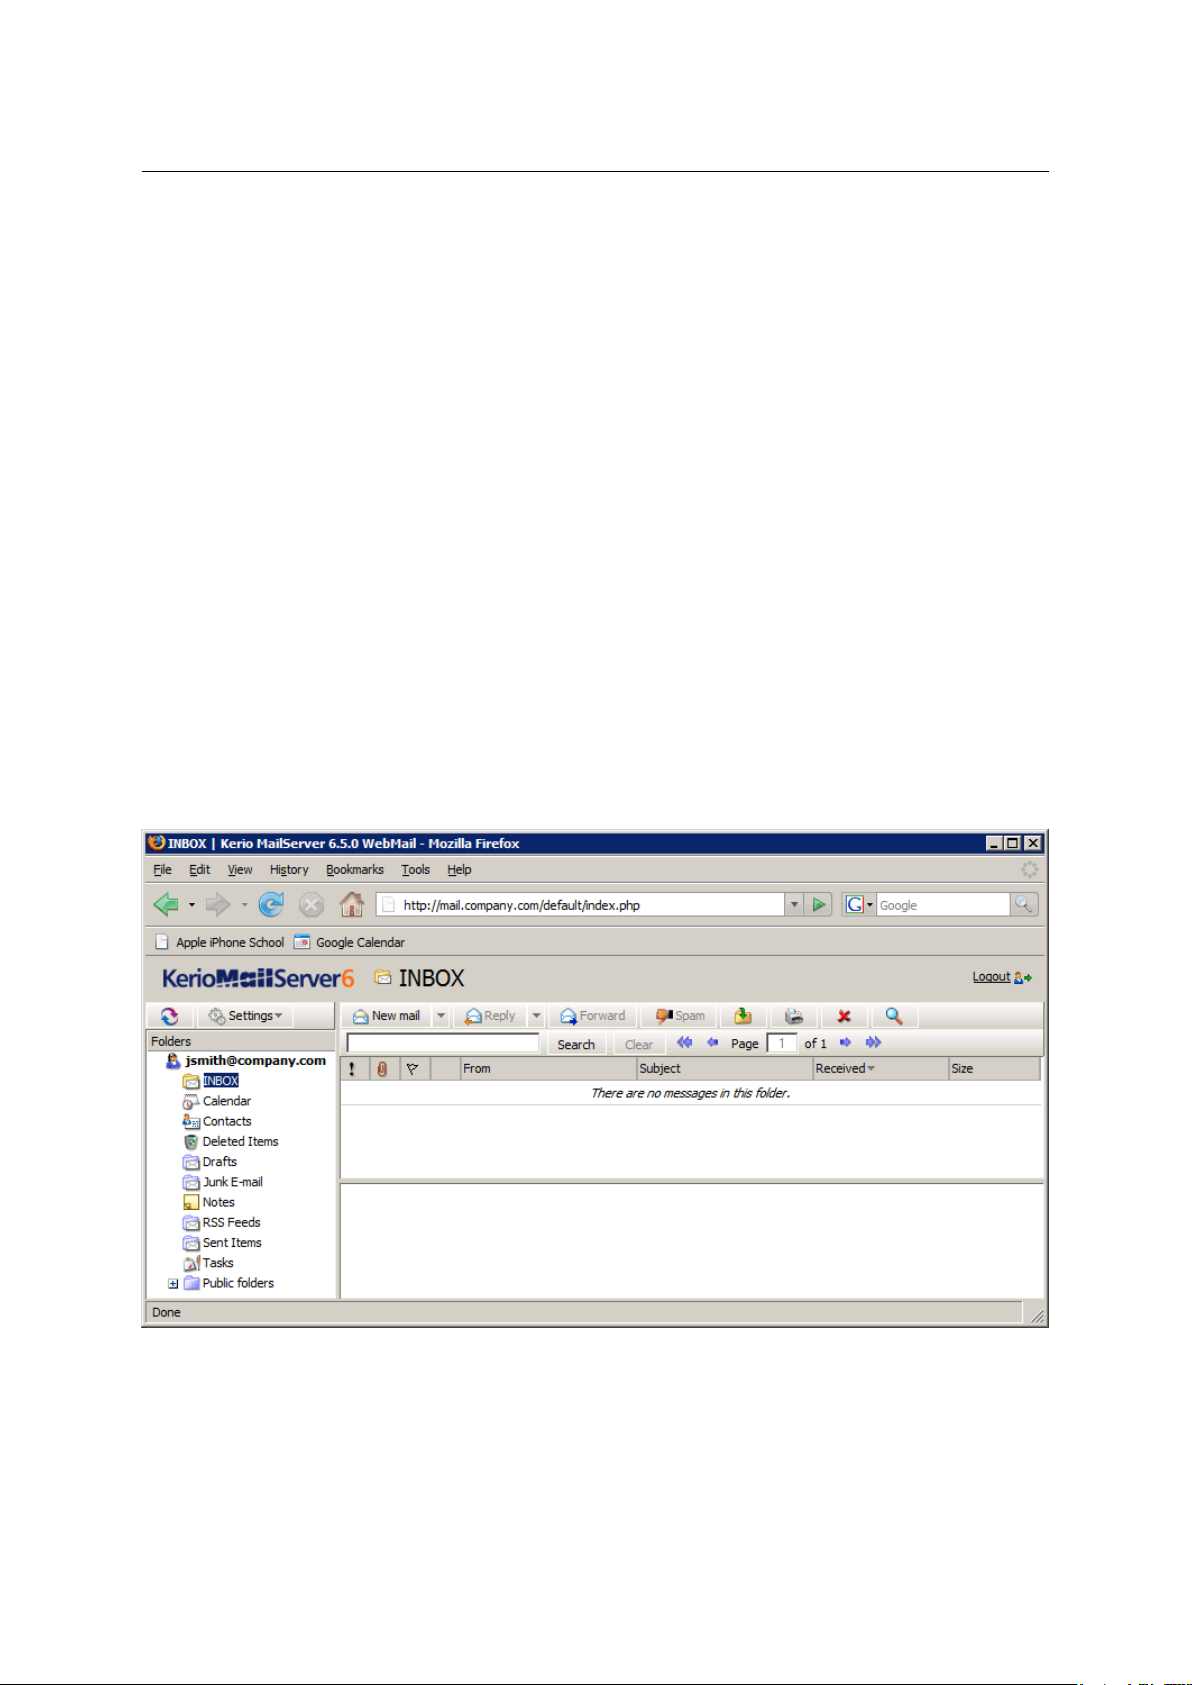
1.3 The Kerio WebMail environment
Once you are successfully connected to Kerio WebMail, a special user interface resembling of
usual email clients is opened in the browser (see figure 1.7). Kerio WebMail actually consists
of three main sections — one with a tree view of folders (remains unchanged), one with the
contents of the folder currently selected (changes according to the type and contents of the
folder), which is referred to as a main window, and the toolbar (its appearance depends on the
folder type).
This section addresses main Kerio WebMail components:
Figure 1.7 The first connection to Kerio WebMail
17
Chapter 1 Kerio WebMail
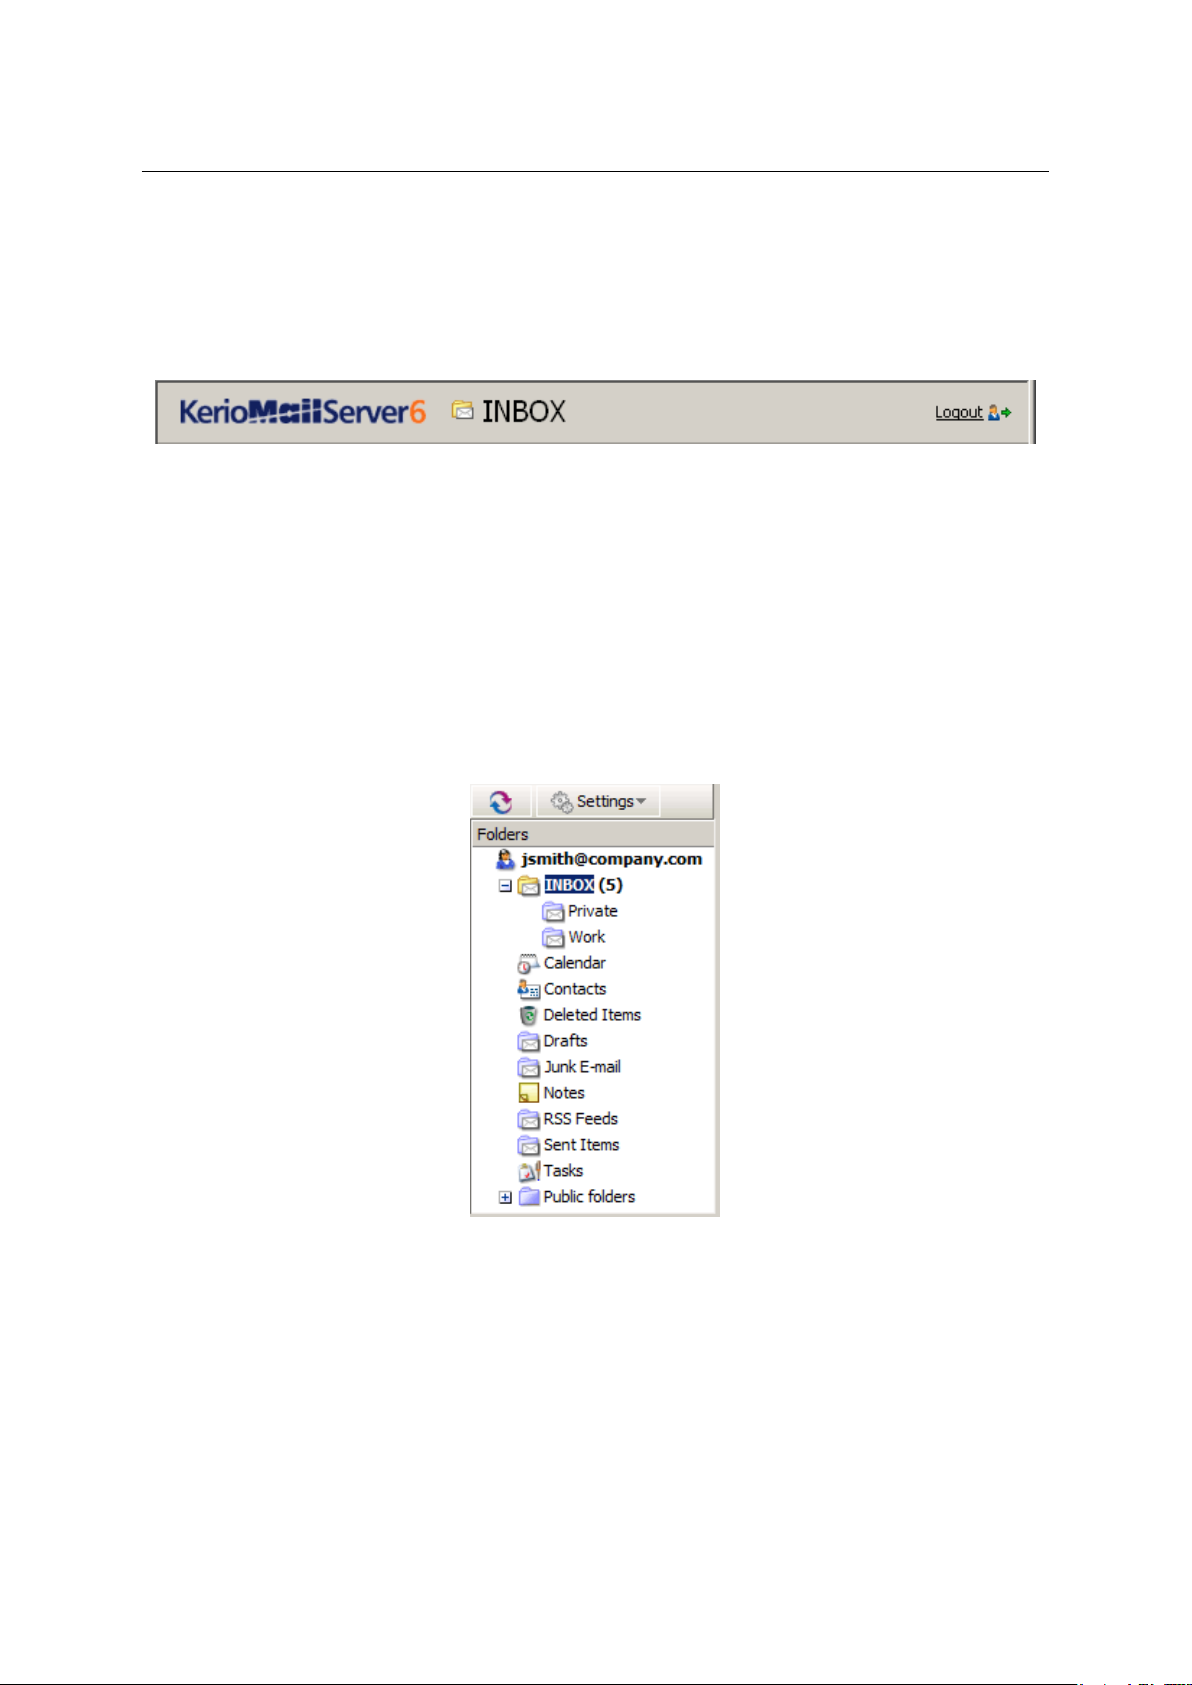
Page header
In the Kerio WebMail header, the name of the active folder and company logo is displayed. The
Logout button in the upper right corner is used for logging out from the server where Kerio
MailServer is installed (for details, check section 1.2).
Figure 1.8 Page header
Folder tree
The left pane of the Kerio WebMail window provides the folder tree (see figure 1.9). The tree
includes all folders of the mailbox. Clicking on any folder displays its contents in the main
pane (message list, calendar, etc.).
The folder tree allows manipulation with individual folders. This means that folders can be
moved, renamed, created and removed here. Folders and possible options are focused in
chapter
1.10.
Figure 1.9 Folder tree
In addition to the basic operations, in the folder tree it is also possible to add or remove access
rights to users as well as subscribe folders of other users. Sharing and subscription of folders
is addressed in section 1.10.5.
18
1.3 The Kerio WebMail environment
The main pane
The main pane of Kerio WebMail displays contents of a folder currently selected in the folder
tree. To view content of the folder in the main pane, click on the particular folder in the tree.
The way of display in the main pane depends on folder type. Kerio WebMail supports viewing
of the following folder types:
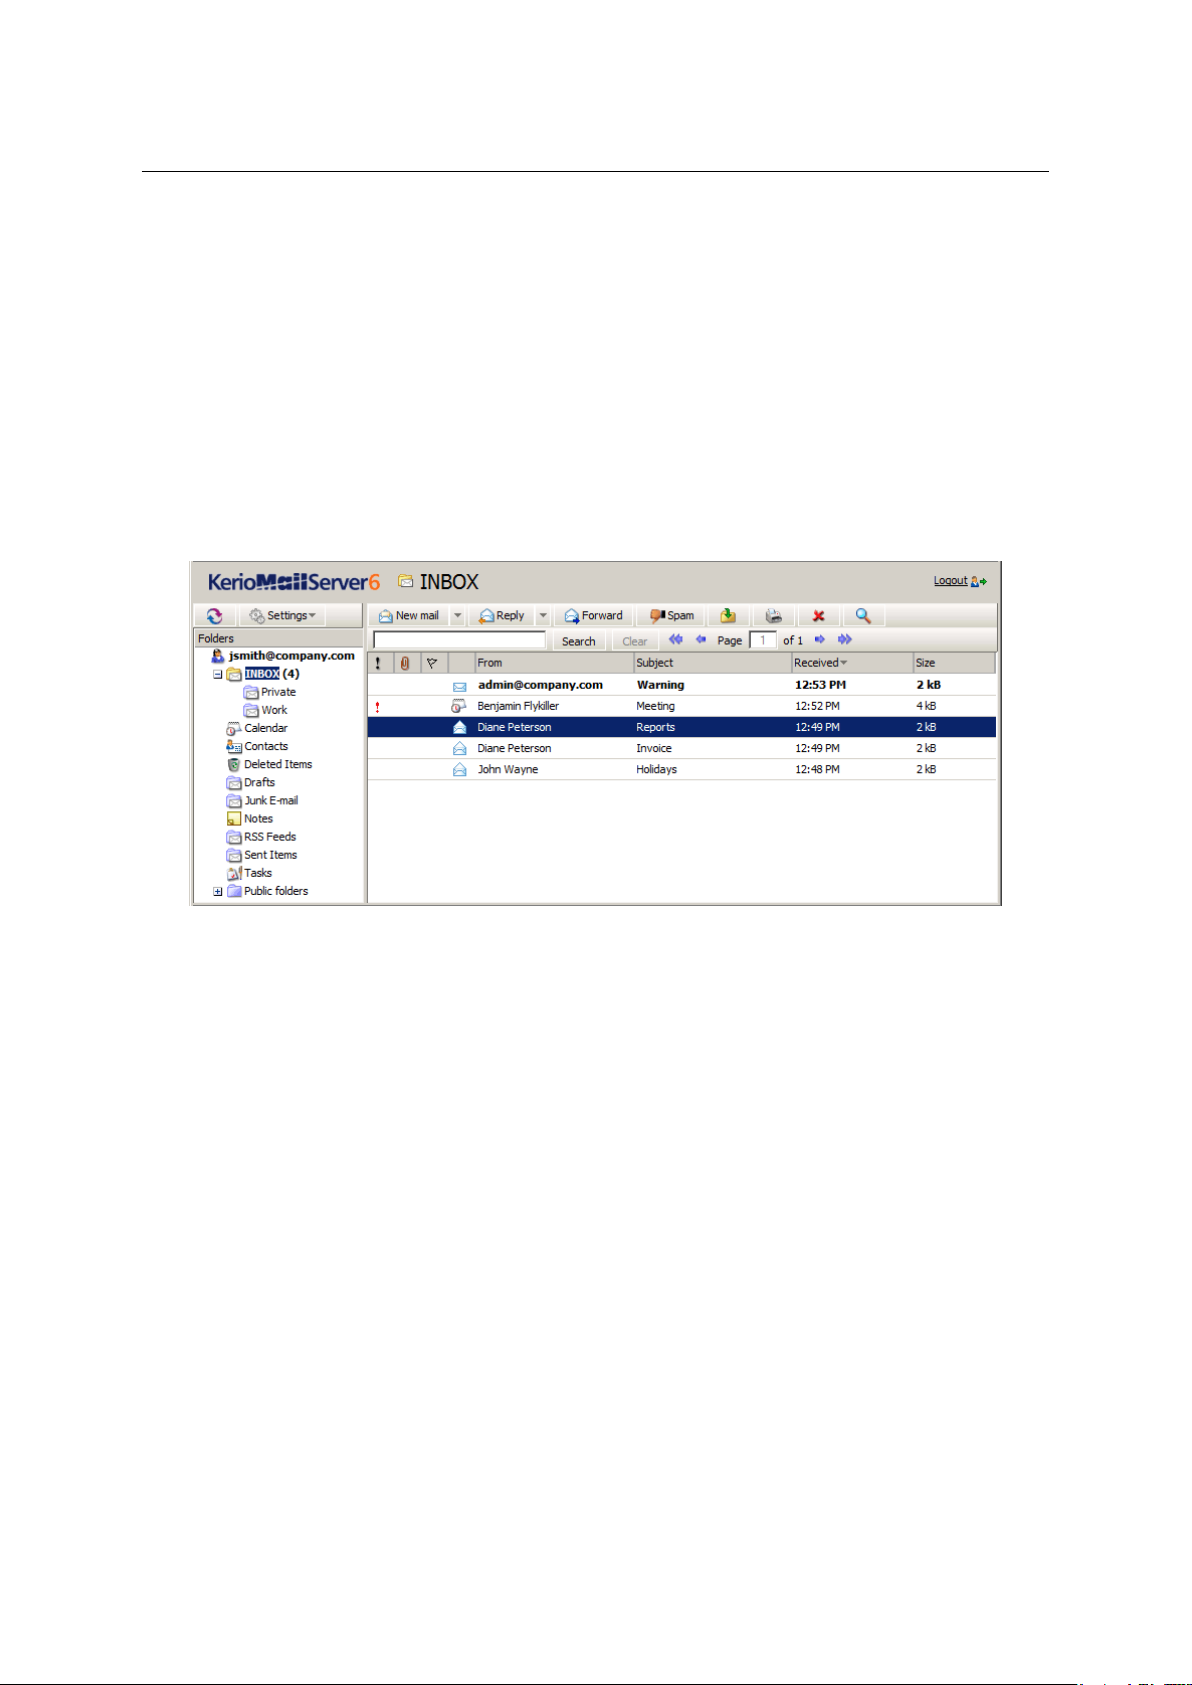
• Email
In case of email folders, the main pane consists of three sections. These include a list of
messages, a special reading pane where the message body is displayed and a toolbar where
several email tools can be found (see figure 1.10).
Figure 1.10 Email
Email folders and their manipulation are addressed in chapter 1.5.
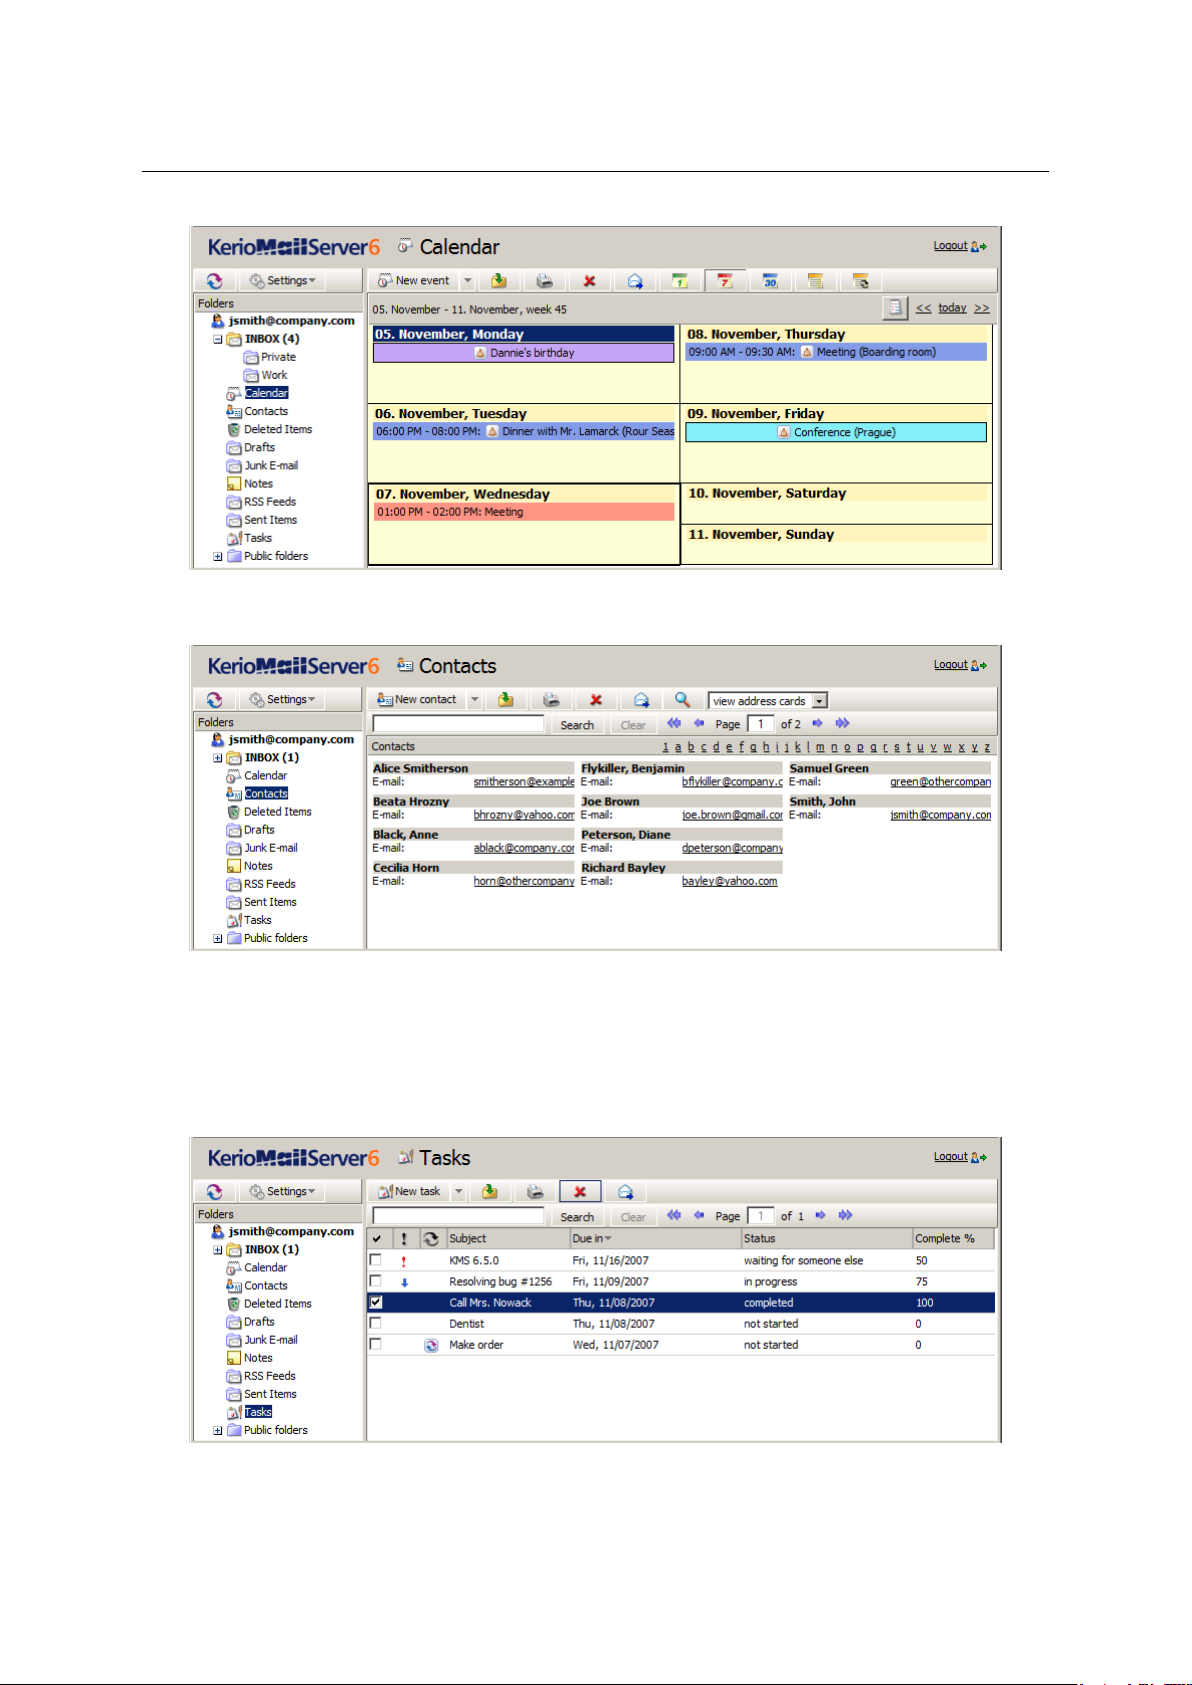
• Calendar
The layout of the calendar’s main pane depends on view mode. Figure 1.11 shows calendar
in the weekly view mode. Beside this mode, day and month views are available, as well as
two types of lists, distinguishing events with and without recurrence.
For detailed information on calendars, see chapter 1.7.
• Contacts
Like calendars, contact folders also allow various view modes. The modes available for
calendars are either address cards or a list of contacts (at figure 1.12, the address cards
mode is shown).
For detailed information on contacts and their management, see chapter 1.6.
19
Chapter 1 Kerio WebMail
Figure 1.11 Calendar
Figure 1.12 Contacts
• Tasks
In case of tasks, the main pane provides a list of created tasks and a toolbar allowing
comfortable administration of tasks (see figure 1.13).
Figure 1.13 Tasks
20
1.3 The Kerio WebMail environment
For detailed information on tasks, see chapter 1.8.
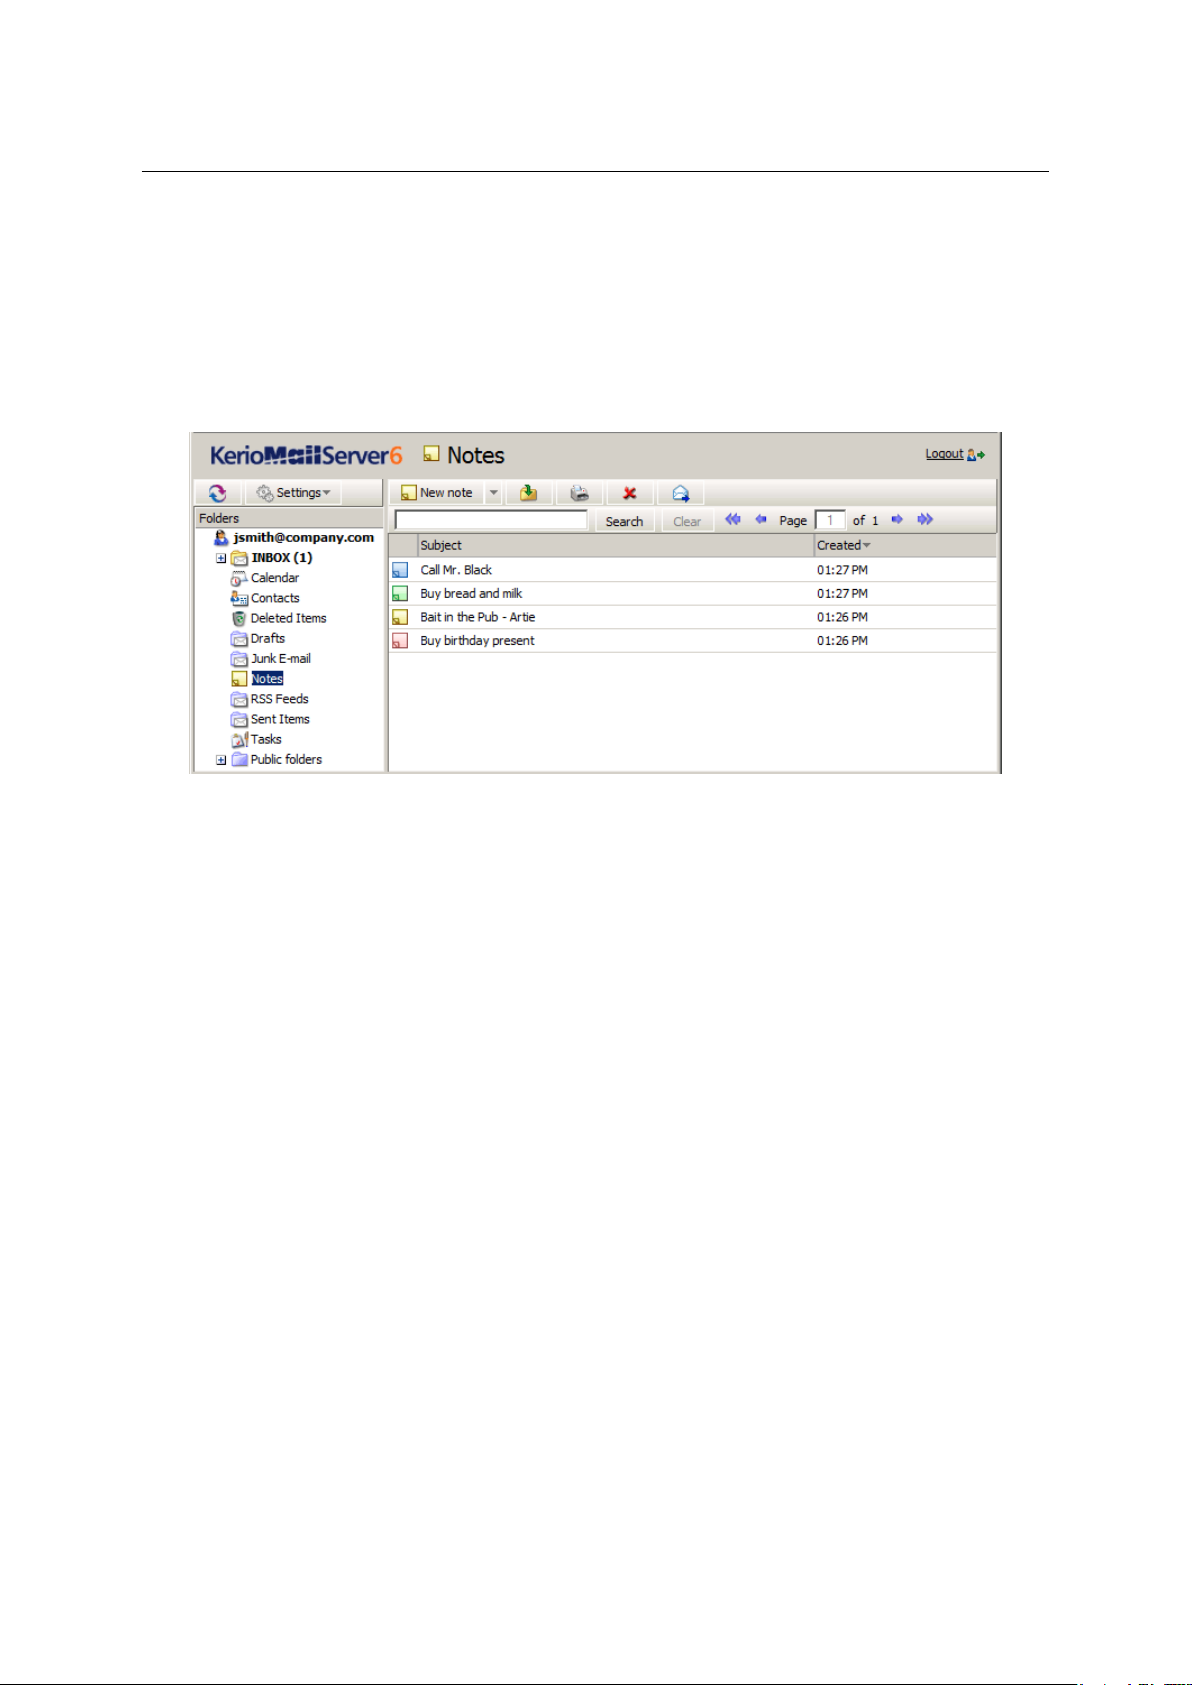
• Notes
The main pane of the Notes folder provides a list of notes (see figure 1.14). The notes use
customizable colours to distinguish various topics. The main pane also includes a toolbar
allowing creation of new notes, their removal, printing, etc.
Figure 1.14 Notes
For detailed information on notes, see chapter 1.9.
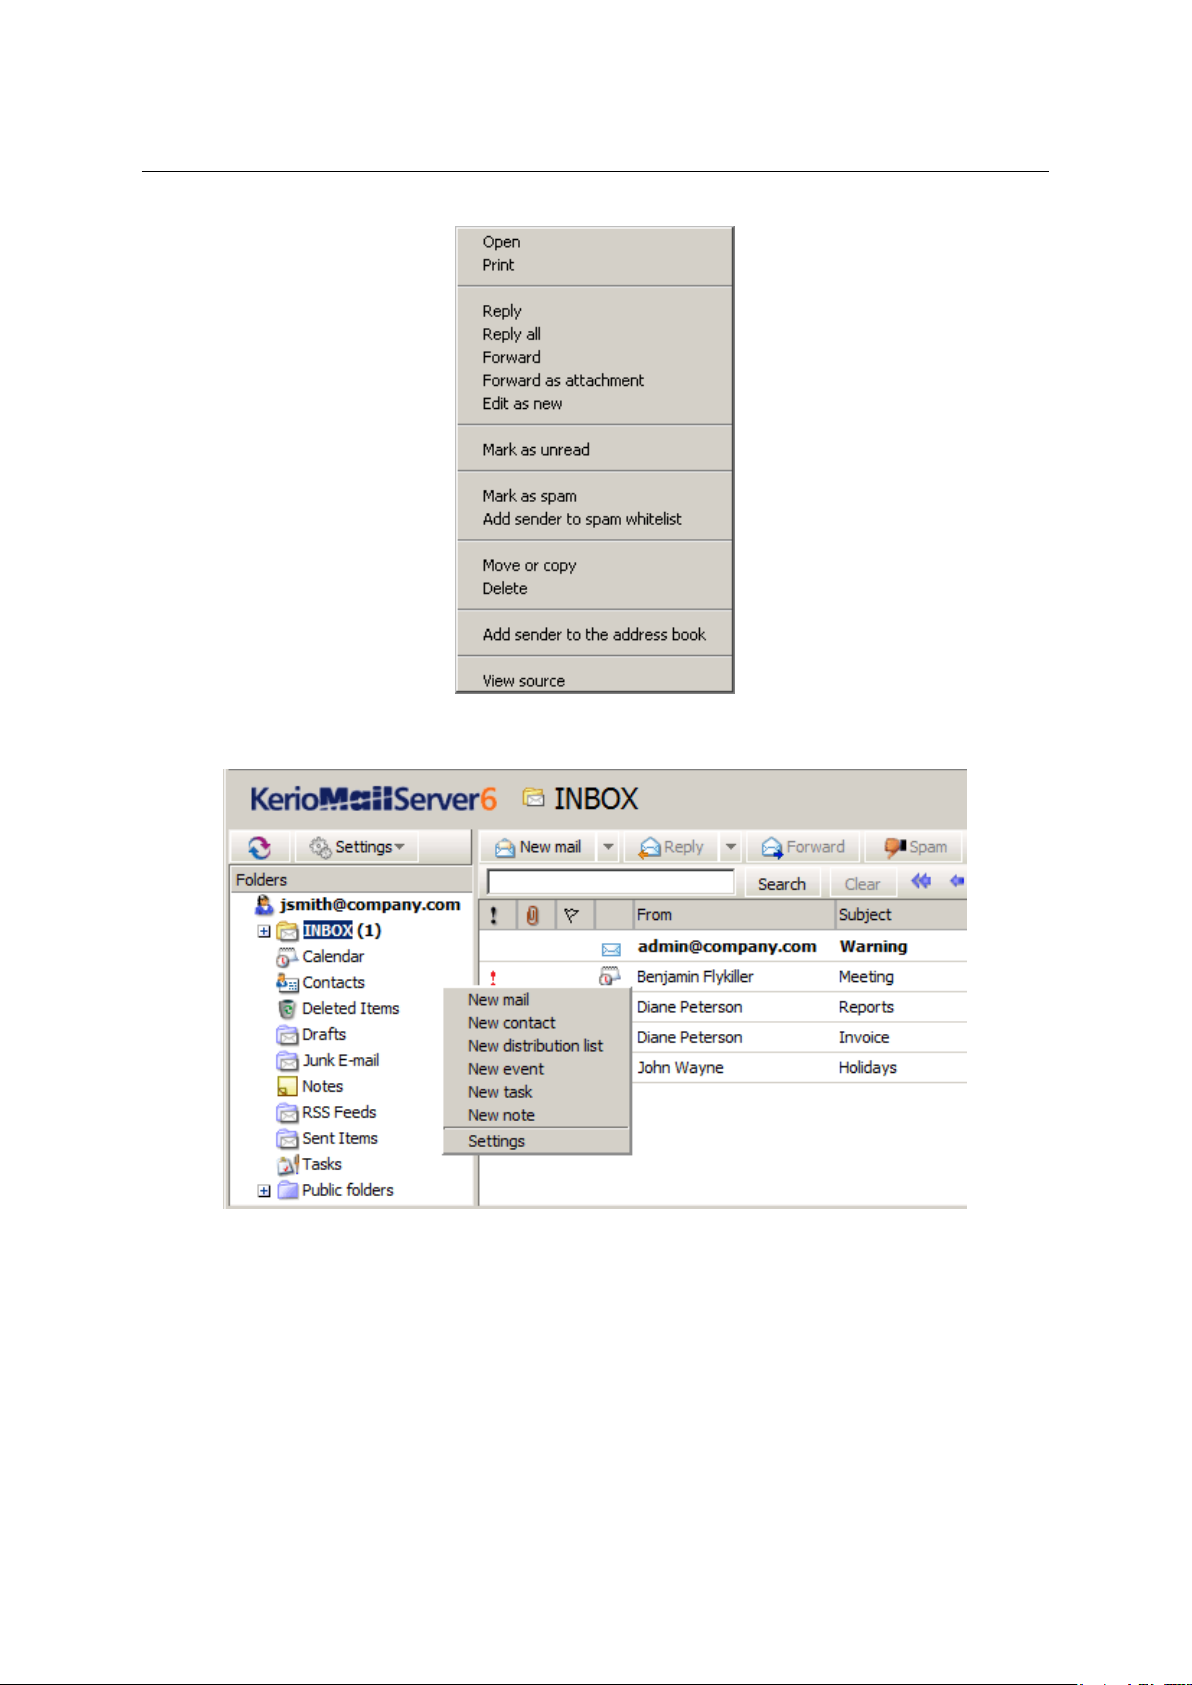
The Kerio WebMail pop-up menu
The Kerio WebMail’s pop-up context menu, opened by right-clicking on an object (folder, message, note, etc.), provides a list of actions. The pop-up menu is always associated with a particular object. This implies that right-clicking on an email message opens a menu (this menu is
shown at figure
1.15) which includes options different from the options included the pop-up
menu associated with the Tasks folder (opened by right-clicking on Tasks in the folder tree).
The Kerio WebMail’s pop-up context menu generally includes the same items as found on
toolbars of individual folders.
Notes:
• If a new contact, event, task or another item is created through the pop-up context menu
(see figure 1.16), these items are added automatically in the default folders (Contacts, Calendar, Tasks). Default folders are folders included in Kerio WebMail by the moment where
the particular account is created (such as Inbox) and they cannot be removed.
21
Chapter 1 Kerio WebMail
Figure 1.15 Context menu for email
Figure 1.16 The pop-up menu for creation of a new item (message, contact, event, etc.)
• On Apple Macintosh computers, click the mouse button and hold the Ctrl key to simulate
the right mouse button behavior. On the standard two-button mouse, the right mouse
button shows the context menu.
22

1.3 The Kerio WebMail environment
Today page
The “Today” page provides overview of the current status of the mailbox. It shows current
number of unread messages in Inbox (Settings allow to add more folders for which this information will be shown) as well as tasks and events for the current day. It also includes a quota
for disk space reserved for the particular mailbox (if the quota has been set by the server
administrator). This section also provides information about current free and occupied space
in the mailbox so the user can always easily recognize how much of the mailbox is currently
available.
To open the “Today” page, click on the root folder (at figure
1.17, the root folder is
jsmith@company.com).
In the user interface it is possible to set the “Today” page as an introductory page that would
be displayed upon each connection to Kerio WebMail (for details on these settings, see chapter 1.11.1). Thus the users can see right at the start what should be done on that day and
they do not have to surf through individual folders. Individual items at the “Today” page
are formated as links which can be simply clicked to view the particular event, task or email
folder.
Figure 1.17 Today page
The “Today” page is divided into four parts. The information in individual sections vary
(events, tasks, quota and number of unread messages):
• Calendar — this section includes a list of events scheduled for the current day. In Kerio
WebMail’s user settings, up to seven days may be set to be displayed at the “Today” page.
For details on where and how number of days to be displayed can be set, see chapter 1.11.1.
• Tasks — by default, this section shows a list of tasks set for the current day. However, in the
user interface it is possible to change the “Today” page settings so that all tasks included
in the particular folder are always displayed. The settings are addressed in chapter 1.11.1.
23

Chapter 1 Kerio WebMail
To make manipulation with tasks even more comfortable, various types of information
are also displayed, such as priority (an exclamation mark or a blue arrow), information on
uncompleted tasks where the due date has already expired (items marked red), etc. These
attributes are shown at figure 1.17.
• Quota — server administrators can set a so-called quota and apply it to particular mail-
boxes. The quota is a limit for number of messages and for diskspace reserved for the
mailbox. The Quota section informs users if quota is set and how much of the reserved
mailbox capacity is left. When the mailbox is full, the server generates an automatic message recommending to remove some messages in the mailbox and sends it to the corresponding user. If the user ignores this warning, other mail will not be delivered to the
mailbox since no more capacity is left.
• Messages — by default, this section shows all unread email in Inbox. In the Kerio WebMail
user settings, it is possible to allow also displaying of other email folders. Details on where
and how these settings can be done are addressed in chapter
1.11.1.
1.4 Specific features and technical limitations
Automatic logout
For security reasons, Kerio WebMail logs off the user automatically after a certain time of
inactivity. By default, the length of inactivity period is set to 1 hour. Kerio MailServer administrators can change this value.
When the inactivity period expires, clicking on any link or button returns the user to the login
page and the user has to log in again.
Pop-up killers
If any pop-up blocker (pop-up killer) is installed on the computer where Kerio WebMail is
running, it is necessary to create an exceptional rule in Kerio WebMail or to connect via secure
connections (see chapter 1.2). Otherwise, event and task reminders will not work in Kerio
WebMail.
If the pop-up blocker is embedded in the web browser, create an exception for Kerio WebMail
or disable the pop-up blocker completely.
Message size limits
Size of any outgoing email message (event, task or contact) must not exceed the limit set by
Kerio MailServer administrator (for detailed information, see the Kerio MailServer administrator’s guide). otherwise the particular message will not be delivered. No limit applies to
incoming mail.
24
1.4 Specific features and technical limitations
Duplication of default folders
After certain period of using, some default folders, such as Deleted items, Junk email, etc., may
be duplicated in the Kerio WebMail’s folder tree.
This problem occurs under the following circumstances:
• besides Kerio WebMail, a user connects to his/her mailbox also via an email client which is
not directly supported by Kerio MailServer (e.g. MS Outlook Express),
• this unsupported email client is not in English,
• client applications connects to the server via IMAP.
If the conditions described above are met, the mail client might create its own set of special
folders (they cannot be found at the server since their names are in English there). These
changes are copied by Kerio WebMail.
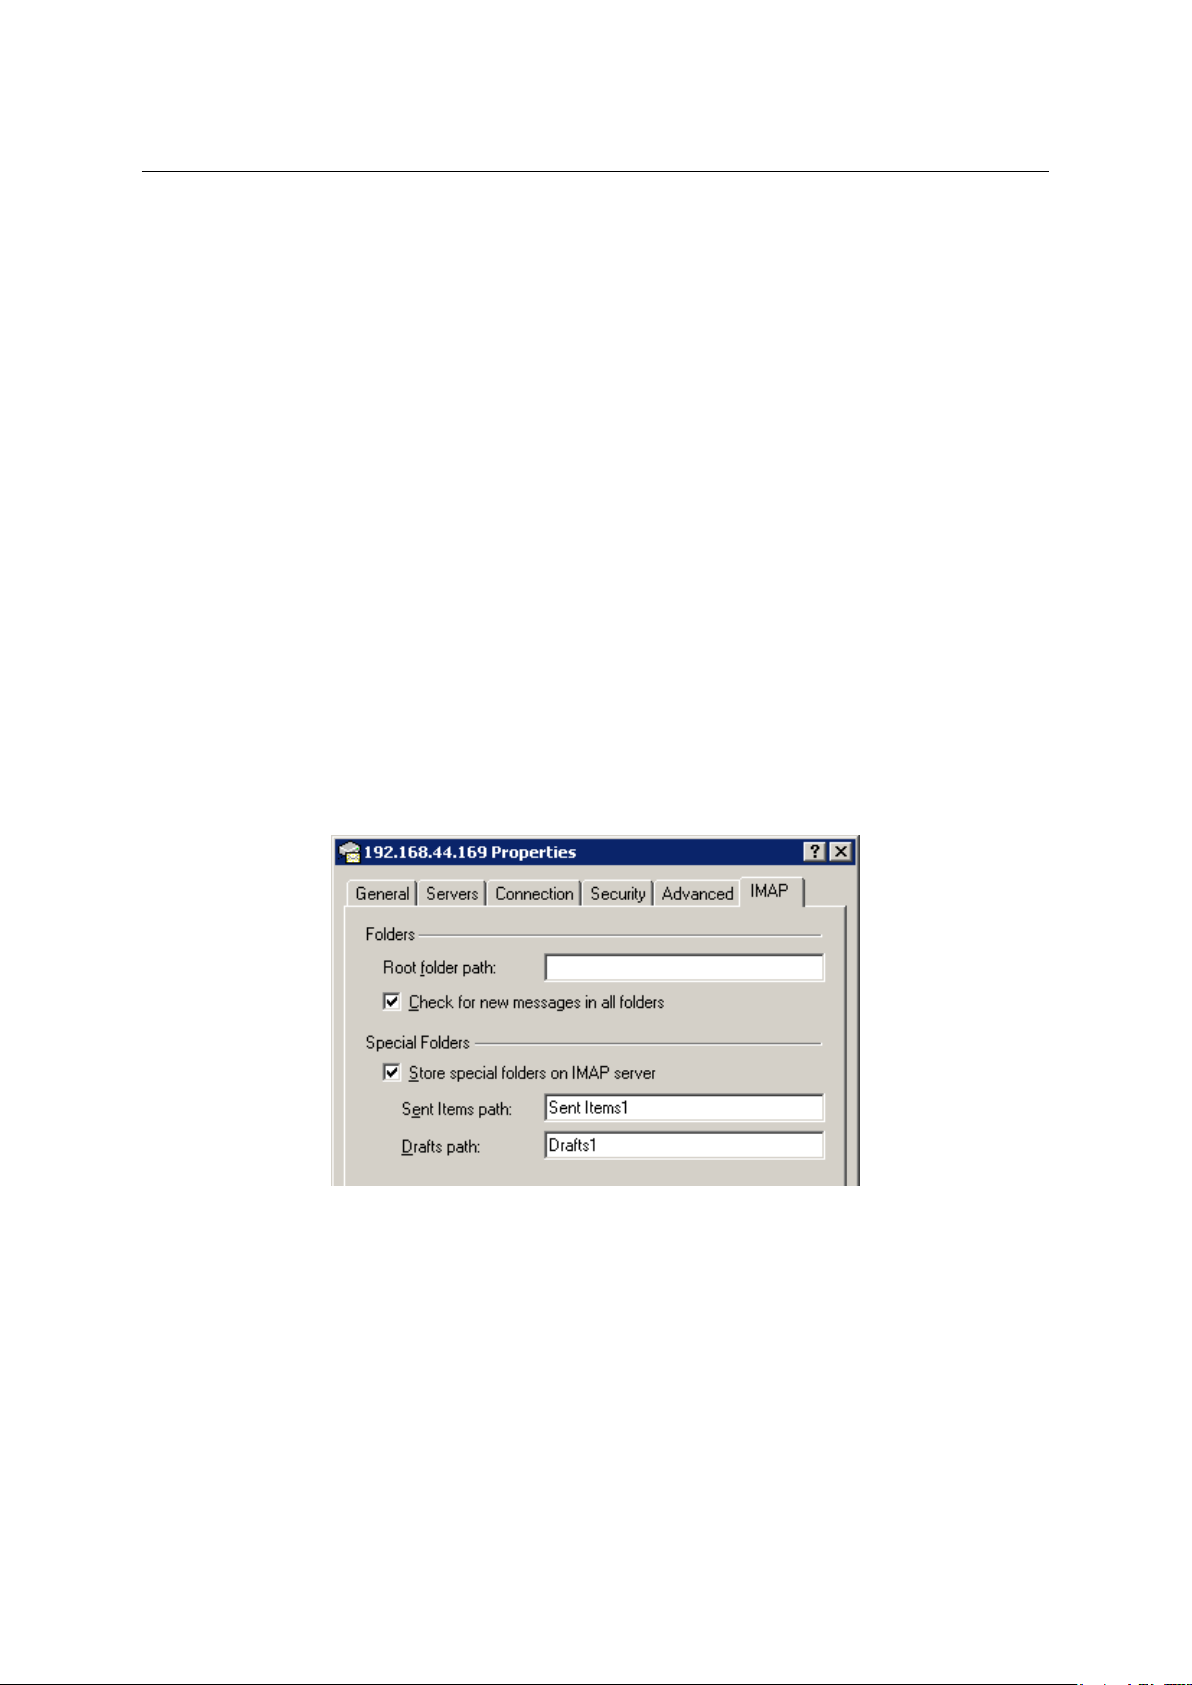
In MS Outlook Express, the problem can be removed by renaming the critical folders (Sent Items
and Drafts) under Tools → Accounts:
1. Click on the particular email account and click Properties.
2. Select the bottom IMAP folder and change the Sent Items and Drafts folder names (for
details, see figure
1.18).
Figure 1.18 Renaming folder names in MS Outlook Express
Messages signed in MS Outlook
Senders who use MS Outlook with the Kerio Outlook Connector (however, this problem can arise
even if some obsolete email clients are used) can send digitally signed messages in a format
that is not supported by Kerio WebMail. This problem can be solved by allowing sending of
digitally-signed email messages in MS Outlook as clear text messages.
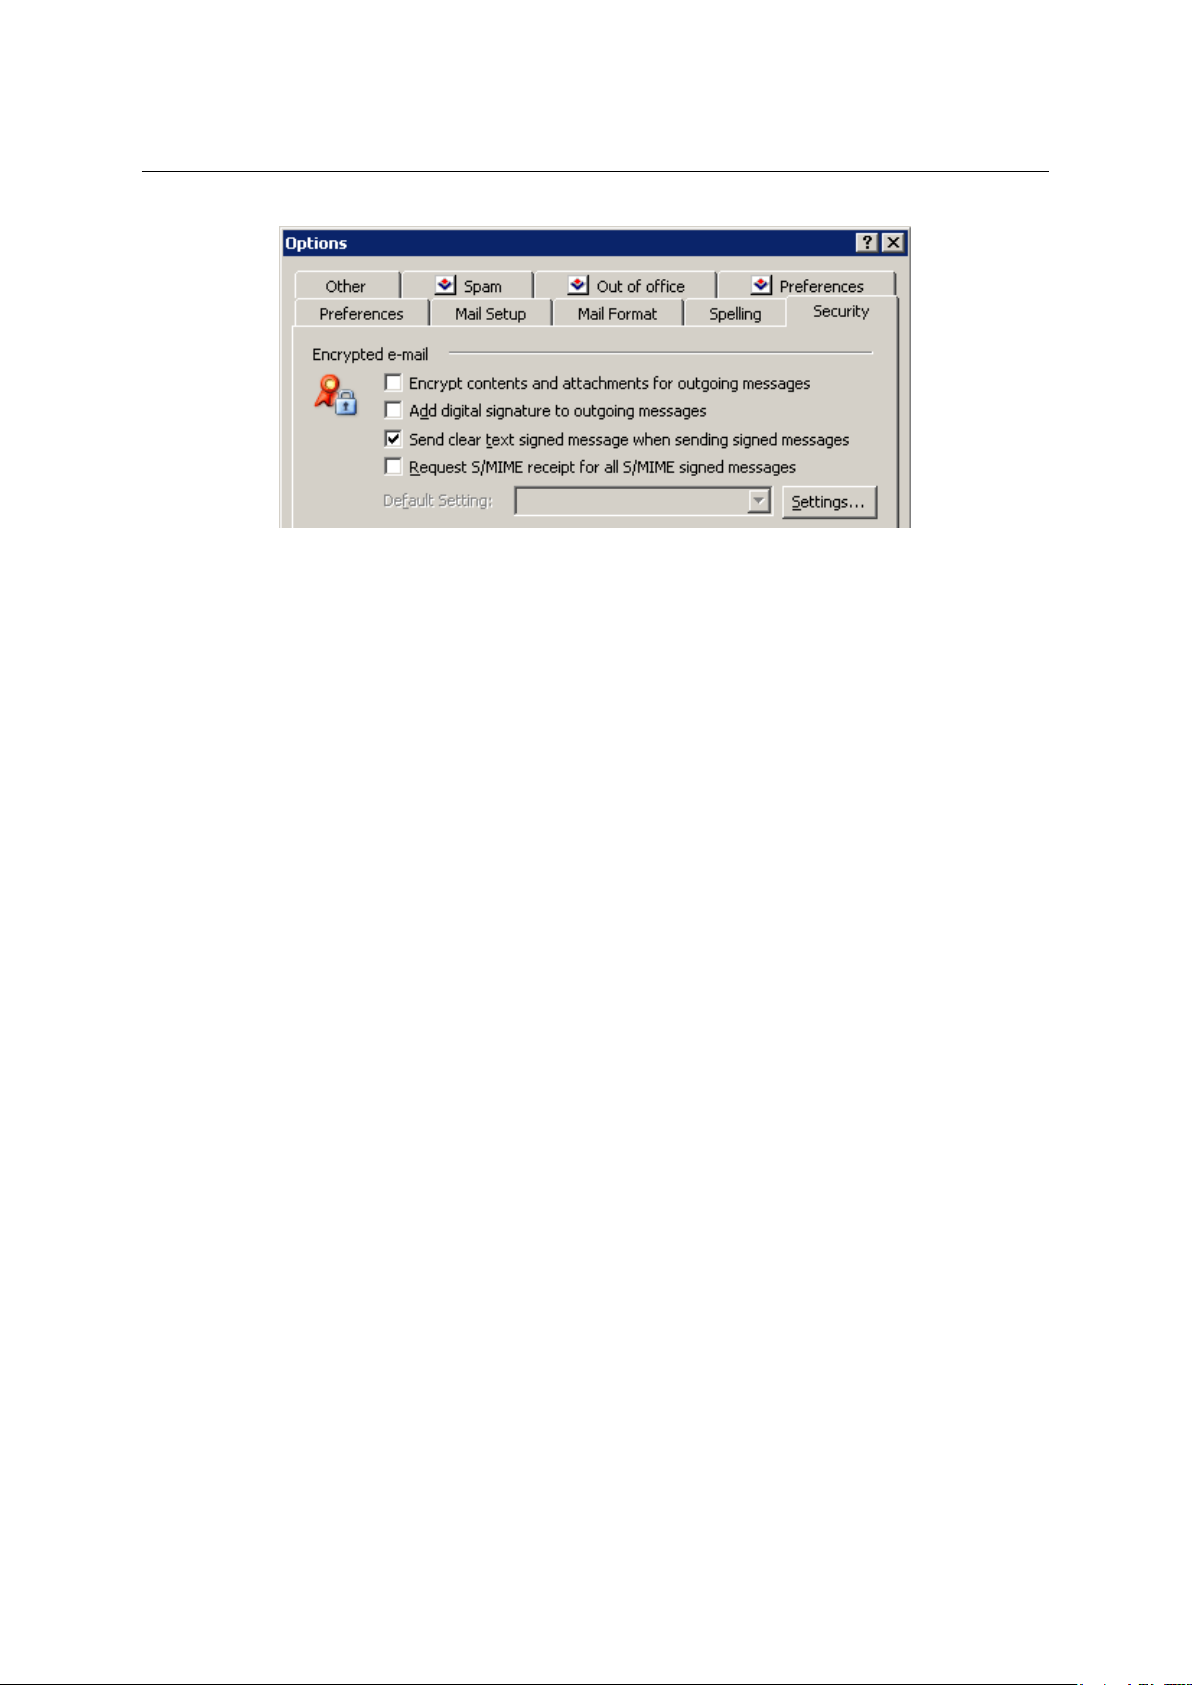
If your messages are digitally signed, in MS Outlook check the Send clear text signed mes-
sage when sending signed messages option under Tools / Options on the Security tab (see
figure
1.19). This option provides that also Kerio WebMail users may read the message.
25
Chapter 1 Kerio WebMail
Figure 1.19 Setting verification of digitally signed messages in MS Outlook
Note: The settings shown here applies to MS Outlook 2003. For MS Outlook (2000/XP), the
settings may differ slightly. In MS Outlook 2007, these settings may be done under Tools →
Trust Center → E-mail Security
Problems with Back and Forward buttons
Also note that the Back and Forward buttons located in the toolbar of the web browser will
not work properly in Kerio WebMail. Therefore, it is recommended not to use these buttons in
Kerio WebMail.
1.5 Email
The most frequently used folders are email folders. These folders store all email messages of
a particular mailbox. Number of email folders in a mailbox is not limited.
The most essential folder is Inbox. By default, new messages are delivered to this folder. It is
also possible to make the server deliver messages sorted by certain criteria to other folders,
however, this issue will be addressed in chapter 1.12. Inbox is showed at figure 1.20.
Another basic email folder is Sent Items. Here, copies of all messages sent from the mailbox
are stored.
Another email folder to be mentioned is Drafts. This folder stores any messages which have
been started or even completed but not sent.
The three basic folders described above cannot be removed as they belong to so-called default
folders. Details on default folders as well as on other folder types are focused in chapter 1.10.
1.5.1 Toolbar
First, we will focus on the toolbar of email folders to learn about its options:
New mail
This button opens a dialog where new messages can be created and sent (for details, see
chapter 1.5.5).
26

Reply, Reply All
The button covers two options:
• Reply — a reply to the sender of the message (this option displays the message editor
page; the original message text appears in the body of the reply message).
• Reply All — a reply to the sender and all recipients of the original message; this option
works similarly to the Reply option. This option can be found in the selection menu
of the Reply button.
Forward
Click on this button to forward the message to another email address.
Spam/Not spam
The toolbar will show only the button that can change the message status.
The Is spam button marks the selected message as spam. If a message is marked as spam,
the Kerio MailServer spam detection tool will automatically mark all similar messages as
spam (for more information, see chapter
1.5.7). Such messages will be deleted or moved
to Junk E-Mail. Use the Settings option in the General tab to decide if the message should
be deleted permanently or moved to the Deleted items folder (see chapter 1.11.1).
The spam detection tool may occasionally mark a solicited message as spam. In such
cases, it is recommended to use the Not spam option. The subsequent messages that
are similar to the message above will be treated as non-spam (for more information, see
chapter 1.5.7).
1.5 Email
Move or copy
This option moves or copies the message to a selected folder. Users can also click the
selected message and drag it to any of the mail folders in the folder tree.
Print
To print messages, click the Print button. First, the printed page preview appears; then
the standard Print dialog box is displayed.
Delete
Click the Delete button to delete the message or move it to the Deleted items folder.
Use the Settings option in the General tab to decide if the message should be deleted
permanently or moved to the Deleted items folder (see chapter 1.11.1).
Messages can be deleted also by the Delete key (in Mac OS X also by Backspace).
Search for:
This button opens a standard box called Search that allows users to find one or more
messages that meet the criteria entered (for more information, see chapter 1.5.9).
Use the Search field to find messages based on their subject or sender. Any search string
(a word, part of a word or character) can be entered in this field. The messages found will
be displayed directly in the main window.
27

Chapter 1 Kerio WebMail
1.5.2 Message list
In this section, we will focus on how email folders are displayed and how they work. The mail
folders are arranged in a table (list). Each row contains one message and available information.
Information to selected messages are listed in the columns.
Figure 1.20 The Inbox email folder
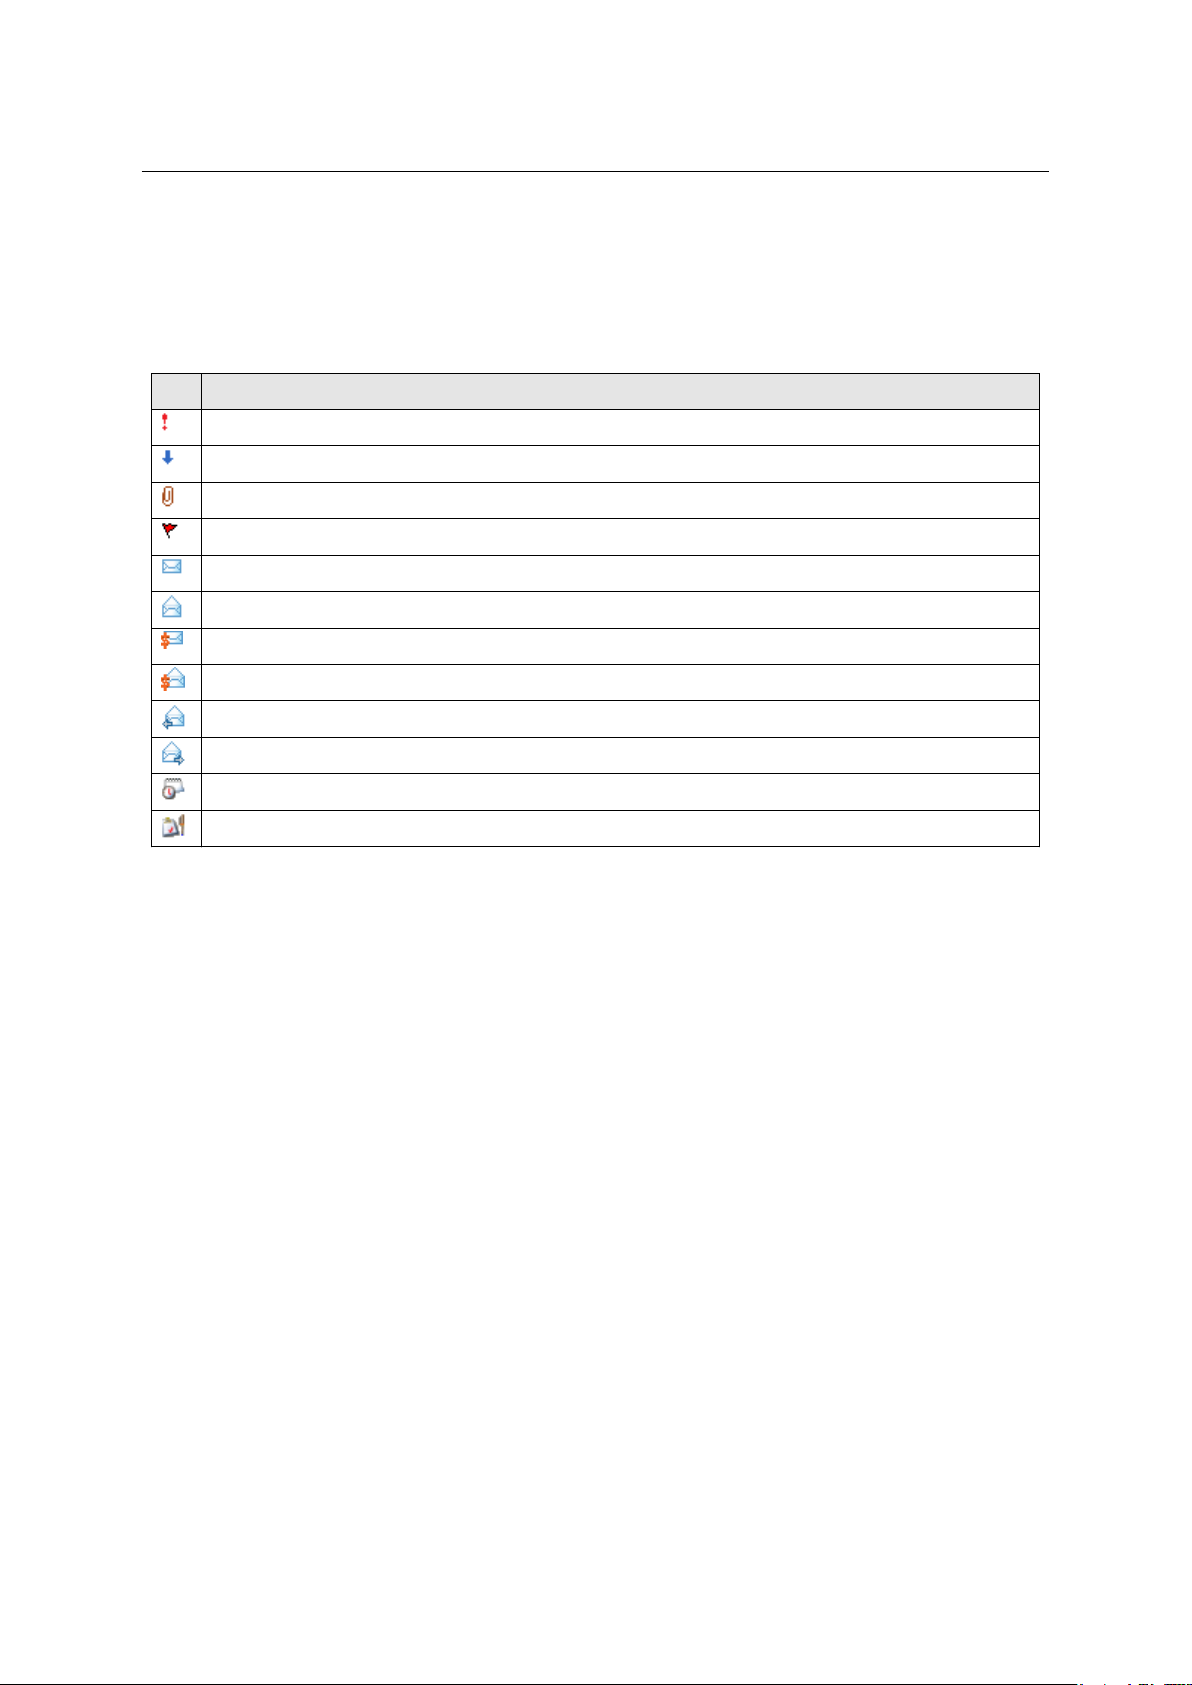
Each line may include icons referring to other features of the particular message (the description provided below addresses them in the order from left as they may appear in the line):
• Priority — this icon represents the importance of the message. High priority is marked by
a red exclamation mark, whereas a blue downward arrow stands for a low priority message.
Priorities are set by sender. In chapter1.5.5, message priority settings are addressed in
detail.
• Attachment — the paperclip icon indicates that the message contains an attachment (i.e.
an attached file).
• Flag — flags are represented by a little red flag icon used to highlight messages (so it is
later easier to find them).
• Icon — these icons indicate different types of messages (forwarded message, spam, invita-
tion, etc.).
• From — the address of the sender.
• Subject — the subject of the message.
• To — the address(es) of the recipient(s).
• Cc — the address(es) of the copy recipients.
• Received — the date/time when the message was received. On the day of receipt, this
column shows only the time data; from the next day on, the date is displayed as well.
28
1.5 Email
• Date — the day when the message was sent. If the message is received on the same day,
only time data are shown. From the next day on, the date is displayed as well.
• Size — the size of the message in kilobytes.
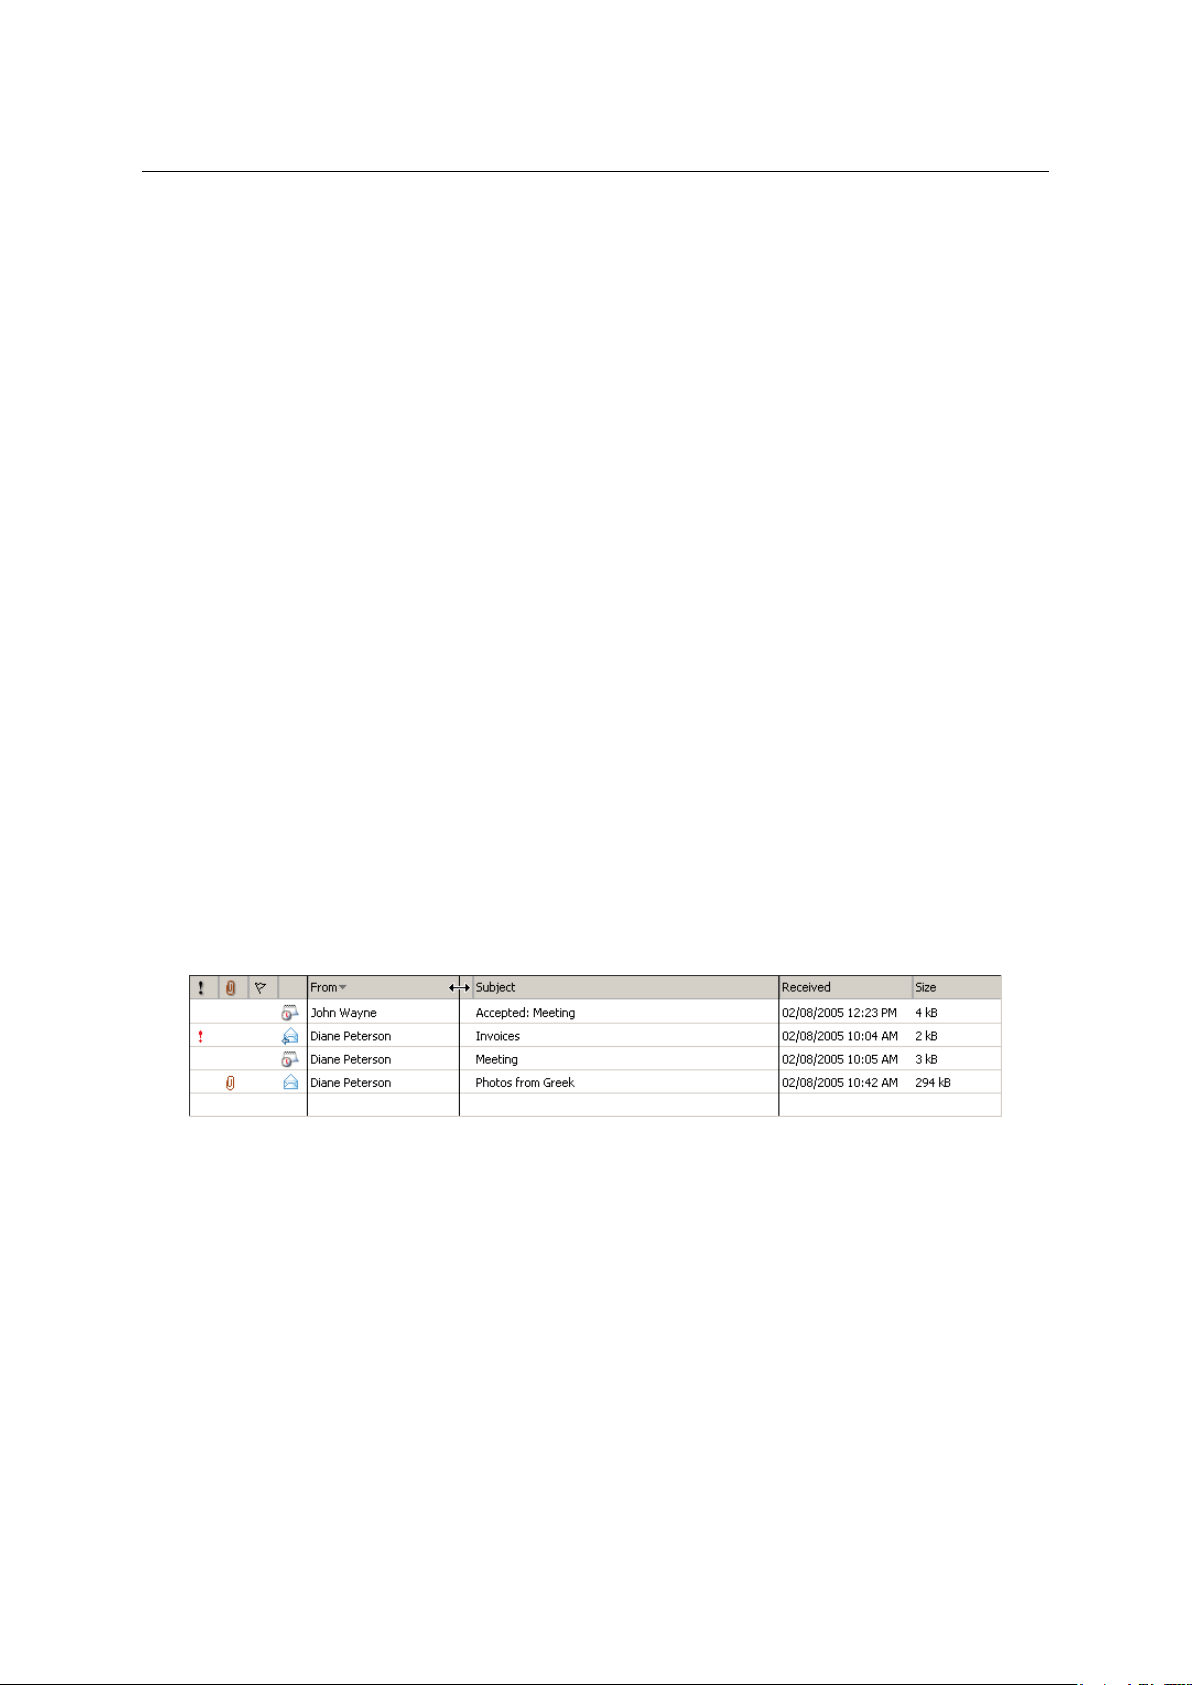
icon Description
high priority messages
low priority messages
attachment
message flag
unread message
read message
unread spam
read spam
messages already replied
forwarded messages
event (meeting invitation or a reply to an invitation)
task (notice informing of the user’s participation on a task or a reply to such a notice)
Table 1.1 Overview of icons used in message lists
By default, up to 20 messages are listed on one page. To change number of messages displayed
on a single page, use the Settings section in Kerio WebMail (see chapter 1.11.1).
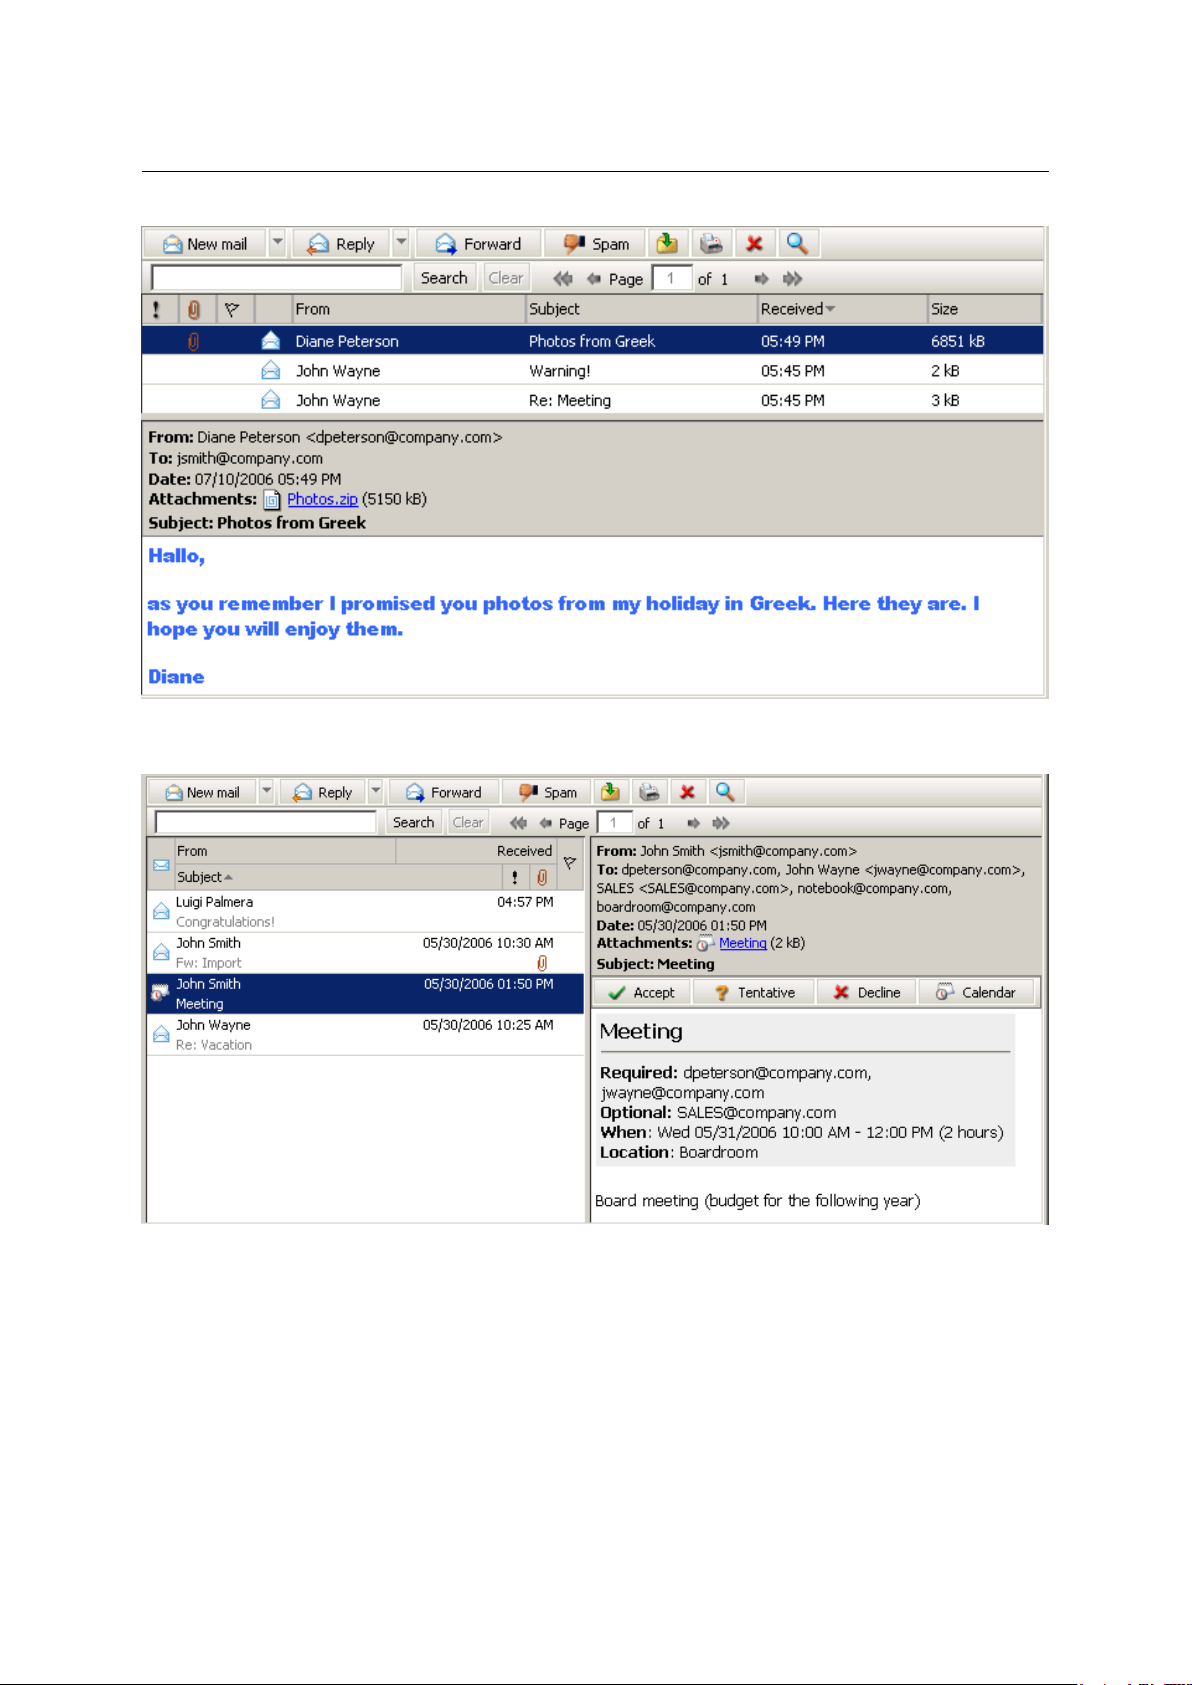
1.5.3 Message reading
New messages are delivered to the Inbox folder by default (folders for incoming messages can
be specified in the rules— see chapter 1.12). The unread messages are marked in bold. The
number of unread messages is indicated in parentheses next to the folder name. Double-click
selected message to open it in a new window (or select a message in the list and press Enter).
The reading pane is an area where the message body is displayed (message body, images, etc.).
There are two options of location of the reading pane (at the bottom or on the right — see
figures 1.21 and 1.22) or it can be hidden. If the window is hidden, message contents are
displayed in separate windows. The reading pane can be enabled or disabled in Settings. For
detailed information on user settings, see chapter 1.11.1.
29
Chapter 1 Kerio WebMail
Figure 1.21 Message reading
Figure 1.22 The reading pane is located on the right from the list of messages
Message list editing
• Adding and deleting columns
The appearance of the message table can be changed depending on the information shown.
Kerio WebMail enables users to display or hide any of the columns. Columns can be set as
follows:
30
1.5 Email
1. Right-click on the column captions.
2. The pop-up menu that appears contains the Change columns option.
3. Click on Change columns to open the Select fields dialog box and select columns to be
shown in the list of messages.
Users can select (check) the columns they want to include in the table. Checked columns
will be displayed in the table, unchecked columns will be hidden.
• Sorting messages by columns
The detailed information on individual messages is displayed in the columns. Each column enables sorting messages by information. Click the column heading to sort tasks in
the ascending or descending order (see the arrow next to the column name) by alphabet,
numbers or time (depending on the column contents).
Note: For sorting by subject or by sender, items are sorted by the alphabet of the language
set in Settings as preferred (the General tab) in Kerio WebMail — see chapter 1.11.1. In
result, if for example English is set as preferred and subjects are in German, subjects will be
ordered by English alphabet and some specific national characters may also cause problems
in sorting.
• Adjusting the column width
The width of the message table can be adjusted the same way as in the spreadsheet programs. To change the column width, click between two columns in the table header and
drag the cursor right or left as needed (see image 1.23).
Figure 1.23 Adjusting the column width
Note: Settings of column width is not remembered. Next time opened, the columns return
to their default state.
Attachments
Each incoming message may include one or more attachments. The attachments are files
of various types (text, images, audio, video, archived compressed folders, etc.), that can be
attached to a message and sent to the recipient.
If you receive an attachment in a message, you can open it, view it and also save it to a folder
(by using the pop-up menu opened by right-clicking on the attachment). This opens a standard
31

Chapter 1 Kerio WebMail
dialog where the attachment can be saved. Users can also use the pop-up menu of the link
(the Save as option).
Reply to a message
It is possible to reply directly to any message. This can be done by the Reply button available
on the toolbar (see figure 1.24). The button includes a menu where it is possible to select from
two options (Reply to send the reply only to the sender or Reply All to send the reply to all
addresses included in the original message). Click on one of these buttons to compose the
reply message. The email address of the person who has sent the original message is entered
automatically in the To field. Note also that the subject of the message now contains the Re
string. This string indicates reply to previous message.
Figure 1.24 The Reply button menu
The message can be also forwarded to other recipients. Click on Forward to edit the selected
message where the To and Cc fields are left blank, because the system does not know who do
you intend to forward the message to.
If you receive a message with the Fw: string prefixing the subject, you’ll know that it is a forwarded message (. Fw: detailed information regarding the today’s meeting).
Message flag
Each of the received messages can be marked by a flag in Kerio WebMail. It is a little colored
flag symbol that reminds users of the message it was appended to. Flags help us look up
messages easily.
Click the column with the flag image to add a flag to/from a message (see image 1.25). The
same method can be followed to remove a flag. Simply click on the flag you wish to remove.
Figure 1.25 Message list
32

1.5 Email
Note: Image flags can be added to messages even in MS Outlook. The flags appended to messages in this application will be displayed also in Kerio WebMail and vice versa. The problem
is, that MS Outlook enables users to add flags of different colors. Kerio WebMail shows all flags
in one color.
1.5.4 Moving and copying messages
Kerio WebMail allows moving and copying of messages between folders. Variety of methods
can be used for this purpose and it depends on the user’s choice which one they feel more
comfortable with. The methods are described in the following section:
The Drag & Drop method
The Drag & Drop method is a simple way how to move and copy message by using the left
mouse button:
1. Put the mouse pointer over the message to be moved. Hold the left mouse button and
drag the message over the destination folder. Release the mouse button.
Note: To copy the selected message(s), hold the Ctrl key (or Alt on Mac OS X).
2. Hold down the mouse button (and the Ctrl key, when copying) and drag the message to
another folder.
Figure 1.26 Moving messages by the Drag & Drop method
3. A green icon appears when the message is ready to move (see figure 1.26) or a blue icon
when ready for copying (see figure 1.27).
4. Let hold of the button to move the message to the selected folder immediately.
Note: Unless the message is dragged over a folder where it can be moved (i.e. any mail folder
with corresponding access rights in the folder tree), a red icon is displayed meaning it is
impossible to move the message to the particular location.
33

Chapter 1 Kerio WebMail
Figure 1.27 Copying messages by the Drag & Drop method
Using the Move or copy button
The toolbar includes a clickable Move or copy icon. Messages can be move or copied by using
this button as described below:
1. Use the mouse pointer to select a message and click on the Move or copy button available
on the toolbar (see figure 1.28).
Figure 1.28 Moving/copying messages by the button on the toolbar
2. In the Folder selection dialog just opened, select the folder where you want to move or
copy the message and click on Move or Copy.
Pop-up menu
Messages can be moved or copied also by a special option in pop-up menu:
1. Right-click a message. In the context menu, select Move or copy (see figure
1.29).
2. This opens the Folder selection dialog where you can select a folder where the message
will be move or copied. Click on Move/Copy.
34

Figure 1.29 Move/Copy messages using the context menu
1.5 Email
1.5.5 Message writing
In Kerio WebMail, new messages can be composed in the special window designed for message
editing. To open this window, use the New mail button on the toolbar. In the mail composer
dialog, the message body can be edited, attachments can be added, it is also possible to use
spellchecker and/or save the message as a draft.
The window for creating new messages is divided into several sections. The first one allows
editing of addressees and message subject (name). This part is called message header. The
second section allows insertion of the message. This part is called body. Another section is
the toolbar in the upper part of the window. Several functions are included that can be used
to manipulate with the current message.
E-mail header
The message header (see figure 1.30) provides the following options:
From
This item is displayed only if you use an address different from the default email address
(setting of default user address is described in section 1.11.1).
The selected address will be treated as sender address.
To
Enter the email address of the recipient in this field. More than one email address is
allowed; the addresses must be separated by commas (see picture 1.30).
35

Chapter 1 Kerio WebMail
Figure 1.30 E-mail header
Cc
The same function as the To field. However, this item is used in special cases where the
message includes multiple addressee, some of them only being informed of the issue by
the message. The addressees included in this section are not expected to reply to the
message.
Bcc
The address entered in this field is hidden for the other recipients. Blind copy is useful
especially when a message is to be sent to more email addresses and you want to protect
the privacy of one or more users.
Subject
The subject stands for the message’s name. It should provide clear hint on the message
content (helpful for later reference).
Next to the fields for recipients’ addresses, the To, Cc and Bcc buttons are available (see figure 1.30). These buttons open the search dialog (see figure 1.31) where first and last names
can be used to easily filter out particular email address to which the message would be sent.
The look-up dialog scans only through the addresses included in the account’s contact folders.
Below, you can find detailed description of the look-up feature:
Folder
The addresses of recipients can be selected from the personal address book or from other
contact folders that the user has connected to. In menu, select folders where the search
will be performed.
Search for:
Enter at least the first letters of the searched contact (first name, last name or a part of
email address) which will be used as a searching criteria string.
Note: The look-up is not case-sensitive.
36

1.5 Email
Figure 1.31 Searching in contacts
Click the Search button to start searching using the parameters previously defined.
Toolbar
The toolbar includes several buttons allowing basic operations such as message sending or
saving:
Send
The message will be sent to the addresses entered into the To, Cc and Bcc fields.
Save as Draft
The message will be saved to the Drafts folder, where it can be opened, edited and sent.
Attach
Use this button to attach a file to a message. More than one file can be attached to the
message. Press the Attach more button multiple times and select the files you want to
attach to the message.
If an undesirable file has been attached to the message by mistake, remove it by clicking
on the Remove link next to the attachment.
Warning: Each attachment appended must not exceed the limit set by the administrator
in Kerio MailServer, otherwise the particular message will not be delivered.
Spelling
Use the Spelling button to perform a spellcheck of the written text (for more information
on spellchecker, see section 1.5.6).
37

Chapter 1 Kerio WebMail
Check
The Check for names button completes addresses by using connected contact folders. By
default, the default personal contact folder is set for checking for names. In addition,
other contact folders can be added in Settings (for details, see section 1.5.8). As well as
the Check for names button, the Ctrl+K shortcut can be used for the same purpose (see
section 1.5.8).
Priority
Press the exclamation mark icon to send the message with high priority.
Options
The Options button opens a dialog box where some of the message parameters can be
set, e.g. its priority or delivery confirmation request.
Figure 1.32 New mail options
• Message format — messages can be sent either as plain text or in HTML format. Users
cannot use formatting in the plain text message and the formatting toolbar is disabled.
These settings apply only to a single message. General settings can be defined in Set-
tings (chapter 1.11.1).
Note: In the Safari browser, HTML editor is not supported and, therefore, the option is
not available.
• Priority — priority of a message. The priority is indicated by an exclamation mark or
an arrow.
• Request a read receipt — if this option is enabled, the recipient’s client sends the
sender an automatic alert that their message has already been read (if conformed by
the reader). This option can be therefore used also in cases where an answer is nt
explicitly demanded but it is important to know whether the message has been read.
• Request a delivery receipt — check this option to request an automatic notification of
the message’s successful delivery. The notification does not provide the information
of if the message has been read.
38
1.5 Email
Message body
The message body consists of the text and attachments (if any).
The message body can be sent as plain or formatted text. Text formatting is allowed thanks
to an embedded HTML editor that supports text formatting functionality. However, writing of
the email messages in this editor is not supported by some of the browsers:
• Safari — the HTML formatting is not supported at all, the messages can be sent only in
plain text format.
• Firefox — HTML editor is functional, only some of the buttons are disabled (Cut, Copy and
Paste icons). Users can use keyboard shortcuts instead of these buttons (chapter 1.11.4).
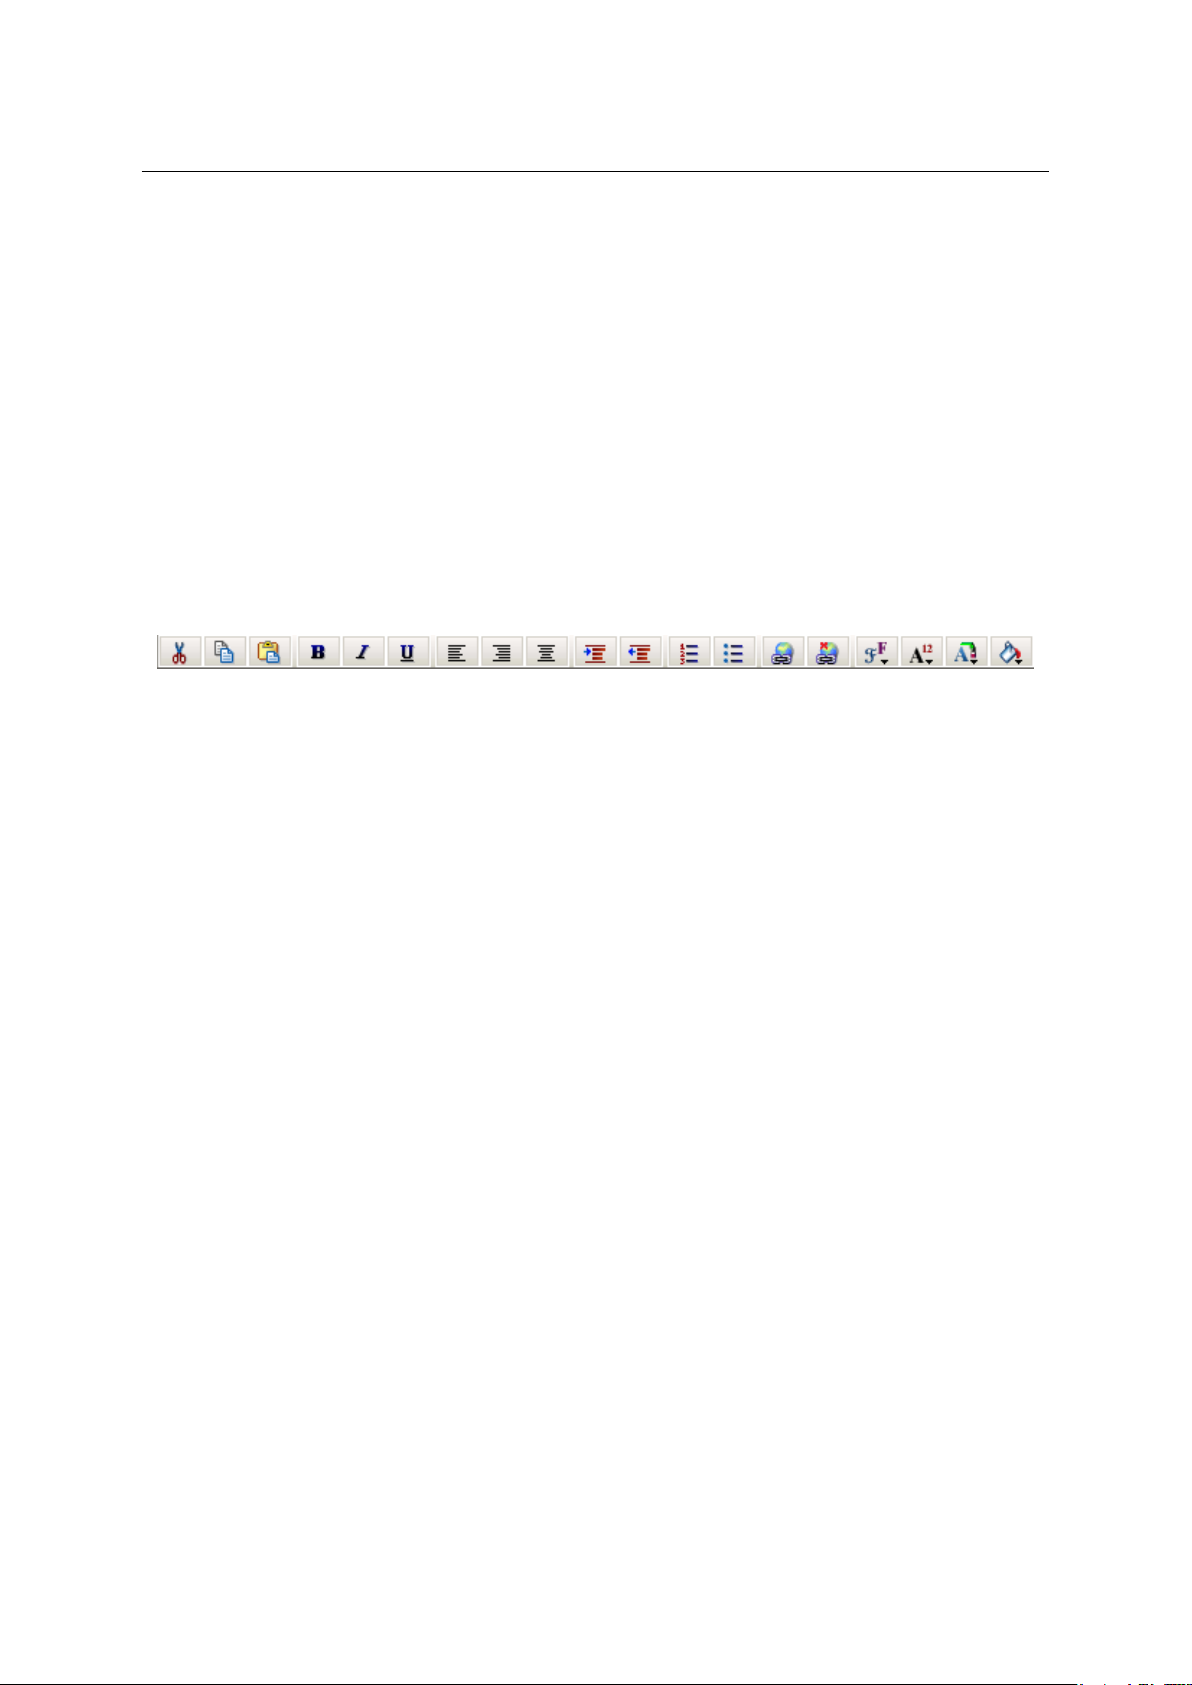
To format the message text in Kerio WebMail, use icons in the toolbar above the text field.
Figure 1.33 Toolbar
Edits
The dialog box contains standard Cut, Copy and Paste tools. It is possible to use standard
key shortcuts (Ctrl+c for copying, Ctrl+v for pasting and Ctrl+x for cutting of the
selected object) or the first three icons on the toolbar.
• Cut — a selected portion of a text is cut and moved into clipboard.
• Copy — a selected portion of a text is copied into clipboard.
• Paste — a selected portion of a text or a selected image stored in clipboard is removed
from the clipboard and pasted to the place marked by cursor.
Besides the buttons, the Drag & Drop method can be applied when moving or copying
text a message. Simply select part of the text and drag it to the desired position while
holding the mouse button. Hold down the Ctrl key to copy the text.
Font
The font can be changed the same way as in other editors. Users can select different
fonts, sizes, colors and styles:
• Fonts — in Kerio WebMail, some basic fonts are available: Arial (Black), Courier, Times
New Roman and Verdana.
• Font size — click the appropriate icon in the toolbar to change the font size.
• Font color — click the appropriate icon in the toolbar to change the font color.
• Font style — standard icons for selecting a font style are available in the editor: bold,
italic, underlined.
Paragraph
The text paragraphs can be aligned right, left and centered, as well as indented from
the left margin. Use the standard icons in the toolbars to change the appearance of the
paragraph.
39

Chapter 1 Kerio WebMail
Bullets and numbering
Standard icons for creating bullets and numbered lists are available in the toolbar. Click
the selected text to enable the bullets/numbering. When users click the icon again, the
bullets/numbering are disabled.
Text highlighting
The selected text can be highlighted in one of the colors of the Highlight palette in the
toolbar (the last item).
Hypertext
A hyperlink is an active portion of a text, usually underlined and marked by a different
color, that direct users to an intranet or Internet site. The hyperlink is used for directing
to web pages, downloading files, sending email or accessing discussion groups.
Use the Create link icon in the toolbar to enter the URL for the hyperlink.
Figure 1.34 Link
Use the Remove link icon to delete the hyperlink.
The following example illustrates how to use the hyperlinks:
Here is a fragment of a possible message body: “I am sending you a link to an interesting
website”. The “interesting website” part can be used as a hyperlink.
Solution:
Mark the words “interesting website” by cursor and click the Create link button. A dialog
box for creating a link appears. Specify the URL entry with corresponding URL address.
Warning: If an email composition takes longer, connection between the server and the browser
may be lost. If this happens, finish the message and enter your user password in the dialog
which is opened upon attempting to Send or Save the message. Then the attempted action will
be performed.
Moving attachments by the Drag & Drop method in Firefox
Firefox supports moving of attachments to the message editor’s window by the Drag
& Drop method. The dragdropupload plugin is required for this action (available at
https://addons.mozilla.org/firefox/2190/).
After installation, it is necessary to check whether the plug-in was installed successfully.
1. In the Tools menu, select Extension.
40

1.5 Email
Figure 1.35 The Extensions dialog
2. This opens the Extensions dialog. After successful installation, the dialog contains the
dragdropupload plug-in (see figure 1.35).
The plug-in allows to attach one or more files to email messages by the Drag & Drop method
in one of the following ways:
1. Open the message editor. To attach files to a message, left-click on them, hold the mouse
button and drag them to the Attachment toolbar button. This adds the attachments to the
message.
2. Open the message editor. Click on Attachment. This opens an empty entry for specification of the attachment path. Simply left-click on the files to be attached, drag them to the
blank entry and release the mouse button. This attaches the files to the message.
1.5.6 Spellchecker
Use the Spellcheck button in the New mail toolbar to start the spellcheck. If an error is detected, a dialog is displayed with the incorrect phrase highlighted (see figure
1.36). The fol-
lowing options are available:
• Select a correct phrase in the Suggestions dialog box and click OK to confirm.
• Insert the correct phrase manually in the Change to dialog box and click Change to confirm.
• If the phrase was entered correctly, click Skip to skip the phrase.
• Use the Skip all button, if the phrase appears frequently in the text. All occurrences of the
phrase in the text will be skipped.
• Click Add to add the phrase in the dictionary. New phrases can be also added using a special
dialog box created for this purpose — see below.
• Click Delete to delete the phrase.
41
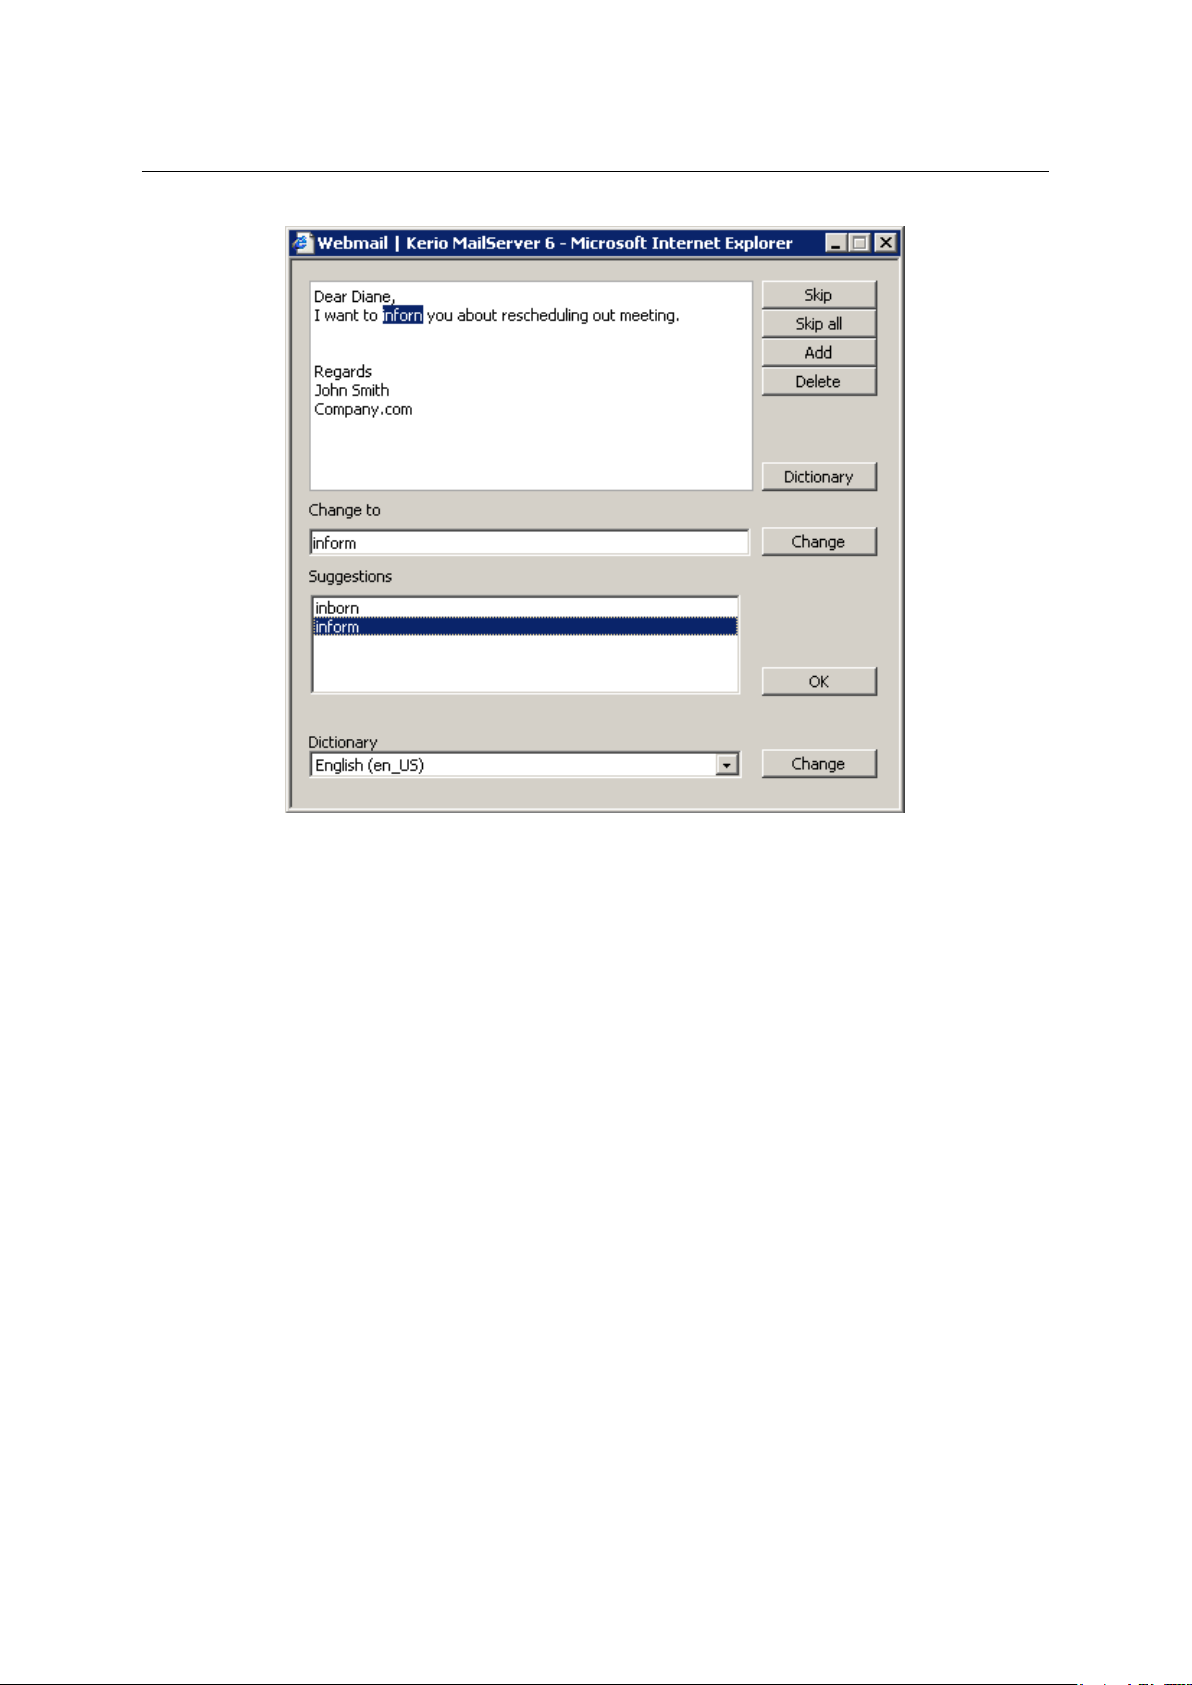
Chapter 1 Kerio WebMail
Figure 1.36 Spellchecker
In order for the dictionary to work properly, select the correct dictionary for the written text.
Users can use either the Dictionary menu (the last item in the dialog) or Settings menu (chapter 1.11.1).
Dictionary
Kerio WebMail contains a personal custom dictionary where unknown phrases not available
in the default spellcheck dictionary can be entered. Each user can thus create his/her own
dictionary.
The default dictionary used for spellcheck can be amended when needed. Select the Dictionary
item from the Settings menu in the spellcheck dialog. Users can add or delete words to and
from the dialog box that is opened (see figure 1.37). New words and expressions can be added
to the dictionary also when spellchecking a message.
42
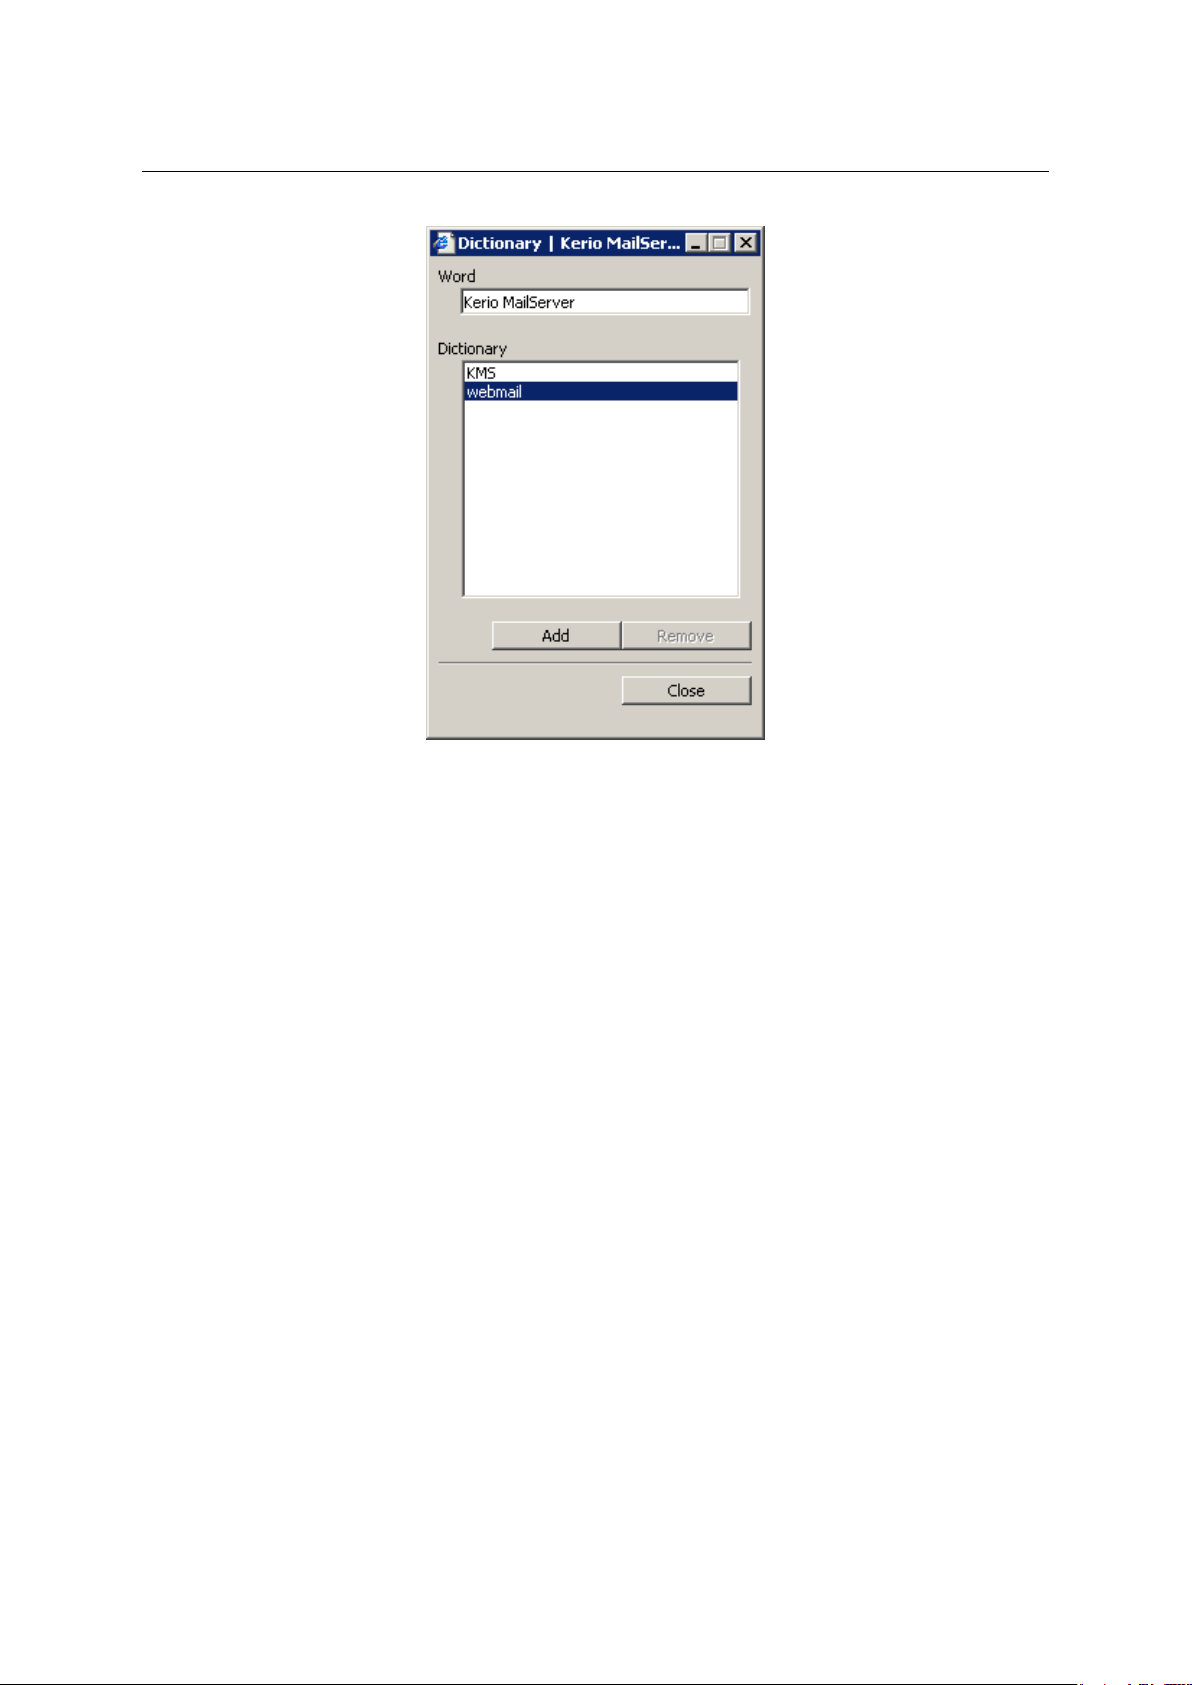
1.5 Email
Figure 1.37 Dictionary
1.5.7 Spam filter
Spam messages are mostly represented by advertisements. Spam are usually sent in bulk and
the recipient addresses are obtained by illegal means (e.g. by tapping the network communication). In their wilder modifications, spams may also distribute and seed dangerous viruses.
Kerio MailServer contains a sophisticated antispam filter. The filter is designed so that it
can recognize specific attributes of spam from the message contents (spam messages usually
contain specific keywords that can be recognized and counted by the filter). Each message is
assigned a numeric score; if this value exceeds the limit set in Kerio MailServer, the message
is marked as spam.
Self-learning antispam filter
The built-in antispam filter may let some spam messages through from time to time by mistake
(their score is low) and mark some regular messages as spam (their score is too high). For the
reasons above, the antispam filter allows modification to the database used for recognition
of spam messages. This method, however, requires user input. Users should reassign the
incorrectly evaluated messages to correct types (spam / non-spam) so that the filter learns to
recognize them in the future.
Kerio WebMail uses the Spam and Not spam buttons located in the toolbar to mark the messages correctly. Highlight the incorrectly marked message and click one of the buttons. The
filter receives information regarding update of the database. This decreases chance for incorrect deliveries.
43

Chapter 1 Kerio WebMail
A rule for unwanted messages
All messages marked as spam can be automatically delivered to Junk E-mail folder, created
in the folder tree for this purpose. This function may be enabled when creating the email
account or it can be enabled by the users themselves in their user settings, on in theSpam tab
(for details, see chapter 1.11.1).
To enable the spam rule, check the Move spam to the Junk E-Mail folder on the Spam tab (see
figure 1.38). Once the rule is enabled, it is also recommended to enable the rule which allows
messages sent from addresses included in the user’s contact folders skip the antispam check.
Figure 1.38 User settings — Spam tab
It is also possible to add addresses to a special whitelist. Messages sent from the addresses
involved in the list will be considered as non-spam. To add an address to the whitelist, users
can use one of the following options:
1. On the Spam tab in user settings (see figure 1.38).
2. Right-click a message in the list to open the pop-up menu and select Add user to spam
whitelist (see figure 1.39).
This option prevents from moving solicited messages with some attributes of spam to the
Spam folder.
Note: The spam rule has higher priority than rules set in the Filters dialog box (see chap-
ter 1.12). If the filter includes any rule which in any way handles messages marked as spam,
the action set in this rule is ignored.
44

Figure 1.39 The message pop-up menu
1.5 Email
1.5.8 Automatic check for email addresses
Automatic check for email addresses helps to accelerate writing of addresses and ensures that
the addresses entered will be correct.
Upon entering of first letters of email address in the address entry, this feature uses all contact
folders to look up all addresses matching the string. The search focuses on items First Name,
Last Name, E-mail Address and Company. The offered items include also user groups with
email address and distribution lists if their name (or their email address in case of groups)
matches the string.
Warning: Search results do not include email addresses in an unallowed form. This rule applies especially to contacts where the email address entry includes addresses separated by
a comma. Such contacts were previously used as a type of distribution lists. It is recommended to remove such contacts and create distribution lists instead. Detailed description on
distribution lists and their usage are addressed in section
1.6.8.
If multiple addresses matching the string are found, a menu is opened that lists all addresses,
user groups and distribution lists matching the string (see figure
1.40).
Initiation of the look-up function depends on Kerio MailServer configuration:
• Automatic check for addresses is disabled in Settings — to check for an address, it is
necessary to click on the Check Names button icon available on the toolbar or to use the
Ctrl+k keyboard shortcut.
• Automatic check for addresses is enabled in Settings — detected addresses matching the
string are filled in the entry when the pointer is moved to another textfield. To check
45
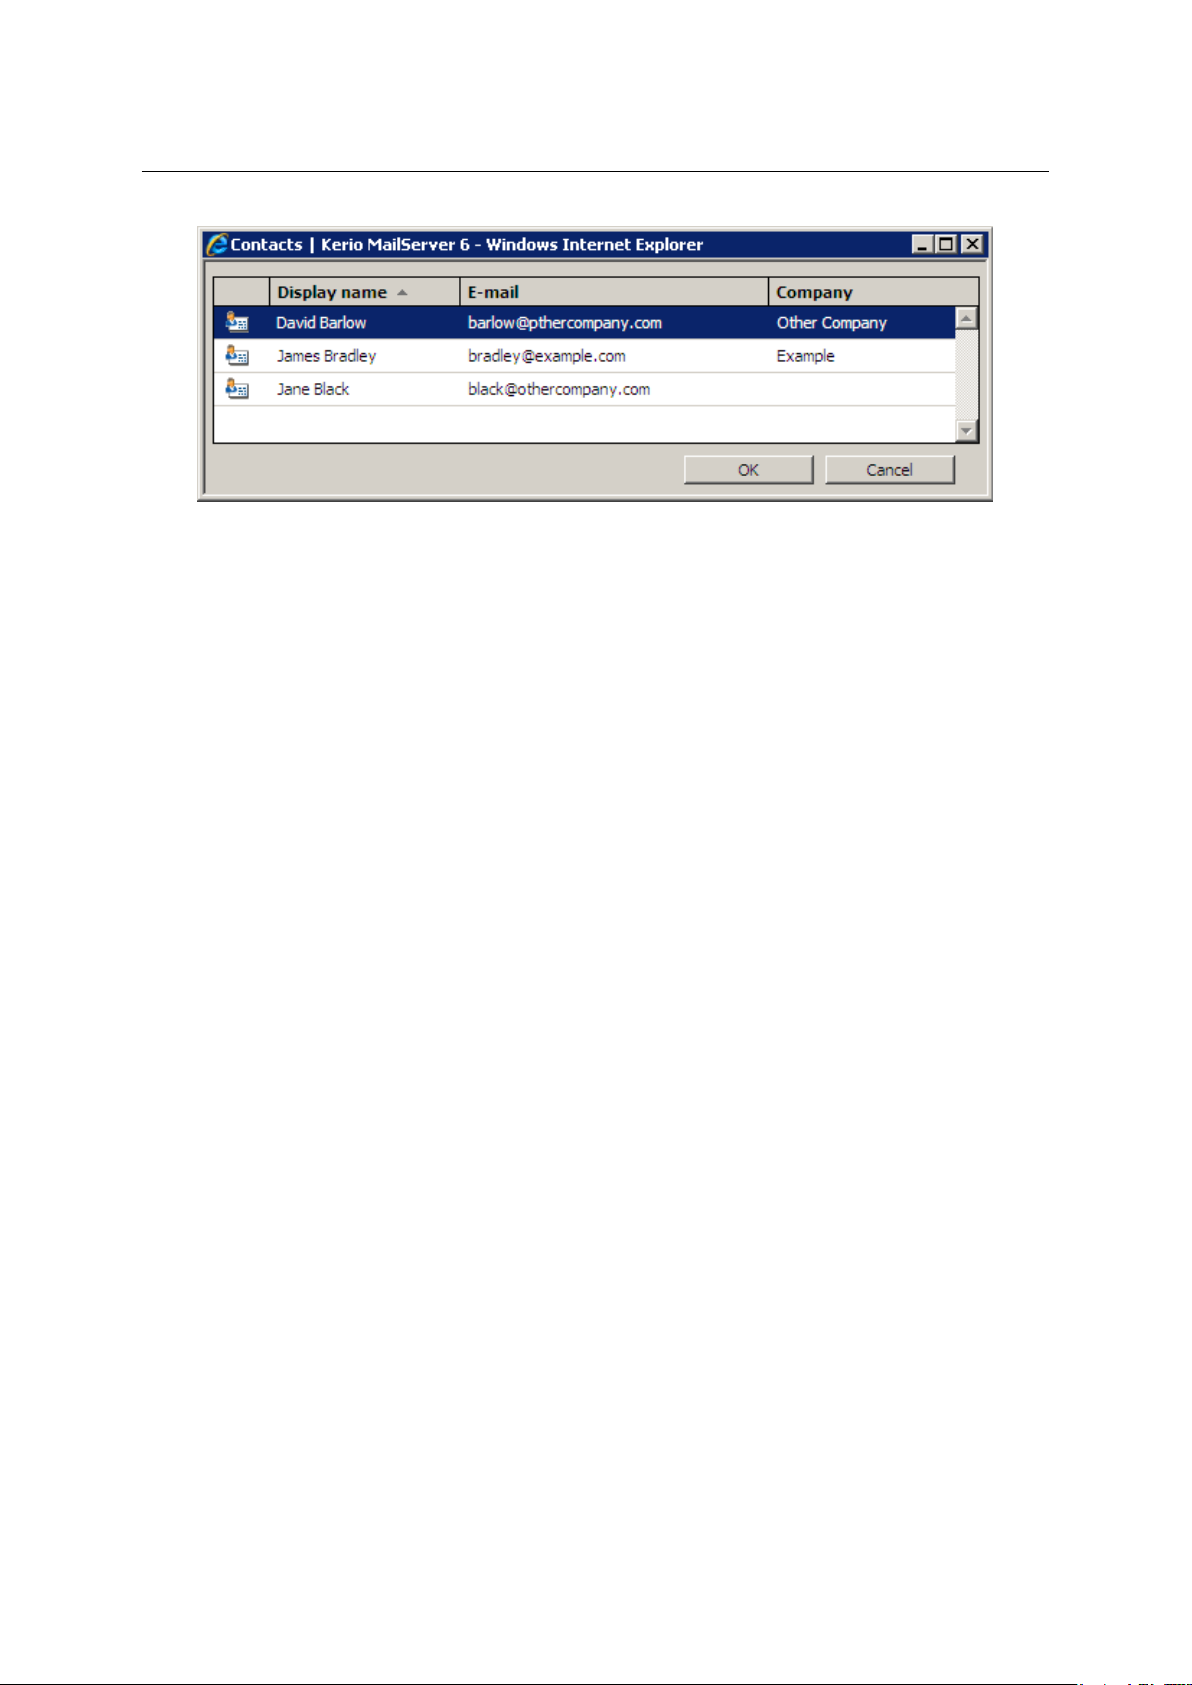
Chapter 1 Kerio WebMail
Figure 1.40 List of contacts matching the string
for addresses while entering multiple addresses, click on the Check for names icon on the
toolbar or use the Ctrl+k shortcut.
In Kerio WebMail, the automatic check for addresses can be enabled/disabled under Settings:
1. Go to Settings (under Settings → Settings).
2. Switch to the Mail tab.
3. Check or uncheck the Check names automatically option (see figure 1.41).
Addresses are searched in contact folders where the check is enabled. By default, the check
is enabled only for the default private Contact folder and the default public Contact folder.
Other folders can be added as described below:
1. Go to Settings (under Settings → Settings).
2. Switch to the Mail composing tab.
3. Click on Choose folders at the Search for contacts in selected folders item.
4. Check folders to be added to the scanned folders (see figure 1.42).
46
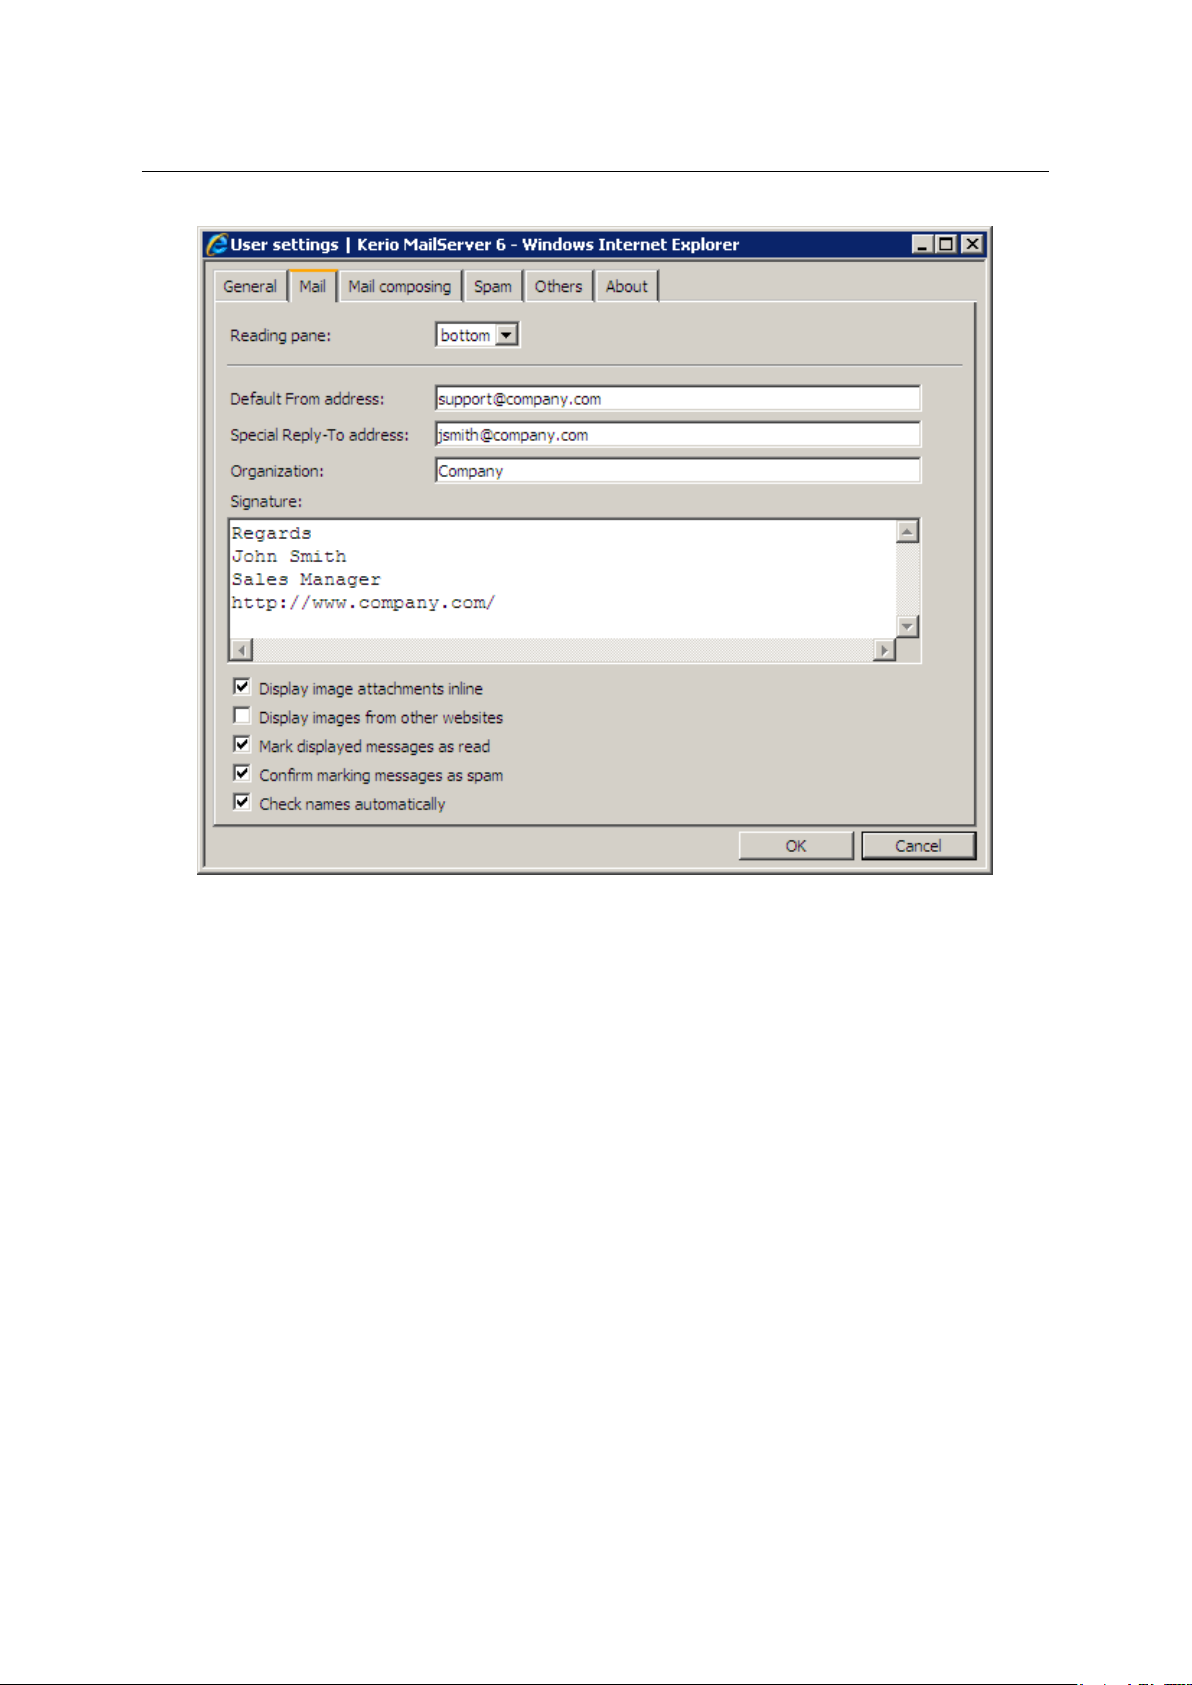
1.5 Email
Figure 1.41 Settings — Automatic checks for addresses
47

Chapter 1 Kerio WebMail
Figure 1.42 Settings — Adding contact folders to the automatic check for names
5. Click OK to confirm settings.
Warning: The more folders are included in the check, the longer the search may take.
1.5.9 Looking up messages
The message look-up helps find specific messages quickly, using the criteria defined. The
standard search form is used for searching messages in Kerio WebMail mail folders. Use the
Search button (the magnifying glass icon in the toolbar) to open the form.
If the search fails or too many messages are found, the data can be modified and searched
again.
The search window is divided into three parts. The first part lists the folder where the search
is performed (the current folder by default). To change this setting, click the Browse button
located on the right of the Folder item.
The other part of the window contains two tabs used to define the search parameters. On the
General tab, users can perform the basic search by subject or sender/recipient.
Search for:
Insert a string that will be used as a searching criteria.
48

Where
The menu offers only the Subject option.
1.5 Email
Figure 1.43 Searching — General tab
To search by subject, enter a corresponding string to the Search textfield and click on Search.
Searching results will include all messages which contain the string.
Sender
Use the Sender textfield to specify a string that will be used as a searching criteria applied
to senders’ addresses. You can also click the Sender button to open a dialog box where
email addresses can be selected from your contact folders.
Recipient
Use the Recipient textfield to specify a string that will be used as a searching criteria
applied to recipients’ addresses. You can also click the Recipient button to open a dialog
box where email addresses can be selected from your contact folders.
To list all messages from any sender/recipient, simply use their address as a searching criteria
and click Search.
It is also possible to combine searching criteria. For example, to search a particular message
where you know the sender, use the Search (searching by subject) textbox to specify a particular string and the Sender field to enter an email address.
Use the Advanced tab to specify additional criteria for searching:
49

Chapter 1 Kerio WebMail
Only items that are
Narrowing of items by the read/unread criteria.
Only items with
Narrowing the list of items by the flagged/non-flagged criteria.
Only items
Narrowing the list of items by the attachment/no attachment criteria.
Date
Searching messages sent or received within the selected time period.
Size
Searching messages by size.
Figure 1.44 Searching — Advanced tab
The last part contains a table with search results and a toolbar. Using this toolbar, users can
handle individual messages right in the table.
As in other similar table displays, also in Kerio WebMail it is necessary to select a message
with the cursor. The toolbar icons become active. The pop-up menu can also be used for the
same purpose.
50

1.6 Contacts
Using the Search field
Another way of looking for a specific message is the Search field in the toolbar. Search string
(a word, part of a word or a character) can be entered in this field. Messages are looked up by
sender address or message subject. Simply enter the first letters of an address or subject. The
messages found will be listed directly in the message list.
1.5.10 Interrupted connection between the server and the browser
Sometimes, the connection between Kerio MailServer and a web browser may be interrupted.
Connection may be interrupted by a connection failure or by expiration of the session timeout
set in Kerio MailServer.1.
If the connection fails, it is necessary to reconnect by authentication by username and password.
If a message is just being edited when the connection fails, it is possible to finish it and
reconnect by authenticating by username and password upon clicking on the Send button (see
figure 1.45).
Figure 1.45 The dialog for authentication through username
Warning: Beware of closing the window with the edited message before the new authentication.
Otherwise, the message will be lost.
1.6 Contacts
Most of us use or at least know address books and little notebooks where names, phone numbers and addresses of family members, friends, colleagues, business partners and other people
are kept. Another possibility to remember contacts is keeping of business cards provided by
people we meet. In these times of booming electronic communication where we are almost
becoming slaves of time, looking contacts up in tiny pocket books and visit-card filers is too
time-consuming and ineffective.
For this reason, contact folders have been developed. Actually, these folders are electronic
address books replacing the old-fashioned methods of contact maintenance. In addition to
the fact that all contacts are kept together, other advantages come along, such as easy look-up
and automatic recognition of known email addresses while being written.
1
Kerio MailServer allows setting of timeouts for total time of sessions and for idle connections. These settings increase
security of Kerio WebMail usage.
51

Chapter 1 Kerio WebMail
In addition to creating and maintaining of single contacts, contact folders allow creating and
maintaining of distribution lists. Distribution lists are groups of contacts recognized by a single group name. This name is simply used instead of entering all included addresses separately.
Contact folders provide a large scale of benefits addressing maintenance of contacts, distribution lists, etc. These benefits are focused in this chapter.
1.6.1 Toolbar
This section describes actions related to contacts (available from the contact folder toolbar):
Figure 1.46 Contacts folders toolbar
New contact
This button opens a dialog box where users can create a new contact (see section 1.6.3).
The menu also includes an option to create a new distribution list (see figure 1.47).
Figure 1.47 New contact, New distribution list
Move or copy
The icon can be used to move or copy the contact to another folder (for details, see
section
1.6.6).
Print
Click the Print button to print the selected contact. First, the printed page preview appears; then the standard Print dialog box is displayed.
Delete
Use this icon to delete the selected contact. Contacts can be deleted also by the Delete
key (in Mac OS X also by Backspace).
Forward
Use this button to forward the selected contact. Contacts are forwarded in a special
format supported by Kerio WebMail and MS Outlook so that it is possible to move the
contact directly to the contact folder.
52

1.6 Contacts
Search
Clicking on the button opens a dialog where criteria can be defined for search for a contact (for details, see section 1.6.5).
View address cards/phone book
You can switch between two view modes. Contacts can be displayed either as address
cards or ordered in a list.
Users can work with Contacts folders the same way they work with other folders. This means
these folders can be shared and shared folders can be subscribed. Details on sharing and
subscription of folders are provided in chapter 1.10.
1.6.2 Contacts display
The contacts in Kerio WebMail can be displayed in two ways; either as individual cards, or as a
list of contacts. Use the menu in the toolbar to set the display mode (see picture 1.48).
Note: For classification by contacts, items are sorted by the alphabet of the language set in
Settings as preferred (the General tab) in Kerio WebMail — see chapter 1.11.1. In result, if for
example English is set as preferred and subject are in German, contacts will be ordered by
English alphabet and some specific national characters may also cause problems in sorting.
By default, up to 20 contacts are listed on one page in contact folders. Number of messages
displayed at one page can be changed, however, it is necessary to keep in mind that the same
settings apply also to email and task folders. To change number of items displayed on a single
page, use the Settings section in Kerio WebMail (see chapter 1.11.1).
Cards
Besides other methods, the cards can be sorted by alphabet letters, available below the toolbar
as links. By clicking a specific letter, the first contact starting with this character will be
highlighted.
TIP: Pressing Shift+letter when searching in the row of letters, the contacts starting with this
character are marked.
Users can also use the purple arrows to navigate between the pages with contacts.
53

Chapter 1 Kerio WebMail
List
Figure 1.48 Contacts
In the list view mode, information to individual contacts are listed in the columns. Contacts
can be sorted according to the information This view mode provides several advantages. First,
columns can be sorted and ordered in accordance with information they include. Click the
column heading to sort contacts in the ascending or descending order (see the arrow next to
the column name) by alphabet, numbers or time (depending on the column contents).
Users can also customize the information to be displayed. The columns can be added or
deleted. Right-click the table header and specify the column settings in the window where
columns to be displayed can be selected. The pop-up menu contains the Change columns
option.
The width of the contacts list can be adjusted the same way as in the spreadsheet programs.
To change the column width, click between two columns in the table header and drag the
cursor right or left as needed. When the window is refreshed, layout of the columns is set to
the default mode.
1.6.3 New contact
Click on the New contact button in the toolbar or use the New contact item in the main folder
panel’s pop-up menu to access a dialog box with three tabs where the information about
a specific person can be entered.
The first tab (see figure 1.49) includes entries for general information to be specified. (the first
and last name, phone number, email address or personal web page URL can be specified).
54

1.6 Contacts
Figure 1.49 New contact — General tab
Note: It is not recommended to use multiple email addresses in the E-mail entry to create
recipient lists. For this purpose, Kerio MailServer 6.2 allows creation of distribution lists (for
details, refer to chapter 1.6.8).
The Address tab (see figure 1.50) includes information referring to user addresses. In this tab,
three different addresses — Business, Home and Other — can be specified. The address type
can be selected in the Address menu. Check the This is the postal address option to select one
of the addresses as primary.
The Details tab (see figure
1.51) contains additional information about the contact, such as
birthday, anniversary or title.
55

Chapter 1 Kerio WebMail
Figure 1.50 New contact — Address tab
Figure 1.51 New contact — Details tab
1.6.4 Private contacts
Private contacts can be used especially for sharing of contact folders with other users. If
a user shares a private contact folder with other users, it is possible to mark certain contacts
as private. These contacts will not be displayed to anyone else except the user with whom the
56

1.6 Contacts
contacts are shared and even the person who shares these contacts cannot see them in the
shared folder.
To mark a contact as private, do the following:
1. Double-click on the contact to show its details.
2. On the General tab, enable the Private option (see figure 1.49).
3. Save changes by clicking Save and Close.
Warning: Private contacts are treated as private only if the client where private contact folders
are viewed supports this feature. In other client applications (like MS Outlook), it is possible to
view and edit contacts without any restrictions by users with appropriate access rights. This
implies that information included in private contacts are not well secured.
1.6.5 Searching in contacts
There are several ways of searching in contact folders based on the type of display. The cards
display enables users to search for contacts using the letters under the toolbar. By clicking
a specific letter, the contacts starting with this character are highlighted.
When contacts are displayed in the form of a list, only the standard ascending and descending
order of messages is possible. Thus, searching for a specific contact is not very efficient,
especially when there are too many contacts in the folder.
Searching for contacts using the Search window is completely different from the above procedure. Use the Search button (the magnifying glass icon in the toolbar) to open the window or
enter a string (a word, part of a word or a character in the message to be searched for) into
the Search for: field in the toolbar.
Use the first option (the magnifying glass button) When opened, the dialog window provides
a list of all contacts saved in the folder. When searching for a particular contact, the following
information is used as the search criteria:
Folder
Set folders in which the search will be performed. By default, the folder from which the
dialog was opened is selected.
Search for:
This entry can be used to enter a string which will be searched (the first letters of first
name, second name or username can be used). The search string is not case-sensitive.
Click on Search to run the searching.
57

Chapter 1 Kerio WebMail
Figure 1.52 Search contact
Users can also enter the search string into the appropriate field in the toolbar (see figure 1.46).
Click Search to open the Search window. Only the contacts containing the specified string
are listed. If the searched contact is not included in the table, retry the search process upon
modifying the string or switching to another folder (the search applies only to the folder
currently opened).
1.6.6 Moving and copying contacts
Kerio WebMail allows moving and copying of contacts between folders. Variety of methods
can be used for this purpose and it depends on the user’s choice which one they feel more
comfortable with. The methods are described in the following section:
The Drag & Drop method
Drag & Drop is a simple method for moving and copying items by using only the mouse:
1. Hover a contact with the mouse pointer and click on the left mouse button. Hold the
button and drag the contact over the destination folder. Release the mouse button.
Note: To copy the selected contact(s), hold the Ctrl key (or Alt on Mac OS X).
2. Hold down the mouse button (and the Ctrl key, when copying) and drag the contact to
another folder.
58
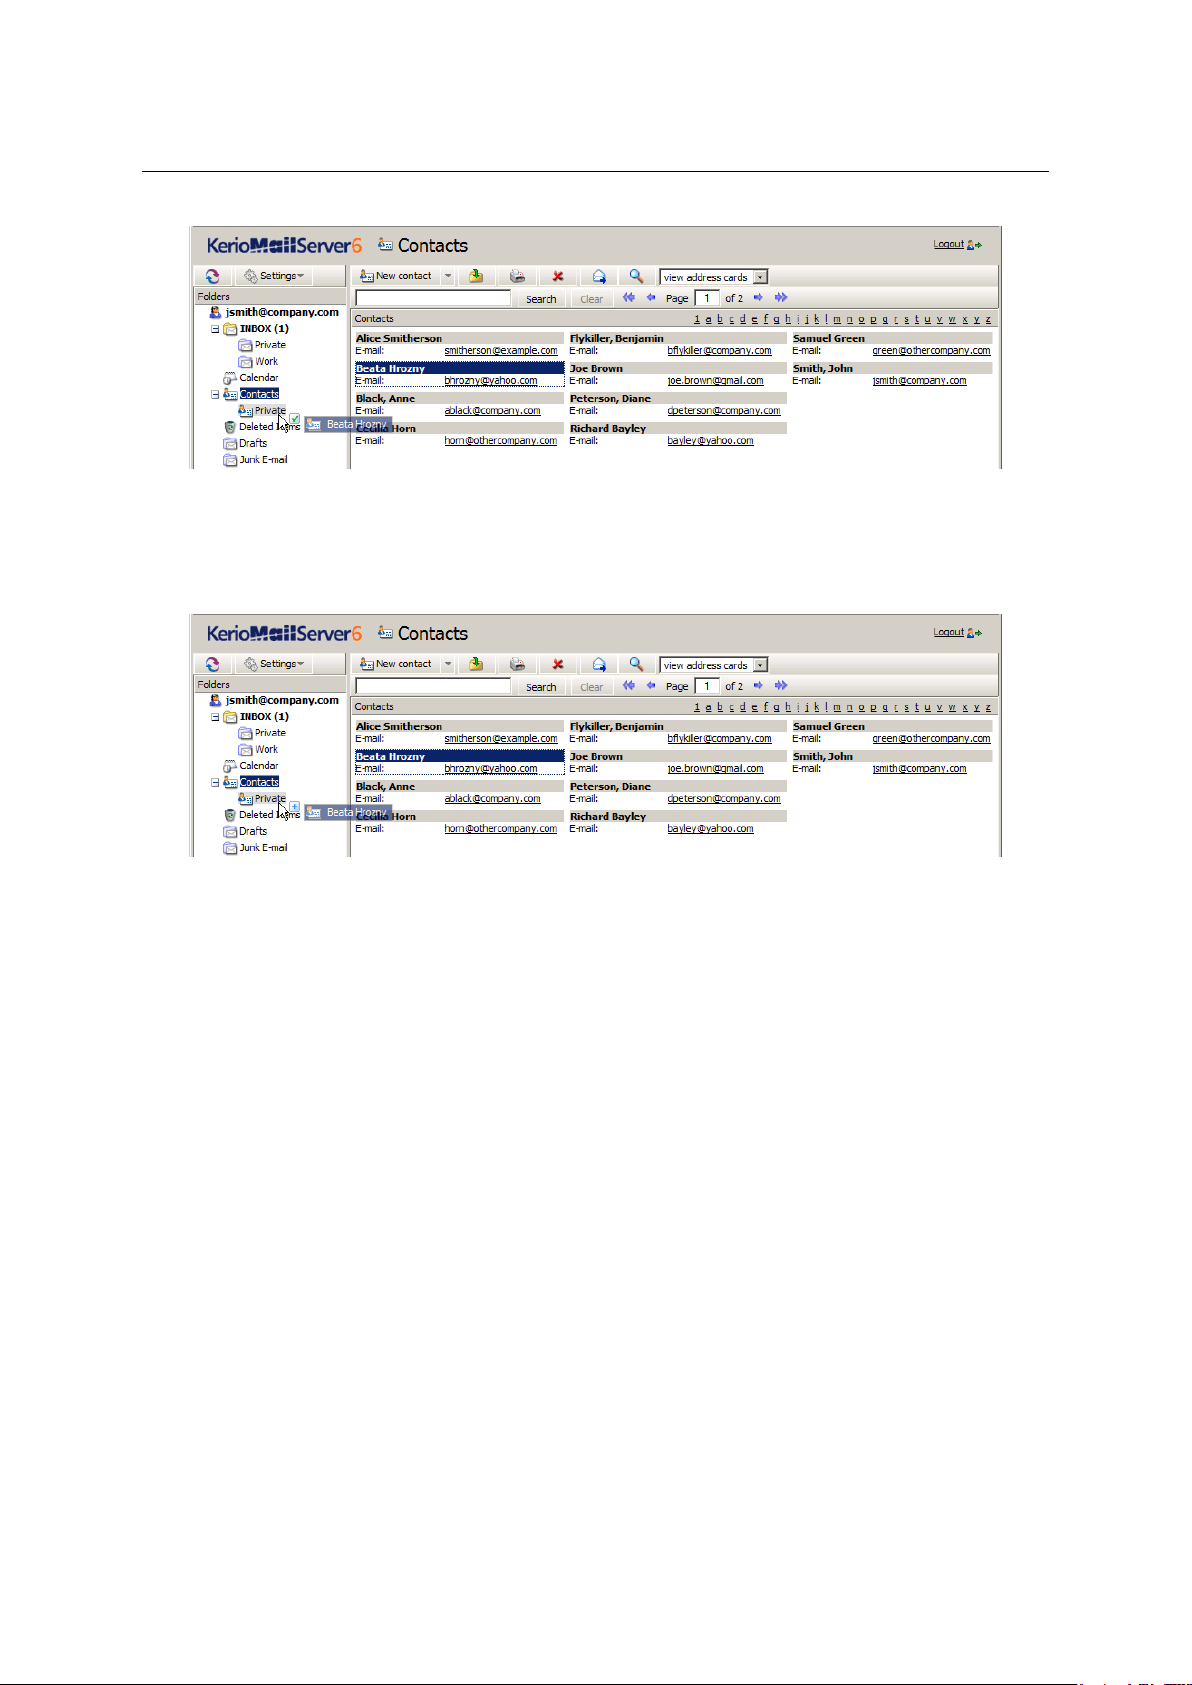
1.6 Contacts
Figure 1.53 Moving contacts by the Drag & Drop method
3. A green icon appears when the contact is ready to move (see figure 1.53) or a blue icon
when ready for copying (see figure 1.54).
Figure 1.54 Copying contacts by the Drag & Drop method
4. Let hold of the button to move the contact immediately.
Note: Unless the contact is dragged over a folder where it can be moved (i.e. any mail folder
with appropriate access rights in the folder tree), a red icon is displayed meaning it is impossible to move the message to the particular location.
Using the Move or copy button
The toolbar includes a clickable Move or copy icon. Contacts can be move or copied by using
this button as described below:
1. Use the mouse pointer to select a contact and click on the Move or copy button available
on the toolbar (see figure 1.55).
2. In the Folder selection dialog just opened, select the folder where you want to move or
copy the contact and click on Move or Copy.
59
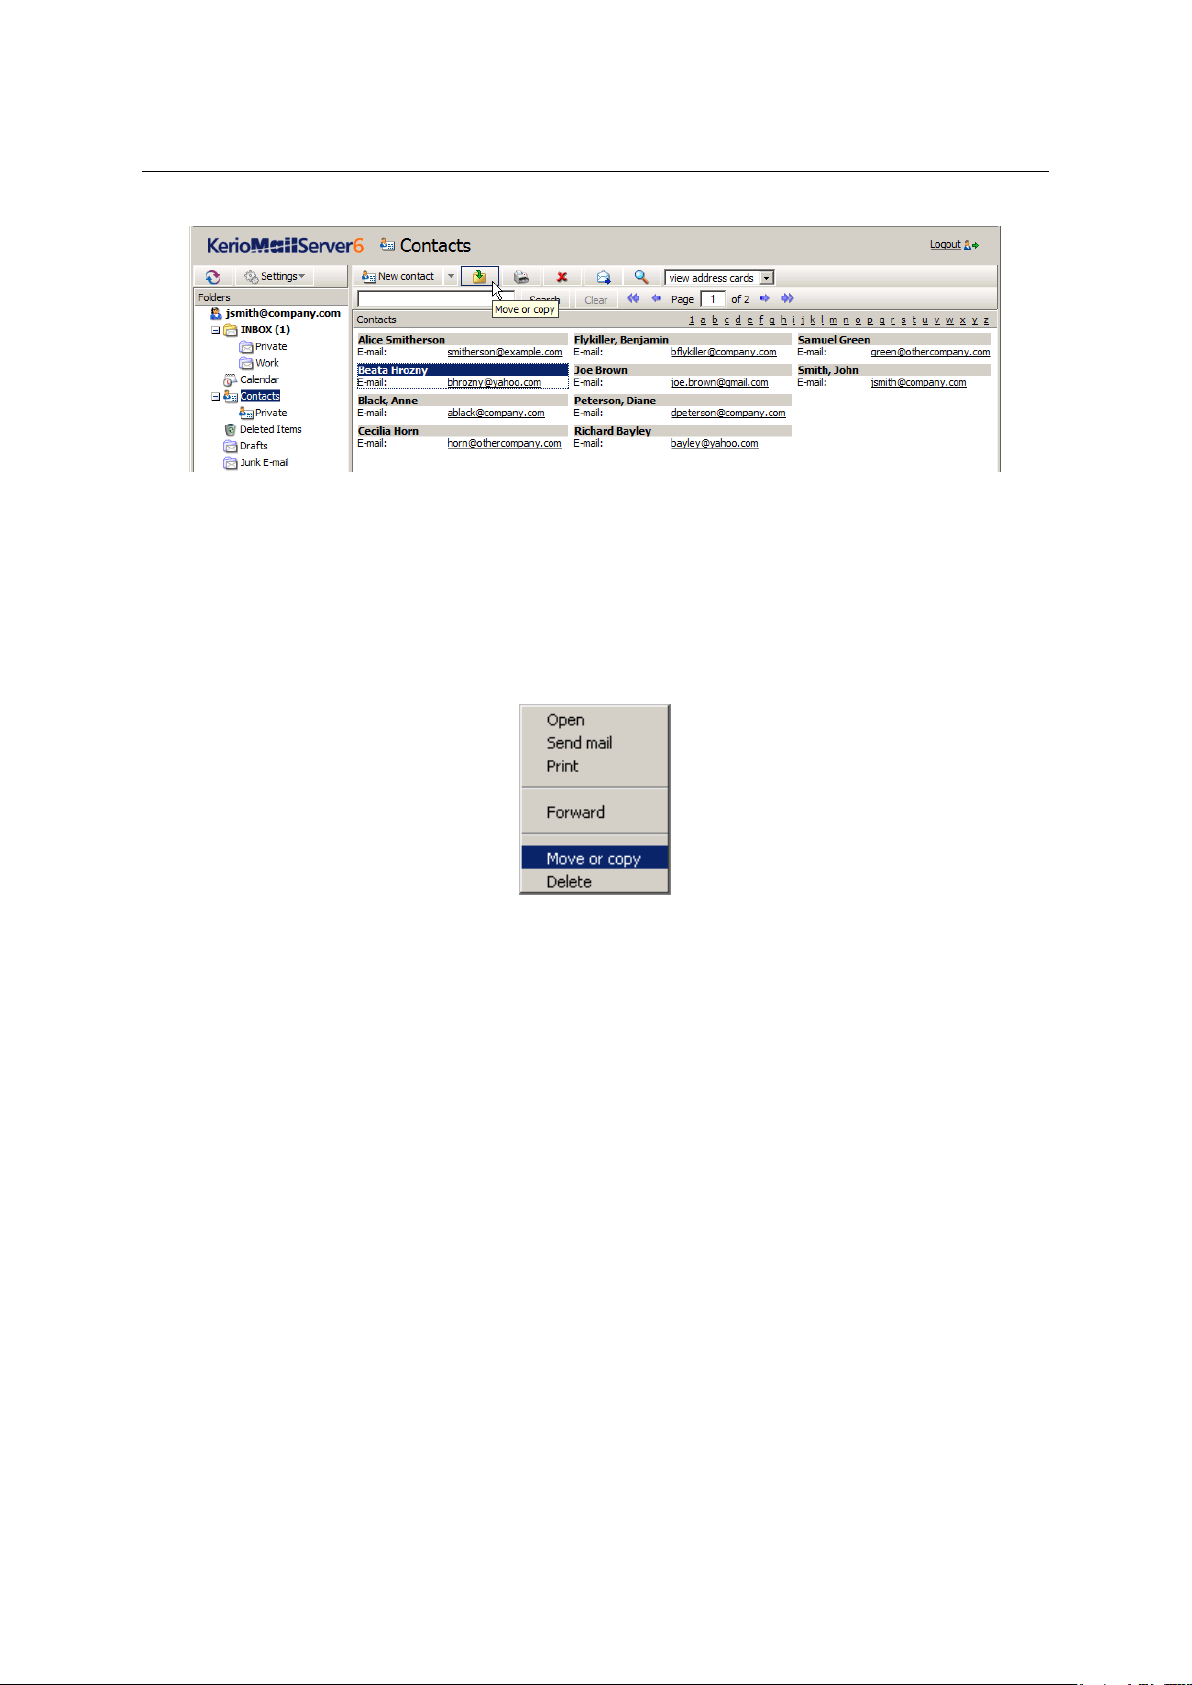
Chapter 1 Kerio WebMail
Figure 1.55 Moving/copying contacts by the button on the toolbar
Pop-up menu
The contact’s pop-up menu can also be used to move or copy contacts:
1. Right-click a contact. In the context menu, select Move or copy (see figure 1.56).
Figure 1.56 Move/Copy contacts using the context menu
2. This opens the Folder selection dialog where you can select a folder where the contact will
be move or copied. Click on Move/Copy.
1.6.7 Contacts forwarding
Kerio WebMail allows contact forwarding in a special format so that forwarded contacts can be
directly added to contact lists upon their delivery. Thanks to this feature, it is not necessary
to copy contacts to email messages and to contact lists.
Kerio WebMail also supports another option. When a message with a contact in the attachment
is received, the recipient can simply click on the attachment to open the contact automatically
in the standard dialog box. Click on Save and Close to confirm settings and save the contact
to the default private Contacts folder.
Note: To save a contact or open it as an attachment, right-click on it and use one of the options
available, Open or Save.
60
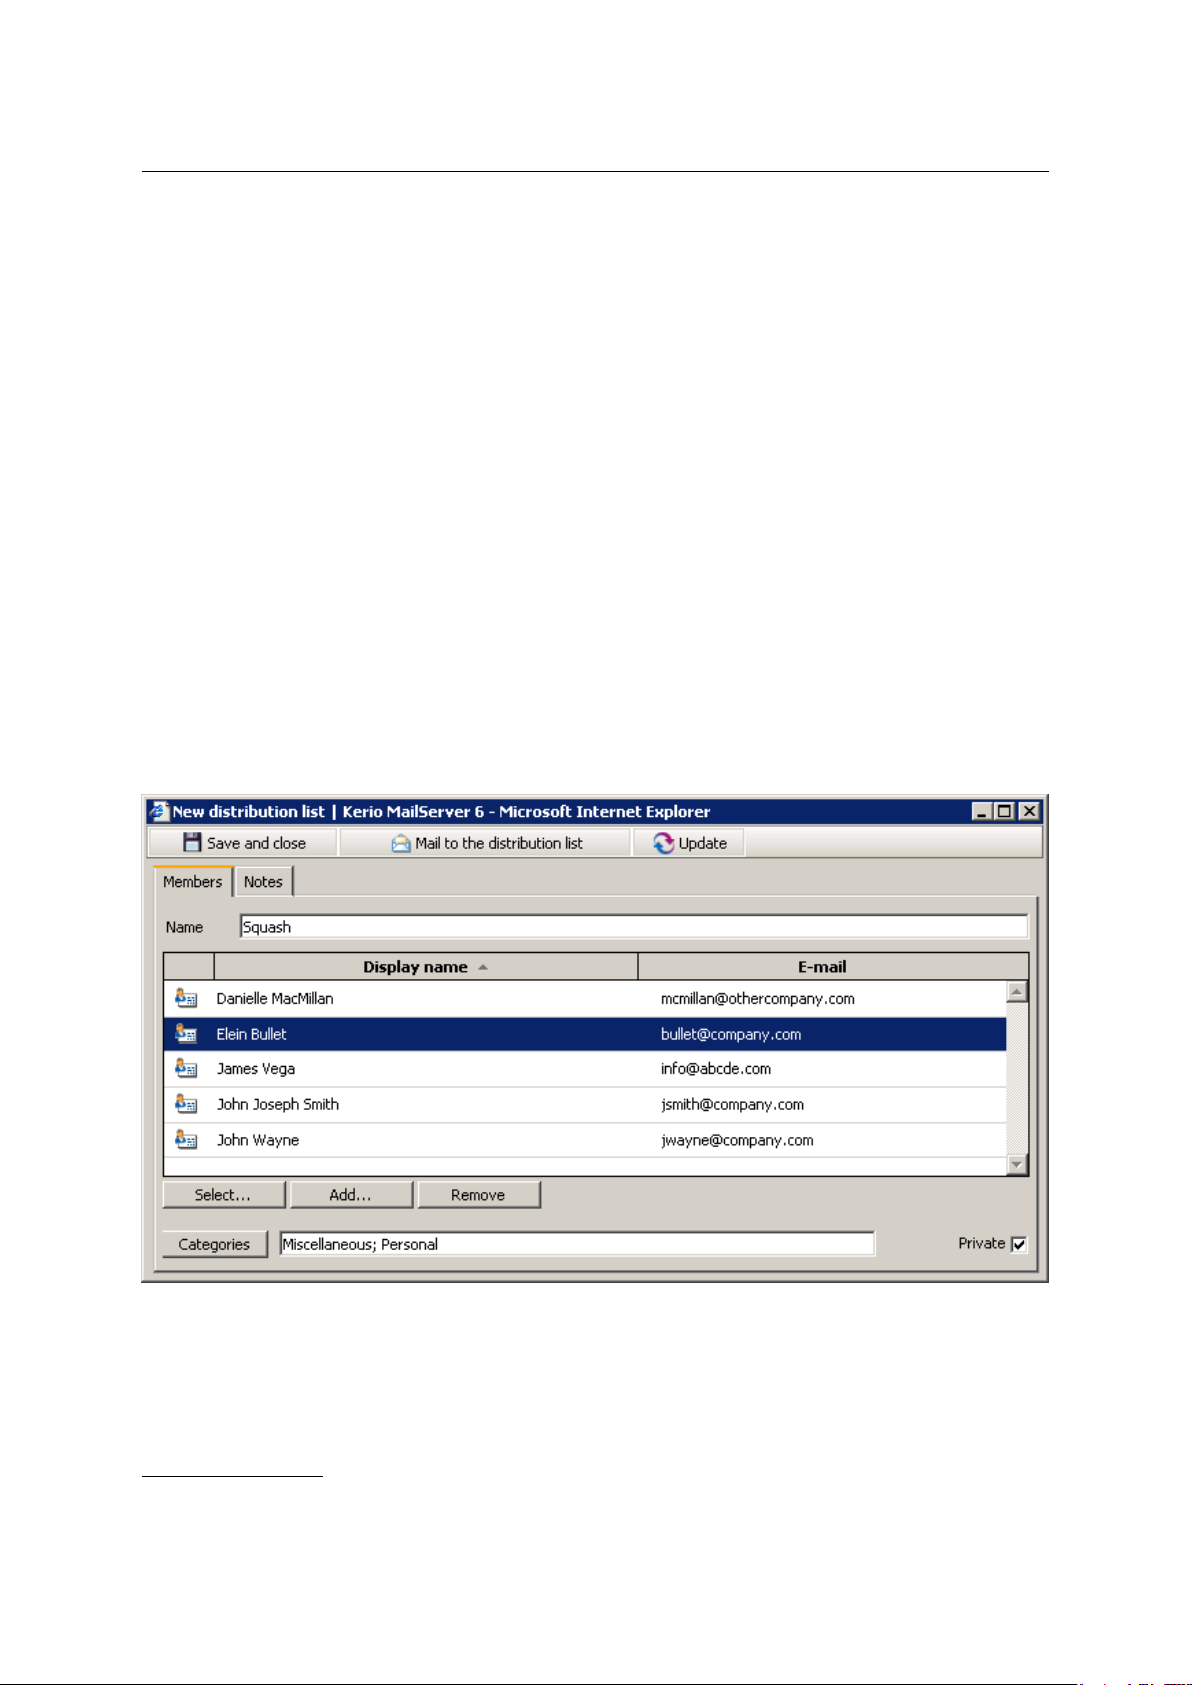
1.6 Contacts
How to forward contacts
To forward a contact, select it by the mouse pointer and click on the Forward button on the
contact folder’s toolbar (it is also possible to use the same option in the pop-up context menu).
Select a contact and click on a corresponding icon to open a message editor where the contact
is included as an attachment.2Now the message can be sent (it is also possible to edit the
message before sending it).
Warning: Do not forget to enter the recipient’s email address in the To: textfield.
1.6.8 Distribution lists
Distribution lists are groups of email addresses used for sending of collective email. Simply
use a special dialog in Kerio WebMail to complete desired email addresses and save them
under a common name. Whenever sending an email message to such a group, simply enter
the distribution list name in the To entry instead of filling in individual addresses.
Distribution lists are helpful if email is often sent to a group of addressees. For example, it can
be a group of people with whom you often communicate in your work or outside the office, as
shown at figure 1.57 (it is a certain alternative to mailing lists or to group addresses).
2
The contact is saved in as vCard (.vcf).
Figure 1.57 Distribution list — an item tab
61
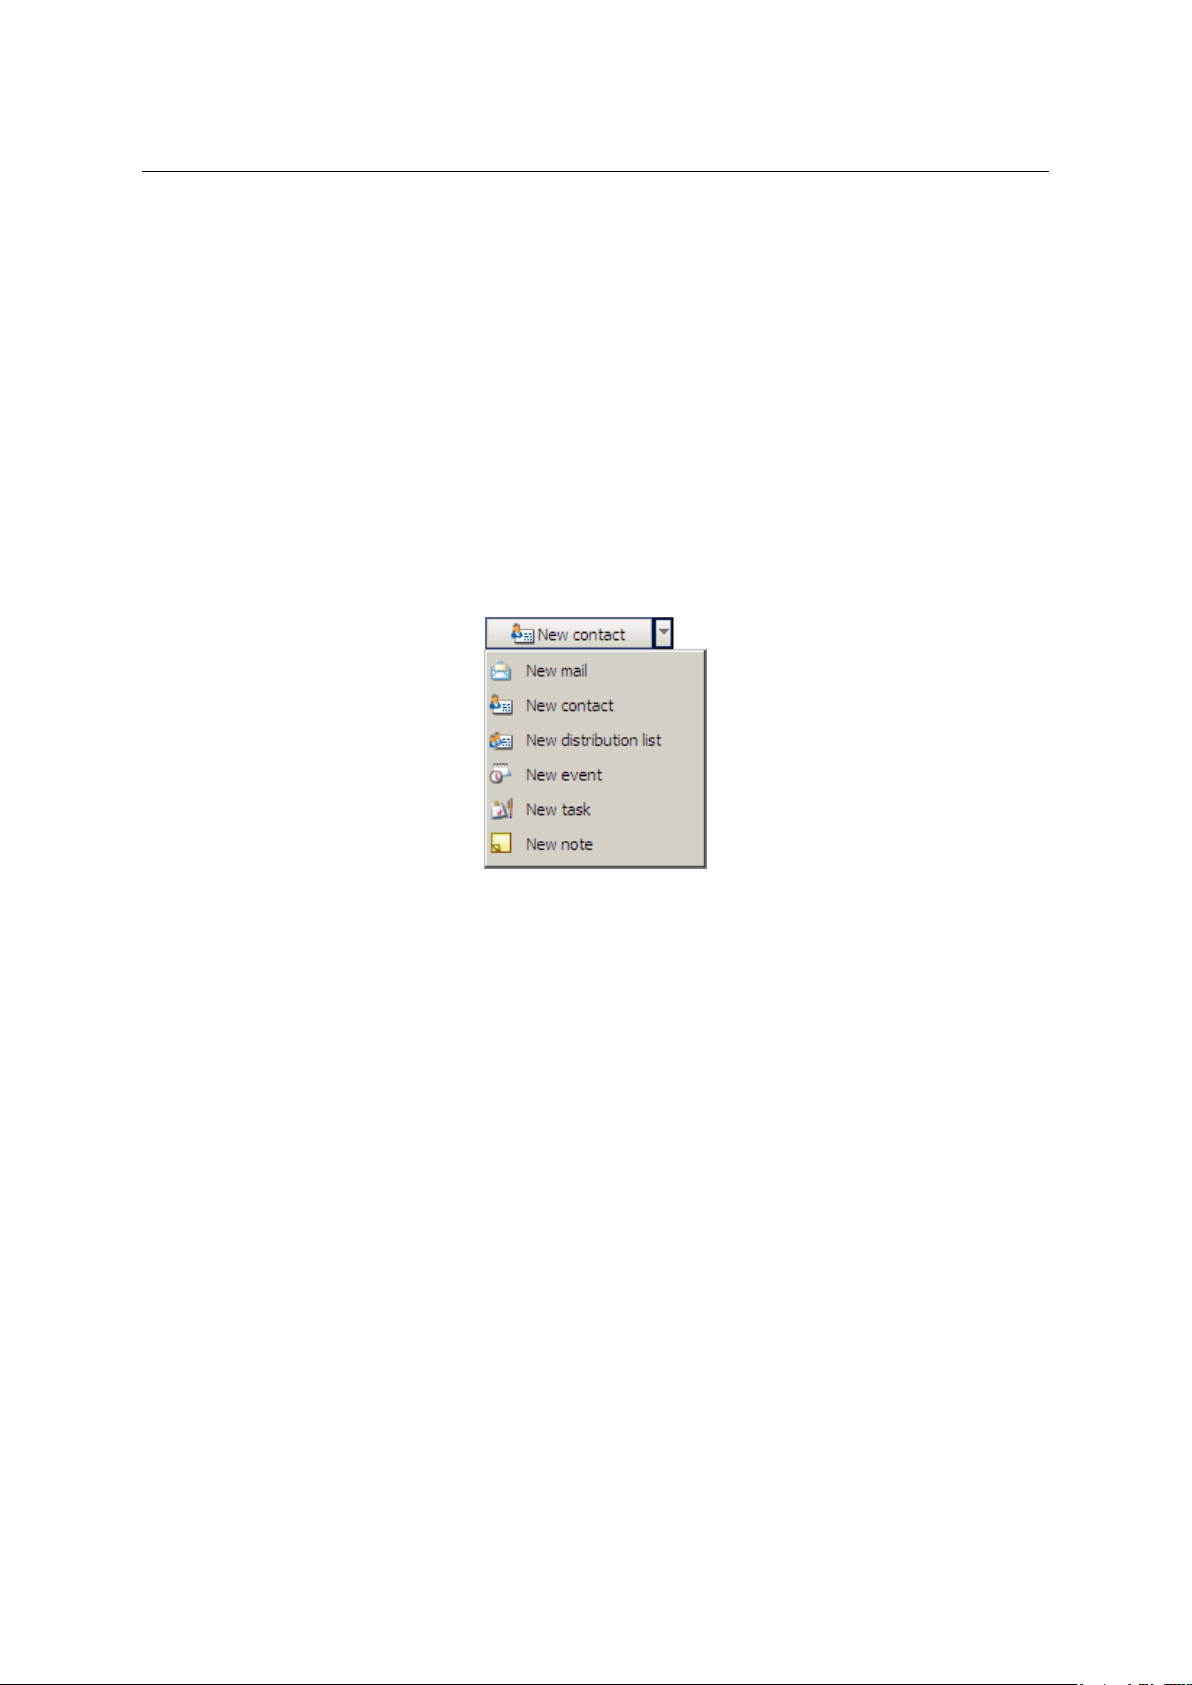
Chapter 1 Kerio WebMail
Once created, distribution lists are displayed in the contact folder. If multiple contact folders
are used, the particular distribution list is saved in the folder where it is created. If the list is
for example created in a task folder, the distribution list is automatically saved in the default
private contact folder, in Contacts. to distinguish distribution lists from other items in the
contact list, they are displayed bold.
A new distribution list
To create a new distribution list, follow the instructions provided below:
1. Click on the button which allows creating of new items (see figure 1.58).
2. In the menu, select the New distribution list option.
Figure 1.58 Toolbar menu
3. A dialog is opened where a distribution list can be created (see figure 1.57).
4. Now, specify name of the distribution list. For this purpose, use the Name entry.
5. Now, add email addresses to the list. The Select and Add buttons can be used for this
purpose:
• The Select button opens a dialog where addresses can be looked up and selected in
contact folders.
The dialog contains the following items:
Folder
The menu includes all contact folders in the mailbox (including public and subscribed contacts).
Search for:
Enter a string which will be used as search criteria, i.e. any contacts including the
string will be searched. First letters of first or second name or username (the part
of address preceding the at-sign) can be used as the string. The search string is
not case-sensitive.
62
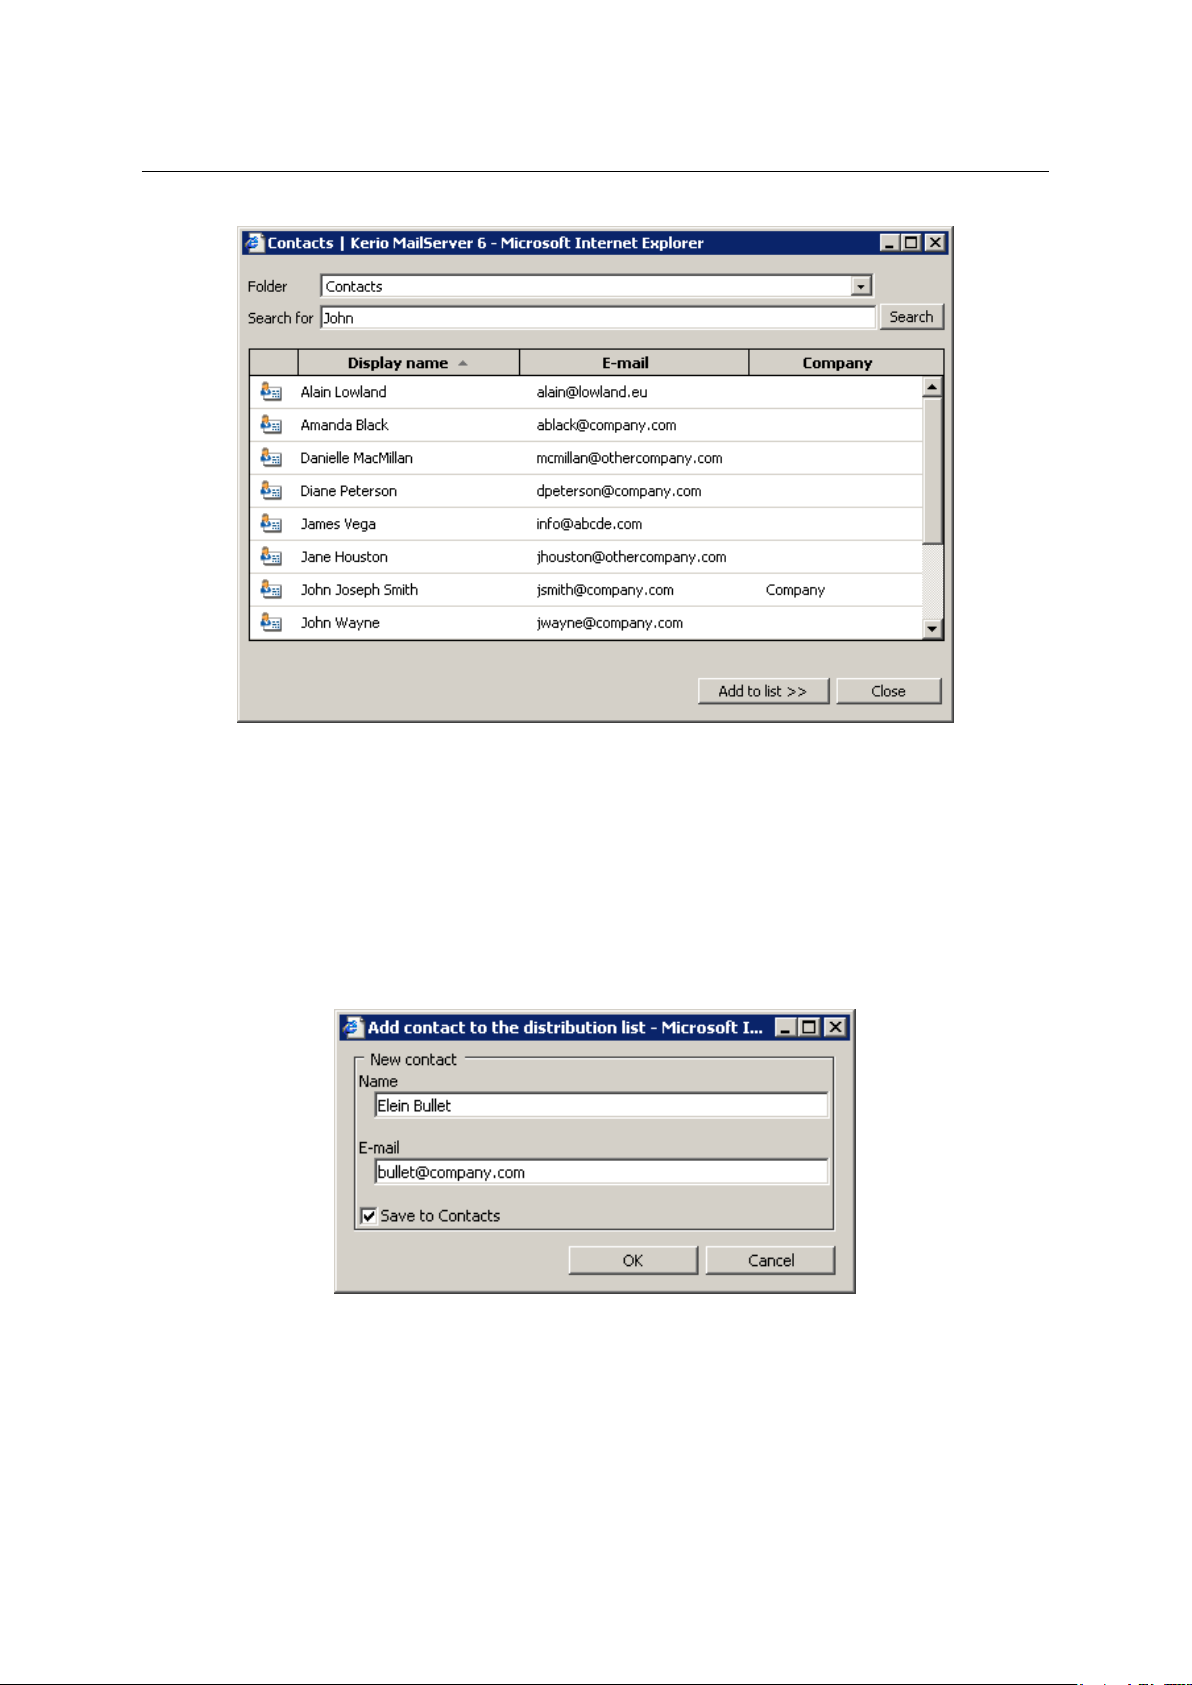
1.6 Contacts
Figure 1.59 Select
One or multiple contacts can be chosen in contact lists (by holding the Shift or Ctrl
key and selecting items by the mouse pointer) and then added to the distribution list
by the Add to list button. Double-clicking on a contact also copies the particular item
to the distribution list.
• Use the Add button to open a dialog where a new address can be added to the list. The
address needs to be entered manually:
Figure 1.60 Add
Name
Enter first and second name of the new distribution list member.
63

Chapter 1 Kerio WebMail
E-mail
Enter email address of the new distribution list member.
Save to contacts
Enable this option to save member information also in the Contacts folder.
• The Remove button can be used to delete an address from the list.
6. Save changes by clicking Save and Close.
A note can be attached to any distribution list. It can be for example a description of the
group or another information. The note can be defined on the Notes tab of the distribution list
dialog.
Besides the method described above, there is another way to create distribution lists. Simply
select one or more items in the contact list (using the Ctrl key), use the right mouse button
to open the pop-up menu and select Create a distribution list (see figure 1.61).
Figure 1.61 Creating distribution lists by selecting contacts from the list
This opens a distribution list with the selected contacts already included. This list can be
simply saved after entering its name. Contacts can be added anytime if desired.
Edit and update distribution lists
Each distribution list can be edited and also removed. To remove a distribution list, follow the
same pattern as when removing a contact item. Simply select a distribution list by the mouse
pointer and use either the Delete key or right-click on the item and use the appropriate option
in the context menu.
It is also simple to edit a distribution list. Double-click on a distribution list to open it. Contact information can be edited, removed or a new one can be added. It is also possible to
update a distribution list. It is necessary to perform updates where at least one contact has
been changed since the last update. Usually, contacts are edited directly in a contact folder.
Such changes take no effect in distribution lists. Therefore, it is recommended to update
distribution lists from time to time by the Update button.
64

1.7 Calendar
To save changes, click on Save and Close.
1.7 Calendar
This chapter addresses calendar folders. Why should you throw your paper calendar and
adopt a digital one? There are several reasons to do it. First, events recorded in the calendar
can be reminded by visual alerts. Second, various layouts can be applied. Compared to electronic calendars, paper ones cannot for example be switched to week or month layouts when
necessary. And another reason to be mentioned, last but not least, is that electronic calendars
allow creating of meetings and sending of invitations for these meetings to other users.
Before we focus on features of calendar folders, basic terminology will be addressed. There are
two most essential items, events and meetings. Events are calendar items with time scheduled
whereas meetings are events where other participants are involved (invited).
Figure 1.62 Calendar
1.7.1 Toolbar
This section introduces options of the calendar folder’s toolbar:
New event
Click the New event button to open the empty event dialog box (for details on how to
define events, see chapter 1.7.3).
65

Chapter 1 Kerio WebMail
Move or copy
The move and copy icon can be used to move or copy one or more selected items to
another calendar (for details regarding this issue, see section 1.7.8).
Print
Click Print to easily print out the current calendar or individual events. The preview is
displayed and a standard print dialog box available in your browser (where Kerio WebMail
is running) is opened automatically.
• Regarding calendars, their daily, weekly or monthly view can be printed. If no event is
selected, it is also possible to print the entire calendar.
Notes:
1. By default, the daily view is printed from 07:00 to18:00 (most of users end their
working day by that hour). Events taking place before 07:00 and after 18:00 are
listed at the end of the calendar.
2. It is not possible to print out list of events in Kerio WebMail.
• Contents of an event can be printed separately by the same print button as used for
printing of the complete calendar view. To do this, simply mark an event and click on
Print.
Delete
Click the Delete button to delete the selected event permanently or move it to Deleted
items folder. Use the Settings option on the General tab to decide whether the events
should be deleted permanently or just moved to the Deleted items folder (see chapter
1.11.1).
Events can be deleted also by the Delete key (in Mac OS X also by Backspace).
Forward
Use this button to forward selected events in a special iCalendar format. Users who
receive this event via Kerio WebMail or any application that provides support for the
iCalendar format, are able to open the event directly in Calendar type folder. For more
information on forwarding, see chapter 1.7.9.
Day view
This option switches to a single-day calendar view. The next or previous day can be
displayed using arrows in the upper right corner of the dialog box.
Week view
Events for one calendar week including Saturday and Sunday. The next or previous week
can be displayed again using arrows in the upper right corner of the dialog box.
If there are more events defined for one day, they are sorted by type: multiple-day events,
entire-day events and the other. Only the events of the same type are sorted according to
the planned time.
Month view
Events for each day of the month. The next or previous month can be displayed using
arrows in the upper right corner of the dialog box, as in the above views.
66

1.7 Calendar
If there are more events defined for one day, they are sorted by type: multiple-day events,
entire-day events and the other. Only the events of the same type are sorted according to
the planned time.
List view
In this view, all events are listed (except repeated events), sorted by date by default. To
reorder events, click the heading again to change the order from ascending to descending
and vice versa.
Events with recurrence
All recurrent events sorted in a reference table by creation date. To change and to reverse
order of events, click the heading again to change the order from ascending to descending
and vice versa.
Today
Press the Today link to move the pointer to the current day. The following or previous
day/week/month is displayed using sliders in the upper right corner of the dialog box.
Subsidiary calendar
Click the calendar icon in the upper right corner of the dialog box to open the month
subsidiary calendar (see figure 1.63). Above all, this thumbnail calendar is used for fast
navigation through the calendar, especially if we need to navigate back or forth to a distant event.
The today is marked by a box. When another day in the calendar is clicked, the main
display of the calendar is also switched to the selected day. To switch to the current day,
click Today.
Figure 1.63 Subsidiary calendar
67

Chapter 1 Kerio WebMail
1.7.2 Calendar view
As suggested at the beginning of this chapter, calendars allow several layout views. Users
can select a view type which they currently find the most useful. In this section, detailed
descriptions of individual view modes are provided.
Figure 1.64 Switching between view modes
Note: Modes can be changed by the corresponding toolbar buttons (see figure 1.64):
Day view
The day view is the most detailed one since it focuses the shortest period. The schedule is
divided into 30-minute periods market by a clock symbol on the left. The current interval is
highlighted in yellow color (the first half-hour of the 12th hour in the picture 1.65).
The single-day view header serves to better reference in the calendar. In the left section, the
current day and date are displayed; in the right section, there is a thumbnail calendar icon
with sliders.
The individual calendar events are ordered in a vertical timeline. Each event is marked by
a colored stripe and it contains the basic information (subject, location, whether it is private
or not and if is has a notification). Whole-day or multiple-day events are displayed in the upper
section of the calendar, before the timed schedule (so that these events do not mess into the
daily schedule).
The events in this type of view can be moved to a different time using the mouse pointer or
extended to cover more hours. To move an event, move the mouse pointer to the left stripe
marked with a different color. After the pointer changes its shape to four arrows, click the
left mouse button and move the event to another time. To extend or reduce the time interval
of an event, move the pointer to the upper or lower area of an event and after the pointer
changes its shape, click the left mouse button and edit the event as necessary.
Focus once again on the left coloured vertical stripe. This area shows the time of the event’s
duration. If the event is shorter than half an hour, the stripe is shorter as well so that users
can recognize the time period taken by the event.
The coloured stripe also shows level of the user’s busyness during the event:
• purple stripe — away,
• full blue stripe — busy,
68

1.7 Calendar
Figure 1.65 Day view
• dash blue stripe — tentative,
• grey stripe — free.
The fastest and most simple way to open and edit an event is to double-click on it.
To open a new window and define a new event, double-click on the calendar line corresponding
to the time which we want to set the event for. The time is set automatically in accordance
with the row where the new event was opened. The day is also preset in the definition.
Events in the calendar may be distinguished by colors (see figure 1.65). Colors associate various event types (such as events referring to work, to private issues, to important issues, etc.)
and make manipulation with the calendar more transparent. Colors of events can be defined
in the event’s edit dialog.
69

Chapter 1 Kerio WebMail
Week view
One week display mode (including Saturday and Sunday). The events in the week view are
marked as colored stripes (according to the event type). If more events are displayed in a single
day, they are ordered by type as follows:
1. The all-day or multiple-day events — these are displayed without any time limitation. If
there are more all-day events specified in one day, they are ordered by subject alphabetically. The all-day events are described in chapter 1.7.5 in more detail.
2. Time-ranged events — repeated events, meetings, etc. If multiple events are defined for
a day, they are ordered by the time when they were set.
The events of the same type are displayed in descending order according to their scheduled
time.
The events in this type of view can be marked by different colors. These colors represent
different event types and can be specified in the edit dialog box — chapter 1.7.3).
Each event can be moved to any other day in the week displayed. Click the selected event (after
the pointer changes its shape to four arrows) and drag it to another location in the calendar.
Note: Only events with no recurrence set can be moved.
Today is marked by a box in the weekly view.
A new event can be created by double-clicking on a selected day. An event editing window will
be opened with the date information automatically set to the selected day.
To display the previous or next week, use sliders on the right of the dialog box. Users can also
use the thumbnail calendar icon next to the sliders. Click the icon to open the month calendar.
The today is marked by a box. When another day in the calendar is clicked, the main display
of the calendar is also switched to the selected day. To switch to today, click on Today. The
current week is marked in the left corner of the bar.
Month view
It is similar to the week view, but the events for the whole month are displayed.
List view
This view type provides a comprehensible list of events where every single line stands for one
event and includes relevant information. By default, events are ordered by their starting dates.
The list of events includes all items where no recurrence is set.
This view mode can be helpful especially when a particular event is searched since it allows
ordering of the items by simple clicking on a particular parameter’s header. Click the heading
again to change the order from ascending to descending and vice versa.
By default, up to 20 events are listed on one page. To change number of events displayed on
a single page, use the Settings section in Kerio WebMail (see chapter 1.11.1).
70

1.7 Calendar
The information to be displayed in the list can be chosen. Sometimes it is better to hide some
columns in order to make the navigation easier, sometimes showing more columns is desired.
Right-click the column heading to open the dialog box with column selection. The pop-up
menu that appears contains the Change columns option.
TIP 1: If using meetings, it may be useful to show the column with the attendees, to see who
was invited.
TIP 2: To see the duration of each event, show the Duration column.
Note: The column settings apply to the event list as well as the list of repeated events.
The column width can be modified in the event list. To change the column width, click between
two columns in the table header and drag the cursor right or left as needed.
Repeated list view
This view is similar to the previous one, but it shows only the repeated events.
1.7.3 Creating and editing events
Events are all items created in the calendar. New events can be added in a special create-andedit dialog. To open this dialog, use the New event button on the toolbar or the corresponding
option available in the context pop-up menu (opened by right-clicking on the calendar’s main
panel).
Meetings are special events. This event is shared by multiple participants (invited users). For
details on how to create a meeting, see section 1.7.7.
Some events and meetings can be repeated in regular periods. To set periods of repetition for
an event, click on Recurrence. When recurrence is set for an event, the item will be repeated
in the calendar according to the settings. For detailed information, read chapter 1.7.6.
Event settings
Use the General tab to define basic configuration (see figure 1.66):
Subject
The summary information about the event. This information will be displayed in the
calendar window after the event is saved, therefore it should be as brief as possible.
Location
Location of the event.
Label
Use this menu to specify the type of event. A specific color next to the description represents the type of event. The same color will be also used to mark the event in the
calendar.
71

Chapter 1 Kerio WebMail
Figure 1.66 Event settings
Start time
Start time of the event.
End time
End time of the event.
All day event
In the All day event, the start and end time items are missing. This means that this event
will be in progress over the entire day, but other events can be still planned for this day.
The typical example is setting entire-day events like wedding anniversaries, symposiums,
vacations, business trips, etc.
Reminder
Reminder is a special function of the Kerio WebMail interface that allows reminding of
events. If the reminder is set for an event, an alert is displayed at the defined time that
informs of an upcoming event(s). The default alarm time is set to 15 minutes, but any
different value can be selected from the drop-down list. To cancel the reminder, simply
disable the option in the event’s edit dialog box.
The event reminder (see figure
1.67) is displayed as an alert window including a list of
upcoming events. Each row contains the subject of the specific event (task) and time left
to the upcoming event.
Note: Besides events, it is also possible to use the reminder for Tasks. Therefore, a single
alert window may contain both events and tasks if their reminder time is the same.
It is also possible to set another interval for later reminder of the event. This might be
helpful especially when you have no time to focus to the event’s subject at the particular
72

1.7 Calendar
moment. Set the desired time to the next reminder (from five minutes to two weeks) in
the pull-down menu in lower part of the window and click Remind me later.
It is also possible to double-click on the alert window to view the event.
Figure 1.67 Reminder
Click the Dismiss all/Dismiss buttons to cancel the selected reminder or all reminders.
The dismissed reminder will not be displayed any more unless it relates to a repeated
event.
Warning:
1. The reminder window is active only when Kerio WebMail is running.
2. Alerts are displayed only if reminders are set in the default personal Calendar and
Tasks folders (default folders which are created with each user account). Reminding
alerts are not displayed for custom calendar and task folders.
Show time as
In this item, users can select the state of the user during the time of the event. Three
status modes are available: free, tentative, busy and out of office. Selecting the state is
useful e.g. when the Free/Busy server is used for scheduling and communication (for
more details on this topic, see chapter 1.7.7).
Private
The Private option allows hiding of the event in case the calendar is shared with other
users. Events set as private cannot be viewed by other users (for details, see chapter 1.7.4).
Comment
To any event it is possible to add a comment referring to various issues such as event
details or lists of items related to the event.
73

Chapter 1 Kerio WebMail
Categories
The Categories item is useful only if the web interface is used in connection with MS
Outlook with Kerio Outlook Connector preinstalled. Use the tools in this application to
display the events in individual categories.
Click the Categories button to display the list of default categories. Users can also create
new categories that are more suitable.
1.7.4 Private Events
Events are private when they are set as Private. This feature allows to hide private events in
shared calendars. The users with whom the particular event is shared cannot view its content,
edit it or remove it. Such users will see only the item labeled as Private event. The only
information these users learn from the calendar is date and time.
Note: In the Free/Busy calendar, the level of busyness and the time of private events are
available.
Private events can be created as follows:
1. Open the New event dialog box.
2. Insert relevant information.
3. On the Settings tab, enable the Private option (see figure
1.66).
4. Save changes by clicking Save and Close.
Warning: Private events are treated as private only if the client where the calendar is viewed
supports this feature. In other client applications, it is possible to view and edit events without any restrictions by users with appropriate access rights. This implies that information
included in private events are not well secured.
1.7.5 All (multiple) day event
All-day events are special events useful especially when the user leaves for a business trip for
one or more days, when we want to note someone’s birthday, etc.
All-day events last 24, 48 hours, etc. and it is limited by dates, not by time as usual for
other events. In the calendar, such event is displayed above other time-limited events and the
subject is centered (see picture 1.68). This type of event is not included in the day schedule
because users can add other types of time-limited events in the day schedule. No starting or
ending time is specified for all-day events.
To set the all-day event, check the All day option in the dialog box for creating an event (see
picture
1.66). When this option is checked, the event’s time range specification is disabled.
Starting and ending date can close range of one or multiple days. All-day events applied to
more than one day are called multiple-day events.
74

1.7 Calendar
Note: All-day events are not moved according to time zones since they are bound to date, not
to particular time. This means that if for example an all-day event is set for December 24,
2006, this date will be kept for all time zones. For details regarding behavior of events in
different time zones, see chapter 1.13.
Warning: If the Free/Busy calendar is used, the free/busy status in the Show as menu must be
set to free or out of office (according to the event type).
Figure 1.68 Month view events
Multiple-day event
The multiple-day event is created the same way as the all-day event, but the time range must
be specified in the Start and End fields in the event’s edit dialog box.
Examples of multiple-day events are multi-day business trips or vacation.
Note: Multi-day events can also be created by non-checking the All-day option and simple
setting an event for more days. The only difference in the layout may arise from frequent trips
to various time zones, as events can be moved accordingly to the current time zone.
1.7.6 Recurred event
For periodically repeated events the Repeat mode can be set. This feature enables for example
setting of regular company briefings or regular Thursday Scrabble parties with friends. Simply
define the event once and set its repetition. To set recurrence of an event, click the Recurrence
icon in the top-left of the Edit event dialog box.
Various types of recurrence periods are available —daily, weekly, monthly or every year. Range
of the recurrence (validity) can be also set. Just set an initial and the final date.
Range of recurrence
Set the desired range of recurrence.
• No end date — the event will be repeated for an unlimited period (useful for birthdays,
anniversaries, etc.).
• End after ... occurrences — the recurrence is over when the specified number of recur-
rences is reached.
• End by — the repetitions will occur during the specified time range (including the end
date).
75
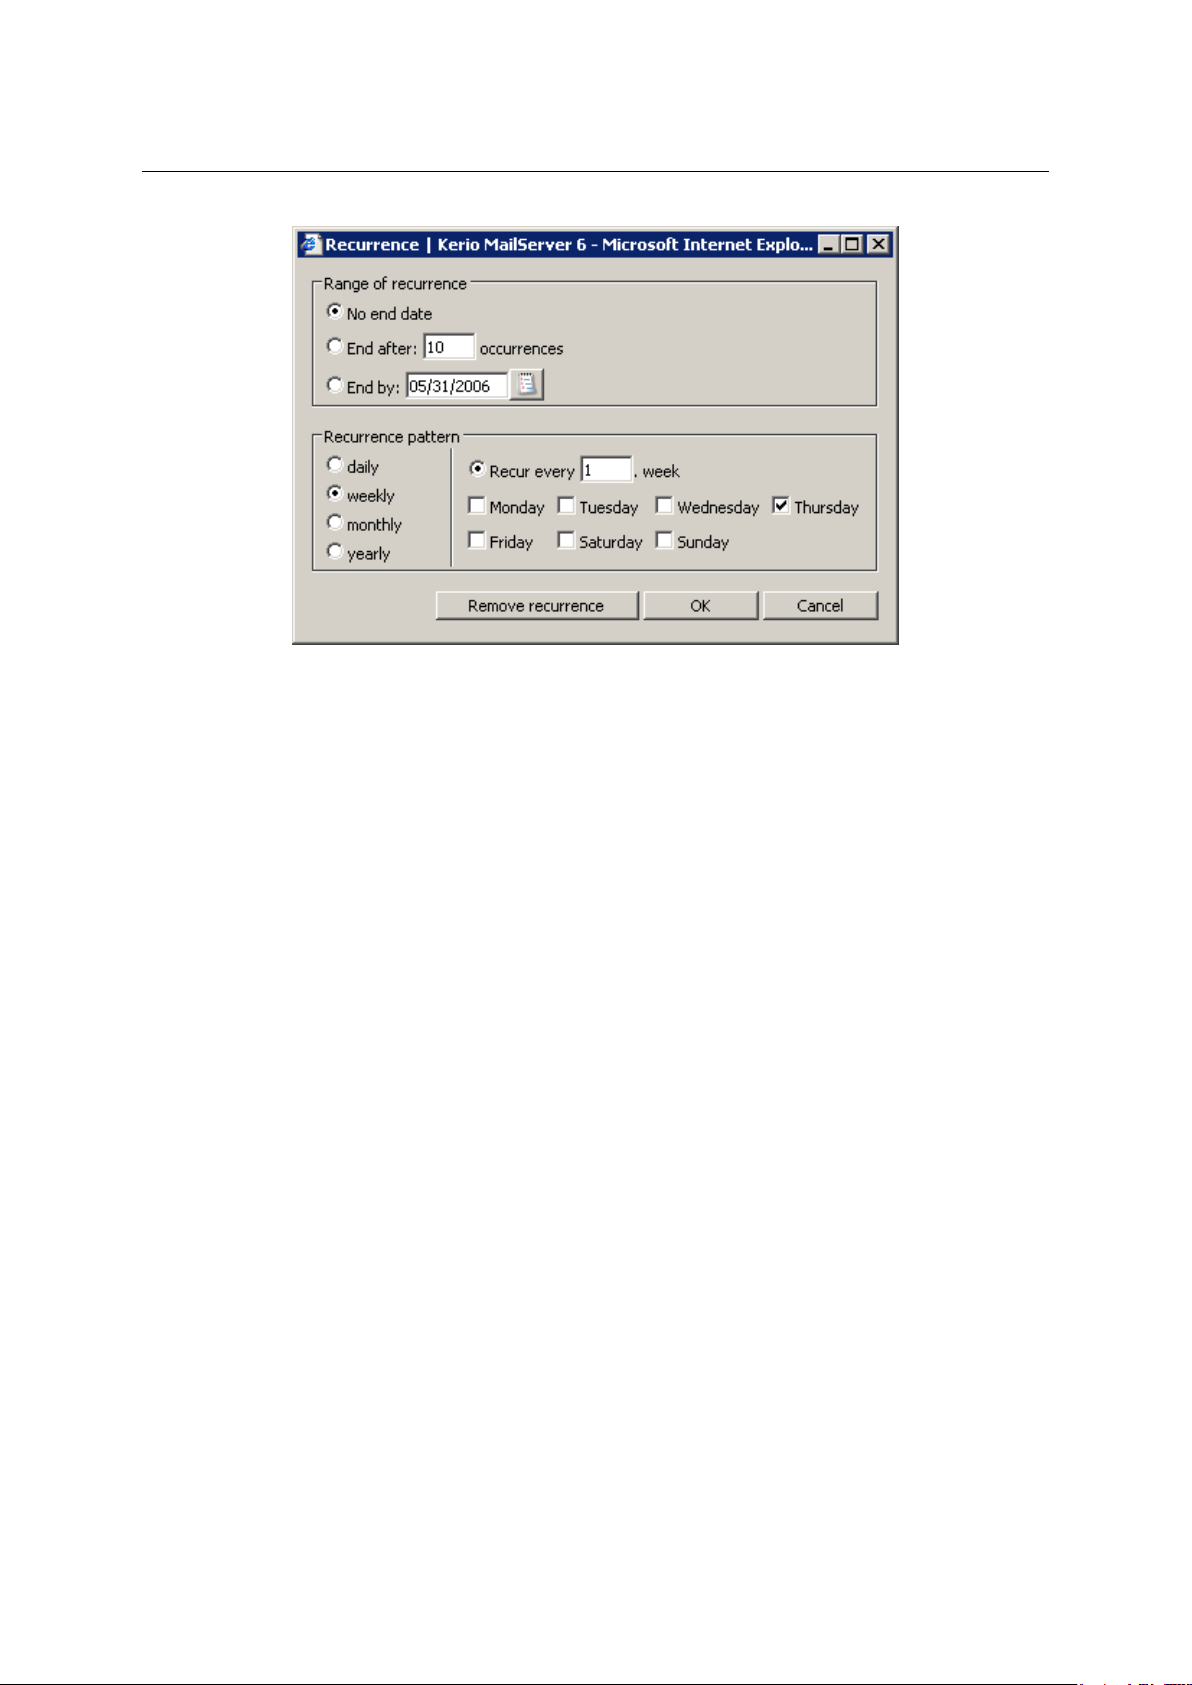
Chapter 1 Kerio WebMail
Figure 1.69 Event recurrence
Recurrence pattern
Several recurrence patterns are available (daily, weekly, monthly and yearly). For each
one, different parameters can be set in the right part of the dialog.
1.7.7 Meeting
Meetings are special events where email addresses of other participants can be involved. Once
a meeting is created, addresses can be added to which the message will be sent — these
special messages are called invitations. Invitations are special messages informing users of
topics, times and place of a meeting. Invitations include special accept/reject buttons.
Information derived from the participant’s reaction is sent to the meeting initiator (chair member). The initiator thus know whether the persons invited come or not.
It is also possible to send updates related to meetings when the initiator modifies the invitation.
In addition to the option of creating of meetings, meeting scheduler tools are also included in
Kerio WebMail. If participants are added who also use a Kerio MailServer account, meetings can
be scheduled in accordance with free time information available in calendars of these users.
The following sections address creating and scheduling of meetings in detail:
How to create meetings
Meetings are created in the same way as events. Simply open a dialog where an event can be
edited and specify corresponding parameters in the General tab (for more information, refer
to chapter sect-event"/>). Then create a list of attendees who will participate in the meeting.
These participants will be invited to the meeting by an email message.
76
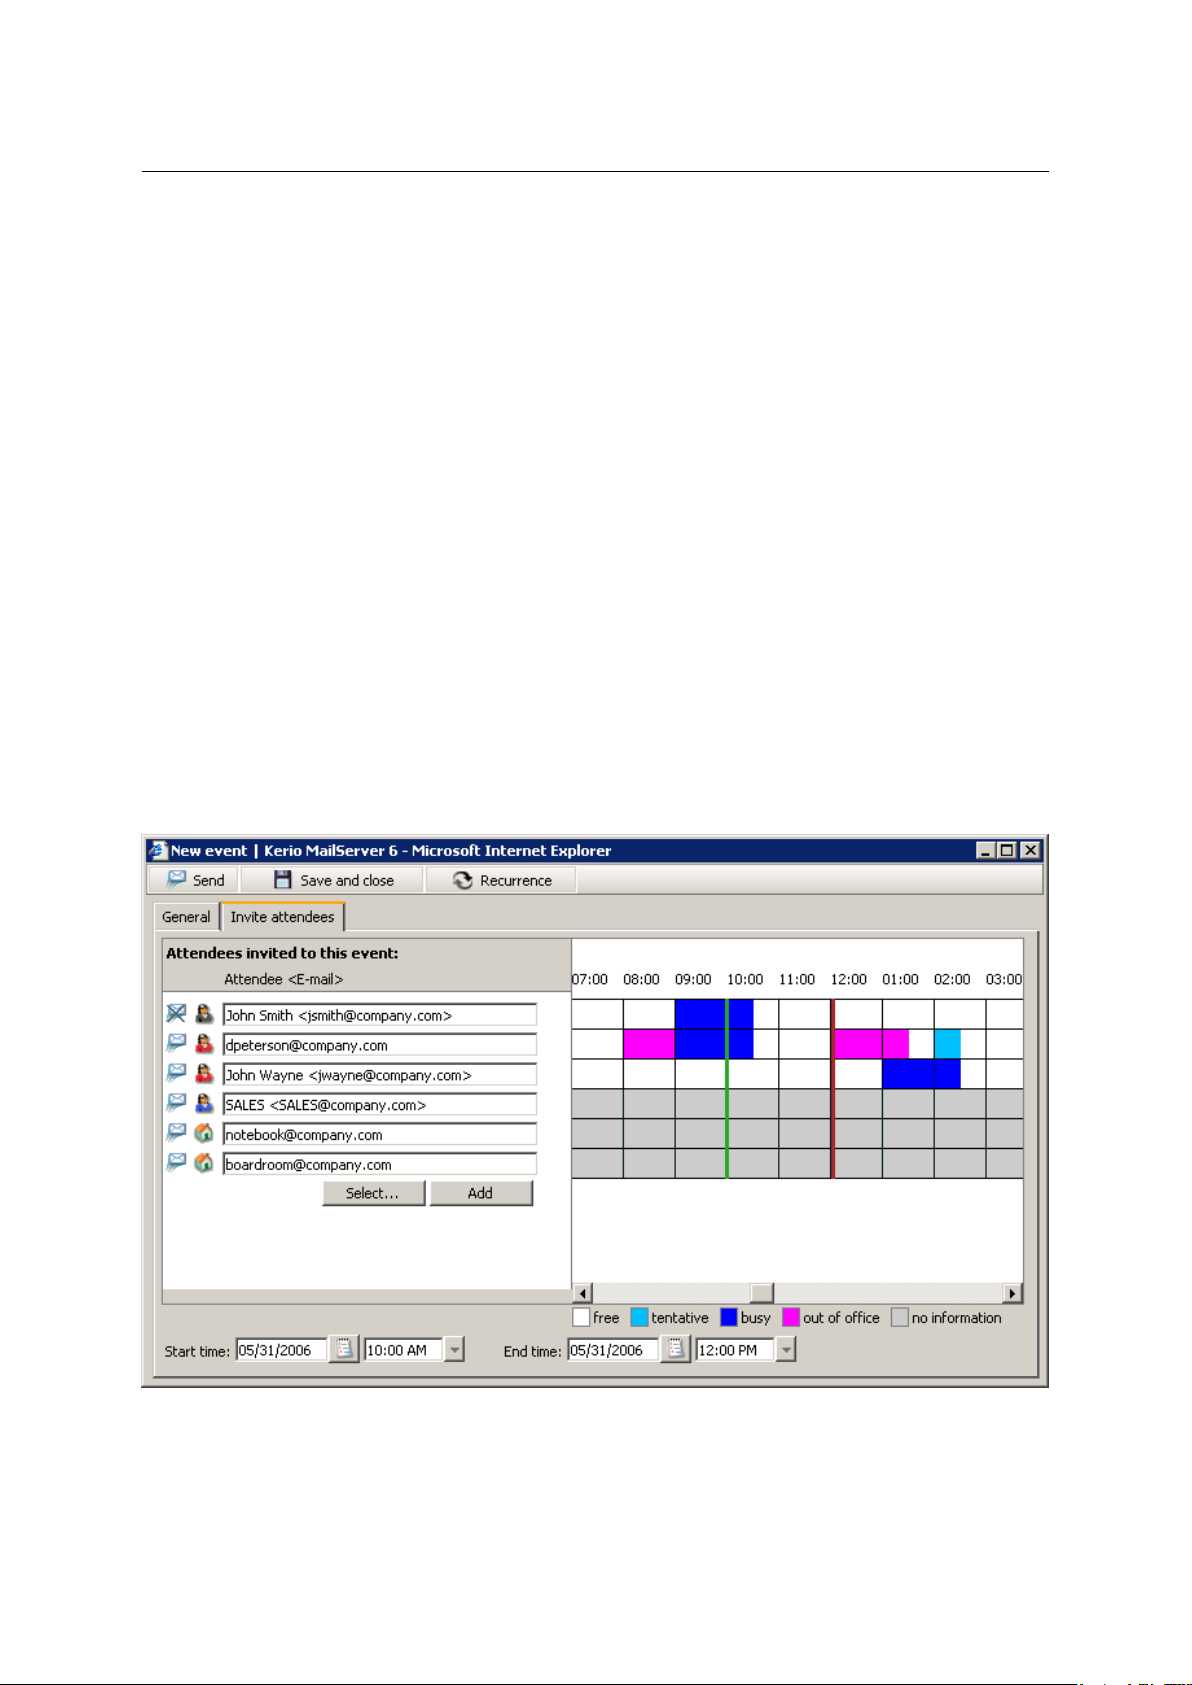
1.7 Calendar
By default, the Attendees section includes only the name of the meeting initiator. Use special
buttons to add more attendees (see picture 1.70). Several types of attendees can be created:
• Required — this group includes invited persons who should not miss the meeting from any
reason. The invitation includes this information so that each user addressed knows if their
presence is required or not.
• Optional — this group includes users who can decide whether to come or not.
• Source — special type of attendee. The group does not refer to any person but to resources
needed for the meeting. Using this attendee type it is possible to book certain equipment
such as projectors, laptops and meeting rooms. Specify the email address of the person
who maintains the particular resources.
There is also the chair attendee, a special attendee type. This member cannot be changed. The
chair attendee is always the person who creates the particular meeting.
Attendees can also be divided between those to whom the invitation will be sent and the
others. It is also possible to create meeting and include attendees without sending them any
invitation. By default, however, sending of invitations and meeting newsletters is enabled.
Below, you can find instructions on how to create a list of attendees:
Figure 1.70 Attendees
77
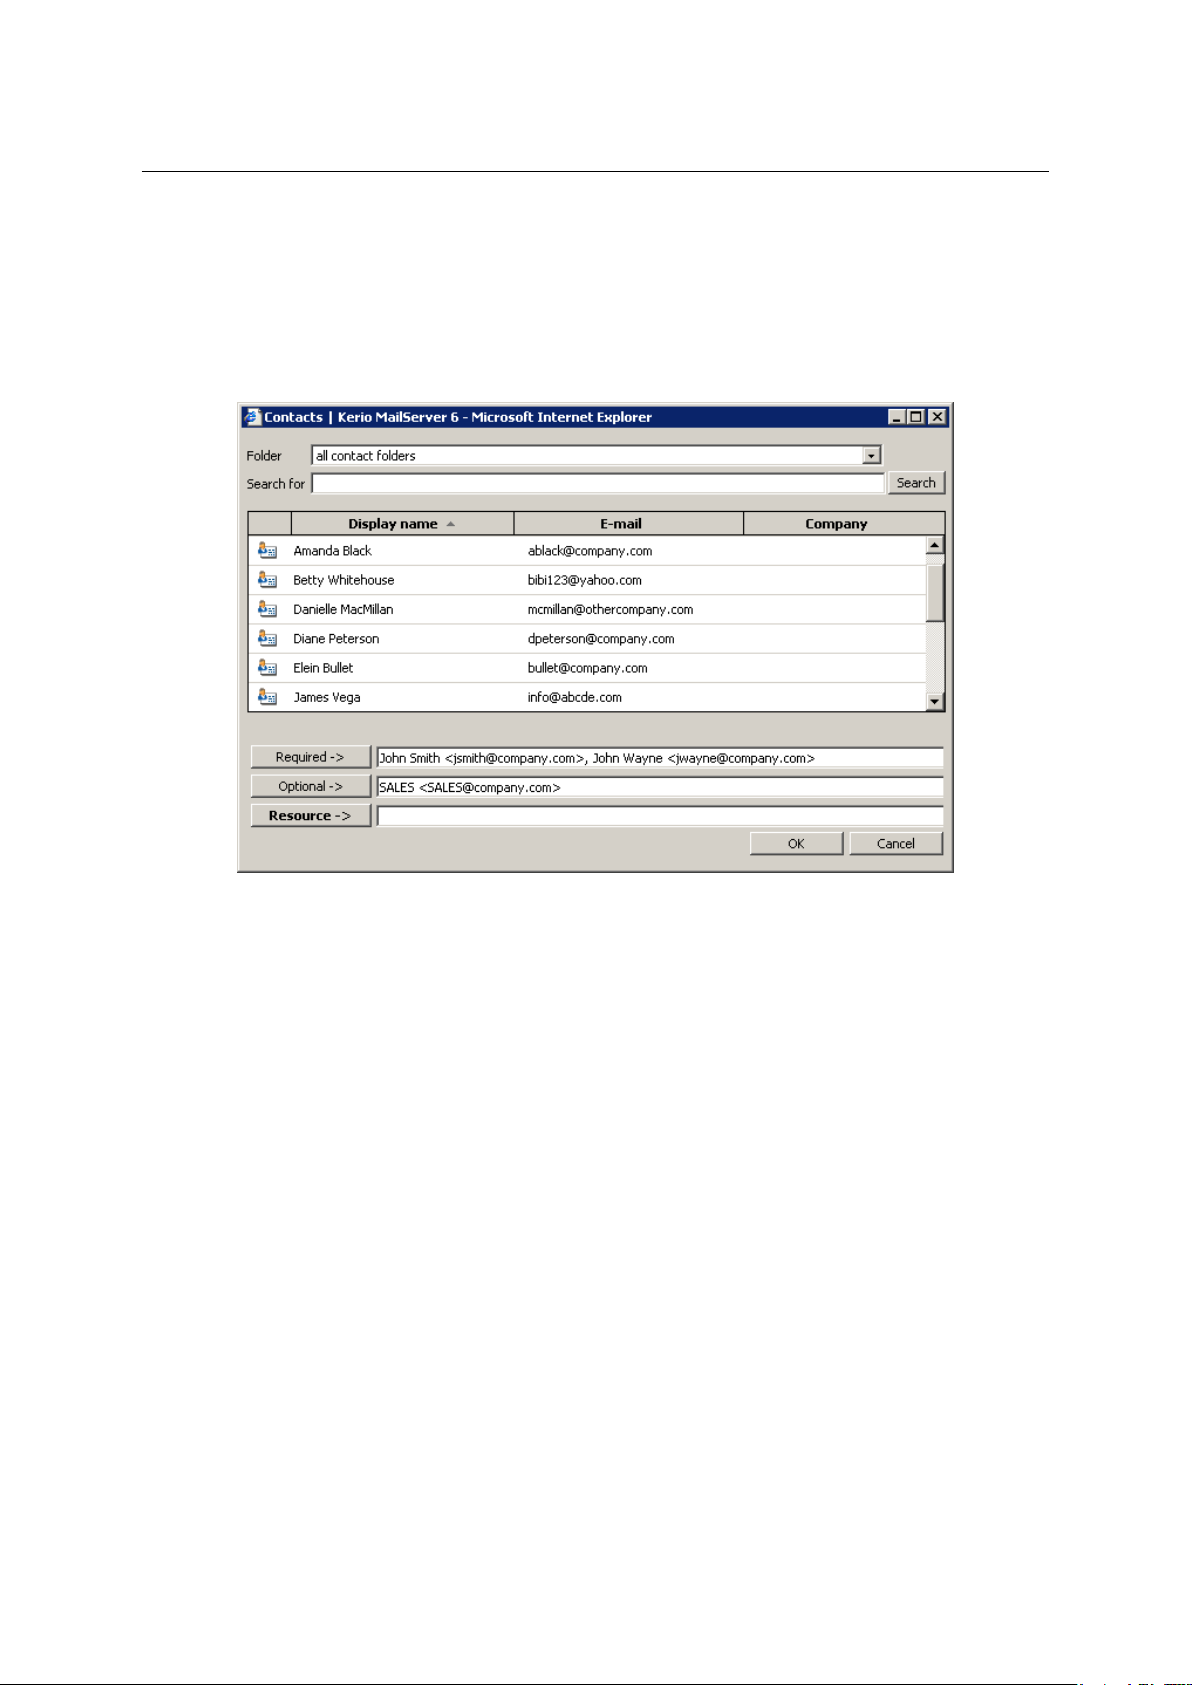
Chapter 1 Kerio WebMail
1. Two buttons located below the list can be used to add attendees (see figure 1.70):
• Use the Select button to search attendees in contacts (see figure 1.71). Look up and
select addresses you want to add.
The dialog contains the following items:
Figure 1.71 Select
Folder
The menu includes all contact folders in the mailbox (including public and subscribed contacts).
Search for:
Enter a string which will be used as search criteria, i.e. any addresses including
the string will be searched. First letters of first or second name or username (the
part of address preceding the at-sign) can be used as the string. The search string
is not case-sensitive.
One or multiple addresses can be selected from the list (by left-clicking while holding
the Ctrl key), or the Required, Optional a Resource buttons can be used to add selected
addresses.
Note: Addresses can be also added to the attendee list by double-clicking on a particular
item. The address is filled in the active entry. At figure
1.71, the Required is currently
active. The button name preceding the active entry (Required, Optional or Resource) is
bold. You can switch between entries by clicking on a particular textfield.
78
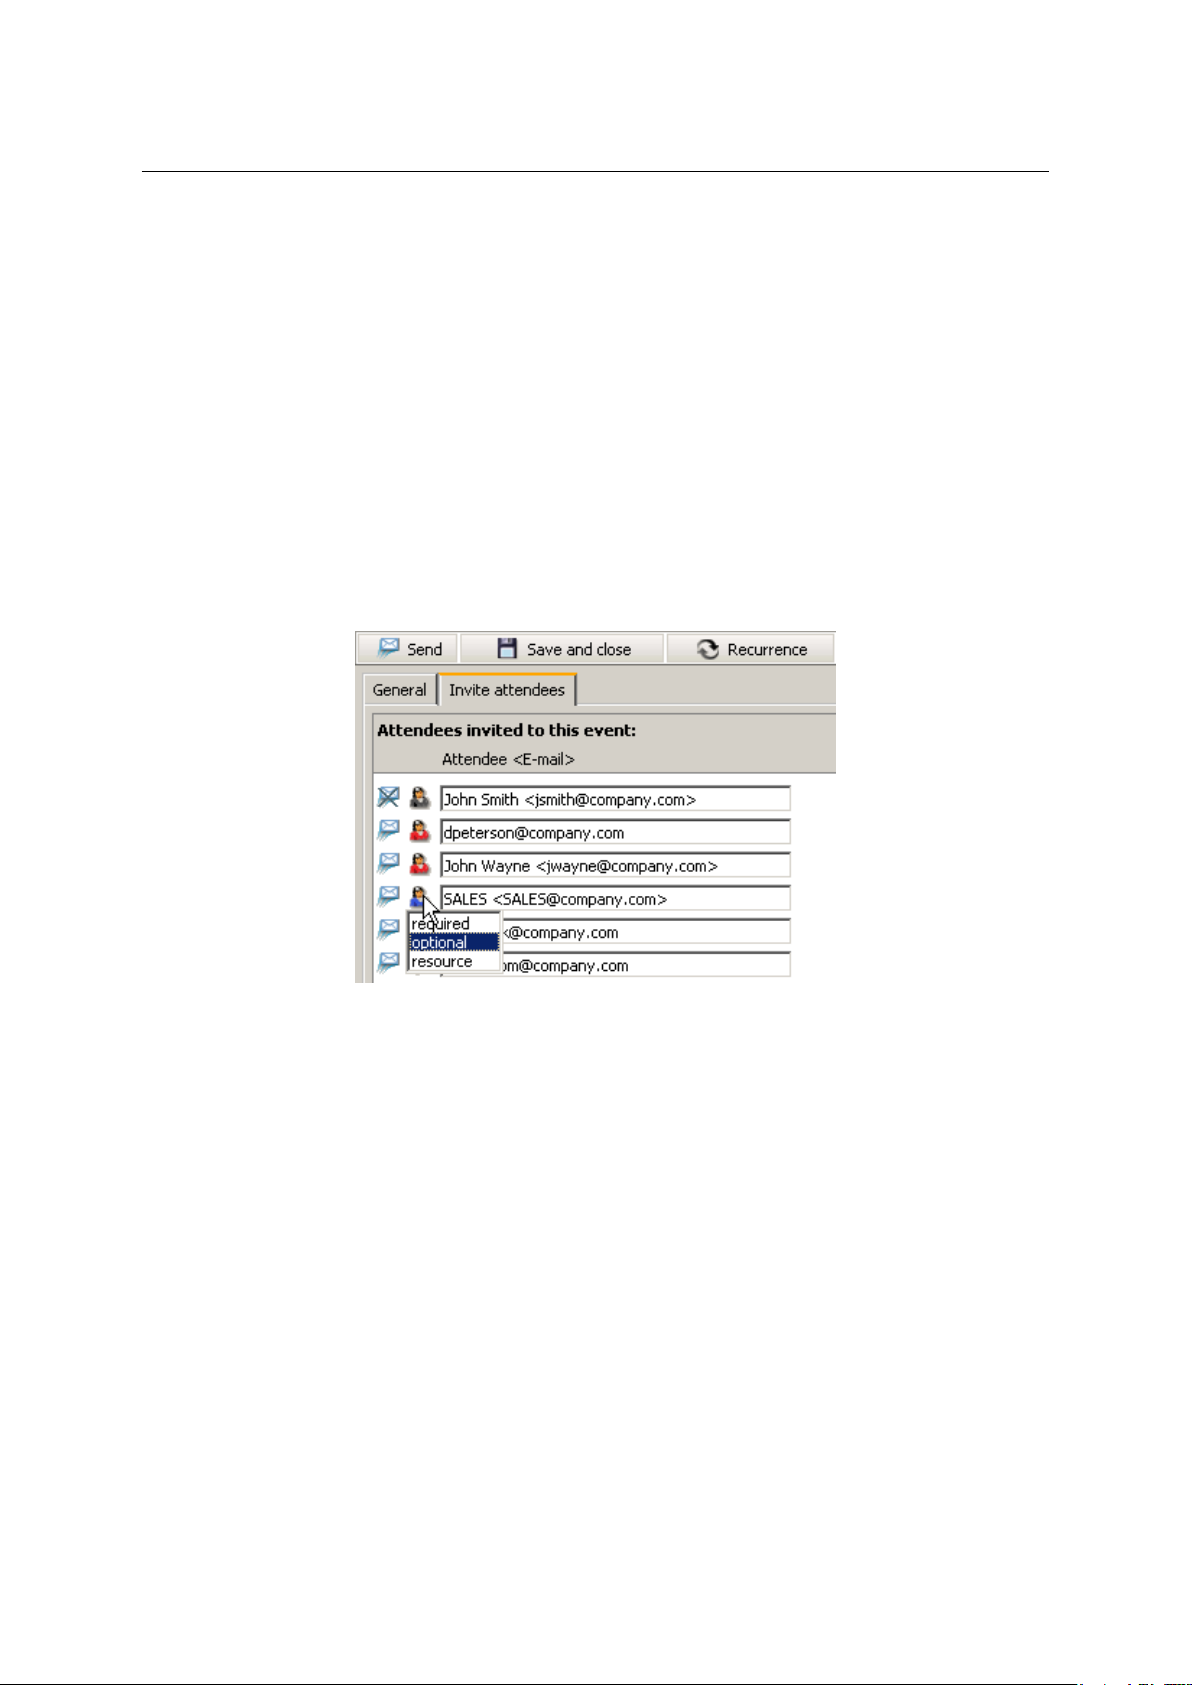
1.7 Calendar
Once attendees are selected, save settings by the OK button. The dialog is closed and
all selected addresses are listed. Various icons are used to mark attendees as required,
optional or resource. Roles of attendees can be changed (see figure 1.72)
• Use the Add button to add users to the list by hand. In case you know the particular
email address by heart, this method is the fastest one. The Add button can also be
used if the address we intend to add is not included in our contact lists.
The Add button is not active unless there is at least one line blank where another
address can be added. Once addresses are filled in all entries, the button is activated
so that another line can be added.
2. To set or change attendee type, simply click on the attendee icon in the list and perform
the settings (see figure 1.72).
Figure 1.72 Setting an attendee’s status
3. To enable/disable sending of invitations and updates to individual users, simply click on
the envelope icon next to the particular user’s name and set an appropriate option in the
menu (see figure 1.73). Simply choose yes to send the invitation or no not to send it.
When inserted, events can be sent to attendees or just saved by the Send button (Send update
— this button appears instead of the Send option where an existing meeting is changed) and
the Save and Close toolbar button.
Note: Appointments can be canceled only by their initiators.
79

Chapter 1 Kerio WebMail
Scheduling of meetings
Figure 1.73 Sending an email message to an attendee
As denoted right at the start of this chapter, a special tool is provided for time scheduling. It is
known as Free/Busy server and it might simplify creation of meetings. Thanks to the Free/Busy
feature, it is easy to find out whether users invited to the meeting are free or busy in the time
scheduled by comparing the meeting date and time calendars of these users. It is, therefore,
easier to find a time range where all attendees required to participate in the meetings are free.
This feature help us avoid many phone calls and emails that we would otherwise make or
send.
Free/Busy server exploits information on user’s free time from the calendar of the particular
user. However, the meeting initiator can only see when the attendee is free or busy. It is not
possible to view particular details on the user’s activities.
Free/Busy information is displayed in the event’s edit window on the Attendees tab in the
section addressing meetings. Free/Busy is enabled automatically when attendees are entered
in the list. To the right from the list, you can find Free/Busy information (see figure 1.74).
The Free/Busy feature also provides information on how much busy the user is. Degree of
user’s busyness is suggested by the color. Color key is provided below the Free/Busy information.
The Free/Busy calendar displays all meetings and events included in the default calendar folder
and its subfolders. If you want that some events (e.g. items of a private calendar) are not
shown in the Free/Busy calendar, create a new calendar folder out of the branch of the default
calendar and its subfolders.
Warning: Free/Busy information is displayed only for attendees with an account in the Kerio
MailServer (usually, this function is used to set meetings with colleagues). The information is
not displayed for external attendees (as shown at figure
1.74).
80

1.7 Calendar
Figure 1.74 The free/busy data of the users
As shown at figure 1.74, Free/Busy is kind of a timeline. Each Free/Busy line shows freetime
information related to a particular user. Coloured parts refer to time segments when the user
is busy or free. The two vertical lines (a green and a red) show where the meeting we are
setting starts and ends. Ideal conditions are when no coloured field interferes with the range
set by the two lines. Both lines can be moved within the timeline as needed. To move lines,
use the Start time and End time fields located below the timeline section. These fields are
interconnected with fields of the same names on the General tab. This implies that if these
items are change on either of these tabs, the values are automatically copied to the twin items.
Now, let us see the attendee’s view of Free/Busy To make the Free/Busy information as relevant
as possible, the following conditions should be met:
• Each user should use their Calendar folder and include all their events in it.
• Degree of busyness should be set in the Show time as menu (see figure 1.75) of the event’s
edit dialog.
In the Show as menu, the following options can be specified:
Figure 1.75 Setting of busyness level
free
Such event is not displayed in the Free/Busy calendar. Use this mode when you can be
interrupted while completing a task or for entire-day anniversary events.
tentative
This event is highlighted by a light blue color in the Free/Busy calendar. This option
may be useful especially for events where time settings can be changed if needed.
busy
This event is highlighted by a dark blue color in the Free/Busy calendar.
81

Chapter 1 Kerio WebMail
absent
This event is highlighted by a pink color in the Free/Busy calendar.
The Free/Busy calendar works only for users of one Kerio MailServer. Other users will be
displayed in grey color, since there are no free/busy data available for them.
Invitations
Short description of invitations was provided at the top of this chapter. In this section, we
will focus on invitation’s layout and on how to react when an invitation is delivered to your
mailbox.
Invitations use a special icon, different from the one used for usual email messages (see figure 1.76). Upon clicking on an invitation, meeting information is shown along with several
buttons. Name of the meeting is provided in the header (at figure 1.76, Meeting is simply set
as the name). Below, you can find basic information such as when and where the meeting takes
place and a list of attendees, both required and optional. If your name is included in the list
of required attendees, you should accept the meeting. Otherwise, it is up to you whether you
choose to participate in the meeting or not.
Figure 1.76 Acceptation or declination of a meeting
By opening (reading) of an invitation, the meeting is automatically added to the calendar with
the “tentative” status set.
Buttons located below the basic meeting information allow fast response, as follows:
• Accept — upon clicking on this button, an email message informing of acceptance of the
invitation is sent to the meeting initiator and a green icon appears at the name of the name
82

1.7 Calendar
of the user who has accepted the invitation (the same icon as used on the Accept button in
the invitation).
• Tentative — upon clicking on this button, an email message informing of acceptance of the
invitation is sent to the meeting initiator and an orange question mark icon appears at the
name of the name of the user who has tentatively accepted the invitation (the same icon as
used on the Tentative button in the invitation).
• Decline — upon clicking on this button, an email message informing of acceptance of the
invitation is sent to the meeting initiator and a red cross icon appears at the name of the
name of the user who has rejected the invitation (the same icon as used on the Decline
button in the invitation).
Upon clicking on any of these buttons, a dialog box is opened where a message to be attached
to the acceptation status notice can be entered. No additional information is required since
the necessary data has already been entered by the moment.
In addition to the options described above, there is another button labeled as Calendar. This
button opens a special dialog box including a one-day view of the calendar with the date and
time of the meeting marked so the user can easily find out whether the event collides with
another activity or not. This help us make an appropriate reaction.
Once the event is answered, the invitation is removed from the email folder and the meeting is
marked in the private calendar if accepted. Rejected meetings are not included in the calendar.
1.7.8 Moving and copying events
Events can be moved or copied between folders as follows:
The Drag & Drop method
Drag & Drop is a simple method for moving and copying items by using only the mouse:
1. Hover an event with the mouse pointer and click on the left mouse button. Hold the button
and drag the event over the destination folder. Release the mouse button.
Note: To copy the selected event(s), hold the Ctrl key (or Alt on Mac OS X).
2. Hold down the mouse button (and the Ctrl key, when copying) and drag the event to
another folder.
3. A green icon appears when the event is ready to move (see figure
1.77) or a blue plus icon
when ready for copying (see figure 1.78).
83

Chapter 1 Kerio WebMail
Figure 1.77 Moving events by the Drag & Drop method
Figure 1.78 Copying events by the Drag & Drop method
4. Let hold of the button to move the event immediately.
Note: Unless the event is dragged over a folder where it can be moved (i.e. any calendar with
appropriate access rights in the folder tree), a red icon is displayed meaning it is impossible
to move the message to the particular location.
Using the Move or copy button
The Move or copy toolbar button can be used to move or copy the item, as follows:
1. Use the mouse pointer to select an event and click on the Move or copy button available
on the toolbar (see figure 1.79).
2. In the Folder selection dialog just opened, select the folder where you want to move or
copy the item and click on Move or Copy.
84

Figure 1.79 Moving/copying events by the button on the toolbar
Pop-up menu
The pop-up menu can also be used to move or copy items:
1.7 Calendar
1. Right-click an event. In the context menu, select Move or copy (see figure 1.80).
Figure 1.80 Move/Copy events using the context menu
2. This opens the Folder selection dialog where you can select a folder where the event will
be move or copied. Click on Move/Copy.
1.7.9 Events forwarding
Kerio WebMail allows forwarding of events in such a format so that it is possible to save it to
the calendar directly. Thanks to this feature, it is not necessary to copy event data to email
messages and to the event’s edit dialog box at the addressee’s side.
Kerio WebMail also supports another option. When a message with an event in the attachment
is received, the recipient can simply click on the attachment to open the event in the standard
event edit dialog box. Click on Save and Close to confirm settings and save the event to the
Calendar folder.
Note: To save an event or open it as an attachment, right-click on it and use one of the options
available, Open or Save.
85

Chapter 1 Kerio WebMail
How to forward an event
To forward an event, select it by the mouse pointer and click on the Forward button on the
calendar folder’s toolbar (it is also possible to use the corresponding option in the pop-up
context menu).
Select an event and click on a corresponding icon to open a message editor where the event is
included as an attachment.3The message can be edited before it is sent.
Warning: Do not forget to enter the recipient’s email address in the To: textfield.
1.8 Tasks
Every single day, we complete various tasks — at work, at home or anywhere else. Those of
us equipped with an excellent memory can remember them, others use various tools such as
little notepapers and check them off when the items are completed. Task folder play the role
of these notepapers in the electronic environment.
Advantages of electronic tasks involve especially central storage of all tasks and automatic
alerts, informing of upcoming events.
Tasks in folders are organized in a table where each line stands for one task including task
name and other information available, such as priority level, etc.
Figure 1.81 Tasks
Task folders are equivalent to other folders. They can be shared, set as public or attached. For
more information on shared and public folders, see chapter 1.10.
1.8.1 Toolbar
The tasks folder toolbar contains the following options:
New task
Click the New task button to display the dialog for creating of a new task. Users can also
use the arrow located on the right from the New task button to open the New mail, New
task and New contact windows.
3
The event will be saved in the iCalendar format (.ics).
86

1.8 Tasks
Move or copy
Use the icon to copy or move a selected task (see chapter 1.8.5).
Print
To print out a task, click on Print. First, the printed page preview appears; then the
standard Print dialog box is displayed.
Delete
Use this button to delete the selected task. Tasks can be deleted also by the Delete key
(in Mac OS X also by Backspace).
Forward
Use this button to forward the selected task to other users.
1.8.2 Task list display
In Kerio WebMail, the tasks are shown in a simple list that contains data such as the name of
the task, scheduled deadline and the status of the task (percentage as well as description).
By default, up to 20 tasks are listed on one page. To change number of tasks displayed on
a single page, use the Settings section in Kerio WebMail (see chapter 1.11.1).
Sorting tasks by columns
The detailed information on individual tasks is displayed in the columns. The tasks can be
sorted by the details listed in individual columns. Click the column heading to sort tasks in the
ascending or descending order (see the arrow next to the column name) by alphabet, numbers
or time (depending on the column contents).
Note: For listing by subject, items are sorted by the alphabet of the language set in Settings as
preferred (the General tab) — for details, see chapter 1.11.1. In result, if for example English
is set as preferred and subject are in German, subjects will be ordered by English alphabet and
some specific national characters may also cause problems in sorting.
Adding and deleting columns
Users can customize the appearance of the table and the information shown. The columns can
be added or deleted. Right-click the table header and specify the column settings in the Select
fields window. The pop-up menu contains the Change columns option. Checked columns will
be shown in the dialog box, unchecked columns will be hidden.
Adjusting the column width
The width of the task list can be adjusted. To change the column width, click between two
columns in the table header and drag the cursor right or left as needed.
87

Chapter 1 Kerio WebMail
Solving tasks
After a specific task is solved, it can be marked as solved in the task list using the checkboxes
before each task. When the task is checked, its status is set to completed and date and time of
the completion are set.
1.8.3 Creating and editing tasks
To create a new task, use the task edit window. To open the dialog, use the New task option
available on the toolbar. The edit dialog box includes two tabs where the following parameters
can be set:
Task settings
In the General tab, the following task details can be defined:
Figure 1.82 Task settings
Subject
Insert a text which will be later shown in the task list as well as in the Reminder window
(if the reminder is enabled for the task). The text should not be too long and it should be
as comprehensive as possible.
88

Location
Task location.
Due date
Time required for completion of the task.
Start date
The date to start on the task.
Date completed
Date of completion.
Status
Each task goes through several stages during the process of its completion:
• Not started — the task has not been started yet.
• Waiting for someone else — useful in cases where the completion of the task depends
on another person/other people).
• Completed — the task is completed and 100% is automatically inserted in the Finished
field.
• In Progress — the task is being solved. It is possible to enter a number specifying what
percent of the task has already been completed in the Done field.
• Deferred — the task cannot be completed at the moment (e.g. as there are higher
priority tasks). It is useful to set Reminder time to avoid the situation that the task is
kept in the list uncompleted.
1.8 Tasks
Priority
Using this option, the task priority can be defined. Tasks with highest priority are marked
with a red exclamation mark, a low priority task is marked with an arrow.
Reminder
This feature enables users to set a reminder to an upcoming due date. The alarm time
can be set to a specific day and time. The option can be disabled by unchecking the box.
The reminder is displayed as a popup window that lists the events and tasks to be reminded at that time. Each row contains the subject of the specific event (task) and time
to the next reminder.
Users can extend or reduce the time to the next reminder of a specific event. Set the
desired time of event recurrence (from five minutes to two weeks) and click Remind me
later.
Click the Dismiss all or Dismiss buttons to cancel the selected reminder or all reminders.
The dismissed reminder will not be displayed any more unless it relates to a repeated
event.
Warning:
1. The reminder window is active only when Kerio WebMail is running.
2. For notifications, only the basic calendar and task folders (standard folders created
automatically when the user account is created) are searched through in Kerio Web-
Mail. If users create other calendar and task folders, keep in mind that the event
89

Chapter 1 Kerio WebMail
and task notification will not work in Kerio WebMail. However, if the notification
timeout expires when MS Outlook is running, a notification is displayed in a standard
MS Outlook window.
Complete %
Shows what percent of the task has already been completed.
Comment
Detailed information can be provided for each task.
Categories
The Categories item is useful only if the web interface is used in connection with MS
Outlook with Kerio Outlook Connector preinstalled. Use the tools in this application to
display the events in individual categories.
Click the Categories button to display the list of default categories. Users can also create
new categories that are more suitable.
Private
The Private item is helpful especially for sharing of folders. If the folder is shared with
other users, tasks set as private can be viewed only by their owner (for details, see chapter 1.8.4).
Co-workers
When a task is created, it can be sent to other people. This feature can be used for several
purposes. For example, it might be desired to inform a superior about a task.
Use the Co-workers tab in the task’s edit dialog box to send the task information to other
people (see figure 1.83). The Co-workers allows creating of a list of persons to whom an
informative email including the task details will be sent when the task is created. The task is
sent when created and then again whenever it is updated by the task owner (the initiator). The
message is set so that if the co-worker to whom the task was sent uses Kerio WebMail, the task
can be saved in the task folder and send a confirmative/rejection message at once.
Co-workers and their addresses can be added to the list by the following methods:
• Use the Select button to search attendees in contacts. Simply look up and add any co-
workers included in your contact folders.
The dialog allows setting of the following options:
90

Figure 1.83 Co-workers
1.8 Tasks
Figure 1.84 Select
Folder
The menu includes all contact folders in the mailbox (including public and subscribed
contacts).
Search for:
Enter a string which will be used as search criteria, i.e. any addresses including the
string will be searched. First letters of first or second name or username (the part
91
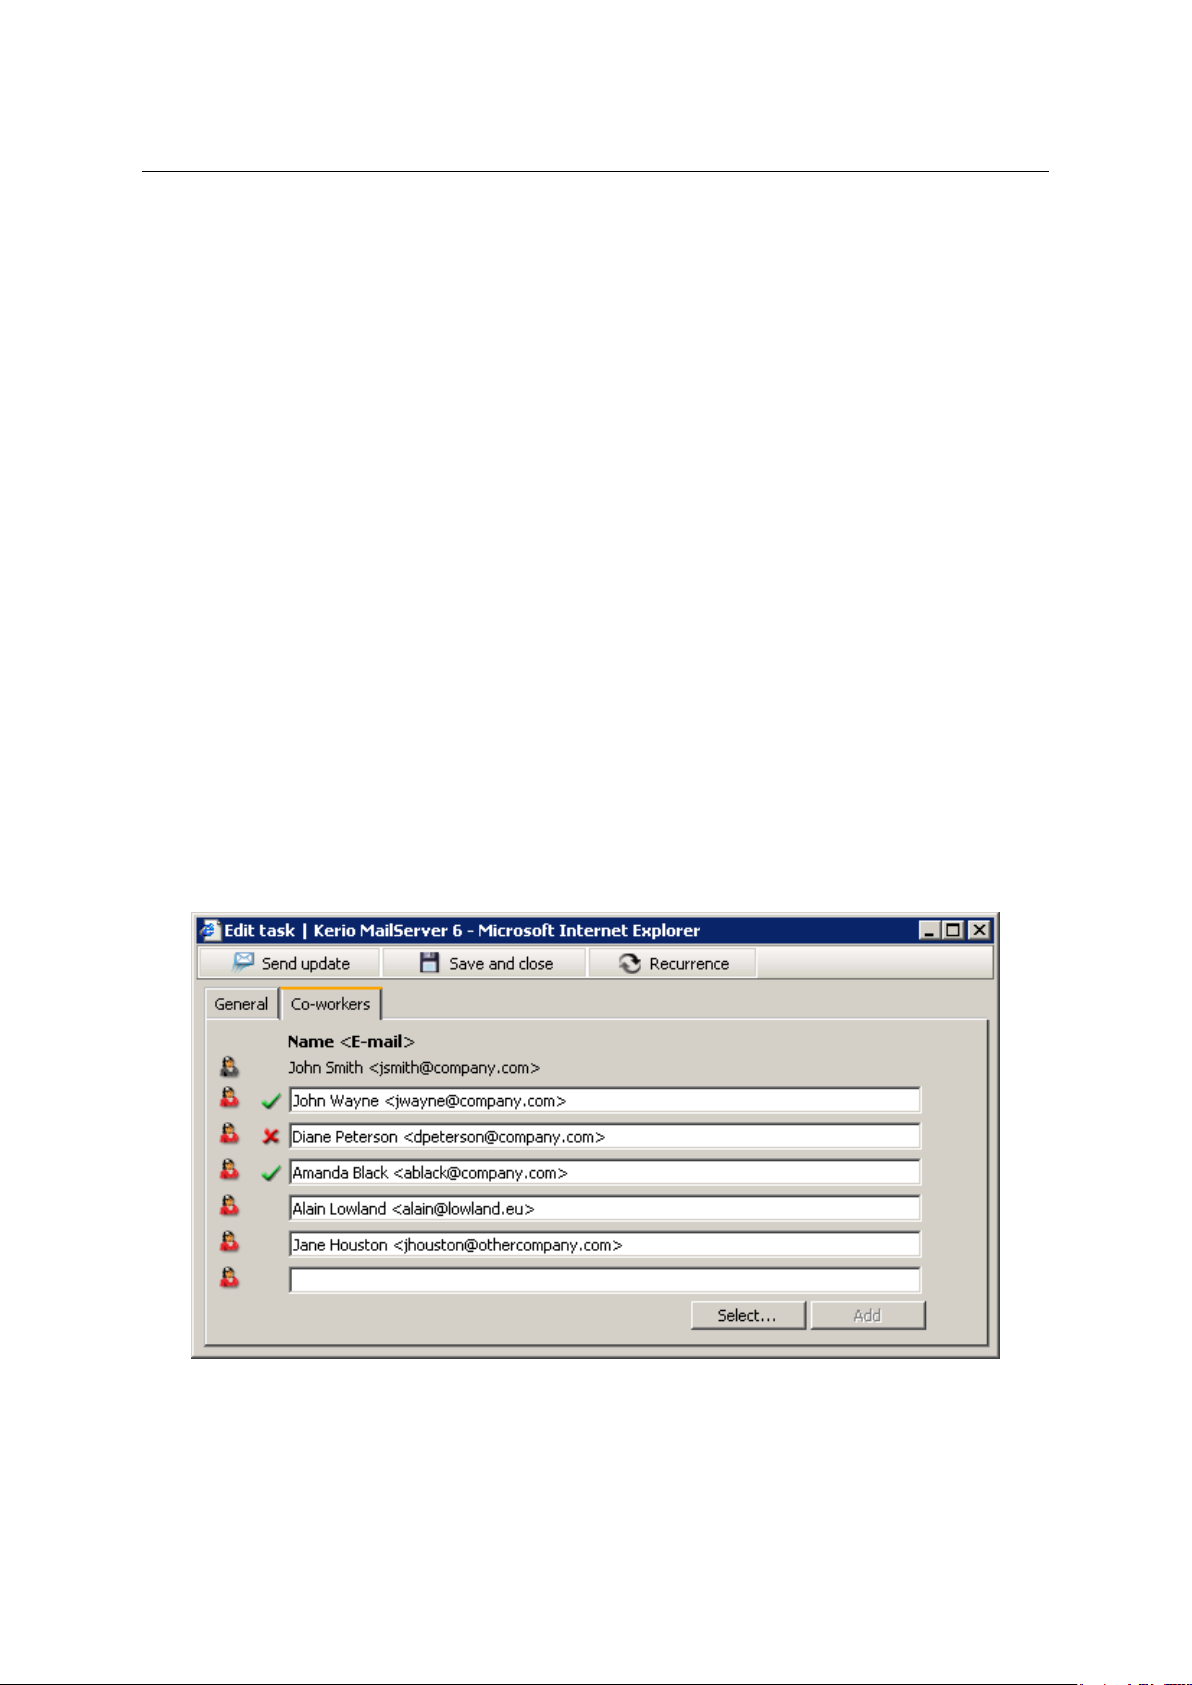
Chapter 1 Kerio WebMail
of address preceding the at-sign) can be used as the string. The search string is not
case-sensitive.
One or multiple addresses can be selected from the list (by clicking on them while holding
the Shift or the Ctrl key) and selected addresses can be added to the co-workers list by
the Co-workers.
Note: Addresses can be also added to the co-workers list by double-clicking on a particular
item.
Once attendees are selected, save settings by the OK button. The dialog is closed and all
selected addresses are listed.
• By the Add button — use the button to add lines where co-workers can be added by hand.
This feature allows add addresses which are not included in any contact folder.
The Add button is not active unless there is at least one line blank where another address
can be added. Once addresses are filled in all entries, the button is activated so that another
line can be added.
Note: The best way is to add a co-worker to the list as Firstname Lastname
<name@company.com>. The email address is sufficient.
Once addresses are filled in and the task definition is completed, the task can be either saved
or sent to co-workers. Co-workers can accept or reject it. Acceptance or rejection status is
shown on the Co-workers tab (see figure 1.85)
Figure 1.85 Task acceptance/rejection
92

1.8 Tasks
Task recurrence
Click The dialog where recurrence can be set is opened by the Recurrence icon provided in the
upper part of the task edit window.
Figure 1.86 Task recurrence
Recurrence pattern
Multiple recurrence patterns are available (daily, weekly, monthly, yearly). Each of these
patterns has different parameters.
Range of recurrence
Set the desired range of recurrence.
• No end date — no end date is set.
• End after ... occurrences — the recurrence is over when the specified number of recur-
rences is reached.
• End by — recurrences happen in the specified time.
1.8.4 Private Tasks
Private tasks are helpful especially for sharing of folders. If the folder is shared with other
users, tasks set as private can be viewed only by the folder’s owner.
Private tasks can be created as follows:
1. Open the New task dialog box.
2. Insert relevant information.
3. On the Settings tab, enable the Private option (see figure 1.82).
4. Save changes by clicking Save and Close.
93
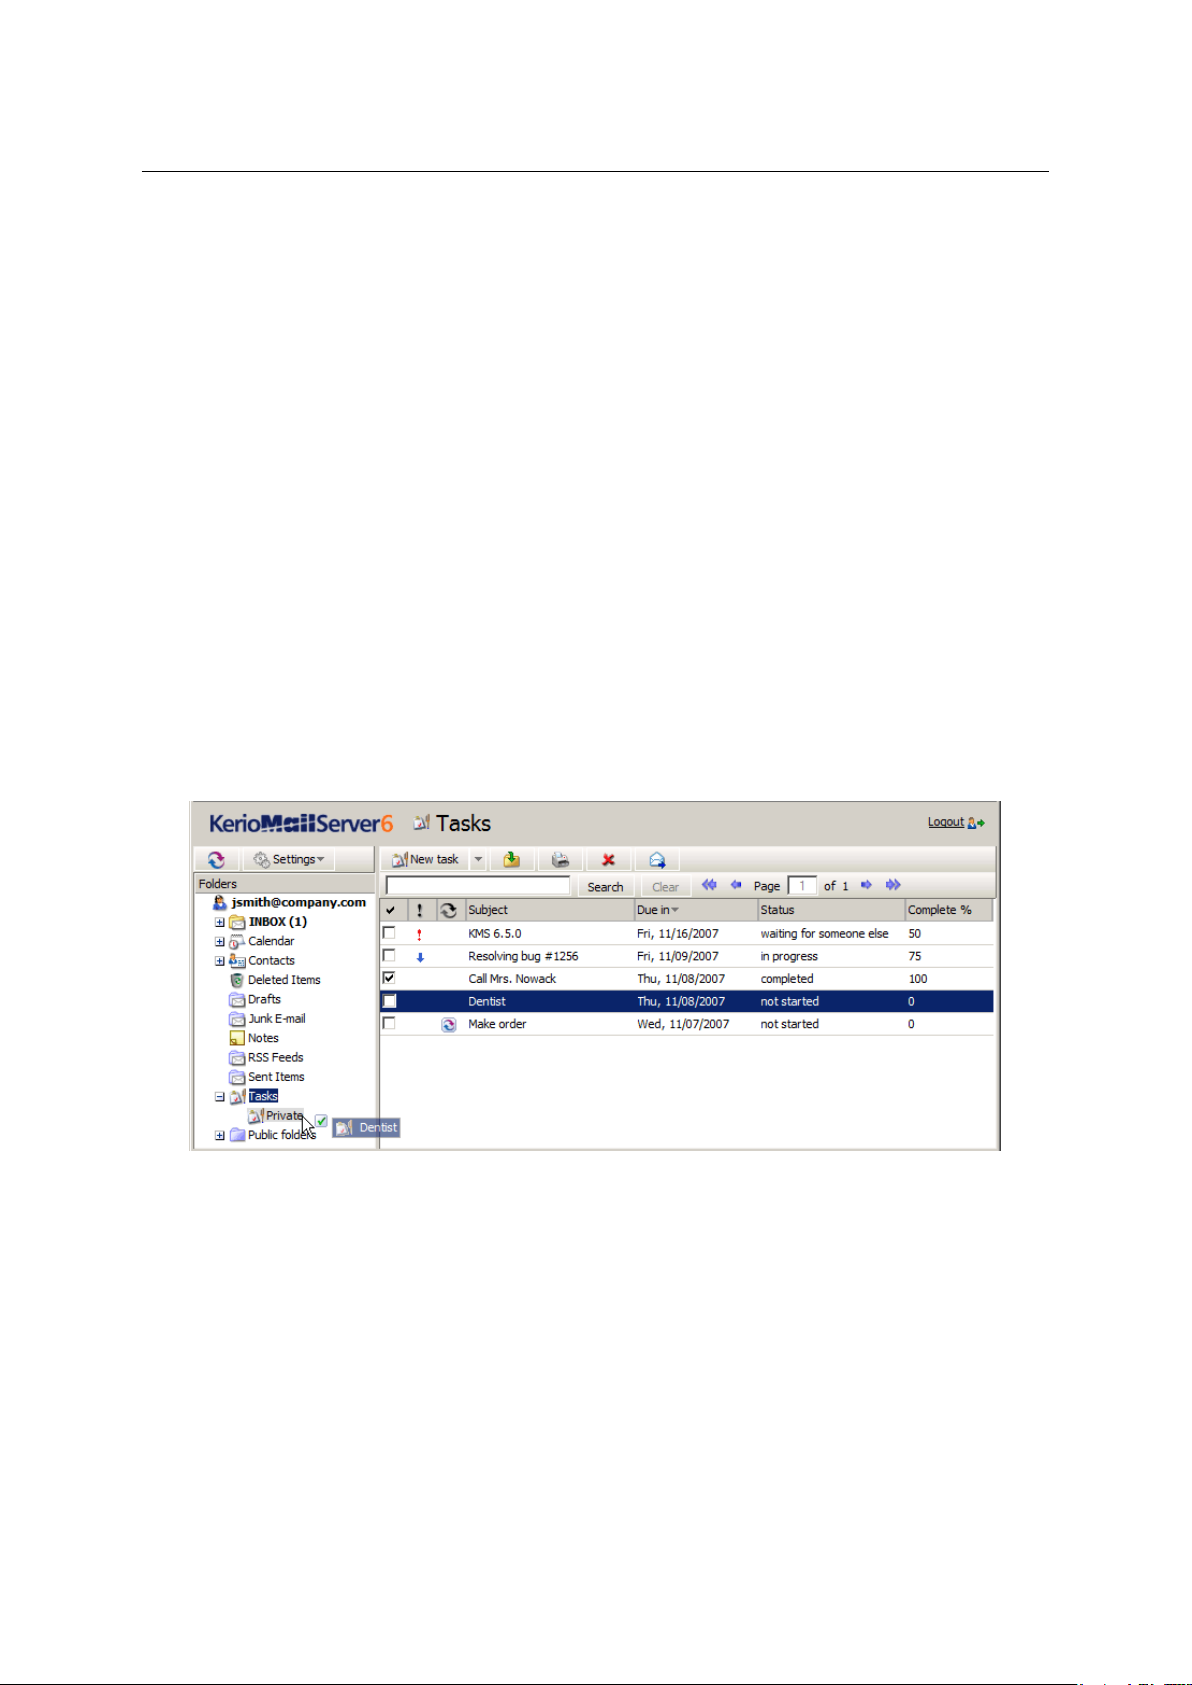
Chapter 1 Kerio WebMail
Warning: Private tasks are treated as private only if the client where private task folders
are viewed supports this feature. In other client applications, it is possible to view and edit
tasks without any restrictions by users with appropriate access rights. This also implies that
information included in private tasks are not well secured.
1.8.5 Moving and copying tasks
Tasks can be moved or copied between folders as follows:
The Drag & Drop method
Drag & Drop is a simple method for moving and copying items by using only the mouse:
1. Hover a task with the mouse pointer and click on the left mouse button. Hold the button
and drag the event over the destination folder. Release the mouse button.
Note: To copy the selected task(s), hold the Ctrl key (or Alt on Mac OS X).
2. Hold down the mouse button (and the Ctrl key, when copying) and drag the task to
another folder.
Figure 1.87 Moving tasks by the Drag & Drop method
3. A green icon appears when the task is ready to move (see figure 1.87) or a blue icon when
ready for copying (see figure 1.88).
4. Let hold of the button to move the task immediately.
Note: Unless the task is dragged over a folder where it can be moved (i.e. any task folder with
appropriate access rights in the folder tree), a red icon is displayed meaning it is impossible
to move the message to the particular location.
94
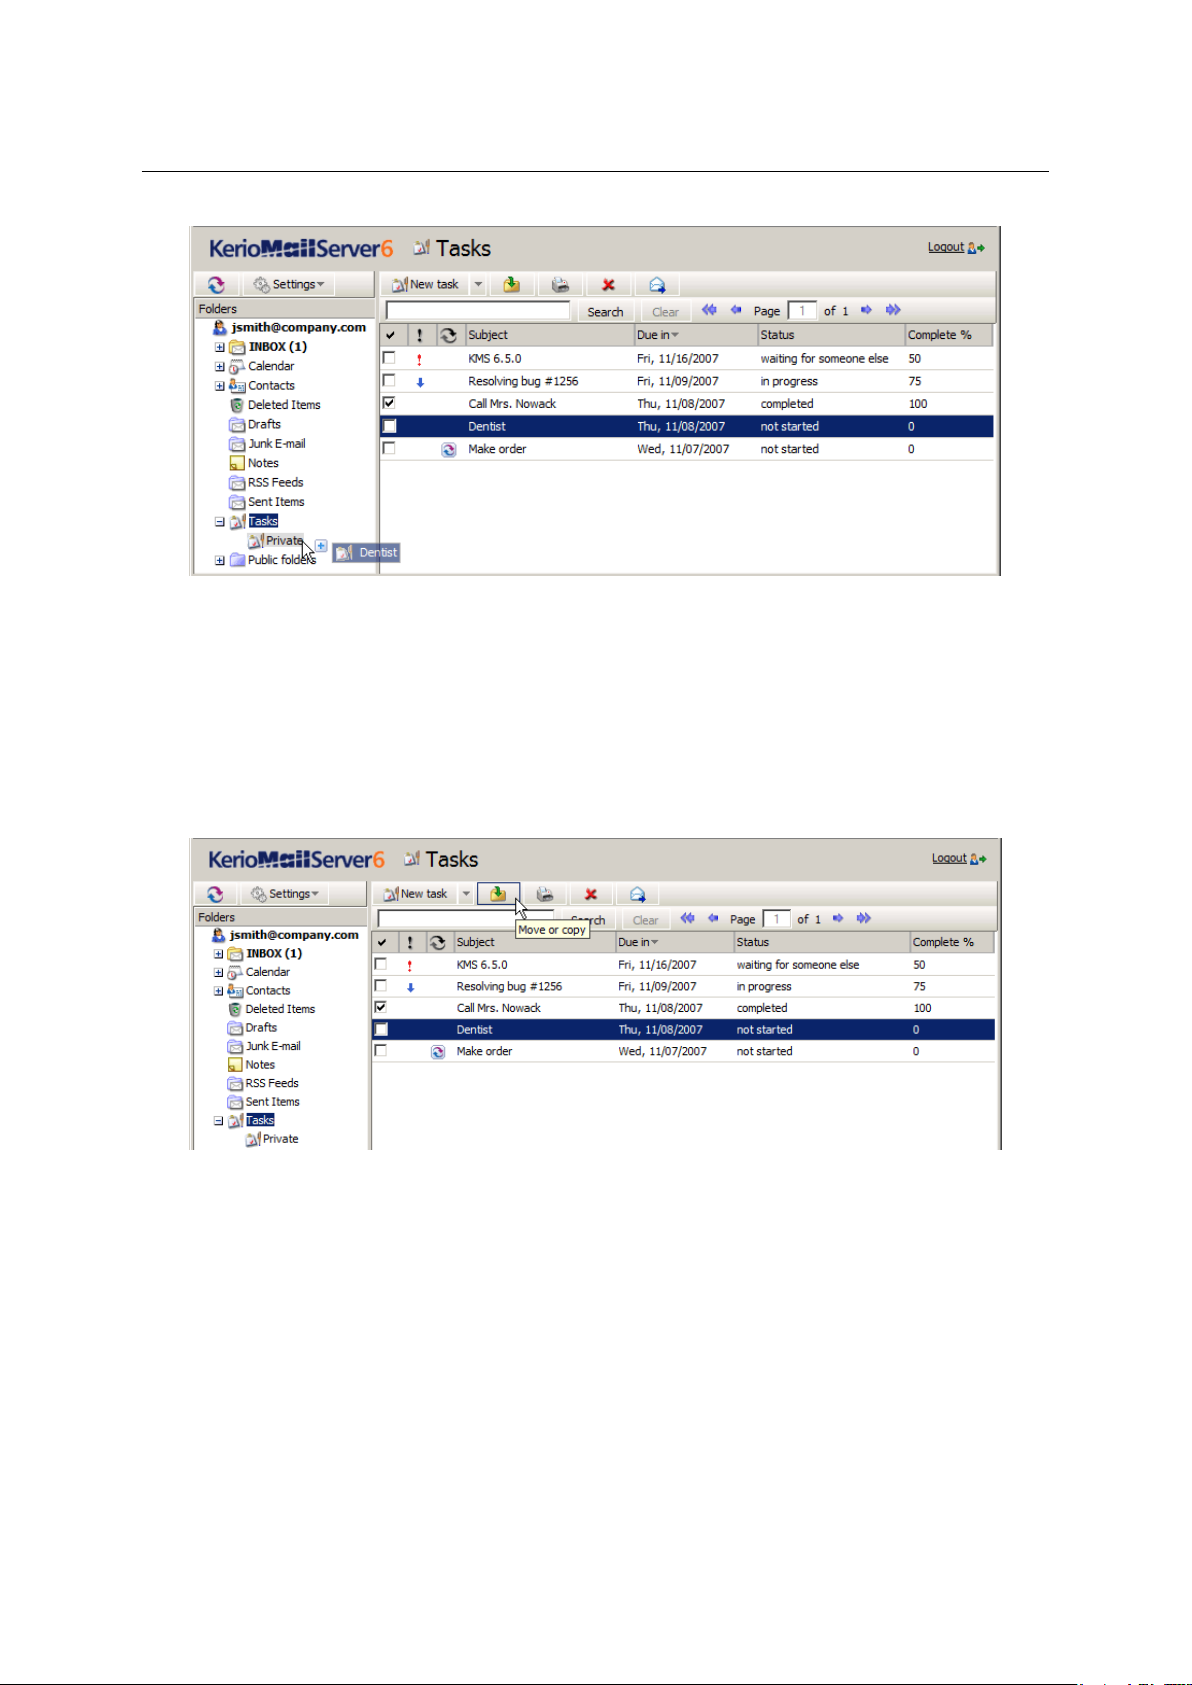
Figure 1.88 Copying tasks by the Drag & Drop method
Using the Move or copy button
The Move or copy toolbar button can be used to move or copy the item, as follows:
1.8 Tasks
1. Use the mouse pointer to select a task and click on the Move or copy button available on
the toolbar (see figure
1.89).
Figure 1.89 Moving/copying tasks by the button on the toolbar
2. In the Folder selection dialog just opened, select the folder where you want to move or
copy the item and click on Move or Copy.
Pop-up menu
The pop-up menu can also be used to move or copy tasks:
1. Right-click a task. In the context menu, select Move or copy (see figure 1.90).
95

Chapter 1 Kerio WebMail
Figure 1.90 Move/Copy tasks using the context menu
2. This opens the Folder selection dialog where you can select a folder where the task will be
move or copied. Click on Move/Copy.
1.8.6 Forwarding tasks attached to email
Kerio WebMail allows forwarding of tasks in such a format so that it is possible to save it to
a task folder. Thanks to this feature we can avoid copying of task data to an email message
and to a new task edit dialog box on the addressee’s side.
Kerio WebMail also supports another option. When a message with an task in the attachment
is received, the recipient can simply click on the attachment to open the task in the standard
task edit dialog box. Click on Save and Close to confirm settings and save the task to the Tasks
folder.
Note: To save a task or open it as an attachment, right-click on it and use one of the options
available, Open or Save.
How to forward a task
To forward a task, select it by the mouse pointer and click on the Forward button on the
task folder’s toolbar (it is also possible to use the corresponding option in the pop-up context
menu).
Select a task and click on a corresponding icon to open a message editor where the task is
included as an attachment.4At this point, simply send the email message.
Warning: Do not forget to enter the recipient’s email address in the To: textfield.
1.9 Notes
Note folders in Kerio WebMail can be used to record simple notes. In non-digital world, these
notes are represented by loads of colourful stickers used as reminders. One of the great
advantages of electronic notes is their central storage and the impossibility of losing them.
Individual notes are organized in a table where users can mark them as completed. Each row
contains one note, as well as available information about it (see figure 1.91).
4
The task will be forwarded in the iCalendar format (.ics).
96

1.9 Notes
Figure 1.91 Notes
Note folders are equivalent to other folders. They can be shared, set as public or attached. For
more information on shared and public folders, see chapter 1.10.
1.9.1 Toolbar
The note folder toolbar contains the following options:
New note
Click on this option to create a note.
Move or copy
Use the button to copy or move a selected note (see chapter 1.9.4).
Print
Click on the Print icon to print the selected note. First, the printed page preview appears;
then the standard Print dialog box is displayed.
Delete
Use this button to delete the selected note. Notes can be deleted also by the Delete key
(in Mac OS X also by Backspace).
Forward
Use this button to forward the selected note to other users.
1.9.2 Viewing the note list
In Kerio WebMail, notes are shown in a list including note names, date of creation and specific
colours. Colours can be important. Each colour stands for a value. Colours can represent for
example topics and areas or levels of importance.
By default, up to 20 notes are listed on one page. To change number of notes displayed on
a single page, use the Settings section in Kerio WebMail (see chapter
1.11.1).
Sorting notes by columns
The detailed information on individual notes is displayed in the columns. Each column enables sorting notes by information. Click the column heading to sort notes in the ascending
or descending order (see the arrow next to the column name) by alphabet, time or colour
(depending on the column contents).
97

Chapter 1 Kerio WebMail
Note: For listing by subject, items are sorted by the alphabet of the language set in Settings as
preferred (the General tab) — for details, see chapter 1.11.1. In result, if for example English
is set as preferred and subjects are in German, subjects will be ordered by English alphabet
and some specific national characters may also cause problems in sorting.
Adding and deleting columns
Users can customize the appearance of the table and the information shown. The columns can
be added or deleted. Right-click the table header and specify the column settings in the Select
fields window. The pop-up menu contains the Change columns option. Checked columns will
be shown in the dialog box, unchecked columns will be hidden.
Adjusting the column width
The width of the note list can be adjusted. To change the column width, click between two
columns in the table header and drag the cursor right or left as needed.
1.9.3 Create and edit notes
To create a new note, click on the New note option on the toolbar. A simple yellow window
is opened. Any text can be written in the note area. The text of the first line is automatically
used as the note’s subject. To separate this line from others, use Enter. The other lines are
not displayed in the list.
Figure 1.92 Note
The note dialog also includes date and time of the creation and a colour pallet which can be
used to select a colour for the current note (yellow is used by default).
The note window can be resized. The parameters set will be kept for future. This means that
the window’s size and position will be kept for the next time the note is opened.
When finished, save the note by the Close button (see figure 1.92).
98

1.9 Notes
1.9.4 Moving and copying notes
Notes can be moved and copied by several methods, as follows:
The Drag & Drop method
Drag & Drop is a simple method for moving and copying items by using only the mouse:
1. Hover a note with the mouse pointer and click on the left mouse button. Hold the button
and drag the note over the destination folder. Release the mouse button.
Note: To copy the selected note(s), hold the Ctrl key (or Alt on Mac OS X).
2. Hold down the mouse button (and the Ctrl key, when copying) and drag the note to
another folder.
Figure 1.93 Moving notes by the Drag & Drop method
3. A green icon appears when the note is ready to move (see figure 1.93) or a blue plus icon
when ready for copying (see figure 1.94).
Figure 1.94 Copying notes by the Drag & Drop method
99

Chapter 1 Kerio WebMail
4. Let hold of the button to move the note immediately.
Note: Unless the note is dragged over a folder where it can be moved (i.e. any note folder with
appropriate access rights in the folder tree), a red icon is displayed meaning it is impossible
to move the message to the particular location.
Using the Move or copy button
The Move or copy toolbar button can be used to move or copy the item, as follows:
1. Use the mouse pointer to select a note and click on the Move or copy button available on
the toolbar (see figure 1.95).
Figure 1.95 Moving/copying notes by the button on the toolbar
2. In the Folder selection dialog just opened, select the folder where you want to move or
copy the item and click on Move or Copy.
Pop-up menu
The pop-up menu can also be used to move or copy notes:
1. Right-click a note. In the context menu, select Move or copy (see figure 1.96).
Figure 1.96 Move/Copy notes using the context menu
100
 Loading...