


www.CookWithKenyon.com
SINGLE ZONE GRILLS WITH INTELLIKEN TOUCH™
OWNERS MANUAL
Created: April 10, 2018
Part # 145439
Contents
IMPORTANT SAFETY INSTRUCTIONS
Product Specifications
Before Using the Grill
Quick Start Tips
Stuffed French Toast
Operation
Indicator Lights
Turning On
Safety Lock Feature
Cooking Mode Options
Heat Level Cooking Mode
Temperature Cooking Mode
Changing Temperature Units
Timer Options
Automatic Shut-Off Time
Temperature Guide
Error Code Readout
Power Cord
Grill Parts
Lid Removal
10
12
12
12
12
13
13
13
14
15
15
16
17
18
19
3
Please read & save
5
these instructions
9
Thank you for choosing Kenyon,
the world’s leading manufacturer
of specialty cooking appliances.
By following the instructions in
this owners manual, your grill will
provide you with many years of
reliable service.
To ensure our ability to continue
serving you, please use this page
to record important product
information.
For quick reference
please keep a
record here:
Installation
Unpacking the Grill
Check Electrical Supply Requirements
Countertop Preparation
Drain Connection
Outlet Location
Final Preparations Prior to Use
Warranty
20
20
21
22
23
23
24
Purchase date
Model number
Serial number
Name plate location
NAME PLATE
LABEL LOCATION
IMPORTANT SAFETY INSTRUCTIONS
Read this section BEFORE operating the grill.
The following information applies to all
KENYON Grills.
THIS GRILL, LIKE ALL APPLIANCES, HAS THE POTENTIAL TO
CREATE SAFETY PROBLEMS THROUGH CARELESS AND
IMPROPER USE. PLEASE OBSERVE ALL OF THE
FOLLOWING SAFETY PRECAUTIONS.
Read ALL instructions prior to using
product.
CAUTION
Do not touch hot surfaces. Use handles or
knobs.
To protect against electrical shock,
do not immerse cord or plugs in water or other
liquid.
Close supervision is necessary when any
appliances are used near children.
Unplug from outlet when not in use and
before cleaning. Allow to cool before putting
on or taking off parts.
Warning: If the surface is cracked, switch off
the appliance to avoid the possibility of electric
shock, for hob surfaces of glass-ceramic or
similar material which protect live parts.
Do not operate appliance with a damaged
power cord or plug. If the appliance
malfunctions, discontinue use. Contact
KENYON Customer Care immediately at
(860) 664-4906.
The use of accessory attachments not
supplied by the manufacturer of the
appliance may cause injuries.
Do not use appliance for other than
intended use.
When used as a portable grill, store indoors
when not in use, out of the reach of children.
Suitable shelter must be provided to
prevent direct exposure to rain. Covers
available.
Do not let cord hang over edge of table or
counter, or touch hot surfaces.
Do not place on or near a hot gas or electric
burner, or in a heated oven.
Extreme caution must be used when
moving an appliance containing hot oil or
other hot liquids.
Always attach plug to appliance first, then
plug cord into the wall outlet. To disconnect,
turn any control to “off”, then remove plug from
wall outlet.
Always place a minimum of one (1) cup of
water in disposable drip tray prior to grilling.
Clean drip tray after each use to prevent
possible fire.
Never leave children alone - children should
not be left unattended around the grill at any
time.
Cleaning and user maintenance shall not
be made by children without supervision.
Allow the grill to cool before taking off
cooking grates, disposable drip trays or lids.
3
IMPORTANT SAFETY INSTRUCTIONS
REMOVE & READ PRIOR TO GRILLING
Do not replace or attempt to repair any part
of the grill, unless otherwise noted in this
manual. All other service is to be performed by a
factory authorized technician.
Ensure grill is installed per instructions
and properly grounded by a qualied
electrician.
Do not use water to extinguish a grease fire,
use dry chemical re extinguisher.
The appliance is suitable for outdoor use.
The supply cord should be regularly
examined for signs of damage, and if the cord is
damaged, the appliance must not be used.
Do not use an extension cord with this
appliance.
Appliances are not intended to be operated
by means of an external timer or separate
remote-control system.
Do not store flammable materials near the
grill.
Fuel, such as charcoal briquettes, are not to
be used with this appliance.
Do not wear loose tting or hanging apparel
when using the grill.
The appliance is not to be used by
persons (including children) with reduced
physical, sensory or mental capabilities, or
lack of experience and knowledge, unless they
have been given supervision or
instruction.
The appliance is to be connected to a
socket-outlet having an earthing contact.
The appliance must be supplied through a
residual current device (RCD) having a
rated residual operating current not exceeding
30mA.
DO NOT DISCARD THESE INSTRUCTIONS, KEEP
THEM WITH THE KENYON GRILL FOR FUTURE REFERENCE.
WARNING!
Charcoal or similar combustible fuels must not be used with this appliance.
QUICK START TIPS
Thank you for purchasing the World’s Finest All Seasons® Electric Grill! Here are a few simple
steps you can take to ensure your good decision will lead to years of World-Class Grilling:
Remove grate(s) and drip tray(s), clean both.
1.
Insert the drip tray(s) into the bottom of grill. Make sure the burner brackets are
2.
not resting on the drip tray(s).
Always fill the drip tray(s) with 16 oz. of liquid. Water will work, but why not try
3.
beer or wine to add flavor to your favorite food. Then re-install cooking grate.
You have the choice of temperature or power setting. Adjust control setting for
4.
type of food, for example:
Vegetables - Temp setting 350°F / Power setting 4
Pork and fish - Temp setting 400°F / Power setting 5
Burgers - Temp setting 500°F / Power setting 9
Steak - Temp setting 550°F / Power setting 16
Preheat grill with the lid closed for 7 to 9 minutes. Enjoy the best grilled food you
have ever tasted!
Once cool, place grate/griddle in the dishwasher along with the dirty dishes so that
5.
it’s ready for its next tour of duty!
While the grate is in the wash, don’t forget to clean out the drip tray contents.
6.
This is an important step in preventing a grease fire.
www.CookWithKenyon.com | 860.664.4906 |
IntelliKEN Touch
™
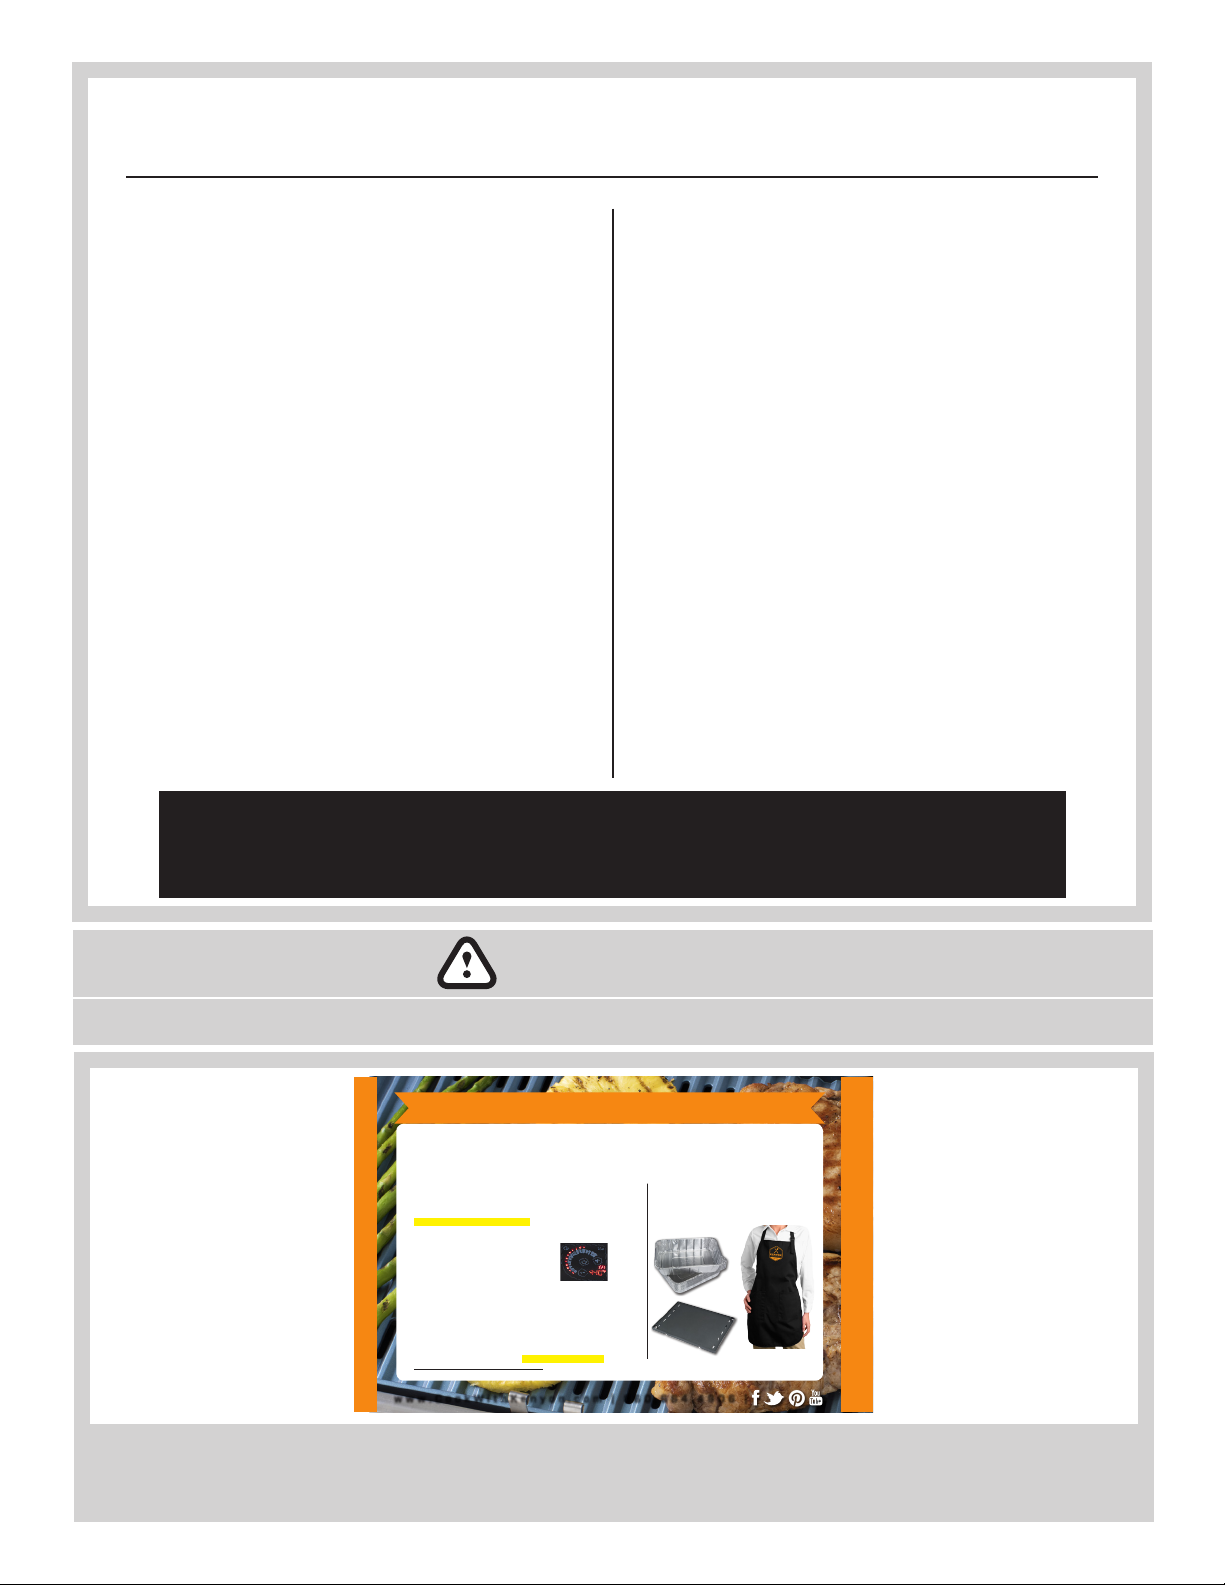
VISIT OUR WEBSITE
to purchase recipe books, cooking utensils,
griddles, grill covers, and more!
THE ABOVE INSERT IS LOCATED UNDERNEATH YOUR GRILL LID.
PLEASE READ INSERT AND REMOVE PRIOR TO GRILL USE.
4
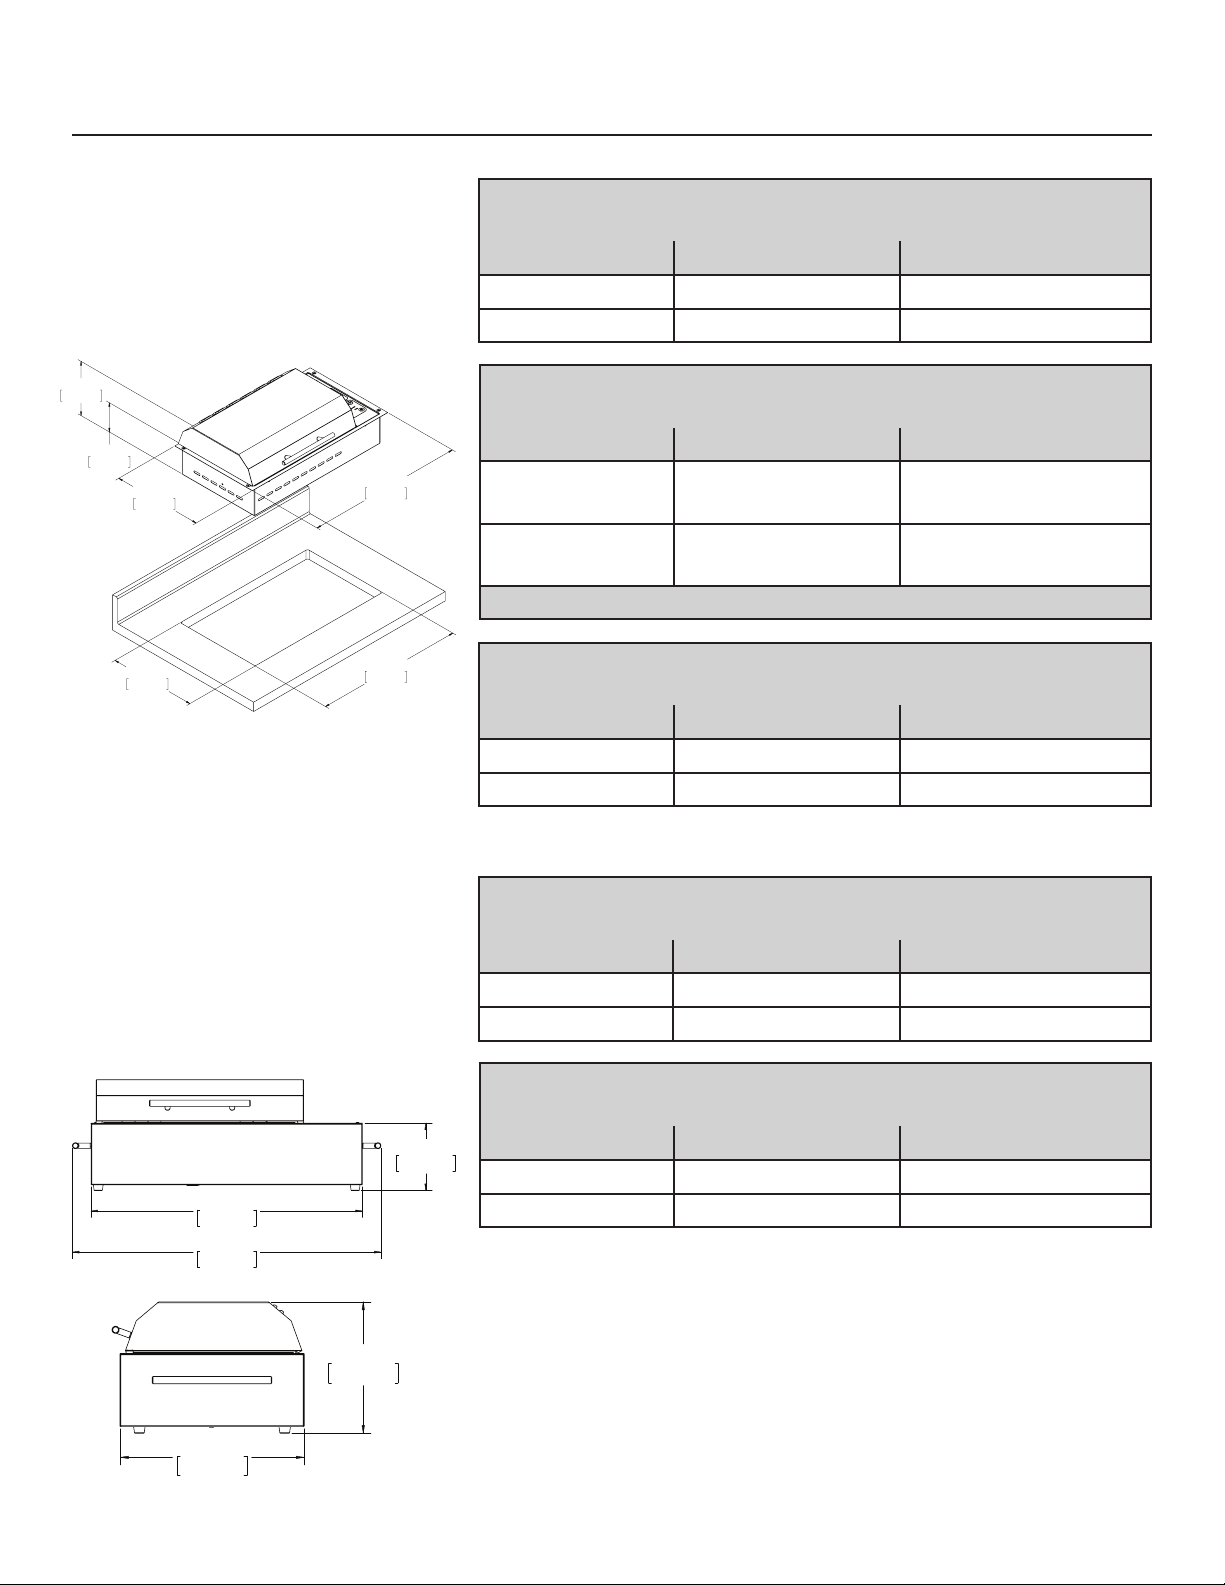
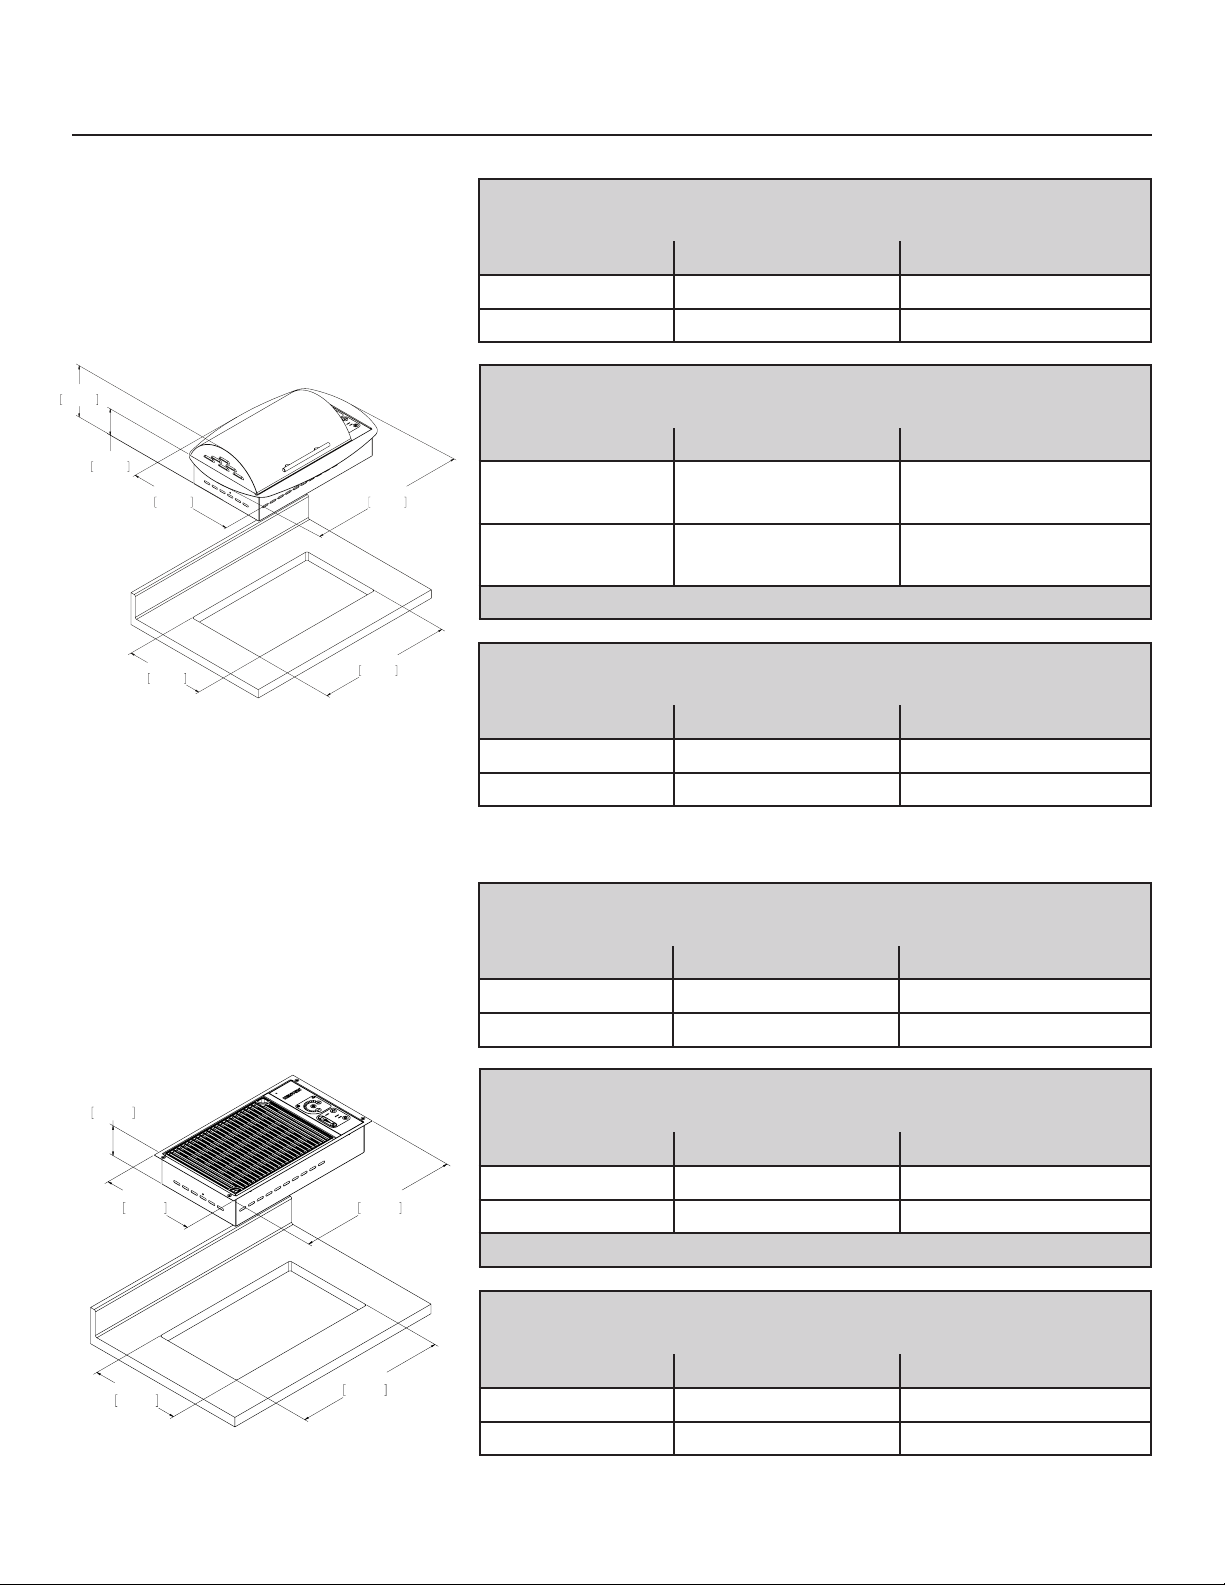
Product Specifications
Frontier Built-in Grill
with IntelliKEN Touch
- Model B70550 (120V)
- Model B70551 (240V)
7 5/16"
185mm
3 15/16"
100mm
12"
305mm
11 5/8"
295mm
21"
533mm
19 3/4"
502mm
™
BURNER DATA
VOLTAGE AMPS OUTPUT IN WATTS
120V AC 11 1300
240V AC 6 1300
PRODUCT DIMENSIONS
WIDTH DEPTH HEIGHT
21” 12” 4 15/16”
(8 5/16” with lid)
533mm 305mm 125mm
(211mm with lid)
Height includes 1” drain tting not visible in drawing
CUTOUT DIMENSIONS
WIDTH DEPTH RADIUS
19 3/4” 11 5/8” 1/4”
502mm 295mm 6mm
Frontier Portable Grill
with IntelliKEN Touch
- Model B70590 (120V)
- Model B70591 (240V)
5 1/4"
133mm
21"
533mm
23 7/8"
606mm
8 9/16"
218mm
12"
305mm
™
BURNER DATA
VOLTAGE AMPS OUTPUT IN WATTS
120V AC 11 1300
240V AC 6 1300
PRODUCT DIMENSIONS
WIDTH DEPTH HEIGHT
21” 12” 8 9/16”
533mm 305mm 218mm
5

Product Specifications
Floridian Built-in Grill
with IntelliKEN Touch
- Model B70580 (120V)
- Model B70581 (240V)
7 5/8"
194mm
3 15/16"
100mm
305mm
11 5/8"
295mm
12"
533mm
19 3/4"
502mm
21"
™
BURNER DATA
VOLTAGE AMPS OUTPUT IN WATTS
120V AC 11 1300
240V AC 6 1300
PRODUCT DIMENSIONS
WIDTH DEPTH HEIGHT
21” 12” 4 15/16”
(8 5/8” with lid)
533mm 305mm 125mm
(219mm with lid)
Height includes 1” drain tting not visible in drawing
CUTOUT DIMENSIONS
WIDTH DEPTH RADIUS
19 3/4” 11 5/8” 1/4”
502mm 295mm 6mm
Floridian Portable Grill
with IntelliKEN Touch
- Model B70582 (120V)
- Model B70583 (240V)
21"
533mm
23 5/8"
600mm
9 5/16"
237mm
™
5 1/4"
133mm
BURNER DATA
VOLTAGE AMPS OUTPUT IN WATTS
120V AC 11 1300
240V AC 6 1300
PRODUCT DIMENSIONS
WIDTH DEPTH HEIGHT
21” 12 1/6” 9 5/16”
533mm 306mm 237mm
12 1/16"
306mm
6
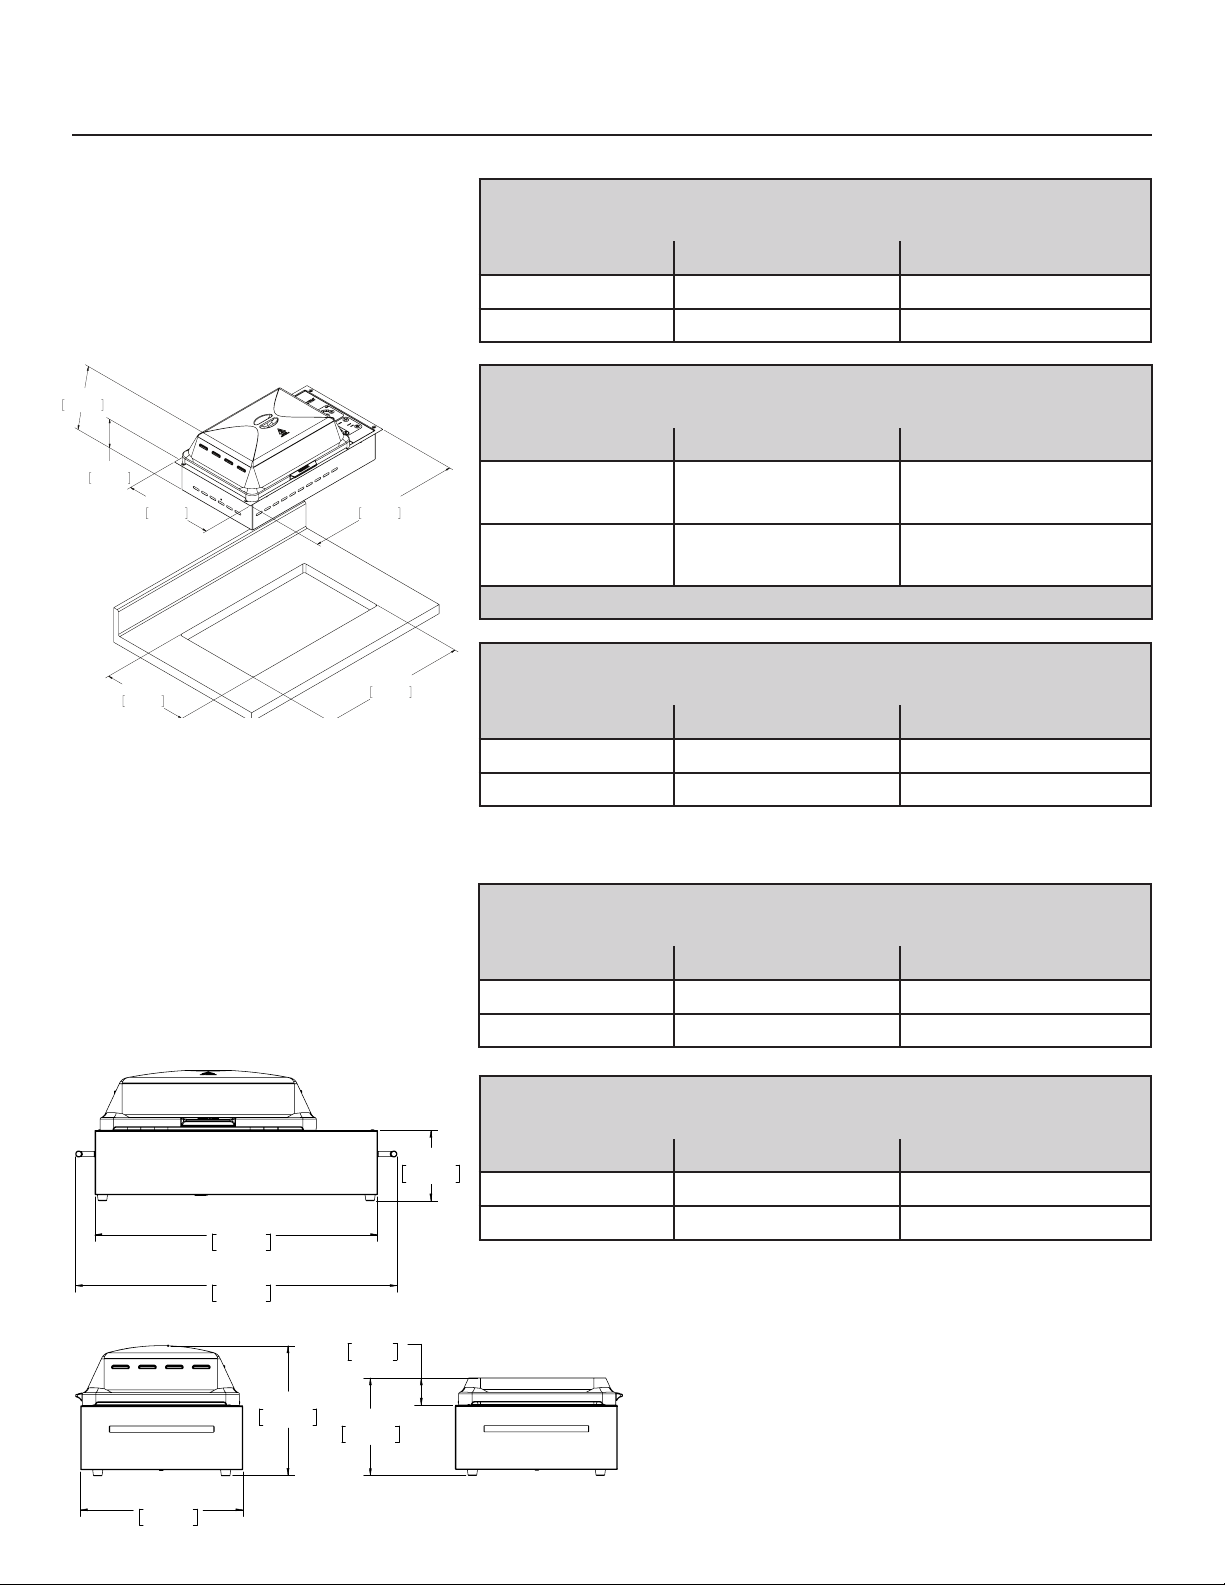
Product Specifications
Rio Built-in Grill with
IntelliKEN Touch
- Model B70585 (120V)
- Model B70586 (240V)
7 5/8"
194mm
3 15/16"
100mm
15 5/8"
397mm
11 5/8"
295mm
™
23 1/16"
586mm
19 3/4"
502mm
BURNER DATA
VOLTAGE AMPS OUTPUT IN WATTS
120V AC 11 1300
240V AC 6 1300
PRODUCT DIMENSIONS
WIDTH DEPTH HEIGHT
23 1/16” 15 5/8” 4 15/16”
(8 5/8” with lid)
586mm 397mm 125mm
(219mm with lid)
Height includes 1” drain tting not visible in drawing
CUTOUT DIMENSIONS
WIDTH DEPTH RADIUS
19 3/4” 11 5/8” 1/4”
502mm 295mm 6mm
No Lid Built-In Grill
with IntelliKEN Touch
- Model B70560 (120V)
- Model B70561 (240V)
3 15/16"
100mm
12"
305mm
11 5/8"
295mm
533mm
19 3/4"
502mm
21"
™
BURNER DATA
VOLTAGE AMPS OUTPUT IN WATTS
120V AC 11 1300
240V AC 6 1300
PRODUCT DIMENSIONS
PRODUCT DIMENSIONS
WIDTH DEPTH HEIGHT
21” 12” 4 15/16”
533mm 305mm 125mm
Height includes 1” drain tting not visible in drawing
CUTOUT DIMENSIONS
WIDTH DEPTH RADIUS
19 3/4” 11 5/8” 1/4”
502mm 295mm 6mm
7
Product Specifications
12 1/16"
306mm
9 5/8"
244mm
D
7
6
5
4
3
2
1
E
F
5 1/4"
133mm
12 1/16"
306mm
9 5/8"
244mm
D
C
6
5
4
3
2
1
E
F
4
3
2
1
E
F
SilKEN® Built-in Grill
with IntelliKEN Touch
- Model B70570 (120V)
- Model B70571 (240V)
8"
203mm
3 15/16"
100mm
11 5/8"
295mm
12"
305mm
21"
533mm
19 3/4"
502mm
™
BURNER DATA
VOLTAGE AMPS OUTPUT IN WATTS
120V AC 11 1300
240V AC 6 1300
PRODUCT DIMENSIONS
WIDTH DEPTH HEIGHT
21” 12” 4 15/16”
(9” with lid)
533mm 305mm 125mm
(229mm with lid)
Height includes 1” drain tting not visible in drawing
CUTOUT DIMENSIONS
WIDTH DEPTH RADIUS
19 3/4” 11 5/8” 1/4”
502mm 295mm 6mm
SilKEN® Portable Grill
9 5/8"
244mm
with IntelliKEN Touch
- Model B70572 (120V)
- Model B70573 (240V)
21"
533mm
23 7/8"
606mm
2"
51mm
7 1/4"
184mm
5 1/4"
133mm
™
BURNER DATA
VOLTAGE AMPS OUTPUT IN WATTS
120V AC 11 1300
240V AC 6 1300
PRODUCT DIMENSIONS
WIDTH DEPTH HEIGHT
21” 12 1/16” 9 5/8”
533mm 306mm 244mm
12 1/16"
306mm
8

Before Using the Grill
Remove the cooking
1
grate and drip tray
from the grill. Wash the
grill with warm soapy water
using a non-abrasive cloth.
USE ONLY HIGH TEMP
PLASTIC UTENSILS
WHEN GRILLING. Visit
our website to purchase a
set of high quality stainless
steel/high temp plastic grill
utensils, www.cookwithkenyon.com.
Make sure the drip tray is inserted all the
2
way into the bottom of grill and electric
element bracket is resting on the element
support bracket.
Cover the bottom of the drip tray with a
3
liquid. Water
is ne. PLEASE
DO NOT USE A
FLAMMABLE
LIQUID! Doing so
would ruin your
cookout. Using
apple juice if you
are grilling pork
adds a nice avor
to the meat. A can
of lime soda is
wonderful if you are grilling sh. Just remember
always add liquid to the drip tray prior to
grilling.
To keep your grill smoke free, always clean
4
the grilling surface after each use. Simply
wash with warm soapy water using
a non-abrasive cloth or place in your
dishwasher. Empty the drip tray and
wipe with a damp paper towel. The
drip tray can be used multiple times
before needing to be replaced.
Preheat grill for 5 to 9 minutes on heat
6
setting for type of food.
• Steak - Temp setting 550˚F/ Power setting 16
• Burgers - Temp setting 500˚F/ Power setting 9
• Pork and Fish - Temp setting 400˚F/ Power setting 5
• Vegetables - Temp setting 350˚F/ Power setting 4
Close the lid and cook. Enjoy the best
7
grilled food you have ever tasted!
Clean up. After the grill has cooled to the
8
touch, take a few pieces of paper towel and
place on the grilling surface. Pour about one
ounce of water on the towel and then using your
high temperature nylon tongs, swab the paper
toweling back and forth to loosen up the residue
from your grilling. Throw the paper towel away
and wipe the grates off with a dry paper towel.
Once the grate has cooled sufciently,
9
remove the grate and place in your
dishwasher for a thorough cleaning.
With the grate removed, lift up the electric
10
elements and remove the drip tray. Empty
the contents of the drip tray in an appropriate
place. Wipe the tray out with a dry paper towel
and reuse the tray. The tray can last for several
uses.
After you have used your grill many times,
11
you may want to wash the lid. It can be
placed in your dishwasher and run on the pots
& pans cycle. This will restore your grill to its
original pristine look.
To clean the grill, rst be sure the cooking
12
surface has cooled enough to handle.
Then remove the grate, lift up the electric
element until it locks in the up position, then
the drip tray.
Place your cooking grate or optional
5
griddle (part #B96000) onto the element
with drip tray installed. Use the griddle for foods
such as eggs, pancakes or my favorite - stuffed
french toast!
9

Before Using the Grill
Wipe the stainless steel
13
surfaces with a damp cloth
to remove any residue from
previous grilling sessions.
Your Kenyon grill came with
14
a sample bottle of stainless
steel cleaner. Use this cleaner
once a month to keep your grill
looking like new.
Stuffed French Toast
16 slices Thin Sliced Bread
1 lb. Cream Cheese (softened)
½ cup Peach Preserves (or your favorite)
4 T. Butter
The touch control area is ceramic glass
15
which is sealed from the effects of rain,
snow and ice. To clean the glass, use a glass
cleaner and soft towel. If stains appear, use a
ceramic glass cleaner which can be found in
your local grocery store.
French Toast Batter:
5 Large eggs thoroughly beaten
1 cup Milk
1 T. Cinnamon, ground
½ t. Allspice, ground
½ t. Coriander, ground
2 oz. Water (Dark Rum, Optional)
In a large bowl place the eggs and beat with a wire whisk. Add the milk and beat again until
incorporated. In a separate smaller bowl pour water or Rum (if you prefer) and add dry ingredients, mix
thoroughly. Once the dry ingredients have been mixed, add to the egg and milk mixture and beat again
until mixed. By doing this you avoid the clumps that come with making batter.
Method of Preparation:
This will require the use of your griddle. Preheat your ‘All Seasons Grill’ on medium high heat (12 bars)
for approximately ten minutes.
Once the cream cheese has softened mix with the peach preserves. Divide equally onto eight slices
of bread and spread evenly. Place the remaining eight slices on top to make a sandwich. When your
griddle has been preheated, add two tablespoons of butter and move around to coat the griddle.
Reserve the rest of the butter for the remaining pieces of French Toast. Take the sandwich and dip into
the mixture and ip it over to coat both sides of your bread.
Quickly do this to three more “sandwiches”. You will now have four pieces of stuffed French Toast on
your griddle.
Be careful not to burn. Flip the sandwiches over and continue cooking until both sides are browned
nicely.
At this point you either serve with some nicely warmed maple syrup and butter, or you can keep warm
in a low oven until you nish the remaining pieces of French Toast.
10

Operation
DO NOT USE WATER ON GREASE FIRES
Smother re or ame or use dry chemical or foam-
type extinguisher.
USE ONLY DRY POT HOLDERS
Moist or damp pot holders on hot surfaces may
result in burns from steam. Do not let pot holder
touch the grate or element of the grill. Do not use a
towel or other bulky cloth in place of a pot holder.
DO NOT COOK ON BROKEN GRILL GRATE OR
GRIDDLE
If the grate should break, grease and oils may
come into direct contact with the electric element
and create a risk of electric shock or re. Contact
an authorized service center or KENYON
Customer Care immediately at
(860) 664-4906.
CLEAN GRILL WITH CAUTION
If a wet sponge or cloth is used to wipe spills on
a hot cooking surface, be careful to avoid steam
burns. Some cleaners produce noxious fumes if
applied to a hot surface. Read the cleaner label for
details prior to using.
DO NOT TOUCH HEATING ELEMENT
OR GRATE
The heating element and grate will be hot for some
time after cooking. These components should be
allowed to cool and then be handled with care and
caution while cleaning, as they may be hot enough
to cause severe burns.
Do not operate appliance with a damaged
power cord or plug. If the appliance
malfunctions, discontinue use and contact the
nearest authorized appliance dealer or the
factory examination, repair or adjustment.
DO NOT USE POTS OR OTHER BAKEWARE ON
THE GRILL
NEVER LEAVE GRILL UNATTENDED AT HIGH
HEAT SETTINGS
High heat setting may cause heavy smoking and
ignite grease.
CLEAN GRILL AFTER EACH USE
This appliance is equipped with removable,
disposable drip tray. The drip tray MUST be
removed and cleaned after each and EVERY
use. Do not allow grease to accumulate between
cooking. The drip tray and bafe tray MUST be
used when cooking on the grill. Excessive grease
may spill over into the interior of the grill, voiding
your warranty and posing a re hazard.
DO NOT CLEAN UNIT WITH PRESSURIZED
WATER
Never clean the grill with any form of pressurized
water or other types of cleaners. Doing so will
void the warranty and may pose a serious risk of
electric shock. Always clean the grill with a cloth
and a stainless steel or glass surface cleaner.
STORAGE
When used as a portable grill, store indoors
when not in use. When used as a built-in grill,
suitable shelter must be provided to prevent direct
exposure to rain. Covers available.
TO PREVENT SMOKE
To prevent the contents of the drip tray from
smoking, place 1 cup of water (or enough to cover
the bottom of the pan) in the drip tray before
cooking.
THIS APPLIANCE IS NOT INTENDED TO BE
OPERATRED by means of external timer or
separate remote-control system
THIS APPLIANCE IS INTENDED TO BE USED
IN HOUSEHOLD AND SIMILAR APPLICATIONS
SUCH AS:
- Staff kitchen areas in shops, ofces and other
working environments;
- Farm houses;
- By clients in hotels, motels and other residential
type environments;
-Bed and breadfast type environments
KEEP THESE INSTRUCTIONS WITH THE GRILL
FOR FUTURE REFERENCE
11

Operation
Indicator Lights
There are a series of lights that provide
indications of element operation and hot
surfaces.
These lights are located adjacent to the control
panels. When the control is ON, a LED light
array will illuminate indicating that the element
is on.
For your safety, we have incorporated a “HOT”
indicator light. When lit, this light indicates that
some part of the cooking grate is too warm to
touch or place articles upon.
Do not place articles on the cooking surface
while this light is glowing.
Safety Lock Feature
The lock feature can be activated as a safety
measure at any time whether the grill is ON or
OFF.
When the Grill is ON:
Locking the grill when it is ON will deactivate
the power settings from adjusting up or down.
Pressing either the zone power or the master
power button will turn off the grill even when
the lock is on.
When the Grill is OFF:
Locking the grill when it is off will deactivate
all functions of the control panel until it is
unlocked. The master power button will not
power on the grill when the lock is on.
After turning off the element, the “HOT”
indicator light will remain illuminated until the
cooking grate is safe to touch.
Turning On
Touch the controls rmly with the at part of
your ngertips.
With the unit unlocked, touch the POWER
button in the main control frame. Activate
the element by holding the element power
button in the control frame for 2 seconds and
choosing a cooking option. If the element is
not activated within 15 seconds, the grill will
de-power by itself.
Cooking Mode Options
The grill element can be independently
operated by either a heating level ranging from
low to high, or by setting a specic cooking
temperature.
12

Operation
Heat Level Cooking Mode
With the main power on and the element
powered on, swipe your nger along the
temperature control arc and release at the
desired setting. The settings range from
LOW-MED-HIGH in 16 increments, as
indicated by the LED light array that
illuminates along the control sweep. Also, the
arc + and – signs can be toggled to select the
desired heat level. The LED light array will
indicate the selected setting.
The default heat level upon starting any
element is 0. If the element is set or remains at
0 for 15 seconds of inactivity, the element will
de-power.
16 LED LIGHT ARRAY
ELEMENT CONTROL FRAME
Temperature Cooking Mode
Select the temperature cooking mode by
touching the thermometer/gradient graphic.
Select the desired cooking temperature,
ranging from 150° to 550°F (65° to 287°C),
in 10°F (12°C) increments. The selection can
be made by pressing + or – buttons for each
increment change, or swiping the arc. The
selected cooking temperature value will
illuminate and ash in the control frame while
the selection is in progress. The value will
ash until the temperature is reached. After
the temperature has been reached the value
will illuminate steady, and the cooking
temperature will remain set unless it is
changed. The default temperature setting is
always 150°F (65°C) upon startup in
temperature cooking mode.
+ BUTTON
LED LIGHT ARRAY
- BUTTON
HEATING LEVEL CONTROL SWEEP
Changing Temperature
Units
The temperature units can be changed from
Fahrenheit to Celsius by touching the °F/°C
button in the main power control frame. The
chosen default units will remain with every use
unless changed.
SAFETY LOCK FEATURE
TEMPERATURE UNIT
SELECTOR BUTTON
MAIN POWER
CONTROL FRAME
13

Operation
Timer Options
Kitchen Timer
The kitchen timer is a general timer that has
many uses around the kitchen, independent of
cooking activity on the grill.
Activate the main power and touch the timer
clock graphic within the element control frame.
Set the desired time duration by touching the
+ and – buttons, holding the button to increase
or decrease the setting. A beep will sound at
the start of the setting and the set time will
display in the control fame. The time
increments will run from 1-10 minutes in
1 minute increments, and then change to
5 minute increments. The time reading will
speed up as the touch is held. Touch the timer
button again to start. If no time is set, the timer
will deactivate after 20 seconds.
As the set time elapses, the display will show
the time remaining in minutes until it reaches
one minute, after which the display changes
to seconds remaining to zero. The display
will ash and a double beep alarm will sound
every ten seconds until the power button is
touched or after 3 minutes, the ashing display
and alarm will deactivate.
Cooking Timer
The cooking timer can be activated to shut the
heating element off at the end of the set time.
At any time during cooking, set the desired
time duration by rst touching the clock
graphic then touching the + and – buttons,
holding the button to increase or decrease
the setting. A beep will sound at the start of
the setting and the set time will display in the
control fame. The time increments will run from
1-10 minutes in 1 minute increments, and then
change to 5 minute increments.
The time reading will speed up as the touch is
held. Touch the timer button to start. If no time
is set, the timer will deactivate after 20
seconds and normal cooking will resume.
As the set time elapses, the display will show
the time remaining in minutes until it reaches
one minute, after which the display changes to
seconds remaining to zero. The burner will
automatically shut-off and stop cooking at the
end of the set time. The display will ash and
a single beep alarm will sound every ve
seconds until the power button is touched,
within 30 seconds. After 30 seconds of no
activity after the time has elapsed, the timer
will shut off.
KITCHEN AND COOKING TIMER
TEMPERATURE COOKING
MODE BUTTON
COOKING TEMPERATURE
READOUT
14

Operation
Automatic Shut-Off Time
The table below displays the automatic shut-off
time corresponding to each heat setting.
AUTOMATIC
SETTING
1 90
2 90
3 90
4 90
5 70
6 70
7 70
8 70
9 70
10 70
11 60
12 60
13 60
14 60
15 60
16 60
SHUT-OFF (min)
Temperature Guide
The following is meant to be a guideline.
Factors such as wind, and outside temperatures,
food temperature when placed on grill can affect
cooking times. The grill is designed and
engineered for optimal cooking performance
with the lid down or closed.
SETTING FOOD TYPES
1-2
3-4
5-6
7-8
9-10
11-12
13-14
15-16
Fried eggs on griddle
Pancakes - French toast on griddle
Vegetables
Vegetables - Fish
Fish - Chicken
Chicken - Hamburgers
Hamburgers - Steaks
Steaks
15

Operation
SINGLE ZONE GRILL WITH INTELLIKEN TOUCH™
MAINTENANCE
The Kenyon Single Zone Grill with IntelliKEN Touch™ is a sealed unit that does not require regular
maintenance. Please follow our operating instructions as mentioned above. If your grill requires
service, this must be preformed by Authorized Personnel only.
Please call Kenyon Customer Care at 860-664-4906.
Error Code Readout
De-power and re-start the unit to clear the
In the event that the Grill is not operating
correctly, the control readout will display an
error code that will identify the problem. If an
error code is shown on the display, identify the
code in the Troubleshooting Index below and
take action as noted.
display. Allow the unit to cool as necessary.
Lock out the main power supply to the unit by
closing the breaker before performing any
wiring operations. If the problem persists,
please call Kenyon Customer Care at
860-664-4906, M-F, 8AM – 5PM EST or email
at customercare@cookwithkenyon.com.
TROUBLESHOOTING INDEX
ERROR CODE DESCRIPTION ACTION TO REMEDY ERROR
E04
E06
E07
E08
E09
E10
Unit operating at high
temperature.
Internal electronic control issue. Refer to Kenyon Customer
More than two control functions
activated at the same time for
three seconds, unit de-powered.
Allow unit to cool. Ensure
correct cooking utensil type is
used. Lower the cooking level or
temperature setting.
Care.
Re-power unit and command
one control input at a time.
16

Operation
Power Cord
THIS PERTAINS TO 120V
MODELS ONLY
Ground Fault Circuit Interrupter (GFCI)
The GFCI is a safety device designed to protect
the user from any electrical shock hazard.
Indicator Light
The indicator light will stay illuminated when
electrical power is applied and indicates that the
GFCI is working properly.
Test/Emergency Off Button
Pressing this button will test the GFCI. The
indicator light will go out and electrical power will
not be supplied to the grill. The GFCI should be
tested monthly.
GROUNDED 3-PRONG PLUG
Reset Button
Pressing this button will reset the GFCI to
its normal function. The indicator lamp will
illuminate and electrical power will be supplied to
the grill. If the indicator lamp does not illuminate,
the GFCI has detected a malfunction. Unplug
the GFCI from the receptacle and do not use the
grill.
Grounded 3-Prong Plug
CAUTION - To ensure continued protection
against risk of electric shock, the GFCI must be
plugged into a properly grounded
receptacle.
DO NOT USE AN EXTENSION CORD
IMPORTANT!
240V MODELS
GROUND FAULT CIRCUIT
The supply voltage circuit (240V) should
be equipped with a ground fault circuit
interrupter. Check local codes
for compliance.
INDICATOR
LIGHT
RESET
BUTTON
TEST
BUTTON
Ground Fault
Circuit Interrupter
GFCI
17

Operation
Grill Parts
Heating Element
The heating element is designed to pivot as
shown to remove/replace the bafe tray and drip
tray. It will stay in the up position. To put down
apply slight downward pressure.
Baffle Tray
The bafe tray supports the drip tray, heating
element and grate and must always be used
when operating the grill.
Drip Tray
The disposable drip tray collects all the fat and
juices created during the cooking process. The
drip tray must be emptied after each use. When
replacing the drip tray, position the drip tray so
that it is completely contained inside the bafe
tray and ensure that the side of the rim of the
drip tray does not protrude outside of the bafe
tray. Refer to image below.
GRATE
DRIP TRAY
DRIP TRAY MUST BE CONTAINED
INSIDE OF BAFFLE TRAY AS SHOWN
To prevent the contents of the drip tray
from smoking, place 1 cup of water (or
enough to cover the bottom of the pan)
in the drip tray before cooking. The
replacement for the disposable drip tray is
Kenyon part #B96001.
Grate
The grate must be cleaned after every use.
The grate has a nonstick coating for ease of
cleaning. Wash the grate after each use in warm
soapy water.
BAFFLE
TRAY
HEATING
ELEMENT
18

THIS PERTAINS TO SilKEN®
PORTABLE & BUILT-IN GRILLS
The SilKEN® Grill incorporates a high
temperature silicone lid. Through the use of
silicone, the lid can collapse accordion-style to a
height of two inches.
There are two handles on the lid, one on the
top and one on the front edge with vents on
three sides. Use the front handle when the lid is
hinged. The top handle is used to collapse and
expand the lid into the desired height.
Lid Removal
Operation
With the quick release pin removed, grasp the
lid, lifting on the left side to clear the hinge and
slide it to the left until clear of the hinge pin on
the right. Once the lid is removed, it can be
washed in warm, soapy water.
The lid is removable for cleaning. To remove the
lid, slide the quick release pin out of the hinge.
QUICK RELEASE
PIN
WARNING!
Grill must cool completely before
collapsing the silicone lid.
19

Installation
Unpacking the Grill
Carefully unpack the grill from its
1
shipping container.
Verify and identify the package contents.
The following items should be included in the
carton. If any components are missing or
damaged, call KENYON immediately.
Check the Electrical Supply
Requirements
This product must be installed in accordance
2
with national, state and local electric codes.
The following table provides the correct voltage,
amperage and frequency that must be supplied
to the grill. The means for disconnection must
be incorporated in the xed wiring in accordance
with the wiring rules.
PARTS INCLUDED
IntelliKEN Touch™
Grill
3 feet of drain hose
with brass fitting
(1) Stainless
steel cleaner
(4) Mounting
screws
KENYON
PART NUMBER
B70550
B70560
B70570
B70572
B70580
B70582
B70585
B70590
B70551
B70561
B70571
B70573
B70581
B70583
B70586
B70591
ELECTRICAL SUPPLY REQUIREMENTS
MAX CONNECTED
LOAD
1300 Watts 120V AC 11A 60Hz
1300 Watts 240V AC 6A 60Hz
POWER SUPPLY
INPUT
PLUG
TYPE
3 Prong Grounded
Cord with GFCI
3 Wire Cord
No Plug
WARNING!
If the electrical supply does not meet the product specifications, consult with a licensed
electrician before proceeding with installation! Do not remove the GFCI device from the
supplied power cord under any circumstances.
20

Installation
Countertop Preparation
Your IntelliKEN Touch™ Grill is supplied
3
with a factory installed polished stainless
steel ange that accepts four oval head wood
screws for mounting. The trim ange of the grill
is designed to hold the unit rmly in place in the
countertop. If desired, you may seal the edge
of the countertop beneath the trim ange. We
recommend a NON-ADHESIVE such as
Plumber’s Putty. This will help reduce the chance
of damage to the trim ange should the unit
need to be removed from the countertop. Should
you need to remove the unit from the countertop
after installation simply take a piece of shing
line and run back and forth under the trim ange
to break the caulk bond.
WARNING!
D - 30 inches minimum clearance between the
top of the cooking surface and the bottom of an
unprotected wood or metal cabinet or 24 inch
minimum clearance when the bottom of the
wood or metal cabinet is protected by not less
than 1/4-inch-thick ame retardant millboard
covered with not less than No. 28 MSG
sheet steel, 0.015-inch-think stainless steel,
0.024-inch-thick aluminum or 0.020-inch-thickcopper.
E - 6-inch minimum from backsplash of
countertop to edge of grill (refer to page 5 thru 8
for overall grill dimensions). 1-1/2 inches
minimum from front of counter to grill.
Allow a 2 inch (2”) minimum clearance
between the bottom of the grill and
combustible surface located below, ie:
the upper edge of a drawer installed
below the grill (see page 22). Failure
to provide proper clearances and
ventilation may result in a fire hazard.
PLEASE READ THIS SECTION PRIOR TO
MAKING CUTOUT FOR THE GRILL.
It is important to plan ahead for installation of
the grill, keeping the following dimensions in
mind.
A - 13 inches maximum depth of overhead
cabinets
B - 36 inches is minimum height of
countertop above oor
C - The minimum at countertop surface that the
grill will rest upon must be equal to or greater
than the overall grill dimensions (refer to page 5
thru 8 for overall grill dimensions).
FOR INSTALLATIONS IN CANADA:
“Do Not Install Closer Than 1/2 Inch
(12mm) From Any Adjacent Surface”, and
NE PAS INSTALLER A’MDINS DE 12MM
DETOUTE SURFACE ADJACENTE.
21

Installation
WARNING!
To eliminate the risk of burns by
reaching over heated surface units,
cabinet storage space located above
surface units should be avoided. If
cabinet storage is to be provided, the
risk can be reduced by installing a
range hood that projects horizontally
a minimum of 5” beyond the bottom of
the cabinets.
Before making the countertop cutout, check for
clearance. Check to see if the grill will clear
the front and side walls of the base cabinet. It
is also important to provide enough ventilation.
Adequate ventilation of the space below the
countertop must be provided to ensure proper
operation of the grill. Heat transferred from
the grill bottom pan during operation will overheat an improperly ventilated area.
The putty is hidden under the ange, lip, or
edge of the grill and is not visible when the grill
is installed. If caulk were used instead of putty,
it would be difcult to access these areas to cut
through the caulk to remove the part.
Plumber’s Putty is a very inexpensive material
that is sold in small plastic tubs. It is always
shaped by hand before it is applied to the
plumbing part. Follow the basic instructions on
the container of the Plumber’s Putty. If your
countertop is made of granite, marble, quartz,
sandstone or Corian use a stain-free Plumber’s
Putty to prevent the staining of the countertop.
Drain Connection
For your convenience, the grill is equipped
4
with a 1/2” NPT brass pipe tting and 90º
brass elbow which you can attach the 5/8” ID
exible hose that came with your grill. The
portable version of the grill comes with a brass
pipe plug installed in the drain tting. If you are
using your grill as a portable unit, save the hose
and 90º brass tting for possible installation in
the future.
2 INCH (51mm) MINIMUM
When making countertop cutout, radius the
corner to help prevent cracking of the countertop
material. A 1/4 inch radius is typical, but follow
the countertop manufacturer’s instructions
regarding the minimum radius and any
reinforcements required to prevent damage to
the countertop over time.
Use Plumber’s Putty to seal grill to countertop.
Plumber’s Putty is a soft, pliable sealing
compound that is used to make watertight seals
around faucets, drains, and other plumbing
parts.
Drain fitting for 5/8” ID hose
22

Installation
Outlet Location
Be sure the electrical outlet intended for the
5
grill is in an easily accessible location. This
allows the user to easily plug and unplug the
grill. This is necessary to ensure safe cleaning
and storage of the grill.
Suggested
Outlet
Locations
Final Preparations Prior
to Use
Remove the protective plastic lm from the
6
lid, trim ange and glass panel. Clean the grill
before you use it for the rst time. A thorough
cleaning with a stainless steel or glass cleaner
will remove any traces of plastic lm adhesives
and manufacturing oils.
Wash the nonstick coated grates in warm
soapy water before using the grill.
23

KENYON
StatementofWarranty
Kenyon International, Inc (the “Company”) warrants its products in normal usage to be free of defects in
materials and workmanship subject to the conditions and limitations below.
Any part, which proves to be defective in normal usage during the warranty period will be repaired or replaced by the
Company.
In order for product to be covered under this warranty it must be returned to the Company for evaluation. Please
contact kenyonservice@cookwithkenyon.com for return instructions.
This warranty covers certain products built by the Company and is subject to the following conditions and
limitations:
1. The Company’s liability shall be limited to repair or replacement (choice of remedy at Company’s option) of
2. Determination of suitability of the product for the use contemplated by the Buyer is the sole
responsibility of the Buyer and the Company shall have no responsibility in connection with such
suitability.
3. The Company shall not be liable for any damage resulting from:
• failures due to use of the product in applications for which they are not intended;
• failures due to corrosion, wear and tear, abuse, neglect, improper installation or maintenance;
4. The Company shall be responsible for ground shipping charges to the location of the appliance (home)
within the Continental United States and Canada. Any duties, express or special shipping charges are
at the expense of the Buyer.
5. All labor allowed by the Company under this warranty must be pre-authorized and performed by an Authorized
THERE ARE NO OTHER WARRANTIES OF MERCHANTABILITY, FITNESS FOR PURPOSE OR ANY
OTHER KIND, EXPRESSED OR IMPLIED AND NONE SHALL BE IMPLIED BY LAW. The duration of any such warranties
that are nevertheless implied by law for the benefit of a consumer, shall be limited to a period of three years from original
purchase by the user. Some countries do not allow limitations on how long an implied warranty lasts, so this limitation may
not apply to you.
THE COMPANY SHALL NOT BE LIABLE FOR CONSEQUENTIAL OR INCIDENTAL DAMAGES ARISING FROM THE
BREACH OF THIS WARRANTY, WHETHER EXPRESSED, IMPLIED OR STATUTORY. Some countries or states do not
allow exclusion or limitation of consequential or incidental damages so this limitation or exclusion may not apply to you.
THIS WARRANTY GIVES YOU SPECIFIC LEGAL RIGHTS AND YOU MAY ALSO HAVE OTHER LEGAL RIGHTS THAT
MAY VARY FROM COUNTRY TO COUNTRY AND STATE TO STATE.
electronic components as may be defective in materials or workmanship. This liability is limited to three years from
the date of original installation or 42 months from invoice date, whichever comes first; this warranty covers parts
and labor at pre-approved rates. Stainless steel is warranted with a lifetime guarantee to be rust free when cared
for monthly as outlined in owner’s manual. If corrosion begins, contact the Company with photo evidence of
corrosion for replacement components.
• failures due to breakage of glass, accidental or otherwise.
Kenyon International Service Center, unless otherwise specified in writing by the Company.
Kenyon International, Inc.
P.O. Box 925 • 8 Heritage Park Road • Clinton, CT 06413 USA
Phone (860) 664-4906 FAX: (860) 664-4907
SAVE THESE INSTRUCTIONS
24
 Loading...