

Page 1

DVD / VCD / CD PLAYER
DV-502
DVF-3050
INSTRUCTION MANUAL
KENWOOD CORPORATION
B60-5075-08 00 (K/P/T/M/Y) OC 01/03
COM PACT
DIGITAL VIDEO
Page 2
2
Introduction
DV-502/DV F-3050 (EN/K,P,T,M,Y)
Before applying pow er
Units are designed for operation as follows.
U.S.A. and Canada ....................................................... AC 120V only
Australia ....................................................................... AC 240 V only
For the United Kingdom
Factory fitted moulded mains plug
1. The mains plug contains a fuse. For replacement, use
only a 3-Amp ASTA-approved (BS 1362) fus e .
2. The fuse cove r must be refit ted wh en r eplacing the
fuse in th e moul d ed plug.
3. Do not cut off the mains plug from this equipment. If
the plug fitted is not suitable for the power points in
Preparations
your home or the cable is too short to r e ach.
A power point, then obtain an appropriate safety
approved ext ensio n lead or adapter, or con sult your
dealer. If nonetheless the mains plug is cut off,
remove the fuse and dispose of the plug immediately,
to avoid a possible sho c k h azard by inadvertent.
Connection to the mains supply.
IMPORTANT :
The wires in the mains lea d a re coloured in accordance
with t h e following code:
Blue : Neutral
Brown : Live
Do not connect those leads to the earth terminal of a
thr ee-pin plug.
Caution : Read this page carefully to ensure safe operation.
Europe and U.K. ............................................................ AC 230V only
* Other countries .................... AC 110-120 / 220-240 V switchable
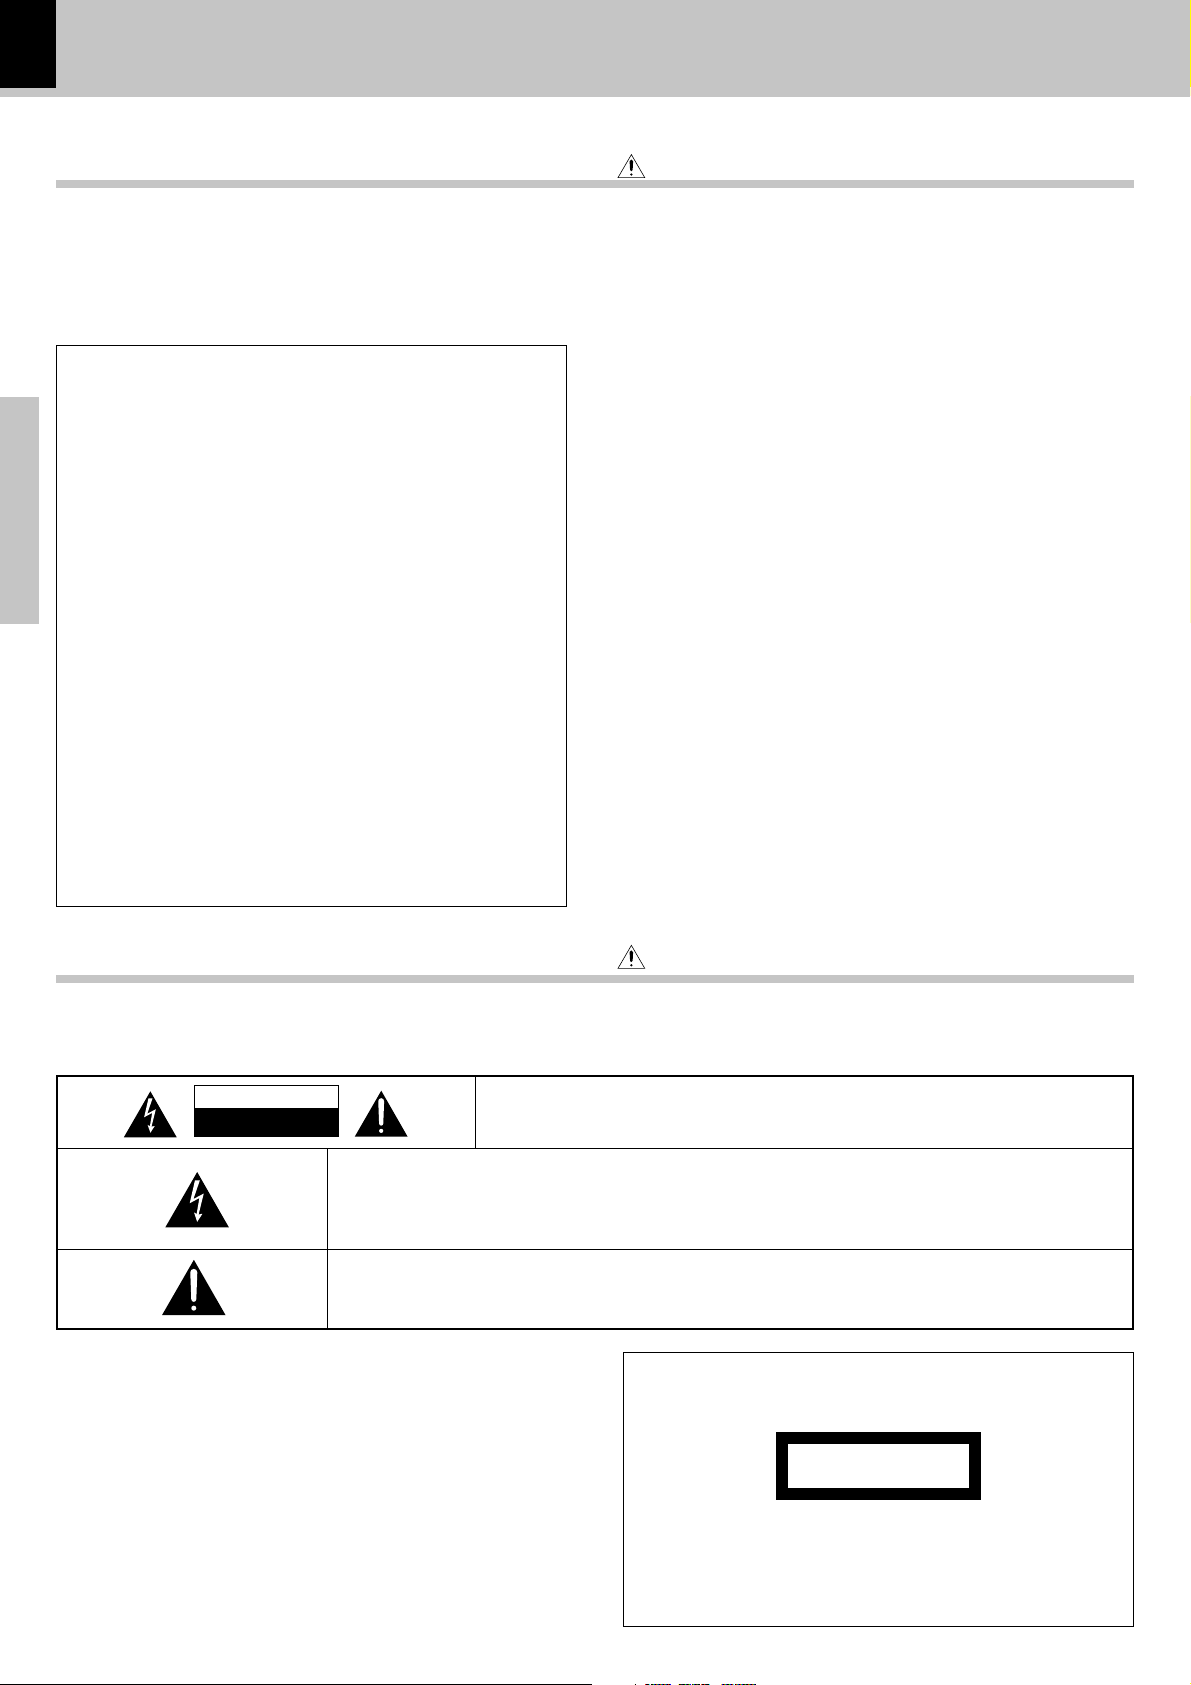
Safety precautions
Caution : Read this page carefully to ensure safe operation.
WARNING :TO PREVENT FIRE OR ELECTRIC SHOCK, DO NOT EXPOSE THIS
APPLIANCE TO RAIN OR MOISTURE.
CAUTION
RISK OF ELECTRIC SHOCK
DO NOT OPEN
THE LIGHTNIN G FLASH WITH ARROW HEAD SYM BOL, WITHIN AN EQUILATERAL TRIANGLE, IS INTENDED TO ALERT THE USER TO THE PRESENCE OF UNINSULATED “DANGER OUS VOL T AGE ” WITHIN THE PR ODUCT’S E NCL OSURE THA T MAY B E OF SUFF IC IE NT
MAGNITUDE TO CON STITUTE A RISK OF ELECTRIC SHOCK TO PERSONS.
THE EXCLAMATION POINT WITHIN AN EQUILATERAL TRIANGLE IS INTENDED TO ALERT
THE USER TO THE PRESENCE OF IMPORTANT OPERATING AN D M AIN TEN ANCE (SERVICING) INSTRUCTIONS IN THE LITERATURE ACCOMPAN YING THE APPLIAN CE.
CAUTION: TO RE DUCE THE R ISK OF E L E C TRIC SHOC K , DO NOT RE MOVE
COVER (OR BACK). NO USER-SERVICE ABLE PARTS INSIDE, REFER SERVICING TO QUALIFIED SERVICE PERSONNEL.
The marking of products using lasers
(Except for some areas)
CLASS 1
LASER PRODUCT
The marking is located on the rear panel and says t h at
the co mponent uses laser beam s that have been classified as Class 1. It means that the unit is utilizing laser
beams that are of a weaker class. There is no danger of
hazardous radiat i o n outsi d e the u n i t.
Page 3

Introduction
DV-502/DV F-3050 (EN/K,P,T,M,Y)
Unpacking
Unpack the unit carefully and make sure that all accessories are put aside so they will not be lost.
Exa mine the unit for any possibility of shipping damage. If your unit is damaged or fails to operate, notify your dealer immedia tely.
If your unit was shipped to you directly, notify the shipping company without delay. Only the consignee (the person or company
receiving the unit) can file a claim against the carrier for shipping damage.
We recommend that you reta in the original carton and packing materials for use should you transport or ship the unit in the future.
Keep this manual handy for future reference.
Accessories
Please confirm that the following accessories are present.
Audio video cord (Red, White, Yellow) ..........(1)
Remote control unit ............ (1)
Batteries (R6/AA) ............... (2)
3
Preparations
Coaxial cable......................... (1)
*AC plug adaptor ..................................... (1)
For the U.S.A.
CAUTION:
Use of controls or adjustments or performance of procedures other than
those specified herein may result in hazardous radiation exposure.
In compliance wit h Federal Regulations, follow ing are reproductions of
labels on, or inside the product relating to laser product safety.
KENWOOD CORPORATION
2967-3, ISHIKAWA-CHO,
HACHIOJI-SHI,
TOKYO, JAPAN
KENW OOD CORP. CERTIFIES THIS EQUIPMENT CONFORMS TO
DHHS REGULATIONS NO. 21 CFR
1040.10, CHAPTER 1, SU BCHAPTER J.
Location: Back Panel
CAUTION- LASER RADIATION WHEN OPEN .
DO NOT STARE INTO BEAM.
* Use to ada pt the plug on the
pow e r cord t o t he shape of
the wall outlet.
(Accessory only f or regions
where use is necessary.)
Location: Laser Pick-up Unit Cover inside this product
For the U.S.A.
FCC WARNING
This equipmen t m ay generate or use radio f requency energy. Changes or modif i cations t o t his equi pm ent may cause harmful interf erence unless t h e
modifications are expressly approved in the instruction manual. The user could lose the authority to operate this equipment if an unauthorized change or
modification is made.
NOTE :
This equipment has been tested and found to comply with the limits for a C lass B digital device, pursuant to Pa rt 15 of the FCC Rules. These limits are designed
to pro vide reasonable prot ection against harmf ul interf erence in a residential installation. This equipm ent m ay cause harmf ul interf erence to radio
communications, if it is not installed and used in accordance with the instructions. However, there is no guarantee that interference will not occur in a pa rticular
installation. If this equipment does cause harmful interference to radio or television reception, which can be determined by turning the equipment off and
on, the user is encouraged to try to correct the interference by one or more of the following measures:
– – Reorient or relocate the receiving antenna.
– – Increase the separation between the equipment and receiver.
– – Connect the equipment into an outlet on a circuit different from that to which the receiver is connected.
– – Consult the dealer or an experienced radio / TV technician f o r he lp .
Page 4
4
IM PORTANT SAFEGUARDS
Caution : Read this page carefully to ensure
safe operation.
DV-502/DV F-3050 (EN/K,P,T,M,Y)
Please read all of the safet y and operating instruct i ons
befo re operati ng t his appliance. Adhere to all warnings on
the appliance and in the inst ruction m anual. Follow all the
safety and operating instructions. These safety and
operating instructions should be retained for future
reference.
1. Power sources – The appliance should be connected to
a power supply only of the type described in the instruction
manual or as marked on the appliance. If you are not sure
of t he typ e of power su pply t o your ho m e, consult your
appliance dealer or local power company. For appliances
intended to operate from battery power, or other sources,
refer to the instruction manual.
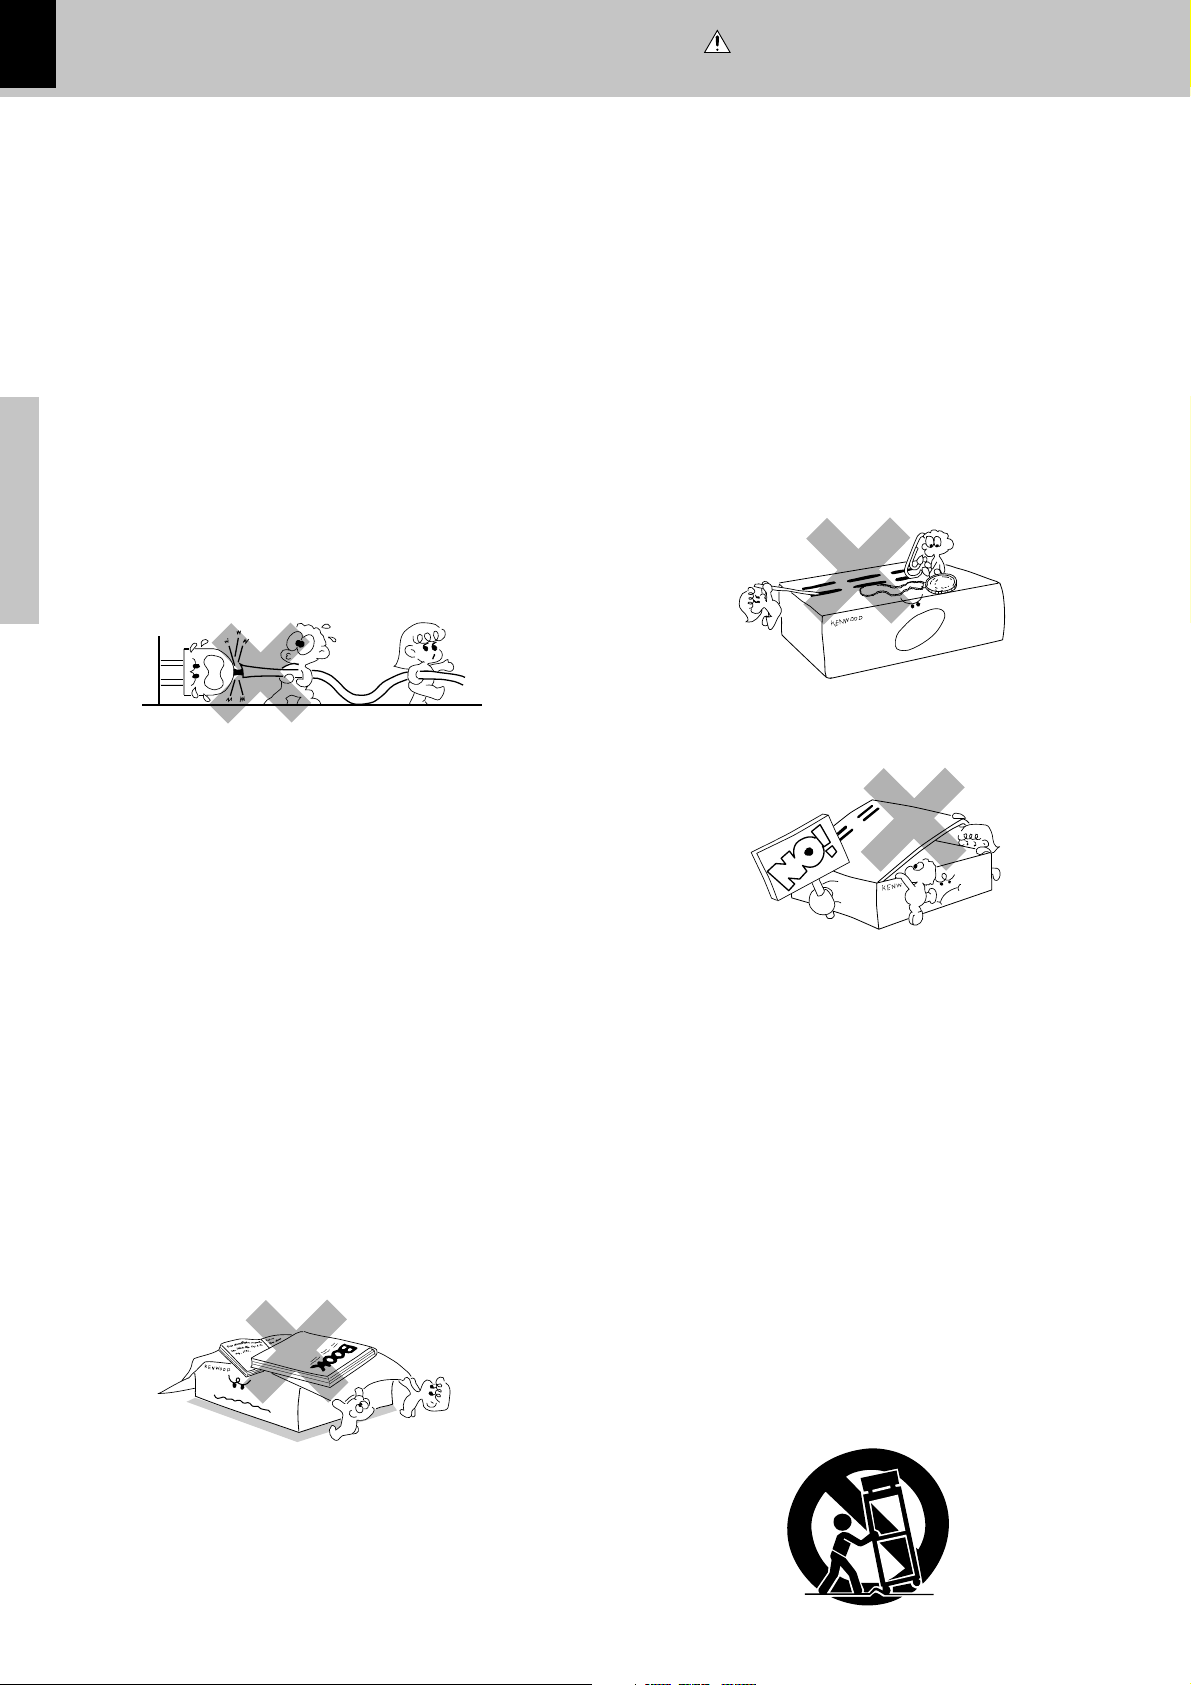
2. P ower-cord protection – P ower-supply cords should
be routed so that they are not likely to be walked on
or pinched by items placed upon or against t hem,
pay particular a ttention to cords at plugs, convenience
recept acles, and t he po int where they exit f rom the
Preparations
appliance.
3. CAUTION – Polarization – This appliance may
be equipped with a polarized a lternating-current line plug (a
plug having one blade wider than the other). This plug will
fit into the pow er out let only one w ay. This is a safet y
feat ure. If you are unable to in sert the plug fully into t he
outlet, try reversing the plug. If the plug should still fail to
fit, contact your electrician to replace your obsolete outlet.
Do not defeat the sa fety purpose of the polarized plug.
4. Ventilat ion – Slots and openings in the cabinet are
provided for ventilation and to ensure reliable operation of
the a ppliance and to protect it from overheating, and these
openings must not b e b lo ck ed or c ov e re d. The appliance
should be situated so that its location or position does not
interfere with its proper ventilation.
To maintain good ventilation, do not put records or a tablecloth on the appliance. Place the appliance at least 10 cm
away from the walls.
Do not use the appliance on a bed, sof a, rug or similar
surface that may block the ventilation openings. This
applia nce should not be placed in a built-in installation such
as a bookcase or rack unless proper ventilation is provided
or the manufacturer’s instructions have been adhered to.
6. Temperature – The appliance may not function
properly if used at extremely low, or freezing
temperatures. The ideal ambient temperature is
above +5° C (41°F).
7. Heat – The appliance should be situated away from
heat sources such as ra diators, heat registers, stoves,
or other applia nces (including amplifiers) that produce
heat.
8. E lec tric shoc k – C are should be taken so that objects
do not fall and liquid is not spilled into the enclosure
thro u g h o p en i n gs . I f a metal objects, su c h as a hair
pin or a needle, comes into contact with the inside of
this applia nce, a dangerous electric shock may result.
For families with children, nev er perm it children t o
put a nything, especially metal, inside this applia nce.
9. Enclosure removal – Never remove t he enclos ure.
If the internal parts are touched accidentally, a serious
elect ric shock m ight o ccur.
10.M agnetic fields – Keep the appliance aw ay from
sources of magnetic fields such as TV sets, speaker
systems, radios, motorized toys or magnetized
objects.
11.Cleaning – Unplug this appliance from the wall
outl et before cleaning. Do not use volati le so lv e nts
such as alcohol, paint th inner, gasoline, or ben zine,
etc. t o clean t he cabinet . Use a clean dry clot h.
12.Accessories – Do not place this appliance on an unstable
cart, stand, tripod, bracket, or table. T he appliance may fall,
causing serious injury to a child or adult, and serious
damage to t he appliance. Use only w ith a cart, stand,
tripod, bracket, or table recommended by the manufacturer,
or sold with the appliance. Any mounting of the applia nce
should follow the manufacturer’s instructions, and should
use a mounting accessory recommended by the
manuf actur er. An appliance and cart com binat ion sho uld
be m oved w it h care. Quick stop s, excessive f orce, and
uneven surfaces may cause the appliance and cart
combination to overturn.
5. Water and moisture – The appliance should not be
used near water - for example, near a bathtub,
washbowl, kitchen sink, laundry tub, in a wet
basement , or near a sw im m ing pool, et c .
Page 5

IM PORTAN T SAFEGUARDS
DV-502/DV F-3050 (EN/K,P,T,M,Y)
5
13.Lightning – For added protection for this applia nce during
a lightning storm, or when it is left unattended and unused
for long periods of time, unplug it from the wall outlet and
disconnect the antenna or cable system. This will prevent
damage to the appliance due to lightning and power-line
surges.
14.Abnorm al smell – If an abnorm al smell or smoke is
detected, immediately turn the power OFF a nd unplug
the a ppliance from the wall outlet. Contact your dealer or
nearest servic e cent er.
P OWER OFF!
15.Dam age requiring service – The appliance should
be serviced b y qualified service personne l when:
A. The power-supply cord or the plug has been
damaged.
B. Objects have fallen, or liquid has been spilled into
the appliance.
C. The applia nce has been exposed to rain or water.
D. The applia nce does not appear to opera te normally
by following the instruction manual. Adjust only those
controls that are covered by the i nstruction manual as an
improper adjustment of other controls may result in damage
and will often require extensive work by a qualified
technician to restore the applia nce to its normal operation.
E. T he appliance has been dropped, or the enclosure
damaged.
F. The a ppliance exhibits a marked change in performance.
16.Servicing – T he user should not attempt to service
the a ppliance beyond that described in the instruction
manual. All other servicing should be referred to
qualified serv ice person nel.
17.Outdoor antenna grounding – If an outside antenna
is connect ed t o t he appliance, be sure t he ant enna
system is grounded so as to provide some protection
against voltage surges and built up st at ic charges.
Arti cle 810 of t h e National Electrical Code ANSI/
NFP A 70, provides information with respect to proper
grounding of the mast and supporting structure,
grounding of the lead- in wire to an antenna discharge
unit, size of grounding conductors, location of antenna
discharge unit , c o n nection to ground i n g e l e c trodes,
and requirem ents for the g rounding elec trod e. See
Figure.
18.Power lines – An outside a ntenna system should not be
located in t he vicinit y of ove rhead powe r lines or ot her
electric light or power circuits, or where it can fall into such
power lines or circuits. When installing an outside antenna
system, extreme care should be taken to keep from
touching such power lines or circuits as contact with them
might be fatal.
19.AC outlets – Do not connect other audio equipment
with a power consumption larger than that specified
to t he AC out let on the re ar panel. Never c onnect
other electrical a ppliances, such as a n iron or toaster,
to it t o preve nt f ire or elect ric s hock.
Preparations
20.Overloading – Do not overl oad w all outlet s, extensio n
cords, or integral convenience receptacles as this can
result in a risk of fire or electric shock.
21.Attachment – Do not use attachments not recommended
by the applia nce manufacturer as they may cause haz ards.
22. Replacement parts – When replacement parts are required,
be sure the service technician has used replacement parts
specified by the manufacturer or have the same
characteristics as the original parts. Unauthorized
subst itut ions may result in fire, ele ctric shock, or other
hazards.
23.Safety check – Upon completion of any service or repairs
to t his appliance, ask the service t echnician to p erform
safety checks to determine that the appliance is in proper
operating condition.
EXAMPLE OF ANTENNA GROUNDING AS PER NATIONAL
ELECTRIC
SERVICE
EQUIPMENT
NEC – NATIONAL ELECTRICAL CODE
ELECTRICAL CODE
GROUND
CLAMPS
ANTENNA
LEAD IN WIRE
ANTENNA
DISCHARGE UNIT
(NEC SECTION 810-20)
GROUNDING CONDUCTORS
(NEC SECTION 810-21)
GROUND CLAMP
POWER SERVICE GROUNDING
ELECTRODE SYSTE M
(NEC ART 250, PART H)
Notes:
1. Item 3 is not required except for grounded or polarized equipment.
2. Item 17 and 18 are not re quired except f or units provided w it h
antenna terminals.
3. Item 17 complies with UL in the U.S.A.
Page 6

6
Special features and Contents
Special features
This document classifies the applications of each feature using the following marks
: Description of a feature that can be used with DVD.
DVD
: Description of a feature that can be used with CD.
CD
: Description of a feature that can be used with VCD.
VCD
Higher video quality than S-VHS video and LaserDisc
DVD
Higher audio quality than music CD
DVD
CD VCD
DVD
Graphical user interface (GUI) compatibility
DV-502/DV F-3050 (EN/K,P,T,M,Y)
DVD
DVD
Versatile DVD playback features
CD
DTS digital output compatibility
Caution : Read the pages marked carefully to ensure safe operation.
Preparations
Contents
Preparations
Introduction ...................................................................................... 2
Before applying pow er .................................................................... 2
Safety precautions ............................................................................ 2
IM PORTANT SAFEGUARDS ...................................................... 4
Special features and Contents ..................................................... 6
Special features ..................................................................................... 6
Contents ................................................................................................... 6
Discs information ............................................................................ 7
Types of playable discs ......................................................................... 7
Unplayable discs .................................................................................... 7
Icons on the DVD discs .........................................................................7
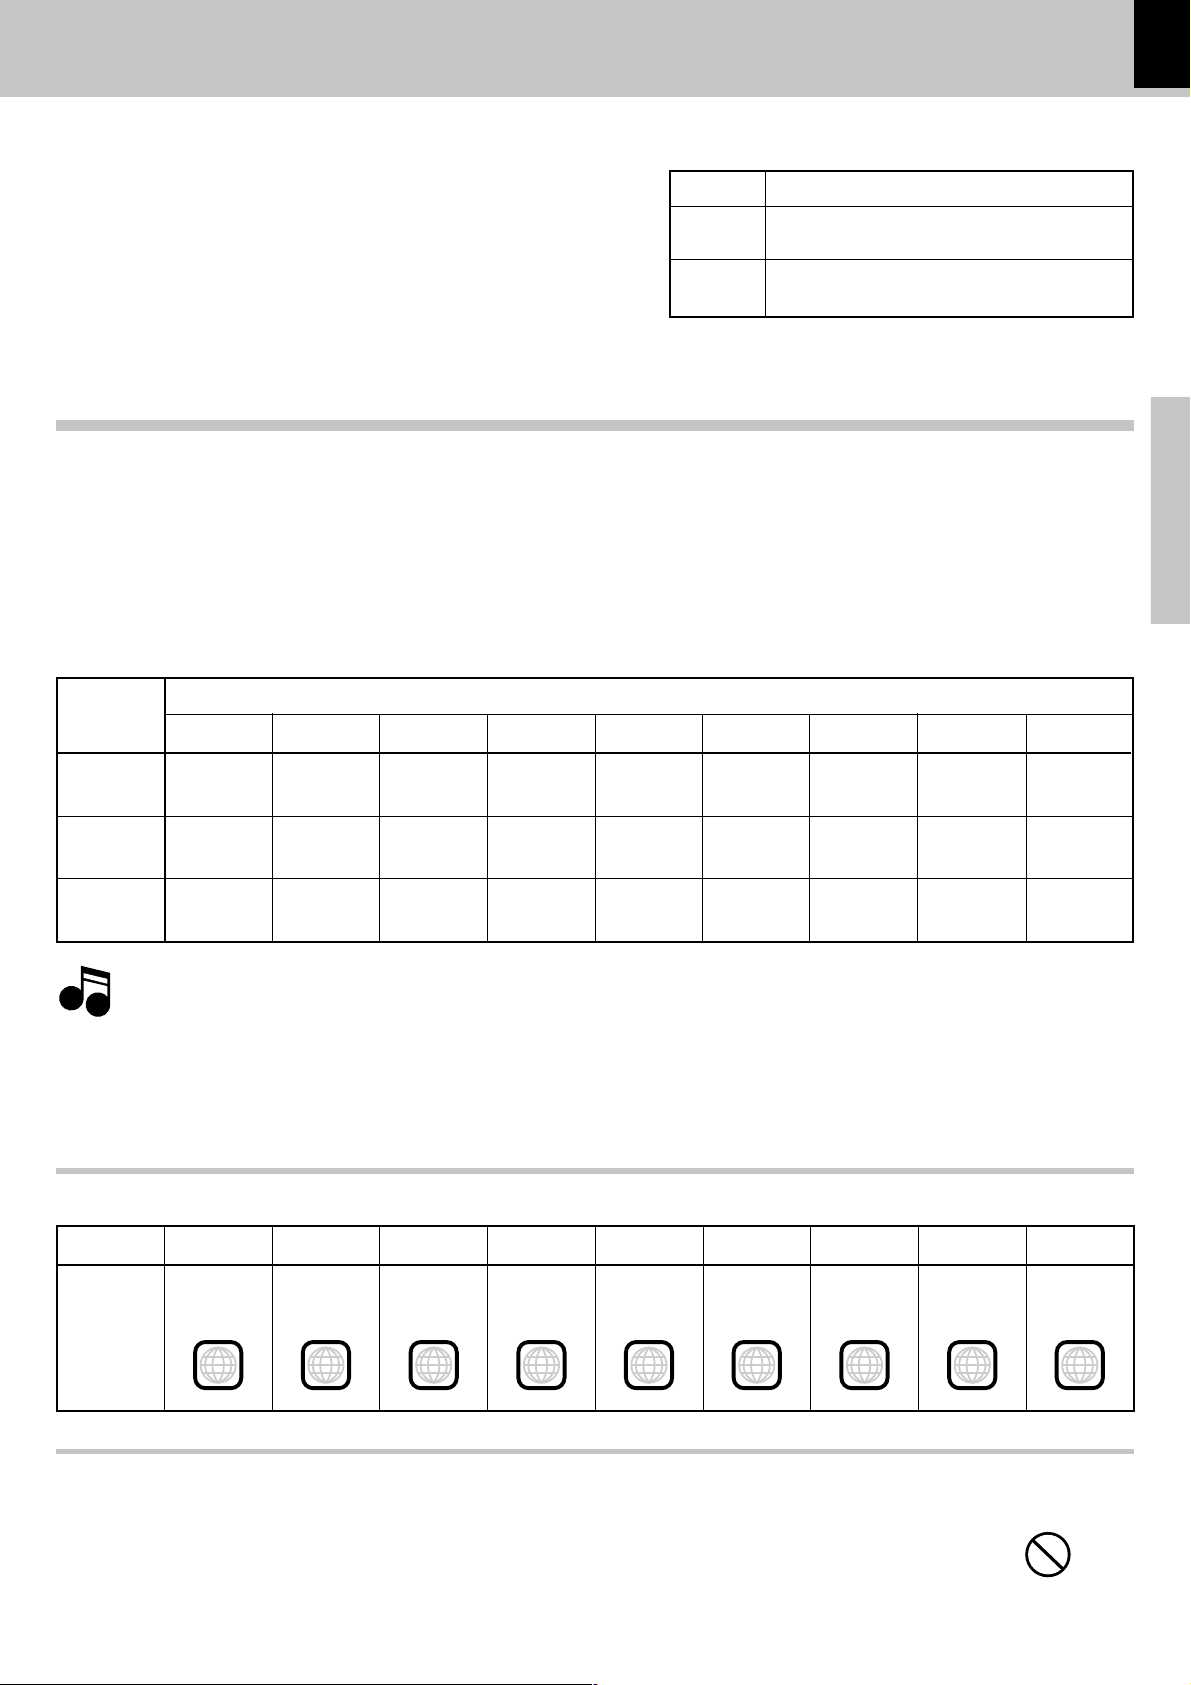
Region codes ................................................................................... 8
Region codes in the w orld .................................................................... 8
Examples of TV screen display of each video format .....................8
Video formats ................................................................................... 9
Video formats of DVD discs that can be played on this unit ..........9
Region code table .................................................................................. 9
Important items.............................................................................. 10
M aintenance ......................................................................................... 10
Reference ............................................................................................... 10
System Connections ..................................................................... 11
Connecting to a TV w ith video (composite) input terminal .......... 11
Connecting to a TV w ith S-video input terminal ............................ 11
Connecting to a TV w ith SCART input terminals (For Europe and
U.K.)..................................................................................................... 11
Connecting to a TV w ith Component input terminals (For other
countries ............................................................................................ 12
Connecting to an Audio component ................................................. 12
Controls and indicators................................................................ 13
Operation of remote control unit ................................................ 14
Operations
Playback of disc ............................................................................ 15
Basic play .............................................................................................. 15
Disc playback features ....................................................................... 16
Using the On-screen banner display ......................................... 17
Selecting a Title .................................................................................... 18
Selecting a Chapter or Track ............................................................. 18
Changing the Audio Language ........................................................... 19
Changing the Subtitle Language ....................................................... 19
Changing the Camera angle ............................................................... 20
Using IntroScan function .................................................................... 20
Using Bookmarks ................................................................................. 21
Repeat play ............................................................................................ 22
A-B Repeat play .................................................................................... 22
Random play .......................................................................................... 23
Program play .................................................................................. 24
Set Up functions ............................................................................ 26
Set up menu ........................................................................................... 26
Select Audio Language ....................................................................... 27
Select Subtitle Language .................................................................... 27
Select M enu Language ....................................................................... 28
Select Rating ......................................................................................... 28
Passw ord ............................................................................................... 29
TV aspect ............................................................................................... 31
Dynamic Range ..................................................................................... 32
Digital Audio Out .................................................................................. 32
Linear PCM ............................................................................................ 33
M enu playback .............................................................................. 33
Hierarchical structure of VCD menus ............................................... 33
Playback w ithout using the menu playback function
(In case of a P.B.C.-compatible VCD) (To P.B.C. On or Off) ........... 34
Selecting the Audio channel ............................................................. 34
Knowledge
Knowledge ..................................................................................... 35
DVD menu language code li st ........................................................... 35
DIM M ER function ................................................................................. 35
In case of difficulty ....................................................................... 36
Specifications................................................................................ 38
Page 7

Discs information
DIGITAL VIDEO
COMPACT
DV-502/DV F-3050 (EN/K,P,T,M,Y)
Types of playable discs
The system using this unit does not only play music from CD but can also play the discs lis ted below to offer you
high-quality entertainment of video of movies and live concerts.
7
Playable Disc
Logo mark on disc
Disc size
Played sides
Contents
Video + Au dio
Audio
DVD CD
8cm
One or both One or both
Approx. 41 min.
(1 side, 1 layer)
Approx. 75 min.
(1 side, 2 layers)
Approx. 82 min.
(2 sides, 1 layer)
Approx. 150 min.
(2 sides, 2 layers)
Approx. 133 min.
(1 side, 1 layer)
Approx. 242 min.
(1 side, 2 layers)
Approx. 266 min.
(2 sides, 1 layer)
Approx. 484 min.
(2 sides, 2 layers)
12cm
8cm
One side only One side only
Max. 20 min., d ig ital Max. 74 min., d ig ital
12cm
VCD
COMPACT
DIGITAL VIDEO
Preparations
12cm
One side only
Max. 74 min.
Unplayable discs
This player cannot play back any of the following discs.
÷ DVD-ROM discs
÷ DVD-R/DVD-RAM/DVD-RW discs
÷ CD-ROM discs
÷ VSD discs
÷ CDV discs (Only the audio part can be reproduced.)
Icons on the DVD discs
Icon Description
ALL
8
32
9
Indicates the region code where the disc can be played.
Number of voice languages recorded with the audio function. The number in the icon indicates the number of voice languages.
(Max. 8 languages)
Num ber of subt itle languages recorded with t he s ubtit le funct io n. The number in the icon indic ates the number of subt itle
languages. (Max. 32 languages)
Number of angles provided by the angle function. The number in the icon indicates the number of angles. (Max. 9 angles)
÷ CD-G/ CD-EG/CD-EXTRA discs (Only the audio can be
reproduced.)
÷ CD-R/ CD-RW discs (Never att empt to play t hem.)
÷ Photo CD discs (Never attempt to play them.)
÷ S-VCD discs
16:9 LB
Aspect ratios that can be selected. “ LB” stands for Letter Box and “PS ” for Pan/S can. In the example on the left, the 16:9 video
can be converted into letter box video.
Page 8

8
Region codes
DV-502/DV F-3050 (EN/K,P,T,M,Y)
Every player of this model has a certain region code as s igned to it bas ed on the country where the player is used.
When the player is us ed to play back DVD disc s , it can only play the DVD discs c arrying the region codes matching
the region code of the player.
The region code for this player is described on the rear panel of the player.
Region codes in the w orld
The DVD players are given a region code ac c ording to the country or area it is marketed, as s hown in the following
map.
1
5
Preparations
2
1
6
2
3
4
1
5
2
4
Examples of TV screen display of each video format
When your TV is sw itchable betw een PAL/
NTSC
Try play a disc. If the picture is black and white or as shown on the right,
stop playba ck and switch the screen display formats of this unit and the
TV t o another format. This will improve th e p layed picture quality.
When your TV is compatible only w ith the
PAL format
With cert ain discs, the playback picture m ay have black spaces above
and below it (as shown on the right).
This is because the disc has been
recorded in t he NTSC format. The
screen may be somew hat hard to
see but this is n ot malfunction .
When your TV is compatible only w ith the
NTSC format
With cert ain discs, the playback picture may be cut above and below i t
(as show n o n the rig ht). This is because the disc has been recorded in
the PAL f or m at . The screen may be
somewhat hard to see but this is not
malfunction.
Page 9
Video formats
9
DV-502/DV F-3050 (EN/K,P,T,M,Y)
The video signals used to display TV pictures and video
TV formats of major countries
disc pictures are mainly based on two types of signal
formats (PAL and NTSC), which are assigned to each
country or area as s hown on the right. As a res ult, it is
required to select discs according to the video format
used with your TV monitor (in your country or area).
TV Format
NTS C
PAL
Japa n, Ta iwan, Korea, U.S .A., Ca nada, Mexico,
Philippines, Chile, etc.
China , North Korea, U.K., Germany, Australia,
New Zealand, Kuwait, Singapore, etc.
Major Countries & Areas
Video formats of DVD discs that can be played on this unit
Set the video formats of the DVD discs to be played on this unit as described below.
Check the video format(s) used by your TV monitor.
1
÷ Refer to th e op e rat i ng i ns tructions of y ou r TV monitor f o r d e tails.
Select DVD discs recorded w ith the playable video format by referring to the follow ing table.
2
÷ See the re g io n co d e table on the b otto m of this page for details on district s 1 to 6.
Your TV
format
District 1
District 2-1
District 2-2
District 2-3
Playable Disc Formats
District 3
District 4-1
District 4-2
District 5
Preparations
District 6
NTSC only
PAL only
NTSC/PAL
switchable
Normal video may not be reproduced when a disc recorded with the video format marked * in the above table is played. See “Examples of TV
Note
Note
screen display of each video format” for details. 8
When your TV is sw itchable betw een NTSC and PAL,
3
÷ Districts 1, 2-2 and 4-2: Set t h e TV to NTSC.
÷ Districts 2-1, 4-1 and 5: Set t h e TV to PAL.
÷ Districts 2-3, 3 and 6: Set the TV according to each disc t o b e p layed.
NTSC
NTSC*
NTSC
NTSC*
PAL*
NTSC
PAL
NTSC
PAL
NTSC
NTSC*
NTSC
NTSC
PAL*
NTSC*
PAL
NTSC
PAL
NTSC
PAL*
NTSC*
NTSC
Region code table
Area or
Country
Name,
Region
Code
District 1
North
Amer ic a
1 2 2 2 3 4 4 5 6
District 2-1
Europe
District 2-2
Japan
District 2-3
Middle East
District 3
Southeast
PAL
PAL
Asia
NTSC*
PAL*
NTSC
PAL
NTSC
PAL
District 4-1
Oceania
NTSC
NTSC*
NTSC
District 4-2
South
Amer ic a
NTSC*
PAL*
NTSC
PAL
NTSC
PAL
District 5
Russia
NTSC
PAL*
NTSC*
PAL
NTSC
PAL
District 6
China
Restrictions due to difference betw een discs
Some DVD discs can be played only in certain playba ck modes according to the intentions of the software
producers. A s t his player plays discs according t o t heir int ent ions , som e f unct ions may not wo rk as
intended by you. Please be sure to read the instructions provided with each disc. When an inhibition icon
is displayed on the TV screen connected to the player, it indicates that the disc being played is under the
restriction as described above.
Inhibition icon
Page 10

10
Important items
M aintenance
DV-502/DV F-3050 (EN/K,P,T,M,Y)
Cleaning
Unplug this appliance from the wall outlet before cleaning. Do not
use volatile so lvent s such as alcohol, paint t hinne r, gasoline, or
benzine, etc. to clean the cabinet. Use a clean dry cloth.
Reference
Disc handling precautions
Handling
Preparations
Sticker
Hold the discs so that you do not touch the
playing surface.
Label side
Playing side
Do not attach paper or tape to either the playing side or the label side of the discs.
Caution against contact revitalizer
Do not use contact cleaners because it could cause a malfunction.
Be specially careful against contact cleaners containing oil, for they
may deform the plastic component.
Never play a cracked or w arped disc
During playback, the disc r o tates at high s p ee d i n the player.
Therefore, t o avoid danger, never use a cracked or deform ed di sc or a
disc repaired wit h tape or adhesive agent.
Please do not use discs which are not round because they may cause a
malfunction.
Disc accessories
The disc accessories (stabilizer, prot ection sheet , prot ect ion ring, et c.)
which are market ed for im provi ng the sound q uality or p rotect ing d iscs
as well as the disc cleaner should not be used with this system because
they may cause malfunction.
Sticky paste
Cleaning
If fingerprints or f ore ign matt er b eco me attached to the disc, lightly wipe the disc with
a soft cotton cloth (or similar) from the center
of the disc outwards in a radial manner.
Storage
When a disc is not to be played for a long
period of time, remove it from the player and
store it in its case.
Note related to transportation and movement
Before transporting or moving this unit, carry out the
following operations.
1. Set the POWER key to ON without loading a disc.
2. Wait a few seconds and verify that the display
shown appears.
3. Set the POWER key to OFF.
Bew are of condensation
Wh en t he d if f erenc e bet ween t he int er nal tem p erature o f t he
unit and ext ernal atm ospher e is large, dew (m ist ) m ay be produced on the internal parts of the unit. In such a case, turn the
unit ON and leave it for a few hours until the condensation has
dried up.
Be especially careful in the following conditions:
Wh en the unit is brough t int o a place w here t here is a large
difference in temperature between the previous location, when
the humidity of the listening room is high, etc.
Page 11
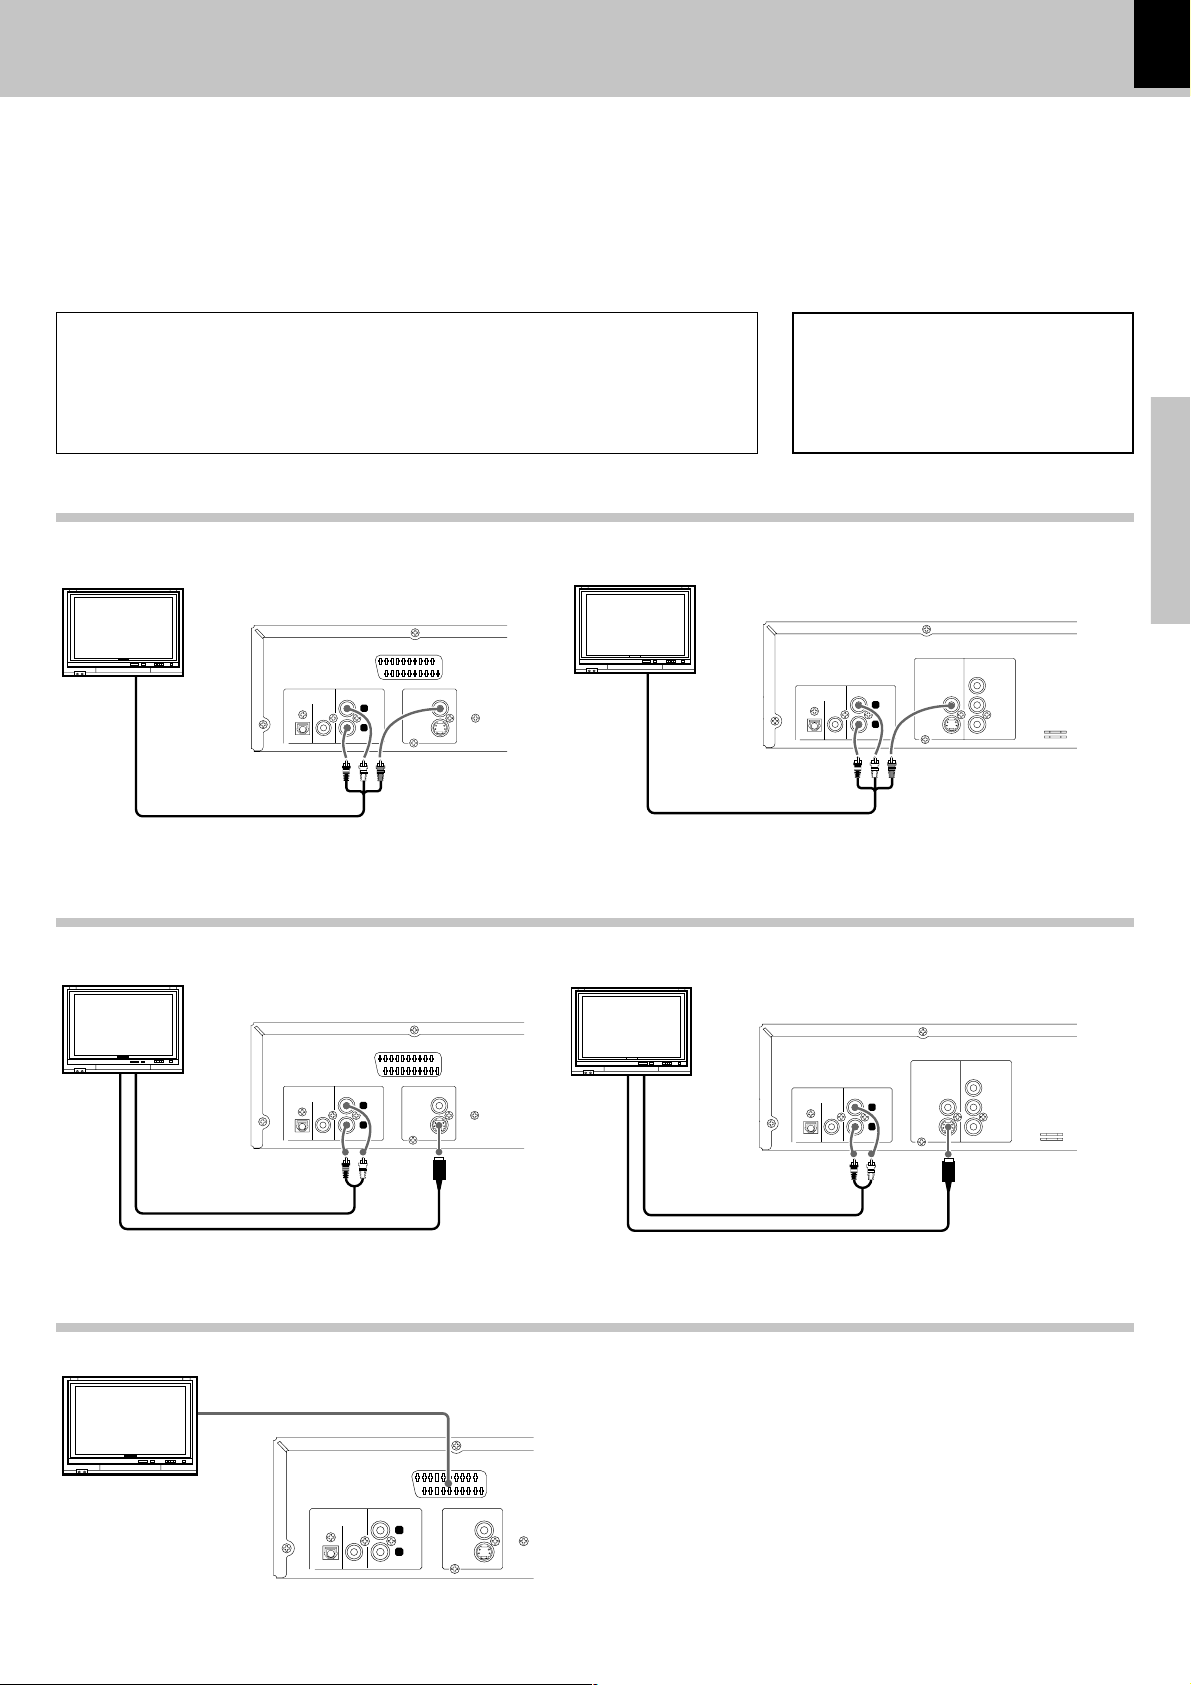
System Connections
DV-502/DV F-3050 (EN/K,P,T,M,Y)
Make connections as shown below.
When connecting the relat ed system component s, refer also t o the
instruction manuals of the related components.
Caution:
Do not plug in the power lead until all c onnections are c ompleted.
Except for U.S.A. and Canada
Caution
Be sure to adhere followings. Or proper ventilation will be blocked causing damage or fire haz a rd.
÷ Do not place any objects impairing heat radiation onto the top of unit.
÷ Leave a space around t he unit (from t he largest outside dimensio n including projec tion)
equal or greater than, shown below.
Top panel : 50 cm Side panel : 10 cm Back panel : 10 cm
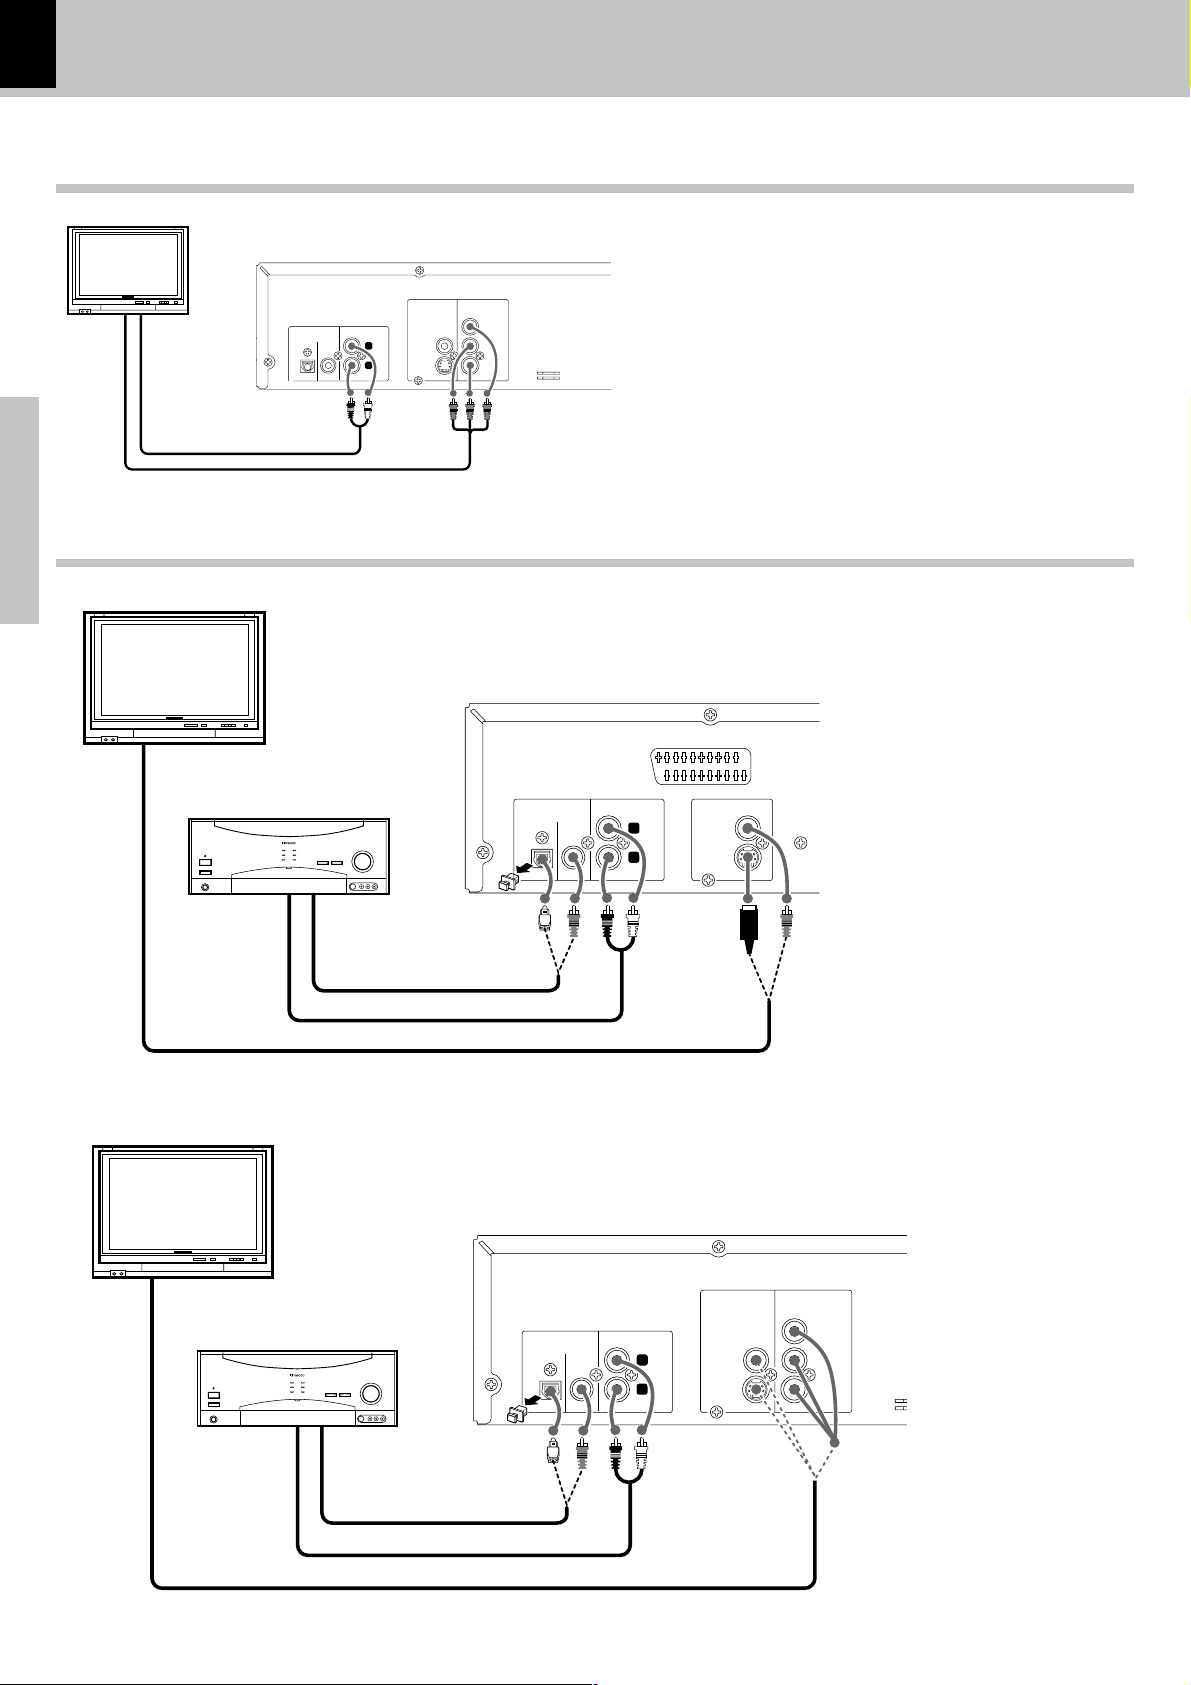
Connecting to a TV w ith video (composite) input terminal
Malfunction of microcomputer
If ope rati on i s no t possible or e rron eo us d isplay appears even though all connections
have been made properl y, reset t he micro comp u ter referring to “ In case of diffic ul ty” .
fl
11
Preparations
TV
(For Europe and U.K.)
DIGITAL OUTPUT
(PCM/BIT STREAM)
DIGITAL
Audio cord and video cord
COAXIAL
AUDIO OUTPUT
L
R
AV
VIDEO OUTPUT
S-VIDEO
TV
(For other countries)
DIGITAL OUTPUT
(PCM/BIT STREAM)
OPTICAL
Audio cord and video cord
Connecting to a TV w ith S-video input terminal
TV
(For Europe and U.K.)
AV
AUDIO OUTPUT
DIGITAL OUTPUT
(PCM/BIT STREAM)
DIGITAL
COAXIAL
L
R
S-VIDEO
VIDEO OUTPUT
TV
(For other countries)
DIGITAL OUTPUT
(PCM/BIT STREAM)
OPTICAL
COAXIAL
COAXIAL
AUDIO OUTPUT
L
R
AUDIO OUTPUT
L
R
VIDEO OUTPUT
S-VIDEO
VIDEO OUTPUT
S-VIDEO
COMPONENT
VIDEO OUTPUT
Cr
Cb
Y
COMPONENT
VIDEO OUTPUT
Cr
Cb
Y
Audio cord
S-video cord
Audio cord
S-video cord
Connecting to a TV w ith SCART input terminal
TV
AV
DIGITAL OUTPUT
AUDIO OUTPUT
(PCM/BIT STREAM)
DIGITAL
COAXIAL
VIDEO OUTPUT
L
R
S-VIDEO
(For Europe and U.K.)
Page 12
12
System Connections
DV-502/DV F-3050 (EN/K,P,T,M,Y)
Connecting to a TV w ith Component input terminals
TV
COMPONENT
VIDEO OUTPUT
VIDEO OUTPUT
DIGITAL OUTPUT
(PCM/BIT STREAM)
OPTICAL
COAXIAL
AUDIO OUTPUT
L
R
S-VIDEO
Cr
Cb
Y
Audio cord
Video cords
Connecting to an Audio component
Preparations
TV
(F or Europe and U.K.)
AV
(For other countries)
AV receiver or Amplifier
Coaxial or Optical cable
Audio cord
Video cord, S-video cord
TV
AV receiver or Amplifier
COAXIAL
AUDIO OUTPUT
L
R
VIDEO OUTPUT
S-VIDEO
DIGITAL OUTPUT
(PCM/BIT STREAM)
DIGITAL
(For other countries )
VIDEO OUTPUT
COAXIAL
AUDIO OUTPUT
L
R
S-VIDEO
DIGITAL OUTPUT
(PCM/BIT STREAM)
OPTICAL
COMPONENT
VIDEO OUTPUT
Cr
Cb
Y
Coaxial or Optical cable
Audio cord
Video cord, S-video cord or C omponent cords
Page 13
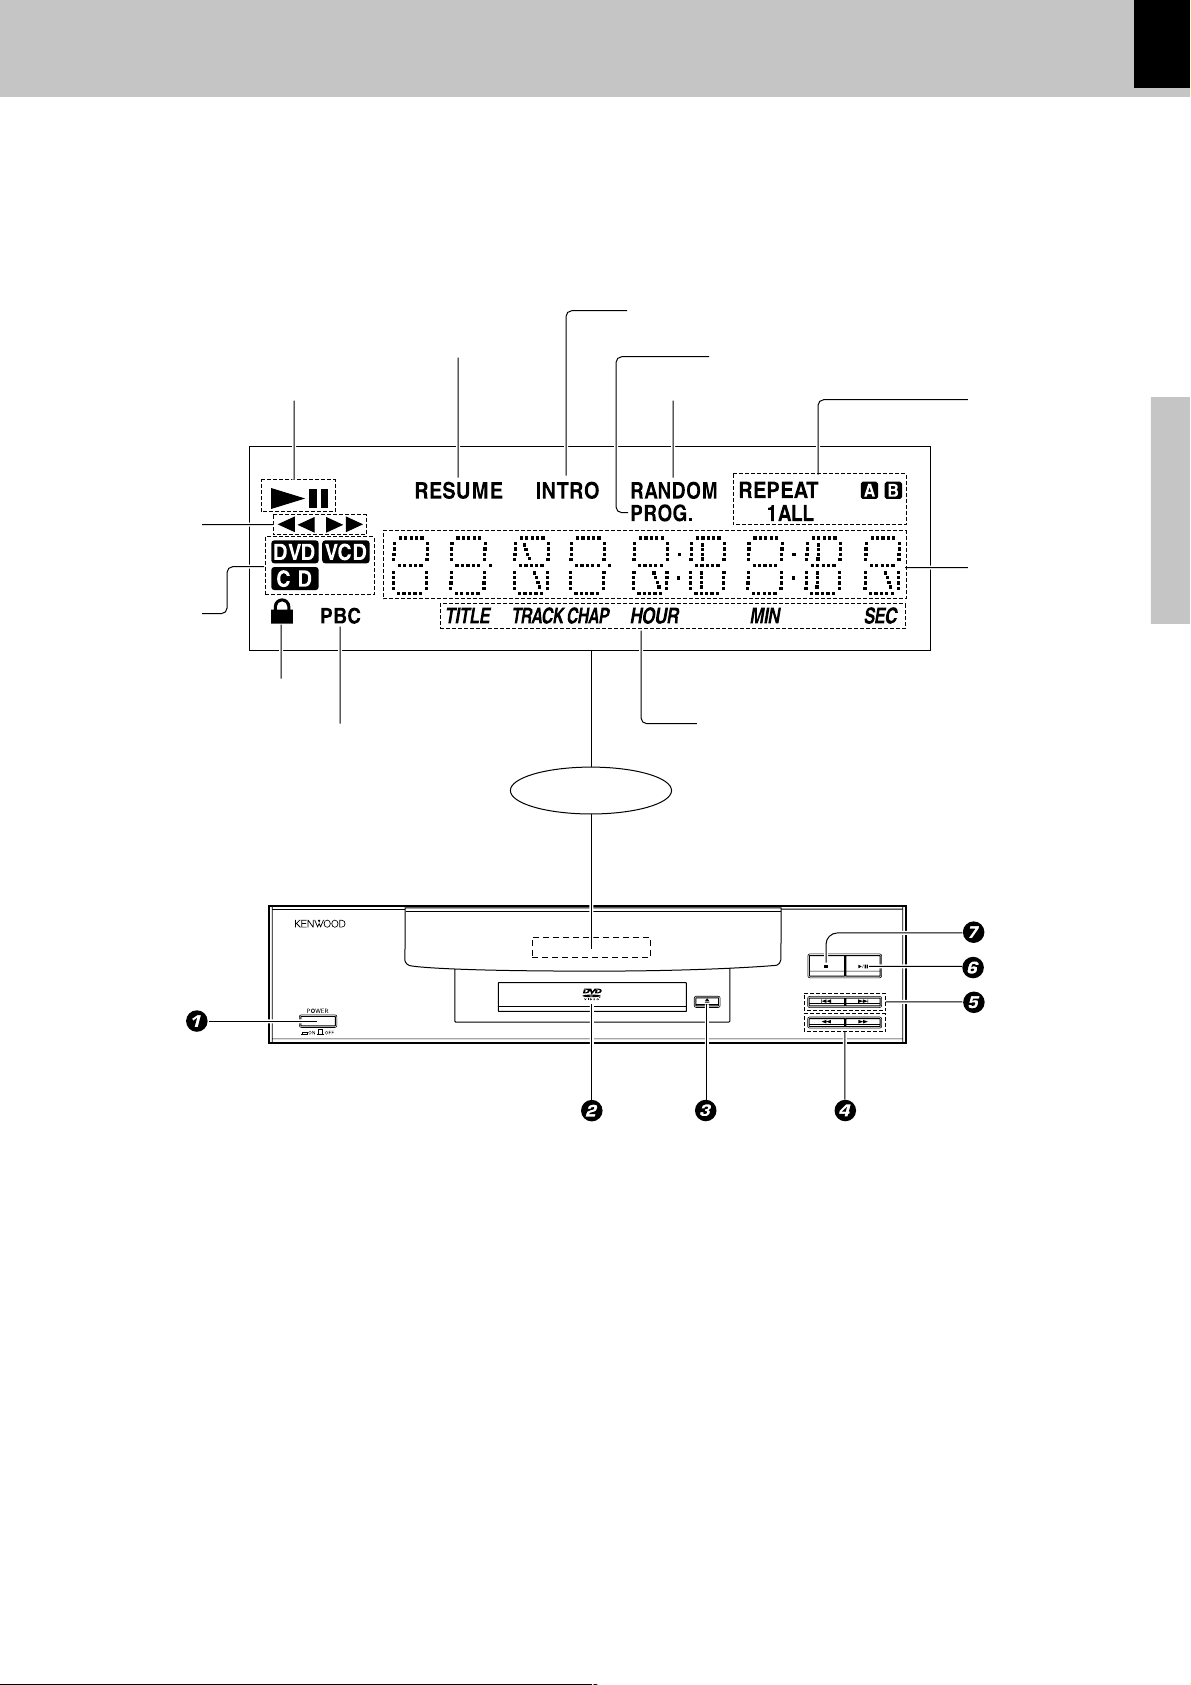
Controls and indicators
13
DV-502/DV F-3050 (EN/K,P,T,M,Y)
INTRO SCAN indicator
SEARCH
indicator
DVD indicator
VCD indicator
CD indicator
PARENTAL LOCK
indicator
RESUME indicator
PLAY/PAUSE indicator
P.B.C. indicator
Display
PROGRAM indicator
RANDOM indicator
TITLE indicator
TRACK indicator
CHAPTER indicator
HOUR indicator
MINUTE indicator
SECOND indicator
REPEAT indicators
REPEAT
REPEAT 1
REPEAT ALL
A-B REPEAT
Character
information
display section
Preparations
1 POWER ON / OFF switch %
2 Disc tray %
00
3
0 (Open/Close) key %
00
¡¡
11
¡ (Search) keys ^
1,
4
11
¡¡
44
5
4(PREV.),
44
66
6
6 (Play/Pause) key %
66
77
7
7 (St o p ) key %
77
¢¢
¢(NEXT) (Skip) keys ^
¢¢
Page 14

14
Operation of remote control unit
The keys on the remote control unit with the same names as on the
main unit have the same function as the keys on the main unit.
DV-502/DV F-3050 (EN/K,P,T,M,Y)
123
1
2
3
4
5
6
Preparations
7
8
456
789
0
SUBTITLE
MULTI CONTROL
P.MODE
RANDOM
SLOW
1¡4¢
REPE AT
A-B
DIMMER
MENU
ON SCREEN
TOP MENU
AUDIO
CLEAR
ANGLE
ON/OFF
RETURN ENTER
STEP
76
0
!
@
#
$
%
^
9
1 Numeric keys *
2 CLEAR key &
3 SUBTITLE key (
(SUBTITLE) ON/ OFF key (
4 Cursor Up (
22
2) and Right (
(
22
55
5), Down (
55
∞∞
∞), Left
∞∞
33
3) keys &
33
5 P.MODE key ¢
RANDOM key £
6 SLOW (Back slow/
Forward slow) keys ^
STEP (Back step/
Forward step) keys ^
1 1
7
1 key/
1 1
¡ ¡
¡ key (Sea rch key)
¡ ¡
^
44
4
44
(PREV.)
key/
¢¢
¢(NEXT)
¢¢
key (S kip
key)
^
8 REPEAT key ™
A-B Repeat key ™
9 DIMMER key fi
0 MENU k e y s §
! ON SCREEN key &
@ TOP MENU %,›
# AUDIO key (,›
$ ANGLE key )
% RETURN k e y §
ENTER key &
77
^
7 (Stop) key %
77
66
6 (Play/Pause) key %
66
Model : RC-D0307
Infrared ray system
Loading batteries
2 Insert batteries. 3 Close the cover.1 Remove the cover.
÷ Insert two R6/LR6 (“AA” -size) batteries
following the polarit y indic ations.
Operation
Insert the power plug into a power outlet, press the POWER
key of the main unit to ON, then press the desired remote
control key.
÷ W hen pressing m ore than one rem ote cont rol keys success ively,
press t he keys securely by leaving an inte rval of 1 second o r m ore
betwe en pr es s in g o f keys.
Remote sensor
6m
76
POWER
30º
0
30º
1. The provided bat t erie s are int ende d f o r use i n operat ion ch ecking , and t heir se rvice li f e may be short .
Notes
Notes
2. W he n t h e remot e con t roll able dist ance becomes short , r eplace bot h o f the batt eri es with new ones.
3. If direct sunlight or the light of a high- frequency fluorescent lamp (inverter type, etc.) is incident to the remote sensor, malfunction
may occur. In s uch a case, change the in st allation posi t ion t o avoid m alfunc t ion .
Operating range (approx.)
Page 15

Playback of disc
Basic play
15
DV-502/DV F-3050 (EN/K,P,T,M,X)
Preparation
POWER
ON OFF
÷ set t he POWER ON/OFF sw it ch t o t he ON ( )
position.
Load a disc
1
MAIN UNIT
0
6 (Play/Pause) key
TOP MENU
7 (Stop) key
key
6 (PLAY/
PAUSE) key
POWER ON/ OFF switch
POWER
0 (open/close) key
Label side
76
0
7 (Stop) key
1 Open the tray.
2 Place a disc.
3 Close t he tray.
÷ When the key is pressed, the tray opens.
When the key is pressed again, the tray closes. When the
PLAY/PAUSE key is pressed while a tray is open, the tray
closes automatically, and then playback begins.
POWER
7
6
0
4
¢
1
¡
When a Disc Menu appears on the screen
In case of interactive D VDs, a Disc Menu appears on th e scre en.
Then press ENTER to select specific menu you want to play by using
Cursor keys.
Operations
Start playback
2
MAIN UNIT REMOTE
6
To stop playback
MAIN UNIT
7
REMOTE
6
7
When a menu sc reen is recorded on the
disc , the menu screen will be displayed
TOP MENU
when the TOP MENU key is press ed. At
the menu screen, the menu can be selected by pressing the Cursor keys.
TRACK No. (CD)
AB
DVDCDVCD
MP3
TITLE
TRACK
CHAP
HOUR
CHAPTER No. (DVD)
TITLE No. (DVD)
MIN
Time display
SEC
÷ Eac h press pauses and plays the disc alternately.
RESUM E playback
When the STOP key has been pressed once during
playback to stop the playback, and then playback is
started again, play will start from t he point where
the playback had been stopped. This is called t he
RESUME function. When t he STOP key is pressed
again during stop, the RESUME function is cancelled.
RESUME is cancelled when 5 minutes have passed in
RESUME status.
Page 16

16
Disc playback features
Playback of disc
DV-502/DV F-3050 (EN/K,P,T,M,X)
6 (Play/Pause) key
Notes
Notes
÷ You won’t hear the s ound (audio) on the DVD when
you’re using the Skip, Search, Step or Slow motion
features.
÷ P laybac k features are not available during the open-
ing credits of a movie.
CD
DVD
VCD
Skipping chapters or tracks
MAIN UNIT
To skip
backward
4¢
CD
DVD
MAIN UNIT
To search
backward
1¡
VCD
Searching
To search
forward
To skip
forward
REMOTE
To skip
backward
4¢
REMOTE
To search
backward
1¡
To skip
forward
To search
forward
Operations
76
SLOW STEP
1, ¡4, ¢
6 key
POWER
4, ¢ (Skip) keys
1, ¡ (Search) keys
0
÷ The chapter (or track) in the direction of the key pressed
is skipped, and t he select ed chapte r (or track) w il l be
played from the beginnin g .
÷ When the 4 key is pressed once during playba ck, the
chapter (or t rack) being played w ill be played f r om t he
beginning.
÷ Dur in g playback, press the
11
1 or
11
¡¡
¡ key
¡¡
÷ Each press switches the searching speed.
(At the time of DVD playback)
1 × 2 (F.SEARCH 1)/(R.SEARCH 1)
2 × 4 (F.SEARCH 2)/(R.SEARCH 2)
3 × 8 (F.SEARCH 3)/(R.SEARCH 3)
4 × 16 (F.SEARCH 4)/(R.SEARCH 4)
(At the time of CD/VCD playback)
1 × 2 (F.SEARCH 1)/(R.SEARCH 1)
2 × 4 (F.SEARCH 2)/(R.SEARCH 2)
3 × 8 (F.SEARCH 3)/(R.SEARCH 3)
÷ Press the PLAY key at any time to resume normal
playback.
DVD
DVD
VCD
STEP (freeze frame and frame advance)
REMOTE
STEP
VCD
Slow motion playback
REMOTE
SLOW
÷ Each time you press the keys, the picture adva nces one
frame.
÷ At the t ime of VCD playback, backw ard STEP is not
possible.
÷ Press the PLAY key to resume normal playback.
÷ Duri n g p layback, press the SLOW keys
÷ Each press switches the motio n speed.
1 F.SLOW 1/16 (R.SLOW 1/16)
2 F.SLOW 1/8 (R.SLOW 1/8)
3 F.SLOW 1/4 (R.SLOW 1/4)
4 F.SLOW 1/2 (R.SLOW 1/2)
(At the time of VCD playback)
1 F.SLOW 1/8 (R.SLOW is n o t possible)
2 F.SLOW 1/4 (R.SLOW is n o t possible)
3 F.SLOW 1/2 (R.SLOW is n o t possible)
÷ Press the PLAY key to resume normal playback.
Page 17

Using the On-screen banner display
Notes
Notes
DV-502/DV F-3050 (EN/K,P,T,M,X)
The on-sc reen B anner Display c ontains many playback features. To s ee the Banner Dis play, pres s ON SCR E E N key
on the remote while a disc is playing. Use the Cursor (Up/ Down/ Left/ Right) keys on the remote to move through
the different features in the Banner Display. Each feature is illust rated with an icon.
1 During playback, press the ON
SCREEN key on the remote.
ON SCREEN
When playing a DVD
CHAPTER SUBTITLES BOOKMARKS
TITLE ANGLES DISC TYPE
AUDIO
TIME INDICATOR
17
2 Press the Cursor left/ right (2/ 3)
keys to highlight a banner display
icon.
MULTI CONTROL
3 Press the ENTER key.
ENTER
When playing a CD/VCD
INTROSCAN TIME INFORMATION
TRACK
BOOKMARKS DISC TYPE
TIME INDICATOR
Time indicator co n tents
Switch the CD time indicator as follows.
1 Select the time information with the cursor key.
2 Each time the ENTER key is pressed, the time
indicator changes as follows.
1 Track Elapsed (elapsed time o f th e track being played)
2 Track Remain (remaining time of the track being played)
3 Disc Elapsed (elapsed time of the disc b ei ng p layed)
4 Disc Remain (remaining time of the disc being p layed)
Operations
To display disappear from the screen
Press the ON SCREEN key or CLEAR key
or
ON SCREEN
CLEAR
÷ You can only access the banner display when you’re
playing a disc.
÷ T he banner display feature are only ava ilable if the disc was
created with that particu lar fe ature (i.e., if you sele ct t he
Subtit le icon, you w on’ t be able to change t he subt itle
language unless the author of the disc created the disc with
subtitles).
÷ The invalid sym bol
press a key t hat does n’ t have any function. If one of t he
icons is “ grayed out,” the banner display feature isn’t
available for the disc you’re pla ying.
appears on t he sc reen w h en you
Page 18

18
Note
Note
DVD
Selecting a Title
DVD
CD VCD
Using the On-screen banner display
DV-502/DV F-3050 (EN/K,P,T,M,X)
Se le cti ng a Chapte r or Tra ck
Some discs c ontain more than one title. For example,
there m ight be four m ovies on one disc (each m ovie
might be considered a title).
1 During playback, press the ON
SCREEN key on the remote.
ON SCREEN ON SCREEN
2 Press the Cursor left / right (2/ 3)
keys until the TITLE icon is highlighted.
MULTI CONTROL
Because DV D discs use digital technology, a title can
be divided into individual chapters (similar to tracks on
a CD). You can skip a specific chapter by using the
Chapter section in the Banner Display.
1 During playback, press the ON
SCREEN key on the remote.
2 Press the Cursor left/ right (2/ 3)
keys until the CHAPTER or TRAC K
icon is highlighted.
MULTI CONTROL
3 Press the ENTER key.
(“T__” appears)
Operations
ENTER
4 Use the numeric keys to enter the
title number.
123
456
789
0
When you enter a one-digit Title num ber, you may
have to press ENTER on t he rem ote aft er pressing
the numeric key (1~9) on the remote. Otherwise
press 0 first and t he ot her value. Then play start s.
This varies depending on number of Title within the
disc you’re playing.
3 Press the ENTER key.
(“C__” or “Tr__” appears)
ENTER
4 Use the numeric keys to enter the
chapter or track number.
123
456
789
0
When you enter a one-digit c hapter or title number,
you may have to press ENTER on the remot e aft er
pressing the numeric key (1~9) on the remote. Otherwise press 0 first and t he other value. Then play
starts. This varies depending on number of chapter
or track within the disc you’re playing.
Note
Note
Some discs only have one title.
÷ The Chapter feature won’t work if the disc isn’t
formatted with separate chapters.
÷ P.B.C. on mode of VCD, the Selecting a Track
function may not work.
Page 19

Notes
Notes
Using the On-screen banner display
ON/OFF
DV-502/DV F-3050 (EN/K,P,T,M,X)
19
DVD
Changing the Audio Language
If the disc was created with different language tracks,
you can us e the Banner Dis play to temporarily change
the DVD player’s Audio setting.
Using the on-screen banner display
1 During playback, press the ON
SCREEN key on the remote.
ON SCREEN
2 Press the Curs or left/right (2/3) keys
until the AUDIO ic on is highlighted.
MULTI CONTROL
3 Press the ENTER key.
ENTER
DVD
Changing the Subtitle Language
You can change the Subt itle language w hile you’re
watc hing a disc (but only if the disc was created with
subtitles).
Using the on-screen banner display
1 During playback, press the ON
SCREEN key on the remote.
ON SCREEN
2 Press the Cursor left/right (2/3) keys
until the SUBTITLE icon is highlighted.
MULTI CONTROL
3 Press the ENTER key.
ENTER
Displayed when
SUB TITLE is ON
The subtitle menu appears
Operations
The a udio menu appears
4 Select the subtit le language w ith
press the ENTER key.
5 Pres s the SUBTITLE ON/OFF key to
4 Select the audio language w it h
sub title ON or OFF.
press the ENTER key.
÷ The menu is sw it ched off w hen no operation is
performed for about 5 seconds.
÷ The menu is sw it ched off w hen no operat ion is
performed for about 5 seconds.
Using the AUDIO key on the remote Using the SUB TITLE key on the remote
1 During playback, press the AUDIO
key on the remote.
AUDIO
2 Select the audio language with press
the ENTER key or AUDIO key.
÷ The menu is sw it ched off w hen no operation is
performed for about 5 seconds.
1. The language feature only works if t he disc was created
w i t h mult iple audio t r acks.
2. When you chose an audio language from the Banner Display, you only override the audio language sett ing in the
DVD Player’ s m ain menu (in the Language Prefere nces
menu within Setup menu) temporarily.
Notes
Notes
SUBTIT LE
1. The subt it le f eature only w orks if th e disc was created
2. The subtitle m enu o f the disc appears in som e disc s.
1 During playback, press the SU B-
TITLE key on the remote.
2 Select the subtitle language with
press the ENTER key or SUBTITL E
key.
3 When t he SUBTITLE ON/ OFF key is
pressed, subtitles will be displayed.
Switching between display of subtitles
and no display of subtitles is done
each time the key is pressed.
Displayed when
SUBTITLE is ON
w i t h mult iple s ubtitle t racks.
Page 20

20
Note
Note
Using the On-screen banner display
DV-502/DV F-3050 (EN/K,P,T,M,X)
DVD
Changing the Camera angle
Some disc c ontains multiple angles particular s cene or
sequence. If the disc only has one angle, this feature
won’t work.
Using the on-screen banner display
1 During playback, press the ON
SCREEN key on the remote.
ON SCREEN
2 Press the Cursor left/ right (2/ 3)
keys until the ANGLE ic on is highlighted.
MULTI CONTROL
3 Press the ENTER key.
VCD
CD
IntroScan plays the first few seconds of each track on
the CD similar to the scan feature that ’s on many car
radios.
Using IntroScan function
Using the on-screen banner display
1 During playback, press the ON
SCREEN key on the remote.
ON SCREEN
2 Press the Cursor left/ right (2/ 3) keys
until the IntroScan icon is highlighted.
MULTI CONTROL
3 Press the ENTER key.
ENTER ENTER
Operations
The ANGLE menu appears
4 Select t he angle wit h press the
ENTER key.
÷ The menu is sw it ched off w hen no operation is
performed for about 5 seconds.
Using the AN GLE key on the remote
1 During playback, press the ANGLE
key on the remote.
ANGLE
÷ The first 10 seconds of each t rack
play.
÷ After Intro Scan goes through all of
the tracks, it stops.
÷ If you want to s top IntroScan while
it’s in progress, just press ENTER
key on the remote (the current track
starts playing in its entirety).
P.B.C. on mode of VCD, the IntroScan function may
not work.
2 Select the C amera angle with pres s
the ENTER key or ANGLE key.
÷ The menu is sw it ched off w hen no operation is
performed for about 5 seconds.
Page 21

Using the On-screen banner display
DV-502/DV F-3050 (EN/K,P,T,M,X)
21
CD
VCD
Using Bookmarks
DVD
The bookmark feat ure lets you mark a point on the disc that you can go t o quickly. You can store up t o 9
bookmarks.
Create the bookmark Recalling a bookmarked scene
1 During playback, press the ON
SCREEN key on the remote.
ON SCREEN
2 Press the Cursor left/ right (2/ 3)
keys until the BOOKMARK icon is
highlighted.
MULTI CONTROL
3 Press the ENTER key.
1 During playback, press the ON
SCREEN key on the remote.
ON SCREEN
2 Press the Cursor left/right (2/ 3)
keys until the BOOKMARK icon is
highlighted.
MULTI CONTROL
3 Press the ENTER key.
ENTER
The bookmark menu appears
4 When you reach the scene you
want to mark, press E NTER key or
the numeric key (1~9) .
ENTER
The bookmark appears on under square
÷ P ress the ON SCR EE N key or C LE AR key to switch
the menu off.
Clearing a bookmark
ENTER
Operations
The bookmark appears on under square
4 Press t he Cursor up (5) key on the
remote t o go the part s of the Bookmark menu.
MULTI CONTROL
5 Use the Cursor left/right (2/ 3)
keys on the remote to select the
bookmarked scene you want to ac tivate.
MULTI CONTROL
÷ The bookmark is cleared each tim e a disc is re-
moved from the player or when the power is
turned off.
Notes
Notes
÷ If all 9 bookmarks are in use, you c an s till mark new
sc enes, but the previous bookmarks will be erased.
÷ Depending on the disc, the Bookmark function may
not work
÷ P.B.C. on mode of VCD, the Bookmark function m ay
not work.
6 Press the ENTER key to active the
bookmark.
ENTER
÷ You can go to bookmarked scene by the numeric
key (1~9) on the step 5.
÷ P ress the ON SCR EE N key or C LE AR key to switch
the menu off.
Page 22

22
Note
Note
Using the On-screen banner display
DV-502/DV F-3050 (EN/K,P,T,M,X)
CD
VCD
Repeat play
DVD
Desired titles or disc s c an be played bac k repeatedly.
There are three Repeat options:
÷ Disc – Repeat the disc that is playing.
÷ Title – Repeat the t itle that is playing.
÷ Chapter – Repeat the chapter that is playing.
1 During playback, press REPEAT on
the remote.
RE P EAT
The R epeat display a ppears
Each press the key switches the
REPEAT mode.
RE P EAT
CD
VCD
A-B Repeat play
DVD
The A-B repeat function lets you mark a segment to
repeat between the beginning “A” and the end “B” of
the segment you want to replay.
1 Press the A-B key on the remot e
w hen you want t o choose a scene
(sound) as the beginning point.
A-B
The R epeat A- displa y appears
REPEAT
Lit
AB
Display
At the time of DVD playback
1 Repeat Disc --- Display lit “REPEAT ALL”
2 Repeat Title --- Display lit “REPEAT”
Operations
3 Repeat Chapter --- Display lit “REPEAT 1”
4 Repeat Off
At the time of CD/VCD playback
1 Repeat Disc --- Display lit “REPEAT ALL”
2 Repeat Track --- Display lit “REPEAT 1”
3 Repeat Off
At the time of REPEAT mode
Display
"REPEAT" is light.
AB
REPEAT
ALL
÷ To c anc el repeat playback, pres s the RE P E AT key
and select "Repeat off".
÷ The menu is sw it ched off w hen no operation is
performed for about 5 seconds.
2 Pres s the A-B key again to choos e a
scene (sound) as the end point.
A-B
The R epeat A-B display appears
REPEAT
Lit
AB
Display
÷ To c anc el A-B R epeat playback, pres s the A-B key
and select "Repeat off".
÷ The menu is sw it ched off w hen no operat ion is
performed for about 5 seconds.
Note
Note
P.B.C. on mode of VCD, the Repeat play function
may not work.
P.B .C. on mode of VCD, the A-B Repeat play function
may not work.
Page 23

VCD
CD
Random play
The tracks of the disc are played in random order.
1 During playback or stop mode, press
RANDOM on the remote.
RANDO M
The R andom Play display appears
Using the On-screen banner display
DV-502/DV F-3050 (EN/K,P,T,M,X)
23
Display
Lit
RANDOM
AB
Each tim e you press RANDOM on t he
remote, random play would be on and
off.
1 “Random Play”
2 “Standard Play”
The St andard Play display appears when
random is off.
÷ The menu is sw it ched off w hen no operation is
performed for about 5 seconds.
Note
Note
÷ When playing a DV D, t he Random function m ay
not work.
÷ P.B.C. on mode of VCD, the Random play
function may not work.
Operations
Page 24

24
Note
Note
DVD
CD
VCD
Program play
You can listen to the desired tracks or chapters of the current disc in any desired order.
Program Edit
1 During stop mode, press the P .MODE
key on the remote
P.MODE
2 Select specific title/ chapter or track
by Press Cursor up/ down (5/ ∞)
keys or numeric keys (0-9).
Program edit display appears.
PROGRAM EDIT
Title
Chapter
All
2
(12) (2)
DV-502/DV F-3050 (EN/K,P,T,M,X)
Playlist
Add
Delete
Play
Done
CT
MULTI CONTROL
(An example of DVD program edit menu)
: Selected icon
2
: An icon which can be selected
3 Press the ENTER key.
ENTER
4 Select Add icon on the screen to
: An icon which presently can not be selected
PROGRAM EDIT
Title
Chapter
All
2
(12) (2)
Add
Delete
Play
Done
Playlist
CT
2 All
register selected value onto
Playlis t, then press the ENTER key.
MULTI CONTROL
Operations
ENTER
÷ When you don’t add values onto “Playlist” and
return t o play mode, select Done icon and press
5 You can select m aximum 32 val-
ues by repeating step 2 - 4.
6 Press the PLAY key to start play-
back.
ENTER key on the remote.
÷ While a disc is playing, press P.M ODE key on t he
remote to start Program play
÷ To return to standard play, press the P.MODE key
again.
Delete Program
During stop mode, press the P.MODE key on the remote
1 Use the Curs or up/ down (5/∞) keys
to select the column t o be deleted
from the "Playlist". (The color of the
column w here t he Cursor is located
will change.)
MULTI CONTROL
2 Press the Curs or left (2) key, use the
Cursor up/down keys to move the
Curs or to the Delete icon, and pres s
the ENTER key. Or press t he clear
key.
MULTI CONTROL
Selected value deletes
ENTER
PROGRAM EDIT
Title
Chapter
All
2
(12) (2)
Add
Delete
Play
Done
Playlist
CT
2 All
312
18
1 All
35
P.B.C. on mode of VCD, the Progam play function
may not work.
Page 25

Insert chapter or track
During stop mode, press the P.MODE key on the remote
1 Select specific title/ chapter or track
to insert by Press Curs or up/ down
(5/∞) keys or numeric keys (0-9).
MULTI CONTROL
Program play
DV-502/DV F-3050 (EN/K,P,T,M,X)
25
2M ove the cursor w ith t he Cursor
right (‰) key t o t he "Playlist" and
selec t the column to be added with
the Cursor up/down (5/ ∞) keys.
MULTI CONTROL
(The color of the column where the
Cursor is located will change.)
3M ove the cursor w ith t he Cursor
left (2) key to t he Insert icon and
press the ENTER key.
MULTI CONTROL
ENTER
The new chapter or t rack w ill be inserted before (above) the selected
column.
PROGRAM EDIT
Title
Chapter
All
2
(12) (2)
Insert
Delete
Play
Done
Playlist
CT
2 All
312
18
1 All
35
(An example of DVD program edit menu)
PROGRAM EDIT
Title
Chapter
All
2
(12) (2)
Insert
Delete
Play
Done
Playlist
CT
2 All
312
18
2 All
1 All
35
Operations
Release Program play
In following case, Program play would be released.
1. When you open and close tray.
2. When you turn power off and on.
Note
Note
Add icon --- Add value onto “Playlist”
Delete icon --- Delete value from “Playlist”
Insert icon --- Insert value in “Playlist”
Play icon --- Play program play
Done icon --- Return to stop or resume mode
Page 26

26
Set Up functions
DV-502/DV F-3050 (EN/K,P,T,M,X)
Set up menu
The initial setup of the player, which has been made at the factory, can be changed to the desired setup.
1 During stop mode or resume mode,
press MENU key on the remote.
MENU
Current setup menu display appears
on the screen.
2 Press C urs or up/down (5/∞) keys
on the rem ote t o select t he it em ,
then press the ENTER key to access t he sub features
MULTI CONTROL
Audio / Subtitle : This sets the language to be used when playing a disc . (If a dis c does not contain the recording
(disc languages)
Menus : This s ets the initial s etup of language as well as the language used in on-s creen mess ages suc h
the selected language, it is played in the priority language set for each disc.)
as “PLAY”.
ENTER
Operations
Rating : This can restrict playback of adult-orient ed DVD discs that you do not w ant t o be seen by
children.
How ever, even when a DV D disc is marked “ Adult -oriented” or so on the label, it s view ing
cannot be restricted unless the restriction level is recorded in the disc itself.
Password : The password for rating setting, change, cancellation, etc. is set.
TV Aspect : This sets the screen size (4:3 or 16:9 aspect ratio) according to the connected TV.
4 x 3 letterbox : Choos e this s etting if you would prefer to see movies in their original
aspect rat io. You w ill see the ent ire fram e of the m ovie, but it will
occupy a s maller portion of the sc reen. This setting may result in the
movie appearing with black bars at the top and bottom of the screen.
4 x 3 Pan Scan : Choose this setting if you want the movie t o fill the ent ire screen of
your TV. You won’t see part of the picture (partic ularly the right and
left edge).
Some disc produced in a wide screen format can’t be cropped in this
fashion, which means the black bars would appear at the top and the
bottom of the screen.
16 x 9 Widescreen : Choose this setting if your DVD player is connected to a widescreen
TV.
Dynamic Range : This is set to ON when the volume change s hould not become overly large, for example when
listening late at night.
Digital Audio Out : This sets the type of audio output from t he digital audio output jack.
How to use the RETURN key
When t he RETURN key is pressed, t he display returns to t he previous screen
(STOP mode).
RETURN
Page 27

Set Up functions
DV-502/DV F-3050 (EN/K,P,T,M,X)
27
DVD
Select Audio Language
1 Press C urs or up/down (5/∞) keys
on the remote to selec t Audio on
the set up menu display, then
press the ENTER key.
MULTI CONTROL
(Audio menu appears.) (Subtitle menu appears.)
ENTER
DVD
Select Subtitle Language
1 Press C urs or up/down (5/∞) keys
on the rem ot e t o select Subt it le
on the set up menu display, then
press the ENTER key.
MULTI CONTROL
ENTER
2 Press C urs or up/down (5/∞) keys
on the rem ote t o select specific
Audio language, then press the
ENTER key.
MULTI CONTROL
ENTER
To select other language
1 Select “ Ot her” and press EN-
TER key
2 Input code in the first digit by
Press Cursor up/ dow n (5/ ∞)
keys or numeric keys on the
remote and repeat other 3 code
with same way.
3 Pres s the ENTER key on “OK”
icon.
(DVD menu language code lis t
fi)
2 Press C urs or up/down (5/∞) keys
on the rem ote t o select specific
Subtitle language, then pres s the
ENTER key.
MULTI CONTROL
ENTER
To select other language
1 Select “ Ot her” and press EN-
TER key
2 Input code in the first digit by
Press Cursor up/ dow n (5/ ∞)
keys or numeric keys on the
remote and repeat other 3 code
with same way.
3 Pres s the ENTER key on “OK”
icon.
(DVD menu language code lis t
fi)
Operations
÷ Press PLAY key to resume normal playback.
÷ Press PLAY key to resume normal playback.
Page 28

28
Set Up functions
DV-502/DV F-3050 (EN/K,P,T,M,X)
DVD
Select M enu Language
1 Press C urs or up/down (5/∞) keys
on the remote to selec t Menus on
the set up menu display, then
press the ENTER key.
MULTI CONTROL
ENTER
(Menus appears.)
DVD
Select Rating
This part of DVD rating let s you determine how your
player w ill react discs that contain m ovies that are
rated (in the U.S.A. the Motion Pic tures As soc iation of
America rates movies as G, PG, PG-13, etc.).
1 Press C urs or up/down (5/∞) keys
on the remote to selec t Menus on
the set up menu display, then
press the ENTER key.
MULTI CONTROL
ENTER
When a password already has been
set, the screen for change of the entered password will be displayed. In
that case, enter the password. (See
page 29.)
(Rating aspect menu appears.)
2 Press C urs or up/down (5/∞) keys
Operations
on the rem ote t o select specific
Audio language, then press the
ENTER key.
MULTI CONTROL
ENTER
2 Press C urs or up/down (5/∞) keys
÷ Press PLAY key to resume normal playback.
on the remot e to highlight rated
titles, then press the ENTER key.
MULTI CONTROL
ENTER
÷ Press PLAY key to resume normal playback.
Parental lock level
Level 8: All DVDs can be played back.(Factory preset)
Level 7 to 2: DVDs for general audiences/children can be
played back. (DVDs for adults are prohibited.)
Level 1: DVDs for children can be played back. (DVDs for
adults/general audiences are prohibited.)
Page 29

DVD
Password
Input passw ord
Set Up functions
DV-502/DV F-3050 (EN/K,P,T,M,X)
29
1 Press C urs or up/down (5/∞) keys
on the remote to selec t Pas sword
on the set up menu display, then
press the ENTER key.
MULTI CONTROL
ENTER
(Password menu appears.)
4 Press ENTER key to finish pass-
word input (Confirm Password
display appears below Enter Pas sword display).
5 Press C urs or up/down (5/∞) keys
or numeric keys on the remote to
enter again password that you
entered.
Operations
2 After select “Set Password”,
press the ENTER key.
MULTI CONTROL
ENTER
MULTI CONTROL
ENTER
6 Press the ENTER key on “OK” icon.
3 Press C urs or up/down (5/∞) keys
or numeric keys on the remote to
enter password.
÷ Press PLAY key to resume normal playback.
Page 30

30
DVD
Password (continued)
Change passw ord
Set Up functions
DV-502/DV F-3050 (EN/K,P,T,M,X)
1 Press C urs or up/down (5/∞) keys
on the rem ot e t o select Passw o rd
on the set up menu display, then
press the ENTER key.
MULTI CONTROL
ENTER
(Enter Password menu appears.)
4 Press C urs or up/down (5/∞) keys
or numeric keys on the remote to
enter password.
MULTI CONTROL
ENTER
5 Press EN TER key to finish pass-
word input (Confirm Password
display appears below Enter Pas sword display).
Operations
2 Press C urs or up/down (5/∞) keys
or numeric keys on the remote to
enter password.
Pres s the ENTER key on “OK” icon.
6 Press C urs or up/down (5/∞) keys
or numeric keys on the remote to
enter again password that you
MULTI CONTROL
ENTER
entered.
MULTI CONTROL
ENTER
3 Press C urs or up/down (5/∞) keys
to select Change Pas sword, then
press EN TER key.
7 Press the ENTER key on “OK” icon.
÷ Press PLAY key to resume normal playback.
Page 31

Set Up functions
DV-502/DV F-3050 (EN/K,P,T,M,X)
31
DVD
Password (continued)
Clear passw ord
1 Press C urs or up/down (5/∞) keys
on the rem ot e t o select Passw o rd
on the set up menu display, then
press the ENTER key.
MULTI CONTROL
(Enter Password menu appears.)
ENTER
DVD
TV aspect
1 Press C urs or up/down (5/∞) keys
on the rem ote t o select TV Aspect
on the set up menu display, then
press the ENTER key.
MULTI CONTROL
ENTER
(TV Aspect menu appears.)
2 Press C urs or up/down (5/∞) keys
or numeric keys on the remote to
enter password.
Pres s the ENTER key on “OK” icon.
MULTI CONTROL
ENTER
2 Press Curs or up/down (5/∞) keys
on the rem ote t o select TV Aspect
menu, then press the ENTER key.
MULTI CONTROL
ENTER
÷ Press PLAY key to resume normal playback.
Operations
3 Press C urs or up/down (5/∞) keys
to select Clear Password, then
press EN TER key.
÷ Press PLAY key to resume normal playback.
Page 32

32
Note
Note
Set Up functions
DV-502/DV F-3050 (EN/K,P,T,M,X)
DVD
Dynamic Range
1 Press C urs or up/down (5/∞) keys
on the remote to select Dynamic
Range on the set up menu display, then press the ENTER key.
MULTI CONTROL
ENTER
(Dynamic Range menu appears.)
DVD
Digital Audio Out
PCM : Choose t his sett ing for all connection
scenarios, except t he Dolby Digital or
DTS receiver or decoder connection.
Dolby Digital : Choose this setting if you connected
Dolby Digital receiver or decoder to
your DVD player.
DTS : Choose this setting if you connected
DTS receiver or decoder to your DV D
player
For Europe and U.K.
MPEG-2/ DTS : Choose this setting if you connected
DTS receiver, decoder or M PEG audio
to your DVD player.
1 Press C urs or up/down (5/∞) keys
on the remot e to select Digital Audio Out o n t he set up menu display, then press the ENTER key.
MULTI CONTROL
ENTER
(Digital Audio Out display appears.)
2 Press Curs or up/down (5/∞) keys
Operations
on the remote to select Dynamic
Range mode (on or off), then press
the ENTER key.
MULTI CONTROL
ENTER
÷ Press PLAY key to resume normal playback.
2 Press C urs or up/down (5/∞) keys
on the rem ote t o select specific
Digital Audio Out mode, then
press the ENTER key.
MULTI CONTROL
ENTER
DTS disclaimer clause
When playing DTS-encoded (CDs , DVDs), exc ess ive nois e
will be exhibited from the analog stereo outputs . To avoid
possible damage to the audio system, the consumer
should take proper pre-cautions when the analog stereo
output s of the DVD player is connected t o an am plification system. To enjoy DTS Digital Surround™ playback,
an external 5.1 channel DTS Digital Surround™ decoder
sys tem must be connec ted to the digital output (S/ P DIF,
AES/EBU, or TosLink) of the DVD player.
÷ Press PLAY key to resume normal playback.
When t he DTS of Digital Audio Out or the Dolby
Digital setting and the format recorded on the disc
are different from each other, audio may not be put
out. Please s witch ac cording to the indic ation on the
disc .
Page 33

Set Up functions M enu playback
DV-502/DV F-3050 (EN/K,P,T,M,X)
DVD
Linear PCM
33
96kHz => 48kHz : Even in c ase of 96 kHz digital signal,
(Digital Audio Out display appears.)
DVD will deliver 48 kHz signal out.
96kHz => 96kHz : In cas e of 96 kHz digital signal, DVD
will deliver 96 kHz signal out. In this
case your rec eiver should control 96
kHz signal.
1 Press C urs or up/down (5/∞) keys
on the remote to selec t Linear P C M
on the set up menu display, then
press the ENTER key.
MULTI CONTROL
ENTER
M enu playback
VCD
Hierarchical structure of VCD menus
When an item is selec ted on the menu sc reen during playbac k of a P.B .C.-c ompatible VCD, another menu with more
details items may be displayed. When a number of menus are c onnected in multiple layers in this way, it is said that
the m enus have a hierarchical structure. In t his st ructure, the desired scene can be reached by repeating it em
selections on the menu screens.
Operations
Example for a hierarchical structure
Advancing
When an item is selec ted on the menu screen with the 3 key
or the num eric keys, advance is made to t he next low er
menu level. When the advance destination is the “sc ene” to
be played, the contents will be played.
÷ When several menus (scenes) can be selected in each level, screen
switch in g is p o ss ib le with the keys ¢ (NEXT) and 4 (PREV.).
Returning
Eac h time the RETURN key is pres sed, return is made to the
next higher menu.
Examples of operation keys and indications used during VCD playback
First level (menu)
Second level (submenu)
Third level (scenes)
Soft jacket indication
KE NWOOD operation key
÷ Depending on the software, the jacket indication may differ from the above.
3
Play RE TURN
4
SKIP
DOWN
¢
SKIP
UP
ENTER or SELECT
ENTER
Page 34

34
M enu playback
DV-502/DV F-3050 (EN/K,P,T,M,X)
Playback w ithout using the menu playback function (In case of a P.B.C.-compatible VCD)
(To P.B.C. On or Off)
÷ For the track numbe rs , r e fer t o the disc jacket or othe r material.
Pres s the TOP MENU key on the remote control unit.
÷ P.B.C. off mode : With ou t using menu playback function.
P.B.C. off mode
PBC
Goes off
TOP MENU
VCD
Selecting the Audio channel
You can choose to play back only the right or t he left channel of audio recorded on the disc, or you can select
stereo playback. This function is used for purposes such as selecting the vocal track on a Karaoke disc.
During VCD playback, press AUDIO key on the
remote.
Operations
AUDIO
To return to menu playback
Press the TOP MENU key again.
P.B.C. on mode
PBC
Lit
Each press the key switches the mode.
1 STEREO
2 LEFT
3 RIGHT
Page 35

Know ledge
DVD menu language code list
35
DV-402/DV F-3530 (EN/K,P,T,M,X)
Cord No. Language
6565
6566
6570
6577
6582
6583
6588
6590
6665
6669
6671
6672
6678
6679
6682
6765
6779
6783
6789
6865
6869
6890
6976
6978
6979
6983
6984
6985
7065
7073
7074
7079
7082
7089
7165
7168
7176
7178
7185
7265
7273
Afar
Abkhazian
Afrikaans
Amharic
Arabic
Assamese
Aymara
Azerbaijani
Bashkir
Byelorussian
Bulgarian
Bihari
Bengali; Bangla
Tibetan
Breton
Catalan
Corsican
Czech
Welsh
Danish
German
Bhutani
Greek
English
Esperanto
Spanish
Estonian
Basque
Persian
Finnish
Fiji
Faroese
French
Frisian
Irish
Scots Gaelic
Galician
Guarani
Gujarati
Hausa
Hindi
Cord No. Language
7282
7285
7289
7365
7378
7383
7384
7387
7465
7473
7487
7565
7575
7576
7577
7578
7579
7583
7585
7589
7665
7678
7679
7684
7686
7771
7773
7775
7776
7778
7779
7782
7783
7784
7789
7865
7869
7876
7879
7982
8065
Croatian
Hungarian
Armenian
Interlingua
Indonesian
Icelandic
Italian
Hebrew
Japanese
Yiddish
Javanese
Geogian
Kazakh
Greenlandic
Cambodian
Kannada
Korean
Kashmiri
Kurdish
Kirghiz
Latin
Lingala
Laothian
Lithuanian
Latvian; Lettish
Malagasy
Maori
Macedonian
Malayalam
Mongolian
Moldavian
Marathi
Malay
Maltese
Burmese
Nauru
Nepali
Dutch
Nowegian
Oriya
Punjabi
Cord No.
8076
8083
8084
8185
8277
8279
8285
8365
8368
8372
8373
8375
8376
8377
8378
8379
8381
8382
8385
8386
8387
8465
8469
8471
8472
8473
8475
8476
8479
8482
8484
8487
8575
8582
8590
8673
8679
8779
8872
8979
9072
9085
Language
Polish
Pashto; Pushto
Portuguese
Quechua
Rhaeto-Romance
Romanian
Russian
Sanskrit
Sindhi
Serbo-Croatian
Singhalese
Slovak
Slovenian
Samoan
Shona
Somali
Albanian
Serbian
Sundanese
Swedish
Swahili
Tamil
Telugu
Tajik
Thai
Tigrinya
Turkmen
Tagalog
Tonga
Turkish
Tatar
Twi
Ukrainian
Urdu
Uzbek
Vietnamese
Volapük
Wolof
Xhosa
Yoruda
Chinese
Zulu
Knowledge
DIM M ER function
The display brightness of the main unit can be changed.
Switching as shown below is done each time the DIMMER key on the remote control is pressed.
1 Dim
2 Not lit
3 Bright
DIMMER
Page 36

36
In case of difficulty
DV-402/DV F-3530 (EN/K,P,T,M,X)
What appears to be a malfunc tion may not always be s erious . If your unit should not perform as expected, cons ult
the table below to see if the problem can be corrected before seeking help from your dealer or service
representative.
Operation to reset
The microprocessor may fall into malfunction (impossibility to
operate erroneous display, etc.) when the power cord is unplugged
while power is ON or due to an external factor. In this case, execute
the following procedure to reset the microprocessor and return it to
normal condition.
DVD player unit
Symptom
Playback does not start when t he play (3)
key is pressed.
Playbac k starts but no image/sound is s een/
heard.
The picture is disrupted when the image is
fast forwarded or fast reversed.
÷ There is no disc in the player.
÷ There are no signals recorded on the side of the
disc being played.
÷ The TV is not turn ed on .
÷ The connection cords are not properly con-
nected.
÷ The picture is slightly disrupted during fast
forward and fast re v er se o p er at io ns .
1 In P OWER ON condition, keep the 7 (S TOP ) key and the
¡¡
¡
¡¡
(Search) key pressed at the same time.
2 When both keys are pressed, the region code of the unit, the
software version, etc. will be displayed on the display. ( When
noth ing is done, t he display of this inf o rmation continues.)
Example: 71 . 101 . 06:14
3 Press the ON/OFF key to go to Power OFF.
4 W hen Power ON is perform ed with t he ON / OFF key, the
settings become the default factory settings.
÷Please note that resetting the microprocessor clears the
contents stored in, it returns the microprocessor to the condition when it left the facto r y .
RemedyCause
÷ Load a disc and press the play (3) key.
÷ Turn the disc over and properly place it on the
disc t ray.
÷ Turn on th e TV.
÷ Properly reconnect t he c o n ne c tion cords.
÷ This is not a malfunctio n .
No sound is heard.
The picture does not look good or the picture/ sound quality is poor.
It takes a while for the disc to start playing.
The tray opens automatically.
The top and bottom of the screen c annot be
Knowledge
seen.
The subtitle is not displayed.
The voice (or subtit le) language cannot be
changed.
÷ The audio output cords are not p roperly con-
necte d.
÷ The volume control of the TV or a mplifier is not
adjusted prope rl y.
÷ The player is in a special playback m o de .
÷ A nearby device is g e n er at in g n o is e.
÷ The disc is dirty.
÷ The disc is damaged.
÷ There is condensat io n on the optical lens.
÷ Time is re qu ire d for t h e un it to de tect the disc
type and size and for the rotation of the motor to
stabilize. This is not a malf u n c tion.
÷ The disc is not placed horizontally.
÷ The video format of the disc being played does
not match that of the connected TV monitor.
÷ The DVD disc being played does not contain the
recording of subt itles.
÷ The subtitle mode is set to off.
÷ The DVD disc being played does not contain the
recording of m ore t han one audio (or subt it le)
language.
÷ Properly connect the audio cord s.
÷ Set the sound volume to an a ppropriate level.
÷ Press the play (3) key to resume normal
playback mode.
÷ Separa te this unit as far as possible from the
device you think is generat i ng the noise.
÷ Refer to the “ Disc handling precautions” sec-
tion and wipe di rt f ro m t h e di sc .
÷ Use a new disc.
÷ Refer to the “ Beware of condensation” sec-
tion and evaporate the condensation .
÷ Approximately 10 to 20 seconds are required
for a disc t o s t art playing, altho ugh t h e t ime
differs dependin g o n the disc.
÷ Properly place the d is c o n the tray.
÷ Refer to the “ Video formats” section ,and use
a disc w it h t he appropriate video for m at f or
your TV or a TV wit h the appropriat e video
format for the dis c.
÷ The subtit le cannot be di splayed w hen t he
DVD disc being played does not cont ain th e
recording of subt itles.
÷ Press the SUB TITL E -ON/OFF key to switch
on th e su b titl e mode.
÷ The voice (or subtit le) language cannot be
changed w hen the DVD disc being played
does not contain t h e rec ord in g o f m ore than
one voice (or subtitle) language.
The viewing angle cannot be changed.
÷ The DVD disc being played does not contain the
recording of mo re than one angle.
÷ You are attempting to switch the angle in a DVD
sectio n w her e m ore t han one angle is not re corded.
÷ The viewing angle cannot be c hanged when
the D VD disc being played does not contain
the re c or d in g o f m o re than one angle.
÷ More than one viewing angle may be re-
corded only in limited sectio ns i n a disc.
Page 37

DVD player unit
In case of difficulty
DV-402/DV F-3530 (EN/K,P,T,M,X)
37
Symptom
Playback w ill not start even aft er a t itle is
selected.
The viewing restriction level (RATING) cannot be changed.
The voice or subtit le language select ed in
the initial setting is not played.
No mess age appears on the TV screen after
a key is pressed.
Menu sc reen messages are not shown in the
desired language.
÷ A viewing restriction (RAT ING) has been set for
the d is c.
÷ You have forgotten the viewing restriction (RAT -
ING) password.
÷ The DVD disc being played does not contain the
recording of the selec t e d voic e or s ubtitle language.
÷ The function for displaying message on the TV
screen (On-Screen Me ss ages) is set to off.
÷ The menu langua ge function (MENU) is not set.
Remote control unit
Symptom Cause Remedy
Remote control operation is not possible. ÷ Batteries are exhauste d.
÷ The rem ote cont rol is t oo far away f rom t he
system, the controlling angle is deviated or
there is an obstacle in betwee n.
RemedyCause
÷ Check the viewing restriction level (RATING)
setting.
÷ Set the initial setup to the factory setup with
the following pro ce d u re .
1 In POWER ON condition, keep the 7 (S TOP ) key and the
(Search) key pressed at the same time.
2 When both keys are pressed, the region code of the unit, the
software version, etc. will be displayed on the display. (When
nothing is done, the display of this information continues.)
3 Press the ON/ OFF key to go to Power OFF.
4 W hen Pow er O N is performed w it h t h e ON / OFF key, the
settings become the default factory settings.
÷ Use a DVD disc cont aining the rec ording of
the se le c ted voice or su b titl e language.
÷ Set On-Screen Messages to o n.
÷ Set the disc menu language function (MENU)
as required.
÷ Replace w ith new batteries.
÷ Operate t he un it in side t he rem ot e cont rol-
lable range.
¡¡
¡
¡¡
Inhibition icon
Symptom Cause Remedy
The inhibition icon is displayed
and remote control is not possible.
Apparatus Claims of U .S. Patent N o s . 4 ,6 3 1, 60 3 , 4 ,5 7 7, 21 6 ,
and 4,819,098, License d for limit e d v ie wing uses onl y.
This product is com patible w it h t he M acroVision type c opy
prot ection. Some d iscs c ontain the reco rding o f c opy inh ibit
signals, and the video m ay be dist urbed w hen t he vid eo of
such discs is re c o r d ed o n to a VCR and played back.
This product incorporates copyright protection technology that is protected by m ethod claims of certain U.S. patents and ot her intellectual property right owned by Macrovision Corporation and other rights
owners. Use of this copyright protection technology must be authorized by Macrovision Corporation, and is intended for home and other
limited viewing uses only unless otherwise authorized by Macrovision
Corporation. Reverse engineering o r d is assembly is prohibited.
÷ Playback is restrict ed i ntenti onally by the sof t-
ware producer.
÷ The operation is inhibited. Please try an-
otheroperation.
It is prohibited b y law s t o duplicate, broadcast, perf orm i n
public or rent a disc without the permission of the copyright
owners.
Manufactured under license from Dolby Laboratories. “ Dolby” ,
“ AC-3”, “Pro Logic” , and the double-D symbol are trademarks of
Dolby Laboratories. Conf ident ial Unpublished W orks. © 1 9921997 Dolby La boratories. All rights reserved.
“ DTS” and “ DTS Digital Surround” are trademarks of Digital
Theater Systems, Inc.
Knowledge
Page 38

38
Specifications
DV-402/DV F-3530 (EN/K,P,T,M,X)
[Type]
System................................................. DV D video player system
Signal read system ..................................... Semiconductor laser
[D/A Conversion Section]
D/A conversion..................................................................... 24 Bit
Oversampling .............. 8 fs (Sampling frequency; 44.1, 48 kHz)
4 fs (Sampling frequency; 96 kHz)
[Audio section]
Frequency response
Sampling frequency ; 44.1 kHz ...................... 4 Hz ~ 20 kHz
Sampling frequency ; 48 kHz.......................... 4 Hz ~ 22 kHz
Sampling frequency ; 96 kHz.......................... 4 Hz ~ 42 kHz
Signal to noise ratio .......................................... More than 98 dB
Dynamic range ................................................... More than 95 dB
Total harmonic distortion ..................Less t han 0.005 % (1 kHz)
Channel separation ..............................More than 95 dB (1 kHz,)
Wow and flutter ................................... Below measurable limit
Analog output level/impedance...................................2 V / 1 kΩ
Digital output level/ impedance
COAXIAL ......................................................... 0.5 Vp-p / 75 Ω
OPTICAL............ -21 dBm ~ -15 dBm (W ave length 660 nm)
[Video Section]
Video output format .................................................... NTSC/PAL
Video compression
DVD .............................................................................. MPEG-2
Composite video output level
......................................... 1 Vp-p (75 Ω load, sync. negative)
S-video output level
(Y-signal)......................... 1 Vp-p (75 Ω load, sync. negative)
(C-signal)
NTSC ...................................................... 0.286 Vp-p (75 Ω)
PAL......................................................... 0.300 Vp-p (75 Ω)
Horizontal resolution ................................... More than 480 lines
Video signal to noise ratio ................................ More than 60 dB
[General]
Power consumption.............................................................. 16 W
Dimensions ................................................. W:440 mm (17-5/16”)
H: 109 mm (4-5/ 16”)
D: 325 mm (12-13/ 16”)
Weight (net) ............................................................. 4.0 kg (8.8 lb)
KENW OOD follow s a policy of continuous advancement s in developm ent. For this reason specifications may be
Notes
Notes
changed without notice.
÷ Sufficient p e rformance may not be e x h ibi ted at extrem el y co ld l oc at io n s (W h e re water fre e zes).
Knowledge
Page 39

DV-402/DV F-3530 (EN/K,P,T,M,X)
39
Knowledge
Page 40

For your records
Record the ser ial number, fou nd on the back of the unit, in the spaces
designated on the warranty card, and in the space provided below. Refer
to the model and serial numbers whenever you call upon your dealer for
information or s er vi ce o n this product.
Model Serial Number
Page 41

documentation manual, user maintenance, brochure, user reference, pdf manual
This file has been downloaded from:
User Manual and User Guide for many equipments like mobile phones, photo cameras, monther board, monitors, software, tv, dvd, and othes..
Manual users, user manuals, user guide manual, owners manual, instruction manual, manual owner, manual owner's, manual guide,
manual operation, operating manual, user's manual, operating instructions, manual operators, manual operator, manual product,
 Loading...