


FM/AM RECEIVER
R-SG7
CD PLAYER
DP-SG7
CASSETTE TAPE DECK
X-SG7
INSTRUCTION MANUAL
KENWOOD CORPORATION
COMPACT
DIGITAL AUDIO
TEXT
B60-4358-00
EN
2
Before applying power
Units are designed for operation as follows.
Caution : Read this page carefully to ensure safe operation.
Before applying power
R-SG7/DP-SG7/X-SG7 (EN)
U.S.A. and Canada ...................................................................AC 120 V only
Australia .................................................................................... AC 240 V only
For the United Kingdom
Factory fitted moulded mains plug
1.The mains plug contains a fuse. For replacement, use only a 13Amp ASTA-approved (BS1362) fuse.
2.The fuse cover must be refitted when replacing the fuse in the
moulded plug.
3.Do not cut off the mains plug from this equipment. If the plug
fitted is not suitable for the power points in your home or the cable
is too short to reach a power point, then obtain an appropriate
safety approved extension lead or adapter, or consult your dealer.
If nonetheless the mains plug is cut off, remove the fuse and dispose of the plug immediately, to avoid a possible shock hazard by
inadvertent connection to the mains supply.
Preparation section
IMPORTANT: The wires in the mains lead are coloured in accord-
ance with the following code:
Blue : Neutral
Brown : Live
Europe and U.K. ........................................................................ AC 230 V only
China and Russia ..................................................................... AC 220 V only
*Other countries ................................ AC 110-120 / 220-240 V switchable
Do not connect those leads to the earth terminal of a three-pin plug.
Basic section
Safety precautions
WARNING : TO PREVENT FIRE OR ELECTRIC SHOCK, DO NOT EXPOSE THIS APPLIANCE TO
RAIN OR MOISTURE.
CAUTION: TO REDUCE THE RISK OF ELECTRIC SHOCK, DO NOT REMOVE COVER
(OR BACK). NO USER-SERVICEABLE PARTS INSIDE. REFER SERVICING TO QUALIFIED SERVICE PERSONNEL.
RISK OF ELECTRIC SHOCK
Application section
CAUTION
DO NOT OPEN
THE LIGHTNING FLASH WITH ARROWHEAD SYMBOL, WITHIN AN EQUILATERAL TRIANGLE, IS INTENDED
TO ALERT THE USER TO THE PRESENCE OF UNINSULATED “DANGEROUS VOLTAGE” WITHIN THE
PRODUCT’S ENCLOSURE THAT MAY BE OF SUFFICIENT MAGNITUDE TO CONSTITUTE A RISK OF ELECTRIC SHOCK TO PERSONS.
THE EXCLAMATION POINT WITHIN AN EQUILATERAL TRIANGLE IS INTENDED TO ALERT THE USER TO
THE PRESENCE OF IMPORTANT OPERATING AND MAINTENANCE (SERVICING) INSTRUCTIONS IN THE
LITERATURE ACCOMPANYING THE APPLIANCE.
The marking of products using lasers
(Except for some areas)
Knowledge sections
Downloaded from:
CLASS 1
LASER PRODUCT
The marking is located on the rear panel and says that the component uses laser beams that have been classified as Class 1. It means
that the unit is utilizing laser beams that are of a weaker class. There
is no danger of hazardous radiation outside the unit.

Contents
Preparation section Application section
Caution : Read the pages marked carefully to ensure safe operation.
Before applying power
R-SG7/DP-SG7/X-SG7 (EN)
3
Before applying power ................................................. 2
Safety precautions .............................................................. 2
IMPORTANT SAFEGUARDS ............................................... 4
The High grade Micro Component Series ...................... 6
About the Instruction Manual ........................................... 6
Special features .................................................................. 7
System Composition and Installation......................... 8
System connection ........................................................ 9
Antenna connection............................................................ 9
Connection of audio cord ................................................ 10
Connection of speakers ................................................... 12
Connection of system control cord ................................ 13
Power Cord Connection ................................................... 13
Controls and indicators............................................... 14
Main Unit ............................................................................ 14
Remote control Unit .......................................................... 16
Operation of remote control unit ............................... 17
Basic section
Hearing sound............................................................... 18
Basic use ............................................................................ 18
Playback of CD................................................................... 20
Playback of tape ................................................................ 22
Receiving broadcast station ........................................... 26
Collective presetting of stations (auto preset) ............ 27
One-by-one presetting (manual preset) ........................ 27
Recording ...................................................................... 28
Recording ............................................................................ 28
Playback of CD ............................................................. 31
Listening in the desired sequence
(program playback) ......................................................... 31
Repeated playback ........................................................... 33
Listening to an unexpected title sequence
(random playback) ........................................................... 34
Convenient CD recording............................................ 35
Selecting the optimum recording method ........................... 35
Giving preference to the tape length
over the tarck sequence
(time edit recording) ....................................................... 36
Recording only desired tarcks
(ONE TOUCH EDIT......single tarck recording) .................... 37
One-touch recording of an entire CD
(ONE TOUCH EDIT......recording of all tarcks) ..................... 38
R.D.S. (Radio Data System)......................................... 39
Searching for a desired program type
(PTY search) ..................................................................... 40
To be able to listen to the desired information
at any time
(EON reservation) ............................................................ 42
Listening with high sound quality (Pure A) ............. 43
Listening in Pure A mode ................................................. 43
Clock adjustment ......................................................... 44
Timer operation ............................................................ 45
Operate easy To use Timer (O.T.T.) ................................. 45
Sleep timer ......................................................................... 45
Timer programming........................................................... 46
Knowledge section
Preparation section Basic section
Application section
Important items............................................................. 49
Handling of discs and tapes ............................................ 49
Maintenance ...................................................................... 50
Reference ............................................................................ 51
In case of difficulty ...................................................... 52
Specifications............................................................... 55
Knowledge sections

4
Caution : Read this page carefully to ensure safe operation.
IMPORTANT SAFEGUARDS
Please read all of the safety and operating instructions
before operating this appliance. Adhere to all warnings
on the appliance and in the instruction manual. Follow all the
safety and operating instructions. These safety and
operating instructions should be retained for future
reference.
Before applying power
R-SG7/DP-SG7/X-SG7 (EN)
1. Power sources – The appliance should be connected
to a power supply only of the type described in the
instruction manual or as marked on the appliance. If you
are not sure of the type of power supply to your home,
consult your appliance dealer or local power company.
For appliances intended to operate from battery power,
or other sources, refer to the instruction manual.
2. Power-cord protection – Power-supply cords
should be routed so that they are not likely to be
Preparation section
walked on or pinched by items placed upon or
against them, paying particular attention to cords
at plugs, convenience receptacles, and the point
where they exit from the appliance.
3.
CAUTION – Polarization – This appliance may
be equipped with a polarized alternating-current line
plug (a plug having one blade wider than the other). This
plug will fit into the power outlet only one way. This is
a safety feature. If you are unable to insert the plug fully
into the outlet, try reversing the plug. If the plug should
still fail to fit, contact your electrician to replace your
Basic section
obsolete outlet. Do not defeat the safety purpose of the
polarized plug.
4. Ventilation – Slots and openings in the cabinet are
provided for ventilation and to ensure reliable operation
of the appliance and to protect it from overheating, and
these openings must not be blocked or covered. The
appliance should be situated so that its location or
position does not interfere with its proper ventilation.
To maintain good ventilation, do not put records or a
table-cloth on the appliance. Place the appliance at least
10 cm away from the walls.
Do not use the appliance on a bed, sofa, rug or similar
surface that may block the ventilation openings. This
Application section
appliance should not be placed in a built-in installation
such as a bookcase or rack unless proper ventilation is
provided or the manufacturer’s instructions have been
adhered to.
7. Heat – The appliance should be situated away
from heat sources such as radiators, heat registers,
stoves, or other appliances (including amplifiers)
that produce heat.
8. Electric shock – Care should be taken so that
objects do not fall and liquid is not spilled into the
enclosure through openings. If a metal objects,
such as a hair pin or a needle, comes into contact
with the inside of this appliance, a dangerous
electric shock may result. For families with
children, never permit children to put anything,
especially metal, inside this appliance.
9. Enclosure removal – Never remove the enclosure.
If the internal parts are touched accidentally, a
serious electric shock might occur.
10. Magnetic fields – Keep the appliance away from
sources of magnetic fields such as TV sets, speaker
systems, radios, motorized toys or magnetized
objects.
11. Cleaning – Unplug this appliance from the wall
outlet before cleaning. Do not use volatile solvents
such as alcohol, paint thinner, gasoline, or benzine,
etc. to clean the cabinet. Use a clean dry cloth.
12. Accessories – Do not place this appliance on an unstable
cart, stand, tripod, bracket, or table. The appliance may
fall, causing serious injury to a child or adult, and serious
damage to the appliance. Use only with a cart, stand,
tripod, bracket, or table recommended by the
manufacturer, or sold with the appliance. Any mounting
of the appliance should follow the manufacturer’s
instructions, and should use a mounting accessory
recommended by the manufacturer. An appliance and
cart combination should be moved with care. Quick
stops, excessive force, and uneven surfaces may cause
the appliance and cart combination to overturn.
5. Water and moisture – The appliance should not
be used near water - for example, near a bathtub,
washbowl, kitchen sink, laundry tub, in a wet
basement, or near a swimming pool, etc.
6. Temperature – The appliance may not function
properly if used at extremely low, or freezing
temperatures. The ideal ambient temperature is
Knowledge sections
above +5°C (41°F).
13. Lightning – For added protection for this appliance
during a lightning storm, or when it is left unattended
and unused for long periods of time, unplug it from the
wall outlet and disconnect the antenna or cable system.
This will prevent damage to the appliance due to lightning
and power-line surges.
14. Abnormal smell – If an abnormal smell or smoke
is detected, immediately turn the power OFF and
unplug the appliance from the wall outlet. Contact
your dealer or nearest service center.

Caution : Read this page carefully to ensure safe operation.
Before applying power
R-SG7/DP-SG7/X-SG7 (EN)
5
15. Damage requiring service – The appliance should
be serviced by qualified service personnel when:
A. The power-supply cord or the plug has been
damaged.
B. Objects have fallen, or liquid has been spilled into
the appliance.
C. The appliance has been exposed to rain or water.
D. The appliance does not appear to operate normally
by following the instruction manual. Adjust only those
controls that are covered by the instruction manual as
an improper adjustment of other controls may result in
damage and will often require extensive work by a
qualified technician to restore the appliance to its normal
operation.
E. The appliance has been dropped, or the enclosure
damaged.
F. The appliance exhibits a marked change in performance.
16. Servicing – The user should not attempt to
service the appliance beyond that described in the
instruction manual. All other servicing should be
referred to qualified service personnel.
17. Outdoor antenna grounding – If an outside
antenna is connected to the appliance, be sure the
antenna system is grounded so as to provide
some protection against voltage surges and built
up static charges. Article 810 of the National
Electrical Code ANSI/NFPA 70, provides
information with respect to proper grounding of
the mast and supporting structure, grounding of
the lead-in wire to an antenna discharge unit, size
of grounding conductors, location of antenna
discharge unit, connection to grounding
electrodes, and requirements for the grounding
electrode. See Figure.
18. Power lines – An outside antenna system should not
be located in the vicinity of overhead power lines or
other electric light or power circuits, or where it can fall
into such power lines or circuits. When installing an
outside antenna system, extreme care should be taken
to keep from touching such power lines or circuits as
contact with them might be fatal.
19. AC outlets – Do not connect other audio
equipment with a power consumption larger than
that specified to the AC outlet on the rear panel.
Never connect other electrical appliances, such
as an iron or toaster, to it to prevent fire or electric
shock.
20. Overloading – Do not overload wall outlets, extension
cords, or integral convenience receptacles as this can
result in a risk of fire or electric shock.
21. Attachment – Do not use attachments not
recommended by the appliance manufacturer as they
may cause hazards.
22. Replacement parts – When replacement parts are
required, be sure the service technician has used
replacement parts specified by the manufacturer or
have the same characteristics as the original parts.
Unauthorized substitutions may result in fire, electric
shock, or other hazards.
23. Safety check – Upon completion of any service or
repairs to this appliance, ask the service technician to
perform safety checks to determine that the appliance
is in proper operating condition.
Preparation section Basic section
Application section
EXAMPLE OF ANTENNA GROUNDING AS PER
NATIONAL ELECTRICAL CODE
ANTENNA
LEAD IN WIRE
GROUND
CLAMPS
ANTENNA
DISCHARGE UNIT
ELECTRIC
SERVICE
EQUIPMENT
NEC – NATIONAL ELECTRICAL CODE
(NEC SECTION 810-20)
GROUNDING CONDUCTORS
(NEC SECTION 810-21)
GROUND CLAMP
POWER SERVICE GROUNDING
ELECTRODE SYSTEM
(NEC ART 250, PART H)
Knowledge sections
Notes:
1. Item 3 is not required except for grounded or polarized
equipment.
2. Item 17 and 18 are not required except for units provided with
antenna terminals.
3. Item 17 complies with UL in the U.S.A.

6
Before applying power
R-SG7/DP-SG7/X-SG7 (EN)
The High grade Micro Component Series
Thank you for purchasing the High grade Micro component series.
This system is available in various configuration according to your preferences.
The system configuration is up to you, but as the following convenient system operations can be
executed by connecting the various units to the system control, the respective units should be purchased as required.
Remote Control
The remote control supplied with the receiver can be used for basic operation of the source units (CD
player, cassette deck, MD recorder).
Automatic Operation
When playback is started on the playback source unit, the input selector on the amp tuner will
automatically be set to input for that source unit. Also, when source input is selected on the amp tuner,
playback of the input source unit will be started automatically.
Synchronized Recording
With recording from CD or MD, it is possible to start synchronized recording by the recording unit (MD
recorder or cassette deck). (Recording from one MD recorder onto another one is not possible.)
There are also other convenient functions like one-touch edit recording for CD and MD etc.
Preparation section
Timer Operation
The clock function of the receiver can be used for timer playback and timer recording of source equipment
(CD player, cassette deck, MD recorder).
High grade Micro Component Series components
R-SG7 (receiver) X-SG7 (cassette deck)
DP-SG7 (CD player) DM-SG7 (MD recorder)
Basic section
About the Instruction Manual
While some models of the High grade Micro component series have an instruction manual explaining
the system operation for R-SG7 (receiver), DP-SG7 (CD player), and X-SG7 (cassette deck), other models have only an operation manual for that model itself. This is done so that the system operation can
be done easily even when optional equipment is purchased at a later date. Please read the required
sections according to the components you purchased.
With the High grade Micro component series, the system explanations show only the connection method
for the DM-SG7 (MD recorder). Please refer to the instruction manual enclosed with the DM-SG7 for the
detailed operation.
Application section
Model name Enclosed instruction manual
(name of the purchased component) (explained models)
Basic system (R-SG7, DP-SG7) System instruction manual (R-SG7, DP-SG7, X-SG7)
Cassette deck (X-SG7) Individual instruction manual (X-SG7)
MD recorder (DM-SG7) Individual instruction manual (DM-SG7)
Knowledge sections

Special features
7
Amplifier unit that accomplishes high grade sound quality and low distortion
¶
“Pure A” High Quality Mode at Low Volume
When listening with low volume close to the set or late at night, we recommend the “Pure A” operation mode. Then you
can enjoy smooth high-quality sound with little distortion. Please use the normal mode to listen at higher volumes.
7
CD player unit that accomplishes improved sound quality and stability
¶
Newly developed D.R.I.V.E. IC installed
A D.R.I.V.E. (Dynamic Resolution Incentive Vector Enhancement) IC that rapidly improves distortion at minute
levels is installed in the CD player in order to extract the maximum performance possible from the CD.
Before applying power
R-SG7/DP-SG7/X-SG7 (EN)
e
7
Convenient easy to use operation
7
¶
Easy Operation
When the High grade Micro component series is connected to the system control, input switching with the
input selector (TAPE, TUNER, CD, MD) of the R-SG7 will start playback by the selected unit. Reversely, when
playback is started from a unit, the input will be switched automatically to this unit.
¶
CD TEXT compatibility
Disc title and track names recorded on the CD appear in the display of the MD player (DM-SG7: sold separately).
¶
Convenient Edit Recording
Time edit recording: Recording so that no track is interrupted within the specified time.
One-touch edit recording: When listening to a CD, either a single track or the entire CD can be recorded on tape
by one-touch operation.
Simple Timer Operation
¶
The wake-up timer and the sleep timer can be set easily.
A daily program timer also can be reserved.
¶
R.D.S. (Radio Data System)
The RDS data included in FM broadcasts can be used to search for the intended broadcasting contents and for
automatic reception from standby.
Preparation section Basic section
fl
t
·
Application section
Unpacking
Unpack the unit carefully and make sure that all accessories are put aside so they will not be lost.
Examine the unit for any possibility of shipping damage. If your unit is damaged or fails to operate, notify your dealer immediately. If your unit was shipped to you directly, notify the shipping company without delay. Only the consignee (the person or
company receiving the unit) can file a claim against the carrier for shipping damage.
We recommend that you retain the original carton and packing materials for use should you transport or ship the unit in the future.
Accessories
Accessories using with R-SG7
AM loop antenna (1)
Loop antenna stand (1)
FM indoor antenna (1)
Remote control unit (1)
Batteries (R6/AA) (2)
Knowledge sections
Accessories using with DP-SG7
Audio cord (1)
System control cord (1)
Accessories supplied with X-SG7
Audio cord (2)
System control cord (1)
8
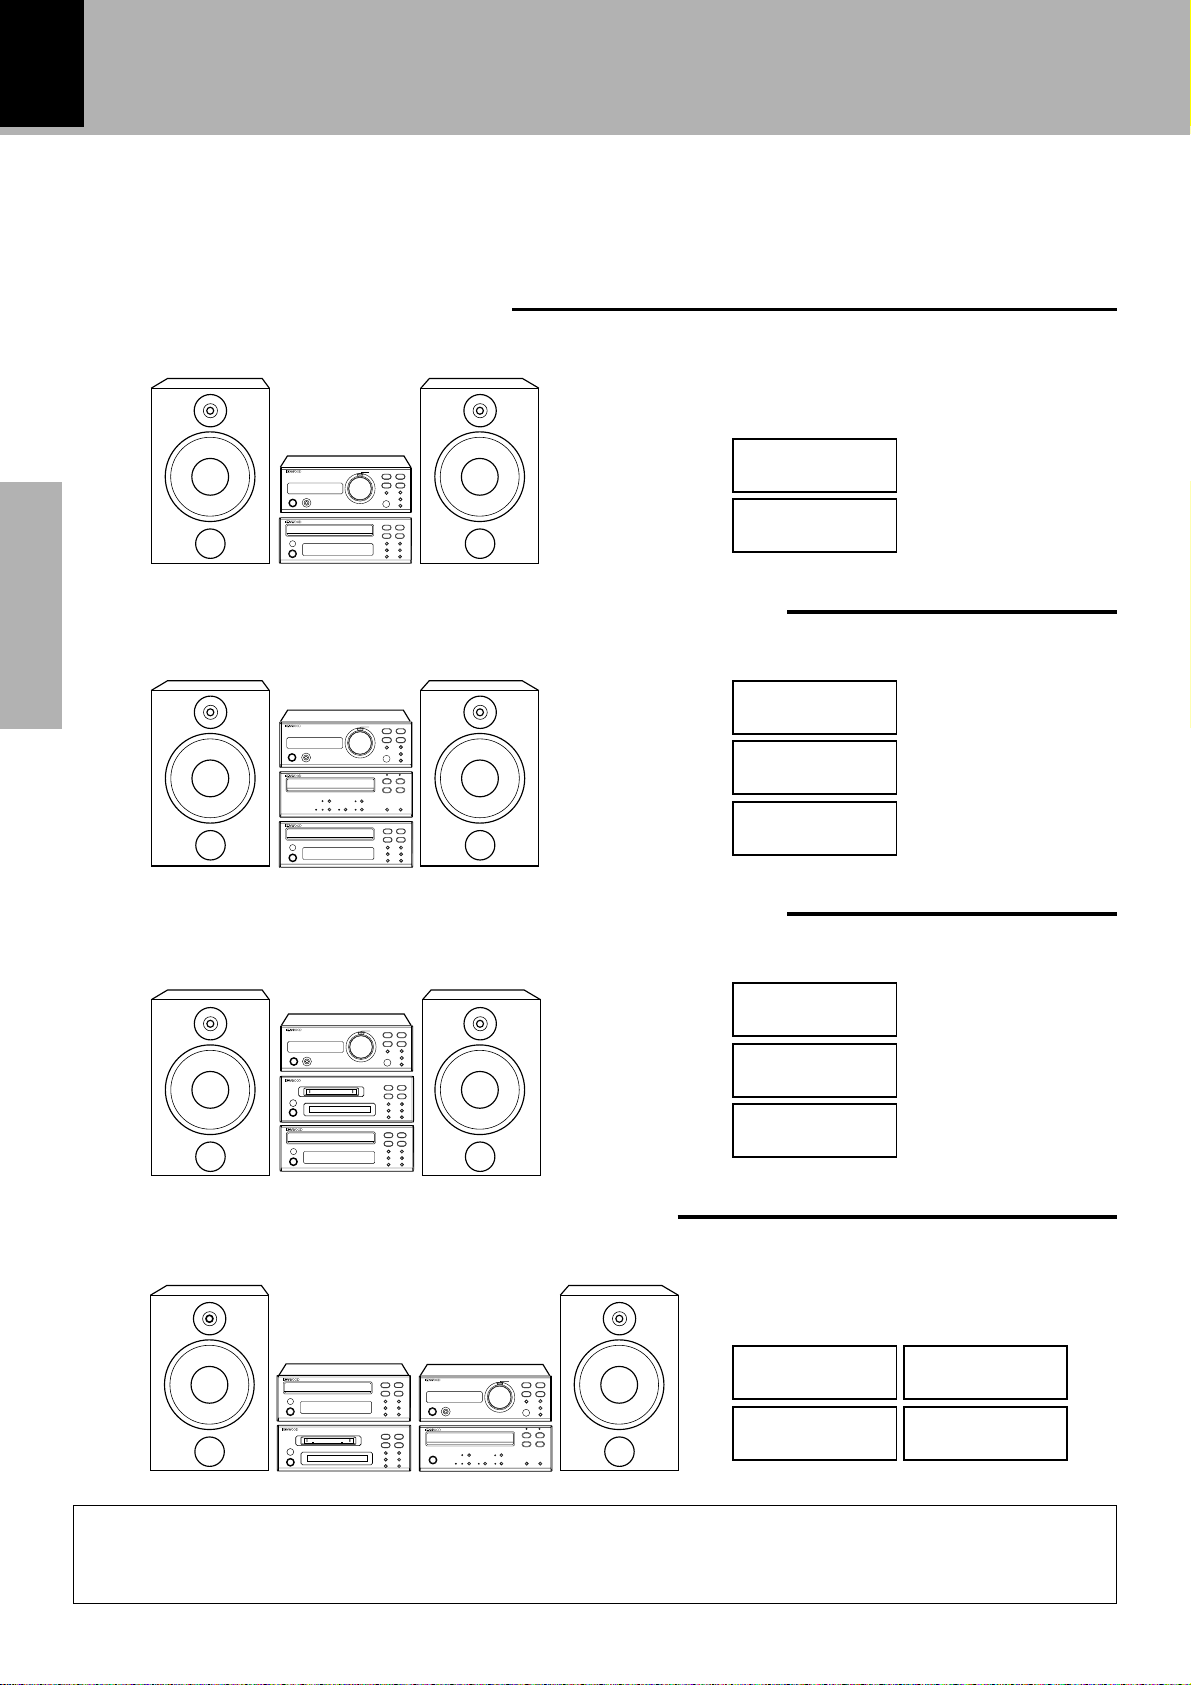
System Composition and Installation
The High grade Micro component series permits various combinations according to the purchased
components. As the installation differs according to the components you purchase, please install correctly under reference to the illustrations.
System connection
R-SG7/DP-SG7/X-SG7 (EN)
Basic System (R-SG7, DP-SG7)
Seen from the front Installation method
R-SG7
DP-SG7
Basic System + Cassette Deck (R-SG7, DP-SG7, X-SG7)
Seen from the front Installation method
Preparation section
R-SG7
Basic System + MD recorder (R-SG7, DP-SG7, DM-SG7)
Basic section
Seen from the front Installation method
disc loading mechanism
Full System (R-SG7, DP-SG7, DM-SG7 X-SG7)
Application section
Seen from the front Installation method
X-SG7
(optional)
DP-SG7
R-SG7
DM-SG7
(optional)
DP-SG7
disc loading mechanism
Knowledge sections
When the power of the R-SG7 (receiver) is switched on, the heat generated on the inside is
CAUTION
radiated to the outside. Always install the R-SG7 on top, and don't place any objects impairing
heat radiation onto the top of the unit.
DM-SG7
(optional)
R-SG7DP-SG7
X-SG7
(optional)
System connection
System connection
R-SG7/DP-SG7/X-SG7 (EN)
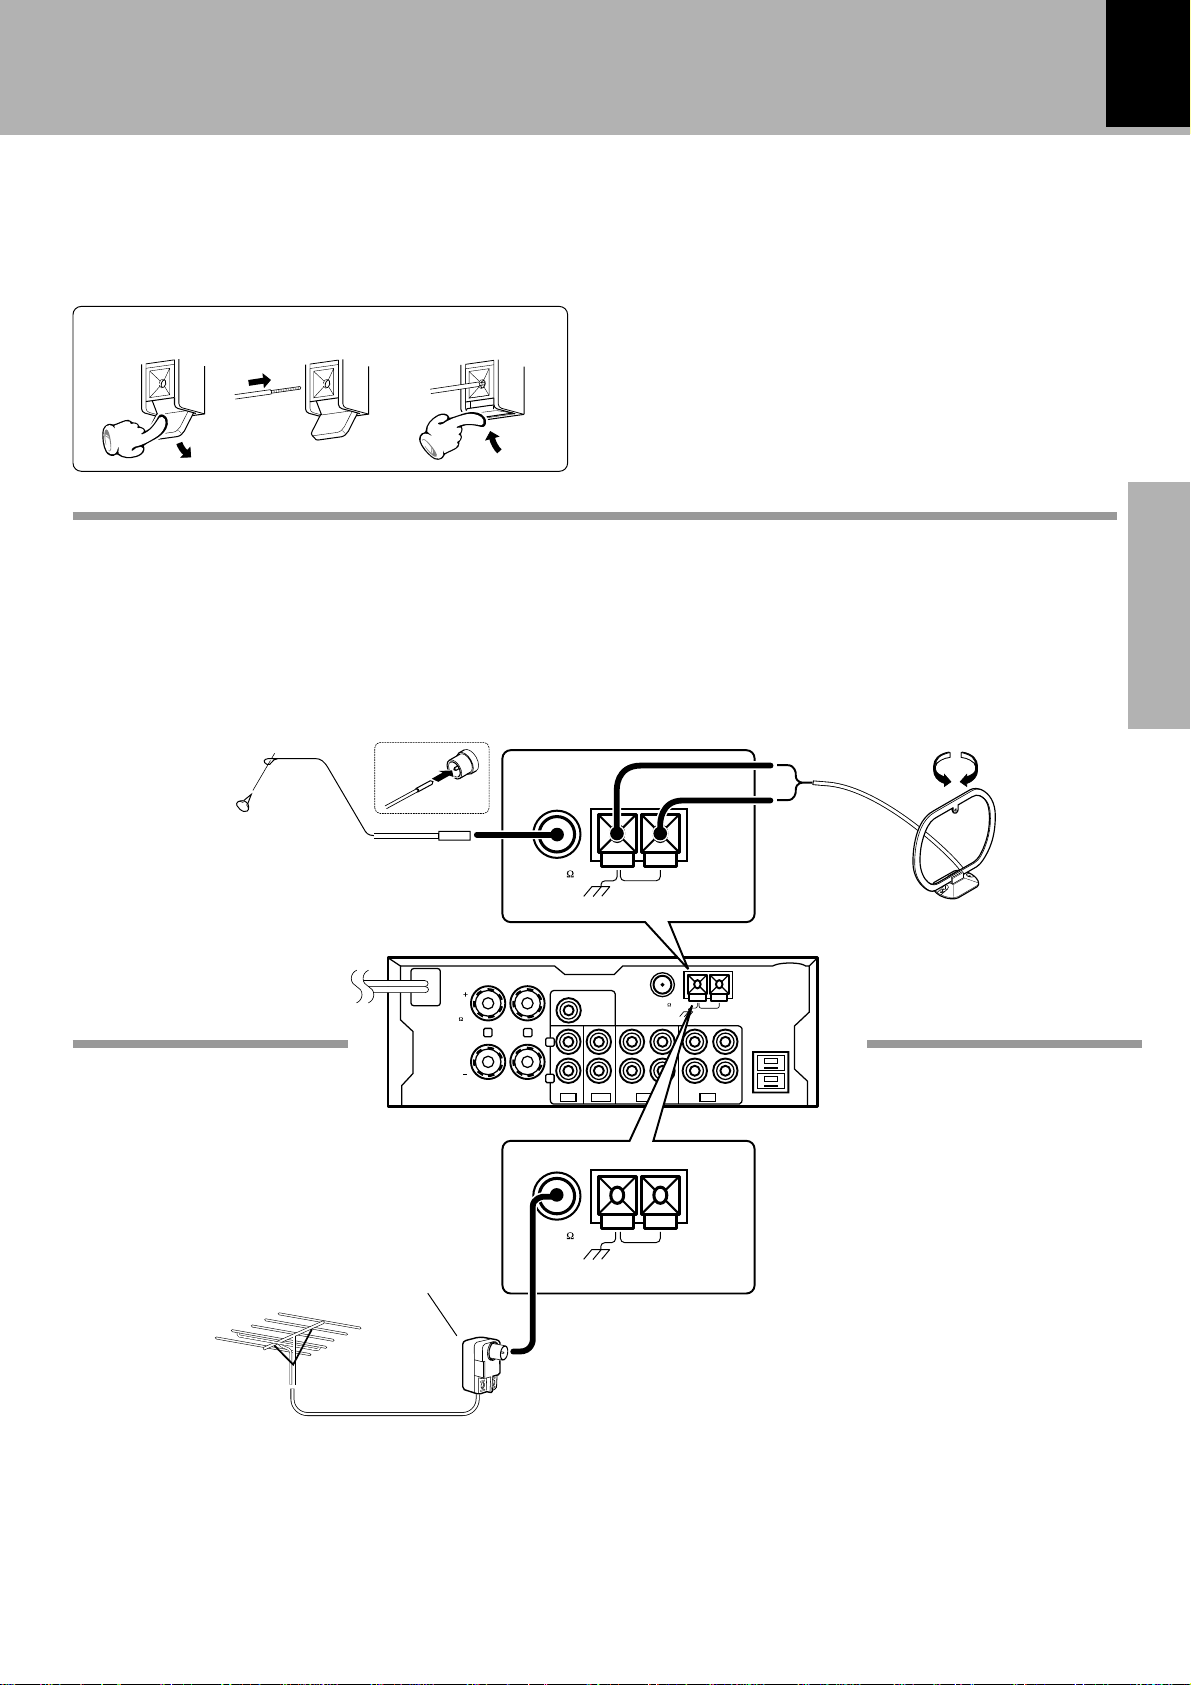
1. Antenna connection
Connect the antenna as shown in the figure.
Do not plug the power cord into a wall AC outlet until the connection has been completed.
123
Connection of the Accessory Antenna
9
Preparation section Basic section
FM indoor antenna
The accessory antenna is for temporary indoor use only.
For stable signal reception we recommend using an outdoor antenna. Remove the indoor antenna if you connect
one outdoors.
FM indoor
antenna
1 Connect it to the antenna terminal.
2 Locate the position providing good
reception condition.
3 Fix the antenna.
In case of bad reception
SPEAKERS
( 6 - 16 )
FM75
R
L
L
R
AM loop antenna
The supplied antenna is for indoor use. Place it as far as
possible from the main system, TV set, speaker cords and
power cord, and set it to a direction which provides the
best reception.
AM
GND
WOOFER
PRE OUT
IN IN REC PLAY
CD
SUPER
ANTENNA
FM75
TAPE
GND
REC PLAY
AM
MDAUX
ANTENNA
SYSTEM
CONTROL
R-SG7
AM loop
antenna
Application section
Antenna adapter
(commercially
available)
FM outdoor
antenna
(commercially
available)
FM outdoor antenna
Lead the 75Ω coaxial cable connected to the FM outdoor
antenna into the room and connect it to the FM 75Ω
termimal.
FM75
GND
AM
ANTENNA
Knowledge sections
10
System connection
R-SG7/DP-SG7/X-SG7 (EN)
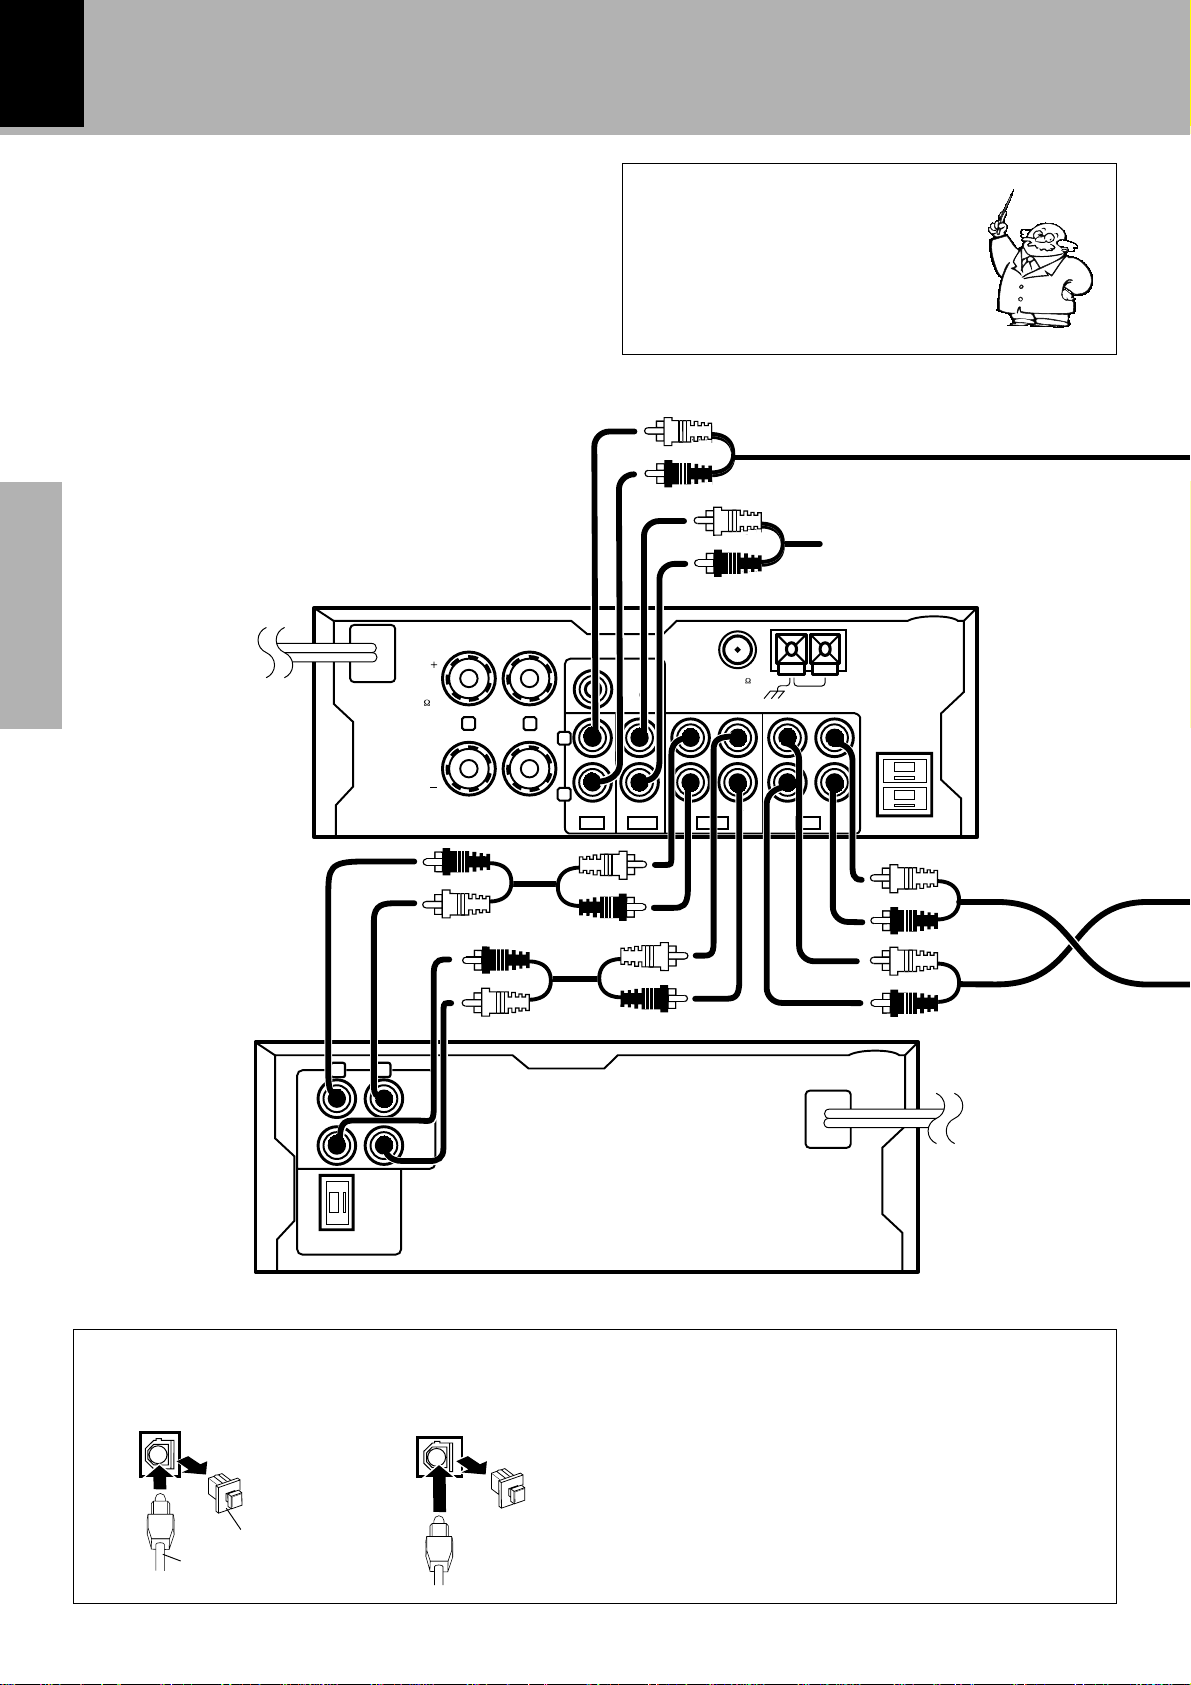
2. Connection of audio cord
Here, connection of separately sold components
also will be explained under consideration of
system connection. Please install correctly
according to the purchased components and
connect the required cords.
R-SG7
Preparation section
SPEAKERS
( 6 - 16 )
R
Malfunction of microcomputer
If operation is not possible or erroneous display appears even though
all connections have been made
properly, reset the microcomputer referring to “In case of difficulty”.
W
Audio cord (Supplied with R-SG7)
Optional record player with internal
RIAA equalizer/amp (P-110)
[ ]
or videodeck (etc.).
SUPER
WOOFER
PRE OUT
L
L
FM75
GND
AM
ANTENNA
SYSTEM
CONTROL
Audio cord (x2)
Basic section
(Supplied with
X-SG7)
X-SG7 (optional)
L
R
REC
IN
PLAY
OUT
Application section
SYSTEM
CONTROL
Connection with Optical Fiber Cable
R
IN IN REC PLAY
CD
TAPE
REC PLAY
MDAUX
DP-SG7
DIGITAL
OUTPUT
OPTICAL
DM-SG7
DIGITAL IN
OPTICAL
Knowledge sections
Remove cap
Optical fiber cable
This is used for digital connections. Digital transmission permits recording without loss of the
high CD sound quality.
Remove the cap and connect an optical fiber
cable.
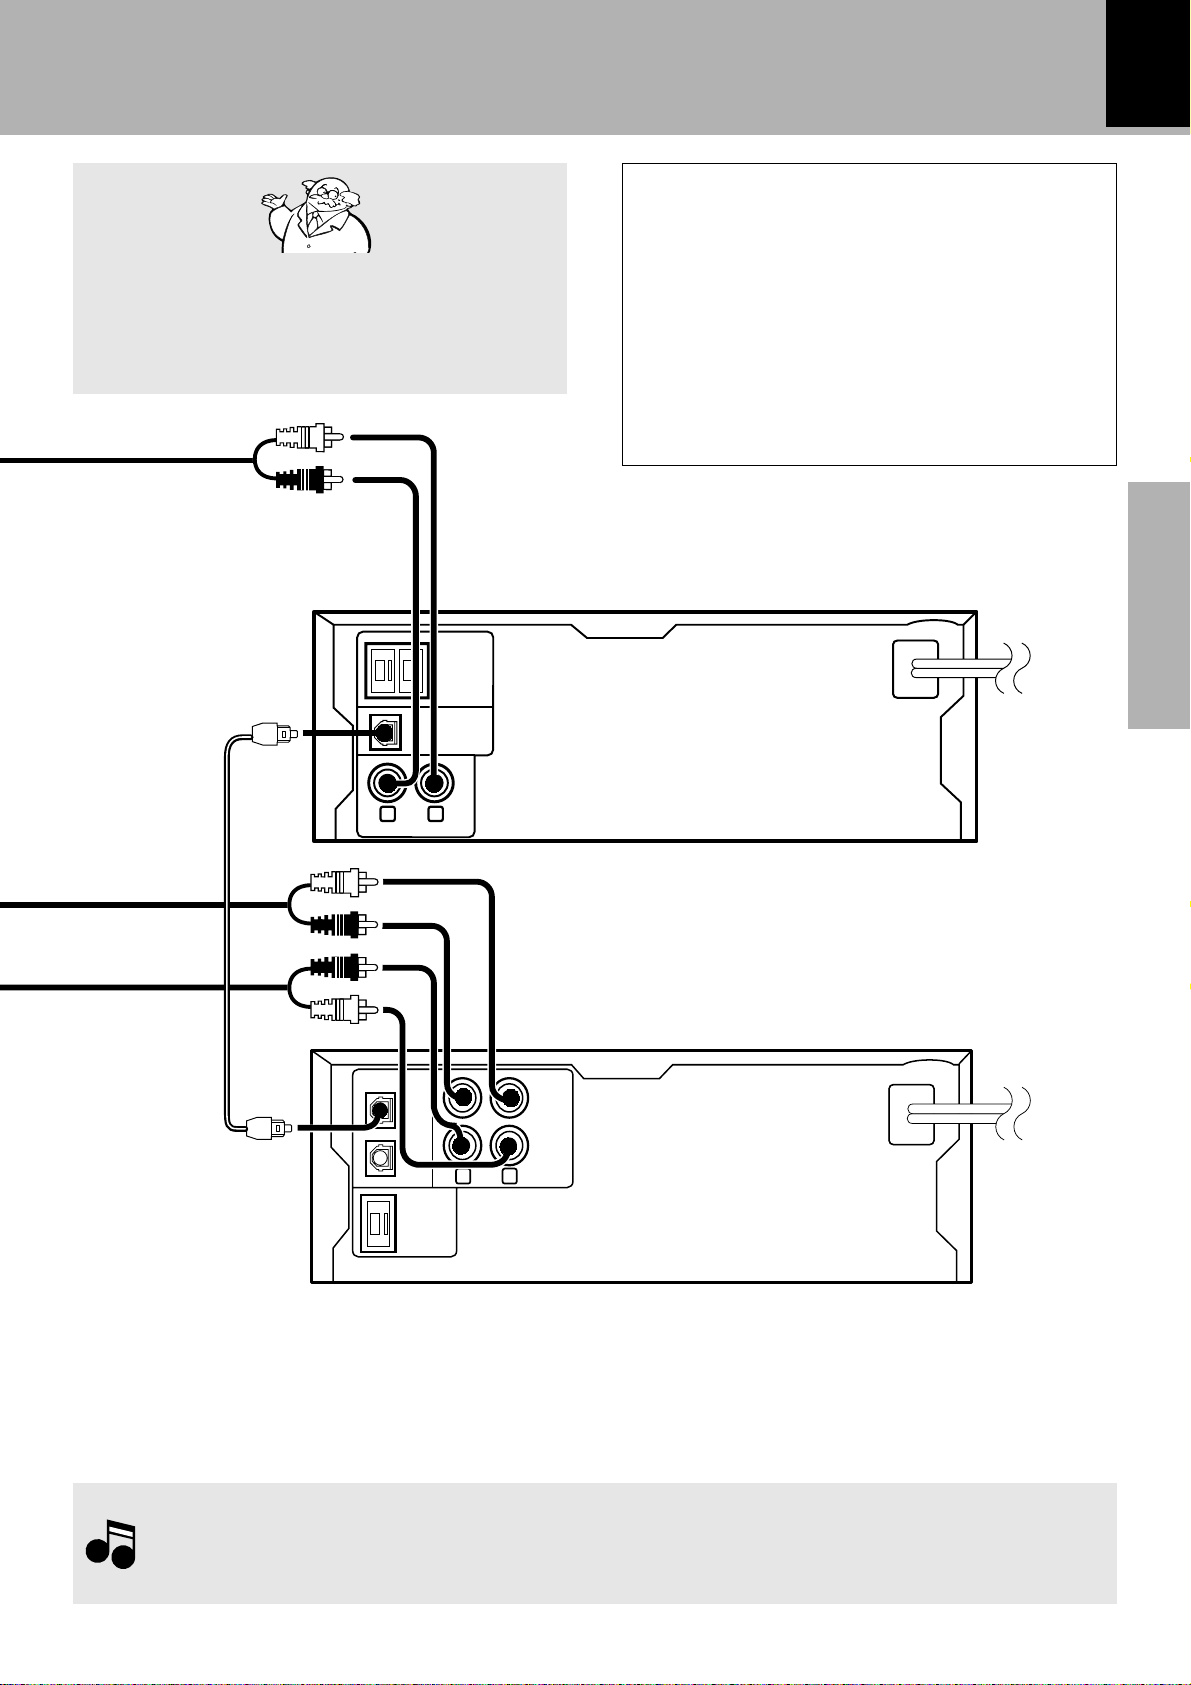
Caution for Connection
Do not plug the power cord into a wall AC outlet until the connection has been completed.
Connect the equipment as shown in the figures.
SYSTEM
CONTROL
System connection
R-SG7/DP-SG7/X-SG7 (EN)
CAUTION
Be sure to adhere followings. Or proper ventilation
will be blocked causing damage or fire hazard.
÷ Install the R-SG7 on the top of the system.
÷ Do not place any objects impairing heat radia-
tion onto the top of unit.
÷ Leave a space around the unit (from the largest
outside dimension including projection) equal or
greater than, shown below.
Top panel : 50 cm
Side panel : 10 cm
Back panel : 10 cm
DP-SG7
11
Preparation section Basic section
Optical fiber cable
(Supplied with
DM-SG7)
DIGITAL IN
OPTICAL
1
2
LR
LINE OUTPUT
SYSTEM
CONTROL
DIGITAL
OUTPUT
OPTICAL
Audio cord (x2)
(Supplied with DM-SG7)
REC
IN
PLAY
OUT
LR
DM-SG7 (optional)
Application section
Notes
Notes
Downloaded from:
Knowledge sections
1.In case an associated system component is connected, also read the instruction manual of the component.
2.Insert the optical-fiber cable straight into the connector until it clicks.
3.Be sure to attach the protection cap when the connector is not used.
4.Be careful not to bend, coil or bundle the optical fiber cable.
12
System connection
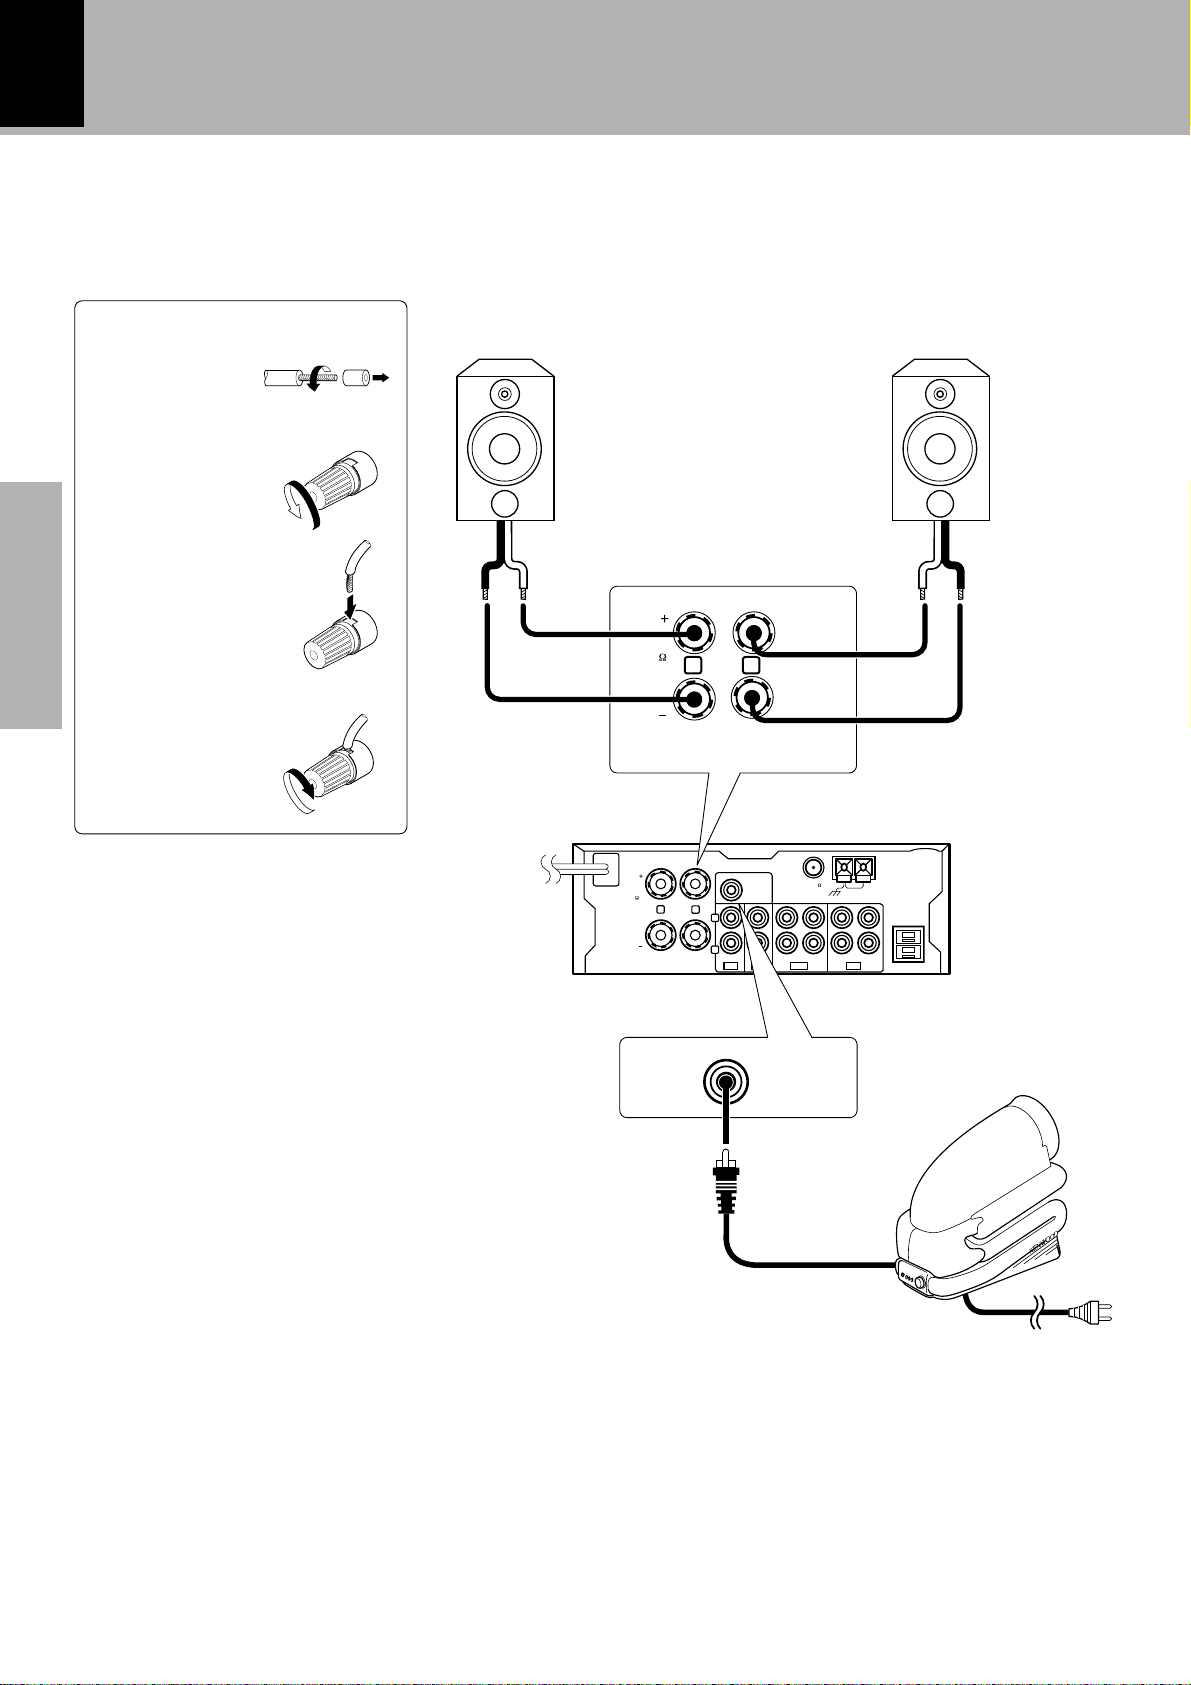
3. Connection of speakers
Connect the speakers as shown in the figure.
Do not plug the power cord into a wall AC outlet until the connection has been completed.
1 Cord preparation.
R-SG7/DP-SG7/X-SG7 (EN)
2 Loosen.
·ª ª·
3 Insert.
Preparation section
4 Secure.
¶ Never short-circuit the + and – speaker cords.
Basic section
The protection circuit will operate and no sound will
be put out.
¶ If the left and right speaker connections or the + and
– polarity are inverted, the sound will be unnatural
with unclear localization of musical instruments, etc.
Be sure to connect them without mistake.
Speaker (right)
(6-16Ω)
SPEAKERS
( 6 - 16 )
R
R-SG7
SPEAKERS
( 6 - 16 )
R
L
Speaker (left)
(6-16Ω)
L
SUPER
WOOFER
PRE OUT
L
R
IN IN REC PLAY
CD
SUPER
WOOFER
PRE OUT
TAPE
FM75
AM
SYSTEM
CONTROL
ANTENNA
GND
REC PLAY
MDAUX
Application section
Knowledge sections
Downloaded from:
Super woofer (SW-500) (optional)
Extremely low frequency sound is played back powerfully.
This can be used with any type of playback.
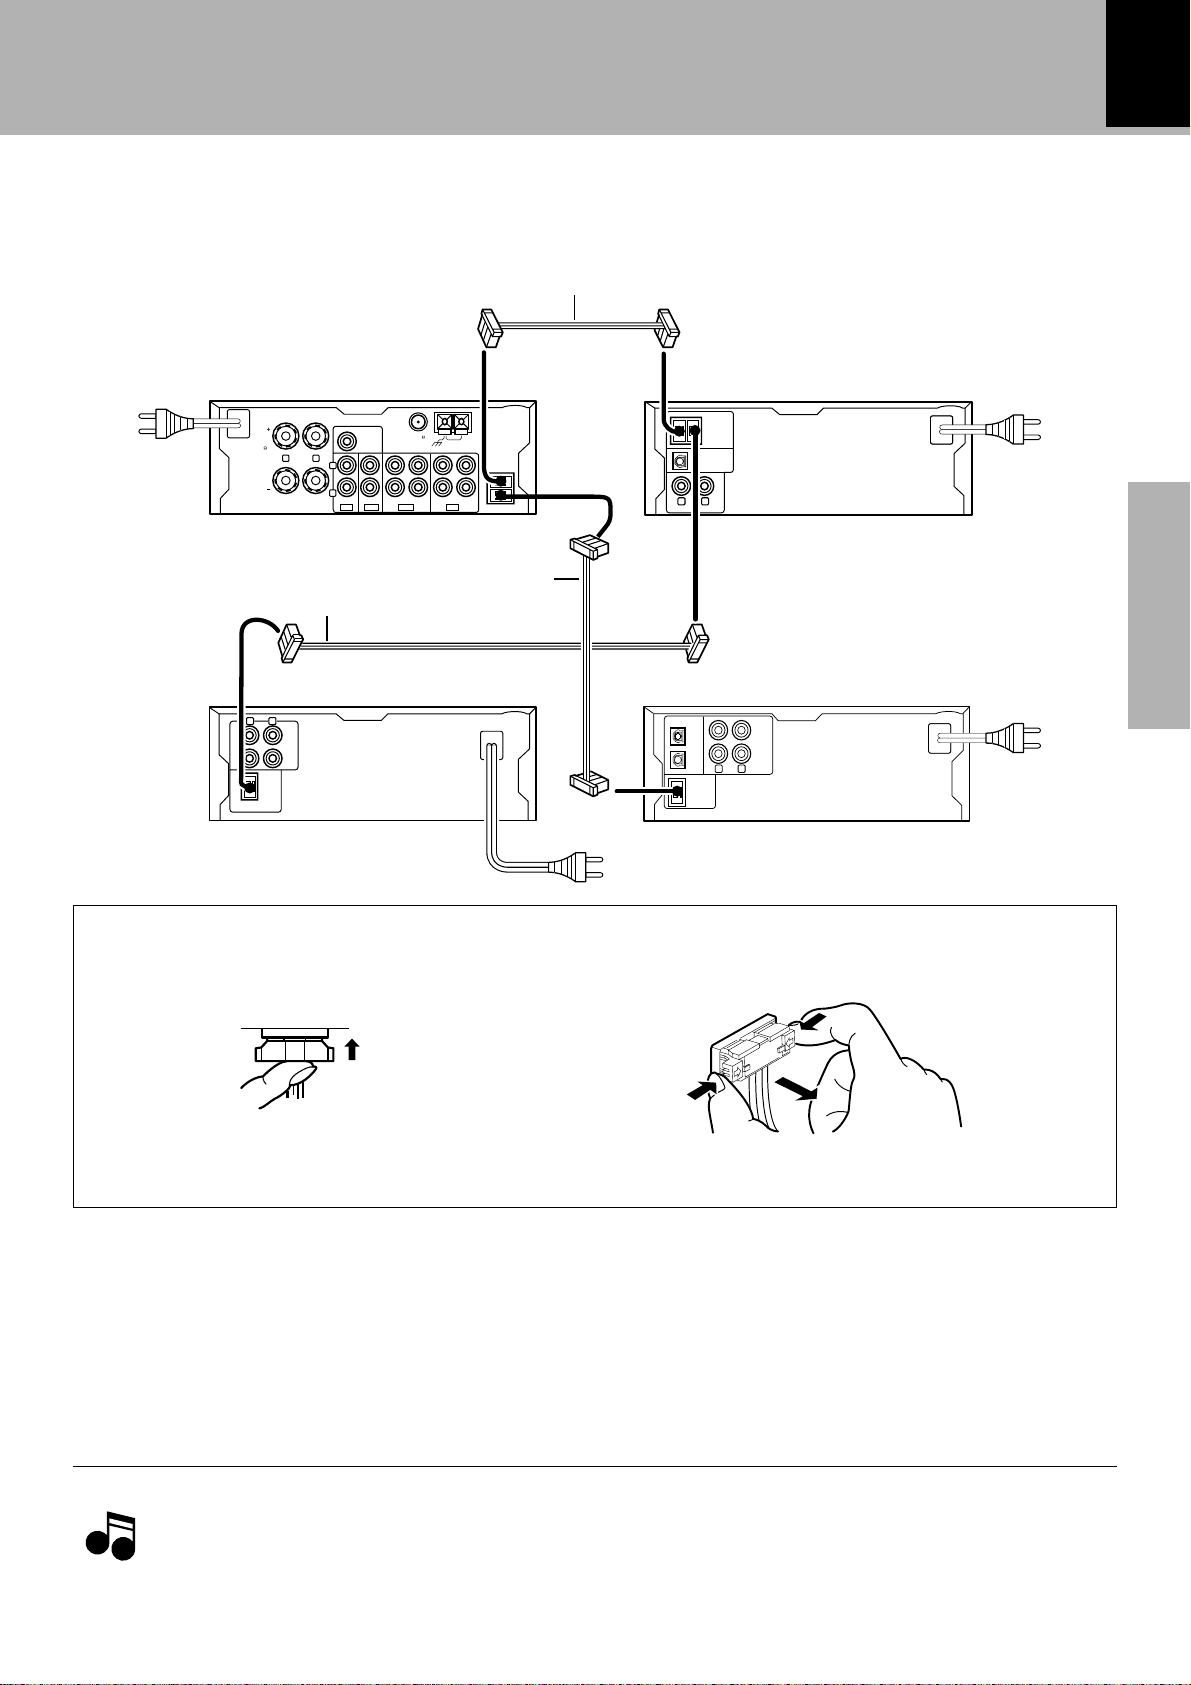
4. Connection of system control cord
Connect the system control cords and the power cords as shown in the figure.
System control cord
(Supplied with R-SG7)
System connection
R-SG7/DP-SG7/X-SG7 (EN)
13
R-SG7
SUPER
FM75
To wall
AC outlet
SPEAKERS
( 6 - 16 )
R
L
L
R
IN IN REC PLAY
CD
WOOFER
PRE OUT
GND
REC PLAY
TAPE
System control
System control cord
(Supplied with X-SG7)
L
R
REC
IN
PLAY
OUT
SYSTEM
CONTROL
cord (Supplied
with DM-SG7)
X-SG7 (optional)
Connection of system control cord
DP-SG7
SYSTEM
DIGITAL IN
OPTICAL
1
2
LINE OUTPUT
SYSTEM
CONTROL
LR
CONTROL
DIGITAL
OUTPUT
OPTICAL
To wall
AC outlet
Preparation section Basic section
REC
IN
PLAY
OUT
LR
To wall
AC outlet
DM-SG7 (optional)
AM
SYSTEM
ANTENNA
CONTROL
MDAUX
To wall
AC outlet
Plugging the connector
Insert the plug straight into the connector until it locks.
Unplugging the connector
While pushing the two sides of connector in, pull it
straight out.
5. Power Cord Connection
Insert the power cord plug into a wall AC outlet after all other connections have been completed.
1.Be sure to insert all connection cords securely. If their connections are imperfect, the sound may not be produced
or noise may interfere.
Notes
Notes
2.Before plugging or unplugging a connection cord, be sure to unplug the power cord from the wall AC outlet.
If connection cords are plugged or unplugged with the power cord left plugged in, malfunction or damage may
result.
Application section
Knowledge sections
Downloaded from:
14
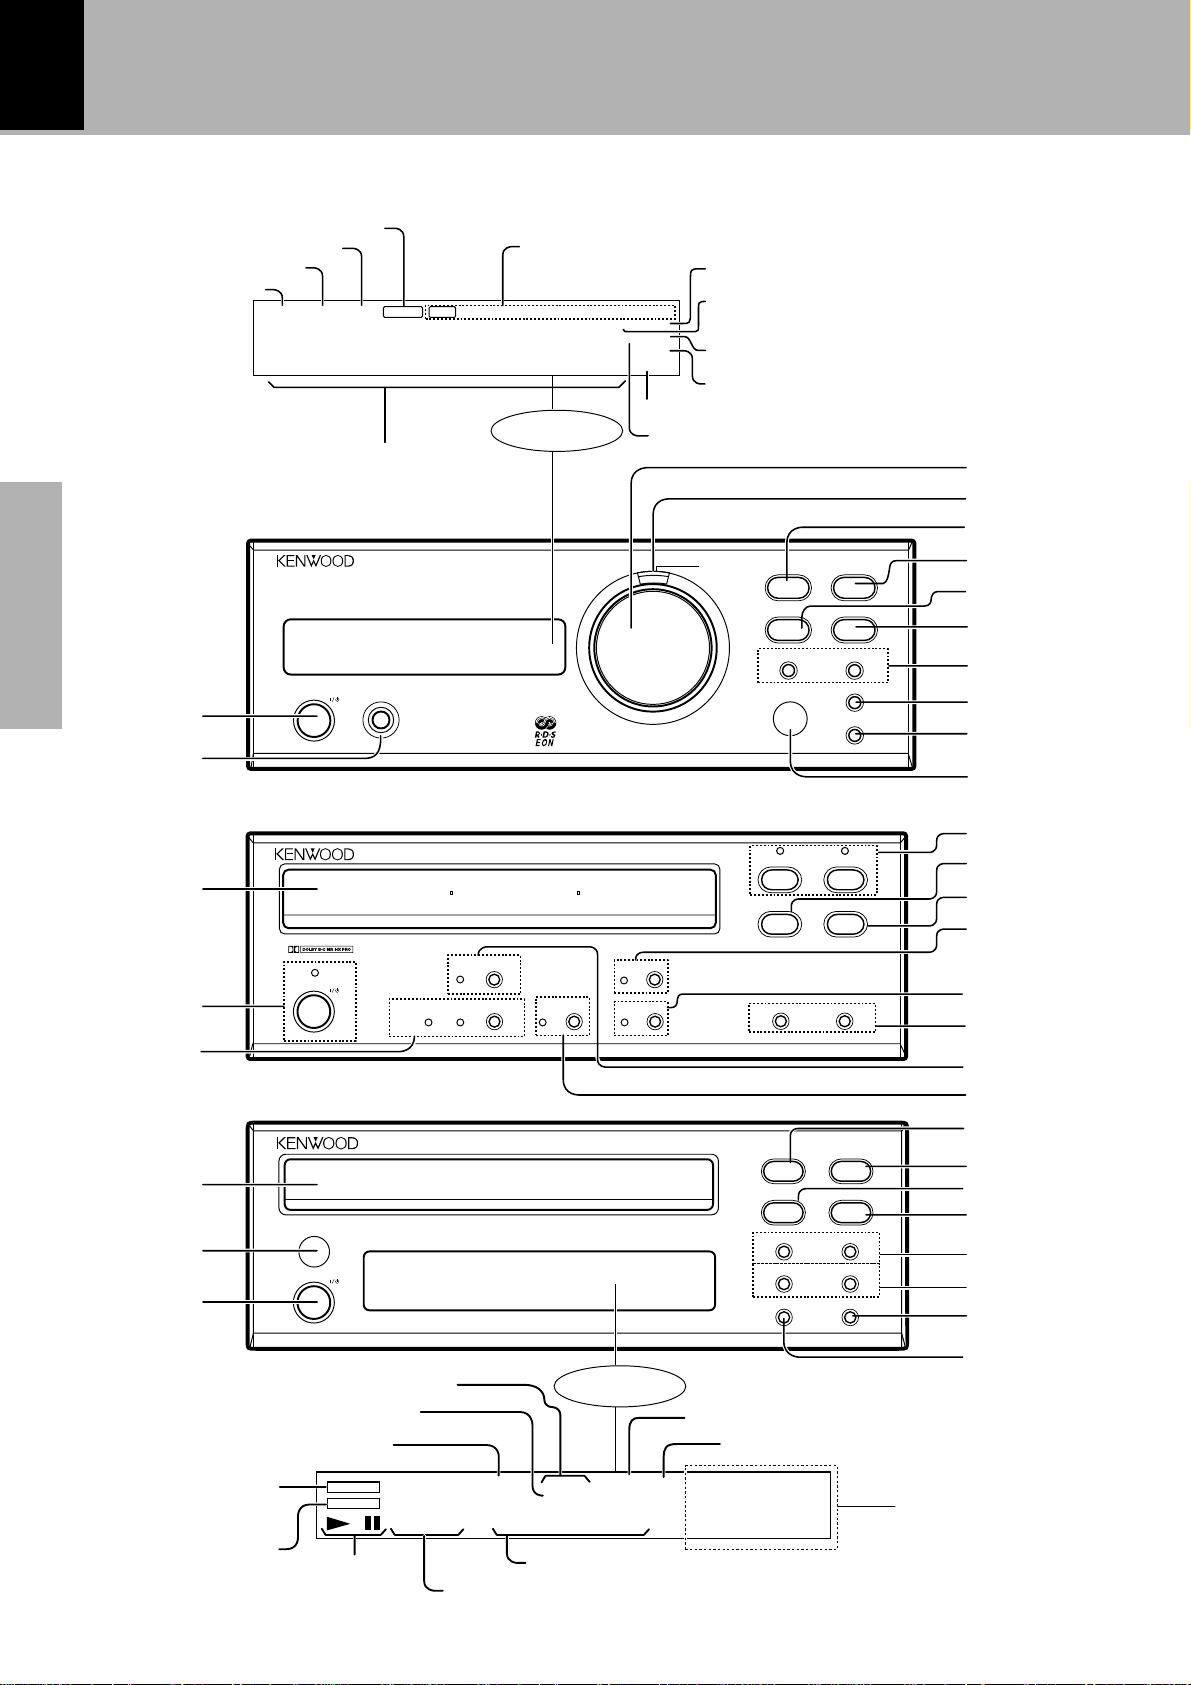
Controls and indicators
Main Unit
Stereo reception indicator
AUTO indicator
MUTE indicator
TUNED indicator
TUNED RDS EON PTY TPST.AUTOMUTE
****** **;
Frequency level display and
Character information display
Receiver R-SG7
stereo integrated amplifier/tuner
Preparation section
1
2
Cassete deck X-SG7 (optional)
1
Basic section
phones
on/standby
stereo auto reverse cassette deck
RDS display
Display
R-SG7
X-SG7
front loading mechanism
rev. mode
”
Sleep timer indicator
TA NEWS INFO
N.B. SLEEP
A.P.S. O.T.T.
kHz MEMO.
MHz PROG.
N.B. indicator
O.T.T. indicator
Memory indicator
Timer Program indicator
A.P.S. indicator
volume
control
∞ ∞
down up
pure
8
Controls and indicators
R-SG7/DP-SG7/X-SG7 (EN)
3
4
5
A
pure
enter
A
N.B./tone
input selector
6
7
8
turning
%
band
auto/mono
9
0
fi
!
@
4
2
0
3
7
5
6
7
2
3
CD player DP-SG7
1
Application section
2
3
Indicator of A and B (EDIT mode)
REPEAT indicator
Program mode
Knowledge sections
indicator
STANDBY indicator
Playback/Pause indicator
on/standby
compact disc player
on/standby
RANDOM indicator
PGM
STANDBY
Dolby NR CRLSBC
DP-SG7
'
TRACK NO. REPEAT EDIT
88
-8 8:88
Track number display
24bit Fine D.R.I.V.E.
D.R.I.V.E.with 24bit D/A converter
Display
RANDOM
Time display
TOTAL SPACEA B
¶
TOTAL indicator
SPACE indicator
12345
678910
11 12 13 14 15
1
repeat 7
1¡
¡
60
¢4
timespace
8
9
0
!
4
5
6
7
8
9
0
!
Track number display
Downloaded from:
Receiver R-SG7
Controls and indicators
R-SG7/DP-SG7/X-SG7 (EN)
15
1 (on/standby) key *
The power is switched ON and OFF (standby). At the
time of system connection, the power is switched ON
and OFF for the entire system.
2 “phones” jack (
Headphones with a stereo mini plug (optional) can be
connected.
3 “volume control” knob *
Normally, this is used to adjust the volume. It is also
used for timer reservation and clock setting.
4 Pure A indicator e
This lights at the time of pure A mode.
5 “pure A” key (e
When the power is ON : Switches Pure A mode ON/
OFF.
When the power is OFF : Switches A.P.S. (auto power
save) ON/OFF.
6 “N.B./tone” key (
This is used for bass and treble compensation.
Cassete deck X-SG7
1 Tape tray ™
This houses the cassette tape.
2
3 Dolby NR key/indicators £
4 Playback keys (2 3)/Operation indicator ™
5 Open/Close key (0) ™
(on/standby) key/Standby indicator
The power is switched ON and OFF (standby). This is
not used in case of system connection.
Dolby noise reduction ON/OFF switching is executed.
During stop and pause: the tape direction lights red.
During playback and recording: the tape direction lights
green.
During fast forward and rewind: the tape direction
flashes green.
This opens the tape tray for tape insertion and removal.
7 “enter” key (¶r
This key is used in many operations including the tone
adjustment, station presetting, clock adjustment and
timer setting.
8 “input selector" key *
This selects the input source. When TAPE, CD, or MD
is selected and a tape or disc already has been set,
playback starts automatically.
9 “tuning” (% fi) key §ti
When the power is ON : Used for station tuning.
When the power is OFF : Used for timer reservation.
%key: Program ON/OFF
fikey: O.T.T. reservation
0 “band” key §i
When the power is ON : Reception band switching.
When the power is OFF : Used for timer reservation.
! “auto/mono” key §r
When the power is ON : The tuning mode is switched.
When the power is OFF : Used for clock setting.
@ Remote control sensor &
This is used with the R-SG7 system remote control
(RC-R0713E).
6 Stop (7) key £
7 Pause (8) key/indicator £
8 Record (¶) key/indicator •
Recording is started. When this switch is pressed
during recording, an unrecorded (blank) portion of
about 4 sec is produced and then the tape stops.
9 Fast forward and rewind (1 ¡) keys £
0 “rev. mode” key/indicator £
The reverse mode of the deck (both sides, one side) is
switched.
! CRLS key/indicator º
The recording level is set automatically according to the
sound source being recorded.
Preparation section
Basic section
Application section
CD player DP-SG7
1 Disc tray )
One disc can be stored.
2 Remote control sensor
This is not used with system connection.
3
4 Open/Close key (0) )
(on/standby) key
The power is switched ON and OFF (standby). This is
not used with system connection.
The disc tray is opened and closed.
5 Playback/Pause key (6) )
6 “repeat” key ‹
This is used for repeated playback of a CD.
7 Stop (7) key ¡
8 Skip (4 ¢) key ¡
9 Fast forward, rewind (1 ¡) key ¡
0 “time” key ¡
The CD time display is switched.
! “space” key ¤
During program playback, a silent part of several
seconds is produced between tracks.
Knowledge sections
16
Controls and indicators
R-SG7/DP-SG7/X-SG7 (EN)
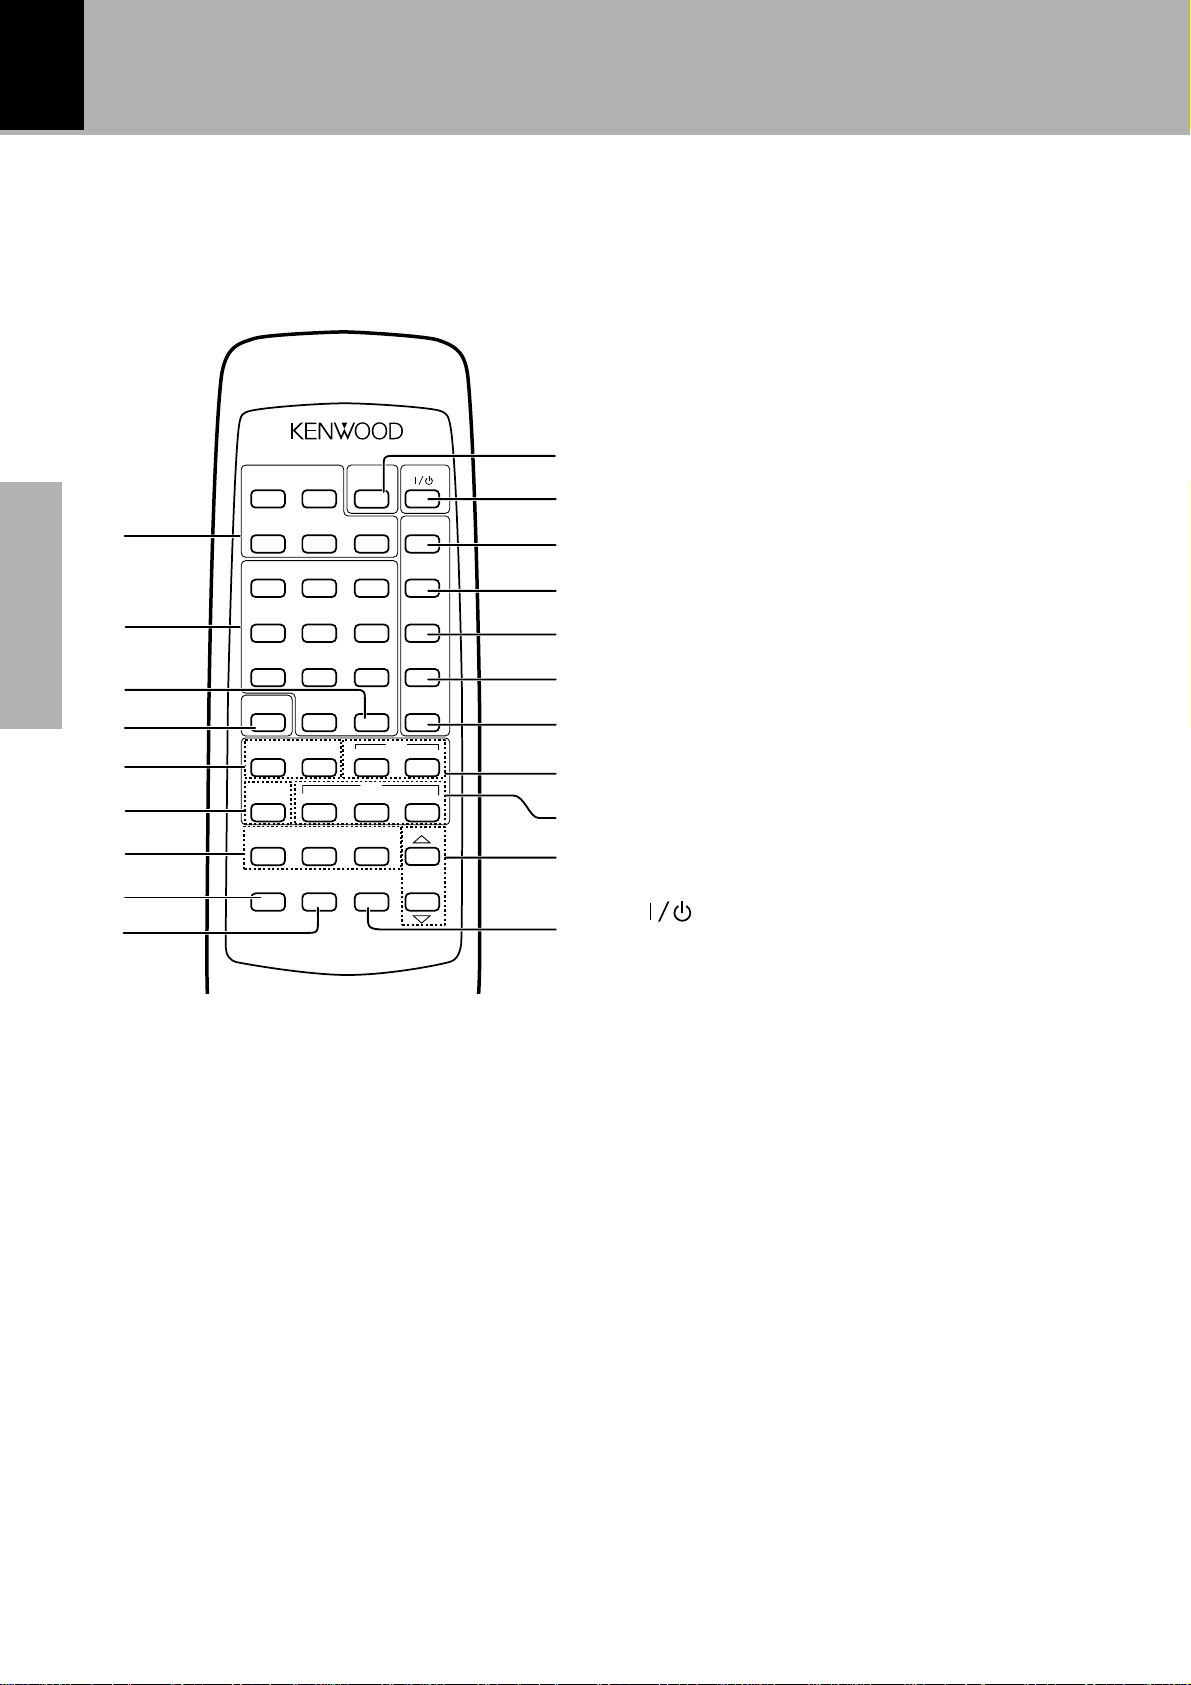
Remote control Unit [RC-R0713E]
When the system control cord is connected, this remote control can be used to operate the entire
system.
The keys on the remote control unit with the same names as on the main unit have the same function
as the keys on the main unit.
6 BAND key §
This is used to switch the tuner reception bands.
7 Keys related to RDS ·
RDS DISPLAY key
The display contents are switched during reception
of RDS broadcasts.
PTY (Program Type) key
This is used to specify the program type when
searching for a station.
TA/NEWS/INFO key
Used for automatic reception of transmissions of a
certain content.
8 INPUT key *
This key selects the input source. When TAPE, CD,
or MD is selected and a tape or disc already has been
set, playback starts automatically.
9 N.B./TONE key (
This is used for bass and treble compensation.
0 SLEEP key t
Use to set the sleep timer.
!
(on/standby) key *
The power for the receiver is switched ON and OFF
(standby). At the time of system connection, the
power is switched ON and OFF for the entire system.
@ DISPLAY key ¶
Switches the display on the AMP/TUNER (R-SG7)
(between the clock display and the input display).
# RANDOM key ›
Selects CD or MD tracks randomly for playback.
$ CLEAR key ¤
The contents of the CD program playback are cleared
title by title from the end.
% P.MODE keys ⁄
Used to program the CD playback sequence.
^ EDIT key fl
Used for CD edit recording (time edit recording).
& CD operation keys ¡
These keys are used to operate the CD player.
* MD operation keys
These keys are used to operate the MD recorder
(DM-SG7).
( VOLUME CONTROL keys *
This has the same function as the volume control
knob on the main unit. However, the AI VOLUME
function does not operate.
) MUTE key (
This is used to mute the sound temporarily.
23
1¡
SLEEPTAPE
7 DISPLAY
1
1 2 3 RANDOM
4 5 6 CLEAR
2
Preparation section
3
4
5
6
7
7 8 9 P.MODE
PTY SEARCH
O.T.E. 0 EDIT
4¢ 7 6
TUNER
BAND
PTY
DISPLAY
INPUT N.B./TONE MUTE
+10
CDP.CALL
MD
783
TA/
RDS
NEWS/INFO.
VOLUME
CONTROL
8
Basic section
9
1 Cassette deck operation keys ™
These keys are used to operate the cassette deck
(X-SG7).
2 Numeric keys ¡¶
These keys can be used as numeric keys when
CD or MD is selected as input. When TUNER is
selected as input, preset stations can be called.
3 PTY SEARCH/+10 key ‚
Application section
This is used to specify the program type and to
search for a station.
4 O.T.E. key fl
When this key is pressed during CD or MD playback,
only the track being played at that time will be recorded on tape. When this key is pressed during
stop, the CD or MD selected at that time will be
recorded on tape from the first track onward.
5 4 ¢ key ¡§
(Skip/Preset call)
When TUNER is selected:
Knowledge sections
This is used as preset call key.
When CD or MD is selected:
This is used as skip key.
REMOTE CONTROL UNIT
RC-R0713E
0
!
@
#
$
%
^
&
*
(
)
Operation of remote control unit
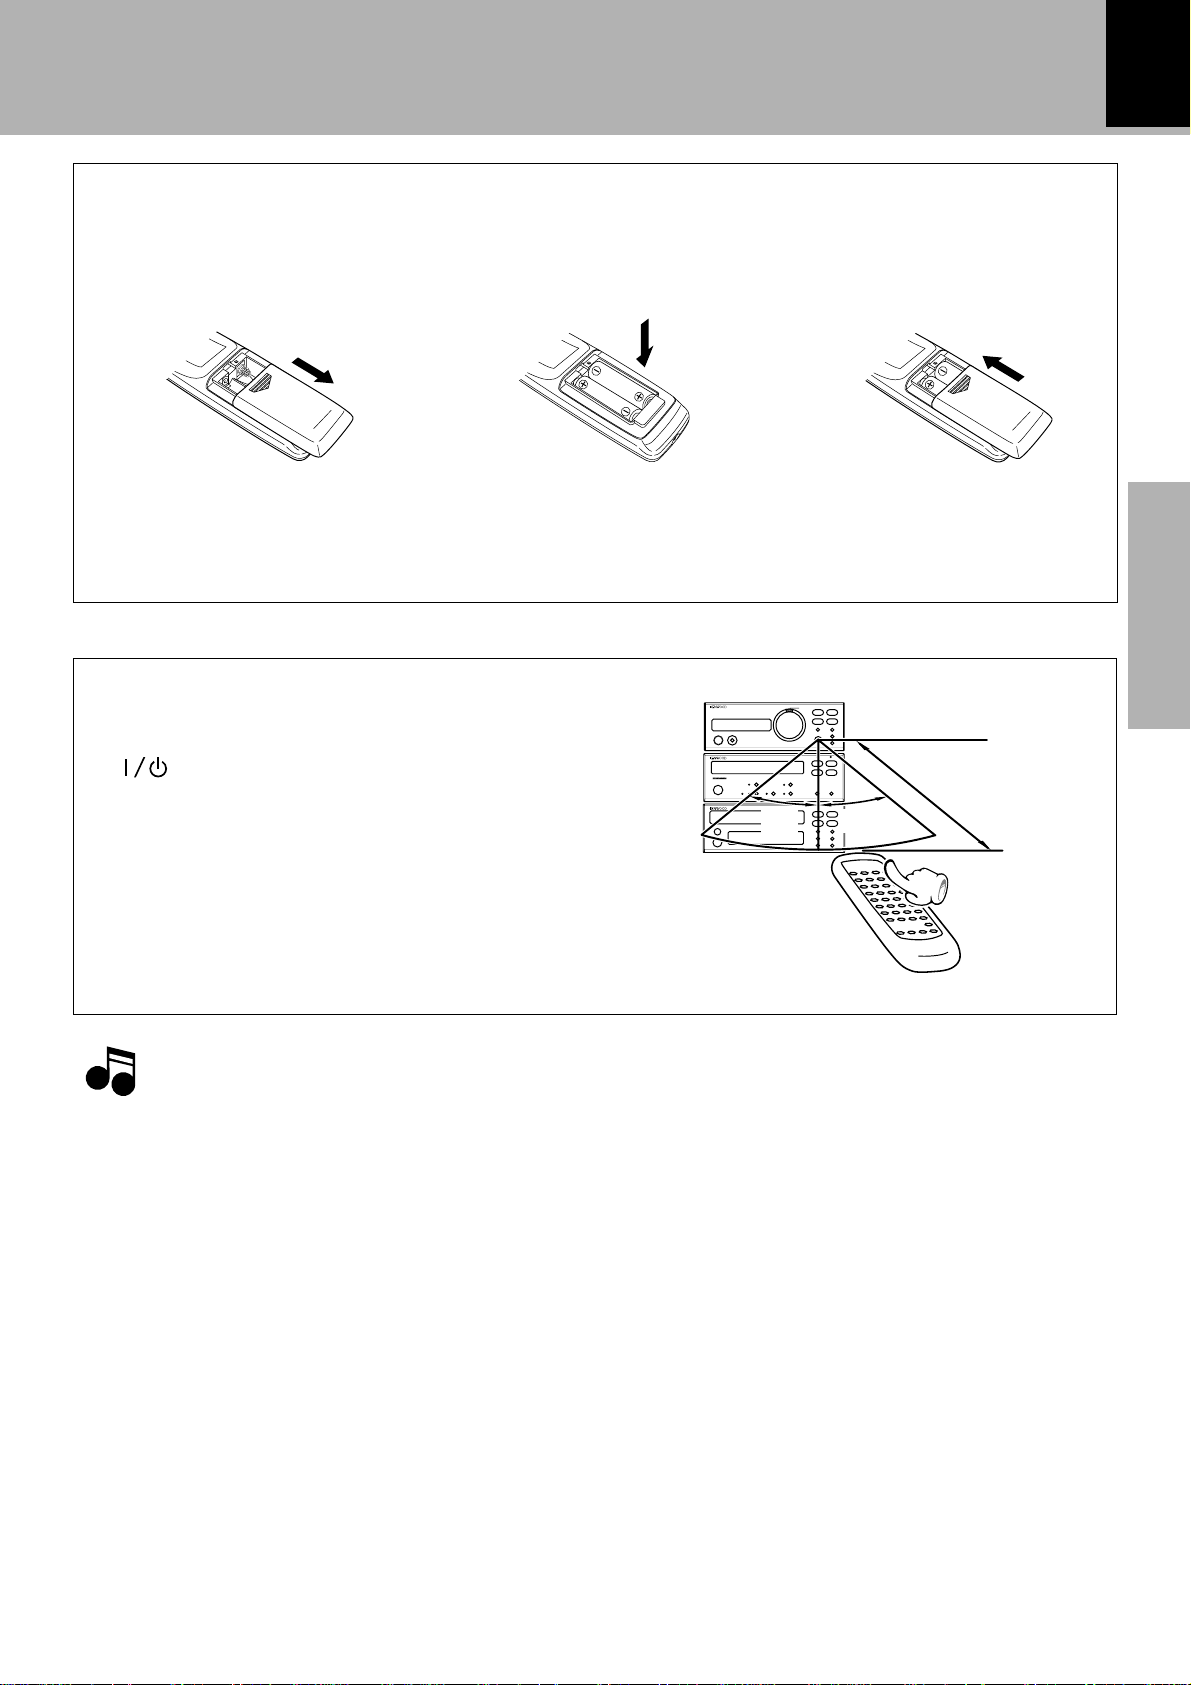
Loading batteries
Operation of remote control unit
R-SG7/DP-SG7/X-SG7 (EN)
17
1 Remove the cover.
2 Insert batteries. 3 Close the cover.
÷ Insert two R6 (“AA”-size) batteries following the polarity indications.
Operation
After plugging the power cord of this unit, press
the (on/standby) key of the remote control
unit to turn the power of the system ON. When
the power is turned ON, press the key of the
function to be operated.
Operating range (approx.)
30° 30°
Preparation section
Remote
sensor
6 m
Basic section
÷ When pressing more than one remote control keys
successively, press the keys securely by leaving an
interval of 1 second or more between keys.
1.The provided batteries are intended for use in operation checking, and their service life may be short.
NotesNotes
Notes
2.When the remote controllable distance becomes short, replace both of the batteries with new ones.
3.If direct sunlight or the light of a high- frequency fluorescent lamp (inverter type, etc.) is incident to the remote
sensor, malfunction may occur. In such a case, change the installation position to avoid malfunction.
Model: RC-R0713E
Infrared ray system
Application section
Knowledge sections
Downloaded from:
18
Hearing sound
Basic use
Hearing sound
R-SG7/DP-SG7/X-SG7 (EN)
Listening through headphones Bass and treble compensation
22
Preparation section
Muting the sound temporarily
Basic section
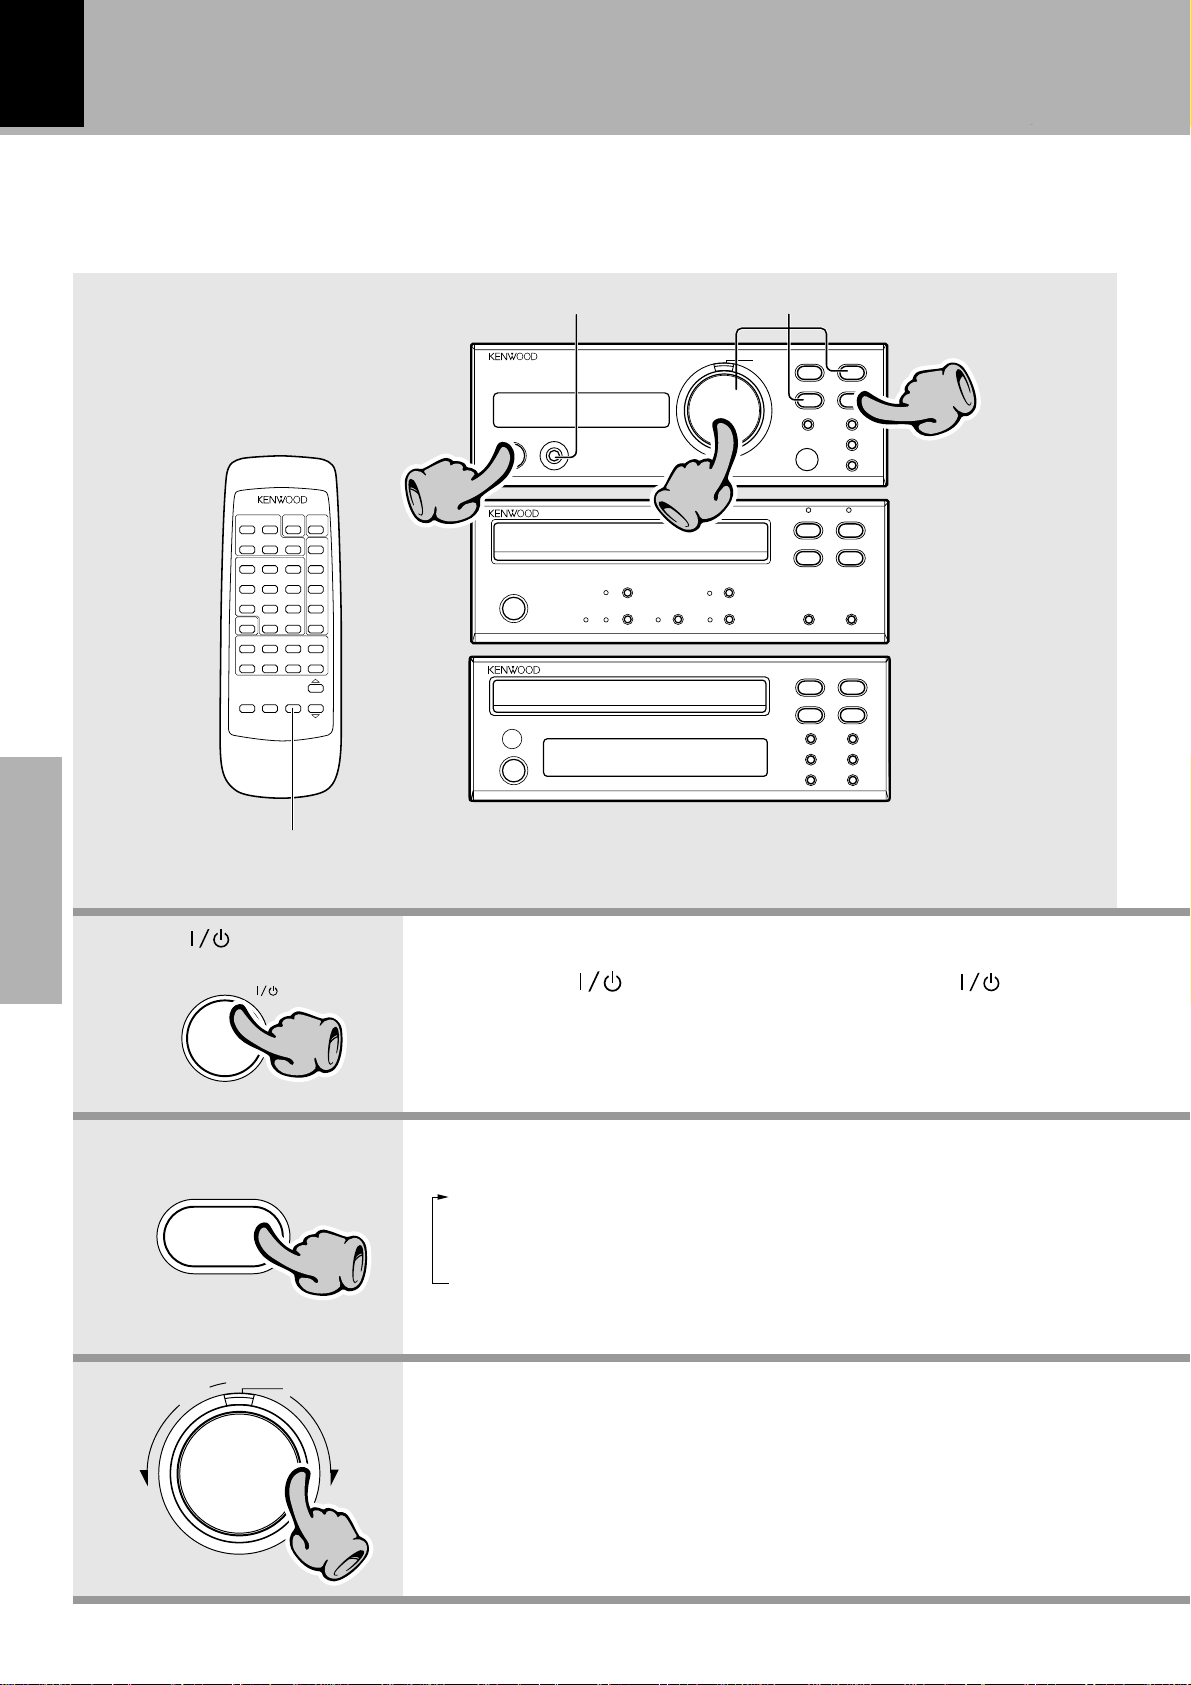
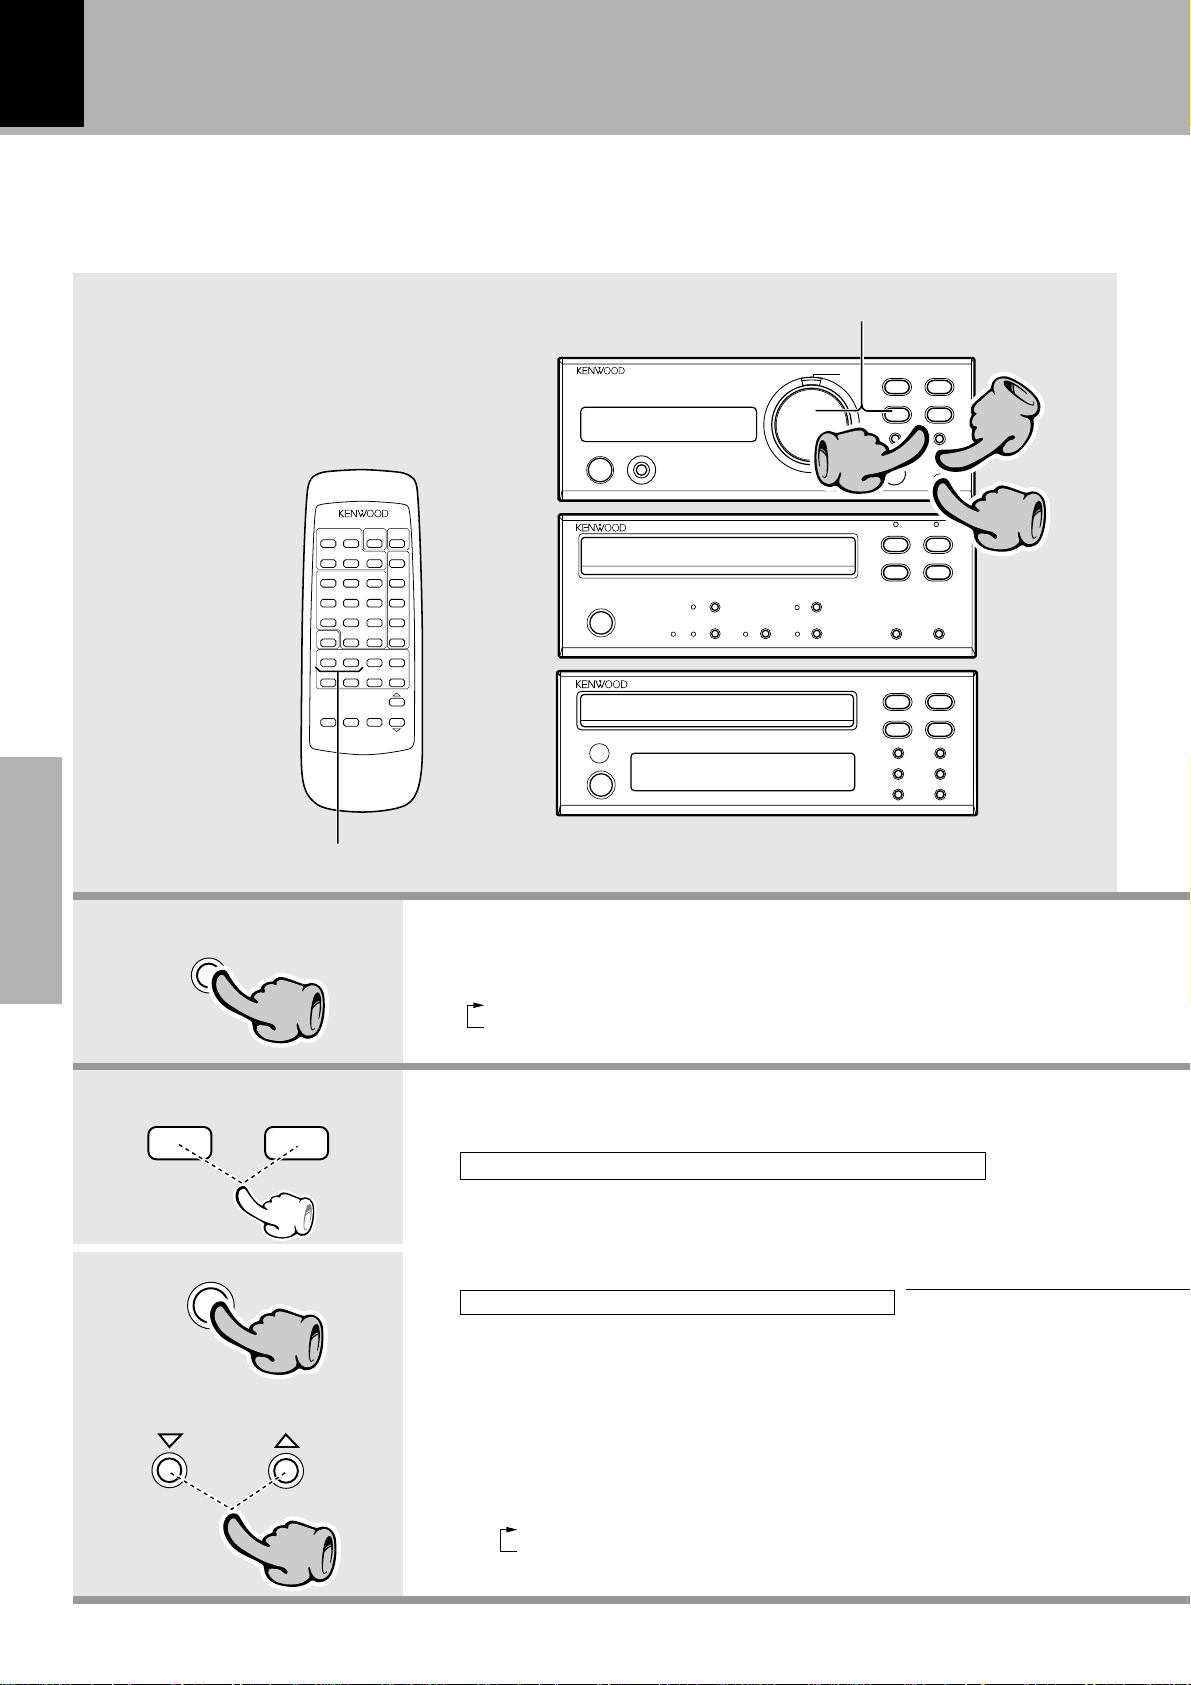
Press the (on/standby) key
of the receiver.
11
on/standby
11
33
1. Switching the power ON (OFF).
÷ The entire system can be switched
When the (on/standby)
key is pressed while the power
is ON, the power will be
switched OFF.
÷ The display part becomes dark when
ON and OFF. The
key on the remote control has the
same function.
the power is switched OFF. (DIMMER function)
(on/standby)
Application section
Knowledge sections
Downloaded from:
2. Selecting the desired output.
input selector
22
pure
volume
control
∞
down
A
5
up
33
3. Volume adjustment.
1 TUNER §
2 CD )
3 TAPE ™
4 MD
5 AUX
For MD, refer to the instruction
manual for the MD recorder (DMSG7).
÷ When CD, TAPE or MD is selected,
playback will start when a disc or a
tape already has been inserted.
÷ Quick turning produces a larger
change amount. (Dynamic rotary
volume control function)
÷ The display shows a reference
value.

Hearing sound
N.B./tone
R-SG7/DP-SG7/X-SG7 (EN)
19
Muting the sound temporarily
MUTE
Remote control unit
÷ Press again to resume the original volume.
÷ This is also cancelled when the volume is adjusted.
(Remote control unit only)
Blinks
MUTE
R-SG7
Listening through headphones
1 Insert the headphone plug into the phones jack.
phones
÷ Headphones with a stereo mini plug can be connected.
÷ The sounds from all speakers are cut off.
2 Adjust the volume.*(step 3)
Bass and treble compensation
(N.B.: Natural Bass circuit)
R-SG7
Lights
NB
The indication changes each time this key is pressed.
1 NB ON1 ...
Compensation of highest and lowest frequencies according to the current volume
level (Effective during low-level listening).
2 NB ON2 .... Compensation of lowest frequencies
according to the current volume level.
3 TONE FLAT (TONE) Variation of tone.
Adjust the “TONE”
1 Press the N.B./tone key so that "TONE FLAT"
("TONE") is displayed.
2 Press the ENTER key
while"TONE FLAT"
("TONE") is displayed.
The indication changes each time this key is pressed.
1 BASS ....... Adjusts the lowest fre-
quencies.
2 TREBLE . .. Adjusts the highest fre-
quencies.
÷ Use the VOLUME control to adjust BASS or TREBLE
in the range between -10 and +10. ("TONE FLAT" is
displayed when both the BASS and TREBLE values
are set to +/-0. "TONE" is displayed when any of them
is adjusted to a value other than 0.)
enter
volume
control
∞ ∞
down up
Preparation section
pure
A
Basic section
When CD has been selected.
CD
VOL 2)
R-SG7
Volume display
R-SG7
AUTO POWER SAVE function
When the power is ON and neither recording nor
playback is executed for 30 minutes or more, the
power is switched off automatically by this function. This function can be made active or not active
by the following operation.
pure
Press when the power is OFF.
Each press switches the modes as follows.
1APS ON..... Auto power save is used.
2APS OFF.... Auto power save is not used.
÷ When the TUNER input is selected, it is available only
when the volume is set to 0.
Power Switch Standby
When this system is in standby condition (time display
for the R-SG7, STANDBY indication for DP-SG7, standby
indicator lit for X-SG7), a slight current flows for memory
protection.
At this time also, the remote control can be used for
power ON.
Application section
Knowledge sections

20
Playback of CD
Preparation section
11
Hearing sound
R-SG7/DP-SG7/X-SG7 (EN)
22
Playback from
desired track
Basic section
0
1111
The tray opens when the key is
pressed and closes when the key
is pressed again.
6
Application section
22
Skipping tracks
To fast forward and backward
1. Load a disc.
1 Open the tray.
2 Place a disc.
3 Close the tray.
2. Start playback.
To stop playback
The label must be on top.
When the power is ON and a disc has been set in advance to the CD player, playback will start just by setting the input selection to CD.
Knowledge sections

Hearing sound
R-SG7/DP-SG7/X-SG7 (EN)
21
Skipping tracks
4
To skip backward To skip forward
÷ The track in the direction of the button pressed is
skipped, and the selected track will be played from the
beginning.
÷ When the 4 key is pressed once during playback, the
track being played will be played from the beginning.
÷ To skip further to the previous track, press the 4 key
quickly.
¢
Playback from desired track
Select the desired track No.
123
456
789
PTY SEARCH
0
Press the numeric keys as shown below....
To enter track No. 23 : 003
To select track No. 40 : 0000)
Remote control unit
+10
To fast forward and backward
1
To b a ck w a r d To for w a r d
÷ Playback starts from the position where the key is
released.
¡
To pause playback
6
÷ Each press pauses and plays the CD alternately.
To stop playback
7
Preparation section
Basic section
÷ Do not touch the playback side of disc.
The recorded track Nos. are shown.
TRACK NO.
01
1:50
12345
678910
11
DP-SG7
÷ After a few seconds, play starts from track No.1.
Time display on CD player
Each press of the “time” key changes the displayed
contents.
1 : Elapsed time of track being
:123
time
played
2 : Remaining time of track being
3 : Elapsed time of entire disc
4 : Remaining time on entire disc
÷ In edit mode and in random mode, display is made only
for the track being played.
:-2 37
TOTAL
played
23 45
:
TOTAL
:
36 1-5
About the CD TEXT function
When a CD with text information (Titles, Artist name,
etc.) is loaded and the optional MD player (DM-SG7) is
connected, the disc title and track names appear in the
display of the MD player. See the operating instructions
for DM-SG7 for details.
Application section
Knowledge sections

22
Playback of tape
Preparation section
Hearing sound
R-SG7/DP-SG7/X-SG7 (EN)
Selection of DOLBY NR Selection of reverse mode
22
11
Basic section
Basic section
0
Application section
2
Knowledge sections
The tape direction lights
green.
11
3
22
To wind tape at high speed
1. Load a cassette tape.
1 Open the tray.
2 Insert a tape and close the
tray.
2. Start playback.
Press the key for the running
direction to be played.
When the power is ON and a cassette has been set in
advance to the cassette deck, playback will start just
by setting the input selection to TAPE.
Top side
Reverse side
Playback of the
reverse side
To stop playback
Side where tape
is exposed
Playback of the
top side
Downloaded from:

Hearing sound
2
3
R-SG7/DP-SG7/X-SG7 (EN)
23
To pause the tape
8
÷ Press the 2 or 3 key to restart playback.
To wind tape at high speed
1
To fast wind in
direction |
÷ Press the 7 key to stop fast winding.
¡
To fast wind in
direction \
Selection of reverse mode
rev. mode
∏
Each press switches the modes as follows.
1 “””lit ...... Both sides are played. (The tape
stops after recording onto both
sides.)
2 Goes off .... Only one side is played back (re-
corded), and then the tape stops.
To stop playback
7
÷ The tape direction lights red.
Selection of DOLBY NR
The Dolby NR system minimizes the hiss noise
heard when playing tape.
BC
Each press switches the modes as follows.
1 “B” is lit ... Dolby B NR is used.
2 “C” is lit ... Dolby C NR is used.
3 “B” and “C” not lit ... Dolby NR is not used.
÷ Select the Dolby NR mode according to the recording
condition of the tape.
(Noise Reduction)
Dolby NR
Preparation section
Basic section
Since longer tape than 100 minutes cassette tape
is very thin, the tape could adhere to the pinch
Note
NoteNote
roller or be easily cut. It is recommended that
these tapes not be used with this unit to prevent
possible damage.
÷ Set the tape correctly as shown in the figure. Wrong tape
setting can cause trouble.
÷ Normal (TYPE I), high (TYPE II), or metal (TYPE IV) tape
selection is set automatically.
÷ Remove tape slack before loading.
Transport direction indicators
The 2 and 3 indicators indicate the current direction in which the tape advances when playback or
recording is started automatically by the easy operation function, etc. This direction is the direction
stored in memory when the tape was last stopped.
(To change the direction, press the key for the desired playback direction, and then press the 7 key.)
Transport direction indicators
Application section
Knowledge sections

24
Hearing sound
R-SG7/DP-SG7/X-SG7 (EN)
DPSS
DPSS (Direct Program Search System) detects an unrecorded part of 4 seconds or more as the interval
between tracks and permits easy operation of cassette tape like a CD.
Skip search
Plays the desired music program from the beginning by skipping programs until you reach the desired
program.
Up to 16 programs can be skipped.
During playback of top side (while 3 is lit)
To play the next program : Press once.
To play the 4th program
after the current program : Press 4 times.
1
¡ 1
During playback of reverse side (while 2 is lit)
To play the next program : Press once.
To play the 4th program
after the current program : Press 4 times.
¡
Preparation section
To return to the beginning
of the current program : Press once.
To play the 4th program
before the current program : Press 5 times.
Listening with fast forward for unrecorded portions (dash & play)
Basic section
Basic section
To return to the beginning
of the current program : Press once.
To play the 4th program
before the current program : Press 5 times.
Plays music programs repeatedly by skipping non-recorded spaces of more than 10 seconds.
Main unit only
÷ The operation changes in reverse mode.
Application section
Knowledge sections
Press simultaneously.
1
¡
1 “””lit ...... The two tape sides are played 8
times, after which playback stops.
2 Goes off .... A tape side is played 8 times,
after which playback stops.
÷ When the 7 key is pressed, playback stops and the
dash & play is canceled.

One-program repeat playback
Plays a single music program repeatedly up to 16 times.
Press during playback.
Hearing sound
R-SG7/DP-SG7/X-SG7 (EN)
25
During playback of reverse side (while 2 is lit)
2
During playback of top
side (while 3 is lit)
3
÷ The program being played will be repeated 16 times,
after which normal playback resumes.
÷ When the 7 key is pressed, playback stops and the one-
program repeat is canceled.
Rewind playback
Rewinds tape to the beginning and restarts playback from there.
Main unit only
During playback of top side (while 3 is lit)
Press simultaneously.
2
0
3
7
During playback of reverse side (while 2 is lit)
Press simultaneously.
Preparation section
Basic section
2
0
3
7
Notes
Notes
1
¡
1
¡
The DPSS may not function normally with the following kinds of tape.
÷ Tapes containing several no-sound intervals of more than 4 seconds, such as conversation and talk tapes.
÷ Tapes containing pianissimo sections, such as classical music tape.
÷ Tapes in which large noise is recorded in blanks between programs.
÷ Tapes containing blanks between programs that are shorter than 4 seconds.
÷ Tapes recorded at low level.
÷ Tapes recorded by cross-fade recording (in which the beginning of next program is overlapped on the end of
previous program).
Application section
Knowledge sections
26
Hearing sound
R-SG7/DP-SG7/X-SG7 (EN)
Receiving broadcast station
It is also possible to receive them by one-touch operations by storing up to 40 stations in the preset
memory.
Collective presetting of stations (auto preset)
One-by-one presetting (manual preset)
11
33
22
Preparation section
Basic section
Remote control unit
Application section
Select a station
1
2
Knowledge sections
To decrease
frequency
band
P.CALL
4
auto/mono
tuning
Preset call
11
¢
22
To increase
frequency
33
1. Select the broadcast band.
Each press alternates the band.
1FM
2AM
2. Select a station.(It is recommended that you memorize the sta-
tion in preset memory in advance.)
When stations have been memorized (preset call)
Every time the key is pressed, the preset stations are switched
over as follows.
Press ¢for the order of 1=2=3 ... 38=39=40=1...
Press 4for the order of 40=39=38 ... 3=2=1=40...
When no stations have been memorized
Select the station tuning mode according to the strength of
radio waves in your environment.
When the radio wave condition is good
: Auto tuning mode (stereo reception)
When the reception is noisy due to weak radio wave
: Manual tuning mode (monaural reception)
1 Select the auto or manual tuning mode.
Each press alternates the mode.
1“AUTO” lit (Auto tuning)
2“AUTO” not lit (Manual tuning)
÷ Normally, use the AUTO (Auto tuning) mode.
¶

Collective presetting of stations (auto preset)
)- 89 )).
TUNEDST.AUTO
MEMO.
MHz
)3 89 )).
TUNEDST.AUTO
MHz
A MEMO
AUTO
DISPLAY
1 Receive a FM broadcast.
2 Keep the "enter" key depressed (for 2 sec or
more).
During recording, the indicator “A MEMO” flashes.
enter
One-by-one presetting (manual preset)
1 Press the “enter” key during reception.
Presetting is cancelled when no
operation is executed for 5 seconds or more.
2 Select one of the preset numbers from 1 to 40.
Presetting is cancelled when
no operation is executed for 5
seconds or more.
volume
control
enter
pure
A
Hearing sound
R-SG7/DP-SG7/X-SG7 (EN)
÷ Up to 30 stations can be memorized.
÷ For use of the RDS function, stations must be memo-
rized by RDS auto presetting.
÷ RDS stations are given priority during auto presetting. If
there is memory left after presetting, the receiver contin-
ues presetting regular FM stations.
÷ For memorizing of stations other than RDS stations (FM,
AM), memorize the stations according to chapter “One-
by-one presetting (manual preset)”.
“MEMO.” lights (for approx. 5 sec.)
Goes off
27
Preparation section
3 Press the “enter” key again.
FM 88 )).
÷ When a key is held depressed, preset stations will be
skipped at an interval of about 0.5 second.
÷ Preset calls also can be made by numerical input via the
numeric keys on the remote control. When the key for
the tens digit has been pressed erroneously at the time
of input, press the +10 key several times to return to the
original display and then enter the number again.
Lights during stereo reception
FM 89 )).
2 Tune in a station.
Auto tuning : Each press receives the next
Manual tuning : Press and hold until the de-
Downloaded from:
AUTO
Frequency display
TUNEDST.AUTO
The “TUNED” indicator lights when
a station is received.
station.
sired station is received.
enter
R-SG7
MHz
R-SG7
MHz
÷ Repeat steps 123 to preset other stations.
÷ If several stations are preset under the same number, the
previous memory is replaced with the latest memory
contents.
About display change during tuner reception
(remote control only)
The display will change each time the DISPLAY
key is pressed.
1Reception band/Frequency
2Preset number/Frequency
3Clock
Basic section
Application section
Knowledge sections

28
Recording
Recording
R-SG7/DP-SG7/X-SG7 (EN)
Note that this cassette deck cannot record onto Metal
Note
Note
tapes.
44
Recording
Preparation section
0
Basic section
Top side
Reverse
side
11
33
1. Load a tape in deck.
1 Open the tray of the
cassette deck.
2 Insert a tape.
3 Close the tray.
Since longer tape than 100 minutes cassette tape is very thin, the
tape could adhere to the pinch roller or be easily cut. It is recom-
Note
NoteNote
mended that these tapes not be used with this unit to prevent
possible damage.
33
11
22
55
÷ Differentiation between normal (TYPE I)
and high (TYPE II) tape is set automatically.
÷ Remove tape slack before loading.
2. Select the tape transport direction.
Check the tape transport direction
Application section
indicator.
1 Press the playback key for the direction to be played (lights green).
Dolby NR
2
rev. mode
3
2 Stop playback (lights red).
3. Set the recording condition.
Knowledge sections
1 Select the reverse mode. £
33
33
2 Select the DOLBY NR mode. £
To reverse the transport direction
÷ When recording is started, the tape is transported in the
direction selected in this step.
÷ Wind the tape to the position where recording is to be
started.

Recording
¶
¶
CD
R-SG7/DP-SG7/X-SG7 (EN)
29
Temporary stop during recording
8
8
¶
÷ Press the record key to restart recording.
To interrupt recording
An unrecorded section of about 4 sec is produced
directly after the recording has been interrupted.
8
¶
÷ Recording pause condition is reached after approxi-
mately 4 sec.
¶
¶
An unrecorded section of about 4 sec is produced (auto recording mute)
1 Obtain stop condition.
2 Press the record key twice.
About
4 sec
¶
÷ An unrecorded section of about 4 sec is produced and
recording pause condition is reached.
8
¶
To end recording
7
Preparation section
Basic section
input selector
44
Select an input source other than
“TAPE” input.
¶
55
4. Select the source to be recorded.
The input source component to be recorded
should be displayed.
R-SG7
÷ When the CD input is selected and if a disc has been set
in the CD player, its playback starts immediately.
5. Start recording.
Lights
1 Play (or tune) the input
source to be recorded.
2 Start recording.
÷ The recording level is adjusted automatically when the
CRLS function is used. º
÷ Recording stops automatically when the tape side(s) to
be recorded have been fully recorded.
Application section
Knowledge sections
30
Recording
R-SG7/DP-SG7/X-SG7 (EN)
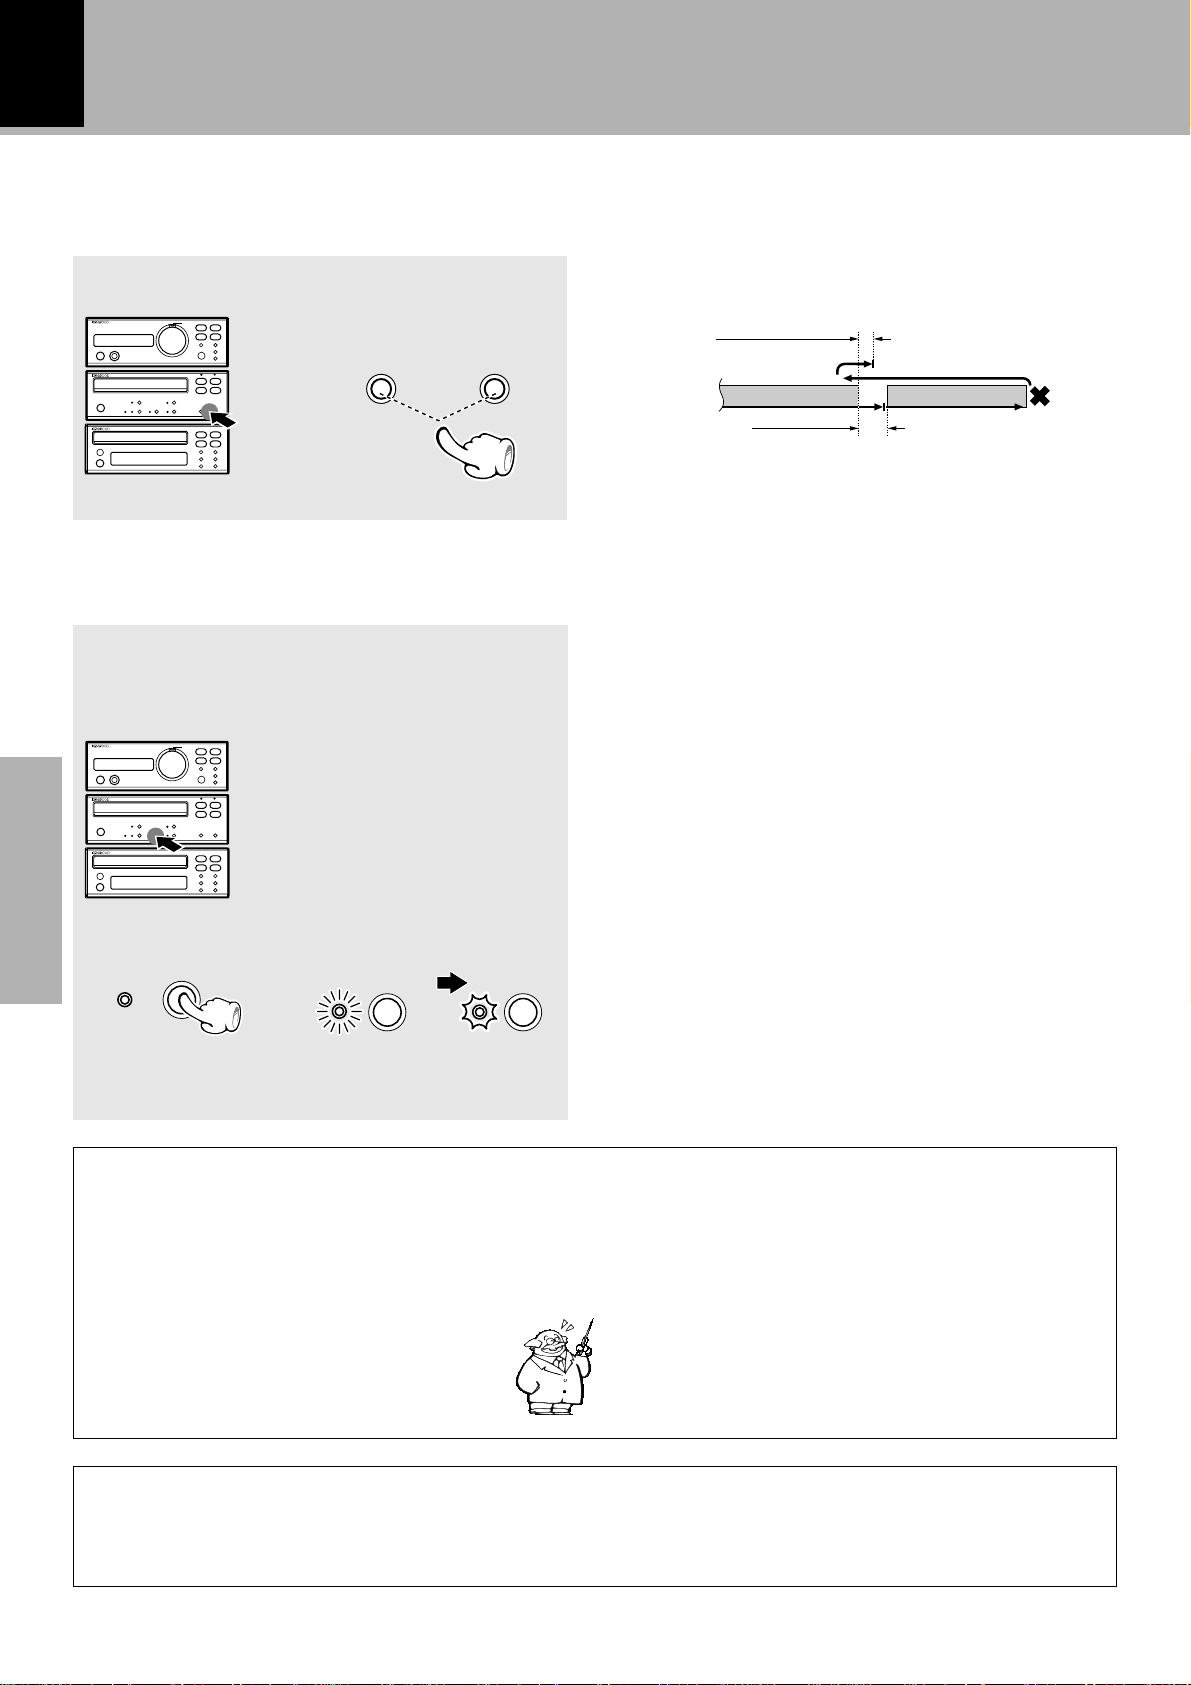
To repeat a recording
Return to the recording start position.
Press the rewind key during recording.
During recording of
reverse side (while 2 is lit)
1
During recording
of top side
(while 3 is lit)
¡
÷ If there is a non-recorded space of more than 4 seconds
before the recording start position, recording is aborted
and tape is rewound as shown below.
Tape stops after 2 sec. of transport.
Recorded tune
Blank of 4 sec. or more
÷ If there is no recorded tune before, the tape will be
rewound then stopped.
Tune to be re-recorded
Re-recording
Automatic Adjustment of the Recording Level (CRLS)
A standard recording level has been set in advance for the cassette deck (X-SG7), but when the CRLS
function is used, the max. recording level is set automatically for the music source.
1 Play the contents to be recorded
(or receive the radio station to be recorded).
Preparation section
2 Press the CRLS key.
Basic section
CRLS
About 20 sec
CRLSCRLS
If the key has never been pressed
.....The sound is recorded with the basic level set with the
unit.
If the key is pressed
.....The recording level is set automatically and stored in
memory as the recording level to be used with the
current input being selected. From the next time on,
this recording level is set automatically for that input
even if the key is not pressed.
To return to the basic level
.....Hold the key depressed until the indicator goes off
(for approx. 3 seconds).
÷ The recording level setting completes in approx. 20
seconds, after which the deck enters the record-pause
mode.
÷ If recording is started during the setting (while the CRLS
indicator is blinking), distorted sound may be recorded.
÷ If a non-recorded space of more than 3 seconds is
detected after the CRLS key is pressed, the recording
level setting is aborted.
Points for Recording from a CD or an MD
For recording from a CD or an MD, playback from
the music source and recording by the cassette deck
Application section
can be started simultaneously (synchro recording
function) when the cassette deck is set to record
pause status in advance.
Dolby HX Pro
Knowledge sections
The Dolby HX Pro headroom extension system records high frequencies such as the cymbal sound clearly by controlling
the bias current during recording according to the frequency composition of the sound being recorded. This system is
activated automatically during recording with this unit.
1 Pause the CD or MD to be played.
2 Use the skip keys (4 ¢) to select the title
to be recorded. (Pause will be reached at the
beginning of the selected title.)
3 Bring the cassette deck to recording pause
condition.
4 Start playback of the CD or MD.
(Synchro recording will start.)
÷ The recording is stopped when the stop key of the
playback unit is pressed.

Playback of CD
PGM
12345
678910
11
02
P- 02
TRACK NO.
Playback of CD
R-SG7/DP-SG7/X-SG7 (EN)
31
Listening in the desired sequence
Any tracks on the discs in the tray can be listened to in the desired sequence. (Max. 32 tracks)
Select the “CD” input.
Check that the CD player is in the stop mode.
1
If it is in play mode
7
Light the “PGM” indicator.
2
P.MODE
(program playback)
TRACK NO.
01
Lights
PGM
0:00
TRACK NO.
Preparation section Basic section Application section
DP-SG7
12345
678910
11
DP-SG7
Enter track Nos. in the order you want to play them.
3
1 Select the track.
Within 8 seconds!
2 Confirmation.
3 Repeat steps 1 and 2 .
Start playback.
4
123
456
789
PTY SEARCH
+10
0
P.MODE
CD
3/8
01
÷ Up to 32 tracks can be programmed. When “FULL” is
displayed, no more tracks can be programmed.
÷ When an error has been made, press the CLEAR key and
select again.
Blinks
PGM
÷ Tracks will be played in the order they were programmed
(in order of P Nos.).
÷ When the 4 or the ¢ key is pressed during play, the
program will jump to the preceding or the following track
respectively.
÷ When the 4 key is pressed once during playback, the
play position returns to the beginning of the current track
being played.
TRACK NO. TOTAL
02
-4:45
DP-SG7
DP-SG7
2
Knowledge sections

32
To add a track to the program
Playback of CD
R-SG7/DP-SG7/X-SG7 (EN)
1 Select the track.
Preparation section
2 Press the P. MODE key.
To delete a programmed track
Basic section
To quit the program mode
123
456
789
PTY SEARCH
+10
0
CLEAR
P.MODE
÷ When a track No. is entered, the track will be added to
the end of the existing program.
÷ Each time the key is pressed, the last track will be
deleted.
÷ A track being played can not be deleted.
Goes off
DP-SG7
TRACK NO.
Application section
Auto space function
This function is convenient for recording CD on a cassette tape. When the “space” key is pressed during programming
of tracks, a non-recorded space of a few seconds will be created between tracks. (The SPACE indicator flashes.) By
recording tracks with these spaces on tape, the search and repeat play operations of tape using the DPSS function
(which works by searching the non-recorded spaces) can be performed reliably.
space
Knowledge sections
01
÷ If the key is pressed during playback, normal playback in
order of tracks resumes from the current track.
÷ Cancellation also is made by pressing the Open/Close ( 0 ) key.
÷ Even when the performances of two tracks are continu-
ous (which occurs with classical or live recording mu-
sic), the spaces will be created if they have different
track Nos.
÷ To cancel the creation of space, press the “space” key
again.

Repeated playback
Desired tracks or discs can be played back repeatedly.
Select the “CD” input.
To repeat a disc
1 Confirm that the “PGM” indicator is not lit.
If the “PGM” indicator is lit, press
the P.MODE key to turn it off.
Confirm that this is not lit.
PGM
TRACK NO.
01
DP-SG7
Playback of CD
R-SG7/DP-SG7/X-SG7 (EN)
33
Preparation section Basic section Application section
2 Press the “repeat” key.
repeat
3 Start playback.
6
To repeat only the programmed tracks
1 Follow the procedure for “Listening in the
desired sequence” to step 3 to program the
tracks to be played. ⁄
2 Press the “repeat” key.
repeat
TRACK NO.
01
Lights
REPEAT
DP-SG7
To stop repeated playback
Press the “repeat” key again.
÷ The “REPEAT” indicator goes off and the playback
following the current mode of the CD player starts.
DP-SG7
PGM
TRACK NO. REPEAT
04
0:00
234
89
11
3 Start playback.
6
Knowledge sections
To stop repeated playback
Press the “repeat” key again.
÷ The “REPEAT” indicator goes off and the playback
following the current mode of the CD player starts.

34
Playback of CD
R-SG7/DP-SG7/X-SG7 (EN)
Listening to an unexpected track sequence
As the tracks each time are selected randomly,
the music can be enjoyed.
Select the “CD” input.
Confirm that the “PGM” indicator is not lit.
1
If the “PGM” indicator is lit, press
the P.MODE key to turn it off.
P.MODE
Preparation section
Confirm that this is not lit.
PGM
01
(random playback)
DP-SG7
TRACK NO.
Press the RANDOM key.
2
TRACK NO.
RANDOM
Basic section
÷ Playback stops after each track has been played once.
÷ The random playback can also be repeated by pressing
the “repeat” key.
Application section
RANDOM
To select another track in the middle of playing one To cancel random playback
DP-SG7
24
6810
12 14
P.CALL
Knowledge sections
÷ Pressing the 4 key once returns to the beginning of
the track being played.
¢
RANDOM
÷ From the track being played at this time, playback will
be in the normal order of tracks.

Convenient CD recording
Selecting the optimum recording method
With this unit, the following edit recording is
possible according to the purpose.
Note that this cassette deck cannot
Note
Note
record onto Metal tapes.
Giving preference to the tape length over the
If you want to avoid any tune being
interrupted at the end of tape
track sequence
\
Edit recording of CD is possible by the simple operation of entering the recording length of the tape.
Convenient CD recording
(time edit recording)
35
R-SG7/DP-SG7/X-SG7 (EN)
Preparation section
fl
If you want to select the tracks to be
recorded while playing a CD
If you want to record a CD in order of
track numbers
Recording only desired tracks
(ONE TOUCH EDIT.....single track recording)
\
Play a CD and, if a track you want to record starts,
press the O.T.E. (One Touch Edit) key. The track will
be recorded from the beginning.
One touch recording of an entire CD
(ONE TOUCH EDIT.....recording of all tracks)
\
Press the O.T.E. (One Touch Edit) key when in the
stop mode. The disc will start to be recorded.
Basic section
‡
Application section
°
Knowledge sections

36
PGM
12345
678910
11
C- --
TRACK NO. EDIT
PGM
03 FI
LE
EDIT A
3
PGM
12345
678910
11
01
0:05
TRACK NO. EDIT A
Convenient CD recording
R-SG7/DP-SG7/X-SG7 (EN)
Giving preference to the tape length over the track sequence
(time edit recording)
When the tape recording time is specified, recording is executed with changing the track sequence
so that no track will be interrupted when the tape
direction is changed at the end of one side.
Recording preparations are required.
Select the “EDIT” mode.
1
1 Confirm that the “PGM” indicator is not lit.
If the “PGM” indicator is lit, press the P.MODE key
to turn it off.
2 Press the EDIT key.
Preparation section
Enter the recording length of the tape.
2
Basic section
The editing is ended when no operation is executed for 8 sec or more.
EDIT
123
456
789
PTY SEARCH
+10
0
•
(Steps 1 to 4)
Confirm that this is not lit
PGM
TRACK NO.
00
÷ To cancel the EDIT mode, press the P.MODE key of the
remote control unit.
Press the numeric keys as shown below.
30-minute tape : 000)
46-minute tape : 00006
DP-SG7
DP-SG7
When the “time” key is pressed
repeatedly, a tape length of 46, 54, 60,
or 90 minutes can be selected easily.
After selection, press the EDIT key to
go to step 3.
Confirm that the “EDIT” indicator changes from
Application section
flashing to steady lighting, and then go to step 3.
Start edit recording.
3
O.T.E.
Knowledge sections
Note
Note
Depending on the combination of conditions from CD contents (number of tracks and length of the tracks) and
tape recording time, interruption of a track may not be avoidable. In such a case, the respective track will not be
recorded.
÷ When automatic edition has been completed, the “EDIT”
indicator lights.
÷ When a wrong time has been entered, confirm that the
“EDIT” indicator is lit and start again from step 1.
÷ Up to 32 tracks can be edited.
÷ Every time the ¢ key is pressed, the edited track
numbers will be displayed in the changed order. Press
the 7 key to return to the track number of the first track.
DP-SG7
÷ The tape and CD stop automatically when recording has
completed.

Convenient CD recording
345
678910
11
03
0:05
TRACK NO.
R-SG7/DP-SG7/X-SG7 (EN)
37
Recording only desired tracks
At the time of CD playback, any desired track can
be selected immediately for recording.
When playing an MD with the DM-SG7 (option),
the same procedure can be used to record only
that track on tape.
Recording preparations are required.
Play a CD.
1
Select a mode other than random
play.
6
•
(ONE TOUCH EDIT.....single track recording)
(Steps 1 to 4)
DP-SG7
Lights
TRACK NO.
03
1:07
345
678910
11
Preparation section
When you want to record a track being played, press the O.T.E. key.
2
O.T.E.
When recording has been completed, a non-recorded portion of 4 seconds will be produced and
the cassette deck part will stop. The CD player will
enter temporary stop condition.
To record a different track, repeat the steps 1 and 2.
In case the key is pressed with track No.3
÷ Playback restarts from the beginning of the track being
played and recording starts at the same time.
To end recording in the middle
Basic section
DP-SG7
Application section
Knowledge sections
If you set CRLS beforehand you can enjoy better
recording. º
Downloaded from:
7
÷ Both the cassette deck and CD player stop.

38
Convenient CD recording
R-SG7/DP-SG7/X-SG7 (EN)
One-touch recording of an entire CD
When the O.T.E. key is pressed while the CD
player is in the stop mode, recording of a CD can
be started at the same time as playback.
When the DM-SG7 (option) is connected and
the input selector is set to “MD”, the same procedure can be used to make a one-touch recording of the entire MD on tape.
Recording preparations are required.
Check that the CD player is in the stop mode.
1
If it is in play mode
7
Preparation section
•
(Steps 1 to 4)
(ONE TOUCH EDIT.....recording of all tracks)
÷ When recording a CD, set the input selector to CD.
Step 2 also can be executed after the order of the
tracks has been programmed.
Press the O.T.E. key.
2
Basic section
O.T.E.
Application section
÷ Recording of CD starts at the same time as playback.
÷ When the tape direction is changed at the end of the
tape, no sound is recorded on the guide tape. When
interruption of a track is to be avoided, restart recording
from the very beginning of the reverse side according to
“Recording”. •
Knowledge sections
To end recording in the middle
7
÷ Both the cassette deck and CD player stop.

R.D.S.
BBC 1 FM
TUNEDST.AUTO RDS
RDS is a system which transmits useful
information (digital data) for FM broadcasts
together with the broadcast signal. Tuners and
receivers designed for RDS reception can extract
the information from the broadcast signal for use
with various functions such as automatic display
of the station name.
(Radio Data System)
R.D.S.
R-SG7/DP-SG7/X-SG7 (EN)
For reception of RDS stations, the RDS auto
presetting function must be used to preset the
stations.
“NO DATA” will be flashed when a station not
preset by auto presetting is received. ¶
39
This unit is equipped with the following
functions utilizing RDS data:
PTY (Program Type Identification) Search :‚
The tuner automatically searches for a station which is
currently broadcasting a specified program type (genre).
PS (Program Service Name) Display : (See below.)
When an RDS broadcast is received, the station name is
automatically displayed.
EON (Enhanced Other Network) : w
When the information to be received is set in advance and
any RDS station in the same network starts broadcasting
of such information, the reception automatically will be
switched to that station.
To switch the display contents
Pressing the DISPLAY key
changes the display contents.
RDS
DISPLAY
Preparation section Basic section Application section
Lights
TUNEDST.AUTO RDS
BBC 1 FM
The “RDS” indicator lights up when
an RDS broadcast (signal) is received.
* Some functions may not be provided or be given
different names depending on countries or areas.
Display mode priority ranking
1 PS (Program Service Name) Display :
When an RDS broadcast is received, the
station name is automatically displayed.
If no PS data was sent, “NO PS” is dis
played.
2 Frequency Display :
The frequency of the current station is displayed.
TUNEDST.AUTO RDS
FM 1)2 5).
Knowledge sections
MHz

40
NEWS
RDS PTY
R.D.S.
R-SG7/DP-SG7/X-SG7 (EN)
Searching for a desired program type
By specifying the type of program (genre) you
want to listen to, the tuner automatically
searches for a station which is currently
broadcasting a program of the specified type.
Set the reception band to FM.
Activate the PTY search mode.
1
PTY
Preparation section
Select the program type you desire.
2
Use the program type table on the right for your
convenience.
A To select using the P.CALL keys
P.CALL
0
PTY SEARCH
+10
¢
Next
program
type
Basic section
Application section
Previous
program
type
4
Select while "PTY" is lit.
The P.CALL keys let you select
from all 29 program types in the
order shown at right.
Press the key and release it when
the desired type is displayed.
B To select with the numeric keys
123
456
789
The numeric keys allow to you
select programme types 1 to 0
directly. If you want to select
one of the other programme
types, use the P.CALL key.
For reception of RDS stations, the RDS auto
presetting function must be used to preset the
stations. ¶
When an RDS broadcast is received, the program type is
shown on the display. If no PTY data is available, or if the
station is not an RDS station, “NONE” is displayed.
Program type table
(4)
DOWN
(¢)
UP
(PTY search)
B Program Type Name Display
A
1 Pop Music POP M
2 Rock Music ROCK M
3 Easy listening Music EASY M
4 Light Classical Music LIGHT M
5 Serious Classical Music CLASSICS
6 Other Music OTHER M
7 News NEWS
8 Current Affairs AFFAIRS
9 Information INFO
0 Sport SPORT
Education EDUCATE
Drama DRAMA
Culture CULTURE
Science SCIENCE
Varied Speech VARIED
Weather WEATHER
Finance FINANCE
Children’s programmes CHILDREN
Social affairs SOCIAL
Religion RELIGION
Phone in PHONE IN
Travel TRAVEL
Leisure LEISURE
Jazz music JAZZ
Country Music COUNTRY
National Music NATION M
Oldies Music OLDIES
Folk Music FOLK M
Documentary DOCUMENT
Knowledge sections
“NO DATA” is displayed if this operation is
attempted before performing the RDS auto presetting function.
• The operations shown in A can also be performed with
the TUNING keys on the front control.

R.D.S.
BBC 1 FM
TUNEDST.AUTO RDS
ROCK M
TUNEDST.AUTO RDS PTY
R-SG7/DP-SG7/X-SG7 (EN)
41
Start the search.
3
PTY SEARCH
+10
To select another program type
Repeat steps 1, 2 and 3
EXAMPLE: Searching for a Rock Music broadcast.
Display while searching
Program type name display
• When the PTY is received, the PTY name blinks and
the “PTY” lights up.
Display when a station is received.
Station name display
Blinks
Goes out
R-SG7
R-SG7
Preparation section Basic section Application section
Downloaded from:
• No sound is heard while “PTY” is blinking.
• If the desired program type cannot be found, “NO
PROG” is displayed, then after several seconds the
display returns to the original display.
• If the desired program type is found, that program is
received. The program type display changes temporarily
to the frequency display, and then to the station name
display.
Knowledge sections
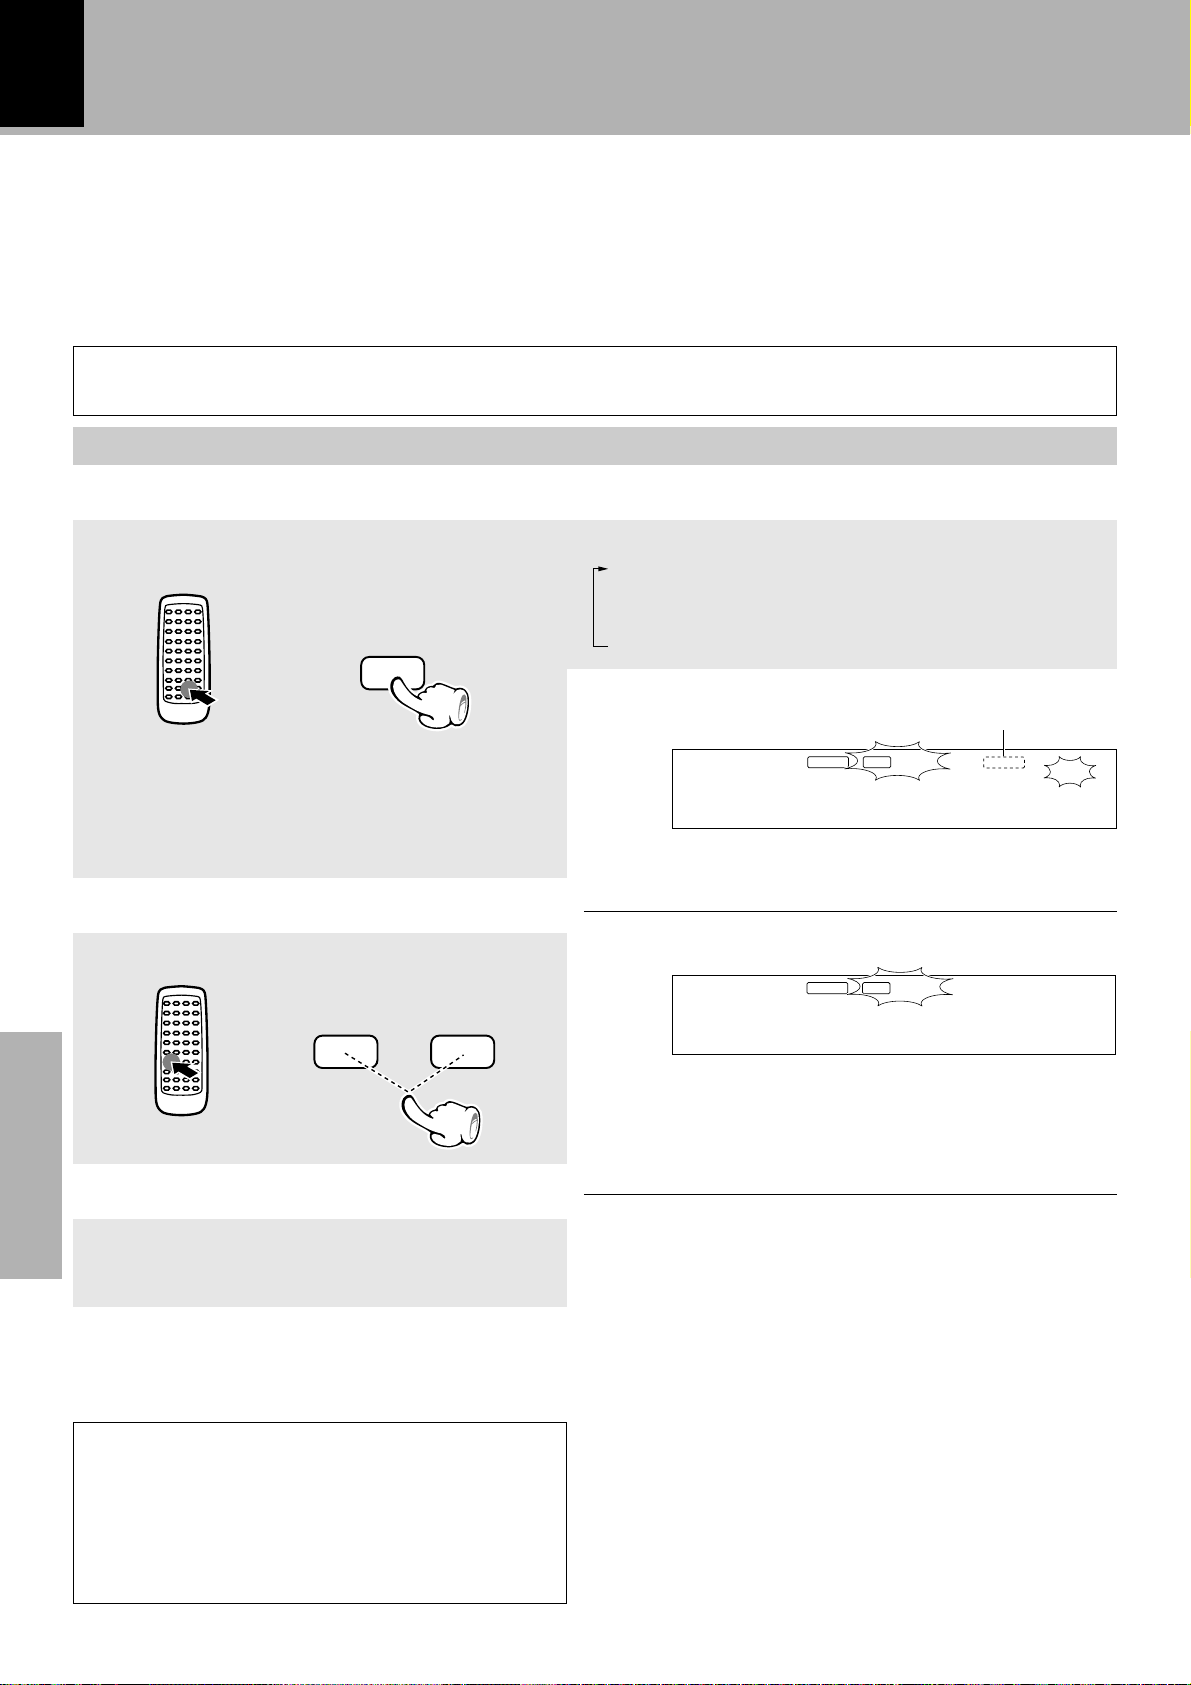
42
BBC 1 FM
TUNEDST.AUTO RDS EON
TP
INFO
R.D.S.
R-SG7/DP-SG7/X-SG7 (EN)
To be able to listen to the desired information at any time
By using the EON function, which manages the information of other stations, listening to desired information like
traffic information or news etc. can be reserved even when it is not being transmitted at the present. When
listening to a station with the “EON” display lit and another station of the same network starts to broadcast an
information program for which a reservation has been made, then that station will be selected automatically.
When the desired information program ends, return is made to the original program.
For reception of RDS stations, the RDS auto presetting function must be used to preset the stations.
(EON reservation)
Set the reception band to FM.
Select the desired information.
1
Each press switches the modes as follows.
1TA..........................Traffic Announcement
2NEWS................... News
3INFO...................... Information
4Display not lit.......EON cancelled
This lights for stations where TP
When “INFO” is selected
(Traffic Program) can be received.
Preparation section
TA/
NEWS/INFO.
¶
Receive an RDS station.
2
Basic section
Select a station where “RDS”
and “EON” are lit.
4
Wait for the desired information.
3
P.CALL
¢
Application section
CD or tape playback also may be started.
As long as the power is ON, standby condition will
exist.
TP (Traffic Program) Indication
When the “TP” indication is lit, this indicates that this
station or a station in the same network is transmitting
Knowledge sections
traffic information.
When “TP” is displayed for the station presently being
received, the traffic information of this station can be
heard even without EON reservation.
÷ Please execute automatic presetting when TA, NEWS,
and INFO can not be selected.
“RDS” and “EON” are lit
TUNEDST.AUTO RDS TP
EON
INFO
BBC 2 FM
÷ When “TA” has been selected in step 1, always select
a station for which the “TP” indication is lit.
÷ When “EON” does not light although an RDS station is
received, that station is not transmitting EON data.
Please select a different station.
÷ When one of the stations of the network of the station
received in 2 starts broadcasting the program contents
selected in 1, that station will be received automatically.
At this time, the input selection becomes TUNER, and
CD or MD playback will pause.
However, external equipment (AUX) will remain as it is.
When reception of the desired EON programs is complete, input selector returns to the previous input source.
÷ When the power is OFF and during recording, the EON
function does not operate.
÷ When the transmission of the selected program contents
ends in case of automatic reception with the EON function, return will be made to the status directly before
operation of the EON function.
Downloaded from:

Listening with High Sound Quality
Listening in Pure A Mode
Setting to pure A operation mode (pure A) is recommended when listening with low volume
close to the set or late at night. Then you can
enjoy smooth high-quality sound with little distortion.
Please use the normal mode to listen at higher
volumes.
CAUTION
When pure A mode is selected, a certain amount of
power is used even when no music source is played
back, and the temperature of the amplifier section
will rise.
(Pure A)
43
R-SG7/DP-SG7/X-SG7 (EN)
Switch on pure A.
1
Play the music.
2
Adjust the volume.
3
pure
volume
control
∞ ∞
down up
pure
Preparation section Basic section Application section
Lights
volume
control
pure
R-SG7
PURE A
A
R-SG7
VOL 7 2).
Volume indication
÷ The volume indication changes to an indication matching
the low volume.
÷ When this is pressed again in pure A mode, normal mode
will be obtained. (The pure A indicator goes out.)
What is Pure A?
The amplifier section amplifies the voltage and current of the input signal from the CD etc. and sends the output to the
speakers. In order to suppress the distortion occurring with this amplification, amplifiers with class A operation or class AB
operation always have current flowing through the circuits for current amplification. This is called the idling circuit. Especially
an amplifier with class A operation has a high idling current in comparison to an amplifier with class AB operation, which
is used by many units. As the result, class A operation has distortion suppressed to a minimum, and smooth playback with
high quality is possible. However, as a certain amount of power is consumed even when no music source is played, the
temperature of the amplifier section will become comparatively high. Thus a high-class amplifier with a large-capacity
power supply is required to enjoy the sound quality of class A operation.
The amplifier of this unit normally operates in class AB operation, but as the high sound quality of class A operation can
be enjoyed easily, a class A operation mode for listening at low volume (pure A) has been provided. Please enjoy the pure
A sound quality when listening at low volume close to the set, late at night, etc.
Knowledge sections
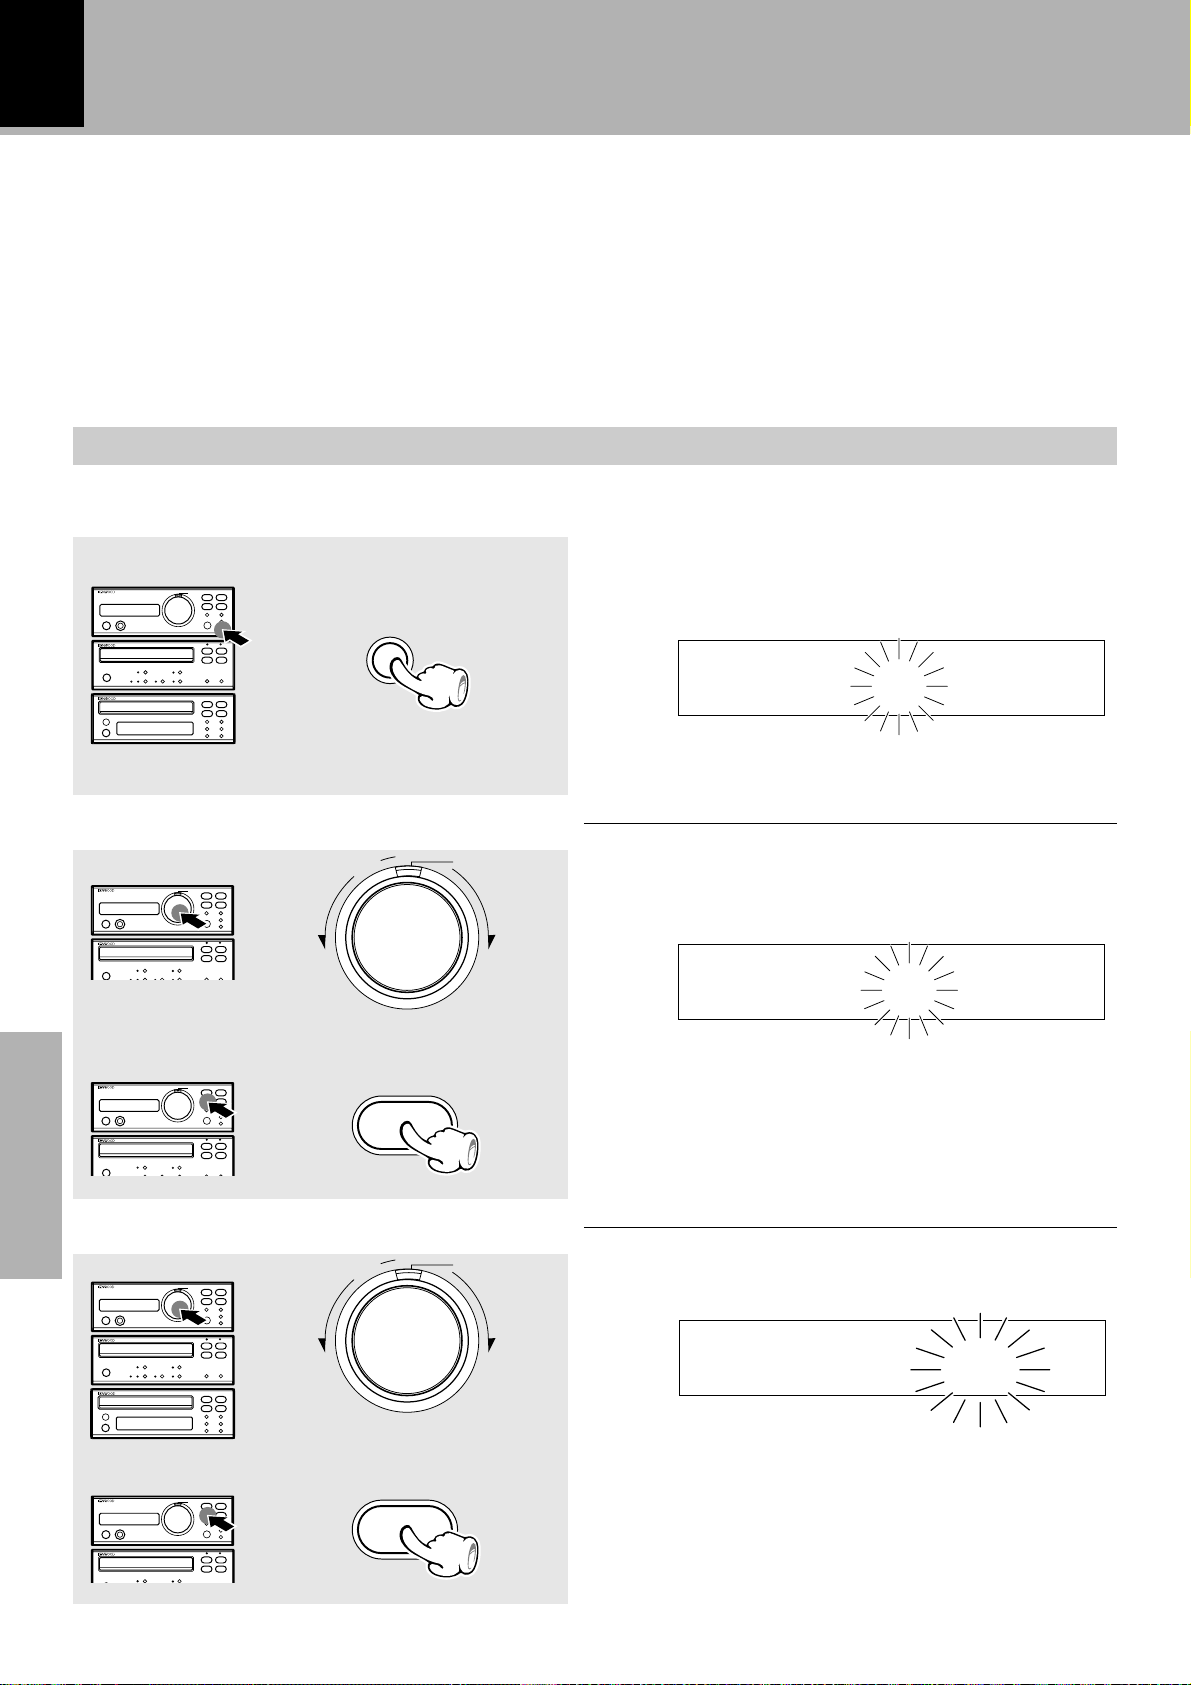
44
AM 12 )):
AM 8 )):
AM 8 45:
Clock adjustment
This unit incorporates a clock function. Be sure
to adjust the correct time before using the timer
function.
Ensure that the power is OFF.
Activate the clock adjustment mode.
1
R-SG7/DP-SG7/X-SG7 (EN)
Example: Adjustment to 8:45
Preparation section
Enter the hour.
2
Basic section
1
down up
To decrease
the figure
2
auto/mono
volume
control
∞ ∞
enter
pure
To increase
the figure
R-SG7
÷ The time display starts to blink.
A
R-SG7
÷ The time of the day is represented in 12-hour AM/PM
method.
÷ Press the “enter” key. The hour is entered and the
minute display starts to blink.
Application section
Knowledge sections
Enter the minute.
3
1
To decrease
the figure
2
volume
control
∞ ∞
down up
enter
pure
To increase
the figure
A
R-SG7
÷ If you make a mistake, restart from the beginning.
÷ To adjust correct time, press the “enter” key at the same
moment as a time announcement.
÷ The time display blinks after a power failure or when the
power cord has been unplugged from the AC outlet and
plugged again. In such a case, adjust the clock again.

Timer operation
AM 7 )):
O.T.T.
Operate easy To use Timer (O.T.T.)
Playback of the selected input source starts at the specified time, and the power is switched off after one
hour. This timer operates only once directly after setting.
Sleep timer
The power is turned OFF automatically after the specified period has elapsed.
Timer playback, timer recording
Playback of the selected source (or broadcast recording) will be executed for the set time.
AI timer playback
When timer playback starts, the volume increases gradually.
Timer operation
R-SG7/DP-SG7/X-SG7 (EN)
45
Adjust the clock before setting the timer.
Operate easy To use Timer (O.T.T.)
Timer playback is possible simply by setting the time.
The source selected last before the power was switched
off will be played. One hour after start of timer playback, the power will be switched off automatically.
1 Select the source to be played and set the
volume.
2 Switch OFF the power supply.
3 Press the “tuning (fi)” key.
tuning
pure
4 Set the ON time.
To decrease
the figure
5 Press the “enter” key.
volume
control
∞ ∞
down up
enter
A
To increase
the figure
r
The program timer does not operate during
playback by the O.T.T. timer.
÷ When the “tuning (fi)” key is pressed, the input source
will be displayed, and after a few seconds, the ON time
will be displayed.
ON time display
÷ The ON time can be set in steps of 5 minutes.
÷ In case of combination with another timer, the input
source which operated last will be played.
R-SG7
Blinks
Preparation section Basic section Application section
Adjust the clock before setting the timer.
Sleep timer
Set the number of minutes after which the power
is to be turned OFF.
1 Turn the power ON.
2 Set the time.
SLEEP
To cancel
Press the “tuning (fi)” key twice while the
power is OFF.
÷ The power is turned OFF automatically after the set time
has elapsed.
÷ Each press decreases the time by 10 minutes. The
maximum time that can be set is 90 minutes.
90=80=70...30=20=10=Cancel=90=80...
Lights
SLEEP
R-SG7
9)
Duration for sleep timer
To cancel
Turn the power OFF or press the SLEEP key until
the sleep time is cancelled.
Knowledge sections

46
Timer operation
R-SG7/DP-SG7/X-SG7 (EN)
Timer programming
This is a 24 hour timer.
Select the time and duration for the operation and the contents, and select operation or no operation
as required.
Adjust the clock before setting the timer.
Make preparations for the play (recording).
1
÷ To listen to radio
The station should
be preset prior to
the above.
Preparation section
Adjust the listening volume.
2
Basic section
¶
÷ To listen to CD ÷ To listen to tape ÷ Listening to MD ÷ For recording
(Program playback
is not possible.)
................................................................
pure
volume
control
A
r
Set a tape into deck.Insert a disc.
................................................................
÷ For recording of broadcasts, muting becomes ON auto-
matically when the power is switched on by the timer.
Set a disc into the
MD recorder.
For recording and playback with an MD
recorder (DM-SG7), also refer to the instruction manual enclosed with the DM-SG7.
................................................................
Make preparations for recording.•
............................
(Steps 1 to 4)
Set the on/standby switch to standby
3
position.
Application section
Select a program No.
4
1
Knowledge sections
2
on/standby
band
During display of program content
enter
÷ The “PROG.” indicator lights.
÷ When a timer reservation already has been made, the
contents will change to the new settings.
R-SG7
1) )):
PROG.

Enter the ON time.
AM 7 )):
PROG.
AM 8 )):
PROG.
5
1
volume
control
Timer operation
R-SG7/DP-SG7/X-SG7 (EN)
A
pure
÷ After entering the “hour” with the procedure in 1 and
47
2, enter the “minute” using the same procedure.
R-SG7
To decrease
the figure
2
enter
To increase
the figure
÷ If you commit a mistake, restart from step 4.
Enter the OFF time.
6
1
volume
control
A
pure
÷ After entering the “hour” with the procedure in 1 and
2, enter the “minute” using the same procedure.
R-SG7
To decrease
the figure
enter
To increase
the figure
2
÷ If you commit a mistake, restart from step 4.
Make the desired reservation.
7
For timer playback or AI timer playback Timer recording of radio broadcasts
1 Select the mode.
volume
control
pure
A
Select “PLAY” or “AI”.
PLAY ....... Timer play
AI ............ Timer play with gradually
«
enter
REC
Enter it.
increasing volume
PLAY
PROG.
2 Select the input source.
A
volume
control
pure
Select the source to be played.
TUNER
«
enter
CD
TAPE
MD (DM-SG7)
TUNER
PROG.
AUX
Enter it.
3 Select the broadcast station (only when TUNER is
selected).
volume
control
pure
A
Select the preset station No.
15
PROG.
«
enter
Enter it.
1 Select the mode.
volume
control
pure A
Select “REC”.
PLAY
«
enter
2 Select the input source.
volume
control
pure A
AI
REC
Enter it.
Select the source
to be played.
TUNER
«
enter
AUX
Enter it.
3 Select the broadcast station (only
when TUNER is selected).
volume
control
pure
A
Select the preset
station No.
«
enter
Enter it.
4 Select the recording unit.
volume
control
pure A
TAPE
MD (DM-SG7)
Preparation section Basic section Application section
Knowledge sections
Continued on next page
«
enter
Enter it.

48
Set the program.
8
Timer operation
R-SG7/DP-SG7/X-SG7 (EN)
÷ The “PROG.” indicator lights.
tuning
1) ):5
÷ The timer does not operate when no program is set.
This completes the program timer reservation. Please refer to the following item for confirmation,
changes, etc.
Ensure that the power is OFF.
NoteNote
Note
The reservation contents cannot be cleared. The
contents are cleared only when they are changed.
R-SG7
PROG.
Check the reservation content.
÷ The reserved contents will be displayed for 3 seconds
per item. After this, the previous display content appears
Preparation section
band
again.
To change the reserved contents
Restart the procedure of “Timer programming”
from the beginning. y
When timer operation is not required
Basic section
Extinguish the program indication.
tuning
To set the same timer program again
Light the program indication.
Application section
tuning
Goes off
R-SG7
1) ):5
÷ The reservation contents are held in memory.
R-SG7
1) ):5
÷ Also prepare the disc or tape and adjust the listening
volume.
PROG.
Lights
Knowledge sections

Important Items
Handling of discs and tapes
Important Items
R-SG7/DP-SG7/X-SG7 (EN)
49
Disc handling precautions
Handling
Hold the discs so that you do not
touch the playing surface.
Label side
Playing side
Sticker
Do not attach paper or tape to either the playing side or the label side
of the discs.
Sticky paste
Cleaning
If fingerprints or foreign matter become attached to the disc, lightly
wipe the disc with a soft cotton cloth
(or similar) from the center of the disc
outwards in a radial manner.
Storage
When a disc is not to be played for
a long period of time, remove it from
the player and store it in its case.
Discs which can be played with this unit
CD (12 cm, 8 cm), and the audio part of CDV, CD-G and CDEXTRA.
Use discs that comply with the IEC standard, for example
a disc carrying the marking on the label surface.
COMPACT
COMPACT
DIGITAL AUDIODIGITAL AUDIO
Never play a cracked or warped disc
During playback, the disc rotates at high speed in the player.
Therefore, to avoid danger, never use a cracked or deformed
disc or a disc repaired with tape or adhesive agent.
Please do not use discs which are not round because they
may cause a malfunction.
Disc accessories
The disc accessories (stabilizer, protection sheet, protection ring, etc.) which are marketed for improving the sound
quality or protecting discs as well as the disc cleaner should
not be used with this system because they may cause
malfunction.
Preparation section Basic section
Notes on cassette tape
Safety tab (accidental erasure prevention tab)
After an important recording has been finished, break the
safety tab, to prevent the recorded contents from being
erased or recorded on accidentally.
For A side
For B side
To re-record
1.Longer tape than 100 minutes cassette tape
NotesNotes
Notes
Since longer tape than 100 minutes cassette
tape is very thin, the tape could adhere to the
pinch roller or be easily cut. It is recommended
that these tapes not be used with this unit to
prevent possible damage.
Apply tape only to the position
where the tab has been removed.
To store cassette tapes
Do not store the tapes in a place which is subject to direct sunlight, or near equipment that generates heat. Keep
the cassette tapes away from any magnetic field.
N
S
When there is slack in the tape
In such a case, insert a pencil into the reel hole and wind
the reel hub to remove the slack.
2. Endless tapes
Do not use an endless tape, as this could damage the
mechanism of the unit.
Application section
Knowledge section

50
Maintenance
Cleaning the head section
Important Items
R-SG7/DP-SG7/X-SG7 (EN)
Cleaning the heads and peripheral components
For maintaining the best condition of the deck and for
longer service life, always keep the heads (recording /
playback / erase), capstan and pinch roller clean.
For the cleaning, use a cleaning cassette available in audio
stores.
For details, read the instruction manual of your cleaning
tape.
Maintenance of the unit
When the front panel or case becomes dirty, wipe with
a soft, dry cloth. Do not use thinner, benzine, alcohol,
etc. for these agents may cause discoloration.
In regard to contact cleaner
Preparation section
Do not use contact cleaners because it could cause a
malfunction. Be specially careful not to use contact
cleaners containing oil, for they may deform the plastic
component.
When your unit needs to be repaired, bring the entire
set (Speakers excluded) to your dealer.
Demagnetizing the head
When the recording / playback head is magnetized, the
sound quality will deteriorate. In such a case, demagnetize
the head using a commercially available demagnetizer
(head eraser).
Basic section
Application section
Knowledge section
Downloaded from:

Reference
Important Items
R-SG7/DP-SG7/X-SG7 (EN)
51
Caution on condensation
Condensation (of dew) may occur inside the unit when
there is a great difference in temperature between this
unit and the outside.
This unit may not function properly if condensation occurs. In this case, leave the unit for a few hours with the
power left ON, and restart the operation after the condensation has dride up.
Be specially cautious against condensatin in a following
circumsatance:
When this unit is carried from a place to another across
a large difference in temperature, when the humidity in
the room where this unit is installed increases, etc.
Dolby noise reduction and HX Pro headroom extension
manufactured under license from Dolby Laboratories.
HX Pro originated by Bang & Olufsen.
“DOLBY”, the double-D symbol and “HX PRO” are
trademarks of Dolby Laboratories.
Note related to transportation and movement
(CD player)
Before transporting or moving this unit, carry out
the following operations.
Memory backup function
Stored contents which
are cleared immediately
when power plug is unplugged from power outlet
Stored contents which
are cleared in at least a
day after power plug is
unplugged from power
outlet
Clock display
Amplifier
POWER status (ON or
OFF)
Input selection
Volume control value
TONE Level
Tuner unit
Receiving band
Frequency
Preset stations
Program settings
WARNING NOTICE:
IN MOST CASES IT IS AN INFRINGEMENT OF COPYRIGHT TO MAKE COPIES OF TAPES OR DISCS WITHOUT THE PERMISSION OF THE COPYRIGHT OWNERS.
ANYONE WISHING TO COPY COMMERCIALLY AVAILABLE TAPES OR DISC SHOULD CONTACT THE MECHANICAL COPYRIGHT PROTECTION SOCIETY LIMITED
OR THE PERFORMING RIGHTS SOCIETY LIMITED.
Preparation section Basic section
1. Turn the power ON but do not load a disc.
2. Wait a few seconds and verify that the display
shown appears.
DP-SG7
12345
678910
no
3. Turn the power OFF.
dI SC
11 12 13 14 15
Application section
Knowledge section
Downloaded from:

52
In case of difficulty
In case of difficulty
R-SG7/DP-SG7/X-SG7 (EN)
What appears to be a malfunction may not always be serious. If your unit should not perform as expected, consult
the table below to see if the problem can be corrected before seeking help from your dealer or service representative.
Operation to reset
The microcomputer may fall into malfunction (impossibility to operate, erroneous display, etc.) when the
power cord is unplugged while power is ON or due
to an external factor. In this case, execute the following procedure to reset the microcomputer and return
it to normal condition.
÷ Please note that resetting the microcomputer clears
the contents stored in it returns it to condition when it
left the factory.
R-SG7
Pull the power plug from the receptacle, and then
plug it in again while keeping the “on/standby”
key pressed.
DP-SG7
Pull the power plug from the receptacle, and then
plug it in again.
X-SG7
Pull the power plug from the receptacle, and then
plug it in again while keeping the “stop (7)” key
pressed.
Receiver unit, speakers
RemedyCauseSymptom
Sound is not produced.
Preparation section
÷ The speaker cords are discon-
nected.
÷ The volume control is set to the
minimum position.
÷ The MUTE switch of remote con-
trol unit is switched ON.
÷ The headphone plug is inserted
into the jack.
÷ Connect properly referring to
“System connection”.
÷ Adjust to an required volume.
÷ Switch MUTE OFF.
÷ Unplug the headphone plug.
@
*
(
(
All digits of the display section
show flashing indication of “--”
and no sound is put out.
Basic section
Sound is not produced from the
left or right speakers.
The clock display blinks without
changing the figures.
Timer operation is not possible.
Application section
Radio stations cannot be
received.
Noise interferes.
Knowledge section
÷ The speaker cords are short-cir-
cuited.
÷ The speaker cords are discon-
nected.
÷ There was a power failure.
÷ The power cord was unplugged
from the outlet.
÷ The present time has not been ad-
justed or there was a power failure.
÷ The timer ON time and OFF time
have not been set.
÷ The timer execution was not set
up.
÷
The antennas have not been connected.
÷ A proper broadcasting band has
not been selected.
÷ The frequency of the station to be
received is not tuned.
÷ Car ignition noise.
÷ Influence of an electric appliance.
÷ A TV set is installed near the sys-
tem.
÷ Turn the power OFF, remove the short-
circuit and turn the power ON again.
÷ Connect properly referring to
“System connection”.
÷ Adjust the present time again.
÷ Adjust the present time again.
÷ Adjust the present time referring
to “Clock adjustment”.
÷ Set the timer ON time and OFF time.
÷ Press the “Tuning (%)” key to set
up the execution.
÷ Connect antennas.
÷ Select a band.
÷ Tune to the frequency of the de-
sired station.
÷ Install the outdoor antenna in an
apart position from the road.
÷ Switch the suspected electric ap-
pliance OFF.
÷ Install the TV or the system at an
increased distance between them.
@
@
r
r
r
y
i
9
§
§
9
Downloaded from:

Receiver unit, speakers
After presetting, reception is not
possible with preset call.
Cassette deck unit
Sound cannot be produced by
pressing the play key or no
operation occurs even when an
operation key is pressed.
÷ The frequency of the preset sta-
tion is not tunable.
÷ The preset memory has been cleared
because the power cord has been
unplugged for a long period.
÷ The head is dirty.
÷ The tape is wound too tight due to
irregular winding.
÷ A nonrecorded tape is played.
In case of difficulty
R-SG7/DP-SG7/X-SG7 (EN)
RemedyCauseSymptom
÷ Preset stations with tunable fre-
quencies.
÷ Preset stations again.
¶
¶
RemedyCauseSymptom
÷ Clean the head referring to “Maintenance”.
p
÷ Try another tape.
÷ Play a recorded tape.
53
Preparation section Basic section
No operation occurs even when
an operation key is pressed.
The DPSS malfunctions.
The tray does not open when
the Open/Close key is pressed.
Sound is harsh or high
frequencies are not reproduced.
Sound is distorted.
÷
The operation key is pressed in less than
4 seconds after turning the power ON.
÷ A tape is not inserted in the unit.
÷ The tape is wound too tight due to
irregular winding.
÷ The tape is fully wound to one of
the reels.
÷ The tape used is not suitable for
DPSS, for example the spaces between tunes may be too short.
÷ The key is pressed during recording.
÷ The microcomputer is malfunction-
ing due to external noise.
÷ The head is dirty.
÷ The tape is stretched or shrunk.
÷ The recording revel has not been
set with the CRLS key.
÷ The tape being played was re-
corded with distorted sound.
÷ Press operation keys after waiting for
more than 4 seconds.
÷ Insert a tape.
÷ Try another tape.
÷ Change the tape transport direction or re-
verse the tape insertion orientation.
÷ Refer to “DPSS”.
÷ Press in stop mode.
÷ Unplug the power cord and plug it again.
™
™
£
¢
£
W
÷ Clean the head referring to “Maintenance”.
p
÷ Try another tape.
÷ Refer to “Recording”.
÷ Try another tape.
•
Application section
Noise is noticeable.
Sound fluctuates.
Downloaded from:
÷ The tape head is magnetized.
÷ External noise is induced.
÷ A tape recorded with Dolby NR ON
is played with Dolby NR OFF.
÷ The capstans or pinch rollers are dirty.
÷ The tape is wound irregularly.
÷ Demagnetize the head referring to “Main-
tenance”.
÷ Install the system at a distance from other
electric appliances and TV.
÷ Set the Dolby NR to on.
÷ Clean the head referring to “Maintenance”.
p
£
p
÷ Wind the tape again by fast forwarding,
rewinding or playing from an end to the
other.
£
Knowledge section

54
Cassette deck unit
Recording cannot be started by
pressing the record key.
CD player unit
A CD is placed in the player but
it cannot be played.
Preparation section
÷ The recording protect tab of the
cassette has been broken.
÷ The TAPE input is selected.
÷ The tape is fully wound to one of
the reels.
÷ The disc is placed upside down.
÷ The disc position is displaced.
÷ The disc is extremely dirty.
÷ The disc is scratched.
÷ Dew is condensed on the optics lens.
In case of difficulty
R-SG7/DP-SG7/X-SG7 (EN)
RemedyCauseSymptom
÷ Use a cassette with an unbroken re-
cording protect tab or block the hole.
÷ Select the source to be recorded
with the input selector key.
÷ Change the tape transport direc-
tion or reverse the tape insertion
orientation.
RemedyCauseSymptom
÷ Place the disc properly, with the
label side facing upward.
÷ Place the disc properly.
÷ Clean the disc referring to “Disc
handling precautions”.
÷ Try another disc.
÷ Refer to “Beware of condensation”
and remove the condensation by
evaporation.
o
ª
•
)
)
o
Q
Sound is not produced.
Basic section
Sound skips.
Remote control unit
Symptom Cause Remedy
Remote control operation is not
possible.
Application section
÷ The disc has not been placed.
÷ The player is not put to the play mode.
÷ The disc is extremely dirty.
÷ The disc is scratched.
÷ The disc is dirty.
÷ The disc is scratched.
÷ The player is subject to vibration.
÷ Batteries are exhausted.
÷ The remote control is too far away
from the system, the controlling angle
is deviated or there is an obstacle in
between.
÷ There is no tape or CD set in the
component to be played.
÷ An attempt is made to play the cas-
sette deck which is recording something.
÷ Place a disc in the CD player.
÷ Press the 6 key.
÷ Clean the disc referring to “Disc
handling precautions”.
÷ Try another disc.
÷ Clean the disc referring to “Disc
handling precautions”.
÷ Try another disc.
÷ Install the unit in a place not sub-
ject to vibrations.
÷ Replace with new batteries.
÷ Operate the unit inside the remote
controllable range.
÷ Set a tape or CD in the component
to be played.
÷ Wait until the recording ends.
)
)
o
o
&
&
Knowledge section
1.With some tapes, a squeaky noise is produced when the tape is stopped automatically. This is due to the tape
Notes
Notes
protection function, and not a malfunction.
2.Do not use longer than 100 minutes tapes, for the tape is too thin and gets easily tangled.

Specifications
Receiver (R-SG7)
[Amplifier section]
Rated power output
Class AB operation
20 watts per channel minimum RMS, both chan-
nels driven, at 6 Ω, 1 kHz with no more than 10 %
total harmonic distortion.
(DIN) 1 kHz at 6 Ω, 0.7 % T.H.D............ 15 W + 15 W
Class A operation
7.5 watts per channel minimum RMS, both chan-
nels driven, at 6 Ω, 1 kHz with no more than 10 %
total harmonic distortion.
Total harmonic distortion ...... 0.02% (1 kHz, 10 W, 6 Ω)
Frequency response ......... 20 Hz ~ 40 kHz, +0 dB, -3 dB
Input sensitivity / Impedance
.......................................................... 200 mV / 47 kΩ
Output level / Impedance
SUPER WOOFER PRE OUT ................... 2.0 V / 1 kΩ
TAPE REC ........................................... 200 mV / 1 kΩ
Signal to noise ratio
............................................................. 96 dB (IHF’66)
[FM Tuner section]
Tuning frequency range ............... 87.5 MHz ~ 108 MHz
Usable sensitivity (DIN)
MONO
.. 1.2 µV (75 Ω) / 13.2 dBf (40 kHz DEV., S/N 26 dB)
Signal to noise ratio
(DIN weighted at 1 kHz, 65.2 dBf input)
MONO .............................................................. 65 dB
STEREO ............................................................ 58 dB
Selectivity (DIN ±300 kHz) ................................... 64 dB
Stereo separation (DIN at 1 kHz) ........................ 35 dB
[AM Tuner section]
Tuning frequency range ................ 531 kHz ~ 1,602 kHz
Usable sensitivity (30% mod., S/N 20 dB)
.................................................... 15 µV / (500 µV/m)
Signal to noise ratio (at 30% mod., 1 mV input)
........................................................................... 48 dB
Output level / Impedance (30% mod., 1 mV input)
............................................................... 0.18 V / 1 kΩ
General
Power consumption.............................................. 45 W
Dimensions .................................................. W: 200 mm
H: 77 mm
D: 278 mm
Weight (net) .......................................................... 3.0 kg
R-SG7/DP-SG7/X-SG7 (EN)
CD player (DP-SG7)
Laser ............................................. Semiconductor laser
Playing rotation .................... 200 rpm ~ 500 rpm (CLV)
Frequency response ................. 4 Hz ~ 20 kHz, ±1.0 dB
Signal to noise ratio......................... More than 100 dB
Dynamic range .................................... More than 96 dB
Total harmonic distortion
.................................... Less than 0.004 % (at 1 kHz)
Channel separation .......... More than 92 dB (at 1 kHz)
Wow & Flutter ............................. Unmeasurable Limit
Output level / Impedance
Fixed ........................................................ 1.2 V / 1 kΩ
Digital output
Optical ...................................... –15 dBm ~ –21 dBm
(wave length 660 nm)
General
Power consumption.............................................. 10 W
Dimensions .................................................. W: 200 mm
H: 77 mm
D: 249 mm
Weight (net) .......................................................... 2.0 kg
Cassette deck (X-SG7)
Track ...................................... 4-track, 2-channel stereo
Recording system ................................ AC bias system
(Frequency: 105 kHz)
Heads
Playback / recording head...................................... 1
Erasing head ............................................................ 1
Motors ........................................................................... 1
Wow and flutter ................................. 0.1 % (W.R.M.S.)
Fast winding time ...................... Approx. 110 seconds
(C-60 tape)
Frequency response
TYPE I tape .................... 40 Hz to 18,000 Hz, ±3 dB
TYPE IV tape ................. 40 Hz to 19,000 Hz, ±3 dB
Signal to noise ratio
Dolby B NR ON ............................ 67 dB (CrO2 tape)
Dolby C NR ON ............................ 73 dB (CrO2 tape)
Dolby NR OFF .............................. 60 dB (CrO2 tape)
Input sensitivity / Impedance ............ 77.5 mV / 47 kΩ
Output level / Impedance ................... 775 mV / 10 kΩ
General
Power consumption.............................................. 14 W
Dimensions .................................................. W: 200 mm
H: 77 mm
D: 249 mm
Weight (net) .......................................................... 2.2 kg
55
Preparation section Basic section
Application section
Knowledge section
1.KENWOOD follows a policy of continuous advancements in development. For this reason specifications may
NotesNotes
Notes
be changed without notice.
2.Sufficient performance may not be possible at very low temperatures (under a water-freezing temperature).

56
Preparation section
R-SG7/DP-SG7/X-SG7 (EN)
Basic section
Application section
Knowledge section
For your records
Record the serial number, found on the back of the unit, in the
spaces designated on the warranty card, and in the space provided
below. Refer to the model and serial numbers whenever you call
upon your dealer for information or service on this product.
Model Serial Number

documentation manual, user maintenance, brochure, user reference, pdf manual
This file has been downloaded from:
User Manual and User Guide for many equipments like mobile phones, photo cameras, monther board, monitors, software, tv, dvd, and othes..
Manual users, user manuals, user guide manual, owners manual, instruction manual, manual owner, manual owner's, manual guide,
manual operation, operating manual, user's manual, operating instructions, manual operators, manual operator, manual product,
 Loading...