

Page 1

COMPACT HI-FI COMPONENT SYSTEM
R-K1
INSTRUCTION MANUAL
ENGLISH FRANÇAIS DEUTSCH NEDERLANDS ITALIANO ESPAÑOL
B60-5669-00/00 (E, X) AP
©
Page 2
Before applying power
Caution: Read this page carefully to ensure safe operation.
Units are designed for operation as follows.
Australia
Europe ..............................................................................................................................................................AC 230 V only
Information on Disposal of Old Electrical
and Electronic Equipment (applicable for
EU countries that have adopted separate
waste collection systems)
...........................................................................................................................................................AC 240 V only
Produ c ts wi t h t he sym b ol (cross e d- ou t
wheeled bin) cannot be disposed as house
hold waste.
-
Old electrical and electronic equipment should be re
cycled at a facility capable of handling these items and
their waste by products.
ENGLISH
Contact your local authority for details in locating a re
cycle facility nearest to you.
Proper recycling and waste disposal will help conserve
resources whilst preventing detrimental effects on our
health and the environment.
-
-
Safety precautions
WARNING : TO PREVENT FIRE OR ELECTRIC SHOCK, DO NOT EXPOSE THIS
APPLIANCE TO RAIN OR MOISTURE.
CAUTION
RISK OF ELECTRIC SHOCK
DO NOT OPEN
THE LIGHTNING FLASH WITH ARROWHEAD SYMBOL, WITHIN AN EQUILATERAL TRIANGLE, IS
INTENDED TO ALERT THE USER TO THE PRESENCE OF UNINSULATED “DANGEROUS VOLTAGE”
WITHIN THE PRODUCT’S ENCLOSURE THAT MAY BE OF SUFFICIENT MAGNITUDE TO
CONSTITUTE A RISK OF ELECTRIC SHOCK TO PERSONS.
THE EXCLAMATION POINT WITHIN AN EQUILATERAL TRIANGLE IS INTENDED TO ALERT THE
USER TO THE PRESENCE OF IMPORTANT OPERATING AND MAINTENANCE (SERVICING)
INSTRUCTIONS IN THE LITERATURE ACCOMPANYING THE APPLIANCE.
CAUTION: TO REDUCE THE RISK OF ELECTRIC SHOCK, DO NOT
REMOVE COVER (OR BACK). NO USER-SERVICEABLE PARTS
INSIDE. REFER SERVICING TO QUALIFIED SERVICE PERSONNEL.
The marking of products using lasers
CLASS 1
LASER PRODUCT
The marking this product has been classified as Class 1.
It means that there is no danger of hazardous radiation
outside the product.
Location: Back panel
EN
2
Page 3
IMPORTANT SAFETY INSTRUCTIONS
Caution: Read this page carefully to ensure safe operation.
Read Instructions – All the safety and operating instructions
should be read before the product is operated.
Retain Instructions – The safety and operating instructions should
be retained for future reference.
Heed Warnings – All warnings on the product and in the operating
instructions should be adhered to.
Follow Instructions – All operating and use instructions should be
followed.
1. Cleaning – Unplug this product from the wall outlet before
cleaning. Do not use liquid cleaners or aerosol cleaners. Use a
damp cloth for cleaning.
2. Attachments – Do not use attachments not recommended by
the product manufacturer as they may cause hazards.
3. Water and Moisture – This product shall not be exposed to
dripping and splashing – for example, near a bath tub, wash
bowl, kitchen sink, or laundry tub; in a wet basement; or near a
swimming pool; and the like. Do not place an object containing
liquid, such as a flower vase, on the appliance.
4. Accessories – Do not place this product on an
unstable cart, stand, tripod, bracket, or table. The
product may fall, causing serious injury to a child
or adult, an d se rious damage to the produ ct.
Use only wit h a cart, stand, tripo d, bracket, or
table recommended by the manufacturer. Any mounting of
the product should follow the manufacturer’s instructions,
and should use a mounting accessory recommended by the
manufacturer. A product and cart combination should be moved
with care. Quick stops, excessive force, and uneven surfaces may
cause the product and cart combination to overturn.
5. Ventilation – Slots and openings in the cabinet are provided for
ventilation and to ensure reliable operation of the product and
to protect it from overheating, and these openings must not be
blocked or covered. The openings should never be blocked by
placing the product on a bed, sofa, rug, or other similar surface.
This product should not be placed in a built-in installation such
as a bookcase or rack unless proper ventilation is provided or
the manufacturer’s instructions have been adhered to.
6. Power Sources –
This product should be operated only from the
type of power source indicated on the product. If you are not sure of
the type of power supply to your home, consult your product dealer
or local power company.
CAUTION
7.
– Polarization –
This product may be equipped
with a polarized alternating-current line plug (a plug having one
blade wider than the other). This plug will fit into the power outlet
only one way. This is a safety feature. If you are unable to insert the
plug fully into the outlet, try reversing the plug. If the plug should
still fail to fit, contact your electrician to replace your obsolete
outlet. Do not defeat the safety purpose of the polarized plug.
8. Power Cord Protection – Power-supply cords should be routed
so that they are not likely to be walked on or pinched by items
placed upon or against them, paying particular attention to
cords at plugs, convenience receptacles, and the point where
they exit from the product.
9. Lightning – For added protec tion for this product during a
lightning storm, or when it is left unattended and unused
for long periods of time, unplug it from the wall outlet and
disconnec t th e antenna or cable syst em. Thi s will preven t
damage to the product due to lightning and power-line surges.
10. Overloading – Do not overload wall outlets, extension cords,
or integral convenience receptacles as this can result in a risk of
fire or electric shock.
11. Object and Liquid Entry – Never push objects of any kind into
this product through openings as they may touch dangerous
voltage points or short-out parts that could result in a fire or
electric shock. Never spill liquid of any kind on the product.
12. Servicing – Do not attempt to service this product yourself
as opening or removing covers may expose you to dangerous
voltage or other hazards. Refer all servicing to qualified service
personnel.
13. Damage Requiring Service – Unplug this product from the
wall outlet and refer servicing to qualified service personnel
under the following conditions:
a) When the power-supply cord or plug is damaged,
b) If liquid has been spilled, or objects have fallen into the
product,
c) If the product has been exposed to rain or water,
d) If the product does not operate normally by following the
operating instructions.
e) If the product has been dropped or damaged in any way, and
f) When the product exhibits a distinct change in performance
– this indicates a need for service.
g) If an abnormal smell or smoke is detected.
14.
Replacement Parts – When replacement parts are required, be
sure the service technician has used replacement parts specified by
the manufacturer or have the same characteristics as the original
part. Unauthorized substitutions may result in fire, electric shock, or
other hazards.
15. Safety Check – Upon completion of any service or repairs to
this product, ask the service technician to perform safety checks
to determine that the product is in proper operating condition.
16. Wall or Ceiling Mounting – This product should be mounted
to a wall or ceiling only as recommended by the manufacturer.
17. Heat – This product should be situated away from heat sources
such as radiators, heat registers, stoves, or other products that
produce heat. Do not place a flaming object, such as a candle
or lantern, or near the product.
18. Power Lines – A n outsi de antenna system sh ould no t be
located in the vicinity of overhead power lines or other electric
light or power circuits, or where it can fall into such power lines
or circuits. When installing an outside antenna system, extreme
care should be taken to keep from touching such power lines or
circuits as contact with them might be fatal.
19. Outdoor Antenna Grounding – If an outside antenna or cable
system is connected to the product, be sure the antenna or
cable system is grounded so as to provide some protection
again st voltag e surges and built-up static char ges. Article
810 of the National Elec trical Code, ANSI/NFPA 70, provides
information with regard to proper grounding of the mast
and supporting structure, grounding of the lead-in wire to an
antenna discharge unit, size of grounding conductors, location
of antenna-discharge unit, connection to grounding electrodes,
and requirements for the grounding electrode.
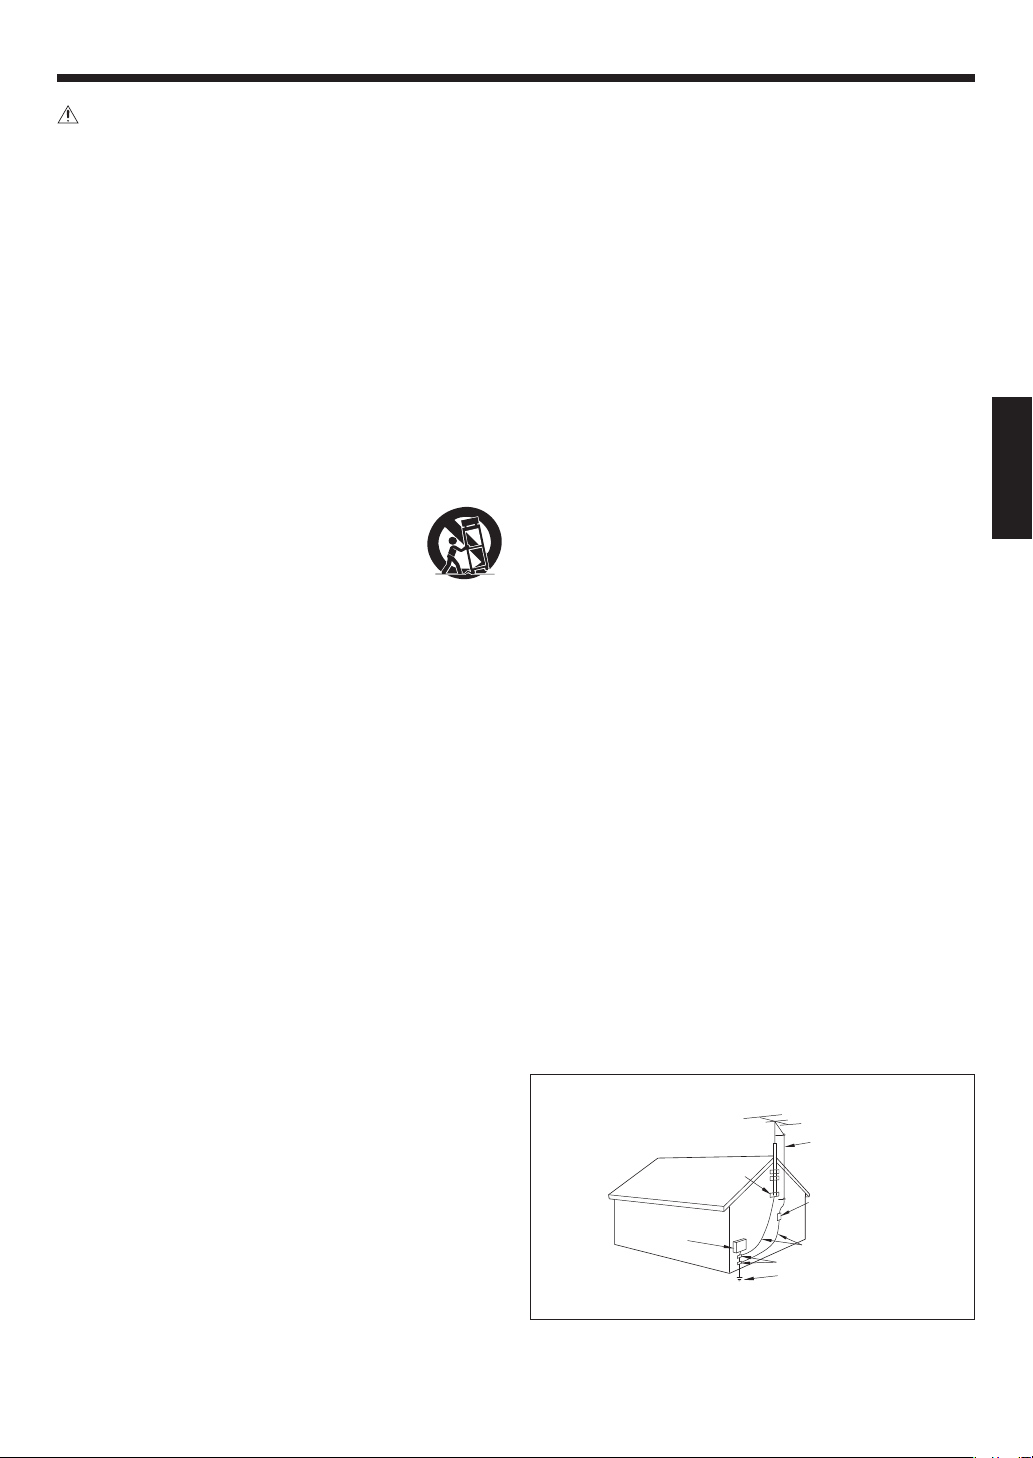
EXAMPLE OF ANTENNA GROUNDING AS PER NATIONAL ELECTRICAL CODE
GROUND CLAMPS
ELECTRIC SERVICE
EQUIPMENT
NEC – NATIONAL ELECTRICAL CODE
Notes:
1. Item 7 is not required except for grounded or polarized
equipment.
2. Item 19 complies with UL in the U.S.A.
ANTENNA
LEAD IN WIR
ANTENNA
DISCHARGE UNIT
(NEC SECTION 810-20)
GROUNDING CONDUCTORS
(NEC SECTION 810-21)
GROUND CLAMP
POWER SERVICE GROUNDING
ELECTRODE SYSTEM
(NEC ART 250, PART H)
E
ENGLISH
EN
3
Page 4
Before applying power
How to use this manual
This manual consists of four parts including Preparations, Basics,
Applications and Knowledge.
Preparations
This part describes the methods of connections to other audio
components and the names of parts of the system. Connections
are some ti mes comp lica te d with cer tain aud io com po nent s.
Please read this part carefully before proceeding to the connections.
Basics
This part gives the operating procedures of basic functions including playback of music.
Applications
This part gives the operatin g procedures of applied functions
(functions for convenience) including program playback of music.
Knowledge
This part gives useful information such as "Troubleshooting" and
"Specifications".
ENGLISH
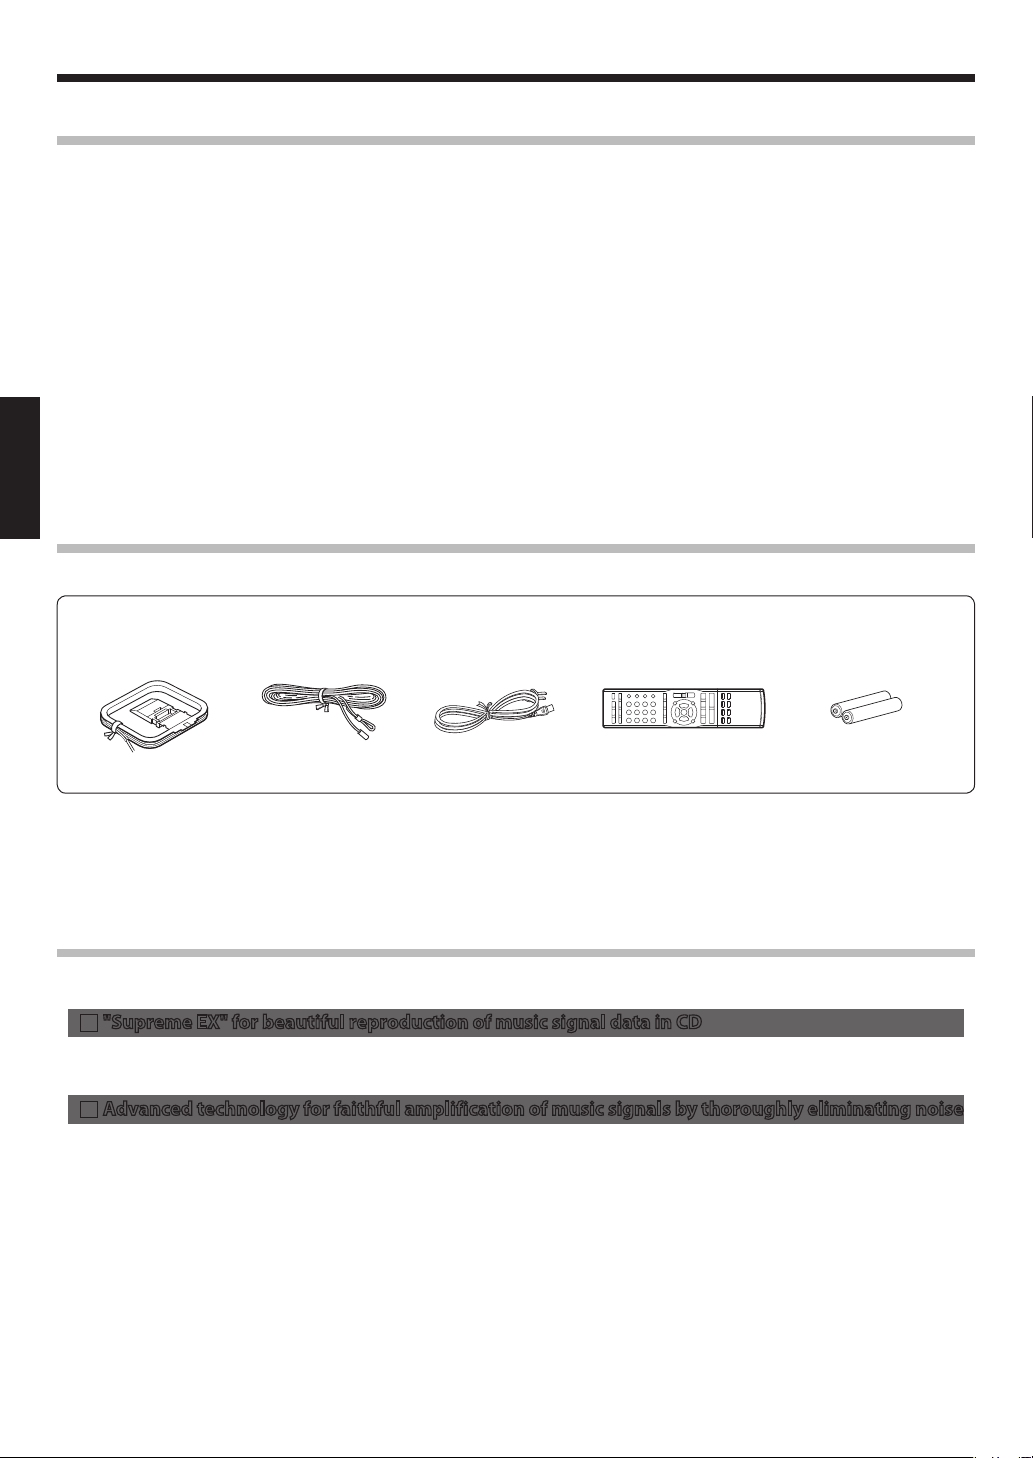
Accessories
Check that all accessories are present in the package.
AM loop antenna
(x 1)
If any accessories are missing, or if the unit is damaged or fails to operate, notify your dealer immediately. If the unit was shipped to you
directly, notify your shipper immediately. Kenwood recommends that you retain the original carton and packing materials in case you
need to move or ship the unit in the future.
Keep this manual handy for future reference.
FM indoor antenna
(x 1)
Power cord
(x 1)
Remote control unit
(RC-RP0704E x 1)
Remote control batteries
(R03 x 2)
Features of the System
New-generation audio system for impressive CD music entertainment
"Supreme EX" for beautiful reproduction of music signal data in CD
7
Highly accurate interpolation of music signals up to 20 kHz into a wide range of signals up to 40 kHz.
Left/right independent D/A converters for reproduction of even the delicate atmosphere of concert halls.
Advanced technology for faithful amplification of music signals by thoroughly eliminating noise
7
Separate circuit design for preventing degradation of music signals:
The mechanical block, digital block and analog block are separated to minimize the effects on the sound quality due to mutual relations between these blocks. In addition, the analog signal paths employ independent differentiated circuit configurations for the
left and right channels to prevent crosstalk.
Three-transformer configuration for stable power supply:
Independent power transformers are provided for the "amplifier circuitry", "CD mechanism/digital converter circuitry" and "con
trol circuitry". A toroidal power transformer featuring stable power supply is used with the amplifier circuitry that requires highest
power. The final stage of the amplifier circuitry uses the TRAIT, which features an excellent temperature-tracking characteristic and
enriches the volume of low frequencies and free expansion of high frequencies.
CD-dedicated direct circuitry:
The CD-dedicated direct circuitr y transmits the music signals from the CD to the amplifier through the shor test distance by bypass
ing the selector and tone circuits.
-
-
EN
4
Page 5

Contents
To ensure safety, read the items carrying this marking carefully.
Before applying power
Preparation section
Before applying power ...................................... 2
IMPORTANT SAFETY INSTRUCTIONS ............... 3
How to use this manual ........................................................... 4
Accessories ...................................................................................
Features of the System .............................................................
Contents ........................................................................................
Connections .............................................................6
Connecting the antennas ....................................................... 6
Connecting the speakers ........................................................
Connecting the digital audio player ...................................
Connecting Associated Products
(Commercially Available) ........................................................
Controls, Connectors and Indicators ................... 10
Main unit .....................................................................................10
Remote control unit ................................................................
Loading batteries in the remote control unit .......
Operation ...........................................................................
11
12
12
Time Adjustment ................................................... 13
Basic section
Basic Operation .....................................................14
Listening through headphones .................................15
Adjusting the tone (BASS/TREBLE) ...........................
Adjusting the speaker balance (BALANCE) ............
Muting audio temporarily (MUTE) ............................
Switching the display brightness (DIMMER) .........
Enhancing the audio quality (SOURCE DIRECT) ....
CD Playback ........................................................... 17
To let it playback or pause temporarily ................... 18
To stop playback ..............................................................
To skip a track ...................................................................
Starting playback from the desired track ...............
To fast forward or fast reverse (search) ...................
Switching the time information display .................
Switching the displayed information ......................
Playback of Digital Audio Player .........................20
Controlling the digital audio player .................................. 20
To let it playback or pause temporarily ...................
To stop playback ..............................................................
To skip a track ...................................................................
To fast forward or fast reverse (search) ...................
To skip a folder .................................................................
Switching the displayed information ......................
Adjusting the digital audio player input level ..............
Radio Reception ....................................................23
Receiving radio broadcasting .............................................23
Presetting stations automatically (Auto Memory) ......
Presetting Stations Manually (Manual Preset) ......
Receiving a preset station (Preset Call) ...................
RDS (Radio Data System) ......................................26
PS (Program Service Name) Display ................................. 26
Searching for a desired program type (PTY search) ...
To switch the displays ....................................................
15
16
16
16
16
18
18
18
19
19
19
20
21
21
21
21
21
22
24
25
25
26
27
Application section
Playback of Tracks in Desired Order
(Program Playback) ...............................................28
To stop playback .............................................................. 29
4
4
Playback in Repeated Cycle (Repeat Playback) ...30
5
Playback of Tracks in Random Order
7
8
(Random Playback) ............................................... 31
9
To add tracks .....................................................................
Clearing programmed tracks ......................................
Repeating the disc or track(s) ..................................... 30
Repeating program playback .....................................
Selecting another track during playback ............... 31
Canceling random playback .......................................
Adjustment of Input Levels from External Compo-
nents .......................................................................32
Switching the displayed information ......................32
Timer Operations ..................................................33
Making the program timer reservation ........................... 33
Reactivating/canceling the timer program ...........
Setting the Sleep timer (SLEEP) ..........................................
Using the Auto Power Save function
UTO POWER SAVE
(A
: A.P.S.) ........................................................... 36
Knowledge section
For Your Information ............................................37
Handling of CD ................................................................. 37
Care and Storage .............................................................
Caution for Transport or Movement ........................
Troubleshooting ....................................................38
Resetting the Microcomputer ....................................38
Message List ......................................................................
Specifications ........................................................40
29
29
30
31
36
36
37
37
39
EN
ENGLISH
5
Page 6
Connections
CAUTION
Observe the following cautions when installing the system.
Insuf ficient heat radiation may build up interna l heat and
cause a malfunction or fire hazard.
÷
Do not place an object that may hinder heat radiation on the system.
÷
Leave the spaces specified below around the cabinets of the main unit.
Top panel:50cm or more
Side panel:10cm or more
Back panel:10cm or more
Install the system so that the power outlet is easily accessible
from the user, and unplug the power cord from the power
outlet immediately in case of a trouble. Note that the power
supply to the system is not shut down completely by simply
setting the power key to OFF. To shut down the power supply
completely, it is required to unplug the power cord.
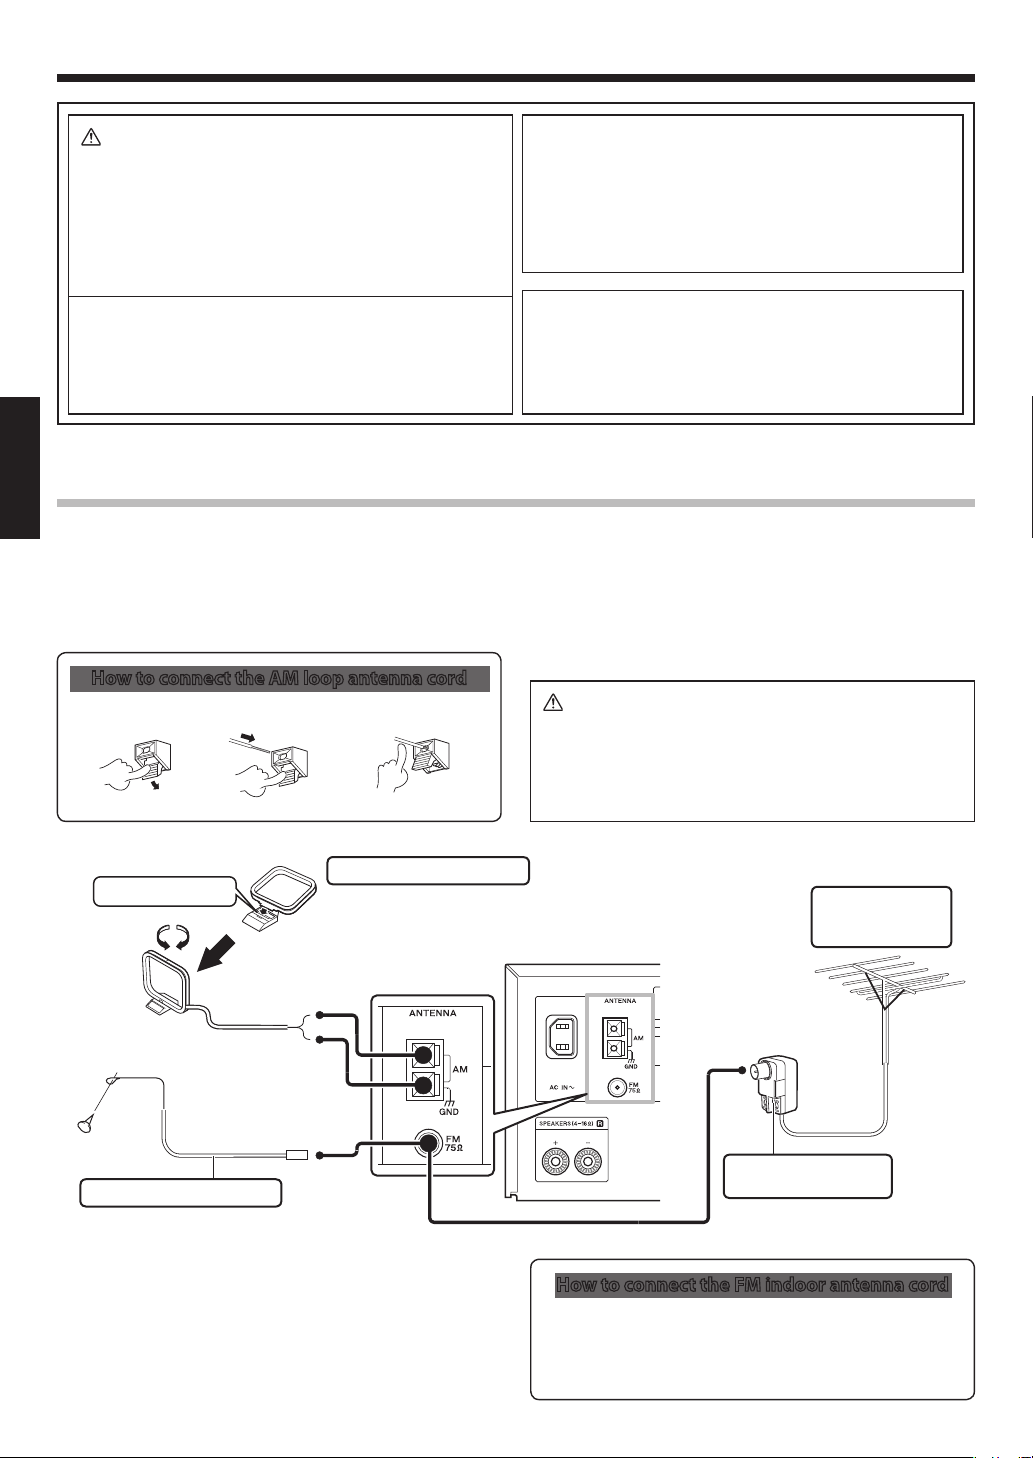
Connecting the antennas
ENGLISH
AM/FM radio stations cannot be received without the proper antenna connections. Connect the antennas properly according to the following instructions.
AM loop antenna
The provided AM antenna is an indoor antenna. Install it as apart as
possible from the main unit, TV set, speaker cords and power cord
and orient it in the direction that offers best reception condition.
Caution for connection
Do not plug the power cord into the power outlet until all
other connections are completed. Before unplugging a connected cord or cable, be sure to set the power key to OFF and
unplug the power cord from the power outlet in advance.
Malfunction of microcomputer
If the system does not work properly or the display shows
wrong information even when correct connections are made,
reset the microcomputer referring to "Resetting the Micro-
computer". (See page 38.)
FM outdoor antenna (commercially available)
To receive FM broadcas ting more cl earl y, it is recommen de d
to use an FM outdoor antenna. Use a 75-Ω coaxial cable, lead it
indoors and connect to the [FM 75 Ω] terminal. Remove the FM
indoor antenna after connecting the outdoor antenna.
How to connect the AM loop antenna cord
Push the lever2 Insert the cord3 Return the lever
1
Caution for FM outdoor antenna installation
Sinc e ant enna ins tallati on neces sitates skill and expe rience, always consult your dea le r bef ore installati on . T he
antenna sho uld be placed at a d istance from the power
distribution wi res. Otherwise, an electric shock acci de nt
may occur if the antenna falls down.
AM loop antenna (accessory)
Fit into the groove.
Attach to the stand
FM indoor antenna (accessory)
FM indoor antenna
The provided FM antenna is a simplified one for indoor use, intended for temporary use. To receive FM stations stably, it is recommended to use an outdoor antenna (commercially available).
Remove the FM indoor antenna after connecting the outdoor antenna.
EN
6
FM outdoor antenna
(commercially
available)
Antenna adaptor
(commercially available)
How to connect the FM indoor antenna cord
Connect the antenna to the antenna terminal
1
Find the antenna location that offers best reception
2
Fix the antenna in the found location
3
Page 7
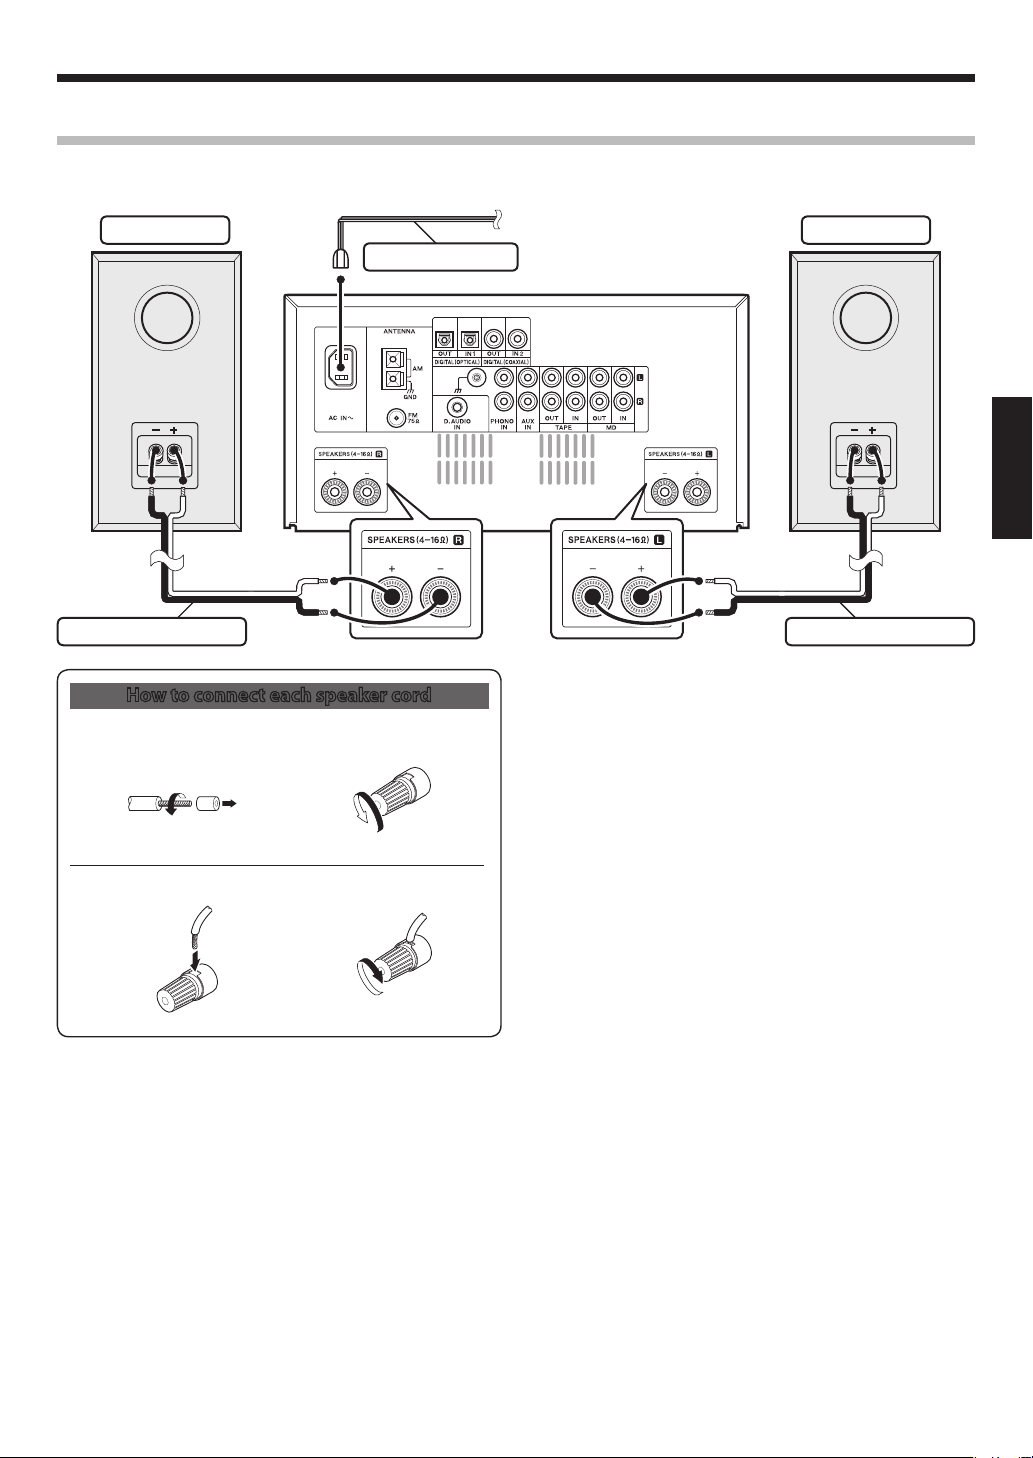
Connecting the speakers
Connect the speakers as shown below.
Right speaker Left speaker
Power cord (accessory)
To wall AC outlet
Connect the power cord to the [AC IN
receptacle on the rear panel of the system
and to a wall power outlet by inserting
the plugs completely and securely.
]
Connections
ENGLISH
Speaker cordSpeaker cord
How to connect each speaker cord
Strip coating
1
Twist
Insert
3
Be careful not to short-circuit the + and – conductors of the speaker cord.
÷
If the speaker cord is connected by inverting the + and – polarity, the reproduced audio will be unnatural with unclear positioning of
÷
musical instruments.
Connect every connection cord firmly. Incomplete insertion may cause loss of audio output or generation of noise.
÷
The magnetism from the speakers may cause color irregularities on a nearby TV or PC screen. Always install the speakers at a distance
÷
from a TV or PC.
2
4
Loosen
Secure
EN
7
Page 8
Connections
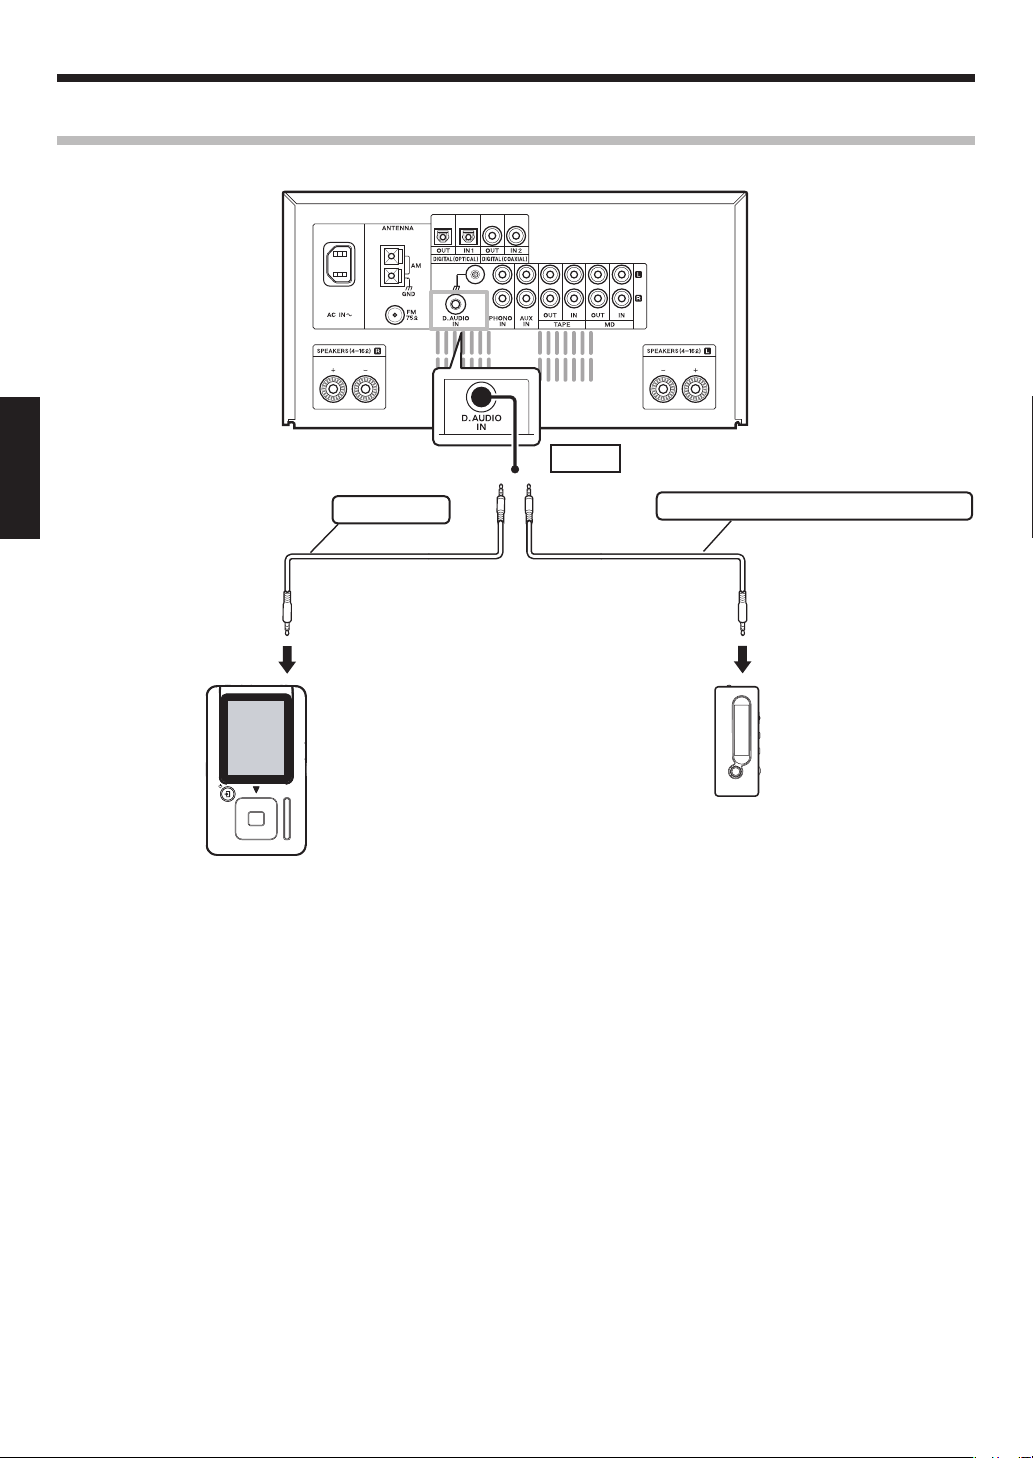
Connecting the digital audio player
AUDIO IN
ENGLISH
÷
Before connecting associated system products, be sure to read their instruction manuals.
÷
Connect every connection cord firmly. Incomplete insertion may cause loss of audio output or generation of noise.
÷
Af ter using the digital audio player, be sure to disconnect the connection cord from the [D.AUDIO IN] connector on the rear panel of
this system.
Dedicated cable
To headphones jack
Digital Audio Link-compatible player
Applicable models: HD20GA7, M1GC7
Stereo mini plug cable (commercially available)
To headphones jack
Other digital audio player
EN
8
Page 9
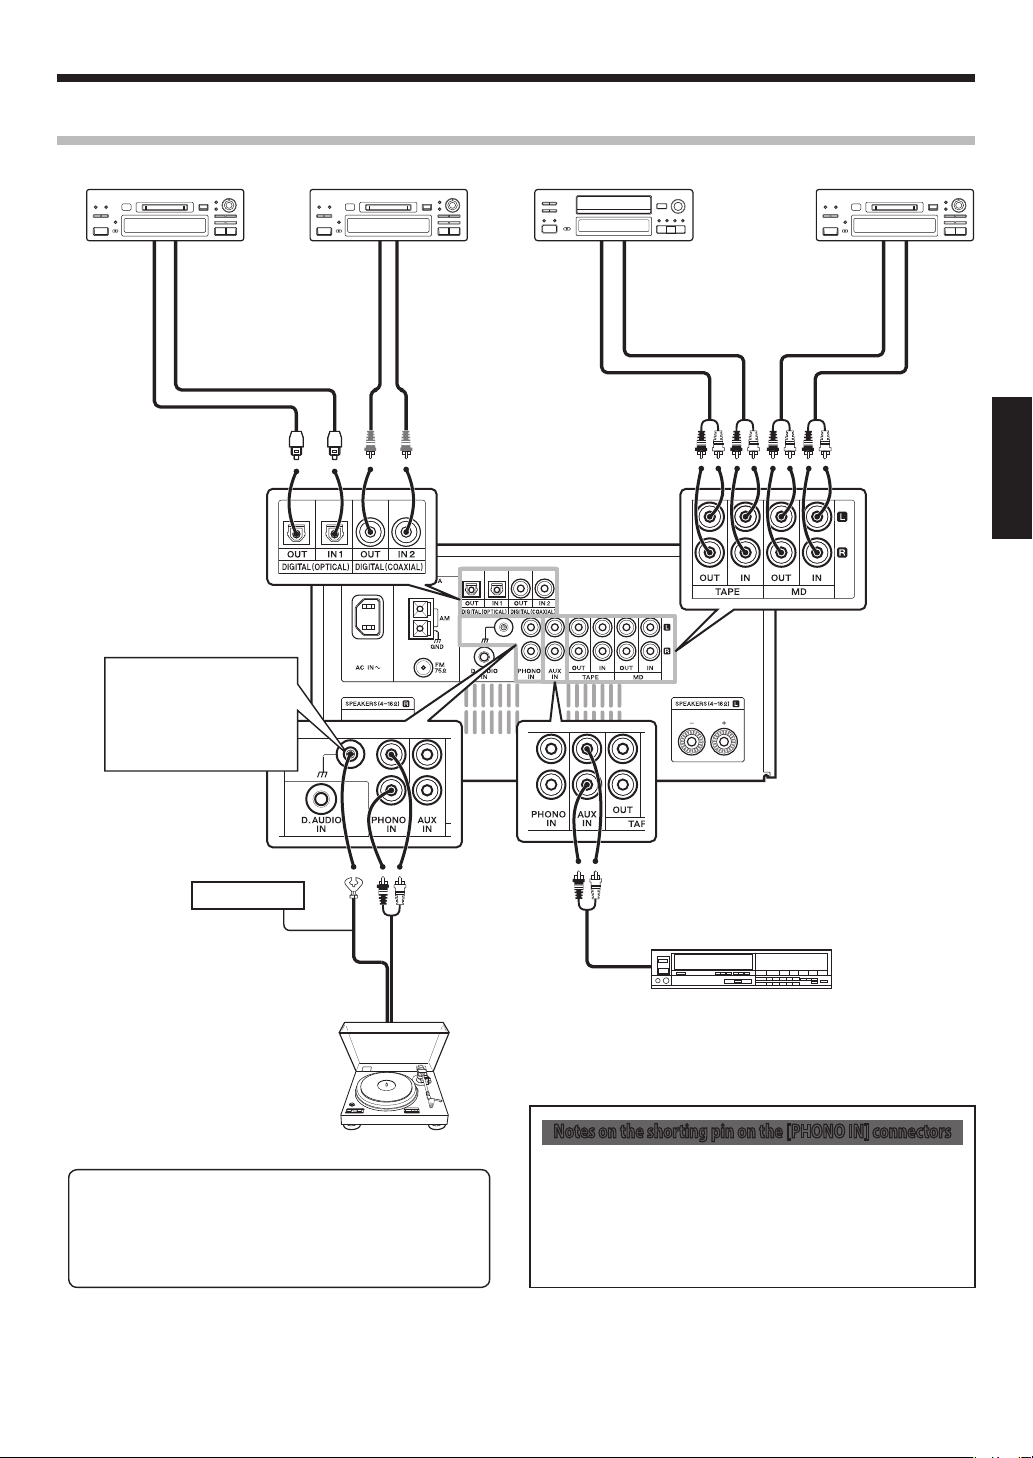
Connections
Connecting Associated Products (Commercially Available)
Digital component 1 Cassette deck MD recorder
Optica l Digital
Audio In
The earth termi nal with
the
for nois e reduction of
turnta ble. It is not for
safet y earth.
Optica l Digital
Audio Out
H
symbol is used
Digital component 2
Coaxia l Digital Audio In
Coaxia l Digital Audio O ut
AUDIO IN AUDIO OUT AUDIO IN AUDIO OUT
ENGLISH
Signal GND wire
AUDIO OUT
AUDIO OUT
VCR, etc.
urntable with MM cartridge
T
Notes on the shorting pin on the [PHONO IN] connectors
÷
T he s ystem com es with a shorting pin inserted into the
÷
For turntable with equalizer amplifier, connect it to the
[AUX IN] terminal.
÷
Moving coil (MC) cartridge turntable cannot be used di-
rectly from the unit. Use a dedicated equalizer amplifier
and connect this to the [AUX IN] connectors.
Before connecting associated system products, be sure to read their instruction manuals.
÷
Connect every connection cord firmly. Incomplete insertion may cause loss of audio output or generation of noise.
÷
If the speaker cord is connected by inverting the + and – polarity, the reproduced audio will be unnatural with unclear positioning of
÷
musical instruments.
[PHONO IN] connectors. If you want to connect an analog
disk turntable, remove the shorting pin and store it carefully so as not to lose it.
÷
Do not connect the removed shorting pin to output con
nectors.
-
EN
9
Page 10
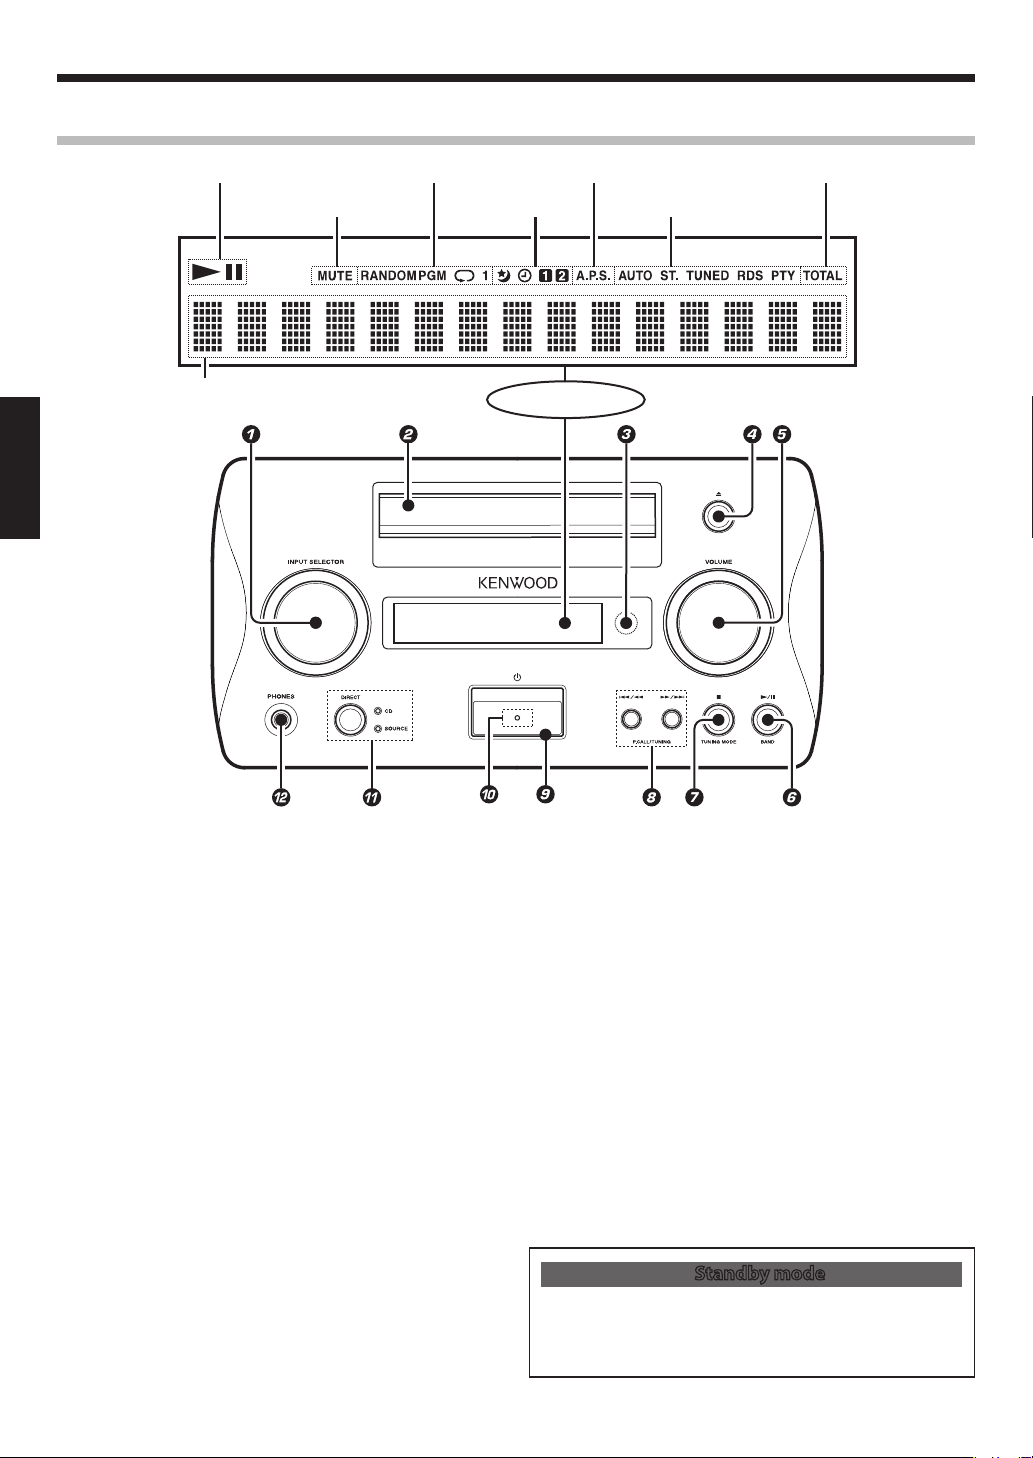
Controls, Connectors and Indicators
Main unit
ENGLISH
Charac ter informatio n display
MUTE ind icator
CD playba ck mode indicat orPlay/paus e indicator
Timer- related indica tors
Auto Power Sav e indicator Elapse d time indicator
Tuner-rela ted indicators
Display
INPUT SELECTOR knob (See page 14.)
1
Turn the knob to select an input.
CD tray (See page 17.)
2
Remote control sensor (See page 12.)
3
CD tray open/close (
4
Press to open or close the CD tray.
VOLUME knob (See page 14.)
5
Turn the knob to adjust the volume.
6
/BAND key (See pages 18, 20 and 23.)
6
{
When the [TUNER] input is selected: Press to switch the
receiving radio band (FM/AM).
{
When the [CD] or [D.AUDIO] input is selected: Press to
switch the play and pause modes.
7/TUNING MODE key (See pages 18, 21 and 23.)
7
{
Wh en the [TUNER ] input is selec ted: Press to s witch
between auto tuning (auto/stereo reception) and mono
tuning (manual/monaural reception).
{
When the [CD] or [D.AUDIO] input is selected: Press to
stop playback.
{
In standby mode: Press to display the time of the day or
day of the week.
4/1, ¡/
8
0
) key (See page 17.)
¢
, P.CALL/TUNING keys
(See pages 18, 19, 21 and 23.)
{
When the [TUNER] input is selected: Press to recall a
preset radio station (Preset Call) or selecting a radio station.
EN
10
{
Wh en t he [CD] or [D.AUDIO] input is selected : Press
to skip or search (by fast forward or fast reverse) a track.
(Pressing and holding a key for more than 1 second starts
search in the direction corresponding to the key. Pressing
a key shortly starts skip in the direction corresponding to
the pressed key.)
Power key (See page 14.)
9
Press to switch the power mode of the system between ON
and standby.
Standby indicator (See page 14.)
0
Red lighting: Ordinary standby mode.
Orange lighting: Timer standby mode.
If the indicator is blinking, see "Troubleshooting".
(See page 38.)
DIRECT key/CD and SOURCE indicators (See page 16.)
!
Press the key to switch the CD/SOURCE DIRECT functions ON
and OFF.
PHONES jack (See page 15.)
@
Connect headphones when using them.
Standby mode
When the standby indicator is lit, a small amount of power is
supplied to the system to back up the memory. This status is
referred to as the standby mode. During this mode, the system
can be switched ON from the remote control unit.
Page 11
MUTEMODE
AUTO/MONO DIRECT
TUNER
CD D.AUDIO
MDPHONO TAPE
AUX D-IN 1 D-IN 2 DIMMER
TIMER
SLEE
P
TIME/PT
Y
CLEAR DISPLA
Y
P.MODE RANDOM REPEA
T
OPEN/
CLOSE
FOLDER
BASS TREBLE
BALANCE
PREV. NEX
T
RC-RP0704E
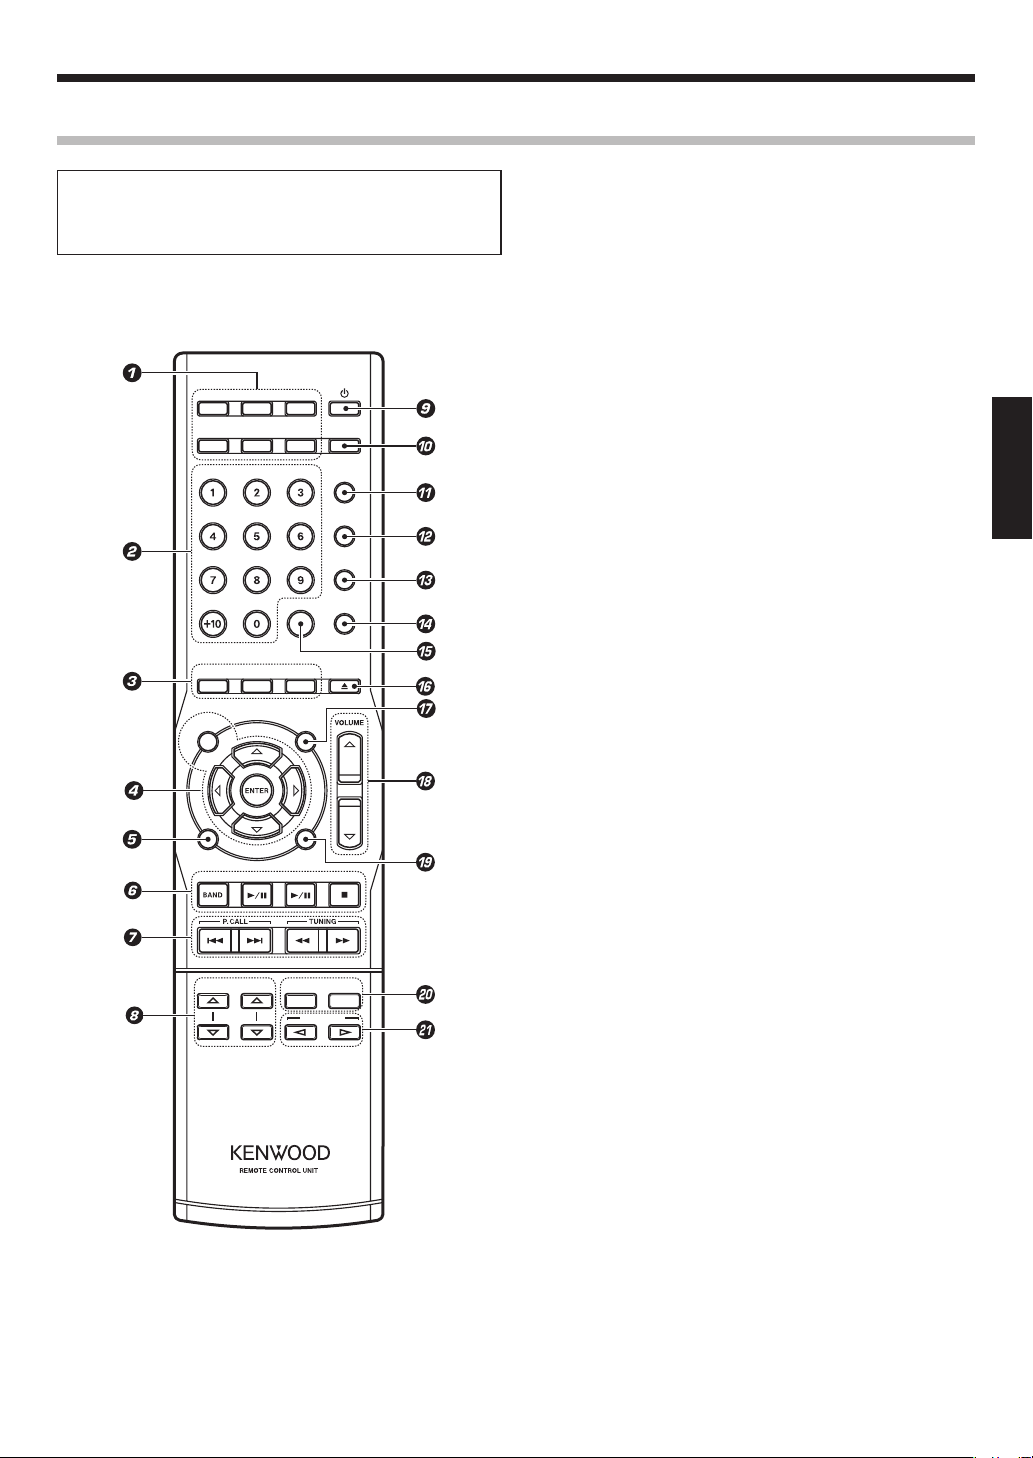
Remote control unit
The remote control keys with the same names as the keys
on the main system function in the same way as the keys
on the main system. The keys marked * are available only
on the remote control unit.
Controls, Connectors and Indicators
PHONO, MD, TAPE, AUX, D-IN 1 and D-IN 2 keys*
1
(See page 14.)
Press one of these keys to select the desired external input
source.
Numeric keys* (See pages 18, 25 and 28.)
2
{
When the [TUNER] input is selected: Press the keys for
Preset Call (recalling a preset radio station).
{
When the [CD] input is selected: Press to select a track
number or program number.
P.MODE key* (See page 28.)
3
Press to switch between the track mode (normal playback)
and program playback (playback by reordering tracks).
RANDOM key* (See page 31.)
Press for random playback (playback in a random order) of CD.
REPEAT key* (See page 30.)
Press for repeat playback (repeating a track(s)) of CD.
Setup mode-related keys
4
(See pages 13, 22, 24, 32, 33 and 36.)
MODE key*
Press for various setups including auto presetting of radio sta-
tions and timer setting.
#
Multi-control (%, fi, @,
Press to select a setup item.
ENTER key*
Press to enter a setup.
AUTO/MONO key (See page 23.)
5
{
Wh en th e [TUN ER] input is selec ted: Press to swi tch
between auto tuning (auto/stereo reception) and mono
tuning (manual/monaural reception).
TUNER/BAND key (See page 23.)
6
Press to select the [TUNER] input.
{
When the [TUNER] input is selected: Press to switch the
receiving radio band (FM/AM).
6
CD
key (See page 18.)
Press to select the [CD] input.
{
When the [CD] input is selected: Press to switch the play
and pause modes.
6
D.AUDIO
key (See page 20.)
Press to select the [D.AUDIO] input.
{
Wh en the [D.AUDIO] input is selected: Press to switch
the play and pause modes.
7
key (See pages 18 and 21.)
{
When the [CD] or [D.AUDIO] input is selected: Press to
stop playback.
{
In standby mode: Press to display the time of the day or
day of the week.
¢
P.CALL/4,
7
{
When the [TUNER] input is selected: Press for Preset Re-
keys (See pages 18, 21 and 25.)
call (recalling a preset radio station).
{
When the [CD] input is selected: Press to skip a track.
{
When the [D.AUDIO] input is selected: Press to skip or
search (by fast forward or fast reverse) a track.
¡
TUNING/1,
{
When the [TUNER] input is selected: Press to select a
keys (See pages 19 and 23.)
frequency.
{
When the [CD] input is selected: Press to search a track
(by fast forward or fast reverse).
fi
BASS %,
8
Press to adjust the bass (low-frequency) level.
TREBLE %,
keys* (See page 15.)
fi
keys* (See page 15.)
Press to adjust the treble (high-frequency) level.
Power key (See page 14.)
9
Press to switch the power mode of the system between ON
and standby.
Continued to next page
) keys*
EN
ENGLISH
11
Page 12
Controls, Connectors and Indicators
DIMMER key* (See page 16.)
0
Press to switch the display brightness.
TIMER key* (See page 36.)
!
Press to select the mode of executing the program timer.
SLEEP key* (See page 36.)
@
Press to set the sleep timer.
TIME key* (See page 19.)
#
Press to switch the time information display of CD.
PTY key* (See page 26.)
Press to enter PTY mode.
DISPLAY key* (See pages 19, 21, 27 and 32.)
$
Press to switch the displayed information.
CLEAR key* (See pages 29.)
%
Press to clear a program number.
OPEN/CLOSE
^
Press to open or close the CD tray.
0
key (See page 17.)
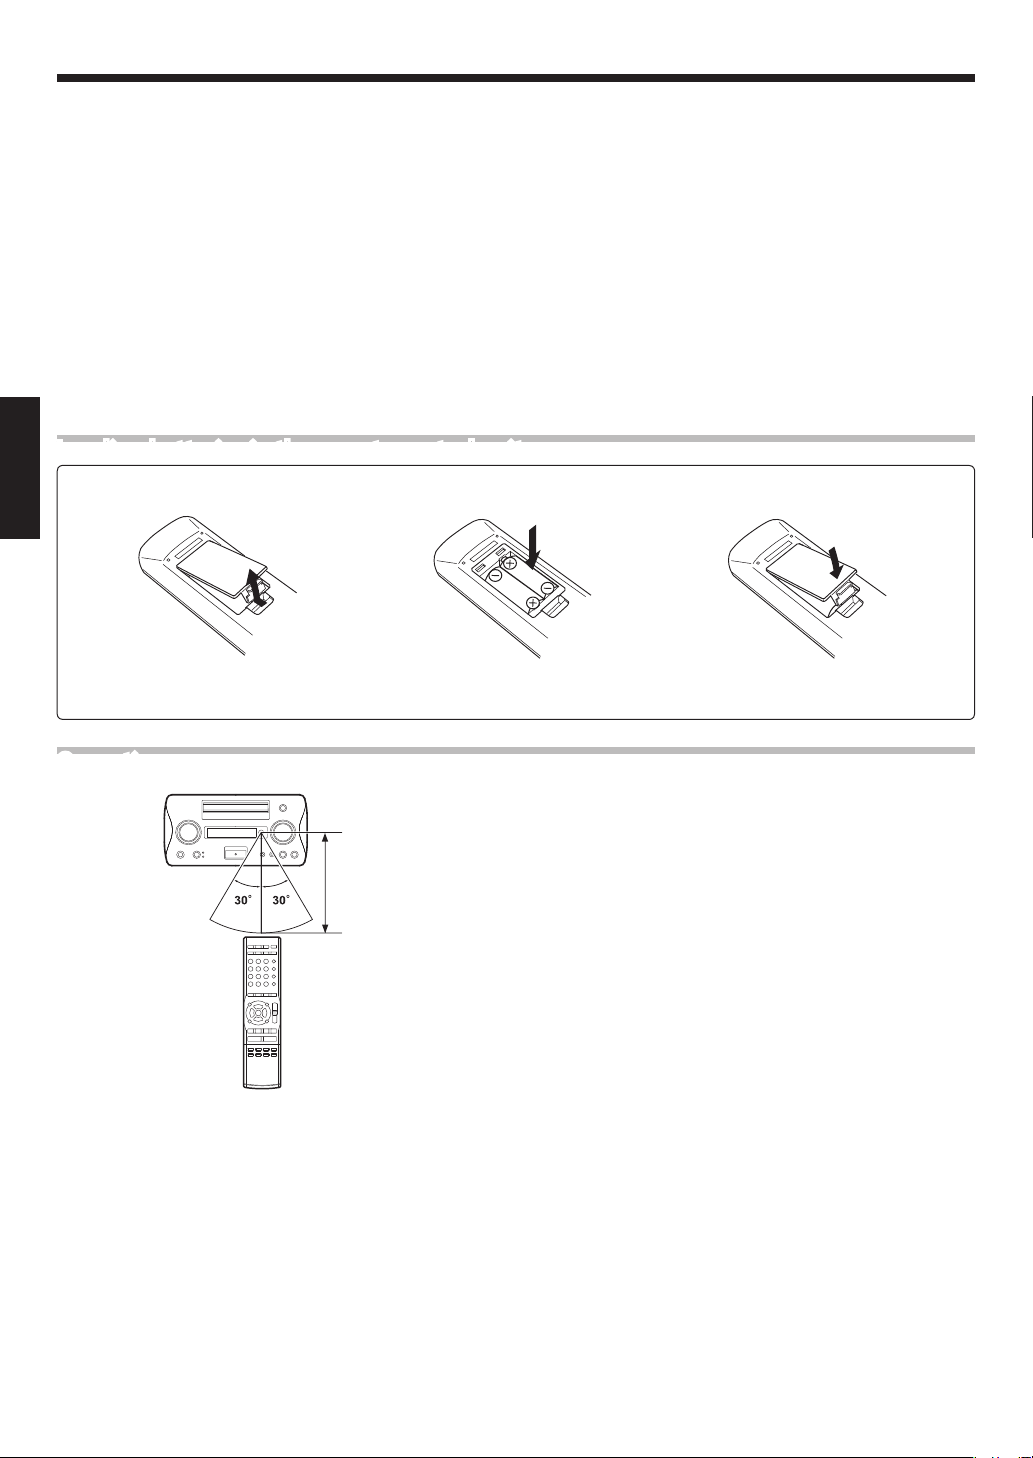
Loading batteries in the remote control unit
Remove the battery cover
1
ENGLISH
Insert batteries
2
MUTE key* (See page 16.)
&
Press to mute the audio temporarily.
VOLUME (%,
*
Press to adjust the volume.
DIRECT key (See page 16.)
(
Press the key to switch the CD/SOURCE DIRECT functions ON
and OFF.
FOLDER PREV., NEXT keys* (See page 21.)
)
{
When the [D.AUDIO] input is selected: Press to select a
folder of a Kenwood digital audio player.
BALANCE @,
¡
Press to adjust the speaker balance.
fi
) keys* (See page 14.)
#
keys* (See page 16.)
Close the battery cover
3
÷
Insert two R03 batteries following the polarity indications.
Operation
Remote sensor
6 m (approx.)
Plug the power cord of the system to a power outlet and press the
power key on the remote control unit to turn the system ON. After
the system is switched ON, press the desired operation key.
÷
When pressing more than one remote control keys in sequence,
leave a period of about 1 second or more between each press.
÷
The provided batteries are intended for use in checking opera
tions and their life may be shorter than usual.
÷
When the remote controllable distance becomes short, replace
both of the batteries with new ones.
÷
The system may malfunction if the remote control sensor is ex
posed to direct sunlight or the light of a fluorescent lamp with
high-frequency lighting system (inverter system, etc.). In this
case, change the system installation to prevent malfunction.
-
-
12
EN
Page 13

0• • M o n • 0 : 0
5• • M o n • • 8 : 4
0S u n 0 : 0
T i m e a d j u s t
0• • M o n • • 8 : 0
Time Adjustment
MUTEMODE
AUTO/MONO DIRECT
TUNER CD D.AUDIO
MDPHONO TAPE
AUX D-IN1 D-IN2 DIMMER
TIMER
SLEEP
TIME/PTY
CLEAR
DISPLAY
P.MODE RANDOM REPEAT
OPEN/
CLOSE
FOLDER
BASS TREBLE
BALANCE
PREV. NEXT
The system incorporates a clock function. As it is required for the
timer operations, adjust the clock before using the system.
Preparations
Press the power key to switch the system ON.
:
Keys and controls used in the operation.
Enter the time adjustment mode
1
Adjust the day of the week and time of the day
2
Press the MODE key
1
Select [Time adjust]
2
Advance
\
Return
Set the day of the week
1
Advance
\
Return
Set the hour
2
Advance
\
Return
Set the minute
3
Advance
\
Return
Enter the
selection
Enter the
selection
Enter the
selection
Enter the
selection
÷
The day of the week display blinks.
To adjust to Monday evening 8:45 am:
÷
Press the ENTER key to enter the day of the week. The figure of
hour starts to blink.
÷
Press the ENTER key to enter the figure of the hour. The figure
of minute starts to blink.
÷
If you press the ENTER key by mistake, press the multi-control
@
) key to return to the previous item and correct its setting.
(
÷
Press the ENTER key at the same time as a time announcement
to adjust the accurate time.
÷
Pressing the
(st andby mode) displays the cur rent time and the progr am
timer reservation ON/OFF condition for about 5 seconds.
7
/T UNING MODE key while th e system is of f
«
EN
ENGLISH
13
Page 14

Basic Operation
D - I N 1 4 8 k H z
V o l u m e - 3 0 . 0 d B
MUTEMODE
AUTO/MONO DIRECT
TUNER CD D.AUDIO
MDPHONO TAPE
AUX D-IN1 D-IN2 DIMMER
TIMER
SLEEP
TIME/PTY
CLEAR
DISPLAY
P.MODE RANDOM REPEAT
OPEN/
CLOSE
FOLDER
BASS TREBLE
BALANCE
PREV. NEXT
MDPHONO TAPE
AUX D-IN 1
TUNER
BAND
CD
6
D.AUDIO
6
D-IN 2
Switch the system ON
1
ENGLISH
:
Keys and controls used in the operation.
Each press of the power key switches the system mode alternately.
Standby indicator ON: The system power is OFF (standby
1
mode).
Standby indicator OFF: The system power is ON.
2
÷
The system is also switched ON and playback (tuner reception)
can be started when the TUNER/BAND
, CD 6, D.AUDIO 6
or an input selector (PHONO, MD, TAPE, AUX, D-IN 1, D-IN 2)
key on the remote control unit is pressed.
Select the input source
2
Play the selected input source
3
Adjust the volume
4
To decrease
volume
To increase
volume
To decrease
volume
To increase
volume
Turning the knob switches the input functions in the following sequence.
[TUNER
1
[CD
2
[D.AUDIO
3
[PHONO
4
[MD
5
[TAPE
6
[AUX
7
[D-IN1 (OPT)
8
[D-IN2 (COAX)
9
]
]
]
]
]
]
]
]*
]*
Sampling frequency of the input signal
* The digital signal that can be reproduced with this system is
only the PCM (32 kHz to 96 kHz) signal.
÷
"CD Playback" (See page 17.)
÷
"Radio Reception" (See page 23.)
Volume display
÷
When the volume level is -30dB or higher, it can be adjusted
more finely in 0.5 (dB) steps.
14
EN
Page 15

Listening through headphones
BASS
B a
s s
+ 2
Insert the headphones
1
plug into the [PHONES]
jack
Adjusting the volume
2
To decrease
volume
To decrease
volume
To increase
volume
To increase
volume
Basic Operation
÷
Use headphones equipped with a stereo mini-plug.
÷
When the plug is inserted into the [PHONES] jack, the audio is
no longer output from the speakers.
ENGLISH
Adjusting the tone (BASS/TREBLE)
Bass adjustment
To decrease
bass level
\
Enter the selection
Press within 8 sec.
Treble adjustment
To decrease
treble level
\
Enter the selection
To increase
bass level
To increase
treble level
Display in bass adjustment:
Adjustment level display
÷
Press the BASS or TREBLE key shortly to display the current
bass or treble level. (Begin the level adjustment within 8 seconds after the display starts.)
÷
The level can be adjusted between
steps.
÷
When the SOURCE DIRECT function is ON, the tone adjustment
using the BASS and TREBLE keys is defeated. (See page 16.)
-
5 (dB) and +5 (dB) in 1-dB
Press within 8 sec.
EN
15
Page 16

Basic Operation
C D T 0 6 2 : 1 4
C D T 0 6 2 : 1 4
C D T 0 6 2 : 1 4
C D T 0 6 2 : 1 4
BALANCE
L - - - - - - - - - R
Adjusting the speaker balance (BALANCE)
To move
toward Lef t
To move
toward Right
\
Enter the selection
Press within 8 sec.
Muting audio temporarily (MUTE)
ENGLISH
Switching the display brightness (DIMMER)
The display brightness can be switched in 3 steps.
Balance level display
÷
Press the BALANCE key shortly to display the current speaker
balance. (Begin the balance adjustment within 8 seconds after
the display starts.)
÷
During headphones listening, the speaker balance adjustment
is defeated.
Each press switches the selection.
[MUTE] indicator ON: The muting function is ON.
1
[MUTE] indicator OFF:
2
celed).
÷
The previous volume resumes when muting is canceled.
÷
Muting is also canceled when the volume is adjusted.
Each press switches the selection.
The brightness drops.
1
The muting function is OFF (can-
The brightness drops further.
2
Dimmer function is OFF (canceled).
3
Enhancing the audio quality (SOURCE DIRECT)
The audio from the CD or an external source component can be reproduced in highest possible quality by bypassing the tone adjust
ment circuitry (bass and treble).
Each press switches the selection.
[CD] or [SOURCE] indicator ON: The Source Direct function
1
is ON.
[CD] or [SOURCE
2
function is OFF (canceled).
÷
D o not sw itch the Source Dire ct func tion ON or OFF in t he
middle of recording.
÷
When the SOURCE DIRECT function is ON, the tone adjustment
using the BASS and TREBLE keys is defeated.
DIRECT] indicator OFF: The Source Direct
ON when the [CD] input is
selected
ON when an input source
other than [CD] is selected
-
EN
16
Page 17

CD Playback
C D
MUTEMODE
AUTO/MONO DIRECT
TUNER CD D.AUDIO
MDPHONO TAPE
AUX D-IN1 D-IN2 DIMMER
TIMER
SLEEP
TIME/PTY
CLEAR
DISPLAY
P.MODE RANDOM REPEAT
OPEN/
CLOSE
FOLDER
BASS TREBLE
BALANCE
PREV. NEXT
T r a y O p e n
T r a y C l o s e
The following procedure describes how to play the CD tracks from
track number 1 in the order they are recorded.
:
Keys and controls used in the operation.
Select the [CD] input
1
Open the tray
2
Load a disc
3
CD tray
Label side up
÷
Provide d that a disc is already loaded in the system, simply
pressing the CD
6
key on the remote control unit selects the
[CD] input source and starts playback.
÷
Do not touch the played side of the disc.
÷
Do not stack two discs on the tray to prevent malfunction.
÷
Place the disc correctly, along the groove on the CD tray.
(Malfunction may occur if the disc position is deviated.)
÷
A single CD (8 cm disc) can also be played.
÷
The commercially available CD single (8 cm) disc adapter can-
not be used with this system.
ENGLISH
Close the tray
4
Continued to next page
EN
17
Page 18

CD Playback
C D T 0 1 2 : 1 4
C D T 0 1 0 : 0 2
Start playback
5
ON
To let it playback or pause temporarily
ENGLISH
To stop playback
Track No. being played
ON
÷
Each press of the key switches the pause and play modes alter-
nately.
Elapsed time of track being
played
To skip a track
Return Advance
Return Advance
Starting playback from the desired track
EN
18
÷
Each press skips a track in the direction corresponding to the
pressed key, and the track at the skip destination starts to play
from the beginning.
÷
Pressing the
ning of the track being played and re-plays it.
Press numeric keys as follows.
To select track number [15]:
To select track number [20]:
4
key once during playback skips to the begin
0, 5
0, 0, )
-
Page 19

To fast forward or fast reverse (search)
C D T 0 1 1 : 0 3
C D T 0 1 - 1 : 4 1
C D T 2 1 1 4 : 0 2
C D T 0 1 - 5 4 : 1 0
Fast
reverse
Press and hold during playback
Fast
forward
CD Playback
÷
Press and hold a key for more than 1 second during playback. Nor-
mal playback resumes at the moment the key is released.
Fast
reverse
Press and hold during playback
Fast
forward
Switching the time information display
Each press switches the selection.
Elapsed time of track being played
1
Remaining time of track being played
2
Elapsed time of entire disc
3
Remaining time of entire disc
4
ENGLISH
Switching the displayed information
Note on the title of CD-TEXT disc
When a CD-TEXT-compatible disc is played, the system automatically displays the title of the disc and the titles of its tracks
(provided that they are recorded using alphanumeric characters).
÷
During program playback, the information is displayed in order
of
4, 1, 2
÷
During single-track repeat playback or random playback, only
the information
Each press switches the selection.
CD-TEXT disc title display
1
(Th e track titles are disp layed in play mode of CD-TEXT
disc, and the disc title is displayed in stop mode.)
Track number display
2
Day of the week and time of day display
3
÷
cannot be selected with an ordinar y disc or a CD-TEXT disc
1
without character information.
÷
Info rmation in certain CD-TEXT discs may not be displaye d.
[CD Text full] is displayed if the character information recorded
in a disc exceeds about 1500 characters.
. (See page 28.)
and
3
and 2 is displayed.
1
(See pages 30 and 31.)
EN
19
Page 20

MUTEMODE
AUTO/MONO DIRECT
TUNER CD D.AUDIO
MDPHONO TAPE
AUX D-IN1 D-IN2 DIMMER
TIMER
SLEEP
TIME/PTY
CLEAR
DISPLAY
P.MODE RANDOM REPEAT
OPEN/
CLOSE
FOLDER
BASS TREBLE
BALANCE
PREV. NEXT
Playback of Digital Audio Player
When a Kenwood digital audio player is connected to the system
using the dedicated cable, the player can be controlled from this
system or the remote control unit.
Controlling the digital audio player
Connect a digital audio player
1
:
Keys and controls used in the operation.
Bo th th e sy stem and digi tal audio player shoul d be
switched OFF before connecting them.
÷
Using the dedicated cable, connect the [D.AUDIO IN] connec
tor on the rear panel of the system and the headphones jack of
the digital audio player.
÷
Af ter playing the digital audio player, be sure to disconnect the
ENGLISH
Dedicated cable
To headphones jack
connection cable.
÷
A commercially available stereo mini-plug cable can be used
for the connection. In this case, however, the input from the
digital audio player can be output from the system but the
player cannot be controlled from this system or the remote
control unit.
Switch the system and digital audio player ON
2
Start playback
3
Select the [D.AUDIO] input
1
6
Press
2
/BAND key
-
To let it playback or pause temporarily
EN
20
÷
Simply pressing the D. AUDIO
6
key on the remote control
unit selects the [D.AUDIO] input source and starts playback.
÷
Each press of the key switches the pause and play modes alter
nately.
-
Page 21

To stop playback
To skip a track
Return Advance
Playback of Digital Audio Player
÷
Each press skips a track in the direction corresponding to the
pressed key, and the track at the skip destination starts to play
from the beginning.
÷
Pressing the
ning of the track being played and re-plays it.
4
key once during playback skips to the begin
ENGLISH
-
Return Advance
To fast forward or fast reverse (search)
Fast
reverse
Press and hold during playback
Fast
reverse
Press and hold during playback
Fast
forward
Fast
forward
To skip a folder
Return
Advance
÷
Press and hold a key for more than 1 second during playback.
Normal playback resumes at the moment the key is released.
Switching the displayed information
Each press switches the selection.
Input selection display
1
Day of the week and time of day display
2
EN
21
Page 22

MUTEMODE
AUTO/MONO DIRECT
TUNER CD D.AUDIO
MDPHONO TAPE
AUX D-IN1 D-IN2 DIMMER
TIMER
SLEEP
TIME/PTY
CLEAR
DISPLAY
P.MODE RANDOM REPEAT
OPEN/
CLOSE
FOLDER
BASS TREBLE
BALANCE
PREV. NEXT
Playback of Digital Audio Player
I -n p u t L e v e l 6
I n p u t L e v e l
0
I n p u t L e v e l
The level of the input from the digital audio player connected to
the [D.AUDIO IN] connector can be adjusted. Adjust it so that the
audio from the digital audio player is played at a similar volume to
CD playback.
:
Keys and controls used in the operation.
Adjusting the digital audio player input level
Perform steps 1 and 2 of the procedure in "Controlling the digi-
1
tal audio player" (see page 20.)
ENGLISH
Enter the input level adjustment mode
2
Press the MODE key
1
Select [Input Level]
2
Advance
Adjust the input level
3
Increase
Return
Decrease
\
\
Enter the
selection
Enter the
selection
÷
The input level display starts to blink. (Begin the level adjust-
ment within 20 seconds after the display appears.)
÷
The level can be adjusted in three steps of -6, -3 and 0.
÷
When the input level is adjusted so that so that the audio from
the digital audio player is played at a similar volume to CD playback, the level of recording from the component connected to
the [D.AUDIO IN] connector is also adjusted. Therefore, do not
vary the input level in the middle of recording as this will vary
the recording level.
«
EN
22
Page 23

F M - - 8 8 . 0 0 M H z
F M - - 8 8 . 0 0 M H z
Radio Reception
MUTEMODE
AUTO/MONO DIRECT
TUNER CD D.AUDIO
MDPHONO TAPE
AUX D-IN1 D-IN2 DIMMER
TIMER
SLEEP
TIME/PTY
CLEAR
DISPLAY
P.MODE RANDOM REPEAT
OPEN/
CLOSE
FOLDER
BASS TREBLE
BALANCE
PREV. NEXT
F M - - 8 7 . 5 0 M H z
Receiving radio broadcasting
:
Keys and controls used in the operation.
Select the [TUNER] input
1
Select the FM or AM band
2
Select the tuning mode
3
Each press switches the selection.
]
[FM
1
]
[AM
2
Receiving band display
Each press switches the selection.
[AUTO] indicator ON:
1
[AUTO] indicator OFF: Manual tuning/Monaural reception
2
Auto tuning/Stereo reception
ON during auto tuning/stereo reception
÷
Normally, use the Auto tuning (stereo reception).
÷
When the radio wave receiving condition is poor and noisy, set
to MONO (manual tuning/monaural reception). The FM broad
casting is played in monaural audio but the audio quality will
be improved.
ENGLISH
-
Select a radio station
4
decrease
frequency
To decrease
frequency
To
To
increase
frequency
To increase
frequency
ON when a station is turned
Frequenc y display
In auto tuning mode: Press either key once to receive the next
searched station automatically.
In manual tuning mode: Press and hold either key to vary the
frequency continuously. The frequency scanning stops at the
moment the key is released.
EN
23
Page 24

Radio Reception
MUTEMODE
AUTO/MONO DIRECT
TUNER CD D.AUDIO
MDPHONO TAPE
AUX D-IN1 D-IN2 DIMMER
TIMER
SLEEP
TIME/PTY
CLEAR
DISPLAY
P.MODE RANDOM REPEAT
OPEN/
CLOSE
FOLDER
BASS TREBLE
BALANCE
PREV. NEXT
A u t o M e m o r y
A u t o M e m o r y
Up to 40 stations can be preset in the system.
For use of the RDS function, stations must be memorized by Auto
Memory.
:
Keys and controls used in the operation.
Presetting stations automatically (Auto Memory)
Select the [TUNER] input
1
Enter the Auto memory mode
2
ENGLISH
Press the MODE key
1
Select [Auto Memory]
2
Advance
Presetting of Stations
3
Return
Press within 20 sec.
÷
[Auto Memory] blinks on the display and after a few minutes,
up to 40 RDS stations are preset in order from channel 01.
÷
A preset frequency can be rewritten later.
÷
RDS stations are given priority during auto presetting. If there
is memor y left after presetting, this unit continues presetting
regular FM and AM stations.
÷
A broadcast station that cannot be preset with Auto Memory
should be set with Manual preset. (See page 25.)
EN
24
Page 25

F M 2 5 8 7 . 5 0 M H z
Presetting Stations Manually (Manual Preset)
F M - - 8 7 . 5 0 M H z
A desired station can be selected and preset in the preset memory.
Press the ENTER key
1
during reception of the
desired station
Go to step 2 within 20 sec.
Select the preset number
2
for presetting the station
Advance
Enter the
selection
\
Return
Press within 20 sec.
Repeat steps 1 and 2 for
3
each station you like
Radio Reception
Preset number
÷
The preset number can also be entered directly using the numeric
keys on the remote control unit.
Press numeric keys as follows.
To enter preset number [15]:
To enter preset number [20]:
÷
A preset frequency can be rewritten later.
0, 5
0, 0, )
ENGLISH
Receiving a preset station (Preset Call)
Recalling a preset station by specif ying its
number:
To
decrease
number
To
decrease
number
Recalling a preset station by specif ying its
number:
To
increase
number
To
increase
number
Press the P.CALL
following cycle.
Press the P.CALL
the following cycle.
÷
Press and hold the key to skip preset stations at about 0.5-sec
ond intervals.
Press numeric keys as follows.
To enter preset number [15]:
To enter preset number [20]:
¢
key to increase the preset number in the
4
key to decrease the preset number in
0, 5
0, 0, )
-
EN
25
Page 26

RDS (Radio Data System)
F M 0 1 S T A T I O N 1
P o p M
MUTEMODE
AUTO/MONO DIRECT
TUNER CD D.AUDIO
MDPHONO TAPE
AUX D-IN1 D-IN2 DIMMER
TIMER
SLEEP
TIME/PTY
CLEAR
DISPLAY
P.MODE RANDOM REPEAT
OPEN/
CLOSE
FOLDER
BASS TREBLE
BALANCE
PREV. NEXT
This system is designed for RDS reception, it can extract the information from the broadcast signal for use with various functions
such as automatic display of the station name.
Preparations
÷
Select the FM band.
÷
Preset RDS stations with the Auto Memory functions.
(See page 24.)
Some functions may not be provided or be given different
names depending on countries or areas.
PS (Program Service Name) Display
When an RDS broadcast is received, the station name is automatically displayed.
: Keys and controls used in the operation.
ENGLISH
÷
[RDS] indicator lights up when an RDS broadcast (signal) is re
ceived.
Searching for a desired program type (PTY search)
Press the PTY key
1
÷
When an RDS broadcast is received, the program type is shown
Go to step 2 within 20 sec.
Select the desired program type
2
Advance
Return
Go to step 3 within 20 sec.
on the display. If no PTY data is available, or if the station is not
an RDS station,
÷
Select it while [PTY] indicator is lit.
÷
Use program type table for your convenience.
[None] is displayed.
-
Program type table:
Program Type Name
Pop Music
Rock Music
Easy Listening Music
Light Classical
Serious Classical
Other Music
News
Current Affairs
Information
Sport
EN
26
Display
Pop M
Rock M
Easy M
Light M
Classics
Other M
News
Affairs
Info
Sport
Program Type Name
Education
Drama
Culture
Science
Varied
Weather
Finance
Children's programs
Social Affairs
Religion
Display
Educate
Drama
Culture
Science
Varied
Weather
Finance
Children
Social
Religion
Program Type Name
Phone In
Travel
Leisure
Jazz Music
Country Music
National Music
Oldies Music
Folk Music
Documentary
Display
Phone In
Travel
Leisure
Jazz
Country
Nation M
Oldies
Folk M
Document
Page 27

Start the search
3
To cancel in the middle:
To switch the displays
Press within 20 sec.
RDS (Radio Data System)
÷
No sound is heard while [PTY] indicator is blinking.
÷
If a program of the desired type is found, that program is re
ceived and the program type name display changes to the station name display.
÷
If a program of the desired type cannot be found,
blinks, then after several seconds the display returns to the
original display.
Each press switches the selection.
When an RDS broadcasts is received:
Program Service name (See page 26.)
1
Frequency
2
Day of Week /Clock
3
[No Program]
-
ENGLISH
When other than RDS broadcasts is received (FM):
Frequency
1
2
3
When the AM band is received:
1
2
]
[No PS
Day of Week /Clock
Frequency
Day of Week /Clock
EN
27
Page 28

Playback of Tracks in Desired Order (Program Playback)
P 0 1 T - 0 : 0 0- -
MUTEMODE
AUTO/MONO DIRECT
TUNER CD D.AUDIO
MDPHONO TAPE
AUX D-IN1 D-IN2 DIMMER
TIMER
SLEEP
TIME/PTY
CLEAR
DISPLAY
P.MODE RANDOM REPEAT
OPEN/
CLOSE
FOLDER
BASS TREBLE
BALANCE
PREV. NEXT
P 0 1 T 1 5 - 0 : 0 0
P 0 1 T 1 5 - 2 : 1 5
P 0 1 T 1 5 P G M S e t
Playback of Desired Music in Desired Order (max. 30 tracks)
Preparations
÷
Place a CD on the tray.
÷
Select the [CD] input.
:
Keys and controls used in the operation.
Enter program play mode (This mode should be entered from
1
stop mode)
ENGLISH
ON
Press in stop mode
Program the desired tracks
2
Select a track number
1
Press within 20 sec.
To select and program
2
the second or later tracks,
perform step
track
\
for each
1
Enter the
selection
÷
Pressing the
P.MODE key while the [PGM] indicator is lit turns
the indicator OFF.
Program No
Track No. programmed
Press numeric keys as follows.
To select track number [15]:
To select track number [20]:
0, 5
0, 0, )
\
Total play time of programmed tracks
÷
Up to 32 tracks can be programmed. When [Program full] is
displayed, no more track can be programmed.
÷
I f you make a mistake in track number se le ctio n, p ress the
CLEAR key and retry selection.
÷
The time displays becomes [
time of the programmed tracks reaches 1000 minutes.
--
: --] when the total playing
EN
28
Page 29

Start playback
P 0 2 P G M C l e a r
P 0 2 T 0 8 - 2 : 1 5
P 0 1 T 1 5 - 1 1 : 2 2
P 0 2 T 0 8 P G M S e t
3
To stop playback
To add tracks
Select a track number.
1
\
Playback of Tracks in Desired Order (Program Playback)
÷
Tracks are played in the order they were programmed (in order
of program numbers).
÷
Pressing the 4 key once during program playback skips to
the beginning of the track being played and re-plays it. Press
the 4 key twice to return to the track before the one being
played.
÷
Pressing the ¢ key during program playback skips to the
next track.
÷
The programmed tracks are held in memor y even after pro
grammed playback is stopped.
Enter the
selection
Blinking
÷
No track can be added to the program during program play
back.
-
ENGLISH
-
Press within 20 sec.
Repeat the step 1.
2
Clearing programmed tracks
To clear the last track in the program:
Press in stop mode
To clear all tracks in the program:
\
Total play time of programmed tracks
÷
Up to 32 tracks can be programmed. When [Program full] is
displayed, no more track can be programmed.
÷
I f you make a mistake in track number se le ctio n, press the
CLEAR key and retry selection.
÷
The selected track number is added to the end of the program.
÷
Each press of the CLEAR key clears the currently last track in
the program.
÷
Tracks cannot be cleared from the program in the middle of
playback.
÷
When the system is switched off (to standby mode) or the CD
tray is opened, the program play mode is canceled and all of
the programmed tracks are cleared from the memory.
Press in stop mode
EN
29
Page 30

P 0 2 T 0 8 - 1 1 : 2 2
Playback in Repeated Cycle (Repeat Playback)
MUTEMODE
AUTO/MONO DIRECT
TUNER CD D.AUDIO
MDPHONO TAPE
AUX D-IN1 D-IN2 DIMMER
TIMER
SLEEP
TIME/PTY
CLEAR
DISPLAY
P.MODE RANDOM REPEAT
OPEN/
CLOSE
FOLDER
BASS TREBLE
BALANCE
PREV. NEXT
C D T 0 1 0 : 0 0
C D T 0 1 0 : 0 0
Preparations
÷
Place a CD on the tray.
÷
Select the [CD] input.
:
Keys and controls used in the operation.
Repeating the disc or track(s)
÷
If the [PGM] indicator is lit, press the P.MODE key in stop mode
to turn the indicator OFF.
Ensure OFF
Each press switches the selection.
] indicator ON: Single-track repeat playback.
[
1
] indicator ON: All-track repeat playback.
[
2
Indicators OFF:
3
Repeat playback canceled.
ON when Repeat is ON
ENGLISH
Ensure that the [PGM]
1
indicator is OFF
Switch the Repeat func-
2
tion ON
Start playback
3
Repeating program playback
All of the programmed tracks can be played repeatedly.
Program the desired
1
tracks
(Perform steps 1 and 2 of the
procedure on page 28. )
Switch the Repeat func-
2
tion ON
Start playback
3
÷
Single-track repeat playback cannot be selected during pro
-
gram playback or random playback. (See pages 28 and 31.)
÷
If single-track repeat playback is selected ([
] indicators
ON) during normal playback , the track being played will be
played repeatedly.
÷
The Repeat function is canceled when the CD tray is opened.
Each press switches the selection.
], [PGM] indicator ON: Program repeat playback.
[
1
] indicator OFF: Repeat playback canceled.
[
2
ON when Repeat is ON
÷
The Repeat function is canceled when the CD tray is opened.
EN
30
Page 31

Playback of Tracks in Random Order (Random Playback)
MUTEMODE
AUTO/MONO DIRECT
TUNER CD D.AUDIO
MDPHONO TAPE
AUX D-IN1 D-IN2 DIMMER
TIMER
SLEEP
TIME/PTY
CLEAR
DISPLAY
P.MODE RANDOM REPEAT
OPEN/
CLOSE
FOLDER
BASS TREBLE
BALANCE
PREV. NEXT
R a n d o m M o d e
C D T 0 8 0 : 0 1
C D T 0 1 0 : 0 0
Random playback plays tracks in a random order so that a single
disc can be enjoyed for long hours without tiring.
Preparations
÷
Place a CD on the tray.
÷
Select the [CD] input.
:
Keys and controls used in the operation.
Ensure that the [PGM] indica-
1
tor is OFF
Switch the Random function ON
2
÷
If the [PGM] indicator is lit, press the P.MODE key in stop mode
to turn the indicator OFF.
Ensure OFF
Each press switches the selection.
[RANDOM] indicator ON: Random playback
1
[RANDOM] indicator OFF: Random playback canceled.
2
ON when RANDOM is ON
\
ON
÷
Every time a track has been played, the system selects the next
played track at random.
÷
Random playback is canceled when all of the tracks in the disc
have been played.
÷
Random playback can be repeated by pressing the REPEAT
key.
ENGLISH
Selecting another track during playback
Press the
Canceling random playback
¢
key
÷
Pressing the
4
key once skips to the beginning of the track
being played and re-plays it.
÷
Press the RANDOM key to return to the normal playback in or
der of tracks. The [RANDOM] indicator is switched OFF.
÷
Random playback can also be canceled by pressing the 7 key.
In this case, the playback itself is also stopped.
EN
-
31
Page 32

Adjustment of Input Levels from External Components
I -n p u t L e v e l 6
MUTEMODE
AUTO/MONO DIRECT
TUNER CD D.AUDIO
MDPHONO TAPE
AUX D-IN1 D-IN2 DIMMER
TIMER
SLEEP
TIME/PTY
CLEAR
DISPLAY
P.MODE RANDOM REPEAT
OPEN/
CLOSE
FOLDER
BASS TREBLE
BALANCE
PREV. NEXT
I n p u t L e v e l
0
I n p u t L e v e l
The level of the analog signal input from each external component can be a djusted independently for the [PHO NO], [MD] ,
[TAPE] and [AUX] input sources. Adjust the input levels so that
the audio from the external components are played at a similar
volume to CD playback.
Preparations
÷
Conne ct the external components in advance as de
scribed in "Connecting Associated Product s (Com-
mercially Available)". (See page 9.)
÷
Switch the external components ON.
Perform the procedure in "Basic Operation" till step 2 to select
1
the [PHONO], [MD], [TAPE] or [AUX] input (see page 14.)
ENGLISH
Enter the input level adjustment mode
2
Press the MODE key
1
-
:
Keys and controls used in the operation.
Select [Input Level]
2
Advance
Return
Adjust the input level
3
Increase
Decrease
Switching the displayed information
\
\
Enter the
selection.
Enter the
selection
÷
The input level display starts to blink. (Begin the level adjust-
ment within 20 seconds after the display appears.)
÷
The level can be adjusted in three steps of -6, -3 and 0. (Begin
the level adjustment within 20 seconds.)
÷
When the input level is adjusted so that the audio from the se-
lected external component is played at a similar volume to CD
playback, the level of recording the signal from the input connector is also adjusted to a similar level regardless of the input
source component. Therefore, do not vary the input level in the
middle of recording as this will vary the recording level.
Each press switches the selection.
Input selection display
1
Day of the week and time of day display
2
«
EN
32
Page 33

MUTEMODE
AUTO/MONO DIRECT
TUNER CD D.AUDIO
MDPHONO TAPE
AUX D-IN1 D-IN2 DIMMER
TIMER
SLEEP
TIME/PTY
CLEAR
DISPLAY
P.MODE RANDOM REPEAT
OPEN/
CLOSE
FOLDER
BASS TREBLE
BALANCE
PREV. NEXT
Timer Operations
P r o g r a m 2 s e t
T i m e r s e t
P r o g r a m 1 s e t
The timer function allows the system to be used as an alarm music player.
Program timer
The system plays the selected input source at the set specified time.
Sleep timer (See page 36.)
The system switches OFF automatically after the set time has
elapsed.
Preparations
Adjust the system clock in advance as described in "Time
Adjustment". (See page 13.)
Making the program timer reservation
:
Keys and controls used in the operation.
After the operation time zone and other details are set, the same timer program can be used repeatedly or canceled.
÷
Two timer programs can be set for [Program 1] and [Program 2].
÷
Leave an interval of at least 1 minute between the two timer programs so that they do not overlap.
After making the program timer reservation, switch the system OFF (standby mode) and ensure that the standby indicator lights orange.
Make preparations for playback
1
Radio Reception CD Playback
Presetting of Stations
÷
Select a radio station with its preset number.
"Presetting stations automat ically (Auto Memor y)"
(See page 24.)
"Presetting Stations Manually (Manual Preset)"
(See page 25.)
Enter the timer setting mode
2
Press the MODE key
1
Select [Timer set]
2
Advance
Enter the
selection
Place a disc (note that program
playback of CD is not available
with timer operation).
(See page 17.)
Example for setting a timer program that plays a radio station from 10:30 am to 11:30 am every Friday in [Program 2]:
÷
If a timer program that has already been set is selected, the
previous setting will be overwritten by the new setting.
ENGLISH
Select the timer program number to be set
3
Return
Advance
Return
\
\
Enter the
selection
«
Each press switches the selection.
[Program 1 set]:
1
[Program 2 set]:
2
Example for selecting [Program 2]:
Continued to next page
[ ] and [ ] indicators ON
[ ] and [ ] indicators ON
EN
33
Page 34

Timer Operations
F r i d a y
P r o g r a m 2 o n
E v e r y w e e k
O n T i m e 1 0 : 0 0
Select the program timer on or off
4
5
ENGLISH
Advance
Enter the
selection
\
÷
When [Program 1 off] or [Program 2 off] is selected, the dis
play returns to the original status.
÷
Return
If you press the ENTER
@
) key to return to the previous item and correct its setting.
(
key by mistake, press the multi-control
Select the day of the week on which the timer program is executed.
Each press switches the selection.
Advance
Return
\
Enter the
selection
[Everyday] : Everyday
1
[Sunday] : Sunday
2
[Monday] : Monday
3
[Tuesday] : Tuesday
4
[Wednesday] : Wednesday
5
[Thursday] : Thursday
6
[Friday] : Friday
7
[Saturday] : Saturday
8
[Mon - Fri] : Monday to Friday
9
[Tue - Sat] : Tuesday to Saturday
0
[Sat - Sun] : Saturday and Sunday
-
The timer operation will be
repeated until the program is
canceled.
After selecting one of these, go
to step
to select whether the
6
timer is operated every week or
only once.
The timer operation
will be repeated
until the program is
canceled.
-
÷
When you have selected one of the timer operation that will be
repeated until the program is canceled, go to step
Select how the timer operation will be executed
6
Each press switches the selection.
[Every week]: The timer operation is executed every week.
Advance
Enter the
selection
1
[Oneti me]: The progr am timer is switche d off after the
2
timer operation was executed once.
\
Return
Set the timer operation on time and off time
7
Advance
Return
\
Enter the
selection
÷
Both the on time and off time can be set in the same way; press
the multi-control (% or fi) key to select the figure of hour, press
the ENTER key to enter it, press the multi-control key to select
the figure of minute, and press the ENTER key to enter it.
.
7
EN
34
Continued to next page
Page 35

T U N E R
Set the details of the timer program.
A I P l a y
V o l u m e - 5 6 . 0 d B
F M 0 1 8 7 . 5 0 M H z
8
Select the desired volume
1
level to be increased when
a program timer is acti
vated
Advance
-
Enter the
selection
\
Return
Adjust the volume
2
Advance
Enter the
selection
\
Return
Select an input source
3
Advance
Enter the
selection
\
Return
Timer Operations
Each press switches the selection.
[Play]: The timer operation starts with the volume level set
1
in step
[AI Play]: The timer operation starts by gradually increasing
2
the volume till the level set step
Each press switches the selection.
[TUNER] (Radio broadcasting)
1
[CD
2
.
8-2
.
8-2
]
ENGLISH
Select a preset number
4
([TUNER] only)
Advance
Return
Switch the system power OFF (standby mode)
9
\
Enter the
selection
÷
Select a radio station with its preset number.
"Presetting stations automatically (Auto Memory)"
(See page 24.)
"Presetting Stations Manually (Manual Preset)"
(See page 25.)
÷
[ Co mple te] is displaye d wh en the set ting is completed by
pressing the ENTER key.
÷
When the system is switched to OFF (standby mode), the stand
by indicator lights orange and the program timer is activated
(timer standby mode).
÷
If the standby indicator blinks orange, it is required to adjust
the clock of the system. (See page 13.)
-
EN
35
Page 36

S l e e p 9 0
Timer Operations
A . P . S . o n
A . P . S . s e t
A . P . S . o f f
Reactivating/canceling the timer program
The settings made in "Making the program timer reservation" can be reactivated or canceled. (See page 33.)
Press while p ower is ON
Each press switches the selection.
÷
] and [ ] indicators ON : Ac tivates the [Pro gram 1]
[
1
timer operation.
] and [ ] indicators ON : Ac tivates the [Program 2]
[
2
timer operation.
], [ ] and [ ] indicators ON: Activates the [Program 1]
[
3
and [Program 2] timer operations.
All OFF: The program timer operation is canceled.
4
The program setting is held in memory even after the timer operation is canceled.
Setting the Sleep timer (SLEEP)
The system switches OFF (standby mode) automatically af ter the set period of time has elapsed.
Each press switches the selection.
=
20 = 30 ..... 70 = 80 = 90 = canceled = 10 = 20 ....
10
ENGLISH
Lights when the sleep timer is ON
Press during CD playback
or tuner reception
Using the Auto Power Save function (A
When this function is ON, the system switches OFF (standby mode) automatically when it has been left untouched in the CD stop mode
for about 30 minutes. This function is convenient in assisting you in case you forget to switch the system OFF.
Press the MODE key
1
Select [A. P. S. set]
2
Advance
Return
\
Enter the
selection
Set time
÷
Each press of the key increments the time by 10 minutes.
The sleep time can be set up to 90 minutes.
÷
The sleep timer is canceled when the system is switched OFF
(standby mode).
÷
Pressing the SLEEP key while the sleep timer is activated dis-
plays the remaining time until the sleep timer expires.
UTO POWER SAVE
: A.P.S.)
«
Set the Auto Power Save
3
function to ON or OFF
Advance
Return
EN
36
\
Enter the
selection
Each press switches the selection.
[A. P. S. on]: Auto Power Save ON.
1
[A. P. S. off]: Auto Power Save OFF.
2
÷
When the selected input source is other than [CD], the A.P.S.
function is activated only when the volume level is Mute function is ON.
∞ or the
Page 37

For Your Information
Handling of CD
Handling precautions
Hold a CD taking care not to touch the played surface.
Discs playable on the system
This system can play back CD (12 cm, 8 cm), CD-R, CD-RW or
the audio part of a CD-EXTRA disc.
Notes on CD-R/CD-RW discs
If the CD-R or CD-RW disc in use has a printable label surface,
the disc may be unable to be taken out of the system due to
sticking of the label surface. To prevent malfunction of the
system, do not use such a disc.
Care and Storage
Care and storage of main unit
7
Do not place in the following locations.
÷
Place exposed to direct sunlight.
÷
Place subjected to excessive humidit y or dirt.
÷
Place exposed to direct heat fro m heating equip ment.
7
Be careful against condensation
When the difference in temperatures between the main unit
and the environmental air is large, dew may be condensed
inside the main unit and may cause malfunction of the main
unit. If this happens, leave the main unit for a few hours until
its internal mechanisms are dried up.
Take special care against condensation when the main unit is
moved between places with a large temperature difference or
into a room with high humidity.
7
When a main unit becomes dirty
When the front panel or case gets dirty, wipe with a soft dry
cloth. Do not use lacquer thinner, benzine, alcohol or contact
revitalizer for these chemicals will cause discoloration or deformation.
Cautions on CD discs
Always use a disc carrying the marking.
A disc without this marking may be unable to be played back
correctly.
The disc rotates at a high speed during playback. Never use a
cracked, chipped or greatly warped disc. Otherwise, damage
or malfunction of the player may result.
Also, do not use a disc with a non-circular shape as this may
result in malfunction.
Care and storage of CD
7
Before storing the CD
When the main unit is not to be used for a long period, take
out the CD and store in the case.
7
When a CD becomes dirty
÷
W hen a disc is co ntami nated with fi ngerprin ts or
other stains, wip e gently in the radial direction using
a soft dr y cloth.
÷
D o not use an anal og disk cle aner, lacque r t hinner,
benzine or alcohol.
÷
D o n ot us e a dis c acc ess or y (s tabil izer, pr ote ct ive
sheet, protective ring, etc.) or lens cleaner.
7
Other cautions
÷
Do not write letters on a CD using a pencil or ballpoint
pen .
÷
Do not use a CD if the sticker or label on it is peeled
off or bond is overf lowed around th e sticker or label .
÷
Do not stick a sheet of paper, sticke r or labe l on a CD.
ENGLISH
Caution for Transport or Movement
Before transporting or moving the system, prepare it as described below.
Switch the system ON without placing a disc in it.
1
Ensure that [No Disc] is displayed.
2
Wait a few seconds, and then switch the system OFF.
3
EN
37
Page 38

Troubleshooting
I n i t i a l i z e
Troubles are not always due to malfunction or failure of the system. In case of a trouble, check the following tales before calling for service.
Resetting the Microcomputer
The built-in microcomputer may malfunction (e.g. impossibility
of control, erroneous display, etc.) if the power cord is unplugged
and plugged while the system is set to ON or an e xtra ne ou s
cause.
If this happens, try the following operation to reset the microcomputer and restore the system in normal condition.
Amplifier Block
ENGLISH
The system cannot be switched ON by
pressing the power switch.
No audio output.
The standby indicator blinks in red and
no audio is output.
The standby indicator blinks in orange.
No audio from headphones.
One of the speakers does not output au
dio or the volume of one speaker is low.
A humming noise is produced when the
[PHONO] input is selected.
Time display is stopped and blinking.
The program timer cannot be activated.
Symptom Remedy
÷
Insert the power plug all the way into the wall power outlet firmly.
÷
Connect the speakers properly as described in "Connecting the speakers". (See
page 7.)
÷
If the volume is set to the minimum level, turn the VOLUME control slowly up to an
optimum volume.
÷
Cancel the Muting function. (See page 16.)
÷
If headphones are connected, disconnect the plug.
÷
The protection circuitry may be activated by short-circuiting of a speaker cord.
Unplug the power cord from the power outlet, switch the system OFF and remove
the short-circuiting of the speaker cord.
÷
The protection circuitry may be activated because the impedance of the speakers
is lower than specified. Use speakers with the specified impedance.
÷
There may be an internal defect. Switch it OFF, unplug the power cord and call for service.
÷
If there is a power failure or the power cord is unplugged from the power outlet,
the current time of the clock is reset to the factory-set condition. Adjust the time
again as described in "Time Adjustment". (See page 13.)
÷
The on time and off time of the program timer are not set properly. Set them prop
erly as described in "Making the program timer reservation". (See page 33.)
÷
Check if the headphones plug is connected properly. (See page 15.)
÷
Increase the volume gradually. (See page 14.)
÷
Cancel the Muting function. (See page 16.)
÷
Connect the speakers properly as described in "Connecting the speakers". (See
-
page 7.)
÷
Adjust the speaker balance properly as described in "Adjusting the speaker bal
ance (BALANCE)". (See page 16.)
÷
Check if the audio cords are inserted completely into the [PHONO IN] connectors,
and that the signal GND wire is connected firmly to the GND terminal on the rear
panel. Connect them properly as described in "Connecting Associated Products
(Commercially Available)". (See page 9.)
÷
If there is a power failure or the power cord is unplugged from the power outlet,
the current time of the clock is reset to the factory-set condition. Adjust the time
again as described in "Time Adjustment". (See page 13.)
÷
If there is a power failure or the power cord is unplugged from the power outlet,
the current time of the clock is reset to the factory-set condition. Adjust the time
again as described in "Time Adjustment". (See page 13.)
÷
Either or both the on time and off time of the program timer are not set or they
are set at the same time of the day. Set them properly as described in "Making the
program timer reservation". (See page 33.)
÷
The program timer is not activated. Press the TIMER key to activate it. (See page 36.)
Unplug the power cord from the wall power outlet and,
while pressing and holding the power key of the system,
plug the power cord again.
The following message is displayed when the microcomputer is reset.
÷
If the microcomputer is reset while a CD is placed on the CD
tray, the disc would be detected automatically. Be sure to
take out the CD and close the CD tray before resetting.
÷
Resetting the microcomputer results in erasing the setups of
the system and returns it to the factory-shipped condition.
-
-
EN
38
Page 39

Amplifier Block (continued)
Symptom Remedy
The recorded audio is interrupted.
Tuner Block
Symptom Remedy
Radio stations cannot be tuned.
Noise interferes with reception.
A preset station cannot be received by
pressing the P.CALL key.
CD Block
Symptom Remedy
No audio from the loaded disc.
No sound output.
CD sound skips.
Troubleshooting
÷
Do not adjust the input level (see pages 22 and 32) or switch the Source Direct function ON or OFF (see page 16) in the middle of recording on an external component.
÷
Connect the antennas properly as described in "Connecting the antennas". (See
page 6.)
÷
Select the appropriate radio band as described in "Receiving radio broadcast
ing". (See page 23.)
÷
Tune the frequency of the desired radio station as described in "Receiving radio
broadcasting". (See page 23.)
÷
Install the outdoor antenna away from the road.
÷
Switch off the nearby electrical appliances.
÷
Install the system away from a TV or PC.
÷
The frequency of the preset system cannot be received with the system.
÷
Select the [TUNER] input.
÷
Place the CD properly with the label side up. (See page 17.)
÷
Clean the disc as described in "Care and storage of CD". (See page 37.)
÷
Wait for the condensed dew to evaporate as described in "Care and storage of
main unit". (See page 37.)
÷
Press the CD
÷
Clean the disc as described in "Care and storage of CD. (See page 37.)
÷
Install the system in a vibration-free environment.
÷
Clean the disc as described in "Care and storage of CD". (See page 37.)
6
key to enter play mode.
-
ENGLISH
Remote Control Unit
Symptom Remedy
÷
Remote control is unavailable.
Replace the batteries with new R03 batteries. (See page 12.)
÷
Point the remote control unit to the remote sensor of the system and control it
from within the controllable distance. (See page 12.)
Message List
Displayed Message Description
÷
[CD No Text]
[CD PGM mode]
[Check Disc]
[Non-PCM]
[Unlock]
[– – – kHz]
* The CD records information called TOC (Table Of Contents) in addition to music data. Like the table of contents of a book, the TOC
data includes data that cannot be rewritten, such as the number of tracks, their play time and other character information.
The CD does not contain the CD-TEXT information.
÷
Random playback is attempted in the program play mode.
÷
The TOC data* of the CD cannot be read.
÷
The disc is not loaded properly.
÷
A signal other than a PCM signal is applied to the [DIGITAL (OPTICAL) IN 1] or
[DIGITAL (COAXIAL) IN 2] connector on the rear panel.
÷
The component connected to the [DIGITAL (OPTICAL) IN 1] or [DIGITAL (COAXIAL) IN 2]
connector on the rear panel is not switched ON or no signal is input from the component.
÷
The sampling signal used with the PCM signal being input is not compatible with
this system.
EN
39
Page 40

Specifications
[Amplifier Block]
Rated output power during STEREO operation (IEC)
................. 38 W + 38 W (20 Hz - 20 kHz, 0.07 % T.H.D., at 6Ω)
................. 45 W + 45 W (20 Hz - 20 kHz, 0.07 % T.H.D., at 4Ω)
Effective output power during STEREO operation (RMS)
...................................... 55 W + 55 W (1 kHz, 10 % T.H.D., at 6Ω)
.....................................70 W + 70 W (1 kHz, 10 % T.H.D., at 4Ω)
Total harmonic distortion ................. 0.015 % (20 Hz - 20 kHz, 10 W, 6 Ω)
.............................................................0.003 % (1 kHz, 10 W, 6 Ω)
Frequency response (IHF'66)
LINE (AUX, MD, TAPE, D. AUDIO)
......................................................5 Hz - 100 kHz (+ 0 dB - – 3 dB)
PHONO 'RIAA' response .......... 20 Hz - 20 kHz (+ 1.0 dB - – 1.0 dB)
Maximum input level
PHONO (MM) .............................. 50 mV (0.1 % T.H.D., at 1 kHz)
Signal to noise ratio (IHF'66)
PHONO (MM) ........................................................................90 dB
LINE (AUX, MD, TAPE, D. AUDIO) ......................................100 dB
Tone control
BASS .................................................................. ± 4 dB (at 100 Hz)
ENGLISH
TREBLE .............................................................. ± 4 dB (at 10 kHz)
Input sensitivity/impedance
PHONO (MM) ........................................................... 12 mV/31 kΩ
LINE (AUX, MD, TAPE) .........................................520 mV/100 kΩ
LINE (D. AUDIO) ................................................... 265 mV/100 kΩ
Output level/impedance
MD, TAPE ................................................................520 mV/200 Ω
[Digital block]
Sampling frequency
............................... 32 kHz, 44.1 kHz, 48 kHz, 88.2 kHz, 96 kHz
Supreme EX (CD, D-IN1, D-IN2)
Frequency response ............................................... 1 Hz - 40 kHz
Input level/impedance/wave length
Optical ............................ – 15 dBm - – 24 dBm, 660 nm ± 30 nm
Coaxial .................................................................... 0.5 Vp-p/75 Ω
Output level/impedance/wave length
Optical ............................ – 21 dBm - – 24 dBm, 660 nm ± 30 nm
Coaxial .................................................................... 0.5 Vp-p/75 Ω
[Tuner block]
FM tuner
Reception frequency range .........................87.5 MHz - 108 MHz
Sensitivity
MONO ........................1.3 µV/13.2 dBf (40 kHz dev, S/N 26 dB)
STEREO .................45 µV/42.1 dBf (40 + 6 kHz dev, S/N 46 dB)
Total harmonic distortion
MONO (1 kHz, 40 kHz dev) ...................0.2 % (65. 2 dBf input)
STEREO (1 kHz, 40 + 6 kHz dev) ........... 0.8 % (65.2 dBf input)
Signal to noise ratio (DIN-weighted)
MONO ........................................................ 65 dB (65 dBf input)
STEREO ..................................................... 60 dB (65 dBf input)
Stereo separation (1 kHz) .....................................................36 dB
Selectivity (DIN ± 300 kHz) ..................................................64 dB
Frequency response (30 Hz - 15 kHz) ............. + 0.5 dB - – 3.0 dB
AM tuner
Reception frequency range .........................531 kHz - 1,602 kHz
Sensitivity (30% mod, S/N 20 dB) .................. 16 µV/(600 µV/m)
Signal to noise ratio (30 % mod, 400 Hz)
....................................................... 50 dB (60 dBµV EMF input)
[General]
Power consumption ............................................................. 120 W
Standby power consumption .......................... Less than 0.25 W
Dimensions .................................................. Width: 280 mm (11")
Height: 151 mm (5-15/16")
Depth: 407 mm (16")
Weight (net) ........................................................... 9.6 kg (21.2 Ib)
[CD Block]
Laser ............................................................ Semiconductor laser
D/A conversion ........................................................................1 bit
Oversampling ....................................................... 8 fs (352.8 kHz)
Frequency response ............................................. 20 Hz - 20 kHz
Signal to noise ratio ......................................... More than 110 dB
Dynamic range .................................................More than 100 dB
Channel separation ..........................More than 102 dB (at 1 kHz)
EN
40
÷
Design and specifications are subject to change without notice.
÷
Full performance is not guaranteed in extremely cold environ-
ments (under water-freezing temperatures).
For your records
Record the serial number, found on the back of the unit, in the spaces
designated on the warranty card, and in the space provided below.
Refer to the model and serial numbers whenever you call upon your
dealer for information or service on this product.
Model
Serial Number
 Loading...