

Kenwood RD-K511USB, K-511USB Instruction Manual

© B60-5755-00/00 (EW/XW)
COMPACT Hi-Fi COMPONENT SYSTEM
K-511USB
RD-K511USB
INSTRUCTION MANUAL
Declaration of Conformity with regard to the EMC Directive
2004/108/EC
Manufacturer:
Kenwood Corporation
2967-3 Ishikawa-machi, Hachioji-shi, Tokyo, 192-8525 Japan
EU Representative's:
Kenwood Electronics Europe BV
Amsterdamseweg 37, 1422 AC UITHOORN, The Netherlands
2
K-511USB/RD-K 511USB
3
English
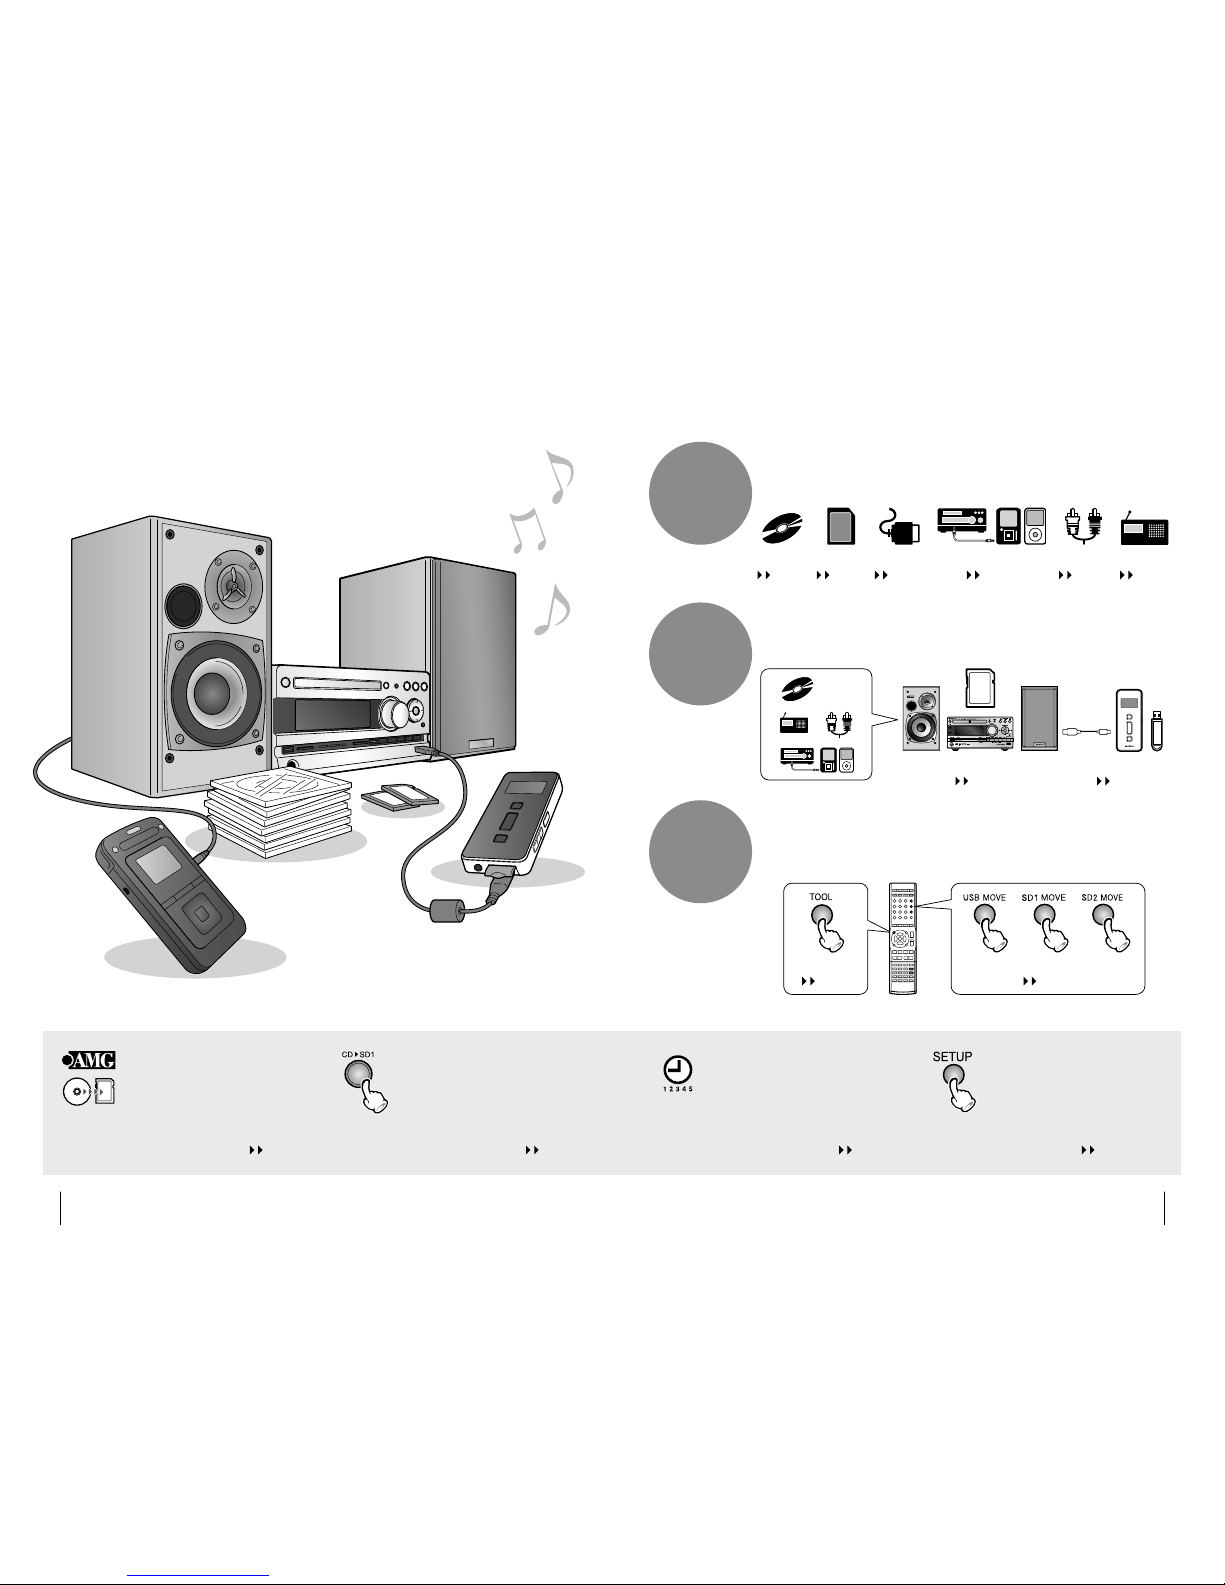
Playback of a large variety of media including the SD card and
digital audio player as well as CD.
Play
Record
Edit
Recording of various sources including CD, radio broadcasting and
externally connected source to the SD card or digital audio player
without using a PC.
Editing of folders and les in SD and USB, including move, delete and
title input operations. Pressing the [TOOL] button opens the menu of
editing items for each audio source.
Recording on SD
page 52
Recording on USB
page 52
Tool menu
page 70
Moving folders and les
page 60
iPod/D.AUDIO
page 40
TUNER
page 44
AUX
page 42
CD
page 28
USB
page 36
SD
page 32
[SETUP] button for setting the
system according to your lifestyle
The system setup function, the recording settings
including the recording speed and level, and the sound
setup for reproducing desired audio in each sound
range allow you to arrange the system as you like.
pages 72, 84, 92
5-program timer
The weekly timer is convenient for
recording or listening to the radio
program you are fond of.
page 78
Auto CD title acquisition
The title information including the album
name, track names and artist name can
be obtained from the AMG database for
display during playback or addition as
the tag information to the recorded les.
page 24
One-Touch Edit recording
Single press of a button can start
recording of CD audio in SD card or
USB memory at either the 4x or 1x
speed.
page 52
What are available with this system

4
K-511USB/RD-K 511USB
5
English
Creating the desired sound setting
Advanced operations
Edit
Record
Playing music tracks
Read before use
Recording setup
Maintenance
Contents
Caution : Read the pages marked ¤ carefully to
ensure safe operation.
Before appl ying power ……………………… 6
Safety pre cautions ……………………………… 6
IMPORTANT SAFET Y INSTRUCTIONS ……… 6
Read before use
Accessories …………………………………… 9
Installati on …………………………………… 10
Preparation of re mote control ……………… 11
Connectio ns …………………………………… 12
Names and func tions of parts ………………16
Playing music tracks
Basic Operat ion ……………………………… 22
Acquiring the CD ti tle information ………… 24
AMG database ………………………………… 24
How to use the AMG dat abase ……………… 24
Folders and mu sic les ……………………… 26
Playing a CD or audi o le disc ……………… 28
Playback ……………………………………… 28
Folder play mod e ……………………………… 30
Program playb ack …………………………… 30
Playing an SD car d …………………………… 32
Playback ……………………………………… 32
Folder play mod e ……………………………… 34
Program playb ack …………………………… 34
Relay playback o f two SD cards ……………… 35
Intro Scan play back …………………………… 35
Playing a USB device ………………………… 36
Playback ……………………………………… 36
Folder play mod e ……………………………… 38
Program playba ck …………………………… 38
Playing iPod/D. AUDIO ……………………… 40
Playback ……………………………………… 40
Switching the mo de ………………………… 41
Playback with t he AUX Connection ………… 42
Playback ……………………………………… 42
Switching the mo de ………………………… 43
Listening to Ra dio Broadcasting ……………4 4
Listening to Rad io Broadcasting ……………… 44
Presetting stations automatically
(Auto Preset) ……………………………… 46
Presetting stations manually
(Manual Preset) …………………………… 4 6
RDS (Radio Data Syste m) ……………………… 4 8
PS (Program Ser vice Name) Display ………… 48
Searching for a d esired program typ e
(PTY search) ………………………………… 48
Record
Before recor ding ……………………………… 50
Various recordi ng methods ………………… 50
Selectin g the recording mode accord ing to the
quality and p urpose ……………………… 51
One-Touch Edit recordi ng …………………… 51
Recording des tination folder/ le names …… 51
Recording CD in S D/USB ……………………… 52
One-Touch Edit recordi ng …………………… 52
Recording all t racks in CD …………………… 52
Recording a sin gle track in CD ……………… 53
Recording des ired tracks in desire d order …… 53
Recording general audio source into SD/USB
…54
Recording in the digital audio player ……… 56
Listening to an aud io source while recording
another …………………………………… 5 8
Edit
Moving a folde r or audio le …………………6 0
Renaming a fol der or music le ……………… 62
Renaming ……………………………………… 62
Character Inp ut ……………………………… 64
Deleting a fo lder or audio le ……………… 66
Checking the r emaining recording tim e of
SD or USB ………………………………… 68
Adjusting the E xternal Signal Input Leve l … 69
Editing usin g the Tool menu ………………… 70
Advanced operations
Making the s ystem setup using the
Setup menu ……………………………… 72
Setting the S leep Timer (SLEEP) ……………… 74
Adjusting the Disp lay Brightness
(DIMMER SET) 75
Formatting an SD c ard (SD FORMAT) ………… 75
Setting Auto Powe r Save (A.P.S.) ……………… 76
Adjusting the Ti me (TIME ADJUST) ………… 77
Setting the p rogram timer (TIMER SE TTING) … 78
Switching the D isplay Information ………… 82
Recording setup
Making the re cording setup using the
Setup menu ……………………………… 84
Setting re cording mode for each audi o source
(REC MODE) ………………………………… 86
Setting the r ecording speed (O.T.E. SPEED) … 87
Setting the r ecording input (REC INPUT ) …… 88
Setting the re cording level (REC LEVEL) ……… 88
Setting the le division method
(AUTO DIVIDE) ……………………………… 89
Dividing les automati cally (DIVIDE TIME) … 90
Recording the CD -TEXT information
(TEXT COPY ) ………………………………… 90
Relay recordin g between SD1 and SD2
(RELAY REC) ………………………………… 91
Creating the desired sound setting
Making the so und setup using the
Setup menu ……………………………… 92
Enhancing the bass to ne (D-BASS) …………… 94
Enhancing both ba ss and treble (TONE) …… 95
Setting the d esired sound proper ties
(MANUAL EQ) ……………………………… 96
Recalling a us er setup of sound prope rties
(MANUAL EQ) ……………………………… 97
Reproducin g audio with sound prope rties
close to the origi nal (SPRM: Supreme) …… 98
Playing best- t sound according to gen re
(BestFit EQ EX) ……………………………… 98
Playback with hig h sound quality (HR SOUN D) 99
Setting the l eft and right speaker ba lance
(BALANCE) ………………………………… 99
Resetting th e adjusted frequenc y characteristics
to the original so und (FLAT) ……………… 99
Maintenance
Additional Inf ormation …………………… 100
Message List ………………………………… 106
Troubleshootin g …………………………… 108
Glossary …………………………………… 111
Care and Storage …………………………… 112
Speci cations ……………………………… 114
6
K-511USB/RD-K 511USB
7
English
6. Power Sources –
This product should be operated
only from the type of power source indicated on the
product. If you are not sure of the type of power supply
to your home, consult your product dealer or local power
company.
7.
CAUTION
– Polarization – This product may
be equipped with a polarized alternating-current line
plug (a plug having one blade wider than the other).
This plug will t into the power outlet only one way. This
is a safety feature. If you are unable to insert the plug
fully into the outlet, try reversing the plug. If the plug
should still fail to t, contact your electrician to replace
your obsolete outlet. Do not defeat the safety purpose
of the polarized plug.
8. Power Cord Protection – Power-supply cords
should be routed so that they are not likely to be
walked on or pinched by items placed upon or against
them, paying particular attention to cords at plugs,
convenience receptacles, and the point where they exit
from the product.
9. Lightning – For added protection for this product
during a lightning storm, or when it is left unattended
and unused for long periods of time, unplug it from
the wall outlet and disconnect the antenna or cable
system. This will prevent damage to the product due to
lightning and power-line surges.
10. Overloading – Do not overload wall outlets,
extension cords, or integral convenience receptacles as
this can result in a risk of re or electric shock.
11. Object and Liquid Entr y – Never push objects of
any kind into this product through openings as they
may touch dangerous voltage points or short-out parts
that could result in a re or electric shock. Never spill
liquid of any kind on the product.
12. Servicing – Do not attempt to service this product
yourself as opening or removing covers may expose
you to dangerous voltage or other hazards. Refer all
servicing to quali ed service personnel.
13. Damage Requiring Service – Unplug this product
from the wall outlet and refer servicing to quali ed
service personnel under the following conditions:
a) When the power-supply cord or plug is damaged,
b) If liquid has been spilled, or objects have fallen
into the product,
c) If the product has been exposed to rain or water,
d) If the product does not operate normally by
following the operating instructions.
e) If the product has been dropped or damaged in
any way, and
f) When the product exhibits a distinct change in
performance – this indicates a need for service.
g) If an abnormal smell or smoke is detected.
14.
Replacement Parts – When replacement parts
are required, be sure the service technician has used
replacement parts speci ed by the manufacturer or have
the same characteristics as the original part. Unauthorized
substitutions may result in re, electric shock, or other
hazards.
15. Safety Check – Upon completion of any ser vice
or repairs to this product, ask the service technician to
perform safety checks to determine that the product is
in proper operating condition.
16. Wall or Ceiling Mounting – This product should
be mounted to a wall or ceiling only as recommended
by the manufacturer.
17. Heat – This product should be situated away from
heat sources such as radiators, heat registers, stoves,
or other products that produce heat. Do not place a
aming object, such as a candle or lantern, or near the
product.
18. Power Lines – An outside antenna system should
not be located in the vicinity of overhead power lines
or other electric light or power circuits, or where it can
fall into such power lines or circuits. When installing an
outside antenna system, extreme care should be taken
to keep from touching such power lines or circuits as
contact with them might be fatal.
19. Outdoor Antenna Grounding – If an outside
antenna or cable system is connected to the product, be
sure the antenna or cable system is grounded so as to
provide some protection against voltage surges and builtup static charges. Article 810 of the National Electrical
Code, ANSI/NFPA 70, provides information with regard to
proper grounding of the mast and supporting structure,
grounding of the lead-in wire to an antenna discharge
unit, size of grounding conductors, location of antennadischarge unit, connection to grounding electrodes, and
requirements for the grounding electrode.
I
EXAMPLE OF ANTENNA GROUNDING AS PER
NATIONAL ELECTRICAL CODE
POWER SERVICE GROUNDING
ELECTRODE SYSTEM
(NEC ART 250, PART H)
NEC – NATIONAL ELECTRICAL CODE
GROUNDING CONDUCTORS
(NEC SECTION 810-21)
ANTENNA
LEAD IN WIRE
ANTENNA
DISCHARGE UNIT
(NEC SECTION 810-20)
GROUND CLAMP
ELECTRIC
SERVICE
EQUIPMENT
GROUND CLAMPS
Notes:
1. Item 7 is not required except for grounded or
polarized equipment.
2. Item 19 complies with UL in the U.S.A.
Before applying power
¤
Caution : Read this page carefully to
ensure safe operation.
Units are designed for operation as follows.
Australia ........................................................... AC 240 V only
Europe ..............................................................AC 230 V only
Safety precautions
WARNING : TO PREVENT FIRE
OR ELECTRIC SHOCK, DO NOT
EXPOSE THIS APPLIANCE TO
RAIN OR MOISTURE.
The marking of products using lasers
The marking this product has been classified as
Class 1. It means that there is no danger of hazardous radiation outside the product.
Location: Back panel
CLASS 1
LASER PRODUCT
IMPORTANT SAFETY
INSTRUCTIONS
¤
Caution : Read this page carefully to
ensure safe operation.
Read Instructions – All the safety and operating
instructions should be read before the product is
operated.
Retain Instructions – The safety and operating
instructions should be retained for future reference.
Heed Warnings – All warnings on the product and in
the operating instructions should be adhered to.
Follow Instructions – All operating and use
instructions should be followed.
1. Cleaning – Unplug this product from the wall
outlet before cleaning. Do not use liquid cleaners or
aerosol cleaners. Use a damp cloth for cleaning.
2. Attachments – Do not use attachments not
recommended by the product manufacturer as they
may cause hazards.
3. Water and Moisture – This product shall not be
exposed to dripping and splashing – for example, near
a bath tub, wash bowl, kitchen sink, or laundry tub; in
a wet basement; or near a swimming pool; and the
like. Do not place an object containing liquid, such as a
ower vase, on the appliance.
4. Accessories – Do not place this product on
an unstable cart, stand, tripod, bracket, or table.
The product may fall, causing serious injury to a
child or adult, and serious damage to the product.
Use only with a cart, stand, tripod, bracket, or table
recommended by the manufacturer. Any mounting
of the product should follow the manufacturer’s
instructions, and should use a mounting accessory
recommended by the manufacturer.
A product and cart combination should
be moved with care. Quick stops,
excessive force, and uneven surfaces may
cause the product and cart combination
to overturn.
5. Ventilation – Slots and openings in the cabinet
are provided for ventilation and to ensure reliable
operation of the product and to protect it from
overheating, and these openings must not be blocked
or covered. The openings should never be blocked
by placing the product on a bed, sofa, rug, or other
similar surface. This product should not be placed in a
built-in installation such as a bookcase or rack unless
proper ventilation is provided or the manufacturer’s
instructions have been adhered to.
CAUTION
RISK OF ELECTRIC SHOCK
DO NOT OPEN
CAUTION: TO REDUCE THE RISK OF ELEC TRIC SHOCK,
DO NOT REMOVE COVER (OR BACK). NO USERSERVICEABLE PARTS INSIDE. REFER SERVICING TO
QUALIFIED SERVICE PERSONNEL.
THE LIGHTNING FLASH WITH ARROWHEAD
SYMBOL, WITHIN AN EQUILATERAL TRIANGLE, IS INTENDED TO ALERT THE USER
TO THE PRESENCE OF UNINSULATED "DANGEROUS VOLTAGE" WITHIN THE PRODUCT ’
S ENCLOSURE THAT MAY BE OF SUFFICIENT
MAGNITUDE TO CONSTITUTE A RISK OF
ELECTRIC SHOCK TO PERSONS.
THE EXCLAMATION POINT WITHIN AN EQUILATERAL TRIANGLE IS INTENDED TO ALERT
THE USER TO THE PRESENCE OF IMPORTANT
OPERATING AND MAINTENANCE (SERVICING) INSTRUCTIONS IN THE LITERATURE ACCOMPANYING THE APPLIANCE.
8
K-511USB/RD-K 511USB
9
English
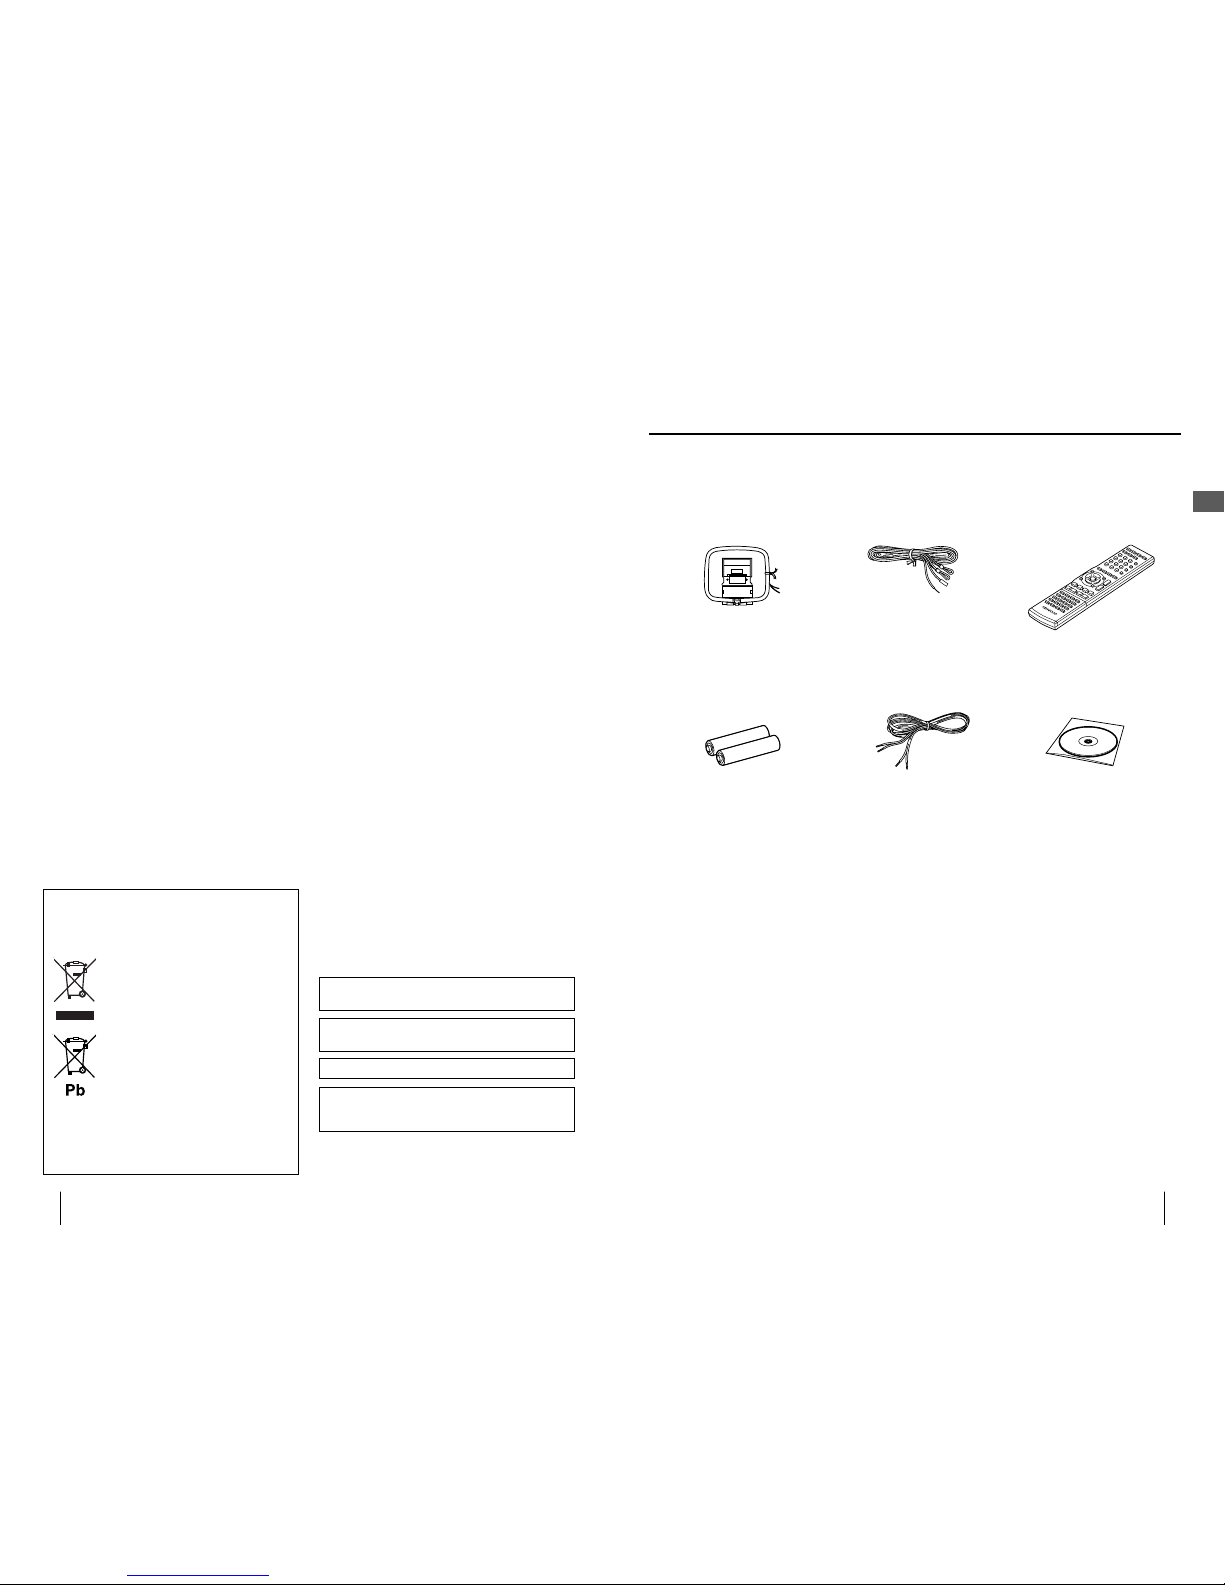
Accessories
Accessories
AM loop antenna
(x 1)
FM indoor antenna
(x 1)
Remote control unit
(RC-F0714E x 1)
Remote control batteries
(LR03(AAA) x 2)
Speaker cords
(2 m x 2)
The batteries are inserted
in the packaging material.
AMG database CD
(x 1)
Read before use
K-511USB only:
Packaged with the speakers.
Microsoft, Windows and Windows Media are registered
trademarks or trademarks of Microsoft Corporation in
the United States and other countries.
Other system names and product names are generally trademarks or
registered trademarks of their developers. However, note that the text
in this manual does not use the TM and ® markings to them.
Supreme is a registered trademark of Kenwood
Corporation.
The SDHC logo is a trademark.
Information on Disposal of Old Electrical
and Electronic Equipment and Batteries
(applicable for EU countries that have
adopted separate waste collection systems)
Products and batteries with the symbol
(crossed-out wheeled bin) cannot be disposed
as household waste.
Old electrical and electronic equipment and
batteries should be recycled at a facility
capable of handling these items and their
waste by products.
Contact your local authority for details in
locating a recycle facility nearest to you.
Proper recycling and waste disposal will help
conserve resources whilst preventing
detrimental effects on our health and the
environment.
Notice: The sign "Pb" below the symbol for
batteries indicates that this battery
contains lead.
Apple and iPod are trademarks of Apple Inc.,
registered in the U.S. and other countries.
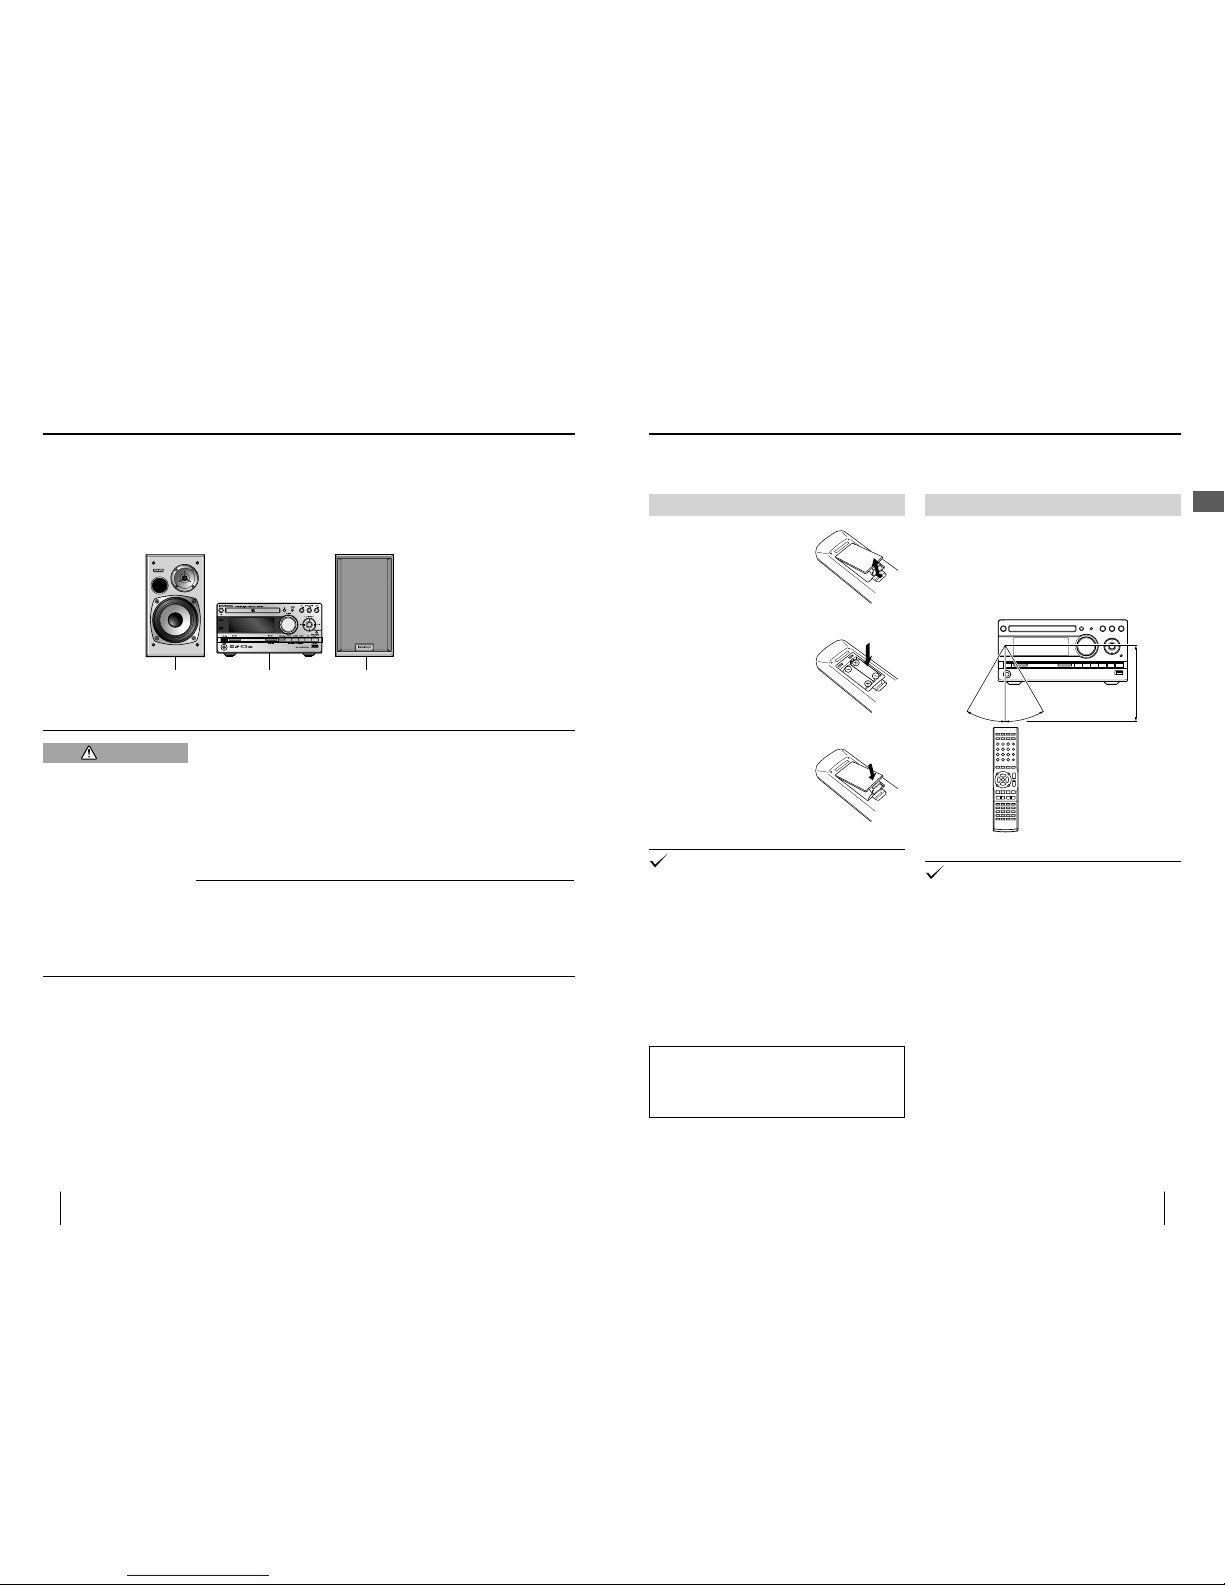
Left speaker Right speaker
Main unit
10
K-511USB/RD-K 511USB
11
English
Loading batteries
1
Remove the battery cover.
2
Insert the provided AAAsize batteries.
Insert batteries with correct
polarity.
•
3
Close the battery cover.
The provided batteries are intended for use in operation
check and their service life may be shorter than usual.
When replacing batteries, be always sure to replace both
of the two batteries together.
•
•
Operation
Plug the power cord of the system to a power outlet
and press [K] on the remote control unit to turn the
system ON. After the system is switched ON, press the
desired operation button. Use the remote control unit
by pointing it to the remote sensor on the main unit.
About
6 m
About 30°
About 30°
The system may malfunction if the remote control sensor
is exposed to direct sunlight or the light of a uorescent
lamp with high-frequency lighting system (inverter
system, etc.). Change the system installation to prevent
malfunction.
•
Preparing the remote control unit
Preparation of remote control
Installation precautions
Always install the system on a level, stable surface. When installing on a stand or tabletop, be sure to con rm the strength of the stand.
The magnetism from the speakers may cause color irregularities on a nearby TV or PC screen. Always install the speakers at
a distance from a TV or PC.
•
•
Installation
Observe the following cautions when installing the system. Insu cient heat
radiation may build up internal heat and cause a malfunction or re hazard.
Do not place an object that may hinder heat radiation on the system.
Do not install the system on the back, on the side or upside down.
Do not place a cloth on the system or place it on a carpet or cushion.
Do not use the system in a poorly ventilated place.
Leave the spaces speci ed below around the cabinets of the main unit.
Top: 50 cm or more, Side: 10 cm or more, Rear: 10 cm or more
Install the system so that the power outlet is easily accessible from the user, and
unplug the power cord from the power outlet immediately in case of a trouble.
Note that the power supply to the system is not shut down completely by simply
setting the power button to OFF. To shut down the power supply completely, it is
required to unplug the power cord.
•
•
•
•
•
To fully enjoy the acoustic e ects
The audio is variable depending on how the speakers are installed. Ensure the following points to enjoy music with
higher quality.
Make the environments around the left and right speakers as equal as possible. Install the left and right speakers at a
distance of a wall, and minimize the sound reverberations by drawing thick curtains on the windows.
Place the left and right speakers at a large distance between each other.
Place the left and right speakers on the same height as the ears of the listener.
•
•
•
Read before use
The speakers is not provided with
RD-K511USB.
¤
CAUTION
• Do not leave the batter y near fire or under direct
sunlight. A fire, explosion or excessive heat generation
may result.
CAUTION
12
K-511USB/RD-K 511USB
13
English
Malfunction of the
system
If the system does not function properly or the display shows erroneous information even
when the connections are made correctly, reset the system. (page 110)
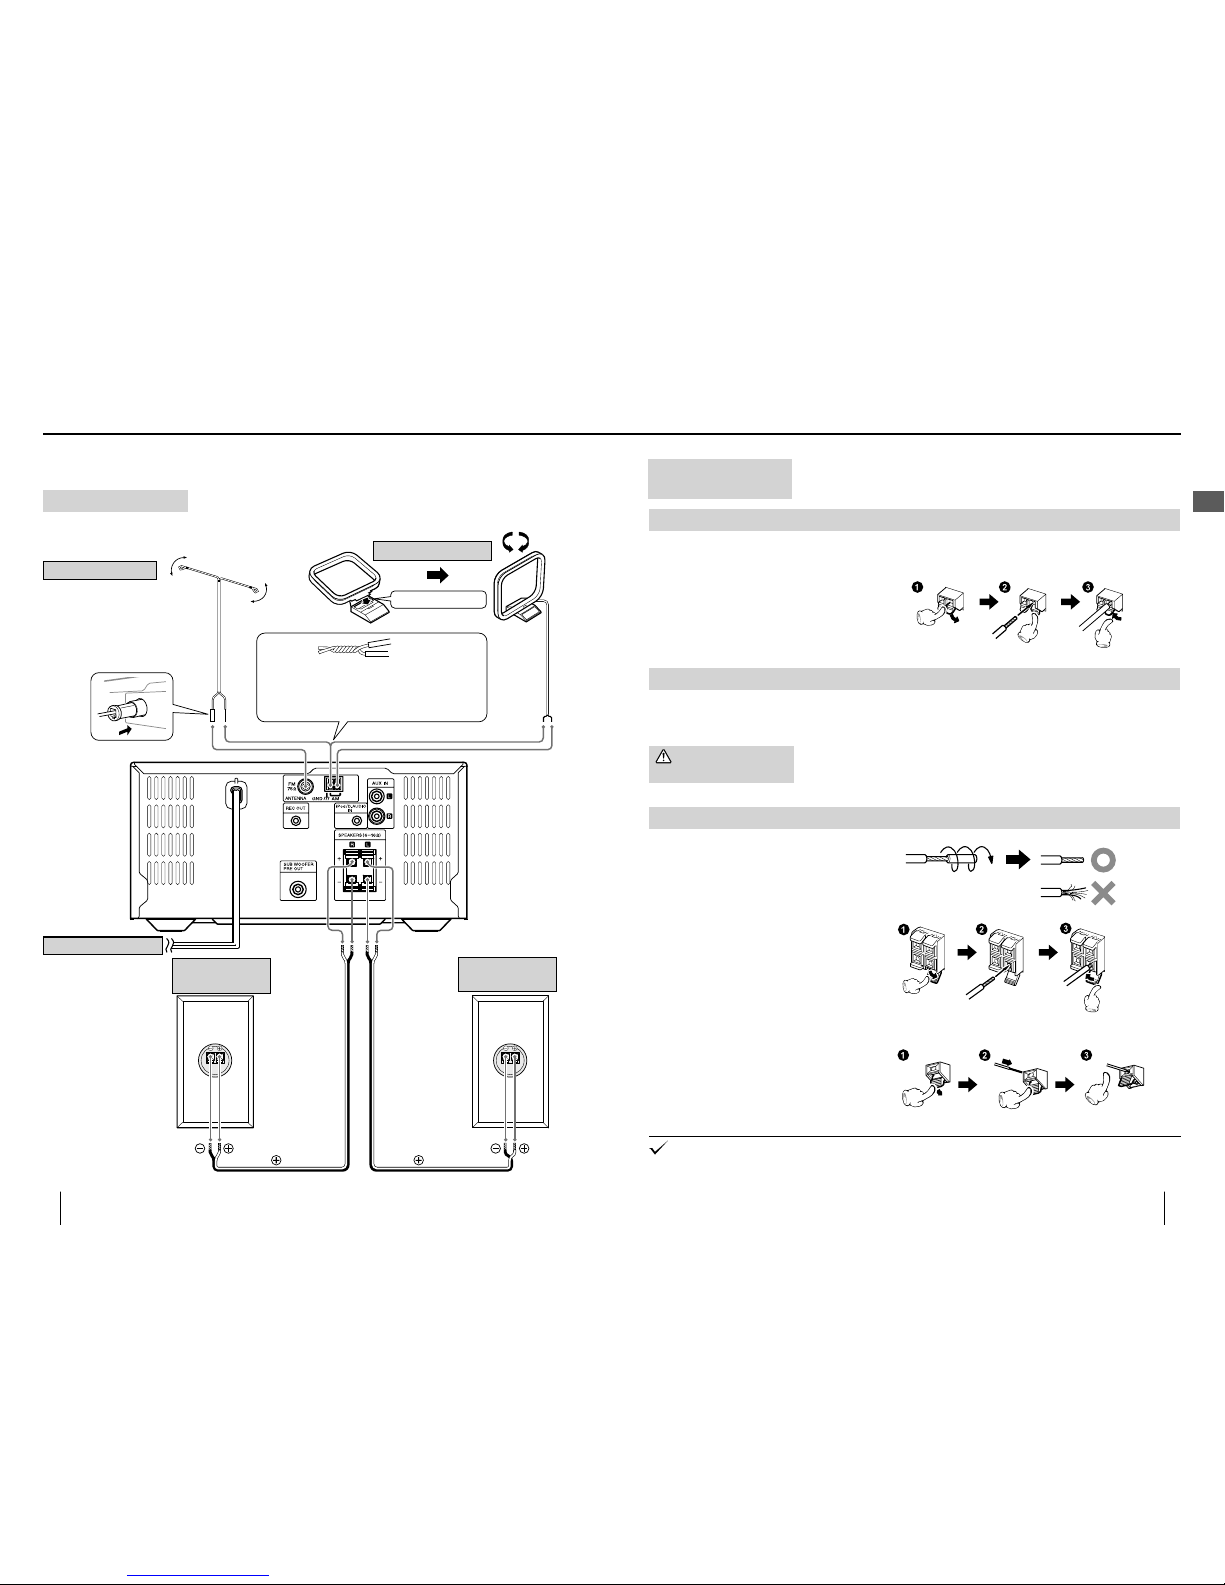
Connecting the AM loop antenna
The provided AM antenna is an indoor antenna. Install it as apart as possible from the main unit, TV set, speaker cords
and power cord and orient it in the direction that o ers best reception condition.
Connecting a antenna cord
Connect the AM antenna code across the [AM] and
[MGND] terminals as shown on the right.
•
Connecting the FM indoor antenna
The provided FM antenna is a simpli ed one for indoor use. To receive FM stations stably, it is recommended to use an
outdoor antenna (commercially available). Remove the simpli ed antenna before connecting the outdoor antenna.
Connecting the speakers
Treatment of the speaker cord extremities
Twist and remove the vinyl coating on the
extremity of each speaker cord.
•
Connecting a speaker cord to the main unit•
Connecting the speaker cords to the speakers
•
Be careful not to short-circuit the + and – conductors of the speaker cord (be sure to avoid contact between the + and –
conductors). If the speaker cord is connected by inverting the + and – polarity, the reproduced audio will be unnatural with
unclear positioning of musical instruments.
•
Caution for outdoor
antenna installation
Since antenna installation necessitates skill and experience, always consult your dealer
before installation. The antenna should be placed at a distance from the power distribution
wires. Otherwise, an electric shock accident may occur if the antenna falls down.
Connections
Basic connections
Bind one of the conductors of the AM loop
antenna with a conductor of the FM indoor
antenna by twisting them together, and insert the
twisted pair into the [MGND] terminal.
Fit into the groove.
AM loop antenna
1
Connect the [FM75Ω] and [MGND]
terminals.
2
Find the antenna location that o ers
best reception.
3
Fix the antenna in the found location.
FM indoor antenna
Power cord
LS-K511 L
Left speaker
Caution for connection
Do not plug the power cord into the power outlet until all other connections are
completed. Before unplugging a connected cord or cable, be sure to switch the
system OFF and unplug the power cord from the power outlet in advance.
LS-K511 R
Right speaker
White line on transparent
coating
White line on transparent
coating
Read before use
To AC wall outlet
• I nsert the plug firmly all the
way into the AC wall outlet.
14
K-511USB/RD-K 511USB
15
English
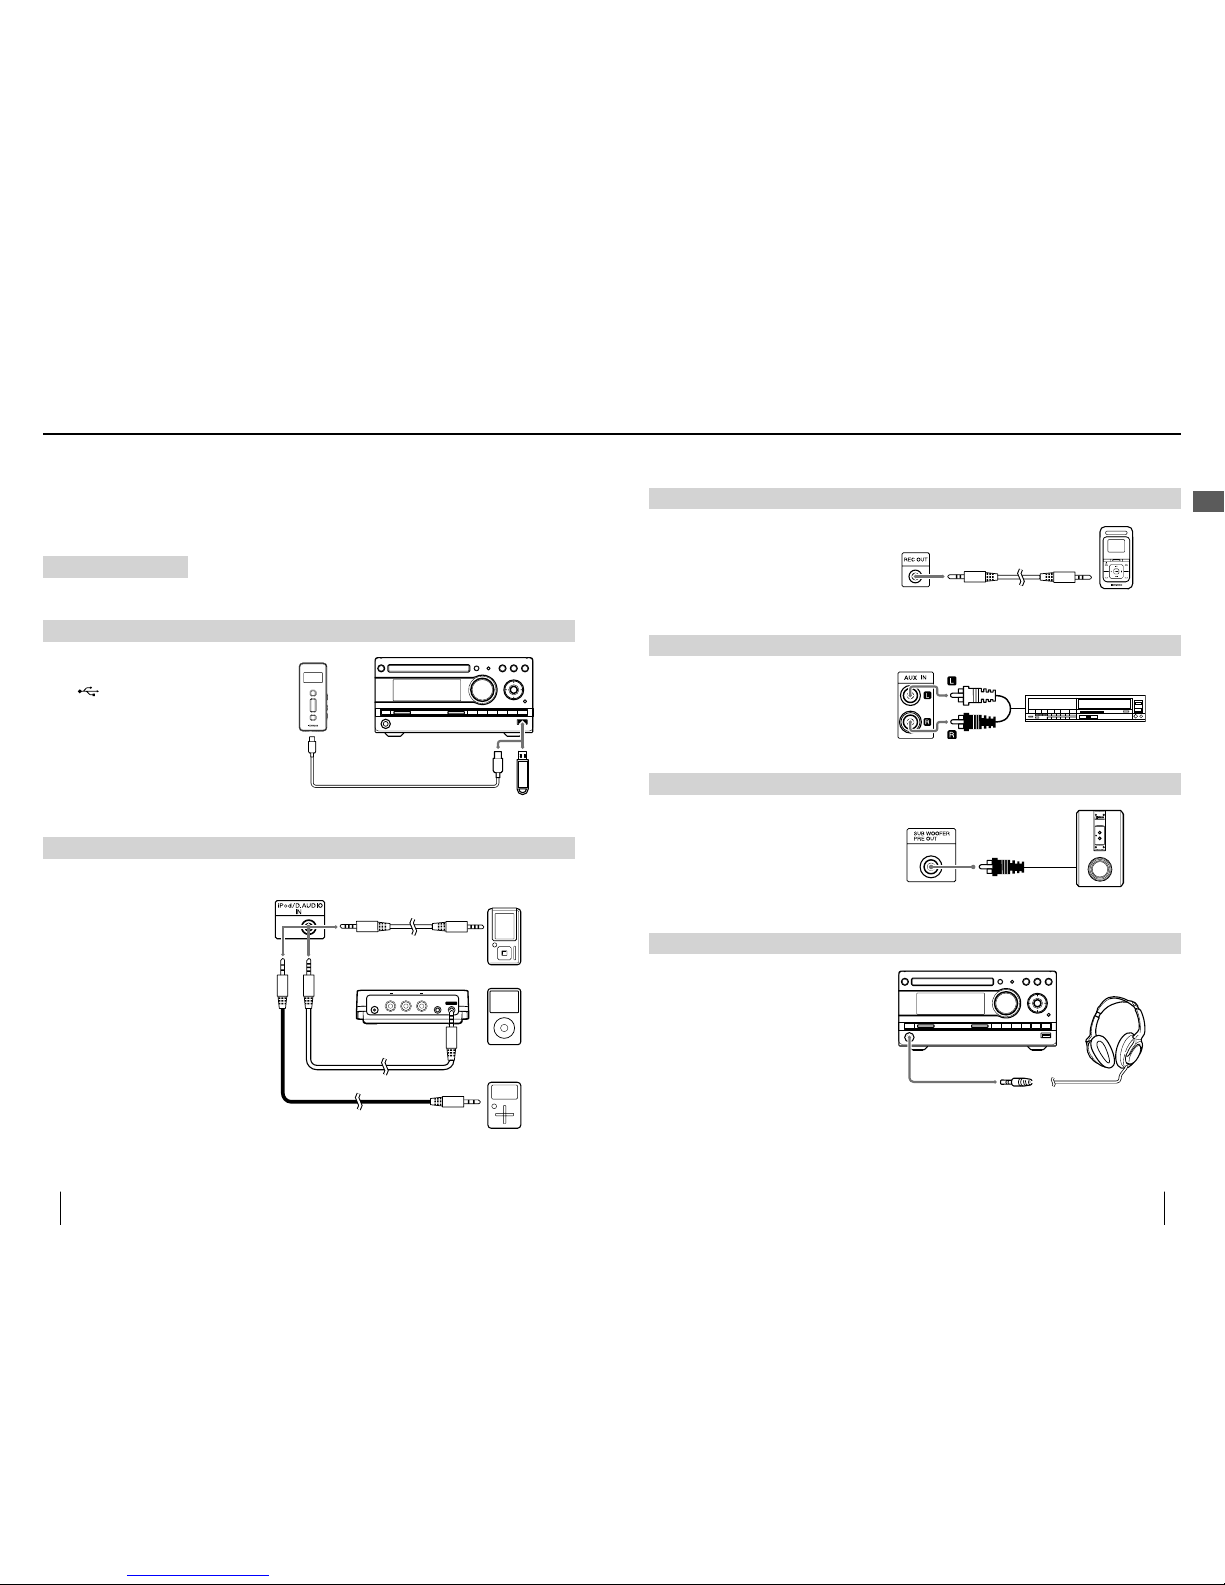
REC OUT
Connect a kenwood digital audio player with
direct encoding function to the [REC OUT]
terminal on the rear of the main unit.
The [REC OUT] terminal output the analog audio
signals.
•
To REC IN
AUX IN
Connect the audio output of the VCR, etc. to the
[AUX IN] terminals on the rear of the main unit.
AUDIO OUT
VCR, etc.
SUB WOOFER PRE OUT
Connect a subwoofer (SW-40HT (separately
available), etc.) to the [SUB WOOFER PRE OUT]
terminal on the rear of the main unit.
Subwoofer
PHONES
Connect headphones with a stereo miniplug to
the [PHONES] jack on the front of the main unit.
Connecting associated products (commercially available)
Before connecting associated system products, be sure to read their instruction manuals.
Connect every connection cord rmly. Incomplete insertion may cause loss of audio output or generation of noise.
•
•
USB
Connect a USB ash memory or a digital audio
player with USB mass storage class compatibility
to the [
USB] terminal on the front of the main
unit.
With certain models, it takes a certain period
before the connection is recognized.
Certain models display the USB connection mode
selection menu. In this case, select the "Storage"
mode.
•
•
iPod/D.AUDIO IN
Connect a digital audio player or an iPod to the
[iPod/D.AUDIO IN] terminal on the rear of the
main unit.
When a kenwood digital audio player with digital
audio link compatibility is connected using the
PNC-150 dedicated cable (separately available),
the player can be controlled from this system or
its remote control unit. The iPod can be controlled
when it is connected using the PAD-iP7 dedicated
adapter (separately available). (page 40)
A digital audio player other than above can
be connected using a stereo miniplug cable
(commercially available).
When not using the digital audio player or the iPod,
unplug the miniplug cable from the main unit.
•
•
•
Y Cb Cr
AUDIO/
VIDEO
DC IN
COMPONENT VIDEO
D.AUDIO
kenwood
digital audio player
iPod
PNC-150 (separately
available)
PAD-iP7 (separately
available)
Stereo miniplug cord (separately
available)
Digital audio player,
etc.
Connection s
Read before use
Caution for connection
Set the main unit in the standby mode before connecting any associated product to
it and do not set the power button to ON until all connections are completed. Before
unplugging a connected cord or cable, be sure to set the power button to OFF and
unplug the power cord from the power outlet in advance.
4765321
8
c
9
i
gjhfed
0
a
b
k
l
m
16
K-511USB/RD-K 511USB
17
English
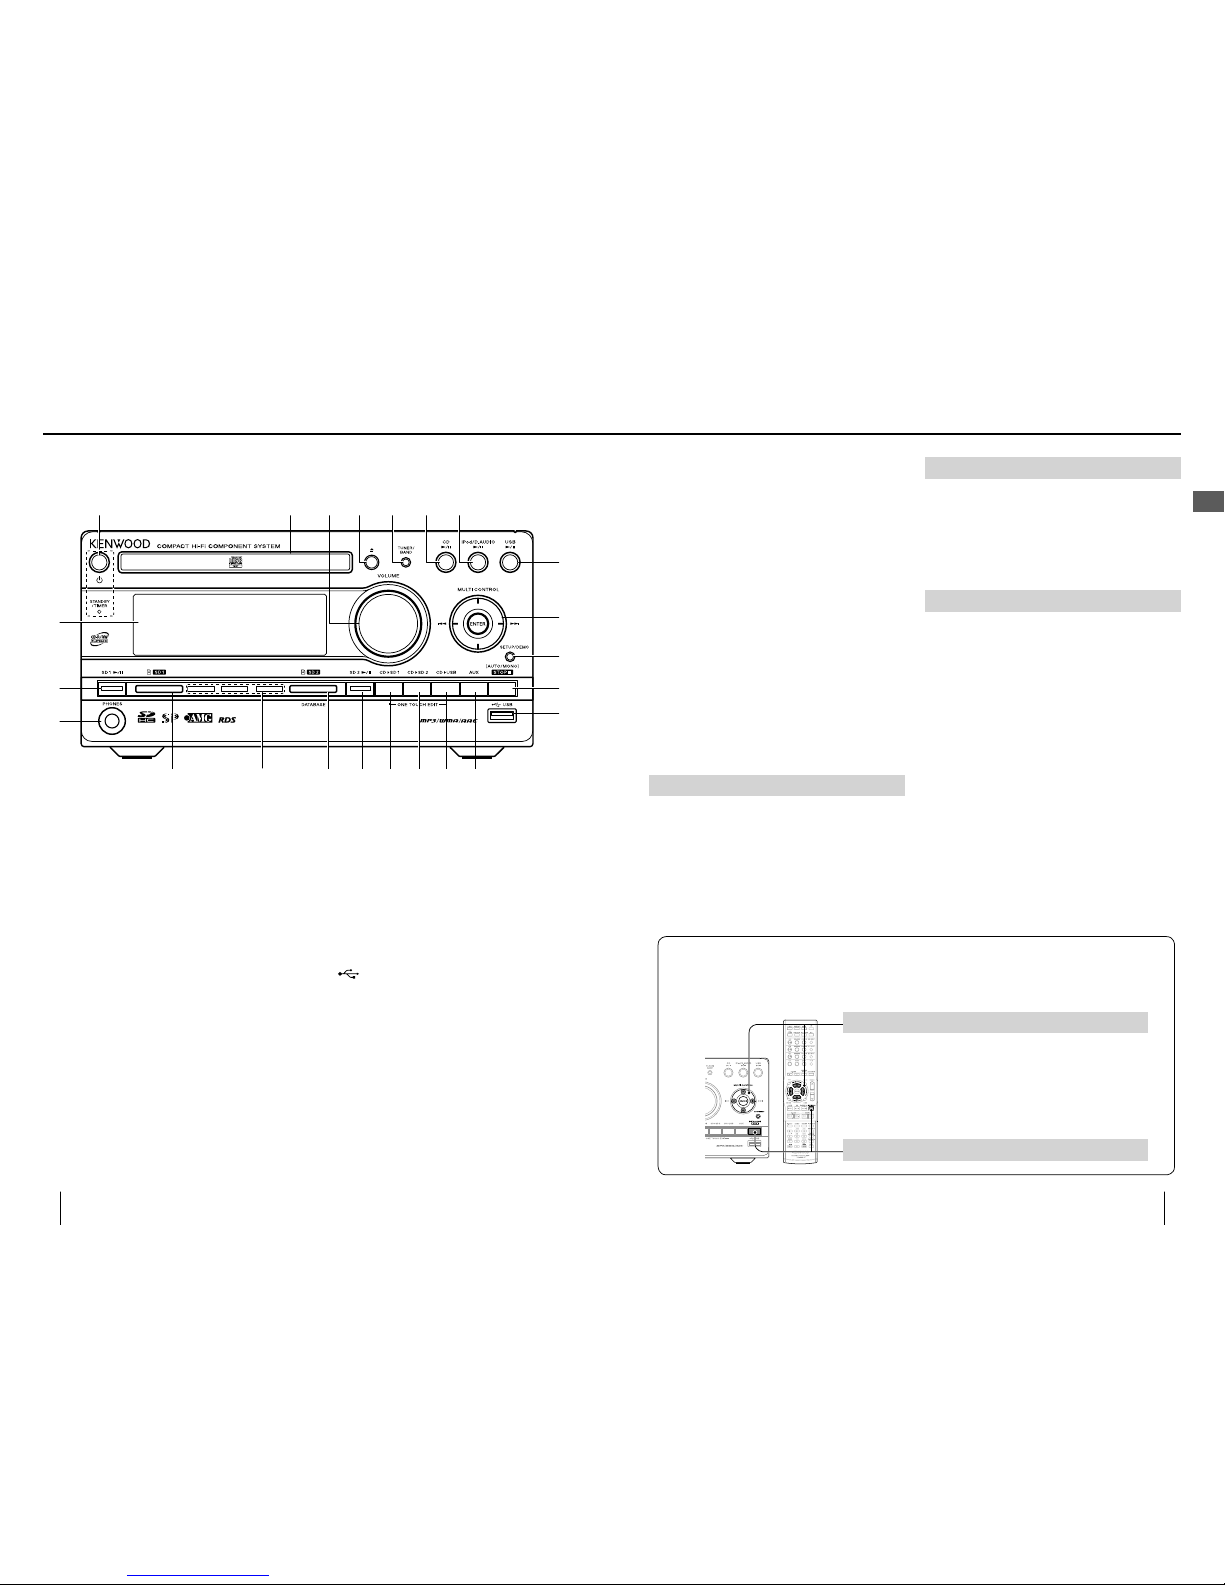
1
K
(page 23)
Press to switch the power of the system ON/OFF
(standby mode).
STANDBY/TIMER indicator
Red lighting: Ordinary standby mode
Orange lighting: Timer standby mode
2
CD tray (page 23)
3
VOLUME (page 22)
4
L
(page 23)
Press to open or close the CD tray.
5
TUNER (page 44)
Press to switch the radio band between FM/AM.
6
CDE (page 28)
Press to start/pause CD playback.
7
iPod/D.AUDIOE (page 40)
Press to start/pause iPod/D.AUDIO playback.
8
USBE (page 36)
Press to start/pause USB playback.
9
MULTI CONTROL
Press to select a track, le or radio station.
Press to fast forward or fast reverse it during
playback.
Press to select a menu item.
ENTER
Press to enter the selected item.
0
SETUP/DEMO
Press to initiate the mode for selecting the function setups.
(page 72-)
Press to switch the demonstration function ON/OFF.
a
STOP
F
Press to stop playback or recording.
When the TUNER input is selected, press to switch
the tuning mode between auto and manual.
Press during a setup to stop it in the middle.
b
USB terminal (page 14)
c
AUX (page 42)
Press to select the AUX source.
d
CDDUSB (page 52)
Press to start One-Touch Edit recording of CD into
USB.
e
CDDSD2 (page 52)
Press to start One-Touch Edit recording of CD into
SD2.
f
CDDSD1 (page 52)
Press to start One-Touch Edit recording of CD into
SD1.
Names and functions of parts
Main unit
Read before use
g
SD2E (page 32)
Press to start/pause SD2 playback.
h
SD2 slot (page 23)
Insert an SD card. This slot is used as the AMG
database slot during CD playback.
i
SD card illumination
The illumination varies as SD playback/record/move
operation advances.
During playback/pause: Blue (Blinks during pause.)
During recording/record-pause: Red (Blinks during recordpause.)
During move: Moving red
j
SD1 slot (page 23)
Insert an SD card.
k
PHONES terminal (page 15)
l
SD1E (page 32)
Press to start/pause SD1 playback.
m
Display (page 18)
Standby mode
When the [STANDBY/TIMER] indicator is lit, a small
amount of power is supplied to the system to operate
the microcomputer. This status is referred to as the
standby mode. In this state, the system can be switched
OFF from the remote control unit.
One-touch operation function
The system incorporates the convenient one-touch
operation function. When the system is in standby
mode, pressing any of [TUNER], [CDE], [iPod/
D.AUDIOE], [USBE], [AUX], [SD1E] and
[SD2E] turns the system ON. Playback also starts if a
button related to CD, SD or USB is pressed.
Demonstration function
This system incorporates a demonstration function
(display only). In the demonstration mode, the lighting
operation indicators vary in sequence but this variation
is accompanied with no change in played audio.
To cancel:
Press [SETUP] on the main unit in the middle of
demonstration.
To start:
When the system is ON, press and hold the [SETUP]
button on the main unit for more than 2 seconds.
The demonstration is switched on automatically when a
power failure occurs or the power cord is unplugged or
plugged in again while the system power is ON.
■
■
•
Uni ed naming on the main unit and remote control unit
In the text describing operations in this manual, the following controls on the main unit and the
remote control unit are expressed as shown below.
[STOPF]
[MULTI CONTROL]
When operation in all of the 4 directions is required: [MULTI CONTROL]
When only the up-down operations are required: [MULTI CONTROL
A/B
]
When only the left-right operations are required: [MULTI CONTROL
C/D
]
•
•
•
18
K-511USB/RD-K 511USB
19
English
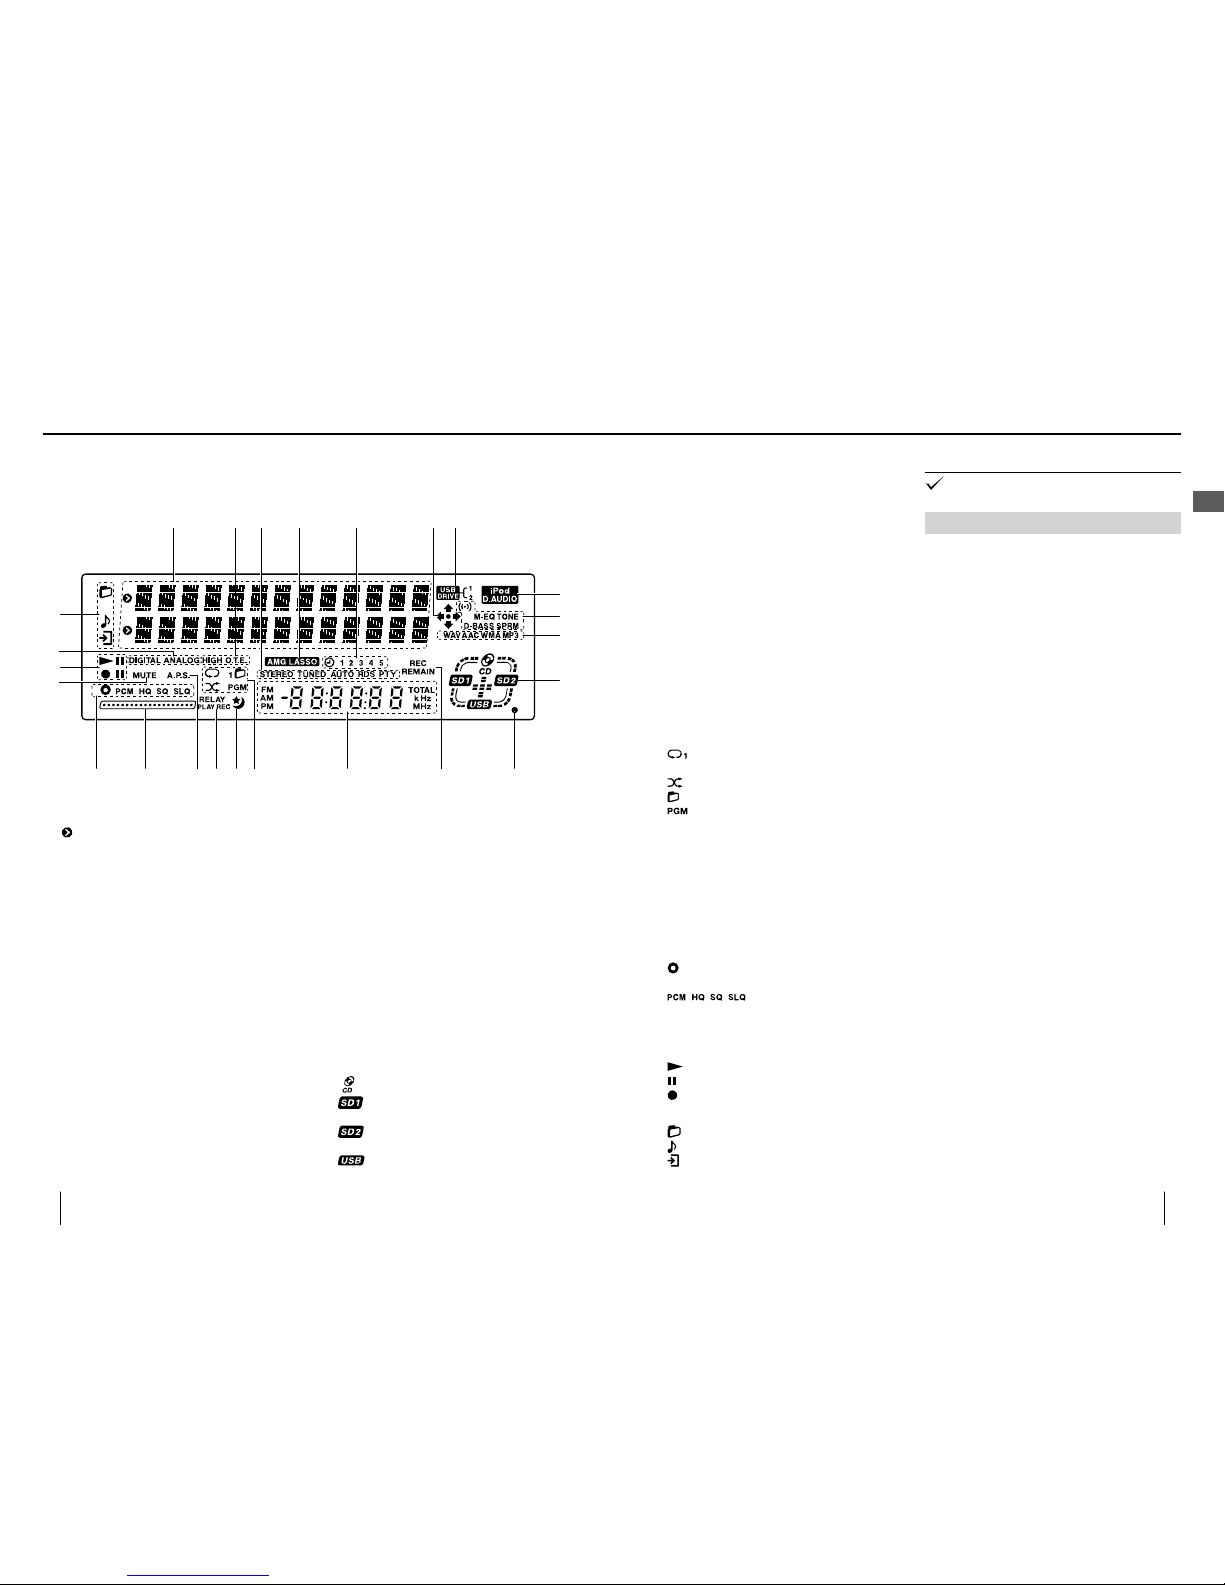
1
Shows the information in alphanumeric characters.
indicates the information being selected.
2
O.T.E. (page 52)
Lights during One-Touch Edit recording.
HIGH (page 87)
Lights during One-Touch Edit recording at the high
speed.
3
STEREO (page 45)
Lights when stereo broadcasting is tuned.
TUNED (page 45)
Lights when a radio station is turned.
AUTO (page 45)
Lights during auto tuning. Does not light in manual
tuning mode.
RDS (page 48)
Lights when an RDS station is tuned.
PTY (page 48)
Lights when PTY is selected.
4
AMG LASSO (page 24)
Lights when an SD card in which the AMG database
is copied is inserted into the SD2 slot.
5
Lights when the program timer is set.
6
The arrows light to indicate the directions
controllable with [MULTI CONTROL] for music
selection, setup or editing.
7
Lights when the connected USB device has two
drives, such as the internal memory and SD card
drives, for example when kenwood MGR-A7 is
connected. The number indicates the drive being
selected on the USB device.
8
Lights when an iPod or kenwood digital audio player
is connected. (page 40)
9
Lights when a SOUND SETUP item is selected. (page
92–)
0
Lights to indicate the type of the audio le being
played.
a
Lights or blinks according to the connection and
recording status of each medium.
: Lights when a disc is inserted.
: Lights when an SD card is inserted in the SD1
slot.
: Lights when an SD card is inserted in the SD2
slot.
: Lights when a USB device is connected.
Display
Names and functions of parts
Read before use
1 2 3 5
8
76
0
a
d cefghi
l
n
j
k
m
9
4
b
b
Lights when HR SOUND is set. (page 99)
c
REC REMAIN (page 66)
Lights when the remaining recording time is
displayed.
d
Shows the time of the day, time information or
frequency.
FM (page 44)
Lights in FM tuning mode.
AM (page 44)
Lights in AM tuning mode.
TOTAL (page 82)
Lights to indicate the elapse time and remaining
time of the disc during CD playback.
kHz
Shows the AM tuning frequency.
MHz
Shows the FM tuning frequency.
e
Lights when a playback mode is set.
: Repeat: Repeat play mode (1 indicates single
repeat.)
: Random play mode
: Folder play mode
: Program play mode
f
Lights when the sleep timer i.e. set.
g
RELAY PLAY: Lights when relay play is set. (page 35)
RELAY REC: Lights when relay recording is set.
(page 91)
h
A.P.S. (page 76)
Lights when Auto Power Save is set.
i
Shows the progress of recording.
j
Shows the SD or USB recording mode.
: Lights when another source is played during
recording. (page 58)
:
Indicate the recording mode. (page
86)
k
MUTE (page 22)
Blinks when muting is activated.
l
: Lights during playback.
: Lights during pause.
: Lights during recording.
m
Indicates the recording signal. (page 88)
n
: Lights when a folder is selected.
: Lights when a le is selected.
: Lights during setup or tool editing operation.
The display illustrations shown in this manual may di er
from actual display.
Resume function
When the source of playback is switched from CD-ROM,
SD or USB to another input source, pressing [CDE],
[SDE] or [USBE] results the playback of the
previous source from the point that has been played
before the source switching.
•
3
7
8
0
b
c
e
f
g
h
i
j
l
m
o
q
k
R
s
t
u
v
w
x
y
z
A
9
a
d
2
1
n
p
6
5
4
20
K-511USB/RD-K 511USB
21
English
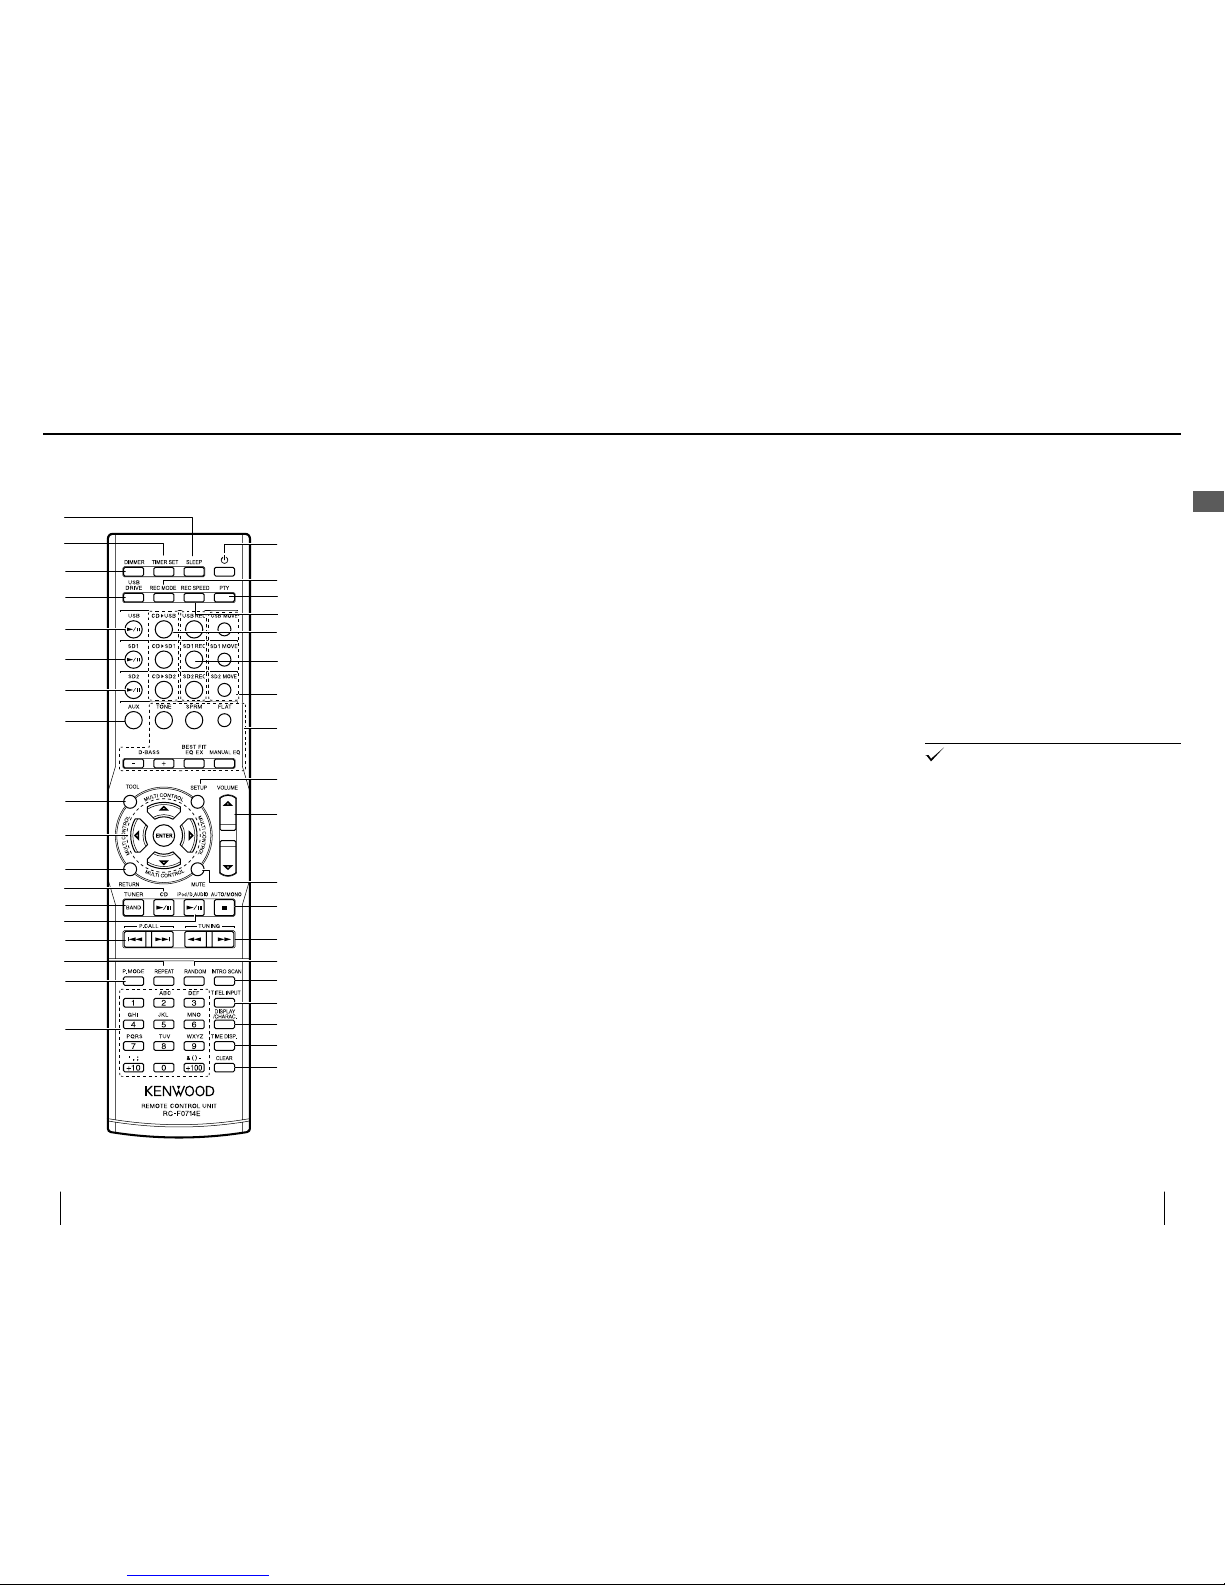
Remote Control Unit
1
K
(page 23)
Press to switch the power of the system ON/OFF
(standby mode).
2
REC MODE (page 86)
Press to set the recording mode used in recording.
3
PTY (page 48)
Performs PTY search.
4
REC SPEED (page 87)
Press to set the speed of One-Touch Edit recording.
5
Press to start O.T.E. recording of a CD to SD1/SD2/
USB.
6
Press to start recording in SD1/SD2/USB.
7
Press to move a le or folder between SD1/SD2/USB.
SD1 MOVE :
Moves into SD1
.
SD2 MOVE :
Moves into SD2
.
USB MOVE
: Moves into USB
.
8
Press to set TONE, SPRM, FLAT, D -BASS +/−, BEST
FIT EQ EX and MANUAL EQ. (page 92-)
9
SETUP (pages 72, 84, 92)
Press to set up the system of this unit.
0
VOLUME A/B (page 22)
Press to adjust the listening volume.Pressing A
increases the volume and pressing B decreases the
volume.
a
MUTE (page 22)
b
STOP
F
c
TUNINGI/
J
Press to fast forward or fast reverse music.
When the tuner source is selected, press to select a
broadcasting station. (page 45)
d
RANDOM (pages 29, 33, 37)
Press to start random playback.
e
INTRO SCAN (page 35)
Press to play the rst 10 seconds of every le in SD.
f
TITLE INPUT (page 62)
Press to rename music les or folders.
Names and functions of parts
Read before use
g
DISPLAY/CHARAC.
Press to switch the information shown on the
display. (page 82)
Press during title input to switch the character
group. (page 64)
h
TIME DISP. (page 82)
Press to switch the time information on the display.
i
CLEAR
Press to clear a program or preset radio stations.
Press during title input to clear a character. (page
64)
j
Numeric buttons
Press to select music or broadcasting station.
Press during title input to input desired characters.
(page 64)
k
P.MODE (page 30, 34, 38)
Press to switch the playback mode.
l
REPEAT (pages 29, 33, 37)
Press to start repeat playback.
m
P.C ALLG/
H
Press to skip an audio le/track.
When the tuner source is selected, press to select a
broadcasting station. (page 44)
n
iPod/D.AUDIOE (page 40)
o
TUNER (page 44)
p
CDE (page 28)
q
RETURN (pages 70, 72, 84, 92)
Press during menu selection to return to the
previous operation.
r
MULTI CONTROL A/B/C/
D
Press to select music or music le.
Press to select an item.
ENTER
Press to enter the selected item.
s
TOOL (page 70)
Press to start editing operations.
t
AUX (page 42)
u
SD2E (page 32)
v
SD1E (page 32)
w
USBE (page 36)
x
USB DRIVE (page 37)
When the connected USB device has two drives,
such as the internal memory and SD card drives,
for example when kenwood MGR-A7 is connected,
press to select the drive to be used.
y
DIMMER (page 75)
Press to adjust the display brightness.
z
TIMER SET (page 78)
Press to reserve recording of radio broadcasting or
playback of music at the speci ed time of the day
on the speci ed day(s) of the week.
A
SLEEP (page 74)
Press to set the sleep timer.
The buttons having the same names as the buttons on
the main unit function in the same way as the main unit
buttons with the same times.
•
123
3
Adjusting the volume
Adjust using [VOLUME]
Decreasing the
volume level
Increasing the
volume level
Increasing the
volume level
Decreasing the
volume level
Adjust in the range from 0 to 40 (max.).
Turning the knob quickly (on the main unit) or
holding a button depressed (on the remote control
unit) accelerates the volume variation speed.
•
Muting the audio temporarily
Press [MUTE].
"MUTE" blinks on the display.
To cancel muting
Press [MUTE] again (this resumes the original
volume) or adjust the volume.
■
2
3
22
K-511USB/RD-K 511USB
23
English
1
Turn the system ON (OFF).
Press [K].
Pressing the play/pause button of the desired audio
input source also turns the system ON. (page 17,
"One-touch operation function")
Pressing [K] while the system is ON switches it OFF
(standby mode).
2
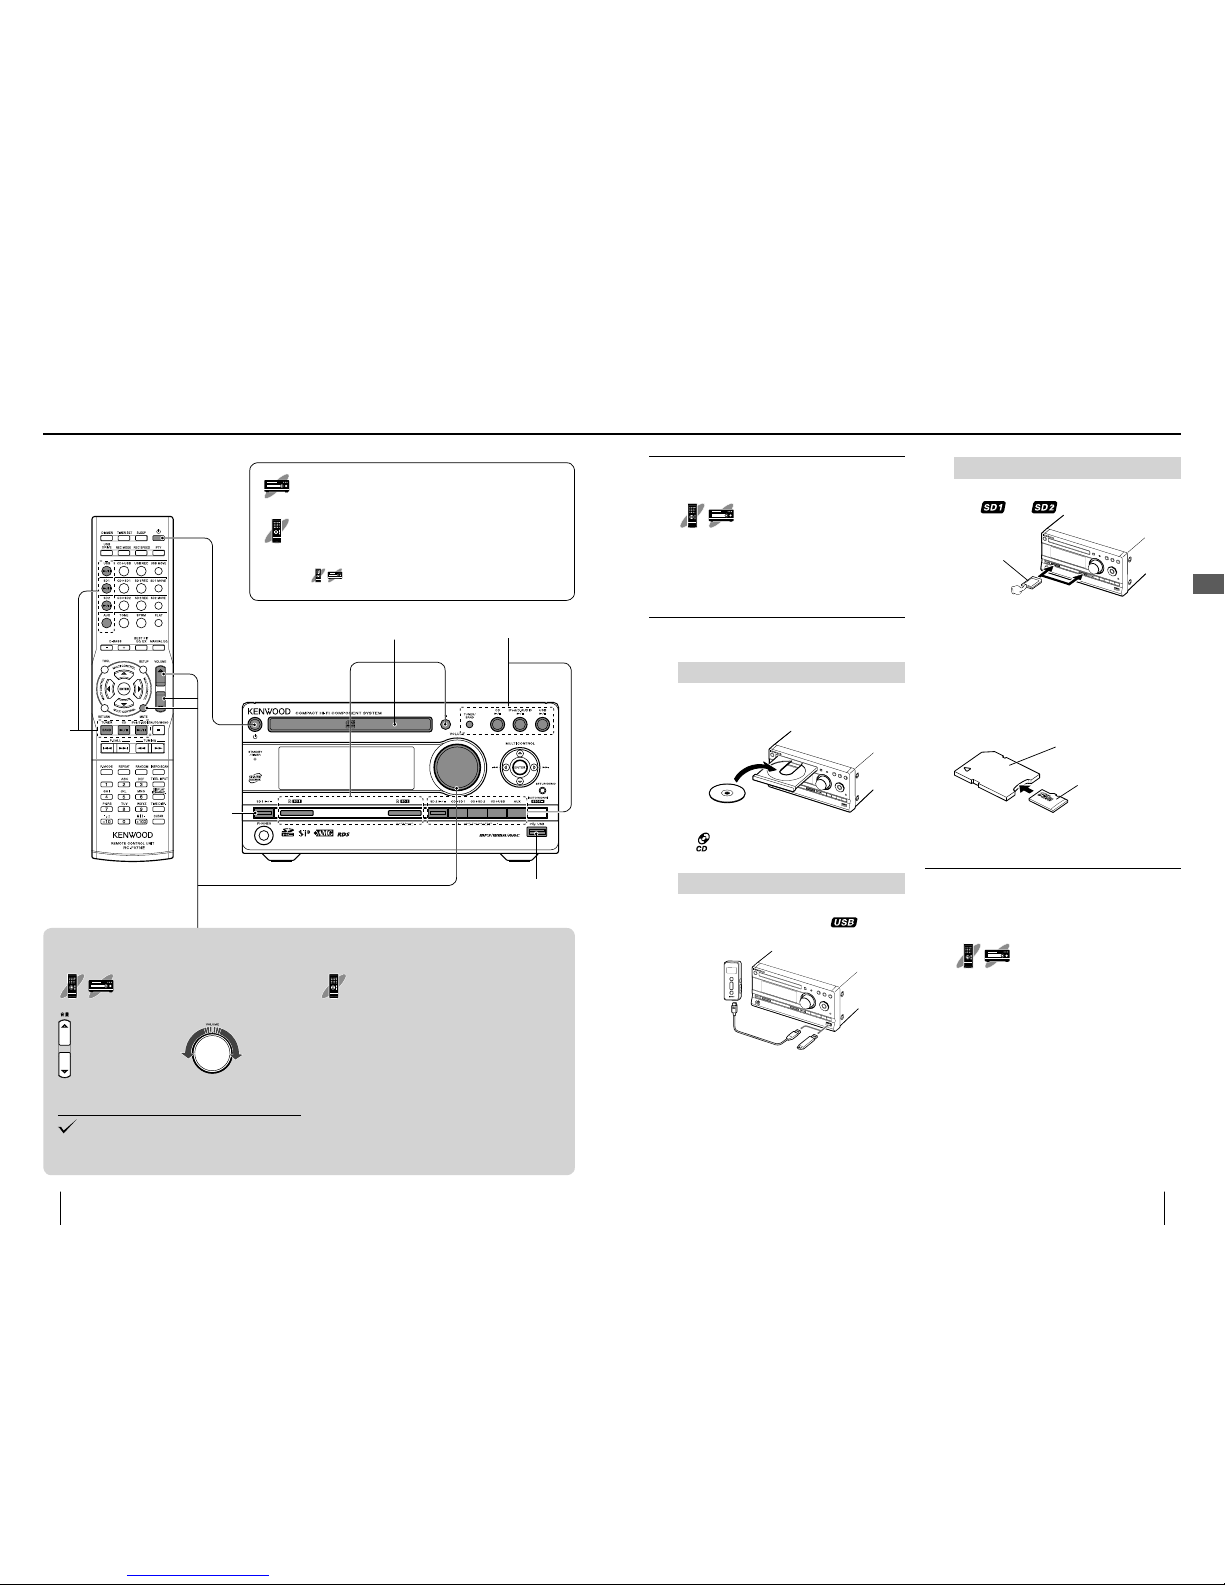
Set the source to be played.
How to load a CD
1
Press [L] on the main unit to open the tray.
2
Place a disc with the label side facing up.
3
Press [L] on the main unit to close the tray.
"
" is displayed.
How to connect a USB device
Hold the device in the correct orientation and
insert the connector all the way. " " is
displayed.
To disconnect the USB device:
After stopping, set the system to the standby
mode and pull out the USB device.
•
•
■
How to load an SD card
Insert the card completely into the SD1 or SD2
slot. "
"
or " " is displayed.
Be careful of
orientation.
Insert the SD card so that the label side faces up and
the side with a cut comes on the right.
To remove the SD card:
After stopping, set the system to the standby
mode and push the SD card. When it pops out,
grasp it and pull out.
To use a mini SD or micro SD card:
microSD card
adapter
microSD card
Attach the card to a special adapter (commercially
available) and insert it. The adapter is inserted in the
same orientation as the SD card.
3
Start playback.
Press the play/pause button of the desired audio
source.
[CDE], [USBE],
[SD1E], [SD2E], [TUNER],
[iPod/D.AUDIO], [AUX]
Note on audio source switching
Since this system is compatible with various audio
sources (CD, SD card, USB device, etc.), the input
selection is not switched by simply setting the
audio source in the system.
In this manual, the operation of switching the input
selector is expressed as "audio source switching".
Whenever this instruction is given, press the play button
for the desired audio source. The switching operation
should sometimes be started from stop mode.
•
■
■
•
■
Basic Operation
This symbol indicates an operation on the main unit. When
it is marked, perform the operation by pressing the required
button(s) on the main unit.
This symbol indicates an operation on the remote control
unit. When it is marked, perform the operation by pressing the
required button(s) on the remote control unit.
When both are marked for an operation, it can be controlled either
on the main unit or the remote control unit.
Playing music tracks
24
K-511USB/RD-K 511USB
25
English
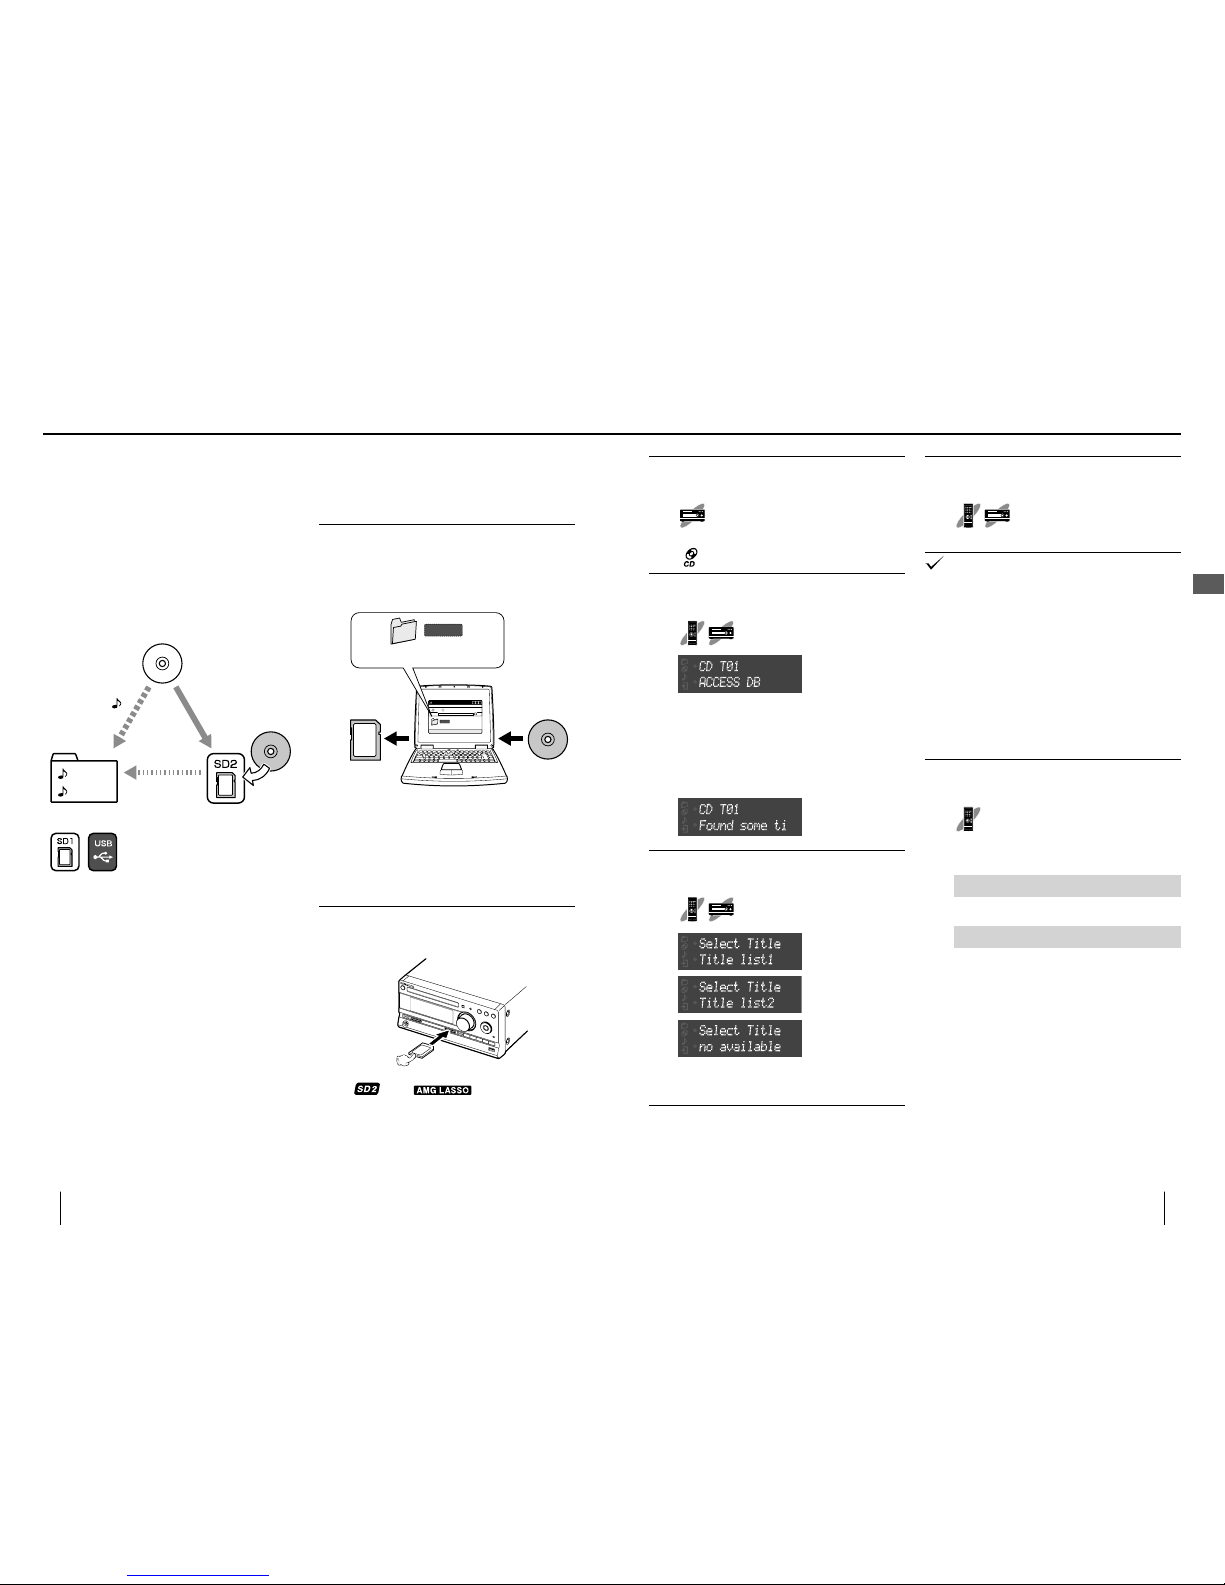
3
Load a CD.
Press [L] to open the tray and place
a CD.
" " is displayed.
4
Start playback.
Press [CDE].
When the CD starts to be played, the AMG
database in the SD card is searched using the
TOC information of the CD and, if the applicable
information is found, it is shown on the display. If
the AMG database contains more than one items
of applicable information, you can select one of
them and use it with the system.
5
Select the candidate information.
Press [MULTI CONTROL A/B].
If "no available" is selected, the information of the
AMG database will not be displayed.
6
Enter the selected candidate.
Press [ENTER].
With certain CDs, the title information of a CD having
similar TOC information may be acquired.
Do not attempt to record anything in the SD card
containing a copy of the AMG database. Otherwise, the
AMG database search will take a longer period.
The non-displayable character is displayed as "*".
When there is only one candidate, the candidate is
selected and entered automatically.
Switching the displayed
information
The acquired title information is displayed.
1
Switch the displayed information.
Press [DISPLAY/CHARAC.].
Each press switches the displayed information in
the following sequence.
Stop mode
Disc title R Artist R Genre R Day of week/time
Play mode
Disc title R Track title
R
Artist R Genre R Day of week/time
•
•
•
•
Acquiring the CD title information
AMG database
When a CD is played, the AMG Database can be used
to search the title information of the CD based on its
TOC (Table Of Contents) information and to acquire
information including the album name, track names and
artist name.
When the CD is recorded into SD or USB, the title
information is added to the recorded les so that it is not
necessary to input the information written on the album
manually.
CD
XXXXX
Music
AMG database
CD
XXXXX
TOC data
AMG database
and matching
Auto acquisition of
album information
Even when the played CD is a CD-TEXT disc (a CD
containing recording of character information on the
titles and artist), the information acquired from the AMG
database is displayed in priority.
The AMG database is updated periodically. The updating
allows the users to acquire the title information of even
latest albums.
•
•
How to use the AMG database
The title information can be acquired automatically
when the CD source is selected and a CD is loaded.
1
Copy the provided AMG Database
CD into an SD card.
Copy using a PC.
(The copy takes about 10 minutes.)
AMG
AMG
ファイル(F) 編集(E) 表示(V)
AMG
Copy the entire folder.
SD card AMG database
CD
Your PC
For how to copy the data, refer to the manuals
provided with your PC.
For accommodating the database, it is recommended
to use an SD or SDHC card with a capacity of 2 GB or
more (transfer rate Class 4 or higher).
2
Insert the SD card containing the
copy in the SD2 slot.
" " and " " are displayed.
Always insert the SD card containing a copy of the
AMG database in the SD2 slot.
•
•
Playing music tracks
26
K-511USB/RD-K 511USB
27
English
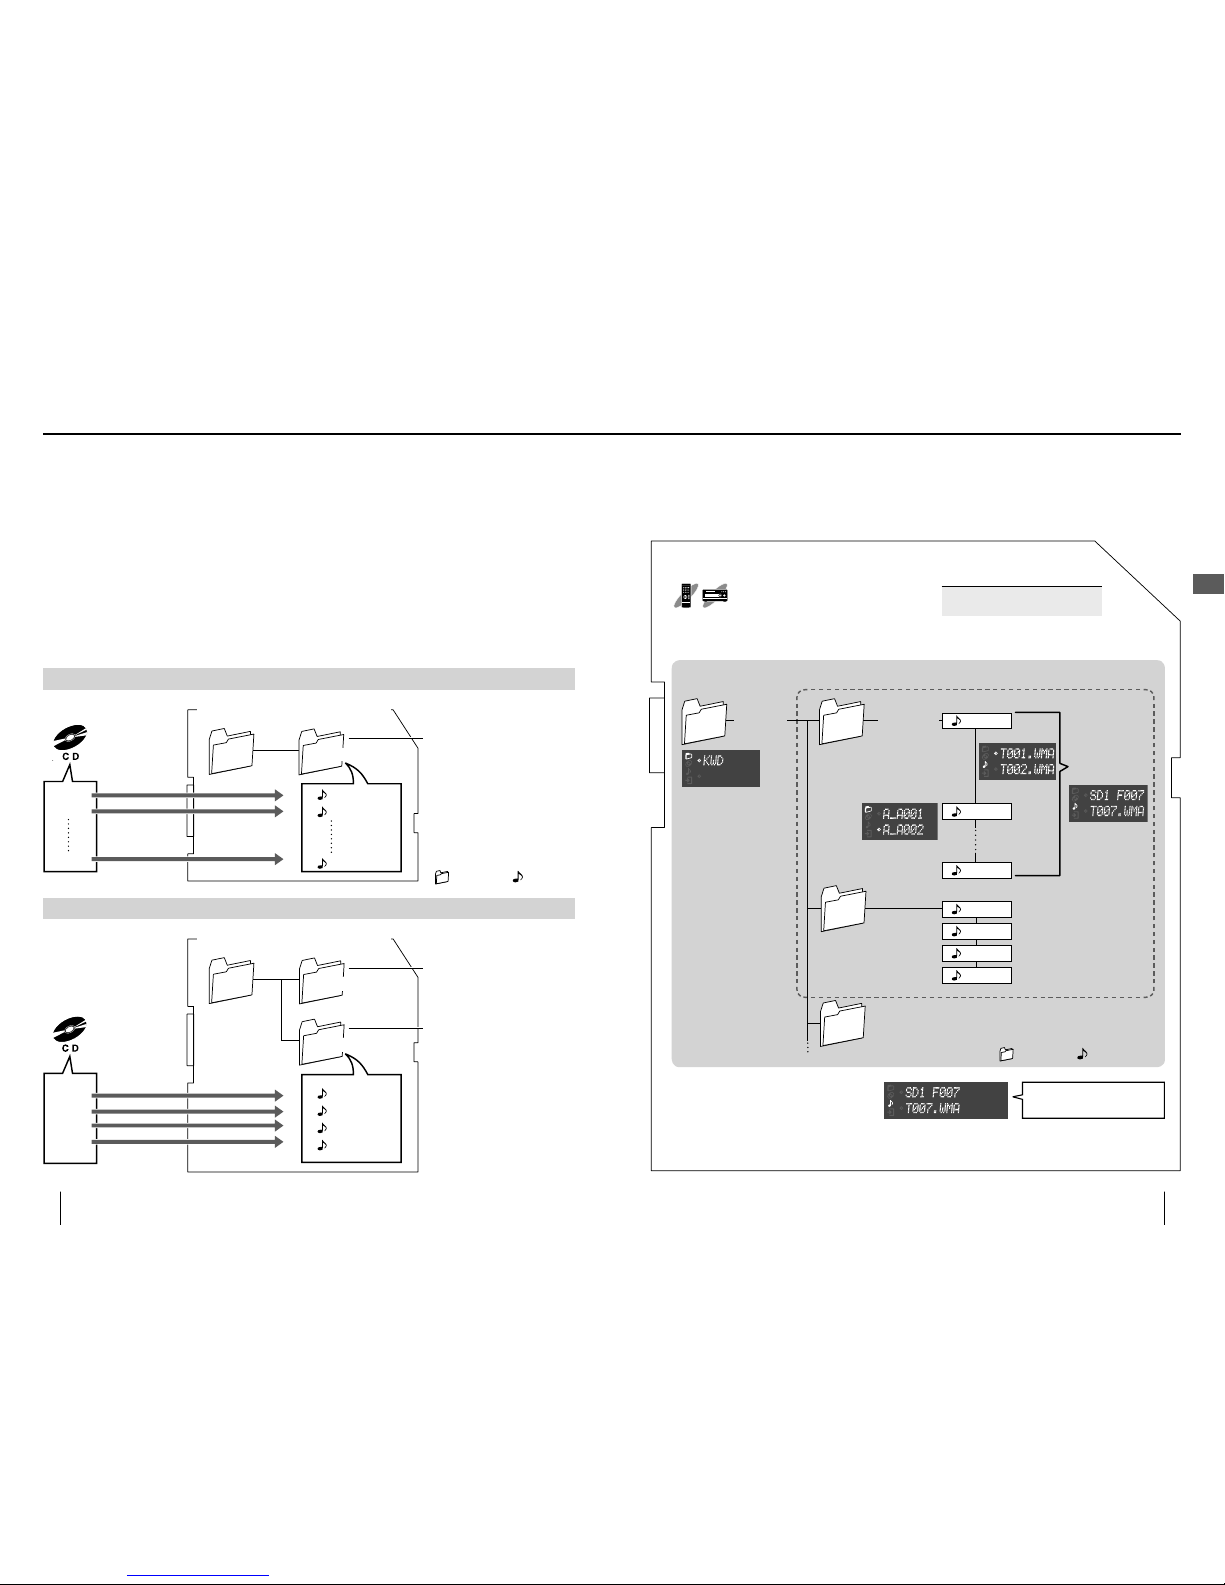
When an SD card or USB card is recorded using this system:
The les recorded into an SD card or USB device using this system are grouped in folders, and management numbers
are automatically given to the created folders and les.
Management number given automatically to a folder: A_A001…A_A999…A_Z999
Management number given automatically to a le: T001.WMA, T002.WMA……
When a folder is recorded after the title information has been acquired from the AMG database, the album name is attached automatically
after the management number of the le, and the lename is attached automatically after the management number of each le.
This system uses the WMA and WAV formats for recording audio into the SD card and USB device.
When a CD is recorded:
T001_title.WMA
T002_title.WMA
T011_title.WMA
Inside of the SD card or USB device
KWD
A_A001_albumname
Track 1
Track 2
Track 11
AL_A001 folder is automatically
created.
*
When an SD card or USB device is
recorded for the rst time using this
system, the KWD folder is created
automatically. The folders and les
recorded hereafter are managed in
the KWD folder.
*
When the desired tracks of another CD are recorded after the above:
AL_A002 folder is newly created.
KWD
A_A001_albumname
A_A002_albumname
Inside of the SD card or USB device
Track 3
Track 5
Track 8
Track 9
AL_A001 folder created in
previous recording.
T001_title.WMA
T002_title.WMA
T003_title.WMA
T004_title.WMA
•
•
•
Folders and music les
: Folder
: File
How to select a folder and/or le
With this system, the music recorded in the CD-ROM, SD card, USB device or digital audio player is referred to as
"audio le(s)" or " le(s)".
The folder and le can be selected as follows.
Use [MULTI CONTROL] for selection, then
press [ENTER] to enter the selection.
*
FXXX indicates the order of each le. The
folders and les are numbered automatically
according to the positions in their orders.
Pressing the numeric buttons of the remote
control unit makes it possible to start
playback from the selected le. (pages 33, 37)
Examples) F007: [7]
F102: [+100], [2]
Numbers of folders and les that can
be accommodated in the KWD folder
Folder .........................200
File ............................1000
To check the numbers of available folders
and les, see "Checking the remaining
SD/USB recording time". (page 68)
*
Select the le
and press [ENTER]
to start playback.
Move using [MULTI
COTROL A/B].
Move using
[MULTI
CONTROL
C/D
].
Move using
[MULTI
CONTROL
A/B
].
Move using [MULTI
CONTROL A/B] .
Move using [MULTI CONTROL
A/B
] .
Move using
[MULTI
COTROL C/D].
KWD
A_A001
A_A002
A_A003
T001.WMA
T011.WMA
T002.WMA
T001.WMA
T002.WMA
T003.WMA
T004.WMA
Move using
[MULTI
CONTROL
C/D
].
: Folder
: File
Playing music tracks
Numeric
ENTER
P.M O D E
G/H
CD
E
CLEAR
TIME DISP.
DISPLAY/
CHARAC.
REPEAT
RANDOM
STOP
F
I/J
MULTI CONTROL
28
K-511USB/RD-K 511USB
29
English
Button operations during playback/stop
To Operation
Switch the display
information
Press [DISPLAY/CHARAC.] during playback or stop.
Each press switches the displayed information.
(page 82)
Switch the time
display information
Press [TIME DISP.].
Each press switches the displayed information. (page 82)
Stop
Press [STOPF] during playback.
Pause
Press [CDE] during playback.
Press again to resume playback.
Select a track
Press the numeric button(s).
File number selection methods : 7th file R Press [7].
12th file
R
Press [+10], then [2].
Selecting a folder
(
audio le disc
)
Press [MULTI CONTROL A/B].
Fast forward/fast
reverse
Press [I]/[J] during playback.
Press and hold [MULTI CONTROL C/D] during playback.
Skip a track
Press [CDH].
Press [MULTI CONTROL D].
Return to previous
track
Press [G] successively twice or more.
Press [MULTI CONTROL C] successively twice or more.
Return to the
beginning of current
track
Press [G] once.
Press [MULTI CONTROL C1] once.
Start random
playback
(Playing music in a
random order)
Press [RANDOM].
Each press switches the
selection.
lit Not lit
Random
playback ON
Random
playback OFF
When [REPEAT] is pressed in the middle of random playback, random playback in a
di erent order of audio les will start af ter the current random playback has completed.
It is not possible to skip to already played music during random playback.
•
•
Start repeat
playback
(Playing music
repeatedly)
Press [REPEAT].
Each press switches the
selection.
lit lit Not lit
Repeat playback
of single music
le/track.
Repeat playback
of all music les/
tracks.
Repeat playback
canceled.
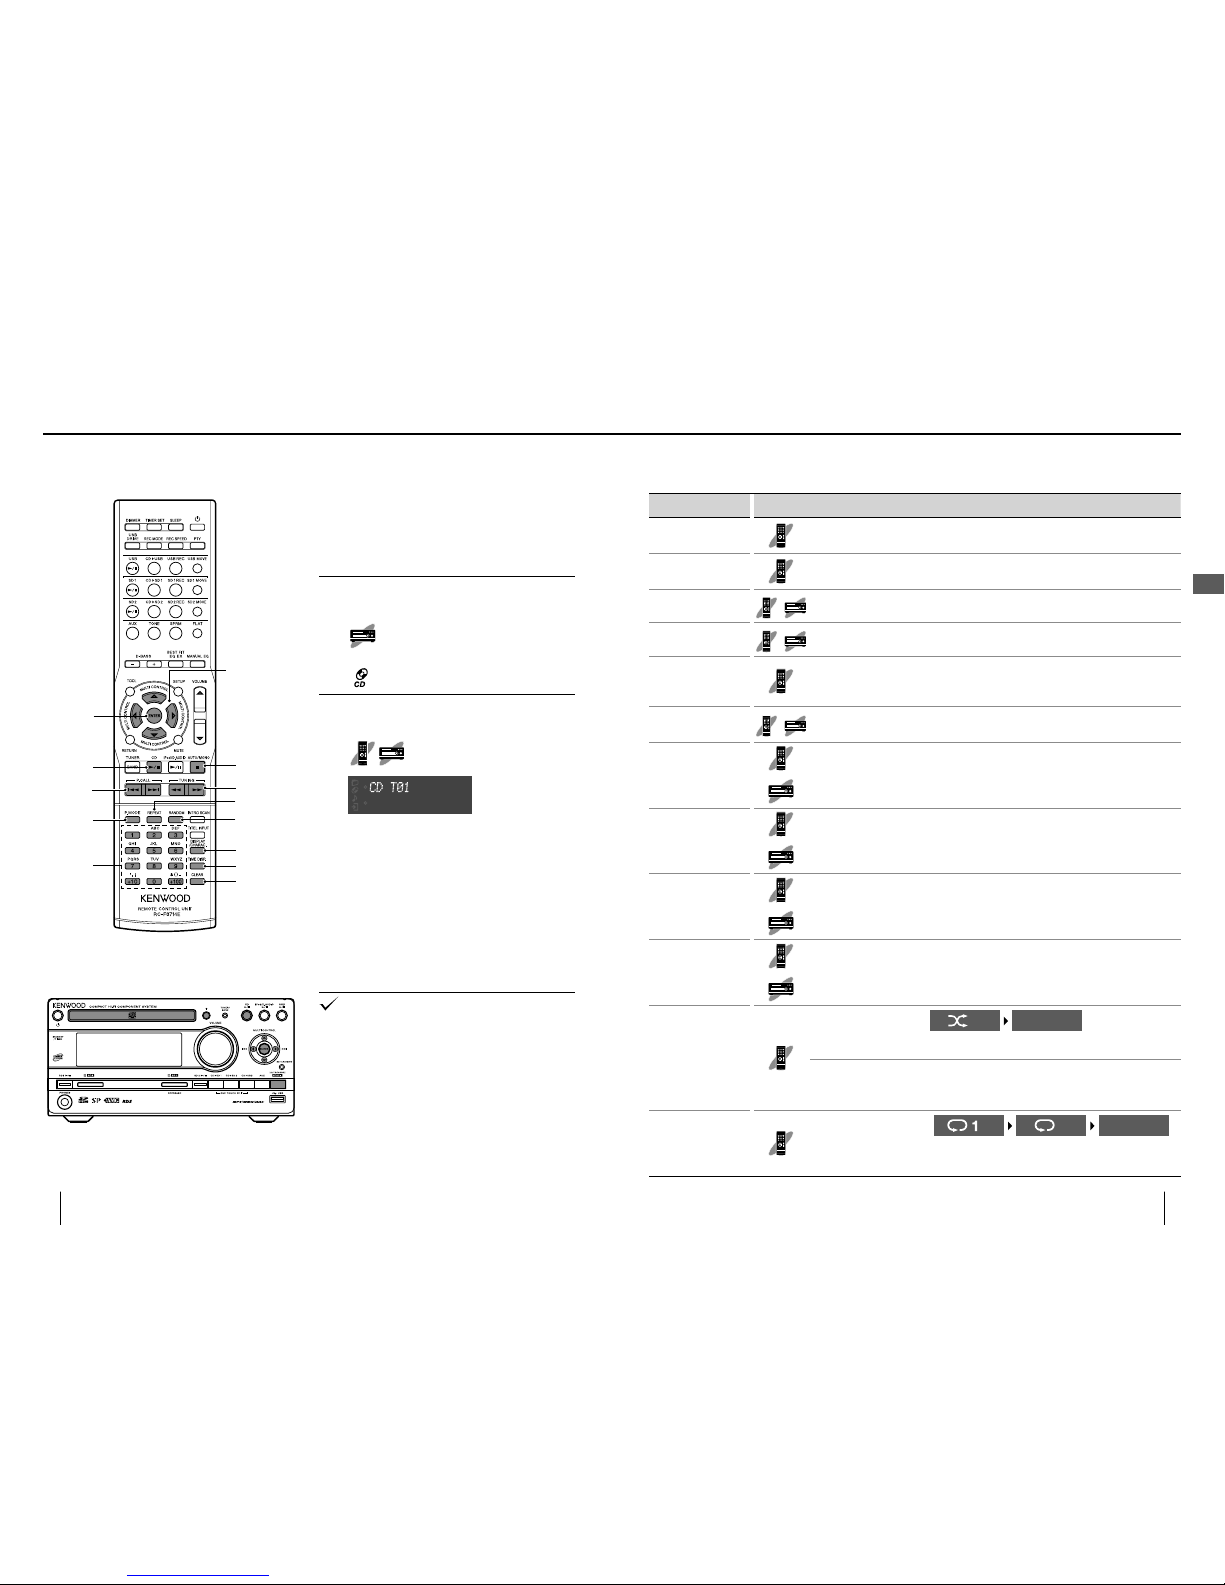
Playing a CD or audio le disc
A CD or a CD-ROM/CD-R/CD-RW containing audio
les (WMA/MP3/AAC) can be played as described
below.
For the playable les, see "Playable audio les". (page 102)
Playback
1
Load a CD.
Press [L] to open the tray and place
a CD.
" " is displayed.
2
Start playback.
Press [CDE].
When a CD is played:
The CD is played from the rst track.
When a disc containing audio les is played, the
folders and les are searched and playback is
started with the le with the smallest le number.
For the sequence of playback in case multiple folders
and/or les are present, see page 103.
To acquire the CD title information automatically:
Insert the SD card containing a copy of the AMG
database in the SD2 slow. See page 24 for details.
With a CD-TEXT compatible disc, character information
including the track title and album title is displayed.
When the AMG database is used, the information
acquired from it is given the priority.
The audio is interrupted if [REC INPUT] is switched
during playback. (page 88)
•
•
■
•
•
•
Playing music tracks

30
K-511USB/RD-K 511USB
31
English
Audio le disc operation
Press [MULTI CONTROL] or the
numeric button(s) to select the
folder, then press [ENTER].
Press [MULTI CONTROL] or the
numeric button(s) to select the le,
then press [ENTER].
Use [MULTI CONTROL] to selec t, then
press [ENTER].
Use [MULTI CONTROL] to selec t, then
press [ENTER].
When the 4th le in
folder "005" (T002.WMA)
is selected as the rst
track of the program:
If you committed a mistake in selection, press
[CLEAR] on the remote control unit before
pressing [ENTER] and restart selection.
Up to 32 les can be programmed.
3
End the programming.
Press [STOPF].
4
Start playback.
Press [CDE].
To clear a music le from the program
Stop playback and press [CLEAR] on the remote
control unit. Each press clears the currently last
track in the program.
To add a track in the program
If playback is underway, stop it and perform steps
2 and after.
To cancel program playback
Stop playback and press [P.MODE] to select the normal
play mode. The program is cleared at this time.
•
■
■
■
Turning the system OFF or taking out a CD with program
playback set erases the set program.
•
Program playback
Music in a CD or audio le disc can be played in the
order programmed by the user.
Select the CD source and enter stop mode.
1
Select "PGM" (program play mode).
Press [P.MODE].
Each press switches the selection.
CD operation
Program play mode
PGM
lit
Normal play mode
Not lit
Audio le disc operation
Folder play mode
Program play mode
PGM
lit
N
lit
Normal play mode
Not lit
2
Select a le.
CD operation
Press [MULTI CONTROL A/B] or
the numeric button(s) to select, then
press [ENTER].
Use [MULTI CONTROL] to selec t, then
press [ENTER].
When the 7th le is
selected as the rst le
of the program:
•
Folder play mode
Audio le disc only
The system can be set to a mode for playback per
folder. In this mode, the system plays only the
selected folder and stops after all of its les have
been played.
Select the CD source and enter stop mode.
1
Select "N" (folder play mode).
Press [P.MODE].
Each press switches the selection.
Folder play mode
Program play mode
PGM
ON
N
lit
Normal play mode
Not lit
2
Select the folder to be played.
Press [MULTI CONTROL A/B].
3
Start playback.
Press [CDE].
To cancel the folder play mode:
Stop playback and press [P.MODE] to select the
normal play mode.
•
■
Playing a CD or audio le disc
Playing music tracks
Numeric
P.M O D E
REPEAT
STOP
F
ENTER
CLEAR
TIME DISP.
DISPLAY/
CHARAC.
RANDOM
INTRO SCAN
SD1
E
SD2
E
G/H
I/J
MULTI CONTROL
32
K-511USB/RD-K 511USB
33
English
Button operations during playback/stop
To Operation
Switch the display
information
Press [DISPLAY/CHARAC.] during playback or stop.
Each press switches the displayed information. (page 82)
Switch the time
display information
Press [TIME DISP.].
Each press switches the displayed information. (page 82)
Stop
Press [STOPF] during playback.
Pause
Press [SD1E] or [SD2E] during playback.
Press again to resume playback.
Select a track
Press the numeric button(s).
File number selection methods: 7th file R Press [7].
12th file
R
Press [+10], then [2].
Select a folder and/
or le
Press [MULTI CONTROL].
Fast forward/fast
reverse
Press [I]/[J] during playback.
Press and hold [MULTI CONTROL C/D] during playback.
Skip a le/track
Press [H].
Return to previous
le/track
Press [G] successively twice or more.
Return to the
beginning of current
le/track
Press [G] once.
Start random
playback
(Playing music in a
random order)
Press [RANDOM].
Each press switches the
selection.
lit Not lit
Random
playback ON
Random
playback OFF
When [REPEAT] is pressed in the middle of random playback, random playback
in a di erent order of audio les will start af ter the current random playback has
completed.
It is not possible to skip to already played le/track during random playback.
•
•
Start repeat
playback
(Playing music
repeatedly)
Press [REPEAT].
Each press switches the
selection.
lit lit Not lit
Repeat playback
of single music
le/track.
Repeat playback
of all music les/
tracks.
Repeat playback
canceled.
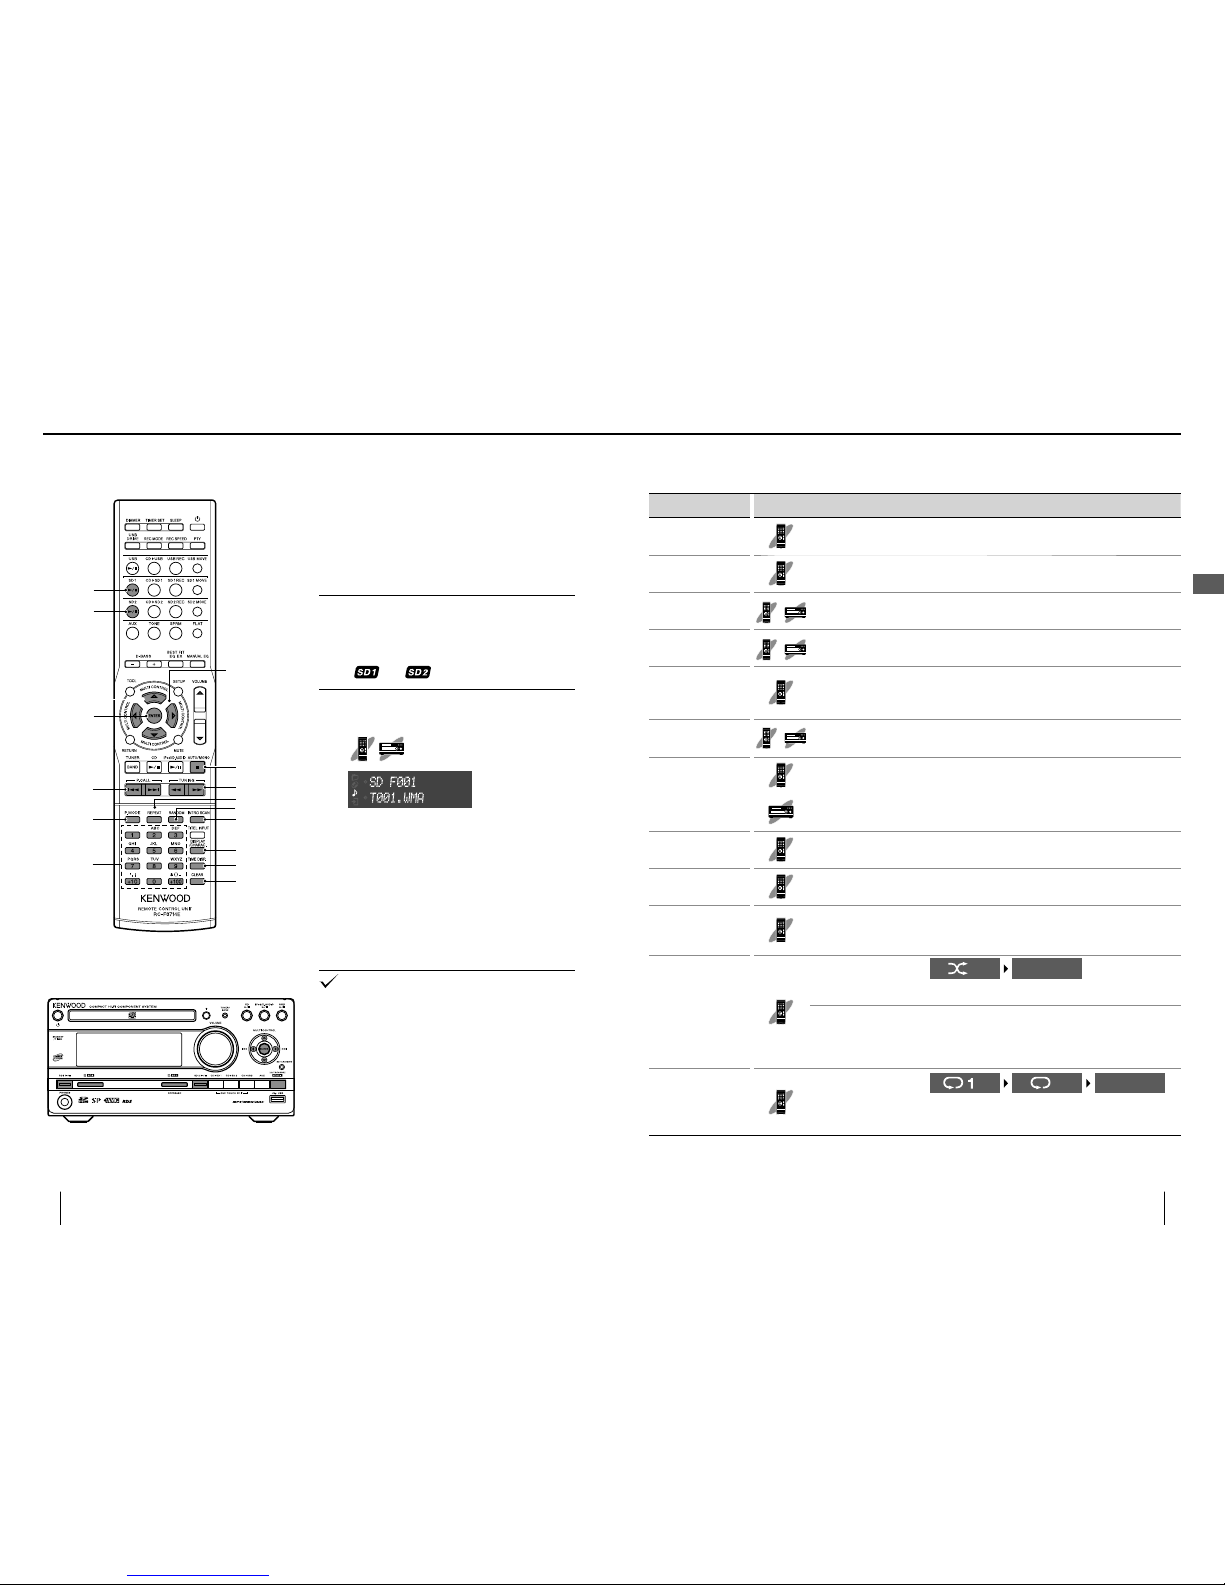
Playing an SD card
The audio les in an SD card can be played as
described below.
The SD1 and SD2 slots can be used exactly in the
same way.
For the playable les, see "Playable audio les". (page 102)
Playback
1
Insert the SD card.
Insert the SD card in the SD1 or SD2 slot of the
main unit.
"
" or " " is displayed.
2
Start playback.
Press [SD1E] or
[SD2E].
The folders and les are searched and playback is
started with the le with the smallest le number.
For the sequence of playback in case multiple folders
and/or les are present, see page 103.
To remove the SD card:
After stopping, set the system to the standby
mode and push the SD card. When it pops out,
grasp it and pull out.
Playback does not start if there is no playable le in the
card.
•
•
■
•
Playing music tracks
34
K-511USB/RD-K 511USB
35
English
3
Start playback.
Press [SD1E] or
[SD2E].
To clear a music le from the program
Stop playback and press [CLEAR]. Each press
clears the currently last track in the program.
To add an audio le in the program:
If playback is underway, stop it and perform steps
2 and after.
To cancel program playback:
Stop playback and press [P.MODE] to select the
normal play mode. The program is cleared at this
time.
The program is cleared when the system is turned OFF
or the SD card used in programming is disconnected.
Relay playback of two SD cards
Two SD cards can be played successively in order
from SD1 to SD2 or from SD2 to SD1.
Select the SD source and enter stop mode.
1
Select "RELAY PLAY" (relay play
mode).
Press [P.MODE].
Each press switches the selection.
Folder play mode
Program play mode
PGM
ON
N
ON
Relay play mode
RELAY PLAY
ON
Normal play mode
Not lit
■
■
■
•
•
2
Start playback.
Press [SD1E] or
[SD2E].
To cancel relay playback:
Stop playback and press [P.MODE] to select the
normal play mode.
Intro Scan playback
Intro Scan plays the rst 10 seconds of every audio
le. This makes it possible to select the desired
audio le from the introduction part and play the
entire le in normal playback.
Select the SD source and enter stop mode.
1
Select the Intro Scan play mode.
Press [INTRO SCAN].
2
When the introduction of the
desired le is played, select it.
Press [ENTER].
Intro Scan playback completes and normal
playback starts.
Editing operations such as le deletion, renaming and
moving are possible even in the middle of Intro Scan
playback.
Intro Scan can also be started from the Tool menu. (page
70)
■
•
•
•
Folder play mode
The system can be set to a mode for playback
per folder.In this mode, the system plays only the
selected folder and stops after all of its les have
been played.
SD1 and SD2 can be set separately.
Select the SD source and enter stop mode.
1
Select "N" (folder play mode).
Press [P.MODE].
Each press switches the selection.
Folder play mode
Program play mode
PGM
lit
N
lit
Relay play mode
RELAY PLAY
ON
Normal play mode
Not lit
2
Select the folder to be played.
Press [MULTI CONTROL].
For how to select it, see "Folders and les" on page
26.
3
Start playback.
Press [SD1E] or
[SD2E].
To cancel the folder play mode:
Stop playback and press [P.MODE] to select the
normal play mode.
•
•
■
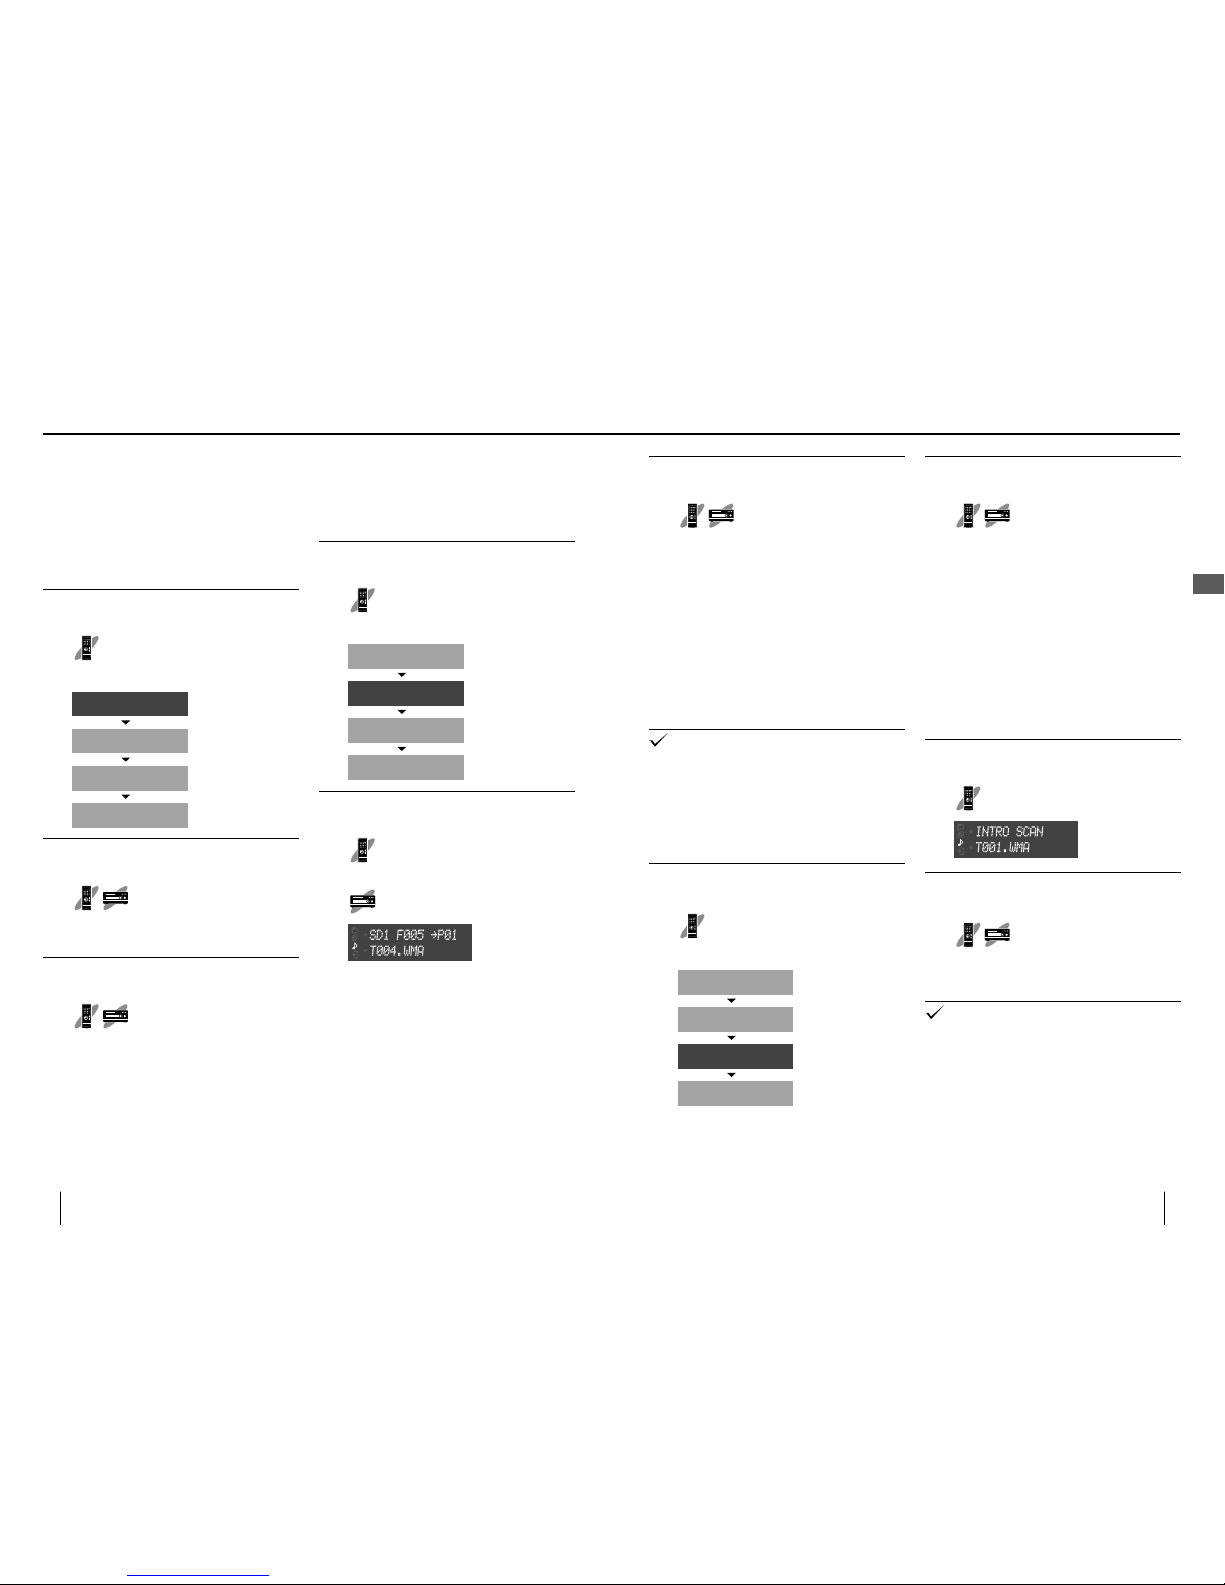
Program playback
Audio les can be played in the order programmed
by the user.
Select the SD source and enter stop mode.
1
Select "PGM" (program play mode).
Press [P.MODE].
Each press switches the selection.
Folder play mode
Program play mode
PGM
lit
N
lit
Relay play mode
RELAY PLAY
lit
Normal play mode
Not lit
2
Select a le.
Press [MULTI CONTROL] or the
numeric button(s) to select the le,
then press [ENTER].
Use [MULTI CONTROL] to selec t, then
press [ENTER].
When the 5th le "T004.
WMA" is selected as the
rst track of the program:
If you committed a mistake in selection, press
[CLEAR] on the remote control unit before
pressing [ENTER] and restart selection.
Up to 32 les can be programmed.
For how to select it, see "Folders and les" on page
26.
•
•
•
Playing an SD card
Playing music tracks
 Loading...