

Kenwood KRC-194AK, RC-194GK, RC-17AK, RC-17G Instruction Manual

— 2 —
Accessories ...............................21
Installation Procedure ..............21
Connecting Wires
to Terminals ...........................22
Installation ................................23
Troubleshooting Guide .............25
Specifications ...........................28

— 3 —
IMPORTANT INFORMATION
About CD players/disc changers
connected to this unit:
KENWOOD disc changers/ CD players
released in 1998 or later can be connected to
this unit.
Refer to the catalog for connectable models of
disc changers/ CD players.
Note that any KENWOOD disc changers/ CD
players released in 1997 or earlier and disc
changers made by other makers cannot be
connected to this unit.
Unsupported connection may result in break or
failure.
Setting the O-N Switch to the N position for
the applicable KENWOOD disc changers/ CD
players.
The functions that can be used and the
information that can be displayed will differ
depending on the models being connected.
You can damage both your unit and the CD
changer if you connect them incorrectly.

— 4 —
RDS (Radio Data System)
When listening to an RDS station, the
programme service name of the station is
displayed, advising you quickly which station is
being received.
RDS (Radio Data System) stations also
transmit frequency data for the same station.
When you are making long trips, this function
automatically alternative switches to the
particular frequency with the best reception
for the particular network of stations that you
want to listen to. The data is automatically
stored, allowing you to switch quickly to
another RDS stations, broadcasting the same
programme, that has better reception. These
include stations stored in the station preset
memory that you often listen to.
Enhanced Other Network
Stations that offer <Enhanced Other
Network> also transmit information about
other RDS stations that have traffic
information. When you are tuned to a station
that is not transmitting traffic information, but
another RDS station starts transmitting a
traffic bulletin, the tuner automatically
switches to the other station for the duration
of the bulletin.
Alarm
When an emergency transmission (announcing
disasters, etc.) is sent, all current functions are
interrupted to allow the warning to be
received.
About RDS
Turning the volume down quickly.
Press the [ATT] button.
Each time the button is pressed the Attenuator turns ON or OFF.
When it’s ON, the "ATT" indicator blinks.
Attenuator
Increasing Volume
Press the [u] button.
Decreasing Volume
Press the [d] button.
Volume
Turning ON the Power
Press the [SRC] button.
Turning OFF the Power
Press the [PWR OFF] button for at least 1 second.
Power
— 5 —
¢
AM
1 Select the source for adjustment
Press the [SRC] button.
2 Enter Audio Control mode
Press the [AUD] button.
3 Select the Audio item for adjustment
Press the [FM] or [AM] button.
Audio Control
2 Enter Control mode
Press the [AUD] button.
3 Select the Audio item for adjustment
Press the [FM] or [AM] button.
Select the "DB " display.
4 Select the Sound type
Press the [#1] — [#5] button.
Press button Sound setting Display
[#1] Flat "DB FLAT"
[#2] Rock "DB ROCK"
[#3] Pops "DB POPS"
[#4] Jazz "DB JAZZ"
[#5] Easy "DB EASY"
When the dB(Sound Coordinate) setting is changed, the Bass and
Treble set in audio control replace the dB(Sound Coordinate) values.
5 Exit Control mode
Press the [AUD] button.
— 6 —
The audio system automatically mutes when a call comes in.
When a call comes in
"CALL" is displayed.
The audio system pauses.
Listening to the audio during a call
Press the [SRC] button.
The "CALL" display disappears and the audio system comes back
ON.
When the call ends
Hang up the phone.
The "CALL" display disappears and the audio system comes back
ON.
TEL Mute
In Tape source
Information
Play side
Clock
In External disc source (KRC-294A/ 294G/ 27A/ 27G)
Information Display
Track Time
Disc name "D-NAME"
Disc title "D-TITLE"
Track title "T-TITLE"
Clock
— 7 —
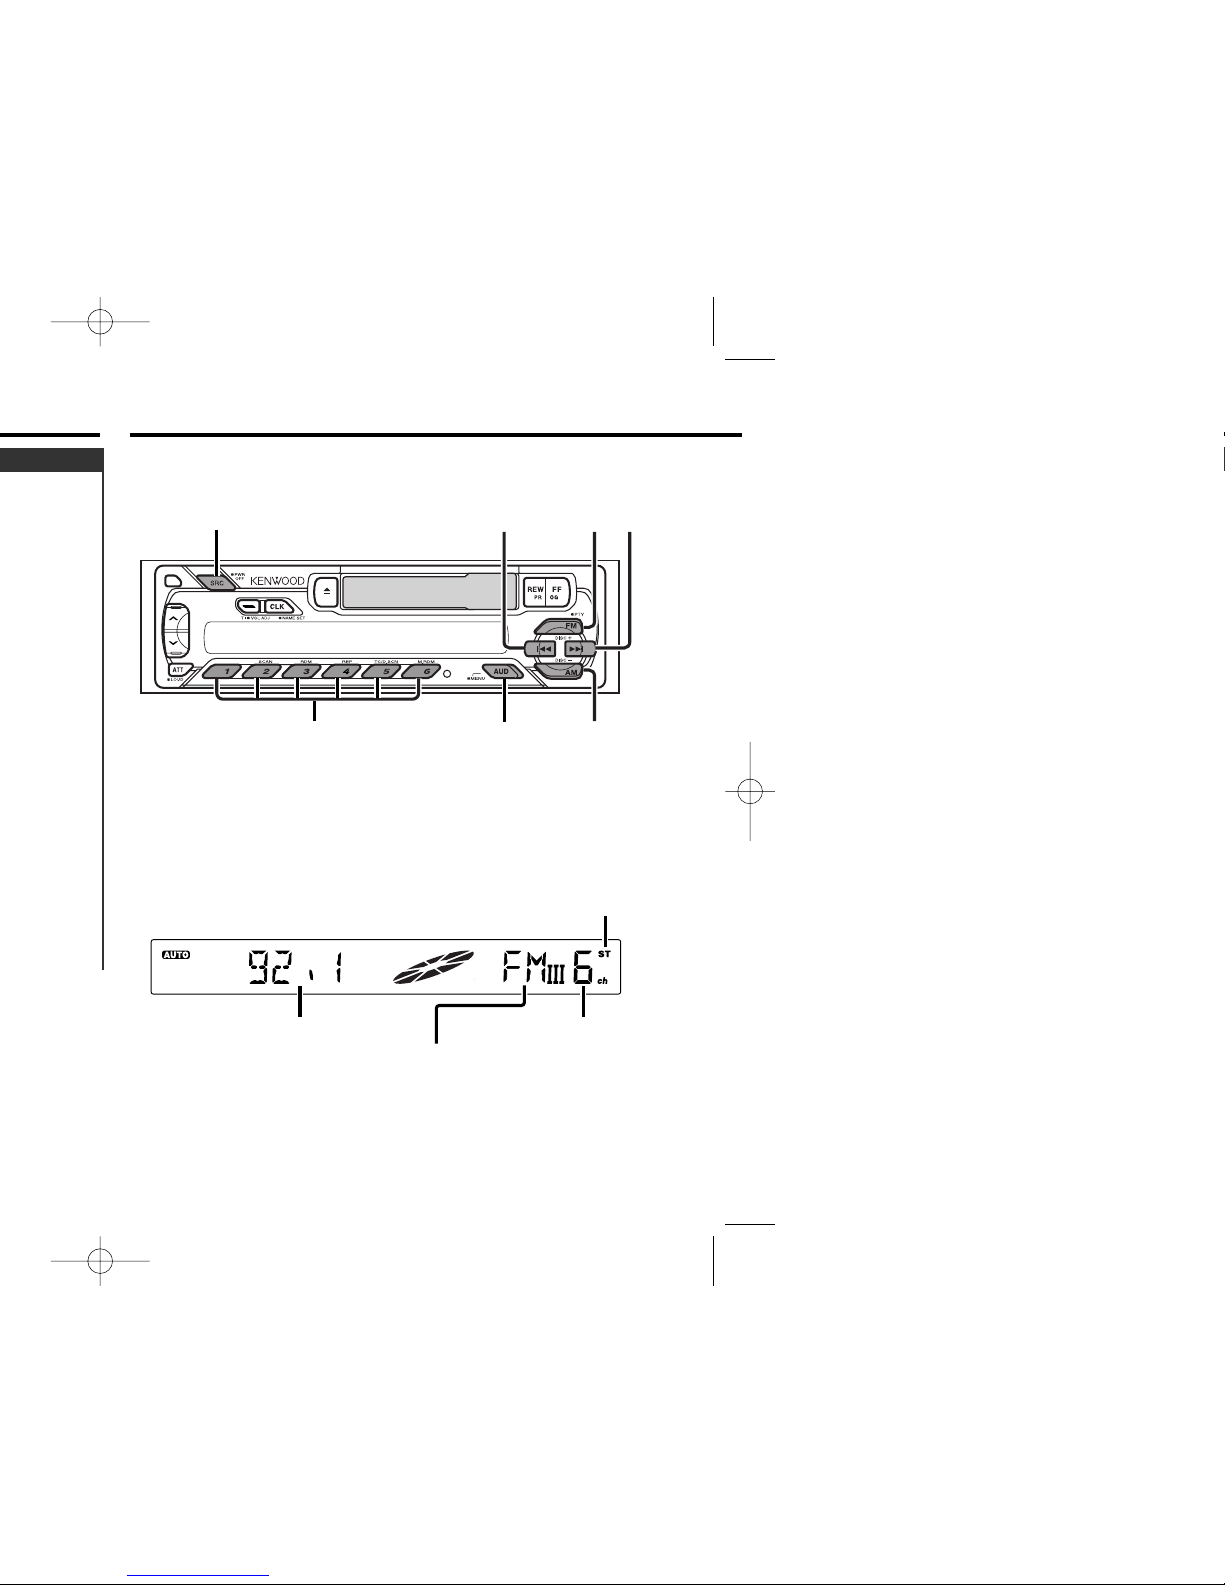
Tuner features
— 8 —
SRC
¢
4
FM
AM
MENU#1 - 6
Frequency display
ST indicator
Band display
Preset station number
Calling up the stations in the memory.
1 Select the band
Press the [FM] or [AM] button.
2 Call up the station
Press the [#1] — [#6] button.
Preset Tuning
Putting a station with good reception in the memory
automatically.
1 Select the band for Auto Memory Entry
Press the [FM] or [AM] button.
2 Enter Menu mode
Press the [MENU] button for at least 1 second.
"MENU" is displayed.
3 Select the Auto Memory Entry mode
Press the [FM] or [AM] button.
Select the "A-MEMORY" display.
4 Open Auto Memory Entry
Press the [4] or [¢] button for at least 2 seconds.
When 6 stations that can be received are put in the memory
Auto Memory Entry closes.
• When the <AF Function> (page 19) is ON, only RDS stations are
put in the memory.
• When Auto Memory Entry is done in the FM2 band, the RDS
stations preset in the FM1 band aren't put in the memory.
Likewise, when it is done in the FM3 band, RDS stations preset in
FM1 or FM2 aren't put in the memory.
Auto Memory Entry
— 9 —
 Loading...