

Kenwood multipro FP734, multipro FP735 Instructions Manual
m
u
l
t
i
p
r
o
instructions
istruzioni
instrucciones
Bedienungsanleitungen
gebruiksaanwijzing
FP734
FP735

English 2 - 9
Nederlands 10 - 17
Français 18 - 26
Deutsch 27 - 35
Italiano 36 - 44
Dansk 45 - 52
Svenska 53 - 60
Norsk 61 - 68
Suomi 69 - 76
m
u
l
t
i
p
r
o

safety
●
Read these instructions carefully and retain for future reference.
●
Remove all packaging and any labels.
●
The blades and discs are very sharp, handle with care.
Always hold the knife blade by the finger grip
at the top, away from the cutting edge, both when
handling and cleaning.
●
Do not lift or carry the processor by the handle - or the handle may break
resulting in injury.
●
Always remove the knife blade before pouring contents from the bowl.
●
Keep hands and utensils out of the processor bowl and liquidiser goblet
whilst connected to the power supply.
●
Switch off and unplug:
●●
before fitting or removing parts
●●
after use
●●
before cleaning
●
Never use your fingers to push food down the feed tube. Always use the
pusher/s supplied.
●
Never fit the blade unit to the power unit without the
liquidiser or mini chopper/mill jar fitted.
●
Before removing the lid from the bowl or liquidiser or mini chopper/mill
from the power unit:-
●●
switch off;
●●
wait until the attachment/blades have completely stopped;
●●
be careful not to unscrew the liquidiser goblet or mini chopper/mill from
the blade assembly.
●
Liquids should be allowed to cool to room temperature before blending.
●
Do not use the lid to operate the processor, always use the on/off speed
control.
●
This machine will be damaged and may cause injury if the
interlock mechanism is subjected to excessive force.
●
Never use an unauthorised attachment.
●
Never leave the machine on unattended.
●
Never use a damaged machine. Get it checked or repaired: see ‘service
and customer care’.
●
Never let the power unit, cord or plug get wet.
●
Don’t let excess cord hang over the edge of a table or worktop or touch
hot surfaces.
●
Do not exceed the maximum capacities stated in the recommended
speed chart.
2

●
Appliances can be used by persons with reduced physical, sensory or
mental capabilities or lack of experience and knowledge if they have been
given supervision or instruction concerning use of the appliance in a safe
way and if they understand the hazards involved.
●
This appliance shall not be used by children. Keep the appliance and its
cord out of reach of children.
●
Children should be supervised to ensure that they do not play with the
appliance.
●
Only use the appliance for its intended domestic use. Kenwood will not
accept any liability if the appliance is subject to improper use, or failure to
comply with these instructions.
●
Misuse of your processor/liquidiser can result in injury.
Refer to the relevant section under “using the attachments” for additional
safety warnings for each individual attachment.
liquidiser
●
Allow all liquids to cool to room temperature before placing
them in the liquidiser.
●
To ensure the long life of your liquidiser, never run it for longer than 60
seconds. Switch off as soon as you’ve got the right consistency.
●
Don’t process spices - they may damage the plastic.
●
Don’t use the liquidiser as a storage container. Keep it empty before and
after use.
●
Never blend more than 11⁄2 litres (2pts 12floz) - less for frothy liquids like
milkshakes.
slicing/shredding disc safety
●
Never remove the lid until the cutting disc has completely
stopped.
●
Handle the cutting discs with care - they are extremely
sharp.
compact chopper/grinder safety
●
Never fit the blade unit to your food processor without the jar fitted.
●
Never unscrew the jar while the mini chopper/mill is fitted to your
appliance.
●
Do not touch the sharp blades – Keep the blade unit away from children.
●
Never remove the mini chopper/mill until the blades have completely
stopped.
3

before plugging in
●
Make sure your electricity supply is the same as the one
s
hown on the underside of your machine.
●
This appliance conforms to EC directive 2004/108/EC on
Electromagnetic Compatibility and EC regulation no.
1
935/2004 of 27/10/2004 on materials intended for contact
with food.
before using for the first time
1 Remove all packaging including the plastic blade covers
from the knife blade. Take care the blades are very
sharp. These covers should be discarded as they are to
protect the blade during manufacture and transit only.
2 Wash the parts see ‘cleaning’
3 Push excess cord into the back of the machine.
key
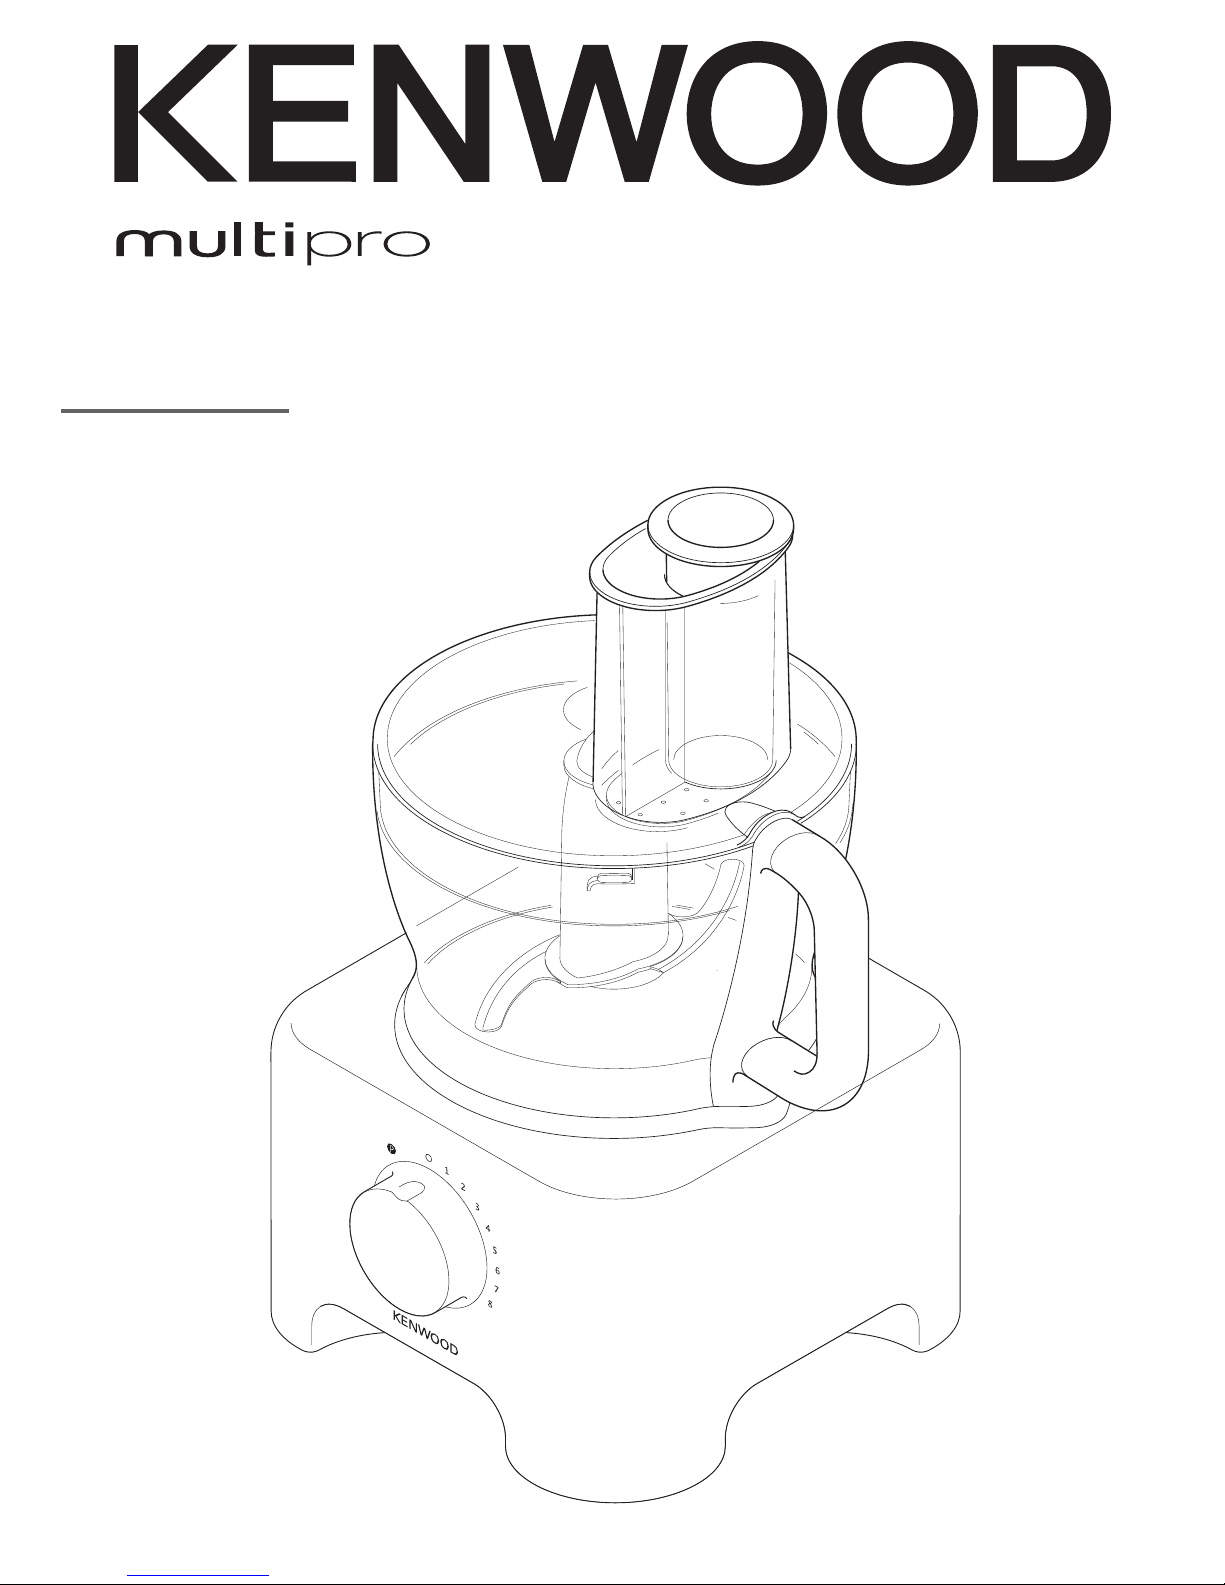
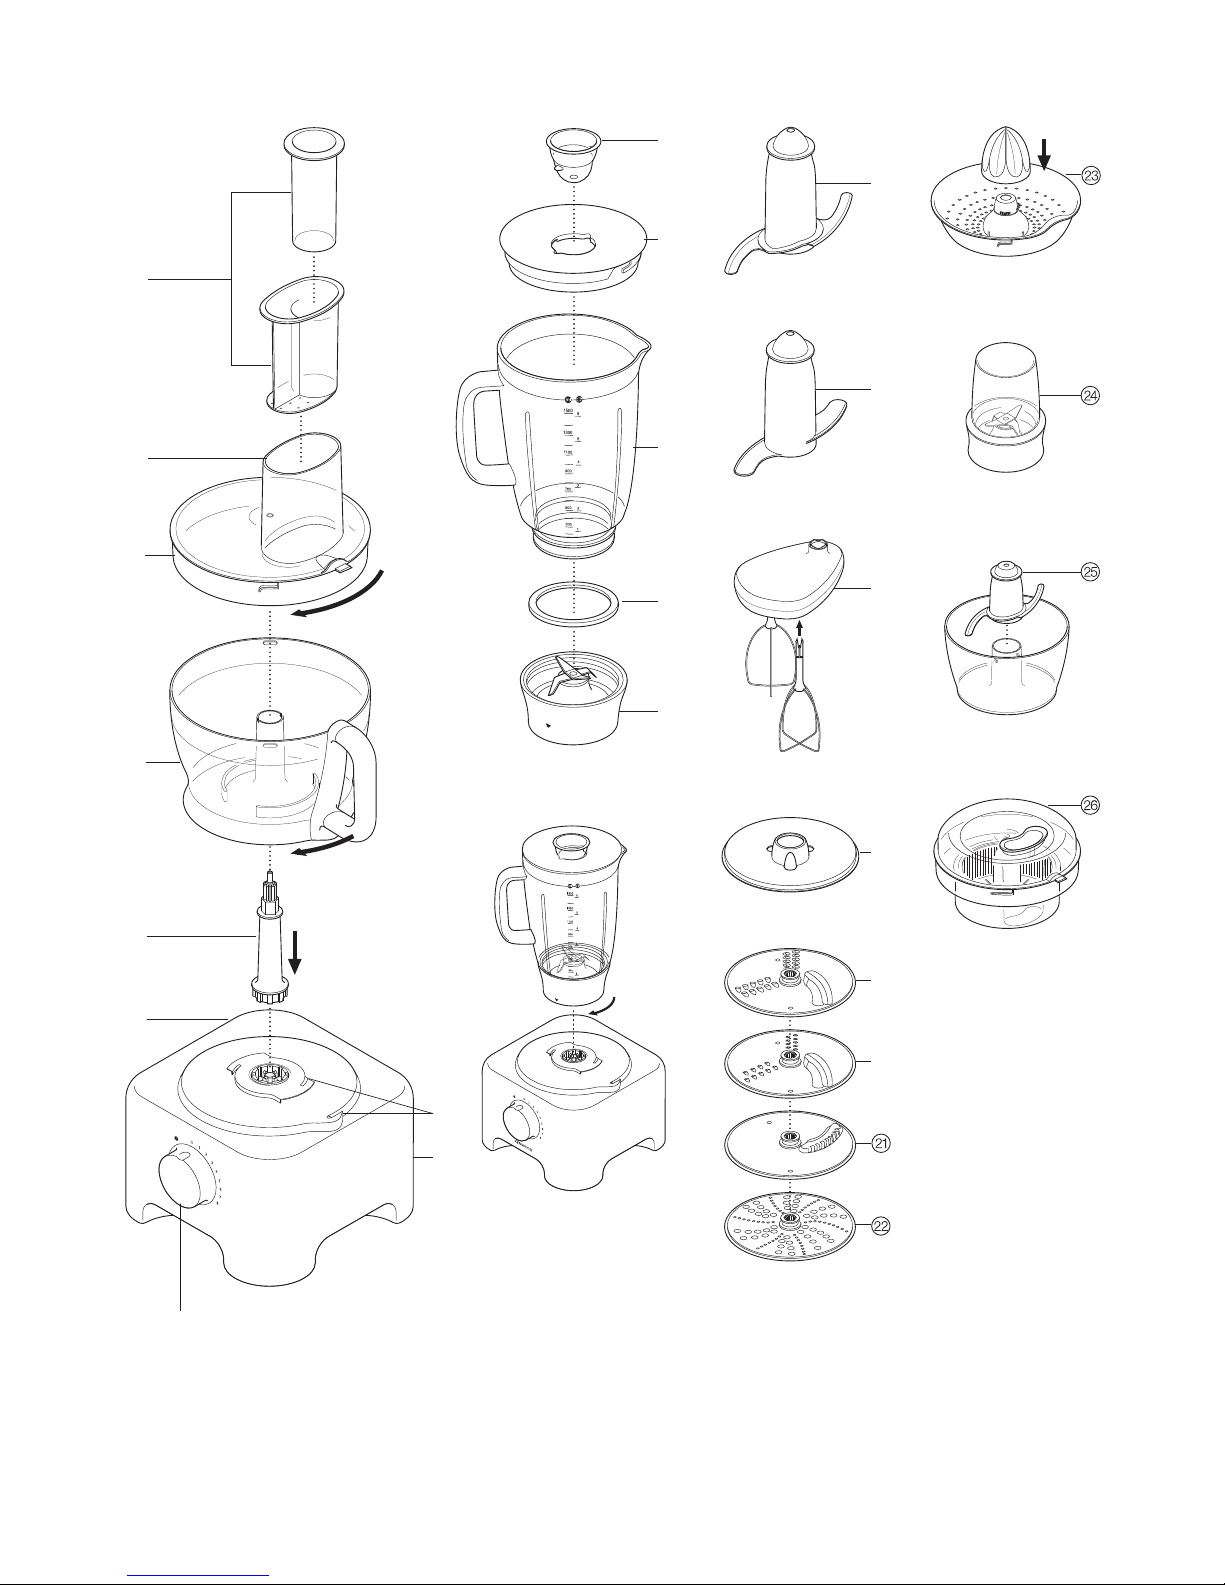
processor
power unit
detachable drive shaft
bowl
lid
feed tube
pushers
safety interlocks
cord storage
speed control
liquidiser
filler cap
lid
goblet
sealing ring
blade unit
additional attachments
Not all of the attachments listed below may be included with
your food processor. Attachments are dependent upon the
model variant.
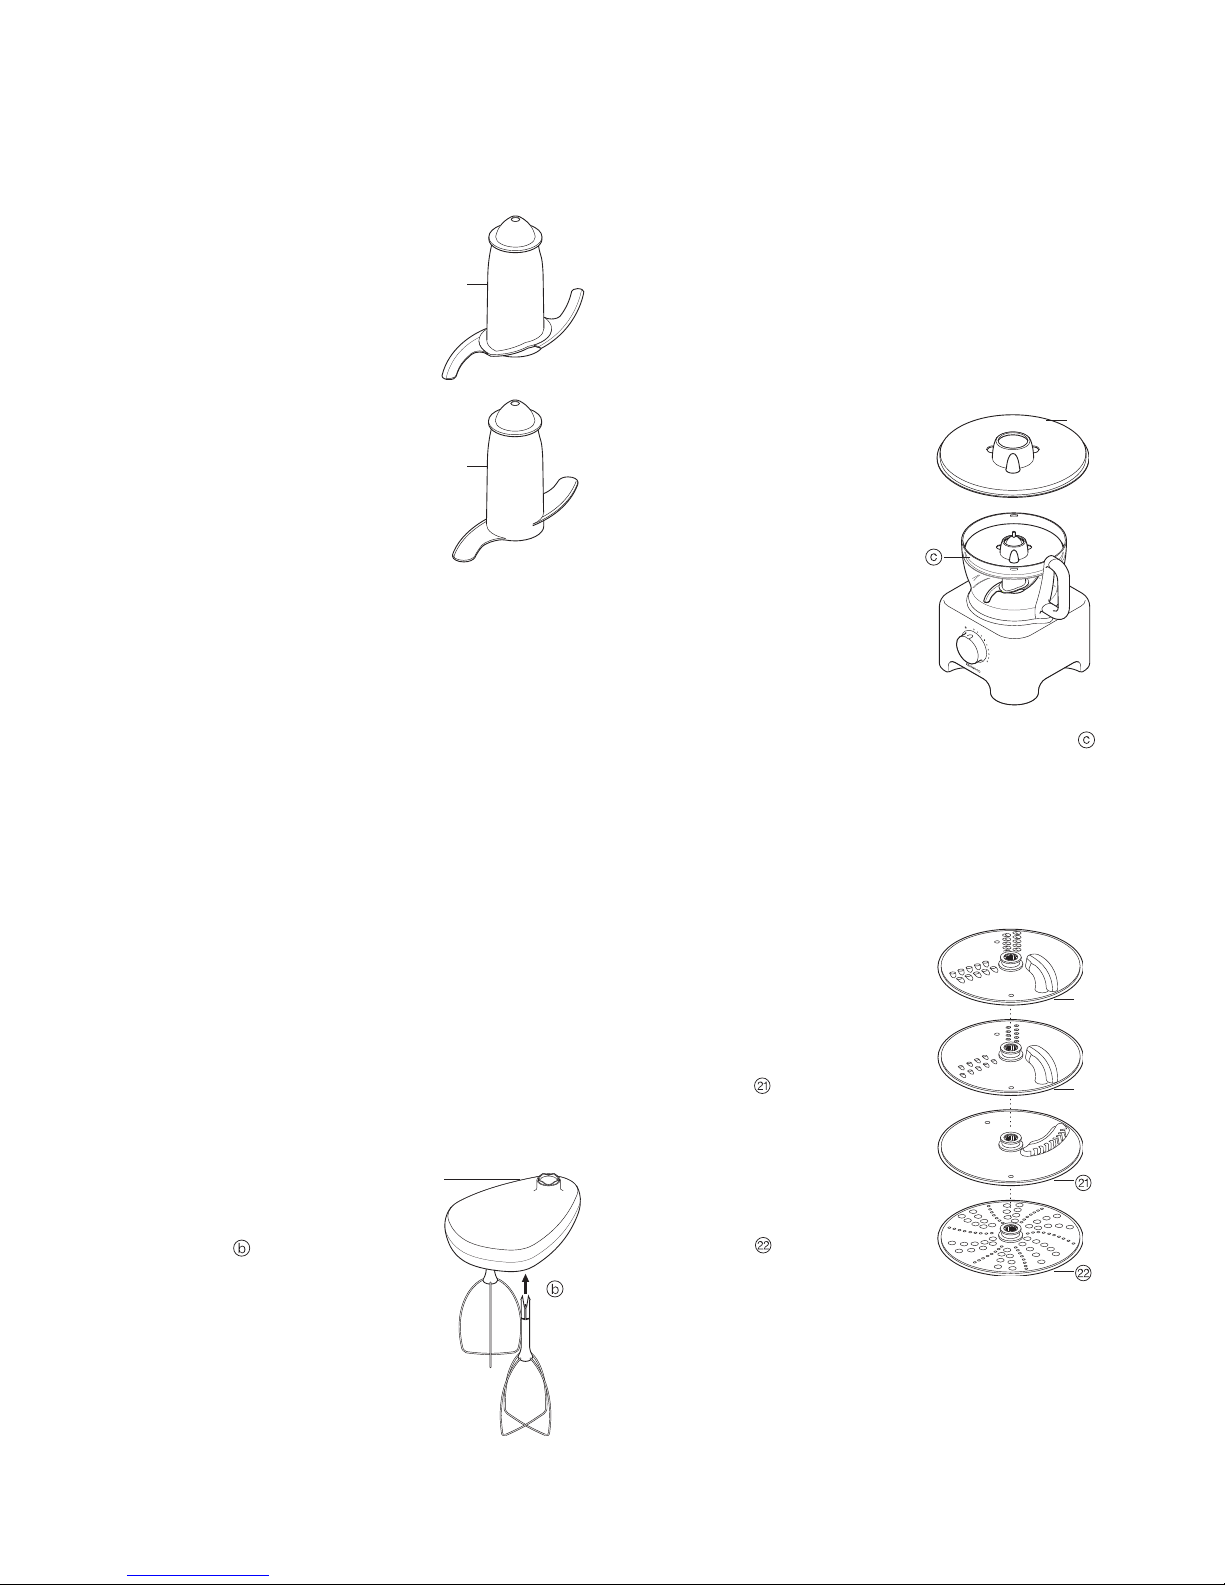
knife blade
dough tool
twin beater geared metal whisk
maxi-blend canopy
thick slicing/coarse shredding disc
thin slicing/fine shredding disc
fine (Julienne style) chipper disc
rasping disc
geared citrus press
mini chopper/mill
mini processor bowl
centrifugal juicer
4
juice extractor safety
●
Do not use the juice extractor if the filter is damaged.
●
Only use the pusher supplied. Never put your fingers in the feed tube.
Unplug before unblocking the feed tube.
●
Before removing the lid, switch off and wait for the filter to stop.
●
Never use a damaged attachment.
choosing a speed for all functions
Tool/Attachment Function Speed Maximum Capacities
Knife Blade One Stage Cake Mix 1 – 8 1.5Kg/3lb 5oz Total Wt
Pastry - rubbing fat into flour 5 – 8 340g/12oz Flour Wt
Adding water to combine pastry ingredients 1 – 5
Chopping/pureeing/pates 8 600g/1lb 6oz Meat
Knife Blade with maxi-blend canopy Soups – start at a low speed and move up to 8 1 – 8 1.5 litres/2pts 12fl. oz
Whisk Egg Whites 8 6 Egg Whites
Egg & sugar for fatless sponges 8
Cream 5 – 8 500 mls
Dough tool Yeasted mixes 8 500g/1lb 2oz
Discs – slicing/shredding/chipping Firm food items such as carrots, hard cheese. 5 – 8
Softer items such as cucumbers, tomatoes 1 – 5
Rasping disc Parmesan cheese, Potatoes for German 8
potato dumplings.
Citrus Press Citrus fruits 1
Mini Bowl & knife All processing 8 200g/8oz
Liquidiser All processing 8 1.5 litres/2pts 12fl.oz
Mini chopper/mill All processing 8
Centrifugal juicer Fruit & Vegetables 8 450g/1lb

5
to use your food processor
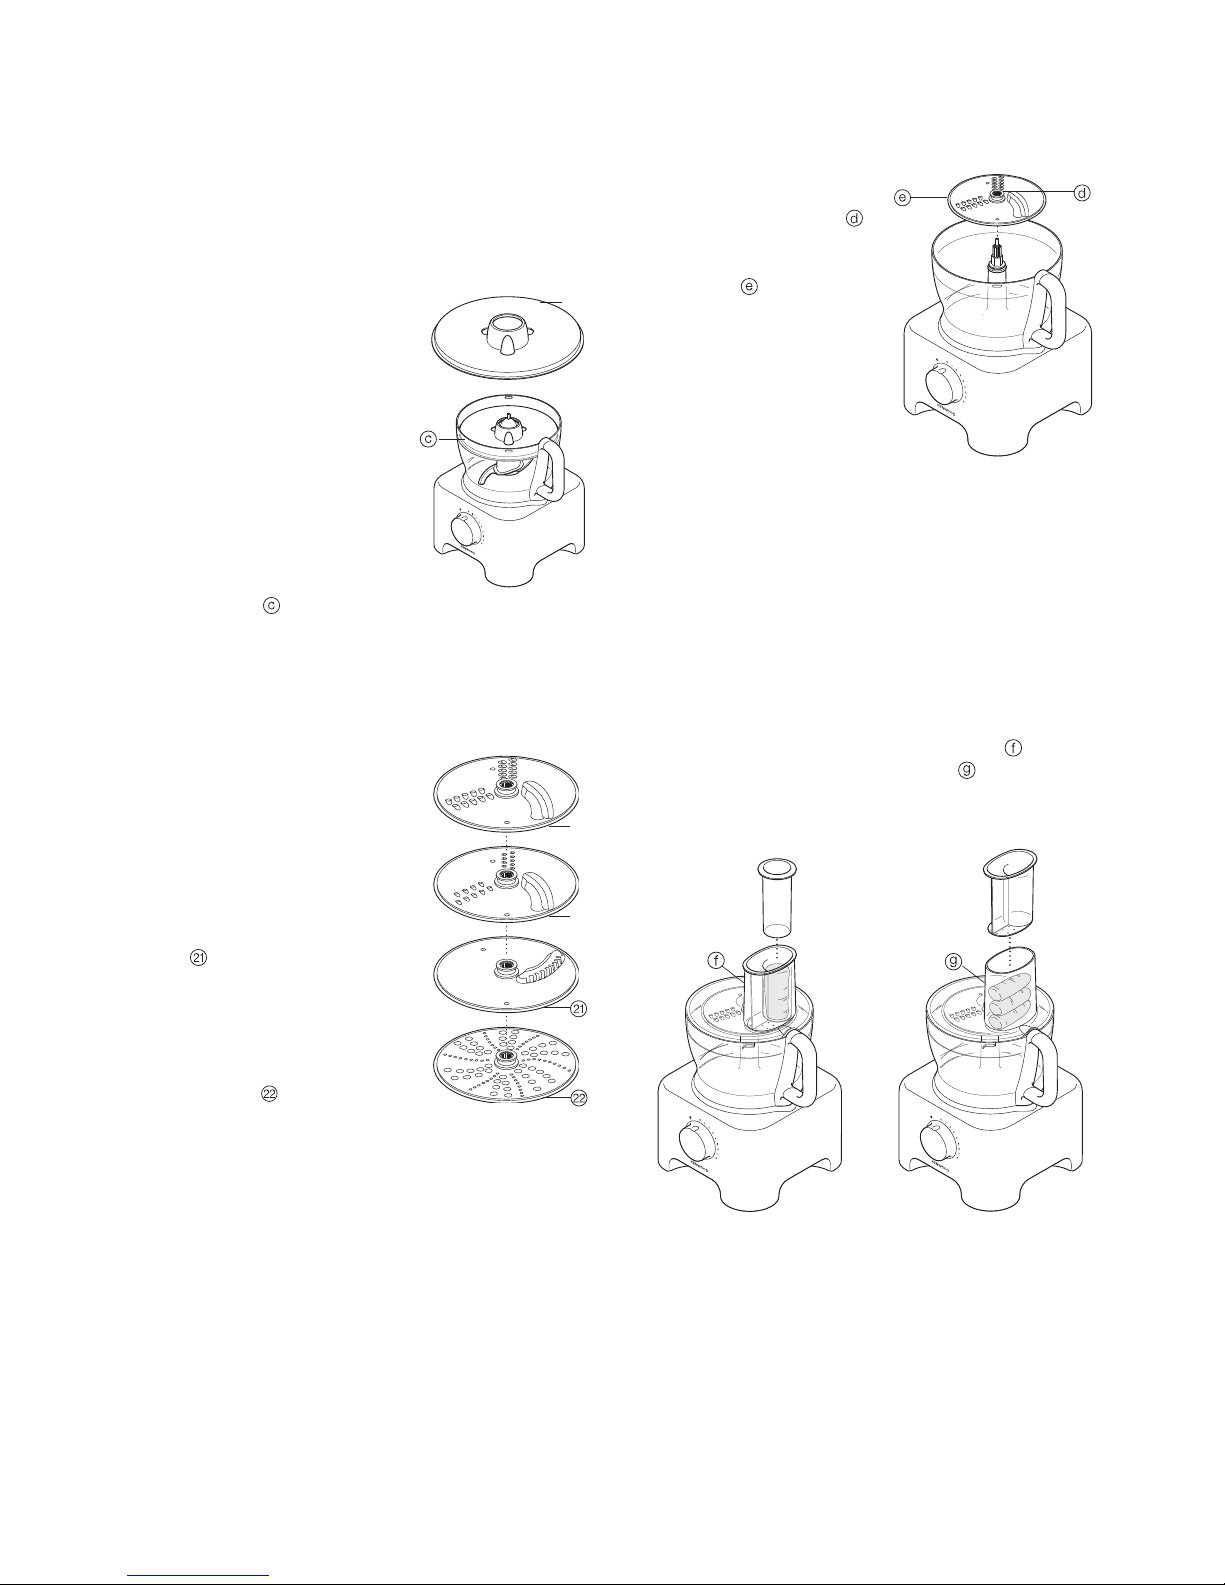
1
Fit the detachable shaft onto the power unit .
2 Then fit the bowl. Place the handle towards the back and
t
urn clockwise until it locks .
3
Fit an attachment over the drive shaft.
●
Always fit the bowl and attachment onto the machine before
a
dding ingredients.
4
Fit the lid - ensuring the top of the drive shaft locates into
the centre of the lid.
●
Do not use the lid to operate the processor,
a
lways use the on/off control.
5 Switch on and select a speed.
●
The processor won’t work if the bowl and lid are
f
itted incorrectly.
●
Use the pulse (P) for short bursts. The pulse will operate for
as long as the control is held in position.
6 Reverse the above procedure to remove the lid, attachments
and bowl.
●
Always switch off before removing the lid.
important
●
Your processor is not suitable for crushing or grinding coffee
beans, or converting granulated sugar to caster sugar.
●
When adding almond essence or flavouring to mixtures
avoid contact with the plastic as this may result in
permanent marking.
to use your liquidiser
1 Fit the sealing ring into the blade unit - ensuring the seal
is located correctly. Leaking will occur if the seal is
damaged or not fitted correctly.
2 Screw the jug onto the blade unit.
3 Put your ingredients into the jug.
4 Put the filler cap in the lid, then turn.
5 Turn the lid in a clockwise direction to lock onto the jug.
6 Place the liquidiser onto the power unit and turn to lock .
7 Select a speed or use the pulse control.
●
Allow all liquids to cool to room temperature
before placing them in the liquidiser.
hints
●
When making mayonnaise, put all the ingredients, except the
oil into the liquidiser. Then with the machine running, pour the
oil into the filler cap and let it run through.
●
Thick mixtures, eg pates and dips, may need scraping
down. If it’s difficult to process, add more liquid.
●
When crushing ice use the pulse in short bursts.
●
To ensure the long life of your liquidiser, never run it for longer
than 60 seconds. Switch off as soon as you’ve got the right
consistency.
●
Don’t process spices - they may damage the plastic.
●
The machine won’t work if the liquidiser is fitted incorrectly.
●
Don’t put dry ingredients into the liquidiser before switching
on. If necessary, cut them into pieces; remove the filler cap;
then with the machine running, drop them through one by
one.
●
Don’t use the liquidiser as a storage container. Keep it
empty before and after use.
●
Never blend more than 11⁄2 litres (2pts 12floz) - less for frothy
liquids like milkshakes.
using the attachments
knife blade/ dough tool
T
he knife blade is the most versatile of
all the attachments. The length of the
processing time will determine the
t
exture achieved. For coarser textures
use the pulse control.
Use the knife blade for cake and
p
astry making, chopping raw and
cooked meat, vegetables, nuts, pate,
dips, pureeing soups and to also
make crumbs from biscuits and
b
read. It can also be used for
y
easted dough mixes if the dough
tool is not supplied.
Use the dough tool for yeasted
mixes.
hints
knife blade
●
Cut food such as meat, bread, vegetables into cubes
approximately 2cm/
3
⁄4in before processing.
●
Biscuits should be broken into pieces and added down the
feed tube whilst the machine is running.
●
When making pastry use fat straight from the fridge cut into
2cm/
3
⁄4in.cubes.
●
Take care not to over-process.
dough tool
●
Place the dry ingredients in the bowl and add the liquid
down the feed tube whilst the machine is running. Process
until a smooth elastic ball of dough is formed this will take
60 - 90 secs.
●
Re-knead by hand only. Re-kneading in the bowl is not
recommended as it may cause the processor to become
unstable.
twin beater geared whisk
Use for light mixtures only eg egg whites, cream, evaporated
milk and for whisking eggs and sugar for fatless sponges.
Heavier mixtures such as fat and flour will damage it.
using the whisk
1 Fit the drive shaft and bowl onto the
power unit.
2 Push each beater securely into the
drive head .
3 Fit the whisk by carefully turning until
it drops over the drive shaft.
4 Add the ingredients.
5 Fit the lid - ensuring the end of the
shaft locates into the centre of the
lid.
6 Switch on.
important
●
The whisk is not suitable for making
one-stage cakes or creaming fat and sugar as these mixes
will damage it. Always use the knife blade for cake making.
h
ints
●
Best results are obtained when the eggs are at room
temperature.
●
E
nsure the bowl and whisks are clean and free from grease
before whisking.
maxi-blend canopy
W
hen blending liquids, use the maxiblend canopy with the knife blade. It
allows you to increase the liquid
p
rocessing capacity from 1 litre to
1.5 litres, prevents leaking and
improves the chopping performance
o
f the blade.
1
Fit the drive shaft and bowl onto the
power unit.
2 Fit the knife blade.
3 Add ingredients to be processed.
4 Fit the canopy over the top of the
blade ensuring it sits on the ledge
inside the bowl . Do not push down on the
canopy, hold by the centre grip.
5 Fit the lid and switch on.
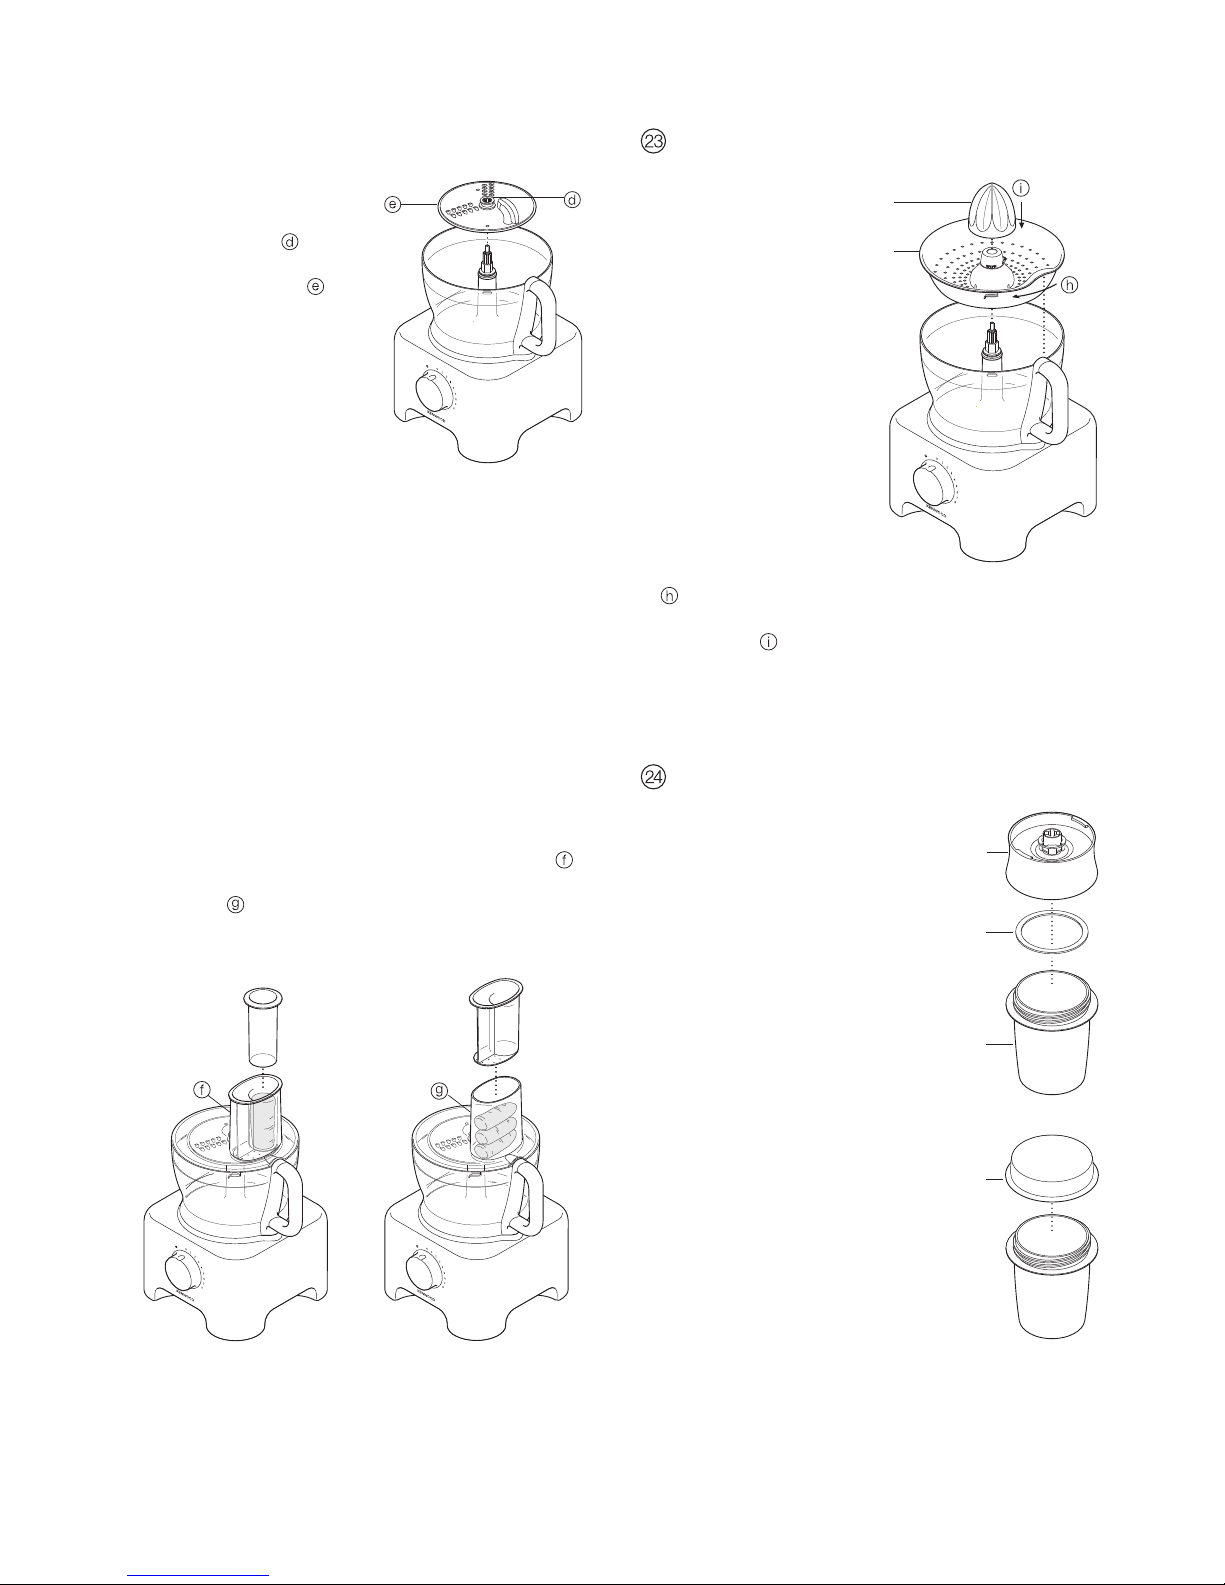
slicing/shredding discs
reversible slicing/shredding discs - thick , thin
Use the shredding side for cheese,
carrots, potatoes and foods of a
similar texture.
Use the slicing side for cheese,
carrots, potatoes, cabbage,
cucumber, courgette, beetroot and
onions.
fine (Julienne style) chipper
disc
Use to cut: potatoes for Julienne
style French fries; firm ingredients for
salads, garnishes, casseroles and
stir fries (eg carrot, swede,
courgette, cucumber).
rasping disc
Grates Parmesan cheese and
potatoes for German potato dumplings.
safety
●
Never remove the lid until the cutting disc has
completely stopped.
●
Handle the cutting discs with care - they are
extremely sharp.
to use the cutting discs
1
Fit the drive shaft and bowl onto
the power unit.
2
Holding by the centre grip ,
p
lace the disc onto the drive
shaft with the appropriate side
u
ppermost .
3
Fit the lid.
4 Choose which size feed tube
you want to use. The pusher
c
ontains a smaller feed tube for
processing individual items or
thin ingredients.
T
o use the small feed tube - first
put the large pusher inside the
feed tube.
To use the large feed tube - use both pushers together.
5 Put the food in the feed tube.
6 Switch on and push down evenly with the pusher - never
put your fingers in the feed tube.
hints
●
Use fresh ingredients
●
Don’t cut food too small. Fill the width of the large feed tube
fairly full. This prevents the food from slipping sideways
during processing. Alternatively use the small feed tube.
●
When using the chipper disc, place ingredients horizontally.
●
When slicing or shredding: food placed upright comes
out shorter than food placed horizontally .
●
There will always be a small amount of waste on the plate or
in the bowl after processing.
6
m
u
l
t
i
p
r
o
m
u
l
t
i
p
r
o
m
u
l
t
i
p
r
o
m
u
l
t
i
p
r
o
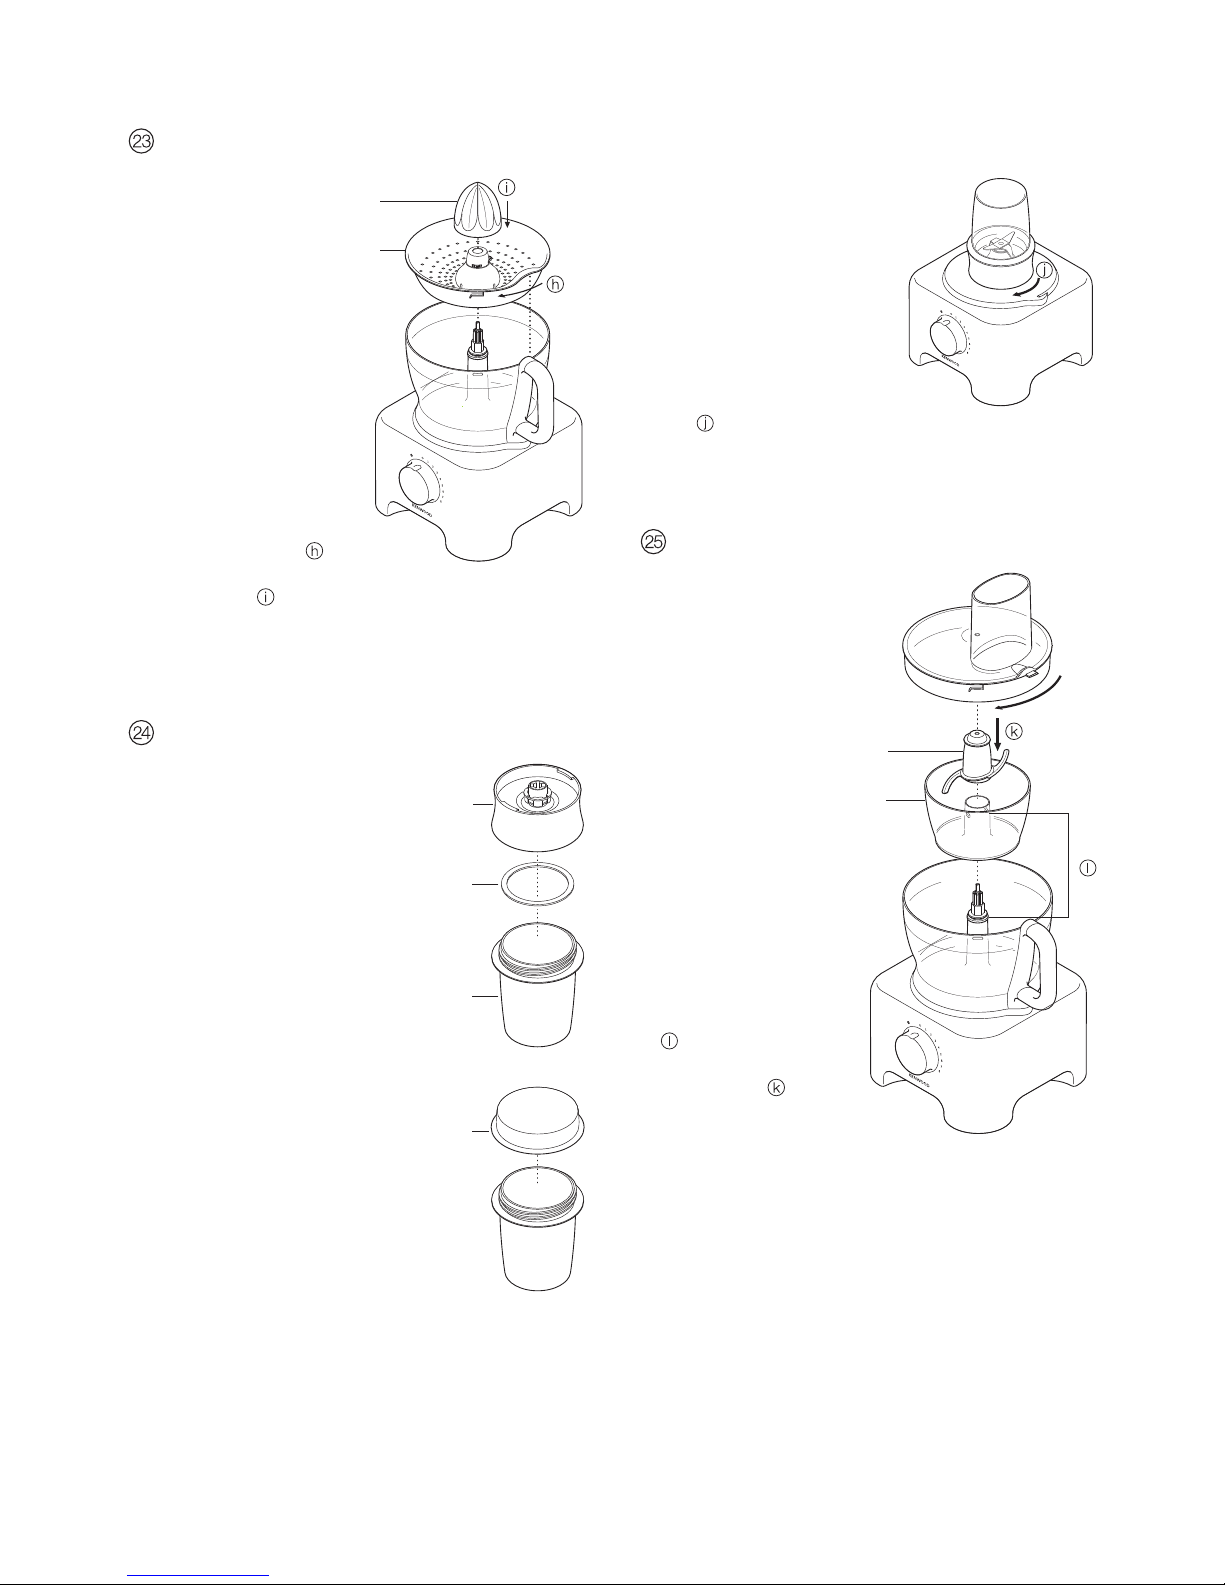
citrus press
Use the citrus press to
s
queeze the juice from
c
itrus fruits (eg oranges,
lemons, limes and
g
rapefruits).
cone
sieve
to use the citrus
press
1 Fit the drive shaft and bowl
o
nto the power unit.
2
Fit the sieve into the bowl ensuring the sieve handle is
locked into position directly
over the bowl handle .
3 Place the cone over the drive shaft turning until it drops all
the way down .
4 Cut the fruit in half. Then switch on and press the fruit onto
the cone.
●
The citrus press will not operate if the sieve is
not locked correctly.
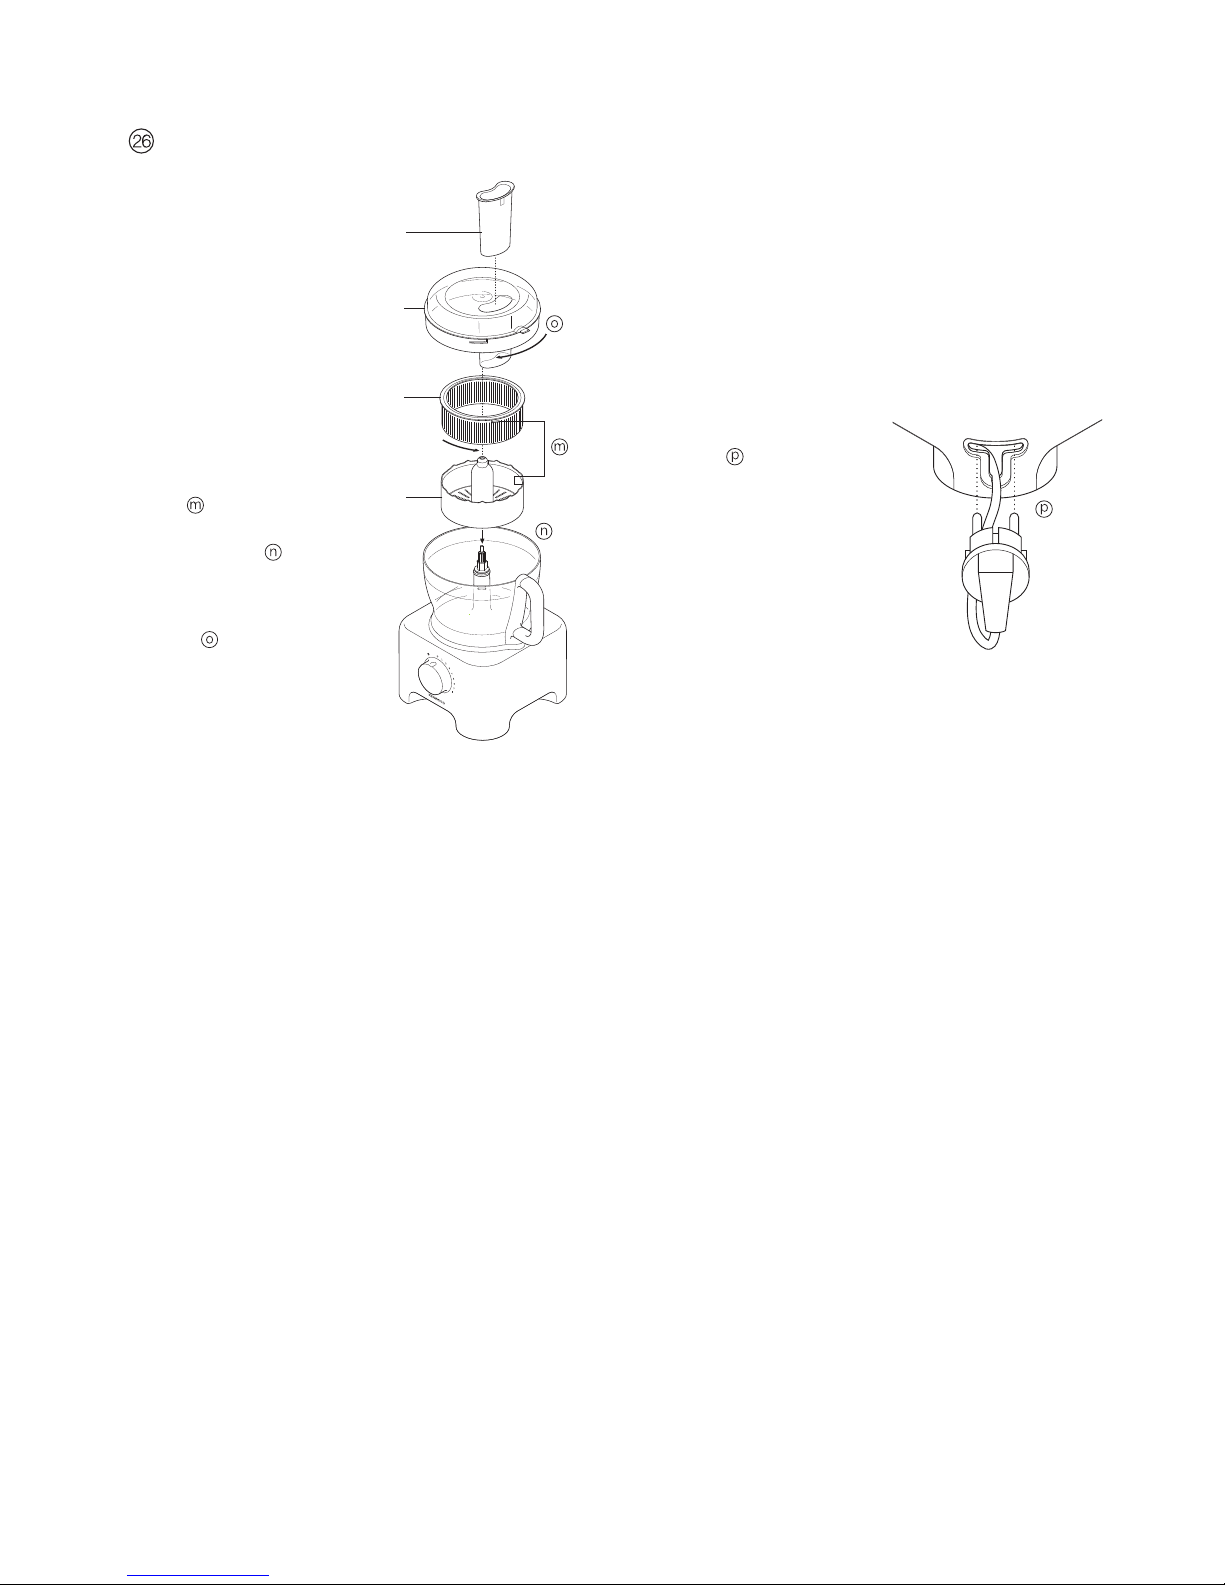
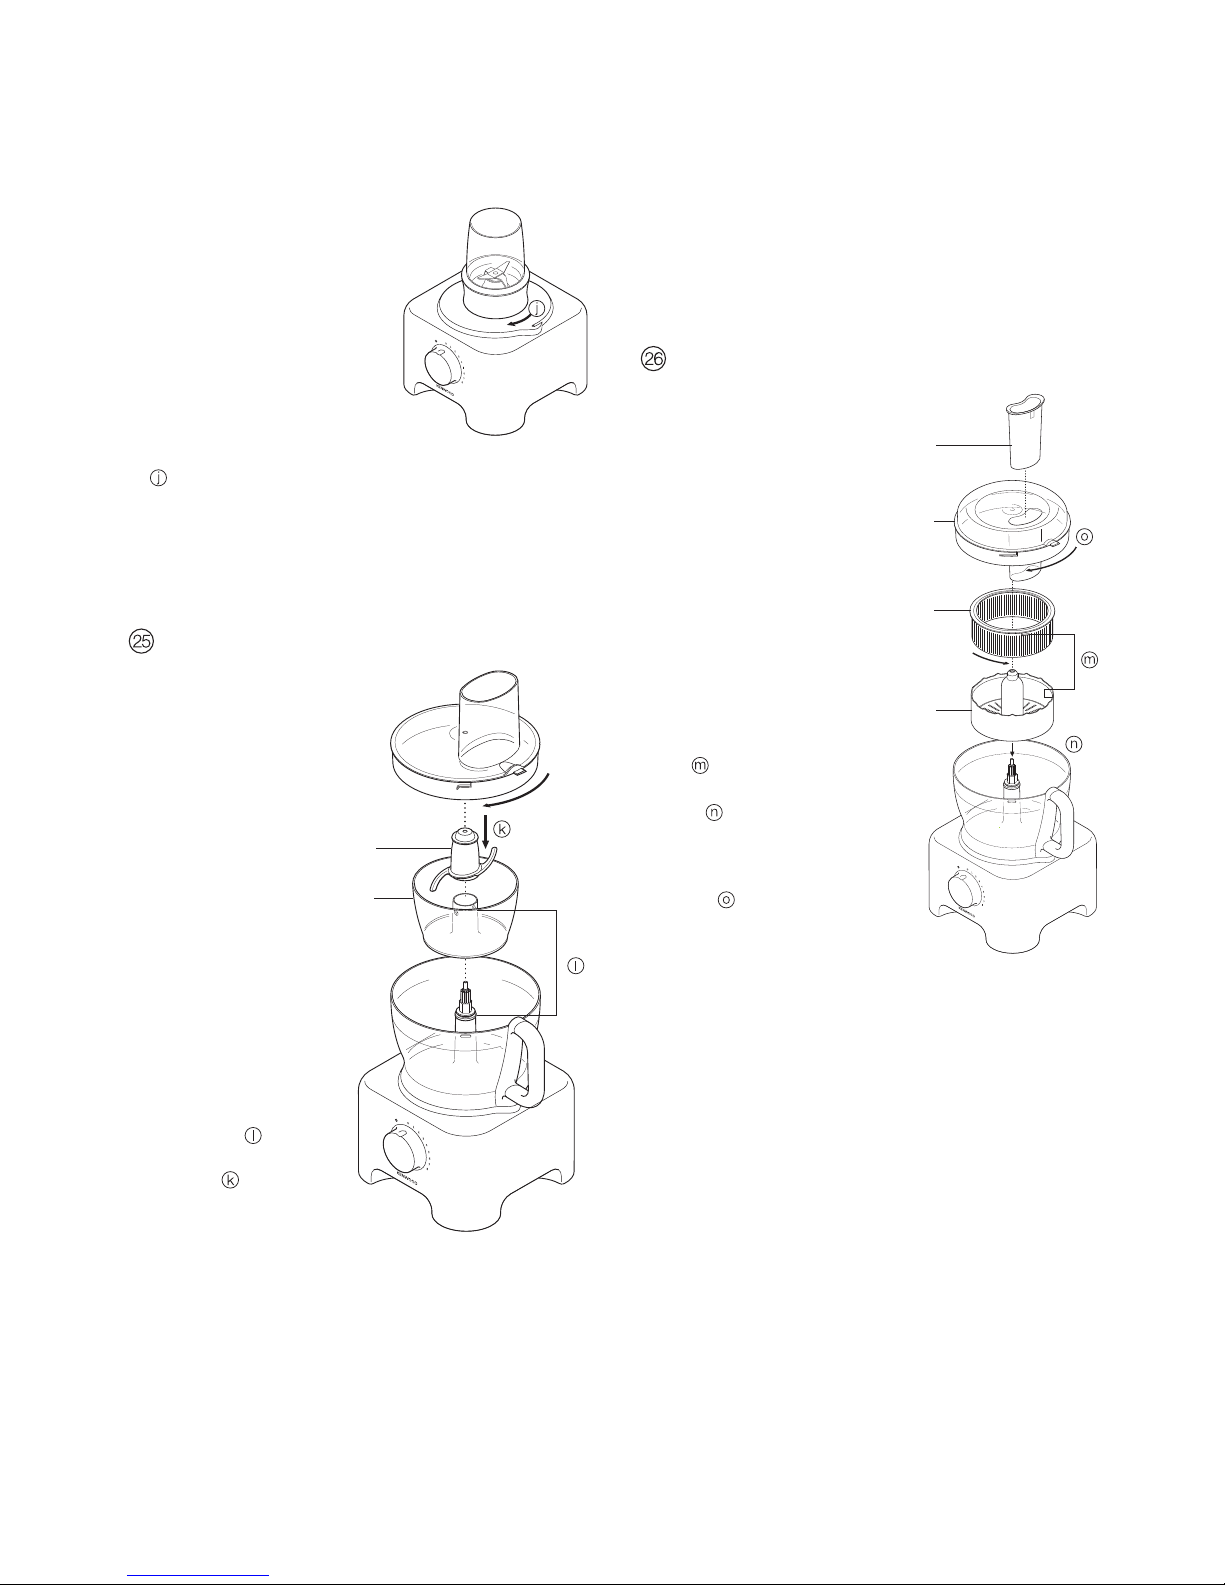
mini chopper/mill
Use the mini chopper/mill for milling herbs,
nuts and coffee beans.
blade unit
sealing ring
jar
mill lid
safety
●
Never fit the blade unit to your food
processor without the jar fitted.
●
Never unscrew the jar while the mini
chopper/mill is fitted to your appliance.
●
Do not touch the sharp blades – Keep the
blade unit away from children.
●
Never remove the mini chopper/mill until
the blades have completely stopped.
important
●
To ensure the long life of your mini
chopper/mill, never run for longer than 30
seconds. Switch off as soon as you have got
the right consistency.
●
The processing of spices is not
recommended as they may damage the
plastic parts.
●
The appliance will not work if the mini chopper/mill is
incorrectly fitted.
●
Use for dry ingredients only.
to use your mini chopper/mill
1
Put your ingredients into the jar.
Fill it no more than half full.
2
Fit the sealing ring into the
b
lade unit.
3 Turn the blade unit upside
d
own. Lower it into the jar,
b
lades down.
4 Screw the blade unit onto the
jar until it is finger tight.
5
Place the mini chopper/mill onto
the power unit and turn to
lock .
6
Switch on to maximum speed or use the pulse control.
h
ints
●
H
erbs are best milled when clean and dry.
mini processor bowl
Use the mini processor
bowl to chop herbs and
process small quantities of
ingredients e.g. meat,
onion, nuts, mayonnaise,
vegetables, purées, sauces
and baby food.
mini processor knife blade
mini processor bowl
to use the mini
processor bowl
1 Fit the drive shaft and bowl
onto the power unit.
2 Fit the mini processor bowl
- ensuring the ribs on the
inside of the mini bowl
chimney align with the slots
in the main bowl chimney
.
3 Place the knife blade over
the drive shaft .
4 Add the ingredients to be
processed.
5 Fit the lid and switch on.
safety
●
Never remove the lid until the knife blade has completely
stopped.
●
The knife blade is very sharp - always handle with care.
important
●
Don’t process spices – they may damage the plastic.
●
Don’t process hard food such as coffee beans, ice cubes or
chocolate – they may damage the blade.
hints
●
Herbs are best chopped when clean and dry.
●
Always add a little liquid when blending cooked ingredients
to make baby food.
●
Cut foods such as meat, bread, vegetables into cubes
approximately 1-2 cm (
1
⁄2 – 3⁄4 in) before processing.
●
When making mayonnaise add the oil down the feed tube.
7
m
u
l
t
i
p
r
o
m
ul
t
i
p
r
o
mu
l
t
i
p
r
o
centrifugal juicer
U
se the centrifugal juice for
m
aking juice from firm fruit and
vegetables.
pusher
lid
strainer
inner bowl
to use the centrifugal
juicer
1
Fit the drive shaft and bowl onto
the power unit.
2 Lock the strainer into the inner
bowl .
3 Fit the inner bowl into the
processor bowl .
4 Place the attachment lid onto
the bowl, turn until it locks and
the feed tube sits over the
handle .
5 Cut the food into small pieces to
fit the feed tube.
6 Switch on and push down
evenly with the pusher - never
put your fingers in the
feed tube. Process fully before adding more.
7 After adding the last piece, let the machine run for a further
20 seconds to extract all the juice from the strainer.
important
●
If the processor vibrates, switch off and empty the strainer
(The processor vibrates if the pulp becomes unevenly
distributed).
●
Process small amounts at a time (450g maximum) and
empty the strainer and inner bowl regularly.
●
Before processing remove stones and pips (eg pepper,
melon, plum) and tough skins (eg melon, pineapple). You
don’t need to peel or core apples and pears.
hints
●
Use firm, fresh fruit and vegetables.
●
Citrus juice will be bitter and frothy because its peel and pith
get processed too. Use the citrus juicer instead.
care & cleaning
●
A
lways switch off and unplug before cleaning.
●
Handle the blades and cutting discs with care - they are
e
xtremely sharp.
●
S
ome foods may discolour the plastic. This is perfectly
normal and won’t harm the plastic or affect the flavour of
y
our food. Rub with a cloth dipped in vegetable oil to
r
emove the discolouration.
p
ower unit
●
Wipe with a damp cloth, then dry. Ensure that the interlock
area is clear of food debris.
●
S
tore excess cord in the
storage area at the back of the
machine .
liquidiser and mini chopper/mill
1 Empty the goblet/jar before unscrewing it from the blade
unit.
2 Wash the goblet/jar by hand.
3 Remove and wash the seals.
4 Don’t touch the sharp blades – brush them clean using hot
soapy water, then rinse thoroughly under the tap. Don’t
immerse the blade unit in water.
5 Leave to dry upside down.
twin beater geared whisk
●
Detach the beaters from the drive head by gently pulling
them free. Wash in warm soapy water.
●
Wipe the drive head with a damp cloth, then dry.
Do not immerse the drive head in water.
all other parts
●
Wash by hand, then dry.
●
Alternatively they can be washed on the top rack of your
dishwasher. A short low temperature programme is
recommended.
8
mu
l
t
i
p
r
o

service and customer care
●
I
f the cord is damaged it must, for safety reasons, be
replaced by KENWOOD or an authorised KENWOOD
r
epairer.
I
f you need help with:
●
u
sing your appliance or
●
servicing or repairs
●
C
ontact the shop where you bought your appliance.
●
Designed and engineered by Kenwood in the UK
●
M
ade in China
IMPORTANT INFORMATION FOR CORRECT
DISPOSAL OF THE PRODUCT IN ACCORDANCE
WITH EC DIRECTIVE 2002/96/EC.
At the end of its working life, the product must not be disposed
of as urban waste.
It must be taken to a special local authority differentiated waste
collection centre or to a dealer providing this service.
Disposing of a household appliance separately avoids possible
negative consequences for the environment and health deriving
from inappropriate disposal and enables the constituent
materials to be recovered to obtain significant savings in energy
and resources. As a reminder of the need to dispose of
household appliances separately, the product is marked with a
crossed-out wheeled dustbin.
9

veiligheid
●
Lees deze instructies zorgvuldig door en bewaar ze voor toekomstig
gebruik.
●
Verwijder alle verpakking en labels.
●
De messen en schijven zijn scherp: u dient ze voorzichtig te
behandelen. Houd het snijvlak altijd bij de
vingergreep vast aan de bovenzijde, van de
snijkant af, zowel bij het werken als het
schoonmaken.
●
De keukenmachine niet aan het handvat optillen of meedragen – het
handvat kan afbreken met persoonlijk letsel als gevolg.
●
Voordat u de inhoud uit de kom giet, dient u altijd eerst het mes te
verwijderen.
●
Haal altijd de stekker uit het stopcontact, voordat u met uw handen of
gereedschappen in de kom van de machine of de blenderkan komt.
●
Zet het apparaat uit en trek de stekker uit het stopcontact:
●●
alvorens onderdelen aan te brengen of te verwijderen
●●
na gebruik
●●
voor het schoonmaken
●
Gebruik nooit uw vingers om voedsel in de invoerkoker te duwen. Gebruik
altijd de bijgeleverde stamper.
●
Zet het mes nooit op het motorblok zonder dat de blender of
de beker van het mini-hakhulpstuk of de molen op het
apparaat is geplaatst.
●
Voor u het deksel van de kom haalt, of de blender of het mini-hakhulpstuk
/ de molen van het motorblok verwijdert:-
●●
zet het apparaat uit;
●●
wacht totdat de hulpstukken / messen helemaal tot stilstand zijn
gekomen;
●●
zorg dat u de blenderbeker of het mini-hakhulpstuk / de molen niet
losschroeft van de messeneenheid.
●
Vloeistoffen eerst tot kamertemperatuur laten afkoelen voordat u ze in de
blender verwerkt.
●
Gebruik nooit het deksel om de keukenmachine te bedienen, maar altijd de
aan/uit-knop.
●
Deze machine wordt beschadigd en kan letsel veroorzaken
wanneer er te veel kracht wordt uitgeoefend op het
veiligheidsmechanisme.
●
Gebruik nooit een niet bij het apparaat behorend hulpstuk.
●
De machine mag nooit op de stroom aangesloten zijn als er niemand bij is.
10
V
ouw voor het lezen a.u.b. de voorpagina met illustraties uit
Nederlands

●
Gebruik nooit een beschadigde machine. Laat een beschadigd apparaat
nakijken of repareren: zie onder ‘onderhoud en klantenservice’.
●
Laat het motorhuis, het netsnoer of de stekker nooit nat worden.
●
Laat het snoer nooit over de rand van een tafel of werkblad hangen of in
aanraking komen met hete oppervlakken.
●
U mag de maximum capaciteit die in de snelheidstabel wordt aangegeven,
niet overschrijden.
●
Dit apparaat kan worden gebruikt door personen met verminderde
lichamelijke, sensorische of geestelijke capaciteiten of gebrek aan ervaring
en kennis mits ze onder toezicht staan of instructie hebben gekregen over
het veilig gebruik van het apparaat en de betrokken risico's begrijpen.
●
Dit apparaat mag niet door kinderen worden gebruikt. Houd het apparaat
en het snoer buiten het bereik van kinderen.
●
Op kinderen moet toezicht gehouden worden om er zeker van te zijn dat
ze niet met het apparaat spelen.
●
Gebruik het apparaat alleen voor het huishoudelijke gebruik waarvoor het
is bedoeld. Kenwood kan niet aansprakelijk worden gesteld in het geval
dat het apparaat niet correct is gebruikt, of waar deze instructies niet
worden opgevolgd.
●
Misbruik van uw keukenmachine/blender kan tot letsel leiden.
Raadpleeg de betreffende paragraaf onder De hulpstukken gebruiken voor
aanvullende veiligheidswaarschuwingen voor ieder hulpstuk afzonderlijk.
blender
●
Laat alle vloeistoffen tot kamertemperatuur afkoelen voor u
ze in de blender doet.
●
Als u wilt dat uw blender lang mee gaat, zet hem dan nooit langer dan 60
seconden aan. Zet de blender uit zodra u de juiste dikte hebt verkregen.
●
Doe geen specerijen in de keukenmachine – ze kunnen het plastic
beschadigen.
●
Gebruik de blender niet als een opslagcontainer. Houd de blender voor en
na gebruik leeg.
●
Meng nooit meer dan 11⁄2 liter vloeistof – minder voor schuimende
vloeistoffen, zoals milkshakes.
veiligheid m.b.t. de snij/raspschijf
●
Verwijder het deksel nooit voordat de schijf helemaal tot
stilstand is gekomen.
●
Wees voorzichtig met de snijschijven – ze zijn heel erg
scherp
11

veiligheid m.b.t. het compacte hak/molenhulpstuk
●
Bevestig het meseenheid nooit aan de machine zonder de beker.
●
Schroef de beker nooit los terwijl het mini-hakhulpstuk / de molen op uw
keukenmachine bevestigd is.
●
Raak de scherpe messen niet aan – Houd kinderen uit de buurt van de
meseenheid.
●
Verwijder het mini-hakhulpstuk / de molen pas als de messen volledig tot
stilstand zijn gekomen.
veiligheid m.b.t. de sapcentrifuge
●
De sapcentrifuge niet gebruiken als het filter beschadigd is.
●
Gebruik alleen de meegeleverde stamper. Steek uw vingers nooit in de
toevoerbuis. Haal de stekker uit het stopcontact voordat u de vulopening
deblokkeert.
●
Voordat u het deksel verwijdert, schakelt u de machine uit en wacht u
totdat het filter is gestopt.
●
Gebruik nooit een beschadigd hulpstuk.
12
alvorens het apparaat aan te sluiten
●
Controleer of de netspanning overeenkomt met het op de
onderkant van het apparaat aangegeven voltage.
●
Dit apparaat voldoet aan de EC-richtlijn 2004/108/EC
betreffende de elektromagnetische compatibiliteit en ECbepaling 1935/2004 van 27/10/2004 betreffende materialen
die bestemd zijn voor contact met voedsel.
voordat u het apparaat voor het eerst gebruikt
1 Verwijder al het verpakkingsmateriaal, inclusief de kunststof
beschermhoezen van de messen. Wees voorzichtig, de
messen zijn erg scherp. Deze hoezen zijn alleen
bedoeld om de messen tijdens de fabricage en het transport
te beschermen; u kunt deze weggooien.
2 Reinig de onderdelen: zie onder ‘reinigen’.
3 Berg het overbodige snoer in de speciale opbergruimte aan
de achterkant van het apparaat op.
legenda
keukenmachine
motorhuis
losmaakbare aandrijfas
kom
deksel
invoerkoker
stampers
veiligheidsvergrendelingen
opbergvak snoer
snelheidsknop
blender
vulkap
deksel
kan
afsluitring
messeneenheid
extra hulpstukken
Het kan zijn dat uw foodprocessor niet met alle hieronder
genoemde hulpstukken geleverd wordt. De selectie aan
hulpstukken is afhankelijk van het model.
mes
deeghaak
dubbele metalen garde met snelheidsregeling
maxi mengkap
schijf voor dik snijden/grof raspen
schijf voor dun snijden/fijn raspen
schijf voor fijnhakken (julienne)
raspschijf
citroenpers met snelheidsregeling
mini-hakhulpstuk / molen
miniwerkkom
centrifugale fruitpers

gebruik van uw keukenmachine
1 Plaats de afneembare as op het motorblok .
2 Breng vervolgens de kom aan. Richt de handgreep eerst
naar achteren en draai deze vervolgens met de klok mee
totdat deze vastklikt .
3 Plaats een hulpstuk op de aandrijfas.
●
Breng altijd eerst de kom en het hulpstuk aan op het
apparaat voordat u ingrediënten toevoegt.
4 Breng het deksel aan - verzeker u ervan dat de bovenkant
van de aandrijfas zich in het midden van het deksel bevindt.
●
Gebruik nooit het deksel om de keukenmachine
te bedienen, maar altijd de aan/uit
snelheidsregelaar.
5 Schakel het apparaat aan en selecteer een snelheid.
●
De keukenmachine werkt niet wanneer de kom
en het deksel niet correct zijn aangebracht.
●
Gebruik de stootfunctie (P) om korte stroomstoten te geven.
Als u de stroomstoot wilt stoppen, laat u de knop los.
6 Volg de bovenstaande procedure in omgekeerde volgorde
om het deksel, de hulpstukken en de kom te verwijderen.
●
Zet het apparaat altijd uit voordat u het deksel
verwijdert.
belangrijk
●
Deze keukenmachine is niet geschikt voor het persen of
malen van koffiebonen of voor het vermalen van kristalsuiker
tot basterdsuiker.
●
Wanneer u amandelessence of -smaakstof aan mengsels
toevoegt, dient u contact met de kunststof te vermijden,
aangezien dit permanente vlekken kan geven.
de blender gebruiken
1 Plaats de afsluitring over de roterende mesjes – zorg
ervoor dat de afsluitring goed is geplaatst.
Als de afsluitring niet goed is geïnstalleerd, zal
de machine lekken.
2 Schroef de maatbeker op het onderstel.
3 Giet de ingrediënten in de maatbeker.
4 Plaats de vuldop in het deksel en geef hem een draai.
5 Draai het deksel naar rechts om hem op de maatbeker te
vergrendelen.
6 Plaats de blender op het motorelement en draai hem vast
.
7 Kies een snelheid of gebruik de stroomstootknop.
●
Laat alle vloeistoffen tot kamertemperatuur
afkoelen voor u ze in de blender doet.
tips
●
Wanneer u mayonaise maakt, doet u alle ingrediënten
behalve de olie in de blender. Terwijl de machine aan staat,
giet u de olie door de vuldop in de kom.
●
Dikke mengsels, zoals paté’s en dipsauzen moeten soms
van de zijkant van de kom af geschraapt worden. Als de
mengeling met moeite wordt gemengd, voeg dan wat meer
vloeistof toe.
●
Wanneer u ijs wilt vergruizen, gebruikt u korte stroomstoten.
●
Als u wilt dat uw blender lang mee gaat, zet hem dan nooit
langer dan 60 seconden aan. Zet de blender uit zodra u de
juiste dikte hebt verkregen.
●
Doe geen specerijen in de keukenmachine – ze kunnen het
plastic beschadigen.
●
De machine functioneert niet als de blender onjuist is
geïnstalleerd.
●
Doe geen droge ingrediënten in de blender voordat u hem
aan zet. Snij ze zo nodig in stukjes; verwijder de vuldop en
terwijl de machine aan staat, laat u ze één voor één door de
vuldop vallen.
●
Gebruik de blender niet als een opslagcontainer. Houd de
blender voor en na gebruik leeg.
●
Meng nooit meer dan 11⁄2 liter vloeistof – minder voor
schuimende vloeistoffen, zoals milkshakes.
13
de juiste snelheden voor alle functies
Instrument/hulpstuk Functie Snelheid Maximum capaciteit
Mes Instant cakemix 1 – 8 1,5 kg totaalgewicht
G
ebaksdeeg – boter met bloem mengen 5 – 8 340 gr bloemgewicht
W
ater toevoegen om ingrediënten te mengen 1 – 5
Hakken/pureren/paté’s 8 600 gr vlees
Mes met maxi mengkap Soep – begin op lage snelheid en verhoog tot 8 1 – 8 1,5 liter
G
arde Eiwit 8 het wit van 6 eieren
Ei & suiker voor vetloze taarten 8
Slagroom 5 – 8 500 ml
Deeghaak Mengsels met gist 8 500 gr
S
chijven – snijden/schaven/hakken Harde etenswaren als wortelen, harde kaas 5 – 8
Z
achtere etenswaren als komkommer, tomaten 1 – 5
R
aspschijf Parmezaanse kaas, aardappelen voor knoedels 8
Citroenpers Citrusvruchten 1
Minikom & mes Alle functies 8 200 gr
Blender Alle functies 8 1,5 liter
mini-hakhulpstuk / molen Alle functies 8
Centrifugale fruitpers Fruit & groente 8 450 gr
het gebruik van de hulpstukken
snijmes/ deeggereedschap
H
et snijmes is het meest veelzijdige
v
an alle hulpstukken. De
verwerkingstijd bepaalt de verkregen
s
tructuur. Gebruik de pulsknop voor
e
en grovere structuur.
Gebruik het snijmes voor het bakken
v
an taarten en gebak, het hakken van
r
auw en gekookt vlees, groenten,
noten, paté, dipsauzen, gepureerde
s
oepen en verder om biscuits en
b
rood te verkruimelen. Het kan ook
worden gebruikt om gegiste
d
eegmengsels te maken indien het
deeggereedschap niet is bijgeleverd.
Gebruik het deeggereedschap voor
gegiste deegmengsels.
nuttige tips
snijmes
●
Snijd producten zoals vlees, brood en groenten in blokjes
van ongeveer 2 cm voor verwerking.
●
Biscuits moeten in stukken worden gebroken en in de
invoerkoker ingebracht terwijl de machine draait.
●
Bij het bereiden van gebak, gebruik vet dat direct uit de
ijskast in blokjes van 2 cm is gesneden.
●
Zorg ervoor de producten niet te fijn te bewerken.
deeg gereedschap
●
Plaats de droge ingrediënten in de kom en giet de vloeistof
in de invoerkoker terwijl de machine draait. Ga door totdat er
zich een elastische deegbal heeft gevormd. Dit duurt 60 - 90
seconden.
●
Kneed het opnieuw, alleen met de hand. Het wordt niet
aanbevolen om het herkneden in de kom uit te voeren
aangezien de keukenmachine daar instabiel van kan worden.
aangedreven dubbele garde
Gebruik voor de lichte mengsels en het kloppen van eieren
bijvoorbeeld alleen eiwitten, room, poedermelk en suiker
voor vetvrije biscuits. Zwaardere mengsels zoals vet en
bloem beschadigen de garde.
het gebruik van de garde
1 Bevestig de aandrijfas en de kom op
het motorhuis.
2 Druk iedere menger stevig in de
aandrijfkop .
3 Breng de garde aan door deze
zorgvuldig te draaien totdat zij over
de aandrijfas valt.
4 Voeg de ingrediënten toe.
5 Breng het deksel aan - controleer of
de bovenkant van de aandrijfas zich
in het midden van het deksel bevindt.
6 Zet het apparaat aan.
b
elangrijk
●
De garde is niet geschikt voor het mengen van instant
cakemix of boter en suiker, aangezien hierdoor de garde
b
eschadigd raakt. Gebruik altijd het mes voor de bereiding
van cakes en taarten.
handige tips
●
De beste resultaten worden verkregen wanneer de eieren op
k
amertemperatuur zijn.
●
Controleer of de kom en de gardes schoon en vetvrij zijn voordat
u gaat kloppen.
blenderkap
Gebruik de blenderkap en het
snijmes bij het mengen van
v
loeistoffen. Hiermee kunt u de
c
apaciteit voor het verwerken van
vloeistoffen vergroten van 1 liter tot
1,5 liter, lekken voorkomen en de
hakprestaties van het mes
vergroten.
1 Bevestig de aandrijfas en de kom
aan het motorhuis.
2 Plaats het snijmes.
3 Voeg de te bewerken ingrediënten
toe.
4 Plaats de kap over de bovenzijde van het mes en controleer
dat deze rust op de rand aan de binnenkant van de kom
. Druk niet op de kap, houd deze vast aan de
centrale handgreep.
5 Plaats het deksel en zet het apparaat aan.
schijven voor snijden/raspen
omkeerbare schijven voor snijden/raspen - dik ,
dun
Gebruik de raspzijde voor kaas,
wortels, aardappels en producten
met een vergelijkbare structuur.
Gebruik de snijzijde voor kaas,
wortels, aardappels, kool,
courgette, bieten en uien.
schijf voor fijn hakken
(Julienne)
Gebruik: aardappels snijden voor
frieten à la Julienne; stevige
ingrediënten voor salades,
garneringen, stoofschotels en
roerbakgroenten (bv. wortels,
koolraap, courgette, komkommer).
raspschijf
Raspt Parmezaanse kaas en
aardappelen voor Duitse
aardappelknoedels.
veiligheid
●
Verwijder het deksel nooit voordat de snijschijf
geheel tot stilstand is gekomen.
●
De snijschijven zijn scherp - u dient ze
voorzichtig te behandelen.
14
m
u
l
t
i
p
r
o
gebruik van de snijschijven
1
Bevestig de aandrijfas en de
kom op het motorhuis.
2
Houd de schijf bij de handgreep
i
n het midden vast en plaats
de schijf op de aandrijfas met de
j
uiste zijde naar boven .
3
Breng het deksel aan.
4 Kies het formaat invoerkoker dat
u wilt gebruiken. De stamper
b
evat een kleinere invoerkoker
voor het verwerken van losse
producten of dunne
i
ngrediënten.
Om de kleine invoerkoker te
gebruiken - plaatst u eerst de grote stamper in de
invoerkoker.
Om de grote invoerkoker te gebruiken - gebruikt u beide
stampers tegelijk.
5 Plaats het voedsel in de invoerkoker.
6 Zet het apparaat aan en druk de stamper gelijkmatig naar
beneden - steek nooit uw vingers in de
invoerkoker.
nuttige tips
●
Gebruik verse ingrediënten
●
Snij het voedsel niet te klein. Vul de grote invoerkoker
behoorlijk en over de hele breedte. Dit voorkomt dat het
voedsel opzij glipt tijdens de verwerking. U kunt ook de
kleine invoerkoker gebruiken.
●
Wanneer u de hakschijf gebruikt, plaats de ingrediënten dan
horizontaal.
●
Bij het snijden of raspen: verticaal geplaatste producten
worden korter gesneden dan horizontaal geplaatste
producten .
●
Er zal na verwerking altijd een kleine hoeveelheid afval
overblijven op de plaat of in de kom.
citruspers
Gebruik de citruspers om
h
et sap van citrusvruchten
u
it te persen (b.v.
sinaasappels, citroenen,
l
imoenen en grapefruits).
kegel
zeef
het gebruik van de
citruspers
1 Bevestig de aandrijfas en
d
e kom op het motorhuis.
2
Plaats de zeef in de kom verzeker u ervan dat de
handgreep van de zeef
direct boven de handgreep
van de kom is vastgezet
.
3 Plaats de kegel over de aandrijfas totdat deze geheel naar
beneden valt .
4 Snijd het fruit in tweeën. Zet het apparaat vervolgens aan en
druk het fruit op de kegel.
●
De citruspers werkt niet als de zeef niet correct
is vastgezet.
mini-hakhulpstuk / molen
Gebruik het mini-hakhulpstuk / de molen
voor het malen van kruiden, noten en
koffiebonen.
messeneenheid
afdichtring
pot
molendeksel
veiligheid
●
Bevestig het meseenheid nooit aan de
machine zonder de beker.
●
Schroef de beker nooit los terwijl het minihakhulpstuk / de molen op uw
keukenmachine bevestigd is.
●
Raak de scherpe messen niet aan –
Houd kinderen uit de buurt van de
meseenheid.
●
Verwijder het mini-hakhulpstuk / de molen
pas als de messen volledig tot stilstand zijn
gekomen.
belangrijk
●
Om een lange levensduur van uw minihakhulpstuk / molen te garanderen, mag u
hem nooit langer dan 30 seconden achtereen laten draaien.
Schakel het apparaat uit zodra u de juiste consistentie hebt
verkregen.
●
Het verwerken van specerijen wordt niet aangeraden, omdat
de kunststof onderdelen beschadigd kunnen raken.
●
Het apparaat werkt niet als het mini-hakhulpstuk / de molen
onjuist is bevestigd.
●
Gebruik de molen alleen voor droge ingrediënten.
15
m
u
l
t
i
p
r
o
m
u
l
t
i
p
r
o
m
u
l
t
i
p
r
o
m
u
l
ti
p
r
o
het gebruik van uw mini-hakhulpstuk /
de molen
1 Doe uw ingrediënten in de pot.
V
ul de pot maximaal tot de helft.
2
Plaats de afdichtring in de
messeneenheid.
3
Zet de messeneenheid
o
ndersteboven en laat deze met
de messen naar beneden in de
pot zakken.
4
Schroef de messeneenheid op
de pot tot hij losvast zit.
5 Zet het mini-hakhulpstuk / de
m
olen op het motorblok en draai om hem te vergrendelen
.
6 Zet de molen aan op de hoogste snelheid of gebruik de
pulsregelaar.
tips
●
Kruiden kunnen het best worden gemalen, als ze schoon en
droog zijn.
miniwerkkom
Gebruik de miniwerkkom
om kruiden te hakken en
om kleine hoeveelheden
ingrediënten te mengen,
zoals vlees, ui, noten,
mayonaise, groente, puré,
sauzen en babyvoeding.
mes van miniwerkkom
miniwerkkom
de miniwerkkom
gebruiken
1 Plaats de aandrijfas en de
kom op het motorelement.
2 Installeer de miniwerkkom –
zorg dat de ribben aan de
binnenkant van de
minikompijp op één lijn
liggen met de gleuven van
de hoofdpijp .
3 Plaats het mes over de
aandrijfas .
4 Voeg de ingrediënten toe
die verwerkt moeten
worden.
5 Plaats het deksel op de kom en zet de machine aan.
veiligheidsmaatregelen
●
Verwijder het deksel nooit voordat het mes helemaal tot
stilstand is gekomen.
●
Het mes is erg scherp – ga er altijd voorzichtig mee om.
belangrijk
●
Doe geen specerijen in de keukenmachine – ze kunnen het
plastic beschadigen.
●
Meng geen harde ingrediënten, zoals koffiebonen, ijsklontjes
of chocolade – ze kunnen het mes beschadigen.
t
ips
●
Kruiden worden het beste verwerkt wanneer ze schoon en
droog zijn.
●
V
oeg altijd een klein beetje vloeistof toe wanneer u gekookte
ingrediënten tot babyvoeding mengt.
●
Snij etenswaren als vlees, brood, groente in blokjes van
1
-2 cm, voordat u ze gaat mengen.
●
Wanneer u mayonaise maakt, giet u de olie door de
toevoerbuis.
centrifugale fruitpers
G
ebruik de centrifugale fruitpers
v
oor het persen van sap uit stevig
fruit en groenten.
stamper
deksel
zeef
inwendige bak
Hoe de centrifugale
fruitpers moet worden
gebruikt
1 Breng de aandrijfas en kom aan op
het motorblok.
2 Vergrendel de zeef in de inwendige
bak .
3 Breng de inwendige bak aan in de
beker .
4 Plaats het deksel op de beker en
draai het tot het vastzit en de
vulbuis zich boven de handgreep
bevindt .
5 Snijd het voedsel in kleine stukken,
zodat ze in de vulbuis passen.
6 Zet de fruitpers aan en druk de
inhoud met de stamper gelijkmatig
omlaag - steek nooit uw vingers in de vulbuis.
Verwerk de gehele inhoud, voordat u meer stukken
toevoegt.
7 Laat het apparaat na de toevoeging van het laatste stuk nog
20 seconden draaien om al het sap uit de zeef te
verwijderen.
belangrijk
●
Als de fruitpers gaat trillen, zet hem dan uit en leeg de zeef
(de fruitpers gaat trillen, als de moes ongelijkmatig verdeeld
raakt).
●
Verwerk kleine hoeveelheden tegelijk (maximaal 450 g) en
leeg de zeef en inwendige bak regelmatig.
●
Verwijder vóór het verwerken pitten (bv. peper, meloen,
pruimen) en harde schillen (bv. meloen, ananas). Het is niet
nodig appels of peren te schillen en van hun klokhuis te
ontdoen.
tips
●
Gebruik stevige, verse vruchten en groenten.
●
Het sap van citrusvruchten zal bitter en schuimig zijn, omdat
de schil, het wit en de velletjes ook worden verwerkt.
Gebruik daarvoor een citrusvruchtenpers.
16
m
ul
t
i
p
r
o
m
ul
ti
p
r
o
mu
l
t
i
p
r
o

onderhoud & reiniging
●
Z
et het apparaat altijd uit en trek de stekker uit het
stopcontact voordat u het gaat schoonmaken.
●
M
essen en snijschijven zijn zeer scherp - ga er voorzichtig
m
ee om.
●
Het plastic kan verkleuren door sommige voedselproducten.
D
it is normaal, levert geen schade op aan het plastic en
b
eïnvloedt de smaak van uw voedsel niet. U kunt deze
verkleuringen verwijderen met een doek die licht bevochtigd
is met plantaardige olie.
Motorhuis
●
V
eeg af met een vochtige doek, en droog dan af. Controleer
of het veiligheidsmechanisme vrij is van voedselresten.
●
Berg het overbodige snoer op
i
n het opbergvak aan de
achterzijde van het apparaat
.
blender en mini-hakhulpstuk / molen
1 Leeg de beker, voordat u hem van de eenheid met snijmes
afschroeft.
2 Was de beker met de hand.
3 Verwijder en was de afdichtringen
4 Raak de scherpe messen niet aan - borstel ze schoon met
heet water en zeep, en spoel ze zorgvuldig af onder de
kraan. Dompel de messeneenheid niet onder in
water.
5 Laat het ondersteboven opdrogen.
aangedreven dubbele garde
●
Maak de gardes los van de aandrijfkop door ze voorzichtig
los te trekken. Wassen in warm water met zeep.
●
Veeg de aandrijfkop af met een vochtige doek, en droog
deze dan af. Dompel de aandrijfkop niet onder in
water.
alle andere onderdelen
●
Met de hand afwassen, en dan afdrogen.
●
Ze kunnen ook op het bovenrek van uw afwasmachine
gewassen worden. Aanbevolen wordt een kort programma
op lage temperatuur te gebruiken.
onderhoud en klantenservice
●
A
ls het snoer beschadigd is, moet het om veiligheidsredenen
door KENWOOD of een door KENWOOD geautoriseerd
r
eparatiebedrijf vervangen worden.
A
ls u hulp nodig hebt met:
●
h
et gebruik van uw apparaat of
●
onderhoud en reparatie
●
k
unt u contact opnemen met de winkel waar u het apparaat
g
ekocht hebt.
●
O
ntworpen en ontwikkeld door Kenwood in het VK.
●
V
ervaardigd in China.
BELANGRIJKE INFORMATIE VOOR DE CORRECTE
VERWERKING VAN HET PRODUCT IN
OVEREENSTEMMING MET DE EUROPESE
RICHTLIJN 2002/96/EC
Aan het einde van de levensduur van het product mag het niet
samen met het gewone huishoudelijke afval worden verwerkt.
Het moet naar een speciaal centrum voor gescheiden
afvalinzameling van de gemeente worden gebracht, of naar een
verkooppunt dat deze service verschaft. Het apart verwerken
van een huishoudelijk apparaat voorkomt mogelijke gevolgen
voor het milieu en de gezondheid die door een ongeschikte
verwerking ontstaan en zorgt ervoor dat de materialen waaruit
het apparaat bestaat, teruggewonnen kunnen worden om een
aanmerkelijke besparing van energie en grondstoffen te
verkrijgen. Om op de verplichting tot gescheiden verwerking
van elektrische huishoudelijke apparatuur te wijzen, is op het
product het symbool van een doorgekruiste vuilnisbak
aangebracht.
17

sécurité
●
Lisez et conservez soigneusement ces instructions pour pouvoir vous y
référer ultérieurement.
●
Retirez tous les éléments d’emballage et les étiquettes.
●
Les lames et lamelles sont très tranchantes, manipulez-les avec
précaution. Tenez systématiquement la lame du couteau à
l’emplacement prévu pour les doigts à l’opposé du
tranchant, durant la manipulation et le nettoyage.
●
Ne pas soulever ou porter le robot par la poignée car celle-ci risque de
casser et de provoquer des blessures.
●
Veillez toujours à retirer la lame avant de verser le contenu du bol.
●
Ne mettez jamais les mains dans le bol du robot ou dans le récipient du mixeur
quand ils sont branchés.
●
Eteignez et débranchez l’appareil :
●
●
avant l’assemblage ou le retrait d’accessoires
●
●
après chaque utilisation
●
●
avant le nettoyage
●
N’utilisez jamais vos doigts pour pousser la nourriture dans le tube d’alimentation.
Utilisez toujours le poussoir fourni.
●
N'essayez jamais d'installer l'unité porte-lames sur l'appareil
sans avoir au préalable installé le bocal du mini-hachoir /
moulin ou du mixeur.
●
Avant de retirer le couvercle du bol, ou le mixeur ou le mini-hachoir /
moulin du bloc-moteur : -
●
●
éteignez l'appareil ;
●
●
assurez-vous que les accessoires/lames sont complètement arrêtés ;
●
●
veillez à ne pas dévisser le gobelet du mixeur ou le mini-hachoir /
moulin de l'unité porte-lames.
●
Laissez les liquides refroidir à température ambiante avant de les placer
dans le mixeur.
●
Ne vous servez pas du couvercle pour arrêter ou allumer le robot ; utilisez toujours
le sélecteur de vitesse Marche / Arrêt.
●
Veillez à ne pas forcer le mécanisme de verrouillage, l’appareil serait
alors endommagé et pourrait provoquer des blessures.
●
N’utilisez jamais un accessoire non autorisé.
●
Ne laissez jamais l’appareil sans surveillance quand il est en marche.
●
N’utilisez jamais un appareil endommagé. Faites-le vérifier ou réparer : voir la
rubrique « service après-vente ».
●
Ne mouillez jamais l’unité moteur, le cordon d’alimentaiton ou la prise.
●
Ne laissez pas le cordon d’alimentation dépasser du bord d’une table, du plan de
travail ou être en contact avec des surfaces chaudes.
18
V
euillez déplier les illustrations de la première page
Français

●
Ne dépassez pas les capacités maximales indiquées dans le tableau des
vitesses recommandées.
●
Les appareils peuvent être utilisée par des personnes dont les capacités
physiques, sensorielles ou mentales sont diminuées, ou qui ne disposent
pas des connaissances ou de l’expérience nécessaires, si elles ont été
formées et encadrées pour l’utilisation des appareils, et si elles ont
conscience des risques encourus.
●
Cet appareil ne doit pas être utilisé par des enfants. Veuillez garder
l'appareil et le cordon hors de portée des enfants.
●
Les enfants doivent être surveillés afin qu'ils ne puissent pas jouer avec
cet appareil.
●
N’employez l’appareil qu’à la fin domestique prévue. Kenwood décline
toute responsabilité dans les cas où l’appareil est utilisé incorrectement ou
que les présentes instructions ne sont pas respectées.
●
Une mauvaise utilisation de votre robot/mixeur peut provoquer des
blessures.
Référez-vous à la section pertinente du chapitre « utilisation des
accessoires » pour consulter d’autres avertissements relatifs à la sécurité
de chaque accessoire.
mixeur
●
Laissez tous les liquides refroidir à température ambiante
avant de les placer dans le mixeur.
●
Pour protéger votre appareil dans la durée, procédez par séquences de
60 secondes maximum. Arrêtez l’appareil dès que vous obtenez la
consistance requise.
●
Ne pas insérer d’épices car elles risqueraient d’endommager le plastique.
●
Ne pas utiliser le mixeur pour préparations liquides comme espace de
stockage. Il doit être vide avant et après utilisation.
●
Ne jamais mixer plus de 1,5 litres – moins pour les liquides épais comme
les milk-shakes.
sécurité du disque à râper / à découper
●
Ne retirez jamais le couvercle tant que les disques de coupe
ne sont pas complètement arrêtés.
●
Manipulez les disques de coupe avec précaution - ils sont
extrêmement tranchants.
19

avant de brancher
●
Assurez-vous que votre alimentation électrique correspond à
celle qui est indiquée sur la partie inférieure de votre
appareil.
●
Cet appareil est conforme à la directive 2004/108/CE de la
CE sur la compatibilité électromagnétique, et au règlement
1935/2004 de la CE du 27/10/2004 sur les matériaux
destinés au contact alimentaire.
avant la première utilisation
1 Otez tous les emballages y compris le cache lame en plastique du
couteau. Manipulez avec précautions les lames car elles
sont extrêmement coupantes. Ces emballages doivent être
jetés, ils sont uniquement destinés à protéger la lame durant le
processus de fabrication et de transport.
2 Lavez les différents éléments : voir la rubrique « Nettoyage »
3 Enroulez l’excès de cordon d’alimentation au dos de l’appareil.
clé
principal
unité moteur
manche amovible
bol
couvercle
tube d’alimentation
poussoirs
systèmes de verrouillage de sécurité
enrouleur
commande de la vitesse
mixeur
bouchon
couvercle
pichet
joint d’étanchéité
support de lame
accessoires supplémentaires
Tous les accessoires mentionnés ci-dessous peuvent ne pas
être fournis avec votre robot. Les accessoires dépendent du
modèle de l’appareil.
lame tranchante
outil à pétrir
double batteur métallique
couvercle mixeur
disque pour lamelles épaisses/râpeuse (épais)
disque pour lamelles fines/râpeuse (fin)
disque à découper en fines lamelles (style Julienne)
disque grattoir
presse-agrumes à récipient
mini-hachoir / moulin
mini-bol
centrifugeuse
20
sécurité du mini hachoir / moulin
●
N’installez jamais l’unité porte-lames sur votre appareil sans avoir installé le
bol.
●
Ne dévissez jamais le bocal tant que le mini-hachoir / moulin est fixé à
l'appareil.
●
Ne touchez pas les lames tranchantes. Conservez l’unité porte-lames hors
de portée des enfants.
●
Ne retirez jamais le mini-hachoir / moulin tant que les lames ne sont pas
complètement à l'arrêt.
sécurité de l'extracteur de jus
●
N'utilisez pas la centrifugeuse si le filtre est endommagé.
●
Utilisez uniquement le poussoir fourni avec l’appareil. N’introduisez jamais
vos doigts dans le tube d’alimentation. Débranchez avant de retirer tout
élément obstruant le tube d’alimentation.
●
Avant de retirer le couvercle, éteignez l’appareil et attendez l’immobilisation
du filtre.
●
N'utilisez jamais un accessoire endommagé.

utilisation du robot
1 Fixez l’axe d’entraînement amovible sur le bloc moteur .
2 Mettez le bol en place. Orientez la poignée vers l’arrière et tournez
dans le sens des aiguilles d’une montre jusqu’à ce qu’il s’enclenche
en position .
3 Ajoutez un accessoire sur le manche du robot.
●
Fixez toujours le bol et l’accessoire sur l’appareil avant d’y ajouter
les ingrédients.
4 Fixez le couvercle sur le bol - le haut du manche doit se trouver au
centre du couvercle.
●
N’utilisez pas le couvercle pour faire fonctionner le
robot ; utilisez toujours le sélecteur de vitesse Marche /
Arrêt.
5 Allumez l’appareil et sélectionnez une vitesse.
●
Si le couvercle n’est pas fixé correctement, le robot ne
fonctionnera pas.
●
Utilisez le bouton de mélange intermittent Pulse (P). Pour un
fonctionnement prolongé de cette commande, laissez en
position P.
6 Procédez de façon inverse pour retirer le couvercle, les accessoires
et le bol.
●
Eteignez toujours l’appareil avant de retirer le
couvercle.
important
●
Votre robot n’est pas conçu pour concasser ou moudre des grains
de café ou transformer du sucre cristallisé en sucre en poudre.
●
Si vous ajoutez de l’essence d’amandes ou un parfum aux
préparations, évitez le contact avec le plastique car il risquerait
d’être tâché définitivement.
utilisation du mixeur
1 Installez la rondelle d’étanchéité dans l’unité à lame en
prenant soin de positionner la rondelle correctement.
Toute rondelle endommagée ou qui n’est pas
installée correctement entraîne un risque de
fuite.
2 Vissez le bol sur l’unité à lame.
3 Mettez les ingrédients dans le bol.
4 Enfoncez le bouchon sur le couvercle puis tournez.
5 Tournez le couvercle dans le sens des aiguilles d’une montre
pour l’installer fermement sur le bol.
6 Placez le mixeur pour préparations liquides sur le bloc
moteur puis tournez pour verrouiller .
7 Sélectionnez une vitesse ou utilisez le bouton de réglage
Pulse.
●
Laissez tous les liquides refroidir à température
ambiante avant de les placer dans le mixeur.
astuces
●
Lorsque vous faites une mayonnaise, mettez tous les
ingrédients à l’exception de l’huile dans le mixeur pour
préparations liquides. Une fois l’appareil en marche, versez
l’huile dans le conduit de remplissage.
●
Raclez les mélanges épais des parois, par ex. les pâtes ou
les sauces épaisses pour hors-d’œuvre. Si le mélange est
trop épais, ajoutez du liquide.
●
Pour piler de la glace, utilisez le bouton de mélange
intermittent Pulse (P).
●
Pour protéger votre appareil dans la durée, procédez par
séquences de 60 secondes maximum. Arrêtez l’appareil dès
que vous obtenez la consistance requise.
●
Ne pas insérer d’épices car elles risqueraient d’endommager
le plastique.
●
L’appareil ne se mettra pas en marche si le mixeur n’est pas
installé correctement.
21
sélection de la vitesse selon la fonction requise
Outil/accessoire Fonction Vitesse Capacité maximale
Lame tranchante Mélange pour préparations de gâteaux 1 – 8 1,5 kg poids total
Pâte – mélange de la matière grasse avec la farine 5 – 8 340 g farine
A
jout de l’eau à la pâte 1 – 5
Emincer/mixer/pâtes 8 600 g viande
L
ame tranchante avec Soupes – démarrer à vitesse faible puis augmenter 1 – 8 1,5 litres
couvercle mixeur progressivement jusqu’à la vitesse 8
Batteur Blancs d’oeufs 8 6 blancs d’oeufs
Oeuf et sucre pour gâteaux de Savoie sans 8
m
atière grasse
Crème 5 – 8 500 ml
O
util à pétrir Mélange à base de levure 8 500 g
D
isques – éminceur/râpeuse/fines Aliments durs – carottes, fromages à pâtes dures 5 – 8
lamelles Aliments plus mous – concombres, tomates 1 – 5
Disque grattoir Parmesan, pommes de terre pour les boulettes 8
de pomme de terre
Presse-agrumes Agrumes 1
Mini-bol et lame tranchante Toutes les fonctions 8 200 g
Mixeur Toutes les fonctions 8 1,5 litres
Mini-hachoir / moulin Toutes les fonctions 8
Centrifugeuse Fruits et légumes 8 450 g

●
N
e pas insérer d’ingrédients secs dans le mixeur avant de le
m
ettre en marche. Si nécessaire, coupez-les en morceaux,
enlevez le bouchon de remplissage, puis une fois que
l’appareil est en marche, introduisez-les un par un.
●
N
e pas utiliser le mixeur pour préparations liquides comme
e
space de stockage. Il doit être vide avant et après
u
tilisation.
●
Ne jamais mixer plus de 1,5 litres – moins pour les liquides
épais comme les milk-shakes.
utilisation des accessoires
lame couteau / mélangeur
Cette lame est l’accessoire le plus
p
olyvalent. La texture que vous obtenez
e
st déterminée par la durée de mixage.
Pour les textures plus granuleuses, utilisez
le mode de fonctionnement par impulsion
(pulse).
Utilisez la lame couteau pour la préparation
de gâteau et de pâtes à tarte, pour hacher
la viande fraîche et cuite, les légumes, les
noisettes, les pâtes, les pâtes à tartiner
salées, pour mixer les potages et aussi
réduire les biscuits et le pain en miettes.
Elle peut également servir pour la
préparation de pâtes levées lorsque
l’accessoire mélangeur n’est pas fourni.
Utilisez l’accessoire mélangeur pour la
préparation de pâtes levées.
conseils
lame couteau
●
Coupez les aliments, tels que la viande, le pain et les légumes en
cubes de 2 cm avant la préparation.
●
Les biscuits doivent être coupés en morceaux et introduits dans le
tube d’alimentation pendant que le moteur est en marche.
●
Pour la préparation de pâte à tarte, utilisez la matière grasse
directement du réfrigérateur et coupez-la en cubes de 2cm.
●
Prenez garde à ne pas mélanger trop longtemps.
mélangeur
●
Disposez les ingrédients secs dans le bol et versez le liquide dans le
tube d’alimentation pendant que le moteur est en marche.
Mélangez jusqu’à ce que le tout forme une pâte et soit lisse
d’apparence et élastique au touché (cela prend 60 à 90 secondes).
●
Pétrissez la pâte à la main uniquement. Il est déconseillé de pétrir
dans le bol car cela peut entraîner une certaine instabilité du robot.
fouet à deux batteurs
U
tilisez cet accessoire pour les mélanges légers uniquement, tels
q
ue les blancs d’oeufs, la crème, le lait condensé non sucré et pour
le mélange d’oeufs et de sucre pour les gâteaux mousseline légers.
L
es préparations plus lourdes, avec matière grasse et levure,
r
isquent d’endommager l’accessoire.
utilisation du fouet
1 Fixez le manche et le bol sur l’unité
moteur.
2
Introduisez fermement chaque batteur
dans la tête du fouet .
3 Mettez le fouet en place en le faisant
d
élicatement tourner jusqu’à ce qu’il
s’enclenche sur le manche.
4 Ajoutez les ingrédients.
5 Mettez le couvercle - assurez-vous que
l’extrémité du manche est correctement
positionnée au centre du couvercle.
6 Allumez l’appareil.
important
●
Le batteur ne convient pas aux préparations de gâteaux ni
aux mélanges de matière grasse et de sucre, qui
risqueraient d’endommager le batteur. Toujours utiliser la
lame tranchante pour faire vos gâteaux.
conseils
●
Pour de meilleurs résultats, utilisez des oeufs à température
ambiante.
●
Assurez-vous que le bol et les fouets sont propres et exempts de
graisse avant de battre la préparation.
récipient mélangeur maxi blend
Pour mélanger les liquides, utilisez le
récipient mélangeur maxi blend avec la
lame couteau. Il vous permet d’accroître
la capacité de traitement des liquides de
1 litres à 1,5 litres, d’empêcher les
écoulements et d’améliorer les
performances de hachage de la lame.
1 Adaptez le manche et le bol sur l’unité
moteur.
2 Fixez la lame couteau.
3 Ajoutez les ingrédients à mélanger.
4 Fixez le récipient mélangeur sur la partie
supérieure de la lame en veillant à le
stabiliser sur le socle à l’intérieur du bol
. N’enfoncez pas le récipient, maintenez-le par la
poignée centrale.
5 Adaptez le couvercle et allumez l’appareil.
22
m
u
l
t
i
p
r
o
 Loading...