


FP710 series
FP720 series
multi
pr
o
m
u
l
t
i
p
r
o
m
u
lti p
ro
22
24
25
26
21
23

before using your Kenwood appliance
●
Read these instructions carefully and retain for future reference.
●
Remove all packaging and any labels.
safety
●
The blades and discs are very sharp, handle
with care. Always hold the knife blade
by the finger grip at the top, away
from the cutting edge, both when
handling and cleaning.
●
Do not lift or carry the processor by the handle - or the handle
may break resulting in injury.
●
Always remove the knife blade before pouring contents from the
bowl.
●
Keep hands and utensils out of the processor bowl and liquidiser
jug whilst connected to the power supply.
●
Switch off and unplug:
●●
before fitting or removing parts
●●
after use
●●
before cleaning
●
Never use your fingers to push food down the feed tube. Always
use the pusher/s supplied.
●
Before removing the lid from the bowl or liquidiser/mill from the
power unit:-
●●
switch off;
●●
wait until the attachment/blades have completely stopped;
●●
be careful not to unscrew the liquidiser jug or mill from the
blade unit.
●
Allow all liquids to cool to room temperature before placing them
in the liquidiser.
●
Do not use the lid to operate the processor, always use the on/off
speed control.
●
This machine will be damaged and may cause injury
if the interlock mechanism is subjected to excessive
force.
●
Never use an unauthorised attachment.
●
Never leave the machine on unattended.
●
Never use a damaged machine. Get it checked or repaired: see
‘service’.
●
Never let the power unit, cord or plug get wet.
●
Don’t let excess cord hang over the edge of a table or worktop
or touch hot surfaces.
●
Do not exceed the maximum capacities stated.
●
Do not let infirm people use the appliance without supervision.
●
Do not let children use or play with the appliance.
●
Only use the appliance for its intended domestic use. Kenwood
will not accept any liability if the appliance is subject to improper
use, or failure to comply with these instructions.
before plugging in
●
Make sure your electricity supply is the same as the one shown
on the underside of your machine.
Important – UK only
●
The wires in the cord are coloured as follows:
Blue = Neutral,
Brown = Live.
●
The appliance must be protected by a 13A approved (BS1362)
fuse.
Note:
●
For non-rewireable plugs the fuse cover MUST be refitted when
replacing the fuse. If the fuse cover is lost then the plug must not
be used until a replacement can be obtained. The correct fuse
cover is identified by colour and a replacement may be obtained
from your Kenwood Authorised Repairer (see Service).
●
If a non-rewireable plug is cut off it must be DESTROYED
IMMEDIATELY. An electric shock hazard may arise if an
unwanted non-rewireable pug is inadvertently inserted into a 13A
socket outlet.
●
This appliance complies with European Economic Community
Directive 89/336/EEC.
before using for the first time
1 Remove all packaging including the plastic blade covers from the
knife blade. Take care the blades are very sharp. These
covers should be discarded as they are to protect the blade
during manufacture and transit only.
2Wash the parts see ‘cleaning’
3 Push excess cord into the back of the machine.
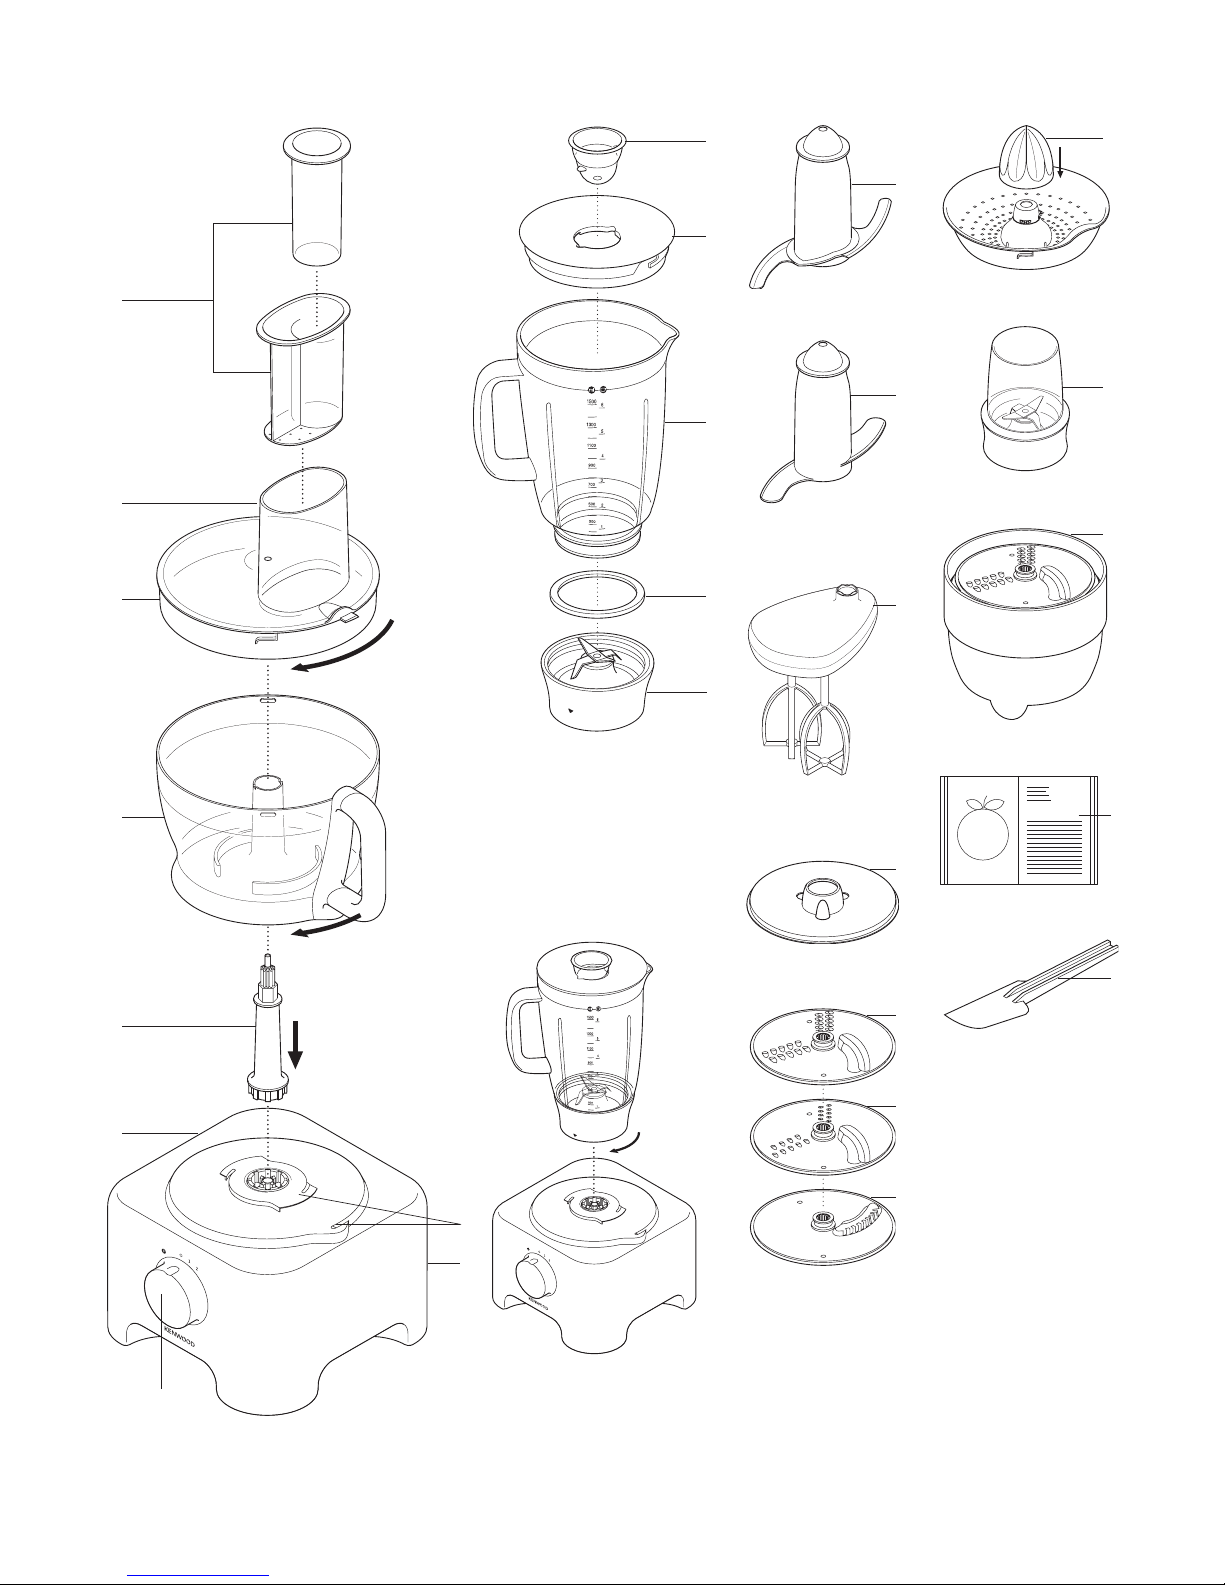
key
processor
power unit
detachable drive shaft
bowl
lid
feed tube
pushers
safety interlocks
cord storage
speed control
liquidiser
filler cap
lid
jug
sealing ring
blade unit
2

3
to use your food processor
1 Fit the detachable shaft onto the power unit .
2 Then fit the bowl. Place the handle towards the back and turn
clockwise until it locks .
3 Fit an attachment over the drive shaft.
●
Always fit the bowl and attachment onto the machine before
adding ingredients.
4 Fit the lid - ensuring the top of the drive shaft locates into the
centre of the lid.
●
Do not use the lid to operate the processor, always
use the on/off control.
5 Switch on and select a speed.
●
The processor won’t work if the bowl and lid are fitted
incorrectly.
●
Use the pulse (P) for short bursts. The pulse will operate for as
long as the control is held in position.
6 Reverse the above procedure to remove the lid, attachments and
bowl.
●
Always switch off before removing the lid.
important
●
Your processor is not suitable for crushing or grinding coffee
beans, or converting granulated sugar to caster sugar.
●
When adding almond essence or flavouring to mixtures avoid
contact with the plastic as this may result in permanent marking.
choosing a speed for all functions
Tool/Attachment Function Speed Maximum Capacities
Knife Blade One Stage Cake Mix 1 – 2 1.5Kg/3lb 5oz Total Wt
Pastry - rubbing fat into flour 2 340g/12oz Flour Wt
Adding water to combine pastry ingredients 1 – 2
Chopping/pureeing/pates 2 600g/1lb 6oz Meat
Knife Blade with maxi-blend canopy Soups – start at a low speed and move up to 2 1 – 2 1.5 litres/2pts 12fl.oz
Whisk Egg Whites 2 6 Egg Whites
Egg & sugar for fatless sponges 2
Cream 1 – 2 500 mls
Dough tool Yeasted mixes 2 500g/1lb 2oz
Discs – slicing/shredding/chipping Firm food items such as carrots, hard cheese. 2
Softer items such as cucumbers, tomatoes 1
Citrus Press Citrus fruits 1
Liquidiser All processing 2 1.5 litres/2pts 12fl.oz
Mill All processing 2
additional attachments
Not all of the attachments listed below may be included with your
food processor. Attachments are dependent upon the model
variant.
knife blade
dough tool
twin beater geared whisk
maxi-blend canopy
thick slicing/coarse shredding disc
thin slicing/fine shredding disc
fine (Julienne style) chipper disc
geared citrus press
mill
KENSTORE™ attachments carousel
recipe book
spatula

to use your liquidiser
1 Fit the sealing ring into the blade unit - ensuring the seal is
located correctly. Leaking will occur if the seal is
damaged or not fitted correctly.
2 Screw the jug onto the blade unit.
3 Put your ingredients into the jug.
4 Put the filler cap in the lid, then turn.
5Turn the lid in a clockwise direction to lock onto the jug.
6 Place the liquidiser onto the power unit and turn to lock .
7 Select a speed or use the pulse control.
●
Allow all liquids to cool to room temperature before
placing them in the liquidiser
hints
●
When making mayonnaise, put all the ingredients, except the oil
into the liquidiser. Then with the machine running, pour the oil into
the filler cap and let it run through.
●
Thick mixtures, eg pates and dips, may need scraping down. If
it’s difficult to process, add more liquid.
●
When crushing ice use the pulse in short bursts.
●
To ensure the long life of your liquidiser, never run it for longer
than 60 seconds. Switch off as soon as you’ve got the right
consistency.
●
Don’t process spices - they may damage the plastic.
●
The machine won’t work if the liquidiser is fitted incorrectly.
●
Don’t put dry ingredients into the liquidiser before switching on. If
necessary, cut them into pieces; remove the filler cap; then with
the machine running, drop them through one by one.
●
Don’t use the liquidiser as a storage container. Keep it empty
before and after use.
●
Never blend more than 11⁄2 litres (2pts 12floz) - less for frothy
liquids like milkshakes.
using the attachments
knife blade/ dough tool
The knife blade is the most versatile of all
the attachments. The length of the
processing time will determine the texture
achieved. For coarser textures use the
pulse control.
Use the knife blade for cake and pastry
making, chopping raw and cooked meat,
vegetables, nuts, pate, dips, pureeing
soups and to also make crumbs from
biscuits and bread. It can also be used
for yeasted dough mixes if the dough
tool is not supplied.
Use the dough tool for yeasted mixes.
hints
knife blade
●
Cut food such as meat, bread,
vegetables into cubes approximately
2cm/
3
⁄4in before processing.
●
Biscuits should be broken into pieces and added down the feed
tube whilst the machine is running.
●
When making pastry use fat straight from the fridge cut into
2cm/
3
⁄
4in.cubes.
●
Take care not to over-process.
dough tool
●
Place the dry ingredients in the bowl and add the liquid down the
feed tube whilst the machine is running. Process until a smooth
elastic ball of dough is formed this will take 60 - 90 secs.
●
Re-knead by hand only. Re-kneading in the bowl is not
recommended as it may cause the processor to become
unstable.
twin beater geared whisk
Use for light mixtures only eg egg whites, cream, evaporated
milk and for whisking eggs and sugar for fatless sponges.
Heavier mixtures such as fat and flour will damage it.
using the whisk
1 Fit the drive shaft and bowl onto the
power unit.
2Push each beater securely into the drive
head .
3 Fit the whisk by carefully turning until it
drops over the drive shaft.
4 Add the ingredients.
5Fit the lid - ensuring the end of the shaft
locates into the centre of the lid.
6Switch on.
important
●
The whisk is not suitable for making one-
stage cakes or creaming fat and sugar as
these mixes will damage it. Always use the knife blade for cake
making.
hints
●
Best results are obtained when the eggs are at room
temperature.
●
Ensure the bowl and whisks are clean and free from grease
before whisking.
maxi-blend canopy
When blending liquids, use the maxi-
blend canopy with the knife blade. It
allows you to increase the liquid
processing capacity from 1 litre to 1.5
litres, prevents leaking and improves the
chopping performance of the blade.
1 Fit the drive shaft and bowl onto the
power unit.
2Fit the knife blade.
3 Add ingredients to be processed.
4 Fit the canopy over the top of the blade
ensuring it sits on the ledge inside the
bowl . Do not push down on the
canopy, hold by the centre grip.
5 Fit the lid and switch on.
4
m
u
l
t
i
p
r
o

slicing/shredding discs
reversible slicing/shredding discs
- thick , thin
Use the shredding side for cheese,
carrots, potatoes and foods of a similar
texture.
Use the slicing side for cheese, carrots,
potatoes, cabbage, cucumber,
courgette, beetroot and onions.
fine (Julienne style) chipper disc
Use to cut: potatoes for Julienne style
French fries; firm ingredients for salads,
garnishes, casseroles and stir fries (eg
carrot, swede, courgette, cucumber).
safety
●
Never remove the lid until the cutting disc
has completely stopped.
●
Handle the cutting discs with care - they are
extremely sharp
to use the cutting discs
1 Fit the drive shaft and bowl onto the
power unit.
2 Holding by the centre grip , place
the disc onto the drive shaft with the
appropriate side uppermost .
3 Fit the lid.
4 Choose which size feed tube you
want to use. The pusher contains a
smaller feed tube for processing
individual items or thin ingredients.
To use the small feed tube - first put
the large pusher inside the feed tube.
To use the large feed tube - use both
pushers together.
5 Put the food in the feed tube.
6 Switch on and push down evenly with the pusher - never put
your fingers in the feed tube.
hints
●
Use fresh ingredients
●
Don’t cut food too small. Fill the width of the large feed tube
fairly full. This prevents the food from slipping sideways during
processing. Alternatively use the small feed tube.
●
When using the chipper disc, place ingredients horizontally.
●
When slicing or shredding: food placed upright comes out
shorter than food placed horizontally .
●
There will always be a small amount of waste on the plate or in
the bowl after processing.
citrus press
Use the citrus press to squeeze
the juice from citrus fruits (eg
oranges, lemons, limes and
grapefruits).
cone
sieve
to use the citrus
press
1 Fit the drive shaft and bowl
onto the power unit.
2 Fit the sieve into the bowl -
ensuring the sieve handle is
locked into position directly over
the bowl handle .
3 Place the cone over the drive
shaft turning until it drops all the
way down .
4 Cut the fruit in half. Then switch on and press the fruit onto the
cone.
●
The citrus press will not operate if the sieve is not
locked correctly.
5
m
u
l
t
i
p
r
o
m
ul
ti
pro
m
ul
t
i
pro
m
u
l
t
i
p
r
o

mill
Use the mill for milling herbs, nuts and
coffee beans.
blade unit
sealing ring
jar
sprinkler lid
safety
●
Never fit the blade unit to your machine
without the jar fitted.
●
Never unscrew the jar while the mill is fitted to
your machine.
●
Don’t touch the sharp blades. Keep the
blade unit away from children.
●
Never remove the mill until the blades have
completely stopped.
important
●
To ensure long life of your mill, never run for
longer than 30 seconds. Switch off as soon as
you’ve got the right consistency.
●
Don’t process spices - they may damage the
plastic.
●
The machine won’t work if the mill is fitted
incorrectly.
●
Use for dry ingredients only.
to use your mill
1 Put your ingredients into the jar. Fill it
no more than half full.
2 Fit the sealing ring into the blade
unit.
3Turn the blade unit upside down.
Lower it into the jar, blades down.
4 Screw the blade unit onto the jar
until it is finger tight.
5 Place the mill onto the power unit
and turn to lock .
6 Switch on to maximum speed or use
the pulse control.
7 After milling, you can replace the blade unit with the sprinkler lid
and shake out your food.
●
The sprinkler lid is not airtight.
hints
●
Herbs are best milled when clean and dry.
KENSTORE™ attachments carousel
Your food processor is supplied with an attachment storage
carousel that fits inside the bowl.
to use the storage carousel
1 Fit the knife blade to the bowl.
2 Then fit the whisk, discs and canopy into the carousel .
3 Fit the carousel over the knife blade and place the processor lid
on top .
care & cleaning
●
Always switch off and unplug before cleaning.
●
Handle the blades and cutting discs with care - they are
extremely sharp.
●
Some foods may discolour the plastic. This is perfectly normal
and won’t harm the plastic or affect the flavour of your food. Rub
with a cloth dipped in vegetable oil to remove the discolouration.
power unit
●
Wipe with a damp cloth, then dry. Ensure that the interlock area
is clear of food debris.
●
Store excess cord in the storage
area at the back of the
machine .
6
m
u
l
t
i
p
r
o
m
u
lt
i
pro

liquidiser/mill
1 Empty the jug/jar before unscrewing it from the blade unit.
2Wash the jug/jar by hand.
3 Remove and wash the seals.
4 Don’t touch the sharp blades – brush them clean using hot
soapy water, then rinse thoroughly under the tap. Don’t
immerse the blade unit in water.
5 Leave to dry upside down.
twin beater geared whisk
●
Detach the beaters from the drive head by gently pulling them
free. Wash in warm soapy water.
●
Wipe the drive head with a damp cloth, then dry.
Do not immerse the drive head in water.
all other parts
●
Wash by hand, then dry.
●
Alternatively they can be washed on the top rack of your
dishwasher. A short low temperature programme is
recommended.
service & customer care
●
If the cord is damaged it must, for safety reasons, be replaced
by Kenwood or an authorised Kenwood repairer.
UK
If you need help with:
●
Using your machine
●
Servicing or repairs (in or out of guarantee)
call Kenwood on 023 92392333 and ask for customer care.
Have your model number ready - it’s on the underside of
the processor.
●
spares and attachments
call 0870 2413653.
other countries
Contact the shop where you brought the food processor.
guarantee UK only
If your food processor goes wrong within one year from the date
you bought it, we will repair or replace it free of charge provided:
●
you have not misused, neglected, or damaged it;
●
it has not been modified (unless by Kenwood);
●
it is not second hand;
●
it has not been used commercially;
●
you have not fitted a plug incorrectly; and
●
you supply your receipt to show when you bought it.
This guarantee does not affect your statutory rights.
7

recipes
shortcrust pastry
300g (12oz) plain flour
150g (6oz) mixture of lard and margarine cut into small pieces
2.5 mls (
1
⁄2 tsp) salt
45mls (3tbsp) cold water
1 Fit the knife blade and add the flour, salt and fat. Process for
approximately 10 seconds or until the mixture looks like coarse
breadcrumbs.
2 Then add the water down the feed tube until the mixture looks
like it is about to stick together.
3Turn out the mixture onto a worksurface and shape by hand.
Use as required.
●
For best results allow the pastry to rest before use. Place in a
plastic bag or wrap in clingfilm and chill in the fridge for 20
minutes.
meringues
4 egg whites
200g (8oz) caster sugar
1 Whisk the egg whites until stiff.
2 Add half the sugar and continue to whisk until the mixture is
glossy.
3 Remove the whisk and carefully fold in the remaining sugar with
a metal spoon.
4 Pipe the mixture onto trays lined with non-stick baking paper.
5 Bake in a pre-heated oven at 110°C/225°F/Gas mark
1
⁄4 for
about 4 - 5hours until firm and crisp. If they start to brown, leave
the door slightly ajar.
lasagne
300g (12oz) braising steak, cubed.
400g can of tomatoes
30mls (2tbsp) tomato puree
1 onion
5mls (1tsp) basil
100g (4oz) lasagne
200g (8oz) mozzarella cheese
15mls (1tbsp) oil
salt and pepper
1 Grate the cheese using the shredding disc.
2 Then separately chop the meat and onions with the knife blade.
3Pre-heat the oil and fry the onions until softened, add the meat
and fry until brown.
4 Then add the tomatoes, tomato puree and seasonings.
5 Stir well, cover and simmer gently for about 40minutes.
6 Cook the lasagne in plenty of salted boiling water until tender.
Then drain well.
7 Place layers of meat, lasagne and cheese in a 1litre/2pint oven
proof dish. Finish with a layer of cheese.
8 Bake at 190°C/375°F/Gas Mark 5 for 30minutes or until golden
and bubbling.
victoria sandwich
150g (6oz) Soft margarine
150g (6oz) caster sugar
150g (6oz) self raising flour
5mls (1tsp) baking powder
3 eggs
15mls (1tbsp) warm water
filling & decoration
3tbsp strawberry jam
150mls (
1
⁄4pt) double cream whipped (optional)
1tbsp icing sugar or caster sugar
1Pre-heat the oven to 180°C/350°F/Gas mark 4 and grease two
18cm(7”) shallow cake tins.
2 Fit the knife blade. Place all the ingredients for the sponge in the
bowl and process for 5 seconds. Using a spatula, scrape the
mixture into the centre of the bowl and process for a further 5
seconds.
3 Pour the mixture into the prepared tins and bake for 20-25
minutes or until firm to a light touch and coming away from the
edges slightly. If you are unsure whether the cake is cooked
insert a thin skewer in the centre and it should come out clean.
Turn out onto a wire cooling rack.
4 When cool spread the jam and cream over one of the cakes,
top with the other cake and sprinkle with the sugar.
fruit cake
125g (5oz) block margarine (cut into cubes)
125g (5oz) caster sugar
2 eggs
80 - 100mls (5-6tbsp) milk
275g (11oz) mixed fruit
200g (8oz) self raising flour
5mls (1tsp) mixed spice
1Fit the knife blade and place the cubed margarine and sugar in
the bowl.
2 Mix until smooth, light and fluffy, scraping down as necessary.
3Add the eggs one at a time.
4 Add the flour, spices and milk. Pulse until ingredients combined.
5 Add the fruit using the pulse.
6 Pour the mixture into a greased and lined 7”/18cm round cake
tin. Bake in a preheated oven 150°C/300°F/Gas Mark 2 for
approximately 2 hours or until cooked. Turn out of the tin when
cool.
whisked sponge
3 eggs
75g/3oz caster sugar
75g/3oz plain flour (sieved twice)
1 Fit the twin beater geared whisk and add the sugar and eggs
into the bowl.
2 Whisk until the mixture is thick and leaves a trail.
3Fold the flour in carefully by hand using a metal spoon.
4 Pour the mixture into a deep lined and greased 7”/18cm cake
tin. Bake in a preheated oven at 190°C/375°F/Gas Mark 5 for
approximately 25minutes or until the cake springs back when
touched.
5 Remove from the tin and cool on a wire rack.
8

white bread
500g(1lb 2oz) strong white bread flour
5mls (1tsp) salt
15g(
1
⁄
2oz) lard
15g (
1
⁄2oz) fresh yeast or 10mls(2tsp) dried yeast + 5mls (1tsp)
caster sugar.
300mls (11fl oz) warm water, 100mls (3
1
⁄2 fl oz) boiling water to
200mls (7
1
⁄
2 fl oz) cold water
1 Dried yeast (the type that needs reconstituting): Add
the yeast and sugar to the warm water. Leave to stand for 5 - 10
minutes until frothy.
Fresh yeast: crumble into the flour
Other types of yeast: follow the manufacturer’s instructions.
2 Fit the dough tool or knife blade and add the flour (with fresh
yeast if used), salt and lard. Process for a few seconds to evenly
distribute the ingredients.
3 Then with the motor running quickly pour the liquid in a steady
stream down the feed tube until the mixture forms an elastic soft
dough. This will take about 60 - 90 seconds.
4 Remove the dough, place in a bowl, cover with an oiled piece of
clingfilm or a plastic bag, and leave in a warm place for 45 - 60
minutes or until doubled in size.
5 Re-knead by hand for 2 - 3 minute. Re-kneading in the
bowl is not recommended as it may cause the
processor to become unstable. Shape into a loaf or 15
rolls and place on greased baking trays and leave until double in
size.
6 Then bake in a pre-heated oven at 230°C/450°F/Gas mark 8 for
20 - 25 minutes for the loaf or 10 - 15 minutes for bread rolls.
When ready they should sound hollow when tapped on the
base.
carrot and coriander soup
25g (1oz) butter
1 onion chopped
1 clove garlic crushed
700g (1lb 10oz) carrot cut into 1 cm cubes
cold chicken stock
10-15ml (2-3tsp) ground coriander
salt and pepper
1 Melt the butter in a pan, add the onion and garlic and fry until
soft.
2 Place the carrot into the liquidiser, add the onion and garlic. Add
sufficient stock to reach the 1.5L level marked on the goblet. Fit
the lid and filler cap.
3 Blend on maximum speed for 5 seconds for a coarse soup or
longer for a finer result.
4Transfer the mixture to a saucepan, add the coriander and
seasoning and simmer the soup for 30 to 35 minutes or until
cooked.
5 Adjust the seasoning as necessary and add extra liquid if
required.
9

Kenwood Limited, New Lane, Havant, Hampshire PO9 2NH, UK
www.kenwoodworld.com
57829/1
 Loading...