

Kenwood KHH30 multizone, MultiOne Instructions Manual

TYPE KHH30
instructions
istruzioni
instrucciones
Bedienungsanleitungen
gebruiksaanwijzing

English 2 - 14
Nederlands 15 - 28
Français 29 - 43
Deutsch 44 - 57
Italiano 58 - 71
Português 72 - 85
Español 86 - 99
Dansk 100 - 112
Svenska 113 - 125
Norsk 126 - 137
Suomi 138 - 149
Türkçe 150 - 162
Ïesky 163 - 175
Magyar 176 - 189
Polski 190 - 204
Ekkgmij 205 - 220
Slovenčina 221 - 235
Українська 236 - 251
´¸∂w
252 - 462
4
8
9
7
2
3
bp
bq
br
bs
bt
bk
1
3
2
4
1
bl
bm bn bo
56
A
F
A
B
G
H
I
C
B
D
E
5
6
7
bp bq
9
8
A
F
G
H
I
A
B
D
E
F
C
C
B
D
E
bk
bm
bl
bq
bo
bp
bn
bs
br
bt
A
B
C
D
E
br bs bt

safety
l
Read these instructions carefully and retain for future
reference.
l
Remove all packaging and any labels.
l
Switch off and unplug:
l
before fitting or removing parts;
l
when not in use;
l
before cleaning.
l
Turn the speed control to ‘O’ (OFF) position and unplug
before fitting or removing tools/attachments, after use and
before cleaning.
l
Keep your fingers away from moving parts and fitted
attachments.
l
Never leave the Kitchen Machine unattended when it is
operating.
l
Never use a damaged appliance. Get it checked or repaired:
see ‘service and customer care’ section.
l
Never let the cord hang down where a child could grab it.
l
Never let the power unit, cord or plug get wet.
l
Ensure that no bowl tools are fitted or stored in
the bowl when using the dual drive outlet.
l
Never use an unauthorised attachment or more than one
attachment at once.
l
Never exceed the quantities stated in the maximum capacity
chart.
l
Take care when lifting this appliance. Ensure the head is
correctly latched in the down position and that the bowl,
tools, outlet cover and cord are secure before lifting.
l
Ensure the cord is fully unwound from the cord storage
compartment
4
before using the Kitchen Machine.
l
Children should be supervised to ensure that they do not play
with the appliance.
l
Do not move or raise the mixer head with an attachment
fitted as the Kitchen Machine could become unstable.
2

l
Do not operate your appliance near the edge of a work
surface.
l
Appliances can be used by persons with reduced physical,
sensory or mental capabilities or lack of experience and
knowledge if they have been given supervision or instruction
concerning use of the appliance in a safe way and if they
understand the hazards involved.
l
Misuse of your appliance can result in injury.
l
This appliance shall not be used by children. Keep the
appliance and its cord out of reach of children.
l
Only use the appliance for its intended domestic use.
Kenwood will not accept any liability if the appliance is subject
to improper use, or failure to comply with these instructions.
l
The maximum rating is based on the attachment that draws
the greatest load. Other attachments may draw less power.
l
Attachments will be damaged and may cause
injury if the interlock mechanism is subjected to
excessive force.
Food Processor attachment
l
The food processor knife blade and discs are extremely
sharp, handle with care. Always hold by the finger grip
at the top, away from the cutting edge, both when
handling and cleaning.
l
Always remove the knife blade before pouring contents from
the bowl.
l
Keep hands and utensils out of the food processor bowl
whilst connected to the power supply.
l
Never use your fingers to push food down the feed tube.
Always use the pusher supplied.
l
Before removing the lid from the food processor bowl:
l
switch off;
l
wait until the attachment/blades have completely stopped.
l
Never remove the food processor lid until the knife
blades/cutting discs have completely stopped.
3

l
SCALD RISK: Hot ingredients should be allowed to cool to
room temperature before processing in the attachment.
l
Do not use the lid to operate the food processor, always use
the speed/pulse control.
Blender attachment
l
Keep hands and utensils out of the blender goblet whilst
connected to the power supply.
l
Never fit the blade unit to the power unit without
the blender goblet fitted.
l
SCALD RISK: Hot ingredients should be allowed to cool to
room temperature before processing or blending in the
attachment.
l
Only operate the blender with the lid in place.
l
Only use the goblet with the blade assembly supplied.
l
Never run the blender empty.
l
To ensure the long life of your blender, never run for longer
than 60 seconds. Switch off as soon as you have achieved
the right consistency.
l
The processing of spices is not recommended as they may
damage the plastic parts.
l
Smoothie recipes – never blend frozen ingredients that have
formed a solid mass during freezing; break it up before adding
to the goblet.
Food Mincer attachment
l
Always ensure bones and rind etc. are removed from the
meat before mincing.
l
When mincing nuts only feed a few down at a time and allow
the scroll to pick them up before adding any more.
l
Always use the pusher supplied. Never put your fingers or
utensils in the feed tube.
l
Warning – the cutting blade is sharp, handle with care both in
use and when cleaning.
l
Ensure the attachment is secured in position before switching
on.
4

before plugging in
l
Make sure your electricity supply is the same as
the one shown on the underside of your appliance.
l
This appliance conforms to EC directive
2004/108/EC on Electromagnetic Compatibility and
EC regulation no. 1935/2004 of 27/10/2004 on
materials intended for contact with food.
before using for the first time
l
Wash the parts: see ‘care and cleaning’.
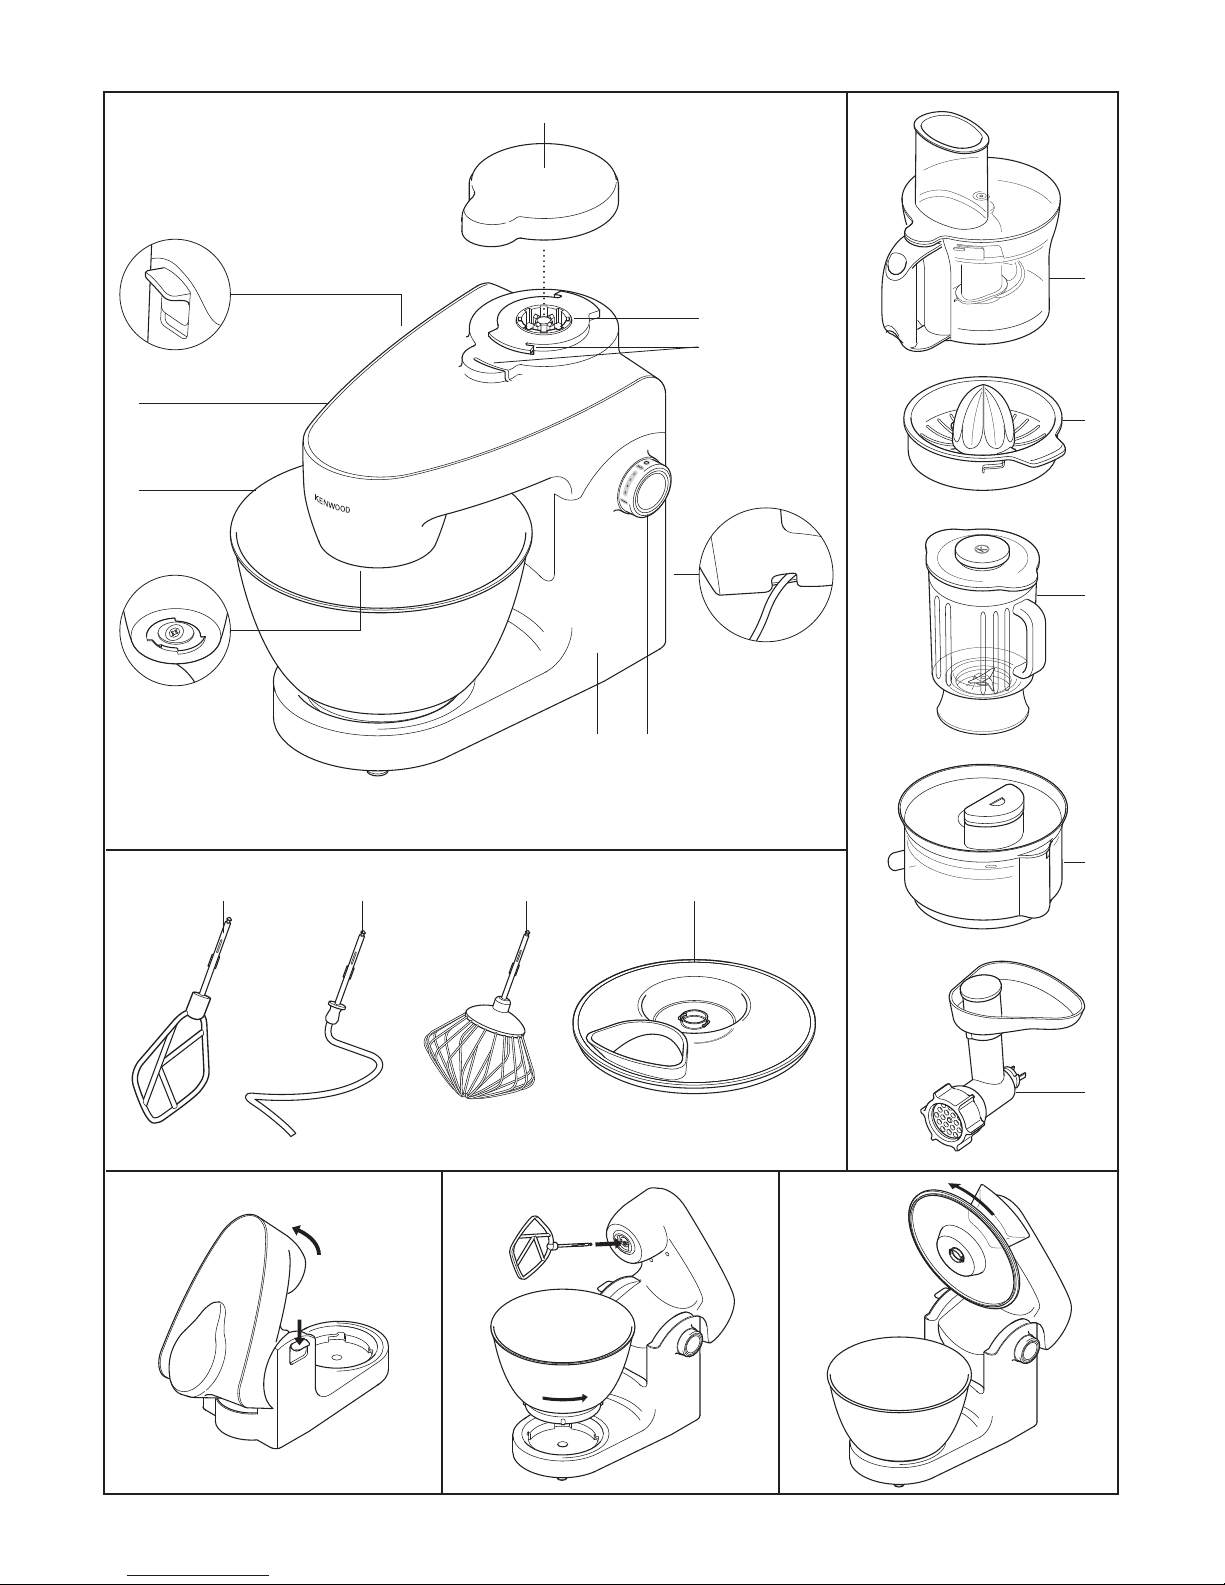
key
1
outlet cover
2
dual drive outlet (medium and high speed)
3
interlocks
4
cord storage compartment
5
speed/pulse control
6
power unit
7
bowl tool socket
8
bowl
9
mixer head
bk
head release lever
bl
K-beater
bm
spiral dough hook
bn
whisk
bo
splashguard
attachments
bp
food processor
bq
citrus juicer
br
glass blender
bs
juice extractor
bt
food mincer
Refer to the recommended speed chart for each
attachment.
Juice Extractor attachment
l
Do not use the juicer if the filter is damaged.
l
The cutting blades on the base of the filter are very sharp,
take care when handling and cleaning the filter.
• Do not use the lid to operate the juicer, always use the
speed/pulse control.
• Should excessive vibration occur when using this attachment,
either adjust the speed or stop the machine, unplug and clear
any pulp from the drum (the juicer vibrates if the pulp
becomes unevenly distributed).
5

the mixing tools and some of
their uses
K
-beater
l
For making cakes, biscuits, pastry, icing, fillings,
éclairs and mashed potato.
whisk
l
For eggs, cream, batters, fatless sponges,
meringues, cheesecakes, mousses, soufflés. Do
not use the whisk for heavy mixtures (eg creaming
fat and sugar) - you could damage it.
spiral dough hook
l
For yeast mixtures.
to use your bowl tools
1 Press the head release lever down 1and raise the
mixer head until it locks into position.
2 Fit the bowl into the base and turn anti-clockwise
to lock into position 2.
3 Select a tool and push into the tool socket until it
clicks
3
.
4 Press the head release lever down and lower the
mixer head until it locks into position.
5 Plug into the power supply. To switch on, turn the
speed switch to the desired setting. To switch off
turn to ‘O’ (OFF) position.
If the mixer head is in the raised position
or the outlet cover is not fitted, the Power
On light will flash and the machine will
not operate.
l
Switch to pulse for short bursts.
6 Unplug from the power supply.
7 Raise the mixer head and whilst holding it steady,
pull the tool from the tool socket.
important
l
If the mixer head is raised during operation, the
machine will stop working straight away. To
re-start, lower the mixer head, turn the speed
switch to the ‘O’ (OFF) position, wait a few
seconds and then re-select the speed. The
machine should resume operating straight away.
l
If for any reason power is interrupted and the
machine stops working, turn the speed switch to
the ‘O’ (OFF) position, wait a few seconds and then
re-select the speed. It should resume operating
straight away.
l
The machine will not operate unless the
outlet cover is correctly fitted.
l
If you hear the machine labouring either switch off
and remove some of the mixture or increase the
speed.
l
A
lways remove attachments fitted to the dual drive
outlet before raising the mixer head.
l
E
nsure that no bowl tools are fitted or
s
tored in the bowl when using the dual
drive outlet.
hints
l
S
witch off and scrape the bowl with a spatula
when necessary.
l
Eggs at room temperature are best for whisking.
l
Before whisking egg whites, make sure there is no
grease or egg yolk on the whisk or bowl.
l
Use cold ingredients for pastry unless your recipe
states otherwise.
l
When creaming fat and sugar for cake mixes,
always use the fat at room temperature or soften it
first.
l
Your machine has been fitted with a ‘soft start’
feature to minimise spillage. However if the
machine is switched on with a heavy mixture in the
bowl such as bread dough, you may notice that it
takes a few seconds to reach the selected speed.
points for bread making
important
l
Never exceed the maximum capacities stated - you
will overload the machine.
l
Some movement of the mixer head is
normal when mixing heavy loads such as
bread dough.
l
The ingredients mix best if you put the liquid in first.
l
At intervals stop the machine and scrape the
mixture off the dough hook.
l
Different batches of flour vary considerably in the
quantities of liquid required and the stickiness of
the dough can have a marked effect on the load
imposed on the machine. You are advised to keep
the machine under observation whilst the dough is
being mixed; the operation should take no longer
than 6-8 minutes.
to fit and use your splashguard
1 Fit the bowl into the base and add the ingredients.
2 Fit the splashguard by aligning the tabs with the
bowl tool socket
7
and rotate anti-clockwise to
lock into position
4
.
3 Fit the tool then lower the mixer head.
4 To remove the splashguard reverse the above
procedure.
l
During mixing, ingredients can be added directly to
the bowl via the chute.
PP
6

electronic speed sensor control
Y
our mixer is fitted with an electronic speed sensor
control that is designed to maintain the speed
under different load conditions, such as when
k
neading bread dough or when eggs are added to
a cake mix. You may therefore hear some variation
in speed during the operation as the mixer adjusts
to the load and speed selected - this is normal.
bp
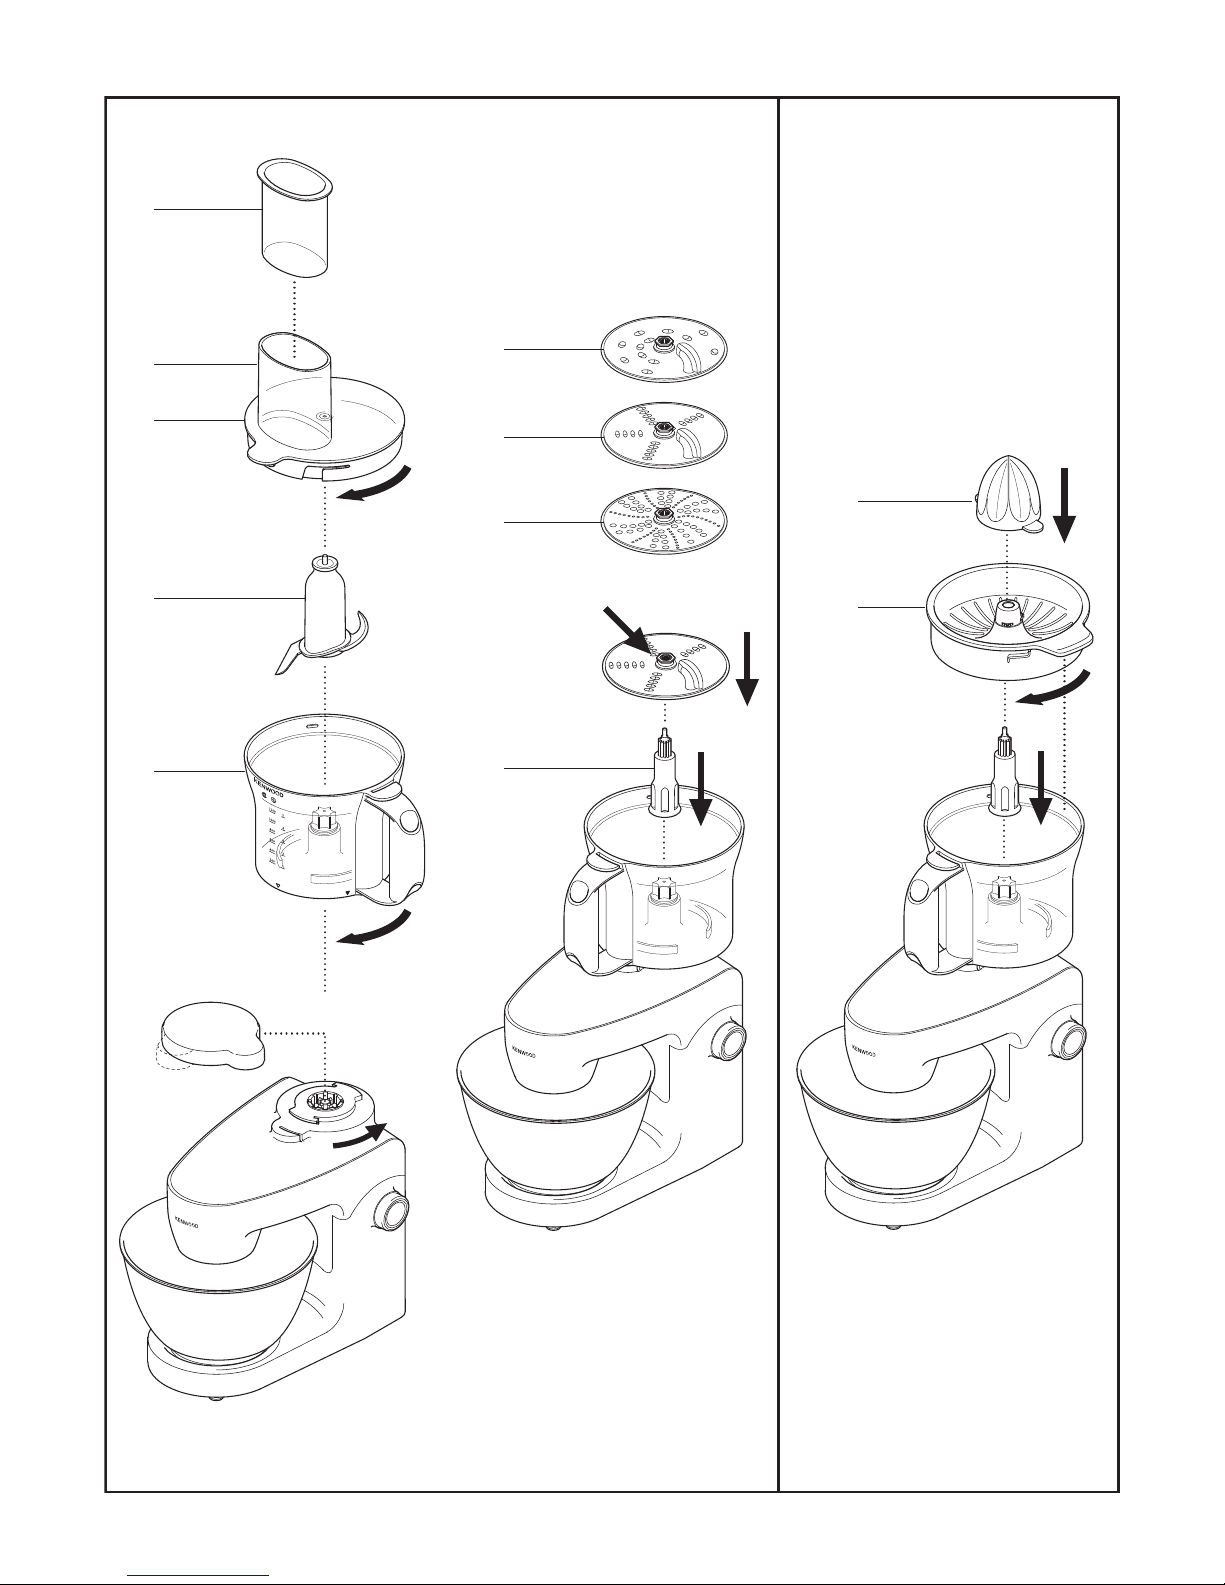
food processor
A
pusher
B
feed tube
C
lid
D
knife blade
E
bowl with drive shaft
F
thick slicing/grating disc
G
thin slicing/grating disc
H
extra fine grating disc
I
detachable drive shaft
to use your food processor
1 Remove the outlet cover by turning it anti-
clockwise and lifting off
5
.
2 Fit the bowl
E
over the outlet with the handle to
the right hand side and turn clockwise until it locks
into position
6
.
3 Add the knife blade or detachable drive shaft with
the desired attachment.
Note: The detachable drive shaft
I
should only be fitted when using the discs
and citrus juicer.
l
Always fit the bowl and attachment onto the
processor before adding ingredients.
4 Fit the lid
7
– ensuring the top of the knife
blade/drive shaft locates into the centre of the lid.
l
Do not use the lid to operate the
processor, always use the speed/pulse
control.
5 Plug in, switch on and select a speed (refer to the
recommended speed chart).
l
The processor will not operate if the bowl
or lid are not fitted correctly into the
interlocks. Check that the feed tube and
bowl handle are situated to the front.
l
Use the pulse Pfor short bursts. The pulse will
operate for as long as the control is held in
position.
6 Reverse the above procedure to remove the lid,
attachments and bowl.
l
Always switch off and unplug before
removing the lid.
i
mportant
l
Your processor is not suitable for crushing or
g
rinding coffee beans, or converting granulated
s
ugar to caster sugar.
l
When adding almond essence or flavouring to
m
ixtures, avoid contact with the plastic as this may
r
esult in permanent marking.
l
Do not process hot ingredients.
knife blade
D
The knife blade is the most versatile of all the
attachments. The length of the processing time will
determine the texture achieved.
For coarser textures use the pulse control.
Use the knife blade for cake and pastry making,
chopping raw and cooked meat, vegetables, nuts,
pâté, dips, pureeing soups and to also make
crumbs from biscuits and bread.
hints
l
Cut food such as meat, bread, vegetables into
cubes approximately 2cm/ ¾in before processing.
l
Biscuits should be broken into pieces and added
down the feed tube whilst the machine is running.
l
When making pastry, use fat straight from the
fridge cut into 2cm/ ¾in cubes.
l
Take care not to over-process.
l
Do not use the knife blade to mix heavy
loads such as bread dough.
l
Do not use the knife blade to chop ice cubes or
other hard foods, such as spices, they may
damage the attachment.
slicing/grating discs
to use the discs
reversible slicing/grating discs – thick
F
,
thin
G
Use the grating side for cheese, carrots, potatoes
and foods of a similar nature.
Use the slicing side for cheese, carrots, potatoes,
cabbage, cucumber, beetroot and onions.
extra fine grating disc
H
Grates Parmesan cheese and potatoes for German
potato dumplings.
7

to use the cutting discs
1
Fit the bowl on the power unit, add the detachable
drive shaft.
2 Hold by the centre grip, place the disc onto the
d
rive shaft with the appropriate side uppermost.
3 Fit the lid.
4 Put the food in the feed tube.
5 Switch on, then push down evenly with the pusher
– never put your fingers in the feed tube.
hints
l
Use fresh ingredients.
l
Do not cut food too small. Fill the width of the feed
tube fairly full. This prevents the food from slipping
sideways during processing.
l
Food placed upright comes out shorter than food
placed horizontally.
l
There will always be a small amount of waste on
the disc or in the bowl after processing.
bq
citrus juicer
Use the citrus juicer to squeeze the juice from
citrus fruits (e.g. oranges, lemons, limes and
grapefruits).
A
cone
B
sieve
to use the citrus juicer
1 Fit the bowl onto the power unit, add the
detachable drive shaft.
2 Fit the sieve into the bowl – ensuring the sieve
handle is locked into position directly over the bowl
handle
8
.
3 Place the cone over the drive shaft turning until it
drops all the way down
9
.
4 Cut the fruit in half. Then switch on and press the
fruit onto the cone.
l
The citrus juicer will not operate if the
sieve is not locked correctly.
l
For best results store and juice the fruit at room
temperature and hand roll on a worktop before
juicing.
l
To help with juice extraction move the fruit from
side to side when juicing.
l
When juicing large quantities, empty the strainer
regularly to prevent the build up of pulp and seeds.
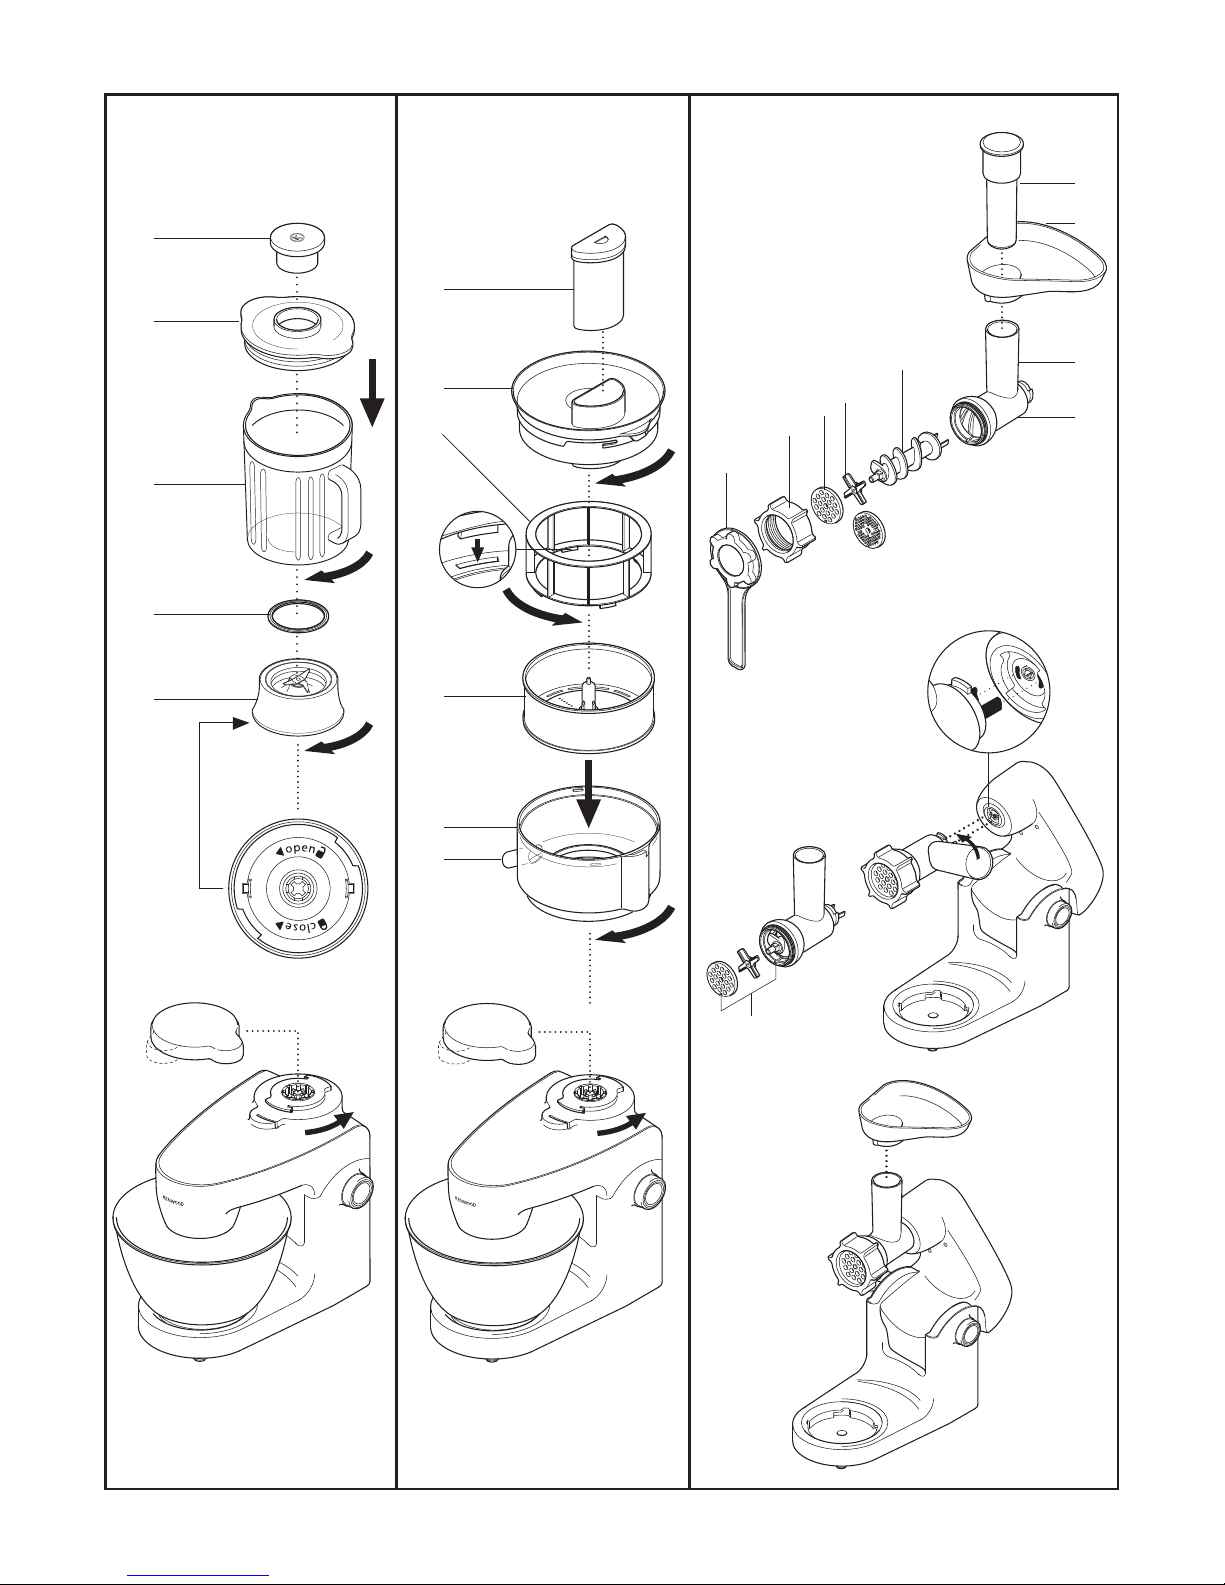
br
glass blender
A
f
iller cap
B
l
id
C
goblet
D
s
ealing ring
E
b
lade unit
to use your glass blender
1 Fit the sealing ring Dinto the blade unit E-
ensuring the seal is located correctly in the grooved
area.
l
Leaking will occur if the seal is damaged
or incorrectly fitted.
2 Screw the goblet onto the blade assembly
bk
.
Refer to the graphics on the underside of the blade
unit as follows:
- unlocked position
- locked position
The blender will not operate if incorrectly
assembled.
3 Put your ingredients into the goblet.
4 Fit the lid to the goblet and push down to secure
bl
. Fit the filler cap.
5 Remove the dual drive outlet cover by turning it
anti-clockwise and lifting off.
6 Place the blender onto the power unit, and turn
clockwise
bm
until it clicks into position.
l
The appliance will not operate if the
blender is incorrectly fitted to the
interlock.
7 Select a speed (refer to recommended speed
chart) or use pulse
P
for short bursts.
hints
l
When making mayonnaise, put all the ingredients,
except the oil, into the blender. Remove the filler
cap. Then, with the appliance running, add the oil
slowly through the hole in the lid.
l
Thick mixtures, e.g. pâtés and dips, may need
scraping down. If the mixture is difficult to process,
add more liquid.
l
Ice crushing – operate the pulse in short bursts
until crushed to the desired consistency.
l
The processing of spices is not recommended as
they may damage the plastic parts.
l
The appliance will not work if the blender
is incorrectly fitted.
8

l
T
o blend dry ingredients – cut into pieces, remove
the filler cap, then with the appliance running, drop
t
he pieces down one by one. Keep your hand over
t
he opening. For best results empty regularly.
l
Do not use the blender as a storage container.
Keep it empty before and after use.
l
Never blend more than 1.2 litres (42 fl oz) – less for
f
rothy liquids like milkshakes.
bs
juice extractor
Use the juice extractor for making juice from firm
fruit and vegetables.
A
pusher
B
juicer lid
C
pulp remover
D
filter drum
E
juicer bowl
F
spout
to use your juice extractor
1 Fit the juicer bowl Eover the dual drive outlet with
the spout
F
to the left hand side and turn
clockwise until it locks
bn
.
2 Place the pulp remover
C
into the filter drum D–
ensuring the tabs locate with the slots in the
bottom of the drum
bo
.
3 Fit the filter drum
bp
.
4 Place the juicer lid
B
onto the bowl and turn until
it locks
bq
. Your juicer will not operate if
the bowl or lid are not fitted correctly into
the interlock.
5 Place a suitable container under the juice outlet.
6 Cut the food to fit the feed tube.
7 Switch to maximum speed, then place the food
into the feed tube. Push down evenly with the
pusher - never put your fingers in the feed
tube. Process fully before adding more.
l
After adding the last piece, let the juicer run for a
further 30 seconds to extract all the juice from the
filter drum.
important
l
If the juicer starts to vibrate, switch off and empty
the pulp from the filter. (The juicer vibrates if the
pulp becomes unevenly distributed).
l
Maximum capacity that can be processed at one
time is 800g (1lb 12oz) of fruit or vegetables.
l
Some very hard foods may make your attachment
slow down or stop. If this happens switch off and
unblock the filter.
l
S
witch off and empty the pulp and juice containers
regularly during use.
hints
l
I
nsert soft food slowly to get the most juice.
l
Vitamins disappear - the sooner you drink your
juice, the more vitamins you will get.
l
I
f you need to store the juice for a few hours put it
in the fridge. It will keep better if you add a few
drops of lemon juice.
l
Do not drink more than three 230mls (8 fl.oz.)
glasses of juice a day unless you are used to it.
l
Dilute juice for children with an equal amount of
water.
l
Juice from dark green (broccoli, spinach etc) or
dark red (beetroot, red cabbage etc) vegetables is
extremely strong, so always dilute it.
l
Fruit juice is high in Fructose (fruit sugar), so people
with diabetes or low blood sugar should avoid
drinking too much.
bt
food mincer
Use the food mincer to process meat, poultry and
fish.
A
spanner
B
ring nut
C
screens: medium and coarse
D
cutter
E
scroll
F
body
G
feed tube
H
tray
I
pusher
to assemble
1 Fit the scroll Einside the food mincer body F.
2 Fit the cutter
D
– cutting side outermost. Ensure it
is seated properly, otherwise you could damage
your food mincer.
3 Fit a screen
C
. Put the notch over the locating
tab
br
.
4 Loosely fit the ring nut
B
.
to use your food mincer
1 Raise the mixer head.
2 With the food mincer in the position shown, align
the drive tabs on the end of the scroll with the
corresponding slots in the drive outlet
bs
.
3 Push the food mincer into the outlet and turn anti-
clockwise until it locks into place.
9

4
Hold the feed tube in place and tighten the ring nut
by hand.
5
Fit the tray
bt
.
6
Thaw frozen food thoroughly before
mincing. Cut meat into 2.5cm (1”) –wide strips.
7 Switch to maximum speed. Using the pusher,
gently push the food through one piece at a time.
D
o not push hard – you could damage your
food mincer.
important
l
Never operate the food mincer attachment for
longer than 10 minutes as this could damage your
mixer.
l
The food mincer attachment will not
operate unless the dual speed outlet
cover is fitted.
8 Once all the food has been minced, switch off and
unplug.
9 Remove the food mincer. Use the spanner
A
to
remove the ring nut if it is too tight.
care and cleaning
l
Always switch off and unplug before cleaning.
l
Dismantle attachments fully before cleaning.
power unit
l
Wipe with a damp cloth, then dry.
l
Never use abrasives or immerse in water.
l
Store excess cord in the storage compartment
4
at the back of the machine.
l
Ensure the feet on the base of the mixer are kept
clean.
bowl, tools, splashguard
l
Wash by hand, then dry thoroughly.
l
Never use a wire brush, steel wool or bleach to
clean your stainless steel bowl. Use vinegar to
remove limescale.
l
Keep away from heat (cooker tops, ovens,
microwaves).
food processor
l
Handle the blades and discs with care –
they are extremely sharp.
l
Some foods may discolour the plastic. This is
perfectly normal and won’t harm the plastic or
affect the flavour of your food. Rub with a cloth
dipped in vegetable oil to remove the
discolouration.
citrus juicer
l
Wash by hand, then dry thoroughly.
b
lender
1 Empty the goblet before unscrewing it from the
b
lade unit.
2
Wash the goblet by hand.
3 Remove and wash the seal.
4
Do not touch the sharp blades – brush them clean
u
sing hot soapy water, then rinse thoroughly under
the tap. Do not immerse the blade unit in
water.
5 Leave to dry upside down.
juice extractor
l
For easier cleaning always wash the parts
immediately after use.
l
Some foods, e.g. carrot, will discolour the plastic.
Rubbing with a cloth dipped in vegetable oil helps
remove discolouring.
l
Clean the filter using a soft brush.
l
Check the filter regularly for signs of
damage. Do not use if the filter is
damaged. Refer to “service and customer
care”.
food mincer
l
Wash all parts in hot soapy water, then dry
thoroughly. Do not wash any part in the
dishwasher. Never use a soda solution.
l
Wipe the screens with vegetable oil, then wrap in
greaseproof paper to prevent discolouring/rusting.
10

a
ll other parts
l
Wash by hand, then dry.
l
A
lternatively, refer to dishwasher chart for parts that
a
re dishwasher safe and can be washed on the top
rack of your dishwasher. Avoid placing items on the
b
ottom rack directly over the heating element. A
s
hort, low temperature (Maximum 50°C)
programme is recommended.
service and customer care
l
I
f the cord is damaged it must, for safety reasons,
be replaced by KENWOOD or an authorised
KENWOOD repairer.
l
I
f you experience any problems with the
operation of the Kitchen Machine or
attachments, before calling for assistance
refer to the troubleshooting guide.
If you need help with:
l
using your appliance
l
servicing or repairs
l
Contact the shop where you bought your
appliance.
l
Designed and engineered by Kenwood in the UK.
l
Made in China.
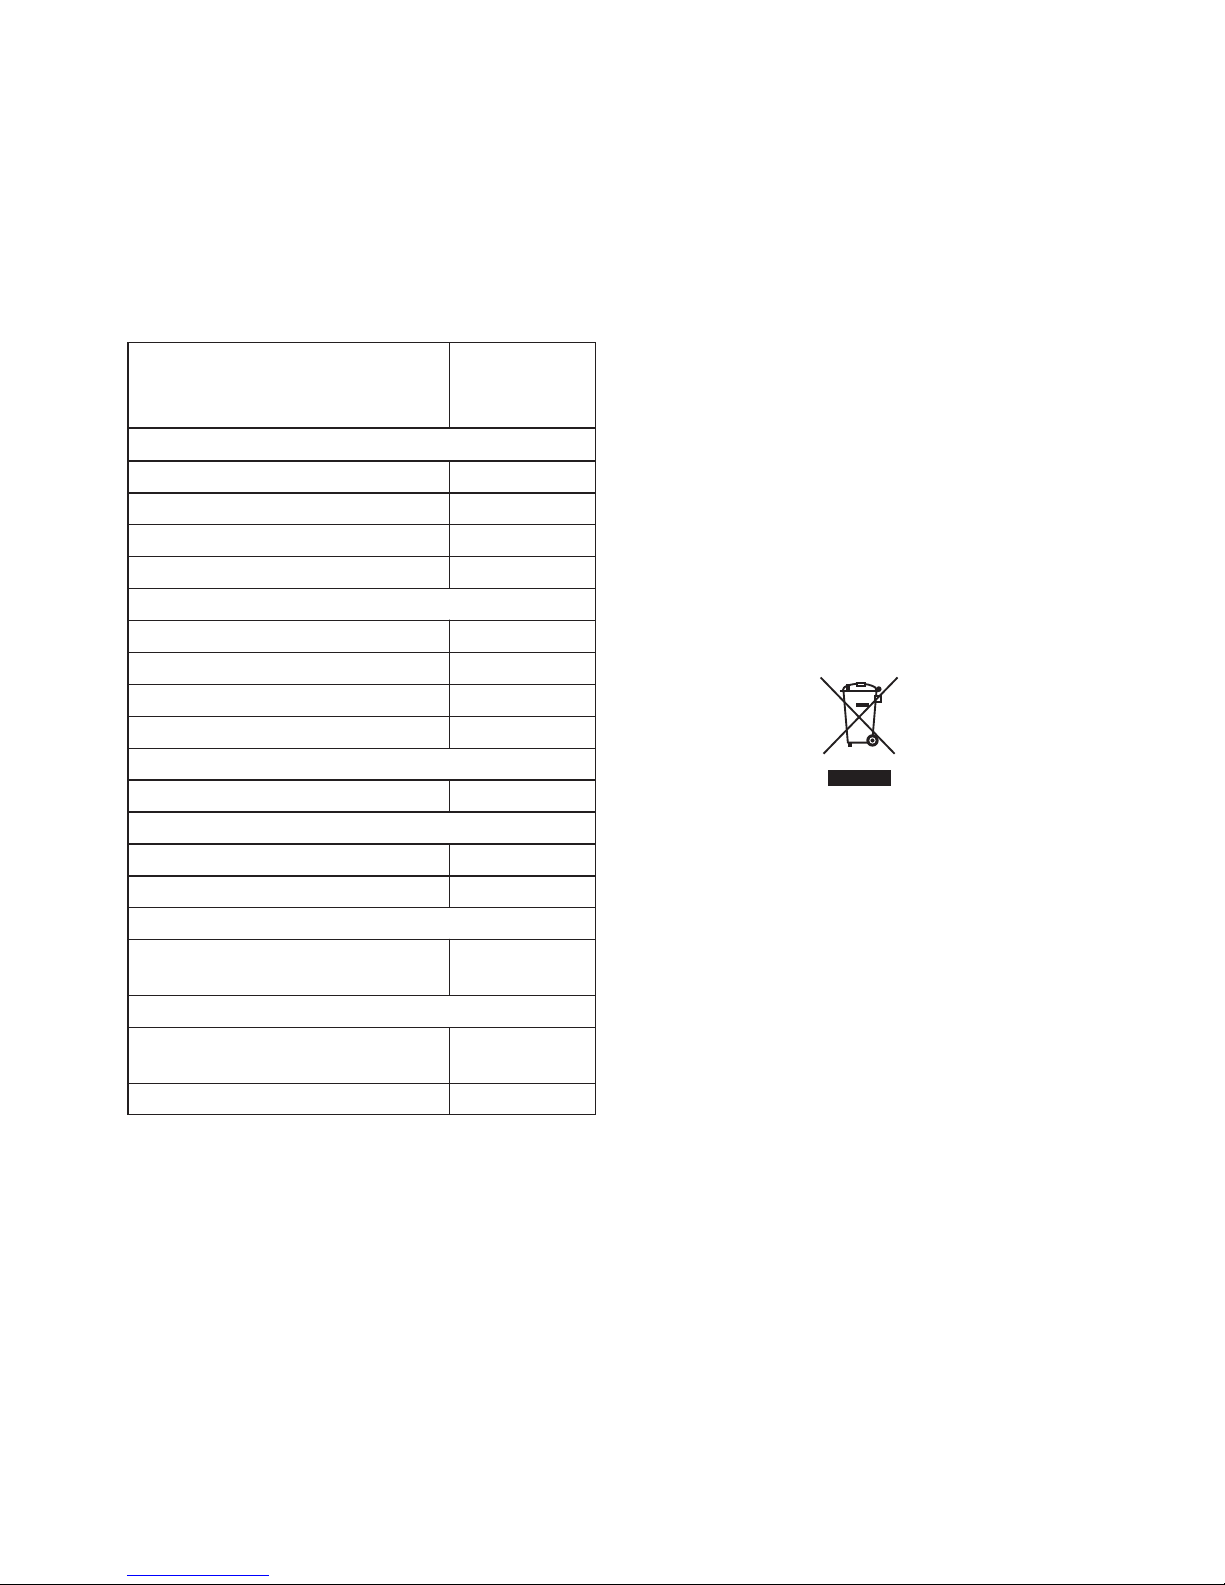
IMPORTANT INFORMATION FOR CORRECT
DISPOSAL OF THE PRODUCT IN
ACCORDANCE WITH EC DIRECTIVE
2002/96/EC.
At the end of its working life, the product must not be
disposed of as urban waste.
It must be taken to a special local authority differentiated
waste collection centre or to a dealer providing this
service.
Disposing of a household appliance separately avoids
possible negative consequences for the environment
and health deriving from inappropriate disposal and
enables the constituent materials to be recovered to
obtain significant savings in energy and resources. As
a reminder of the need to dispose of household
appliances separately, the product is marked with a
crossed-out wheeled dustbin.
11
item suitable for
dishwashing
Mixer
Bowl 4
Whisk, beater and dough hook 4
Splashguard 4
Outlet cover 8
Food Processor
Main bowl, lid and pusher 4
Knife blade 4
Detachable drive shaft 4
Discs 4
Citrus juicer
Cone, sieve 4
Blender
Goblet, lid and filler cap 4
Blade unit and seal 8
Juice extractor
Bowl, pusher, lid, filter drum and
pulp remover
4
Food mincer
Ring nut, screens, cutter, scroll and
body
8
Tray and pusher 4

recommended speed chart and maximum capacities
These are a guide only and will vary depending upon the quantity of mix in the bowl and the ingredients being
m
ixed.
tool/ recipe type speed time maximum capacities
attachment
K
itchen machine
Whisk Egg whites Min to Max 2 mins 2-8 (70g-280g/2oz-10oz)
Cream Min to Max 1½ mins 125ml/4½ fl oz
600ml/21 fl oz
Beater All in one cake mixes Min to Max 1½ mins 1.6kg /3lb 8oz total weight
8 egg mix
Fruit cake - creaming fat and sugar Min to Max 4 mins 1.8kg/4lb total weight
Folding in flour, fruit, etc. Min Up to 1 min 6 egg mix
Rubbing fat into flour Min to 5 mins 450g/1lb flour
Speed 2
Adding water to combine pastry
ingredients Min 30 secs
Dough hook Bread dough (stiff yeasted) Min to 4 mins 500g/1lb 2oz flour weight
Speed 2 800g/1lb 12oz total weight
Food processor
Knife blade All in one cake mixes Max 15 secs 600g/1lb 5oz total weight
3 egg mix
Rubbing fat into flour Max Up to 1 min 340g/12oz flour weight
Adding water to combine pastry Max 10 secs
ingredients
Chopping/pureeing/pâtés Max Up to 30 400g/14oz chopping lean
secs meat total weight
Discs – Firm food items such as carrots, Max –
slicing/grating hard cheeses
Softer items such as cucumbers, Speed 3 –
tomatoes
Extra fine grating Parmesan cheese, potato for Max –
disc German potato dumplings
Citrus juicer Citrus fruits Speed 2 ––
Blender All processing Max Up to 1 min 1.2 litres/42 fl oz
Juice Hard fruits and vegetables e.g. Max – 800g/1lb 12oz
extractor carrots and apples
Soft fruits and vegetables e.g. Max – 500g/1lb 2oz
tomatoes and grapes
Food mincer Meat, poultry, fish cut into 2.5cm Max ––
(1”) –wide strips
12
*Egg sizes used = medium sized (Weight 53-63g)
Do not exceed maximum
capacity marked on the
bowl.

13
P
roblem Cause Solution
The machine will not operate No power/indicator light not lit. Check machine is plugged in.
when using mixing tools.
M
ixer head not locked down correctly. Check that the mixer head is
locked down correctly.
Outlet cover not fitted correctly. Check that the outlet cover is
located correctly.
The machine will not work
if the outlet cover is fitted
incorrectly.
Mixer head has been lifted during Check that the speed control is
operation and lowered again without reset to ‘O’ (OFF) position.
resetting the speed control to
‘O’ (OFF) position.
Machine stops during operation. Machine overloaded/maximum Switch off, unplug and allow the
capacities exceeded. machine to cool down for
30 minutes.
Check maximum capacities in
the recommended speed chart.
Mixer head or outlet cover has Check that the mixer head and
unlocked. outlet cover are located correctly.
Dual drive attachment will Dual drive attachment is not locked Check the dual drive attachment
not operate. on correctly. is located correctly.
Food processor/juice extractor lid Check that the attachment is
or citrus juicer sieve located fitted correctly.
incorrectly.
Food mincer attachment will Attachment is not locked on correctly. Check the attachment is located
not operate. correctly.
Outlet cover is not fitted correctly. Check that the outlet cover is
located correctly.
Movement on the work surface. Feet on the underside of the machine Regularly check the feet are
are dirty or wet. clean and dry.
Poor performance of Refer to hints in relevant “using the attachment” section. Check
tools/attachments. attachments are assembled correctly.
troubleshooting guide

14
P
roblem Cause Solution
Power On light flashing rapidly. Normal operation. If using an attachment, check
The light will flash if one or more of the that it is locked into place
i
nterlocks are not engaged correctly. correctly.
Check the mixer head is fully in
the lowered position, unless
using the meat grinder
attachment.
Check the speed control is in the
‘O’ (OFF) position.
Power On light flashing slowly. Standby mode operating. The kitchen machine will return
If the kitchen machine is left plugged to normal operation when the
in for over 30 minutes without being speed control is turned to a
used, it will go into Standby mode to speed and then turned back to
reduce energy consumption. the ‘O’ (OFF) position.
The light will change to being
constantly lit when ready to use.
If none of the above solve the problem see “service and customer care”.
troubleshooting guide

veiligheid
l
Lees deze instructies zorgvuldig door en bewaar ze voor
toekomstig gebruik.
l
Verwijder alle verpakking en labels.
l
De machine altijd uitzetten en de stekker uit het stopcontact
halen:
l
voordat u hulpstukken bevestigt of loshaalt;
l
indien niet in gebruik;
l
voordat u de machine schoonmaakt.
l
Zet de snelheidsregeling op 'O' (uit) en haal de stekker uit het
stopcontact voordat u hulpstukken monteert of verwijdert,
zowel na het gebruik als voor de reiniging.
l
Houd uw vingers uit de buurt van bewegende onderdelen en
aangebrachte hulpstukken.
l
Laat de keukenmachine nooit onbeheerd aan staan.
l
Gebruik nooit een machine die beschadigd is. Laat de
machine controleren of repareren: raadpleeg het deel
'Klantenservice'.
l
Laat het snoer nooit overhangen, zodat een kind erbij kan.
l
Zorg ervoor dat het motorblok, het snoer en de stekker nooit
nat worden.
l
Zorg ervoor dat er geen menghulpstukken zijn
bevestigd of in de kom aanwezig zijn wanneer u
het contact met dubbele aandrijving gebruikt.
l
Gebruik nooit een hulpstuk dat niet goedgekeurd is en
gebruik nooit meer dan één hulpstuk per keer.
l
Overschrijd nooit de hoeveelheden die staan vermeld op de
tabel met de maximumcapaciteiten.
l
Wees voorzichtig wanneer u de machine optilt. Hij is zwaar.
Zorg ervoor dat de kop omlaag staat en vergrendeld is, en
dat de kom, de hulpstukken, de contactdeksels en het snoer
vast zitten, voordat u de machine optilt.
15
Nederlands
V
ouw voor het lezen a.u.b. de voorpagina met illustraties uit

l
Zorg ervoor dat u het hele snoer uit het opbergvak
4
hebt
gehaald, voordat u de keukenmachine gebruikt.
l
Kinderen mogen de machine alleen onder toezicht gebruiken,
om te voorkomen dat ze ermee spelen.
l
Verplaats de machine niet en haal de kop niet omhoog als
een hulpstuk aangebracht is, omdat de keukenmachine dan
instabiel kan worden.
l
Gebruik de machine niet aan de rand van het werkoppervlak.
l
Dit apparaat kan worden gebruikt door personen met
verminderde lichamelijke, sensorische of geestelijke
capaciteiten of gebrek aan ervaring en kennis mits ze onder
toezicht staan of instructie hebben gekregen over het veilig
gebruik van het apparaat en de betrokken risico's begrijpen.
l
Misbruik van uw apparaat kan tot letsel leiden.
l
Dit apparaat mag niet door kinderen worden gebruikt. Houd
het apparaat en het snoer buiten het bereik van kinderen.
l
Gebruik het apparaat alleen voor het huishoudelijke gebruik
waarvoor het is bedoeld. Kenwood kan niet aansprakelijk
worden gesteld in het geval dat het apparaat niet correct is
gebruikt, of waar deze instructies niet worden opgevolgd.
l
Het maximumvermogen hangt af van het hulpstuk met de
grootste belasting. Andere hulpstukken kunnen minder
energie vragen.
l
De hulpstukken raken beschadigd en kunnen letsel
veroorzaken als er teveel druk op het
vergrendelingsmechanisme wordt uitgeoefend.
Hulpstuk van de keukenmachine
l
Het meselement en de schijven van de keukenmachine zijn
erg scherp, wees dus voorzichtig. Houd het meselement
altijd aan de vingergreep aan de bovenkant vast,
houd uw vingers uit de buurt van de snijrand,
zowel tijdens de verplaatsing als tijdens de
reiniging.
l
Verwijder altijd het meselement voordat u de inhoud van de
kom uitschenkt.
16

l
Steek geen handen of keukengerei in de keukenmachine
wanneer de stekker in het stopcontact steekt.
l
Gebruik nooit uw vingers om voedsel door de vultrechter te
duwen. Gebruik altijd de meegeleverde stamper.
l
Voordat u het deksel van de kom af haalt:
l
schakel de machine uit;
l
wacht totdat het hulpstuk/de messen volledig tot stilstand
zijn gekomen.
l
Verwijder nooit het deksel van de keukenmachine
voordat de messen of schijven volledig tot
stilstand zijn gekomen.
l
VERBRANDINGSGEVAAR: Laat hete ingrediënten altijd tot
kamertemperatuur afkoelen voordat u ze in het hulpstuk
verwerkt.
l
Gebruik nooit het deksel om de keukenmachine te bedienen.
Gebruik hiervoor altijd de snelheidsregeling/pulseerknop.
Blenderhulpstuk
l
Steek geen handen of keukengerei in de blenderbeker
wanneer de stekker in het stopcontact steekt.
l
Monteer de messeneenheid nooit op het motorblok
als de blenderbeker niet is bevestigd.
l
VERBRANDINGSGEVAAR: Laat hete ingrediënten altijd tot
kamertemperatuur afkoelen voordat u ze in het hulpstuk
verwerkt of vermengt.
l
Gebruik de blender altijd met het deksel gesloten.
l
Gebruik de beker alleen met het meegeleverde meselement.
l
Laat de blender nooit leeg draaien.
l
Als u wilt dat uw blender lang mee gaat, zet hem dan nooit
langer dan 60 seconden aan. Zet de blender uit zodra u de
juiste dikte hebt verkregen.
l
Het verwerken van specerijen wordt niet aangeraden, omdat
de kunststofonderdelen beschadigd kunnen raken.
l
Smoothies – meng nooit diepgevroren ingrediënten die tot
een harde klomp zijn vastgevroren. Breek de klomp in stukjes,
voordat u ze in de beker doet.
17

Hulpstuk van de snijmachine
l
Controleer altijd of alle botten, zwoerden, etc. van het vlees
zijn verwijderd voordat u het gaat vermalen.
l
Wanneer u noten gaat fijnhakken, moet u slechts enkele
noten tegelijk toevoegen en wachten tot het schroefelement
ze volledig heeft meegenomen voordat u meer noten
toevoegt.
l
Gebruik altijd de meegeleverde stamper. Steek nooit uw
vingers of keukengerei in de vultrechter.
l
Waarschuwing – het mes is scherp, wees dus voorzichtig
zowel tijdens het gebruik als de reiniging.
l
Controleer of het hulpstuk stevig op zijn plaats vastzit voordat
u het apparaat inschakelt.
Hulpstuk van de sapcentrifuge
l
Gebruik de fruitpers niet als het filter beschadigd
is.
l
De snijmessen onder aan het filter zijn erg scherp. Wees
voorzichtig wanneer u de trommel verplaatst en reinigt.
l
Gebruik nooit het deksel om de fruitpers te bedienen. Gebruik
hiervoor altijd de snelheidsregeling/pulseerknop.
l
Als dit hulpstuk tijdens het gebruik te veel trilt, dient u de
snelheid te verlagen of de machine te stoppen, de stekker uit
het stopcontact te halen en al het vruchtvlees uit de trommel
te verwijderen (de fruitpers gaat trillen als het vruchtvlees
ongelijkmatig verdeeld is).
18
voordat u de stekker in het stopcontact
steekt
l
Zorg dat de elektriciteitsvoorziening dezelfde
spanning heeft als op de onderkant van het
apparaat wordt aangegeven.
l
Dit apparaat voldoet aan de EC-richtlijn
2004/108/EG betreffende de elektromagnetische
compatibiliteit en EG-verordening 1935/2004 van
27/10/2004 betreffende materialen die bestemd
zijn voor contact met voedsel.
voordat u de machine voor het eerst
gebruikt
l
Lees het deel ‘Verzorging en reiniging’, voordat u
de onderdelen gaat schoonmaken.

legenda
1
contactdeksel
2
contact met dubbele aandrijving (medium en
h
oge snelheid)
3
vergrendelingen
4
opbergvak voor het snoer
5
s
nelheids- en pulseerregeling
6
motorblok
7
contact voor het komhulpstuk
8
kom
9
mixerkop
bk
vrijzethendel voor de kop
bl
K-klopper
bm
spiraalvormige deeghaak
bn
garde
bo
spatscherm
hulpstukken
bp
keukenmachine
bq
citrusfruitpers
br
glazen blender
bs
sapcentrifuge
bt
snijmachine
Raadpleeg de tabel met aanbevolen snelheden
voor elk hulpstuk.
de menghulpstukken en hoe ze
gebruikt kunnen worden
K-klopper
l
Voor het bereiden van taarten, koekjes, gebakjes,
suikerglazuur, vullingen, éclairs en aardappelpuree.
garde
l
Voor eieren, room, beslag, vetloos eiergebak,
meringue, kaastaart, mousse, soufflés. Gebruik de
garde niet voor zware mengsels (bijv. boter en
suiker), omdat de garde daardoor beschadigd kan
raken.
spiraalvormige deeghaak
l
Alleen voor gistmengsels.
de menghulpstukken gebruiken
1 Duw de vrijzethendel 1naar beneden en zet de
mengkop omhoog, totdat hij vast zit.
2 Plaats de kom op het onderstel en draai hem naar
links vast
2
.
3 Kies een hulpstuk en duw dit in het contact, totdat
hij vastklikt
3
.
4
Duw de vrijzethendel naar beneden en zet de
mengkop omlaag, totdat hij vast zit.
5
Steek de stekker in het stopcontact. Schakel de
m
achine in, draai de snelheidsregeling op de
gewenste snelheid. U schakelt de machine uit door
de regeling op 'O' (uit) te zetten.
Als de mengkop omhoog staat of het
c
ontactdeksel niet aanwezig is, knippert
het stroomlichtje en functioneert de
machine niet.
l
Zet de regeling op pulseren voor korte
stroomstoten.
6 Haal de stekker uit het stopcontact.
7 Zet de mengkop omhoog, houd hem tegen en trek
het hulpstuk uit het contact.
belangrijk
l
Als de mengkop tijdens de werking omhoog wordt
gezet, stopt de machine onmiddellijk. Als u de
machine weer wilt starten, zet u de mengkop weer
omlaag, de snelheidsregeling op 'O' (uit), wacht u
enkele seconden en draait u de regeling weer op
de gewenste snelheid. De machine start
onmiddellijk.
l
Als de stroom om wat voor reden dan ook wordt
onderbroken zodat de machine stopt, zet u de
snelheidsregeling op 'O' (uit), wacht u enkele
seconden en zet u de snelheidsregeling weer op de
gewenste snelheid. De machine start onmiddellijk.
l
De machine functioneert niet tenzij het
contactdeksel juist is aangebracht.
l
Als u hoort dat de machine moeite met het
mengen heeft, schakelt u hem of uit en verwijdert u
een deel van het mengsel, of u verhoogt de
snelheid.
l
Verwijder altijd de hulpstukken die op het contact
met dubbele aandrijving zijn bevestigd, voordat u
de mengkop omhoog zet.
l
Zorg ervoor dat er geen menghulpstukken
zijn bevestigd of in de kom aanwezig zijn
wanneer u het contact met dubbele
aandrijving gebruikt.
tips
l
Zet de machine uit en schraap de kom zo nodig
met een spatel schoon.
l
Het beste is om eieren eerst op kamertemperatuur
te brengen, voordat u ze gaat kloppen.
l
Zorg ervoor dat er geen boter of eigeel op de
garde of in de kom aanwezig is, voordat u eiwit
gaat opkloppen.
l
Gebruik koude ingrediënten als u deeg gaat
maken, tenzij het recept iets anders voorschrijft.
PP
19

l
W
anneer u boter en suiker voor een taart
vermengt, zorg er dan altijd voor dat de boter op
k
amertemperatuur is gebracht of dat u de boter
e
erst zacht laat worden.
l
Uw machine is uitgerust met een ‘zachte start’
functie, zodat zo min mogelijk gemorst wordt. Als
de machine echter wordt aangezet terwijl er een
z
waar mengsel in de kom zit, zoals brooddeeg,
dan zult u merken dat de machine er enkele
seconden over zal doen om de gewenste snelheid
te bereiken.
tips voor het bereiden van brood
belangrijk
l
Nooit de opgegeven maximumcapaciteit
overschrijden – anders raakt de machine
overbelast.
l
Enige beweging van de mengkop is
normaal bij zware mengsels, zoals
brooddeeg.
l
De ingrediënten zullen het beste mengen als u
eerst de vloeistof in de kom giet.
l
Stop de machine af en toe om het deeg van de
deeghaak af te schrapen.
l
Er bestaat een groot verschil tussen verschillende
soorten bloem en de hoeveelheid vloeistof die
ervoor nodig is. De kleverigheid van het deeg heeft
een groot effect op de belasting van de machine.
Aangeraden wordt de machine in de gaten te
houden wanneer het deeg wordt gekneed; deze
bewerking mag niet langer dan 6 tot 8 minuten
duren.
het spatdeksel plaatsen en
gebruiken
1 Plaats de kom op het onderstel en voeg de
ingrediënten toe.
2 Plaats het spatdeksel door de lipjes met het
hulstukcontact van de kom uit te lijnen
7
. Draai
het deksel naar links vast
4
.
3 Plaats het hulpstuk en laat de mengkop zakken.
4 U verwijdert het spatdeksel in omgekeerde
volgorde.
l
Tijdens het mengen kunnen de ingrediënten direct
via de trechter aan de kom worden toegevoegd.
elektronische snelheidsregeling
D
e machine is uitgerust met een elektronische
snelheidsregeling die speciaal werd ontworpen om
een constante snelheid bij verschillende belastingen
t
e handhaven, zoals tijdens het kneden van
brooddeeg of wanneer eieren aan een cakemix
worden toegevoegd. Daarom is het mogelijk dat u
tijdens de werking snelheidsvariaties hoort,
aangezien de mixer de snelheid automatisch aan
de belasting en aan de gekozen snelheid aanpast –
dit is normaal.
bp
keukenmachine
A
stamper
B
vultrechter
C
deksel
D
meselement
E
kom met aandrijfas
F
schijf voor dikke plakken/dik schaven
G
schijf voor dunne plakken/dun schaven
H
extra fijne schijf
I
verwijderbare aandrijfas
de keukenmachine gebruiken
1 Verwijder het contactdeksel door het naar links te
draaien en te verwijderen
5
.
2 Installeer de kom
E
over het contact met het
handvat rechts. Draai de kom naar links, totdat hij
vastklikt
6
.
3 Voeg het meselement of de verwijderbare aandrijfas
met het gewenste hulpstuk toe.
Opmerking: De verwijderbare aandrijfas
I
mag alleen worden gebruikt wanneer
de schijven en de citrusfruitpers worden
gebruikt.
l
Installeer de kom en het hulpstuk altijd op de
keukenmachine voordat u de ingrediënten
toevoegt.
4 Installeer het deksel
7
– en zorg ervoor dat de
bovenkant van het meselement/de aandrijfas in het
midden van het deksel past.
l
Gebruik nooit het deksel om de
keukenmachine te bedienen. Gebruik
hiervoor altijd de
snelheidsregeling/pulseerknop.
5 Steek de stekker in het stopcontact en kies een
snelheid (raadpleeg de tabel met aanbevolen
snelheden).
20

l
D
e machine functioneert niet als de kom
of het deksel niet goed in de
v
ergrendelingen zitten. Controleer of de
v
ultrechter en het komhandvat zich aan
de voorkant bevinden.
l
Gebruik de pulseerknop voor korte
stroomstoten. Als u de stroomstoot wilt stoppen,
l
aat u de knop los.
6 Voer bovenstaande stappen in omgekeerde
volgorde uit om het deksel, de hulpstukken en de
kom te verwijderen.
l
Schakel de keukenmachine altijd uit en
haal de stekker uit het stopcontact
voordat u het deksel verwijdert.
belangrijk
l
Deze keukenmachine is niet geschikt voor het
pletten of vermalen van koffiebonen of om gewone
suiker tot basterdsuiker te vermalen.
l
Als u amandelextract of smaakstoffen aan uw
mengsel toevoegt, dient u contact met de
kunststofonderdelen te vermijden, omdat deze
permanent kunnen verkleuren.
l
Verwerk geen hete ingrediënten.
meselement
D
Van alle hulpstukken is het meselement het meest
veelzijdige. De duur van de verwerkingstijd bepaalt
de verkregen textuur.
Voor een grovere textuur gebruikt u de
pulseerknop.
Gebruik het meselement voor het maken van taart
en gebak, voor het fijnhakken van rauw of gekookt
vlees, groenten, noten, paté, dips, voor het pureren
van soep en voor het verkruimelen van koekjes en
brood.
tips
l
Snij etenswaren zoals vlees, brood en groente in
blokjes van 2 cm, voordat u ze gaat verwerken.
l
Koekjes moeten in stukjes verbrokkeld worden en
via de vultrechter worden toegevoegd, terwijl de
machine draait.
l
Als u boter direct uit de koelkast gebruikt, moet u
de boter in blokjes van 2 cm snijden.
l
Zorg ervoor dat u de machine niet te lang gebruikt.
l
Gebruik het meselement niet voor zware
mengsels, zoals brooddeeg.
l
Gebruik het meselement niet om ijsklontjes of
andere harde voedingsmiddelen, zoals kruiden,
kleiner te maken, omdat het hulpstuk anders
beschadigd raakt.
schijven voor snijden/raspen
d
e schijven gebruiken
omkeerbare snij- en raspschijven - dik
F
,
dun
G
G
ebruik de raspzijde voor kaas, wortels,
aardappelen en gelijksoortige voedingsmiddelen.
Gebruik de snijzijde voor kaas, wortelen,
aardappelen, kool, komkommer, bieten en uien.
extra fijne raspschijf
H
Voor het raspen van Parmezaanse kaas en
aardappelen voor knoedels.
de snijschijven gebruiken
1 Plaats de kom op het motorblok en bevestig de
verwijderbare aandrijfas.
2 Houd de schijf aan de middengreep vast en plaats
hem op de aandrijfas, met de juiste zijde naar
boven gekeerd.
3 Zet het deksel op zijn plaats.
4 Doe de ingrediënten in de vultrechter.
5 Zet de keukenmachine aan en duw de ingrediënten
gelijkmatig met de stamper door de vultrechter.
Steek nooit uw vingers in de vultrechter.
tips
l
Gebruik verse ingrediënten.
l
Maak de voedingsmiddelen niet te klein. Vul de
hele breedte van de vultrechter met de
ingrediënten. Zodoende kunnen de ingrediënten
tijdens de verwerking niet zijwaarts verschuiven.
l
Ingrediënten die rechtop worden ingebracht
worden korter dan ingrediënten die horizontaal
worden ingebracht.
l
Er blijven altijd restjes aan de schijf of in de kom
hangen na de verwerking.
PP
21

bq
citrusfruitpers
G
ebruik de citrusfruitpers om het sap uit
citrusvruchten te persen (bijv. sinaasappels,
citroenen, limoenen en grapefruits).
A
kegel
B
zeef
de citrusfruitpers gebruiken
1 Plaats de kom op het onderstel en bevestig de
verwijderbare aandrijfas.
2 Plaats de zeef in de kom. Zorg ervoor dat de
hendel van de zeef vlak boven de hendel van de
kom vergrendeld is
8
.
3 Plaats de kegel over de aandrijfas. Draai de kegel
totdat hij helemaal naar beneden valt
9
.
4 Snijd het fruit door midden. Zet de machine aan en
druk het fruit op de kegel.
l
De citrusfruitpers functioneert niet als de
zeef niet juist is vergrendeld.
l
Voor het beste resultaat gebruikt u vruchten op
kamertemperatuur en rolt u ze met de hand over
een werktafel, voordat u ze gaat persen.
l
Om zoveel mogelijk sap uit het fruit te halen kunt u
de vrucht heen en weer bewegen.
l
Wanneer u erg veel vruchten perst, dient u de zeef
regelmatig te legen om ervoor te zorgen dat er niet
teveel vruchtvlees en pitjes in vast blijven zitten.
br
glazen blender
A
vuldop
B
deksel
C
beker
D
afsluitring
E
messeneenheid
de glazen blender gebruiken
1 Plaats de afdichtring Din de messeneenheid E-
zorg ervoor dat de ring juist in de groef ligt.
l
Als de afsluitring niet goed is
geïnstalleerd, zal de machine lekken.
2 Schroef de beker op de messeneenheid
bk
.
Raadpleeg de afbeeldingen aan de onderzijde van
de messeneenheid, als volgt:
- onvergrendelde stand
- vergrendelde stand
De blender functioneert niet als hij niet
goed in elkaar is gezet.
3
Doe de ingrediënten in de beker.
4 Plaats het deksel op de beker en duw hem goed
v
ast
bl
.
Installeer de vuldop.
5
Verwijder het deksel van het contact met dubbele
aandrijving door hem naar rechts te draaien en te
verwijderen.
6 Plaats de blender op het motorblok en draai hem
n
aar rechts
bm
t
otdat hij vastklikt.
l
De keukenmachine functioneert niet als
de blender onjuist op de vergrendeling is
geplaatst.
7 Kies een snelheid (raadpleeg de tabel met
aanbevolen snelheden) of gebruik de pulseerknop
voor korte stroomstoten.
tips
l
Wanneer u mayonaise maakt, doet u alle
ingrediënten behalve de olie in de blender.
Verwijder de vuldop. Terwijl de keukenmachine
draait, giet u de olie langzaam door het gat in het
deksel.
l
Dikke mengsels, zoals paté en dipsauzen moeten
soms van de zijkant van de kom af geschraapt
worden. Als de blender moeite heeft met mengen,
voeg dan wat meer vloeistof toe.
l
IJs vermalen – gebruik de blender met korte
stroomstoten totdat het ijs tot de juiste consistentie
is vermalen.
l
Het verwerken van specerijen wordt niet
aangeraden, omdat de kunststofonderdelen
beschadigd kunnen raken.
l
De keukenmachine functioneert niet als
de blender onjuist is gemonteerd.
l
Droge ingrediënten vermengen: – snijd ze in
stukjes, verwijder de vuldop en terwijl de
keukenmachine draait, laat u de stukjes één voor
één in de kom vallen. Houd uw hand over de
opening. Voor het beste resultaat leegt u de kom
regelmatig.
l
Gebruik de blender niet voor opslag. Zorg ervoor
dat de blender voor en na elk gebruik leeg is.
l
Vermeng nooit meer dan 1,2 liter vloeistof – en
minder voor opschuimende vloeistoffen, zoals
milkshakes.
PP
22

bs
sapcentrifuge
G
ebruik de sapcentrifuge om sap uit stevige
vruchten en groenten te persen.
A
s
tamper
B
deksel
C
vruchtvleesschraper
D
filtertrommel
E
sapkom
F
tuit
de sapcentrifuge gebruiken
1 Plaats de kom van de sapcentrifuge Eover het
contact met de dubbele aandrijving met de tuit
F
aan de linkerkant. Draai de kom naar rechts, totdat
hij vastklikt
bn
.
2 Plaats de vruchtvleesschraper
C
in de
filtertrommel
D
– en zorg ervoor dat de lipjes in de
gleuven aan de onderkant van de trommel passen
bo
.
3 Monteer de filtertrommel
bp
.
4 Plaats het deksel van de sapcentrifuge
B
op de
kom en draai hem totdat hij vast zit
bq
. De
sapcentrifuge functioneert niet als de
kom of het deksel niet goed op de
vergrendeling zijn geplaatst.
5 Plaats een geschikte container onder de sapuitlaat.
6 Snijd de etenswaren in stukjes die in de vultrechter
passen.
7 Zet de keukenmachine op de maximumsnelheid en
plaats de ingrediënten in de vultrechter. Duw de
ingrediënten met de stamper naar beneden -
steek nooit uw vingers in de vultrechter.
Verwerk eerst alle etenswaren in de vultrechter,
voordat u er meer aan toevoegt.
l
Wanneer u het laatste stukje hebt verwerkt, laat u
de pers nog eens 30 seconden draaien om al het
sap uit de filtertrommel te laten stromen.
belangrijk
l
Als de sapcentrifuge begint te trillen, zet u de
machine uit en verwijdert u al het vruchtvlees van
het filter. (De sapcentrifuge trilt als het vruchtvlees
ongelijkmatig verdeeld is).
l
De maximumcapaciteit die in één keer kan worden
verwerkt is 800 g groente of fruit.
l
Bij sommige heel harde etenswaren zal de machine
langzamer draaien of helemaal stoppen. Als dit
gebeurt, zet u het apparaat uit en reinigt u het filter.
l
Schakel de sapcentrifuge regelmatig uit om de
opvangbakken voor het vruchtvlees en het sap te
legen.
t
ips
l
Duw zachte voedingsmiddelen langzaam door de
v
ultrechter om het meeste sap te verkrijgen.
l
V
itaminen verdwijnen - hoe sneller u het sap
opdrinkt, des te meer vitaminen krijgt u binnen.
l
A
ls u het sap enkele uurtjes moet bewaren, zet u
h
et in de koelkast. Het sap blijft beter bewaard als
u er enkele druppels citroensap in doet.
l
Drink niet meer dan drie 230 ml glazen sap per
dag, tenzij u eraan gewend bent.
l
Verdun het sap voor kinderen met evenveel water.
l
Het sap van donkergroene (broccoli, spinazie, enz.)
of donkerrode (bieten, rode kool, enz.) groenten is
erg sterk. Daarom dient u het altijd te verdunnen.
l
Vruchtensap bevat veel fructose (fruitsuiker).
Mensen met diabetes of een laag
bloedsuikergehalte mogen er niet te veel van
drinken.
bt
snijmachine
Gebruik de snijmachine voor het verwerken van
vlees, gevogelte en vis.
A
moersleutel
B
ringmoer
C
zeven: medium en grof
D
mes
E
spiraal
F
element
G
vultrechter
H
bak
I
stamper
installeren
1 Plaats de spiraal Ein het element van de
snijmachine
F
.
2 Monteer het mes
D
– met de snijkant naar buiten.
Zorg ervoor dat het element goed is bevestigd,
anders raakt uw snijmachine beschadigd.
3 Installeer een zeef
C
. Zorg ervoor dat de inkeping
over het lipje past
br
.
4 Breng de ringmoer losjes aan
B
.
de snijmachine gebruiken
1 Zet de mengkop omhoog.
2 Terwijl de snijmachine op de aangegeven positie
staat, steekt u de lipjes aan het uiteinde van de
spiraal in de bijbehorende gleuven van het
aandrijfcontact
bs
.
23

3
Duw de snijmachine in het contact en draai hem
naar links totdat hij vergrendelt.
4
Houd de vultrechter op zijn plaats en draai de
r
ingmoer met de hand aan.
5 Installeer de bak
bt
.
6 Laat bevroren voedingsmiddelen helemaal
ontdooien voordat u ze fijn gaat snijden.
S
nij vlees in repen –van 2,5 cm.
7 Zet de machine op de maximumsnelheid. Gebruik
de stamper en duw de voedingsmiddelen stuk voor
stuk door de vultrechter. Duw niet hard, anders
raakt de machine beschadigd.
belangrijk
l
Gebruik het hulpstuk van de snijmachine nooit
langer dan 10 minuten, anders raakt de machine
beschadigd.
l
Het hulpstuk functioneert alleen als het
deksel over de uitlaat met dubbele
snelheid is aangebracht.
8 Nadat alle voedingsmiddelen zijn fijngesneden,
schakelt u de keukenmachine uit en haalt u de
stekker uit het stopcontact.
9 Verwijder de snijmachine. Gebruik de moersleutel
A
om de ringmoer te verwijderen, als hij te strak
zit.
verzorging en reiniging
l
Zet de machine altijd uit en haal de stekker uit het
stopcontact.
l
Demonteer de hulpstukken voorafgaand aan de
reiniging.
motorblok
l
Veeg ze met een vochtige doek schoon en droog
ze af.
l
Gebruik nooit schuurmiddelen en dompel de
onderdelen nooit onder in water.
l
Berg de rest van het snoer op in het opbergvak
4
aan de achterkant van de machine.
l
Zorg ervoor dat de poten aan de onderkant van de
keukenmachine altijd schoon zijn.
kom, hulpstukken, spatdeksel
l
Met de hand wassen en afdrogen.
l
Gebruik geen staalborstel, schuursponsje of
bleekmiddel om uw roestvrijstalen kom te reinigen.
Gebruik azijn om kalkaanslag te verwijderen.
l
Houd de kom uit de buurt van hittebronnen
(gaspitten, ovens, magnetrons).
k
eukenmachine
l
Wees voorzichtig met de messen en
s
chijven – ze zijn heel erg scherp.
l
H
et plastic kan verkleuren door sommige
voedselproducten. Dit is normaal, levert geen
s
chade op aan het plastic en beïnvloedt de smaak
v
an uw voedsel niet. U kunt deze verkleuringen
verwijderen met een doek die licht bevochtigd is
met plantaardige olie.
citrusfruitpers
l
Met de hand wassen en afdrogen.
blender
1 Zorg ervoor dat de beker leeg is, voordat u hem
van de messeneenheid afschroeft.
2 Was de beker met de hand.
3 Verwijder en was de afdichtring.
4 Raak de scherpe messen niet aan - borstel ze
schoon met een warm sopje, spoel ze vervolgens
grondig af onder de kraan. Dompel de
messeneenheid niet onder in water.
5 Laat ondersteboven drogen.
sapcentrifuge
l
Het is eenvoudiger om de onderdelen meteen na
het gebruik te wassen.
l
Sommige voedingsmiddelen, zoals wortelen,
verkleuren de kunststofonderdelen. Met een in
plantaardige olie gedoopte doek kunt u de
verkleuring verwijderen.
l
Reinig het filter met een zachte borstel.
l
Controleer het filter regelmatig op
beschadigingen. Gebruik het filter niet als
het beschadigd is. Lees het deel
'onderhoud en klantenservice'.
snijmachine
l
Was alle onderdelen in warm zeepsop en droog ze
goed af. De onderdelen zijn niet geschikt voor
reiniging in een vaatwasmachine. Gebruik ook nooit
een sodaoplossing.
l
Veeg de zeven af met plantaardige olie en wikkel ze
in vetvrij papier om verkleuring/roestvorming te
voorkomen.
24
a
lle overige onderdelen
l
Met de hand wassen en afdrogen.
l
U
kunt ook op de vaatwastabel zien welke
o
nderdelen geschikt zijn voor de vaatwasmachine.
Leg ze op het bovenste rek. Plaats geen
o
nderdelen op het onderste rek, vlak boven het
v
erwarmingselement. Aanbevolen wordt een kort
wasprogramma op lage temperatuur (maximaal
50°C) te gebruiken.
onderhoud en klantenservice
l
A
ls het snoer beschadigd is, moet het om
veiligheidsredenen door Kenwood of een door
Kenwood geautoriseerd reparatiebedrijf vervangen
w
orden.
l
Als u problemen ondervindt met de
werking van de keukenmachine of de
hulpstukken, dient u de informatie onder
'problemen oplossen' te raadplegen,
voordat u contact met de technische
dienst opneemt.
Als u hulp nodig hebt met:
l
het gebruik van uw apparaat of
l
onderhoud en reparatie
l
kunt u contact opnemen met de winkel waar u het
apparaat gekocht hebt.
l
Ontworpen en ontwikkeld door Kenwood in het VK.
l
Vervaardigd in China.
BELANGRIJKE INFORMATIE VOOR DE
CORRECTE VERWERKING VAN HET
PRODUCT IN OVEREENSTEMMING MET DE
EUROPESE RICHTLIJN 2002/96/EC
Aan het einde van de levensduur van het product
mag het niet samen met het gewone huishoudelijke
afval worden verwerkt. Het moet naar een speciaal
centrum voor gescheiden afvalinzameling van de
gemeente worden gebracht, of naar een verkooppunt
dat deze service verschaft. Het apart verwerken van
een huishoudelijk apparaat voorkomt mogelijke
gevolgen voor het milieu en de gezondheid die door
een ongeschikte verwerking ontstaan en zorgt ervoor
dat de materialen waaruit het apparaat bestaat,
teruggewonnen kunnen worden om een aanmerkelijke
besparing van energie en grondstoffen te verkrijgen.
Om op de verplichting tot gescheiden verwerking van
elektrische huishoudelijke apparatuur te wijzen, is op
het product het symbool van een doorgekruiste
vuilnisbak aangebracht.
25
item geschikt
voor de
vaatwas-
machine
Mixer
Kom 4
Garde, klopper en deeghaak 4
Spatdeksel 4
Contactdeksel 8
Keukenmachine
Kom, deksel, stamper 4
Meselement 4
Verwijderbare aandrijfas 4
Schijven 4
Citroenfruitpers
Kegel, zeef 4
Blender
Beker, deksel en vuldop 4
Messeneenheid en afdichting 8
Sapcentrifuge
Kom, stamper, deksel, filtertrommel
en vruchtvleesschraper
4
Snijmachine
Ringmoer, zeven, mes, spiraal
8
en element
Bak en stamper 4

26
tabel met aanbevolen snelheden en maximumcapaciteit
Deze informatie dient alleen als richtlijn. Het resultaat hangt af van de hoeveelheid mengsel in de kom en de
i
ngrediënten die worden gemengd.
instrument/ soort recept snelheid tijd maximumcapaciteit
hulpstuk
M
ixer
Garde Eiwit Min. naar Max. 2 m 2 - 8 (70 - 280 g)
Room Min. naar Max. 1½ m 125 ml
600 ml
Klopper All-in-one cakemix Min. naar Max. 1½ m 1,6 kg totaalgewicht
8 eieren
Vruchtencake - mengen van boter Min. naar Max. 4 m 1,8 kg totaalgewicht
en suiker 6 eieren
Bloem, fruit, enz. in het mengsel Min. Tot 1 m
vouwen
De boter en de bloem mengen Min. naar 5 m 450 g bloem
snelheid 2
Water toevoegen om Min. 30 s
gebakingrediënten te mengen
Deeghaak Brooddeeg (stijf gegist) Min. naar 4 m 500 g bloemgewicht
snelheid 2 800 g totaalgewicht
Keukenmachine
Meselement All-in-one cakemix Max. 15 s 600 g totaalgewicht
3 eieren
De boter en de bloem mengen Max. Tot 1 m 340 g bloemgewicht
Water toevoegen om Max. 10 s
gebakingrediënten te mengen
Hakken/pureren/paté Max. Tot 30 s 400 g vetarm vlees
snijden totaalgewicht
Schijven – voor Harde etenswaren als wortelen, Max. –
snijden/raspen harde kaas
Zachtere etenswaren als Snelheid 3 –
komkommer, tomaten
Extra fijne Parmezaanse kaas, aardappelen Max. –
raspschijf voor knoedels
Citroenfruitpers
Citrusvruchten Snelheid 2 ––
Blender Alle functies Max. Tot 1 m 1,2 liter
Sap centrifuge Harde vruchten en groente, bijv. Max. – 800 g
wortelen en appels
Zachte vruchten en groente, bijv. Max. – 500 g
tomaten en druiven
Snijmachine Snij vlees, gevogelte, vis in Max. ––
repen –van 2,5 cm
*Gebruikte eieren = medium (gewicht 53 - 63 g)
Overschrijd de
maximumcapaciteit op
de kom niet.
 Loading...