

Page 1

COMPACT CD SYSTEM
MS-A5
INSTRUCTION MANUAL
KENWOOD CORPORATION
iîId§(s
DIGITAL AUDIO
B60-1471-08CS)(K,T,E.M,X.Y) [Mçl
94/12 11 10 98765 4321 93/12 11 10 9 8
Page 2
I For your records
I Record the serial number, found on the back of the unit, in the
A I spaces designated on the warranty card, and in the space pro^ s vided below. Refer to the model and serial numbers whenever
■I you call upon your dealer for information or service on this prod-
uct.
Model MS-A5 Serial Number
Unpacking
Unpack the unit carefully and make sure that all accessories are
put aside so they will not be lost.
Examine the unit for any possibility of shipping damage. If your
unit is damaged or fails to operate, notify your dealer immedi*
ately. If your unit was shipped to you directly, notify the ship
ping company without delay, Only the consignee {the person or
company receiving the unit) can file a claim against the carrier
for shipping damage,
We recommend that you retain the original carton and packing
materials for use should you transport or ship the unit in the
future.
When your unit needs to be repaired, bring the entire set
(Speaker excluded) to your dealer.
___________________________________
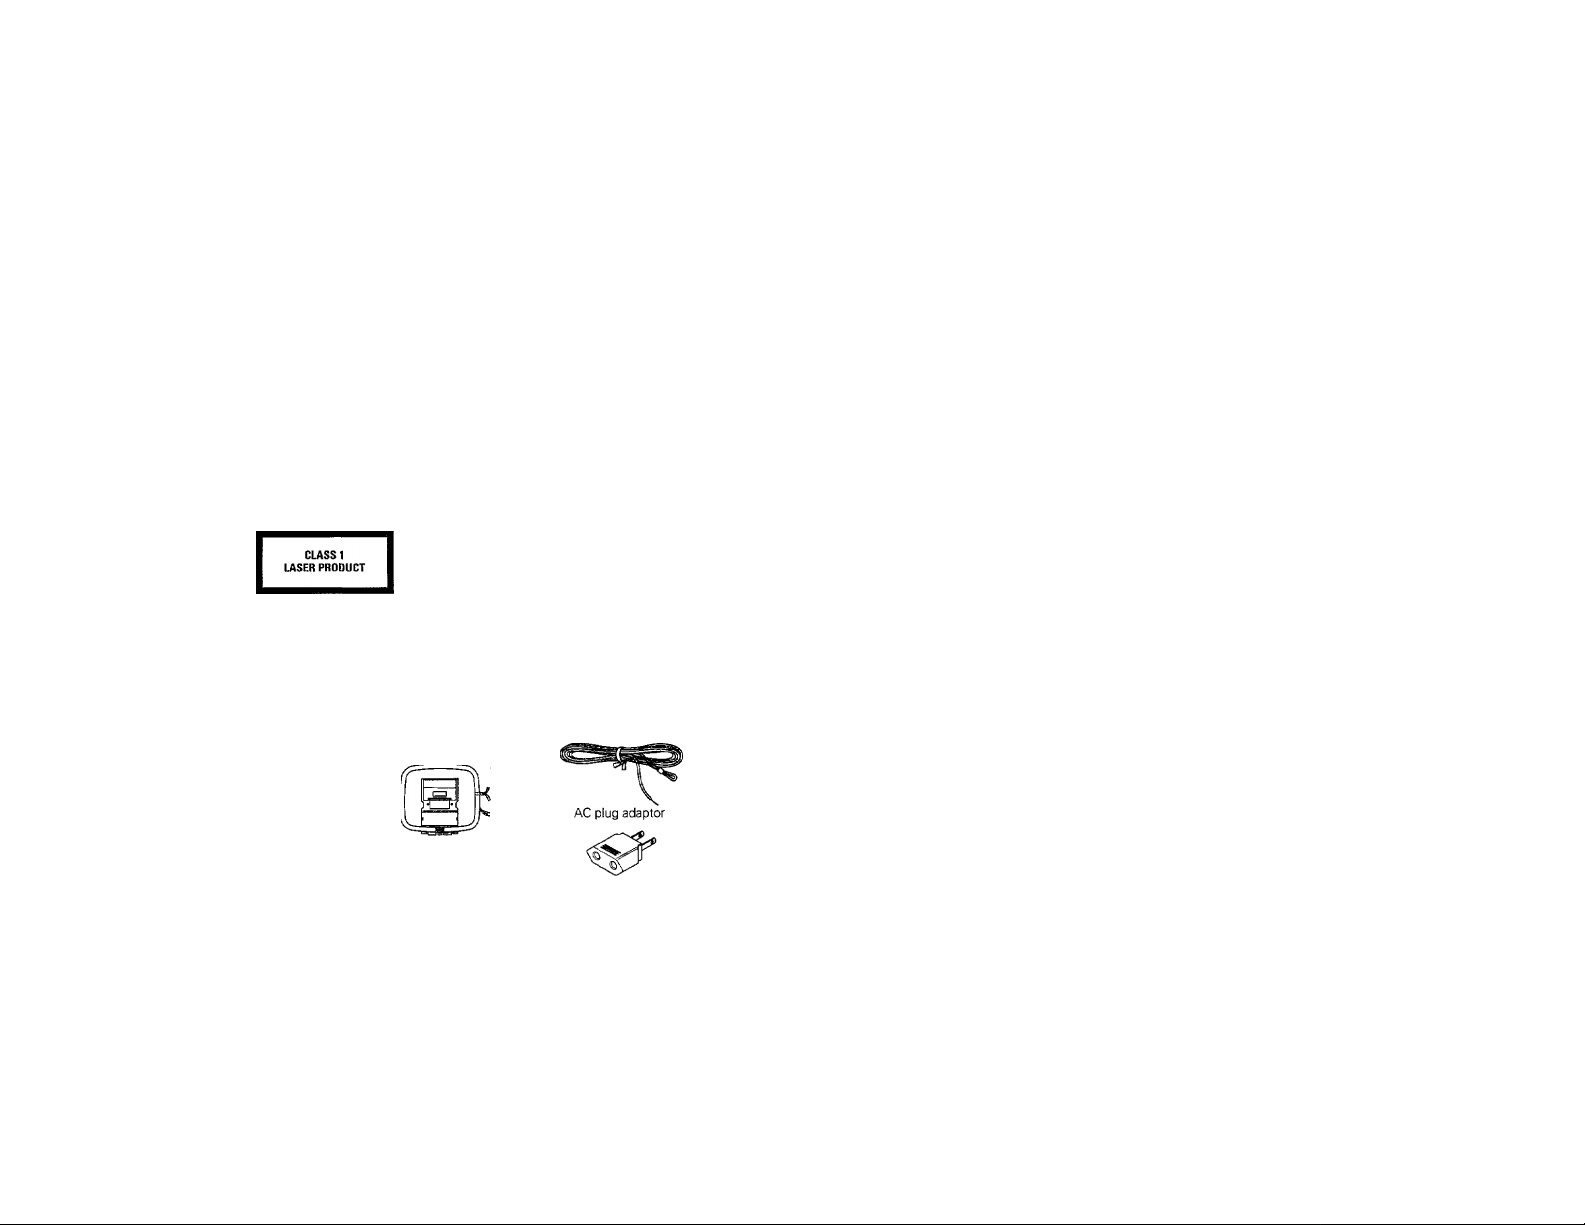
The marking of products using lasers
(Except for some areas.)
The label is attached to the back panel and says that the compo
nent uses laser beams that have been classified as Class 1, It
means that the unit is utilizing laser beams that are of a weaker
class. There is no danger of hazardous radiation outside the
unit.
WARNING NOTICE:
IN MOST CASES IT IS AN INFRINGEMENT OF COPYRIGHTTO
MAKE COPIES OF TAPES OR DISCS WITHOUT THE PERMIS
SION OF THE COPYRIGHT OWNERS. ANYONE WISHING TO
COPY COMMERCIALLY AVAILABLE TAPES OR DISCS' .
SHOULD CONTACT THE MECHANICAL COPYRIGHT PROTEC
TION SOCIETY LIMITED OR THE PERFORMING RIGHTS SOCI
ETY LIMITED,
For the U.S.A.
Note to CATV system installer:
This reminder is provided to cal! the CATV system installer's
attention to Article 820-40 of the NEC that provides guide-lines
for proper grounding and, in particular, specifies that the cable
ground shall be connected to the grounding system of the build
ing, as close to the point of cable entry as practical.
Accessories
Remote control unit
Contents
ABefore applying power
Safety precautions.............................................................3
¿^IMPORTANT SAFEGUARDS ......................................... 4
Before operation.................................................................
Antenna connections
Connections....................................................................... 9
Part names
Operation of remote controj unit..........................................12
Setting the current time on the clock
......................................................................
....................................................
.........................................................
AM loop antenna FM indoor antenna
Caution: Read the pages marked A carefully to ensure safe operation.
....3
..8
10
.....
.............................13
Only some areas
Listening to the radio............................................................14
Playing CDs
Listening to tapes ................................................................20
Recording operation..............................................................22
6
Changing the tone.................................................................27
Operation of timer................................................................
Using the DISPLAY key........................................................30.
in case of difficulty.................................................................31
Specifications....................................................................
.........................................................................16
Batteries
Speaker cords
28
32
Page 3
mg power
^ B0Bd thiB pBg0 mreMfy tP I
::,.
...........................................................
.
For the U.S.A. and Canada
Units shipped to the U.S.A. and Canada are designed for
operation on 120 volts AC only.
CAUTION: TO PREVENT ELECTRIC SHOCK DO NOT USE
THE AC PLUG WITH AN EXTENSION CORD, RECEPTACLE OR
OTHER OUTLET UNLESS THE BLADES CAN BE FULLY
INSERTED TO PREVENT BLADE EXPOSURE.
For the United Kingdom
Units shipped to the U.K, are designed for operation on 240
volts AC only.
Factory fitted mouided mains plug
1. The mains plug contains a fuse. ForreplacemenL use only a 13-Amp
ASTA-approved (BS1362) fuse.
2. The fuse cover must be refitted when replacing the fuse in the
moulded plug.
3. Do not cut off the mains plug from this equipment. If the plug fitted
is not suitable for the power points in your home or the cable is too
short to reach a power point, then obtain an appropriate safety
approved extension lead or adapter, or consult your dealer.
If nonetheless the mains plug is cut off, remove the fuse and
dispose of the plug immediately, to avoid a possible shock hazard
by inadvertent connection to the mains supply.
Important!
Important!
For Australia
Units shipped to Australia are designed for operation on 240 V AC
only,
For Europe
Units shipped to Europe are desiged for operation on 230 V AC
only.
For other countries
Units shipped to countries other than the above countries are equipped
with an AC voltage selector switch on the botom cover. Refer to the
following paragraph for the proper setting of this switch.
AC voltage selection
This unit operates on 110 -120 or 220 - 240 volts AC. The AC voltage
selector switch on the botom cover is set to the voltage that
prevails in the area to which the unit is shipped, Before connecting
the power cord to your AC outlet, make sure that the setting position
of this switch matches your line voltage. If not, it must be set to your
voltage in accordance with the following direction.
Note:
------------------------------------------------------------------------------------------
Our warranty does not cover damage caused by excessive line
voltage due to improper setting of the AC voltage selector switch.
AC voltage selector switch
Move switch lever to match your line voltage with a
small screwdriver or other pointed tool.
Important!
Important!
Important!
voltage
SELECTOR
AC110-
120V-
WARNING: TO PREVENT FIRE OR ELECTRIC SHOCK, DO NOT EXPOSE THIS APPLIANCE
TO RAIN OR MOISTURE.
CAUTION; TO REDUCE THE RISK OF ELECTRIC SHOCK, DO NOT REMOVE
COVER (OR BACK). NO USER-SERVICEABLE PARTS INSIDE, REFER SER
VICING TO QUALIFIED SERVICE PERSONNEL
A Q
A
A
OJ^nON
j A
THE LIGHTNING FLASH WITH ARROWHEAD SYMBOL, WITHIN AN EQUILATERAL TRIANGLE,
IS INTENDED TO ALERT THE USER TO THE PRESENCE OF UNINSULATED "DANGEROUS VOL
TAGE" WITHIN THE PRODUCT'S ENCLOSURE THAT MAY BE OF SUFFICIENT MAGNITUDE
TO CONSTITUTE A RISK OF ELECTRIC SHOCK TO PERSON'S.
THE EXCLAMATION POINT WITHIN AN EQUILATERAL TRIANGLE IS INTENDED TO ALERT THE
USER TO THE PRESENCE OF IMPORTANT OPERATING AND MAINTENANCE (SERVICING) IN
STRUCTIONS IN THE LITERATURE ACCOMPANYING THE APPLIANCE,
Page 4
0g0 cmfi0fMy io
Please read ail of the safety and operating instructions
before operating this appliance. Adhere to all warnings on
the appliance and in the instruction manual. Follow all the
safety and operating instructions. These safety and
operating instructions should be retained for future
reference.
1. Power sources - The appliance should be connected to
a power supply only of the type described in the instruction
manual or as marked on the appliance, if you are not sure
of the type of power supply to your home, consult your
appliance dealer or local power company. For appliances
intended to operate from battery power, or other sources,
refer to the instruction manual.
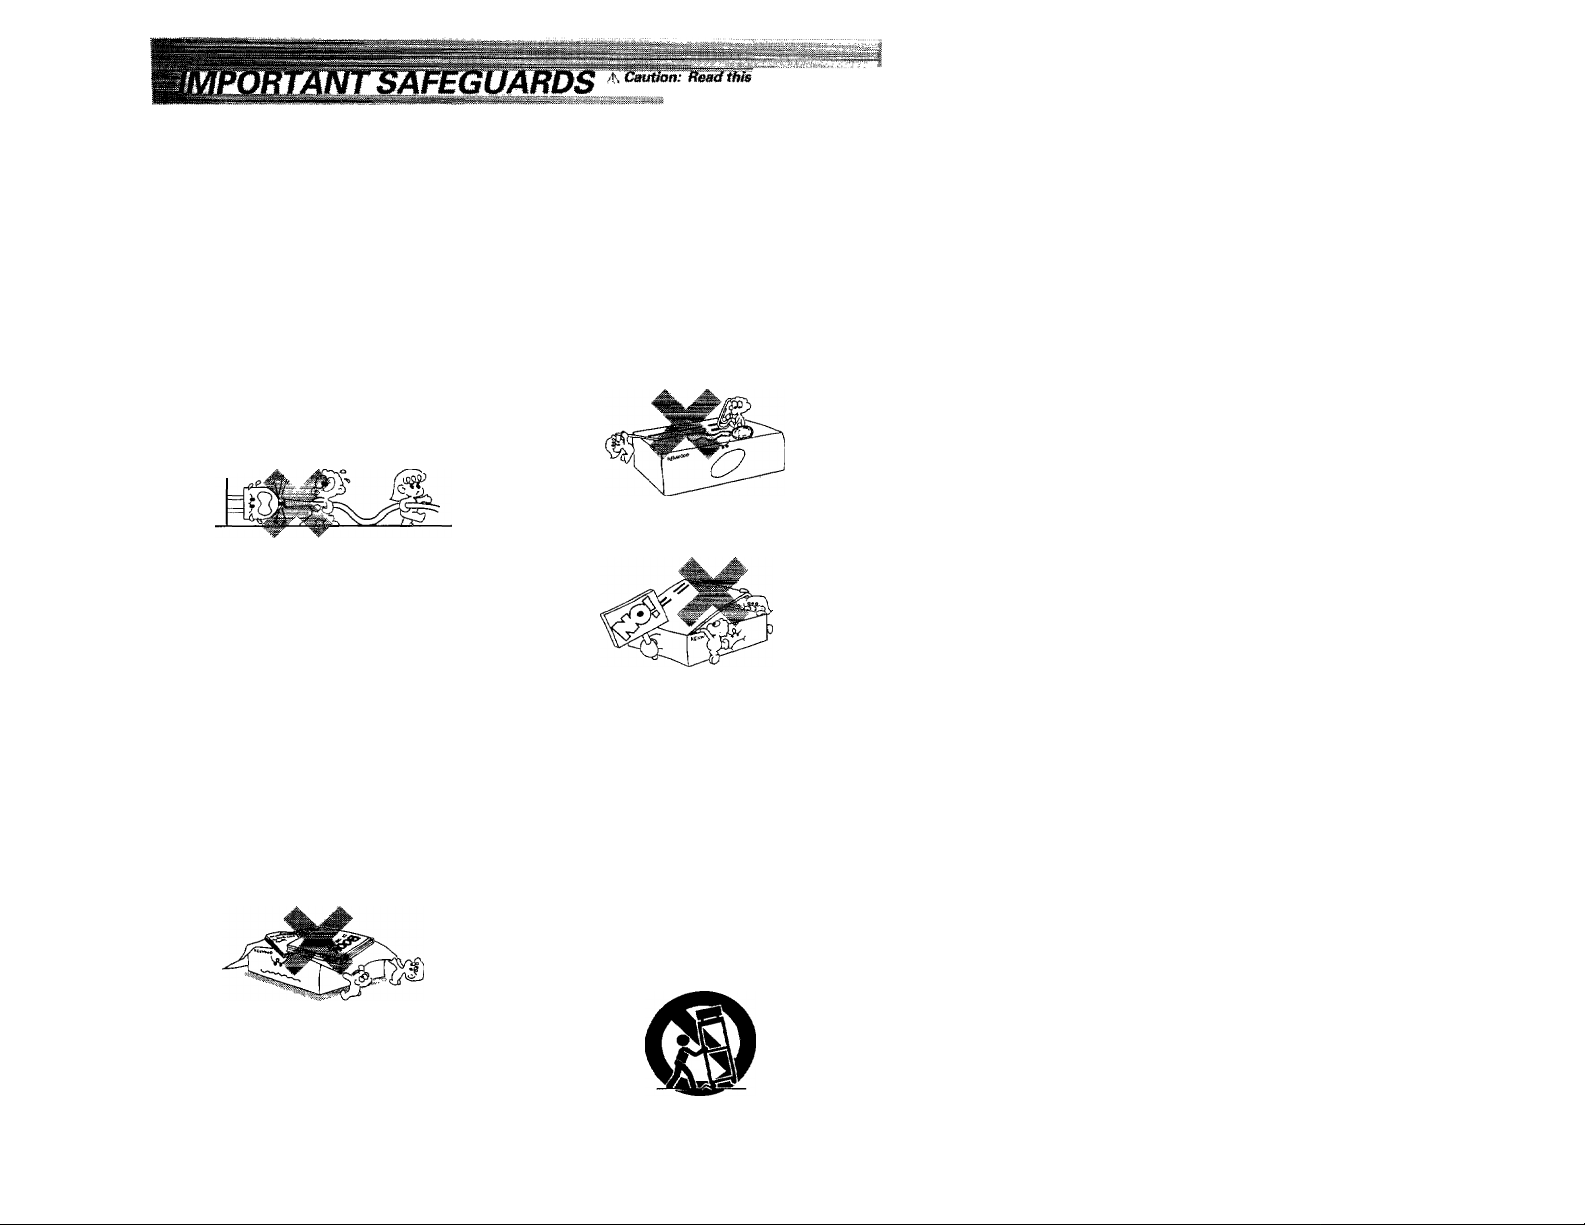
2. Power-cord protection - Power-supply cords should
be routed so that they are not likely to be walked on
or pinched by items placed upon or against them,
pay particular attention to cords at plugs, convenience
receptacles, and the point where they exit from the
appliance.
Never pull or stretch
the cord.
3. CAUTION “ Polarization - This appliance may be
equipped with a polarized alternating-current line plug (a
plug having one blade wider than the other). This plug will
fit into the power outlet only one way. This is a safety
future. If you are unable to insert the plug fully into the
outlet, try reversing the plug. If the plug should still fail to
fit, contact your electrician to replace your obsolete outlet.
Do not defeat the safety purpose of the polarized plug,
4. Ventilation ~ Slots and openings in the cabinet are
provided for ventilation and to ensure reliable operation of
the appliance and to protect it from overheating, and these
openings must not be blocked or covered. The appliance
should be situated so that its location or position does not
interfere with its proper ventilation.
To maintain good ventilation, do not put records or a table
cloth on the appliance. Place the appliance at least 10 cm
away from the walls.
Do not use the appliance on a bed, sofa, rug or similar
surface that may block the ventilation openings. This ■
appliance should not be placed in a built-in installation such
as a bookcase or rack unless proper ventilation is provided
or the manufacturer's instructions have been adhered to.
6. Temperature - The appliance may not function
properly if used at extremely low, or freezing
temperatures. The ideal ambient temperature is
above +5'’C Ì41'"F}.
7. Heat - The appliance should be situated away from
heat sources such as radiators, heat registers, stoves,
or other appliances (including amplifiers) that produce
heat.
8. Electric shock- Care should be taken so that objects
do not fall and liquid is not spilled into the enclosure
through openings. If a metal objects, such as a hair
pin or a needle, comes into contact with the inside of
this appliance, a dangerous electric shock may result.
For families with children, never permit children to.
put anything, especially metal, inside this appliance.
9. Enclosure removal - Never remove the enclosure.
If the internal parts are touched accidentally, a serious
electric shock might occur.
10. Magnetic fields - Keep the appliance away from
sources of magnetic fields such as TV sets, speaker
systems, radios, motorized toys or magnetized
objects.
11. Cleaning - Unplug this appliance from the wall
outlet befpre cleaning. Do not use volatile solvents
such as alcohol, paint thinner, gasoline, or benzine,
etc. to clean the cabinet. Use a clean dry cloth.
12. Accessories - Do not place this appliance on an unstable
cart, stand, tripod, bracket, or table. The appliance may fall,
causing serious injury to a child or adult, and serious
damage to the appliance. Use only with a cart, stand,
tripod, bracket, or table recommended by the manufacturer,
or sold with the appIiance. Any mounting of the appliance
should follow the manufacturer's instructions, and should
use a mounting accessory recommended by the
manufacturer. An appliance and cart combination should
be moved with care. Quick stops, excessive force, and
uneven surfaces may cause the appliance and cart
combination to overturn.
5, Water and moisture - The appliance should not be
used near water - for example, near a bathtub,
washbowl, kitchen sink, laundry tub, in a wet
basement, or near a swimming pool, etc.
Page 5
IS.Lightning- For added protection for this appliance during
a lightning storm, or when it is left unattended and unused
for long periods of time, unplug it from the wall outlet and
disconnect the antenna or cable system. This will prevent
damage to the appliance due to lightning and power-line
surges.
14.Abnormal smell - If an abnormal smell or smoke is
detected, immediately turn the power OFF andunplug
theappliance from the wall outlet. Contactyour dealer or
nearest service center. POWER OFF^
15.Damage requiring service - The appliance should
be serviced by qualified service personnel when:
A. The power-supply cord or the plug has been
damaged.
B. Objects have fallen, or liquid has been spilled into
theappliance.
C. The appliance has been exposed to rain or water.
D. Theappliance does not appear to operate normally
by following the instruction manual. Adjust only those
controls that are covered by the instruction manual as an
i m prop er adj ustm e nt of oth er
and will often require extensive work by a qualified
technician to restore the appliance to its normal operation.
E. Theappliance has been dropped, or the enclosure
damaged,
F. Theappliance exhibits a marked change in performance.
le.Servicing - The user should not attempt to service
the appliance beyond that described in the instruction
manual, All other servicing should be referred to
qualified service personnel.
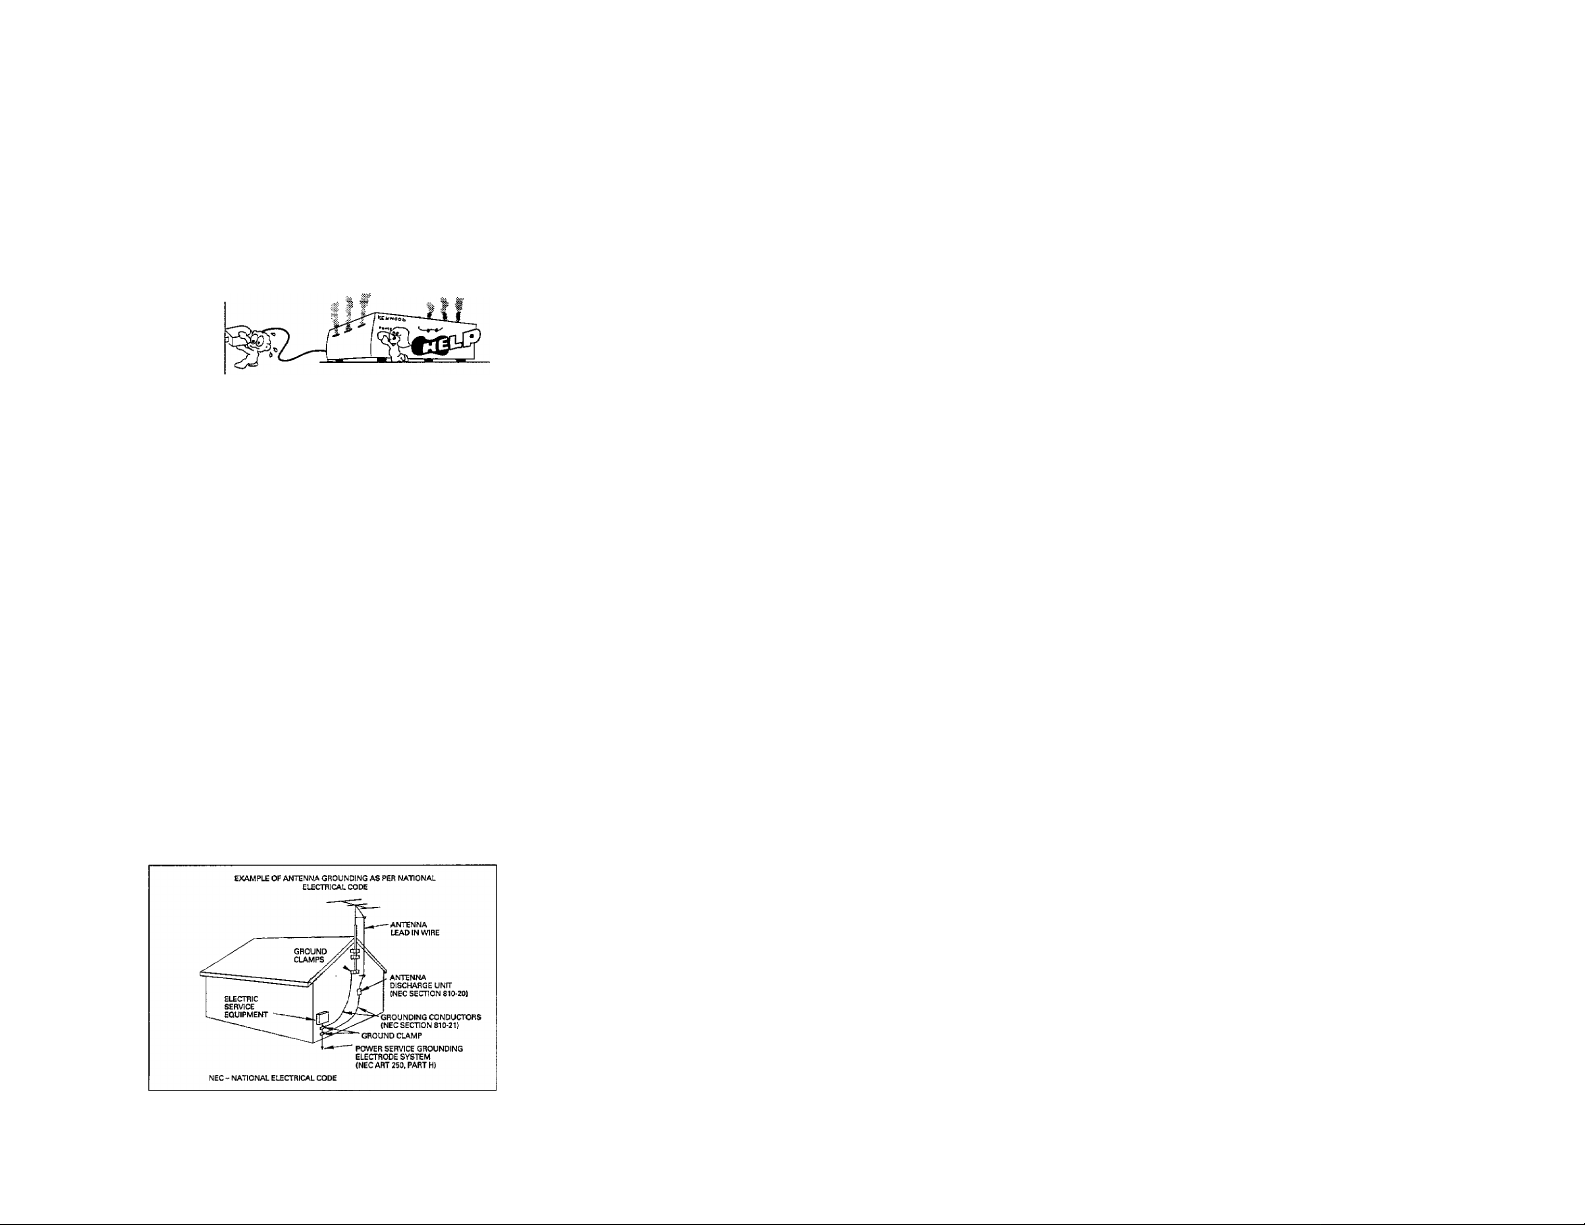
17.Outdoor antenna grounding - If an outside antenna
is connected to the appliance, be sure the antenna
system Is grounded so as to provide some protection
against voltage surges and built up static charges.
Article 810 of the National Electrical Code ANSI/
NFPA 70, provides information with respect to proper
grounding of the mast and supporting structure,
grounding of the lead-in wire to an antenna discharge
unit, sizeof grounding conductors, location of antenna
discharge unit, connection to grounding electrodes,
and requirements for the grounding electrode. See
Figure.
CO ntro Is may resu it i n da mage
18. Power lines-An outside antenna system should not be
located in the vicinity of overhead power lines or other
electric light or power circuits, or where it can fall into such
power lines or circuits. When installing an outside antenna
system, extreme care should be taken to keep from
touching such power lines or circuits as contact with them
might be fatal.
19. Overloading - Do not overload wall outlets, extension
cords, or integral convenience receptacles as this can
result in a risk of fire or electric shock.
20. Attachment- Do not use attachments not recommended
by the appliance manufacturer as they may cause hazards.
21. Replacement parts-When replacement parts are required,
be sure the service technician has used replacement parts
specified by the manufacturer or have the same
characteristics as the original parts. Unauthorized
substitutions may result in fire, electric shock, or other
hazards.
22. Safety check - Upon completion of any service or repairs
to this appliance, ask the service technician to perform
safety checks to determine that the appliance is in proper
operating condition.
For the U.S.A.
CAUTION:
Use of controls or adjustments or performance of procedures other
than those specified herein may result in hazardous radiation
exposure.
incompliance with Federal Regulations, following are reproductions
of labels on, or inside the product relating to laser product safety.
r
KENWOOD CORPORATION
SHIONOGI SHIBUYA BUILDING 17-5,
2-CHOME, SHIBUYA. SHIBUYA-KU,
TOKYO, JAPAN
KENWOOD CORP. CERTIFIES THIS EQUIPMENT
CONFORMSTODHHS REGULATIONS NO. 21 CFR 1040.10,
CHAPTER I, SUBCHAPTER J.
Location: Back Panel
Notes:
1, Item 3 is not required except for grounded or polarized equipment.
2, Item 17 and 18 are not required except for units provided with
antenna terminals.
3, Item 17 complies with UL in the U.S.A.
Page 6
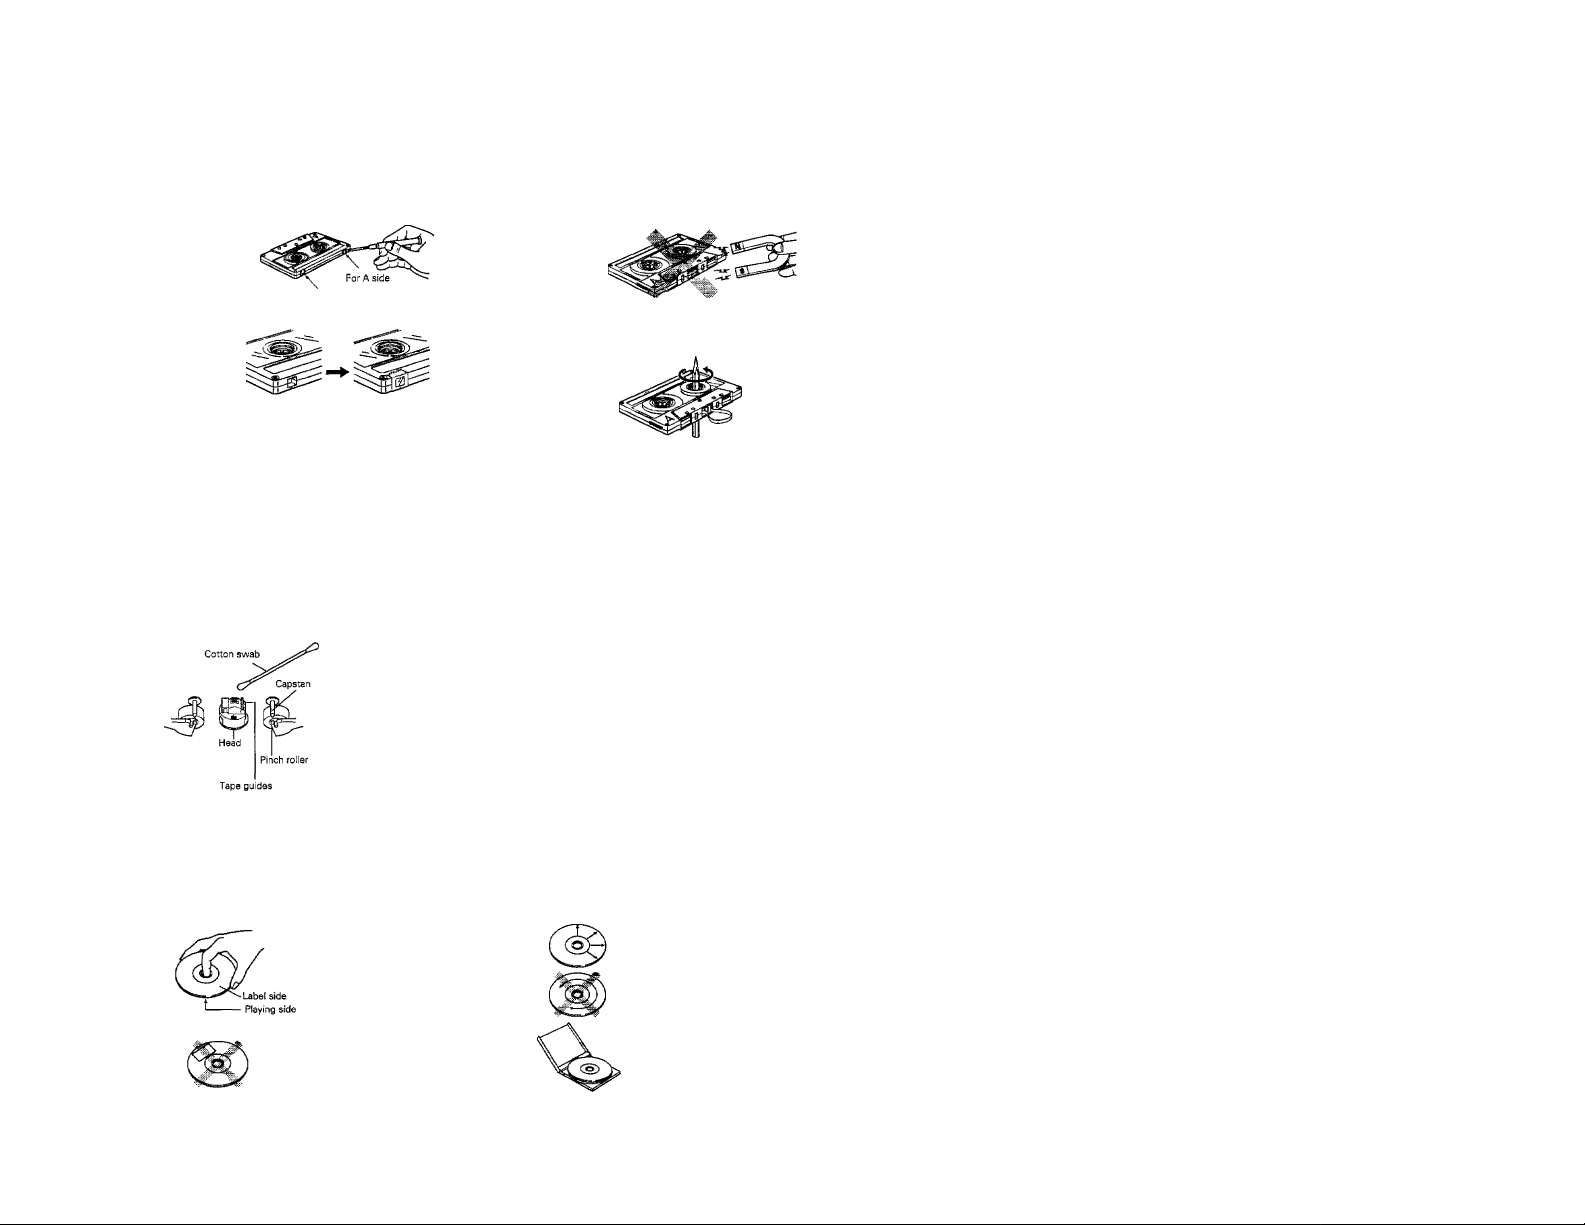
Notes on cassette tape
Safety tab (accidental erasure prevention tab):
After an important recording has been finished; break the
safety tab, to prevent the recorded contents from being
erased or recorded on accidentally,
To store cassette tapes:
Do not store the tapes in a place which is subject to di
rect sunlight, or near equipment that generates heat,
keep the cassette tapes away from any magnetic field.
When there is slack in the tape;
In such a case, insert a pencil into the reel hole and wind
the reel hub to remove the slack.
To re-record
Notes:-
120-minute cassette tape:
Since a 120-minute cassette tape is very thin, the tape
could adhere to the pinch roller or be easily cut. It is recom
mended that these tapes not be used with this unit to pre
vent possible damage.
Cover with adhesive tape.
Cleaning the head section
Cleaning the heads and peripheral com
ponents:
For maintaining the best condition of the deck
and for longer service life, always keep the head
(recording/playback/erase), capstan and pinch
roller clean.
To clean them, perform the following:
1. Open the cassette holder.
2. Using a cotton swab dipped in alcohol,
clean the head (recording/playback/erase),
capstan and pinch roller carefully.
Disc handling precautions
Handling
Hold compact discs so that you do not
touch the playing surface.
Endless tapes:
Do not use an endless tape, as this could damage the
mechanism of the unit.
Demagnetizing the head
When the recording/playback head is magne
tized, the sound quality wiil be deteriorated. In
such a case, demagnetize the head using a
commercially available demagnetizer (head,
eraser).
Note:
There are precisely aligned parts around the
heads, including the tape guides.
When cleaning, pay special attention so as not
to apply shock to them.
Cleaning
If fingerprints or foreign matter become
attached to the disc, lightly wipe the
disc with a soft cotton cloth (or similar)
from the center of the disc outwards in
a radial manner.
Do not attach paper or tape to either
the playing side or the label side of
compact discs.
Storage
When a disc is not to be played for a
long period of time, remove it from the
CD player and store it in its case.
Page 7
Beware of condensation
When water vapor comes into contact with the surface of cold
materiai, water drops are produced.
If condensation occurs, correct operation may not be possible,
or the unit may not function correctlly.
This is not a malfunction, however, and the unit should be dried.
(To do this, turn the POWER switch ON and leave the unit as it
is for several hours.)
Be especially careful in the following conditions:
• _ When the unit is brought from a cold place to a warm place,
and there is a large temperature difference,
• When a heater starts operating.
• When the unit is brought from an air-conditioned place to a
place of high temperature with high humidity.
• When there is a large difference between the internal tem
perature of the unit and the ambient temperature, or in con
ditions where condensation occurs easily.
Setting the channel space (only some areas)
The space between broadcast stations is called the channel space. This space will differ depending on the country.
You can set the proper channel space for the country in which you will be using the unit, immediately after you insert
the plug of the power cord into the power outlet. When you insert the power plug into the outlet:
Operate with the POWER key being kept OFF.
□ Either "STEP 9 kHz" or "STEP 10 kHz" will be displayed.
[2] If "STEP 9 kHz" is displayed and you wish
to change to 10 kHz: —>
[3] If "STEP 10 kHz" is displayed and you wish
to change to 9 kHz: —>
[4] Press the TUNER key to confirm the setting.
Area
U.S.A.
and
Canada
Ohter
countries
AM
CHANNEL SPACE
10 kHz
9 kHz
ca
ft
• Now, the setting operation is completed.
• The power is applied and either AM 531 kHz (for STEP 9 kHz) or
If the AM channel spaces are changed, the characteristics for FM band are also changed so that they match with those in the
corresponding area.
Dolby noise reduction system
The Dolby noise reduction system was developed to reduce the tape hiss noise generated during playback.
The optimum effect of the Dolby NR system is obtained when the same type NR system is used for both recording and playback. If a
different type NR system is used, playback is not performed correctly. Make sure that the same type noise reduction system is used
for both recording and playback.
Dolby B NR
The most popular noise reduction system used in home audio components. Usually, Dolby NR system corresponds to B NR.
AM 530 kHz {for STEP 10 kHz) is displayed.
Dolby noise reduction manufactured under license from Dolby Laboratories Licensing Corporation.
"DOLBY" and the double-D symbol □□ are trademarks of Dolby Laboratories Licensing Corporation,
Page 8
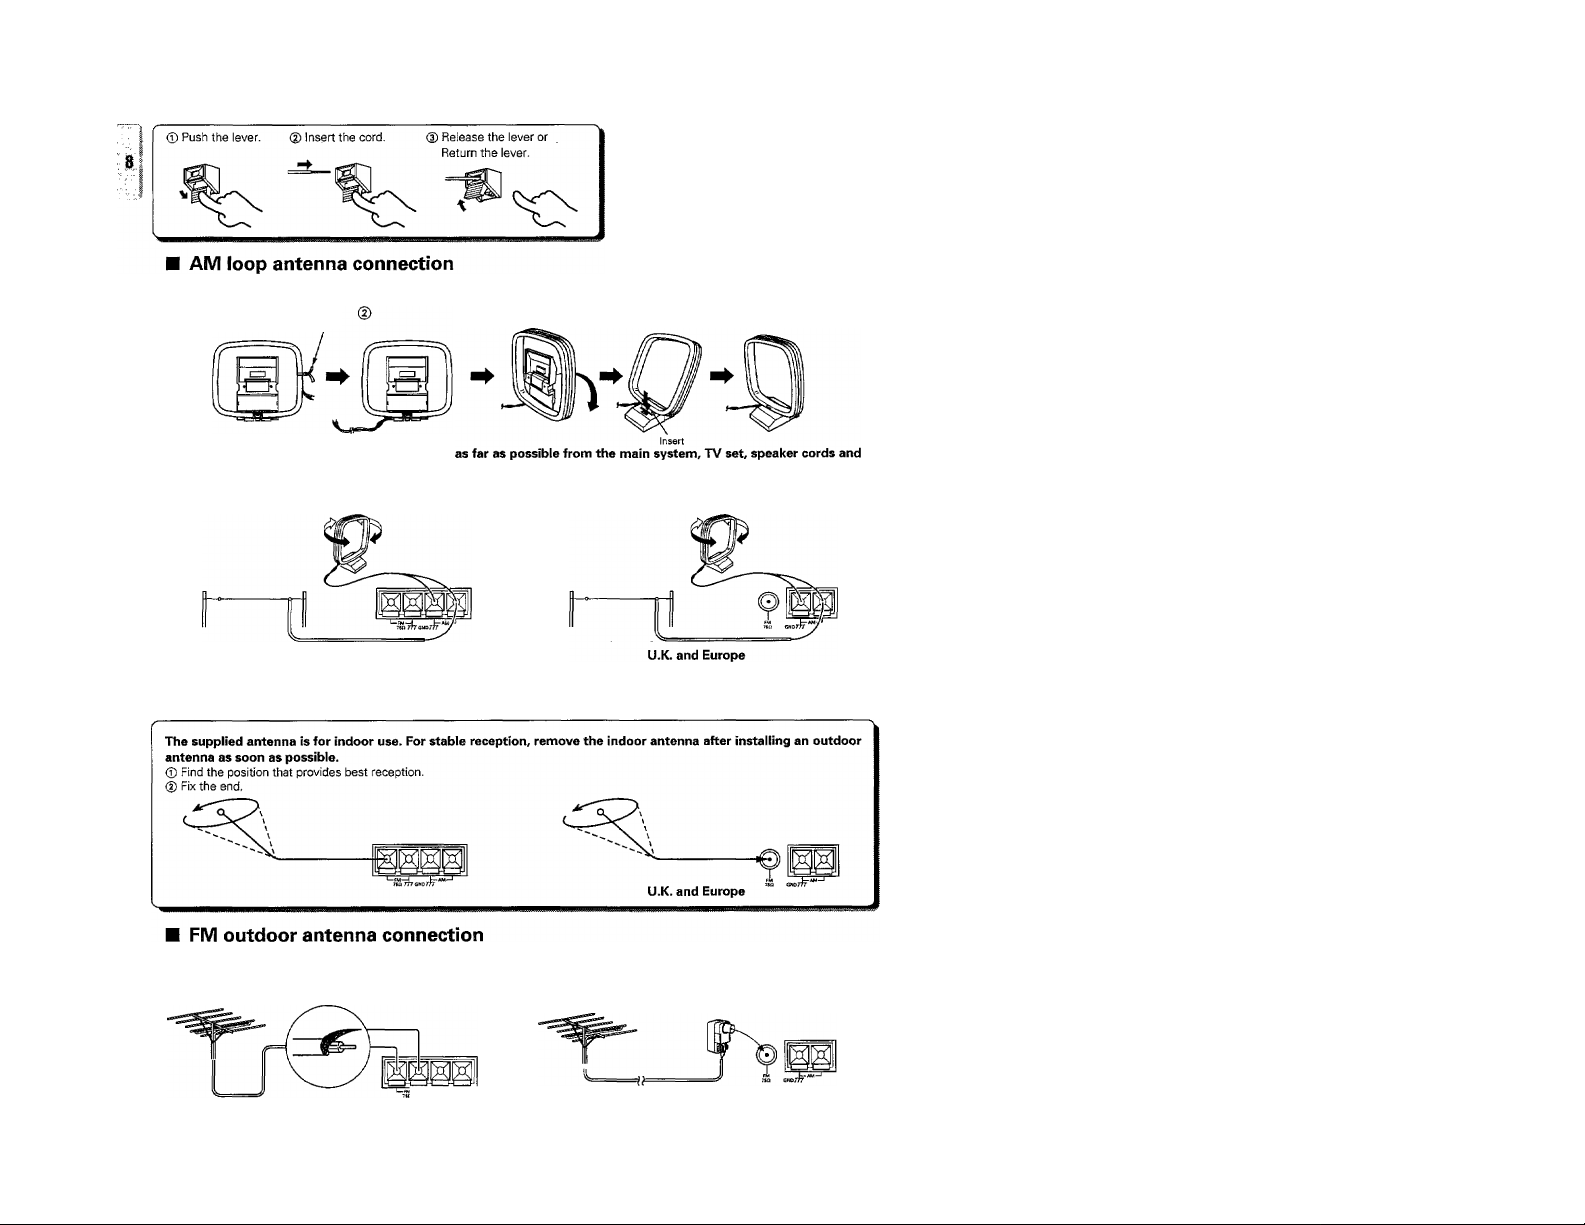
How to assemble
Unfasten the bundle
power cord, and set it to a direction which provides the best reception.
It the reception is poor when the AM loop antenna is used, distribute a vinyl-coated wire of more than 6 meters
outdoors, without disconnecting the loop antenna.
0
FM indoor antenna connection
It is recommended to install an exclusive FM outdoor antenna to capture FM broadcasts with high sound quality.
Use a coaxial cable for the connection between the outdoor antenna and FM ANTENNA terminal on the rear panel.
For the connection between the coaxial cable and FM ANTENNA temninal, please refer to page 9.
U.K. and Europe
Page 9
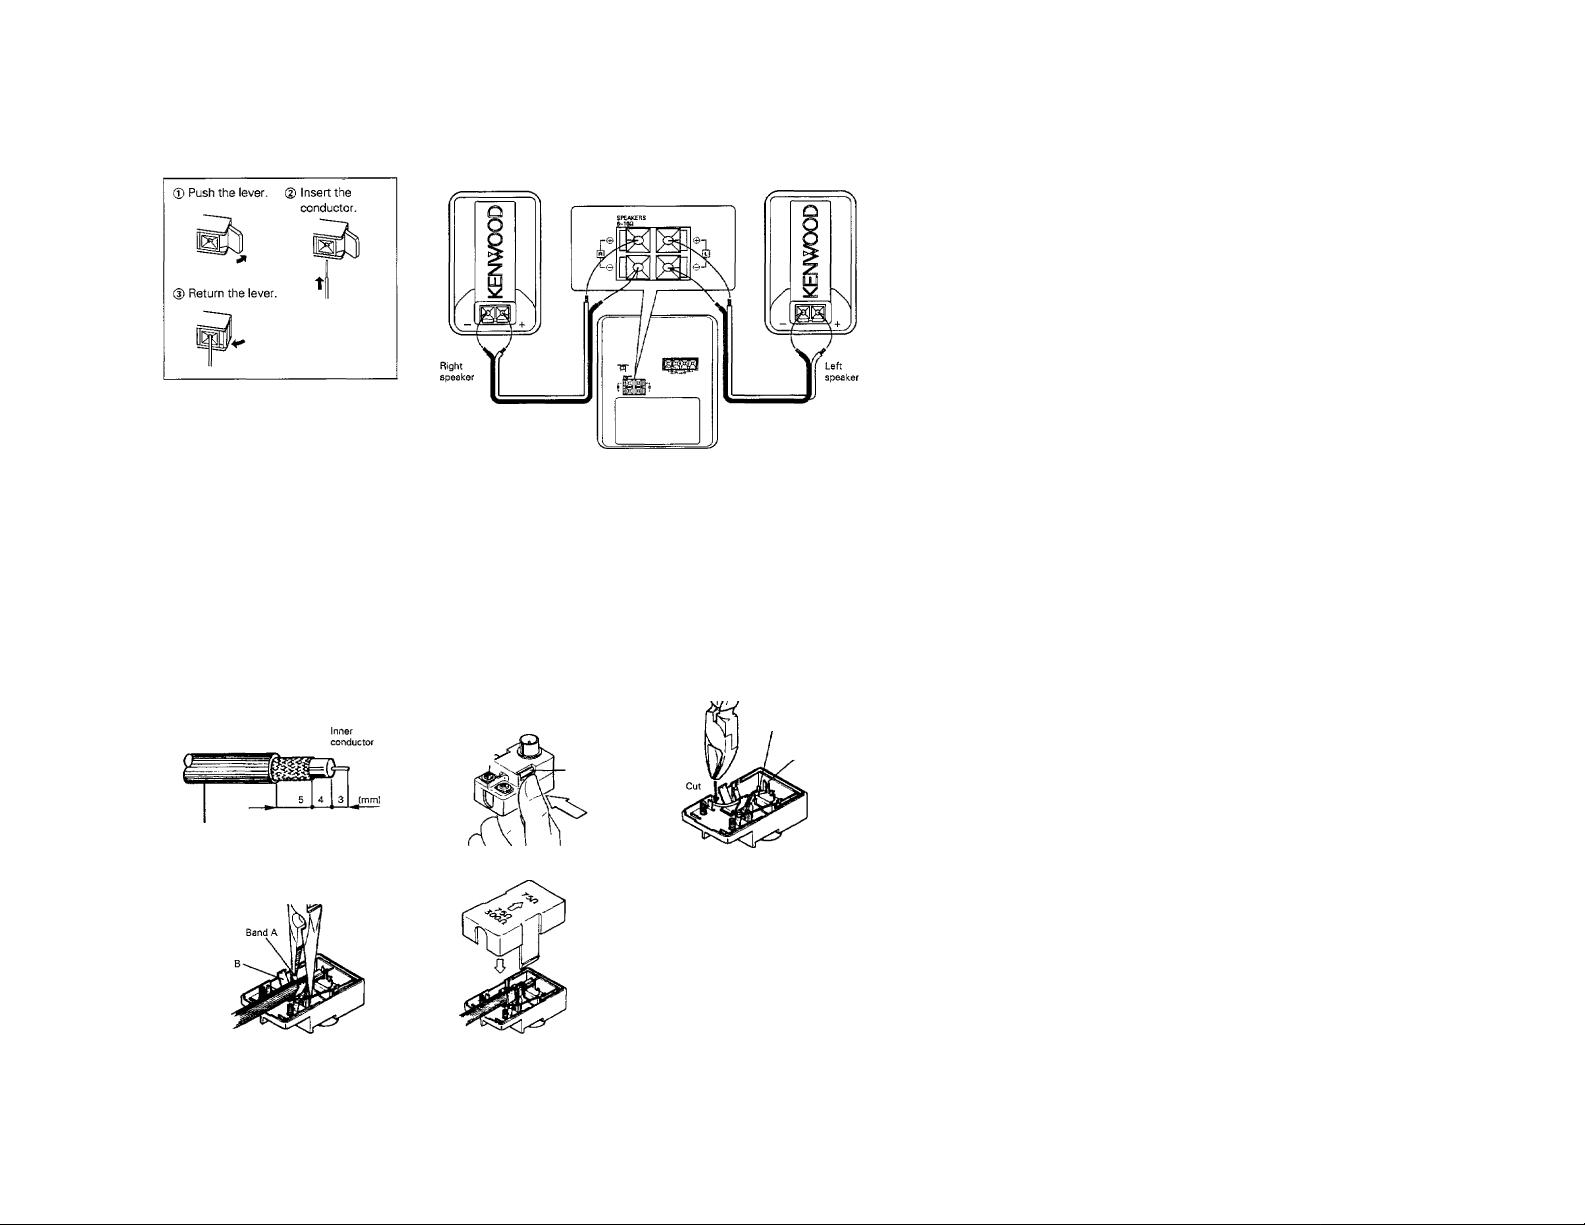
Connection of front speakers
Never short-circuit the + and - speaker cords,
if the speaker cords are connected with reversed polarity,
the sound becomes unnatural with ambiguous acoustic
image positioning.
Be sure to connect the speaker cords correctly,
Left
speaker
The right and the left speakers are the same.
75 Q, coaxial cable connection (For U.K. and Europe]
© Arrange the coaxial cable as il
lustrated.
Outer shield
(Braid)
(D Open the antenna adaptor.
Press the claws in the direction
of the arrows with the fingers to
release the lock and pull out the
cover.
Claw
Right
speaker
Cut off the red wire and remove
it from the clip.
Remove the red wire
Clip
RG-6 (5C-2V) or RG-59 {3C-2V)
® Insert into the slit on the clip.
Fasten the bands A and B, using
a pair of pliers.
Note:
To connect the 300 £1 feeder, attach the ring shown in the figure. If the ring is not attached, the sensitivity decreases.
® Close the cover.
(6) Connect the adaptor to the an
tenna terminal.
Page 10
Cassette deck / Amplifier section
Itti
STANDBY indicator
POWER key
* Input select keys
TAPE: Play tape
TUNER: Tuner and
band select
CD: Play CD
DOLBY NR (noise reduction)
select key ¡»|"p^
CCRS select key 4|
Tuner / CD player section
Natural bass (N.B.) circuit
The power will go on when keys marked with
an asterisk (*) are pressed, even if it was off be
fore the key was pressed.
^ TUNING / UP, DOWN
When set to TUNER: channel select key
When set to CD : SKIP key
- Volume knob/indicator
*0Play A side (forward
- play)
^SlPIay B side (reverse
play)
A side fast-forward
key
B side rewind key
B side fast-forward
key
A side rewind key
® STOP key
¡a REC (record) key
m PAUSE key
PHONES jack
S] EJECT key
When set to TUNER: preset station (UP) key ¡►j
When set to CD: PLAY/PAUSE key
Page 11

Display section
Natural bass (N.B.) circuit
tone indicator
[gPLAY
H PAUSE
FM stereo auto mode indicator
FM stereo indicator
ACOUSTIC
(ASLC display)
Tuning indicator
CD track number display
Tuner preset number indicator
Sleep timer indicator 4'|'P2^
EDIT mode indicators 4-
TRACK mode indicator ^
PROGRAM mode indicator
When set to CD:
track number
— When set to tuner:
tuning band indicator
Back panel
laiiiBsia ib)ibi
[AUTO I m ÌTUNÈÌ; 1
“ “ “
>MS)rr'uH !m kJ Ù! LJtLJ
' TRACK PGM
ipi6^
REPEAT-ONE (repeat one
track) mode Indicator
ALL RANDOM iDaLBYNR
RANDOM mode
indicator
REPEAT-ALL (repeat all
tracks) indicator
m m.E3 m 0-0 o «hz
il( m kii tb u:u u MHZ
3 4
8 9 in;fÀÌÌl^MERÌ;
MHz |i_llS-t3JA15jL LdJ]
DOLBY NR (noise reduction) Indicator
REVERSE mode indicator
jL
' Antenna terminals
SLEEP
Timer/Al timer [D [U
indicators
TIMER RECORDING mode
indicator
When set to CD:
total time indicator
(when CD is not playing)
Current track time indicator
(when CD is playing)
Program number
When set to TUNER:
tuner frequency indicator
Time indicator
Tape counter
Speaker
terminals
U.K. and Europe
J/
Page 12

remôwmwmi unît
Loading batteries
121
Remove the cover.
Slide the cover pressing the
Operation procedure
Plug the power cord of the system into an AC wall out
let, and press the! POWER I key to turn the power on.
The remote control unit is effective only in the range
shown in the figure right.
* When two operation keys on the remote control
unit are pressed successively, press each key se
curely reserving an interval of more than 1 sec
ond for each press.
POWER key
i^/P29! [sleep! timer key
B Insert batteries.
Insert two AA-size (R6) batteries as indicated by
the polarity marking.
B Close the cover.
Remote control light
sensor
> ACOUSTIC select key (ASLC key)
• Natural bass (N.B.) circuit key
>
Tape deck operation keys
I
EDIT I mode key
CD / tuner section
operating keys
I PROGRAM enter! key
»fPI^ [PROGRAM MODEl key-
nh*.bPllt:H * ■ IIVULXJIVIL
fePiSiÇ
P.MGK P.CAU. t ^
KENWOOD
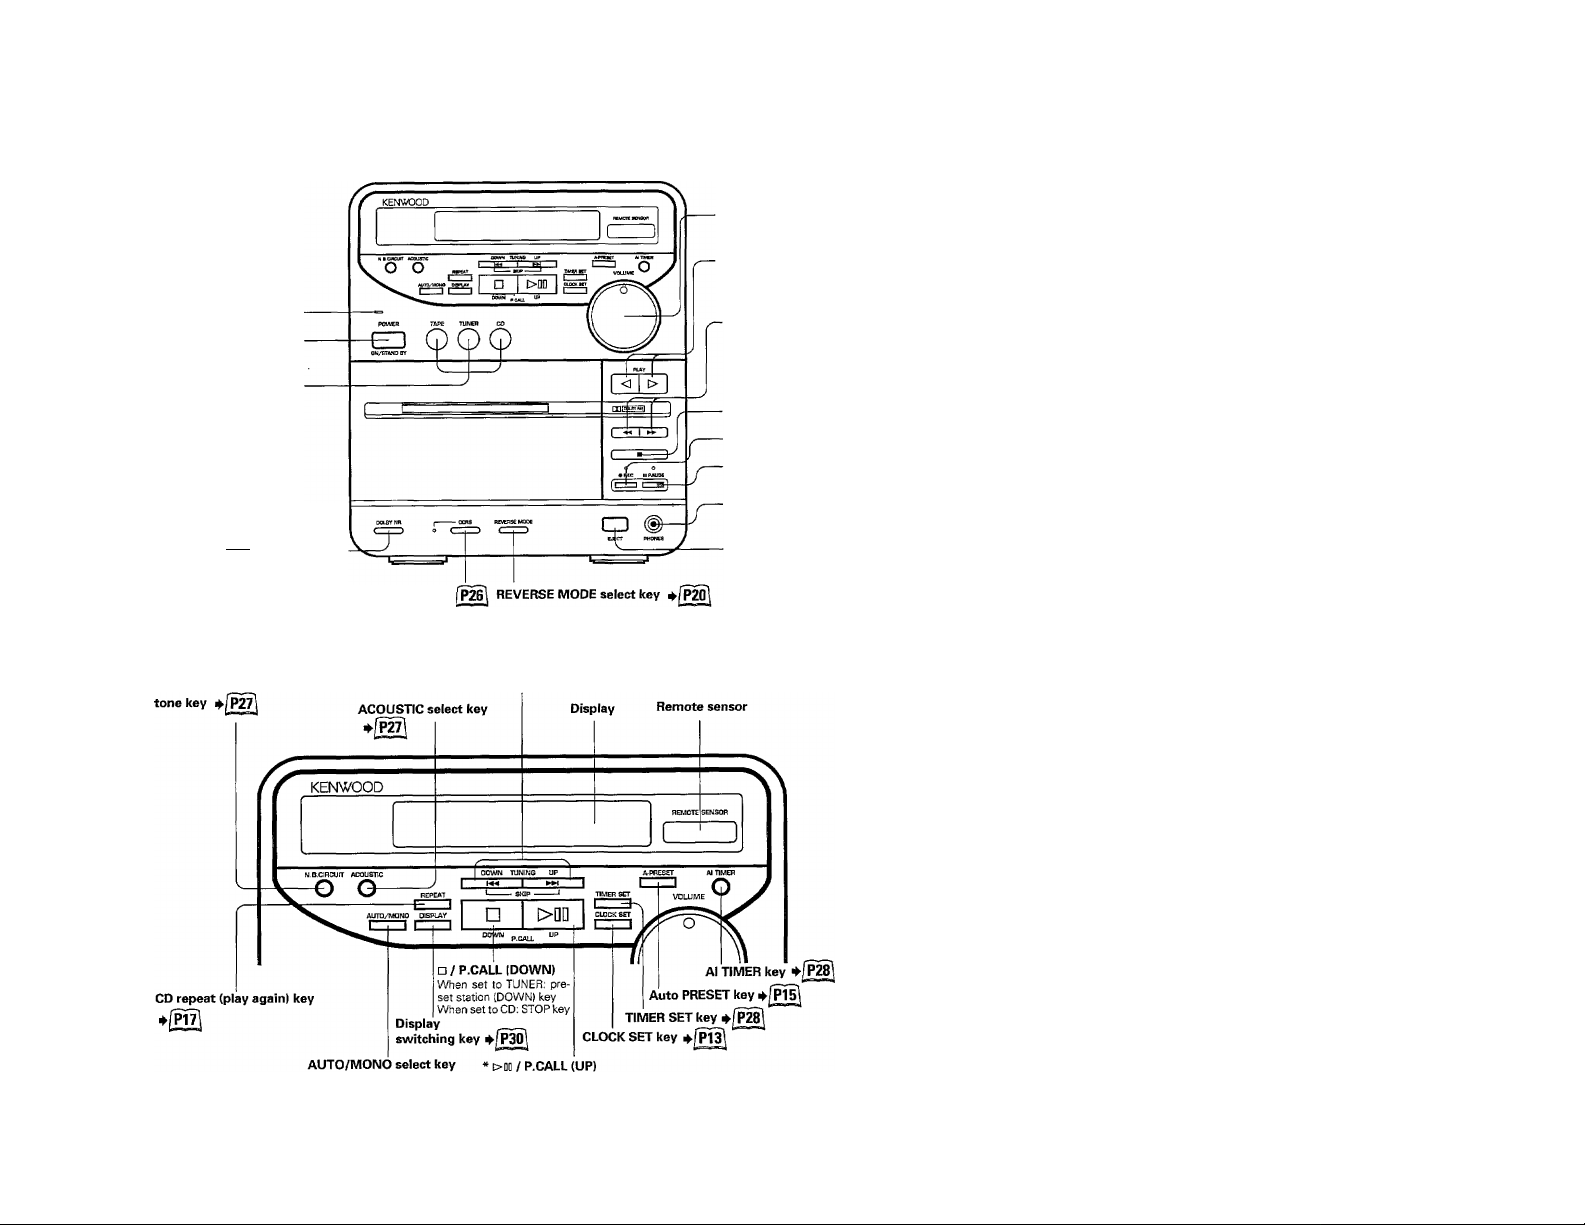
I I Names in boxes refer to keys only available on the remote control unit.
Notes:
1. The supplied batteries are intended for use in operation checks. Therefore, their lives may be shorter than ordinary batteries.
2. When the remote-controilable distance gets shorter than before, replace both batteries with new ones.
3. Malfunction may occur if direct sunlight or the light of a fluorescent lamp using an inverter enters the remote control light sensor.
In such a case, change the system installation position to prevent the malfunction.
REPEAT key
Volume control keys
PROGRAM CALL key
Page 13

HL'JJHII.JJ^IUA'>1 UfjjIyi» ■..vr*r^trr^7"
..........
................................
# çurrent time €m the clock
This unit has a built-in clock. As soon as you start using the unit, you
should set the current time on the clock in order to ensure that the timer
functions work properly.
In the event of a power failure, or when the plug has been removed from
the power outlet, the clock display will blink to indicate that the time
should be reset.
Note: the timer cannot be used unless the time has been set.
First of all, press the POWER key to turn on the power.
Press the CLOCK SET key.
»
CLOCK SET
c
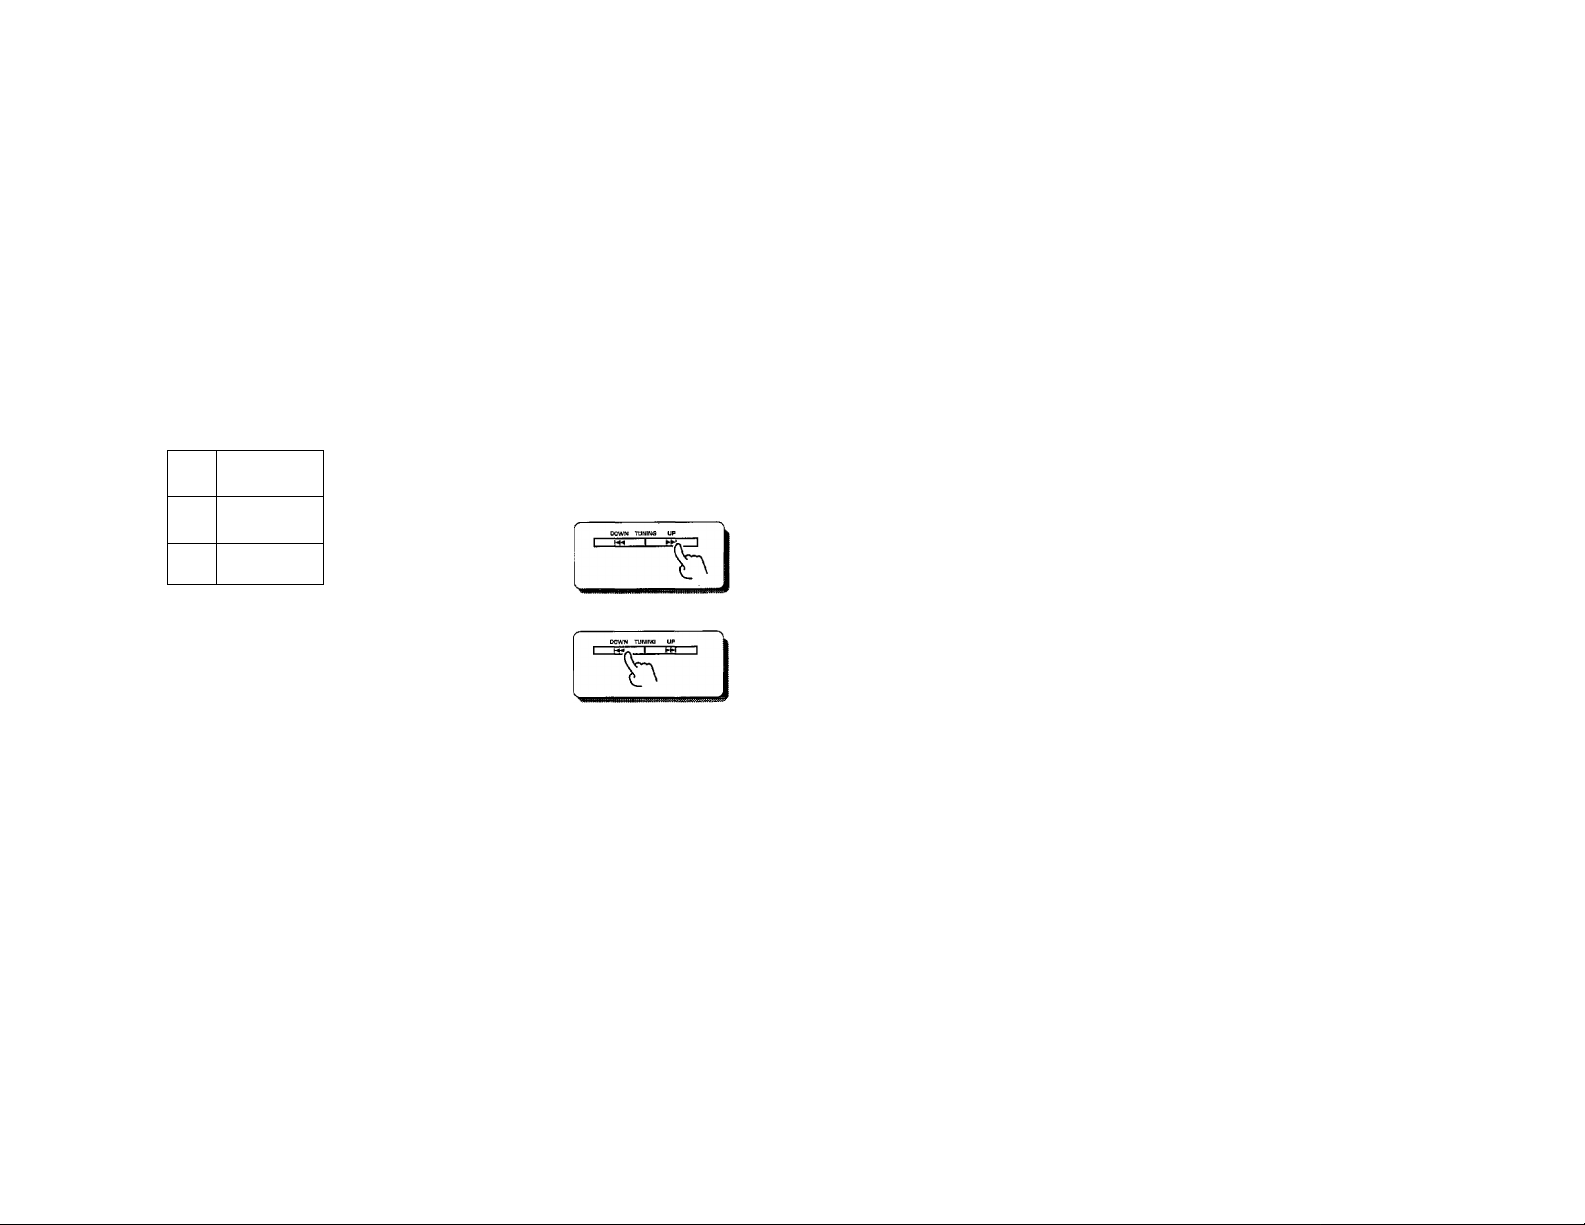
Use the and keys to set the time.
DOWN TUNING
Press the CLOCK SET key again.
CLOCK SET
c:
V' iWj / /
Ns?
l;
Time display will blink.
To increase the minute setting, press the UP key once. The
minute setting will increase 1 minute each time the key is
pressed. Holding the key down will cause the minute and
hour settings to increase quickly,
To decrease the minute setting, press the DOWN key
once. The setting will decrease 1 minute each time the key
is pressed. Holding the key down will cause the minute and
hour settings to decrease quickly.
When the current time has been set, press the "CLOCK
SET" key again.
---------™--------------
/seu
^ The time^splay will stop blinking.
g with ^
Insert the miniplug on the headphones into the
PHONES jack on the unit. Use headphones
equipped with a stereo miniplug, or use a stereo
miniplug adaptor.
The sound from the speakers will be cut off.
Use the VOLUME dial to adjust the volume.
OME-TOUCH OPERATION System
This unit is designed so the power will automatically go on and operation will begin when the TAPE, TUNER, CD, [>i|,
01 # iS
Itey on the unit, or the CD/TAPE key on the remote control unit is pressed
Page 14

I FM stereo indicator
I * When an FM stereo broadcast is received, the unit au-
-14 tomatically switches to stereo mode and the |st| dis-
I play appears.
Preparations
TUNER
If the signal is weak or there is a lot of static, you can
improve reception by pressing the| AUTO/MONO|key
to change the unit to MONO (monaural) mode.
Press TUNER. The power wilt
go on and the unit will change
to tuner input.
broadcasts
Select the broadcast band.
TAPE TUNEB CD
O (^O
Main Unit \
Select the station.
I TUNING UP
Hold down the UP or DOWN key for 1 second or more.
CO/TAPE TUNB1
L
i Control Unit VU. '
Remote
Control Unit 0. 1
Press the TUNER key to switch between AM and FM
bands.
The unit will toggle between these two bands each time
the key is pressed.
• The unit will scan up or down the dial [depending which
button was pressed! and will stop when it finds a station.
• To continue searching, press the key again.
• When the unit appears to be having difficulty locating a sta
tion, press the ITUNINGI UP or DOWN key lightly (without
holding the key down). Each time the key is pressed, the
frequency will change one step. Keep pressing the key un
til the desired frequency is reached.
mJÙMÛaa in a Presat Station
Follow the instructìorts oo page 15 to preset the desired stations In memory.
Select the desired preset station.
Each time the IP.CALLI UP key on the unit
or thelP.CALUkev or> the remote control
unit is pressed, the unit will cycle to the
O Control Unit r*
next preset station.
□
By pressing the jol key (IF.CALLIdOWN key) on the
unit stations can be selected in reverse order [15
->14 13 and so on).
.........
15m
The number oi the current sta
tion wilt appear or the display.
Display
Page 15

D Select the broadcast band.
TAPE TUNER ra
ofp
The band will toggle between AM and FM each time the
TUNER key is pressed.
Press the A.PRESET (automatic
preset) key.
Call up the number for the station
you wish to change.
□ w
Press the P.CALL UP key until the pre- Display
set station that you wish to change is “TTT
tuned in.
Select the desired broadcast band.
TAPE TUNER CO
0(^0
If the broadcast band is changed, the preset number will
disappear, but it is still retained in the unit’s memory
ne^et (using remote control unit only)
Select the broadcast band.
C%\
Tune in the station to be preset.
W^TUNING^W
Press the P.MODE key (on the re
mote control unit).
Display
Blinks
P.MODE
The unit will search the selected band and automatically
store up to 15 stations into memory, after which it will stop
automatically.
In some cases the unit will also mistake frequencies with
powerful static for broadcast stations and store these as
well. If this happens, use the preset procedure shown be
low to change them to actual broadcast stations.
(main unit oniyl
Press the A.PRESET (automatic
preset) key.
• Starting with the number you have selected in D. the unit
will search the selected band and assign stations up to
number 15.
Example ^^
Press the P.CALL key to select the
desired preset number.
Press the key until the desired number is displayed.
I Press the P.MODE key to set the cur
rent station to that preset number.
Display I
I Repeat the process.
Repeat steps
set as desired.
preset on the AM band
h |2|3|4|5|
12 3 4
5 6
15
Select number 5,
Change the broadcast band.
Press A.PRESET key.
FM
-------------
15
C%\
Stops blinking
0
through Q until all 15 preset stations are
Page 16

Jn^
start playing the CD.
The power will come on and " ^ ]}" will appear in the dis
play, and then the CD will begin playing.
O I Control Unit ^
Even when the unit is set to TUNEH^ the CG begins playing
by pressing the CD key among the fnput select keys.
When using the remote controi unit, simply press the
key and the CD wtil begin playing.
TRACK mode;
used when no tracks have been programmed On other
words, when all tracks on the CD are being played in or
der from the beginning).
To pause CD play.
s 006
1 <T>i
^!J I DD-nS
The track Elapsed time of track currently being
currently being played
played
1 ° 1 W L
Main Unit " 1
To stop CD play.
Main Unit
Remote L—
. Control Unit ^
Control Unit T'
*^/l\
■
■ To cancel the pause status, press the ">Q0"tor ►/!!) key
again.
- When CD play is stopped, the display reverts to the total
number of tracks and total time.
51-HB
Page 17

Preparations
(T) Lift the lid of the CD
compartment,
(2) Insert the CD,
(D Close the lid,
To start listening to the tracks in order starting with a certain track (skipping tracks).
Each time the key is pressed, the unit will move to
the beginning of the next track.
T
Remote
Control Unit
When the key is pressed, the unit will move to the
beginning of the current track. Each time the key is pressed
again after that, the unit will move to the beginning of the
previous track.
To listen to previous or subsequent tracks (searching for tracks).
DOWN TUNINS UP
ir"
Main Unit V 1
Hold down the or key.
The REPEAT key allows you to play a desired track again or play the tracks in random order.
Remote
Control Unit \
When the key is held down while playing a CD, the
unit will move forward through subsequent tracks.
When the key is held down while playing a CD, the
unit will move backward through previous tracks.
■ Repeat/Random play.
REPEAT REPEAT
I—
Main Unit 0
Remote 1
------------
Control Unit O
Each time the REPEAT key is pressed, the unit cycles
through the following modes:
ONE
.................
Plays the current track again,
ALL................
RANDOM
OFF
„Plays all tracks on the CD again. In pro
gram mode, plays only the programmed
tracks in the programmed order.
........
Plays all tracks on the CD in random order.
• If the random mode is selected, the
.................
Returns to normal play mode.
program mode is canceled.
Page 18

When playing CDs, you сап program any desired tracks to
play in any desired order. This mode is called program
mode. To do this, you must be in programmed play mode.
18 i
Preparations
CD Lift the lid of the CD compartment,
^[P16j (D Close the lid.
(a) Insert the CD.
(4) If the CD is currently playing, press
the "B"key to stop it.
Tracks (Remote Control Unit Only)
Press the P.MODE key to enter program mode.
■rf-" DD:DD
—t
The number will change each time one of the keys is
pressed. ,
Display
rt:
Track no, Program number
(blinking)
D5 P-0 /
If the P.ENTER key is pressed and held down for more than
2 seconds, the total playing time of the programmed track
will be displayed.
* Repeat steps H and M to program any other desired tracks. You may program up to 20 tracks.
• If you attempt to program any more tracks, the word FULL will appear on the display.
Stops blinking
- Program mode
^lavina the programmed tracks
[T] To play the programmed tracks.
{■
—
^ Main Unit
To stop programmed play.
Main Unit ^
1 Control Unit 0
Remote
Control Unit T*
Remote
>-/11
■
^ 0 3 П П --П f
The tracks will be played in the programmed order.
If the or key is pressed while the pro
grammed tracks are being played, the unit will move to the
next programmed track in that direction.
CAUTION; Pressing the key again while the CD is
stopped will erase the current program.
Page 19

Js if^pgramm6& cu play}
You can check, change or add to the program at will.
Preparations
• Press the key to stop the CD from playing,
* CAUTION: if the CD is already stopped in program
mode, pressing the key again will erase the current
program.
.J^hBckina ot changing the program (remote control unit only)
II To check the tracks that are currently programmed, press P.CALL to call up
the program.
l-'.tiMLI-
To program a different track, use the and keys to enter the desired
track.
rm rr~i
h
Press the P.ENTER key to enter that track.
The programmed track numbers will be displayed in se
quence each time the key is pressed.
¿7^ P- BE
With the program number to be changed shown on the
display, use the or key to select the desired
track.
:IJ3~.P-D3
---------------
Begins blinking '
Q] Enter the track to be added.
TUNING
i~qp~n
h
• When the "hm" and keys are used to select an ad
ditional track, that track will be added to the end of the cur
rent program,
[1] Press the P.ENTER key to enter
that track
I CH
03 P-D3
Stops blinking
s^Qtiirogram
To erase the current program, use any of the follow
ing methods:
® While the program is stopped, press the key again,
d) Press the "A" key and open the lid of the CD compart
ment.
<D Press the P.MODE key.
Page 20

Insert the cassette tape.
Select REVERSE mode or DOLBY NR, if desired.
..One side of the tape wili be played
once.
,, Both sides of the tape will be played once,
if playing is started from the B side, it
stops after only the B side is played up
to its end.
Toggles between these modes
each time the key is pressed.
.. Both sides of the tape will be played
over and over again,
To start playing the tape (PLAY).
( PLAY
^ I
JT
Insert the tape as shown at left, (T) d) (D
For the purposes of this manual we will cal! the side
facing you (the front side) "side A" and the other side
(the back side)"side B." Playing or recording side A will
be called "forward" play/recording; playing or recording
side B will be called "reverse" p!ay/recording,
There is no need to set the type of tape being used (nor
mal, chrome or metal}, as this will be automatically de
tected by the unit. (Meta! tapes may only be played.}
Make sure the tape is tight before you insert it, as
shown in the figure below.
Sets the unit to play tapes recorded in DOLBY NR (noise
reduction) mode (see Page 7}.
When the key is pressed, side A will be played.
When the "<l" key is pressed, side B will be played.
To stop the tape (STOP).
Do not press the EJECT key when the tape is running.
-as Q a
To fast-forward or rewind the tape.
QS)
.'T2> ^ Q S
( I ►► I
Playing direction
* Even when the power is turned off, it remembers the last tape playing
direction. However, if the power cord is disconnected, the direction is
automatically reset to O.
■ To change the tape playing direction, insert the tape and press the
desired PLAY key and then use the key to stop the tape.
► " key: used to fast-forward side A/rewind side B
key: used to fast-forward side B/rewInd side A
When a tape is inserted, the indicator lamp
on one of the PLAY keys will light to indi
cate the playing direction,
PLAY
Side B (back side) Side A (front side)
Page 21

DPSS stands for Direct Program Search System. Using the
DPSS function on this unit, you can skip tracks on a tape or
listen to the same track over and over.
Skipping tunes
When you select a tune several.tunes after (or before) the tune
that is currently playing, the unit immediately skips to the be
ginning of the selected tune, You may select up to 16 tunes in
this manner.
Playing the same tune over
Select the same tune as many times as you wish to hear it (up
to a maximum of 16 times).
Dash and play
- í - : ■ i.,.:.,-, ■ -v
Space between tunes (unrecorded section) Space between tunes (unrecorded section)
ft T T ^ IÍ t t t
Playing direction ------------------------------------------------►
J^£¡aDinatun^(DP$$)
n Listening to a iater tune (while another tune is playing).
For example, to play the 4th tune after the current tune,
press 4 times.
ft
When the A side of the tape is being played (tine 1> direction)
Remote X \
Control Unit ^
When the B side of the tape is being played (the <1 direc
tion), press the "■♦4" key.
Listening to an earlier tune (while another tune is playing).
C5p
■K
When the A side of the tape is being played (the O direction) tion), press the "►>" key.
Remote ft \
Control Unit V_
• To listen to the current tune from the beginning, press the
key once.
• To listen to the 4th tune before the previous one, press the
key 5 times.
• When the B side of the tape is being played (the O direc-
Listening to the same tune over and over again (while that tune is playing).
• Press the key of the currently runn ing directio n onc e. . After the same tune ha s b ee n played 16 tim es, the mo de
1 <
Main Unit
When the A side of the tape is being played (the C> direction)
Control Unit ^ '
will revert to normal play mode.
• Skipping operation is not available while playing the same
track over.
• To cancel the repeat play in mid-operation, press the
key on the deck, or press the key (or the "O" key if the
B side of the tape is being played).
Dash-and-play (main unit only)
• Press the and keys simuftaneously, ei
ther while the tape is playing or when it is stopped.
When there is more than 10 seconds between tunes, the
unit will fast-forward to the beginning of the next tune.
The unit will not fast-forward in the case of the first tune on
the flip side.
Skipping operation is not available during dash-and-play.
Notes:
The skip and repeat operations may not work for the following types of tapes:
• Tapes of conversations, comedy or the like in which there are pauses of 4 seconds or .longer
• Tapes of classical music or other types of music which contain very soft sections or silences
• Tapes with loud static or applause between tunes
Page 22

* It is not possible to record to metal tapes on this unit (metal tapes may only be
m
played).
Preparations
(T) Insert a cassette tape,
------- both sides once or to record one side
(D Select reverse mode (either to record
only).
(3) Select Dolby NR if desired,
(?) Select the direction of tape
movement: A (forward) or B
(reverse).
□
= g| # j
Select the source for recording.
TAPE HJMEB CO
OQ^
Main Unit
CD/TAPE TUNEB
Rernote
Control Unit C. 1
"TAPE" cannot be selected.
When "CD"has been selected, press either the "□"key or
">DD" key in the CD section to stop (or pause) the CD if it is
playing.
Start recording.
© Start the source for recording.
© Press the REC key.
• nEC II PAUSE
•
[HlEl
—1
--------
i
Main Unit ^
Control Unit n
To pause recording.
• REC II PAUSE
Main Unit
Remote ^
Control Unit O
II
To stop recording.
■
Remote
Main Unit ^
Beat cancel
When recording AM radio broadcasts, a high-pitched sound may be re
corded. This is caused by the interaction of the recording circuit and the
signal. This sound can be minimized by changing the circuit as follows:
(T) Tune in the AM broadcast and then set to recording pause mode.
(D Press the tuning UP and DOWN keys simultaneously, The circuit will be changed
each time the keys are pressed in this manner.
Control Unit O
• REC II PAUSE
Main Unit ^
When the REC key is pressed during recording, the deck
enters the record-pause mode after creating a non-recorded blank of 4 seconds.
To restart recording, press the REC key again.
(D
(D
Remote ^
Control Unit P
•
Page 23

CD synchronized recording
When recording a CD, rt is possible to start or pause re
cording using only the CD keys, without having to press
the keys in the tape section.
Preparations
Insert a cassette tape.
CD
Select reverse mode (either to record
@
both sides once or to record one side
only).
Select DOLBY NR if desired.
CD
Select the direction of tape
CD
movement: A (forward) or B
(reverse),
Insert the CD to be recorded.
uzea recording
Set the input to CD.
TAPE TUNHl CO
^ain Uni! 1 I Control Unit ^
Press the RECORD and PAUSE keys simultaneously.
Start playing the CD.
^ ! CD/TAPE
O
>REC »PAUSE
□ MD
X' I Control Unit X' ^
(5) ®
Remo.e
After setting the input to CD, stop {or pause) the CD from
playing by pressing the key (or the "OOD" key) in the
CD section.
neously.
When performing this operation on the remote control unit,
press the key and then immediately afterward press
the "II" key,
The unit will start recording as soon as the CD begins play
ing.
When the CD has ended, recording will also stop.
Press the REC and PAUSE keys on the tape deck simulta
To pause recording.
□ >aa
Be.o.e
D Control Unit ^
To stop recording.
ain Unit ' Control Unit '
Press the stop key on the CD player.
\ Remote X.
The CD will pause and the tape will record silence for
around 4 seconds and then pause as well.
To start recording again, press the "c>0D" key again on the
CD player.
The tape will record around 4 seconds of silence and then
stop.
When the key on the cassette deck has been pressed
to stop recording, the CD will continue playing.
Page 24

- --• -.
........................
,................
JRBCordina of CD playback (Edit function)
24
The edit function is used for editing tunes from a CD for recording them onto a cassette tape. Three types of editing
are available with this unit, as described below.
Ai-r-v■:,■■-■■:,vv^vv.v---. ■ -:-■, ', -'- .V.
1. Normal edit
When the recording time of the tape is entered, the unit auto
matically assigns tunes from the CD for recording thenn on
sides A and B of the tape. For the end of side A, the tune which
best fits into the remaining time on that side is automatically
selected.
• Editing is carried out for all tracks up to track number 22.
If there is no tune available which can fit in the specified tape
recording length, "NO FiLE" is displayed and the edit func
tion is canceled.
CD (track mode)
1
1 :
1 ^
Tape
Ш'п 1 1 2
1
A 10-second space is
inserted.
*
>
1
3 4 5 6
>Тч\
ГГ11 3 1 4 \ 6 ШШ
T
A IQ-second space is
inserted.
2. Program edit
By programming tunes in advance and selecting normal edit
mode, editing is earned out using the programmed tunes.
• If a track with a track number of 23 or greater ts pro
grammed, that track will not be inciuded in the editing pro
cess.
CD (program mode)
\ 4
Tape
^
5 2 3 6
Bi i i 4 |Г|й 5 I 2 |6
3. Al edit
This mode automaticaily makes sure that all tunes from a CD
are recorded onto the tape, if the CD recording time is longer
than the tape, the unit automatically fades out the ends of each
tune so that all tunes can be recorded.
• If the tape is extremely short, all tunes from the CD may
not be recorded.
A 10-SBCond space is
inserted.
CD
1 2 3
Пл
A 10-second space is
inserted.
/
2
>L
A 10-second space is
inserted.
/
A 10-second space is
inserted,
4 5 6
XZ^
5 >[6>|G
............................................
.
EDIT key
In the CD mode, the display changes one by one as shown
below every time the EDIT key on the remote control unit is
pressed:
ШШ................Normal EDIT
I Program EDIT
1^ШШ
..........
Al EDIT
I
Page 25

^ í :, ■ . --1 j -.1 ;
Preparations
Insert a cassette tape,
@ Select reverse mode [either to
record both sides once or to record
one side only).
CD Select DOLBY NR if desired.
(J) Select the direction of tape move
ment: A [forward) or B (reverse).
CD Insert the CD to be recorded.
Change the input to CD.
After changing the input to CD, stop CD play by pressing
the key on the CD unit.
To edit the program for recording, enter the desired pro
gram.
Press the EDIT key to select edit mode.
Edit mode will change each time the "EDIT" key is
pressed.
If the next step is not performed within 8 seconds, edit
mode will be canceled. If this happens, press the "EDIT"
key again,
Set the tape length (total recording time for both sides).
Press the UP key onœ to increase the setting 1 minute.
Exampla;
In the case of a 45 minute tape,
set the tape length to "45"
Beyond 9 minutes, the setting will return to 0 minutes.
Press the DOWN key once to increase the setting 10 min
utes. Beyond 90 minutes, the setting will return to 00 min
utes. (The setting changes in 10-minute increments,)
Start the EDIT process.
Pause recording.
Start playing the CD.
Editing will begin automatically. When editing has been
performed for both A and B sides, the 1 EDITi display will
stop blinking.
- BE-na
Remaining time on A Remaining time on B
side is displayed side is displayed
Press the "«REC" key (Recording key) in the tape section
and then immediately press the "ll" key
Recording on the deck will begin and the CD will begin
playing.
When recording on the A side has been completed, the CD
will pause and the tape will be fast-forwarded until the end
of that side.
After the tape has been advanced for 10 seconds at the
beginning of side B, recording of side B will begin,
- - 0 iB
After several seconds
Page 26

OCRS function description
The OCRS {Computer-Controlled CD Recording System)
makes the following convenient recordings possible by set
ting the optimum tape recording level for the specific CD to be
recorded and starting recording automatically.
Preparations
Insert a cassette tape.
Select reverse mode (either to record both
CD
sides once or to record one side only).
Select DOLBY NR if desired.
Select the direction of tape movement: A
CD
(forward) or B (reverse).
Insert the CD to be recorded.
CD
Select the CD input.
After selecting the CD input, press
stop the operation.
To program desired tracks, set the unit to program mode.
To edit desired tracks, set the unit
Press the CCRS key
CCRS setting is canceled by pressing the lid "±" button of the CD player.
During CCRS operation, keys other than on the CD player, "DISPLAY", and on the cassette deck do not function.
CCRS EDIT recording
If the actual length of the tape is longer than the recording
time entered in EDIT mode:
After recording of the tunes for side A is completed, the
tape is forwarded to the end of side A and recording
starts again at the beginning of side B.
If the actual length of the tape is shorter than the recording
time entered in EDIT mode;
The tracks still remaining at the end of side A are left
unrecorded, and recording at the beginning of side B
starts with the first track edited for side B.
When the fcCRS I key is pressed, the
CD is played and the optimum re
cording level is selected automati
cally. After the recording level is set,
recording automatically starts. When
recording reaches the end of side A
of the tape, the tape automatically
reverses and continues recording on
side B.
in the CD section to
Track mode
A 10-second space
^1 A
F II
J 1 B 1
E IL...D II
1 c
c ^
■ Starts from a post- tion 10 seconds
before the point
where the tape is
reversed.
A 10-second space is in
serted after the tape di
rection reverse.
Program mode
space "" ^
1 C 11 A ll B
,CJ 1 .D 1 1 F 1
i
[f the length of the last tune
on sida B is iess than 5 min
utes, that tune is erased.
I| E.J I
The tune interrupted at
the end of side A is re
corded from the begin
ning,
Erased if the length is
' 5 minutes or less.
Auto
reverse
D
A 10-second space
is inserted after
the tape direction
reverse.
Page 27

Neither "ACOUSTIC" nor "N.B. CIRCUIT" key functions during EDIT recording.
■ I
ACOUSTIC I key
(ASLC...Acoustic Sound Level
Control)
The ACOUSTIC control circuit can be changed to alter the char
acter of the sound. With ACOUSTIC set to ON, the sound field
will be broadened to give the feeling of being surrounded by
sound.
■ I
MB CIRCUIT! key
When listening at a low volume, the human ear has difficulty
hearing both low and high sounds. The circuit used to correct
this is called a loudness control, circuit. This unit is equipped
with a I LOUDi function for loudness control and an |EX BASSl
function that gives rich bass sound.
1
lEX BASSl
I Provides a rich bass
ILQUDI
Ennphas!2es low and high frequencies for a fuller,
more natural sound even at low volumes
Toggles between these in the order shown above each
time the key is pressed.
By combining the ACOUSTIC circuit and the NB CIRCUIT
functions, you can experience a variety of sound variations.
Setting ACOUSTIC.
l\l,B.CIRCUtT ACOUSTIC
O ®
For the remote control unit, press the ASLC key.
Remote
Control Unit
H Setting MB CIRCUIT.
N.B.«RCUIT ACOUSTIC
Remote I
Main Unit V, »
Control Unit ^
C%\
N.B.
CIRCUIT
The set mode is lit
Page 28

mt If ih6 tlrne la not a«i
The timer of the system can be used for the following functions.
28;
(The functions change one by one as shown below every time thelAI TIMER] is pressed.)
Normal Timer..
Recording Timer........
OFF
Al Timer D]..
Al Timerd]..
Sleep Tinner .
...................
^ OFF at the specified OFF time.
^ the specified ON time, and the power is turned OFF at the specified OFF time.
i
Starts receiving broadcast, or playing tape or CD at the specified ON time, and switches power
Recording of the station being received at the time when the power was turned OFF is started at
..When the power is switched ON at the timer ON time, the sound level will increase in 4 stages,
providing a wake-up effect like an alarm clock and switches power OFF at the specified OFF time.
* The volume dial moves.
• The maximum level cannot be changed.
.. Functions only for playing CD.
When the power is switched ON at the timer ON time, the sound level will increase in 4 stages.
Then maximum level can be set in advance by volume.
* Switches power OFF at the specified OFF time.
• Then volume dial does not move but only the sound level changes,
.. Switches power OFF after a set time period has elapsed. If set before you go to bed, power can
be switched OFF automatically even after you fell in sleep,
Set the ON time.
Set the OFF time.
The ON time is displayed.
O N - B : ¡ 5 ^
To increase the minute setting, press the UP key once. The
minute setting will increase 1 minute each time the key is
pressed. Holding the key down will cause the minute and
hour settings to increase quickly,
To decrease the minute setting, press the DOWN key
once. The setting will decrease 1 minute each time the key
is pressed. Holding the key down will cause the minute and
hour settings to decrease quickly.
Page 29

Preparations
® Turn the power on.
(2) Set the ON and OFF tinnes.
the timer
TIMER RECORDING: the last station to be tuned in is re
corded -, .
Set the input source.
rju»e WHEB CD
OJOp
h
Stop playing a CD or a tape,
1 Select the TIMER mode.
Al TIMER
The timer mode
changes each
time the key is
pressed
inij Using the Timer —
Tune in the desired station.
TAPE TUNER CO
♦1SÌ1
Insert the tape on which the broadcast is to be recorded.
Set the desired timer recording mode.
0(^0
Hi IIIVlC.n
When Al TIMER H] is set, adjust the
volume dial.
• In the Al TIMER m mode, the
CD playback is selected.
f
----------------™----------------
Turn off the power.
I—
ON/STANDv.^ X,
The power will automaticaliy go on when the set time is reached.
□ Turn off the power.
I—
ON/STANDs^ X
The power will go on automatically and recording will begin
when the set time is reached.
Setting the SLEEP time
The remaining time decreases every
time the SLEEP key is pressed,
Press 2
times
Controi Unit Onlvl
• The time will be reduced in 10-minute increments each
time the key is pressed.
• If the key is not pressed within 10 seconds, the previous
display will reappear.
• When the set amount of time has elapsed, the power will
go off automatically.
• When the SLEEP timer is on, the power will not go off even
if another timer OFF time is reached.
• To cancel SLEEP timer mode
<3) Either press the SLEEP key until the remaining time display
shows "0"; or
@ Press the POWER key to turn off the power.
Page 30

JMQamLJOUsplay
Normally the display section shows the source cur
rently playing
Example: When a CD is playing
13 0H:f3
When a tape is playing
lEH S
When receiving a radio broadcast
FM BUnn^
DISPLAY key is pressed
Toggles between the modes shown below
When DISPLAY key is pressed:
^esettina the Tape Counter
.11 - L i.i>' f'f
(_
^ seconds or
I Hold down
for 2
* more
When the key on the deck is held down for 2 seconds
or more while the tape is stopped, the tape counter will be
reset to ''0000".
Page 31

What appears to be a malfunction may not always be serious. If your unit should not perform as expected, consult the
table below to see if the program can be corrected.
Amplifier, speakers section
Symptom
Sound is not output.
Cause
* The speaker cords are disconnected.
* The volume dial is set to the minimum
position.
* The headphone plug is left inserted in
the IPHONESI iack.
• Connect them properly, (Refer to page 9.)
• Adjust the volume to a proper level.
• Remove the plug.
Remedy
Tuner section
Radio stations cannot be re
ceived.
No antenna is connected.
The frequency of the desired station is
not tuned,
Connect an antenna properly. (Refer to
page 8.)
Tune the unit to the desired frequency
correctly.
_________________________
Cassette decks section
Sounds is not produced when the
Play key is pressed.
DPSS malfunctions.
Sound is hoarse, or high frequen
cies are not audible.
Recording is not initiated when
the Recording key is pressed.
Noise level is high. • The head is magnetized.
Sound is vibrating.
• The head is dirty.
• Tape is irregularly would and hard to take
up.
• A non-recorded tape is being played.
• The tape is not suitable for DPSS opera
tion, for example the spaces between
tunes are too short.
• The head is dirty.
• The tape is stretched or wrinkled.
• The protection tab on the cassette has
been broken.
* The cassette holder is not closed com
pletely.
* The TAPE input selector has been se
lected on the amplifier.
• Tape has been fully wound to a reel.
• The capstans of pinch rollers are dirty.
• Tape is irregularly wound.
• Clean the head. [Refer to page 6.)
• Replace the tape.
• Play a recorded tape.
• Read page 21.
• Clean the head. (Refer to page 6.)
• Replace the tape.
• Close the hole. (Refer to page 6.)
• Close the cassette holder completely,
• Press the input select key of the source
to be recorded.
• Change the tape transport direction of
Deck or insert the tape inversely.
• Demagnetize the head. (Refer to page 6.)
* Clean the head, [Refer to page 5.)
• Wind the tape regularly by fast forward
ing and rewinding.
CD player section
Disc has been placed but it can
not be played.
Sound skips.
Notes;
1. With some tapes, a squeaky noise is produced when the tape is stopped automatically. This is due to the tape protection function,
and not a malfunction.
2. Do not use 110-, 120- nor 150-minute tapes, for these tapes are too thin and get easily tangled.
3. As this unit employs microprocessor, the unit sometimes malfunctions due to external high-level interference. At that time, press
the POWER key to turn the power off. Disconnect the power cord. Then, while pressing the AUTO/MONO key and A-PRESET key,
connect the power cord to.reset the unit.
(When the unit is reset, the memorized settings are erased.)
• The center of the disc is not aligned with
the turning center correctly.
• The disc is placed upside down.
• The disc is very dirty,
• The disc is scratched or damaged.
• Dew is condensed on the optics lenses.
• The disc is dirty,
• The disc is scratched or damaged.
• Vibrations are applied to the CD player.
• Set the disc properly as shown in the fig
ure on page 16.
• Place the disc properly, with the labeled
side up.
• Clean the disc then play it again. (Refer to
page 6.)
• Replace the disc.
• Read page 7.
• Clean the disc then play It again. (Refer to
page 6.)
• Replace the disc.
• Install the system in a place which is not
subject to vibrations.
Page 32

Center unit
3jE ; Amplifier section
I Rated power output
. - ^ For U.SA and Canada
10 watts per channel minimum RMS, both Channels
driven, at 6 Q from 60 Hz to 20,000 Hz with no more
than 5% total harmonic distortion fFTC)
For U.K. and Europe
{DIN) 1 kHz at 6 n
ilEC11 kHz at 6 a
For other countries
(EIAJ) 1 kHz at 6 a
Total harmonic distortion (1 kHz, 3.3 W, 6 ...„0.1%
Frequency response ............................60 Hz to 20 kHz
Tuner section
FM Tuning frequency range
AM Tuning frequency range
CD player section
Laser ..........
Frequency response....
Signal to noise ratio....
Wow 8i flutter .................. under the measurable limit
Cassette deck section
Type ..........................
Recording system
Heads Playback/recording head..
Erasing head
..........................................
....................
.................. 1
.........................................
.......................................
.........
...........................
........Semiconductor laser
......
...........
.
....... higher than 80 dB
...........
AC bias (Frequency; 105 kHz)
AM tuning frequency range
U.S.A,
CANADA 530 kHz to 1710 kHz
AUSTRALIA 531 kHz to 1602 kHz
EUROPE
U.K.
OTHER COUNTRIES
10 W +10 W
10 W +10 W
12 W +12 W
88 MHz to 108.0 MHz
.............. 1
See below.
60 Hz to 20 kHz
4 track 2 channel
530 kHz to 1710 kHz
531 kHz to 1602 kHz
531 kHz to 1602 kHz
530 kHz to 1610 kHz (10 kHz STEP Area)
531 kHz to 1602 kHz (9 kHz STEP Area]
Frequency response
Normal............................................... 50 Hz to 14 kHz
CrOz tape.............................................. 50 Hz to 15 kHz
Signal to noise ratio (DOLBY NR ON)
Wow «[flutter
General
Power consumption
Dimensions................ 175(W) X 204(H) X 225(D) mm
Weight
Speakers
Type
Rated impedance
Maximum input level
Output sound pressure .............................88 dB/W/m
Frequency response
Dimensions................ 126(W) x 204(H) X 195(D) mm
Weight
......................................
...
.............................................. 35 W
..............................................................................
..............................
.......................................................................
2-Way system, bass-reflex type
..........................................................
..................................................
..........................
...............
...0.15% (W.R.M.S)
.....
80 Hz to 20 kHz
......56 dB
6 O
15 W
1.6 kg
3.3 kg
KENWOOD follows a policy of continuous advancements in development. For this reason specifications may be changed without
notice.
FortheU.S.A.
FCC WARNING
This equipment may generate or use radio frequency energy, Changes or modifications to this equipment may cause harmful interfer
ence unless the modifications are expressly approved in the instruction manual. The user could lose the authority to operate this
equipment if an unauthorized change or modification is made.
NOTE:
This equipment has been tested and found to comply with the limits for a.Class B digital device, pursuant to Part 15 of the FCC Rules.
These limits are designed to provide reasonable protection against harmful inleiference in a residential installation. This equipment may
cause harmful interference to radio communications, if it is not installed and used in accordance with the instructions. However, there
is no guarantee that interference will not occur in a particular installation. If this equipment does cause harmful interference to radio or
television reception, which can "be determined by turning the equipment off and on, the user is encouraged to try to correct the
interference by one or more of the following measures.
- - Reorient or relocate the receiving antenna.
- - Increase the separation between the equipment and receiver.
- Connect the equipment into an outlet on a eircuit different from that to which the receiver is connected.
-- Consult the dealer or an experienced radio/TV technician for help.
 Loading...