

Page 1

How to Connect and Set Up Your Entré Entertainment Hub i
Page 2

ii How to Connect and Set Up Your Entré Entertainment Hub
Page 3
Connecting and Setting Up Your New Kenwood Sovereign Entré
Unpacking
Welcome to the Connection and Setup Guide for your new Kenwood Sovereign
Entré. With Entré, you can enjoy traditional media, like FM/AM radio, CDs, and
movies, alongside exciting new media, such as MP3s and Internet radio. Entré
allows you to control, organize and enjoy your collections from one easy-to
navigate interface.
Use this guide to connect all your current audio and video components— Entré
has a variety of connection jacks so you can customize your entertainment
setup.
OpenGlobe, the OpenGlobe logo, CE-Commerce and entertain simplicity are trademarks of OpenGlobe, Inc.
CDDB is a registered trademark and GraceNote is a trademark of CDDB, Inc. (dba GraceNote)
All other trademarks are property of their registered owners.
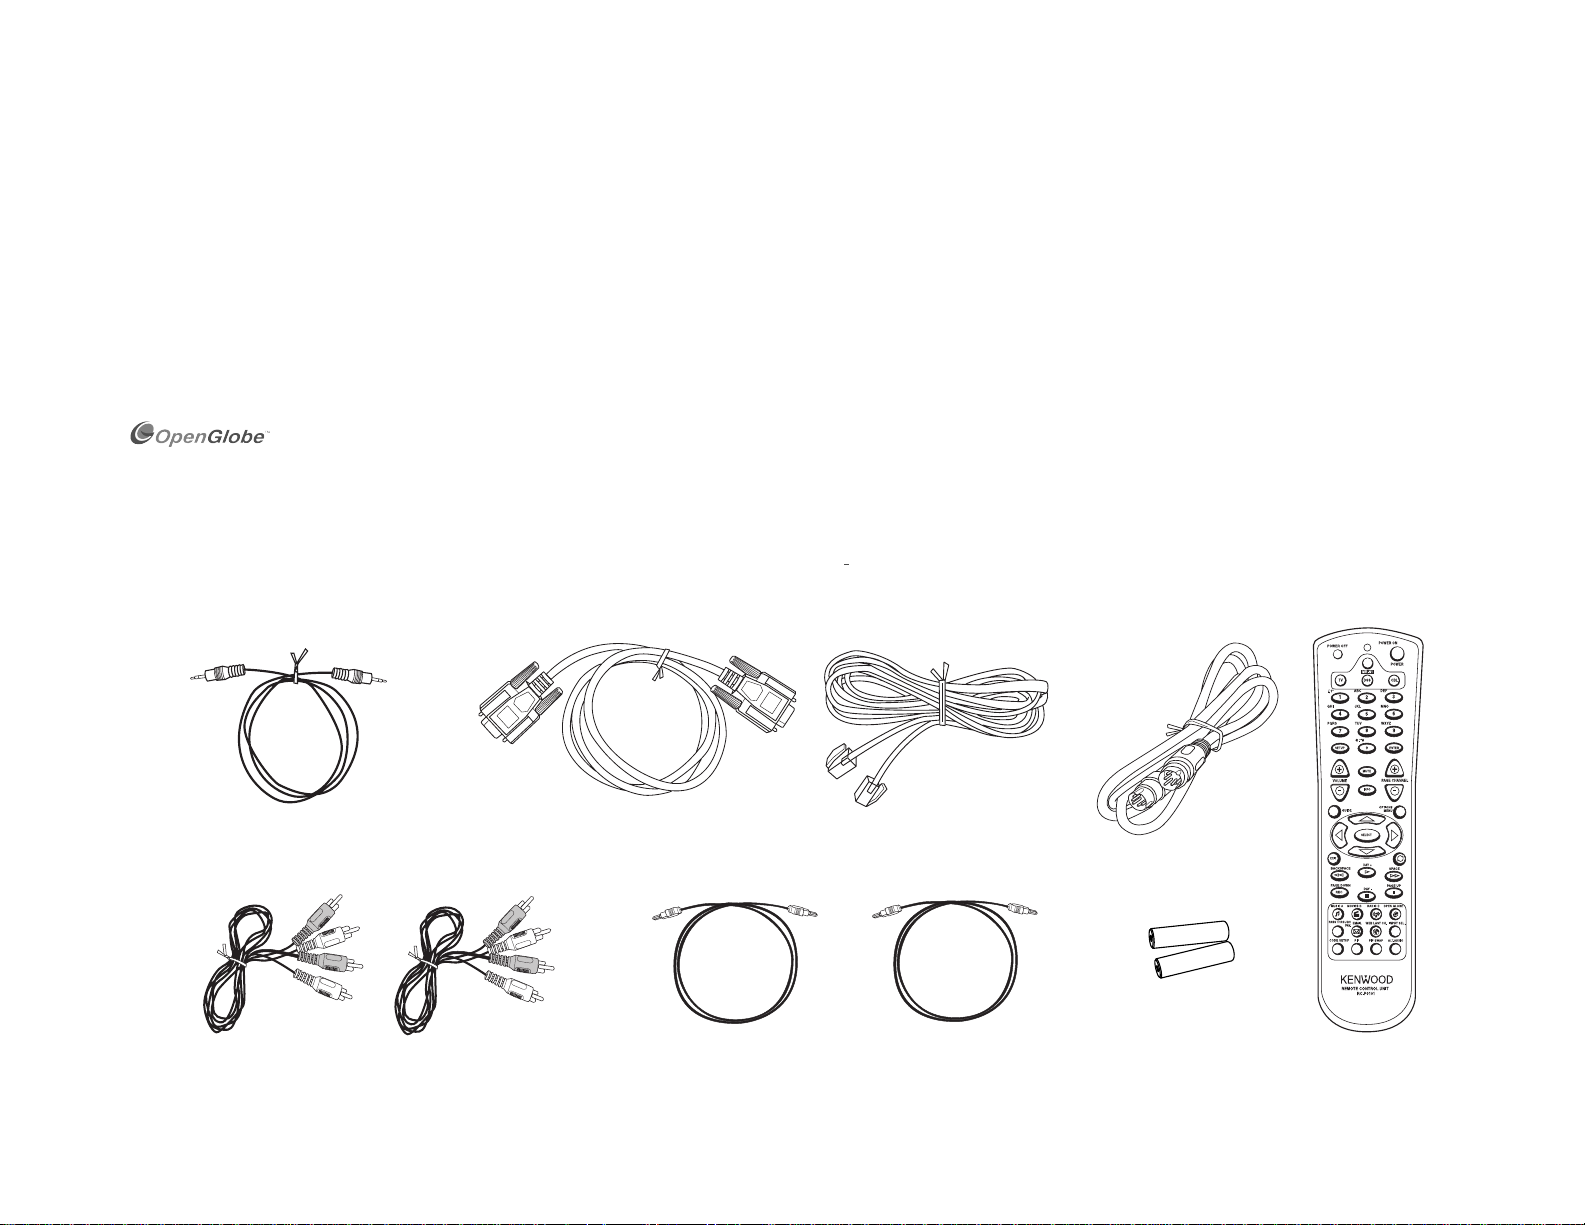
Unpacking
Unpack your new Entré carefully and make sure that all of the accessories are present:
1 RS232C cable
Many of Entré's features require Entré to be connected to the Internet, a Kenwood Sovereign DVD/CD changer, Kenwood CD changer with CDDB capability, and/or a Kenwood Sovereign Receiver. Features requiring external products
or services are noted throughout the manual.
Entré is a dynamic product. Software updates will allow Kenwood and
OpenGlobe to provide new functions and capabilities. Refer to the Kenwood
USA website at www.kenwoodusa.com for the latest information regarding your
new Entré.
1 telephone cable
1 S-Video cable1 mono mini jack cable
Remote control
2 stereo audio cables
If any accessories are missing, or if the Entré is damaged or fails to operate, notify your dealer immediately. If your Entre was shipped to you directly, notify your
shipper immediately. Kenwood recommends that you retain the original carton and packing materials in case you need to move or ship the Entré in the future.
How to Connect and Set Up Your Entré Entertainment Hub
2 digital optical cables
batteries
Page 4
Connecting and Setting Up Your New Kenwood Sovereign Entré
Before Applying Power
Read this section carefully to ensure safe operation.
Kenwood Sovereign Entré is designed for operation on AC 120 V only. Entré
must be connected to a 120V AC outlet that supplys constant voltage. Do not
Safety Precautions
Read this section carefully to ensure safe operation.
Prevent electric shock:
•Do not expose your Entré to rain or moisture.
•Do not remove the cover (or back). There are no user
serviceable parts inside. If your Entré requires repair, take it to
an authorized service outlet.
Internet Connection
Many of Entré’s capabilities, including downloading CD information,
connecting to Internet radio stations, or automatic software updates, require a
specific type of Internet connection.
You must have a third-party Internet service provider (ISP) to access those
features.
use an outlet controlled by a switch, or the switched power outlet on your
Entré or other audio component.
The following icons indicate the presence of uninsulated dangerous voltage
that may be of sufficient magnitude to cause electric shock:
Because free ISPs, AOL, and CompuServe do not use
standard methods of Internet connectivity, and do not open
their networks to outside users, you can not use these ISPs
with Entré.
To obtain an ISP via OpenGlobe, begin the Quick Start Setup
process (see “How Do I Power-Up Entré for the Very First
Time?” on page 19) and call the toll-free number given to
you during the proccess.
How Do I Reset Entré?
If Entré fails to respond to front panel or remote commands or if it responds
erroneously, use the following procedure to reset it:
iv How to Connect and Set Up Your Entré Entertainment Hub
•Hold the POWER button down until the Standby Indicator begins to flash
on and off. Then release the POWER button.
• When the Standby Indicator stops flashing and is lit constantly, push the
POWER button to turn Entré on.
Page 5

Table of Contents
Connecting and Setting Up Your New Kenwood
Sovereign Entré ............................................................... iii
Unpacking......................................................................... iii
Before Applying Power...................................................... iv
Safety Precautions ............................................................. iv
Internet Connection .......................................................... iv
How Do I Reset Entré? ...................................................... iv
Chapter 1: Setting Up and Configuring Your Entré ......... 1
How Do I Connect to My TV? ............................................ 2
Watching TV without Turning on Entré.......................................... 3
How Do I Connect to My Receiver or Amplifier? ................ 4
Connecting a Kenwood Sovereign Receiver................................... 5
Connecting Any Other Primary Receiver........................................ 5
How Do I Connect to My Kenwood Sovereign DVD or
CD Changer?...................................................................... 6
How Do I Connect to My Kenwood Sovereign DVD
Changer and a Non-Kenwood Receiver? ........................... 8
Connecting a Non-Kenwood Receiver to Entré .............................. 9
Connecting a Kenwood Sovereign DVD Changer to Entré.............. 9
Connecting a Non-Kenwood Receiver to a Kenwood
Sovereign DVD Changer................................................................ 9
How Do I Set Up My Remote? ......................................... 10
Loading Batteries......................................................................... 10
Entering Product Codes ............................................................... 10
Finding Unlisted Product Codes................................................... 11
Using Picture within a Picture...................................................... 11
Swapping the Picture within a Picture.......................................... 11
Selecting an Alternate Audio Source............................................ 11
Selecting an Alternate Video Source ............................................ 11
How Do I Program My Kenwood LCD Remote for
Entré? ...............................................................................12
Identifying the Remote’s TV2 Input as the Entré Input ................. 13
Teaching the Entré Remote Button Functions into the
Receiver Remote......................................................................... 14
Using the Receiver Remote to Control Entré................................ 16
How Do I Connect My Entré to the Internet?....................17
Finding Supported Internet Service Providers............................... 17
How Do I Power-Up Entré for the Very First Time? ........... 19
How Do I Configure Internet Setup?................................. 20
Continuing Quick Start with a Dialup Modem ............................. 22
Continuing Quick Start with a HomePNA Connection ................. 23
Continuing Quick Start with an Ethernet Connection................... 25
How Do I Configure Entré’s Setup Menus? .......................28
Entering User Information............................................................ 28
Entering Internet Configuration Information................................. 28
Entering Preferences.................................................................... 28
Entering Audio and Video Settings............................................... 28
Entering Changer Management Information................................. 28
Entering Security and Parental Controls ....................................... 29
Entering Utilities Information....................................................... 29
Appendix A: Program Codes.......................................... 31
Setup Codes for Cable Converters ............................................... 31
Setup Codes for Satellite Receivers.............................................. 32
Setup Codes for TVs.................................................................... 33
How to Connect and Set Up Your Entré Entertainment Hub v
Page 6

Table of Contents
Appendix B: Specifications ............................................ 37
Audio.......................................................................................... 37
Video .......................................................................................... 37
Drive........................................................................................... 37
Dimensions and Weight .............................................................. 37
Index .............................................................................. 39
vi How to Connect and Set Up Your Entré Entertainment Hub
Page 7

Chapter 1: Setting Up and Configuring Your Entré
To enjoy your Entré you will need to connect it to your existing home
entertainment system. Making the proper connections ensures you can fully
integrate Entré with the other components of your existing entertainment
system. Entré enhances your ability to enjoy media through the Internet as well
as acting as a librarian for your existing media formats.
This chapter contains the following sections:
How Do I Connect to My TV? page 2
How Do I Connect to My Receiver or Amplifier? page 4
How Do I Connect to My Kenwood Sovereign DVD or CD Changer?
How Do I Set Up My Remote? page 10
How Do I Program My Kenwood LCD Remote for Entré? page 12
page 6
How Do I Connect My Entré to the Internet? page 17
How Do I Power-Up Entré for the Very First Time? page 19
How Do I Configure Internet Setup? page 20
How Do I Configure Entré’s Setup Menus? page 28
How to Connect and Set Up Your Entré Entertainment Hub 1
Page 8
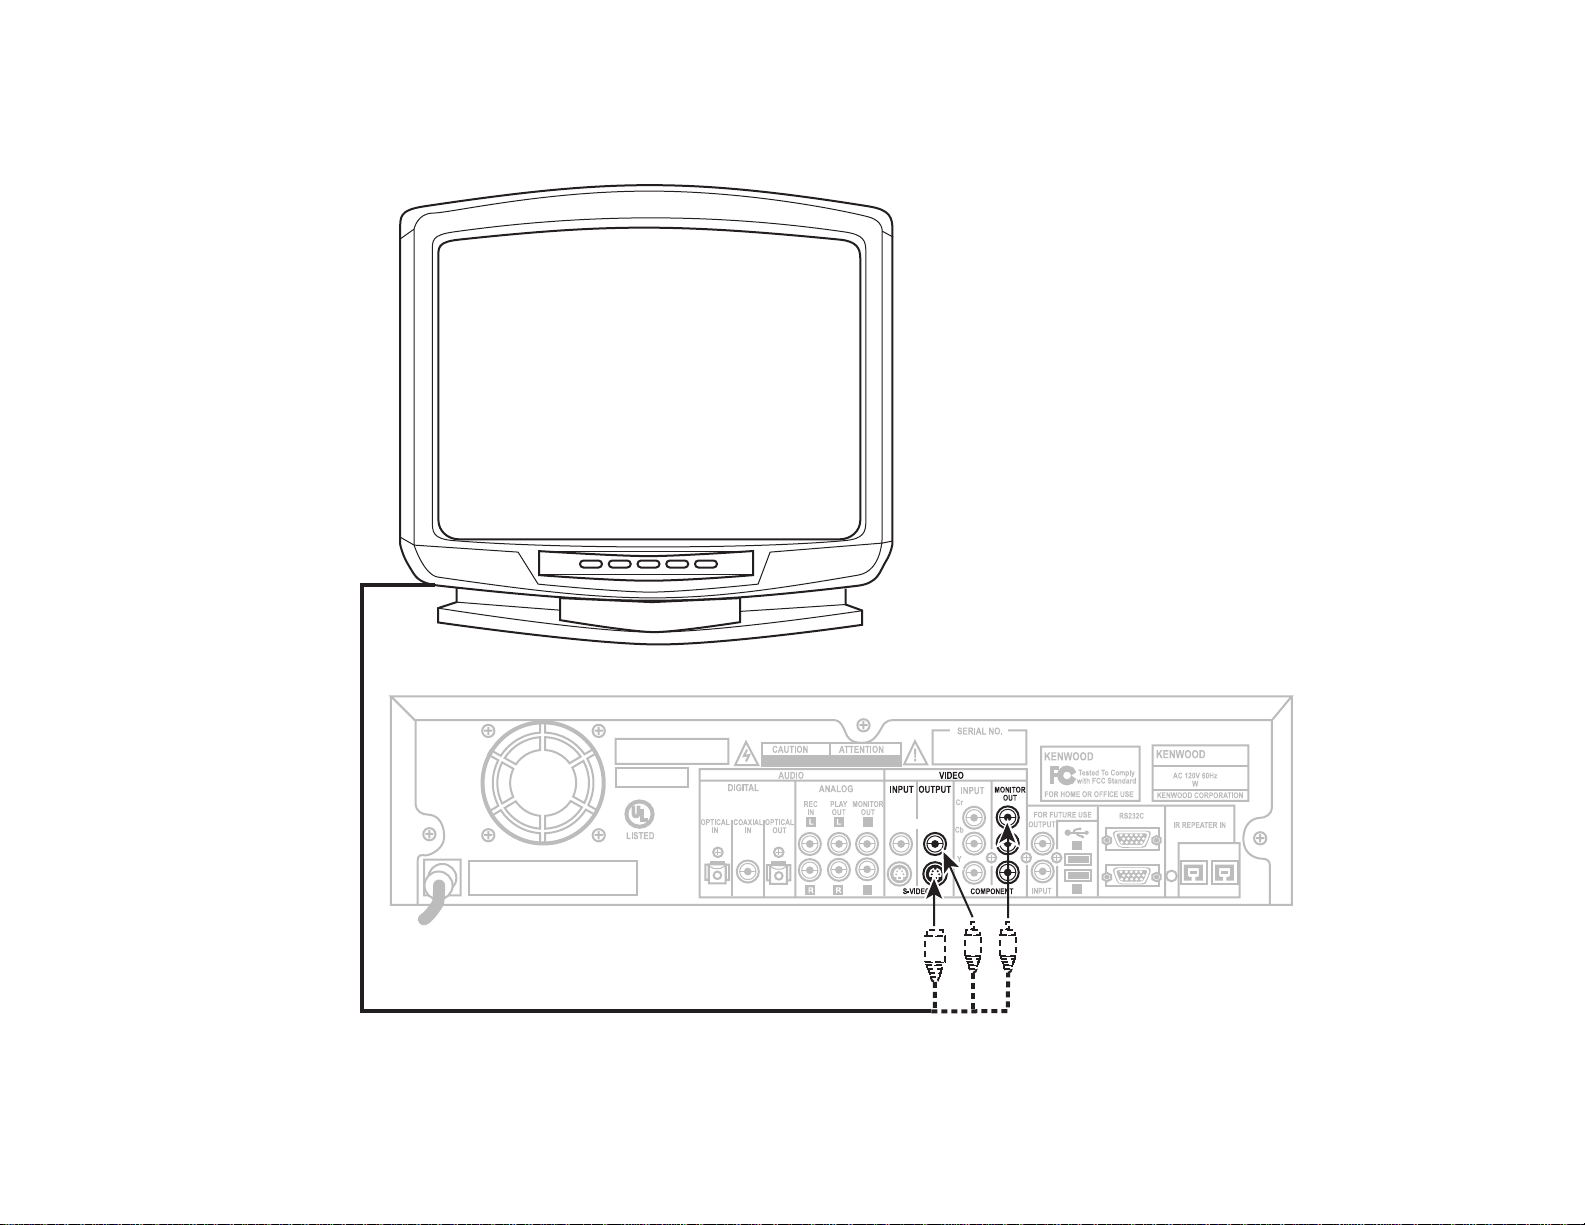
How Do I Connect to My TV?
How Do I Connect to My TV?
To
VIDEO
INPUT
DO NOT OPEN
RISQUE DE CHOC ELECTRIQUE
NE PAS OURVRIR
L
R
COMPOSITE
1
2
TO CD/DVD CHANGER
TO AV RECEIVER
WALL PHONE
RISK OF ELECTRIC SHOCK
- OR -
2 How to Connect and Set Up Your Entré Entertainment Hub
Page 9

How Do I Connect to My TV?, continued
Connect a video cable from Entré’s Video Output jack to your TV's Video IN
jack shown above.
Before making any video connections to the TV you must choose the type of
connection you will use:
• Component video connections provide the best video quality; S-Video connections provide video quality that is superior to standard composite video
connections.
• If your A/V receiver is a Kenwood model with Universal Video™ or Universal Video™ HD, connect Entré to the TV using the highest quality connection type possible, and connect your receiver to Entré using that same type
of connection. See your receiver's Setup and Connection Guide for more
information about connecting video components to your receiver.
• If your A/V receiver is not a Kenwood model with Universal Video™ or Universal Video™ HD, connect Entré to the TV using the same type of video
connection that is being used between the rest of your video components
and your A/V receiver. (You must use the same type of connection for all of
your video components.)
• If your TV does not have any video connections at all (it only has antenna
connections), you must purchase an RF modulator that converts video signals into antenna signals to use your TV with Entré. You should be able to
find an RF modulator at a store specializing in electronic parts.
• If you previously connected your TV directly to your VCR, you must now
connect it through Entré.
How Do I Connect to My TV?, continued
Watching TV without Turning on Entré
The connection described here sets your TV up as a monitor you can use to
view media played on your other video devices (such as a VCR or DVD player)
via Entré. You can still watch TV without having to use Entré—simply turn on
your TV as you normally do.
How to Connect and Set Up Your Entré Entertainment Hub 3
Page 10
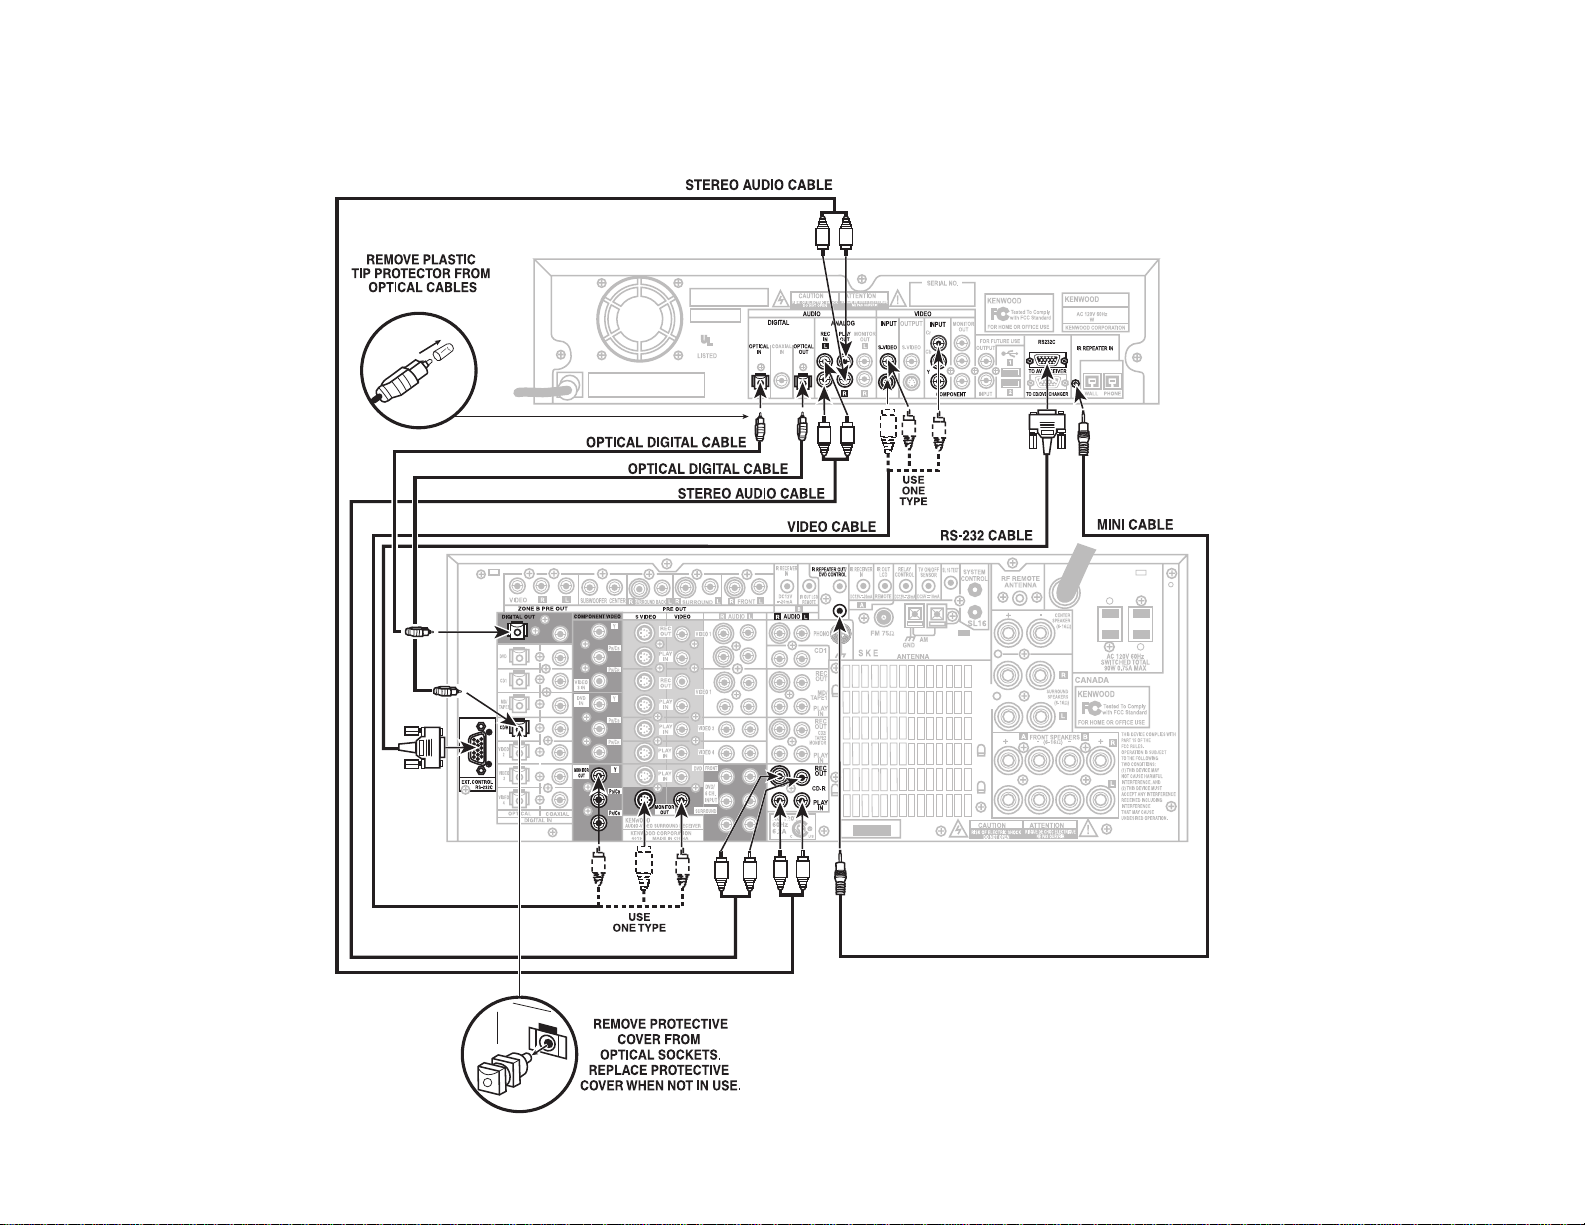
How Do I Connect to My Receiver or Amplifier?
How Do I Connect to My Receiver or Amplifier?
4 How to Connect and Set Up Your Entré Entertainment Hub
Page 11

How Do I Connect to My Receiver or Amplifier?, continued
How Do I Connect to My Receiver or Amplifier?, continued
Do not plug in Entré or devices to AC power until you have connected all your
devices.
This section focuses on the connections from your receiver to Entré. Please refer
to your receiver's instructions for more detail about its connection jacks and
capabilities.
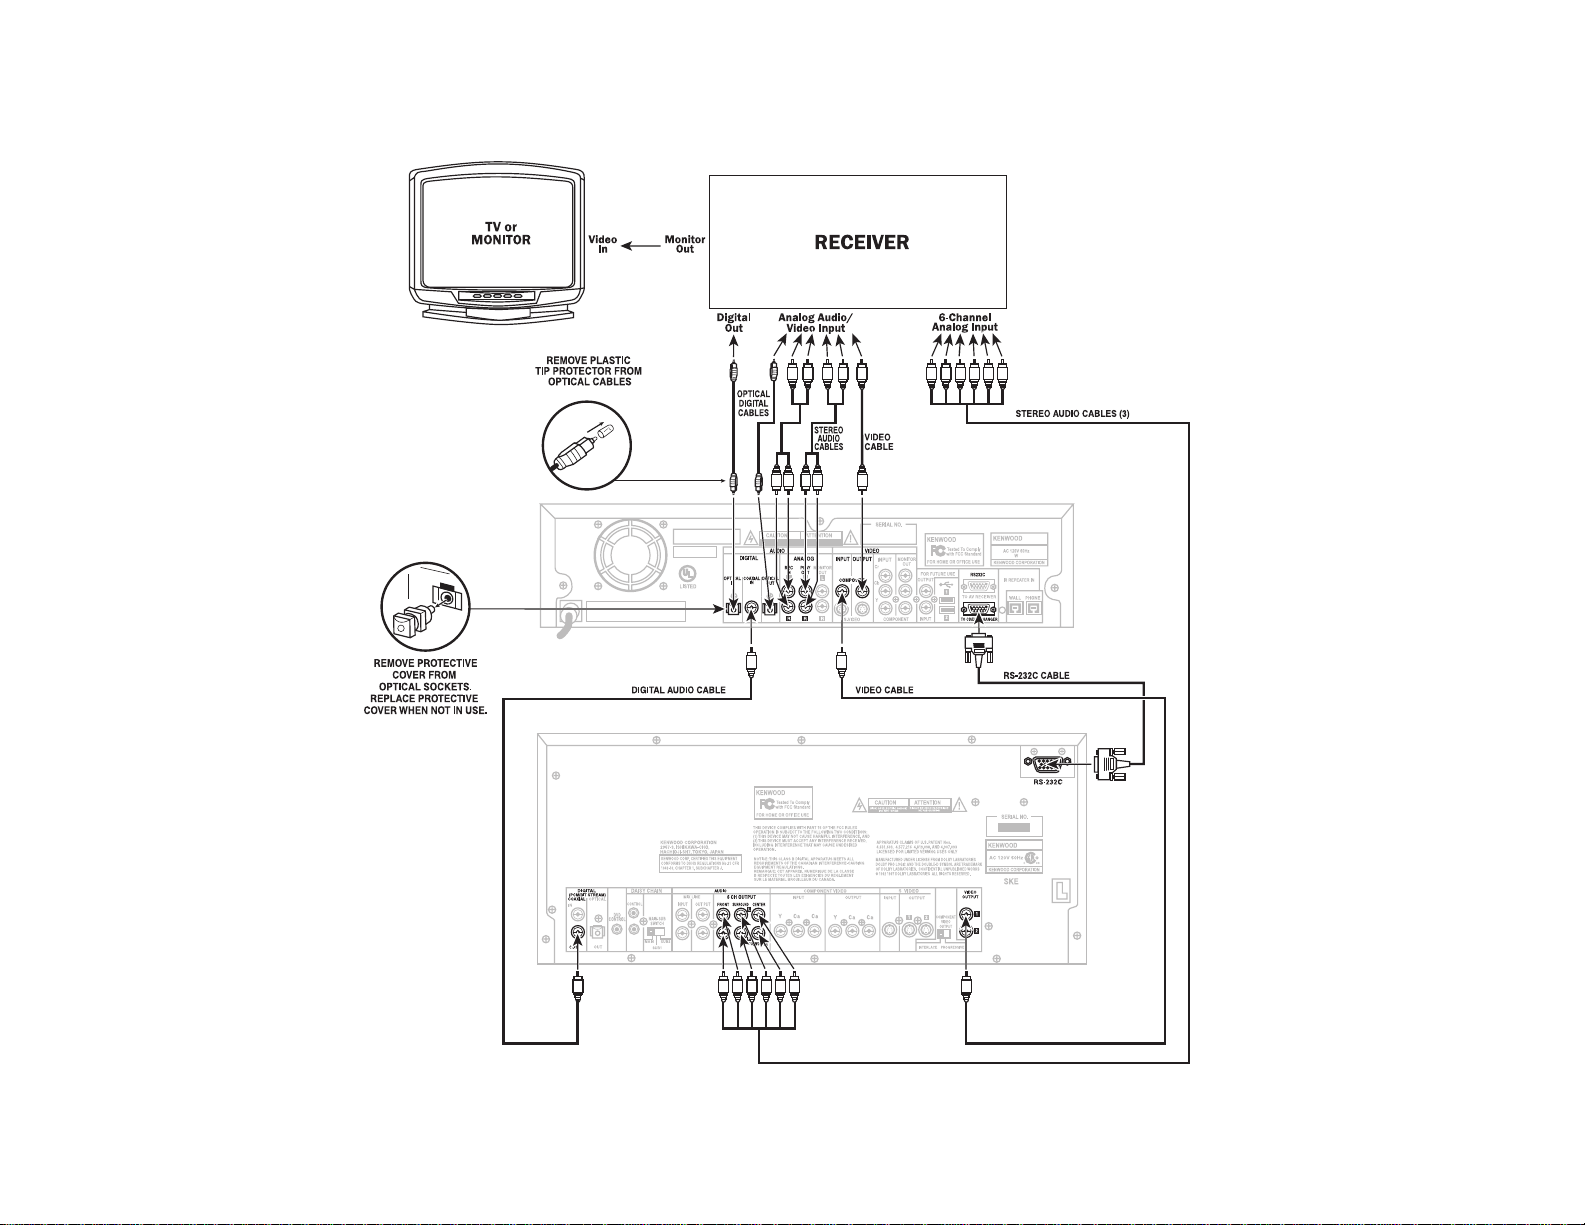
Connecting a Kenwood Sovereign Receiver
Review the information under “Before making any video connections to the
TV”. It contains important notes about the types of connections you can make.
1. Connect one of the included optical digital cables from the receiver's OPTICAL DIGITAL Out jack to Entré's DITIGAL OPTICAL In jack and connect
the other included optical digital cable from Entré's DIGITAL OPTICAL Out
jack to the receiver's CD-R OPTICAL DIGITAL jack, as shown.
If you use the optical digital cable, be sure to remove the
protective cover from the optical jack before connecting.
Please retain the cover and store it in a safe place.
2. Connect the video cable from the receiver’s MONITOR OUT jack to Entré's
Video Input jack as shown. Use the same type of connection that you used
between Entré and your TV (see pages 2-3).
3. Connect the included RS-232C cable from the receiver's RS-232C jack to
Entré's RS-232C jack as shown.
The RS-232C cable included with Entré has female
connectors at both ends. If you are substituting a commercially
available RS-232C cable, make sure that it has female
connectors on both ends.
Connecting Any Other Primary Receiver
1. Examine the receiver's available inputs and outputs. Select an input set for
Entré that has an optical digital input, analog play (tape monitor) outputs,
and analog record (tape monitor) inputs associated with it. Note which
input you select: this will become the receiver's Entré input.
2. Connect a stereo audio cable from the receiver's TAPE MONITOR OUT
(Rec) jacks to Entré's ANALOG REC IN jacks. Connect another stereo audio
cable from Entré's ANALOG PLAY OUT jacks to the receiver's TAPE MONITOR IN (Play) jacks.
3. Connect a digital optical cable from Entré's DIGITAL OPTICAL OUT jack to
the receiver's DIGITAL OPTICAL IN jack. If the receiver has a DIGITAL
OUT jack, and depending on what type it is (either coaxial or optical), connect it to one of Entré's DIGITAL IN jacks.
If you use the optical digital cable, be sure to remove the
protective cover from the optical jack before connecting.
Please retain the cover and store in a safe place.
4. Connect a video cable from the receiver's video MONITOR OUT jack to
Entré's VIDEO INPUT jack. Use the same type of connection that you used
between Entré and your TV (see pages 2-3).
Do NOT plug Entré’s power cord into the receiver’s switched
accessory outlet. Plug Entré’s power cord only into a wall
outlet that receives constant power.
4. Connect one stereo audio cable from the receiver's CD-R REC OUT jacks
to Entré's ANALOG REC IN jacks. Connect another stereo audio cable from
Entré's ANALOG PLAY OUT jacks to the receiver's CD-R PLAY IN jacks as
shown.
If you don’t use Entré’s analog connections, you may not be
able to record certain copy-protected media that can only be
recorded using Entré’s analog inputs.
How to Connect and Set Up Your Entré Entertainment Hub 5
Page 12

How Do I Connect to My Kenwood Sovereign DVD or CD Changer?
How Do I Connect to My Kenwood Sovereign DVD or CD Changer?
RS-232C
6 How to Connect and Set Up Your Entré Entertainment Hub
Page 13

How Do I Connect to My Kenwood Sovereign DVD or CD Changer?, continued
Entré can control the following Kenwood DVD and CD changers:
• DVD: DV-5900M, DV-5050M
• CD: CD-425M, CD-4700M
Do not plug in Entré or devices to AC power until you have connected all your
devices.
Connect the included RS-232D cable from the DVD or CD changer's RS232D jack to Entré's RS 232C to CD/DVD Changer jack as shown.
The RS-232C cable included with Entré has female
connectors at both ends. If you are substituting a commercially
available RS-232C cable, make sure that it has female
connectors on both ends.
For all other connections between the DVD/CD changer and receiver/
amplifier, refer to the instruction manuals for those components.
If you are using Entré with a Kenwood Sovereign DVD
changer and a non-Kenwood Sovereign receiver, follow the
connection instructions on pages 8–9.
How Do I Connect to My Kenwood Sovereign DVD or CD Changer?, continued
If you are daisy-chaining more than one Kenwood Sovereign
DVD changer, Entré will only control the changer in the chain
designated ‘Main’, not those designated ‘Sub 1’ and ‘Sub 2’.
How to Connect and Set Up Your Entré Entertainment Hub 7
Page 14
How Do I Connect to My Kenwood Sovereign DVD Changer and a Non-Kenwood Receiver?
How Do I Connect to My Kenwood Sovereign DVD Changer and a Non-Kenwood Receiver?
8 How to Connect and Set Up Your Entré Entertainment Hub
Page 15

How Do I Connect to My Kenwood Sovereign DVD Changer and a Non-Kenwood Receiver?, continued
How Do I Connect to My Kenwood Sovereign DVD Changer and a Non-Kenwood Receiver?, continued
Do not plug in Entré or devices to AC power until you have connected all your
devices.
This section focuses on the connections from your Kenwood Sovereign DVD
changer and a non-Kenwood receiver to Entré. Please refer to your receiver and
DVD player’s instructions for more detail about their connection jacks and
capabilities.
Though the diagram on page 8 shows a DV-5900M DVD
changer, you can connect a DV-5050M changer to Entré as
well.
Connecting a Non-Kenwood Receiver to Entré
Review the information under “Before making any video connections to the
TV”. It contains important notes about the types of connections you can make.
1. Examine the receiver's available inputs and outputs. Select an input set for
Entré that has an optical digital input, analog play (tape monitor) outputs,
and analog record (tape monitor) inputs associated with it. Note which
input you select: this will become the receiver's Entré input.
2. Connect one of the included optical digital cables from the receiver's OPTICAL DIGITAL Out jack to Entré's DIGITAL OPTICAL In jack and connect
the other included optical digital cable from Entré's DIGITAL OPTICAL Out
jack to the receiver input’s OPTICAL DIGITAL jack, as shown.
Be sure to remove the protective cover from the optical jack
before connecting. Please retain the cover and store it in a safe
place.
5. Connect one video cable from the receiver’s VIDEO INPUT to Entré’s
VIDEO OUTPUT, as shown.
Connecting a Kenwood Sovereign DVD Changer to Entré
1. Connect a digital audio cable from the changer’s DIGITAL COAXIAL OUT
jack to Entré’s DIGITAL COAXIAL IN jack, as shown.
2. Connect a video cable from the changer’s VIDEO OUTPUT jack to Entré’s
COMPOSITE VIDEO INPUT jack, as shown.
3. Connect the included RS-232C cable from the changer’s RS-232 jack to
Entré's RS-232 jack as shown.
Since the DVD player makes a digital connection to Entré,
Entré must make additional digital input and output
connections to the receiver. See step 2 in “Connecting a NonKenwood Receiver to Entré“on this page.
Connecting a Non-Kenwood Receiver to a Kenwood
Sovereign DVD Changer
Connect three stereo audio cables from the receiver’s 6-CHANNEL
ANALOG INPUT to the DVD changer’s 6-CHANNEL ANALOG OUTPUT as
shown.
If you have a DV-5050M, connect one stereo audio cable
from the DVD player’s MIX LINE OUTPUT to the receiver’s
DVD analog input.
3. Connect the video cable from the receiver’s MONITOR OUT jack to the TV
or Monitor’s VIDEO IN jack as shown. Use the same type of connection
that you use between Entré and the receiver.
4. Connect one stereo audio cable from the receiver's ANALOG RECORD
OUTPUT jacks to Entré's ANALOG REC IN jacks, as shown. Connect
another stereo audio cable from Entré's ANALOG PLAY OUT jacks to the
receiver's ANALOG PLAY INPUT jacks, as shown.
If you don’t use Entré’s analog connections, you may not be
able to record certain copy-protected media that can only be
recorded using Entré’s analog inputs.
How to Connect and Set Up Your Entré Entertainment Hub 9
Page 16

How Do I Set Up My Remote?
How Do I Set Up My Remote?
Loading Batteries
1. Remove the cover.
2. Insert two AA batteries as illustrated below:
3. Close the cover.
Entering Product Codes
The remote supplied with your Entré is programmed to work with a number of
different brands of home entertainment devices such as TV, DSS, and cable
boxes. The code listings in the “Appendix A: Program Codes” on page 31 show
all available codes for different manufacturers.
POWER OFF
POWER OFF
TV DSS CBL
TV DSS CBL
./,?*
1
GHI JKL MNO
4
PQRS TUV WXYZ
7
SETUP ENTER
+
VOLUME
-
GUIDE
EXIT
BACKSPACE
PAGE DOWN
REC
PASS THROUGH
PASS THROUGH
CODE SETUP
CODE SETUP
EMAIL WEB LAST CH. EMAIL WEB LAST CH.
EMAIL WEB LAST CH. INPUT SEL.
EMAIL WEB LAST CH. INPUT SEL.
FAV.
FAV.
PASS THROUGH
PASS THROUGH
PIP PIP SWAP ALT.AUDIO
PIP PIP SWAP ALT.AUDIO
FAV.
FAV.
POWER ON
POWER ON
POWER
POWER
MR-H1
MR-N1
ABC DEF
@.**#
EMAIL WEB LAST CH. INPUT SEL.
EMAIL WEB LAST CH. INPUT SEL.
2
5
8
0
MUTE
INFO
SELECT
DAY +
DAY -
3
6
9
+
PAGE CHANNEL
-
OPTIONS
MENU
SPACE
PAGE UP
ll
CODE SETUP
CODE SETUP
PIP PIP SWAP ALT.AUDIO
PIP PIP SWAP ALT.AUDIO
REMOTE CONTROL UNIT
RC-P0101
10 How to Connect and Set Up Your Entré Entertainment Hub
Page 17

How Do I Set Up My Remote?
To enter the correct product code:
1. Look up the brand name of the device you want the remote to work with.
2. Press the button for the device you wish to control (TV, DSS, or CBL
(cable)), then press and hold the CODE SETUP button on the remote.
The LED on the top of the remote will blink twice, indicating
the system is ready for you to enter a four-digit code.
3. Enter the appropriate code from the code listings, making sure the LED
blinks once after every digit is entered.
Ensure the LED blinks twice after entering the last digit of the
code. This tells you the code is valid for the device you
selected. If the code you enter is incorrect, the LED will blink
only once after the last digit.
If you enter an incorrect code, or pause 10 seconds while
pressing the numeric buttons to enter the product code, the
remote will automatically exit the code setup program. Press
the CODE SETUP button again to start over.
Finding Unlisted Product Codes
If the code list does not list the brand of your unit, you can cycle through the
available codes stored on your remote in order to locate a working code.
To cycle through the available codes:
1. Press the CODE SETUP button on the remote
2. Press the 9 button
3. Press the 9 button again
4. Press the 1 button
The remote will enter the first available code cycle for you to test. For example,
if you want to enter a specific code for your TV but discover there are no codes
listed for your TV, run through all the available codes to locate a code that is
compatible with your TV. In order to select or test other codes:
If your device does not respond to any of the available codes,
the Entré remote cannot be programmed to control it.
Using Picture within a Picture
While in the TV mode, press the PIP button to enable the Picture within a
Picture feature available with some TVs. Please refer to your TV’s instructions
for more information about its capabilities.
Swapping the Picture within a Picture
Press the PIP SWAP button to swap the larger picture for the smaller one in the
upper corner of the TV screen.
Selecting an Alternate Audio Source
While in the TV mode, press ALT AUDIO to switch to Second Audio Program
(SAP).
Selecting an Alternate Video Source
Use the INPUT SELECT button to switch from Entré to broadcast TV, Cable,
Satellite, or your VCR.
Press this button: To v i ew :
TV Broadcast TV or VCR
CABLE Cable TV
DSS Satellite TV
1. Press the CODE SETUP button if your TV responds to the code cycle in
order to program the code into the remote.
2. Press the MODE button (the TV button, if you are looking for a code for
your TV) to advance to the next available code cycle if your TV fails to
respond to inputs from the remote. Continue until you locate a code with
the correct available functions for your TV.
How to Connect and Set Up Your Entré Entertainment Hub 11
Page 18

How Do I Program My Kenwood LCD Remote for Entré?
How Do I Program My Kenwood LCD Remote for Entré?
You can use the remote included with your Kenwood Sovereign receiver to
control Entré. If your receiver came with a PowerTouch® touch-screen
controller, see page 18 of “How To Use and Enjoy Your Entré Entertainment
Hub” for information.
If your receiver came with an LCD screen-learning remote, you need to
program the remote to control Entré and teach the button commands from
Entré’s remote into the receiver’s remote.
First you need to identify the LCD remote’s TV2 input as the one with Entré
connected to it (CD-R). See “Identifying the Remote’s TV2 Input as the Entré
Input” on page 13. Then you need to teach the button functions from the Entré
remote into the receiver’s remote. See “Teaching the Entré Remote Button
Functions into the Receiver Remote” on page 14.
For the best way to program your receiver remote so it
maintains the functionality of the Entré remote, see “Using the
Receiver Remote to Control Entré” on page 16.
12 How to Connect and Set Up Your Entré Entertainment Hub
Page 19

Identifying the Remote’s TV2 Input as the Entré Input
1. Press TV. The display will show:
How Do I Program My Kenwood LCD Remote for Entré?
5. Press repeatedly until the
display shows:
2. Press MENU. The display will
show:
3. Press SETUP. The display will
show:
4. Press ENTER. The display will
show:
6. Press ENTER. The display will
show:
7. Press repeatedly until the
display shows:
8. Press ENTER. The display will
show:
How to Connect and Set Up Your Entré Entertainment Hub 13
Page 20

How Do I Program My Kenwood LCD Remote for Entré?
9. Press ENTER. The display will
show:
10. Press ENTER. The display will
show:
11. Press HOME. The display will
show:
Teaching the Entré Remote Button Functions into the Receiver
Remote
1. Place the Entré remote and the receiver remote on a table “head-to-head”,
about 4 inches apart:
4"
2. Press the TV button on the
receiver remote. The display will
show:
(If the display does not show this,
repeat the steps in “Identifying the
Remote’s TV2 Input as the Entré
Input” on page 13.)
3. Press the
LEARN button on the
receiver remote. The display will
show:
4. Press the button on the receiver
remote you want to learn the
new function onto. The display
will show:
14 How to Connect and Set Up Your Entré Entertainment Hub
Page 21

How Do I Program My Kenwood LCD Remote for Entré?
5. Within 5 seconds, hold down
the button on the Entré remote
that you want to learn onto the
receiver remote, until the
receiver remote’s display shows:
If unsuccessful, the display will
show:
Repeat steps 3-5.
6. Repeat steps 3-5 for each function button you want to learn onto the
receiver remote.
To maintain similarity of function between the two remotes, we suggest that you
learn Entré functions onto the receiver remote according to the following
diagrams:
How to Connect and Set Up Your Entré Entertainment Hub 15
Page 22

How Do I Program My Kenwood LCD Remote for Entré?
Using the Receiver Remote to Control Entré
1. Press the TV button on the
receiver remote. The display
will show:
2. Use the buttons you programmed on the receiver remote to control Entré.
16 How to Connect and Set Up Your Entré Entertainment Hub
Page 23

How Do I Connect My Entré to the Internet?
How Do I Connect My Entré to the Internet?
Finding Supported Internet Service Providers
You must have a compatible third-party Internet Service Provider (ISP) in order
to use Entré to access the Internet. Because free ISPs, AOL, and CompuServe do
not use standard methods of Internet connectivity, and do not open their
networks to outside users, you cannot use these ISPs with Entré. If you do not
currently have a supported ISP, during the setup process you will be given a
phone number to call to set up an account with a supported ISP, or you can
establish an account on your own with a supported ISP.
There are three different ways to establish a connection to the Internet:
• If you have a dialup ISP, connect the Input phone line to the phone jack
labeled “Wall” on the back of Entré.
You can plug a telephone into the phone jack labeled “Phone”
on the back of Entré.
Use a minimum of No. 26 AWG wire for telephone cables.
• If you have either DSL or cable modem service, you will need to purchase
an Ethernet adapter and connect Entré as shown below.
Entré supports the CATC NetMate Link (#U-ETH-NM02)
Ethernet adapter, which is available from Kenwood via the
Kenwood USA Web site at www.kenwoodusa.com. Go to the
Kenwood Shop link to purchase an adapter, or check for an
updated list of other supported adapters.
How to Connect and Set Up Your Entré Entertainment Hub 17
Page 24

How Do I Connect My Entré to the Internet?
• If you have a HomePNA network, you will need to connect to Entré as
shown below.
Use a minimum of No. 26 AWG wire for telephone cables.
18 How to Connect and Set Up Your Entré Entertainment Hub
Page 25

How Do I Power-Up Entré for the Very First Time?
After you have made all of the connections described earlier, plug Entré's power
cord directly into a wall outlet that receives constant power.
Do not plug Entré into a receiver's switched accessory outlet
or other outlet that does not receive constant power.
After you plug Entré's power cord into the wall outlet, its Standby indicator will
flash. Wait for the indicator to stop flashing. Once the Standby indicator
remains constantly lit, press the Power button to turn Entré on.
How Do I Power-Up Entré for the Very First Time?
How to Connect and Set Up Your Entré Entertainment Hub 19
Page 26

How Do I Configure Internet Setup?
How Do I Configure Internet Setup?
Entré accesses the Internet through OpenGlobe, using its built-in modem, or
your external DSL or cable modem box. OpenGlobe provides easy access to
Entré’s Internet resources, such as disc information databases, Internet radio,
and CE-commerce opportunities. Whenever Entré accesses the Internet for
information or CE-commerce, it does so via the OpenGlobe portal, at no cost to
you. By connecting to the Internet, you enable important features in Entré, such
as playing Internet radio, downloading movie or music information, and
accessing new Entré software updates.
When you turn on Entré for the first time, you must complete a Quick Start
setup process.
As part of the set-up process, it will require approximately 15
minutes for Entré to download Internet and AM/FM radio
information from the Internet. If Entré is connected to a
compatible Kenwood Sovereign DVD or CD changer, it can
also require up to 4 hours to download the disc and title
information if the changer is full. During the entire set-up
process, Entré requires a constant Internet connection. Please
plan accordingly if you use a dial-up connection.
The very first time you turn on Entré, the following introduction screen appears
on your TV:
1. Press to continue. The first Quick Start screen appears:
The first screen contains some basic navigation instructions to help you
complete the Quick Start process.
20 How to Connect and Set Up Your Entré Entertainment Hub
Page 27

How Do I Configure Internet Setup?
Each Quick Start screen contains a few common elements:
The following table explains what each screen element does:
This screen element: Does this:
Opens a help topic to assist you with the
screen you’re on.
The Quick Start - Internet screen appears:
3. If you have a supported ISP (see page 17), press , and go to step 4.
If you do not have a supported ISP, navigate to the No button on the screen
and press .
The Internet Service Provider Setup screen appears:
Shows you how much of the Quick Start
setup you’ve completed.
Takes you to the previous screen.
Takes you to the next screen.
2. Press to move to the next Quick Start screen.
How to Connect and Set Up Your Entré Entertainment Hub 21
Page 28

How Do I Configure Internet Setup?
You must have an ISP to enjoy Entré. To obtain an ISP, call the
toll-free number on the screen, then press to continue
with setup.
Once you register with an ISP, the Quick Start - Network Access screen appears:
4. Choose the type of Internet access you have and press .
Continuing Quick Start with a Dialup Modem
When you select a dialup modem, Entré automatically checks for a dial tone on
the connected line. Once it finds a dial tone, the Quick Start - Dialup ISP screen
appears:
If Entré does not detect a dial tone, ensure that Entré is properly connected
to your phone line, then press to return to the Quick Start process.
1. Highlight next if you have a supported ISP.
Depending on your Internet connection, the Quick Start setup process will vary.
For information about continuing Quick Start with:
• A dialup modem, see this page.
• A HomePNA connection, see page 23.
• An Ethernet connection, see page 25.
If you use AOL, Compuserve, or a free ISP, highlight more
information and press . Press again to continue
setup.
22 How to Connect and Set Up Your Entré Entertainment Hub
Page 29

How Do I Configure Internet Setup?
2. Enter the login name, password, and dialup number(s) for your dialup service account.
The login name, login password, and dialup number 1 fields
are all required.
Some ISPs require that you type your entire e-mail address,
(for example, “jsmith@isp.net”), as opposed to just your
username (“jsmith”).
When you enter a password in the login password field, the
characters will appear as entered. However, once you move
past that field, each character will appear as an asterisk.
If your ISP connection is a local call, leave the Area Code field
of the phone number empty.
When you have completed the information, press . The Quick Start Dialing Preferences screen appears:
prefix” field. When you have completed the information, press .
The Quick Start - Zip Code screen appears:
4. Enter your Zip Code in the field. To complete setup, press . Entré
will automatically install Internet radio stations and download information
about FM/AM radio stations based on the Zip Code you entered. When
Entré is finished, the following screen will appear:
3. Enter any Internet connection dialing preferences. For example, if you need
to dial 9 to get an outside line, you would need to enter 9 in the “dialing
Press to begin enjoying Entré.
Continuing Quick Start with a HomePNA Connection
A Home Phone Network Alliance (HomePNA) connection allows you to use
your phone line as if it were a mini-computer network in your home—without
tying up a phone line. Once you connect your computer to a HomePNA
How to Connect and Set Up Your Entré Entertainment Hub 23
Page 30

How Do I Configure Internet Setup?
adapter, you can plug Entré into a phone line and access your computer’s
Internet connection anywhere in the house.
If you have a HomePNA connection, Entré automatically checks for a
connected HomePNA network before continuing the Quick Start setup. Once it
finds the network, the Quick Start - IP Addressing screen appears:
If there is no connected network detected, check your
HomePNA connections. Once the problem is resolved, press
to return to the Quick Start process.
Specify from this screen whether your network uses a dynamic or static IP
address.
If your Internet connection uses a dynamic IP address, press . The Quick
Start -Zip Code screen appears. Enter your Zip Code in the field. To complete
setup, press . Entré will automatically install Internet radio stations and
download information about FM/AM radio stations. When Entré is finished, the
following screen will appear:
Press to begin enjoying Entré.
If your Internet connection uses a static IP address, move to the Static button on
the screen and press . The Quick Start - Static IP Info screen appears:
When your network uses a static IP address, it always connects Entré to the
Internet using the same IP address. Every Internet-connected device in your
home (your computer, for example) uses a different IP address. The advantage
of this method is that you can be certain which IP address Entré uses. However,
you must keep track of which IP addresses you assign when adding new
devices.
When your network uses dynamic IP addresses, it uses a range of addresses to
connect Entré to the Internet. Each Internet-connected device in your home
will also connect using that range of addresses. The advantage to dynamic IP
addressing is that you don’t have to remember which IP addresses you’ve
assigned. However, you must ensure that you have enough addresses to support
all of your devices.
If you're not sure what type of IP address your network uses, select Dynamic.
Enter the IP address information provided by your ISP or network administrator.
24 How to Connect and Set Up Your Entré Entertainment Hub
Page 31

How Do I Configure Internet Setup?
The “IP address”, “subnet mask”, gateway address”, and
“DNS 1" fields are required.
Press . The Quick Start - Zip Code screen appears:
Enter your Zip Code in the field. To complete setup, press . Entré will
automatically install Internet radio stations and download information about
FM/AM radio stations. When Entré is finished, the following screen will appear:
Continuing Quick Start with an Ethernet Connection
If you have an Ethernet connection (DSL, cable modem, or LAN), Entré
automatically checks for a USB-to-Ethernet adapter before continuing. Once it
finds the adapter, the Quick Start - IP Addressing screen appears:
If there is no connected network detected, you must purchase
a USB-to-Ethernet adapter in order to connect to the Internet
with Entré. One compatible adapter is the CATC NetMate Link
(#U-ETH-NM02), which is available from Kenwood via the
Kenwood USA Web site at www.kenwoodusa.com. Go to the
Kenwood Shop link to purchase an adapter. For a list of other
compatible adapters, see the Kenwood USA Web site. Once
you have connected the adapter, press to return to the
Quick Start process.
When your network uses a static IP address, it always connects Entré to the
Internet using the same IP address. Every Internet-connected device in your
home (your computer, for example) uses a unique IP address. The advantage of
this method is that you can be certain which IP address Entré uses. However,
you must keep track of which IP addresses you assign when adding new
devices.
Press to begin enjoying Entré. If the connection is not successful, see
page 27.
When your network uses dynamic IP addresses, it uses a range of addresses to
connect Entré to the Internet. Each Internet-connected device in your home
will also connect using that range of addresses. The advantage to dynamic IP
addressing is that you don’t have to remember which IP addresses you’ve
assigned. However, you must ensure that you have enough addresses to support
all of your devices.
How to Connect and Set Up Your Entré Entertainment Hub 25
Page 32

How Do I Configure Internet Setup?
If you're not sure what type of IP address your network uses, select Dynamic.
If your home Ethernet network uses a dynamic IP address, press . The
Quick Start - Zip Code screen appears:
Enter your Zip Code in the field. To complete setup, press . Entré will
automatically install Internet radio stations and download information about
FM/AM radio stations. When Entré is finished, the following screen will appear:
If your Ethernet network uses a static IP address, move to the Static button on
the screen and press . The Quick Start - Static IP Info screen appears:
Enter the IP address information provided by your ISP or network administrator.
The “IP address”, “subnet mask”, “gateway address”, and
“DNS 1" fields are required.
Press . The Quick Start - Zip Code screen appears:
Press to begin enjoying Entré.
26 How to Connect and Set Up Your Entré Entertainment Hub
Page 33

How Do I Configure Internet Setup?
Enter your Zip Code in the field. To complete setup, press . Entré will
automatically install Internet radio stations and download information about
FM/AM radio stations. When Entré is finished, the following screen will appear:
Press to begin enjoying Entré.
After you complete Quick Start, and you’ve begun using
Entré, you can still change any Internet configurations or your
User Profile from Entré Setup. Press to access Entré
Setup.
you can still change any Internet configurations or your User
Profile from Entré Setup. Press to access Entré Setup.
If you have trouble connecting to the Internet, see “How Do I
Solve Internet Connection Problems?” on page 134 of "How to
Use and Enjoy Your Entré Entertainment Hub" for Internet
troubleshooting tips.
If the connection is not successful, or you cancel the connection:
A screen appears, prompting you to do one of the following:
• Return to the Quick Start process to change the information entered. Select
the next button on the screen.
• Retry the connection. Select the retry button on the screen.
• Cancel the connection and use Entré without connecting to the Internet.
Select the cancel button on the screen.
If you cancel the connection at this point, you will not be able
to access many of Entré’s features, which include:
downloading CD or DVD information, connecting to Internet
radio stations, or automatically updating Entré. However, you
can reconnect to the Internet later, enabling those options.
After you complete Quick Start, and you’ve begun using Entré,
How to Connect and Set Up Your Entré Entertainment Hub 27
Page 34

How Do I Configure Entré’s Setup Menus?
How Do I Configure Entré’s Setup Menus?
After configuring Entré for the Internet, it is ready to use. However, Entré has
many settings and functions that make it more flexible and enhance its
capabilities. These options are accessed via the Setup menu:
Press to access the Setup Menu. To exit the Setup mode at any time,
press again.
Entering User Information
Zip Code: You already entered this information during the Internet Setup
process. If you move, enter your new Zip Code here.
Time Zone: Entré automatically establishes your Time Zone based on the Zip
Code you enter during the Quick Start process. If you move, you may need to
change your Time Zone here.
Remote Administration: Allows you to use the Internet and a PC to manually
modify the library of your Entré’s disk information that is stored in a secure area
on the OpenGlobe Web site. You can perform these modifications remotely at
any time and later use Entré’s Web Sync function to transfer the modified
information into your Entré. (See Web Sync, in Utilities on page 29, for more
information.)
1. Point your Web browser to http://www.openglobe.net/kenwood
2. Enter the login number and password shown on Entré’s Remote Administration screen
3. Follow the instructions on the screen
Privacy Policy: This is the Kenwood and OpenGlobe privacy policy.
Screen Saver Preferences: Select the amount of time Entré must be inactive
before its screen saver activates.
Nightly Update Preferences: On the first day it is operational, then once a
week thereafter, Entré will automatically check the OpenGlobe server for
software updates, and if any are available, Entré will automatically install the
update in itself. Use this screen to have Entré look for the upgrades during the
time period that it will least likely be in use.
Entering Audio and Video Settings
Audio Input Selection: Tell Entré what type of component is connected to
each of its audio inputs: analog, optical digital, and coaxial digital. Press
until the type of component connected to the input is displayed, then use
to move to the next input.
Screen Centering: Use to center the image on your TV screen.
Brightness, Contrast, and Sharpness: Use the test images on these screens to
easily adjust your TV controls to achieve the best picture possible.
Color Bars: Use this test pattern to easily adjust your TV's color and tint
controls.
Entering Changer Management Information
Quick Lookup: You can have Entré check the connected changer to see if any
discs have been added or removed, and get disc information for any that have.
Entering Internet Configuration Information
You have already entered this information during the Internet Setup process. If
you change your Internet access (new ISP, upgrade to DSL, etc.), you need to
return to this screen and update this information.
Lookup Range: You can have Entré get disc information for a specific range of
discs in a connected changer.
Lookup All: You can have Entré get disc information for all discs in a connected
changer. (With a full changer, this can take between 3 and 4 hours if you have a
dial-up Internet connection and it will be continuously on during this period.)
Entering Preferences
Music Recording Preferences: You can choose from different bit rates for
MP3 music encoding. For more information, see “Recording from a CD to
Entré’s Storage System” on page 67 of "How to Use and Enjoy Your Entré
Entertainment Hub".
28 How to Connect and Set Up Your Entré Entertainment Hub
Changer Statistics: You can have Entré give you information about how many
and what types of discs are in a connected changer, and how many have
unknown disc information.
Page 35

Entering Security and Parental Controls
Password Protection: Set up a numeric password to access the Setup Menu.
Movie Ratings: You can have Entré hide all movies above the rating you
choose. For example, if you decide to hide all movies with a rating above
PG-13, an R-rated DVD in your changer will not show up on the Movie Guide
screen. (This will not block direct access to discs from the changer's controls.)
See your DVD player’s instruction manual for information about its ratings
feature.
Entering Utilities Information
Web Sync: Uploads modifications to your music library information to a secure
area on the OpenGlobe Web site, and downloads that modified information
into your Entré. (See Remote Administration, in User Information on page 28,
for more information.)
Update Software: You can have Entré search the OpenGlobe server and
download the latest software updates. Entré will also automatically do this once
a week. (See Nightly Update Preferences, in Preferences, for more information.)
How Do I Configure Entré’s Setup Menus?
Restore Factory Defaults: Use this selection to restore Entré's system to its
factory defaults.
This function deletes all of the music files you have stored on
Entré's high-capacity music storage system, and should be
used only if Entré suffers a serious operational failure.
We recommend that you back up your music files periodically
on CD-Rs. For more information on making backup CD-Rs,
see “Recording a Mix of MP3 Tracks from the Music Storage
System onto a CD-R or CD-RW” on page 70.
How to Connect and Set Up Your Entré Entertainment Hub 29
Page 36

How Do I Configure Entré’s Setup Menus?
30 How to Connect and Set Up Your Entré Entertainment Hub
Page 37

Appendix A: Program Codes
Setup Codes for Cable
Converters
A
ABC.............................0003, 0008
0014, 0017
0007, 0011
0 0 1 3 , 0 0 0 1
0033
Allegro ......................... 0153, 0315
Americast..................... 0899
Antronix.......................0022, 0207
Archer..........................0153, 0797
0022, 0207
0039
B
BBT ............................. 0267
Belcor .......................... 0056
Bell & Howell .............. 0014
Bell South ....................0899
C
Cable Star ....................0056
Cabletenna .................. 0022
Cableview.................... 0022
Century........................0153
Citizen ......................... 0153, 0315
Colour Voice................ 0025, 0031
Comband ....................0232
Comtronics ..................0040, 0060
Contec......................... 0019
D
Digi ............................. 0637
E
Eastern......................... 0002
Emerson.......................0797
Everquest..................... 0015, 0040
F
Focus........................... 0400
G
GC Electronics ............. 0056, 0207
0016
GE ............................... 0232
Garrard........................ 0153
Gemini ........................ 0015, 0797
0070, 0242
General Instrument ...... 0476, 0810,
0276, 0011
GoldStar ...................... 0144, 0040
Goodmind ................... 0797, 0770
H, I
Hamlin ........................ 0020, 0259
0009, 0034
0273
Hitachi.........................0011
Hytex .......................... 0007
J
Jasco............................ 0015, 0153
0315
Jerrold ......................... 0003, 0476
0012, 0810
0276, 0014
0015, 0011
0024
L
Linsay .......................... 0440
M
Macom........................ 0033
Magnavox.................... 0027
Memorex..................... 0000
Motorola...................... 1106
Movie Time ................. 0063, 0156
N
NSC............................. 0063, 0156
0070
Nexus .......................... 0770
Novaplex ..................... 0618
O
Oak .............................0019, 0007
Optimus ...................... 0021
P
Panasonic .................... 0000, 0107
0021
Panther........................ 0637
Paragon ....................... 0000
Philips.......................... 0305, 0317
0153, 0025
0031, 0027
0242, 0290
0028, 0029
0030
Pioneer........................ 0144, 0877
0533, 0023
0260
Pioneer........................ 0533
Popular Mechanics ...... 0400
Prelude........................ 0770
Pulsar .......................... 0000
Q
Quasar......................... 0000
R
RCA............................. 0021
Radio Shack................. 0015, 0315,
0797, 0883
Realistic....................... 0207
Recoton....................... 0400
Regal ........................... 0020, 0259
0273
How to Connect and Set Up Your Entré Entertainment Hub 31
Page 38

Appendix A: Program Codes
Regency.......................0002
Rembrandt...................0011, 0070
Runco..........................0000
S
SL Marx ....................... 0040
Samsung ......................0144, 0040
Scientific Atlanta ..........0008, 0477
0877, 0017
0006
Seam ........................... 0510
Signal...........................0015, 0040
Signature......................0011
Sprucer........................ 0021
StarSight.......................0422, 0542
Starcom ....................... 0003, 0015
Stargate........................ 0015, 0040
0797, 0770
Starquest...................... 0015
Sylvania ....................... 0001
T
TFC..............................0310
TV86............................0063
Tandy........................... 0258
TeleCaption..................0221
Teleview.......................0040
Texscan........................0001
Timeless....................... 0418
Tocom ......................... 0012, 0013
Toshiba ........................0000
Tusa ............................. 0015
U
Unika...........................0153, 0022
0207
United Artists............... 0007
Universal ..................... 0153, 0191
0022, 0056
0207, 0039
0077
V
Viewstar....................... 0063, 0258
0027, 0060
W - Z
Zenith.......................... 0525, 0000
0899, 0054
Zentek ......................... 0400
Setup Codes for Satellite
Receivers
A
AlphaStar..................... 0772
B, C
Chaparral..................... 0216, 0053
D, E
Echostar....................... 0775, 1005
0280, 0269
0159
Expressvu..................... 0775
F, G
General Instrument...... 0361, 0627
0869
H
HTS ............................. 0775
Hitachi.........................0819
Homecable.................. 0238
Hughes Network Systems 0749
I
IQ................................ 0210
IQ Prism ...................... 0210
J, K
JVC.............................. 0775
Janeil ........................... 0152
Jerrold ......................... 0361, 0627
L
Legend ........................ 0269
M
Magnavox.................... 0724, 0722
Memorex..................... 0724, 0269
N, O
Next Level ................... 0869
P, Q
Panasonic .................... 0701, 0152
Philips.......................... 0724, 0722
1076
Primestar ..................... 0361, 0627
R
RCA............................. 0566, 0143
0855, 0392
Radio Shack................. 0869
Realistic....................... 0052
S
STS.............................. 0210
Samsung...................... 1109
Sony ............................ 0639
Star Choice.................. 0869
Star Trak ...................... 0180
T
Toshiba........................ 0749, 0790
0082
32 How to Connect and Set Up Your Entré Entertainment Hub
Page 39

U
Uniden ........................0724, 0722
0052, 0238
0074, 0076
V - Z
Zenith..........................0856
Setup Codes for TVs
A
A-Mark ........................ 0003
AOC ............................ 0030, 0019
0185, 0003
0052, 0137
Abex............................0032
Admiral........................ 0093, 0463
Adventura.................... 0046
Aiko.............................0092
Akai ............................. 0030
Alaron.......................... 0179, 0183
Ambassador .................0177
America Action ............0180
Ampro .........................0751
Anam........................... 0180, 0068
0004
Anam National............. 0055
Bell & Howell .............. 0154, 0016
Bradford ...................... 0180
Brockwood .................. 0019
Brooksonic................... 0236, 0463
0003
C
CCE ............................. 0217, 0329
CXC............................. 0180
Candle......................... 0030, 0056
0046, 0186
Carnivale ..................... 0030
Carver.......................... 0054
Celebrity...................... 0000
Cineral......................... 0451, 0092
Citizen......................... 0060, 0030
0056, 0092
0039, 0280
0046, 0186
Clairtone...................... 0185
Curtis Mathes............... 0047, 0747
1147, 1347
0054, 0154
0051, 0451
0093, 0060
0030, 0056
0145, 0016
0166, 0466
0039
D
Daewoo ...................... 0451, 0019
0623, 0624
0092, 0039
0091
Daytron ....................... 0019
Denon......................... 0145
Dumont....................... 0017, 0019
Dwin ........................... 0720, 0774
E
Electroband ................. 0000, 0185
Electrohome ................ 0381, 0389
0409
Archer..........................0003
Audiovox .....................0451, 0180
0623, 0092
0003
B
Baysonic ......................0180
Belcor.......................... 0019
How to Connect and Set Up Your Entré Entertainment Hub 33
Concerto .....................0056
Contec......................... 0180, 0185
0157, 0158
Craig............................ 0180
Crosley ........................ 0054
Crown ......................... 0180, 0039
Emerson ...................... 0154, 0236
0463, 0180
0178, 0179
0019, 0623
0624, 0177
0185, 0282
0039, 0280
0038, 0158
0183, 0182
Envision....................... 0030
Page 40

Appendix A: Program Codes
F
Fisher........................... 0154, 0159
Fujitsu..........................0179, 0683
Funai ........................... 0180, 0179
0171
Futuretech ................... 0180
G
GE ............................... 0047, 0747
1147, 1347
0051, 0451
0093, 0178
0021, 0055
0282, 0135
0027, 0279
0029, 0174
Gibralter ...................... 0017, 0030
0019
GoldStar ...................... 0030, 0178
0056, 0019
0032, 0001
0409, 0106
0002
Gradiente ....................0053, 0056
0392
Grunpy ........................0180, 0179
H
Hallmark......................0178
Harley Davidson ..........0179
Harman/Kardon ...........0054, 0078
Harvard ....................... 0180, 0068
Hitachi.........................0056, 0145
0016, 0151
0032, 0038
0279, 0413
0409
I
Infinity .........................0054
Inteq............................ 0017
J
JBL............................... 0054
JCB ..............................0000
JVC .............................. 0053, 0182
0160
Janeil ........................... 0046
K
KEC ............................. 0180
KMC ............................ 0106
KTV ............................. 0180, 0030
0185, 0039
0280, 0217
0183
Kawasho ......................0158
Kaypani .......................0052
Kenwood..................... 0030, 0019
Kloss ............................0046, 0024
0078
Konka ..........................0707, 0628
0632, 0638
0703
L
LG ............................... 0056
LXI...............................0047, 0747
0054, 0154
0156, 0178
0148
Logik ........................... 0016
Luxman ....................... 0056
M
MEI.............................. 0185
MGA ........................... 0150, 0030
0178, 0019
MTC ............................ 0060, 0030
0056, 0019
0185, 0091
Magnavox.................... 0054, 1254
0030, 0179
0187, 0096
0020, 0186
0386, 0024
0028
Majestic....................... 0016, 0015
Marantz....................... 0054, 0030
Matsushita ................... 0250
Megatron..................... 0178, 0145
0003
Memorex..................... 0154, 0250
0463, 0150
0178, 0179
0056, 0016
0106
Midland....................... 0047, 0747
0017, 0051
0135, 0039
0032
Minutz......................... 0021
Mitsubishi.................... 0093, 0150
0178, 0019
Motorola ..................... 0093, 0055
Multitech..................... 0180, 0217
N
NAD............................ 0156, 0178
0166
NEC............................. 0030, 0056
0019, 0497
NTC ............................ 0092
Nikko .......................... 0030, 0178
0092
Noblex ........................ 0430
Noshi........................... 0018
O
Onwa .......................... 0180
Optimus ...................... 0154, 0250
0166
Optonica ..................... 0093, 0165
Orion .......................... 0236, 0463
0179
P
Panasonic .................... 0051, 0250
0055, 0226
34 How to Connect and Set Up Your Entré Entertainment Hub
Page 41

Penney......................... 0047, 0747
1347, 0156
0051, 0060
0030, 0178
0021, 0056
0019, 0018
0135, 0039
0003, 0027
0032, 0002
Philco .......................... 0054, 0463
0030, 0145
0019, 0096
0020, 0028
Philips.......................... 0054
Pilot.............................0030, 0019
0039
Pioneer........................ 0166, 0679
0038
Portland.......................0019, 0092
0039
Princeton .....................0717
Prism ........................... 0051
Proscan........................0047, 0747
Proton..........................0178, 0466
0003, 0052
Pulsar...........................0017, 0019
Q
Quasar......................... 0051, 0250,
0055, 0165
R
RCA.............................0047, 0747
1047, 1147
1247, 1347
1447, 0090
0051, 0093
0019, 0679
0018, 0135
0038, 0029
0174, 0278
Radio Shack.................0047, 0747
0154, 0180
0030, 0178
0056, 0019
0165, 0039
0032, 0409
Realistic .......................0154, 0180
0030, 0178
0056, 0019
0165, 0039
0032
Rhapsody..................... 0185, 0183
Runco..........................0017, 0030
0603, 0497
S
SSS .............................. 0180, 0019
Sampo .........................0030, 0039
0052, 0032
Samsung ......................0060, 0030
0178, 0056
0019, 0032
0329, 0427
0482
Samsux ........................0039
Sansei ..........................0451
Sansui.......................... 0463
Sanyo .......................... 0154, 0159
0146, 0484
Scimitsu....................... 0019
Scotch ......................... 0178
Scott ............................ 0236, 0180
0178, 0179
0019
Sears............................ 0047, 0747
0054, 0154
0156, 0178
0179, 0056
0171, 0159
0146, 0015
0148
Semivox....................... 0180
Semp........................... 0156
Sharp........................... 0093, 0688
0165, 0039
0386, 0157
Shogun ........................ 0019
Signature ..................... 0016
Simpson....................... 0187, 0186
Sony ............................ 0000, 0080
0111, 0011
Soundesign .................. 0180, 0178
0179, 0186
Spectricon ................... 0003, 0137
Squareview.................. 0171
Starlite ......................... 0180
Supre-Macy ................. 0046
Supreme...................... 0000
Sylvania ....................... 0054, 0030
0096, 0020
0381, 0028
Symphonic .................. 0171
T
TMK ............................ 0178, 0056
0177
TNCi............................ 0017
Tandy .......................... 0093
Tatung ......................... 0055, 0003
Technics....................... 0051, 0250
Technol Ace................. 0179
Techwood.................... 0051, 0056
0003
Teknika........................ 0054, 0180
0150, 0060
0179, 0056
0019, 0016
0092, 0039
0186, 0312
Telefunken................... 0056
Toshiba........................ 0154, 0156
0060
Toshiba........................ 1256
Tosonic ........................ 0185
Totevision .................... 0039
Trical............................ 0157
How to Connect and Set Up Your Entré Entertainment Hub 35
Page 42

Appendix A: Program Codes
U
Universal......................0027
V
Vector Research ........... 0030
Victor...........................0053
Vidikron.......................0054, 0242
Vidtech........................ 0178, 0019
Viking ..........................0046, 0312
W, X
Wards .......................... 0054, 0030
0178, 0021
0179, 0056
0019, 0016
0165, 0096
0020, 0080
0027, 0111
0028, 0029
0174
White Westinghouse.... 0463, 0623
0624
Y
Yamaha........................ 0030, 0019
Z
Zenith.......................... 0017, 0463
0624, 0016
0092
Zonda.......................... 0003
36 How to Connect and Set Up Your Entré Entertainment Hub
Page 43

Appendix B: Specifications
Audio
Frequency Response: 20Hz – 20kHz ±0.5dB
THD: <0.003% (1kHz)
Signal-to-Noise Ratio: 100dB
Channel Separation: 95dB (1kHz)
Input Impedance: 47 kohms
Output Impedance: 200 ohms
Video
Bandwidth (pass-through): 45MHz (Component), 6.5MHz (Composite)
Drive
CD-ROM Read Speed: 24X
CD-R Write Speed: 10X
CD-RW Write Speed: 4X
Dimensions and Weight
Width: 17-5/16”
Height: 4-1/2”
Depth: 11-1/2”
Weight: 14.3 lb.
How to Connect and Set Up Your Entré Entertainment Hub 37
Page 44

38 How to Connect and Set Up Your Entré Entertainment Hub
Page 45

Index
A
accessories ...................................... iii
adding
devices ..................................11
alternate audio or video source ......11
amplifier. See receiver
applying power, guidelines .............. iv
audio
selecting alternate source .......11
B
batteries, loading into remote .........10
C
cable
modem, setting up ................. 25
cables
included with Entré ................. iii
CD changer
connecting ............................... 6
changer, connecting CD or DVD ...... 6
changing
Picture within a Picture (PIP) ..11
choosing
alternate audio or video
source ...............................11
completing Internet setup ...............27
configuring
Internet setup ........................19
connecting
CD, DVD changer ....................6
receiver ................................... 4
Kenwood Sovereign .....5, 9
other ...........................5, 9
TV ........................................... 2
connection
Internet requirements ............. iv
D
devices
adding to remote ...................11
dialup modem, Quick Start setup ...22
Digital Subscriber Line. See DSL
DSL, setup .....................................25
DVD changer
connecting ...............................6
E
entering
product codes ........................11
Entré
accessories .............................. iii
resetting .................................. iv
Ethernet
connection, Quick Start .........25
F
finding
product codes ........................11
H
HomePNA
setup .....................................23
I
inserting batteries ........................... 10
Internet
connecting
on-screen ...................... 19
physical ......................... 12
connection requirements ........ iv
setup
on-screen ...................... 19
physical ......................... 12
K
Kenwood Sovereign
CD or DVD changer,
connecting ........................... 6
receiver, connecting ............5, 9
L
loading batteries ............................ 10
local area network (LAN), setup ..... 25
O
other primary receiver,
connecting ...............................5, 9
P
Picture within a Picture (PIP),
using ..........................................11
power, applying safely .................... iv
precautions, safety .......................... iv
primary receiver, connecting ........5, 9
product codes, entering ................. 11
programming, remote ....................11
Q
Quick Start .............................. 20–27
R
receiver, connecting ..................... 4–5
remote
loading batteries .................... 10
programming ......................... 10
resetting, Entré ................................ iv
S
safely, applying power .................... iv
safety precautions ........................... iv
selecting
audio sources ........................ 11
setup
dialup modem .......................22
DVD or CD changer ............ 6–7
Ethernet connection .............. 25
HomePNA connection ........... 23
Internet
on-screen ................ 19–27
physical ......................... 17
receiver ............................... 4–5
remote .................................. 11
TV ....................................... 2–3
sources
selecting
alternate audio ..............11
swapping, Picture within a Picture . 11
switching
Picture within a Picture .......... 11
T
television. See TV
troubleshooting
Entré ...................................... iv
tuner. See receiver
TV
connecting .......................... 2–3
watching without turning
on Entré .............................. 3
U
unlisted program codes, finding ..... 11
unpacking Entré .............................. iii
unresponsive
Entré ...................................... iv
using
Picture within a Picture .......... 11
V
viewing
TV without Entré ..................... 3
W
watching
TV without Entré ..................... 3
How to Connect and Set Up Your Entré Entertainment Hub 39
Page 46

Index
40
Page 47

documentation manual, user maintenance, brochure, user reference, pdf manual
This file has been downloaded from:
User Manual and User Guide for many equipments like mobile phones, photo cameras, monther board, monitors, software, tv, dvd, and othes..
Manual users, user manuals, user guide manual, owners manual, instruction manual, manual owner, manual owner's, manual guide,
manual operation, operating manual, user's manual, operating instructions, manual operators, manual operator, manual product,
 Loading...