

Page 1

Kompaktes Stereo-System
M-822DAB
BEDIENUNGSANLEITUNG
DEUTSCH
FRANÇAIS
ITALIANOENGLISH
NEDERLANDS
Page 2

Vor der Inbetriebnahme
Inhalt
Vor Einschalten der Spannungsversorgung
Sicherheitshinweise
Vor der Inbetriebnahme
Anschließen
Handhabung von CDs
Wissenswertes über USB-Geräte
Komponentennamen und –funktionen
Grundfunktionen
Anschalten des Systems
Ausschalten in Standby
Lautstärkeregler
Einstellen des Klangs
Verwendung von CD und USB
Vorbereitung
Wiedergabe von CD oder Audiodatei (USB, CD)
Auswählen eines Ordners (nur Audiodateien)
Programmieren von Titeln und Dateien
- Vorgehensweise bei Audio-CD
- Vorgehensweise bei Audiodateien
Zufallswiedergabe und Wiederholungsfunktion
- Vorgehensweise bei Audio-CD
- Vorgehensweise bei Audiodateien
Verwendung des DAB+ Radios
Einstellen der DAB+ Sender
Anwählen eines DAB+ Senders
Speichern von Stationen im Senderspeicher
Erweiterte DAB+ Informationen
Menüfunktionen DAB+
Verwendung des UKW Radios
Einstellen der UKW Sender
Speichern von Stationen im Senderspeicher
Menüfunktionen UKW
Verwendung von BLUETOOTH
Koppeln von BLUETOOTH-Geräten
Wiedergabe über BLUETOOTH
Verwendung von Line-In
Uhrzeit/Datum, Sleeptimer, Wecker
Störungsbehebung
Allgemeine Informationen
Wartung und Pflege
Entsorgung
Technische Daten
Garantie
3
3
6
6
7
7
8
9
9
9
9
9
9
9
10
10
11
11
11
12
12
12
12
12
13
13
14
14
15
15
15
15
16
16
16
16
17
18
18
18
19
20
21
DEUTSCH
2
Page 3

Vor Einschalten der Spannungsversorgung
WICHTIGE SICHERHEITSANWEISUNGEN
Achtung: Lesen Sie diese Seite aufmerksam durch, um den sicheren Betrieb des
Gerätes zu gewährleisten.
Hinweise aufmerksam lesen!
– Befolgen Sie alle Sicherheits- und Bedienungsanweisungen, wenn Sie dieses Produkt in Betrieb
nehmen.
Hinweise sorgfältig aufbewahren!
– Sie sollten die Sicherheits- und Bedienungsanweisungen für spätere Nachschlagezwecke aufbewahren.
Alle Warnhinweise beachten!
– Sie sollten alle an dem Produkt angegebenen und in der Bedienungsanleitung aufgeführten Warnungen strikt befolgen.
1. Nur mit einem trockenen Tuch säubern!
– Ziehen Sie den Netzstecker dieses Gerätes aus der Netzsteckdose heraus, bevor Sie dieses Produkt
reinigen. Verwenden Sie niemals flüssige Reinigungsmittel oder Reinigungssprays. Verwenden Sie nur
ein leicht angefeuchtetes Tuch für das Reinigen.
2. Zubehör
– Verwenden Sie nur das vom Hersteller angegebene Zubehör.
3. Verwenden Sie dieses Gerät nicht in der Nähe von Wasser
– Das Gerät darf niemals Wassertropfen oder Wasserspritzern ausgesetzt werden – wie sie zum
Beispiel in der Nähe einer Badewanne, eines Waschbeckens, einer Küchenspüle, einer Waschmaschine, in einem feuchten Kellerraum oder in der Nähe eines Schwimmbeckens usw. auftreten. Stellen Sie
niemals mit Flüssigkeiten gefüllte Behälter, wie z. B. Blumenvasen, auf das Gerät.
4. Belüftung
– Die Schlitze und Öffnungen im Gehäuse dienen der Belüftung des Geräts, um den zuverlässigen
Betrieb des Geräts sicherzustellen und um das Gerät vor Überhitzung und einer möglichen
Selbstentzündung zu schützen. Blockieren Sie die Lüftungsöffnungen nicht. Installieren Sie das
Gerät nach Angaben des Herstellers. Blockieren Sie niemals die Belüftungsöffnungen, indem Sie
das Gerät auf einem Bett, Sofa, Teppich oder einer ähnlich weichen Unterlage abstellen. Dieses Gerät
sollte nicht in ein Bücherregal oder Einbauschrank eingebaut werden, wenn nicht für ausreichende
Belüftung gesorgt ist, wie es in der Einbauanleitung des Herstellers beschrieben ist.
5. Spannungsversorgung
– Dieses Gerät darf nur an die Netzspannung angeschlossen werden, die an dem Gerät angegeben
ist. Wenn Sie sich über die Art der Spannungsversorgung in Ihrer Wohnung nicht sicher sind, wenden
Sie sich an Ihren Fachhändler oder an das örtliche Energieversorgungsunternehmen.
6. Netzkabel
– Sorgen Sie dafür, dass man weder über das Netzkabel stolpern kann, noch dass es in unmittelbarer
Nähe einer Steckdose, darunter auch Zusatzsteckdosen, abgeklemmt wird. Auch am Austritt aus dem
Gerät darf das Netzkabel auf keinen Fall gequetscht werden.
7. Gewitter
– Das Gerät bei Gewittern und wenn es längere Zeit nicht verwendet wird vom Netz trennen.
3
Page 4

8. Überlastung
– Überlasten Sie niemals Netzsteckdosen, Verlängerungskabel oder Mehrfachsteckdosen, weil
sonst die Gefahr von Feuer oder elektrischen Schlägen besteht.
9. Eindringen von Fremdmaterial und Flüssigkeit
– Achten Sie darauf, dass niemals Fremdmaterial oder Flüssigkeit durch die Belüftungsöffnungen
in dieses Gerät eindringt, da es anderenfalls zu Kontakt mit unter hoher Spannung stehenden
Bauteilen bzw. zu einem Kurzschluss mit dem sich daraus ergebenden Brand oder elektrischen
Schlag kommen kann. Verschütten Sie niemals Flüssigkeiten jeglicher Art auf dieses Gerät.
10. Wartung
– Versuchen Sie niemals selbst, die Wartung dieses Gerätes auszuführen, da durch die Öffnungen
oder durch das Entfernen von Abdeckungen unter Spannung stehende Teile freigelegt werden
können, deren Berührung eine Gefahrenquelle darstellt. Überlassen Sie alle Wartungsarbeiten
dem qualifizierten Kundendienstpersonal.
11. Beschädigungen, die eine Reparatur erfordern
– Wartungs- und Reparaturarbeiten nur von einem qualifizierten Kundendienst ausführen lassen.
Eine Wartung/Reparatur ist erforderlich, wenn das Gerät beschädigt wurde (z. B. das Netzkabel oder
der Stecker), wenn Flüssigkeit in das Gerät gelaufen ist, wenn Gegenstände in das Gerät eingedrungen sind, wenn das Gerät Regen oder Nässe ausgesetzt war, wenn es nicht mehr einwandfrei
funktioniert oder heruntergefallen ist.
12. Ersatzteile
– Wenn Ersatzteile benötigt werden, überzeugen Sie sich, dass der Kundendiensttechniker
Ersatzteile verwendet, die vom Hersteller vorgeschrieben sind oder die gleichen Eigenschaften
wie die Originalteile aufweisen. Nicht zugelassene Ersatzteile können zu Feuer, elektrischen Schlägen
oder anderen Unfällen führen.
13. Sicherheitsprüfung
– Bitten Sie den Kundendiensttechniker nach der Beendigung von Wartungs- oder Reparaturarbeiten
an diesem Gerät um die Durchführung einer Sicherheitsprüfung, um festzustellen, ob sich das Gerät
im einwandfreien Betriebszustand befindet.
14. Wand- oder Deckenmontage
– Dieses Gerät darf nur gemäß Empfehlung des Herstellers an einer Wand oder an der Decke angebracht werden.
15. Wärme
– Installieren Sie das Gerät nicht in der Nähe von heißen Oberflächen wie z. B. Heizkörpern, Heizlüftern, Öfen oder anderen Geräten (einschließlich Verstärkern), die heiß werden können. Stellen Sie niemals Objekte mit offenen Flammen, wie Kerzen oder Laternen, auf oder in die Nähe des Gerätes. Die
installierten Batterien dürfen keiner großen Hitze, wie direktem Sonnenlicht, Feuer oder ähnlichem,
ausgesetzt werden.
16. Stromleitungen
– Eine Außenantenne sollte nicht in der Nähe von Starkstromleitungen oder anderen elektrischen
Leitungen bzw. an Stellen, wo es auf derartige elektrische Leitungen fallen kann, installiert werden.
Beim Installieren einer Außenantenne muss mit größter Sorgfalt darauf geachtet werden, nicht
versehentlich elektrische Leitungen zu berühren, weil dies lebensgefährlich ist.
17. Batterien
- Wenn Sie das Gerät einen Monat oder länger nicht benutzen, entnehmen Sie die Batterien aus
dem Batteriefach der Fernbedienung, um ein Auslaufen zu verhindern. Entsorgen Sie auslaufen-
de Batterien sofort sachgemäß und Beachtung aller relevanten gesetzlichen Vorschriften. Aus-
laufende Batterien können Verletzungen verursachen und das Gerät beschädigen.
4
Page 5

Kombinieren Sie niemals Batterien verschiedenen Typs oder alte und neue Batterien.
Risiken in Verbindung mit hohen Lautstärken
– Um möglichen Hörschäden vorzubeugen, hören Sie nicht über längere Zeiträume mit hoher
Lautstärke. Dies gilt insbesondere bei der Benutzung eines Kopfhörers.
Fernbedienung
–
Wenn Sie den Fernbedienungssensor direktem Sonnenlicht oder dem Licht hochfrequenter Leucht stoffröhren aussetzen, kann es zu Fehlfunktionen kommen. In solchen Fällen sollten Sie das System
an einer anderen Stelle aufstellen, um solche Fehlfunktionen zu vermeiden.
–
Die mitgelieferten Batterien sind zur Funktionsprüfung gedacht und können eine begrenzte Lebensdauer
haben. Wenn die Reichweite der Fernbedienung nachlässt, die alten Batterien durch neue ersetzen.
Vorsicht!
Explosionsgefahr
– wenn Batterien des falschen Typs eingesetzt werden; extrem hohen oder niedrigen Temperaturen,
denen eine Batterie während der Verwendung, Lagerung oder des Transports ausgesetzt sein kann
– niedrigem Luftdruck in großer Höhe; der Entsorgung einer Batterie in Feuer oder einem heißen
Ofen; beim mechanischen Quetschen oder Schneiden einer Batterie; bei Belassen einer Batterie in einer
Umgebung mit extrem hohen Temperaturen oder einem extrem niedrigen Luftdruck, was zu einer
Explosion oder dem Austreten brennbarer Flüssigkeiten oder Gase führen kann.
Um das Risiko eines Stromschlages, Feuer etc. zu minimieren
- entfernen Sie keine Schrauben, Abdeckungen oder Gehäuseteile.
- der Einschaltknopf trennt die Stromzufuhr in keiner Position vollkommen.
Da der Netzstecker zum vollständigen Trennen vom Stromnetz verwendet wird, muss dieser am Netzkabel belassen werden und ständig zugänglich bleiben.
Automatische Energiesparfunktion
Das Modell ist mit einer automatischen Energiesparfunktion ausgestattet. Diese schaltet das Gerät innerhalb von 15 Minuten in den Standby-Modus, wenn die Wiedergabe mit einer sehr geringen Lautstärke erfolgt bzw. das Radio stummgeschaltet ist. Diese Einstellung kann nicht verändert werden.
EU-Konformitätserklärung
Hiermit erklärt die JVCKENWOOD Corporation, dass der Funkanlagentyp M-822DAB der Richtlinie
2014/53/EU entspricht. Der vollständige Text der EU-Konformitätserklärung ist unter der folgenden
Internetadresse verfügbar:
https://www.kenwood.com/euukdoc/
Hersteller:
3-12. Moriyacho, Kanagawa-ku, Yokohama-shi, Kanagawa 221-0022, JAPAN
Bevollmächtigter (EU):
Amsterdamseweg 37, 1422 AC UITHOORN, THE NETHERLANDS
WICHTIG FÜR LASER-PRODUKTE
1. LASER-PRODUKT DER KLASSE 1
2. VORSICHT: Nicht das Gehäuse öffnen. Das Gerät enthält keine Teile, die vom Benutzer
gewartet werden können; Wartungen nur vom qualifizierten Fachpersonal durchführen
lassen.
5
Page 6
Vor der Inbetriebnahme
Auspacken
Packen Sie das Gerät vorsichtig aus und achten Sie darauf, dass alle Zubehörteile vorhanden sind:
2 x Lautsprecher / Fernbedienung / UKW/DAB-Wurfantenne / 2x Batterie R03/AAA 1,5 Volt
Anschließen
• Öffnen Sie das Batteriefach der Fernbedienung und setzen Sie die Batterien polungsrichtig ein.
Die vorgegebene Polarität (+/-) ist im Batteriefach gekennzeichnet.
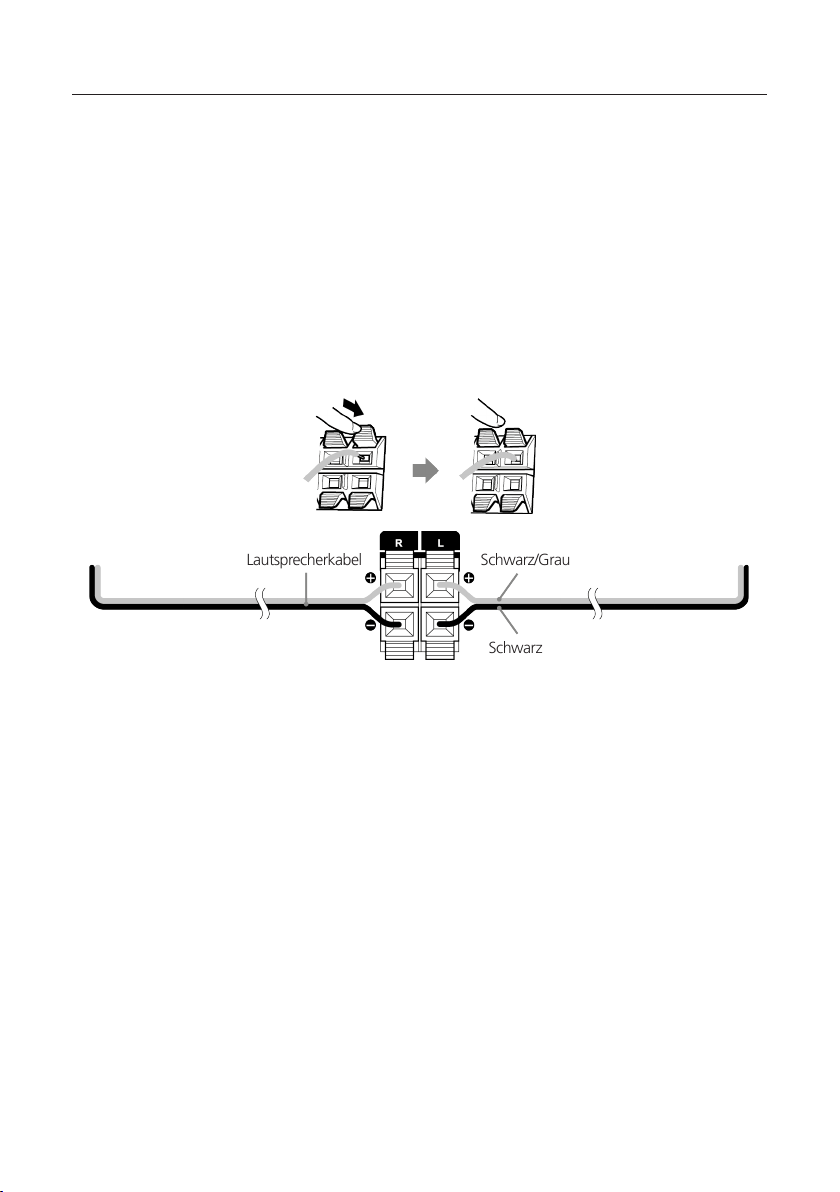
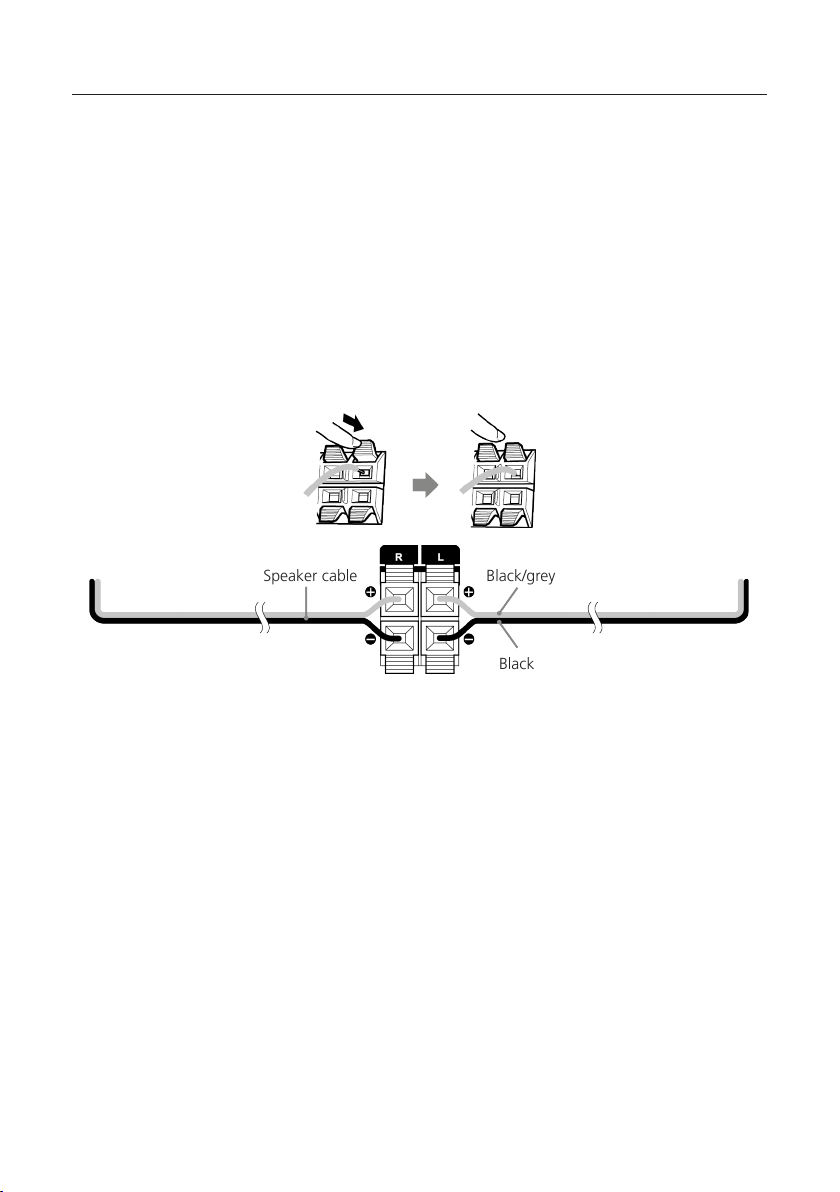
Verbinden Sie den linken und rechten Lautsprecher mit dem Anschluss (Speaker Out) auf der Geräterückseite. Drücken Sie dazu auf die Federklammern und stecken die losen Kabelenden in die dafür vorgesehenen
Öffnungen. Dabei die schwarze Ader mit der schwarzen Federklemme verbinden. Die andere Ader wird
analog dazu mit der roten Klemme verbunden.
Lautsprecherkabel Schwarz/Grau
Schwarz
• Schließen Sie den Netzstecker fest an einer Wechselstromsteckdose an. Da der Netzstecker zum voll-
ständigen Trennen vom Stromnetz verwendet wird, muss die Steckdose ständig zugänglich bleiben.
DAB+ / UKW Antennenanschluss
1. Schließen Sie die Wurfantenne an die Buchse [FM ANTENNA 75Ω] an.
2. Suchen Sie den Ort, an dem der beste Empfang erreicht wird.
3. Fixieren Sie die Antenne.
Bei der mit dem System gelieferten Antenne handelt es sich um eine einfache Wurfantenne. Für einen
stabilen Signalempfang wird die Verwendung einer Außenantenne (im Handel erhältlich) empfohlen.
Ziehen Sie zum Anschluss einer Außenantenne zunächst die Zimmerantenne ab.
Der Empfang von Radiosendern aus dem Kabelnetz kann nicht garantiert werden.
6
Page 7

Erstmaliger Gebrauch
Bei erstmaligem Einschalten des Gerätes wird ein automatischer DAB+ Sendersuchlauf gestartet. Bitte warten
Sie, bis dieser Vorgang komplett abgeschlossen ist. Für weitere Informationen dazu, schauen Sie bitte in den
Abschnitt „Verwendung des DAB+ Radios“.
Handhabung von CDs
Vorsichtshinweise für die Handhabung
Halten Sie die CD so, dass Sie die Signaloberfläche nicht berühren. (Die unbedruckte Seite ist die Abspielseite.)
Vorsichtshinweise hinsichtlich CDs
Verwenden Sie ausschließlich CDs mit der Markierung. Eine CD ohne diese Markierung kann u. U.
nicht ordnungsgemäß wiedergegeben werden.
Wissenswertes über USB-Geräte
Hinweise zur Verwendung eines USB-Gerätes
Dieses Gerät ist in der Lage, auf einem Flash-Speicher oder digitalen Audio-Player gespeicherte Audiodateien wiederzugeben, wenn diese Geräte über einen USB-Port verfügen (in diesem Dokument werden diese
Geräte als USB-Geräte bezeichnet).
Bezüglich der verwendbaren USB-Geräte gelten folgende Einschränkungen:
Verwendbare USB-Geräte
• USB-Geräte, die zur USB-Massenspeicherklasse gehören.
• USB-Geräte, deren maximale Stromaufnahme bei höchstens 500 mA liegt.
• USB-Massenspeicherklasse : USB-Geräte, die der PC als externen Speicher erkennt, ohne dass ein
spezieller Treiber oder eine spezielle Anwendungssoftware erforderlich wäre.
• Konsultieren Sie bitte Ihren Händler, wenn Sie sich nicht sicher sind, ob Ihr USB-Gerät den Spezifikationen
für die USB-Massenspeicherklasse entspricht.
• Die Verwendung eines USB-Gerätes, das nicht unterstützt wird, kann zu einer fehlerhaften Wiedergabe
oder Anzeige der Audio-Datei führen.
Selbst wenn Sie ein USB-Gerät verwenden, das den oben aufgeführten Spezifikationen entspricht, können
Audio- Dateien je nach Typ oder Zustand des USB-Gerätes u. U. nicht ordnungsgemäß wiedergegeben
werden.
7
Page 8
Komponenten und Funktionen
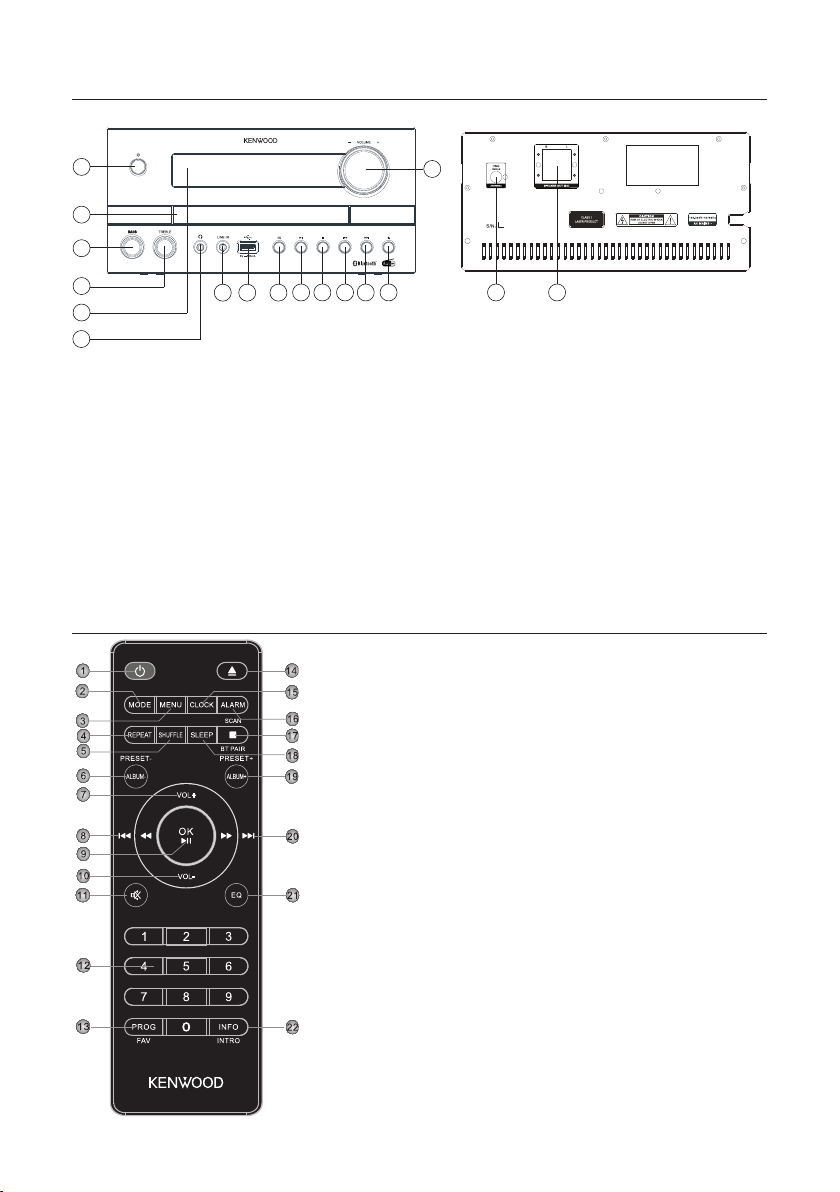
Vorderseite Rückseite
1
15
2
3
4
5
6
7 8 9
10 11 12
13
14
16 17
1 - Standby / Ein
2 - CD-Schublade
3 - Bass-Regler
4 - Höhen-Regler
5 - Display
6 - Kopfhörer-Anschluss
10 - Wiedergabe / Pause
11 - Stop
12 - Vorherige (Titelsprung rückwärts)
13 - Nächste (Titelsprung vorwärts)
14 - Öffnen / Schliessen (Eject)
15 - Lautstärke
7 - Line-In-Anschluss
8 - USB-Anschluss
9 - Quellen-Auswahl (MODE)
16 - UKW / DAB+ Antennenanschluss
17 - Lautsprecher-Anschlüsse
Fernbedienung
1 Standby Ein/Aus
2 Modusauswahl (Quelle)
3 Menü
4 Wiederholungsauswahl
5 Zufallsmodus
6 Vorheriges Album, Presetspeicher -
7 Lautstärke erhöhen
8 Titelsprung/Titelsuchlauf rückwärts
9 Eingabe bestätigen, Wiedergabe/Pause
10 Lautstärke verringern
11 Stummschaltung Ein/Aus (Mute)
12 Zifferntasten
13 Titelprogrammierung, Presetspeicher belegen
14 CD-Lade öffnen/schliessen (Eject)
15 Uhr einstellen
16 Wecker einstellen
17 Wiedergabe stoppen, BLUETOOTH Kopplung, Sendersuchlauf
18 Sleeptimer einstellen
19 Nächstes Album, Presetspeicher +
20 Titelsprung/Titelsuchlauf vorwärts
21 Equalizer Voreinstellungen wählen
22 Umschaltung Displayinformation, bei Wiedergabe 10 Sekun-
den Intro pro Titel
8
Page 9

Grundfunktionen
Anschalten des Systems: Drücken Sie die Taste <STANDBY> auf der Fernbedienung oder am Hauptge-
rät. Im Display erscheint “WELCOME”.
Ausschalten in Standby: Drücken Sie die Taste <STANDBY> auf der Fernbedienung oder am Hauptgerät. Im Display erscheint “STANDBY” und das Gerät schaltet in den Standby-Modus.
Lautstärkeregler
Auf der Fernbedienung: Drücken Sie die Tasten <VOL+> zum Erhöhen oder drücken Sie die
Taste <VOL-> zum Senken der Lautstärke.
Am Hauptgerät: Drehen Sie den Regler <Volume> zum Erhöhen oder Senken der Lautstärke.
Bei minimaler Lautstärke wird “VOL 00” bei maximaler Lautstärke “VOL 32” kurz im Display angezeigt.
Zeitweises Abstellen der Lautstärke: Drücken Sie dazu die Taste <MUTE> auf der Fernbedienung. Im
Display blinkt “MUTE”. Beim nächsten Tastendruck wird die ursprüngliche Lautstärke wieder hergestellt.
Einstellen des Klangs
Sie können die Tiefen- und Höhenpegel entsprechend Ihrer bevorzugten Musik anheben oder absenken.
Am Hauptgerät: Drehen Sie den Regler BASS oder TREBLE, um den Verstärkungspegel einzustellen:
Regelbereich -6 bis +6.
Equalizer
Auf der Fernbedienung: Drücken Sie die Taste <EQ> um nacheinander folgende Einstellungen
aufzurufen: FLAT -> CLASSIC -> POP -> JAZZ -> ROCK
Verwendung von CD und USB
Vorbereitung
Eine CD einlegen
1. Drücken Sie die Taste <EJECT> am Hauptgerät oder auf der Fernbedienung zum Öffnen des CD-Fachs.
2. Legen Sie eine CD mit der bedruckten Seite nach oben weisend in das CD-Fach.
3. Drücken Sie die Taste <EJECT> am Hauptgerät oder auf der Fernbedienung zum Schließen des CD-Fachs
Entnahme einer CD
1. Drücken Sie die Taste <EJECT> am Hauptgerät oder auf der Fernbedienung zum Öffnen des CD-Fachs.
2. Entnehmen Sie die CD vorsichtig aus dem CD-Fach.
3. Drücken Sie die Taste <EJECT> am Hauptgerät oder auf der Fernbedienung zum Schließen des CD-Fachs.
9
Page 10

Anschluss von USB-Geräten
1. Drücken Sie die Taste <STANDBY> zum Auswählen des Standby-Modus.
2. Schließen Sie das USB-Gerät an den USB- Anschluss auf der Vorderseite an.
Abnehmen des USB-Gerätes
1. Drücken Sie die Taste <STANDBY> zum Auswählen des Standby-Modus.
2. Entnehmen Sie das USB-Gerät aus dem USB-Anschluss.
• Warten Sie stets ab, bis das Gerät die CD/das USB-Gerät vollständig gelesen hat, bevor Sie fortfahren.
• Wenn keine CD in das CD-Fach eingelegt ist, wird „NO DISC“ angezeigt.
• Wenn keine abspielbare Audiodatei im USB-Gerät ist, wird „NO SONG“ angezeigt.
• Bei Audio-Dateien kann die Einlesezeit 10 Sekunden überschreiten, wenn sich auf einer CD oder einem
USB-Gerät sehr viele Musikstücke befinden.
Wiedergabe einer CD oder Audiodatei (USB,CD)
Auf der Fernbedienung: Wählen Sie mit der Taste <MODE> die Quelle aus und drücken Sie die Taste
<Wiedergabe/Pause> zum Starten der Wiedergabe.
Am Hauptgerät: Wählen Sie mit der Taste <MODE> die gewünschte Quelle aus und drücken Sie die
Taste <Wiedergabe/Pause> zum Starten der Wiedergabe
Bei USB-Geräten oder CDs, die Audiodateien (z.B. MP3) enthalten, wird die Anzahl der vorhandenen Ordner
und und Dateien wie folgt angezeigt:
Fxx XXX
Dabei steht die Zahl hinter „F“ für die Anzahl der Ordner und der zweite Zahlenblock für die Gesamtzahl der Dateien.
Bei Audio-CDs werden die Information zur Anzahl der Titel und Gesamtspielzeit wie folgt angezeigt:
XX XX:XX
Dabei steht der erste Zahlenblock für die Anzahl der Titel und der zweite für die Gesamtspielzeit der CD.
Grundlegende Bedienfunktionen
Stoppen der Wiedergabe: Drücken Sie die Taste <Stop> am Hauptgerät oder auf der Fernbedienung
um die Wiedergabe zu stoppen.
Unterbrechung der Wiedergabe: Drücken Sie die Taste <Wiedergabe/Pause> am Hauptgerät oder
auf der Fernbedienung um die Wiedergabe zu unterbrechen. Dabei blinkt die Anzeige im Display. Ein weiterer Tastendruck lässt die Wiedergabe fortsetzen.
Suchen einer bestimmten Passage während des Abspielens: Halten Sie die Taste <Titelsprung vorwärts> oder <Titelsprung rückwärts> am Hauptgerät oder auf der Fernbedienung länger als 2 Sekunden
gedrückt, um den schnellen Rücklauf oder Vorlauf zu aktivieren. Sobald die gewünschte Stelle erreicht ist, lassen
Sie die entsprechende Taste wieder los.
Auswählen eines bestimmten Titels: Drücken Sie die Taste <Titelsprung vorwärts> oder <Titelsprung rückwärts> am Hauptgerät oder auf der Fernbedienung im Wiedergabe-, Pause- oder Stop-Mo-
dus. Über die Zifferntasten der Fernbedienung können die Titel direkt angewählt werden.
Auswählen eines bestimmten Ordners (Nur bei Audiodateien): Drücken die die Tasten
<ALBUM+> oder <ALBUM-> auf der Fernbedienung um einen Ordner auszuwählen.
10
Page 11

Titel kurz anspielen: Halten Sie die Taste <INTRO> auf der Fernbedienung gedrückt, um die Titel 10
Sekunden lang anzuspielen. Erneutes Drücken stoppt den Modus.
Programmieren von Titeln und Dateien
Sie können mit Hilfe der Fernbedienung Titel einer Audio-CD oder Dateien in einer von Ihnen gewünschten
Reihenfolge programmieren. Dabei steht die folgende Anzahl von Speicherplätzen zur Verfügung:
Audio-CD: 20 Speicherplätze Dateien: 99 Speicherplätze
Vorgehensweise bei Audio-CD
1. Die Quelle „CD“ muss sich im Stop-Modus befinden, sonst erscheint im Display „STOP FIRST“.
2. Drücken Sie die Taste <PROG> um den Programmiermodus zu starten.
3. Das Display zeigt nun „P01 001“ an, wobei „01“ blinkt. Der erste Zahlenblock zeigt den aktuellen Titel,
der zweite Zahlenblock den aktuellen Speicherplatz an.
4. Wählen Sie nur mit der Taste <Titelsprung vorwärts> oder <Titelsprung rückwärts> den Titel aus,
den Sie auf dem aktuellen Speicherplatz ablegen möchten. Die Titel können auch über die Zifferntasten der
Fernbedienung ausgewählt werden.
5. Drücken Sie die Taste <PROG> um den Vorgang zu bestätigen.
6. Danach wird der nächste Speicherplatz angezeigt. Wiederholen Sie die Schritte 4 und 5 bis Ihre Auswahl
abgeschlossen ist, oder die Anzahl der Speicherplätze belegt ist. In diesem Fall erscheint „Full“ im Display.
7. Mit der Taste <Wiedergabe/Pause> starten Sie die Wiedergabe der programmierten Titel. Während
der Wiedergabe wird abwechselnd die Nummer des Titels und die des Programmplatzes angezeigt.
8. Zweifaches Drücken der Taste <STOP> löscht die Programmierung.
Vorgehensweise bei Audiodateien
1. Die Quelle „USB“ muss sich im Stop-Modus befinden, sonst erscheint im Display „STOP FIRST“.
2. Drücken Sie die Taste <PROG> um den Programmiermodus zu starten.
3. Das Display zeigt nun „P01 001“ an, wobei „01“ blinkt. Der erste Zahlenblock zeigt den aktuellen Titel,
der zweite Zahlenblock den aktuellen Speicherplatz an.
4. Wählen Sie nur mit der Taste <Titelsprung vorwärts> oder <Titelsprung rückwärts> den Titel aus,
den Sie auf dem aktuellen Speicherplatz ablegen möchten. Die Titel können auch über die Zifferntasten der
Fernbedienung ausgewählt werden.
5. Drücken Sie die Taste <PROG> um den Vorgang zu bestätigen.
6. Danach wird der nächste Speicherplatz angezeigt. Wiederholen Sie die Schritte 4 und 5 bis Ihre Auswahl
abgeschlossen ist, oder die Anzahl der Speicherplätze belegt ist. In diesem Fall erscheint „FULL“ im Display.
7. Mit der Taste <Wiedergabe/Pause> starten Sie die Wiedergabe der programmierten Titel. Während
der Wiedergabe wird abwechselnd die Nummer des Titels und die des Programmplatzes angezeigt.
8. Zweifaches Drücken der Taste <STOP> löscht die Programmierung.
• Wird während der Programmierung die Taste <STOP> gedrückt, so wird der Vorgang abgebrochen.
Das Ausschalten des Gerätes löscht ein vorhandene Programm.
11
Page 12

Zufallswiedergabe und Wiederholfunktion
Vorgehensweise bei Audio-CD
• Drücken Sie auf der Fernbedienung die Taste <SHUFFLE> um die Zufallswiedergabe zu starten. Im Display
erscheint „SHUF“ und die Wiedergabe kann gestartet werden. Zweifaches Drücken der Taste <SHUFFLE>
oder Drücken der Taste <STOP> hebt die Zufallswiedergabe auf.
• Drücken Sie auf der Fernbedienung die Taste <REPEAT> um die Wiederholfunktion zu aktivieren.
Mehrmaliges drücken schaltet folgende Funktionen:
Wiederholung des aktuellen Titels (Display „RPT ONE“)
Wiederholung aller Titel (Display „RPT ALL“)
Ausschalten der Wiederholfunktion (Display „RTP OFF“)
Mit der Taste <Wiedergabe/Pause> starten Sie die Wiedergabe.
Das Drücken der Taste <Stop> schaltet die Wiederholfunktion aus.
Vorgehensweise bei Audiodateien
• Drücken Sie auf der Fernbedienung die Taste <SHUFFLE> um die Zufallswiedergabe zu starten. Im Display
erscheint „SHUF“ und die Wiedergabe kann gestartet werden. Zweifaches Drücken der Taste <SHUFFLE>
oder Drücken der Taste <STOP> hebt die Zufallswiedergabe auf.
• Drücken Sie auf der Fernbedienung die Taste <REPEAT> um die Wiederholfunktion zu aktivieren.
Mehrmaliges drücken schaltet folgende Funktionen:
Wiederholung des aktuellen Titels (Display „RPT ONE“)
Wiederholung aller Titel (Display „RPT ALL“)
Wiederholung des aktuellen Albums („RPT ALB“)
Ausschalten der Wiederholfunktion (Display „RTP OFF“)
Mit der Taste <Wiedergabe/Pause> starten Sie die Wiedergabe.
Das Drücken der Taste <Stop> schaltet die Wiederholfunktion aus.
Verwendung des DAB+ Radios
Drücken Sie die Taste <MODE> auf der Fernbedienung oder am Hauptgerät, bis im Display „DAB“ erscheint.
Einstellen der DAB+ Sender
Bei Inbetriebnahme des Gerätes wurde bereits ein Sendersuchlauf durchgeführt. Die dabei gefundenen
Sender werden alphabetisch in der Stationsliste gespeichert.
12
Page 13

Erneutes Starten des automatischen Sendersuchlaufs
• Drücken Sie die Taste <MENU> um das DAB Menü aufzurufen.
Im Display steht „FULL SCAN“. Starten Sie den Suchlauf mit der Taste <OK>.
• Während des Suchlaufs zeigt das Display die Zahl bisher gefundenen Sender an.
• Sollten während des Suchlaufs keine Stationen gefunden werden, so steht für ca. 2 Sekunden „NO DAB“
im Display und wechselt danach auf die Anzeige „FULL SCAN“.
Bitte überprüfen Sie dann den korrekten Anschluss der Antenne oder versuchen Sie einen anderen Stand-
ort für das Gerät zu finden, um einen besseren Empfang zu erreichen.
Manuelles Einstellen von Ensembles
• Drücken Sie die Taste <MENU> um das DAB Menü aufzurufen.
• Drücken Sie die Taste <Titelsprung vorwärts> bis „MANUAL“ im Display erscheint.
• Mit der Taste <OK> wird die Funktion bestätigt, und es steht der aktuell eingestellte Kanal mit der
dazugehörigen Frequenz im Display.
• Drücken Sie die Taste <Titelsprung vorwärts> oder <Titelsprung rückwärts> um manuell einen
anderen Kanal auszuwählen.
• Mit der Taste <OK> bestätigen Sie die Auswahl. Danach wird der Signalpegel im Display angezeigt, ein
weiterer Tastendruck lädt das aktuelle Ensemble.
Anwählen eines DAB+ Senders
Die in der Stationsliste alphabetisch gespeicherten Sender lassen sich wie folgt abrufen:
• Drücken Sie die Taste <Titelsprung vorwärts> oder <Titelsprung rückwärts> auf der Fernbedie-
nung oder am Gerät, um vorwärts oder rückwärts in der Stationsliste zu blättern.
• Wenn der gewünschte Sender ausgewählt ist, drücken Sie die Taste <OK> auf der Fernbedienung oder
warten Sie ca. 2 Sekunden um die Wiedergabe zu starten.
Im Display erscheint „LOADING“ gefolgt von „PLAYING“.
• Sollte der Empfangspegel beim ausgewählten Sender für eine störungsfreie Wiedergabe nicht ausreichen,
so erscheint im Display „OFF AIR“. Wählen Sie dann bitte einen anderen Sender aus.
Speichern von Stationen im Senderspeicher
Um DAB-Sender zum leichteren Auffinden abzuspeichern, stehen 30 Speicherplätze zur Verfügung. Zur
Belegung des Speichers gehen Sie bitte wie folgt vor:
• Wählen Sie einen Sender zur Speicherung aus
• Drücken Sie die Taste <PROG> bis das Display blinkt und einen Speicherplatz anzeigt. Ein leerer Speicher platz wird mit „EMPTY“, ein belegter Speicherplatz mit dem Sendernamen angezeigt. Sie können auch
einen bereits verwendeten Speicher neu belegen.
• Drücken Sie die Taste <Titelsprung vorwärts> oder <Titelsprung rückwärts> um einen Speicher platz auszuwählen.
• Mit der Taste <OK> bestätigen Sie die Speicherung. Im Display blinkt kurz „STORED“.
• Die gespeicherten Sender können wie folgt abgerufen werden:
Drücken Sie die Zifferntasten auf der Fernbedienung, um die Nummer des Speicherplatzes direkt
einzugeben. Schliessen Sie die Eingabe mit der Taste <OK> ab. Alternativ können Sie die Taste <PROG>
gefolgt von <Titelsprung vorwärts> oder <Titelsprung rückwärts> zur Auswahl verwenden.
13
Page 14
Erweiterte DAB+ Information
Bei DAB+ werden neben dem Musiksignal auch Zusatzinformationen übertragen. Diese können wie folgt abgerufen werden.
Drücken Sie auf der Fernbedienung die Taste <INFO> um nacheinander folgende Informationen abzufrufen:
• Signalpegel: Im Display wird anhand von Symbolen von links nach rechts angezeigt.
Je mehr Symbole angezeigt werden, desto besser ist der Empfang.
• PTY (Programme Type): Dies bezeichnet die Einteilung der Sender nach Sparten, z.B. Pop, News,
Religion, Info, Classics, etc.
• Name des Ensembles, z.B. DR Deutschland
• Anzeige von Kanal und Frequenz des eingestellten Senders
• ERR XX: Diese Information zeigt die Fehlerrate des digitalen Empfangs. Diese ist auch vom Signalpegel
abhängig und lässt sich auch zur Ausrichtung der Antenne verwenden.
• XX K BPS: Anzeige der Datenrate des Senders, z.b. 80 kBit/s. Die Datenrate kann von Sender zu Sender unter-
schiedlich sein.
• DABPLUS: Bezeichnet die Empfangsart „DAB+“.
• Aktuelle Uhrzeit
• Aktuelles Datum
Menüfunktionen DAB+
Die Taste <MENU> öffnet ein Menü, in dem sich verschiedene Funktion für DAB+ einstellen lassen. Mit den Tasten
<Titelsprung vorwärts> oder <Titelsprung rückwärts> lässt sich durch das Menü scrollen. Folgende Funktionen
sind verfügbar:
• FULL SCAN: Erneuter automatischer Sendersuchlauf. Bestätigen Sie die Funktion mit der Taste <OK>.
• MANUAL: Damit lässt sich manuell ein bestimmter Empfangskanal einstellen.Mit der Taste <OK> wird die
Funktion bestätigt, und es steht der aktuell eingestellte Kanal mit der dazugehörigen Frequenz im Display.
• Drücken Sie die Taste <Titelsprung vorwärts> oder <Titelsprung rückwärts>, um manuell einen anderen
Kanal auszuwählen.
• Mit der Taste <OK> bestätigen Sie die Auswahl. Danach wird der Signalpegel im Display angezeigt, ein weiterer
Tastendruck lädt das aktuelle Ensemble.
• DRC (Dynamic Range Control): Sofern vom eingestellten Sender unterstützt lässt sich damit eine Anpassung
des Dynamikbereichs vornehmen. Mögliche Einstellungen sind “OFF”, “LOW” und “HIGH”. Die Auswahl erfolgt
mit den Tasten <Titelsprung vorwärts> oder <Titelsprung rückwärts>, bestätigt wird die Auswahl mit der
Taste <OK>.
• PRUNE: Damit werden ungültige Stationen aus der Stationsliste gelöscht. Auswählen mit der Taste <OK>, „NO/YES“
mit <Titelsprung vorwärts> oder <Titelsprung rückwärts> und mit <OK> bestätigen.
• SYSTEM: Nur für den Kundendienst!
Verwendung des UKW Radios
Drücken Sie die Taste <MODE> auf der Fernbedienung oder am Hauptgerät, bis im Display „FM“ erscheint.
Einstellen eines UKW Senders
• Drücken Sie die Taste <Titelsprung vorwärts>, um die Empfangsfrequenz zu erhöhen.
• Drücken Sie die Taste <Titelsprung rückwärts>, um die Empfangsfrequenz zu verringern. Wenn Sie diese
Tasten gedrückt halten, startet ein automatischer Sendersuchlauf, der bei der nächsten gefundenen Station
stoppt.
• Halten Sie die Taste <SCAN> kurz gedrückt, um den Sendersuchlauf mit automatischer Speicherung der
gefundenen Sender zu starten. Es werden maximal 30 Sender in der gefundenen Reihenfolge gespeichert.
14
Page 15

Verwendung von Radio Data System (RDS)
RDS ist ein Sendesystem, bei dem UKW-Sender zusammen mit dem eigentlichen Sendesignal weitere nützliche Informationen übertragen. Diese können aus dem normalen Sendesignal extrahiert und für eine Reihe
von Zusatzfunktionen genutzt werden. Wird ein RDS-Signal empfangen, so leuchtet im Display unterhalb der
Frequenzanzeige “RDS” auf, und es wird nach einiger Zeit der Sendername statt der Frequenz angezeigt.
RDS-Funktionen
Folgende Informationen können durch wiederholtes Drücken der Taste <INFO> abgerufen werden:
• Radiotext – Wird vom Sender kein Radiotext ausgestrahlt, so erscheint “NO TEXT”.
• PTY (Program Type) – Wird vom Sender kein PTY-Signal gesendet, so erscheint “NO PTY”.
• Frequenz und Speicherplatz des empfangenen Senders
• Stereo / Mono Anzeige
• Uhrzeit – Wird vom Sender kein Uhrzeitsignal gesendet, so erscheint “00_00_00”.
• Datum – Wird vom Sender kein Datumsignal gesendet, so erscheint “00-00-00”.
Bei unzureichenden Empfangsbedingungen kann trotz leuchtender “RDS” Anzeige der Empfang der Signale
gestört oder nicht möglich sein.
Speichern von Stationen im Senderspeicher
Um UKW-Sender zum leichteren Auffinden abzuspeichern, stehen 30 Speicherplätze zur Verfügung. Zur
Belegung des Speichers gehen Sie bitte wie folgt vor:
• Wählen Sie einen Sender zur Speicherung aus.
• Drücken Sie die Taste <PROG> bis das Display blinkt und einen Speicherplatz anzeigt. Ein leerer Speicher-
platz wird mit „EMPTY“, ein belegter Speicherplatz mit der Frequenz angezeigt. Sie können auch einen
bereits verwendeten Speicher neu belegen.
• Drücken Sie die Taste <Titelsprung vorwärts> oder <Titelsprung rückwärts> um einen Speicherplatz
auszuwählen.
• Mit der Taste <OK> bestätigen Sie die Speicherung. Im Display blinkt kurz „STORED“.
• Die gespeicherten Sender können wie folgt abgerufen werden:
Drücken Sie die Zifferntasten auf der Fernbedienung, um die Nummer des Speicherplatzes direkt
einzugeben. Schliessen Sie die Eingabe mit der Taste <OK> ab. Alternativ können Sie die Taste <PROG>
gefolgt von <Titelsprung vorwärts> oder <Titelsprung rückwärts> zur Auswahl verwenden.
Menüfunktionen UKW
Die Taste <MENU> öffnet ein Menü, in dem sich verschiedene Funktion für DAB+ einstellen lassen. Mit den
Tasten <Titelsprung vorwärts> oder <Titelsprung rückwärts> lässt sich durch das Menü scrollen.
Folgende Funktionen sind verfügbar:
• SCAN SET: Damit lässt sich einstellen, welche Sender beim Suchlauf bei der automatischen Speicherung
berücksichtigt werden . Mögliche Einstellungen sind “ALL” (alle empfangbaren Sender) oder “STRONG”
(nur die stärksten Sender). Die Auswahl erfolgt mit den Tasten <Titelsprung vorwärts> oder
<Titelsprung rückwärts>, bestätigt wird die Auswahl mit der Taste <OK>.
• AUD SET: Einstellung für „Mono“ oder „Stereo“ Empfang. Die Auswahl erfolgt mit den Tasten
<Titelsprung vorwärts> oder <Titelsprung rückwärts>, bestätigt wird die Auswahl mit der Taste <OK>.
• SYSTEM: Nur für den Kundendienst!
15
Page 16

Verwendung von BLUETOOTH
Drücken Sie die Taste <MODE> auf der Fernbedienung oder am Hauptgerät, bis im Display „BT“ erscheint.
Befindet sich kein gekoppeltes Gerät in der Nähe, so blinkt die Anzeige im Display.
Koppeln von BLUETOOTH Geräten
Die BLUETOOTH-Funktion erlaubt die drahtlose Übertragung von Musikdateien (Audio Streaming) an das
System. Zur Koppelung von entsprechenden Geräten (z.B. Smartphones) gehen Sie bitte wie folgt vor:
1. Öffnen Sie auf Ihrem BLUETOOTH Gerät die Koppelungsfunktion und suchen Sie nach „M-822DAB“.
2. Wählen Sie „M-822DAB“ zur Koppelung aus und warten Sie, bis im Display „BT“ erscheint und eine
Tonfolge zu hören ist. Die Koppelung ist nun abgeschlossen.
3. Sollte Ihr BLUETOOTH Gerät nach einem 4-stelligen PIN fragen, so geben Sie bitte „0000“ ein.
4. Das BLUETOOTH Gerät ist nun gespeichert und wird zukünftig automatisch gekoppelt.
5. Um ein anderes BLUETOOTH Gerät zu verbinden, wiederholen Sie bitte die Schritte 1 – 3.
Wiedergabe über BLUETOOTH
Um Musik per Audio-Streaming zu übertragen, benutzen Sie auf dem BLUETOOTH Gerät bitte einen Musikplayer Ihrer Wahl.
Folgende Steuerungsmöglichkeiten stehen nun zur Verfügung:
• Drücken Sie die Taste <Wiedergabe/Pause> auf der Fernbedienung oder am Gerät um die
Wiedergabe zu pausieren oder fortzusetzen.
• Drücken Sie die Tasten <Titelsprung vorwärts> oder <Titelsprung rückwärts>
auf der Fernbedienung oder am Hauptgerät um zum vorherigen oder dem nächsten Titel zu springen.
• Wenn Sie die Taste <Stop> auf der Fernbedienung oder am Hauptgerät für 3 Sekunden gedrückt halten,
wird die BLUETOOTH Verbindung getrennt. Im Display blinkt „BT“. Zur erneuten Verbindung wech seln Sie kurz auf eine andere Quelle, und dann zurück zu BLUETOOTH.
Wenn die BLUETOOTH Verbindung auf Grund größerer Distanzen getrennt werden sollte, erfolgt eine automatische Verbindung, sobald der Abstand wieder reduziert wird.
Verwendung von Line-In
Abspielen von externen Komponenten
Zur Wiedergabe von Musik können an den Line-In Anschluss externe Geräte, wie z.B. MP3-Player, DVD-Spieler oder Spielekonsolen, angeschlossen werden.
Drücken Sie die Taste <MODE> auf der Fernbedienung oder am Hauptgerät, bis im Display „LINE IN“
erscheint.
16
Page 17

Einstellen von Uhrzeit und Datum
Beim Empfang eines DAB+ oder UKW Senders in ausreichender Qualität wird die Uhrzeit automatisch
eingestellt. Je nach Empfangsstärke dauert dieser Vorgang einige Zeit. Sollte kein entsprechender
Sender zur Verfügung stehen, können Sie die Uhrzeit auch manuell einstellen:
1. Schalten Sie das Radio ein und drücken Sie die Taste <CLOCK> auf der Fernbedienung.
2. Anschließend mittels <Titelsprung vorwärts> oder <Titelsprung rückwärts> Stunden, Minuten,
Tag, Monat und Jahr auswählen und jeweils mit der Taste <OK> bestätigen.
3. Wenn „SAVED“ im Display angezeigt wird, wurde die Uhrzeit und das Datum abgespeichert.
Einstellen des Sleeptimers
Der Sleeptimer wird verwendet, um das Radio nach einem voreingestellten Zeitraum automatisch
abzuschalten. Zur Einstellung gehen Sie bitte wie folgt vor:
1. Schalten Sie das Radio ein und drücken Sie die Taste <SLEEP> auf der Fernbedienung.
2. Durch wiederholtes drücken der Taste kann die Abschaltzeit wie folgt festgelegt werden:
„OFF, 15, 30, 45, 60, 90 Minuten“
Ein aktiver Sleeptimer wird durch „SLEEP“ in der untersten Zeile des Dsiplays dargestellt.
Mittels „SLEEP OFF“ wird ein aktiver Timer ausgeschaltet.
3. Durch kurzes drücken der Taste <SLEEP> wird die restliche Laufzeit des Timers angezeigt.
Einstellen des Weckers
Beim diesem Gerät lassen sich 2 unterschiedliche Weckzeiten einstellen. Diese Weckzeiten können für
folgende Zeitblöcke programmiert werden: „Täglich“ / „Einmal“ / „Wochenende“ / „Werktage“
Zur Einstellung der Weckzeit gehen Sie bitte wie folgt vor:
1. Schalten Sie das Radio ein und drücken Sie die Taste <ALARM> auf der Fernbedienung.
2. „ALARM 1“ wird angezeigt. Sie können nun die Weckzeit 1 einrichten oder mit den Tasten
<Titelsprung vorwärts> oder <Titelsprung rückwärts> auf die Weckzeit 2 wechseln
(„ALARM 2“).
3. Nach der Bestätigung mit der Taste <OK> führen Sie bitte folgende Schritte durch:
• „ON TIME“: Einstellung von Stunden und Minuten, die Auswahl jeweils bestätigen.
• „DURATION“: Einstellung der Weckdauer in Minuten (“15, 30, 45, 60, 90“).
• „SOURCE“: Anschliessend als Quelle DAB, FM, CD, USB oder BUZZER auswählen und bestätigen.
• „DEFAULT“ oder anderen Speicherplatz auswählen und bestätigen. Bei „DEFAULT“ wird der
aktuell eingestellte Sender verwendet. Dieser Menüpunkt erscheint nur, wenn als Quelle
DAB oder FM gewählt wurde.
• Im nächsten Menü die Häugkeit mit „DAILY“ / „ONCE“ / „WEEKENDS“ / „WEEKDAYS“
auswählen und bestätigen. Wurde „ONCE“ ausgewählt, bitte das gewünschte Datum einstellen.
• Danach die Wecklautstärke mit den Tasten <VOL+> und <VOL-> auswählen und bestätigen.
• „ALARM ON“ oder „ALARM OFF“ auswählen und bestätigen.
Die Weckzeit ist nun gespeichert, und „TIMER“ erscheint im Standby unten rechts im Display.
Für die Einstellung der 2. Weckzeit gehen Sie analog vor. Um einen eingestellten Wecker zu löschen,
so wählen Sie im letzten Schritt der Einstellung „ALARM OFF“, oder halten die Taste <ALARM> für
2 Sekunden gedrückt. Der Wecker schaltet sich zur angegebenen Zeit für die eingestellte Dauer ein,
„TIMER“ blinkt dabei im Display.
Bei aktivem Wecker kann durch Drücken der Taste <OK> das Wecksignal für 9 Minuten unterbrochen
werden.
17
Page 18

Störungsbehebung
Bitte überprüfen Sie bei Fehlfunktionen die folgenden Punkte:
Führen Sie einen Reset in den Werkszustand aus: „MENU“ -> „SYSTEM“ -> „RESET“ -> „YES“
Kein Ton
Stecken Sie den Netzstecker ordnungsgemäß ein.
Stellen Sie die Lautstärke auf den richtigen Pegel.
Stellen Sie sicher, dass die gewünschte Quelle ausgewählt ist.
Linker und rechter Kanal vertauscht
Überprüfen Sie die Verbindung der Lautsprecher und ihre Standorte.
Das System reagiert nicht auf Tastendruck
Ziehen Sie das Netzkabel ab und schließen Sie es wieder an.
Probleme beim Radioempfang
Richten Sie die Antenne neu aus.
Verwenden Sie möglichst eine Außenantenne.
Andere Elektrogeräte stören den Empfang.
Standort nicht für den Empfang von DAB+ Signalen geeignet.
CD-Spieler – Anzeige „NO DISC“
Legen Sie die CD mit der beschrifteten Seite nach oben ein.
Reinigen Sie die CD.
Benutzen Sie nur konforme CDs.
USB-Betrieb
„NO USB“ Schalten Sie das Gerät aus und schließen Sie das USB-Gerät erneut an.
„NO SONG“ Bitte stellen Sie sicher, dass das USB-Gerät kompatible Dateien enthält.
Fernbedienung – Keine ordnungsgemäße Funktion
Wechseln Sie die Batterie.
Entfernen Sie eventuelle Hindernisse
Bewegen Sie sich näher zum Hauptgerät und stellen Sie sicher, dass Sie zum Fernbedienungssensor am Gerät zeigen.
Wartung und Pege
Reinigung des Gehäuses: Benutzen Sie ein mit einem milden Reinigungsmittel leicht angefeuchtetes
Tuch. Benutzen Sie keine Reinigungsmittel, die Alkohol, Ammoniak oder Scheuermittel enthalten.
Reinigung der CDs
• Reinigen Sie verschmutzte Discs mit einem speziellen Reinigungstuch. Wischen Sie die Disc geradlinig
von der Mitte bis zum Rand hin ab. Wischen Sie nicht mit kreisenden Bewegungen.
• Benutzen Sie keine Lösungsmittel, wie etwa Waschbenzin, Verdünner, handelsübliche Reinigungsmittel
oder Anti-Statik- Spray für analoge Schallplatten.
Vorsichtshinweise zur Kondensationsbildung
Kondensation (Tau) kann sich im Innern des Geräts bilden, wenn zwischen der Temperatur des Geräts und
der Umgebungstemperatur ein wesentlicher Unterschied besteht. Sollte im Innern des Geräts Kondensation auftreten, ist eine einwandfreie Funktion nicht mehr gewährleistet. In diesem Fall muss einige Stunden
gewartet werden; nachdem die Feuchtigkeit getrocknet ist, kann das Gerät wieder verwendet werden.
Besondere Vorsicht ist unter den folgenden Umständen geboten
Wenn das Gerät von einem Ort zu einem anderen bewegt wird, der eine wesentlich höhere oder niedrigere
Temperatur aufweist, oder wenn sich die Luftfeuchtigkeit am Aufstellort des Geräts erhöht, usw.
18
Page 19
Entsorgung
Entsorgung von gebrauchten elektrischen und elektronischen Geräten und Batterien.
Das Symbol (durchgestrichene Mülltonne) auf dem Produkt oder seiner Verpackung weist darauf hin,
dass dieses Produkt an seinem Lebensende nicht als normaler Haushaltsabfall behandelt werden darf,
sondern bei einer Sammelstelle eines öffentlich-rechtlichen Entsorgungsträgers oder bei einer von
Herstellern oder Vertreibern eingerichteten Rücknahmestelle unentgeltlich abgegeben werden muss.
Besitzer von Elektroaltgeräten haben Altbatterien und Altakkumulatoren, die nicht vom Altgerät fest
umschlossen sind, im Regelfall vor der Abgabe an der Erfassungsstelle vom Altgerät zu trennen. Dies
gilt nicht, soweit Altgeräte einer Vorbereitung zur Wiederverwendung unter Beteiligung eines öffentlich-rechtlichen Entsorgungsträgers zugeführt werden. Durch Ihren Beitrag zur korrekten Entsorgung
dieses Produktes schützen Sie die Umwelt und die Gesundheit Ihrer Mitmenschen. Unsachgemässe
oder falsche Entsorgung gefährden Umwelt und Gesundheit. Weitere Informationen über das Recycling von Elektroaltgeräten und Batterien erhalten Sie von Ihrer Gemeinde oder den kommunalen
Entsorgungsbetrieben.
Entsorgungshinweise für Verbraucher in Deutschland: https://www.e-schrott-entsorgen.org/
Entsorgungshinweise für Verbraucher in Österreich: https://www.elektro-ade.at/
Die Bluetooth® Wortmarke und Logos sind eingetragene Marken von BLUETOOTH SIG Inc. und jegliche Verwendung dieser Marken durch die erfolgt unter Lizenz. Andere Marken
und Handelsnamen sind die ihrer jeweiligen Eigentümer.
19
Page 20
Technische Daten M-822DAB
Spannungsversorgung Wechselspannung ~ 100 – 240 V 50/60 Hz
Aufnahmeleistung 40 Watt
Aufnahmeleistung im Standby-Modus < 1 Watt
CD-Betrieb
Signal-Rauschabstand (A-Filter) ≥ 70 dB
Dynamikumfang ≥ 60 dB
Tuner UKW/DAB+
DAB-Abstimmbereich BAND III 174,928 MHz – 239,200 MHz
UKW-Abstimmbereich 87,50 MHz – 108,00 MHz
BLUETOOTH
BLUETOOTH Version V5.0
Leistungsklasse Klasse 2
Sendeleistung max. 13dbm
Reichweite ca. 10 Meter (kann je nach Umgebung abwei-
chen)
Frequenzband 2,402 GHz – 2,480 GHz
BLUETOOTH Profile A2DP (Advanced Audio Distribution Profile, AV-
RCP (Audio/Video Remote Control Profile)
USB Geräte Abspielbare Dateien: MP3
Kompatibel mit USB1.1 Full-Speed
Kompatibel mit FAT16, FAT32
Maximal 500 mA
Bitraten: 32 kBit/s bis 320 kBit/s
Line-In 3,5 mm Klinkenbuchse
Köpfhörer 3,5 mm Klinkenbuchse
Verstärkerteil
Ausgangsleistung 2 x 50 Watt / 6 Ohm
Frequenzgang 20 Hz – 20kHz (+- 3dB)
Maße und Gewichte
Haupteinheit (B x H x T) 260 x 129 x 240 mm / 2,4 kg
Lautsprecher (B x H x T) 173 x 263 x 240 mm / 2,45 kg je Stk.
Temperaturbereich 0°C bis +40°C
20
Technische Änderungen vorbehalten
Page 21

Garantie
Sehr geehrter Kunde,
wir danken Ihnen für den Kauf dieses Kenwood-Produkts. Sollte dieses Produkt unter normalen Betriebsbedingungen Material- oder Verarbeitungsmängel aufweisen, werden wir diese in Übereinstimmung mit den nachfolgenden Garantiebestimmungen kostenlos beseitigen, bzw. das
Gerät umtauschen.
Bitte bewahren Sie diese Garantiekarte sorgfältig auf.
Kenwood gewährt auf dieses Gerät eine Garantie von zwei Jahren ab Kaufdatum laut Rechnung oder Kaufbeleg des Kenwood-Händlers.
Diese Garantie erstreckt sich auf Material- und Verarbeitungs-Mängel. Wir behalten uns das Recht vor, das Produkt umzutauschen, falls eine
wirtschaftliche Instandsetzung nicht mehr möglich ist. Kosten für Verpackung und Installation sowie Kosten und Risiken im Zusammenhang mit
der eigentlichen Instandsetzung sind nicht in der Garantieleistung enthalten und werden in Rechnung gestellt.
Bedingungen
A. Zur Geltendmachung von Garantieansprüchen sind zusätzlich zur Vorlage dieser Garantiekarte folgende Angaben erforderlich:
(a) Ihr Name mit vollständiger Anschrift
(b) Der Kassenbeleg oder die Rechnung eines in einem EU-Staat ansässigen Einzelhändlers, aus der das ursprüngliche
Kaufdatum hervorgeht.
(c) Der vollständige Name und die Anschrift des Einzelhändlers,
bei dem das Produkt gekauft wurde.
(d) Die Seriennummer und die Modellbezeichnung des Produkts.
Kenwood behält sich das Recht vor, Garantieleistungen abzulehnen, wenn die vorgenannten Informationen fehlen oder wenn seit Ersterwerb
Veränderungen am Produkt vorgenommen wurden.
B. Zum Zeitpunkt der Auslieferung an den Handel erfüllt dieses Produkt alle im Bestimmungsland gültigen Normen und Sicherheitsvorschriften.
Erforderliche Modifikationen zum Betrieb des Gerätes in Ländern außerhalb des Bestimmungslandes fallen nicht unter die vorgenannten Garantiebestimmungen. Außerdem übernehmen wir keinerlei Haftung für Arbeiten in diesem Zusammenhang oder für Beschädigungen des Produktes,
die durch solche Arbeiten entstehen.
Wird das Produkt in einem Land benutzt, für das dieses nicht konzipiert und hergestellt worden ist, dann werden Garantiearbeiten nur dann ausgeführt, wenn die Kosten für Umrüstung des Gerätes auf national gültige Normen und Sicherheitsvorschriften vom Benutzer getragen werden.
Unterscheidet sich außerdem das Produkt von den durch den offiziellen Importeur vertriebenen Produkten und sollten für die Reparatur dieses
Produktes Eratzteile nicht verfügbar sein, muß der Benutzer die Kosten für Hin- u. Rücktransport des Gerätes in das Kaufland tragen.
Gleiches gilt, wenn im betreffenden Land aus anderen berechtigten Gründen keine Garantieleistungen angeboten werden können.
C. Ausgenommen von den Garantieleistungen sind:
(a) Veränderungen am Produkt, sowie normale Wartungs und Justage-Arbeiten, einschließlich der in der in der Bedienungsanleitung erwähnten
regelmäßigen Kontrollen.
(b) Schäden am Produkt, die durch mangelhafte oder nicht fachgerechte Arbeiten entstanden sind, wenn diese Arbeiten von Dritten vorgenom men wurden, die nicht zur Durchführung von Garantieleistungen im Namen des Herstellers ermächtigt sind.
(c) Schäden durch Nachlässigkeit, Unfälle, Änderungen, unsachgemäße Montage, mangelhafte Verpackung, Fehlbedienung oder Verwendung
falscher Ersatzteile bei einer Reparatur.
(d) Schäden durch Feuer, Wasserschaden, Blitzschlag, Erdbeben, unzureichende Belüftung, höhere Gewalt, Anschluß an falsche Netzspannung
oder sonstige von Kenwood nicht zu verantwortende Ursachen.
(e) Schäden an Lautsprechern durch den Betrieb an höheren Leistungen als den angegebenen. Schäden an Schallplatten, Tonbändern, Ton- und
Videokassetten, CD-Kompaktschallplatten und anderen Gegenständen, die nicht Bestandteil des Produkts sind.
(f) Verbrauchs- oder Verschleißteile, die im Rahmen des normalen Kundendienstes auszutauschen sind, wie z.B.: Tonabnehmersysteme, Nadeln,
Antriebsriemen, Tonköpfe, Einschübe, Tonmöbel, Trockenbatterien, wiederaufladbare Akkus, Leistungs-Endröhren u.s.w.
(g) Alle Produkte, bei denen die Seriennummer(n) ganz oder teilweise entfernt, verändert oder unkenntlich gemacht wurde(n).
Diese Garantie kann von allen Personen beansprucht werden, die das Produkt legal erworben haben.
In der Übereinstimmung mit den vorgenannten Garantiebedingungen, wird das Produkt kostenlos instandgesetzt oder umgetauscht. Dieses
Recht beeinträchtigt in keiner Weise sonstige Rechte des Benutzers im Rahmen der gültigen rechtlichen Bestimmungen.
Instandsetzung oder Austausch bewirken keine Verlängerung der Garantiezeit.
Weitergehende Ansprüche sind ausgeschlossen, insbesondere solche auf Wandelung, Minderung oder Schadenersatz.
Kontaktadresse:
JVCKENWOOD DEUTSCHLAND GMBH
Konrad-Adenauer-Allee 1-11, 61118 Bad Vilbel
Tel. 06101-4988 0, www.kenwood.de
21
Page 22

Page 23

Compact Stereo System
M-822DAB
OPERATING MANUAL
DEUTSCH
FRANÇAIS
ITALIANOENGLISH
NEDERLANDS
Page 24

Before initial operation
Contents
Before switching on the power supply
Safety instructions
Before initial operation
Connecting
Handling CDs
Useful information about USB-devices
Component names and functions
Basic functions
Turning on the system
Switch off in standby
Volume control
Adjusting the sound
Using CD and USB
Preparation
Playback of CD or audio files (USB, CD)
Selecting a folder (only audio files)
Programming tracks and files
- Procedure with audio CD
- Procedure with audio files
Shuffle play and repeat function
- Procedure with audio CD
- Procedure with audio files
Use of the DAB+ radio
Setting the DAB+ transmitter
Dialling a DAB+ transmitter
Saving stations in station memory
Expanded DAB+ information
DAB+ menu functions
Use of the FM radio
Setting the FM transmitter
Saving stations in station memory
FM menu functions
Using BLUETOOTH
Pairing BLUETOOTH devices
Playback via BLUETOOTH
Using Line-in
Time/date, Sleeptimer, Alarm clock
Troubleshooting
General Information
Maintenance and care
Disposal
Technical Data
Warranty
3
3
6
6
7
7
8
9
9
9
9
9
9
9
10
10
11
11
11
12
12
12
12
12
13
13
14
14
15
15
15
15
16
16
16
16
17
18
18
18
19
20
21
ENGLISH
2
Page 25

Before switching on the power supply
IMPORTANT SAFETY INSTRUCTIONS
Attention: Please read through this sheet carefully in order to ensure safe operation of the device.
Read notes carefully!
- Please comply with all safety and operation instructions when you put this product into operation.
Keep these instructions in a safe place!
– Please keep the safety and operating instructions for later reference.
Please comply with all warnings!
– Please comply rigorously with all warnings given on the product and cited in the operating manual.
1. Clean with a dry cloth only!
– Remove the mains plug of this device from the mains socket before you clean the product. Never
use fluid cleaning solution or cleaning spray. Use only a slightly damp cloth for cleaning.
2. Accessories
– Only use the accessories specified by the manufacturer.
3. Do not use this device near water
– The device should never be exposed to water drops or water spray - as for instance would be occur
near a bath, bathroom sink, kitchen sink, washing machine in a damp cellar or near a swimming pool
etc. Never place containers filled with liquid such as, for instance, a vase of flowers, on the device.
4. Ventilation
– The slits and openings in the housing serve to ventilate the device to ensure the reliable operation
of the device and to protect the device from overheating and potential spontaneous combustion.
Please do not block the ventilation openings. Please install the device according to the manufacturer’s
instructions. Never block the ventilation openings by placing the device on a bed, sofa, rug or similarly
soft underlay. This device should not be installed in a bookshelf or built-in cupboard if sufficient ventilation has been ensured as described in the manufacturer’s installation instructions.
5. Power supply
– This device may only be connected to the mains power supply which is specified on the device. If
you are unsure which type of power supply is in your home, please contact your specialist supplier or
the local energy supply company.
6. Mains cable
– Make sure that the mains cable is not in a position where someone can trip over it nor that it can
be disconnected in the immediate vicinity of a socket including additional sockets. Also it should not
be crushed in any way when coming out of the device.
7. Thunderstorms
– Disconnect from the mains supply in the event of thunderstorms or if not used for a longer period.
8. Overload
– Never overload the mains sockets, extension cables or power strips because otherwise there is a risk
of fire or electrical shock.
9. Entry of foreign material or liquid
– Take care that foreign material or liquid never enter into the device through the ventilation openings, since otherwise contact with high voltage components or short circuit with a resulting fire or
electric shock can occur. Never spill liquid of any kind on this device.
3
Page 26

10. Service
– Never attempt to service this device yourself since if covers are opened or removed, live parts may
be exposed, touching which can be a source of risk. Please refer all servicing to qualified customer
service personnel.
11. Damage which requires repair
– Service and repair work should only be carried out by qualified customer service department.
Service/repair is required if the device is damaged (e.g. the mains cable or plug), if liquid had entered
the device, if items have penetrated into the device, if the device was exposed to rain or moisture, if it
no longer works properly or has fallen down.
12. Spare parts
– If replacement parts are needed, ensure that the customer service technician is using the
spare parts which are stipulated by the manufacturer or which have the same properties
as the original parts. Replacement parts which are not approved can lead to fire, electrical shock or
other accidents.
13. Safety check
– Please ask the customer service technician to carry out a safety check on this device after finishing
service or repair work in order to determine if the device is in proper working order.
14. Wall or ceiling mounting
-This device may only be mounted on a wall or ceiling following the manufacturer’s recommendations.
15. Heat
– Do not install this device near hot surfaces such as radiators, fan heaters, ovens or other devices
(including amplifiers) which can become hot. Never place items with open flames such as candles
or lanterns on top of or near the device. The batteries which are installed should not be exposed to
great heat such as sunlight or similar.
16. Electricity lines
– An outdoor antenna should not be installed near power lines or other electrical lines or in places
where such electrical lines could fall. When installing outdoor antennas, great care should be taken
not to unintentionally touch electrical lines because that can fatal.
17. Batteries
– If you do not use the device for a month or longer, remove the batteries from the battery compartment of the remote control to prevent leakage. Immediately dispose of leaking batteries properly and
in accordance with all relevant legal requirements. Leaking batteries can cause injuries and damage
the device. Never combine batteries of different types or old and new batteries.
Risks associated with high volume levels
- To prevent possible hearing damage, do not listen at high volumes for long periods of time.
This is especially true when using headphones.
Remote control
- Exposing the remote control sensor to direct sunlight or high-frequency fluorescent light
high-frequency fluorescent tubes, it may malfunction. In such cases, move the system to another
location to avoid such malfunctions.
- The supplied batteries are intended for functional testing and may have a limited life. When the
range of the remote control decreases, replace the old batteries with new ones.
4
Page 27
Caution.
Danger of explosion
- if batteries of the wrong type are used; extremely high or low temperatures to which a battery may
be exposed during use, storage or transport
- low air pressure at high altitudes; disposing of a battery in fire or a hot oven; mechanically crushing
or cutting a battery; leaving a battery in an environment with extremely high temperatures or extremely low air pressure, which may result in an explosion or leakage of flammable liquids or gases.
To minimize the risk of electric shock, fire, etc.
- do not remove any screws, covers or housing parts.
- the power button does not completely disconnect the power supply in any position.
Since the power plug is used to completely disconnect the power, it must be left attached to the
power cord and remain accessible at all times.
Automatic energy saving function
The model is equipped with an automatic energy saving function. This switches the unit to standby
mode within 15 minutes if playback is at a very low volume or the radio is muted. This setting cannot
be changed.
EU Declaration of Conformity
The JVCKENWOOD Corporation hereby declares that the radio equipment type M-822DAB is in
compliance with the 2014/53/EU guidelines. The complete text of the EU Declaration of Conformity is
available under the following internet address:
https://www.kenwood.com/euukdoc/
Manufacturer:
3-12. Moriyacho, Kanagawa-ku, Yokohama-shi, Kanagawa 221-0022, JAPAN
Agent (EU):
Amsterdamseweg 37, 1422 AC UITHOORN, THE NETHERLANDS
IMPORTANT FOR LASER PRODUCTS
1. CLASS 1 LASER PRODUCTS
2. CAUTION: Do not open the housing. This device does not contain any parts which can be
serviced by the user; only allow qualified specialist personnel to carry out servicing.
5
Page 28
Before initial operation
Unpacking
Carefully unpack the device and take care that all accessories are present:
Operating manual / Remote control / FM/DAB antenna / 2x R03/AAA 1.5 Volt Battery
Connect
• Open the battery compartment of the remote control and insert the batteries w. correct polarity.
The specied polarity (+/-) is marked in the battery compartment.
Connect the left and right speakers to the connection (Speaker Out) on the rear of the device. To do
this, press the spring clips and insert the loose cable ends into the openings provided. Connect the
black wire with the black spring clamp. The other wire is connected to the red terminal in the same
way.
Speaker cable Black/grey
Black
• Finally, connect the power plug to an AC outlet. Since the mains plug is used to completely
disconnect it from the power grid, the socket must always be accessible.
DAB+ / FM antenna connection
1. Connect the wire antenna to [FM ANTENNA 75Ω] socket.
2. Find the place where the best reception is achieved.
3. Fix the antenna.
The antenna supplied with the system is a simple wire antenna. It is recommended to use an outdoor
antenna (commercially available) for stable signal reception.
To connect an outdoor antenna, rst pull out the indoor antenna.
The reception of radio stations from the cable network cannot be guaranteed.
6
Page 29

First use
When you use the device for the first time, an automatic DAB+ station scan is started. Please wait until this procedure has completely finished. For further information on this, please refer to the “Using
the DAB+ radio” section.
Handling CDs
Precautions when handling
Hold the CD in such a way that you are not touching the signal surface. (The side without printing is
the playing side)
Precautions regarding CDs
Only use CDs with the mark. Among other issues, a CD without this mark cannot be correctly
played back.
Useful information about USB-devices
Notes on using a USB device
This device is able to play back audio files saved on a flash memory or digital audio player if this
device has a USB port (these devices are referred to as USB devices in this document).
The following restrictions apply to the USB devices which can be used:
Usable USB devices
• USB devices which belong to the USB mass storage class.
• USB devices which have a maximal power consumption of max. 500mA.
• USB mass storage class : USB devices which the PC recognises as external memory without the need
for a special drive or special application software.
• Please consult your dealer if you are not sure if your USB device complies with the USB mass storage
class specifications.
• Use of a USB device which is not supported can lead to faulty playback or display of the audio file.
Even if you use a USB device which complies with the above named specifications, depending on the
type or condition of the USB device, audio file may not play back properly among other issues.
7
Page 30
Components and functions
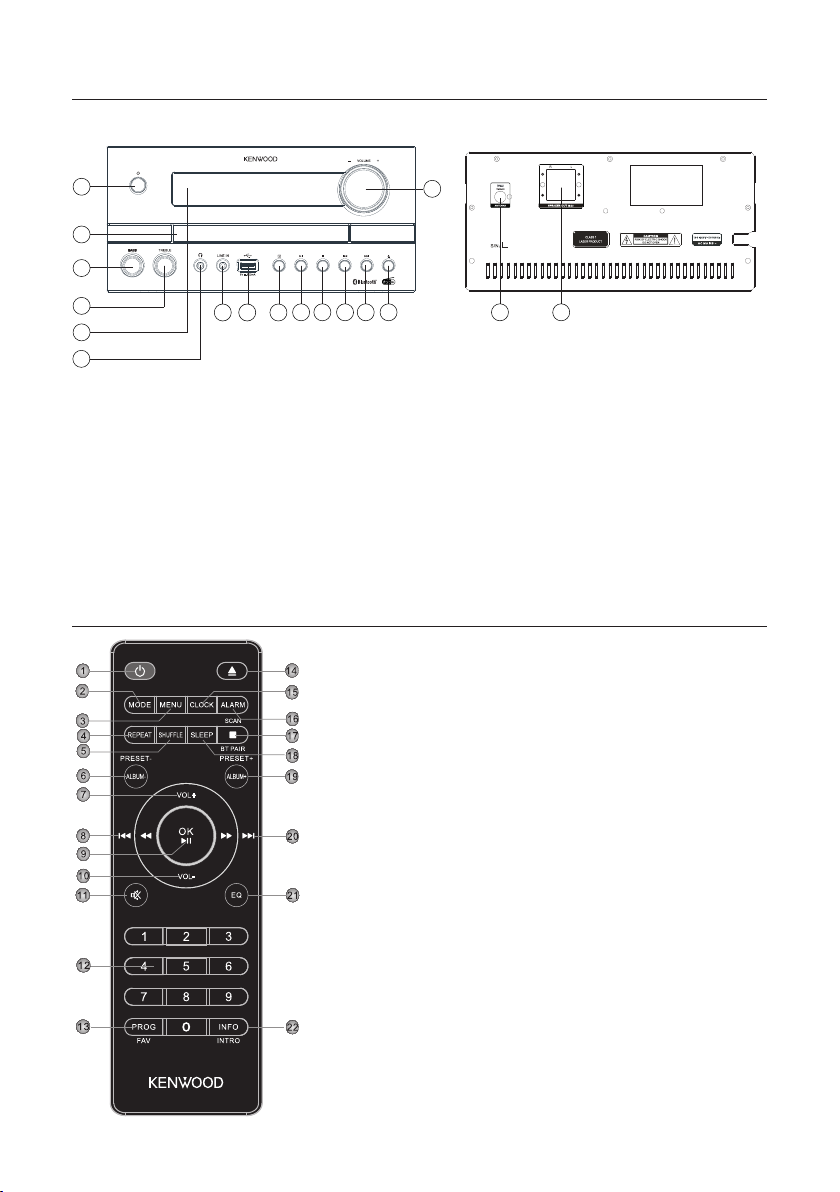
Control elements
1
2
3
4
5
6
7 8 9
10 11 12
13
15
14
16 17
1 - Standby / On
2 - CD tray
3 - Bass control
4 - Treble control
5 - Display
6 - Headphone port
7 - Line-In port
8 - USB port
9 - Select Source (MODE)
10 - Playback / Pause
11 - Stop
12 - Previous (skip backward)
13 - Next (skip forward)
14 - Open / Close
15 - Volume
16 - FM / DAB+ Antenna Port
17 - Speaker ports
Remote control
1 Standby On/Off
2 Mode selection (source)
3 Menu
4 Repeat selection
5 Shuffle mode
6 Previous album, preset memory -
7 Volume up
8 Track skip / track search backward
9 Confirm entry, playback/pause
10 Decrease volume
11 Mute On/Off
12 Number keys
13 Track programming, use preset memory
14 Open/close CD tray (eject)
15 Set the time
16 Set alarm clock
17 Stop playback, BLUETOOTH pairing, station search
18 Set sleep timer
19 Next album, preset memory +
20 Skip track / track search forwards
21 Select equaliser preset
22 Switching display information, 10 seconds intro per track with
playback
8
Page 31

Basic functions
Turning on the system: Press the button <STANDBY> on the remote control or on the main device.
“WELCOME” appears in the display.
Switch off in standby: Press the button <STANDBY> on the remote control or on the main device.
“STANDBY” appears in the display and the device switches in standby mode.
Volume control
On the remote control: Press the <VOL+> button to raise the volume or press the <VOL-> button to
lower it.
On the main device: Turn the VOLUME control to raise or lower volume.
At minimal volume, “VOL 00” will be briefly shown in the display and at maximal volume,
“VOL 32 will be displayed.
Temporary turning off volume: Press the button <Mute> on the remote control for this. “MUTE”
flashes on the display. When the button is pressed again, the original volumes will be reinstated.
Adjusting the sound
You can raise or lower the bass and treble to suit your musical preferences.
On the main device: Turn the BASS or TREBLE control to set the volume level in steps: -6 to +6
Equalizer
On the remote control: Press the <EQ> button to retrieve settings one after the other:
FLAT -> CLASSSIC -> POP -> JAZZ -> ROCK
Using CD and USB
Preparation
Insert a CD
1. Press the <EJECT> button on the main device or on the remote control to open the CD
compartment
2. Lay a CD in the CD compartment with the printed side facing upwards
3. Press the <EJECT> button on the main device or on the remote control to close the CD
compartment
To remove a CD
1. Press the <EJECT> button on the main device or on the remote control to open the CD
compartment
2. Carefully remove the CD from the CD compartment
3. Press the <EJECT> button on the main device or on the remote control to close the CD
compartment
9
Page 32

Connection of USB devices
1. Press the <STANDBY> button to select standby mode.
2. Connect the USB device to the USB port on the front panel.
Removal of the USB device
1. Press the <STANDBY> button to select standby mode.
2. Remove the USB device from the USB port.
• Always wait until the device has completely read the CD/USB device before continuing.
• If no CD has been laid in the CD compartment, “NO DISC” will be displayed.
• If there is no playable audio file in the USB device, “NO SONG” will be displayed.
• The reading time can exceed 10 seconds with audio files if there is a great quantity of music
on a CD or USB device.
Playback of CD or audio les (USB, CD)
On the remote control: With the <MODE> button, select the source and press the <PLAY/PAUSE>
button to begin playback.
On the main device: With the <MODE> button, select the source and press the <PLAY/PAUSE>
button to begin playback.
In USB devices or CDs which contain audio files (e.g. MP3), the number of folders present and the
files will be displayed as follows:
Fxx XXX
Here the number behind “F”stands for the number of folders and the second block of numbers for
the total number of files.
For audio CDs, the information about the number of tracks and total play time will be displayed as
follows:
XX XX:XX
Here the first block of numbers stands for the number of tracks and the second for the total play time
of the CD.
Basic Operating Functions
Stopping Playback: Press the <STOP> button on the main device or on the remote control to stop
playback.
Interrupting Playback: Press the <PLAY/PAUSE> button on the main device or on the remote
control to interrupt playback. The display flashes during this. If you press the button one more time
the playback continues.
Searching for a specic passages during playback: Keep the <TRACK SKIP FORWARD> or
<TRACK SKIP BACKWARD> button on the main device or the remote control pressed down for
longer than 2 seconds to activate fast rewind or fast forward. As soon as the desired place is reached,
release the relevant button again.
Selecting a specic track: Press the <TRACK SKIP FORWARD> or <TRACK SKIP BACKWARD>
button on the main device or on the remote control in playback, pause or stop mode. Titles can be
selected directly using the numeric keys on the remote control.
Selecting a specic folder (only with audio les): Press the buttons <ALBUM+> or <ALBUM->
buttons on the remote control to select a folder.
10
Page 33

Play tracks briey: Press and hold the <INTRO> button on the remote control to play the tracks for 10
seconds. Pressing again stops the mode.
Programming tracks and les
Using the remote control, you can programme tracks from an audio CD or files to play in the order
you desire. The following number of spaces in memory is available to you for this:
Audio-CD: 20 memory spaces Files: 99 memory spaces
Procedure with audio CD
1. The “CD” source must be in Stop mode, otherwise “STOP FIRST” will show in the display.
2. Press the <PROG> button to start the programming mode.
3. The display will now show “P01 001” where “01” will be shown. The first block of numbers
shows the current track, the second block of numbers shows the current storage space.
4. Using only the <TRACK SKIP FORWARD> or <TRACK SKIP BACKWARD> button, select the track
which you want to drop into the current storage space.
5. Press the <PROG> button to confirm the operation.
6. Afterwards the next storage space will be displayed. Repeat steps 4 and 5 until your selection is com pleted or the complete number of memory spaces in occupied. In this case, “Full” will be displayed.
7. With the <PLAY/PAUSE> button, you can start playback of the programmed tracks. During
playback the number of the track and that of the programme space will be alternately displayed.
8. Pressing the <STOP> button twice deletes the programming.
Procedure with audio les
1. The “USB” source must be in Stop mode, otherwise “STOP FIRST” will show in the display.
2. Press the <PROG> button to start the programming mode.
3. The display will now show “P01 001“ where “01“ will be shown. The first block of numbers
shows the current track, the second block of numbers shows the current storage space.
4. Using only the <TRACK SKIP FORWARD> or <TRACK SKIP BACKWARD> button, select the track
which you want to drop into the current storage space.
5. Press the <PROG> button to confirm the operation.
6. Afterwards the next storage space will be displayed. Repeat steps 4 and 5 until your selection is com-
pleted or the complete number of memory spaces in occupied. In this case, “FULL” will be displayed.
7. With the <PLAY/PAUSE> button, you can start playback of the programmed tracks.
8. Pressing the <STOP> button twice deletes the programming.
• If the <STOP> button is pressed during programming the process is interrupted. Turning off
the device deletes any programme which is present.
11
Page 34

Shufe play and repeat function
Procedure with audio CD
• Press the <SHUFFLE> button on the remote control to start shuffle play. “SHUF” will appear in
the display and playback will start. Pressing the <SHUFFLE> button twice or pressing
the <STOP> button cancels random play.
• Press the <REPEAT> button on the remote control to activate the repeat function. Pressing
several times switches the following functions:
Repeat current track (Display “RPT ONE”)
Repeat all tracks (Display “RPT ALL”)
Switch off repeat function (Display “RPT OFF”)
Start playback with the <PLAY/PAUSE> button.
Pressing the <STOP> button switches off the repeat function.
Procedure with audio les
• Press the <SHUFFLE> button on the remote control to start shuffle play. “SHUF” will appear in
the display and playback will start. Pressing the <SHUFFLE> button twice or pressing
the <STOP> button cancels random play.
• Press the <REPEAT> button on the remote control to activate the repeat function. Pressing several
times switches the following functions:
Repeat current track (Display “RPT ONE”)
Repeat all tracks (Display “RPT ALL”)
Repeat current album (Display “RPT ALB”)
Switch off repeat function (Display “RPT OFF”)
Start playback with the <PLAY/PAUSE> button.
Pressing the <STOP> button switches off the repeat function.
Use of the DAB+ stations
Press the <MODE> button on the remote control or on the main device until “DAB” appears on the
display.
Setting the DAB+ stations
A station scan has already been carried out as part of the device’s startup procedure. The stations
found in the process are saved alphabetically in the stations list.
12
Page 35

Starting the automatic station search again
• Press the <MENU> button to retrieve the DAB menu.
“FULL SCAN” will show on the display. Start the search with the <OK> button.
• During the search the display will show the number of stations found so far.
• If no stations are found during the search, then “NO DAB” will be displayed for approx. 2 seconds
and then change to the display “FULL SCAN”.
Please then check that the antenna is connected correctly or try to find a different position for the
device to achieve a better reception.
Manual tuning of ensembles
• Press the <MENU> button to retrieve the DAB menu.
• Press the <TRACK SKIP FORWARD> button until “MANUAL” shows in the display.
• Using the <OK> button, the function is confirmed and the display will show the station which is
currently set with the corresponding frequency.
• Press the <TRACK SKIP FORWARD> or <TRACK SKIP BACKWARD> buttons to manually select
another channel.
• Confirm selection using the <OK> button. Then the signal level will be shown in the display,
another press of the button will load the current ensemble.
Selecting a DAB+ station
The stations saved alphabetically in the stations list can be retrieved as follows:
• Press the <TRACK SKIP FORWARD> or <TRACK SKIP BACKWARD> buttons on the remote
control or the main unit to scroll backwards or forwards in the stations list.
• When you have selected the desired station, press the <OK> button on the remote control or
wait 2 seconds for the playback to start. “LOADING” followed by “PLAYING” appears in the
display.
• If the reception level for the selected station is not sufficient for trouble-free playback,
then”OFF AIR” will appear in the display. Please then select a different station.
Saving stations in station memory
There are 30 memory spaces available to make it easier to find DAB stations. To assign the memory,
proceed as follows:
• Select a station to be saved.
• Press and hold the <PROG> button until the display flashes and shows a memory space. An empty
memory space is indicated by “EMPTY”, an assigned space is shown with its station name. You can
also re-assign a memory space which is already in use.
• Press the <TRACK SKIP FORWARD> or <TRACK SKIP BACKWARD> buttons to select a memory
space.
• Confirm save using the <OK> button. “STORED” flashes briefly on the display.
• The stored stations can be recalled as follows:
Press the numeric buttons on the remote control to enter the number of the memory location
directly. Complete the entry by pressing the <OK> button. Alternatively, you can use the <PROG>
key followed by <TRACK SKIP FORWARD> or <TRACK SKIP BACKWARD> to select.
13
Page 36
Expanded DAB+ information
With DAB+, supplemental information is transmitted in addition to the music signal. This can be retrieved as follows.
Press the <INFO> button on the remote control to retrieve successively the following information:
• DLS (Dynamic Label Segment): Text information accompanying the programme, such as performer, song
title, album name etc. “NO DLS” is shown for stations which do not support DLS.
• Signal level: This is shown from left to right in the display using symbols.
The more symbols that are shown, the better is the reception.
• PTY (Programme Type): This indicated the classification of stations according to categories, e.g.Pop, News,
Religion, Info, Classics, etc.
• Ensemble name, e.g. DR Deutschland
• Display of channel and frequency of the station assigned
• ERR XX: This information shows the error rate of the digital reception. This is also dependent on the signal level
and can also be used for orienting the antenna.
• XX K BPS: Display of station data rate, e.g. 80 kBit/s. The data rate can differ from station to station.
• DABPLUS: Indicates the “DAB+” receiving mode.
• Current time
• Current date
DAB+ menu functions
The <MENU> button opens a menu in which different DAB+ functions can be set. You can scroll through the
menu using the <TRACK SKIP FORWARD> or <TRACK SKIP BACKWARD> buttons. The following functions
can be set:
• FULL SCAN: Repeated automatic station scan. Confirm the function using the <OK> button.
• MANUAL: With this you can set a specific receiving channel. Using the <OK> button, the function is confirmed
and the display will show the station which is currently set with the corresponding frequency.
• Press the <TRACK SKIP FORWARD> or <TRACK SKIP BACKWARD> buttons to manually select another
channel.
• Confirm selection using the <OK> button. Then the signal level will be shown in the display, another
press of the button will load the current ensemble.
• DRC (Dynamic Range Control): With this you can adjust the dynamic range, provided that this is supported
by the selected station. The available settings are “OFF”, “LOW” and “HIGH”. The selection is made with
the <TRACK SKIP FORWARD> or <TRACK SKIP BACKWARD> buttons and confirmed with the <OK>
button.
• PRUNE: Invalid stations are deleted from the stations list with this. Select with the <OK> button,
“NO/YES” with <TRACK SKIP FORWARD> or <TRACK SKIP BACKWARD> and confirm with <OK>.
• SYSTEM: For customer service only!
Use of the FM radio
Press the <MODE> button on the remote control or on the main device until “FM” appears on the display.
Setting a FM station
• Press the <TRACK SKIP FORWARD> button on the remote control to increase the reception frequency.
• Press the <TRACK SKIP BACKWARD> button on the remote control to lower the reception frequency.
• If you hold down these buttons, an automatic station scan starts which stops at the
first station which is found.
• Press the <SCAN> button to start a station scan with automatic storage of the
stations which are found. A maximum of 30 stations will be stored in the order they were found.
14
Page 37

Use of Radio Data System (RDS)
RDS is a transmission system whereby FM station transmit other useful information along with the actual
transmitter signal. This can be extracted from the normal transmitter signal and used for a range of
additional functions. If an RDS signal is received, then ”RDS” appears in the display below the frequency
display and after a while the station name is displayed instead of the frequency.
RDS functions
The following information can be retrieved by repeatedly pressing the <INFO> button:
• Radiotext – If the station is not broadcasting any radio text, then “NO TEXT” appears.
• PTY (Program Type) – If the station is not broadcasting any PTY signal, then “NO PTY” appears.
• Frequency and memory space of the station received
• Stereo / Mono display
• Time – If the station is not broadcasting any time signal, then “00_00_00” appears.
• Date – If the station is not broadcasting any date signal, then “00-00-00” appears.
If there is insufficient reception signal, signal reception can be disturbed or impossible despite showing the
“RDS” display.
Saving stations in station memory
There are 30 memory spaces available to make it easier to find FM stations. To assign the memory, proceed as follows:
• Select a station to be saved
• Press and hold the <PROG> button until the display flashes and shows a memory space. An empty
memory space is indicated by “EMPTY”, an assigned space is shown with its frequency. You can also
re-assign a memory space which is already in use.
• Press the <TRACK SKIP FORWARD> or <TRACK SKIP BACKWARD> buttons to select a memory
space.
• Confirm save using the <OK> button. “STORED” flashes briefly on the display.
• The stored stations can be recalled as follows:
Press the numeric buttons on the remote control to enter the number of the memory location
directly. Complete the entry by pressing the <OK> button. Alternatively, you can use the <PROG>
key followed by <TRACK SKIP FORWARD> or <TRACK SKIP BACKWARD> to select.
FM menu functions
The <MENU> button opens a menu in which different FM functions can be set. The menu can be scrolled
through using the <TRACK SKIP FORWARD> or <TRACK SKIP BACKWARD> buttons and the desired
menu point can be confirmed with the <OK> button. The following functions can be set:
• SCAN SET: With this you can set which station should be considered for automatic storage during the station
scan. The settings which are possible are “ALL” (all stations which can be received) or “STRONG” (only the
strongest stations). The selection is made <TRACK SKIP FORWARD> or <TRACK SKIP BACKWARD>
buttons and confirmed with the <OK> button.
• AUD SET: Setting for “Mono” or “Stereo” reception. The selection is made <TRACK SKIP FORWARD>
or <TRACK SKIP BACKWARD> buttons and confirmed with the <OK> button.
• SYSTEM: For customer service only!
15
Page 38

Using BLUETOOTH
Press the <MODE> button on the remote control or on the main device until “BT” appears on the
display. If there is no paired device in the vicinity, the icon flashes in the display.
Pairing of BLUETOOTH devices
The BLUETOOTH function allows wireless transmission of music files (audio streaming) to the system.
To couple appropriate devices (e.g. smartphones) please proceed as follows:
1. Open the pairing function on your BLUETOOTH device and look for “M-822DAB”.
2. Select “M-822DAB” for pairing and wait until “BT” stops flashing on the display and a sequence of
tones is heard. Pairing is now complete.
3. If your BLUETOOTH devices asks for a 4 digit PIN then please enter “0000”.
4. The BLUETOOTH device is now saved and in future will be automatically paired.
5. To connect to another BLUETOOTH device, please repeat steps 1 - 3.
Playback via BLUETOOTH
To transmit music via audio streaming, use the music player of your choice on the BLUETOOTH
device.
The following control options are available to you:
• Press the <PLAY/PAUSE> button on the remote control or on the device to pause or continue
playback.
• Press the <TRACK SKIP FORWARD> or <TRACK SKIP BACKWARD> button on the remote
control or on the main device to jump to the previous or the next track.
• If you hold down the <STOP> button on the remote or on the main device for 3 seconds,
the BLUETOOTH connection is canceled. “BT” flashes in the display. To renew connection, briefly
change to a different source and then back to BLUETOOTH.
If the BLUETOOTH connection should be disconnected because of larger distances, automatic connection takes place once the distance is reduced again.
Using Line-in
Playing external components
External devices such as MP3 players, DVD players or games consoles can be connected to the Line-In
port to play music.
Press the <MODE> button on the remote control or on the main device until “LINE IN” appears on
the display.
16
Page 39

Setting the time and date
When receiving a DAB+ or FM station in sufficient quality, the time is set automatically. Depending
on the reception strength, this process takes some time. If no corresponding station is available, you
can also set the time manually.
1. Turn on the radio and press the <CLOCK> button on the remote control.
2. Then use <TRACK SKIP FORWARD> or <TRACK SKIP BACKWARD> to select hours, minutes,
day, month and year, and press <OK> button to confirm each.
3. When “SAVED” appears on the display, the time and date have been saved.
Setting the sleep timer
The sleep timer is used to automatically turn off the radio after a preset period of time. To set it,
please proceed as follows:
1. Turn on the radio and press the <SLEEP> button on the remote control.
2. Press the button repeatedly to set the power off time as follows:
“OFF, 15, 30, 45, 60, 90 minutes”.
An active sleep timer is indicated by “SLEEP” on the bottom line of the display.
With “SLEEP OFF” an active timer is switched off.
3. By pressing the <SLEEP> key briefly, the remaining running time of the timer is displayed.
Setting the alarm clock
With this device, 2 different alarm times can be set. These alarm times can be programmed for the
following time blocks: “Daily” / “Once” / “Weekends” / “Weekdays”.
To set the alarm time, please proceed as follows:
1. Turn on the radio and press <ALARM> button on the remote control.
2. “ALARM 1” will be displayed. You can now set up the alarm time 1 or press the buttons.
<TRACK SKIP FORWARD> or <TRACK SKIP BACKWARD> to switch to alarm time 2
(“ALARM 2”).
3. After confirming with <OK> key, please do the following steps:
- “ON TIME”: setting hours and minutes, confirm the selection each time.
- “DURATION”: setting the alarm duration in minutes (“15, 30, 45, 60, 90”).
- “SOURCE”: Then select DAB, FM, CD, USB or BUZZER as the source and confirm.
- “DEFAULT” or select another memory location and confirm. With “DEFAULT”, the currently set
station is used. This menu item only appears if the source DAB or FM has been selected.
- In the next menu, select and confirm the frequency with “DAILY” / “ONCE” / “WEEKENDS” /
“WEEKDAYS” and confirm. If set to “ONCE”, please enter the desired date.
- Then select and confirm the wakeup volume with <VOL+> and <VOL-> buttons.
- Select “ALARM ON” or “ALARM OFF” and confirm.
The alarm time is now stored and “TIMER” appears in standby at the bottom right of the display.
To set the 2nd alarm time, proceed in the same way. To delete a set alarm, select “ALARM OFF” in
the last step of the setting, or press and hold the <ALARM> key for 2 seconds. The alarm clock will
turn on at the specified time for the set duration, with “TIMER” flashing on the display.
When the alarm is active, the alarm signal can be interrupted for 9 minutes by pressing the <OK>
key.
17
Page 40

Troubleshooting
In the event of malfunctions, please check the following points:
Perform a factory reset: “MENU” -> “SYSTEM” -> “RESET” -> “YES”.
No sound
Insert the mains plug in properly.
Adjust the volume to the correct level.
Make sure that the correct source is selected.
Left and right channel mixed up
Check the speaker connection and their locations.
The system is not responding to button pressing
Remove the mains plug and connect it again.
Problems with radio reception
Readjust the antenna.
Look for a more suitable location.
If possible use an outdoor antenna.
Other electrical devices are disturbing the reception.
Location not suitable for DAB+ reception.
CD-Player – display “NO DISC”
Insert the CD with the labelled side facing up.
Clean the CD.
Use only compliant CDs.
USB operation
“NO USB“ Turn the device off and then re-connect the USB device.
“NO SONG” Please make sure that the USB device contains compatible files.
Remote control - not working properly
Change the battery.
Remove any obstructions
Move closer to the main device and make sure that you are pointing towards the remote control
sensor on the device.
Maintenance and care
Cleaning the housing: Use a cloth which is slightly dampened with a mild cleanser. Do not use any
cleanser which contains alcohol, ammonia or abrasives.
Cleaning CDs
• Clean soiled discs with a special cleaning cloth. Wipe the disc in straight lines
from the middle to the edge. Do not wipe with a circular motion.
• Do not use any solution, such as white spirit, thinner, commercial detergents
or anti-static spray for analogue records.
Precautions regarding condensation formation
Condensation can form inside the device when there is a significant difference between the temperature of the device and the ambient temperature. If condensation should develop in the device
interior, proper function can no longer be ensured. In this case, it is imperative to wait for several
hours after the dampness has dried before the device can be used again.
Particular care must be taken in the following circumstances
If the device is moved from one location to another location which is significantly hotter or colder or
if the humidity has increased in the installation location of the device etc.
18
Page 41
Disposal
Disposal of used electrical and electronic devices and batteries.
The (crossed-out wheeled bin) symbol on the product or its packaging indicates that this product
must not be handled as normal household waste, but handed in to a collection point managed by
public waste management authorities or to a collection point set up by the manufacturer or distributor, free of charge.
The owners of electrical devices should usually separate the waste batteries and waste accumulators
which are not firmly enclosed in the waste devices from these waste devices before handing them
over to collection points. This does not apply if the waste devices are prepared for recycling with the
participation of a public waste management authority. By helping to properly dispose of this product,
you are protecting the environment and the health of your fellow human beings. Improper or incorrect disposal endangers the environment and health. For more information on the recycling of these
electrical devices and batteries, please contact your local authority or your municipal waste disposal
companies.
The Bluetooth® word mark and logo are owned by the BLUETOOTH SIG, Inc. and any use of such
marks by is under license. Other trademarks and tradenames are the
property of their respective owners.
19
Page 42
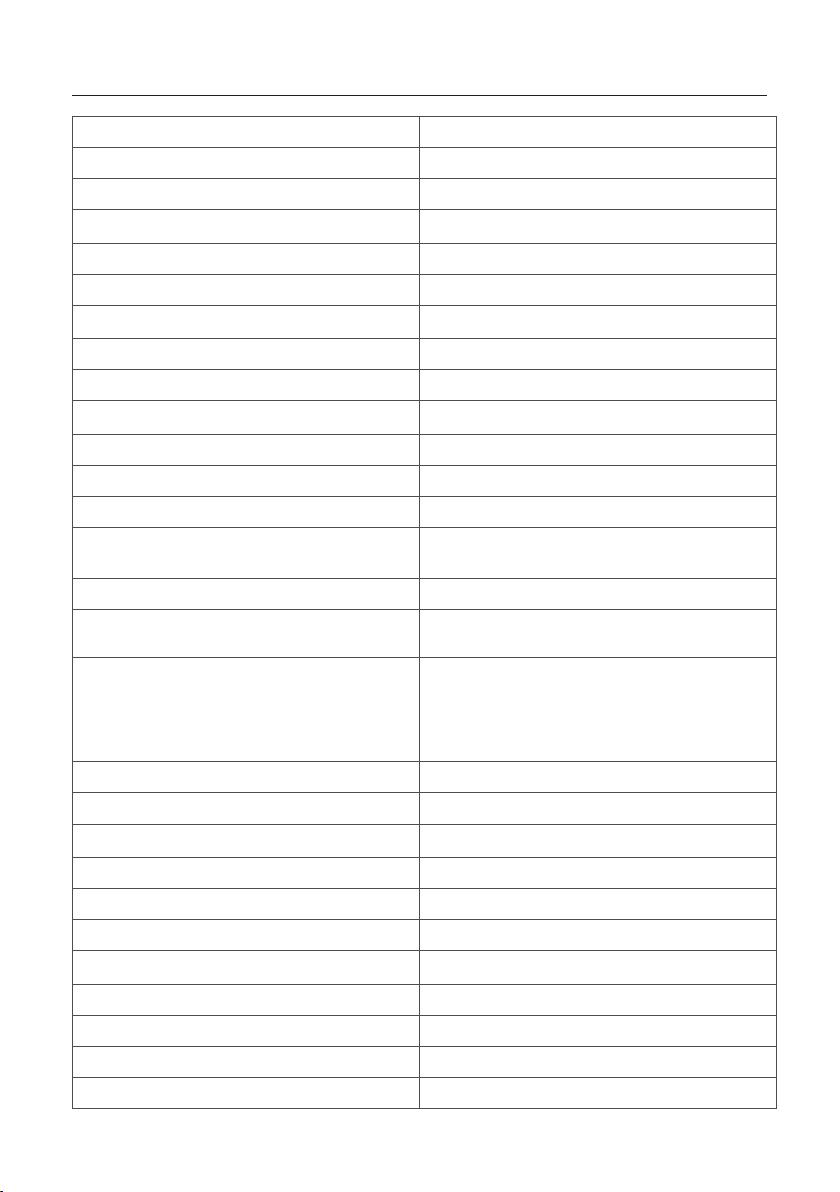
M-822DAB technical specications
Power supply AC ~ 100 – 240 V 50/60 Hz
Power consumption 40 Watt
Power consumption in standby mode < 1 Watt
CD operation
Signal to Noise Ratio (A-Filter) ≥ 70 dB
Dynamic Range ≥ 60 dB
Tuner FM/DAB+
DAB Tuning Range BAND III 174.928 MHz – 239.200 MHz
FM Tuning Range 87.50 MHz – 108.00 MHz
BLUETOOTH
BLUETOOTH Version V5.0
Performance Class Class 2
Transmission Power max. 13 dbm
Range approx. 10 metres (can vary depending on sur-
Frequency range 2.402 GHz – 2.480 GHz
BLUETOOTH Profile A2DP (Advanced Audio Distribution Profile,
USB devices Playable files: MP3
Line-In 3.5 mm jack socket
Headphone 3.5 mm jack socket
Amplifier part
Output Power 2 x 50 Watt / 6 Ohm
Frequency response 20Hz – 20kHz (+- 3dB)
roundings)
AVRCP (Audio/Video Remote Control Profile)
Compatible with USB1.1 Full-Speed
Compatible with FAT16, FAT32
Maximal 500 mA
Bit rates: 32 kBit/s bis 320 kBit/s
Dimensions and Weight
Main Unit (W x H x D) 260 x 129 x 240 mm / 2.4 kg
Speakers (W x H x D) 173 x 263 x 240 mm / 2.45 kg each.
Temperature range 0°C to +40°C
Subject to technical changes
20
Page 43

Warranty
Dear Customer,
We would like to thank you for purchasing this Kenwood product. If this product is found to be defective in material or workmanship
under normal operating conditions, in accordance with the provisions of the following warranty, we will rectify these faults free of
charge or replace the device.
Please retain this warranty card in a safe place.
Kenwood grants a two year warranty for this device from the date of purchase according to the invoice or purchase receipt from the
Kenwood dealer.
This warranty covers defects in materials or workmanship. We reserve the right to replace the product if economical repair is no longer
possible. Costs for packaging and installation and risks associated with the actual repair are not included in the warranty coverage and
will be invoiced.
Conditions
A. In addition to presentation of this warranty card, the following information is required to assert a claim:
(a) Your name with complete address
(b) The receipt or invoice of a retailer established in an EU state from which the original purchase date can be inferred.
(c) The complete name and address of the retailer from whom the product was purchased.
(d) The serial number and model of the product.
Kenwood reserves to right to deny warranty coverage if the above-mentioned information is missing or if changes have been made to
the product after its initial purchase.
B. At the time of delivery of this product to the retailer, this product complied with all standards and safety regulations which apply
in the country of destination. Modifications required to operate this device in countries outside the country of destination do not fall
under the above-mentioned warranty provisions. Furthermore, we do not accept liability for work connected with this or for damage to
the product which arise due to such work.
If the product is used in a country for which it is not designed and produced, then warranty work will only be carried out if the cost for
converting the device to nationally valid standards and safety regulations is carried by the user.
Furthermore, if the product differs from the products distributed by the official importer and if replacement parts are not available for
repairing this device, the user must carry the costs for the transport of the device to and from the land of purchase.
The same applies if no warranty coverage can be offered in the country under consideration because of other, justifiable reasons.
C. Exceptions from warranty coverage are:
(a) Changes to the product as well as normal service and adjustment work, including the regular checks mentioned in the operating manual.
(b) Damage to the product which have occurred as a result of defective or improper work if this work has been undertaken by third
parties who are not authorised to carry out warranty services on behalf of the manufacturer.
(c) Damage due to negligence, accidents, modifications, incorrect mounting, defective packaging, incorrect operation or use of incorrect
replacement parts during a repair.
(d) Damage due to fire, water damage, lightening, earthquake, insufficient ventilation, force majeure, connection to incorrect voltage
or other causes external to Kenwood.
(e) Damage to speakers due to operation at higher outputs than those specified. Damage to records, tapes and video cassettes, CD
Compact Discs and other articles which are not part of this product.
(f) Consumables and wear parts which must be replaced in the course of normal customer service, such as: Pickup systems, needles,
drive belts, recording heads, slots, consoles, dry-cell batteries, rechargeable batteries, power tubes etc.
(g) All products on which the serial number(s) has/have been wholly or partially removed, changed or rendered unrecognisable.
This warranty can be invoked by anyone who has legally purchased the product.
In accordance with the above warranty provisions, the product will be either repaired or replaced free of charge. This right in now way
restricts the user’s other rights within the framework of the applicable legal regulations.
Repair or replacement do not effect any extension on the warranty period.
Any further claims shall be excluded, in particular any claims for order cancellation, price reduction or for compensation for any
damage.
Contact address:
JVCKENWOOD U.K. Limited
First Floor, Gleneagles, the Belfry, Colonial Way, Watford, Hertfordshire WD24 4WH, UNITED KINGDOM
Email : [email protected] www.kenwood-electronics.co.uk
21
Page 44

Page 45

Système stéréo compact
M-822DAB
NOTICE D’EMPLOI
DEUTSCH
FRANÇAIS
ITALIANOENGLISH
NEDERLANDS
Page 46

Avant la mise en service
Sommaire
Avant la mise sous tension
Consignes de sécurité
Avant la mise en service
Branchement
Manipulation des CD
Informations intéressantes au sujet des appareils USB
Désignations et fonctions des éléments
Fonctions de base
Mise en marche du système
Arrêt du système
Régulateur de volume
Réglage du son
Utilisation des CD et appareils USB
Préparation
Lecture d’un CD ou fichier audio (USB, CD)
Sélection d'un répertoire (fichiers audio uniquement)
Programmation de titres et fichiers
– Mode opératoires pour CD audio
– Mode opératoire pour fichiers audio
Lecture aléatoire et fonction de lecture en boucle
– Mode opératoires pour CD audio
– Mode opératoire pour fichiers audio
Utilisation de la radio DAB+
Réglage des stations DAB+
Sélection d’une station DAB+
Enregistrement des stations dans la mémoire de stations
Informations DAB+ étendues
Fonctions du menu DAB+
Utilisation de la radio FM
Réglage des stations FM
Enregistrement des stations dans la mémoire de stations
Fonctions du menu « FM »
Utilisation de BLUETOOTH
Appariage d’appareils BLUETOOTH
Lecture par BLUETOOTH
Utilisation de Line-In
Date/heure, minuteur de veille, réveil
Élimination des défaillances
Informations générales
Maintenance et entretien
Mise au rebut
Caractéristiques techniques
Garantie
3
3
6
6
7
7
8
9
9
9
9
9
9
9
10
10
11
11
11
12
12
12
12
12
13
13
14
14
15
15
15
15
16
16
16
16
17
18
18
18
19
20
21
FRANÇAIS
2
Page 47

Avant la mise sous tension
CONSIGNES DE SÉCURITÉ IMPORTANTES
Attention : Lisez attentivement cette page afin d’assurer l’utilisation sûre de l’appareil !
Lire attentivement ces consignes !
– Respectez toutes les consignes de sécurité et d’action lorsque vous mettez ce produit en service.
Conserver soigneusement ces consignes !
– Conservez les consignes de sécurité et d’action afin de pouvoir vous y reporter ultérieurement.
Respecter toutes les mises en garde !
– Respectez scrupuleusement toutes les mises en garde figurant sur le produit et dans la notice
d’emploi
1. Nettoyer uniquement avec un chiffon sec !
– Débranchez la fiche d’alimentation de cet appareil de la prise secteur avant de le nettoyer. N’utilisez
jamais de détergents liquides ou en aérosol. Utilisez uniquement un chiffon légèrement humide pour
nettoyer l’appareil.
2. Accessoires
– Utilisez uniquement les accessoires indiqués par le fabricant.
3. N’utilisez pas cet appareil à proximité de l’eau
– L'appareil ne doit jamais être exposé à des gouttes ou projections d’eau – par exemple à proximité
d’une baignoire, d’un lavabo, d’un évier, d’une machine à laver, dans un sous-sol humide ou à
proximité d’une piscine, etc. Ne posez jamais des récipients contenant de l’eau sur l’appareil, par
exemple un vase avec des fleurs.
4. Ventilation
– Les fentes et orifices du boîtier servent à la ventilation de l’appareil, afin d’assurer le bon
fonctionnement de l’appareil et le protéger contre toute surchauffe qui pourrait occasionner
une auto-ignition. N’obturez pas les orifices de ventilation. Installez l’appareil conformément aux
consignes du fabricant. N’obturez pas les orifices de ventilation en posant l’appareil sur un lit, un
canapé, un tapis ou un autre support mou similaire. En absence d’une ventilation suffisante telle
que décrite dans la notice de montage du fabricant, l’appareil ne doit pas être encastré dans une
bibliothèque ou un placard.
5. Alimentation électrique
– Cet appareil ne doit être branché qu’à la tension d’alimentation indiquée appareil. Si vous avez
des doutes sur le type d’alimentation électrique de votre logement, veuillez vous adresser à votre
revendeur spécialisé ou à votre fournisseur d'énergie local.
6. Câble d’alimentation
– Veillez à ce que personne ne puisse trébucher sur le câble d’alimentation. Veillez également à ce
que le câble d’alimentation ne puisse pas être écrasé à proximité immédiate d’une prise secteur, y
compris les prises à rallonge. Le câble d'alimentation ne doit pas non plus être écrasé à la sortie de
l’appareil.
7. Orages
– Débranchez l’appareil du secteur en cas d’orage ou s’il n’est pas utilisé pendant une durée
prolongée.
3
Page 48

8. Surcharge
– N’exposez jamais les prises secteur, rallonges ou multiprises à une surcharge, puisque cela génère
un risque d’incendie ou d’électrisation.
9. Pénétration de corps étrangers et de liquides
– Veillez à ce qu’aucun corps étranger ou liquide ne puisse pénétrer dans l’appareil par les orifices
de ventilation. Cela pourrait conduire à un contact avec des éléments sous haute tension ou un
court-circuit, qui peuvent occasionner un incendie ou une électrisation. Ne déversez jamais un liquide
quelconque sur l’appareil.
10. Maintenance
– Ne tentez jamais de réaliser par vous-même la maintenance de cet appareil, puisque l’ouverture
ou le retrait de caches peuvent donner accès à des éléments sous tension.
Tout contact avec ces éléments génère des risques. Confiez toutes les opérations de maintenance
aux collaborateurs qualifiés du service clients.
11. Détériorations qui requièrent une réparation
– Ne faites effectuer les opérations de maintenance et de réparation que par un service clients qualifié.
La maintenance/réparation est nécessaire lorsque l’appareil a été endommagé (par ex. le câble
d’alimentation ou la fiche), qu’un liquide a pénétré dans l’appareil, que des objets ont pénétré
dans l’appareil, que l’appareil a été exposé à la pluie ou l’humidité, lorsqu’il ne fonctionne plus
correctement ou est tombé.
12. Pièces détachées
– En cas de mise en place de pièces détachées, assurez-vous que le technicien du service clients
Utilise des pièces détachées prescrites par le fabricant ou présentant les mêmes caractéristiques que
les pièces d’origine.
Les pièces détachées non homologuées peuvent occasionner des incendies, électrisations ou autres
accidents.
13. Contrôle de sécurité
– Après la réalisation d’opérations de maintenance ou de réparation, priez le technicien du service clients
d’effectuer un contrôle de sécurité afin de s’assurer du parfait état de fonctionnement de l’appareil.
14. Montage mural ou au plafond
– Cet appareil ne doit être installé sur un mur ou au plafond que conformément aux recommandations du fabricant.
15. Chaleur
– N’installez pas l’appareil à proximité de surfaces chaudes telles que par exemple des radiateurs,
radiateurs soufflants, poêles ou autres appareils pouvant dégager de la chaleur (y compris les
amplificateurs). Ne posez jamais des objets avec des flammes nues tels que des bougies ou des
lanternes sur ou à proximité de l’appareil. Les piles installées ne doivent pas être exposés à une
chaleur élevée occasionnée par ex. par la lumière directe du soleil, le feu, etc.
16. Câbles électriques
– Une antenne extérieure ne doit pas être installée à proximité d’un câble haute tension ou d’autres
câbles électriques ou d’un endroit d’où il peut tomber sur de tels câbles électriques.
Lors de l’installation d’une antenne extérieure, il convient de veiller avec une circonspection extrême à
ne pas toucher par mégarde des câbles électriques, puisque cela implique un danger de mort.
17. Batteries
– Lorsque l’appareil n’est pas utilisé pendant un mois ou plus, vous devez retirer la pile du
compartiment à piles de la télécommande afin d’éviter toute fuite. Mettez immédiatement au rebut
les piles qui fuient, en respectant l’ensemble des dispositions légales applicables.
4
Page 49

Les piles qui fuient peuvent occasionner des blessures et endommager l’appareil.
Ne mélangez jamais des piles de différents types ou des piles usagées avec des piles neuves.
Risques liés à un volume sonore élevé
– Pour éviter les éventuels dommages auditifs, nous vous recommandons de ne pas trop prolonger
l’écoute à un volume sonore élevé. Cela s’applique notamment lors de l’utilisation d'un
casque audio.
Télécommande
–
Si vous exposez le capteur de la télécommande à la lumière directe du soleil ou à la lumière de tubes
fluorescents à haute fréquence, des dysfonctionnements sont possibles. Dans de tels cas, le système
doit être installé à un autre endroit pour éviter de tels dysfonctionnements.
–
Les piles fournies sont destinées au contrôle fonctionnel et peuvent présenter une durée de vie
limitée. Lorsque la portée de la télécommande diminue, il convient de remplacer les piles usagées
par piles neuves.
Prudence!
Risques d’explosion
–
Lorsque des piles d’un type non adapté sont utilisées ; des températures élevées ou basses extrêmes
auxquelles une pile peut être exposée pendant l’utilisation, le stockage ou le transport
–
Lors d’une faible pression atmosphérique à grande altitude , lorsqu’une pile est jetée au feu ou
placée dans un four chaud ; lors de l’écrasement ou du sectionnement mécaniques d’une pile ;
lors de l’exposition prolongée d’une pile à un environnement à températures très élevées ou une
pression atmosphérique très faible, qui peuvent conduire à l’explosion ou à la fuite de liquides ou
gaz inflammables.
Afin de minimiser le risque d’une électrisation, d’un incendie, etc.
- Vous ne devez pas retirer de vis, de caches ou d’éléments du boîtier.
- Le bouton Marche/Arrêt ne coupe jamais entièrement l'alimentation électrique, quelle que soit sa
position.
Comme la fiche d’alimentation est utilisée pour isoler l’appareil entièrement du secteur, elle ne doit
pas être démontée du câble d’alimentation et être accessible à tout moment.
Fonction d’économie d’énergie automatique
Le modèle est équipé d’une fonction d’économie d’énergie automatique. Elle commute l’appareil en
mode veille après 15 minutes lorsque le volume sonore la lecture est très faible ou que la radio est
réglée sur le mode silencieux. Ce réglage ne peut pas être modifié.
Déclaration de conformité UE
Par la présente, la société JVCKENWOOD Corporation déclare que le type de dispositif radio
M-822DAB satisfait aux exigences de la directive 2014/53/UE. Le texte complet de la déclaration de
conformité UE est disponible via l’adresse Internet suivante :
https://www.kenwood.com/euukdoc/
Fabricant :
3-12. Moriyacho, Kanagawa-ku, Yokohama-shi, Kanagawa 221-0022, JAPAN
Responsable (UE) :
Amsterdamseweg 37, 1422 AC UITHOORN, THE NETHERLANDS
IMPORTANT POUR LES PRODUITS LASER
1. PRODUIT LASER DE LA CLASSE 1
2. PRUDENCE: Ne pas ouvrir le boîtier. L’appareil ne contient pas d’éléments dont la
maintenance peut être effectuée par l’utilisateur. Faites effectuer la maintenance
uniquement par des techniciens qualifiés.
5
Page 50
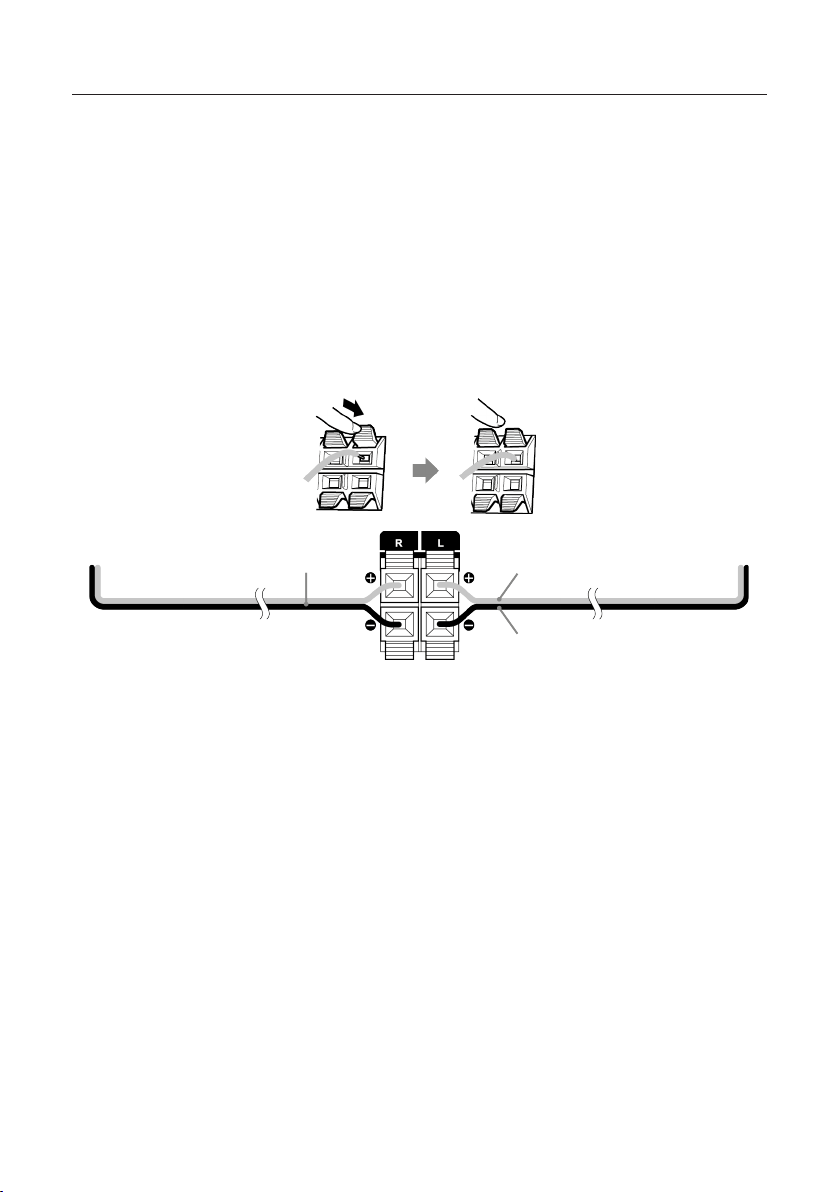
Avant la mise en service
Déballage
Déballez avec précaution l’appareil en veillant à ce que tous les accessoires soient présents.
2 x enceintes / télécommande / Antenne laire FM/DAB / 2 x piles R03/AAA 1,5 V
Branchement
• Ouvrez le compartiment à piles de la télécommande et insérez les piles en veillant à leur polarité.
La polarité requise (+/-) est indiquée dans le compartiment à piles.
Branchez les baffes gauche et droite au connecteur (Speaker Out) au dos de l’appareil. Appuyez à
cet effet sur les bornes à ressort et insérez les extrémités libres des câbles dans les orifices prévus à cet
effet. Veillez à relier le conducteur noir à la borne à ressort noire. L’autre conducteur est branché à la
borne rouge.
Câble de baffle Noir/Gris
Noir
• Branchez la fiche d’alimentation directement à une prise secteur à courant alternatif. Comme la
fiche d’alimentation est utilisée pour isoler entièrement l’appareil du réseau électrique, la prise
doit être constamment accessible.
Branchement de l’antenne DAB+ / FM
1. Branchez l’antenne filaire au connecteur [ FM ANTENNA 75Ω ].
2. Cherchez l’endroit qui vous offrira la meilleure réception.
3. Fixez l’antenne.
L’antenne fournie est une antenne filaire simple. Pour assurer une réception stable, nous recommandons l’installation d’une antenne extérieure (disponible dans le commerce).
Pour brancher l’antenne extérieure, commencez par débrancher l’antenne intérieure.
Nous ne sommes pas en mesure de garantir la bonne réception des stations radio depuis le réseau
câblé.
6
Page 51

Première utilisation
Lors de la première mise en service de l’appareil, il exécute une recherche automatique des stations
DAB+. Veuillez patienter jusqu’à ce que ce processus soit entièrement terminé. Vous trouverez de
plus amples informations à ce sujet dans la section « Utilisation de la radio DAB+ »
Manipulation des CD
Mesures de précaution pour la manipulation
Tenez le CD de sorte à ne pas toucher la surface numérique. (Le côté non imprimé du CD correspond
au côté de lecture.)
Mesures de précaution à prendre pour les CD
Utilisez exclusivement des CD avec le marquage . Un CD sans ce marquage ne pourra
éventuellement pas être lu correctement.
Informations intéressantes au sujet des appareils USB
Remarques concernant l’utilisation d’un appareil USB
Cet appareil est en mesure de lire les fichiers audio enregistrés sur une mémoire Flash ou un lecteur
audio numérique, dès lors que ces appareils disposent d’un port USB (dans le présent document, ces
appareils sont désignés par « Appareils USB »).
Les restrictions suivantes s’appliquent concernant les appareils USB utilisables :
Appareils USB utilisables
• Appareils USB appartenant à la classe des mémoires masse USB.
• Appareils USB, dont le courant absorbé maximal est de 500 mA.
• Appareils USB, de la classe des mémoires de masse USB : des appareils USB que le PC détecte com-
me mémoire externe, sans qu’un pilote spécial ou un logiciel d’application spécial ne soit nécessaire.
• Veuillez vous adresser à votre revendeur, si vous n’êtes pas certain que votre appareil USB
correspond aux spécifications de la classe des mémoires de masse USB.
• L’utilisation d'un appareil USB qui n’est pas supporté peut conduite à une lecture ou un affichage
erronés du fichier audio.
Même si vous utilisez un appareil USB qui correspond aux spécifications figurant ci-dessus, les fichiers
audio peuvent ne pas être lus correctement en fonction du type ou de l’état de l’appareil USB.
7
Page 52
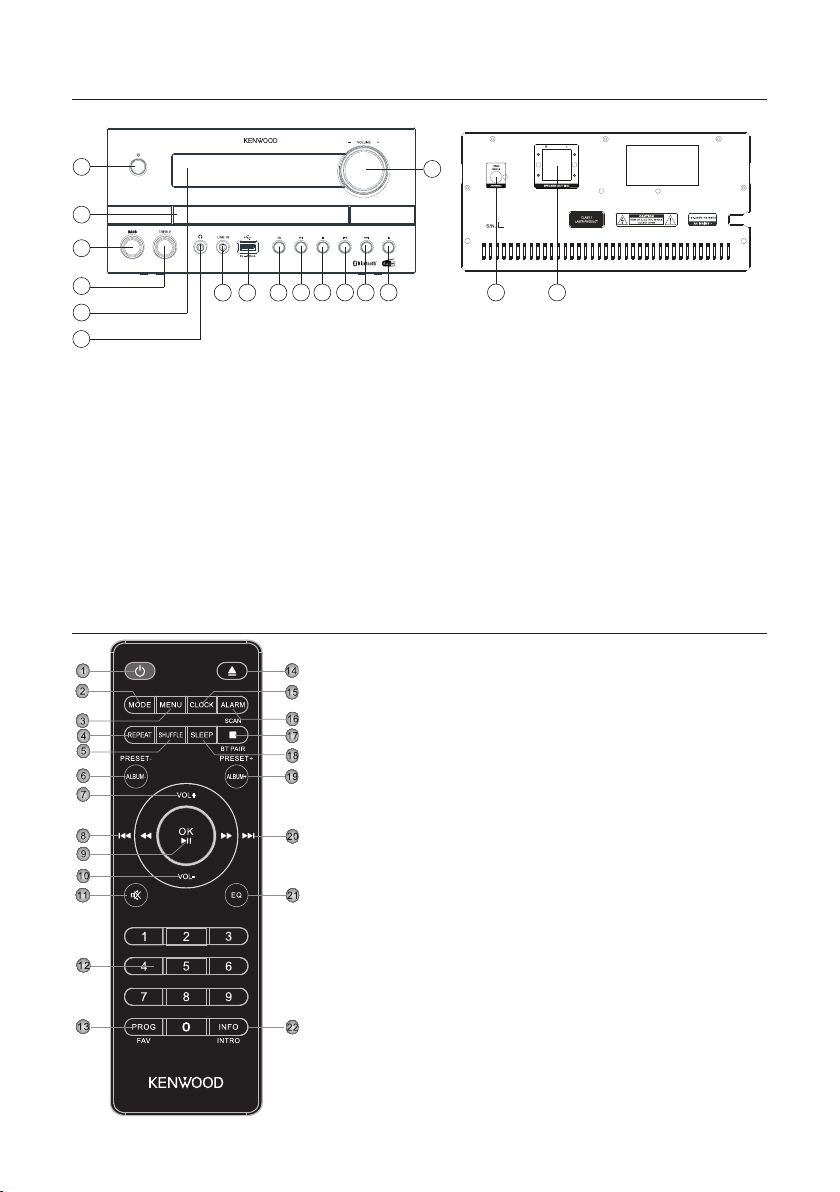
Éléments et fonctions
Face avant Face arrière
1
15
2
3
4
5
6
7 8 9
10 11 12
13
14
16 17
1 – Veille / Marche
2 – Tiroir CD
3 – Régulateur de basses
4 – Régulateur d’aigües
5 – Afficheur
6 – Connecteur de casque
10 – Lecture / Pause
11 – Arrêt
12 – Précédent (Titre précédent)
13 – Suivant (Titre suivant)
14 – Ouvrir / Fermer (Éjecter)
15 – Volume
7 – Port Line-In
8 – Port USB
9 – Sélection de source (MODE)
16 – Port d’antenne FM / DAB+
17 – Connecteurs de baffle
Télécommande
1 Veille Marche / Arrêt
2 Sélection du mode (source)
3 Menu
4 Sélection de lecture en boucle
5 Mode aléatoire
6 Album précédent, mémoire de préréglages –
7 Augmenter le volume
8 Changement de titre / Recherche de titre parmi les titres
précédents
9 Confirmer la saisie, Lecture/Pause
10 Diminuer le volume
11 Mode silencieux Marche / Arrêt (Mute)
12 Touches numériques
13 Programmation de titres, attribution un emplacement mémoire
14 Ouvrir/Fermer le tiroir de CD
15 Régler l’horloge
16 Réglage du réveil
17 Interrompre la lecture, appariage BLUETOOTH, recherche de
stations
18 Réglage du minuteur de veille
19 Album prochain, mémoire de préréglages +
20 Changement de titre/Recherche de titre parmi les titres suivants
21 Sélection du préréglage d’égalisateur
22 Commutation sur les informations à l’écran, lors de la lecture
10 secondes d’introduction par titre
8
Page 53

Fonctions de base
Pour allumer le système: Appuyez sur la touche <STANDBY> de la télécommande ou de l’appareil
principal. L’écran affiche «WELCOME».
Arrêt du système: Appuyez sur la touche <STANDBY> de la télécommande ou de l’appareil
principal. L’écran affiche «VEILLE» et l’appareil commute en mode Veille.
Régulateur de volume
Sur la télécommande: Appuyez sur les touches <VOL+> pou augmenter le volume ou sur la tou-
che <VOL-> pour diminuer le volume.
Sur l’appareil principal: Tournez le régulateur <Volume> pour augmenter ou diminuer le volume.
Lorsque le volume est réglé au minimum, l’écran affiche «VOL 00», tandis que le volume maximal
est indiqué par «VOL 32».
Mode silencieux temporaire: Appuyez à cet effet sur la touche <MUTE> de la télécommande.
« MUTE » clignote sur l’afficheur. Au prochain actionnement de la touche, le volume précédent est
rétabli.
Réglage du son
Vous pouvez augmenter ou diminuer les niveaux de basses et d’aigües en fonction de votre musique
préférée.
Sur l’appareil principal: Tournez le régulateur BASS ou TREBLE pour régler le niveau d’amplification : Plage de réglage -6 à +6.
Égaliseur
Sur la télécommande: Appuyez sur la touche <EQ> pour ouvrir les uns après les autres les réglages
suivants : FLAT -> CLASSIC -> POP -> JAZZ -> ROCK
Utilisation des CD et appareils USB
Préparation
Insérer un CD
1. Appuyez sur la touche <EJECT> de l’appareil principal ou de la télécommande pour ouvrir le
compartiment à CD.
2. Insérez un CD avec la face imprimée vers le haut dans le compartiment à CD.
3. Appuyez sur la touche <EJECT> de l’appareil principal ou de la télécommande pour fermer le
compartiment à CD.
Retrait d’un CD
1. Appuyez sur la touche <EJECT> de l’appareil principal ou de la télécommande pour ouvrir le
compartiment à CD.
2. Retirez le CD prudemment du compartiment à CD.
3. Appuyez sur la touche <EJECT> de l’appareil principal ou de la télécommande pour fermer le
compartiment à CD.
9
Page 54

Branchement d’appareils USB.
1. Appuyez sur la touche <STANDBY> pour sélectionner le mode Veille.
2. Branchez l’appareil USB au port USB situé sur la face avant.
Retrait de l’appareil USB
1. Appuyez sur la touche <STANDBY> pour sélectionner le mode Veille.
2. Débranchez l’appareil USB du port USB.
• Attendez toujours que l’appareil ait lu intégralement le CD / l’appareil USB avant de poursuivre.
• Si aucun CD n’est placé dans le compartiment à CD, l’afficheur indique «NO DISC».
• Si aucun fichier exécutable ne se trouve sur l’appareil USB, l’afficheur indique « NO SONG ».
• Pour les fichiers audio, le temps de chargement peut être supérieur à 10 secondes si de nombreux
titres sont enregistrés sur le CD ou l’appareil USB.
Lecture d’un CD ou d’un chier audio (USB, CD)
Sur la télécommande: À l’aide de la touche «MODE», sélectionnez la source et appuyez sur la
touche <Lecture/Pause> pour démarrer la lecture.
Sur l’appareil principal: À l’aide de la touche <MODE> sélectionnez la source souhaitée et
appuyez sur la touche <Lecture/Pause> pour démarrer la lecture.
Sur les appareils USB ou CD contenant des fichiers audio (par ex. MP3), le nombre de répertoires et
fichiers disponibles s’affiche comme suit :
FXX XXX
Le chiffre après le « F » correspond au nombre de répertoires, et le second bloc de chiffres au nombre total de fichiers.
Pour les CD audio, les informations concernant le nombre de titres et la durée de lecture totale
s’affichent comme suit :
XX XX:XX
Le premier bloc de chiffres correspond alors au nombre de titres et le second à la durée de lecture
totale du CD.
Fonctions de commande de base
Interruption de la lecture: Appuyez sur la touche <STOP> de l’appareil principal ou de la
télécommande pour interrompre la lecture.
Interruption de la lecture: Appuyez sur la touche <Lecture/Pause> de l’appareil principal ou
de la télécommande pour interrompre la lecture. Le témoin sur l’afficheur clignote. Un nouvel
actionnement de la touche permet de poursuivre la lecture.
Recherche d’une section spécique lors de la lecture: Appuyez pendant plus de 2 secondes sur la
touche <Titre suivant> ou <Titre précédent> de l’appareil principal ou de la télécommande pour activer
l’avance ou le recul rapide. Dès que la section souhaitée est atteinte, relâchez la touche correspondante.
Sélection d’un titre spécique: Appuyez sur la touche <Titre suivant> ou <Titre précédent> de
l’appareil principal ou de la télécommande en mode lecture, pause ou arrêt. Les touches numériques
de la télécommande permettent de sélectionner les titres directement.
Sélection d'un répertoire spécique (chiers audio uniquement): Appuyez sur les touches
<ALBUM+> ou <ALBUM-> de la télécommande, pour sélectionner un répertoire.
10
Page 55

Lecture brève des débuts de titres: Appuyez de manière prolongée sur la touche <INTRO> de la
télécommande pour écouter brièvement (10 secondes) les débuts des titres. Un nouvel actionnement
interrompt ce mode.
Programmation de titres et chiers
À l’aide de la télécommande, vous pouvez programmer les titres d’un CD audio ou les fichiers dans
l’ordre souhaité. Vous disposez à cet effet du nombre suivant d’emplacements de mémoire :
CD audio : 20 emplacements mémoire Fichiers : 99 emplacements mémoire
Mode opératoires pour CD audio
1. La source «CD» doit être en mode Arrêt. Si ce n’est pas le cas, l’écran affiche «STOP FIRST».
2. Appuyez sur la touche <PROG> pour démarrer le mode de programmation.
3. L’écran affiche à présent «P01 001» tandis que «01» clignote. Le premier bloc de chiffres
correspond au titre actuel, le second à l’emplacement mémoire actuel.
4. À l’aide des touches <Titre suivant> ou <Titre précédent>, sélectionnez le titre que vous
souhaitez enregistrer sur l’emplacement mémoire actuel. Les titres peuvent être choisis aussi à
l’aide des touches numériques de la télécommande.
5. Appuyez sur la touche <PROG> pour confirmer le processus.
6. Ensuite, l’afficheur indique l’emplacement mémoire suivant. Répétez les étapes 4 et 5 jusqu’à avoir
terminé votre sélection ou jusqu’à ce que tous les emplacements mémoire soient occupés. Dans ce
cas, « Full » s’affiche sur l’afficheur.
7. La touche <Lecture/Pause> permet de démarrer la lecture des titres programmés. Pendant la
lecture, l’écran affiche en alternant le numéro du titre et celui de l’emplacement programmé.
8. Pour effacer la programmation, il vous suffit d’appuyer deux fois sur la touche <STOP>.
Mode opératoire pour chiers audio
1. La source «USB» doit être en mode Arrêt. Si ce n’est pas le cas, l’écran affiche «STOP FIRST».
2.
Appuyez sur la touche
3. L’écran affiche à présent «P01 001» tandis que «01» clignote. Le premier bloc de chiffres
correspond au titre actuel, le second à l’emplacement mémoire actuel.
4. À l’aide des touches <Titre suivant> ou <Titre précédent>, sélectionnez le titre que vous
souhaitez enregistrer sur l’emplacement mémoire actuel. Les titres peuvent être choisis aussi à
l’aide des touches numériques de la télécommande.
5. Appuyez sur la touche <PROG> pour confirmer le processus.
6. Ensuite, l’afficheur indique l’emplacement mémoire suivant. Répétez les étapes 4 et 5 jusqu’à avoir
terminé votre sélection ou jusqu’à ce que tous les emplacements mémoire soient occupés. Dans ce
cas, « FULL » s’affiche sur l’afficheur.
7. La touche <Lecture/Pause> permet de démarrer la lecture des titres programmés. Pendant la
lecture, l’écran affiche en alternant le numéro du titre et celui de l’emplacement programmé.
8. Pour effacer la programmation, il vous suffit d’appuyer deux fois sur la touche <STOP>.
<PROG> pour démarrer le mode de programmation.
• Si vous appuyez sur la touche <STOP>pendant la programmation, le processus est annulé.
Le programme existant est supprimé lorsque vous éteignez l’appareil.
11
Page 56

Lecture aléatoire et fonction de lecture en boucle
Mode opératoires pour CD audio
• Appuyez sur la touche <SHUFFLE> de la télécommande pour démarrer la lecture aléatoire. L’écran
affiche «SHUF» et la lecture peut être démarrée. Si vous appuyez deux fois sur la touche <SHUFF-
LE> ou une fois sur la touche<STOP>, la lecture aléatoire est interrompue.
• Appuyez sur la touche <REPEAT> de la télécommande pour démarrer la lecture en boucle.
L’actionnement répété active les fonctions suivantes :
Répéter le titre actuel (affichage « RPT ONE »)
Lecture en boucle de tous les titres (affichage « RPT ALL »)
Désactivation de la lecture en boucle (l’écran affiche «RTP OFF»)
La touche <Lecture/Pause> permet de démarrer la lecture.
La fonction de lecture en boucle est annulée en appuyant sur la touche <STOP>.
Mode opératoire pour chiers audio
• Appuyez sur la touche <SHUFFLE> de la télécommande pour démarrer la lecture aléatoire. L’écran
affiche «SHUF» et la lecture peut être démarrée. Si vous appuyez deux fois sur la touche <SHUFF-
LE> ou une fois sur la touche<STOP>, la lecture aléatoire est interrompue.
• Appuyez sur la touche <REPEAT> de la télécommande pour démarrer la lecture en boucle.
L’actionnement répété active les fonctions suivantes :
Répéter le titre actuel (affichage « RPT ONE »)
Lecture en boucle de tous les titres (affichage « RPT ALL »)
Lecture en boucle de l’album actuel («RPT ALB»)
Désactivation de la lecture en boucle (l’écran affiche «RTP OFF»)
La touche <Lecture/Pause> permet de démarrer la lecture.
La fonction de lecture en boucle est annulée en appuyant sur la touche <STOP>.
Utilisation de la radio DAB+
Appuyez sur la touche <MODE> de la télécommande ou de l’appareil principal jusqu’à ce que l’écran
affiche «DAB».
Réglage des stations DAB+
Lors de la mise en service de l’appareil, une recherche de stations a été réalisée. Les stations trouvées
ainsi sont enregistrées par ordre alphabétique dans la liste des stations.
12
Page 57

Relancement de la recherche de stations
• Appuyez sur la touche <MENU> pour afficher le menu DAB.
L’écran affiche «FULL SCAN». Démarrez la recherche de stations à l’aide de la touche <OK>.
• Pendant la recherche de stations, l’afficheur affiche le nombre de stations déjà trouvées.
• Si aucune station n’est trouvée lors de la recherche de stations, l’écran affiche pendant env. 2
secondes «NO DAB», puis commute sur l’affichage «FULL SCAN».
Vous devez contrôler alors le branchement correct de l’antenne ou déplacer l’appareil afin
d’améliorer la réception.
Réglage manuel des ensembles
• Appuyez sur la touche <MENU> pour afficher le menu DAB.
• Appuyez sur la touche <Titre suivant> jusqu’à ce que «MANUAL» s’affiche à l’écran.
• La touche «OK» confirme la fonction et le canal réglé actuel s’affiche avec la fréquence
correspondante sur l’afficheur.
• Appuyez sur la touche <Titre suivant> ou <Titre précédent> pour choisir manuell. un autre canal.
• Confirmez la sélection à l’aide de la touche <OK>. Le niveau du signal s’affiche alors sur l’afficheur.
Un nouvel actionnement de la touche charge l’ensemble.
Sélection d’une station DAB+
Pour afficher les stations mémorisées par ordre alphabétique dans la liste des stations, procédez
comme suit :
• Appuyez sur la touche <Titre suivant> ou <Titre précédent> sur la télécommande ou l’appareil
pour feuilleter la liste des stations dans un sens ou dans l’autre.
• Lorsque vous avez sélectionné la station souhaitée, appuyez sur la touche <OK> de la
télécommande ou attendez env. 2 secondes pour démarrer la lecture.
L’écran affiche «LOADING» suivi de «PLAYING».
• Si le niveau de réception de la station sélectionnée est insuffisant pour une lecture fluide, le
message «OFF AIR» s’affiche à l’écran. Vous devez alors sélectionner une autre station.
Enregistrement des stations dans la mémoire de stations
30 emplacements mémoire sont disponibles pour enregistrer des stations DAB afin de les trouver plus
facilement. Pour affecter la mémoire, procédez comme suit :
• Sélectionnez une station pour l’enregistrer.
• Appuyez sur la touche <PROG> jusqu’à ce que l’écran clignote et affiche un emplacement
mémoire. Un emplacement mémoire vide est indiqué par «EMPTY», un emplacement occupé par
le nom de la station. Vous pouvez aussi réaffecter un emplacement mémoire déjà attribué.
• Appuyez sur la touche <Titre suivant> ou <Titre précédent> pour choisir un emplacement
mémoire.
• Confirmez la sélection à l’aide de la touche <OK>. Le message «STORED» clignote brièvement à
l’écran.
• Les stations mémorisées peuvent être ouvertes comme suit :
Appuyez sur les touches numériques de la télécommande, pour saisir directement le numéro de
l’emplacement mémoire. Terminez la saisie à l’aide de la touche<OK>. Vous pouvez aussi utiliser la
touche <PROG> suivie de <Titre suivant> ou <Titre précédent> pour la sélection.
13
Page 58

Informations DAB+ étendues
Pour DAB+, des informations complémentaires sont transmises en plus du signal musical. Ces informations
peuvent être affichées comme suit :
Appuyez sur la touche <INFO> de la télécommande pour afficher les unes après les autres les informations
suivantes :
• Niveau du signal: L’afficheur indique le volume à l’aide de symboles de gauche à droite.
Plus le nombre de symboles affichés est élevé, plus la qualité de la réception est élevée.
• PTY (Type de programme): Cette option désigne la répartition des stations par styles, par ex. Pop,
Actualités, Religion, Infos, Classiques, etc.
• Désignation de l’ensemble, par ex. DR Deutschland.
• Affichage du canal et de la fréquence de la station paramétrée.
• ERR XX: Cette information indique le taux d’erreurs de la réception numérique. Il dépend du niveau du
signal et peut aussi servir à l’orientation optimale de l’antenne.
• XX K BPS: Affichage de la vitesse de transmission de la station, par ex. 80 kBit/s. La vitesse de transmission
peut varier d’une station à l’autre.
• DABPLUS: Désigne le type de réception « DAB+ ».
• Heure actuelle.
• Date actuelle.
Fonctions du menu DAB+
La touche <MENU> ouvre un menu dans lequel vous pouvez paramétrer différentes fonctions pour la radio
DAB+. Les touches <Titre suivant> ou <Titre précédent> permettent aussi de faire défiler le menu. Les
fonctions suivantes sont disponibles :
• FULL SCAN: Nouvelle recherche de stations automatique. Confirmez la fonction à l’aide de la touche <OK>.
• MANUAL: Elles permettent de régler manuellement un canal de réception spécifique. La touche <OK>
confirme la fonction et le canal réglé actuel s’affiche avec la fréquence correspondante sur l’afficheur.
• Appuyez sur la touche <Titre suivant> ou <Titre précédent> pour choisir manuellement un autre canal.
• Confirmez la sélection à l’aide de la touche <OK>. Le niveau du signal s’affiche alors sur l’afficheur. Un
nouvel actionnement de la touche charge l’ensemble.
• DRC (Dynamic Range Control): Si cette fonction est compatible avec la station paramétrée, elle permet d’ad-
apter la plage dynamique. Les réglages possibles sont «OFF», «LOW» et «HIGH». La sélection est réalisée à
l’aide des touches <Titre suivant> ou <Titre précédent>. Elle est confirmée à l’aide de la touche <OK>.
• PRUNE: La fonction sert à supprimer les stations invalides de la liste des stations. La sélection est réalisée à
l’aide des touches <OK>, «NO/YES» avec <Titre suivant> ou <Titre précédent>, puis confirmée par <OK>.
• SYSTÈME: Pour le service clients uniquement!
Utilisation de la radio FM
Appuyez sur la touche <MODE> de la télécommande ou de l’appareil principal jusqu’à ce que l’écran affiche «FM».
Réglage d’une station FM
• Appuyez sur la touche <Titre suivant>, pour augmenter la fréquence de réception.
• Appuyez sur la touche <Titre précédent>, pour diminuer la fréquence de réception. Si vous maintenez une
de ces touches appuyées, l’appareil lance une recherche de stations automatiques qui sera interrompue à la
prochaine station trouvée.
• Maintenez la touche <SCAN> brièvement pour démarrer la recherche de stations avec mémorisation
automatique des stations détectées. Un maximum de 30 stations est enregistré dans l’ordre dans lequel elles
ont été trouvées.
14
Page 59

Utilisation du Radio Data System (RDS)
RDS est un système de transmission avec lequel les stations FM transmettent des informations utiles
conjointement au signal de transmission de base. Ces informations peuvent être extraites du signal de
transmission normal et utilisées pour un certain nombre de fonctions complémentaires. Si un signal RDS
est trouvé, «RDS» s’allume à l’écran sous l’affichage de la fréquence qui est ensuite remplacée par le
nom de la station.
Fonctions RDS
Les informations suivantes peuvent être affichées en appuyant de manière répétée sur la touche <INFO> :
• Texte radio – si la station n’émet pas de texte radio, l’écran affiche «NO TEXT».
• PTY (Type de programme) – Si la station n’émet pas de signal PTY, le message « NO PTY » s’affiche.
• Fréquence et emplacement mémoire de la station trouvée.
• Affichage Stéréo / Mono.
• Heure – Si la station n’émet pas de signal d’heure, le message « 00_00_00 » s’affiche.
• Date – Si la station n’émet pas de signal de date, le message « 00-00-00 » s’affiche.
En cas de conditions de réception insuffisantes, la réception des signaux peut être perturbée ou
impossible, même si l’écran affiche «RDS».
Enregistrement des stations dans la mémoire de stations
30 emplacements mémoire sont disponibles pour enregistrer des stations FM afin de les trouver plus
facilement. Pour affecter la mémoire, procédez comme suit :
• Sélectionnez une station pour l’enregistrer.
• Appuyez sur la touche <PROG> jusqu’à ce que l’écran clignote et affiche un emplacement mémoire.
Un emplacement mémoire vide est indiqué par «EMPTY», un emplacement occupé est affiché avec la
fréquence. Vous pouvez aussi réaffecter un emplacement mémoire déjà attribué.
• Appuyez sur la touche <Titre suivant> ou <Titre précédent> pour choisir un emplacement mémoire.
• Confirmez la sélection à l’aide de la touche <OK>. Le message «STORED» clignote brièvement à l’écran.
• Les stations mémorisées peuvent être ouvertes comme suit :
Appuyez sur les touches numériques de la télécommande, pour saisir directement le numéro de
l’emplacement mémoire. Terminez la saisie à l’aide de la touche<OK>. Vous pouvez aussi utiliser la
touche <PROG> suivie de <Titre suivant> ou <Titre précédent> pour la sélection.
Fonctions du menu «FM»
La touche <MENU> ouvre un menu dans lequel vous pouvez paramétrer différentes fonctions pour la
radio DAB+. Les touches <Titre suivant> ou <Titre précédent> permettent aussi de faire défiler le
menu.
Les fonctions suivantes sont disponibles :
• SCAN SET: Cette fonction permet de définir les stations prises en compte pour l’enregistrement
automatique lors de la recherche de stations. Les réglages possibles sont «ALL» (toutes les stations
captées) ou «STRONG» (uniquement les stations avec les signaux les plus puissants). La sélection est
réalisée à l’aide des touches <Titre suivant> ou <Titre précédent>. Elle est confirmée à l’aide de la
touche <OK>.
• AUD SET: Réglages pour la réception «Mono» ou «Stéréo». La sélection est réalisée à l’aide des
touches <Titre suivant> ou <Titre précédent>. Elle est confirmée à l’aide de la touche <OK>.
• SYSTÈME: Pour le service clients uniquement!
15
Page 60

Utilisation de BLUETOOTH
Appuyez sur la touche <MODE> de la télécommande ou de l’appareil principal jusqu’à ce que l’écran
affiche «BT».
Si aucun appareil apparié n’est disponible à proximité, le message clignote à l’écran.
Appariage d’appareils BLUETOOTH
La fonction BLUETOOTH permet la transmission sans fil des fichiers de musique (Streaming audio) au
système. Procédez comme suit pour apparier des appareils adaptés (par ex. les smartphones) :
1. Affichez sur votre appareil BLUETOOTH la fonciton d’appariage et cherchez « M-822DAB ».
2. Sélectionnez «M-822DAB» pour l’appariage et attendez jusqu’à ce que l’écran affiche «BT» et
qu’une séquence de signaux sonore retentisse. L’appariage est terminé.
3. Si votre appareil BLUETOOTH exige la saisie d’un PIN à quatre chiffres, il vous suffit de saisir
« 0000 ».
4. L’appareil BLUETOOTH est enregistré et sera dorénavant connecté automatiquement.
5. Pour apparier un autre appareil BLUETOOTH, il vous suffit de répéter les étapes 1 à 3.
Lecture par BLUETOOTH
Pour transmettre de la musique par Streaming audio, vous devez sélectionner sur l’appareil BLUETOOTH un lecteur de musique de votre choix.
Les possibilités de commande suivantes sont disponibles:
• Appuyez sur la touche <Lecture/Pause> sur la télécommande ou l’appareil pour interrompre tem-
porairement ou poursuivre la lecture.
• Appuyez sur la touche <Titre suivant> ou <Titre précédent>
principal pour feuilleter pour passer au titre précédent ou suivant.
• Si vous appuyez pendant 3 secondes sur la touche <Stop> de la télécommande ou de l'appareil
principal, la connexion BLUETOOTH est interrompue. L’affichage «BT» clignote à l’écran. Pour
rétablir la connexion, commutez brièvement vers une autre source, puis revenez à BLUETOOTH.
sur la télécommande ou l’appareil
Lorsque la connexion BLUETOOTH est interrompue parce que la distance entre les appareils devient
trop importante, la connexion est rétablie automatiquement dès que vous réduisez cette distance.
Utilisation de Line-In
Lecture d’éléments externes
Pour la lecture de musique, vous pouvez brancher des appareils externes tels que des lecteurs MP3,
lecteurs DVD ou consoles de jeu au port Line-In de l’appareil.
Appuyez sur la touche <MODE> de la télécommande ou de l’appareil principal jusqu’à ce que l’écran
affiche «LINE IN».
16
Page 61

Réglage de la date et de l’heure
Lors de la réception d’une station DAB+ ou FM d’une qualité suffisante, l’heure est réglée
automatiquement. En fonction de la qualité de la réception, ce processus peut prendre un certain
temps. Si aucune station appropriée n’est disponible, vous pouvez aussi régler l’heure manuellement :
1. Allumez la radio et appuyez sur la touche <CLOCK> de la télécommande.
2. Sélectionnez ensuite à l’aide des touches <Titre suivant> ou <Titre précédent> les heures, les
minutes, le jour, le mois et l’année, que vous confirmez respectivement avec la touche <OK>.
3. Si «SAVED» s’affiche à l’écran, l’heure et la date ont été enregistrés.
Réglage du minuteur de sommeil
Le minuteur de sommeil est utilisé pour éteindre la radio automatiquement après une durée
prédéfinie. Pour le réglage, procédez comme suit :
1. Allumez la radio et appuyez sur la touche <SLEEP> de la télécommande.
2. L’actionnement répété de la touche permet de définir comme suit l’heure de désactivation :
«OFF / 15, 30, 45, 60, 90 minutes»
Lorsque le minuteur de veille est actif, «SLEEP» s’affiche dans la ligne inférieure de l’écran.
L’option «SLEEP OFF» permet de désactiver un minuteur actif.
3. Appuyez brièvement sur la touche <SLEEP> pour afficher la durée résiduelle du minuteur.
Einstellen des Weckers
Cet appareil permet de régler deux horaires de réveil différents. Ces horaires de réveil peuvent être
programmés pour les blocs temporels suivants : «Tous les jours» / «Une seule fois» /
«Week-end» / «Jours ouvrés» Pour le réglage de l’heure du réveil, procédez comme suit :
1. Allumez la radio et appuyez sur la touche <ALARM> de la télécommande.
2. «ALARM 1» s’affiche. Vous pouvez à présent régler l’heure de réveil 1 ou passer à l’heure de
réveil 2 («ALARM 2») à l’aide des touches <Titre suivant> ou <Titre précédent>.
3. Confirmez par <OK>, puis exécuter les étapes suivantes:
• «ON TIME»: Réglez les heures et minutes en confirmant respectivement la sélection.
• «DURATION»: Réglage de la durée d’activation du réveil en minutes («15, 30, 45, 60, 90»).
• «SOURCE»: Sélectionnez ensuite la source DAB, FM, CD, USB ou BUZZER et la confirmer.
• Sélectionnez «DEFAULT» ou un autre emplacement mémoire, puis confirmez. Si vous sélectionnez
l’option «DEFAULT», la station réglée pour l’instant est utilisée. Cette option de menu ne s’affiche
que lorsque vous sélectionnez DAB ou FM comme source.
• Dans le menu suivant, sélectionnez la fréquence «DAILY» / «ONCE» / «WEEKENDS» /
«WEEKDAYS» et confirmez. Si vous avez sélectionné «ONCE», vous devez régler la date
souhaitée.
• Réglez ensuite le volume du réveil à l’aide des touches <VOL+> et <VOL-> et la confirmer.
• Sélectionnez «ALARM ON» ou «ALARM OFF», puis confirmez.
L’heure de réveil est à présent mémorisée et «TIMER» s’affiche en mode veille en bas à droite de
l’écran.
Procédez de manière identique pour le réglage de la 2ème heure de réveil. Pour supprimer un réveil
réglé, sélectionnez lors de la dernière étape du réglage «ALARM OFF» ou appuyez pendant 2
secondes sur la touche <ALARM>. Le réveil s’allume à l’heure indiquée pour la durée définie, tandis
que «TIMER» clignote à l’écran.
Lorsque le réveil est actif, la touche <OK> permet d’interrompre le signal du réveil pendant 9
minutes.
17
Page 62

Élimination des défaillances
En cas de dysfonctionnements, veuillez vérifier les points suivants :
Réinitialisez l’appareil aux paramètres d’usine : «MENU» -> «SYSTEM» -> «RESET» -> «YES»
Absence de son
Branchez correctement la fiche d’alimentation.
Réglez le volume à un niveau adéquat.
Assurez-vous d’avoir bien sélectionné la source souhaitée.
Canal gauche et droit inversés
Contrôlez le branchement des enceintes et leur positionnement.
Le système ne réagit pas à l’actionnement des touches
Débranchez le câble d’alimentation et rebranchez-le.
Problèmes lors de la réception radio
Réorientez l’antenne.
Utilisez si possible une antenne externe.
D’autres appareils électroniques perturbent la réception.
Le lieu d'installation n’est pas adapté à la réception de signaux DAB+.
Lecteur CD – message «NO DISC»
Insérez le CD avec le côté imprimé vers le haut.
Nettoyez le CD.
Utilisez uniquement des CD conformes.
Mode USB
«NO USB» Éteignez l’appareil et rebranchez l’appareil USB.
«NO SONG» Vérifiez que l’appareil USB contient bien des fichiers compatibles.
Télécommande – ne fonctionne pas correctement
Remplacez la pile.
Dégagez les obstacles éventuels
Rapprochez-vous de l’appareil principal et assurez-vous de bien orienter la télécommande vers le
capteur de l’appareil.
Maintenance et entretien
Nettoyage du boîtier: Utilisez un chiffon légèrement humecté avec un détergent doux. N’utilisez
pas de détergents contenant de l’alcool, de l’ammoniac ou d’abrasifs.
Nettoyage des CD
• Nettoyez les CD souillés avec une lingette de nettoyage spéciale. Essuyez le CD toujours par des mou-
vem. rectilignes du centre vers le bord. N’effectuez pas de mouvem. circulaires pour nettoyer le CD.
• N’utilisez pas de solvants tels que par ex. du White Spirit, du diluant, les détergents du commerce
ou des aérosols antistatiques pour disques analogiques.
Mises en garde au sujet de la formation de condensation
La condensation (rosée) peut se former à l’intérieur de l’appareil si la différence entre la température
de l’appareil et la température ambiante est trop importante. Si la condensation se forme à l’intérieur
de l’appareil, elle peut nuire à son bon fonctionnement. Dans ce cas, il convient d’attendre quelques
heures. Une fois l’humidité disparue, l’appareil peut de nouveau être utilisé.
Des précautions particulières sont à prendre dans les cas suivants
Si l’appareil est déplacé d’un endroit à un autre dont la température est considérablement plus élevée
ou basse, si l'humidité ambiante augmente sur le lieu d’installation de l’appareil, etc.
18
Page 63
Mise au rebut
Mise au rebut d’appareils électriques et électroniques usagés et de piles
Le symbole (poubelle barrée) sur le produit ou son emballage indique qu’en fin de vie, ce produit ne
doit pas être jeté aux ordures ménagères, mais doit être remis gratuitement à un point de collecte
installé par un service public de gestion des déchets ou un distributeur.
De manière générale, les propriétaires d’appareils électriques et électroniques usagés doivent retirer
de l’appareil les piles et accus usagés qui ne sont pas intégrés en fixe dans l’appareil usagé avant de
remettre ce dernier au centre de traitement de déchets. Cela ne s'applique pas si les appareils usagés
sont remis à la préparation de revalorisation sous la responsabilité d’un centre de traitement de
déchets de droit public. Par votre contribution à l’élimination correcte de ce produit, vous protégez
l’environnement et la santé de vos concitoyens. Une mise au rebut non conforme ou erronée
occasionne des risques pour l’environnement et la santé. Vous pouvez obtenir des informations plus
détaillées au sujet du recyclage des appareils électriques et électroniques usagés, ainsi que des piles
usagées auprès de votre commune ou des entreprises de traitement de déchets communaux.
Consignes de mise au rebut à l’attention des consommateurs en Allemagne:
https://www.e-schrott-entsorgen.org/
Consignes de mise au rebut à l’attention des consommateurs en Autriche:
https://www.elektro-ade.at/
La marque et les logos Bluetooth® sont des marques déposées de la société BLUETOOTH SIG Inc.
Toute utilisation de ces marques par la société . Fait l’objet d'une
licence. Les autres marques et appellations commerciales appartiennent à leurs propriétaires respectifs.
19
Page 64
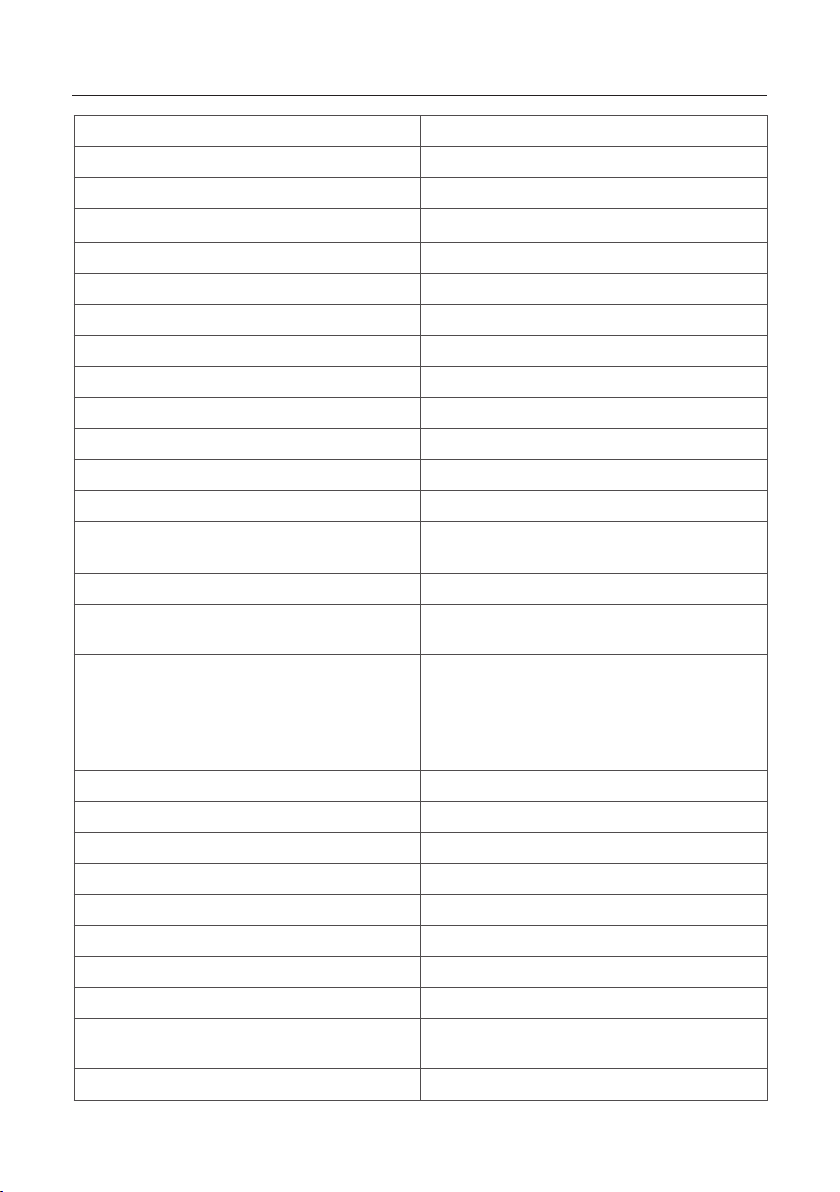
Caractéristiques techniques – M-822DAB
Alimentation électrique Tension alternative ~ 100 – 240 V 50/60 Hz
Puissance absorbée 40 Watt
Puissance absorbée en mode Veille < 1 Watt
Mode CD
Distance de bruit de signal (filtre A) ≥ 70 dB
Étendue dynamique ≥ 60 dB
Antenne UKW/DAB+
Gamme d'accord DAB BANDE III 174,928 MHz – 239,200 MHz
Gamme d’accord FM 87,50 MHz – 108,00 MHz
BLUETOOTH
Version BLUETOOTH V5.0
Classe de performances Classe 2
Puissance d’émetteur max. 13dbm
Portée Env. 10 m (peut varier en fonction de l’environ-
nement)
Bande de fréquences 2,402 GHz – 2,480 GHz
Profil BLUETOOTH A2DP (Advanced Audio Distribution Profile,
AVRCP (Audio/Video Remote Control Profile)
Appareils USB Fichiers exécutables : MP3
Compatible avec USB1.1 Full-speed
Compatible avec FAT16, FAT32
Max. 500 mA
Vitesses de transmission : 32 kbit/s à 320 kbit/s
Line-In Douille de jack 3,5 mm
Casque audio Douille de jack 3,5 mm
Amplificateur
Puissance de sortie 2 x 50 Watt / 6 Ohm
Plage de fréquences 20 Hz – 20kHz (+- 3dB)
Dimensions et poids
Module principal (L x H x P) 260 x 129 x 240 mm / 2,4 kg
Baffles (L x H x P) 173 x 263 x 240 mm / 2,45 kg chaque
unité
Plage de température 0°C à +40°C
20
Sous réserve de modifications techniques
Page 65

Garantie
Cher client,
Nous vous remercions d’avoir opté pour ce produit Kenwood. Si ce produit devait présenter des défauts de pièces ou de main d'œuvre
sous des conditions d’utilisation normales, nous les éliminerons gratuitement ou remplacerons l’appareil à nos frais, conformément à
nos conditions de garantie.
Veuillez conserver soigneusement la présente carte de garantie.
Kenwood accorde sur cet appareil une garantie de deux ans à partir de la date d’achat indiqués sur la facture ou le justificatif d’achat
du revendeur Kenwood.
Cette garantie s’étend aux défauts de pièces et main d'œuvre. Nous nous réservons le droit de remplacer le produit si sa réparation
n’est plus appropriée sur le plan économique. Les coûts d’emballage et d’installation, ainsi que les coûts et risques liés à la réparation
elle-même ne sont pas inclus dans la prestation de garantie et seront facturés.
Conditions
A. Pour faire valoir un droit de garantie, les données suivantes sont nécessaire en plus de la présentation de la présente carte de
garantie :
(a) Vos noms et adresse complets.
(b) Le ticket de caisse ou la facture d’un détaillant domicilié dans un état membre de l’Union Européenne, sur lesquels
(c) Les noms et adresse complets du détaillant auprès duquel le produit a été acheté.
(d) Le numéro de série et la désignation du modèle du produit.
Kenwood se réserve le droit de refuser la prestation de garantie sir les informations indiquées ci-dessus ne sont pas disponibles ou si le
produit a été modifié depuis son acquisition initiale.
B. À a date de la livraison au commerçant, le présent produit satisfait à toutes les normes et disposition de sécurité applicables dans
le pays de destination. Les modifications nécessaires à l’utilisation de l’appareil dans les pays en dehors du pays de destination sont
exclues des dispositions de garantie susnommées. De plus, nous déclinons toute responsabilité pour les interventions réalisées dans ce
contexte, ni pour les détériorations du produit occasionnées par de telles interventions.
Si le produit est utilisé dans un pays pour lequel il n’est ni conçu, ni fabriqué, nos interventions de garantie ne sont réalisées que si
les coûts pour la transformation de l’appareil en fonction des normes et dispositions de sécurité nationales applicables sont prises en
charge par l’utilisateur.
Si de plus, le produit est différent des produits commercialisés par l’importateur officiel et si certaines pièces détachées n’étaient pas
disponibles pour la réparation du produit, l’utilisateur doit prendre en charge les frais pour les transports aller et retour de l’appareil vers
et depuis le pays d’acquisition.
Cela s’applique également si dans le pays concerné, les prestations de garantie ne peuvent pas être proposées pour d’autres raisons.
C. Sont exceptés des prestations de garantie :
(a) Les modifications du produit ainsi que les opérations de maintenance et de réglage normales, y compris les contrôles réguliers
(b) Les dommages sur le produit occasionnés par des opérations défectueuses ou non-conformes, si ces opérations ont été réalisées par
(c) Les dommages occasionnés par de la négligence, des accidents, des modifications, un montage non-conforme, un emballage insuffi-
(d) Les dommages liés au feu, les dégâts des eaux, la foudre, les tremblements de terre, une ventilation insuffisante, des cas de force
(e) La détérioration des haut-parleurs par un fonctionnement à des puissances supérieures à celles indiquées. Les détériorations de
(f) Les consommables et pièces d’usure à remplacer dans le cadre du service clients normal, par ex. : les systèmes de prise de sons,
(g) Tous les produits dont le ou les numéros de série ont été retirés entièrement ou en partie, modifiés ou rendus illisibles.
Cette garantie peut être exercée par toute personne ayant acquis le produit en toute légalité.
Conformément aux dispositions de garantie sus-nommées, le produit est réparé ou remplacé gratuitement. Ce droit ne nuit en aucun
cas aux autres droits de l’utilisation dans le cadre des dispositions juridiques applicables.
La réparation ou le emplacement ne donnent pas lieu à une prolongation de la durée de garantie.
Les droits complémentaires sont exclus, notamment ceux relatifs à la rédhibition, la réduction du prix ou les dommages-intérêts.
Coordonnées :
JVCKENWOOD EUROPE B.V. Succursale France
7 Allee des Barbanniers,
92632 Gennevilliers CEDEX
Tel. 09-69-390-811 www.kenwood-electronics.fr
figurent la date d’achat d’origine.
indiqués dans la notice d’emploi.
des tiers qui n’ont pas été habilités pour la réalisation de prestations de garantie au nom du fabricant.
sant, des erreurs d’utilisation ou l’usage de pièces détachées erronées lors d’une réparation.
majeure, le raccordement à une tension de secteur erronée ou d’autres causes non imputables à Kenwood.
disques, bandes sonores, cassettes audio et vidéo, disques compacts CD et autres objets qui ne font pas partie du produit.
les aiguilles de tourne-disques, les courroies d’entraînement, les têtes de lecture audio, les inserts, les meubles audio, les batteries
sèches, les accus rechargeables, les canules de puissance, etc.
21
Page 66

Page 67

Sistema stereo compatto
M-822DAB
MANUALE DI ISTRUZIONI
DEUTSCH
FRANÇAIS
ITALIANOENGLISH
NEDERLANDS
Page 68

Prima della messa in servizio
Contenuto
Prima di attivare la tensione di alimentazione
Indicazioni di sicurezza
Prima della messa in servizio
Collegamento
Come maneggiare i CD
Informazioni utili sui dispositivi USB
Nomi e funzioni dei componenti
Funzioni di base
Accensione del sistema
Spegnimento in Standby
Regolatore del volume
Regolazione dell'audio
Utilizzo di CD e USB
Preparazione
Riproduzione di un CD o di un file audio (USB, CD)
Selezione di una cartella (solo file audio)
Programmazione di brani e file
- Procedura per CD audio
- Procedura per file audio
Riproduzione casuale e funzione di ripetizione
- Procedura per CD audio
- Procedura per file audio
Uso della radio DAB+
Impostazione delle stazioni DAB+
Selezione di una stazione DAB+
Memorizzazione delle stazioni nella memoria delle stazioni
Informazioni DAB+ avanzate
Funzioni di menu DAB+
Uso della radio FM
Impostazione dei trasmettitori FM
Memorizzazione delle stazioni nella memoria delle stazioni
Funzioni di menu FM
Uso di BLUETOOTH
Accoppiamento di dispositivi BLUETOOTH
Riproduzione tramite BLUETOOTH
Utilizzo di Line-In
Ora/data, sleep timer, sveglia
Risoluzione dei problemi
Informazioni generali
Cura e manutenzione
Smaltimento
Dati tecnici
Garanzia
3
3
6
6
7
7
8
9
9
9
9
9
9
9
10
10
11
11
11
12
12
12
12
12
13
13
14
14
15
15
15
15
16
16
16
16
17
18
18
18
19
20
21
ITALIANO
2
Page 69

Prima di attivare la tensione di alimentazione
IMPORTANTI ISTRUZIONI DI SICUREZZA
Attenzione: Leggere attentamente questa pagina per garantire un funzionamento sicuro dell'unità.
Leggere attentamente queste istruzioni!
– Seguire tutte le istruzioni di sicurezza e d'uso durante l'utilizzo di questo prodotto.
Conservare le note in un luogo sicuro!
– Conservare le istruzioni di sicurezza e d'uso per future consultazioni.
Osservare tutte le indicazioni di avvertenza!
– Seguire scrupolosamente tutte le avvertenze riportate sul prodotto e nelle istruzioni per l'uso.
1. Pulire solo con un panno asciutto!
– Prima di pulire il prodotto, scollegare l'alimentatore di rete dalla presa a muro. Non utilizzare mai
detergenti liquidi o spray di pulizia. Per la pulizia utilizzare solo un panno leggermente umido.
2. Accessori
– Utilizzare solo gli accessori specificati dal produttore.
3. Non usare questo prodotto vicino all'acqua.
– Non esporre mai l'apparecchio a gocce o spruzzi d'acqua - ad esempio in prossimità di una vasca
da bagno, lavabo, lavandino, lavello, lavatrice, cantina umida, piscina, ecc. Non collocare mai sopra
l'apparecchio contenitori pieni di liquidi, come vasi.
4. Ventilazione
– Le fessure e le aperture all'interno dell'involucro sono previste per la ventilazione dell'apparecchio
per garantire un funzionamento affidabile dell'apparecchio, per proteggerlo dal surriscaldamento
e dall'eventuale autoaccensione. Non bloccare le aperture di ventilazione. Installare l'apparecchio
secondo le istruzioni del produttore. Non bloccare mai le aperture di ventilazione collocando l'apparecchio su un letto, un divano, una moquette o una superficie morbida simile. Questa unità non deve
essere installata in una libreria o in un mobile a incasso, a meno che non si provveda a una ventilazione adeguata come descritto nelle istruzioni di installazione del produttore.
5. Alimentazione della tensione
– Questo apparecchio può essere collegato esclusivamente alla tensione di rete indicata sull’apparecchio stesso. Se non siete sicuri del tipo di alimentazione elettrica della vostra casa, contattate il vostro
rivenditore o l'azienda elettrica locale.
6. Cavo di rete
– Assicurarsi che non sia possibile inciampare sul cavo di rete e che esso non sia scollegato nelle
immediate vicinanze di una presa, comprese le uscite aggiuntive. Inoltre, non schiacciare il cavo di
alimentazione quando esce dall'unità.
7. Intemperie
– Scollegare l'apparecchio dalla rete elettrica durante i temporali e quando non verrà utilizzato per un
lungo periodo di tempo.
3
Page 70

8. Sovraccarico
– Non sovraccaricare mai le prese di alimentazione, le prolunghe o le prese multiple, in quanto sussis-
te il rischio di incendio o scossa elettrica.
9. Penetrazione di materiale estraneo e liquido
– Non permettere che materiali estranei o liquidi entrino nell'apparecchio attraverso le aperture in
dotazione, poiché ciò potrebbe causare il contatto diretto dell'apparecchio con elementi soggetti a
tensioni eccessive, provocare cortocircuiti, incendi o scosse elettriche. Non versare mai liquidi di alcun
tipo su questo apparecchio.
10. Manutenzione
– Non tentare mai di riparare l'apparecchio da soli, poiché le aperture o la rimozione dei coperchi
possono esporre parti sotto tensione, che sono fonte di pericolo. Le parti possono essere esposte e
toccarle può essere fonte di pericolo. Affidate tutti i lavori di manutenzione a personale qualificato
dell'assistenza clienti.
11. Danni che richiedono una riparazione
– I lavori di manutenzione e riparazione devono essere eseguiti esclusivamente da un centro di assistenza clienti qualificato.
L'assistenza è necessaria quando l'apparecchio è stato danneggiato (ad esempio, cavo di
alimentazione o la espina), è stato versato del liquido, sono caduti oggetti all'interno dell'apparecchio,
oppure l’apparecchio è stato esposto a pioggia o umidità, non funziona normalmente o è caduto.
12. Ricambi
– Se sono necessarie parti di ricambio, assicurarsi che l’addetto dell'assistenza tecnica Vengono
utilizzati i ricambi prescritti dal produttore o che hanno le stesse caratteristiche delle parti originali.
Ricambi non autorizzati possono causare incendi, scosse elettriche o altri incidenti.
13. Controllo di sicurezza
– Al termine dei lavori di manutenzione o riparazione di questo apparecchio, chiedere al tecnico
dell'assistenza di eseguire un controllo di sicurezza per determinare se l'apparecchio è in perfette
condizioni di funzionamento.
14. Montaggio a parete o a soffitto
– Questa unità può essere montata a parete o a soffitto solo come raccomandato dal produttore.
15. Calore
– Non installare l'unità in prossimità di superfici calde come radiatori, termoventilatori, stufe o altre
apparecchiature (compresi gli amplificatori) che potrebbero surriscaldarsi. Non collocare mai oggetti
con fiamme libere, come candele o lanterne, sopra o vicino al prodotto. Non esporre le batterie
installate a calore eccessivo, come luce solare diretta, fuoco o simili.
16. Linee elettriche
– Un'antenna esterna non deve essere collocata vicino a linee elettriche o ad altre apparecchiature
elettriche
Cavi elettrici o in luoghi in cui può cadere su tali cavi elettrici.
Durante l'installazione di un'antenna esterna, è necessario prestare la massima attenzione a non
toccare accidentalmente i cavi elettrici, in quanto ciò è pericoloso per la vita.
17. Batterie
- Se non si utilizza l'unità per un mese o più, rimuovere le batterie dal vano batterie del telecomando
per evitare perdite. Smaltire immediatamente le batterie che presentano perdite e rispettare tutte
le disposizioni di legge pertinenti. La perdita delle batterie può causare lesioni e danneggiare il
dispositivo.
Non combinare mai batterie di tipo diverso o batterie vecchie e nuove.
4
Page 71

Rischi associati a volumi elevati
– Per evitare possibili danni all'udito, non ascoltare ad alto volume per lunghi periodi di tempo.
Ciò è particolarmente vero quando si utilizzano le cufe.
Telecomando
–
Se si espone il sensore del telecomando alla luce solare diretta o alla luce di tubi fluorescenti ad alta
frequenza, possono verificarsi dei malfunzionamenti. In questi casi collocare il sistema in un altro
posto per evitare tali malfunzionamenti.
–
La batteria fornita in dotazione è pensata per un test funzionale e può avere una durata limitata.
Quando il raggio d’azione del telecomando diminuisce, sostituire la batteria vecchia con una nuova.
Prudenza!
Pericolo di esplosione
– Se si utilizzano batterie del tipo sbagliato; temperature estremamente alte o basse a cui una batteria
può essere esposta durante l'uso, lo stoccaggio o il trasporto
– Bassa pressione dell'aria ad alta quota; smaltire una batteria in un fuoco o in un forno caldo; schiac-
ciare o tagliare meccanicamente una batteria; lasciare una batteria in un ambiente con temperature
estremamente elevate o con una pressione dell'aria estremamente bassa, il che potrebbe causare
un'esplosione o una fuoriuscita di liquidi o gas infiammabili.
Per ridurre al minimo il rischio di scosse elettriche, incendi, ecc
- non rimuovere viti, coperture o parti dell'alloggiamento.
- il pulsante di accensione non scollega completamente l'alimentazione in nessuna posizione.
Poiché la spina di rete viene utilizzata per lo scollegamento completo dalla rete, deve essere lasciata
attaccata al cavo di rete e rimanere sempre accessibile.
Funzione automatica di risparmio energetico
Il modello è dotata di una funzione automatica di risparmio energetico. Questo commuta l'apparecchio in modalità standby entro 15 minuti se la radio è in riproduzione a volume molto basso o se la
radio è silenziata. Questa impostazione non può essere modificata.
Dichiarazione di conformità UE
JVCKENWOOD Corporation dichiara che l'apparecchiatura radio tipo M-822DAB è conforme alla
Direttiva 2014/53/UE. Il testo integrale della dichiarazione di conformità UE è disponibile al seguente
indirizzo Internet:
https://www.kenwood.com/euukdoc/
Produttore:
3-12. Moriyacho, Kanagawa-ku, Yokohama-shi, Kanagawa 221-0022, JAPAN
Rappresentante autorizzato (UE):
Amsterdamseweg 37, 1422 AC UITHOORN, THE NETHERLANDS
IMPORTANTE PER PRODOTTI LASER
1. PRODOTTO LASER DI CLASSE 1
2. PRUDENZA: Non aprire l’alloggiamento. L’apparecchio non contiene pezzi che possono
essere sottoposti a manutenzione da parte dell’utente; fare eseguire le operazioni di
manutenzione esclusivamente a personale specializzato qualificato.
5
Page 72
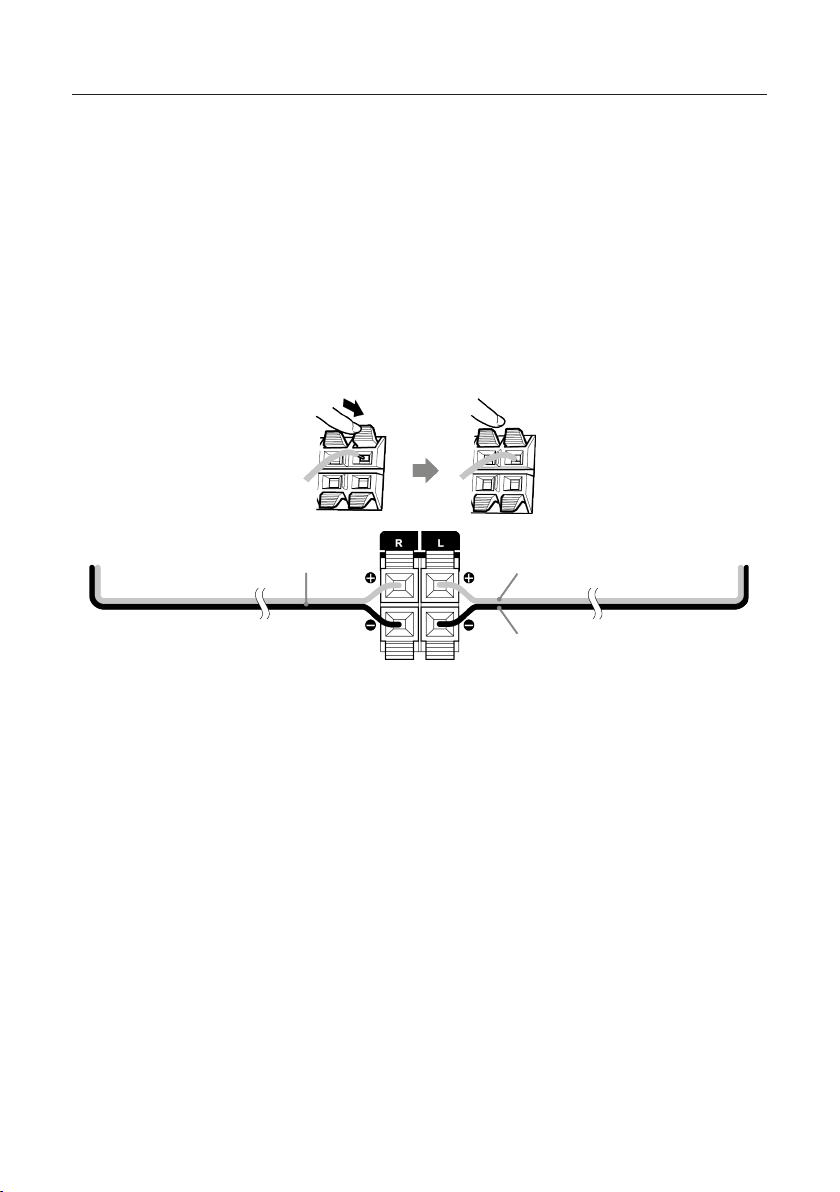
Prima della messa in servizio
Sconfezionamento
Sconfezionare delicatamente il dispositivo e assicurarsi che tutti gli accessori siano presenti:
2 x altoparlante / telecomando / antenna di lancio FM/DAB / 2x batteria R03/AAA 1,5 volt
Collegamento
• Aprire il vano batterie del telecomando e inserire le batterie con la polarità corretta.
La polarità specificata (+/-) è indicata nel vano batterie.
Collegare gli altoparlanti sulla presa e destra e a sinistra (all’uscita altoparlante) sul retro dell'unità.
A tale scopo, premere le clip a molla e inserire le estremità dei cavi sfusi nelle aperture previste.
Collegare il filo nero con il morsetto a molla nero. L'altro filo è collegato al terminale rosso nello
stesso modo.
Cavo dell’altoparlante Nero/ grigio
Nero
• Collegare saldamente la spina di alimentazione a una presa di corrente. Poiché la spina di rete
serve per scollegarsi completamente dalla rete, la presa deve rimanere sempre accessibile.
Attacco antenna mobile DAB+ / FM
1. Collegare l'antenna mobile alla presa [ANTENNA FM 75Ω].
2. Trovare il luogo dove si ottiene la migliore ricezione.
3. Fissare l'antenna.
L'antenna fornita con il sistema è una semplice antenna mobile. Per una
ricezione stabile del segnale, si raccomanda l'uso di un'antenna esterna (disponibile in commercio).
Per collegare un'antenna esterna, prima scollegare l'antenna interna.
La ricezione delle stazioni radio dalla rete via cavo non può essere garantita.
6
Page 73

Primo utilizzo
Quando l'unità viene accesa per la prima volta, viene avviata una ricerca automatica delle stazioni
DAB+. Attendere il completamento di questa procedura. Per ulteriori informazioni, consultare la
sezione "Uso della radio DAB+".
Come maneggiare i CD
Precauzioni per la manipolazione
Tenere il CD in modo da non toccare la superficiedel segnale.
(Il lato non stampato è il lato di riproduzione.)
Precauzioni relative ai CD
Utilizzare esclusivamente CD con la marcatura . Un CD privo di questa marcatura potrebbe non
essere riprodotto correttamente.
Informazioni utili sui dispositivi USB
Indicazioni per l’utilizzo di un dispositivo USB
Questo apparecchio è in grado di riprodurre file audio salvati su una memoria flash o su un audio
player digitale, se questi dispositivi dispongono di una porta USB (Nel presente documento questi
apparecchi vengono definiti dispositivi USB).
Per quanto concerne i dispositivi USB utilizzabili valgono le seguenti limitazioni:
Dispositivi USB utilizzabili
• Dispositivi USB appartenenti alla classe dei dispositivi di memoria di massa USB.
• I dispositivi USB il cui assorbimento massimo di corrente non supera i 500 mA.
• Classe dei dispositivi di memoria di massa USB: Dispositivi USB che il PC riconosce come memorie
esterne, senza che siano necessari un driver o un software di utilizzo speciali.
• Consultare il proprio rivenditore se non si è sicuri se il proprio dispositivo USB è conforme alle
specifiche per la classe dei dispositivi di memoria di massa USB.
• L’utilizzo di un dispositivo USB non supportato può determinare una riproduzione o una
visualizzazione errate dei fileaudio.
Anche quando si utilizza un dispositivo USB conforme alle specifiche summenzionate, è possibile che i
file audio, in base al tipo o allo stato del dispositivo USB, non vengano riprodotti correttamente.
7
Page 74
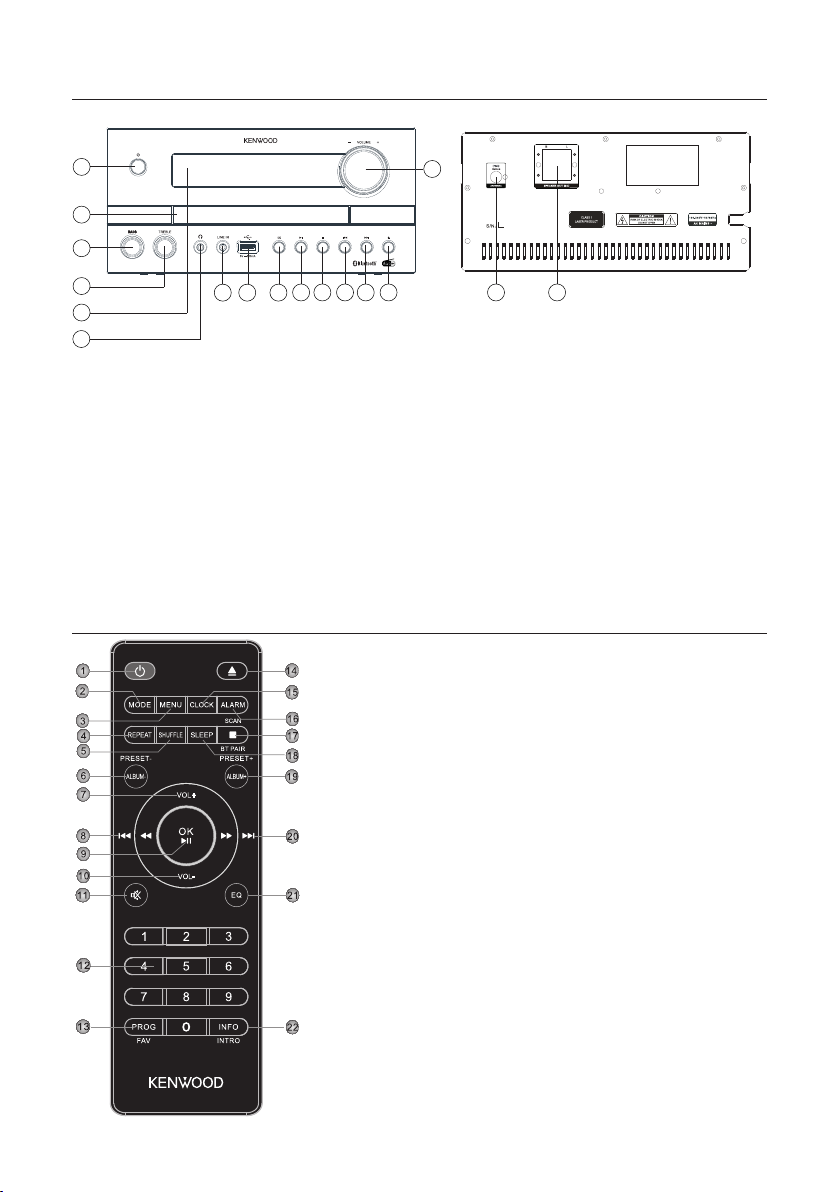
Componenti e funzioni
Lato anteriore Lato posteriore
1
15
2
3
4
5
6
7 8 9
10 11 12
13
14
16 17
1- Stand-by / On
2- Vassoio CD
3 - Controllo dei bassi
4 - Controllo degli acuti
5 - Display
6 - Attacco cuffie
10 - Play/Pausa
11 - Stop
12 - Precedente (brano indietro)
13 - Avanti (brano avanti)
14 - Apertura / Chiusura (Espulsione)
15 - Volume
7- Collegamento in linea
8 - Porta USB
9 - Selezione sorgente (MODO)
16 - Collegamento antenna FM / DAB+
17 - Collegamenti degli altoparlanti
Telecomando
1 Standby On/Off
2 Selezione della modalità (sorgente)
3 Menu
4 Ripetere la selezione
5 Modalità random
6 Album precedente, memoria preimpostata -
7 Aumento volume
8 Salto del brano/ricerca brano all'indietro
9 Conferma ingresso, riproduzione/pausa
10 Diminuire il volume
11 Silenziamento On/Off (Mute)
12 Tasti numerici
13 Prog. dei titoli, occupazione della memoria di preselezione
14 Apertura/chiusura del vassoio CD (espulsione)
15 Impostare l'orologio
16 Impostazione sveglia
17 Arresto della riproduzione, accoppiamento BLUETOOTH,
ricerca delle stazioni
18 Impostare il timer di sleep
19 Album successivo, memoria preimpostata +
20 Salta la brano /ricerca del brano avanti
21 Selezionare la preimpostazione dell'equalizzatore
22 Commutazione delle informazioni sul display, durante la
riproduzione 10 secondi di introduzione per brano
8
Page 75

Funzioni di base
Accensione del sistema: Premere il tasto <STANDBY sul telecomando o sul displaydel dispositivo
principale. Il display visualizza "BENVENUTO".
Spegnimento in Standby: Premere il tasto <STANDBY sul telecomando o sull'unità principale. Il
display appare "STANDBY" e l'unità passa in modalità standby.
Regolatore del volume
Sul telecomando: Premere i tasti <VOL+> per aumentare o premere il tastopulsante <VOL-> per
diminuire il volume.
Sull’apparecchio principale: Ruotare la manopola <Volume> per aumentare o diminuire il volume.
A volume minimo "VOL 00" al massimo volume "VOL 32" viene visualizzato brevemente nel display.
Spegnimento temporaneo del volume: Premere a tale scopo il tasto <MUTE> sul telecomando.
Sul display lampeggia "MUTE". Premendo di nuovo il tasto, viene ripristinato il volume iniziale.
Regolazione dell'audio
Sie può alzare o abbassare i livelli dei bassi e degli acuti in base alla musica che preferisce.
Suldispositivo principale: Ruotare il comando BASSI o ACUTI per regolare il livello di guadagno:
Range di controllo da -6 a +6.
Equalizzatore
Sul telecomando: Premere il tasto <EQ> per accedere alle seguenti impostazioni in
sequenza: FLAT -> CLASSICO -> POP -> JAZZ -> ROCK
Utilizzo di CD e USB
Preparazione
Inserire un CD
1. Premere il pulsante <EJECT> sull'unità principale o sul telecomando per aprire il vano CD.
2. Inserire un CD con il lato stampato rivolto verso l’alto nell’apposito vano.
3. Premere il pulsante <EJECT> sull'unità principale o sul telecomando per chiudere il vano CD
Rimozione di un CD
1. Premere il pulsante <EJECT> sull'unità principale o sul telecomando per aprire il vano CD.
2. Estrarre con cautela il CD dal vano CD.
3. Premere il pulsante <EJECT> sull'unità principale o sul telecomando per chiudere il vano CD.
9
Page 76

Collegamento di dispositivi USB
1. Premere il tasto <STANDBY> per selezionare la modalità standby.
2. Collegare il dispositivo USB alla porta USB posta sul lato anteriore.
Scollegamento del dispositivo USB
1. Premere il tasto <STANDBY> per selezionare la modalità standby.
2. Staccare il dispositivo USB dalla porta USB.
• Attendere che l’apparecchio abbia letto completamente il CD / dispositivo USB prima di proseguire.
• Se non è inserito nessun CD nell’apposito vano, viene visualizzato "NO DISC".
• Se nel dispositivo USB non è presente nessun file audio riproducibile, viene visualizzato
"NO SONG".
• Per i file audio il tempo di lettura può durare più di 10 secondi, se su un CD o un dispositivoUSB
sono presenti molti brani musicali.
Riproduzione di un CD o di un le audio (USB, CD)
Sul telecomando: Utilizzare il tasto <MODE> per selezionare la sorgente e premere il tasto
pulsante <play/pausa> per avviare la riproduzione.
Sull’apparecchio principale: Utilizzare il tasto <MODO> per selezionare la sorgente desiderata e
premere il tasto pulsante <play/pausa> per Avviare la riproduzione
Per dispositivi USB o CD contenenti file audio (ad es. MP3), il numero delle cartelle e dei file presenti
viene visualizzatonel modo seguente:
Fxx XXX
In questo caso la cifra dopo la lettera "F" indica il numero delle cartelle mentre il secondo gruppo di
numeri indica la quantità totale di file.
Per i CD audio l’informazione relativa al numero di brani e alla durata totale del brano, viene
visualizzata nel modo seguente:
XX XX:XX
In questo caso il primo gruppo di numeri indica il numero dei brani e il secondo il tempo di
riproduzione totale del CD.
Funzioni operative fondamentali
Arresto della riproduzione: Premere il tasto <Stop> sull'unità principale o sul telecomando per
interrompere la riproduzione.
Interruzione della riproduzione: Premere il tasto <play/pausa> sull'unità principale o sul
telecomando per mettere in pausa la riproduzione. In questo caso lampeggia l’indicazione sul display.
Premendo di nuovo il tasto, la riproduzione riprende.
Ricerca di un passaggio determinato mentre è in corso la riproduzione: Tenere premuto il tasto
<Brano avanti> o <Brano indietro> sull'unità principale o sul telecomando per più di 2 secondi
per attivare un avanzamento rapido avanti o indietro. Non appena si raggiunge il punto desiderato,
rilasciare il tasto corrispondente.
Selezione di un determinato brano: Premere il tasto <Brano avanti> o <Brano indietro>
sull’apparecchio principale o sul telecomando nella modalità di riproduzione, pausa o stop. I titoli
possono essere selezionati direttamente con i tasti numerici del telecomando.
Selezione di una determinata cartella (solo per i le audio): Premere i tasti <ALBUM+> o
<ALBUM-> sul telecomando per selezionare una cartella.
10
Page 77

Riprodurre brevemente il brano: Tenere premuto il tasto <INTRO> sul telecomando per riprodurre
i brani per 10 secondi. Premendo nuovamente si interrompe la modalità.
Programmazione di brani e le
Con il telecomando è possibile programmare i brani di un CD audio o i file nella sequenza desiderata.
Per questo è disponibile il seguente numero di posizioni di memoria:
CD audio: 20 posizioni di memoria File: 99 posizioni di memoria
Procedura per CD audio
1. La fonte "CD" deve essere in modalità di arresto, altrimenti il display visualizzerà "STOP FIRST".
2. Premere il tasto <PROG> per avviare la modalità di programmazione.
3. Il display mostra ora "P01 001" dove "01" lampeggia. Il primo blocco numerico mostra il brano
corrente, il secondo blocco numerico la posizione di memoria corrente.
4. Selezionare con il tasto <Brano avanti> o <Brano indietro> il brano che si desidera salvare nella
posizione di memoria attuale. I brani possono essere selezionati anche con i tasti numerici del
telecomando.
5. Premere il tasto <PROG> per confermare la procedura.
6. Successivamente viene visualizzata la posizione di memoria successiva. Ripetere i passaggi 4 e 5
fino alla conclusione della selezione o fino a quando le posizioni di memoria sono occupate. In
questo caso viene visualizzato "Full" sul display.
7. Con la chiave pulsante <play/pausa> per avviare la riproduzione dei brani programmati. Durante
la riproduzione, vengono visualizzati alternativamente il numero del brano e la posizione del programma.
8. Premendo due volte il tasto <STOP> si cancella la programmazione.
Procedura per le audio
1. La fonte "USB" deve essere in modalità di arresto, altrimenti il display visualizzerà "STOP FIRST".
2. Premere il tasto <PROG> per avviare la modalità di programmazione.
3. Il display mostra ora "P01 001" dove "01" lampeggia. Il primo blocco numerico mostra il brano
corrente, il secondo blocco numerico la posizione di memoria corrente.
4. Selezionare con il tasto <Brano avanti> o <Brano indietro> il brano che si desidera salvare nella
posizione di memoria attuale. I brani possono essere selezionati anche con i tasti numerici del
telecomando.
5. Premere il tasto <PROG> per confermare la procedura.
6. Successivamente viene visualizzata la posizione di memoria successiva. Ripetere i passaggi 4 e 5
fino alla conclusione della selezione o fino a quando le posizioni di memoria sono occupate. In
questo caso viene visualizzato "FULL" sul display.
7. Con la chiave pulsante <play/pausa> per avviare la riproduzione dei brani programmati. Durante
la riproduzione, vengono visualizzati alternativamente il numero del brano e la posizione del programma.
8. Premendo due volte il tasto <STOP> si cancella la programmazione.
• Se durante la programmazione viene premuto il tasto <STOP> si interrompe la procedura.
Lo spegnimento dell’apparecchio elimina un programma esistente.
11
Page 78

Riproduzione casuale e funzione di ripetizione
Procedura per CD audio
• Sul telecomando premere il tasto <SHUFFLE> per avviare la riproduzione casuale. Il display
visualizza "SHUF" e la riproduzione può essere avviata. Premere due volte il pulsante <SHUFFLE>
opremendo il tasto <STOP> annulla la riproduzione casuale.
• Sul telecomando premere il tasto <REPEAT> per attivare la funzione di ripetizione.
Premendo piùvolte si attivano le seguenti funzioni:
Ripetizione del brano attuale (display "RPT ONE")
Ripetizione di tutti i brani (display "RPT ALL")
Controlloselezione della funzione di ripetizione (Display "RTP OFF")
Con la chiave pulsante <play/pausa> per avviare la riproduzione.
Premendo il tasto <Stop> si disattiva la funzione di ripetizione.
Procedura per le audio
• Sul telecomando premere il tasto <SHUFFLE> per avviare la riproduzione casuale. Il display
visualizza "SHUF" e la riproduzione può essere avviata. Premere due volte il pulsante <SHUFFLE>
opremendo il tasto <STOP> annulla la riproduzione casuale.
• Sul telecomando premere il tasto <REPEAT> per attivare la funzione di ripetizione.
Premendo piùvolte si attivano le seguenti funzioni:
Ripetizione del brano attuale (display "RPT ONE")
Ripetizione di tutti i brani (display "RPT ALL")
Ripetizione dell'album corrente ("RPT ALB")
Spegnere la funzione di ripetizione (Display "RTP OFF")
Con la chiave pulsante <play/pausa> per avviare la riproduzione.
Premendo il tasto <Stop> si disattiva la funzione di ripetizione.
Uso della radio DAB+
Stampapremere il tasto <MODE> pulsante sul telecomando o sull'unità principale fino a quando sul
display non compare la scritta "DAB" appare.
Impostazione delle stazioni DAB+
La ricerca delle stazioni era già stata effettuata quando l'apparecchio è stato messo in funzione. Le
emittenti trovatesono memorizzate in ordine alfabetico nell'elenco delle stazioni.
12
Page 79

Riavvio della ricerca automatica delle stazioni
• Premere il tasto <MENU> per accedere al menu DAB.
Il display visualizza "FULL SCAN". Avviare la ricerca con il tasto <OK>.
• Durante la ricerca, il display mostra il numero di stazioni trovate finora.
• Se durante la ricerca non viene trovata alcuna stazione, viene visualizzato "NO DAB" per circa 2
secondi "NO DAB" appare sul display per circa 2 secondi e poi passa al display "FULL SCAN".
Controllare quindi il corretto collegamento dell'antenna o cercare di trovare un'altra posizione per
l'unità per ottenere una migliore ricezione.
Impostazione manuale dell’emittente
• Premere il tasto <MENU> per accedere al menu DAB.
• Premere il tasto <Brano avanti> fino a quando "MANUAL" appare sul display.
• Con il tasto <OK> la funzione viene confermata e sul display viene visualizzato il canale attualmente
impostato con la frequenza corrispondente.
• Premere il tasto <Brano avanti> o <Brano indietro> per selezionare manualmente un altro canale.
• Premere il tasto <OK> per confermare la selezione. Il livello del segnale viene quindi visualizzato sul
display, premendo il tasto ancora una volta si carica l’attuale emittente.
Selezione di una stazione DAB+
Le stazioni memorizzate in ordine alfabetico nell'elenco delle stazioni possono essere richiamate come segue:
• Premere il tasto <Brano avanti> o <Brano indietro> sul telecomando o sull'unità per scorrere in
avanti o indietro l'elenco delle stazioni.
• Una volta selezionata la stazione desiderata, premere il tasto <OK> sul telecomando o attendere
circa 2 secondi per avviare la riproduzione.
Il display visualizza "LOADING" seguito da "PLAYING".
• Se il livello di ricezione della stazione selezionata non è sufficiente per una riproduzione priva di interferenze, sul display viene visualizzato il seguente messaggioappare sul display "OFF AIR". Quindi
selezionare un'altra stazione.
Memorizzazione delle stazioni nella memoria delle stazioni
Per facilitare la ricerca a un stazione DAB sono disponibili 30 posizioni di memoria. Per l’occupazione
della memoria, procedere come segue:
• Selezionare una stazione da memorizzare
• Premere il tasto <PROG> finché il display non lampeggia e visualizza una posizione di memoria.
Una posizione di memoria vuota è indicata con "EMPTY" e viene visualizzata una posizione di
memoria occupata con il nome della stazione. Può essere occupata di nuovo anche una memoria
già usata.
• Premere il tasto <Brano avanti> o <Brano indietro> per selezionare una posizione di memoria.
• Con la chiave <OK> tasto per confermare la memorizzazione. Sul display lampeggia brevemente
quanto segue "STORED".
• Le stazioni memorizzate possono essere richiamate come segue:
Premere i tasti numerici del telecomando per inserire direttamente il numero della posizione di
memoria. Chiudere l'ingresso con il tasto <OK> pulsante. In alternativa, è possibile premere il tasto
<PROG> seguito da <Brano avanti> o <Brano indietro> per effettuare una selezione.
13
Page 80

Informazioni DAB+ avanzate
Con DAB+, oltre al segnale musicale, vengono trasmesse informazioni aggiuntive. Esse possono essere
recuperati come segue.
Premere il tasto <INFO> sul telecomando per richiamare le seguenti informazioni in successione:
• Livello del segnale: Il display visualizza i simboli da sinistra a destra.
Più simboli sono visualizzati, migliore è la ricezione.
• PTY (tipo di programma): Si riferisce alla classificazione dei canali per categorie, come pop, notizie,
religione, informazioni, classici e così via.
• Nome dell'emittente radio ad es DR Deutschland
• Visualizzazione del canale e della frequenza della stazione impostata
• ERR XX: Questa informazione mostra il tasso di errore della ricezione digitale. Questo dipende anche dal
livello del segnale e può essere utilizzato anche per allineare l'antenna.
• XX K BPS: Visualizzazione della velocità di trasmissione dati della stazione, ad es. 80 kBit/s. La velocità di
trasmissione dati può variare da un’emittente all'altra.
• DABPLUS: Indica il modo di ricezione "DAB+".
• Ora corrente
• Data corrente
Funzioni di menu DAB+
Il tasto <MENU> apre un menu in cui è possibile impostare diverse funzioni per DAB+. Usare i tasti <Brano
avanti> o <Brano indietro> per scorrere il menu. Sono disponibili le seguenti funzioni:
• FULL SCAN: Nuova ricerca automatica delle stazioni. Confermare la selezione premendo il tasto <OK>.
• MANUAL: Questo consente di impostare manualmente un determinato canale di ricezione.Con il tasto
<OK> viene confermata la funzione e sul display viene visualizzato il canale attualmente impostato con la
frequenza corrispondente.
• Premere il tasto <Brano avanti> o <Brano indietro> per selezionare manualmente un altro canale.
• Premere il tasto <OK> per confermare la selezione. Il livello del segnale viene quindi visualizzato sul display,
premendo il tasto ancora una volta si carica l’attuale emittente.
• DRC (Dynamic Range Control): Se supportato dalla stazione selezionata, effettuare un adattamento
dell’intervallo dinamico. Le impostazioni possibili sono "OFF", "LOW" e "HIGH". La selezione si effettua con
i tasti <Brano avanti> o <Brano indietro>, la selezione viene confermata con il tasto <OK>.
• PRUNE: Consente di eliminare le stazioni non valide dall'elenco delle stazioni. Selezionare con il tasto <OK>,
"NO/SÌ" con <Brano avanti> o <Brano indietro> e confermare con <OK>.
• SYSTEM: Solo per il servizio clienti!
Uso della radio FM
Stampapremere il tasto <MODE> pulsante sul telecomando o sull'unità principale fino a quando sul display
non compare la scritta "FM" appare.
Impostazione di un stazione FM
• Premere il tasto <Brano avanti> per aumentare la frequenza di ricezione.
• Premere il tasto <Brano indietro> per ridurre la frequenza di ricezione. Se si tengono premuti questi
pulsanti, si avvia una ricerca automatica delle stazioni che si interrompe alla stazione successiva trovata.
• Tenere premuto il tasto <SCAN> per avviare la ricerca delle stazioni con memorizzazione automatica delle
stazioni trovate. Vengono memorizzate un massimo di 30 stazioni nell'ordine trovato.
14
Page 81

Uso del Radio Data System (RDS)
RDS è un sistema di trasmissione in cui i trasmettitori VHF trasmettono ulteriori informazioni utili insieme
al segnale di trasmissione effettivo. Queste possono essere estratte dal normale segnale di trasmissione
e utilizzate per una serie di funzioni aggiuntive. Se viene ricevuto un segnale RDS, il display visualizza
"RDS"Si accende sotto il display della frequenza e dopo un po' viene visualizzato il nome della stazione al
posto della frequenza.
Funzioni RDS
Premendo ripetutamente il tasto <INFO> si possono richiamare le seguenti informazioni:
• Testo radio - Se la stazione non trasmette alcun testo radiofonico, viene visualizzato "NO TEXT".
• PTY (Tipo di programma) - Se non viene inviato alcun segnale PTY dal trasmettitore, "NO PTY".
• Frequenza e posizione di memoria della stazione ricevuta
• Visualizzazione stereo / mono
• Ora - Se la stazione non trasmette alcun segnale dell’orario, "00_00_00".
• Data - Se non viene trasmesso alcun segnale di data dalla stazione, "00-00-00".
Se le condizioni di ricezione sono insufficienti, viene visualizzato il messaggio "RDS se l'indicatore" è
acceso, la ricezione dei segnali potrebbe essere disturbata o non possibile.
Memorizzazione delle stazioni nella memoria delle stazioni
Per facilitare la ricerca a un stazione FM sono disponibili 30 posizioni di memoria. Per l’occupazione della
memoria, procedere come segue:
• Selezionare una stazione da memorizzare
• Premere il tasto <PROG> finché il display non lampeggia e visualizza una posizione di memoria. Una
posizione di memoria vuota è indicata con "EMPTY" e una posizione di memoria occupata con la
frequenza. Può essere occupata di nuovo anche una memoria già usata.
• Premere il tasto <Brano avanti> o <Brano indietro> per selezionare una posizione di memoria.
• Con la chiave <OK> Tasto per confermare la memorizzazione. Sul display lampeggia brevemente quanto
segue "STORED".
• Le stazioni memorizzate possono essere richiamate come segue:
Premere i tasti numerici del telecomando per inserire direttamente il numero della posizione di memoria.
Chiudere l'ingresso con il tasto <OK> pulsante. In alternativa, è possibile premere il tasto <PROG>
seguito da <Brano avanti> o <Brano indietro> per effettuare una selezione.
Funzioni di menu FM
Il tasto <MENU> apre un menu in cui è possibile impostare diverse funzioni per DAB+. Usare i tasti
<Brano avanti> o <Brano indietro> per scorrere il menu.
Sono disponibili le seguenti funzioni:Sono disponibili le seguenti funzioni:
• SCAN SET: In questo modo è possibile impostare quali stazioni vengono prese in considerazione nella
memorizzazione automatica durante la ricerca. Le impostazioni possibili sono "ALL" (tutte le stazioni
attive) o "STRONG" (solo le stazioni più forti). La selezione si effettua con i tasti <Brano avanti> o
<Brano indietro>, la selezione viene confermata con il tasto <OK>.
• SET AUD: Impostazione per ricezione "Mono" o "Stereo". La selezione si effettua con i tasti <Brano
avanti> o <Brano indietro>, la selezione viene confermata con il tasto <OK>.
• SYSTEM: Solo per il servizio clienti!
15
Page 82

Uso di BLUETOOTH
Stampapremere il tasto <MODE> pulsante sul telecomando o sull'unità principale fino a quando sul
display non compare la scritta "BT" appare.
Se non c'è nessun dispositivo accoppiato nelle vicinanze, l'indicatore lampeggia sul display.
Accoppiamento di dispositivi BLUETOOTH
La funzione BLUETOOTH permette la trasmissione wireless di file musicali (streaming audio) al sistema. Per collegare i dispositivi corrispondenti (ad es. smartphone), procedere come segue:
1. Sul dispositivo BLUETOOTH, aprire la funzione di accoppiamento e cercare i seguenti elementi
"M-822DAB".
2. Selezionare "M-822DAB" per l'accoppiamento e attendere che il display visualizzi "BT" appare sul
display e si sente una sequenza di toni. Il collegamento è ora completo.
3. Se il dispositivo BLUETOOTH richiede un PIN di 4 cifre, inserire "0000".
4. Il dispositivo BLUETOOTH è ora memorizzato e sarà accoppiato automaticamente in futuro.
5. Per collegare un altro dispositivo BLUETOOTH, ripetere i punti 1 - 3.
Riproduzione tramite BLUETOOTH
Per lo streaming di musica via audio, utilizzare un lettore musicale a scelta sul dispositivo BLUETOOTH.
Sono a disposizione le seguenti possibilità di controllo:
• Premere il tasto pulsante <play/pausa> sul telecomando o sull'unità per mettere in pausa o
riprendere la riproduzione.
• Premere i tasti <Brano avanti> o <Brano indietro> sul telecomando o sull'unità principale per
passare alla brano precedente o successiva.
• Quando si preme il tasto pulsante <Stop> sul telecomando o sull'unità principale per 3 secondi,
la connessione BLUETOOTH viene scollegata. Il display lampeggia "BT". Per ricollegarsi, passare
brevemente a un'altra sorgente e poi di nuovo a BLUETOOTH.
Se il collegamento BLUETOOTH deve essere scollegato a causa di distanze maggiori, viene effettuato
un collegamento automatico non appena la distanza viene nuovamente ridotta.
Utilizzo di Line-In
Componenti esterni di processo
Per la riproduzione musicale è possibile collegare dispositivi esterni come lettori MP3, lettori DVD o
console di gioco alla presa line-in.
Stampapremere il tasto <MODE> pulsante sul telecomando o sull'unità principale fino a quando sul
display non compare la scritta "LINE IN" appare.
16
Page 83

Impostazione della data e dell'ora
Quando si riceve il segnale di una stazione DAB+ o VHF di qualità sufficiente, l'ora viene impostata
automaticamente. A seconda dell'intensità di ricezione, questo processo può richiedere del tempo.
Se non è disponibile una stazione corrispondente, è possibile impostare l'ora anche manualmente:
1. Accendere la radio e premere il pulsante <CLOCK> sul telecomando.
2. Successivamente, tramite <Brano avanti> o <Brano indietro> Per selezionare ore, minuti,
giorno, mese e anno, quindi premere il tasto <OK> per confermare.
3. Quando "SALVATO" appare sul display, l'ora e la data sono state salvate.
Regolazione del timer di sospensione
Il timer di spegnimento viene utilizzato per spegnere automaticamente la radio dopo un periodo di
tempo prestabilito. Per effettuare l'impostazione procedere come segue:
1. Accendere la radio e premere il pulsante <SLEEP> sul telecomando.
2. Premendo ripetutamente il tasto, l'orario di spegnimento può essere impostato come segue:
"OFF, 15, 30, 45, 60, 90 minutes"
Un timer di sleep attivo è indicato da "SLEEP" nella riga inferiore del display.
Per mezzo di "SLEEP OFF" un timer attivo viene disattivato.
3. Premendo brevemente il tasto <SLEEP> viene visualizzato il tempo di funzionamento residuo del
timer.
Impostazione della sveglia
Con questa unità è possibile impostare 2 diversi tempi di allarme. Questi tempi di risveglio
possono essere programmati per i seguenti blocchi di tempo: “Daily” / “Once” / “Weekends” /
“Weekdays” Per impostare l'ora della sveglia, procedere come segue:
1. Accendere la radio e premere il pulsante <ALARM> sul telecomando.
2. "ALARM 1" viene visualizzato. Ora è possibile impostare l'ora della sveglia 1o impostarla con i tasti
<Brano avanti> o <Brano indietro> per passare alla sveglia 2 ("ALARM 2").
3. Dopo aver confermato con il <OK> eseguire i seguenti passaggi:
• "ON TIME": Impostazione di ore e minuti, confermare la selezione in ogni caso.
• "DURATION: Impostazione della durata dell'allarme in minuti ("15, 30, 45, 60, 90").
• "SORGENTE: Poi come sorgente DAB, FM, CD, USB o BUZZER e confermare.
• "DEFAULT" oppure selezionare un'altra posizione di memoria e confermare. A "DEFAULT" viene
utilizzata la stazione attualmente impostata. Questa voce di menu appare solo quando si seleziona
DAB o FM come sorgente.
• Nel menu successivo impostare la frequenza con “Daily” / “Once” / “Weekends” / “Weekdays”
selezionare e confermare. Se si selezione "ONCE" impostare la data desiderata.
• Impostare quindi il volume della sveglia con il tasto <VOL+> e <VOL-> e confermare.
• "ALARM ON" o "ALARM OFF" e confermare.
L'ora della sveglia è ora memorizzata e "TIMER" appare in basso a destra del display in standby.
Per l'impostazione della 2° sveglia procedere allo stesso modo per regolare l'ora. Per eliminare una
sveglia impostata, nell'ultima fase dell'impostazione, selezionare "ALARM OFF" oppure tenere premuto il tasto <ALARM> per 2 secondi. La sveglia si accende all'ora specificata per la durata impostata
e "TIMER" lampeggia sul display.
Quando la sveglia è attiva, premendo il pulsante <OK> si interrompe il segnale di allarme per 9 minuti.
17
Page 84

Risoluzione dei problemi
In caso di malfunzionamenti, verificare i seguenti punti:
Eseguire un reset di fabbrica: "MENU" -> SYSTEM -> RESET -> YES
Nessun suono
Inserire correttamente la spina di rete.
Impostare il volume al livello corretto.
Verificare sempre che sia selezionata la fonte desiderata.
Canale destro e sinistro scambiati
Controllare il collegamento dei diffusori e la loro posizione.
Il sistema non risponde alla pressione di un tasto
Scollegare e ricollegare il cavo di rete.
Problemi di ricezione radio
Riorientare l'antenna.
Se possibile, utilizzare un'antenna esterna.
Altri apparecchi elettrici interferiscono con la ricezione.
Posizione non adatta alla ricezione di segnali DAB+.
Lettore CD - Display "NO DISC
Inserire il CD con il lato etichettato rivolto verso l'alto.
Pulire il CD.
Utilizzare solo CD conformi.
Funzionamento USB
"NO USB" Spegnere l'unità e ricollegare il dispositivo USB.
"NO SONG" Assicurarsi che il dispositivo USB contenga file compatibili.
Telecomando - Non funziona correttamente
Sostituire la batteria.
Rimuovere gli ostacoli
Avvicinarsi all'unità principale e assicurarsi di essere rivolti verso il sensore remoto dell'unità.
Cura e manutenzione
Pulizia dell'alloggiamento: Utilizzare un panno leggermente inumidito con un detergente delicato.
Non utilizzare detergenti contenenti alcool, ammoniaca o abrasivi.
Pulizia dei CD
• Pulire i dischi sporchi con un panno speciale. Strofinare il disco linearmente dal centro verso il bordo. Non strofinare con movimenti circolari.
• Non utilizzare solventi, come benzina per smacchiare, diluente, detergenti esistenti in commercio o
spray antistatico per dischi in vinile analogici.
Precauzioni per evitare la formazione di condensa
La condensa (rugiada) può formarsi all'interno dell'apparecchiatura se vi è una differenza significativa tra
la temperatura dell'apparecchiatura e la temperatura ambiente. Se all'interno dell'unità si forma della
condensa, non è possibile garantire il corretto funzionamento. In questo caso, l'unità deve essere sottoposta a manutenzione per alcune ore; dopo che l'umidità si sia asciugata, l'unità può essere riutilizzata.
Particolare attenzione deve essere prestata nelle seguenti circostanze
Se l'apparecchiatura viene spostata da un luogo ad un altro dove la temperatura è significativamente
più alta o più bassa, o se l'umidità nel luogo in cui l'apparecchiatura è installata aumenta, ecc.
18
Page 85

Smaltimento
Smaltimento delle apparecchiature elettriche ed elettroniche e delle batterie usate.
Il simbolo (pattumiera barrata) presente sul prodotto o sulla sua confezione indica che questo prodotto non deve essere trattato come un normale rifiuto domestico a fine vita, ma deve essere consegnato gratuitamente presso un punto di raccolta di un'autorità pubblica di smaltimento dei rifiuti o
presso un punto di ritiro istituito dai produttori o dai distributori.
Di norma, i proprietari dei RAEE devono separare le pile e gli accumulatori esausti che non sono saldamente racchiusi nei RAEE da questi ultimi prima di consegnarli al punto di raccolta. Ciò non si applica
se i RAEE sono preparati per il riutilizzo con la partecipazione di un'autorità pubblica di gestione dei
rifiuti. Contribuendo al corretto smaltimento di questo prodotto, si protegge l'ambiente e la salute
degli altri esseri umani. Uno smaltimento improprio o non corretto mette in pericolo l'ambiente e la
salute. Per ulteriori informazioni sul riciclaggio dei vecchi apparecchi elettrici e delle batterie è possibile rivolgersi alle autorità locali o alle aziende municipalizzate che si occupano dello smaltimento dei
rifiuti.
Istruzioni per lo smaltimento per i consumatori in Germania:
https://www.e-schrott-entsorgen.org/
Istruzioni per lo smaltimento per i consumatori in Austria:
https://www.elektro-ade.at/
Il marchio e i loghi Bluetooth® sono marchi registrati di BLUETOOTH SIG Inc. e qualsiasi uso di tali
marchi da parte di è concesso in licenza. Gli altri marchi e nomi
commerciali sono quelli dei rispettivi proprietari.
19
Page 86
Dati tecnici M-822DAB
Alimentazione della tensione Tensione alternata ~ 100 – 240 V 50/60 Hz
Potenza assorbita 40 Watt
Potenza assorbita in modalità standby <1 Watt
Funzionamento con CD
Distanza segnale/rumore (filtro A) ≥ 70 dB
Intervallo dinamico ≥ 60 dB
Antenna UKW/DAB+
Intervallo di sintonizzazione DAB BAND III 174,928 MHz – 239,200 MHz
Gamma di sintonia UKW 87,50 MHz – 108,00 MHz
BLUETOOTH
Versione BLUETOOTH V5.0
Classe di prestazione Classe 2
Potenza di trasmissione max. 13dbm
Autonomia Circa 10 metri (può variare a seconda dell'am-
biente)
Banda di frequenza 2,402 GHz – 2,480 GHz
Profili BLUETOOTH A2DP (Profilo di distribuzione audio avanzata,
AVRCP (Profilo telecomando audio/video))
Dispositivi USB File riproducibili: MP3
Compatibili con USB1.1 Full-Speed
Compatibili con FAT16, FAT32
Massimo 500 mA
Bitrate: da 32 kBit/s a 320 kBit/s
Line-In Presa jack da 3,5 mm
Cuffie Presa jack da 3,5 mm
Amplificatore
Potenza in uscita 2 x 50 Watt / 6 Ohm
Range di frequenza 20Hz – 20kHz (+- 3dB)
Pesi e misure
Unità principale (L x A x P) 260 x 129 x 240 mm / 2,4 kg
Altoparlante (L x A x P) 173 x 263 x 240 mm / 2,45 kg per pezzo
Intervallo di temperatura 0°C / +40°C
20
Con riserva di modifiche tecniche
Page 87

Garanzia
Gentile Cliente,
grazie per aver acquistato questo prodotto Kenwood. Se il prodotto presenta difetti di materiale o di lavorazione in normali condizioni
di funzionamento, provvederemo ad eliminarli gratuitamente o a sostituire l'apparecchio secondo le seguenti disposizioni di garanzia.
Si prega di conservare questa scheda di garanzia in un luogo sicuro.
Kenwood garantisce questo prodotto per due anni dalla data di acquisto come da fattura o prova d'acquisto del rivenditore Kenwood.
Questa garanzia copre i difetti dei materiali e di lavorazione. Ci riserviamo il diritto di sostituire il prodotto se una riparazione eseguita
in economia non è più possibile. I costi per l'imballaggio e l'installazione, nonché i costi e i rischi connessi alla riparazione effettiva non
sono inclusi nel servizio di garanzia e saranno fatturati.
Condizioni
A. Per far valere i diritti di garanzia, oltre alla presentazione della presente scheda di garanzia sono necessarie le seguenti informazioni:
(a) Nome e indirizzo completo
(b) La ricevuta o la fattura di un rivenditore stabilito in un paese dell'UE che riporta la data originale di acquisto.
(c) Il nome e l'indirizzo completo del rivenditore presso il quale il prodotto è stato acquistato.
(d) Il numero di serie e il nome del modello del prodotto.
Kenwood si riserva il diritto di rifiutare il servizio di garanzia se le informazioni di cui sopra sono assenti o se sono state apportate
modifiche al prodotto dalla data di acquisto.
B. Al momento della messa in commercio, questo prodotto è conforme a tutte le normative e le norme di sicurezza applicabili nel paese
di destinazione. Eventuali modifiche necessarie per il funzionamento dell'apparecchio in paesi diversi da quello di destinazione non sono
coperte dalle suddette condizioni di garanzia. Inoltre, non ci assumiamo alcuna responsabilità per lavori eseguiti in questo contesto o
per danni al prodotto causati da tali lavori.
Se il prodotto viene utilizzato in un paese per il quale non è stato progettato e fabbricato, gli interventi in garanzia saranno effettuati
solo se i costi per l'adeguamento dell'apparecchio alle norme nazionali e alle norme di sicurezza sono a carico dell'utente.
Inoltre, se il prodotto differisce dai prodotti venduti dall'importatore ufficiale e i pezzi di ricambio non sono disponibili per la riparazione
di questo prodotto, l'utilizzatore deve sostenere le spese di trasporto del dispositivo da e verso il paese di acquisto.
Lo stesso vale se non è possibile offrire servizi di garanzia nel paese in questione per altri motivi giustificati.
C. Sono esclusi dalla garanzia:
(a) Modifiche al prodotto, nonché i normali lavori di manutenzione e di regolazione, compresi i controlli periodici menzionati nelle
istruzioni per l'uso.
(b) Danni al prodotto causati da lavori difettosi o impropri, se questi lavori sono stati eseguiti da terzi non autorizzati ad eseguire servizi
di garanzia per conto del produttore.
(c) Danni causati da negligenza, incidenti, modifiche, alterazioni, installazione non corretta, imballaggio inadeguato, funzionamento
difettoso o uso di pezzi di ricambio non corretti durante la riparazione.
(d) Danni causati da incendio, danni causati da acqua, fulmini, terremoti, ventilazione insufficiente, forza maggiore, collegamento a una
tensione di rete errata o altre cause non imputabili a Kenwood.
(e) Danni agli altoparlanti a causa del funzionamento a potenze superiori a quelle specificate. Danni a dischi, audiocassette, cassette
audio e video, CD compatti e altri elementi che non fanno parte del prodotto.
(f) Materiali di consumo o parti soggette ad usura da sostituire nell'ambito del normale servizio clienti, come ad esempio Sistemi di
raccolta, aghi, cinghie di trasmissione, testate audio, unità plug-in, mobili con impianti audio integrati, batterie a secco, batterie
ricaricabili, finali di potenza, ecc.
(g) Tutti i prodotti per i quali il numero o i numeri di serie sono stati rimossi, modificati o cancellati in tutto o in parte.
Questa garanzia è disponibile per tutte le persone che hanno acquistato legalmente il prodotto.
In conformità con le condizioni di garanzia di cui sopra, il prodotto sarà riparato o sostituito gratuitamente. Questo diritto non pregiudica in alcun modo gli altri diritti dell'utente nell'ambito delle disposizioni di legge applicabili.
La riparazione o la sostituzione non proroga il periodo di garanzia.
Sono escluse ulteriori rivendicazioni, in particolare le richieste di conversione, riduzione o risarcimento danni.
Indirizzo di contatto :
JVCKENWOOD ITALIA S.p.A.
Via G. Sirtori 7/9, 20129 Milano
Tel. +39(02)204821
www.kenwood.it [email protected]
21
Page 88

Page 89

Compact stereosysteem
M-822DAB
GEBRUIKSAANWIJZING
DEUTSCH
FRANÇAIS
ITALIANOENGLISH
NEDERLANDS
Page 90

Vóór de ingebruikname
Inhoud
Vóór het inschakelen van de spanningsvoorziening
Veiligheidsinstructies
Vóór de ingebruikname
Aansluiten
Hantering van CD’s
Wetenswaardigheden over USB-apparaten
Componentnamen en -functies
Basisfuncties
Inschakelen van het systeem
Uitschakelen in stand-by
Volumeregelaar
Instellen van de klank
Gebruik van CD en USB
Voorbereiding
Weergave van CD of audiobestand (USB, CD)
Selecteren van een map (alleen audiobestanden)
Programmeren van titels en bestanden
- Werkwijze bij audio-CD
- Werkwijze bij audiobestanden
Willekeurige weergavefunctie en herhalingsfunctie
- Werkwijze bij audio-CD
- Werkwijze bij audiobestanden
Gebruik van de DAB+ radio
Instellen van de DAB+ zenders
Selecteren van een DAB+ zender
Opslaan van stations in het zendergeheugen
Uitgebreide DAB+ informatie
Menufuncties DAB+
Gebruik van de FM-radio
Instellen van de FM-zenders
Opslaan van stations in het zendergeheugen
Menufuncties FM
Gebruik van BLUETOOTH
Koppelen van BLUETOOTH apparaten
Weergave via BLUETOOTH
Gebruik van Line-In
Tijd/datum, Sleeptimer, wekker
Oplossing van storingen
Algemene informatie
Onderhoud en zorg
Afvalverwerwijdering
Technische gegevens
Garantie
3
3
6
6
7
7
8
9
9
9
9
9
9
9
10
10
11
11
11
12
12
12
12
12
13
13
14
14
15
15
15
15
16
16
16
16
17
18
18
18
19
20
21
NEDERLANDS
2
Page 91

Vóór het inschakelen van de spanningsvoorziening
BELANGRIJKE VEILIGHEIDSINSTRUCTIES
Let op: Lees deze pagina aandachtig door om de veilige werking van het apparaat te garanderen.
Opmerkingen aandachtig lezen!
– Geef gevolg aan alle veiligheids- en bedieningsinstructies wanneer u dit product in gebruik neemt.
Instructies zorgvuldig bewaren!
– U dient de veiligheids- en bedieningsinstructies te bewaren om ze later te kunnen raadplegen.
Alle waarschuwingsinstructies in acht nemen!
– U dient aan alle aan het product aangegeven en in de gebruiksaanwijzing vermelde
waarschuwingen strikt gevolg te geven.
1. Alleen met een droge doek reinigen!
– Trek de netstekker van dit apparaat uit de wandcontactdoos voordat u dit product reinigt. Gebruik
nooit vloeibare reinigingsmiddelen of reinigingssprays. Gebruik voor de reiniging alleen een lichtjes
bevochtigde doek.
2. Accessoires
– Gebruik alleen de door de fabrikant aangegeven accessoires.
3. Gebruik dit apparaat niet in de nabijheid van water
– Het apparaat mag nooit aan waterdruppels of –spatten blootgesteld worden – zoals bijvoorbeeld
in de nabijheid van een badkuip, een wastafel, een aanrecht in de keuken, een wasmachine, in een
vochtige kelderruimte of in de nabijheid van een zwembad, enz. Zet nooit met vloeistoffen gevulde
houders, zoals bv. bloemenvazen, op het apparaat.
4. Ventilatie
– Sleuven en openingen in de behuizing dienen voor de verluchting van het apparaat, om de
betrouwbare werking van het apparaat veilig te stellen en om het apparaat tegen oververhitting
en een mogelijke zelfontbranding te beschermen. Blokkeer de ventilatieopeningen niet. Installeer
het apparaat in overeenstemming met de door de fabrikant verstrekte gegevens. Blokkeer nooit de
ventilatieopeningen doordat u het apparaat op een bed, bank, tapijt of een al even zachte onderlaag
zet. Dit apparaat mag niet in een boekenrek of inbouwkast ingebouwd worden indien er niet voor
voldoende ventilatie gezorgd is, zoals dit in de montagehandleiding van de fabrikant beschreven is.
5. Spanningsvoorziening
– Dit apparaat mag alleen aangesloten worden op de netspanning die aan het apparaat aangegeven
is. Als u niet zeker bent van het type van de spanningsvoorziening in uw woning, richt u zich tot uw
dealer of tot het lokale energiebedrijf.
6. Netsnoer
– Zorg ervoor dat men niet over het netsnoer kan struikelen en het snoer niet in de onmiddellijke
nabijheid van een contactdoos, waaronder ook bijkomende contactdozen, afgekneld wordt. Ook aan
de uitlaat aan het apparaat mag het netsnoer in geen geval geplet worden.
7. Onweer
– Het apparaat van het stroomnet verbreken bij onweer en wanneer het langere tijd niet gebruikt
wordt.
3
Page 92

8. Overbelasting
– Overbelast nooit wandcontactdozen, verlengsnoeren of meervoudige contactdozen, omdat anders
het gevaar voor brand of elektrische schokken bestaat.
9. Binnendringen van vreemd materiaal en vloeistof
– Let erop dat er nooit vreemd materiaal of vloeistof door ventilatieopeningen dit apparaat
binnendringt, omdat het anders tot contact met onder hoe spanning staande componenten dan wel
tot een kortsluiting met de daaruit voortvloeiende brand of elektrische schok kan komen. Mors nooit
vloeistoffen van eender welke aard op dit apparaat.
10. Onderhoud
– Tracht niet zelf, het onderhoud van dit apparaat uit te voeren, omdat door de openingen
of door het verwijderen van afdekkingen onder spanning staande onderdelen die bij aanraking een
bron van gevaren vormen, kunnen vrijkomen. Laat alle onderhoudswerkzaamheden over aan
het gekwalificeerde personeel van de klantenservice.
11. Beschadigingen die een reparatie vereisen
– Onderhouds- en reparatiewerkzaamheden alleen door een gekwalificeerde klantenservice laten
uitvoeren.
Een onderhoud/reparatie is noodzakelijk als het apparaat beschadigd werd (bv. het netsnoer of de
stekker), als er vloeistof in het apparaat gelopen is, als voorwerpen het apparaat binnengedrongen
zijn, als het apparaat aan regen of vocht blootgesteld werd, als het niet meer perfect functioneert of
als het neergevallen is.
12. Wisselstukken
– Wanneer er wisselstukken benodigd worden, overtuigt u er zich van dat de klantenservicetechnicus
wisselstukken gebruikt die door de fabrikant voorgeschreven zijn of die dezelfde eigenschappen
als de originele onderdelen hebben. Niet-toelaatbare wisselstukken kunnen tot brand, elektrische
schokken of andere ongevallen leiden.
13. Veiligheidscontrole
– Verzoek de klantenservicetechnicus na de beëindiging van onderhouds- of
reparatiewerkzaamheden aan dit apparaat om de uitvoering van een veiligheidscontrole om vast te
stellen, of het apparaat zich in een perfecte operationele toestand bevindt.
14. Wand- of plafondmontage
– Dit apparaat mag alleen volgens de aanbevelingen van de fabrikant aan een wand of aan het
plafond aangebracht worden.
15. Warmte
– Installeer het apparaat niet in de nabijheid van hete oppervlakken zoals bv. radiatoren, straalkachels,
ovens of andere apparaten (versterkers inbegrepen) die heet kunnen worden. Stel nooit objecten met
open vlammen, zoals kaarsen of lantaarns, op of in de buurt van het apparaat op. De geïnstalleerde
batterijen mogen niet aan felle hitte, zoals direct zonlicht, vuur of dergelijke, blootgesteld worden.
16. Stroomleidingen
– Een buitenantenne mag niet in de nabijheid van elektriciteitskabels of andere elektrische
leidingen resp. op plaatsen, waar ze op dergelijke elektrische leidingen kan vallen, geïnstalleerd worden.
Bij het installeren van een buitenantenne moet er op de grootst mogelijke zorgvuldigheid op gelet
worden, niet per vergissing elektrische leidingen aan te raken, omdat dit levensgevaarlijk is.
17. Batterijen
- Als u het apparaat één maand of langer niet gebruikt, verwijdert u de batterijen uit het batterijvak
van de afstandsbediening om te verhinderen dat de batterijen zouden uitlopen. Voer uitlopende
batterijen onmiddellijk vakkundig en met inachtneming van alle relevante wettelijke voorschriften af.
Uitlopende batterijen kunnen letsels veroorzaken en het apparaat beschadigen.
Combineer nooit batterijen van een verschillend type of oude met nieuwe batterijen.
4
Page 93

Risico’s in combinatie met hoge volumes
– Om mogelijke gehoorschade te voorkomen, luistert u niet gedurende langere perioden met een
hoog volume. Dit geldt in het bijzonder bij het gebruik van een hoofdtelefoon.
Afstandsbediening
–
Als u de afstandsbedieningssensor aan direct zonlicht of aan het licht van fluorescentielampen
blootstelt, kan het tot functiestoringen komen. In dergelijke gevallen dient u het systeem op een
andere plaatste installeren om dergelijke functiestoringen te vermijden.
–
De bijgeleverde batterij is berekend op een functionele controle en kan een beperkte levensduur hebben.
Wanneer de reikwijdte van de afstandsbediening afneemt, vervangt u de oude batterij door een nieuwe.
Opgepast!
Explosiegevaar
– Wanneer batterijen van het verkeerde type gebruikt worden; extreem hoge of lage temperaturen,
aan welke een batterij tijdens het gebruik, de opslag of het transport blootgesteld kan zijn
– Bij lage luchtdruk op grote hoogte; als een batterij in vuur of in een hete oven gegooid wordt;
bij het mechanisch pletten of snijden van een batterij; bij het achterlaten van een batterij in een
omgeving met extreem hoge temperaturen of bij een extreem lage luchtdruk, wat tot een explosie
of tot het vrijkomen van brandbare vloeistoffen of gassen kan leiden.
Om het risico op een elektrische schok, brand etc. tot een minimum te herleiden
- Verwijdert u geen schroeven, afdekkingen of onderdelen van de behuizing.
- De inschakelknop verbreekt de stroomtoevoer in geen enkele stand volkomen.
Omdat de netstekker gebruikt wordt voor het loskoppelen van het stroomnet moet de netstekker aan
het netsnoer gelaten worden en permanent toegankelijk blijven.
Automatische energiebesparingsfunctie
Het model is met een automatische energiebesparingsfunctie uitgerust. Deze schakelt het apparaat
binnen 15 minuten in de modus "Stand-by" wanneer de weergave met een zeer gering volume
plaatsvindt resp. wanneer de radio stil afgestemd is. Deze instelling kan niet gewijzigd worden.
EU-conformiteitsverklaring
Hiermee verklaart de JVCKENWOOD Corporation dat de radio-installatie van het type M-822DAB aan
de richtlijn 2014/53/EU voldoet. De volledige tekst van de EU-conformiteitsverklaring is op volgende
website beschikbaar:
https://www.kenwood.com/euukdoc/
Fabrikant:
3-12. Moriyacho, Kanagawa-ku, Yokohama-shi, Kanagawa 221-0022, JAPAN
Gemachtigde (EU):
Amsterdamseweg 37, 1422 AC UITHOORN, THE NETHERLANDS
BELANGRIJK VOOR LASERPRODUCTEN
1. LASERPRODUCT VAN DE KLASSE 1
2. OPGEPAST: Niet de behuizing openen. Het apparaat bevat geen onderdelen die door de
gebruiker onderhouden kunnen worden; onderhoudsbeurten alleen door gekwalificeerd
vakpersoneel laten uitvoeren.
5
Page 94
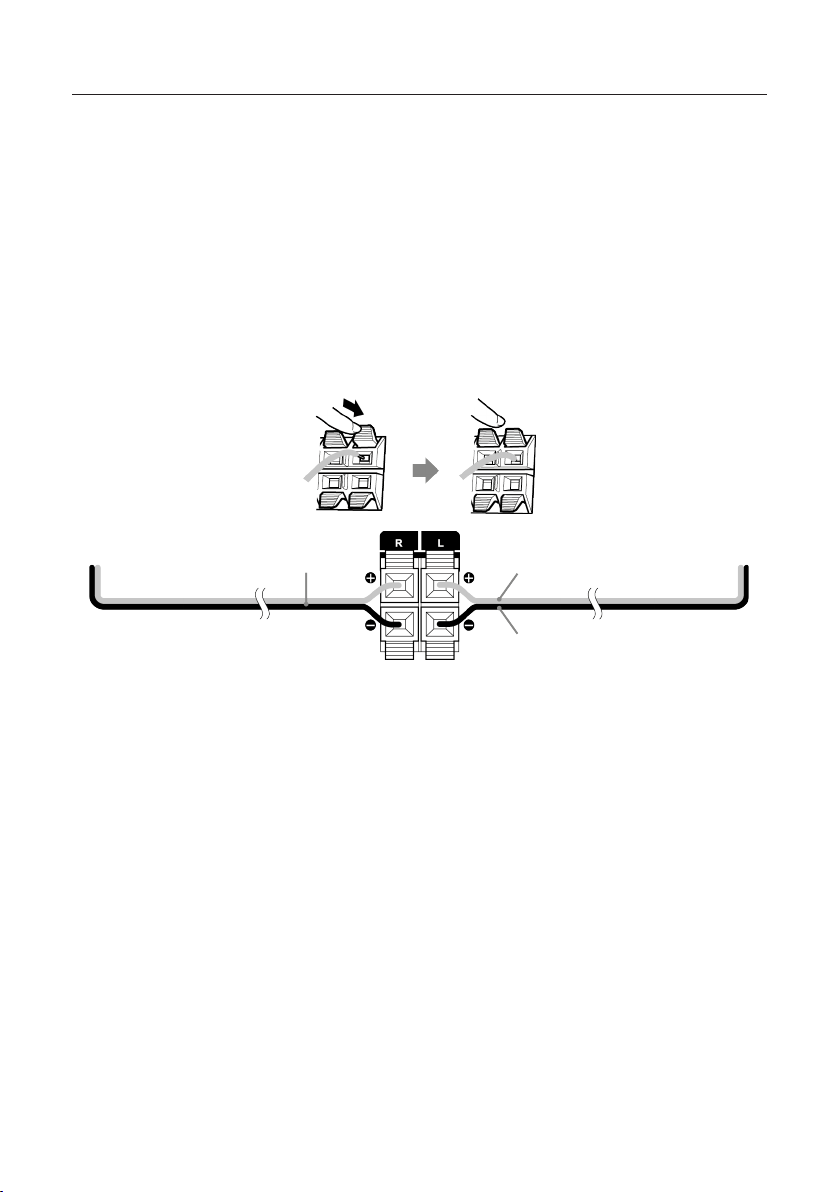
Vóór de ingebruikname
Uitpakken
Pak het apparaat voorzichtig uit en let erop dat alle accessoires aanwezig zijn:
2 x luidspreker / afstandsbediening / UKW/DAB-werpantenne / 2x batterij R03 / AAA 1,5 volt
Aansluiten
• Open het batterijvak van de afstandsbediening en breng de batterijen met de juiste polariteit aan.
De vooropgestelde polariteit (+/-) is in het batterijvak aangegeven.
Verbind de linkse en rechtse luidspreker met de aansluiting (Speaker Out) aan de achterzijde van
het apparaat. Druk daarvoor op de veerklemmen en steek de losse kabeluiteinden in de daarvoor
voorziene openingen. Daarbij de zwarte leidingdraad met de zwarte veerklem verbinden. De andere
leidingdraad wordt daarvoor analoog met de rode klem verbonden.
Luidsprekerkabel Zwart/Grijs
Zwart
• Sluit de netstekker vast op een wisselstroomcontactdoos aan. Omdat de netstekker gebruikt
wordt voor het volledig loskoppelen van het stroomnet moet de contactdoos permanent
toegankelijk blijven.
DAB+ / FM antenneaansluiting
1. Sluit de werpantenne op de bus [FM ANTENNA 75Ω] aan.
2. Zoek de plaats, waar de beste ontvangst bereikt wordt.
3. Zet de antenne vast.
Bij de met het systeem geleverde antenne gaat het om een gewone werpantenne. Voor een
stabiele signaalontvangst wordt het gebruik van een (in de handel verkrijgbare) buitenantenne
aanbevolen.
Trek voor de aansluiting van een buitenantenne in eerste instantie de kamerantenne af.
De ontvangst van radiozenders uit het kabelnetwerk kan niet gegarandeerd worden.
6
Page 95

Eerste gebruik
Wanneer het apparaat voor het eerst ingeschakeld wordt, wordt een automatische DAB+ afstemming
van de zenders gestart. Gelieve te wachten totdat dit proces compleet voltooid is. Gelieve voor
bijkomende informatie daarover het gedeelte "Gebruik van de DAB+ radio" te raadplegen.
Hantering van CD’s
Waarschuwingsinstructies voor de hantering
Houd de CD zodanig vast, dat u het signaaloppervlak niet aanraakt. (De onbedrukte zijde is de
afspeelzijde.)
Waarschuwingsinstructies met betrekking tot CD’s
Gebruik uitsluitend CD’s met de markering. Een CD zonder deze markering kan soms niet
naar behoren weergegeven worden.
Wetenswaardigheden over USB-apparaten
Aanwijzingen voor het gebruik van een USB-apparaat
Dit apparaat is in staat om op een flashgeheugen of digitale Audio-Player opgeslagen
audiobestanden weer te geven als deze apparaten over een USB-poort beschikken (dit document
worden deze apparaten als USB-apparaten bestempeld).
Met betrekking tot de bruikbare USB-apparaten gelden volgende beperkingen:
Bruikbare USB-apparaten
• USB-apparaten die tot de USB-massageheugenklasse behoren.
• USB-apparaten, wier maximale stroomopname hoogstens 500 mA bedraagt.
• USB-massageheugenklasse: USB-apparaten die de PC als extern geheugen detecteert zonder dat er
speciale driver of zonder dat er speciale toepassingssoftware noodzakelijk zou zijn.
• Gelieve uw dealer te raadplegen als u er niet zeker van bent, of uw USB-apparaat met de
specificaties voor de USB-massageheugenklasse overeenstemt.
• Het gebruik van een USB-apparaat dat niet ondersteund wordt, kan tot een verkeerde weergave of
indicatie van het audio-bestand leiden.
Zelfs als u een USB-apparaat gebruikt dat aan de hoger vermelde specificaties voldoet, kunnen
audiobestanden, afhankelijk van type of toestand van het USB-apparaat soms niet perfect
weergegeven worden.
7
Page 96
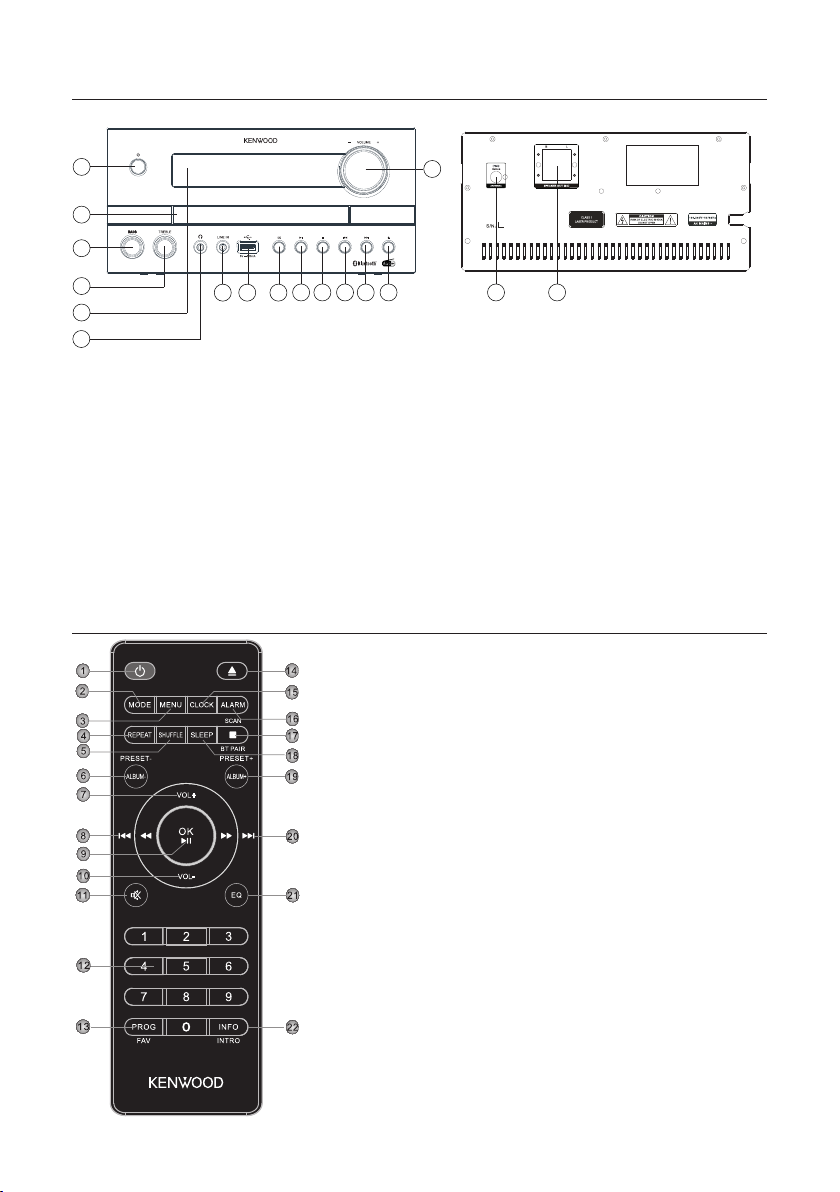
Componenten en functies
Voorzijde Achterzijde
1
15
2
3
4
5
6
7 8 9
10 11 12
13
14
16 17
1 – Stand-by / Aan
2 – CD-schuiflade
3 – Bass regelaar (woofer)
4 – Treble regelaar (tweeter)
5 – Display
6 – Hoofdtelefoonaansluiting
10 – Weergave / pauze
11 – Stop
12 – Vorige (titelsprong achterwaarts)
13 – Volgende (titelsprong voorwaarts)
14 – Openen / sluiten (Eject)
15 – Volume
7 – Line-In-aansluiting
8 – USB-aansluiting
9 – Bronselectie (MODE)
16 – FM / DAB+ antenneaansluiting
17 – Luidsprekeraansluitingen
Afstandsbediening
1 Stand-by "Aan" / "Uit"
2 Modusselectie (bron)
3 Menu
4 Herhalingsselectie
5 Willekeurige modus (at random)
6 Vorig album, voorinstelgeheugen -
7 Volume verhogen
8 Titelsprong/titel-zoekfunctie achterwaarts
9 Invoer bevestigen, weergave/pauze
10 Volume verlagen
11 Stille afstemming Aan/Uit (Mute)
12 Cijfertoetsen
13 Titelprogrammering, voorinstelgeheugen bezetten
14 CD-lade openen/sluiten (Eject)
15 Uur instellen
16 Wekker instellen
17 Weergave stoppen, BLUETOOTH koppeling, zender-zoek-
functie
18 Sleeptimer einstellen
19 Volgend album, voorinstelgeheugen +
20 Titelsprong/titel-zoekfunctie voorwaarts
21 Equalizervoorinstellingen kiezen
22 Omschakeling displayinformatie, bij weergave 10 seconden
intro per titel
8
Page 97

Basisfuncties
Inschakelen van het systeem: Druk op de toets <STAND-BY> op de afstandsbediening of aan het
hoofdapparaat. Op het display verschijnt "WELCOME".
Uitschakelen in stand-by: Druk op de toets <STAND-BY> op de afstandsbediening of aan het
hoofdapparaat. Op het display verschijnt "STAND-BY" en het apparaat schakelt naar de stand-by
modus om.
Volumeregelaar
Op de afstandsbediening: Druk op de toets <VOL+> voor het verhogen of druk op de
toets <VOL-> voor het verlagen van het volume.
Aan het hoofdapparaat: Draai de regelaar <Volume> om het volume te verhogen of te verlagen.
Bij een minimaal volume wordt "VOL 00" bij een maximaal volume "VOL 32" even op het display
aangegeven.
Tijdelijk uitzetten van het volume: Druk daarvoor op de toets <MUTE> op de afstandsbediening.
Op het display knippertt "MUTE". Wanneer de toets de volgende keer ingedrukt wordt, wordt het
oorspronkelijke volume hersteld.
Instellen van de klank
Ukunt het bass (woofer) en treble (tweeter) niveau al naargelang de door u geprefereerde muziek
verhogen of verlagen.
Aan het hoofdapparaat: Draai aan de regelaar BASS (woofer) of TREBLE (tweeter) om het
versterkingsniveau in te stellen: Regelbereik -6 tot +6.
Equalizer
Op de afstandsbediening: Druk op de toets <EQ> om achtereenvolgens volgende instellingen op
te roepen: FLAT -> CLASSIC -> POP -> JAZZ -> ROCK
Gebruik van CD en USB
Voorbereiding
Een CD inleggen
1. Druk op de toets <EJECT> aan het hoofdapparaat of op de afstandsbediening voor het openen
van het CD-vak.
2. Leg een CD met de bedrukte zijde naar boven wijzend in het CD-vak.
3. Druk op de toets <EJECT> aan het hoofdapparaat of op de afstandsbediening voor het sluiten van
het CD-vak.
Verwijderen van een CD
1. Druk op de toets <EJECT> aan het hoofdapparaat of op de afstandsbediening voor het openen
van het CD-vak.
2. Neem de CD voorzichtig uit het CD-vak.
3. Druk op de toets <EJECT> aan het hoofdapparaat of op de afstandsbediening voor het sluiten van
het CD-vak.
9
Page 98

Aansluiting van USB-apparaten
1. Druk op de toets <STAND-BY> voor het selecternb van de stand-by modus.
2. Sluit het USB-apparaat op de USB-aansluiting aan de voorzijde aan.
Afnemen van het USB-apparaat
1. Druk op de toets <STAND-BY> voor het selecternb van de stand-by modus.
2. Verwijder het USB-apparaat uit de USB-aansluiting.
• Wacht steeds af totdat het apparaat de CD / het USB-apparaat volledig gelezen heeft voordat u
verder gaat.
• Wanneer er geen CD in het CD-vak ingelegd is, wordt "NO DISC" aangegeven.
• Wanneer er geen afspeelbaar audiobestand in het USB-apparaat is, wordt "NO SONG" aangegeven.
• Bij audiobestanden kan de inleestijd 10 seconden overschrijden wanneer er zich op een CD of een
USB-apparaat zeer veel liedjes bevinden.
Weergave van een CD of audiobestand (USB,CD)
Op de afstandsbediening: Selecteer met de toets <MODE> de bron en druk op de toets
<Weergave/pauze> voor het starten van de weergave.
Aan het hoofdapparaat: Selecteer met de toets <MODE> de gewenste bron en druk op de toets
<Weergave/pauze> voor het starten van de weergave
Bij USB-apparaten of CD’s die audiobestanden (bv. MP3) bevatten, wordt het aantal aanwezige
mappen en bestanden als volgt aangegeven:
Fxx XXX
Daarbij staat het cijfer achter "F" voor het aantal mappen en het tweede cijferblok voor het
totaalaantal bestanden.
Bij audio-CD’s wordt de informatie over het aantal titels en totale speelduur als volgt aangegeven:
XX XX:XX
Daarbij staat het eerste cijferblok voor het aantal titels en het tweede voor de totale speelduur van de CD.
Essentiële bedieningsfuncties
Stoppen van de weergave: Druk op de toets <Stop> aan het hoofdapparaat of op de
afstandsbediening om de weergave te stoppen.
Onderbreking van de weergave: Druk op de toets <Weergave/pauze> aan het hoofdapparaat
of op de afstandsbediening om de weergave te onderbreken. Daarbij knippert de weergave op het
display. Door de toetsen nogmaals in te drukken, wordt de weeergave voortgezet.
Zoeken van een bepaalde passage tijdens het afspelen: Houd de toets <Titelsprong
voorwaarts> of <Titelsprong achterwaarts> aan het hoofdapparaat of op de afstandsbediening
langer dan 2 seconden ingedrukt om de snelle achteruit of vooruit spoelen te activeren. Zodra de
gewenste plaats bereikt is, laat u de betreffende toets weer los.
Selecteren van een bepaalde titel: Druk op de toets <Titelsprong voorwaarts> of <Titelsprong
achterwaarts> aan het hoofdapparaat of op de afstandsbediening in de weergave-, pauze- of
stopmodus. Via de cijfertoetsen van de afstandsbediening kunnen de titels direct geselecteerd worden.
Selecteren van een bepaalde map (alleen bij audiobestanden): Druk op de
toets <ALBUM+> of <ALBUM-> op de afstandsbediening om een map te selecteren.
10
Page 99

Titel even afspelen: Houd de toets <INTRO> op de afstandsbediening ingedrukt om de titels 10
seconden lang af te spelen. Door de toets opnieuw in te drukken, stopt de modus.
Programmeren van titels en bestanden
U kunt met behulp van de afstandsbediening titels van een audio-CD of bestanden in een door u
gewenste volgorde programmeren. Daarbij staat het volgende aantal geheugenplaatsen ter beschikking:
Audio-CD: 20 geheugenplaatsen Bestanden: 99 geheugenplaatsen
Werkwijze bij audio-CD
1. De bron "CD" moet zich in de stopmodus bevinden, anders verschijnt op het display "STOP
FIRST".
2. Druk op de toets <PROG> om de programmeermodus te starten.
3. Het display geeft nu "P01 001" aan, waarbij "01" knippert. Het eerste cijferblok geeft de actuele
titel, het tweede cijferblok de actuele geheugenplaats aan.
4. Selecteer alleen met de toets <Titelsprong voorwaarts> of <Titelsprong achterwaarts> de titel
die u op de actuele geheugenplaats wenst op te slaan. De titels kunnen ook via de cijfertoetsen
van de afstandsbediening geselecteerd worden.
5. Druk op de toets <PROG> om het proces te bevestigen.
6. Daarna wordt de volgende geheugenplaats aangegeven. Herhaal de stappen 4 en 5 totdat uw
selectie beëindigd is of totdat het aantal geheugenplaatsen bezet is. In di geval verschijnt "Full" op
het display.
7. Met de toets <Weergave/pauze> start u de weergave van de geprogrammeerde titels. Tijdens de
weergave wordt afwisselend het nummer van de titel en dat van de geheugenplaats aangegeven.
8. Door twee keer te drukken op de toets <STOP> wordt de programmering gewist.
Werkwijze bij audiobestanden
1. De bron "USB" moet zich in de stopmodus bevinden, anders verschijnt op het display "STOP
FIRST".
2. Druk op de toets <PROG> om de programmeermodus te starten.
3. Het display geeft nu "P01 001" aan, waarbij "01" knippert. Het eerste cijferblok geeft de actuele
titel, het tweede cijferblok de actuele geheugenplaats aan.
4. Selecteer alleen met de toets <Titelsprong voorwaarts> of <Titelsprong achterwaarts> de titel
die u op de actuele geheugenplaats wenst op te slaan. De titels kunnen ook via de cijfertoetsen
van de afstandsbediening geselecteerd worden.
5. Druk op de toets <PROG> om het proces te bevestigen.
6. Daarna wordt de volgende geheugenplaats aangegeven. Herhaal de stappen 4 en 5 totdat uw
selectie beëindigd is of totdat het aantal geheugenplaatsen bezet is. In di geval verschijnt "FULL"
op het display.
7. Met de toets <Weergave/pauze> start u de weergave van de geprogrammeerde titels. Tijdens de
weergave wordt afwisselend het nummer van de titel en dat van de geheugenplaats aangegeven.
8. Door twee keer te drukken op de toets <STOP> wordt de programmering gewist.
• Wordt tijdens de programmering de toets <STOP> ingedrukt, dan wordt het proces voortijdig
beëindigd.
Door het apparaat uit te schakelen, wordt een bestaand programma gewist.
11
Page 100

Willekeurige weergavefunctie en herhaalfunctie
Werkwijze bij audio-CD
• Druk op de afstandsbediening op de toets <SHUFFLE> om de willekeurige weergave te starten.
Op het display verschijnt "SHUF" en de weergave kan gestart worden. Door twee keer te drukken
op de toets <SHUFFLE> ofdoor te drukken op de toets <STOP> wordt de willekeurige weergave
tenietgedaan.
• Druk op de afstandsbediening op de toets <REPEAT> om de herhaalfunctie te activeren.
Door deze meermaals in te drukken, worden volgende functies geschakeld:
Herhaling van de actuele titel (display "RPT ONE")
Herhaling van alle titels (display "RPT ALL")
Uitschakelen van de herhalingsfunctie (display "RTP OFF")
Met de toets <Weergave/Pauze> start u de weergave.
Door te drukken op de toets <Stop> wordt de herhaalfunctie uitgeschakeld.
Werkwijze bij audiobestanden
• Druk op de afstandsbediening op de toets <SHUFFLE> om de willekeurige weergave te starten.
Op het display verschijnt "SHUF" en de weergave kan gestart worden. Door twee keer te drukken
op de toets <SHUFFLE> ofdoor te drukken op de toets <STOP> wordt de willekeurige weergave
tenietgedaan.
• Druk op de afstandsbediening op de toets <REPEAT> om de herhaalfunctie te activeren.
Door deze meermaals in te drukken, worden volgende functies geschakeld:
Herhaling van de actuele titel (display "RPT ONE")
Herhaling van alle titels (display "RPT ALL")
Herhaling van het actuele album ("RPT ALB")
Uitschakelen van de herhalingsfunctie (display "RTP OFF")
Met de toets <Weergave/Pauze> start u de weergave.
Door te drukken op de toets <Stop> wordt de herhaalfunctie uitgeschakeld.
Gebruik van de DAB+ radio
Druk op de toets <MODE> op de afstandsbediening of aan het hoofdapparaat totdat op het display
"DAB" verschijnt.
Instellen van de DAB+ zenders
Bij ingebruikname van het apparaat werd er reeds een automatische afstemming van de zenders
uitgevoerd. De daarbij gevonden zenders worden alfabetisch in de stationslijst opgeslagen.
12
 Loading...