

Page 1

DIGITAL AUDIO PLAYER
M1GC7
INSTRUCTION MANUAL
© English /01 (E) 0610
Page 2

Contents
Safety precautions ............................................3
Operating Precautions ....................................5
Handling ......................................................................5
Maintenance of the unit ....................................5
Unpacking ...........................................................5
Read Before Use
Names and functions of par ts ......................6
Flow for music playback .................................7
Screen display items ........................................7
Loading the battery .........................................8
Connecting stereo headphones ..................9
HOLD function ...................................................9
Switching Power ON/OFF ..............................9
For first use
Recharging Battery/ Connecting a PC.... 10
Recharging Battery/ Connecting a PC ... 10
PC system configuration requirements 10
Recharging and battery indication ..........10
Disconnecting the Player from the PC ..11
Capturing Music in PC ..................................12
The Player can play the following three
types of music files. .......................................12
Using Windows Media Player 10/9 ..........12
Transferring Music from PC ........................ 13
Using Windows Media Player 10/9 ..........13
Data transfer by drag & drop .......................13
Playing music tracks
Selecting music for playback ..................... 14
Display during playback .............................. 15
Operations available during playback ...16
To skip an item: ..................................................... 16
Various play modes .......................................17
Favorite .............................................................. 17
Receiving FM broadcasting
Selecting FM broadcasting ......................... 18
Display for FM reception .............................18
Tuning a FM station .......................................19
Auto tuning ............................................................. 19
Manual tuning ....................................................... 19
Preset tuning .......................................................... 20
Presetting FM stations .................................. 21
Presetting by auto tuning .............................. 21
Presetting by manual tuning .......................21
Deregistering a preset FM station ............22
Monaural reception ....................................... 22
Adjusting the audio
Adjusting the audio ......................................23
Adjusting the volume ....................................... 23
Selecting the sound effects ..........................23
Managing files
Viewing files ..................................................... 25
Deleting tracks ................................................26
Setting and adjusting the Player
Sleep timer and alarm timer ......................27
Various setups .................................................28
Function items that can be set ................. 28
Setting the menu language .......................29
Initialization/Formatting .............................30
Appendix
Connection of external components...... 31
Connecting to the headphones jack ......31
Connecting to the USB connector ........... 31
Digital Audio Player Link .............................32
Glossary .............................................................33
Error messages ................................................ 33
Troubleshooting ............................................. 34
Specifications...................................................35
English2
Page 3

Safety precautions
¤ Caution:
Read this page carefully to ensure safe operation.
WARNING :
TO PREVENT FIRE OR ELECTRIC SHOCK, DO NOT EXPOSE THIS APPLIANCE
TO RAIN OR MOISTURE.
IMPORTANT SAFETY INSTRUCTIONS
Read Instructions – All the safety and operating instructions should be read
before the product is operated.
Retain Instructions – The safety and operating instructions should be retained
for future reference.
Heed Warnings – All warnings on the product and in the operating instructions
should be adhered to.
Follow Instructions – All operating and use instructions should be followed.
1. Power sources – The appliance should be connected to a power supply only of
the type described in the operating instructions or as marked on the appliance.
2. Enclosure removal – Never remove the enclosure. If the internal parts are
touched accidentally, a serious electric shock might occur.
3. Drop – Do not drop the unit or apply strong shock to it. (Damage due to
dropping the unit is not covered by the warranty.)
4. Ventilation – Avoid hindering the ventilation of the appliance by covering it
with a cloth, etc.
5. Abnormal smell – If an abnormal smell or smoke is detected, immediately
turn the power OFF and pull out the power cord. Contact your dealer or nearest
service center.
6. Heat – Avoid placing the appliance under direct sunlight or near a source of
heat such as heating equipment. Particularly, never leave it in an automobile or on
the dashboard.
7. Temperature – The appliance may not function properly if used at extremely low,
or freezing temperatures. The ideal ambient temperature is above +5°C (41°F).
8. Water and moisture – The appliance shall not be exposed to dripping and
splashing — for example, near a bathtub, washbowl, kitchen sink, laundry tub, in
a wet basement, or near a swimming pool, etc. Do not place an object containing
liquid, such as a ower vase, on the appliance.
9. Dust and moisture – Avoid places where is dusty or where the humidity is
high.
10. Vibrations – Avoid placing the appliance on an unstable place such as a shelf
or in a place subject to vibrations.
11. Magnetic elds – Keep the appliance away from sources of magnetic elds
such as TV sets, speaker systems, radios, motorized toys or magnetized objects.
12. Cleaning – Do not use volatile solvents such as alcohol, paint thinner, gasoline,
or benzine, etc. to clean the cabinet. Use a clean dry cloth.
13. Nonuse periods – The power cord of the unit should be unplugged from the
outlet when left unused for a long period of time.
14. Damage requiring service – The appliance should be serviced by qualied
service personnel when :
A. The power-supply cord or the plug has been damaged.
B. Objects have fallen, or liquid has been spilled into the appliance.
C. The appliance has been exposed to rain.
D. The appliance does not appear to operate normally or exhibits a marked
change in performance.
E. The appliance has been dropped, or the enclosure damaged.
15. Servicing – The user should not attempt to service the unit beyond that
described in the operating instructions. All other servicing should be referred to
qualied service personnel.
English3
Page 4

Safety precautions
Notes on using through car stereo
• Do not leave the products or batteries in the car, particularly above the dashboard,
for this may lead to malfunction or damage due to solar heat.
• If the unit is connected to a car stereo using an audio cord, noise may sometimes
interfere.
Information on Disposal of Old Electrical and Elec tronic
Equipment (applicable for EU countries that have adopted
separate waste collection systems)
Products with the symbol (crossed-out wheeled bin)cannot be
disposed as household waste.
Old electrical and electronic equipment should be recycled
at a facility capable of handling these items and their waste
byproducts.
Contact your local authority for details in locating a recycle facility
nearest to you.
Proper recycling and waste disposal will help conserve resources
whilst preventing detrimental effects on our health and the
environment.
English4
Page 5
Operating Precautions
M1GC7
QUICK ST
AR
T MANU
AL
DIGI
TA
L A
UDIO PLA
YER
M1GC7
QUICK ST
AR
T MANU
AL
DIGI
TA
L A
UDIO PLA
YER
M1GC7
QUICK ST
AR
T MANU
AL
DIGI
TA
L A
UDIO PLA
YER
M1GC7
QUICK ST
AR
T MANU
AL
DIGI
TA
L A
UDIO PLA
YER
M1GC7
QUICK ST
AR
T MANU
AL
DIGI
TA
L A
UDIO PLA
YER
M1GC7
QUICK ST
AR
T MANU
AL
DIGI
TA
L A
UDIO PLA
YER
Handling
• Do not apply an excessive force to the display part. Otherwise, it may be damaged.
• Avoid storing the player in a bag together with a hard object. Otherwise, the player may be
damaged when the bag is pushed.
• Do not expose the player to an insecticide or other volatile substance or bring the player
in extended contact with a rubber or vinyl material. Otherwise, discoloration or peeling of
the surface finish may result.
• Do not put the player in a pocket of trousers. Otherwise, it may be damaged due to a
strong impact when you sit down, etc.
• Protect the player against sweat and moisture.
Do not use the player by putting it in a breast pocket for long hours in the summer or
during exercise. Otherwise, penetration of moisture or sweat may cause malfunction or
failure.
Maintenance of the unit
When the front panel or case becomes dirty, wipe with a soft, dry cloth.
Do not use thinner, benzine, alcohol, etc. for these agents may cause discoloration.
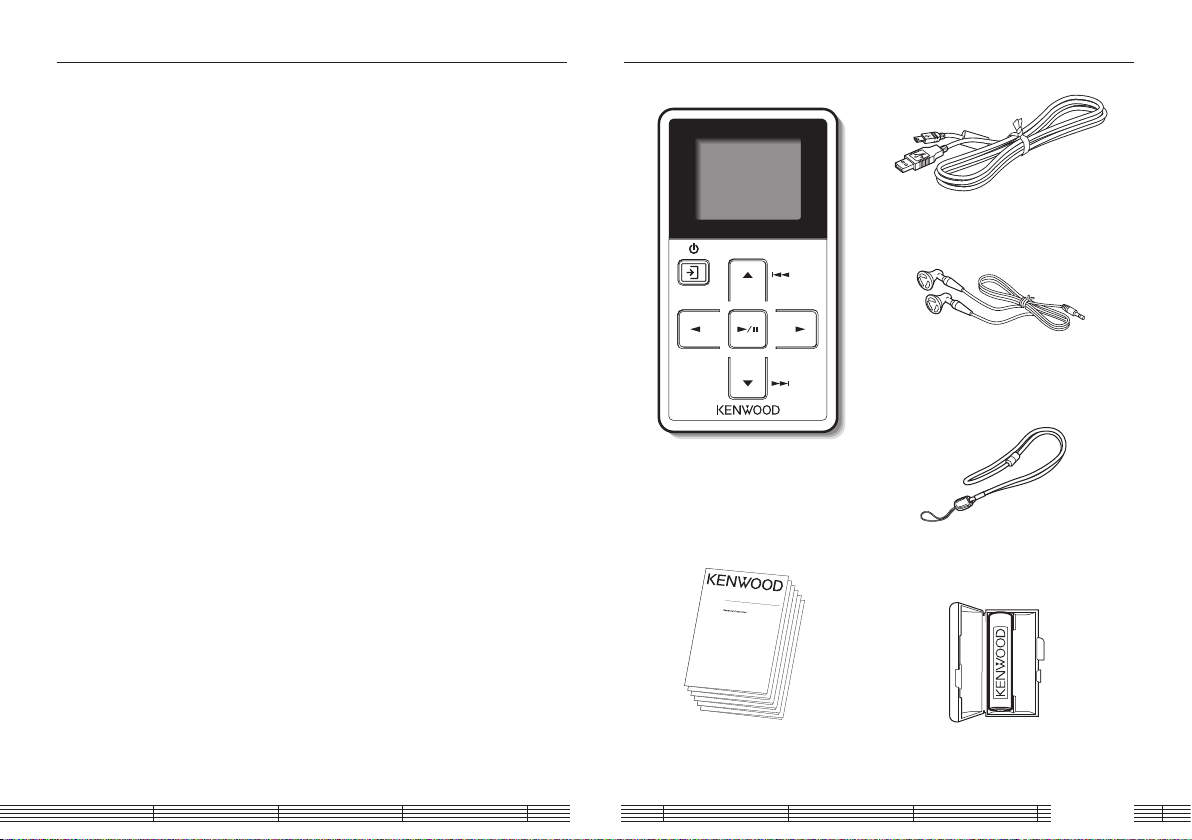
Unpacking
USB cable
Headphones
Player (main unit)
Strap
Quick start manual
Rechargeable battery
English5
Page 6
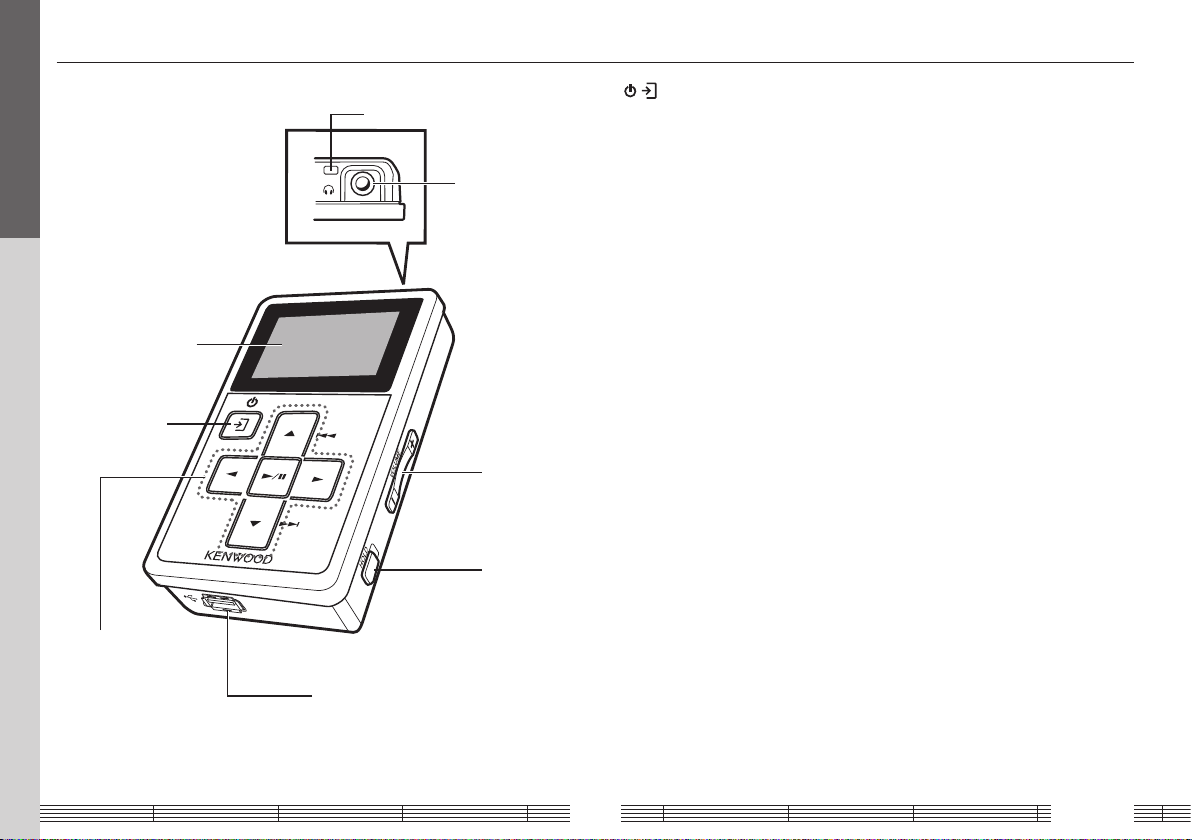
Names and functions of parts
Read Before Use
Display
Power/Menu
button
Multi-control button
USB jack
Strap eyelet
Phones jack
VOLUME
button
HOLD
switch
/ Power/Menu button
• Press shortly to open the pop-up
menu. Pressing the button again
closes the pop-up menu.
• Press and hold to switch the power
ON/OFF.
• Press when the display is turned off
(screen saver mode) to turn on the
display.
Multi-control button
5 Up button
• Press to move the cursor upward.
• Press during playback to skip to
the beginning of the current track.
Pressing the button at the beginning
of a track skips to the beginning of
the previous track.
• Press and hold to fast reverse the
music.
• Also used for tuning stations during
FM broadcast reception.
∞ Down button
• Press to move the cursor downward.
• Press during playback to skip to the
beginning of the next track.
• Press and hold to fast forward the
music.
• Also used for tuning stations during
FM broadcast reception.
2 Left button
• Press to return to the previous (left)
display. This can be used for example
to return from the playback display to
the track list.
• Press and hold to return to the home
screen.
• Also used to hide a pop-up menu.
3 Right button
• Press to enter an item and advance to
the next (right) item.
6 Play/Pause button
• Press to play a track or let it pause.
• Press while the menu is displayed to
enter a selected item.
• Also used to switch the tuning mode
during FM broadcast reception.
VOLUME button
• Press to increase (+) or decrease (-)
the volume. Pressing and holding a
button segment varies the volume
gradually.
HOLD switch
• Press to defeat all other buttons. This
helps prevent erroneous operation of
the Player when it is carried in a bag,
etc.
Phones jack
• Connect the provided stereo
headphones.
USB jack
• Connect to a PC using the provided
USB cable to transfer music files or
recharge the battery.
English6
Page 7
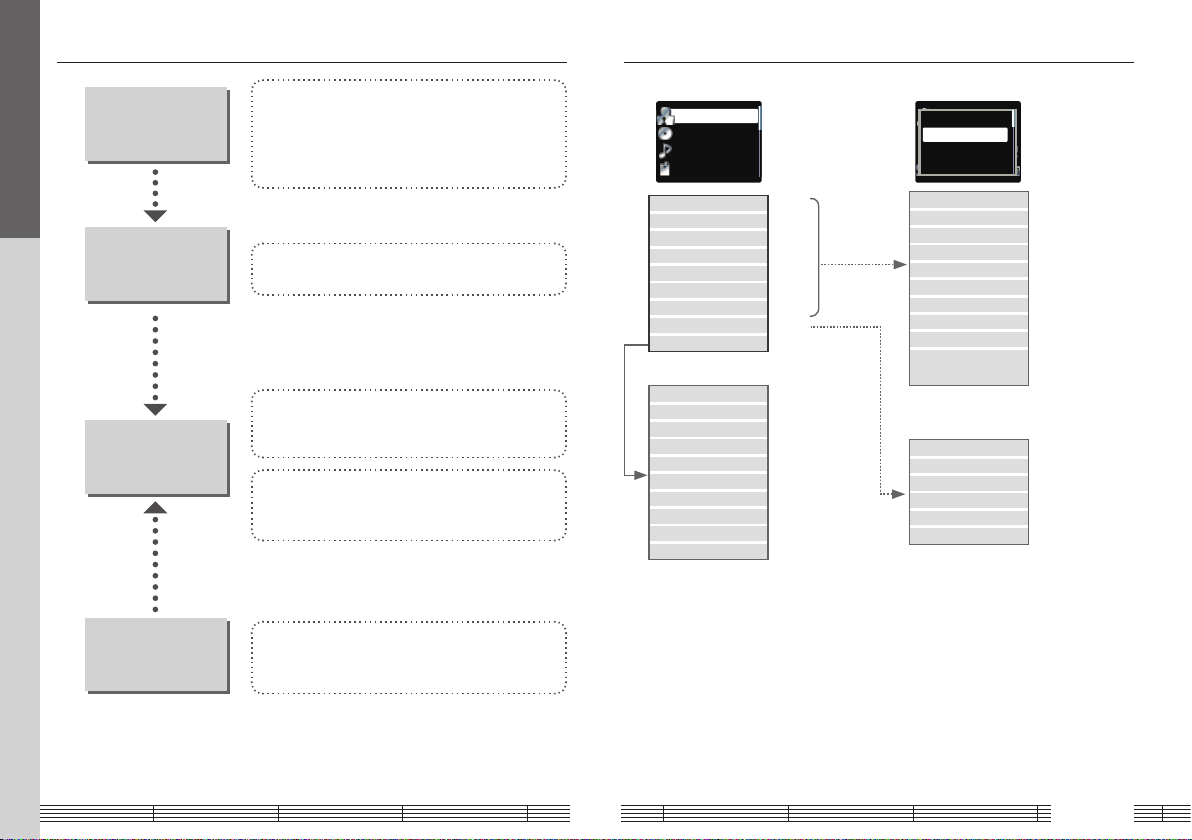
Flow for music playback
Artist
Album
Track
Favorite
Tracktitle
Soundmode
SPRM
Playmode
ToHomesc
Read Before Use
Preparation
Loading the battery (page 8)
Connecting stereo headphones (page 9)
Canceling the HOLD function (page 9)
Switching Power ON (page 9)
Recharging Battery/ Connecting a PC (page 10)
Screen display items
Home screen Pop-up menu
Preparation of
music les
Playback of music
Volume and tone
adjustments
Capturing Music in PC (page 12)
Transferring Music from PC (page 13)
Playing music tracks
Selecting music for playback (page 14)
Operations available during playback (page 15-17)
Receiving FM broadcasting
Selecting FM broadcasting (page 18)
Operations available during FM reception (page 18-22)
Adjusting the audio
Adjusting the volume (page 23)
Selecting the sound effects (page 23)
Artist (page 14)
Album (page 14)
Track (page 14)
Favorite (page 14)
Genre (page 14)
Year (page 14)
Folder (page 25)
FM radio (page 18)
Settings (page 28)
Illumination (page 28)
Brightness (page 28)
Screen saver (page 28)
Auto power off (page 28)
Beep (page 28)
Theme color (page 28)
Language (page 29)
Format (page 30)
Initialize (page 30)
System (page 28)
To Home screen
SPRM (page 23)
Sound mode (page 23)
Play mode (page 17)
Add favorite (page 17)
Delete favorite (page 17)
Skip+ (page 16)
Skip– (page 16)
Timer setting (page 27)
Properties (Music proper ties
information)
To Home screen
Timer setting (page 27)
Multiplex (page 22)
Add preset (page 21)
Delete preset (page 22)
Auto preset (page 21)
English7
Page 8
Loading the battery
Read Before Use
Insert the provided rechargeable battery in the Player.
A commercially available AAA (LR03) size alkaline battery can also be used.
¤ WARNING
If the alkaline fluid of the battery enter your eyes, immediately rinse with abundant
water and see the doctor. Otherwise, loss of vision or injury may result.
¤ CAUTION
When inserting the battery, always fit the · end first. Do not insert the battery by
force, as this may break the battery coating and cause short-circuiting, burst, fluid leak
and/or burns.
Caution on use of rechargeable battery (NiMH rechargeable battery NB3A90)
• The Player is powered by a NiMH (Nickel Metal Hydride) rechargeable battery. As the
rechargeable battery discharges spontaneously even when it is not used, it should
be recharged at least every other month.
• The rechargeable battery can be recharged for up to about 300 times.
• When the operation time reduces even after full recharging, replace the
rechargeable battery with new one. (Please purchase the optional NB-3A90.)
• A small amount of current flows through the Player even when the Power switch is
set to OFF. Remove the rechargeable battery when the Player is not to be used for a
long period of time.
• The rechargeable battery may warm during recharging or use, but this is not
malfunction.
• Before using the battery, connect the Player to the PC and fully recharge the battery.
• If (white) is displayed, connect the Player to the PC to recharge the battery.
• Always use the NB-3A90 rechargeable battery that is provided but also available optionally.
Never attempt to recharge a battery other than the dedicated battery from Kenwood.
• If you use a dry cell battery, use an alkaline battery. Normal operation may not be possible if a
manganese battery is used.
English8
Page 9
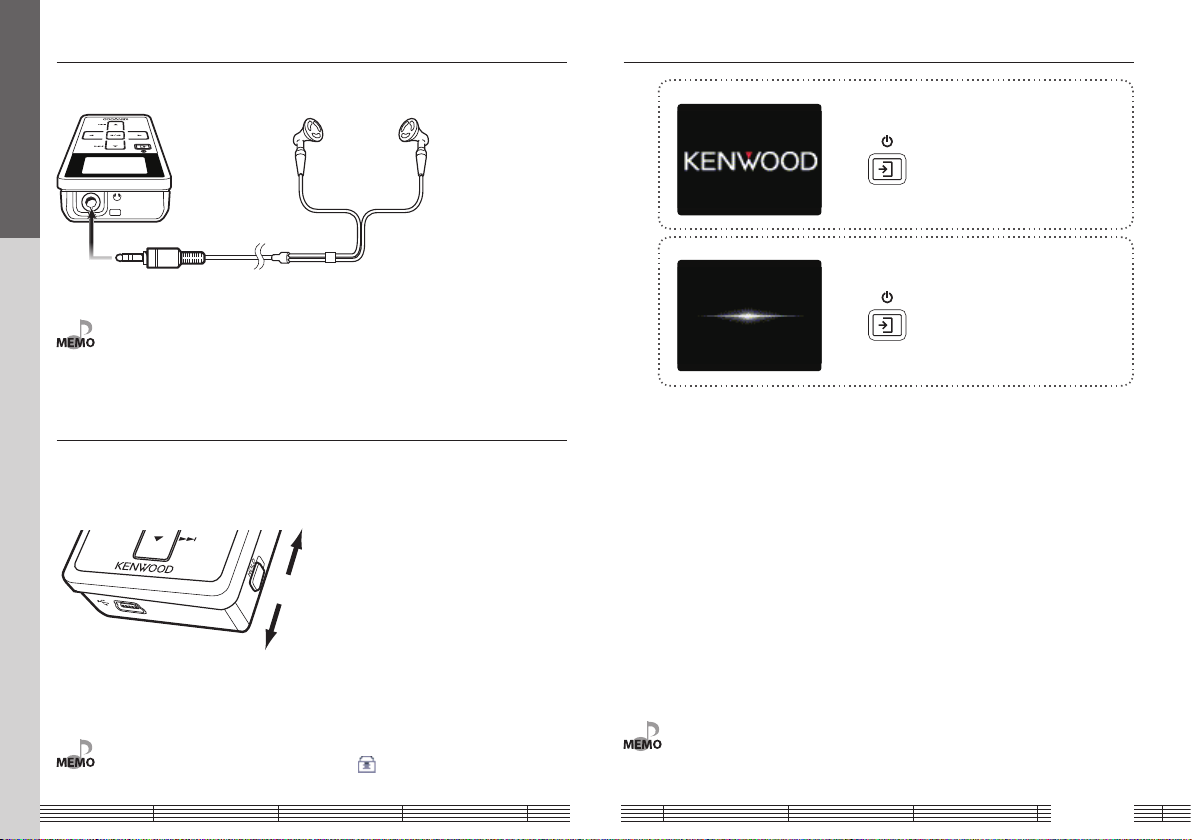
Connecting stereo headphones
Read Before Use
Connect the provided stereo headphones to the Player.
Switching Power ON/OFF
1 Switch the Player ON.
Press and hold the Power/Menu button until
the KENWOOD logo is displayed.
The Player enters the mode before the last time
it was switched OFF.
• The headphones also play the role of an antenna. Always connect them when receiving FM
broadcasting.
HOLD function
The HOLD function defeats all of the Player’s buttons and helps prevent erroneous
operation when the Player is carried in a bag, etc.
The HOLD function should be canceled before using the Player.
HOLD canceled
HOLD
(Red indication is visible.)
• When the HOLD function is switched on and the display is in the screen saver mode, the
Power/Menu button blinks twice every 5 seconds. " " is displayed when the display is turned
on.
2 Switch the Player OFF.
Press and hold the Power/Menu button until
the display is turned off.
• The display is turned off automatically when the Player has not been operated for a certain
period of time (screen saver mode). The Power/Menu button blinks every 5 seconds in the
screen saver mode. The time until the screen saver mode is activated can be changed (page
28).
English9
Page 10
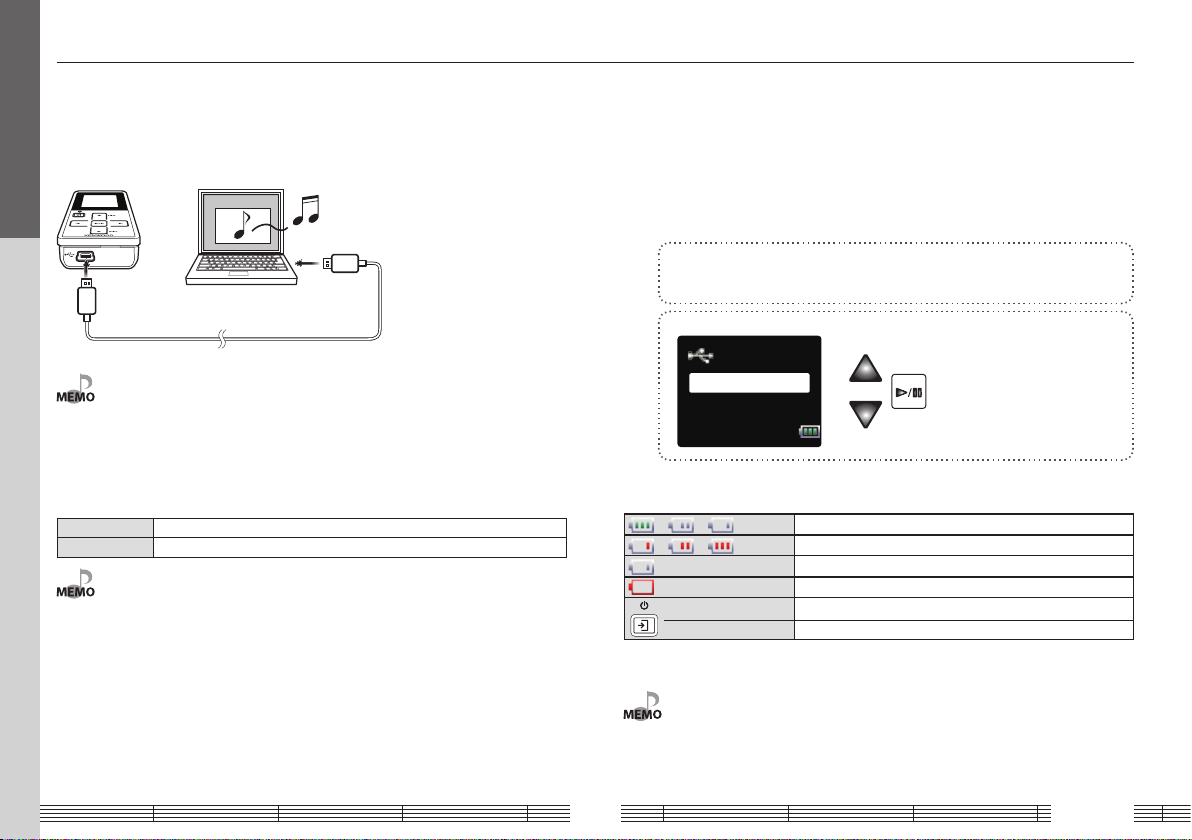
Recharging Battery/ Connecting a PC
USBmode
Storage
Player
Connect the Player to a PC to transfer music from the PC to the Player and to recharge
For first use
its battery.
Recharging Battery/ Connecting a PC
Using the provided USB cable, connect the Player to a PC.
• Start up the PC before connecting the Player.
• The Player is switched ON automatically at the moment it is connected to the PC.
• When the USB connection, always use a supplied USB cable.
• The player should be connected directly to the USB port of the PC. We cannot guarantee the
operation if the player is connected via a USB hub.
PC system configuration requirements
OS Microsoft® Windows® XP/2000
USB connector Compliant to USB 1.1/2.0 standard (USB 2.0 recommended)
• All of the above specified PC environment does not guarantee full operation of the Player.
• Use a PC in which either OS mentioned above is preinstalled. Operation is not guaranteed on a
PC running an upgraded OS or a PC assembled by yourself.
The Player and PC can be connected in either connection mode below.
• Storage
Mode for data transfer and battery recharging. The Player cannot be operated while
it is connected in this mode.
• Player
Mode for operating the Player for playback, etc., while recharging the battery. Data
transfer from the PC is not available in this mode.
1 Connect the Player to a PC.
See page 10.
2 Select the connection mode.
Recharging and battery indication
= = (White)
= = (Red)
(White) The battery is nearly exhausted. Recharge it if it is rechargeable.
(Red) The battery is not inserted or not rechargeable.
(ON) The indicator lights during recharging.
(OFF) The indicator is extinguished when recharging completes.
Recharging completes in about 3 hours.
Shows the remaining power of the battery.
Indications during recharging.
• The Player can recharge only the NB-3A90 rechargeable battery that is provided but also
available optionally. Never attempt to recharge a battery other than the dedicated battery from
Kenwood.
English10
Page 11

Connecting a PC/Recharging Battery
For first use
Disconnecting the Player from the PC
1 Click the [Safe To Remove Hardware] icon.
2 Click [Safely remove USB Mass Storage Device].
When the message showing that the Player
∞
• If the connection mode is the Player mode, simply unplug the USB cable from the PC.
can be disconnected safely, disconnect it from
the PC.
English11
Page 12

Capturing Music in PC
To play music files as tracks of this Player, first rip music files in the PC.
For first use
The Player can play the following three types of music files.
• MP3 (*.mp3) : MPEG-1 Audio Layer-3
Sampling frequency 44.1 KHz
Transfer bit rate 64k – 320 kbps
Variable Bit Rate (VBR) 64k – 320 kbps
ID3 tag Ver. 2.2/ 2.3/ 2.4
• WMA (*.wma) : Windows Media Audio
Sampling frequency 44.1 KHz
Transfer bit rate 32k – 320 kbps
Variable Bit Rate (VBR) 32k – 355 kbps
• WAV (*.wav) : WAVE file (PCM)
Sampling frequency 44.1 KHz
Bit count 16 bit
Channel Stereo/Monaural
• For the operating procedures of software including the Windows Media Player 10/9, refer to
the manuals and help information for the software.
• If copy protection is set, when capturing tracks of a music CD into the PC using the Windows
Media Player 10/9, transferring the music file to the Player is limited only to the Windows Media
Player 10/9. The music files which are transferred using drag & drop or copy & paste cannot be
played.
• Before transferring a music file, view it with the Windows Media Player 10/9 to confirm that the
genre, artist name, album title and track title are set correctly.
Using Windows Media Player 10/9
A music CD can be ripped into the PC using the Windows Media Player 10/9.
(The following steps describes the operation with the Windows Media Player 10.)
1 Launch the Windows Media Player.
2 Click the [Rip] button on the top.
3 Place a music CD in the CD-ROM drive of the PC.
4 Check the checkboxes of the CD tracks to be ripped.
5 Click the [Rip Music] button.
• For selecting a destination folder or a file format, go to [Tools] menu > [Options] > [Rip music]
tab.
English12
Page 13

Transferring Music from PC
The obtained music files can then be transferred to the Player.
For first use
Using Windows Media Player 10/9
(The following steps describes the operation with the Windows Media Player 10.)
Data transfer by drag & drop
Open the Windows Explorer and drag & drop the desired file from the PC’s hard disk drive
to this Player (expressed as [KENWOOD_DAP] on Windows). Copy & paste can also be
used for data transfer.
1 Connect the Player to a PC.
2 Launch the Windows Media Player.
3 Click the [Sync] button on the top.
4 Select the removable disk (KENWOOD_DAP) corresponding to
this Player.
5 Add the music files to be transferred in the Sync List.
6 Click the [Start Sync] button.
1 Open the removable disk corresponding to this Player.
Click [Start] – [My Computer] – [KENWOOD_DAP].
2 Open the folder storing the desired music file.
3 Drag & drop the music file into the removable disk.
English13
Page 14

Selecting music for playback
Artist
Album
Track
Favorite
Artist
Album
Track
Favorite
Album1
Album
Album2
Album3
Album1
Album
Album2
Album3
Album2
Track1
Track2
Track3
Playing music tracks
Select and play the desired track.
Artist Select Ar tist name = Album title = Track title.
Album Select Album title = Track title.
Track Select Track title directly.
Favorite Select one of the tracks registered as favorite tracks.
Genre Select Genre = Artist name = Album title = Track title.
Year Select Year of release = Track title.
Folder Select Folder and then follow the hierarchy to select the music file for the desired Track.
When a major item is selected, the list of intermediate items located below it is displayed.
Press the Play/Pause button when the item to be played ( Track or item name) is displayed
starts its playback.
When a track is selected from the album title, the tracks are played in order they are recorded
in the album. When a track is selected from other item, the tracks are played in order of track
titles.
1 Connect headphones and switch the Player ON.
See page 9.
2 Open the home screen.
Press and hold the Left button
until the home screen appears.
4 Select a major item ("Album", for example).
Press the Right button to enter the selection.
The list for the major item (intermediate items)
is displayed.
5 Select an intermediate item ("Album 2", for example).
6 Select an intermediate item ("Album 2", for example).
If the Play/Pause button is pressed now, all of
the tracks in the selected intermediate item
will be played.
For example, pressing the Play/Pause button after
selecting an album plays all of the tracks in that
album.
7 Select a track ("Track 2", for example).
3 Select a major item ("Album", for example).
Press the Up/Down button to move the cursor
to the desired item.
English14
Page 15

Selecting music for playback
Track1
Album2
Track2
Track3
Tracktitle
Playing music tracks
8 Play a track ("Track 2", for example).
Playback starts with the track selected in step
7 of the intermediate item selected in step 6.
In this example, playback starts with "Track 2"
in "Album 2".
Display during playback
The display shows various information during playback.
Elapsed time
progress bar
Track title
• A track that does not contain tag information is classified as "Unknown".
• If you commit a mistake and want to reselect an item, press the Left button to return to the
previous item.
• To restart the selection from the beginning, press and hold the Left buttonto return to the
home screen.
• In this page, the "selection" and "entry" are described in two steps (steps 3 and 4, for example).
From the subsequent pages, these operations will be described in a single step.
Mode
3 : Play
8 : Pause
Supreme/
Sound mode
(page 23)
Play mode
(page 17)
Elapsed play time
Track No./
Number of
selected tracks
Remaining battery
power
(page 10)
HOLD switch
(page 9)
: HOLD
None: HOLD canceled
Sleep timer/
Alarm timer
(page 27)
: Alarm timer on
: Sleep timer on
English15
Page 16

Operations available during playback
Tracktitle
Tracktitle
Artistskip−
Artistskip+
Timersetting
Addfavorite
Playing music tracks
Up button
Play mode:
Each press skips to the beginning
of the current track or of the
Power/Menu button
Displays the pop-up menu.
Press in screen saver mode
to turn the display on.
Left button
Displays the previous list.
previous track (Skip-down).
Press and hold to fast reverse
the track.
Pause mode:
Each press skips to the beginning
of the current track or of the
previous track (Skip-down).
Press and hold to skip to the
previous tracks one after another.
To skip an item:
Played tracks can be skipped on a per-item basis as shown below.
Artist skip Skips to the tracks of the next (Artist skip+) or previous (Artist skip-) artist.
Album skip Skips to the tracks of the next (Album skip+) or previous (Album skip-) album.
Genre skip Skips to the tracks of the next (Genre skip+) or previous (Genre skip-) genre.
Year skip Skips to the tracks of the next (Year skip+) or previous (Year skip-) year of release.
The item to be skipped is determined according to the item used to select the track being
played. (page 14)
1 Open the pop-up menu during playback.
Play/Pause button
Play mode:
Lets playback pause
temporarily.
Pause mode:
Resumes playback.
• The Player switches OFF automatically after it has been left in pause mode for a certain period
of time (Auto Power-OFF). The time until Auto Power-OFF occurs can be changed (page 28).
• When the pop-up menu is opened in the middle of playback and "Properties" is selected, the
properties information on the track being played is displayed.
Down button
Play mode:
Each press plays the next track (Skip-up).
Press and hold to fast forward the music.
Pause mode:
Each press skips to the beginning of the next
track (Skip-up).
Press and hold to skip to the subsequent tracks
one after another.
2 Select "Artist skip+" or "Artist skip-".
The displayed items var y to "Artist skip",
"Album skip", "Genre skip" or "Year skip"
depending on the item used to select the track
being played.
English16
Page 17

Various play modes
Tracktitle
Tracktitle
Playmode
SPRM
Soundmode
ToHomesc
Tracktitle
Random
Repeatone
Repeat
Off
Tracktitle
Tracktitle
Artistskip−
Artistskip+
Timersetting
Addfavorite
Tracktitle
Artistskip−
Artistskip+
Timersetting
Deletefavori
Playing music tracks
One of the following six play modes can be selected.
Off Playback stops after having played the tracks in the list.
Repeat one Playback of the same track repeatedly.
Random Playback of all of the tracks in the list in a random order, playing every track once.
Repeat Playback of all of the tracks in the list repeatedly.
Repeat random Repeated playback of all of the tracks in the list in a random order.
Intro
The tracks in the list var y depending on the item used for selecting the track being played.
(page 14)
Playback of the introduction parts of all of the tracks in the list, playing the first 10 seconds of every
track.
1 Display the pop-up menu.
Press during playback.
Favorite
Tracks you are particularly fond of can be registered in the Favorite folder for playing
only the favorite tracks later.
1 Play a track you like and open the pop-up menu.
2 Select "Add favorite".
2 Select "Play mode".
3 Select the desired play mode.
3 To deregister a track from the favorite tracks…
Play the track, open the pop-up menu and
select "Delete favorite".
• To play only the favorite tracks, open the home screen and select "Favorite".
• Up to 30 tracks can be registered as favorite tracks.
English17
Page 18

Selecting FM broadcasting
Folder
FMradio
Genre
Year
Auto
Receiving FM broadcasting
The Player can be used to receive FM broadcasting.
Display for FM reception
The FM radio display shows various information.
1 Open the home screen.
2 Select the FM radio mode.
Press and hold the Left button
until the home screen appears.
Tuning mode
(page 19)
Auto: Auto tuning
Manual: Manual tuning
Preset: Preset tuning
Tuned frequency
Stereo/Monaural
(page 22)
: Stereo
broadcasting
received
: Set for monaural
reception
None: Other than
above
Remaining battery
power
(page 10)
HOLD switch
(page 9)
: HOLD
None: HOLD canceled
Sleep timer/
Alarm timer
(page 27)
: Alarm timer on
: Sleep timer on
• The headphones also play the role of an antenna. Always connect them when receiving FM
broadcasting.
English18
Page 19

Tuning a FM station
Auto
Auto
Auto
Manual
Receiving FM broadcasting
Auto tuning
Tunable FM stations can be searched automatically.
1 Select the auto tuning mode.
2 Start auto tuning.
Each press of the button switches the tuning
mode in order of "Auto" = "Manual" =
"Preset".
: Auto tuning by decreasing frequencies.
: Auto tuning by increasing frequencies.
Manual tuning
FM stations can be searched manually.
1 Select the manual tuning mode.
Each press of the button switches the tuning
mode in order of "Auto" = "Manual" =
"Preset".
2 Start manual tuning.
: Decreases frequencies.
: Increases the frequency.
Pressing and holding the Up or Down button
varies the tuned frequency continuously.
• The default tuning mode set before the Player left the factory is "Auto". • The default tuning mode set before the Player left the factory is "Auto".
English19
Page 20

Tuning a FM station
Auto
Preset
Receiving FM broadcasting
Preset tuning
FM stations can be preset and recalled later.
1 Select the preset tuning mode.
2 Select a preset number.
Each press of the button switches the tuning
mode in order of "Auto" = "Manual" =
"Preset".
: Recalls the previous preset number.
: Recalls the next preset number.
• For the method of presetting stations, see pages 21 and 22.
• The default tuning mode set before the Player left the factory is "Auto".
English20
Page 21

Auto
Auto
Multiplex
Timersetting
Addpreset
ToHomesc
Auto
P03
87.50 MHz
92.10 MHz
Presetting FM stations
Auto
Auto
Autopreset
Auto
Yes
No
Receiving FM broadcasting
Presetting by auto tuning
The following steps makes it possible to search the FM stations with good reception
conditions automatically and preset them together. (Auto preset)
1 Display the pop-up menu.
2 Select "Auto preset".
3 Select "Yes".
FM stations with good reception conditions are
preset one after another.
Presetting by manual tuning
The following steps make it possible to preset FM stations individually in desired preset
numbers so that the preset stations can later be recalled using the preset numbers.
(Manual preset)
1 Tune the desired FM station.
See page 19.
2 Display the pop-up menu.
3 Select "Add preset".
4 Select a preset number.
With preset numbers in which no FM station
are registered, "---- MHz" is displayed in the
center line. With preset numbers in which FM
stations are registered, the frequencies of the
preset station are displayed in the center lines.
• Up to 32 FM stations can be preset.
English21
Page 22

Auto
Auto
Timersetting
Addpreset
ToHomesc
Multiplex
Auto
Mono
Autostereo
Presetting FM stations
Preset01
Auto
Multiplex
Timersetting
Deleteprese
ToHemesc
Auto
Yes
No
DeletePreset
Preset01
Receiving FM broadcasting
Deregistering a preset FM station
Preset FM stations can be deregistered as follows.
Monaural reception
Stereo broadcasting can also be received in monaural.
When the reception condition of an FM station is poor, the reception can sometimes be
improved and noise reduced by receiving it in monaural.
1 Select the "Preset" tuning mode and select the preset number.
See page 20.
2 Display the pop-up menu.
3 Select "Delete preset".
4 Select "Yes".
1 Display the pop-up menu.
2 Select "Multiplex".
3 Select "Mono".
• To return to auto stereo reception, select "Auto stereo" in step 3.
• The default tuning mode set before the Player left the factory is "Auto stereo".
English22
Page 23

Tracktitle
Tracktitle
Soundmode
SPRM
Playmode
ToHomesc
Adjusting the audio
Tracktitle
Tracktitle
16
Adjusting the audio
Adjusting the volume
Adjust the listening volume as follows.
1 Select the volume level.
∞
Pressing and holding a button segment varies
the volume gradually.
Selecting the sound effects
Select one of the 9 modes.
SPRM
(Supreme)
Sound mode NORMAL Playback in normal tone.
On Kenwood-original tone improvement technology, which creates
realistic sound by interpolating the high-frequency components
that are lost in MP3 or WMA audio compression.
BASS/ POPS/
ROCK/ JAZZ/
DANCE/ VOICE
CUSTOM Desired tone can be set using a 5-band custom equalizer.
Playback in a tone matching the genre of music.
• If the headphone volume is increased too much, you will be unable to hear the sounds from
1 Open the pop-up menu.
Open from the playback screen.
To select "SPRM":
2 Select "SPRM".
outside. Be careful not to increase the volume too much.
English23
Page 24

Volume and tone adjustments
Tracktitle
Off
On
Tracktitle
Soundmode
SPRM
Playmode
ToHomesc
Tracktitle
BASS
NORMAL
ROCK
POPS
Adjusting the audio
3 Select "On".
To select "Sound mode":
2 Select "Sound mode".
To select "CUSTOM":
4 Select the frequency band to be adjusted.
5 Set the response level.
Set the response levels of other frequency
bands by repeating steps 4 and 5 for each.
3 Select the desired sound mode.
6 Enter the selection.
• With the default condition set at the factory, Supreme is set to "Off" and Sound mode is set to
"NORMAL".
• Supreme and Sound mode cannot be used simultaneously.
• These sound adjustment function will not be applied in FM radio.
English24
Page 25

Viewing files
<
<
<
<
(KENWOODDAP)
Manual(PDFfile)
Root
Folder
Audiodata
M1GC7English.pdf
M1GC7French.pdf
…
Genre
Year
Folder
FMradio
Folder1
Folder
File001.mp3
Folder2
Managing files
The list of the music files stored in the Player can be displayed.
(PDF file)
1 Select "Folder".
Root
Folder
Audio data
2 Select the folder in the lower level.
A list of music files in the selected folder will
be displayed.
• The folder configuration below "Folder" is variable depending on the situations of use and the
number of hierarchical levels is also variable. As a result, when viewing the list of folders, it may
be necessary to repeat step 2 according to the number of hierarchical levels.
English25
Page 26

ToHomesc
Deletefile
ToPlayscre
Tracktitle
Yes
No
Deleting tracks
Genre
Year
Folder
FMradio
File100.WMA
Folder1
File101.WMA
File102.WMA
Deletefile
ToHomesc
ToPlayscre
Managing files
The music files transferred from the PC to the Player can be deleted from the Player.
1 Select "Folder".
2 Select the track (music file) to be deleted.
3 Display the pop-up menu.
4 Select "Delete file".
5 Confirm the selection.
• Once deleted, the music file cannot be restored again. Be cautious when deleting a music file.
• The music files can also be deleted from the PC.
English26
Page 27

Auto
30
Alarmtimer
min
Tracktitle
Artistskip−
Artistskip+
Timersetting
Addfavorite
Tracktitle
Sleeptimer
Off
Alarmtimer
Setting and adjusting the Player
Sleep timer and alarm timer
The sleep timer makes it possible to switch the Player OFF after the set period of time.
The alarm timer makes it possible to generate an alarm (beep tone) after the set period
of time.
1 Display the pop-up menu.
Open from the playback screen or FM reception
screen.
2 Select "Timer setting".
3 Select the timer to be set.
4 Specify the timer period.
Set in the range from 1 to 120 minutes, in 1minute steps.
5 Activate the timer.
• To deactivate the timer, select "Off" in step 3.
• The sleep timer and alarm timer cannot be activated simultaneously.
• The alarm generated by the alarm timer can be stopped by pressing any button.
• The timer setting is canceled when the Player is switched OFF.
English27
Page 28

Settings
Screensaver
Illumination
Settings
Brightness
Low
Brightness
High
Mid
Setting and adjusting the Player
Various setups
Function items that can be set
The functions such as the button illuminations, display resume function and Auto
Power OFF function can be set up as required.
1 Open the home screen.
Press and hold the Left button
until the home screen appears.
2 Open the Settings menu.
3 Select the item to be set.
To decrease the display brightness, for example,
select "Brightness" to view its options.
4 Select the desired option.
After the desired option is set, the Settings
menu appears again.
Pressing the Left button returns to the previous
display without selecting an option.
• Button illumination brightness
(Illumination)
Select the brightness level of the indicators
for the buttons.
High* High
Mid Medium
Low Low
Off Extinguished
(* indicates the factory setting.)
• Display brightness (Brightness)
Select the brightness level of the display
panel.
High High
Mid* Medium
Low Low
(* indicates the factory setting.)
• Display power-save setting (Screen
saver)
Select the time until the display is turned
off when no operation is performed.
3sec/ 5sec/ 10sec*/ 30sec/ 60sec
(* indicates the factory setting.)
• Auto power off
Select the time until the Player is switched
OFF when no operation including playback
is performed.
1min/ 3min/ 5min*/ 10min
(* indicates the factory setting.)
• Operation tone (Beep)
Select whether or not a beep is generated
when a button is pressed.
On* Generates a beep.
Off Does not generate a beep.
(* indicates the factory setting.)
• Display theme color
Select one out of 4 colors for display
illumination.
• Language
Select the language used for the displayed
menus, etc.
ENGLISH*/ 日本語/ DEUTSCH/ FRANCAIS/
ESPAÑOL/ ITALIANO/ NEDERLANDS
(* indicates the factory setting.)
• System information
The system information of the Player
(available memory capacity, total memory
capacity, total number of files, model ID and
version No.) is displayed.
Press the Play/Pause button to hide the
system information display.
English28
Page 29

Settings
Language
Beep
Settings
Themecolor
DEUTSCH
ENGLISH
Language
日本語
Setting and adjusting the Player
Setting the menu language
Select the language used for the display.
1 Open the home screen.
2 Open the Settings menu.
3 Open the language list.
4 Select the language.
Press and hold the Left button
until the home screen appears.
Select "Settings".
Select "Language".
Select the desired language.
English29
Page 30

System
Format
Settings
Initialize
No
Format
Yes
No
Format
Yes
Yes
No
Setting and adjusting the Player
Settings
Initialization/Formatting
Formatting can be used to delete all of the music and other files stored in the Player.
Initialization resets the settings made using the Settings menu, etc. to the default
settings made at the factory.
Caution
• Formatting deletes all of the files in the Player. It also deletes demonstration music,
which cannot be restored later. It does not alter the settings made with the Settings
menu.
• Initialization resets the Settings menu to the default settings. It does not delete
music files, etc.
• Once formatted, the memory cannot be restored to the previous condition. Be
cautious when performing formatting.
1 Open the home screen.
Press and hold the Left button
until the home screen appears.
2 Open the Settings menu.
3 Select "Format" or "Initialize".
4 Select "Yes".
5 Reconfirm and select "Yes".
• The Player (represented as "KENWOOD_DAP" on Windows) can also be formatted from the PC.
Use the "FAT (FAT16)" file system in formatting from the PC.
English30
Page 31

Connection of external components
USBmode
Storage
Player
The headphone jacks can be used to connect an external component such as a speaker
Appendix
with built-in amplifier.
The USB connector can be used to connect an external component such as a stereo set
with USB capability.
Connecting to the headphones jack
Speaker with built-in amplifier
Stereo amplifier
Cable with stereo miniplugs
FM transmitter
Car stereo
Connecting to the USB connector
USB-compatible stereo
USB-compatible car stereo
USB cable
1 Connect the USB cable.
2 Set the USB mode to "Storage". (page 10)
• Prepare an optimum audio cable (commercially available) according to the input terminal of
the connected external component.
• Noise may be interfered depending the installation environment, including the vehicle model,
devices in the surroundings and the antenna positioning.
• Do not use or leave the Player or connected component in an automobile compartment with
high temperatures. Otherwise, equipment failure may result.
• For the operating procedure and the playable files, read the instruction manual for the
connected stereo set.
• Do not use or leave the Player or connected component in an automobile compartment with
high temperatures. Otherwise, equipment failure may result.
English31
Page 32

Digital Audio Player Link
When the Player is connected to a Kenwood audio component with the Digital Audio
Appendix
Player Link compatibility, playback of the Player can be controlled from the external
audio component.
Digital Audio Player Linkcompatible stereo
Digital audio input
Special cable
1 Switch the Player ON.
2 Set the input selector of the connected stereo set to "Digital Audio".
• The Player operations including "Play/Pause", "Sk ip Up/Down" and "Folder Sk ip (Item Skip)" can
be controlled from the main and remote control unit keys of the connected stereo.
* Examples of Digital Audio Player Link-compatible stereo models
: AX-7, K-501USB (as of October 2006)
• For details and operating method of the Digital Audio Player Link, refer to the instruction
manual for a Digital Audio Player Link-compatible audio component.
English32
Page 33

Glossary
Appendix
MP3:
An international data compression standard of MPEG, which is a working group in ISO
(International Standardization Organization). It offers compression rates between about 1/10
and 1/12.
WAV:
The extension used with the Windows standard non-compressed audio files.
WMA (Windows Media Audio):
An audio compressed encoding format developed by Microsoft Corporation. Also the
extension used with audio files created using WMA.
Tag data:
Information on each audio file, including the music title, artist name, album name and genre
name.
DRM (Digital Rights Management):
Technology for protecting the copyright of digital audio and video data by limiting the
number of duplications.
Error messages
Message Remedy
System error An error occurred in the operation of the Player. Consult your Kenwood dealer.
File system error An error occurred in the file system of the Player.
Format the Player (page 30).
Unsupported file An attempt is made to play a file that is not supported by the Player.
For the file formats supported by the Player, see "Specifications". (page 35)
No preset station No FM station is preset. Preset FM stations before using preset tuning.
No contents The Player does not store a playable music file such as the ones transferred
from the PC.
English33
Page 34

Troubleshooting
Appendix
The Player can often be recovered using the PC.
Try recovery from the PC in case of a trouble, for example, when the Player cannot be
switched ON, it switches OFF spontaneously or the display is erroneous.
For details, refer to the support information in our website by visiting:
http://www.kenwood.com/
Symptom Remedy
Power cannot be switched ON or pressing a
button does not start an operation.
The remaining battery power drops soon
after recharging.
Audio is not heard. Headphones are connected improperly.
Battery cannot be recharged. USB cable is connected improperly.
The HOLD function is ON.
Cancel the HOLD function with the HOLD switch on the Player (page 9).
The battery is nearly exhausted.
Recharge it if it is rechargeable or replace it if it is an alkaline batter y.
The Player is being connected to the PC.
The Player is inoperable when it is connected to the PC in the storage mode.
The rechargeable battery is degraded.
Replace it with a brand-new rechargeable battery.
Connect headphones correctly to the Player.
Check the connections on both the Player and PC sides.
The rechargeable battery in use is not the dedicated battery.
The rechargeable battery usable with the player is only the provided battery or
the optionally available NB-3A90.
The player is connected to a USB hub.
The player does not function if connected to a bus power type USB hub.
Connect the player directly to the PC or to a self-powered USB hub.
PC does not recognize the Player. The Player is connected to the PC in the player mode.
Select the storage mode.
USB cable is defective.
Purchase and use another USB cable.
The Player is connected to the PC improperly.
Check the connection between the Player and PC.
The player is connected to a USB hub.
The player does not function if connected to a bus power type USB hub.
Connect the player directly to the PC or to a self-powered USB hub.
FM stations cannot be tuned. Headphones are not connected.
The headphones play the role of an antenna and must be connected for FM
reception.
English34
Page 35

Specifications
Appendix
Built-in flash memory
Headphone output
Interface
Display
Main unit dimensions (W × H × D)
Weight (Net)
1
: 1 GB *
: 3.5 mm stereo mini jack
: 4.5 + 4.5 mW/ 16 Ω
: USB 2.0 (USB 1.1 compatible)
: 1.1 inch 256 colors OLED
: 37.0 mm × 67.0 mm × 15.5 mm
: (1-7/16 × 2-5/8 × 5/8 inch)
: Approx. 31 g (without battery)
: (Approx. 0.07 lbs)
: Approx. 44 g (including battery)
: (Approx. 0.10 lbs)
Battery type
: AAA size Ni-MH rechargeable
battery
: AAA (LR03) size alkaline battery
Battery operation time *
2
Rechargeable battery operation
Continuous play time
MP3 (128 kbps)
: Approx. 10 hours
WMA (64 kbps) : Approx. 8 hours
Continuous FM broadcasting
reception time : Approx. 5.5 hours
Alkaline battery operation
Continuous play time
MP3 (128 kbps)
: Approx. 11 hours
WMA (64 kbps)
: Approx. 8.5 hours
Continuous FM broadcasting
reception time : Approx. 5 hours
Playback format
MP3
Sampling rate: 44.1 kHz
Bit rate: 64 - 320 kbps
Variable bit rate: 64 - 320 kbps
ID3 tag: ver. 2.2/ 2.3/ 2.4
WMA (DRM compatible)
Sampling rate: 44.1 kHz
Bit rate: 32 - 320 kbps
Variable bit rate: 32 - 355 kbps
WAV
Sampling rate: 44.1 kHz
Bit count: 16 bit
Channel: Stereo/Monaural
Maximum number of files
: 3000
Maximum number of folders
: 4000
Max. recording time/ tracks *
: Approx. 32 hours/ Approx. 480
tracks
FM receiver
Frequency range (50 kHz space)
: 87.50 MHz – 108.00 MHz
Channel: Stereo/Monaural
Preset stations: 32
• Kenwood follows a policy of continuous
advancements in development. For this
reason specifications may be changed
without notice.
• The full performance may not be
exhibited in an extremely cold location
(under a water-freezing temperature).
*1 One GB (gigabytes) is equal to
1,000,000,000 bytes. The actual capacity
after formatting may be smaller than
the nominal capacity.
*2 Using the provided headphones,
Supreme "Off", Sound mode "NORMAL".
*3 Assuming that each tracks is in the 64
kbps WMA format with playback time
of about 4 min.
3
Trademark Information
÷ "Microsoft" and "Windows Media" are
trademarks or registered trademarks of
Microsoft Corporation in the USA and
other countries.
÷ "Adobe Reader" is a trademark of Adobe
Systems Incorporated.
Other system names and product names
are also trademarks or registered trademarks of their respective developers. Note
that the "™" and "®" markings are omitted
in the text of this manual.
English35
Page 36

 Loading...